general osteopathic techniques - eastland press
TRANSCRIPT

SECTION II
General OsteopathicTechniques
©Eastland Press

©Eastland Press

Chapter Four
The LowerExtremities
©Eastland Press

The lower extremities are among the most important structures of the bodyand yet are often overlooked. Each lower extremity contains two of themajor transverse planes in the body, that is, the foot and the knee. If thesetransverse planes are dysfunctional, they can act as baffles,1 which mayresult in a blockage of fluid flow from the lower extremity, producing bothlocal and systemic effects. Another neglected aspect of the lower extremitiesis the connection between their fascial compartments and muscles and thelower back. For example, it is not rare for lower back pain to be due to a dys-function of the popliteal fascia.
In addition, as the lower extremities are the foundation for the rest of thebody, an imbalance in either of the lower extremities can affect the muscula-ture of the trunk or the viscera. The effects of lower extremity problems canbe far reaching. For example, arrhythmia can occur after a knee injury due tothe center of gravity moving forward, causing the pelvis to tilt and resultingin mild scoliosis. This in turn can lead to an impingement of cranial nerveXI (vagus), which innervates the heart. Treatment of all the dysfunctionalstructures, starting with the knee, can resolve the arrhythmia.
1 William Garner Sutherland called the LAS techniques he used general osteo-pathic techniques.
2 This concept appears again in Chapter 11. Briefly, baffles are obstructions to flowwithin a structure. In a gas tank baffles keep the fluid from sloshing around.However, for optimal health fluids should slosh around the body. Therefore ifstructures are acting as baffles, we try and help them turn back into diaphragms.You want everything working together and everything moving.
40 Ligamentous Articular Strain
©Eastland Press

©Eastland Press
Chapter Four:The Lower Extremities 41
FootPlantar FasciaTECHNIQUE: Supine direct myofascial release
SYMPTOMS/DIAGNOSIS: Pain on the bottom of the foot, heel spurs, or plantarfasciitis
PATIENT: Supine
PHYSICIAN: Seated at the foot of the table
PROCEDURE: Your thumbs are crossed and the pads are pressed into the plan-tar fascia at the level of the tarsal-metatarsal junctions with your fingersinterlaced across the dorsum of the foot. The pads of the thumbs press in thedirection the thumbs are pointed, that is, toward either side of the foot andslightly toward the toes, and are taken to a point of balanced tension. Once arelease occurs, your thumb tips seem to slip across the fascia. Repeat thesame procedure with the toes in plantar flexion. Once that release occurs,repeat the procedure with the toes in dorsiflexion. The treatment of theplantar fascia is complete once you have accomplished all three releases.
Steven Simmons
Figure 4.1 Plantar fascia technique
Contact the plantar fasciaat the level of the tarsal-metatarsal junction. Directpressure toward the sidesof the foot and slightlytoward the toes.

©Eastland Press
42 Ligamentous Articular Strain
Instruct the patient to “step onthe gas,” forcing the foot intoplantar flexion.
Instruct the patientto bend the toestoward the head.
Figure 4.3 Dorsiflexion
Figure 4.2 Plantar flexion

©Eastland Press
Chapter Four:The Lower Extremities 43
Metatarsals, Tarsals, and ToesTECHNIQUE: Supine indirect ligamentous articular release
SYMPTOMS/DIAGNOSIS: Pain in the middle of the foot or in the toes
PATIENT: Supine with the heels on the table
PHYSICIAN: Standing at the foot of the table, facing toward the head of thetable
PROCEDURE: While bending forward above the patient’s foot, wrap both yourhands around the affected foot from either side with the distal toes imbeddedin the palms of your hands and the foot drawn into slight plantar flexion bycontracting your fingers under the distal metatarsals. The thumbs are on thedorsum of the foot. With your weight, compress the phalanges, metatarsals,and tarsals directly into the table, balancing on top of the rod-like vectorforce felt between your hands and the table. When the release occurs, the tis-sue softens under your fingers.
Steven Simmons
3. The force isstraight down into the table.
2. Grasp the toes.
1. The foot rests onthe table forsupport.
2
3
1
2
Figure 4.4 Metatarsals, tarsals, and toes technique

©Eastland Press
44 Ligamentous Articular Strain
Calcaneus (Bootjack Technique)TECHNIQUE: Supine combination ligamentous articular release (direct on cal-caneus and indirect on forefoot)
SYMPTOMS/DIAGNOSIS: Heel or foot pain, or heel spurs
PATIENT: Supine
PHYSICIAN: Standing on the same side of the table as the affected heel, facingtoward the foot of the table
PROCEDURE: Externally rotate and abduct the patient’s femur and flex theknee. Place the posterior distal humerus of the arm you have closest to thetable across the patient’s distal femur just above the popliteal fossa. Yourhumerus and the patient’s femur should be approximately 90° to each other.Grasp their calcaneus with your thumb and the proximal interphalangealjoint of the bent index finger of the same hand. Lean toward the patient’shead, carrying the knee into deeper flexion to exert traction on the heel.While carrying the heel distally, balance the front of the foot with your otherhand. Grasp under the distal first metatarsal with the thumb of that hand,the fingertips wrapping around the little toe and lateral aspect of the foot.
Figure 4.5 Metatarsals hand placement (plantar view)

©Eastland Press
Balance the tension in the metatarsals and tarsals between your two handswhile you carry the calcaneus inferiorly, away from the head. When therelease at the heel occurs, it feels like your thumb and index finger slip offthe calcaneus. You will also feel a softening in the forefoot when it releases.Both releases may occur at the same time or independently.
Figure 4.6 Bootjack technique
AnkleUnstable AnkleThe function of the ankle is closely tied to the function of the knee. Whenthe fibular head is subluxed at the knee, the head rides on the rim of itssocket. This drives the distal end inferiorly and makes the ankle joint notlevel, that is, the fibular side is more inferior. As a result, the ankle mortiseis unstable, and the patient chronically rolls off the outside of the foot,respraining the ankle. To stabilize an ankle, the fibula must be returned toits socket at the knee. Utilize the fibular head technique, which is describedlater in this chapter, to treat the unstable ankle. Once the fibula is returnedto its normal position and the ankle mortise is level, the ligaments can begintheir three month healing process. If it is not reinjured, the ankle will onceagain be stable.
Chapter Four:The Lower Extremities 45
Steven Simmons

©Eastland Press
46 Ligamentous Articular Strain
Talus AnteriorTECHNIQUE: Supine indirect ligamentous articular release
SYMPTOMS/DIAGNOSIS: Ankle pain or difficulty dorsiflexing the foot, such aswhen going up or down stairs. This can be diagnosed by sweeping your pal-pating thumb down the front of the tibia. The anterior talus feels like a shelfin front of the tibia.
PATIENT: Supine with the heel on the table
PHYSICIAN: Standing at the side of the table, at the level of the affected ankle
PROCEDURE: Place the palm of your distal hand across the distal tibia with thehypothenar side of the palm located within one-fourth to one-half inch of thetalus. Compress the tibia directly down toward the table. You should feel ten-sion coming up through the heel and directly through the tibiotalar joint. Rollthe lower leg slightly internally or externally to bring the force to its exactbalance point (where the tension is most intense). It will feel like you havemet a barrier with the rotation. Your other hand can be placed over the top ofthe treating hand to reinforce it. The amount of pressure will be in the 10 to40 pound range. Maintain this balance point until the release occurs, at whichtime the palpable tension will soften and the lower leg will roll through thebarrier. Slowly remove the pressure, allowing the tibia to move back over thetalus in an anterior direction. The treatment is complete. Remember torecheck the foot to see that the shelf- or step-like projection is gone.
Figure 4.5 Metatarsals hand placement (plantar view)
1. Make sure the patient’s heel is on the table. This provides a counter-force (arrow) so the talus can move in an anterior direction in relation to the tibia.
2. Press posteriorly on the tibia until you reach a point of balance.Maintain that force until a release occurs.
2
1
TALUS
TIBIACALCANEUS
Steven Simmons

©Eastland Press
Talus PosteriorTECHNIQUE: Supine indirect ligamentous articular release
SYMPTOMS/DIAGNOSIS: Ankle pain or difficulty plantar flexing the foot (suchas when going up or down stairs). The cause is posterior subluxation of thetalus on the tibia. This can be diagnosed by drawing the thumb superiorly onthe anterior tibiotalar junction and feeling a small shelf-like projection of thedistal tibia that has shifted anteriorly on the talus.
PATIENT: Supine with the heel just off end of table. The heel should clear theend of the table by approximately one inch.
PHYSICIAN: Standing at the foot of the table, facing the head of the table
PROCEDURE: Using the table to support the distal tibia, carry the foot towardthe floor. To accomplish this, bend forward above the patient’s foot, wrap-ping both your hands around the foot from the sides with the distal toesimbedded in the palms of your hands and the foot drawn into slight flexionby contracting your fingers under the distal metatarsals. Your thumbs are onthe dorsum of the foot. Apply pressure downward to the entire foot, directlypast the end of the table toward the floor to a balance point. When therelease occurs, it feels like the foot shifts more posteriorly on the ankle.Slowly decrease the downward pressure, allowing the foot to move anteri-orly on the ankle joint and to recenter itself.
Figure 4.8 Talus posterior technique
Chapter Four:The Lower Extremities 47
1. Make sure the patient’sheel is over the edge ofthe table. This providesa counterforce (arrow)so the talus can move ina posterior direction inrelation to the tibia.
2. Press posteriorlyto a balancepoint, andmaintain thepressure until arelease occurs.
2
1Steven Simmons

©Eastland Press
48 Ligamentous Articular Strain
The LegDorsiflexors of the Foot and Pretibial FasciaTECHNIQUE: Supine direct myofascial release
SYMPTOMS/DIAGNOSIS: Pain down the front of the lower leg, shin splints, ordorsi-cramping of toes. The most common type of shin splints can be attrib-uted to strains of the pretibial fascia and spasm of the dorsiflexors of the foot.
PATIENT: Supine
PHYSICIAN: Standing, facing the side of the table, at the level of the lower leg
PROCEDURE: Place the pad of the thumb of your more distal hand on theanterior surface of the dorsiflexor muscles and pretibial fascia just lateral tothe tibia. Find the tightest point in the fascia and muscle, and maintain abalanced compressive force (in the range of 20 to 40 pounds of pressure)medially and posteriorly with your thumb, parallel and just lateral to thetibia, until you feel a release. Reinforce your distal thumb with your moreproximal thumb to avoid fatigue of the treating thumb. When the releaseoccurs, the hard spasm will melt—the muscle and fascia have relaxed. Thistreats the dorsiflexor muscles of the foot and toes.
Figure 4.9 Dorsiflexors of the foot and pretibial fascia technique
1. Compress down toward the table.2. Compress slightly into the tibia.
TIBIA
FIBULA
2
1
Steven Simmons

©Eastland Press
Plantar Flexors of the Foot and CalfTECHNIQUE: Supine direct myofascial release
SYMPTOMS/DIAGNOSIS: Calf pain, cramping of the foot, and/or cramping ofthe plantar aspect of the toes
PATIENT: Supine
PHYSICIAN: Sitting at the side of the table just distal to patient’s calf, facingthe head of the table
PROCEDURE: With the fingers bent, line up the fingertips of both your handsside by side with your eight fingers under and transverse to the gastrocne-mius and soleus muscles, allowing the weight of the leg to rest on your fin-gertips. Press into the tight flexor muscle, which feels like a tight guitarstring, with the finger that is directly under the tight spot. With the weightof the leg applying the needed pressure, slightly draw that finger inferiorlytoward the foot. Maintain that balanced tension until the release occurs.
Figure 4.10 Plantar flexors of the foot and calf technique
Chapter Four:The Lower Extremities 49
1. Compress the bands ofmuscle that feel tight.
2. Apply slight tractioninferiorly.
1
2
SOLEUS
GASTROCNEMIUS
Steven Simmons

©Eastland Press
KneeFibular HeadTECHNIQUE: Supine direct ligamentous articular release
SYMPTOMS/DIAGNOSIS: Posterior and lateral knee pain or unstable ankle withchronic spraining of the ankle. The latter is a result of an unstable anklemortise with the fibula displaced at the knee.
PATIENT: Supine
PHYSICIAN: Seated, facing the side of the table at the level of the affectedknee
PROCEDURE: Flex the hip and the knee to approximately 90°. Slightly exter-nally rotate the femur. With the arm closest to the patient’s head, bend yourelbow to 90° and prop it on the table, making a vertical pedestal with yourforearm and thumb. With the pad of this thumb, push the posterior superiorportion of the fibular head inferiorly toward the foot. The distal hand invertsthe foot and slightly rotates the foot medially. This pulls on the distal end ofthe fibula. Balance the connective tissue surrounding both ends of the fibulaand the interosseous membrane between the tibia and fibula until a releaseoccurs. The fibular head moves inferiorly and anteriorly and slides back intoits socket.
Figure 4.11 Fibula technique hand placements
50 Ligamentous Articular Strain
1. Contact the fibular head with the pad of your thumb.Press inferiorly.
2. Invert the foot. Balance it between your two handsuntil a release occurs.
1
2
Steven Simmons

©Eastland Press
Lateral (Fibular) Collateral Ligament of the KneeTECHNIQUE: Supine combination ligamentous articular release (direct on thelateral collateral ligament and indirect on the medial collateral ligament)
SYMPTOMS/DIAGNOSIS: Pain on the lateral aspect of the knee from a strainedlateral collateral ligament
PATIENT: Supine
PHYSICIAN: Seated, facing the side of the table at the level of the knee
PROCEDURE: Externally rotate and abduct the hip on the affected side. Bringthe knee into approximately 90° of flexion. (The patient’s other leg remainsstraight.) With the hand closest to the end of the table, grasp the patient’sfoot with your fingers in the instep and your thumb on the lateral dorsum ofthe foot. The hypothenar eminence supports the lateral aspect of the calca-neus, and the thenar eminence is directly inferior to the distal fibula. Propthat elbow on the table, and without supporting the knee with the otherhand, allow the knee to drop laterally toward the floor. With your hand hold-ing the foot, invert the foot at the ankle and internally rotate it (whichslightly internally rotates the lower leg). Draw the foot inferiorly, straighten-ing the knee while maintaining the balanced tension across the lateral col-lateral ligament. The hand on the foot monitors the tension on the knee.When the knee catches at a barrier, maintain balanced tension at that barrieror still point until a release occurs and the knee straightens further.
Figure 4.13 Lateral collateral ligament set-up
Chapter Four:The Lower Extremities 51
Balance the tensionacross the lateralcollateral ligament.
Steven Simmons

©Eastland Press
52 Ligamentous Articular Strain
There may be multiple barriers. Maintain steady tension against each barrierencountered until the knee straightens completely. Once the knee has com-pletely straightened, the lateral collateral ligament has returned to its normalphysiologic condition and the femur internally rotates to align with the tibia.
Figure 4.14 Lateral collateral ligament technique
Medial Collateral LigamentTECHNIQUE: Supine combination ligamentous articular release (direct on themedial collateral ligament and indirect on the lateral collateral ligament)
SYMPTOMS/DIAGNOSIS: Pain on the medial aspect of the knee as a result of astrained medial collateral ligament
PATIENT: Supine
PHYSICIAN: Sitting just beyond the corner of the foot of the table on the sameside as the affected knee, facing the head of the table
PROCEDURE: Grasp the foot with both hands. Your lateral hand grasps thecalcaneus with the fingers on the medial aspect and the thenar eminence onthe lateral aspect. Your medial hand grasps the forefoot with the distal end ofthe first metatarsal in that palm. The hip is flexed and adducted, causing thefemur to internally rotate. The knee is bent approximately 90° and is nowabove the opposite femur. With both hands on the foot, externally rotate thefoot and attempt to straighten the leg. Draw the foot inferiorly, straightening
Maintain tensionacross the lateralcollateral ligament asthe femur is allowedto rotate internally.
Steven Simmons

©Eastland Press
the knee while maintaining the balanced tension across the medial collat-eral ligament. When the knee catches at a barrier, maintain balanced tensionat that barrier or still point until the knee straightens further. There may bemultiple barriers. Maintain steady pressure against each barrier encountereduntil the knee straightens completely. When this has occurred, the medialcollateral ligament has returned to its normal physiologic condition and thefemur externally rotates to align with the tibia.
Figure 4.15 Medial collateral ligament set-up
Figure 4.16 Medial collateral ligament technique
Chapter Four:The Lower Extremities 53
Maintain a balanced tension across themedial collateral ligament as the leg isstraightened in an inferior direction.
1. Carry the leg in an inferior andslightly lateral direction.
2. The femur will externally rotateas the barrier releases.
1
2
Steven Simmons
Steven Simmons
©Eastland Press
54 Ligamentous Articular Strain
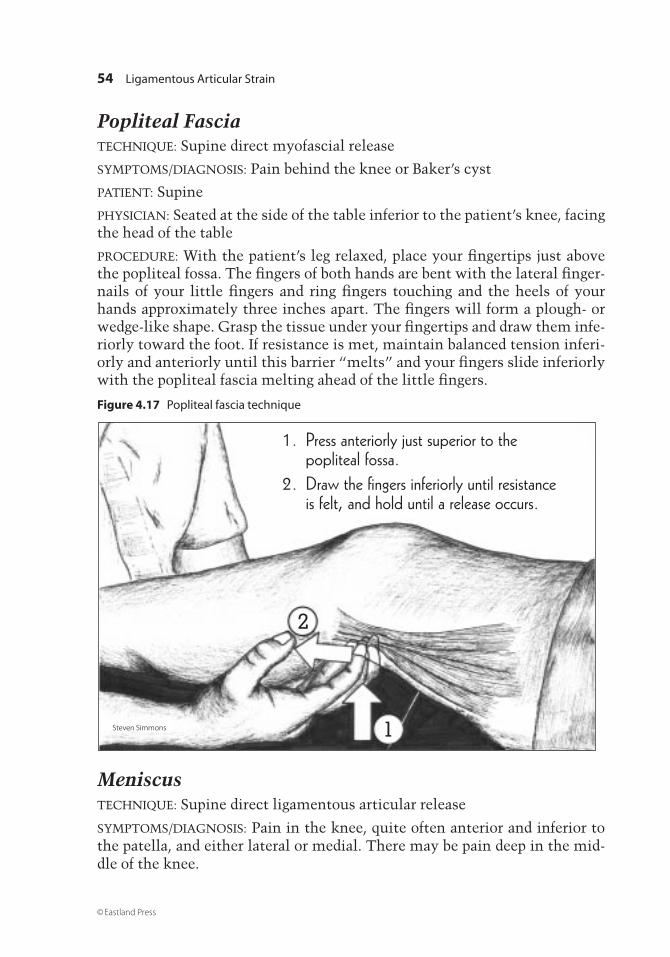
Popliteal FasciaTECHNIQUE: Supine direct myofascial release
SYMPTOMS/DIAGNOSIS: Pain behind the knee or Baker’s cyst
PATIENT: Supine
PHYSICIAN: Seated at the side of the table inferior to the patient’s knee, facingthe head of the table
PROCEDURE: With the patient’s leg relaxed, place your fingertips just abovethe popliteal fossa. The fingers of both hands are bent with the lateral finger-nails of your little fingers and ring fingers touching and the heels of yourhands approximately three inches apart. The fingers will form a plough- orwedge-like shape. Grasp the tissue under your fingertips and draw them infe-riorly toward the foot. If resistance is met, maintain balanced tension inferi-orly and anteriorly until this barrier “melts” and your fingers slide inferiorlywith the popliteal fascia melting ahead of the little fingers.
Figure 4.17 Popliteal fascia technique
MeniscusTECHNIQUE: Supine direct ligamentous articular release
SYMPTOMS/DIAGNOSIS: Pain in the knee, quite often anterior and inferior tothe patella, and either lateral or medial. There may be pain deep in the mid-dle of the knee.
1. Press anteriorly just superior to thepopliteal fossa.
2. Draw the fingers inferiorly until resistanceis felt, and hold until a release occurs.
2
1Steven Simmons

©Eastland Press
PATIENT: Supine with legs straight and relaxed
PHYSICIAN: Sitting at the side of the table inferior to patient’s knee, facingthe head of the table
PROCEDURE: Once all the strains in the popliteal fascia have been released,palpate the back of the knee for any firm or tender lumps (posteriorly sub-luxed menisci). A lump that is found toward the medial popliteal fossa is aposteriorly subluxed medial meniscus, while a lump that is found toward thelateral popliteal fossa is a posteriorly subluxed lateral meniscus. If either con-dition or a combination of both conditions is encountered, use the tip of thepad of the middle finger of your dominant hand reinforced with the pad ofthe middle finger of your other hand to maintain steady balanced pressureanteriorly on the meniscus until it slips back into its normal position andthe lump disappears.
Figure 4.18 Meniscus technique
Cruciate LigamentsTECHNIQUE: Supine indirect ligamentous articular release
SYMPTOMS/DIAGNOSIS: Pain or swelling in the knee or knee hyperextension.The pain in the knee often occurs when climbing or descending stairs orstanding up from a seated position. These symptoms may be a result of astrained anterior or posterior cruciate ligament. The tibial tuberosity is notcentered below the midline of the patella, that is, the tibia is either exter-nally or internally rotated on the femur.
Chapter Four:The Lower Extremities 55
Steven Simmons
Contact the subluxed meniscus. Maintain a balancedpressure anteriorly until it slips back into place.

©Eastland Press
PATIENT: Supine
PHYSICIAN: Standing at the side of the table, facing the patient’s knee
PROCEDURE: With the hand closest to the patient’s head, grasp the thighapproximately five inches above the knee to stabilize the femur. With yourother hand, grasp the lower leg approximately four inches below the knee.Press down on the tibia and femur, then compress your hands toward eachother. With the femur stabilized, first rotate the tibia laterally, then medially,to evaluate in which direction it most easily moves. Maintain the rotation inthat direction. Maintain a balance point on all three forces—pressure down,compression together, and rotation of the tibia—until the release occurs andthe lower leg rotates slightly further in the direction in which the rotationwas maintained. When you slowly decrease the rotation and compression,the knee will return to its normal physiologic position, and the tide, that is,the cranial rhythmic impulse (discussed in Chapter 3), will flow through theknee. Reevaluate the centering of the tibial tubercle, which will have movedtoward the midline of the patella. Note that the transverse ligament of theknee will correct itself when you have treated the strained cruciate liga-ments.
Figure 4.19 Cruciate ligaments technique
56 Ligamentous Articular Strain
1. Press down on the femur and tibia. 2. Compress the knee joint.3. Move the tibia into internal
or external rotation to a balance point.
1
2 3
1
2
Steven Simmons

©Eastland Press
Chapter Four:The Lower Extremities 57
The Thigh RegionTensor Fascia LataTECHNIQUE: Supine direct myofascial release
SYMPTOMS/DIAGNOSIS: Pain in the lateral groin area on flexing the thigh.Pain is just superior and anterior to the greater trochantor of the femur.
PATIENT: Supine
PHYSICIAN: Standing, facing the affected hip
PROCEDURE: Locate the center of the spasm in the tensor fascia lata just ante-rior and superior to the greater trochantor. Contact the strain with yourthumb and push posteriorly and medially, maintaining steady balanced pres-sure, until a release occurs.
Figure 4.20 Fascia lata technique
Steven Simmons

©Eastland Press
Iliotibial Tract (Band)TECHNIQUE: Supine direct myofascial release
SYMPTOMS/DIAGNOSIS: Pain down the lateral aspect of the thigh
PATIENT: Supine
PHYSICIAN: Standing or seated, facing the affected thigh
PROCEDURE: Locate the tightest point in the tract along the lateral aspect ofthe thigh. Using the pad of your dominant thumb, reinforced by your otherthumb, press medially and posteriorly on this point. Maintain this balancedpressure until a release occurs. The pressure is in the 10- to 30-pound range.
Figure 4.21 Iliotibial tract technique
58 Ligamentous Articular Strain
Push medially and posteriorly.
VASTUS LATERALIS
ILIOTIBIAL TRACT
Steven Simmons

©Eastland Press
Adductors of the FemurPectineus, Adductor Brevis, Adductor Longus,Adductor Magnus, and GracilisTECHNIQUE: Supine direct myofascial release
SYMPTOMS/DIAGNOSIS: Groin pain or pain in the medial thigh as a result ofstrained groin muscles. The foot on the affected side will be relatively inter-nally rotated (pigeon-toed).
PATIENT: Supine with the leg slightly abducted
PHYSICIAN: Standing on the opposite side of the table from the medial aspectof the affected thigh
PROCEDURE: Locate the specific muscle or muscles that are in spasm on theupper medial aspect of the thigh. With the pad of your thumb on the tightestpoint of spasm, press toward the femur superiorly, slightly posteriorly, andlaterally. Maintain this steady, balanced, perpendicular pressure to the fibersuntil the muscle relaxes. This area is very tender, and if you let the patientknow that you are aware of this tenderness, he or she can better tolerate thediscomfort until a release occurs. Treat each muscle that is in spasm. Whenthe groin muscles and external hip rotators are all balanced and the patient isfully relaxed, both feet will turn out equally.
Figure 4.22 Adductors of the femur technique
Chapter Four:The Lower Extremities 59
Steven Simmons

©Eastland Press
External Hip Rotators and Abductors of the FemurGluteus Minimus, Superior Gemellus, ObturatorInternus, Inferior Gemellus, Quadratus Femoris,Piriformis, and Gluteus MediusSYMPTOMS/DIAGNOSIS: Sciatica, hip pain, pain in the gluteal area, or paindown the back of the leg
PATIENT: Lateral recumbent position with the affected hip up and both hipsflexed to approximately 90 to 120°. Knees bent to approximately 90°. Thepatient’s back is approximately four inches from the edge of the table.
PHYSICIAN: Standing behind patient at the level of patient’s hip, facing the table
Gluteus MinimusTECHNIQUE: Lateral Recumbent Direct Myofascial Release
PROCEDURE: If the gluteus minimus is in spasm, there will be a tender lumpjust lateral to the upper one-third of the sacroiliac joint. With the pad of yourthumb, first press slightly anteriorly and medially on the tightest point inthis muscle. Maintain this balanced pressure until the release occurs and themuscle relaxes.
Figure 4.23 Gluteus minimus technique
60 Ligamentous Articular Strain
1. Engage themuscle.
2. The treatmentvector is towardthe table.
1
2
Steven Simmons

©Eastland Press
Superior GemellusTECHNIQUE: Lateral recumbent direct myofascial release
PROCEDURE: Palpate for deep muscle spasm on a direct line halfway betweenthe greater trochanter and the lower portion of the sacroiliac joint. With thepad of your thumb lying across the fibers of the middle of the superior gemel-lus muscle, maintain firm, steady pressure in a medial, anterior, and slightlyinferior direction. Maintain this steady pressure until the muscle relaxes.
Obturator InternusTECHNIQUE: Lateral recumbent direct myofascial release
PROCEDURE: Moving inferiorly to the superior gemellus muscle, the nextmuscle that is encountered is the obturator internus. Move the pad of yourthumb just inferior to the superior gemellus muscle, halfway between thegreater trochanter and the inferior pole of the sacroiliac joint. If a spasm isfound, maintain firm, steady pressure with the pad of your thumb perpendic-ular to the muscle fibers in a medial, anterior, and slightly inferior directionuntil the muscle relaxes.
Inferior GemellusTECHNIQUE: Lateral recumbent direct myofascial release
PROCEDURE: Move the pad of your thumb even further in an inferior direc-tion down the depression between the greater trochanter and the ischium,and palpate for spasm in the inferior gemellus muscle (halfway between theupper portion of the ischial tuberosity and the midportion of the greatertrochanter). Treat with the pad of your thumb perpendicular to the fibers,maintaining firm, steady pressure anteriorly and medially.
Chapter Four:The Lower Extremities 61

©Eastland Press
Quadratus FemorisTECHNIQUE: Lateral recumbent direct myofascial release
PROCEDURE: Using the pad of your thumb, palpate the groove in which thesciatic nerve is found, halfway between the ischial tuberosity and the lessertrochanter. A muscle spasm at the lateral inferior portion of the buttocksindicates that the quadratus femoris muscle is involved. With the pad ofyour thumb perpendicular to the fibers, press in a superior, medial, and ante-rior direction. Maintain this balanced pressure until a release occurs.
Figure 4.24 Quadratus femoris technique
62 Ligamentous Articular Strain
Steven Simmons
SUPERIOR GEMELLUS
OBTURATOR INTERNUS
INFERIOR GEMELLUS
QUADRATRUS FEMORIS

©Eastland Press
PiriformisTECHNIQUE: Lateral recumbent direct myofascial release
PROCEDURE: Locate spasms of the piriformis muscle very close to its point ofinsertion on the femur, slightly posterior and inferior to the superior portionof the greater trochanter. Maintain balanced firm pressure with the pad ofyour thumb medially (down toward the table) on this spasm until a releaseoccurs.
Figure 4.25 Piriformis technique
Chapter Four:The Lower Extremities 63
Steven Simmons
The insertionof the piriformismuscle is shown.

©Eastland Press
Gluteus MediusTECHNIQUE: Lateral Recumbent Direct Myofascial Release
PROCEDURE: The gluteus medius attaches to the superior portion of thegreater trochanter. Locate the muscle spasm just superior to the greatertrochanter of the femur. Using the pad of your thumb(s), maintain firm bal-anced pressure in a medial, slightly inferior, and slightly anterior directionclose to the point of the hip. Maintain this steady balanced pressure until arelease occurs. Note: treating all the previously described external hip rota-tors usually corrects sciatica.
Figure 4.26 Gluteus medius technique
Figure 4.27 Gluteus medius hand placement
64 Ligamentous Articular Strain
Contact the gluteusmedius close to the greatertrochanter. Press medially,slightly inferiorly, andslightly anteriorly.
Steven Simmons

©Eastland Press
HipCentering the Femur in the AcetabulumTECHNIQUE: Lateral recumbent indirect ligamentous articular release
SYMPTOMS/DIAGNOSIS: Hip pain, often due to a force transferred up from thelower extremity, or a fall directly on the hip
PATIENT: Lateral recumbent position with the hips and knees flexed. Theaffected hip is on top.
PHYSICIAN: Standing, facing the table behind the hip to be treated
PROCEDURE: Stabilize the ilium with the palm of your superior hand. Withthe greater trochanter centered in the palm of your inferior hand, generate aforce directly down the neck of the femur to center the femoral head in theacetabulum. This involves a slight compression between your handsdirected medially and slightly superiorly on the femur. Maintain this bal-anced force until the injury softens, and the tide begins to flow through thehip joint.
Figure 4.28 The femur in the acetabulum technique
Chapter Four:The Lower Extremities 65
1. Stabilize the ileum with your superior hand. 2. Apply pressure toward the neck of the femur.
2
1
Steven Simmons

©Eastland Press
Figure 4.29 Second hiptechnique hand placement
Second Hip TechniqueTECHNIQUE: Supine indirect ligamentous articular release
SYMPTOMS/DIAGNOSIS: Hip pain, often due to a force transferred up from thelower extremity, or a fall directly on the hip
PATIENT: Supine with the affected hip flexed 90° and the knee flexed. Theother leg is straight.
PHYSICIAN: Standing at the side of the hip to be treated at the level of theknee, facing the head of the table
PROCEDURE: Roll the knee medially to raise the affected hip slightly off thetable. Place the thenar eminence of your hand farthest from the tablebetween the greater trochanter and the table, with your fingers pointingmedially. Place the patient’s knee in the depression just below your coricoidprocess to control the distal femur. Grasp the medial proximal aspect of thefemur close to the femoral head with the middle finger, index finger, andthumb of your other hand. Use your shoulder to increase or decrease the
66 Ligamentous Articular Strain

©Eastland Press
Chapter Four:The Lower Extremities 67
flexion at the hip and to slightly internally or externally rotate the femur.The patient’s foot is dangling just off the table. Compress the hip slightlyanteriorly and medially with your thenar eminence on the greater trochanter.With your medial hand grasping the femur close to the femoral head, gener-ate pressure posteriorly and laterally with your middle finger, index finger,and thumb. Using your shoulder, locate the direction of balanced tension inthe hip by slightly increasing or decreasing the flexion of the femur andslightly rotating the femur internally or externally. Balance the forces at thehip joint from all three contact points. When the release occurs, the connec-tive tissue surrounding the head of the femur will readjust itself, all threevectors of force will melt, the femur will move back to its functional physio-logic position, and the tide will begin flowing through the joint.
Figure 4.30 Second hip technique
1. Contact the greater trochanterwith your thenar eminence.
2. Grasp the femur as close to thefemoral head as possible.
3. Place the knee just below yourcoracoid process.
4. Balance all three forces alongthe vectors shown until a releaseoccurs.
3
2
1
Steven Simmons