gemstudio pro - amulet technologies · 2019-08-19 · beginner's guide from the drop-down...
TRANSCRIPT

GEMstudio Pro
Beginner's Guide2018

Beginner's Guide
Table of Contents
Welcome ...................................................................................................................................3Embedded GUI Video Tutorials ................................................................................................5Creating a Project .....................................................................................................................6
Adding Objects .................................................................................................................13Adding Buttons .................................................................................................................14Add/Remove Parameter in Project ..................................................................................17Add a New Page ...............................................................................................................19Add Page Functions .........................................................................................................21Simulate a Project ............................................................................................................22Program a Project or a Page ............................................................................................23
Open Existing Projects ............................................................................................................26LCD/Board Chooser ...............................................................................................................28Create a New LCD Configuration ............................................................................................30Board Profile Editor ................................................................................................................32Warranty Information .............................................................................................................34

Beginner's Guide
Welcome
Congratulations on your Amulet purchase! Please take a few minutes to read this filewhich contains the latest information about setting up and using your Amulet product. Thisdocumentation is valid starting with GEMstudio Pro software version 3.0.0.0 Overview The Amulet method of displaying graphics on an LCD is totally different from traditionalmethods. The Amulet GEM Graphical OS Chip handles all the LCD and touchpanel functionsso your microcontroller doesn't have to. Hardware-wise, the only requirement is that yourmicrocontroller needs a UART or USB in order to use the Amulet system. On the software side,you need to create an Amulet serial protocol handler. Generally, the only thing that is being sentvia the serial link is data. Here's the Amulet system in a nutshell. 1. GUI authoring tool called GEMstudio Pro is used to create a Graphical User Interface(GUI).2. GEMstudio Pro is used to compile your GUI to a small binary file which is then downloadedinto the Amulet module.3. The Amulet module displays the GUI and handles all touchpanel interaction.4. The Amulet module receives input data from your host microcontroller via the serial linkand also sends command messages back to your microcontroller based upon timer-based ortouchpanel events. There are two types of variables in the Amulet system. External variables (byte, word, color andstring) which reside on your microcontroller's side and InternalRAM variables (byte, word, colorand string) which reside on the Amulet module. InternalRAM is a quasi-dual port RAM that canbe read from and written to by the Amulet chip through commands inserted in the GEMstudioPro code. Your microcontroller interfaces to InternalRAM through the serial link. There arespecific UART and USB commands that can read from and write to InternalRAM. There are four major types of serial messages that will be sent between the Amulet module andyour microcontroller. 1. A request of a variable (byte, word, color or string)2. A setting of a variable (byte, word, color or string)3. A Remote Procedure Call, which is a completely generic message which allows the Amuletmodule to inform your microcontroller of a certain event. You can have up to 256 unique RPC's.What those RPC's signify is entirely up to you.4. A raw byte, or group of bytes, can be sent from the Amulet module to your microcontroller.This option is not part of the Amulet serial protocol, but rather it gives you the flexibility to havethe Amulet module send you small commands that do not need to be answered. In addition, ascripting language gives access to the serial receive byte interrupt and a custom handler can bewritten to define your own serial protocol. Please see the Amulet UART Protocol documentation for more details. Your LCD's user interface is created using GEMstudio Pro. Amulet has created a number of I/O objects, referred to as Amulet Widgets. There are two types of Amulet Widgets, ControlWidgets and View Widgets. Control Widgets are input objects, like function buttons, sliders,radio buttons, etc... Control Widgets have a function, or a set of functions, that can be applied

Beginner's Guide
to them. For instance, a function button can be set to send a Remote Procedure Call #5 out theUART or USB every time it is pressed. View Widgets are output objects, like bargraphs, numericfields, string fields, etc... View Widgets call a function which returns the data used as the inputfor that particular widget. For instance, a bargraph can have a function which requests externalbyte variable #3 every 100ms over the UART or USB. When the Host microcontroller replies tothat message, the bargraph automatically redraws itself with the new value. The complexity of the serial protocol handler depends upon the type of communication you willbe using in your system. You can set up your project so that the Amulet module is the master,requesting data at given update rates and sending command messages asynchronously. Or yourmicrocontroller can be the master, sending data to the Amulet module unsolicited. And youcan also use a dual master setup, where the Amulet module is sending asynchronous commandmessages to your microcontroller, yet your microcontroller is also sending unsolicited data to theAmulet.

Beginner's Guide
Embedded GUI Video Tutorials
If you haven't already done so, please take the time to look at the Online Video Tutorials.The tutorials will provide you with an overview of how to create, compile and simulateyour GUI. To get to the tutorials, pull down the menu for Help when you open a GEMstudiowindow and select "Online Video Tutorials". For additional examples, please go to yourGEMstudio directory and click on the .gemp files.What will I learn in the tutorials?• Creating and Compiling a GUI.• Simulate the GUI• Introduction to GEMscript Click here for the videos.

Beginner's Guide
Creating a Project
Creating a new project in GEMstudio is easy! We will guide you through the following: Creating a ProjectAdding objects to your projectAdding ButtonsAdding a new page to your projectAdding a function to the pageSimulate your projectProgram your project or page To start GEMstudio, please launch GEMstudio either from the shortcut or from your startmenu. An intro page will pop up as shown in the Figure below.
This GEMstudio intro page allows the user to create a new project, open an existing project,create a new LCD profile (only in full version), launch the GEMcompiler, and launch the GEMFont Converter. To create a new GEMstudio project, please either click on the button "Create a newGEMstudio Project" (Menu Item 1) or the pull down File menu (Pull-Down Menu 2) on thetop left hand corner and click "New Project". A New Project Wizard will appear as shownbelow:

Beginner's Guide
From the drop-down menu, pick the Amulet Starter Kit that you want to design for. If youhave an Amulet Starter Kit, the New Project Wizard will choose the appropriate LCD andboard file as well as set the project settings to the most common settings. You can skip allthe steps below if using the New Project Wizard, but you can enter the Project Propertieswindow at any later time to further customize your project's settings by selecting Project >Project Properties from within GEMstudio Pro. If you are unsure of what to pick, or you don't have an Amulet Starter Kit, click on the
button and you will be taken immediately to the Project Propertieswindow. A Project Properties window will pop up where you can define the display you wouldlike to design for. There are 5 tabs which can be used to customize the project: LCD,Communication, Color Depth, Transitions and Miscellaneous. The first tab is the LCDproperties. Please choose the appropriate LCD size, manufacturer, and part number. If youdon't see your LCD choice, please make a new LCD profile (for full versions only).

Beginner's Guide
Project Properties
To set up communication for the project, click on the Communication tab as shown in thefigure below. User can choose between a CRC or ASCII protocol type when the user clickson the down arrow by Protocol Type. Amulet ID is only valid if CRC protocol type is chosen.It has to be different than the Host ID. The range for both Amulet and Host ID is 1 to 254.Timeout in seconds from 0.03 seconds to 2 seconds can be selected from a drop downmenu. The Amulet Slave Response and Null Terminate Messages options are only availablewhen ASCII protocol type is selected.

Beginner's Guide
The next tab is the Color Depth tab. A pull down menu with options of 32-bit or 8-bit colordepth is available. If you intend to run this project on Amulet's 7 inch resisitive displaymodule, 8-bit color depth is the recommended setting.

Beginner's Guide
Transition Options for the project can be selected by clicking on the Transition tab in thesame window. On the transition tab window, user can select page transition options andbackground color.

Beginner's Guide
Miscellaneous tab on the Project Properties page enables the user to select different typesof Frame Buffer, JPEG Compression and touch priority if the user is using a touch panel. Formore information on the Macro File, see the GEMstudio Pro User's Guide under "MacroPreprocessor". The default settings here are fine.

Beginner's Guide
The GEMscript and USB MSD tabs are for the more advanced users. To learn more aboutthis, please read the GEMstudio Pro User's Guide.

Beginner's Guide
Adding Objects
Now that you have a new project created, you need to add to your project. There are fourdifferent objects that can be added: Image, Animated Image, Static Text and Background.
To add an image or an animated image, click on the button on the lower left handcorner of the project window. A menu will pop up and you can select Image.
Once you click to add an Image, a file explorer window will pop up for you to browse to theimage you want to add. If the image is an animated image, GEMstudio will automatically addit as an animated image. If not, it will be added as a normal image. Click on the value of theimage if you want to change the image name.
To add static text, click on the button on the lower left hand corner of the projectwindow and select Static Text. A Static Text object will be added to the current page. Tochange the name of the Static Text object, click on the value of the Static Text.
To use a background image on your current page, page, click on the button on the lowerleft hand corner of the project window and select Background. A file explorer windowwill pop up for you to browse to the background image you want to add. To rename thebackground image, click on the value of the Background.NOTE: If at any time, you need further explanation on objects in your project, select the
object and click on the button on the lower left hand corner of the project window orpress "F1". A help window will pop up explaining the selected object.

Beginner's Guide
Adding Buttons Buttons are the most porlific of all the objects added in a typical GUI. To add a button, click
on the button on the lower left hand corner of the project window. A menu will pop upand select Widgets è CustomButton
The property window on the left will give the parameters on the widget which was justplaced.
Beginner's Guide
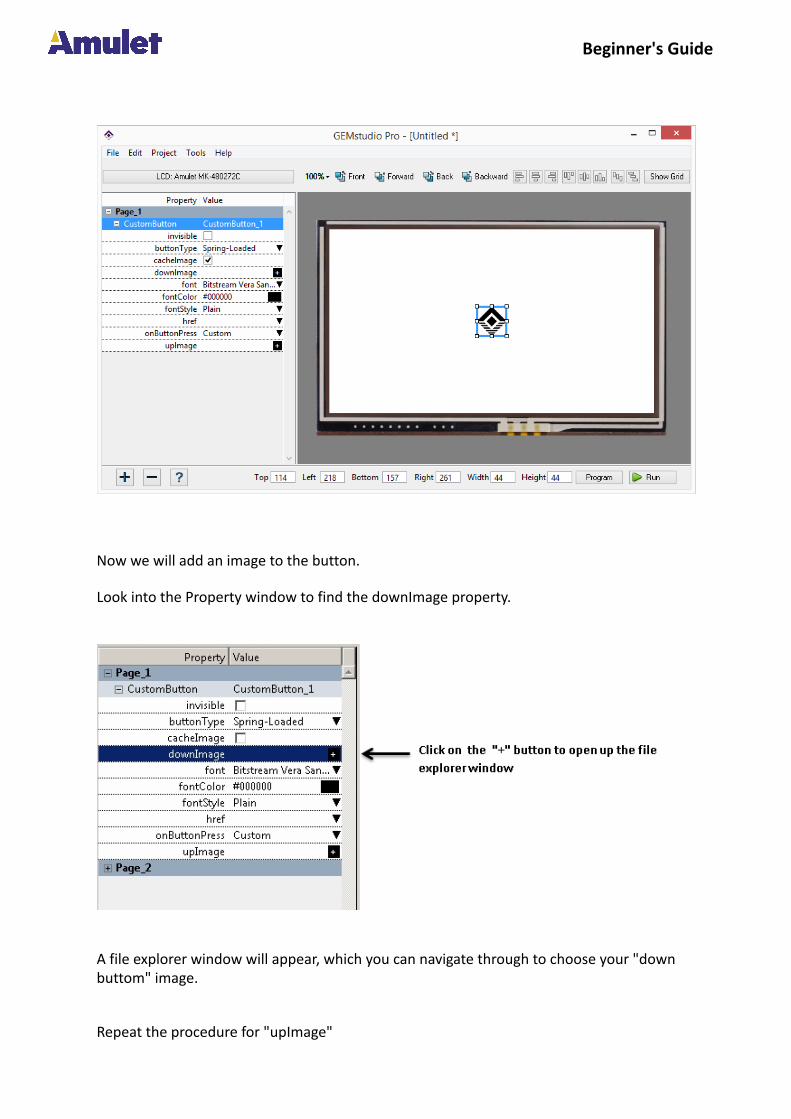
Now we will add an image to the button. Look into the Property window to find the downImage property.
A file explorer window will appear, which you can navigate through to choose your "downbuttom" image. Repeat the procedure for "upImage"

Beginner's Guide
Beginner's Guide
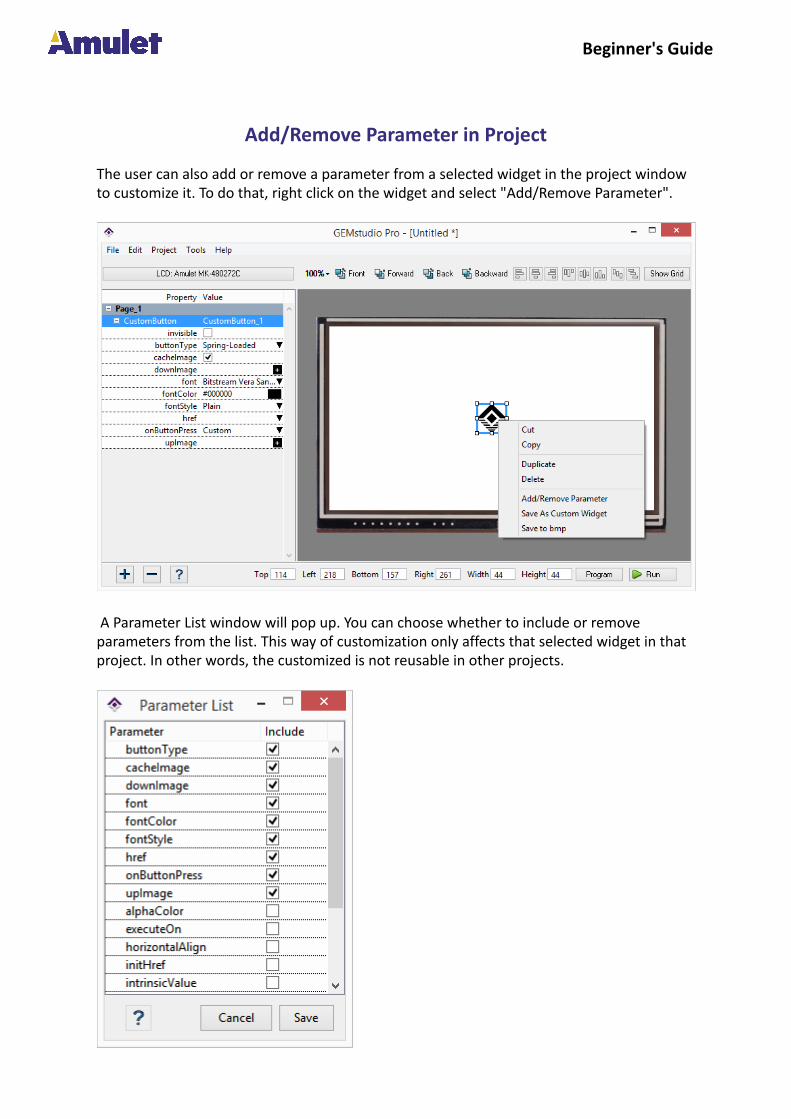
Add/Remove Parameter in Project
The user can also add or remove a parameter from a selected widget in the project windowto customize it. To do that, right click on the widget and select "Add/Remove Parameter".
A Parameter List window will pop up. You can choose whether to include or removeparameters from the list. This way of customization only affects that selected widget in thatproject. In other words, the customized is not reusable in other projects.

Beginner's Guide
NOTE: If at any time, you need further explanation on widget or parameter in your project,
select the widget or parameter and click on the button on the lower left hand cornerof the project window or press "F1". A help window will pop up and explain the selectedwidget or parameter.

Beginner's Guide
Add a New Page
If the project needs a new page, click on the button at the lower left corner of theproject window and select "New Page".
A page options window will pop up and you can customize the page.
For advanced options, click the arrow on the lower left hand corner of the page optionswindow. The window expands to include selections of Communications options, FrameBuffer options and JPEG Compression options.

Beginner's Guide

Beginner's Guide
Add Page Functions
Please check out Amulet's Page Functions Editor and Page Functions section in "GEMstudioPro User's Guide"

Beginner's Guide
Simulate a Project
Simulating a project, enables the user to preview and test the GUI before programming the
project into the hardware. To simulate the entire project, click on the button onthe lower right corner of the project window. To simulate only one page, right click on thepage and select "Run This Page Only" on the pop up menu. A window will pop up to displayyour GUI.
Beginner's Guide
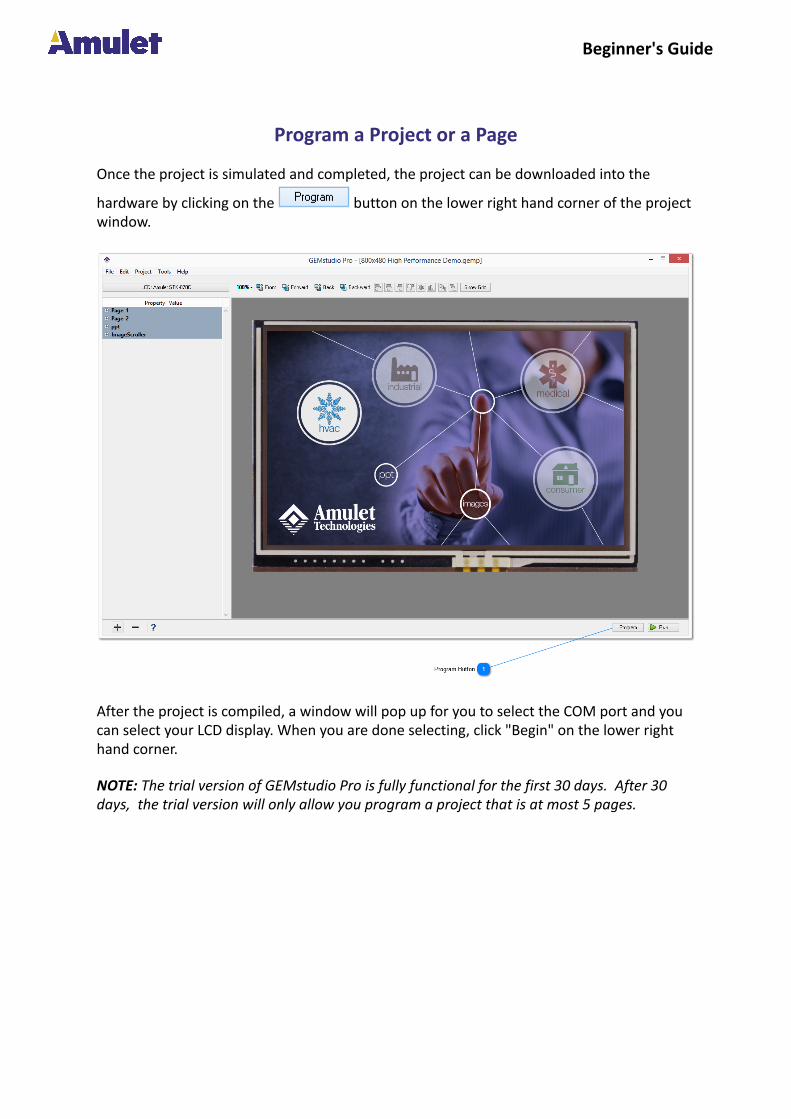
Program a Project or a Page
Once the project is simulated and completed, the project can be downloaded into the
hardware by clicking on the button on the lower right hand corner of the projectwindow.
After the project is compiled, a window will pop up for you to select the COM port and youcan select your LCD display. When you are done selecting, click "Begin" on the lower righthand corner. NOTE: The trial version of GEMstudio Pro is fully functional for the first 30 days. After 30days, the trial version will only allow you program a project that is at most 5 pages.

Beginner's Guide
If you would like to program only one page, right click on the page and select "Program ThisPage Only" in the pop up menu.

Beginner's Guide

Beginner's Guide
Open Existing Projects
Each project images and widgets are relative to the .gemp project file. To open an existingGEMstudio project, either click on the "Open Existing GEMstudio Project" button (MenuItem 1)or pull down the file menu (Pull-Down Menu 2) and click on "Open Project".
A browser window will pop up for selecting the desired .gemp project file.

Beginner's Guide
Once the project is open, you can make changes to the project by adding a page, or addnew objects. After editing the project, you can click on the "Run" button to simulate and"Program" button to download the project to hardware. NOTE: User can only program five page of the project if not using the full version ofGEMstudio.NOTE: If at any time, you need further explanation on widget or parameter in your project,
select the widget or parameter and click on the button on the lower left hand cornerof the project window or press "F1". A help window will pop up and explain the selectedwidget or parameter.

Beginner's Guide
LCD/Board Chooser
The Board Profile Editor can be opened from a drop down menu (Project --> LCD/BoardChooser) on the top of the project window as shown below.
The LCD/Board Chooser provides the user with multiple LCD and Board choices as shownbelow. For LCD choices, the options includ LCD Size, LCD Manufacturer, and LCD PartNumber. For the Board choices, select a board name.

Beginner's Guide
If the board profile you want is not available, please go to Board Profile Editor to make yourown board profile
Beginner's Guide
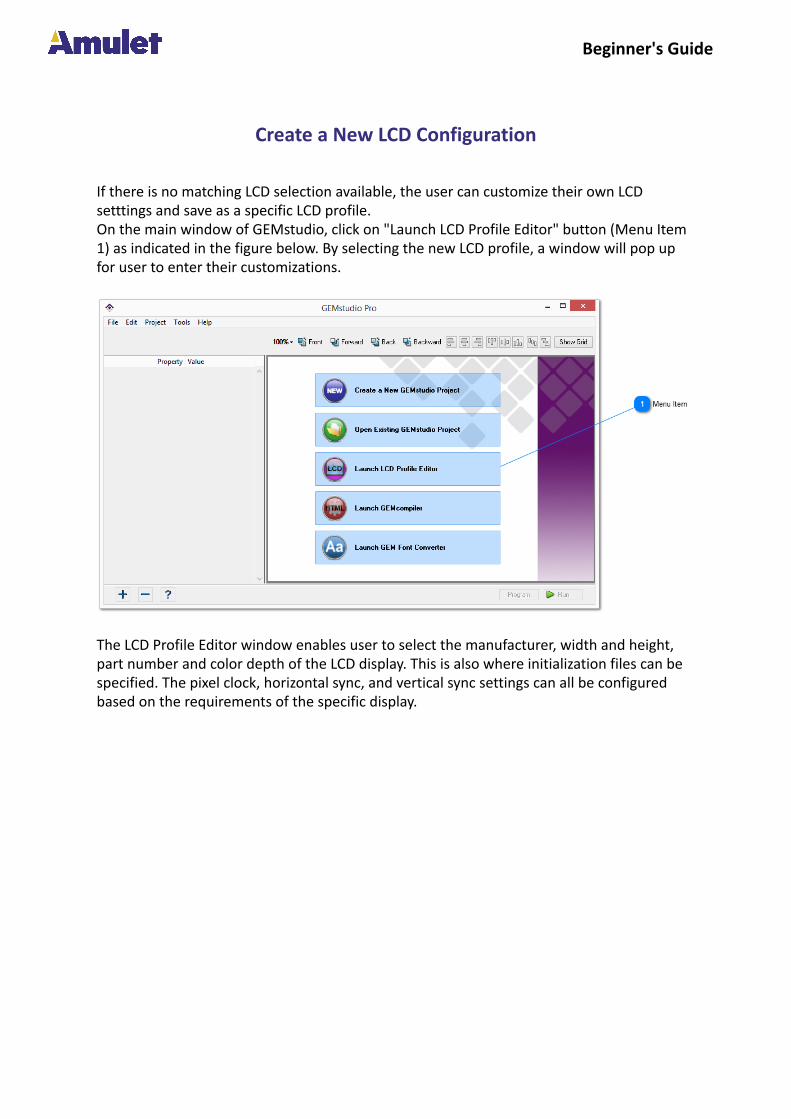
Create a New LCD Configuration
If there is no matching LCD selection available, the user can customize their own LCDsetttings and save as a specific LCD profile.On the main window of GEMstudio, click on "Launch LCD Profile Editor" button (Menu Item1) as indicated in the figure below. By selecting the new LCD profile, a window will pop upfor user to enter their customizations.
The LCD Profile Editor window enables user to select the manufacturer, width and height,part number and color depth of the LCD display. This is also where initialization files can bespecified. The pixel clock, horizontal sync, and vertical sync settings can all be configuredbased on the requirements of the specific display.

Beginner's Guide

Beginner's Guide
Board Profile Editor
The Board Profile Editor can be opened from a drop down menu (Tools --> Board ProfileEditor) on the top of the project window as shown below.

Beginner's Guide
The Board Profile Editor has two sections: supported components and miscellaneous. Toname the board, click "Save" at the bottom of the window.

Beginner's Guide
Warranty Information
AMULET TECHNOLOGIES, LLCWarranty InformationFor a period of one (1) year (ninety (90) days for products with glass) from the date ofshipment, Seller warrants to Buyer that products delivered hereunder shall comply withthe applicable Seller’s Data Sheet or the mutually agreed upon specifications and shall befree from defects in material and workmanship under normal use and service. All otherproducts, including but not limited to products which are “loaners”, “products shippedon consignment”, and/or “prototypes” are sold “AS IS”, “WITH ALL FAULTS”, and with nowarranty whatsoever.If, during the applicable warranty period, (i)Seller is notified promptly in writing upondiscovery of any defect in the products, including a detailed description of such defect;(ii) such products are returned to Seller and Buyer prepays freight cost, accompanied bySeller’s Returned Material Authorization form; and (iii) Seller’s examination of such productsdiscloses to Seller’s satisfaction that such products are defective and such defects arenot caused by accident, abuse, alteration, misuse, neglect, improper installation, repair,improper testing, improper maintenance, negligence, improper handling, inadequatepackaging, damage by excessive voltage or current or otherwise had its serial number or anyother part altered, defaced, or removed or use contrary to any instructions, issued by Seller,Seller shall, at its sole option, either repair or replace such products. No products may bereturned to Seller without Seller’s Returned Material Authorization form. All defective itemsreplaced hereunder shall become the property of the Seller. Any modifications, changes,or alterations to the products by the Distributor or end customer, voids the warranty.The warranty set forth herein cannot be extended, altered, or modified except by writtenamendment to this Agreement. Seller reserves the right at Seller's option to inspect and/orrepair product under warranty claim at Buyer or distributor’s location of business.SELLER HEREBY DISCLAIMS ALL OTHER REPRESENTATIONS AND WARRANTIES, EXPRESSEDOR IMPLIED (EXCEPT THOSE EXPRESSLY SET FORTH IN THIS ARTICLE 7 AS TO THE PRODUCT,INCLUDING, BUT NOT LIMITED TO, ANY IMPLIED WARRANTY OF MERCHANTABILITY OFFITNESS FOR A PARTICULAR PURPOSE. SELLER WILL NOT BE LIABLE FOR ANY DAMAGE, LOSSCOST, OR EXPENSE OR BREACH OF WARRANTY EXCEPT AS AND TO THE EXTENT EXPRESSLYSET FORTH IN THIS ARTICLE 7.BUYER HEREBY WAIVES ALL CLAIMS FOR GENERAL, CONSEQUENTIAL, INCIDENTALOR SPECIAL DAMAGES AND AGREES THAT SELLER’S LIABILITY TO BUYER AND BUYER’SEXCLUSIVE REMEDY ARE EXPRESSLY LIMITED TO THE REPAIR OR REPLACEMENT OFMATERIALS PURSUANT TO THE WARRANTY SET FORTH HEREIN AND SUCH LIABILITY SHALLIN NO EVENT EXCEED THE PURCHASE PRICE FOR SUCH PRODUCT. IN NO EVENT SHALLSELLER BE LIABLE FOR TRANSPORTATION, LABOR, OR OTHER CHARGES FOR ADJUSTMENTS,REPAIRS, REPLACEMENT OF PARTS, INSTALLATION, OR OTHER WORK WHICH MAY BE DONEUPON OR IN CONNECTION WITH SUCH PRODUCTS BY BUYER OR OTHERS.