ge appliances self-cleaning electric ranges · if you do need service, you can relax knowing help...
TRANSCRIPT

GE Appliances
JBP24JBP26JBP30JBP35
Owner’s ManualR
ange
sSe
lf-C
lean
ing
Ele
ctri
c
164D4290P007 49-80038 07-00 JRwww.geappliances.com
Safety InformationAnti-Tip Device . . . . . . . . . . . . . 3Oven . . . . . . . . . . . . . . . . . . . . . 6Safety Precautions . . . . . . . . 3, 4Surface Cooking Units . . . . . . . 5
Operating InstructionsClock and Timer . . . . . . . . . . .11Oven . . . . . . . . . . . . . . . . . .8–10Sabbath Feature . . . . . . . . . . .13Self-Cleaning . . . . . . . . . .15, 16Thermostat . . . . . . . . . . . . . .14Timed Baking and Roasting Features . . . . . .12
Surface Units . . . . . . . . . . . . . . 7
Care and CleaningBroiler Pan & Grid . . . . . . . . . 20Control Knobs . . . . . . . . . . . . 17Lift-Off Oven Door . . . . . . . . . 19Lift-Up Cooktop . . . . . . . . . . . 21Light . . . . . . . . . . . . . . . . . . . .20Shelves . . . . . . . . . . . . . . . . . . 18Storage Drawer Removal . . . . 20Surface Units . . . . . . . . . . . . . 21
Troubleshooting Tips . . . 22–24
Customer ServiceProduct Registration . . . 2, 25, 26Service Telephone Numbers . . . . . . . . . . Back CoverWarranty . . . . . . . . . . . . . . . . . 27
FC updated

Inside you will find many helpful hints on how to use and maintain your range properly. Just a littlepreventive care on your part can save you a great deal of time and money over the life of your range.
READ THIS MANUAL
GE & You, A Service Partnership.
FOR YOUR RECORDSWrite the model and serial numbers here:
#
#
You can find them on a label behind the storage drawer on the front of the range frame.
Staple sales slip or cancelled check here.
Proof of the original purchase date is needed to obtain service under the warranty.
You’ll find many answers to common problems in the Before You Call For Service section. If youreview our chart of Troubleshooting Tips first, you may not need to call for service at all.
If you do need service, you can relax knowing help is only a phone call away. A list of toll-freecustomer service numbers is included in the back section of this manual.
OR
Visit our Website at www.geappliances.com
IF YOU NEED SERVICE
Cust
omer
Ser
vice
Trou
bles
hoot
ing
Tips
Care
and
Cle
anin
gOp
erat
ing
Inst
ruct
ions
Safe
ty In
stru
ctio
ns
2
IMPORTANT!Fill out the Consumer Product Registration Card.
Two Easy Ways To Register Your Appliance!
� Through the internet at www.geappliances.com.
� Complete and mail the enclosed Product Registration Card.

Safety InstructionsOperating Instructions
Safety InstructionsOperating Instructions
Care and CleaningTroubleshooting Tips
Customer Service
IMPORTANT SAFETY INFORMATION.READ ALL INSTRUCTIONS BEFORE USING.
WARNING!For your safety, the information in this manual must be followed to minimize the risk of fire, electric shock, or to prevent property damage, personal injury, or loss of life.
All ranges can tip and injury could result.
To prevent accidental tipping of the range, attach it to the wall and floor by installing the Anti-Tipdevice supplied.
To check if the device is installed and engaged properly, remove the kick panel or storage drawerand inspect the rear leveling leg. Make sure it fits securely into the slot.
If you pull the range out from the wall for any reason, make sure the device is properlyengaged when you push the range back against the wall. If it is not, there is a possible risk ofthe range tipping over and causing injury if you or a child stand, sit or lean on an open door.
Please refer to the Anti-Tip device information in this manual. Failure to take this precautioncould result in tipping of the range and injury.
WARNING ANTI-TIP DEVICE
IMPORTANT SAFETY NOTICEThe California Safe Drinking Water and Toxic Enforcement Act requires the Governor of California topublish a list of substances known to the state to cause cancer, birth defects or other reproductiveharm, and requires businesses to warn customers of potential exposure to such substances.
The fiberglass insulation in self-clean ovens gives off a very small amount of carbon monoxide during the cleaning cycle. Exposure can be minimized by venting with an open window or using a ventilation fan or hood.
Fluorescent light bulbs contain mercury. If your model has a surface light, you must recycle thefluorescent light bulb according to local, state and federal codes.
When using electrical appliances, basic safety precautions should be followed, including the following:
� Use this appliance only for its intendedpurpose as described in this Owner’sManual.
� Be sure your appliance is properlyinstalled and grounded by a qualifiedinstaller in accordance with the providedinstallation instructions.
� Have the installer show you the location of the circuit breaker or fuse. Mark it foreasy reference.
� Do not attempt to repair or replace anypart of your range unless it is specificallyrecommended in this manual. All otherservicing should be referred to a qualifiedtechnician.
� Before performing any service, disconnectthe range power supply at the householddistribution panel by removing the fuse orswitching off the circuit breaker.
� Do not leave children alone—childrenshould not be left alone or unattended inan area where an appliance is in use. Theyshould never be allowed to sit or stand onany part of the appliance.
� Do not allow anyone to climb, stand orhang on the door, storage drawer orcooktop. They could damage the rangeand even tip it over, causing severepersonal injury.
SAFETY PRECAUTIONS
3

4
Cust
omer
Ser
vice
Trou
bles
hoot
ing
Tips
Care
and
Cle
anin
gOp
erat
ing
Inst
ruct
ions
Safe
ty In
stru
ctio
nsIMPORTANT SAFETY INFORMATION.READ ALL INSTRUCTIONS BEFORE USING.
� Do not store flammable materials in anoven or near the cooktop.
� CAUTION: Items of interest tochildren should not be stored in cabinetsabove a range or on the backsplash of arange—children climbing on the range toreach items could be seriously injured.
� Never wear loose-fitting or hanginggarments while using the appliance. Becareful when reaching for items stored over the range. Flammable material couldbe ignited if brought in contact with hotsurface units or heating elements and may cause severe burns.
� Use only dry pot holders—moist or damppot holders on hot surfaces may result inburns from steam. Do not let pot holderstouch hot surface units or heatingelements. Do not use a towel or other bulky cloth in place of pot holders.
� For your safety, never use your appliancefor warming or heating the room.
� Teach children not to play with thecontrols or any other part of the range.
� Always keep dish towels, dish cloths, potholders and other linens a safe distancefrom your range.
� Always keep wooden and plastic utensilsand canned food a safe distance from your range.
� Always keep combustible wall coverings,curtains or drapes a safe distance from your range.
� Do not let cooking grease or otherflammable materials accumulate in or near the range.
� Keep the hood and grease filters clean to maintain good venting and to avoid grease fires.
� Do not use water on grease fires. Neverpick up a flaming pan. Turn the controlsoff. Smother a flaming pan on a surfaceunit by covering the pan completely with awell-fitting lid, cookie sheet or flat tray. Usea multi-purpose dry chemical or foam-typefire extinguisher.
� Flaming grease outside a pan can be putout by covering it with baking soda or, ifavailable, by using a multi-purpose drychemical or foam-type fire extinguisher.
� Flame in the oven can be smotheredcompletely by closing the oven door andturning the oven off or by using a multi-purpose dry chemical or foam-type fireextinguisher.
� Do not touch the surface units, theheating elements or the interior surface of the oven. These surfaces may be hotenough to burn even though they are darkin color. During and after use, do nottouch, or let clothing or other flammablematerials contact the surface units, areasnearby the surface units or any interiorarea of the oven; allow sufficient time forcooling first.
� Potentially hot surfaces include thecooktop, areas facing the cooktop, ovenvent opening, surfaces near the opening,crevices around the oven door.
� REMEMBER: The inside surface of the ovenmay be hot when the door is opened.
� Do not store or use combustible materials,gasoline or other flammable vapors andliquids in the vicinity of this or any otherappliance.
WARNING!SAFETY PRECAUTIONS
Cook meat and poultry thoroughly—meat to at least an INTERNAL temperature of 160°F. and poultry to at leastan INTERNAL temperature of 180°F. Cooking to these temperatures usually protects against foodborne illness.
COOK MEAT AND POULTRY THOROUGHLY…

5
Safety InstructionsOperating Instructions
Safety InstructionsOperating Instructions
Care and CleaningTroubleshooting Tips
Customer Service
Use proper pan size—select cookware having flat bottoms large enough to cover the surface unit heating element. The use of undersized cookware will expose a portion of the surface unit to directcontact and may result in ignition of clothing. Proper relationship of cookware to surface unit will alsoimprove efficiency.
SURFACE COOKING UNITS
� Never leave the surface units unattendedat high heat settings. Boilovers causesmoking and greasy spillovers that maycatch on fire.
� Do not use aluminum foil to line the drippans or anywhere in the oven except asdescribed in this manual. Misuse could result in a shock, fire hazard or damage to the range.
� Be sure the drip pans and the vent ductare not covered and are in place. Theirabsence during cooking could damagerange parts and wiring.
� Only certain types of glass, glass ⁄ceramic,earthenware or other glazed containers aresuitable for cooktop service; others maybreak because of the sudden change intemperature.
� To minimize the possibility of burns,ignition of flammable materials andspillage, the handle of a container should be turned toward the center of the range without extending over nearby surface units.
� Always turn the surface units off beforeremoving cookware.
� Do not immerse or soak the removablesurface units. Do not put them in adishwasher. Do not self-clean the surfaceunits in the oven.
� When preparing flaming foods under thehood, turn the fan on.
� To avoid the possibility of a burn orelectric shock, always be certain that thecontrols for all surface units are at the OFF position and all coils are cool beforeattempting tolift or remove a unit.
� Clean the cooktop with caution. If a wetsponge is used to wipe spills on a hotcooktop, be careful to avoid steam burns.
� Keep an eye on foods being fried at highor medium high heat settings.
� Foods for frying should be as dry aspossible. Frost on frozen foods or moistureon fresh foods can cause hot fat to bubbleup and over the sides of the pan.
� Use little fat for effective shallow or deepfat frying. Filling the pan too full of fat cancause spillovers when food is added.
� If a combination of oils or fats will be usedin frying, stir together before heating, or asfats melt slowly.
� Always heat fat slowly, and watch as it heats.
� Use a deep fat thermometer wheneverpossible to prevent overheating fat beyondthe smoking point.

6
Cust
omer
Ser
vice
Trou
bles
hoot
ing
Tips
Care
and
Cle
anin
gOp
erat
ing
Inst
ruct
ions
Safe
ty In
stru
ctio
ns
READ AND FOLLOW THIS SAFETY INFORMATION CAREFULLY.SAVE THESE INSTRUCTIONS
IMPORTANT SAFETY INFORMATION.READ ALL INSTRUCTIONS BEFORE USING.
� Do not heat unopened food containers.Pressure could build up and the containercould burst, causing an injury.
� Keep the oven vent unobstructed.
� Keep the oven free from grease buildup.
� Place the oven shelf in the desired positionwhile the oven is cool. If shelves must behandled when hot, do not let pot holdercontact the heating elements.
� Pulling out the shelf to the stop-lock is aconvenience in lifting heavy foods. It is alsoa precaution against burns from touchinghot surfaces of the door or oven walls.
� When using cooking or roasting bags in the oven, follow the manufacturer’sdirections.
� Do not use the oven to dry newspapers. If overheated, they can catch on fire.
� Do not use the oven for a storage area.Items stored in an oven can ignite.
� Do not leave paper products, cookingutensils or food in the oven when not in use.
� Do not use aluminum foil to line ovenbottoms, except as suggested in thismanual. Improper installation ofaluminum foil may result in a risk ofelectric shock or fire.
Stand away from the range when opening the oven door. Hot air or steam which escapes can causeburns to hands, face and/or eyes.
WARNING! OVEN
Do not use oven cleaners. No commercial oven cleaner or oven liner protective coating of any kindshould be used in or around any part of the oven. Residue from oven cleaners will damage the insideof the oven when the self-clean cycle is used.
� Do not clean the door gasket. The doorgasket is essential for a good seal. Careshould be taken not to rub, damage ormove the gasket.
� Before self-cleaning the oven, remove thebroiler pan, grid and other cookware.
� Be sure to wipe up excess spillage beforestarting the self-cleaning operation.
� If the self-cleaning mode malfunctions,turn the oven off and disconnect the power supply. Have it serviced by aqualified technician.
� Clean only parts listed in this Owner’sManual.
SELF-CLEANING OVEN

7
Safety InstructionsOperating Instructions
Safety InstructionsOperating Instructions
Care and CleaningTroubleshooting Tips
Customer Service
Using the surface units.Throughout this manual, features and appearance may vary from your model.
How to SetPush the knob in and turn in eitherdirection to the setting you want.
At both OFF and HI the control clicksinto position. You may hear slightclicking sounds during cooking,indicating the control is maintaining yourdesired setting.
A surface unit ON indicator light willglow when any surface unit is on.
Be sure you turn the control knob toOFF when you finish cooking.
Surface Cookware TipsUse medium- or heavy-weight cookware.Aluminum cookware conducts heat fasterthan other metals. Cast-iron and coatedcast-iron cookware are slow to absorbheat, but generally cook evenly at low tomedium heat settings. Steel pans maycook unevenly if not combined with other metals.
For best cooking results, pans should beflat on the bottom. Match the size of thesaucepan to the size of the surface unit.The pan should not extend over theedge of the surface unit more than 1″.
Not over 1 inch
1″
Home Canning TipsBe sure the canner is centered over thesurface unit.
Make sure the canner is flat on thebottom.
Use recipes and procedures fromreputable sources. These are availablefrom manufacturers such as Ball® andKerr® and the Department of AgricultureExtension Service.
To prevent burns from steam or heat, use caution when canning.
Use only flat-bottomed woks.
Wok CookingWe recommend that you use only a flat-bottomedwok. They are available at your local retail store.
Do not use woks that have support rings.
Placing the ring over the surface unit willcause a build-up of heat that will damagethe porcelain cooktop.
Do not use round bottom woks. Youcould be seriously burned if the woktipped over.

8
Cust
omer
Ser
vice
Trou
bles
hoot
ing
Tips
Care
and
Cle
anin
gOp
erat
ing
Inst
ruct
ions
Safe
ty In
stru
ctio
ns Using the oven controls.Throughout this manual, features and appearance may vary from your model.
Oven Control, Clock and Timer Features and SettingsOn some models, opening the oven door will not automatically turn the oven light on. You may use theoven light switch to turn the light on and off.
COOK TIME ON/OFF PadPress this pad and then press the HOUR and MIN. pads to set the amount of time you want your food to cook. Turn the Oven Temperature knob to the desiredtemperature. The oven will shut off whenthe Cook Time has run out.
TIMER ON/OFF PadPress this pad to select the timer feature.
AUTOMATIC OVEN LightThis lights anytime the oven has beenprogrammed to automatically turn on or off.
HOUR and MIN. PadsThese pads allow you to set times up to 11 hours and 59 minutes.
As a safety feature, this oven will automatically shutoff after 12 hours. On models with touch pad clockcontrols this feature may be deactivated to allow theoven to be left on for more than 12 hours.
To deactivate or reactivate the Automatic OvenShut-Off, press and hold both the MIN. +/– pads forabout 4 seconds.
OVEN ON LightGlows anytime the oven is heating. The light will flash when the oven automaticallyturns off to remind you to turn the OvenTemperature knob to OFF.
Oven Temperature KnobTurn this knob to the setting you want. (On some models, you must push the knobin before turning.) The temperature will bedisplayed to indicate setting. Display willchange back to time after a few seconds.
PREHEATED LightGlows when the oven reaches your selectedtemperature.
CLEAN LightGlows when the oven is in the self-cleancycle. After the self-clean cycle, the light willflash. Unlatch the door and turn the OvenTemperature knob to OFF.
Do not lock the oven door with the latch duringcooking. The latch is used for self-cleaning only.
TEMP RECALLPress the – pad above TEMP RECALL todisplay the selected oven temperature.
DisplayShows the time of day and the time set for the timer.
If “F—and a number or letter” flash in the displayand the oven control signals, this indicates a functionerror code.
If your oven was set for a timed oven operation and a power outage occurred, the clock and allprogrammed functions must be reset.
The time of day will flash in the display when therehas been a power outage.
CLOCK PadPress this pad before setting the clock.
START TIME ON/OFF PadPress this pad and the HOUR and MIN.pads to delay the starting of your oven up to 11 hours and 59 minutes.
Safety InstructionsOperating Instructions
Safety InstructionsOperating Instructions
Care and CleaningTroubleshooting Tips
Customer Service
9
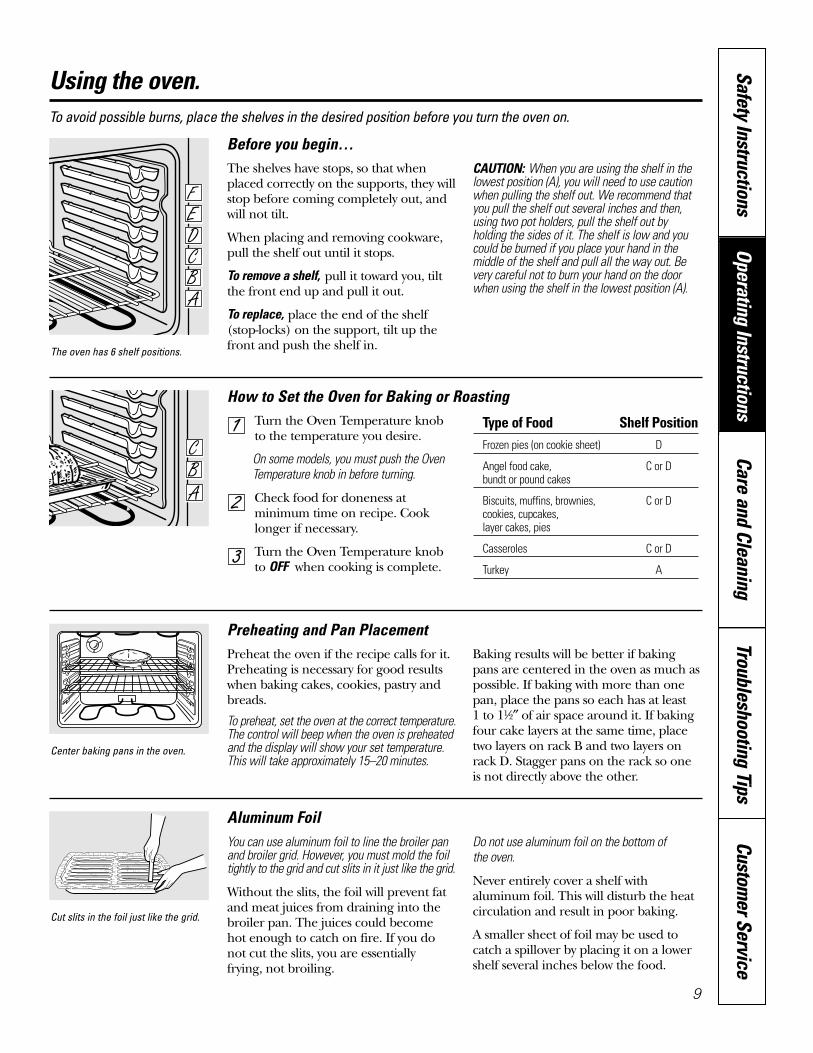
Preheating and Pan PlacementPreheat the oven if the recipe calls for it. Preheating is necessary for good resultswhen baking cakes, cookies, pastry andbreads.
To preheat, set the oven at the correct temperature.The control will beep when the oven is preheatedand the display will show your set temperature.This will take approximately 15–20 minutes.
Baking results will be better if bakingpans are centered in the oven as much aspossible. If baking with more than onepan, place the pans so each has at least 1 to 11⁄2″ of air space around it. If bakingfour cake layers at the same time, placetwo layers on rack B and two layers onrack D. Stagger pans on the rack so one is not directly above the other.
Using the oven.To avoid possible burns, place the shelves in the desired position before you turn the oven on.
Before you begin…The shelves have stops, so that whenplaced correctly on the supports, they willstop before coming completely out, andwill not tilt.
When placing and removing cookware, pull the shelf out until it stops.
To remove a shelf, pull it toward you, tiltthe front end up and pull it out.
To replace, place the end of the shelf(stop-locks) on the support, tilt up thefront and push the shelf in.
CAUTION: When you are using the shelf in thelowest position (A), you will need to use cautionwhen pulling the shelf out. We recommend thatyou pull the shelf out several inches and then,using two pot holders, pull the shelf out byholding the sides of it. The shelf is low and youcould be burned if you place your hand in themiddle of the shelf and pull all the way out. Bevery careful not to burn your hand on the doorwhen using the shelf in the lowest position (A).
The oven has 6 shelf positions.
How to Set the Oven for Baking or RoastingTurn the Oven Temperature knobto the temperature you desire.
On some models, you must push the OvenTemperature knob in before turning.
Check food for doneness atminimum time on recipe. Cooklonger if necessary.
Turn the Oven Temperature knobto OFF when cooking is complete.
Type of Food Shelf PositionFrozen pies (on cookie sheet) D
Angel food cake, C or Dbundt or pound cakes
Biscuits, muffins, brownies, C or Dcookies, cupcakes, layer cakes, pies
Casseroles C or D
Turkey A
Aluminum FoilYou can use aluminum foil to line the broiler panand broiler grid. However, you must mold the foiltightly to the grid and cut slits in it just like the grid.
Without the slits, the foil will prevent fatand meat juices from draining into thebroiler pan. The juices could become hot enough to catch on fire. If you do not cut the slits, you are essentially frying, not broiling.
Do not use aluminum foil on the bottom of the oven.
Never entirely cover a shelf withaluminum foil. This will disturb the heatcirculation and result in poor baking.
A smaller sheet of foil may be used tocatch a spillover by placing it on a lowershelf several inches below the food.
Cut slits in the foil just like the grid.
Center baking pans in the oven.

10
Cust
omer
Ser
vice
Trou
bles
hoot
ing
Tips
Care
and
Cle
anin
gOp
erat
ing
Inst
ruct
ions
Safe
ty In
stru
ctio
ns Using the oven.Do not latch the oven door during broiling. The latch is used for self-cleaning only.
How to Set the Oven for BroilingPlace the meat or fish on the broilergrid in the broiler pan.
Follow suggested shelf positions inthe Broiling Guide.
If your range is connected to 208 volts, raresteaks may be broiled by preheating the broilerand positioning the oven shelf one positionhigher.
Use LO Broil to cook foods such aspoultry or thick cuts of meat thoroughlywithout over-browning them.
Turn the Oven Temperature knob to BROIL.
On some models, you must push the OvenTemperature knob in before turning.
When broiling is finished, turn theOven Temperature knob to OFF.
Leave the door open to the broilstop position. The door stays openby itself, yet the proper temperatureis maintained in the oven.
Quantity and/ Shelf First Side Second SideFood or Thickness Position Time (min.) Time (min.) Comments
Ground Beef 1 lb. (4 patties) D 13 8 Space evenly. 1/2 to 3/4″ thick4 lbs. (12 patties) D 15 11
Beef SteaksRare† 3/4 to 1″ thick F 6 4 Steaks less than 3/4″Medium 1 to 1 1/2 lbs. E 8 6 thick are difficult Well Done E 10 8 to cook rare.
Slash fat.Rare† 1 1/2″ thick D 10 8Medium 2 to 2 1/2 lbs. D 15 10–12Well Done E 20 20Chicken 1 whole cut up C 25 25 Brush each side with
2 to 2 1⁄2 lbs., melted butter.split lengthwise Broil skin-side-downBreast C 25 15 first.
Bakery ProductBread (toast) 2 to 4 slices E 3 1 Space evenly. PlaceEnglish Muffin 2 (split) F 3-4 English muffins cut-
side-up and brush with butter if desired.
Lobster Tails 2–4 C 18–20 Do not Cut through back of turn shell. Spread open. over. Brush with melted
butter before broiling and after half of broiling time.
Fish Fillets 1 lb. (1/4 to 1/2″ thick) E 5 5 Handle and turn very carefully. Brush with lemon butter before and during cooking,if desired.
SalmonSteaks 2 (1″ thick) E 10 5 Turn carefully. Do notFillets 2 (1/2 to 3/4″ thick) E 10 turn skin side down.Ham Slices 1/2″ thick D 6 6(precooked) 1″ thick D 8 8Pork Chops 2 (1/2″ thick) D 10 10 Slash fat.Well Done 2 (1″ thick) about 1 lb. D 15 15Lamb ChopsMedium 2 (1″ thick) about 10 E 7 4 Slash fat.Well Done to 12 oz. E 10 9Medium 2 (11/2″ thick) about 1 lb. E 9 6Well Done E 14 10
Broiling Guide
The size, weight, thickness,starting temperature, and your preference of doneness will affectbroiling times. This guideis based on meats atrefrigerator temperature.
† The U.S. Department ofAgriculture says “Rare beef ispopular, but you should know thatcooking it to only 140°F. meanssome food poisoning organismsmay survive.” (Source: Safe FoodBook. Your Kitchen Guide. USDARev. June 1985.)

11
Safety InstructionsOperating Instructions
Safety InstructionsOperating Instructions
Care and CleaningTroubleshooting Tips
Customer Service
Using the clock and timer.Not all features are on all models.
To Set the ClockThe clock must be set to the correct timeof day for the automatic oven timingfunctions to work properly. The time ofday cannot be changed during a timedbaking or self-cleaning cycle.
Press the CLOCK pad.
Press the HOUR and MIN. pads untilthe time of day shows in the display.
Make sure the clock is set to thecorrect time of day.
To Set the TimerPress the TIMER ON/OFF pad. Press the HOUR and MIN. pads until
the amount of time you want showsin the display. The timer will startautomatically within a few seconds ofreleasing the pad.The timer is a minute timer only.
The timer does not control ovenoperations. The maximum setting on the timer is 11 hours and 59 minutes.
End of Cycle TonesClear the tones by pressing the pad ofthe function you are using.
or
To Reset the TimerIf the display is still showing the timeremaining, you may change it by pressingthe HOUR and MIN. pads until the timeyou want appears in the display.
If the remaining time is not in the display,recall the remaining time by pressing theTIMER ON/OFF pad and then pressing theHOUR and MIN. pads until the new timeyou want shows in the display.
To Cancel the TimerPress the TIMER ON/OFF pad twice.
To Black-Out the ClockIf you have several clocks in your kitchen,you may wish to black-out the time of daydisplay of your range. If so, press the CLOCK pad.
Press the CLOCK pad twice to retain the time ofday after a black-out.
Although you cannot see it, the clockmaintains the correct time of day. It willreappear for the duration of any functionthat displays a Start Time or Cook Time.Press the CLOCK pad again to bring back the display.

12
Cust
omer
Ser
vice
Trou
bles
hoot
ing
Tips
Care
and
Cle
anin
gOp
erat
ing
Inst
ruct
ions
Safe
ty In
stru
ctio
ns Using the timed baking and roasting features.Do not latch the oven door during timed cooking. The latch is used for self-cleaning only.
NOTE: Foods that spoil easily–such as milk, eggs, fish, stuffings, poultry and pork–should not be allowed to sit formore than 1 hour before or after cooking. Room temperature promotes the growth of harmful bacteria. Be sure thatthe oven light is off because heat from the bulb will speed harmful bacteria growth.
How to Set an Immediate Start and Automatic StopThe oven will turn on immediately and cook for aselected length of time. At the end of the cookingtime the oven will turn off automatically.
Press the COOK TIME ON/OFF pad.
Using the HOUR and MIN. pads,enter the length of cooking time.
Turn the Oven Temperature knobto the desired temperature.
On some models, you must push the OvenTemperature knob in before turning.
The display will show the cooking timeremaining. When the oven reaches theset temperature, a tone sounds.
When the oven automatically turns offthe AUTOMATIC OVEN light will flash and the oven will signal. Turn the oven control to OFF to stop the flashesand signal.
How to Set a Delayed Start and Automatic StopYou can set the oven control to delay-start theoven, cook for a specific length of time and thenturn off automatically.
Make sure the clock shows the correcttime of day.
Press the START TIME ON/OFF pad.
Using the HOUR and MIN. pads,enter the time you want cooking to start.
Press the COOK TIME ON/OFF pad.
Using the HOUR and MIN. pads,enter the length of cooking time.
Turn the Oven Temperature knob to the desired temperature.
On some models, you must push the OvenTemperature knob in before turning.
When the oven automatically turns offthe AUTOMATIC OVEN light will flash and the oven will signal. Turn the oven control to OFF to stop the flashesand signal.

Safety InstructionsOperating Instructions
Safety InstructionsOperating Instructions
Care and CleaningTroubleshooting Tips
Customer Service
13
Using the Sabbath Feature. (Designed for use on the Jewish Sabbath and Holidays.)(On some models)
The Sabbath feature can be used for baking/roasting only. It cannot be used for broiling, self-cleaning, or Delay Start cooking.
NOTE: The oven light comes on automatically (on some models) when the door is opened and goes off when thedoor is closed. The bulb may be removed. See the Oven Light Replacement section. On models with a light switch on the control panel, the oven light may be turned on and left on.
How to Set for Regular Baking/RoastingMake sure the clock shows the correct time of day.
Press and hold both the MIN. + AND -pads, at the same time, until the displaychanges.
Press and hold either the MIN. + OR -pad until the display changes, thenrelease the pad. If SAb appears in thedisplay, go to the next step. If SAb is notin the display, continue to press, holdand release the pad until SAb appears.
Turn the Oven Temperature knob to the desired temperature between
warm (WM) and 550°. The display willshow ⊃.
After a random delay period ofapproximately 30 seconds to 1 minute,⊃ will appear in the displayindicating that the oven is baking orroasting. If ⊃ does not appear in the display, reset the temperature. To adjust the oven temperature, turn theOven Temperature knob to the desiredtemperature.
NOTE: The COOK TIME ON/OFF pad is activeduring the Sabbath feature.
⊃
⊃
How to Set for Timed Baking/Roasting - Immediate Start and Automatic StopMake sure the clock shows the correct time of day.
Press and hold both the MIN. + AND -pads, at the same time, until the displaychanges.
Press and hold either the MIN. + OR -pad until the display changes, thenrelease the pad. If SAb appears in thedisplay, go to the next step. If SAb is notin the display, continue to press, holdand release the pad until SAb appears.
Press the COOK TIME ON/OFF pad.
Immediately enter the length of cookingtime, using the HOUR and MIN. pads. The cooking time that you entered willbe displayed.
Turn the Oven Temperature knob to the desired temperature. The display willshow ⊃.After a random delay period ofapproximately 30 seconds to 1 minute,⊃ will appear in the displayindicating that the oven is baking orroasting. If ⊃ does not appear in the display, reset the temperature. To adjust the oven temperature, turn theOven Temperature knob to the desiredtemperature.
When cooking is finished, the display willchange from ⊃ to ⊃, indicating that theoven has turned OFF but is still set in Sabbath.Remove the cooked food.
⊃
⊃
How to Exit the Sabbath FeatureTurn the Oven Temperature knob to OFF.
If the oven is cooking, wait for a randomtime delay of approximately 30 secondsto 1 minute until only ⊃ is in the display.
Press and hold both the MIN. + AND -pads, at the same time, until the displaychanges.
Press and hold either the MIN. + OR -pad until the display changes, thenrelease the pad. Continue to press, holdand release the pad until ON or OFF
appears for your preference of 12 hourautomatic oven shut-off. ON indicatesthat the 12 hour automatic oven shut-offis turned on and OFF indicates that the12 hour automatic oven shut-off isturned off.
Press the CLOCK pad to return to thetime of day.
NOTE: If a power outage occurred when theoven was in Sabbath mode, the oven willautomatically turn off and the oven controlmust be reset.
⊃

14
Cust
omer
Ser
vice
Trou
bles
hoot
ing
Tips
Care
and
Cle
anin
gOp
erat
ing
Inst
ruct
ions
Safe
ty In
stru
ctio
ns Adjust the oven thermostat—Do it yourself!You may find that your new oven cooks differently than the one it replaced. Use your new oven for a few weeks to become more familiar with it. If you still think your new oven is too hot or too cold, you can adjust the thermostat yourself.
Do not use thermometers, such as those found in grocery stores, to check the temperature setting of your oven.These thermometers may vary 20–40°F.
To Adjust the ThermostatPut the Oven Temperature knob inthe OFF position.
Press and hold the HOUR +/– padsfor 5 seconds until the displaychanges.
Before display changes back, pressthe HOUR +/– pads to increase ordecrease the temperature in 5°increments.
The oven temperature can be adjustedup as much as 35°F. or down as much as 35°F.
If the oven adjustment is set cooler than the factory setting a minus sign (–)and the adjusted temperature will appearin the display.
Wait several seconds for the controlto automatically set and return to itsprevious setting.
NOTE: This adjustment will not affect thebroiling or the self-cleaning temperatures. Theadjustment will be retained after a power failure.
The type of margarine will affect baking performance!Most recipes for baking have been developed using high fat products such as butter or margarine (80% fat). If youdecrease the fat, the recipe may not give the same results as with a higher fat product.
Recipe failure can result if cakes, pies, pastries, cookies or candies are made with low fat spreads. The lower the fatcontent of a spread product, the more noticeable these differences become.
Federal standards require products labeled “margarine” to contain at least 80% fat by weight. Low fat spreads, on theother hand, contain less fat and more water. The high moisture content of these spreads affects the texture and flavorof baked goods. For best results with your old favorite recipes, use margarine, butter or stick spreads containing at least70% vegetable oil.

15
Safety InstructionsOperating Instructions
Care and CleaningTroubleshooting Tips
Customer Service
Using the self-cleaning oven.Never force the latch handle. Forcing the handle will damage the door lock mechanism.
Before a Clean CycleWe recommend venting your kitchenwith an open window or using aventilation fan or hood during the firstself-clean cycle.
Remove the shelves, broiler pan, broilergrid, all cookware and any aluminum foilfrom the oven.
The oven shelves can be self-cleaned, butthey will darken, lose their luster andbecome hard to slide.
Soil on the front frame of the range andoutside the gasket on the door will needto be cleaned by hand. Clean these areaswith hot water, soap-filled steel-wool padsor cleansers such as Soft Scrub.® Rinsewell with clean water and dry.
Do not clean the gasket. The fiberglassmaterial of the oven door gasket cannotwithstand abrasion. It is essential for thegasket to remain intact. If you notice itbecoming worn or frayed, replace it.
Wipe up any heavy spillovers on the oven bottom.
Make sure the oven light bulb cover is in place and the oven light is off.
IMPORTANT: The health of some birds is extremely sensitive to the fumes givenoff during the self-cleaning cycle of anyrange. Move birds to another wellventilated room.
Wipe up heavy soil on the ovenbottom.
How to Set the Oven for CleaningLatch the door.
Turn the Oven Temperature knob to CLEAN.
On some models, you must push the OvenTemperature knob in before turning.
Clean cycle time is normally 4 hours.
On models with COOK TIME and STARTTIME pads, you can change the clean time to between 3 hours and 5 hours, 59 minutes by using the HOUR and MIN.pads. The display will show the clean timecounting down.
When the CLEAN light flashes, slide thelatch handle to the left, and turn theOven Temperature knob to OFF.
To stop a clean cycle, turn the OvenTemperature knob to OFF. Wait until theoven has cooled and unlatch the door.

16
Cust
omer
Ser
vice
Trou
bles
hoot
ing
Tips
Care
and
Cle
anin
gOp
erat
ing
Inst
ruct
ions
Safe
ty In
stru
ctio
ns Using the self-cleaning oven.How to Delay the Start of Cleaning
Make sure the clock shows the correcttime of day.
Latch the door.
Turn the Oven Temperature knob to CLEAN.
On some models, you must push the OvenTemperature knob in before turning.
Press the START TIME ON/OFF pad.
Press the HOUR and MIN. pads to setthe time cleaning will start.
When the CLEAN light flashes, slide the latch handle to the left as far as it will go and turn the Oven Temperatureknob to OFF.
After a Clean CycleYou may notice some white ash in theoven. Wipe it up with a damp cloth afterthe oven cools.
If white spots remain, remove them with a soap-filled steel wool pad and rinse thoroughly with avinegar and water mixture.
These deposits are usually a salt residuethat cannot be removed by the cleancycle.
If the oven is not clean after one cleancycle, repeat the cycle.
� You cannot set the oven for cookinguntil the oven is cool enough for thedoor to be unlatched.
� While the oven is self-cleaning, you canpress the CLOCK pad to display thetime of day. To return to the cleancountdown, press the COOK TIMEON/OFF pad.
� If the shelves become hard to slide,apply a small amount of vegetable oil orcooking oil to a paper towel and wipethe edges of the oven shelves with thepaper towel.

Safety InstructionsOperating Instructions
Safety InstructionsOperating Instructions
Care and CleaningTroubleshooting Tips
Customer Service
Care and cleaning of the range.Be sure all controls are off and all surfaces are cool before cleaning any part of the range.
If your range is removed for cleaning, servicing or any reason, be sure the anti-tipdevice is re-engaged properly when the range is replaced. Failure to take thisprecaution could result in tipping of the range and cause injury.
How to Remove Packaging TapeTo assure no damage is done to the finishof the product, the safest way to removethe adhesive left from packaging tape onnew appliances is an application of ahousehold liquid dishwashing detergent,mineral oil or cooking oil.
Apply with a soft cloth and allow to soak.Wipe dry and then apply an appliancepolish to thoroughly clean and protectthe surface.
NOTE: The plastic tape (on some models) mustbe removed from all chrome trim. It cannot beremoved if it is baked on.
Oven Heating ElementsDo not clean the bake element or the broilelement. Any soil will burn off when the elements are heated.
To clean the oven floor, gently lift the bake element. Clean with warm soapy water.
Control KnobsTo Remove:
Be sure the knob is in the OFFposition.
Pull straight off the stem. Using apiece of string can make removingthe knob easier. Slip the stringunder and around the knob, pullstraight out.
Wash the knob thoroughly with warm soapywater. Dry completely with a soft cloth. DO NOTlet the knob soak.
To Replace:Check the back of the knob.
The molded rib of the knob isdesigned to fit perfectly onto theknob stem.
Align the molded rib to the cleargroove in the knob stem. Push theknob back as far as it will go.
Control Panel� Clean up splatters with a damp cloth.
� You may also use a glass cleaner.
� Remove heavier soil with warm soapy water.
� Do not use abrasives of any kind.
Molded rib
Spring clip
Clear groove instem
17

18
Cust
omer
Ser
vice
Trou
bles
hoot
ing
Tips
Care
and
Cle
anin
gOp
erat
ing
Inst
ruct
ions
Safe
ty In
stru
ctio
ns Care and cleaning of the range.Oven ShelvesClean the oven shelves with an abrasivecleanser or steel wool. After cleaning,rinse the shelves with clean water and drywith a clean cloth.
NOTE: The oven shelves may be cleaned in theself-cleaning oven. However, the shelves willdarken in color, lose their luster and become hardto slide if cleaned during the self-cleaning cycle.
To make the shelves slide more easilyapply a small amount of vegetable oil or cooking oil to a paper towel and wipethe edges of the oven shelves with thepaper towel.
Painted SurfacesPainted surfaces include the sides, top of backguard and the drawer front.
Clean these with soap and water or avinegar and water solution.
Do not use commercial oven cleaners,cleaning powders, steel wool or harshabrasives on any painted surface.
Porcelain Enamel CooktopThe porcelain enamel finish is sturdy butbreakable if misused. This finish is acid-resistant. However, any acidic foodsspilled (such as fruit juices, tomato orvinegar) should not be permitted toremain on the finish.
If acids spill on the cooktop while it ishot, use a dry paper towel or cloth towipe it up right away. When the surfacehas cooled, wash with soap and water.Rinse well.
For other spills such as fat spatterings,wash with soap and water or cleansingpowders after the surface has cooled.Rinse well. Polish with a dry cloth.
Oven Vent The oven is vented through an openingunder the right rear surface unit.
This area could become hot during oven use.
It is normal for steam to come out of thevent and moisture may collect underneathwhen the oven is in use.
The vent is important for proper aircirculation.
Never block this vent.

Safety InstructionsOperating Instructions
Safety InstructionsOperating Instructions
Care and CleaningTroubleshooting Tips
Customer Service
19
Lift-Off Oven DoorThe oven door is removable for easieraccess to the light bulb.
Do not lift the door by the handle.
To remove the door:
Fully open the door.
Each hinge has a hinge lock. Usinga tool, pull the hinge locks downagainst the door frame.
Firmly grasp the door at the topsides.
Close the door to the stop position.
Lift the door up and pull straightout.
To replace the door:
Firmly grasp the door at the topsides. This is critical.
Approach the range with the doorangled in a vertical position.
Guide the hinges into the slots.
Push door in firmly while opening.
Once in position, open the doorcompletely. Push the hinge locksback in towards the front frame.
To clean the inside of the door:
� Because the area inside the gasket iscleaned during the self-clean cycle, youdo not need to clean this by hand.
� The area outside the gasket and thedoor liner can be cleaned with a soap-filled steel wool or plastic pad, hotwater and detergent. Rinse well with a vinegar and water solution.
To clean the outside of the door:
� Use soap and water to thoroughlyclean the top, sides and front of theoven door. Rinse well. You may also usea glass cleaner to clean the glass on theoutside of the door. Do not let waterdrip into the vent openings.
� If any stain on the door vent trim ispersistent, use a soft abrasive cleanerand a sponge-scrubber for best results.
� Spillage of marinades, fruit juices,tomato sauces and basting materialscontaining acids may causediscoloration and should be wiped upimmediately. When surface is cool,clean and rinse.
� Do not use oven cleaners, cleaningpowders or harsh abrasives on the outside of the door.
The gasket is designed with a gapat the bottom to allow for proper aircirculation.Do not rub or clean the doorgasket—it has an extremely lowresistance to abrasion. If you notice the gasket becomingworn, frayed or damaged in anyway or if it has become displacedon the door, you should have itreplaced.
Pull the hinge locks down to theunlocked position.
Unlockedposition
Locked position

20
Cust
omer
Ser
vice
Trou
bles
hoot
ing
Tips
Care
and
Cle
anin
gOp
erat
ing
Inst
ruct
ions
Safe
ty In
stru
ctio
ns Care and cleaning of the range.Oven Light Replacement
CAUTION: Before replacing your ovenlight bulb, disconnect the electricalpower to the range at the main fuse or circuit breaker panel.
Be sure to let the light cover and bulbcool completely.
To remove the cover:
Hold a hand under the cover so itdoesn’t fall when released. Withfingers of the same hand, firmlypush back the wire cover holder. Lift off the cover.
Do not remove any screws to remove the cover.
Replace bulb with a 40-wattappliance bulb.
To replace the cover:
Place it into groove of the lightreceptacle. Pull wire forward to the center of the cover until it snaps into place.
Connect electrical power to the range.Wire cover holder.
Broiler Pan & GridDo not clean the broiler pan or grid in a self-cleaning oven.
After broiling, remove the broiler panfrom the oven. Remove the grid from thepan. Carefully pour out the grease fromthe pan into a proper container.
Wash and rinse the broiler pan and gridin hot water with a soap-filled or plasticscouring pad.
If food has burned on, sprinkle the gridwith detergent while hot and cover withwet paper towels or a dishcloth. Soakingthe pan will remove burned-on foods.
Both the broiler pan and grid may becleaned with a commercial oven cleaner.
Both the broiler pan and grid can also becleaned in a dishwasher.
Do not store a soiled broiler pan and gridanywhere in the range.
After broiling, remove the broilerpan from the oven.
Storage Drawer RemovalTo remove the drawer:
Pull the drawer out until it stops.
Lift the front of the drawer until thestops clear the guides.
Remove the drawer.
To replace the drawer:
Place the drawer rails on the guides.
Push the drawer back until it stops.
Lift the front of the drawer andpush back until the stops clear theguides.
Lower the front of the drawer andpush back until it closes.
Stop guideRail

21
Safety InstructionsOperating Instructions
Care and CleaningTroubleshooting Tips
Customer Service
Safety InstructionsOperating Instructions
Troubleshooting Tips
Be sure the controls are turned to OFF and the surface units are cool before attempting to remove them.
Surface UnitsTo clean the surface units, turn thecontrol to the highest setting for aminute. The coils will burn off any soil.
To remove a surface unit:
To remove the drip pans for cleaning, the surface units must be removed first.
Lift the surface unit about 1″ above the drip pan and pull it out.
Do not lift the surface unit more than 1″. If youdo, it may not lie flat on the drip pan when youplug it back in.
NOTE: Repeated lifting of the surface unitmore than 1″ above the drip pan canpermanently damage the receptacle.
To replace a surface unit:
Replace the drip pan into the recess inthe cooktop. Make sure the opening inthe pan lines up with the receptacle.
Insert the terminals of the surface unitthrough the opening in the drip pan andinto the receptacle.
Guide the surface unit into place so it rests evenly.
Do not immerse the surface units in liquids of any kind.
Do not clean the surface units in a dishwasher.
Do not bend the surface unit plug terminals.
Do not attempt to clean, adjust or in any wayrepair the plug-in receptacle.
Drip PansRemove the surface units. Then lift outthe drip pans.
For best results, clean the drip pans byhand. Place them in a covered container (or a plastic bag) with 1/4 cup ammoniato loosen the soil. Then scrub with asoap-filled scouring pad if necessary.Rinse with clean water and polish with a clean soft cloth.
The drip pans may also be cleaned in a dishwasher.
Clean the area under the drip pans often. Built-up soil, especially grease, may catch fire.
Do not cover the drip pans with foil. Using foil soclose to the receptacle could cause shock, fire ordamage to the range.
Surface unit
Drip panReceptacle
Lift-Up CooktopSome models have a cooktop that can be lifted upfor easier cleaning. The entire cooktop may belifted up and supported in the up position.
The surface units do not need to beremoved; however, you may remove one to make raising the cooktop easier.There are two side supports that lock intoposition when the cooktop is lifted up.
After cleaning under the cooktop withhot, mild soapy water and a clean cloth,lower the cooktop. Be careful not topinch your fingers.
To lower the cooktop, push the rods backand gently lower the cooktop until it rests in place.Be sure all surface units are turned
off before raising the cooktop.

22
Cust
omer
Ser
vice
Trou
bles
hoot
ing
Tips
Care
and
Cle
anin
gOp
erat
ing
Inst
ruct
ions
Safe
ty In
stru
ctio
ns Before You Call For Service…Troubleshooting Tips
Problem Possible Causes What To DoSurface units not The surface units are • With the controls off, check to make sure the surface functioning properly not plugged in solidly. unit is plugged completely into the receptacle.
The surface unit controls • Check to see the correct control is set for the surfaceimproperly set. unit you are using.
The drip pans are not set • With the controls off, check to make sure the drip securely in the cooktop. pan is in the recess in the cooktop and that the
opening in the pan lines up with the receptacle.
The display goes Power surge. • Disconnect power at the fuse box or circuit breakerblank or indicator for at least 10 seconds. Turn power on and power lights come on when up your range. If the indicator lights are still on, range is not in use call for service.
Clock and timer do Plug on range is not completely • Make sure electrical plug is plugged into a live, properlynot work inserted in the electrical outlet. grounded outlet.
A fuse in your home • Replace the fuse or reset the circuit breaker.may be blown or thecircuit breaker tripped.
Oven controls improperly set. • See the Using the clock and timer section.
Oven light does Light bulb is loose or defective. • Tighten or replace the bulb.not work Switch operating light • Call for service.
is broken.
Oven will not work Plug on range is not completely • Make sure electrical plug is plugged into a live, properlyinserted in the electrical outlet. grounded outlet.
A fuse in your home may be • Replace the fuse or reset the circuit breaker.blown or the circuit breaker tripped.
Oven controls improperly set. • See the Using the oven section.
Door left in the locked • If necessary, allow the oven to cool then unlock position. the door.
Food does not bake Oven controls improperly set. • See the Using the oven section.or roast properly
Shelf position is incorrect • See the Using the oven section.or the shelf is not level.
Incorrect cookware or • See the Using the oven section.cookware of improper size being used.
Oven thermostat needs • See the Adjust the oven thermostat—Do it yourself!adjustment. section.

Safety InstructionsOperating Instructions
Safety InstructionsOperating Instructions
Care and CleaningTroubleshooting Tips
Customer Service
Problem Possible Causes What To DoFood does not Oven controls improperly set. • Make sure you turn the knob all the way to the broil properly BROIL position.
Door not open to the • See the Using the oven section.broil stop position as recommended.
Improper shelf position • See the Broiling Guide.being used.
Cookware not suited • Use the broiling pan and grid that came with your range.for broiling.
Aluminum foil used on the • See the Using the oven section.broiling pan and grid has not been fitted properly and slit as recommended.
In some areas the power • Preheat the broil element for 10 minutes.(voltage) may be low.
• Broil for the longest period of time recommended in the Broiling Guide.
Oven temperature Oven thermostat • See the Adjust the oven thermostat—Do it yourself! too hot or too cold needs adjustment. section.
Power outage, Power outage or surge. • Some models will automatically resume their setting clock flashes once the power is restored. On models with a clock,
you must reset the clock. If the oven was in use, you must reset it by turning the Oven Temperature knob back to OFF, setting the clock and resetting any cooking function.
Oven will not self-clean The oven temperature • Allow the range to cool to room temperature and reset is too high to set a the controls.self-clean operation.
Oven controls improperly set. • Make sure you turn the control knob all the way to the CLEAN position.
Oven door is not in • Make sure you move the door latch handle all thethe locked position. way to the right.
Oven starts a self-clean Oven door locked during • Turn the Oven Temperature knob to OFF. Allow the cycle when you wanted cooking. oven to cool. Never force the door latch handle.to bake, roast or broil
“Crackling” or This is the sound of the metal • This is normal. “popping” sound heating and cooling during
both the cooking and cleaning functions.
Excessive smoking Excessive soil. • Turn the Oven Temperature knob to OFF. Open during a clean cycle the windows to rid the room of smoke. Wait until
the CLEAN light goes off. Wipe up the excess soil and reset the clean cycle.
Oven door will Oven too hot. • Allow the oven to cool below locking temperature.not unlock
Oven not clean after Oven controls not • See the Using the self-cleaning oven section.a clean cycle properly set.
Oven was heavily soiled. • Clean up heavy spillovers before starting the clean cycle. Heavily soiled ovens may need to self-clean again or for a longer period of time.
23
Cust
omer
Ser
vice
Trou
bles
hoot
ing
Tips
Care
and
Cle
anin
gOp
erat
ing
Inst
ruct
ions
Safe
ty In
stru
ctio
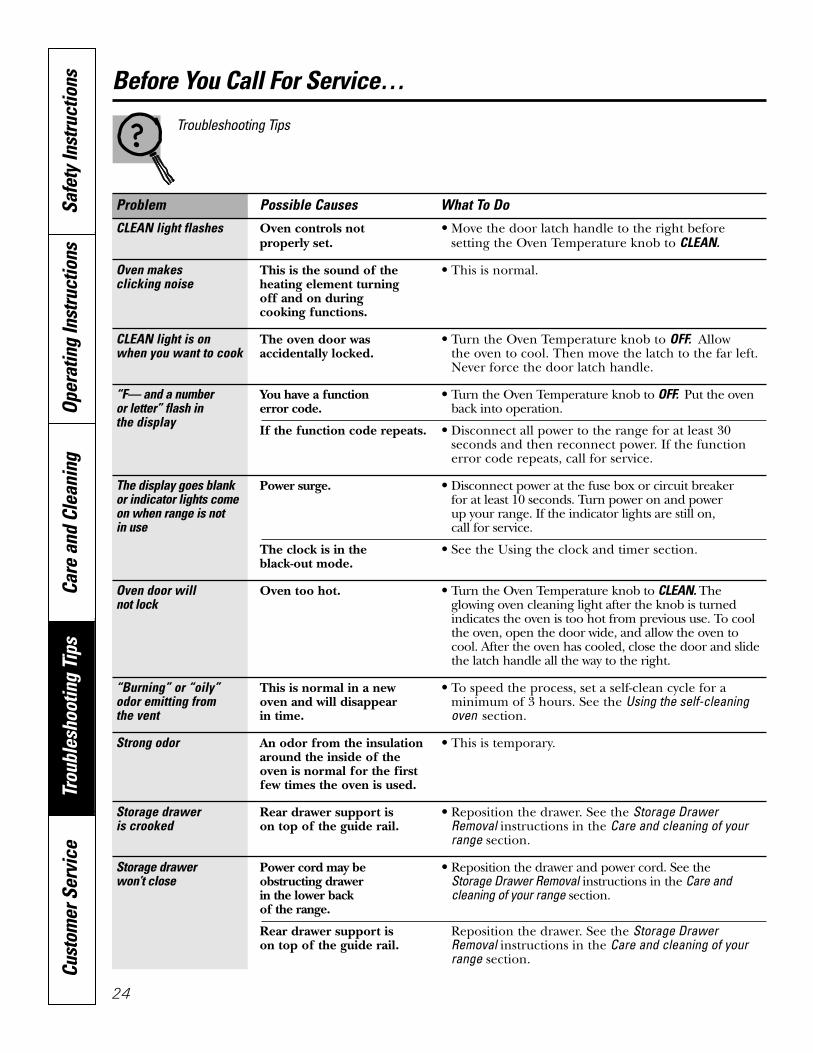
ns Before You Call For Service…
Problem Possible Causes What To Do
CLEAN light flashes Oven controls not • Move the door latch handle to the right before properly set. setting the Oven Temperature knob to CLEAN.
Oven makes This is the sound of the • This is normal.clicking noise heating element turning
off and on during cooking functions.
CLEAN light is on The oven door was • Turn the Oven Temperature knob to OFF. Allow when you want to cook accidentally locked. the oven to cool. Then move the latch to the far left.
Never force the door latch handle.
“F— and a number You have a function • Turn the Oven Temperature knob to OFF. Put the oven or letter” flash in error code. back into operation.the display
If the function code repeats. • Disconnect all power to the range for at least 30seconds and then reconnect power. If the function error code repeats, call for service.
The display goes blank Power surge. • Disconnect power at the fuse box or circuit breakeror indicator lights come for at least 10 seconds. Turn power on and power on when range is not up your range. If the indicator lights are still on, in use call for service.
The clock is in the • See the Using the clock and timer section.black-out mode.
Oven door will Oven too hot. • Turn the Oven Temperature knob to CLEAN. Thenot lock glowing oven cleaning light after the knob is turned
indicates the oven is too hot from previous use. To coolthe oven, open the door wide, and allow the oven tocool. After the oven has cooled, close the door and slidethe latch handle all the way to the right.
“Burning” or “oily” This is normal in a new • To speed the process, set a self-clean cycle for a odor emitting from oven and will disappear minimum of 3 hours. See the Using the self-cleaningthe vent in time. oven section.
Strong odor An odor from the insulation • This is temporary.around the inside of the oven is normal for the first few times the oven is used.
Storage drawer Rear drawer support is • Reposition the drawer. See the Storage Drawer is crooked on top of the guide rail. Removal instructions in the Care and cleaning of your
range section.
Storage drawer Power cord may be • Reposition the drawer and power cord. See the won’t close obstructing drawer Storage Drawer Removal instructions in the Care and
in the lower back cleaning of your range section.of the range.
Rear drawer support is Reposition the drawer. See the Storage Drawer on top of the guide rail. Removal instructions in the Care and cleaning of your
range section.
24
Troubleshooting Tips

General Electric CompanyWarranty Registration DepartmentP.O. Box 32150Louisville, KY 40232-2150
GE Service Protection Plus™
GE, a name recognized worldwide for quality and dependability, offers you Service Protection Plus ™—comprehensive protection on all your appliances—No Matter What Brand!
Benefits Include:• Backed by GE• All brands covered• Unlimited service calls• All parts and labor costs included• No out-of-pocket expenses• No hidden deductibles• One 800 number to call
You will be completely satisfied with our service protection or you may request your money back on the remaining value of your contract. No questions asked. It’s that simple.
Protect your refrigerator, dishwasher, washer and dryer, range, TV, VCR and much more—any brand! Plus there’s no extra charge for emergency service and low monthly financing is available. Even icemakercoverage and food spoilage protection is offered. You can rest easy, knowing that all your valuablehousehold products are protected against expensive repairs.
Place your confidence in GE and call us in the U.S. toll-free at 800-626-2224for more information.
*All brands covered, up to 20 years old, in the continental U.S.
We’ll Cover Any Appliance.Anywhere. Anytime.*
Please place in envelope and mail to:
✁Cut here
25

Consumer Product Ownership Registration
Important
Today!
General Electric CompanyLouisville, Kentuckywww.GEAppliances.com
FirstName
Mr. �� Ms. �� Mrs. �� Miss ��
StreetAddress
City State
Date PlacedIn Use
Month Day Year
ZipCode
Apt. #
LastName
PhoneNumber
_ _
Consumer Product Ownership RegistrationDear Customer:Thank you for purchasing our product and thank you for placing your confidence in us. We are proud to have you as a customer!
Follow these three steps to protect your new appliance investment:
Important: If you did not get a registration card with your product, detach and return the form below to ensure that your product is registered, or registeronline at www.geappliances.com.
1 2 3Model Number Serial Number
✁Cut here
Complete and mailyour ConsumerProduct OwnershipRegistration today.Have the peace ofmind of knowing wecan contact you inthe unlikely event of asafety modification.
After mailing theregistration below, store this document in a safe place. Itcontains informationyou will need should you require service. Our service number is800 GE CARES (800-432-2737).
Read your Owner’sManual carefully.It will help youoperate your newappliance properly.
Model Number Serial Number
E-mail Address
Occasionally, we may allow selected companies to send you information.�� Check here if you do not want this information.
26

27
Safety InstructionsOperating Instructions
Safety InstructionsOperating Instructions
Care and CleaningTroubleshooting Tips
Customer Service
GE Electric Range Warranty.All warranty service provided by our Factory Service Centers or an authorized Customer Care® technician. For service, call 800-GE-CARES.
For The Period Of: GE Will Provide:
One Year Any part of the range which fails due to a defect in materials or workmanship. From the date of the During this full one-year warranty, GE will also provide, free of charge, all labor original purchase and in-home service to replace the defective part.
� Service trips to your home to teach you how to use theproduct.
� Improper installation.
� Failure of the product if it is abused, misused, or usedfor other than the intended purpose or usedcommercially.
� Replacement of house fuses or resetting of circuitbreakers.
� Damage to the product caused by accident, fire, floodsor acts of God.
� Incidental or consequential damage caused by possibledefects with this appliance.
What GE Will Not Cover:
This warranty is extended to the original purchaser and any succeeding owner for products purchased forhome use within the USA. In Alaska, the warranty excludes the cost of shipping or service calls to your home.
Some states do not allow the exclusion or limitation of incidental or consequential damages. This warrantygives you specific legal rights, and you may also have other rights which vary from state to state. To knowwhat your legal rights are, consult your local or state consumer affairs office or your state’s Attorney General.
Warrantor: General Electric Company. Louisville, KY 40225

28
Cust
omer
Ser
vice
Trou
bles
hoot
ing
Tips
Care
and
Cle
anin
gOp
erat
ing
Inst
ruct
ions
Safe
ty In
stru
ctio
ns Service Telephone Numbers.
GE Answer Center® 800.626.2000The GE Answer Center® is open 24 hours a day, 7 days a week.
OR
Visit our Website at www.geappliances.com
In-Home Repair Service 800-GE-CARES (800-432-2737)Expert GE repair service is only a phone call away.
Special Needs Service 800.626.2000
800-TDD-GEAC (800-833-4322)GE offers, free of charge, a brochure to assist in planning a barrier-free kitchen for persons with limited mobility.
Service Contracts 800-626-2224Purchase a GE service contract while your warranty is still in effect and you’ll receive a substantial discount. GE Consumer Service will still be there after your warranty expires.
Parts and Accessories 800-626-2002Individuals qualified to service their own appliances can have parts or accessories sent directly to their homes (VISA, MasterCard and Discover cards are accepted).
Instructions contained in this manual cover procedures to be performed by any user. Other servicinggenerally should be referred to qualified service personnel. Caution must be exercised, sinceimproper servicing may cause unsafe operation.
Service Satisfaction If you are not satisfied with the service you receive from GE:
First, contact the people who serviced your appliance.
Next, if you are still not pleased, write all the details—including your phone number—to:Manager, Customer RelationsGE AppliancesAppliance ParkLouisville, KY 40225
Printed in LaFayette, GA