gamification for corporate and professional training ......sections are used to separate moodle...
TRANSCRIPT

Gamification for Corporate and Professional Training
Account Admin User Guide

Mootivation Technologies Corp. 2 of 27
Table of Contents
Quick Start .......................................................................................................................................................... 3
LMS User-Role Guide......................................................................................................................................... 4
Dashboard Section Admin ................................................................................................................................ 7
Dashboard Account Admin ............................................................................................................................ 12
Moodle Administrator ...................................................................................................................................... 22
Mootivation Technologies Corp. 3 of 27
Quick Start: Let’s get you set up and running quickly. For your reference, you can watch our Quickstart video of the steps below: Steps:
1. Install our plugin and block from Moodle. 2. Ensure the plugin server IP is set to: dashboard.motrain.com (Global Server)
OR set to: dashboard.eu.motrain.com (E.U. Server) 3. Create a cohort in Moodle and a Section on the Motrain dashboard with the same name. 4. Copy/Paste the Private Key from the Motrain Dashboard to the matching cohort in the
plugin. 5. Add users to the cohort (cohort = Section) 6. Create site token (p.15 guide or watch this tutorial) and send us the Moodle URL and site
token for linking. 7. In the plugin, set the Reward Method to Dashboard Rules for each cohort/section. 8. On the Motrain Dashboard, set the Custom Coin values for activity and course completion. 9. Add items to the Store for each selected Section on the Motrain dashboard (top right
dropdown). 10. Continue adding cohorts/sections as needed. They will each have their own unique Store. 11. Note on Active Users: Users in the cohort or audience linked to the Motrain dashboard
with a private key will appear on the dashboard when they become active. Users become active when they either earn coins or click on the block. If you would like to make all of the users in the cohort/audience become active, you can push them all to the Motrain dashboard in the plugin. Please note, active users count towards the tiered user number of your subscription.
12. Block Setup: For help with setting up the block, watch our tutorial.

Mootivation Technologies Corp. 4 of 27
LMS User-Role Guide
If you are an employee/professional using Motrain in your training, this guide will help you understand how virtual coins are earned and what you can do with them. 1. Coin Rewards There are three ways virtual coins are earned depending on how your organization has decided to set this up.
1. Event Based - Coins are earned when you interact with course material based on CRUD (Create = 3 coins, Read = 1 coin, Update = 1 coin, and Delete = 0 coins) and not on grades. This system encourages students to keep coming back into Moodle regardless of their abilities. Examples of CRUD rewards are: Create a forum post (3 coins), Read a PDF file (1 coin), Update a file submission for an assignment (1 coin), Delete a Database entry (0 coins). There is a cheat guard that comes with the plugin, so the frequency of coin rewards will be limited during a session.
2. Completion-based – if completion rewards are turned on, you will earn coins when you meet certain criteria. For example, you might need to post to a Forum a minimum of 3 times, or you might need to achieve a minimum grade on a Quiz.
3. Completion – earn coins when an activity or course is marked complete. Look for the block in your course or on your dashboard.

Mootivation Technologies Corp. 5 of 27
2. Store In the Store, you can see the items listed by your organization. You can either buy items directly, buy entries to a raffle draw and increase your chance of winning the item, or bid on items in an auction.

Mootivation Technologies Corp. 6 of 27
3. My Purchases and Item Redemptions With your virtual coins, you can buy items directly, buy entries to a raffle draw, or bid on auction items. Items won in a raffle or auction will be found in “My Purchases”. Items can be redeemed by:
1. Self redemption: check your notifications and email for instructions. 2. Request Approval: send a message to find out how to claim your items.
3. Shipping: fill out the form to have your item sent to you.

Mootivation Technologies Corp. 7 of 27
Motrain Section Admin Dashboard Guide:
Welcome to the Motrain dashboard as a Section Administrator. From here, you can manage the platform for the users assigned to this section. If you manage multiple sections, be sure to select the desired section from the top right drop down menu before performing any actions. Users: The USERS page allows you to see individual coin analytics, manually add coins to users, and redeem items. Deleting a user will soft delete the user from the dashboard and they will no longer be displayed in any part of the platform, then every two weeks, our server will hard delete the user and all of their data. By clicking on the number of coins the user has, you can see their coin collecting history over the last two weeks.
Under Purchased Items, you can see the status of the item redemptions.
Add Coins: Manually add coins to a user for any reason you choose. Send a message to the user and it will appear in their notifications/email. Coins can take a few hours to show up in the user’s block due to the synchronising schedules of the LMS.

Mootivation Technologies Corp. 8 of 27
Redemption Requests: The dashboard administrators that are given Redemption Request permissions can see these requests and redeem items accordingly with a congratulatory return message that can include specifics on how to claim the item. These return messages appear as notifications/emails for the user in their LMS.
Leaderboard:
You can enable/disable a leaderboard for your section with an anonymous option. BE SURE TO CLICK SAVE.
Transactions: This page keeps track of all the user transactions.
Mootivation Technologies Corp. 9 of 27
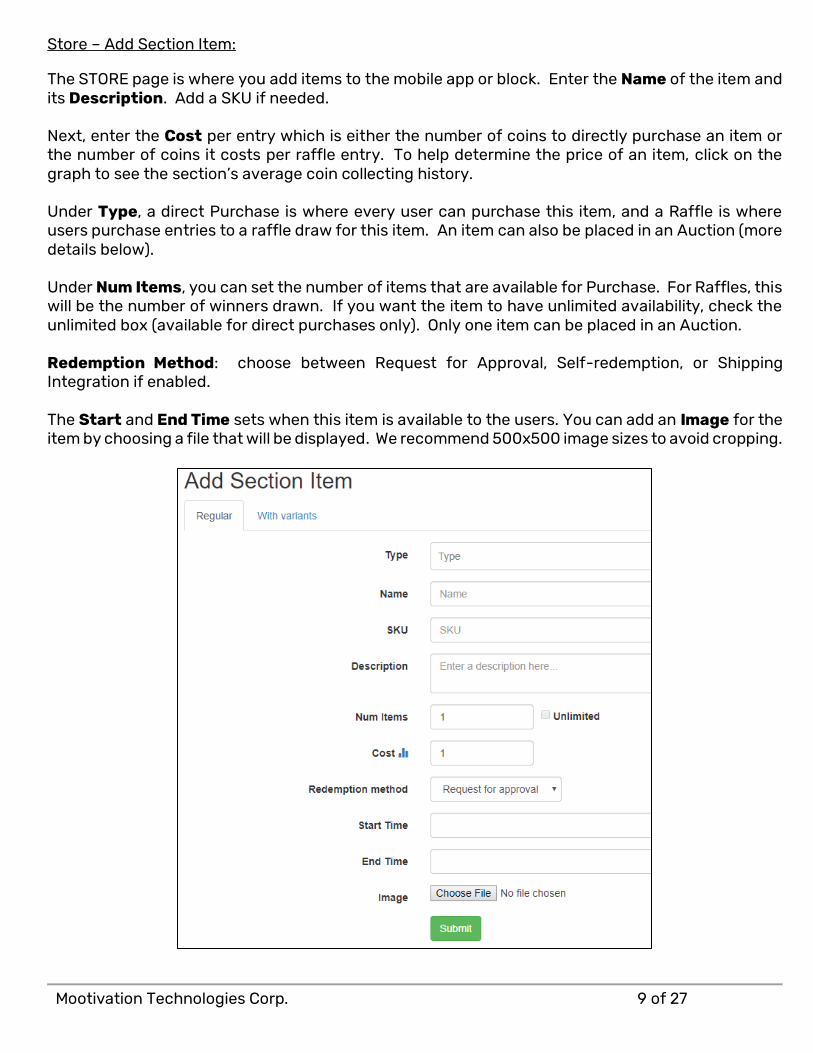
Store – Add Section Item:
The STORE page is where you add items to the mobile app or block. Enter the Name of the item and its Description. Add a SKU if needed. Next, enter the Cost per entry which is either the number of coins to directly purchase an item or the number of coins it costs per raffle entry. To help determine the price of an item, click on the graph to see the section’s average coin collecting history. Under Type, a direct Purchase is where every user can purchase this item, and a Raffle is where users purchase entries to a raffle draw for this item. An item can also be placed in an Auction (more details below). Under Num Items, you can set the number of items that are available for Purchase. For Raffles, this will be the number of winners drawn. If you want the item to have unlimited availability, check the unlimited box (available for direct purchases only). Only one item can be placed in an Auction. Redemption Method: choose between Request for Approval, Self-redemption, or Shipping Integration if enabled. The Start and End Time sets when this item is available to the users. You can add an Image for the item by choosing a file that will be displayed. We recommend 500x500 image sizes to avoid cropping.

Mootivation Technologies Corp. 10 of 27
Items with Variants For direct Purchases only, you can add variants, such as color or sizes.
These variants will be displayed in the block and if there’s a limited number of a particular variant, it will be displayed in brackets in the block. If the stock of each variant is unlimited, no brackets are displayed:
Note: There is a maximum of 10 variants for each item. Raffle Draws Winners are automatically drawn once per day or can be manually drawn on the dashboard. The winner will have the item placed in their My Purchases as a regular item waiting for redemption.
Mootivation Technologies Corp. 11 of 27
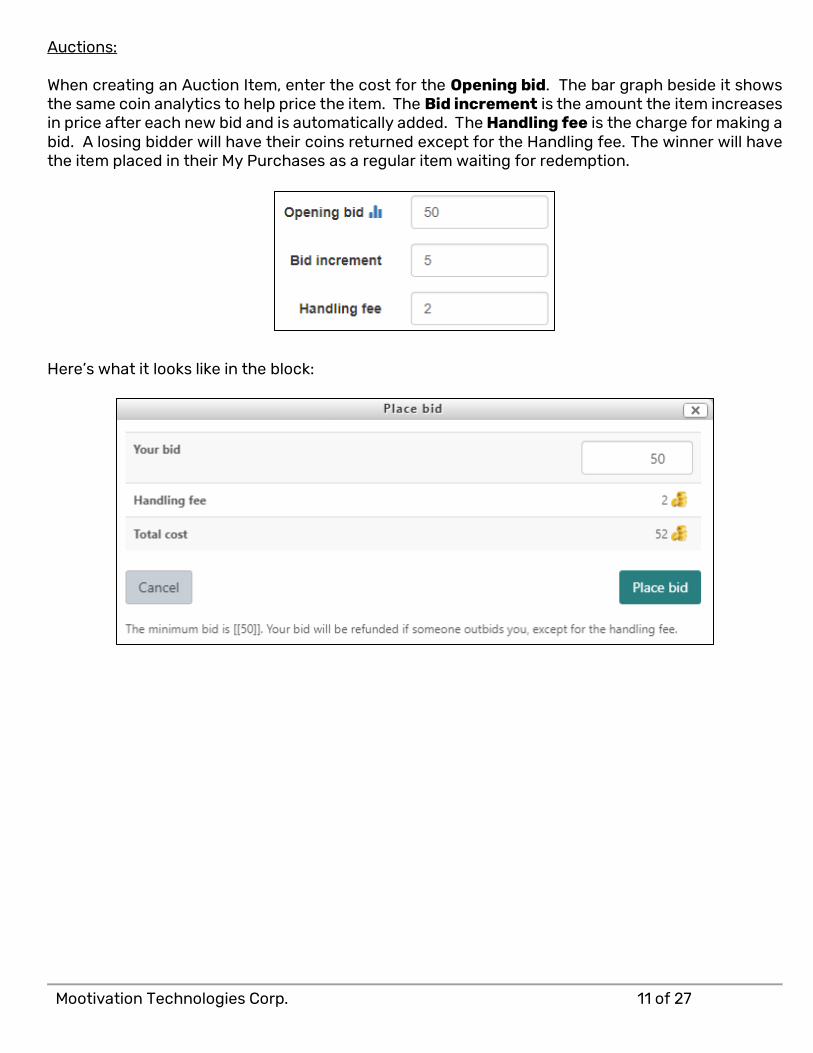
Auctions: When creating an Auction Item, enter the cost for the Opening bid. The bar graph beside it shows the same coin analytics to help price the item. The Bid increment is the amount the item increases in price after each new bid and is automatically added. The Handling fee is the charge for making a bid. A losing bidder will have their coins returned except for the Handling fee. The winner will have the item placed in their My Purchases as a regular item waiting for redemption. Here’s what it looks like in the block:

Mootivation Technologies Corp. 12 of 27
Motrain Account Admin Dashboard Guide:
If you are an Account Admin, you have all the permissions of a Section Admin plus a few more. The most important thing to keep in mind as an Account Admin is to be sure you select the desired Account and Section in the top right corner when working on the dashboard.
Sections: SECTIONS are used to separate Moodle cohorts or Totara audiences into their own unique Motrain experience. We recommend naming a Section with the same name as the matching cohort or audience name in the LMS (see our bulk uploading system on the following page). Once a Section has been created, you can copy and paste the Private Key into the plugin for the matching cohort/audience. You can suspend/activate a Section in the Action column. If suspended, the users in the Section will not be able to access the platform and will not occupy active user spaces provided they haven’t already logged in during that month.
Leaderboards: You can enable/disable a Section vs. Section leaderboard in your account with an anonymous option. BE SURE TO CLICK SAVE.

Mootivation Technologies Corp. 13 of 27
Dashboard Users: Before creating dashboard users, ensure you have selected the correct account and section in the top right corner. Please note: Account Admins do not have to belong to a section, but Section Admins MUST belong to a section. To invite a dashboard user to help manage an account and/or section, simply enter their name and email address. Once submitted, this user will receive a welcome email with login credentials and instructions. If you would like to create multiple sections, assign dashboard users, and set permissions all at once, you can use our bulk upload feature “Import Dashboard Users and Sections” with a CSV file.
The file formatting for columns are: firstname, lastname, email, cohort1, permission. By default, permissions are set to Section Admin, so you only need to include “accountadmin” in the column for users that need Account Admin permissions set. A sample csv list is below:
firstname lastname email cohort1 permission Josiah Melledy [email protected] Globex HR Adele Tierney [email protected] Globex Marketing Merwyn Swindin [email protected] Globex R&D accountadmin Ryon Reddell [email protected] Globex Finance Cleve Ramiro [email protected] Globex Industries
Once a dashboard user has been created, you can set their User Role (Account Admin, Section Admin, or Custom). You can choose the accounts and sections they’ll have access to. To add a dashboard user to an account, choose the account name in the dropdown menu and click “add account” in the Accounts column. To add this user to a Section, be sure to have the Account and Section chosen from the top menus, then click the “Add Section” button in the Sections column. You can add multiple account and section permissions to a user, and if a user would like to receive our welcome email again, click the “resend email button”.

Mootivation Technologies Corp. 14 of 27
Custom User Role
When selecting Custom User Role, choose Edit to assign specific permissions to a dashboard user.
Store – Add Account Item:
The STORE page is where you add items to the mobile app or block. An Account Item is available to every user in all Sections within an Account. Think of these items as “Organization-wide items”. Choose All Sections highlighted in the drop down, then add the item. Notice the title changes to: Add Account Item. Section Admins cannot edit this item. Note: If you’d like to add an item to a specific section, choose the Section in the drop down and add the item.
Mootivation Technologies Corp. 15 of 27
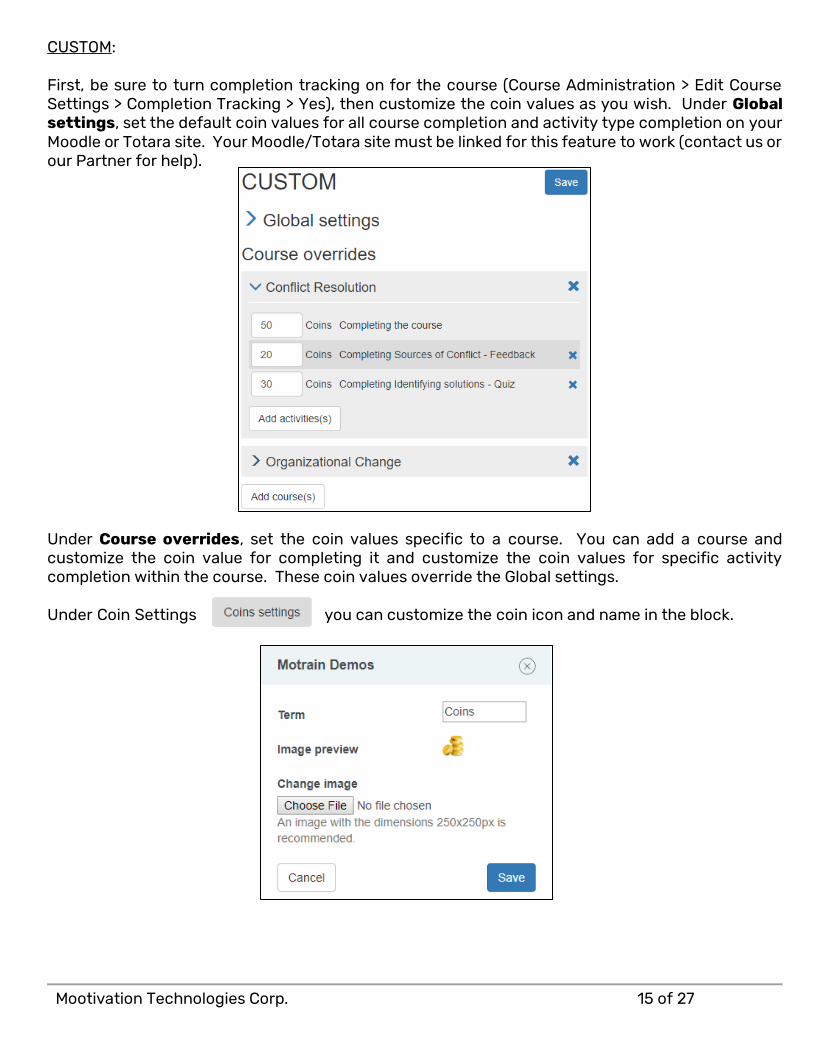
CUSTOM: First, be sure to turn completion tracking on for the course (Course Administration > Edit Course Settings > Completion Tracking > Yes), then customize the coin values as you wish. Under Global settings, set the default coin values for all course completion and activity type completion on your Moodle or Totara site. Your Moodle/Totara site must be linked for this feature to work (contact us or our Partner for help). Under Course overrides, set the coin values specific to a course. You can add a course and customize the coin value for completing it and customize the coin values for specific activity completion within the course. These coin values override the Global settings. Under Coin Settings you can customize the coin icon and name in the block.

Mootivation Technologies Corp. 16 of 27
Linking a Moodle site for Single Sign-On and Custom Coin Values
Setting up automatic authentication from Moodle to the Motrain dashboard. Set-up prerequisites
● Moodle plugin block_mootivated v1.4.0 or greater ● Moodle plugin local_mootivated v1.7.0 or greater ● Moodle web services enabled ● Moodle REST protocol enabled
SSO prerequisites
● A Moodle account with the permission local/mootivated:ssodashboard. ● A dashboard account with the same email address as in Moodle. ● The dashboard user’s account must be linked to the Moodle site. ● The Moodle site must be publicly accessible.

Mootivation Technologies Corp. 17 of 27
Moodle set-up Create an API token for the dashboard Navigate to the external services.
Locate the the Mootivated dashboard service, and follow “Authorised users”.
Select the Admin User.
Navigate to the external tokens
At bottom of the page, click the link “Add” to create a new token.

Mootivation Technologies Corp. 18 of 27
Select the Admin User, and select the “Mootivated dashboard service”. See below:
Validate your changes and make note (copy/paste) of the generated token. It will be displayed on the previous screen listing all tokens, probably on the last page if there is more than one. Here is an example:
NOTE: You must send us your Moodle URL and site Token. We will link your site on our server.

Mootivation Technologies Corp. 19 of 27
Authorize users to SSO to the dashboard Navigate to the “Roles” page, and click “Add a role”.
Do not use any archetype or role as base for this new role.
Enter the following details:
Only allow the one permission local/mootivated:ssodashboard.
Finalise by clicking “Create role”.

Mootivation Technologies Corp. 20 of 27
Now assign the role to the users who will be allowed to SSO to the dashboard. Navigate to “Assign system roles”.
Select the “Mootivated SSO” role and select the relevant users.
The selected users will be allowed SSO to the dashboard from the block, provided they are registered with the same email address that exists on the dashboard, and they belong to an account linked to this Moodle site. You do NOT want students/learners to have this role.

Mootivation Technologies Corp. 21 of 27
SSO to the dashboard Provided the dashboard and Moodle have been set-up, after logging in Moodle as a user who has the permission to SSO to the dashboard, the Mootivated block should display a link to the dashboard.
The first time an account connects to the dashboard from Moodle, they will have to confirm that the Moodle site is allowed to authenticate them. A verification code is sent to the person’s email address.
Once confirmed, a Moodle site will no longer require verification.
Mootivation Technologies Corp. 22 of 27
Mootivated/Motrain Plugin Guide Overview The Mootivated/Motrain plugin for Moodle and Totara is used for:
• connecting the mobile app and server components to the Moodle/Totara server • allows students to earn coins in Moodle/Totara and login to the mobile app • allows teachers to login to the mobile app to redeem student items.
Step 1: Plugin Installation The first step to using the platform is by installing the plugin and block. You can find the latest versions in the Moodle Plugin Directory. For your reference, you can watch our Quickstart video. For Zip Folder Uploading using the Moodle Plugin Installer:
1. A video of the complete install and setup can be found here. 2. Sign into Moodle using an administrator account. 3. In the administrator panel go to Site Administration >> Plugins >> Install Plugins. 4. Drag the ZIP file from your computer and drop it into the specific location on the web page. 5. Click “Install plugin from the ZIP file” and continue as prompted.
For manually installing the PLUGIN on Totara: Motrain is a Totara plugin of type local, therefore it needs to be extracted in the local/ directory. Here is how to manually install it.
1. Download the zip file of the latest version of the plugin here. It should be named local_mootivated.zip.
2. Extract the content of the zip file in the folder local of your Totara installation. 3. If you have extracted the content at the right place, the following file should be
present: local/mootivated/version.php. 4. Visit the admin notifications page to trigger the installation.
o Navigate to Site administration > Notifications. 5. Follow the Totara installation process.
For manually installing the BLOCK on Totara: Motrain is a Moodle plugin of type block, therefore it needs to be extracted in the block/ directory. Here is how to manually install it.
1. Download the zip file of the latest version of the plugin here. It should be named block_mootivated.zip.
2. Extract the content of the zip file in the folder block of your Totara installation. 3. If you have extracted the content at the right place, the following file should be
present: block/mootivated/version.php. 4. Visit the admin notifications page to trigger the installation.
o Navigate to Site administration > Notifications. 5. Follow the Totara installation process.
For more information on installing plugins, please visit the official Moodle documentation.

Mootivation Technologies Corp. 23 of 27
Step 2: User Roles and Permissions
1. Now that the plugin is installed and the web services are set up, you will need to allow our platform to communicate with the plugin. The Mootivated User role has been created to do this. To auto-assign this role to existing users, run the Role Synchronisation. This will be a scheduled task that will run every 24hrs by default, and any new users will automatically be assigned the Mootivated User role.
2. If you would like to remove the Mootivated User role permissions and prevent users from accessing the platform, you can do this by clicking on the Assign Roles circled in red:
3. Important: If you’re using our Global server, point the Server host to: dashboard.motrain.com
If you’re using our E.U. server, point the Server host: dashboard.eu.motrain.com
Mootivation Technologies Corp. 24 of 27
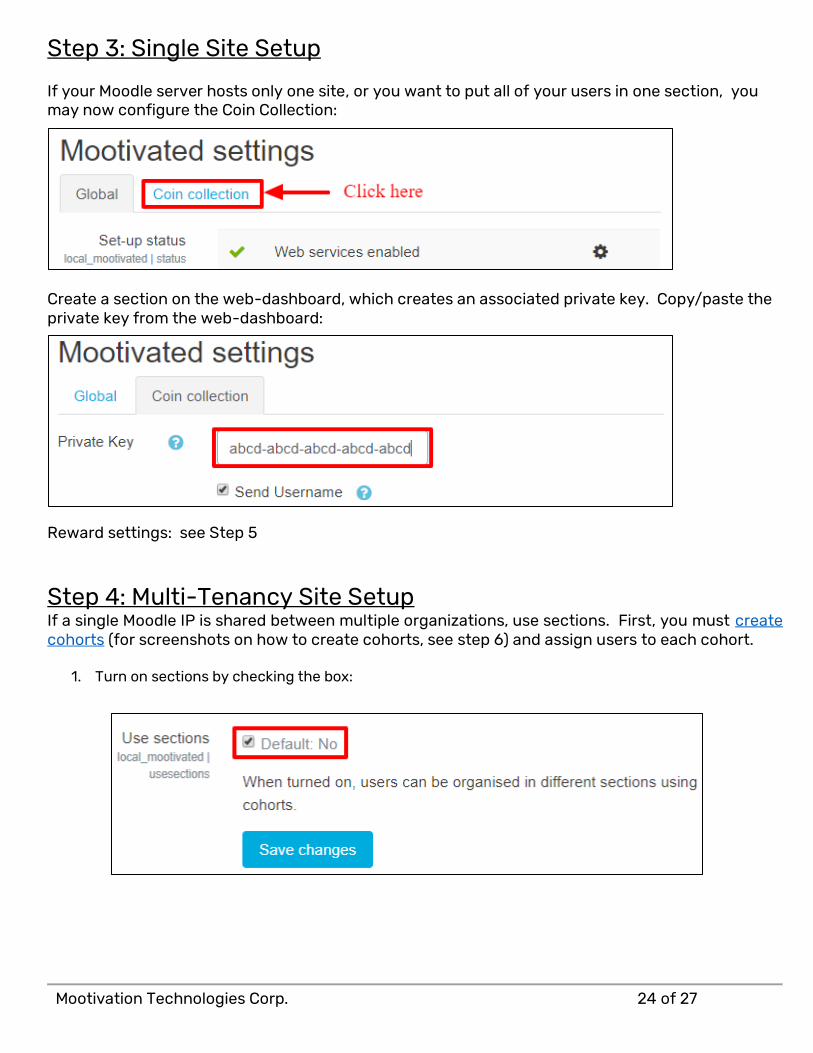
Step 3: Single Site Setup If your Moodle server hosts only one site, or you want to put all of your users in one section, you may now configure the Coin Collection:
Create a section on the web-dashboard, which creates an associated private key. Copy/paste the private key from the web-dashboard:
Reward settings: see Step 5
Step 4: Multi-Tenancy Site Setup If a single Moodle IP is shared between multiple organizations, use sections. First, you must create cohorts (for screenshots on how to create cohorts, see step 6) and assign users to each cohort.
1. Turn on sections by checking the box:

Mootivation Technologies Corp. 25 of 27
2. Choose the cohort. Create a corresponding section on the web-dashboard with the same name, which creates an associated private key. Copy/paste the private key from the web-dashboard:
3. Continue adding sections in the same way, then run the Role Synchronisation when you’re done.
Step 5: Coin Rewards There are four ways coins can be earned within the LMS.
1. Event Based - This is the easiest reward option as coins are awarded simply for users interacting with course material based on CRUD (Create = 3 coins, Read = 1 coin, Update = 1 coin, and Delete = 0 coins).
If you would like to Test the event based rewards, be mindful of the cheat guard. The cheat guard restricts a user’s ability to earn coins for the set time intervals and are fully customizable. FOR TESTING PURPOSES ONLY, please use the following set up: BE SURE TO CHANGE THESE SETTINGS BEFORE GOING LIVE WITH USERS. Default values are 10 actions/1 minute/1 hour, but you may adjust them accordingly.

Mootivation Technologies Corp. 26 of 27
2. Completion-based, else event based - choose this option if users are required to have an activity marked as complete before coins are rewarded. This requires teachers to assign completion-based criteria for activities, and once an activity is marked complete, no further rewards can be earned for that activity. If an activity has completion turned off, then the activity will still award coins using the event-based system. You may configure the completion-based coin rewards as you see fit. These are global settings for the section, so all activity/resource types within the courses will be rewarded with these values.
3. Completion-based – no coins are earned for events. Users will only earn coins when activities are marked complete, and the coin values are customized in the Completion rewards setting.
4. Dashboard Rules (Recommended) – set up specific course and activity completion rules on the dashboard. This requires the Moodle/Totara site to be linked to the dashboard via the token.
5. Course Completion – coins are earned only when a course is marked complete.

Mootivation Technologies Corp. 27 of 27
Step 6: Add/Manage Sections With Cohorts/Audiences If your Moodle or Totara server hosts multiple sites (multi-tenancy), or if you would like to create different sections within your account (Examples: for separate companies or schools, for different divisions within a company, for different grade levels within a school, for different faculties etc.) you can organize sections this way. Create a section by creating a cohort and assigning users to it. Each section has its own unique Mootivated/Motrain platform (users can only be assigned to one section).
1. Create cohort:
2. Create a name for the section and save:
3. Assign users to the section. A user can only belong to one cohort:
4. Create corresponding Sections on the dashboard and assign their Private Key in the plugin.
Users will now earn coins for their online learning and can spend them as they wish. Use the web dashboard to customize the platform specifically for your users. Block Setup: For help with setting up the block, watch our tutorial here. Thank you for choosing a Mootivation Technologies motivational design platform!