game design skill cards - · pdf filesprites are graphics you can place and animate on the...
TRANSCRIPT

GAME DESIGN SKILL CARDS

If you are new to Scratch, click the right edge to expand the Help panel for tips and tutorials.
Use Scratch at scratch.mit.edu or download from scratch.mit.edu/scratch2download.
1
OVERVIEWFULL SCREENCHANGE LANGUAGERUN/STOP PROJECT
STAGE HELP
SPRITES
SCRIPTS

CHANGE BACKDROP
2

A backdrop covers the entire Stage. Backdrops cannot be resized or move across the stage.
Click the small icons beneath the Stage button to choose a new backdrop from the backdrops library, paint a new backdrop, upload a photo or use a webcam.
Use these script blocks to change backdrops during a game:
2
STAGE BUTTON
BACKDROP FROM WEBCAMUPLOAD BACKDROPPAINT BACKDROPCHOOSE BACKDROP
CHANGE BACKDROP

ADD SPRITES
3
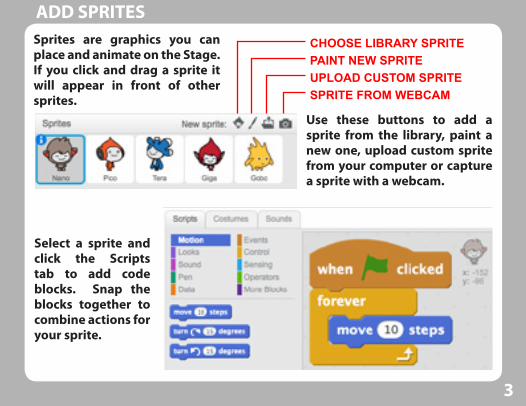
Sprites are graphics you can place and animate on the Stage. If you click and drag a sprite it will appear in front of other sprites.
Use these buttons to add a sprite from the library, paint a new one, upload custom sprite from your computer or capture a sprite with a webcam.
Select a sprite and click the Scripts tab to add code blocks. Snap the blocks together to combine actions for your sprite.
3
CHOOSE LIBRARY SPRITE PAINT NEW SPRITEUPLOAD CUSTOM SPRITESPRITE FROM WEBCAM
ADD SPRITES

MOVE SPRITE
4

The easiest way to move a sprite across the Stage is to click and drag with your mouse or trackpad. Several blocks control the movement of sprites while a project is running:
A sprite’s position can be animated by placing MOVE and CHANGE blocks inside a “C” block (FOREVER, REPEAT or IF THEN).
4
Move sprite a specified number of steps in the direction it is pointing.
Move sprite to a specific location on the Stage (x: -240 to 240, and y: -180 to 180).
Move sprite to a specific location in a set amount of time.
Move sprite to a specific horizontal position. While the SET Y block moves the sprite to a vertical position.
Change horizontal position by the specified amount. CHANGE Y changes vertical.
MOVE SPRITE

SWITCH COSTUMES
5

A sprite can have multiple costumes which appear under the costumes tab.
One way to animate sprites is by adding a new costume for each pose. Use the Duplicate tool, then make changes with the Paint Editor tools.
Use these two script blocks to switch costumes while a project is running. Give each costume a descriptive name to make them easier to keep track of.
5
DUPLICATE TOOL
SWITCH COSTUMES

CHANGE DIRECTION
6

Use the Set Costume Center tool in the Paint Editor (near top right corner of the canvas) to change the point around which a sprite rotates.
6
If you Shift-click a sprite and choose info you can see the current direction and rotation style, as well as the x and y position.
To change the direction of a sprite while your project is running there are several options:
Turn the sprite clockwise by specified degrees (or counter-clockwise with other TURN block).
Turn the sprite to a specific direction (right: 90, left: -90, up: 0, down: 180 or custom 0 to 360).
Turn the sprite toward another sprite or toward the position of the cursor on the stage.
Change sprite orientation (all around [sprite rotates], don’t rotate or left-right [sprite flips left or right]).
CHANGE DIRECTION

KEYBOARD CONTROL
7
W D
A
S

7
The most popular way for players to control sprites is with the keyboard. The blocks to the left are the easiest way. . .
. . . while these blocks provide smoother motion and allow more options to control the movement of a sprite.
KEYBOARD CONTROL

MOUSE CONTROL
8

8
One way to allow players to control the movement of a sprite using a mouse or trackpad is to put a GO TO block inside FOREVER and choose mouse-pointer.
You may have a sprite merely face in the direction of the cursor by placing POINT TOWARDS inside a FOREVER block.
You need additional code on target sprites to switch costumes and make a sound (below is an example from a shooting gallery game).
MOUSE CONTROL

ADD SOUND
9
Select the Stage or a sprite, then click the Sounds tab to choose, record or upload new sounds.
STOPPLAYRECORD
CHOOSE FROM LIBRARYRECORD SOUNDUPLOAD SOUND
ADJUST RECORDING VOLUME
You may preview, add effects, adjust the volume and edit soundwaves.

9
Use the PLAY SOUND block to begin a recorded or library sound. To play the entire sound before running connected blocks use PLAY SOUND UNTIL DONE.
Use the PLAY DRUM block for individual drumbeats, the REST block to pause between notes, VOLUME blocks to adjust levels and TEMPO to adjust timing.
Use SET INSTRUMENT to choose one of the built-in musical instruments. Then use the PLAY NOTE block to play a single note (1 to 127; 60 is middle C) for the specified number of beats. (You can manually enter notes below 48 or above 72).
ADD SOUND

SAY/THINK/ASK
10

10
To create dialogue in your game, use the SAY FOR block to automatically create speech bubbles and pause before moving on. Use WAIT blocks to pause a sprite while another sprite is talking.
You can also show what your sprites are thinking by using the THINK block, which works just like SAY, except creating a thought bubble.
The ASK block is in the Sensing category because it collects information from the player. The player’s typed reply is stored in the ANSWER block, which can be used to trigger events.
SAY/THINK/ASK

DETECT COLLISION
11

11
Use the first TOUCHING block with an IF THEN to check if a sprite is touching the mouse-pointer, the Stage edge or another sprite. (Code to right would go on a ball sprite).
You can also check if a specific color of a sprite is touching another color, such as a player’s white shoes touching a red platform or hands on a ladder.
Or use TOUCHING COLOR with a REPEAT block to check if a sprite is touching a specific color in a sprite or backdrop. Click the color in the block then click a color on the Stage to select it.
Use the BOUNCE ON EDGE BLOCK to detect the Stage edge and change direction.
DETECT COLLISION

KEEP SCORE
12

12
Most games begin with a score of zero when the Green Flag is clicked. You can set a global variable from any sprite or even from the Stage. If you choose For this sprite only, that creates a variable whose value can only be read or changed by this sprite.
No blocks will appear in the Data category until you click the Make a Variable button.
Each variable must have a unique name. Choose For all sprites to make it available to other sprites in your game.
Use a CHANGE VARIABLE block inside an IF THEN to add to, or subtract from, any variable by a set amount. (Such code will usually go inside a FOREVER or REPEAT block.)
KEEP SCORE
Double click the Score on the Stage to change how it is displayed to players.

DISPLAY HEALTH/LIVES
13
13
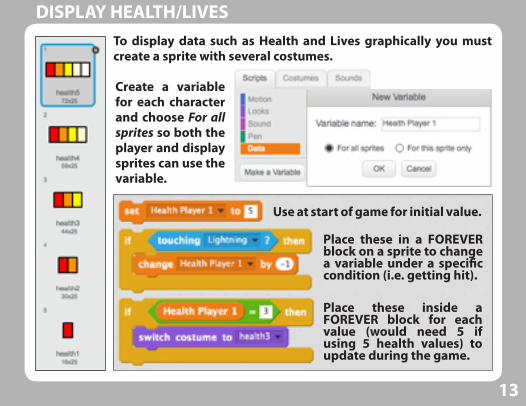
To display data such as Health and Lives graphically you must create a sprite with several costumes.
Create a variable for each character and choose For all sprites so both the player and display sprites can use the variable.
Use at start of game for initial value.
Place these in a FOREVER block on a sprite to change a variable under a specific condition (i.e. getting hit).
Place these inside a FOREVER block for each value (would need 5 if using 5 health values) to update during the game.
DISPLAY HEALTH/LIVES

CLONE SPRITES
14

14
Use the CREATE CLONE OF block to make a copy of a sprite. Here the Spaceship makes a clone of the Laser sprite when space is pressed.
WHEN I START AS A CLONE executes blocks as soon as the clone is created. While DELETE THIS CLONE removes the clone and stops scripts.
The code to the right shows how to create 21 clones in 3 rows and 7 columns (like the invaders). Change the X and Y position to spread them out.
CLONE SPRITES

TRACK INVENTORY
15
15
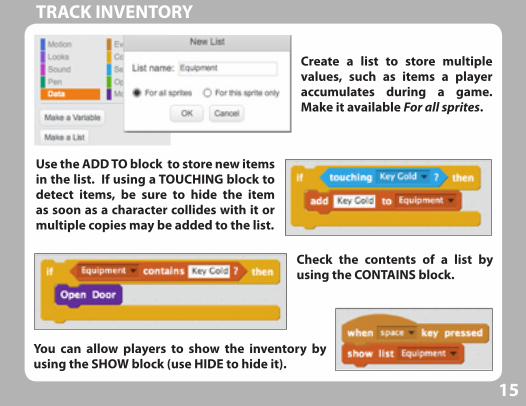
Create a list to store multiple values, such as items a player accumulates during a game. Make it available For all sprites.
Use the ADD TO block to store new items in the list. If using a TOUCHING block to detect items, be sure to hide the item as soon as a character collides with it or multiple copies may be added to the list.
Check the contents of a list by using the CONTAINS block.
You can allow players to show the inventory by using the SHOW block (use HIDE to hide it).
TRACK INVENTORY

BROADCAST MESSAGES
16
If you use the BROADCAST AND WAIT block the blocks snapped beneath it will not execute until all the sprites running WHEN I RECEIVE finish their scripts.
Use BROADCAST blocks to send messages between two sprites (such as two characters alternating speech) or to trigger several sprites to start running scripts at exactly the same time. The Stage can also send and receive broadcast messages.
Place WHEN I RECEIVE blocks on each of the sprites you want to respond to the new broadcast.
Place the BROADCAST block on a sprite, choose new message and type a descriptive name.

1) TITLE/OVERVIEW 9) ADD SOUND
2) CHANGE BACKDROP 10) SAY/THINK/ASK
3) ADD SPRITES 11) DETECT COLLISION
4) MOVE SPRITE 12) KEEP SCORE
5) SWITCH COSTUMES 13) DISPLAY HEALTH/LIVES
6) CHANGE DIRECTION 14) CLONE SPRITES
7) KEYBOARD CONTROL 15) TRACK INVENTORY
8) MOUSE CONTROL 16) BROADCAST/INDEX
With Scratch you can create your own interactive stories, games, and animations. Use Scratch online at scratch.mit.edu or download from scratch.mit.edu/scratch2download. Scratch is developed by the Lifelong Kindergarten Group at the MIT Media Lab.