fxtrade platform user guide - forex & cfd trading platforms...
TRANSCRIPT

fxTrade Platform User Guide

ii
Table Of Contents Introducing fxTrade.......................................................................................................................... 1
The fxTrade Main Window........................................................................................................... 1
What Is fxTrade?.......................................................................................................................... 2
System Requirements.................................................................................................................. 2
Getting Started................................................................................................................................. 3
Quick Start ................................................................................................................................... 3
Log In, Log Out, Disconnect, Lock............................................................................................... 8
Managing Accounts ................................................................................................................... 10
Issue Market or Limit Orders...................................................................................................... 11
Modify Trades and Orders ......................................................................................................... 19
Add Trailing Stops...................................................................................................................... 23
Close a Trade, Order, Position, or Exposure............................................................................. 26
Use Box Options ........................................................................................................................ 29
Customize the Interface ............................................................................................................. 35
Set Up Multiple Profiles.............................................................................................................. 37
Keyboard Shortcuts ................................................................................................................... 41
Using Graph Features ................................................................................................................... 42
What Do Currency Graphs Show?............................................................................................. 42
Currency Graph Quick Start....................................................................................................... 43
Trading Activity Symbols............................................................................................................ 48
Draw Trendlines ......................................................................................................................... 51
Use Overlay and Indicator Studies ............................................................................................ 54
fxTrade Interface............................................................................................................................ 57
Action Buttons ............................................................................................................................ 57
Account Summary...................................................................................................................... 58
Quote List and Quote Panel....................................................................................................... 61
Pull-Down Menus ....................................................................................................................... 63
Transaction History Window ...................................................................................................... 68
User Preferences Window ......................................................................................................... 71
Tables ........................................................................................................................................ 79

1
Introducing fxTrade
This user guide describes how to use the user interface for OANDA's fxTrade and fxTrade Practice (formerly fxGame). If you're not familiar with currency markets and currency trading terminology, consult the Learn section of the fxTrade web site.
The fxTrade Main Window
fxTrade Main Window
The fxTrade platform window is divided into a number of sections:
� Action Buttons: The vertical panel located on the left side of the platform contains a set of action buttons that allows you to perform operations or access additional information.
� Pull-Down Menus: The pull-down menus across the top provide additional functionality.
� Tables: The area located across the top of the fxTrade platform displays various types of activity information in tabular format. Click on a tab to view particular information about your account, such as currently held trades, current open positions, exposure to particular currencies, or the recent Activity Log.
� Account Summary: The area in the middle left of the Platform gives a summary of your account.
� Quote List and Panel: The area at the bottom left displays the currency rates of your choice, continuously updated in real time.

fxTrade Platform User Guide
2
� Graph: Taking up the large part of the window at the bottom-right, the graph displays currency rates over time. It is updated in real time with the latest rates at your chosen granularity. Click over the graph to choose buy/sell positions, modify existing trades, draw box options, or view trendlines or studies.
What Is fxTrade? The fxTrade platform lets you interact with the OANDA fxTrade system. Use it to analyze changes in currency exchange rates, review current currency positions, review past transactions, or issue buy and sell requests.
Some of the key benefits of this platform include:
� It can be run on any of the popular web browsers connected to the Internet (or directly from any computer desktop connected to the Internet).
� Currency exchange rates are continuously updated and displayed in real time.
� All pertinent information appears in one window.
� All interaction with the server occurs over fully encrypted Internet connections.
fxTrade Practice is the demo version of fxTrade. You can use it to trade under real market conditions with real prices and spreads at no financial risk, for as long as you want.
System Requirements The fxTrade platform can run on most browsers connected to the Web. For detailed hardware and software requirements, go to the technical requirements web page.

3
Getting Started
Quick Start This page is for those who don't have the time or patience to wade through an entire user manual. It provides the quickest way to do something (not all the ways).
Work with the Correct Account
If you set up multiple subaccounts, you must make sure you are using the correct account before you start trading:
1. Select Account > Change Account and choose the correct account from the submenu.
2. You can see the current account in the window title.
(Managing Accounts)
Place a Trade
1. From the Quote Panel, click the buy or sell side of the currency you're interested in. An order window appears pre-filled with the correct buy/sell button and the currency pair.
2. Choose market or limit order.
3. Type the number of units you'd like.
4. For limit orders, specify your target exchange rate and the length of time before the order expires.
5. Optionally, specify upper and/or lower bounds, stop loss and/or take profit levels.
6. Click Submit.
(Placing a Trade—Details.)
Customize Your Quote List
1. Click the icon just above the Quotes List box.
2. Add all pairs, or just the pair you want.
3. Click Save.
4. Select Tools > Save Current Profile (to save your layout for future sessions).
(Quotes Tab—Details.)

fxTrade Platform User Guide
4
Close a Trade
1. In the Trades table, click the trade you want to close. The trade ticket window appears. (This same window is used for closing and modifying trades. By default, it is set to close trades.)
2. Click Submit.
(To close all trades, select Account > Close All > Close All Trades.)
(Closing a Trade—Details.)
Modify a Trade
1. In the Trades table, click the trade you want to modify. The trade ticket window appears.
2. Click the Modify radio button.
3. Add stop loss and/or take profit levels or change existing levels.
4. Click Submit.
(Modifying a Trade—Details.)
Set a Trailing Stop
1. Place (or modify) a trade.
2. Click the Trailing Stop button.
3. Use the default value (in price or pips), or type in your own value.
4. Click Submit.
(Trailing Stops.)
Cancel an Order
(An open order is a request that a trade should be opened automatically if the exchange rate of the currency pair reaches a specified threshold.)
1. In the Orders table, click on the order. The order's Ticket window appears, which is used for canceling and modifying open orders. By default, it is set to cancel orders.
2. Ensure the Cancel button is clicked, then click Submit.
(Canceling an Order—Details.)

Getting Started
5
Modify an Order
1. In the Orders table, click on the order. The order's Ticket window appears.
2. Click the Modify radio button.
3. Change any of the units, exchange rate, lower bound, upper bound, stop loss, take profit, or duration values.
4. Click Submit.
(Modifying an Order—Details.)
Change Graph Type
1. Locate the three pull-down menus above the graph.
2. Click the third one.
3. Select the graph type you want.
Note: To change which values are shown on the graph—ask price, bid price, and so on—click on
the Chart Options button above the graph, the third icon from the right.
(Changing Graph Type—Details.)
Draw Trendlines
1. Click the Draw Trendlines button located above the graph, the second icon from the right. A menu appears listing simple and advanced trendlines.
2. Select the type of trendline you want to draw. (For details, see the section on Trendlines.)
3. Place the cursor where you would like the trendline to begin, and click. (For horizontal and vertical trendlines, simply click once to place the line.)
4. Move the cursor where you would like the trendline to end, and click.
Observe Market Sentiment
1. From the Resources menu, select Open Orders Statistics, Open Trades Statistics, or Long-Short Ratios. These tools provide instructions showing you how to interpret these statistics. You can also access these tools directly from the web by visiting the fxTrade News and Analysis web page.

fxTrade Platform User Guide
6
See Your Total Risk to Each Currency
1. Click on the Exposure tab. The overall long or short positions are shown for each currency you have exposure to.
(Exposure Table)
Check the Interest Rates Charged by OANDA
1. Select Resources > Interest Rates.
2. Select the date(s) and the currency you’re interested in. The interest rates appear with the BID (borrowing) and ASK (lending) rates. You receive the BID rate on the base currency you long and pay the ASK rate on the base currency you short, and vice versa for the counter currency.
OANDA Interest Rate Calculation—Details (web page)
Check Your Account History
1. Click on the History action button. The Full Transaction window appears in your browser.
2. To narrow your search, select whether you’d like transactions for a specific date or a range of dates.
3. Click the Filter button to filter your results.
(Transaction History—Details.)
View the Leverage for your Accounts
1. Select Account > Account Details. (A window appears.)
2. The current margin ratio (called "Margin Rate") is listed for each of your accounts.
3. If you want to change the leverage for one or more accounts and go to the next task.

Getting Started
7
Change Current Leverage for an Account
1. Select Account > Change Leverage. (A window appears.)
2. Type your user name, password, and the account number.
3. Select the new leverage amount you’d like.
4. Click Submit (and go back to step 4 for the other accounts you want to change).

fxTrade Platform User Guide
8
Log In, Log Out, Disconnect, Lock
In This Section
� Log In
� Log Out
� Disconnect
� Lock
Log In
1. Before you can log in to fxTrade or fxTrade Practice, you must be a registered user and obtain a user name and password. (Register for a free fxTrade account or open a free fxTrade Practice practice account.)
2. Log in from a Web browser (for fxTrade or fxTrade Practice). Logging in requires that you provide a username and password. Both the username and password are case sensitive. (If you've forgotten your password or are having other problems, go to the troubleshooting page.)
3. If you enter the username and password correctly, a small window appears indicating that the fxTrade Platform is loading (see the image to the right). Do not close this small window or it will close the fxTrade platform. However, you can minimize it so it's not in your way.
4. After a short time, the main fxTrade window appears.
Log Out
You can log out of the fxTrade platform in several ways:
� From the platform's menu, select Connection > Quit. This disconnects you from the server and closes the application completely.
� Close the small pop-up window that appeared when you first opened the platform, or click its Logout button. This disconnects you from the server and closes the application completely.
Disconnect
You can disconnect the fxTrade platform from the OANDA fxTrade server to reduce computer or network resources. The main platform window stays open so you can stay logged in and quickly reconnect later.

Getting Started
9
To disconnect, select Connection > Disconnect from the platform menus, or click on the connection meter at the bottom left of the fxTrade window:
Lock
For your privacy or security, you may want to lock the fxTrade platform. If you do so, you will need to type your password to access it later.
To lock the fxTrade platform immediately, select Connection > Lock.
To set up the platform so it locks automatically after a certain period of inactivity, go to the Misc tab of the User Preferences window.

fxTrade Platform User Guide
10
Managing Accounts
Why Use Multiple Accounts?
You may choose to open any number of accounts in addition to your primary account. You can create accounts in your primary currency, or in other supported currencies.
You may want to open additional accounts for a variety of reasons:
• To keep your funds in a currency other than the currency of your primary account for hedging or personal needs.
• To test trading strategies using a small amount of funds without affecting your primary account
• To allocate funds to your investment manager for your FXManager account
For more information on opening multiple accounts, see the Multicurrency Accounts web page.
Add Accounts
To add an account, select Account > Create Account. A web page appears where you can provide a name for the account, and designate the currency and leverage.
(You will not be able to change the name or currency later, but will be able to change leverage by selecting Account > Change Leverage.)
Important! Make Sure You are Trading with the Correct Account
When working with multiple accounts, you must make sure you are using the correct account before you start trading:
1. Select Account > Change Account and choose the correct account from the submenu.
2. You can see the current account in the window title.
Add or Withdraw Funds from Accounts
For fxTrade users:
1. Log in to the Cash Management System. (Select Account > Transfer Funds from the fxTrade interface.)
2. Select the Transfer Funds option.
For fxTrade Practice users:
1. Select the account you want to fund from your primary account, or from which you want to withdraw funds to return to your primary account.
2. Select Account > Add or Remove Funds. A web page appears where you can choose from various amounts of funds to add to the account (the positive values) or deduct from it (the negative values).

Getting Started
11
Issue Market or Limit Orders
In this section:
• Types of Orders
• Open the Buy/Sell Window to Place Orders
• Place a Market Order
• Place a Market Order with One Click
• Place a Limit Order
Types of Orders
For important information on how orders are processed on the fxTrade Platform, please review the online tutorial, particularly the section, Buying and Selling Currency Pairs.
Market Orders are executed when they are submitted and become trades to buy or sell based on the market exchange rates in effect when the order is executed. Market Orders can be closed at any time (with the difference between execution rates and current market rates paid or charged). Market Orders can have Take Profit or Stop Loss Orders attached to them so they're closed automatically when certain criteria are reached, and upper and lower bounds to ensure they're executed at a rate close to the one in effect when the Order was submitted.
Limit Orders are executed (become a trade) only when certain criteria are met. For example, when the exchange rate reaches a specified threshold before a specified expiry time. Limit orders, if executed, become trades to buy or sell based on the exchange rate at the time of execution.
Open the Buy/Sell Window to Place Orders
You issue Market Orders or Limit Orders for either buy or sell trades from the Buy/Sell window. (You can select the type of order by clicking the window's tabs. A Market Order is the default type.)
You can open the Buy/Sell window in a variety of ways:
� Choose Buy or Sell under the Account menu.
� Click on the Buy/Sell Action button.
� Click on the bid or ask price in the Quote List or Quote Panel.
� Press the keyboard shortcuts: F2 (Buy Market), F3 (Sell Market), F4 (Buy Limit), or F5 (Sell Limit).
� Click the graph at the value you want and select the order type from the menu that appears. The Buy/Sell pop-up window appears once you've made your selection.
� Click the Buy button or the Sell button above the graph at the top right.

fxTrade Platform User Guide
12
Access the Buy/Sell window in various ways
Default Fields
The fields of the Buy/Sell window are filled in depending on how you open the window or which preferences you've set up. You can preset the default number of units, upper/lower bounds, and stop loss/take profit values in the Trading tab of the User Preferences window. (Select Tools > User Preferences.)
Place a Market Order
Market orders are executed when they are submitted. They are executed at the current market price, unless it's outside of upper and lower bounds optionally set by the user.

Getting Started
13
To place a market order:
1. Open the Buy/Sell window (shown to the right) using any of the methods listed above. Note: If the window title is "Limit Order", click the Market Order tab to change it.
2. Define the bid or offer, including the position (Buy/Sell), the market (currency pair), and the number of units. (See below for a complete description of all the options. You can click the arrow above the Submit button to reduce or expand the number of options available.) By default, the upper bound, lower bound, take profit, stop loss or trailing stop are not set. To set them, click the corresponding check box. Their initial default values are determined by the settings in the Trading tab of the User Preferences. Change the field values using the
buttons, or by typing a new value. (Click the radio buttons above these values to view them by quoted price or by difference in pips.)
3. Check the information provided at the bottom of the window to verify your order.
4. When you are ready, click the Submit button. If the order is successful and a trade occurs, then an acknowledgement window appears with a ticket number that you can use for future reference. (You can disable or enable trading confirmation windows in the Trading tab of the User Preferences window.)
5. The Trades and Activity tables are updated and the aggregated effects from this new trade are reflected in the Positions and Exposures tables.
Buy/Sell Window for a Market Order
Important Note
If an order is successful and a trade is executed, the exchange rate obtained for the trade will correspond to the most current exchange rate maintained at the OANDA fxTrade servers and not necessarily the rate you saw in the Buy/Sell Market Order window. This is because the rate may change due to market conditions during the time it takes to process and confirm the order.

fxTrade Platform User Guide
14
To control this situation, you can set lower and upper bounds. The trade will be executed only if the exchange rate at the time of execution is between the two bounds. (You are not required to use lower and upper bounds when requesting a market order.)
Place a Market Order with One Click
1. From the Quote Panel, click the One-Click Mode button:
The Quote Panel adds Units fields (as pictured above) in which you can change the size of the trade. These fields are pre-filled with default values.
2. Scroll to the currency pair you want to trade, verify and update the number of units you want to trade, and then click the BUY or SELL side of the quote.
3. By default, a verification window appears for you to confirm your trade. (To avoid seeing this window, de-select the Confirm One-Click Trades preference in the Trading tab in the User Preferences window.)
Market Order Options
Buy/Sell Choose between buy (long) and sell (short).
To find out about the differences between buy and sell, refer to the currency trading conventions section of the online tutorials.
Market Choose the currency pair you wish to buy or sell from the pull-down menu.
This field shows the following currency pair by default:
� If you click the Buy or Sell button, the currency pair currently shown in the graph.
� If you click the bid or ask price for a particular currency pair in the Quote panel, respectively, the sell or buy order for that currency pair.
(To find out about the three-letter acronyms used for currency codes, go to FXLookUp.)
Units The number of units of the currency pair you wish to buy or sell, expressed in terms of the base currency of the pair.
You can use the following shortcut abbreviations when typing: k = thousand (that is, 10k = 10,000), m = million (that is, 1m = 1,000,000).
You can set a value that will always appear by default in this field on the Trading

Getting Started
15
tab of the User Preferences.
Quote This read-only field is constantly updated to show the most recent exchange rate for the selected currency pair.
Price / Pips
Shows units in either the price, or in the number of pips from the current price (a pip is 1/100th of a price unit).
Lower Bound
The order will result in a trade only if a price is obtained from the OANDA fxTrade servers that is higher than or equal to this limit.
Upper Bound
The order will result in a trade only if a price is obtained from the OANDA fxTrade servers that is lower than or equal to this limit.
Take Profit
If the order results in a trade, then this take profit value will be associated with the trade. Setting a take profit limit closes a position at a specified level, thereby locking in your expected profits.
Stop Loss
If the order results in a trade, then this stop loss value will be associated with the trade. Setting a stop loss limit protects against the possibility of losses "running away" from you. Use this feature as "insurance" if there's a sudden movement in the market at a time when you are experiencing computer problems or are away from your trading screen.
Trailing Stop
Sets a trailing stop.
Read-Only Information
The following read-only fields, shown at the bottom of the Buy/Sell window, provide information on your account and on your proposed trade. These values are automatically updated when you change the other fields in the window.
Units Available
The maximum number of units of the base currency that you can trade for the chosen currency pair. This value is based on your available margin funds. If you already have a position in the pair and you select the opposite trade, the units released from closing the existing trade are added to the total number of units.
PIP Value
Shows the profit or loss in the account's home currency for a 1-pip change in the exchange rate.
Trade Value
The total cost of the trade, in the account's home currency.
Margin Used
The amount of your account's margin used by this trade.

fxTrade Platform User Guide
16
Take Profit
The total amount gained if the exchange rate reaches the Take Profit level, shown in the account's home currency or in pips. (This value is 0 if you haven't set a Take Profit.)
Stop Loss The maximum amount lost if the exchange rate reaches the Stop Loss level, shown in the account's home currency or in pips. (The value is 0 if you haven't set a Stop Loss.)
Place a Limit Order
Limit Orders are executed when the exchange rate reaches a specified threshold, before a specified expiry period.
To place a limit order:
1. Open the Buy/Sell window.
2. Click the Limit Order tab (see the picture to the right).
3. Define the order, including the position (Buy/Sell), the market (the currency pair), the number of units (in the base currency), the quote (your target currency value), and the order's expiry period. (See below for a complete description of the options. You can click the arrow above the Submit button to expand/reduce the number of options available.) By default, the upper bound, lower bound, take profit, stop loss or trailing stop are not set. To set them, click their corresponding check box. Their initial default value is determined by the settings in the Trading tab of the User Preferences.
Change the field values using the buttons, or by typing in a value. (Click the radio buttons above these values to view them by quoted price or by difference in pips.)
4. Check the information provided at the bottom of the window to verify the order.
5. When you are ready to issue the order, click the Submit button. An acknowledgement window appears with a ticket number that you can use for future reference. (You can disable or enable trading confirmation windows in the Trading tab of the User Preferences window.)
Buy/Sell Window for a Market Order

Getting Started
17
6. The Orders Table and Activity Table are updated to reflect the order. The ticket number appears beside its entry.
Important Notes
� Click on an open order in the Orders Table to modify its options.
� You must manually close an order. Closing the browser or disconnecting from the system will not close it.
Limit Order Options
Buy/Sell Choose between buy and sell.
To find out about buy and sell, review the online tutorial, particularly the section, Buying and Selling Currency Pairs.
Market Choose the currency pair you wish to buy or sell from the pull-down menu.
This field shows the following currency pair by default:
� If you clicked the Buy/Sell button, the currency pair currently shown in the graph.
� If you clicked the bid or ask price for a particular currency pair in the Quote panel and then clicked the Limit Order tab, respectively, the sell or buy order for that currency pair.
(To find out about the acronyms used for currency codes, go to FXLookUp.)
Units The number of units of the currency pair you wish to buy or sell, expressed in
terms of the base currency of the pair.
You can use the following shortcut abbreviations when typing: k = thousand (that is, 10k = 10,000), m = million (that is, 1m = 1,000,000).
You can set a value that will always appear by default in this field on the Trading tab of the User Preferences.
Quote The target rate. The order will request a trade when the exchange rate for the selected currency crosses this target rate.
Expires
The amount of time before the limit order will expire.
Use the pull-down menu to choose from periods ranging from one hour to one month (the default is one week). The exact expiry time is displayed at the bottom of the window.
Price / Pips
Shows units in either the price, or in the number of pips from the current price (a pip is 1/100th of a price unit).
Lower Bound
When the quoted rate is reached and a trade is automatically requested, the order will result in a trade only if a price is obtained from the OANDA fxTrade servers that is higher than or equal to this limit. (If the order is not executed, it is canceled.)

fxTrade Platform User Guide
18
Upper Bound
When the quoted rate is reached and a trade is automatically requested, the order will result in a trade only if a price is obtained from the OANDA fxTrade servers that is lower than or equal to this limit. (If the order is not executed, it is canceled.)
Take Profit
The Take Profit Limit comes into effect if the order becomes a trade. Setting a take profit limit closes a position at a specified level, thereby locking in your expected profits.
Stop Loss The Stop Loss Limit comes into effect if the order becomes a trade. Setting a stop loss limit protects against the possibility of losses "running away" from you. Use this feature as "insurance" if the market suffers a downturn at a time when you are experiencing computer problems or are away from your trading screen.
Trailing Stop
Sets a trailing stop.
Read-Only Information
The following read-only fields, shown at the bottom of the Buy/Sell window, provide information on your account and on your proposed trade. These values are automatically updated when you change the other fields in the window.
Expires
The exact date and time when the order will expire. It is updated based on the expiry period you chose.
Units Available
The maximum number of units of the base currency that you can trade for the chosen currency pair. This value is based on your available margin funds. If you already have a position in the pair and you select the opposite trade, the units released from closing the existing trade are added to the total number of units.
PIP Value
Shows the profit or loss in the account's home currency for a 1-pip change in the exchange rate.
Trade Value
The total cost of the order, in the account's home currency.
Margin Used
The amount of your account's margin used by this order.

Getting Started
19
Modify Trades and Orders
In This Section
• Modify a Trade (Market Order)
• Modify a Limit Order
Modify a Trade (Market Order)
To modify the stop loss and take profit limits for a specific trade:
1. Click on the trade in the Trades Table. Its Ticket window appears.
2. Click the Modify radio button.
3. Update the options and click Submit. (For details on these fields, see Place a Market Order.)

fxTrade Platform User Guide
20
Modify Trade Window
Alternatives
There are several other ways to modify take profits or stop losses:
• Click on the trading activity icon for the trade and choose to modify the stop loss or take profit from the menu that appears. You can then drag a line to where you want to set the new value.
• Click on a trade's corresponding red (stop loss) or green (take profit) line on the graph. Choose the Modify menu option. Drag the line to where you want the new value and click the mouse again to set the new take profit or stop loss value. (Move the cursor outside of the graph area to cancel the modification.)

Getting Started
21
Modify a Limit Order
Because a limit order is not yet executed, you can modify any of its parameters (including the number of units or the quote value). After a limit order is executed and becomes a market order (that is, an open trade), you can only change its Stop Loss or Take Profit values.
To modify a limit order:
1. Click the Orders tab. Limit orders are identified in the first column as "Long" or "Short." (Entries identified as "TP" or "SL" are for market orders and will only let you change the Take Profit or Stop Loss values.)
2. Click on the order in the Orders Table. Its Ticket window appears.
3. Click the Modify radio button.
4. Add, remove, or change the options. (For details on these options, see the Issue a Limit Order topic.)

fxTrade Platform User Guide
22
Modify Limit Order Window
Alternative
You can also modify a limit order by clicking on its trading activity icon and selecting modify order from the menu that appears.

Getting Started
23
Add Trailing Stops
What is a Trailing Stop?
A trailing stop allows a trade to continue to gain in value when the market price moves in a favorable direction, but automatically closes the trade if the market price suddenly moves in an unfavorable direction by a specified distance.
Technically, a trailing stop is a loss order that makes use of an automatically-adjusted stop-loss limit instruction to maintain a trigger price. The trigger price dynamically follows the market price in the favorable direction at a specified distance. For example,
• In the case of a long position, the trigger price keeps moving up if the market price moves up, but stays unchanged as the price moves down.
• In the case of a short position, the trigger price keeps moving down if the market price moves down, but stays unchanged as the price moves up.
What Happens After You Set a Trailing Stop?
When the market price moves in a favorable direction (up for long positions, down for short positions), the trigger price follows the market price by the stop distance you specified (plus the spread). That is, the trigger price is calculated from the ask price (for short market orders) or the bid price (for long market orders).
If the market price moves in the opposite (unfavorable) direction, the trigger price stays stationary and the distance between this price and the market price becomes smaller. If the market price reverses itself again and moves back in a favorable direction so it exceeds the maximum stop distance plus the spread, the trigger price will start following it again.
If the market price continues to move in an unfavorable direction until it reaches the trigger price, an order is triggered to close the trade. The fxTrade server closes the trades automatically, whether or not you are signed in.

fxTrade Platform User Guide
24
Caution!
Trailing stops, just like regular stop-loss orders, must be used with caution. If you use a small stop loss distance, even a relatively slight drop in the exchange rate would trigger your stop loss order. A drop of only 20 or even 50 pips, for example, is really not much of a fluctuation in a typical market, and it is quite likely that this level could be reached in the normal ebb and flow of daily prices.
You do not want to set the stop loss at such a small distance that it will be triggered by normal market fluctuations, guaranteeing a loss without any possibility of benefiting from future favorable movements in the market. The irony with trailing stops is that even though they are designed to protect you from extreme losses, using them carelessly may actually increase your losses.
To Set a Trailing Stop:
1. Use your favorite method to place a limit order or a market order.
Note: To use trailing stops with one-click trades, you must set up your default trailing stop values in the user preferences. (See below.)
2. In the Limit Order or Market Order window (where you place the trade), click one of the Price or PIPS radio buttons to indicate whether you want the trailing stop to be calculated using the base price, or by the number of pips.

Getting Started
25
3. Click the check box beside Trailing Stop:
4. Type in the number of trailing stop units (in price or pips), or click the up/down arrows to adjust the default amount. (You cannot set a trailing stop for less than 10 pips or more than 1000 pips. This upper limit will be increased for future releases.)
This distance is shown in the T/S column of the Trades table or Orders table.
Change Default Preferences for Trailing Stops
To enable trailing stops by default, and to set the default trailing stop value, select Tools > User Preferences, and click the Trading tab.

fxTrade Platform User Guide
26
Close a Trade, Order, Position, or Exposure
In This Section
� Close a Trade
� Cancel an Order
� Close a Position
� Close an Exposure to a Currency
Important Note
When you close the fxTrade Platform or log off, you do NOT automatically close any open trades or orders. You must take one of the following actions to close open trades or orders.
Close a Trade
Click on a specific trade in the Trades Table to view a trade ticket populated with the details of the trade. To close the trade, click the Close radio button, and then click Submit.
Close Trade Window
You can also close a trade by clicking on its trading activity indicator and selecting close trade from the menu that appears.

Getting Started
27
To close all trades, select the menu item Account > Close All > Close All Trades.
Cancel an Order
To cancel an order, do one of the following:
• Click on a specific order in the Orders Table to view a trade ticket showing the details of the order. Select the Cancel radio button, then click Submit.
• Click on a trading activity indicator and select cancel order from the menu that appears.
• To cancel all orders, select the menu item Account > Close All > Close All Orders.
Close a Position
The Positions Table shows the aggregate of all trades for each currency pair. Click on a specific pair to close your position for that pair (that is, to close all of the open trades related to that pair). A confirmation window asks you to verify that you want to close the position. Click OK to confirm.
Close Position Confirmation Window
When you close a position, it will simultaneously close all the individual open trades in that pair. For example, closing a EUR/USD position closes all open EUR/USD trades. (They will all be removed from the Trades Table.)
Close an Exposure to a Currency
The Exposure Table shows the aggregate of all positions and individual trades for each currency. To close all trades related to a specific currency, click on that currency in this table. A confirmation window asks you to verify that you want to close the exposure. Click OK to confirm.

fxTrade Platform User Guide
28
Close Exposure Window
When you close an exposure, it will simultaneously close all positions and individual trades (both short and long) involving that currency. For example, closing a EUR exposure closes ALL transactions with EUR as the base or quote currency.

Getting Started
29
Use Box Options
In This Section
� How Do Box Options Work?
� Define and Purchase a Box Option
� Hide/Show Box Options
� Box Option Visual Cues
� Sell a Box Option
� Box Option Fields
How Do Box Options Work?
With Box Options, you use your cursor to draw a box around expected future price targets or resistance/support levels, and then specify if the box will be hit or missed. After you specify the purchase price you will pay when you submit the Box Option, you are given a quote from OANDA for the payment you'll receive if the exchange rate moves to hit the hit-box or miss the miss-box. The fxTrade system determines this payment by calculating the probability that the box will be hit (or missed) based on market trends and on the boundaries and position of the box. The lower the probability the box will be hit (or missed), the higher the quoted payment.
If the midpoint of the exchange rate price (not the bid or ask price) crosses into a hit-box (or if the midpoint misses a miss-box completely), you receive the quoted payment. There is no payment if the exchange rate "misses" a hit-box, or "hits" a miss-box—your initial payment is forfeited.
Box Option purchases are immediately debited from your account at the time of purchase, in real currency—there is no option to purchase boxes on margin. Boxes which have not yet been hit or missed (and aren't yet timed out) are said to be "open". Open boxes can be sold at a quoted price that is a fraction of the final payout amount. This quoted price varies over time and is displayed in the Boxes table.
In technical terms, a box option is an exotic cross between a binary option and a corridor option. Read more about box options on the fxTrade web site.
Restrictions: Certain restrictions apply. For example, box options are not available to Canadian residents and are not supported on all pairs.
Define and Purchase a Box Option
1. To define a box option, either:
• Click on the Price Box button above the platform graph.
• Click on an empty area of the graph and select Price Box from the menu that appears.

fxTrade Platform User Guide
30
2. Using your mouse, draw a box on the screen. This box represents the minimum and maximum price levels and the start and end times for when these levels will be in effect.
• Place the cursor at the lower right corner of the box you want to draw (that is, at the farthest time and lowest price), and then click.
• Drag the cursor up and to the left to draw the box. If the box you're drawing is valid, it stays white. It turns yellow if it's not valid (for example, if you pull the box so far to the left that it's less than 15 minutes from the current time).
• When the box is drawn to your liking, click to complete the box. Don't worry if what you've drawn is not exact. You'll be given the opportunity to manually adjust it in the Buy Box Option window that appears next.
3. The Buy Box Option window appears, prompting you to specify your purchase price and letting you manually fine-tune the boundaries of the options box.

Getting Started
31
4. Choose from the following radio buttons: Hit: Specifies that the box should be a "hit" box. Miss: Specifies that the box should be a "miss" box. Visually, a hit-box is depicted as a filled-in box (the outline in the above picture is for a "Hit" box), while a miss-box is depicted as an outlined box with a hollow center.
5. In the Purchase Price field, enter the price you want to pay for the box. This is the amount of money you are willing to risk on the Box Option, and will be deducted from your fxTrade account when you submit the Box Option.
6. The system calculates a payment for the box based on your purchase price and on market conditions. Note: The fxTrade server will not allow you to purchase a Box Option whose payment is less than its purchase price.
7. Adjust the times and levels if you didn't draw them correctly, or if you want to influence the payment value.
8. When you are satisfied with the information in all the fields, click Submit. The Box Option purchase price amount is immediately deducted from your account balance.
9. Go to the Boxes table to track the current value of the Box Options.
Note: Because the mid-price of the exchange rate must cross a hit-box or avoid a miss-box for payments to occur, use the Candlestick graph to best see whether or not your box is successful.
fxTrade Platform User Guide
32
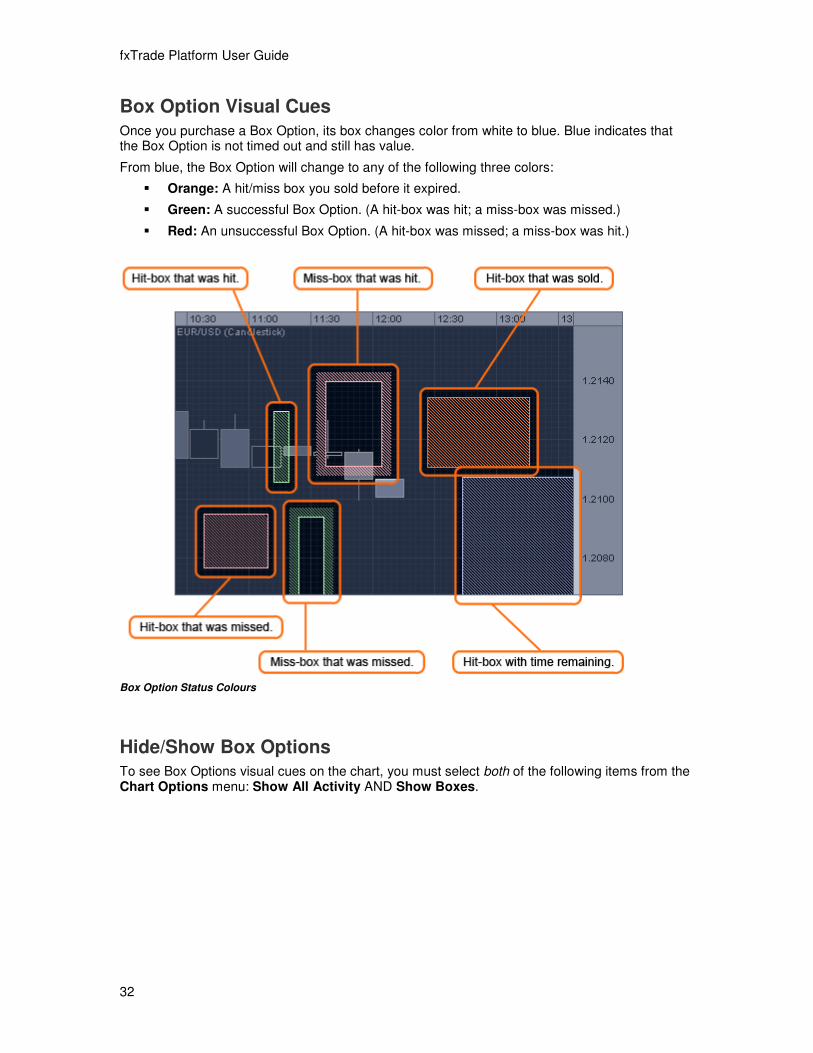
Box Option Visual Cues
Once you purchase a Box Option, its box changes color from white to blue. Blue indicates that the Box Option is not timed out and still has value.
From blue, the Box Option will change to any of the following three colors:
� Orange: A hit/miss box you sold before it expired.
� Green: A successful Box Option. (A hit-box was hit; a miss-box was missed.)
� Red: An unsuccessful Box Option. (A hit-box was missed; a miss-box was hit.)
Box Option Status Colours
Hide/Show Box Options
To see Box Options visual cues on the chart, you must select both of the following items from the Chart Options menu: Show All Activity AND Show Boxes.

Getting Started
33
Both of these Chart Option menu items must be selected to see Box Options.
(To hide Box Options, deselect either of these menu items.)
Sell a Box Option
To sell an open Box Option at the quoted resale value, either:
• Click on the box in the graph area and select "sell box" from the menu that appears.
• Click on the Boxes tab in the tables section of the main window, and then click on the Box Option you want to close:
Either method displays the current resale value of the box and prompts you to confirm the sale.
Box Option Fields
Hit/Miss Click one of these buttons to specify whether you expect the future exchange rate to hit or miss the box.
Purchase Price
Specify how much you would like to risk. This amount will be deducted from your fxTrade account.
The initial value shown in this field is set by the value specified in the User Preferences (Trading tab).
Payment The amount you will receive if your hit-box is hit or miss-box is missed (this figure is automatically generated by the fxTrade servers based on current and projected market conditions).
Minimum Payment
If current and projected market conditions change over the time it takes you to submit a Box Option, the posted value of the Box Option payment may end up being different from the value shown in the Payment field. The Minimum

fxTrade Platform User Guide
34
Payment field lets you specify the minimum acceptable payment should this change occur.
By default, this field is set to the value specified in the User Preferences (Trading tab). To have the Box Option rejected if the payment will be less than what's shown in the Payment field, type that payment value into this field.
Start Time Specify when you would like the box to begin. The start time must be at least 15 minutes in the future and corresponds to left side of the box.
End Time Specify when you would like the box to end. The End Time must be at least 5 minutes after the Start Time and cannot be more than 180 days into the future. The end time corresponds to the right side of the box.
Maximum Level
Specify the maximum exchange rate for the box. The maximum level corresponds to the top of the box. The maximum level and minimum level must be at least 10 pips apart.
Minimum Level
Specify the minimum exchange rate for the box. The minimum level corresponds to the bottom of the box. The maximum level and minimum level must be at least 10 pips apart.

Getting Started
35
Customize the Interface
In This Section
� Hide and Show Panels in the Window
� Change the Appearance and Behavior of the Chart
� Change the Appearance and Behavior of the Interface
� List Only Certain Currency Pairs
� Pre-Fill Trading Values and Control Other Trading Behavior
� Change International Settings
� Save Different Sets of Customizations in Different Profiles
� Add Sound Alerts
Save your changes!
Important! To save any customization changes you make, always select Tools > Save Current Profile. This saves your changes for future sessions.
Hide and Show Panels in the Window
Select Tools > View, then click the type of control you want to hide/show (by default, all are checked, meaning all panels are visible).
Change the Appearance and Behavior of the Chart
Select Tools > User Preferences and click the Chart Tab to change the appearance and behavior of chart features such as:
� lines pinpointing the cursor
� information boxes
� trendlines (colour, style, and behavior)
� weekend data
Change the Appearance and Behavior of the Interface
� To change the font size, select Tools > Font Size.
� To switch to a different colour scheme, select Tools > Colour Scheme.
� To use your own colours, select Tools > Colour Scheme > Edit Custom Theme. A list of all interface controls is shown in the Theme Editor. Update the colours for any of these controls using either RGB colour values or hexadecimal colour values. (If you do not already have a prepared palette of particular colour values and need to access colour value lists, search on the Internet for the strings

fxTrade Platform User Guide
36
"RGB color values" or "hexadecimal color values".) Click Save to keep your changes. To switch to your custom theme, select Tools > Colour Scheme > Custom.
� For miscellaneous interface changes (for example, to show dual bid/ask columns, colour coded tables, or pipettes; or to sort subaccounts or lock the screen after a period of time) select Tools > User Preferences, then click the Misc Tab.
List Only Certain Currency Pairs
To specify which currency pairs are shown in the fxTrade interface (in places such as the Quotes Panel, the Quote List, the quotes pull-downs and other currency lists), select Tools > User Preferences, and then click the Quotes Tab.
(Find out about the 3-letter acronyms used for currency codes.)
Pre-Fill Trading Values and Control Other Trading Behavior
Select Tools > User Preferences and click the Trading Tab to:
� Pre-fill values in the Market Order or Limit Order windows so you can quickly place default trades (you can specify default values for each currency pair).
� Enable bounds, stop loss, or take profit by default.
� Turn off confirmation windows, including the window to confirm if a position is being reduced, closed, or reversed by a new trade.
Change International Settings
To change the language or to set preferences related to your geographic location (such as the number format and time zone), select Tools > User Preferences, and then click the Locale Tab.
Save Different Sets of Customizations in Different Profiles
You can customize the interface and then save your customization settings in a separate profile that you can use for certain occasions (for example, for particular trading strategies, currency pairs, or subaccounts).
For more information, see Set Up Multiple Profiles.
Add Sound Alerts
Go to the Sounds tab in Tools > User Preferences to add your own sound alerts for various events. You can use any aiff, au, midi, or wav file located on your computer.

Getting Started
37
Set Up Multiple Profiles
In This Section
� Why Use Multiple Profiles?
� Update The Current Profile With Recent Changes
� Create a New Profile and Switch to It
� Assign A Profile to an Account
� Delete Unused Profiles
Why Use Multiple Profiles?
You may want to set up various profiles, each with unique settings. By switching from one profile to the other, you can quickly optimize your fxTrade interface for different trading strategies, currencies, or subaccounts. For example, you may want to view simple moving averages while trading USD/CAD, and pivot points while trading NZD/USD.
A profile includes custom settings such as:
• currently viewed currencies and tabs
• trend lines, indicator graphs, and overlays
• colour scheme
• open tabs, window layouts, open windows, and detached summaries
• settings from Account > User preferences, including chosen currency pairs and default account
Update the Current Profile with Recent Changes
To update the current profile with your most recent interface changes, select Tools > Save Current Profile.
(When you save a current profile with no assigned name, it is given the name of the current account.)
Create a New Profile and Switch to It
To save the current interface to a new profile:
1. Select Tools > Profile Manager > Save Current Profile As.

fxTrade Platform User Guide
38
The Profile Manager window appears with its Save As tab open.
2. Type the name of the new profile in the Save As field.
3. The new profile appears in the Tools > Profile Manager menu. Switch to it at any time from this menu.
Assign a Profile to an Account 1. Select Tools > Profile Manager > Manage. The Profile Manager window appears with
its Assign tab open.
2. Use the drop-down menu to assign a specific profile to any one of your accounts.

Getting Started
39
3. Select Account > Change Accounts > Change Profiles on Switch.
• If this menu item is checked and you switch accounts, the assigned profiles are used.
• If it is not checked, the current profile stays when you switch accounts, even if they are assigned different profiles.
Delete Unused Profiles
To delete the profiles you're no longer using:
1. Select Tools > Profile Manager > Manage. The Profile Manager window appears with its Assign tab open.
2. Click the Delete tab.
3. Click the Delete checkboxes beside the profiles you want to delete, and then click the Delete Marked Profile button. (You can delete any profile except for the one grayed out, which is the one currently used for the active account.)

fxTrade Platform User Guide
40
The deleted profiles no longer appear in the Tools > Profile Manager menu.

Getting Started
41
Keyboard Shortcuts Keyboard shortcuts are provided for the most common actions on the fxTrade platform so you can quickly access these actions. Press the F1 button on your keyboard to see a list of all the available keyboard shortcuts.
Keyboard Shortcuts

42
Using Graph Features
In This Section
• What Do Currency Graphs Show?
• Currency Graph Quick Start
• Trading Activity Symbols
• Draw Trendlines
• Use Overlay and Indicator Studies
What Do Currency Graphs Show? The currency rate graphs used in the fxTrade platform show how currency exchange rates change over a period of time ranging from minutes to months. All charts are updated in real time as OANDA sends out the latest currency rates.
In addition to the standard chart types, there are also a number of overlays and indicators available through the Platform. For detailed information on each of the fxTrade trendlines, overlays, and indicators, go to the fxTrade Graphing Indicators web pages.
fxTrade Graph

Using Graph Features
43
Currency Graph Quick Start
Choose your currency pair
Use the top left drop-down menu to choose the currency pair (for example, EUR/USD or USD/CAD):
Notes:
• To find out about the 3-letter acronyms used for currency codes, go to FXLookUp.
• To choose which pairs are available in this list, go to Tools > User Preferences > Quotes.
Set time period granularity
The purpose of using different granularities is to focus on short-term vs. long-term trends. To set the granularity, use the second drop-down menu at the top left:
Choose from a granularity ranging from 5 seconds (the finest granularity, which graphs prices for roughly the last 40 minutes), to 1 day (the largest granularity, which graphs prices for roughly the last year).

fxTrade Platform User Guide
44
Specify the graph type
Use the third drop-down menu from the left to choose the type of line that's plotted on the graph.
Graph Type Example
Ask Price - Average Price - Bid Price A line showing one of the ask price, average price, or bid price.
If these lines were all plotted on the same graph, the ask price would be higher than the other lines, the bid price lower, and the average price midway between the two.
Candlestick Candlesticks show the open, close, maximum, and minimum values for each period.
The body length of the candlestick shows the relative change in the open and close rates for the reporting period. The longer the body, the more volatile the swing between the open and close rates.
A hollow candlestick points to a rising trend: the bottom of the body represents the opening rate, while the top shows the closing price. A filled candlestick shows a decreasing trend, with the opening rate at the top of the body and the closing rate at the bottom.
The top end of the upper vertical line represents the average of the highest ask and bid rate reached during the interval; the bottom end of the lower vertical line represents the average of the lowest bid and ask rate reached

Using Graph Features
45
during the interval.
For details on how to interpret candlesticks, see the tutorial, Candlesticks Formation in Forex in the online forex tutorial, Introduction to Currency Trading.
Heikin-Ashi The Heikin-Ashi (meaning "average bar" in Japanese) is a modified candlestick chart where the open-high-low-close (OHLC) values take the previous period into account to better isolate trends. Other than using different calculations, the chart acts and looks the same as the candlestick chart.
OHLC values are calculated from midprice values as follows:
• Open: The midpoint of the current Heikin-Ashi open and close values for the previous bar.
• High: The high (or the Heikin-Ashi Open if it was higher).
• Low: The low (or the Heikin-Ashi Open if it was lower).
• Close: The average of four bar prices: open, high, low, and close.
HLC (High-Low-Close) Bar The HLC bar shows highs and lows for each period using a vertical bar, with a horizontal tick to the right showing the closing price.
The highest point of the vertical bar represents the average of the highest bid and ask rate reached during the period; the lowest point represents the average of the lowest bid and ask rate. The horizontal tick represents the closing mid-price for the period (that is, the sum of the closing bid and the ask rate divided by two).
Tips: Hold the mouse over a bar to see details. Right-click over any bar to add colors for rising or falling bars.

fxTrade Platform User Guide
46
OHLC (Open-High-Low-Close) Bar The OHLC is similar to the HLC bar, in that it shows highs and lows for each period using a vertical bar, with a horizontal tick to the right showing the closing mid-price. It also provides a horizontal tick to the left, showing the opening mid-price for the period.
Minimum/Maximum Chart The Min/Max chart plots the minimum and maximum prices for the interval chosen. The upper boundary represents the maximum ask price, while the lower boundary represents the minimum bid price.
The Min/Max chart is different from the Closing Price chart because minimum and maximum prices may not be the opening and closing prices for that interval.
Add price lines
Click the Chart Options button (located near the top-right corner above the graph) to add horizontal lines on the chart so you can track the current ask price, average price, or bid price. Select Show Average Position to add a horizontal line showing the average position of your current trades for the currency pair shown in the graph. (Your average position is shown in the Positions table.)
Seeing these lines may help you track the status of your trades, because you will see when the current price is approaching trading activity symbols or your average position.
Move in, out, and around the graph
Scroll: The scroll bars are located on the right and at the bottom of the graph. Use them to see information that is hidden from view.
Zoom In/Out: Zoom to change the level of detail displayed and use different perspectives to better understand short-term and long-term trends. Zooming does not change the granularity of the graph, only your view of it. The price (vertical) and time (horizontal) zoom controls are located

Using Graph Features
47
at the bottom right corner, next to the scroll bars. Click the or buttons to zoom in or out respectively. Or, use the slider bar to manipulate the zoom level.
Reset: The button on the bottom-right corner resets the graph view to default scroll and zoom settings.
Place a trade from the graph
Click on any empty part of the graph. Place your trade from the menu that appears:
Note: The limit order quote field is filled with the value of the current cursor position.
Open the chart in a separate window
Open the current chart in a new window: Click the button in the upper right corner of the chart.
Open a new chart for a different currency pair: Click on the currency pair codes in the Quotes List.
Hide or simplify the chart
To hide the chart, de-select the check box at Tools > View > Graph.
For a basic chart view where scroll bars and other controls are hidden, click the Chart Options
button located at the top-right corner of the graph and select Basic Chart View from the menu that appears. (The menu choice changes to Advanced Chart View; select it to return to the default chart view.)
Change colours
To change the colour of the graph, click directly over the exchange rates being plotted on the chart. A menu appears with a list of colors.

fxTrade Platform User Guide
48
To customize the colors used in the interface (including the colors used in this menu), select Tools > Color Scheme > Edit Custom Theme.
View additional information
• A set of crosshair lines follows your mouse to indicate the price and time. (You can turn off either the horizontal or vertical crosshair lines in the Chart tab of the User Preferences.)
• The Graph Information Box in the lower left corner of the graph shows precise exchange rate information for the current cursor location. This information varies by chart type.
Print the chart
To print the chart, click the Chart Options button located at the top-right corner above the graph and select Print from the menu that appears.
Trading Activity Symbols fxTrade uses distinct symbols to indicate particular trading activities and highlight when they occur (for example, when a limit order was placed or when a take profit was executed).
Symbol Summary
Note: This table shows the default platform colours. (To change these colours, select Tools > Colour Scheme > Edit Custom Theme.)
Icon Action Example
Buy Market
A market buy immediately closed.

Using Graph Features
49
Buy Limit Order
A limit buy order later closed.
Buy Limit Order (Original)
A limit buy order modified with a new take profit.
Sell Market
A sell market trade (immediately closed).
Sell Limit Order
A sell limit order (later filled).
Sell Limit Order (Original)
A sell limit order, modified with a new take profit value.
Intervening modification
(Used when there's more than one modification to an order.)
A buy limit order modified twice.
Limit Order, Cancelled or Expired (Sell or Buy)
A buy limit order expired (without the take profit being reached).
A sell limit order immediately canceled.

fxTrade Platform User Guide
50
Take Profit order limit (green line) and Stop Loss order limit (red line).
(To change your take profit or stop loss order limits, click on these lines and drag them up and down the graph.)
A buy market with take profit (top, green) and stop loss (bottom, red).
A sell market with take profit (bottom, green) and stop loss (top, red).
Stop Loss Triggered
A stop loss triggered on a buy market trade.
Take Profit Triggered
A take profit triggered on a market buy.
Margin Closeout
A market buy is closed by a margin closeout during an unexpected market change.
Actions You Can Take Using Trading Activity Symbols
To see basic information
Hold the cursor over the symbol to see its information in the upper left corner of the graph.
To modify or close an active order or trade
For active orders or trades, click on their symbol and choose from the options in the submenu:

Using Graph Features
51
To see detailed closing information
For completed orders or trades, click on their symbol and choose view details from the submenu:
Show or Hide Trading Activity Symbols
Click the Chart Options button located on the top-right corner above the graph to:
• Show (or hide) indicators for all activity (including historical activity)
• Show only those indicators for active trades and orders
Control the display of trading activity symbols
Draw Trendlines Trendlines are lines you can add to the chart to mark times or prices, or to help identify trends in the movement of currency prices.
Why Use Trendlines?
Trendlines can be used for many different purposes:
Directional indicators: Peaks or troughs over a particular period may be joined with a trendline to identify the general direction. For example, if the trendline is a downward sloping line and the curve breaks the trend by rising above the line, this might be seen as a buying opportunity.

fxTrade Platform User Guide
52
Conversely, if the trendline is an upward sloping line and the curve breaks the trend by dropping below the line, this might be seen as a selling opportunity.
Support and resistance lines: When the price goes below trendlines horizontally drawn across previous lows, it may be a selling opportunity. Conversely, when the price goes above trendlines horizontally drawn across previous highs, it may be a buying opportunity.
Channels: If the currency price line stays between two parallel lines connecting peaks and troughs, this is a "channel" where fluctuations are "range-bound." If the currency price breaks out of this channel, it could be considered a signal of a change in direction.
Add Trendlines
To work with trendlines, click the button located in the top right corner above the graph. A menu appears for you to choose from available trendlines and choose trendline options:
To draw horizontal or vertical trendlines, choose their menu item, move the cursor to the place on the graph where you want to place the trendline, and then click once.
To draw other types of trendlines, choose their menu item, move the cursor to the place on the graph where you want to start the trendline, and then click once. Then move the cursor to the place where you want the trendline to end, and click again.
Types of Trendlines
For detailed information on every type of trendline, go to the Forex Indicators web pages.
Basic Trendlines
Basic trendlines are straight lines that you can draw on the graph to mark times, values, or trends. The following basic trendlines are available from the Trendlines menu:
• Vertical Trendline: Used to mark a time period.
• Horizontal Trendline: Used to mark a price.
• Trendline: A diagonal line to mark trends or movement on the graph. (You can set trendlines to "auto-extend" left or right from the User Preferences Chart tab.)

Using Graph Features
53
Advanced Trendlines
Advanced trendlines include the following:
� Fibonacci Arc
� Fibonacci Fan
� Fibonacci Retracement
� Fibonacci Time Zone
� Pivot Points
� Speed Lines
For information on these more sophisticated trendlines, go to the Forex Indicators web pages.
To include a numbered label on advanced trendlines (so you can distinguish them from each other), select the Show Trendline Labels check box in the Trendlines menu.
Manage Trendlines
Click the button located in the top right corner above the graph. Use the bottom menu items to:
• Show or hide trendlines
• Show or hide trendline labels (available for advanced trendlines)
• Turn on magnetic trendlines (so trendlines stick to the graph when you plot them)
• Remove all trendlines for the currently viewed currency pair
Modify Individual Trendlines
Click over an existing trendline to modify it. A menu will appear:

fxTrade Platform User Guide
54
Use this menu to:
� Remove the trendline.
� Move or duplicate the trendline. (Then click on the corresponding area on the chart where the trendline is to be moved or duplicated. Move the cursor outside of the graph area to cancel the action.)
� Move the trendline's endpoints.
� Add a Fibonacci study or Speed Lines to the trendline, or remove them.
� Change the line's colour or style.
Use Overlay and Indicator Studies There are a number of overlays and indicators to help you interpret the chart.
• Overlays are positioned directly over the price curve. You can see their value at the cursor in the upper left hand corner.
• Indicators are separate curves appearing under the price curve.
For full descriptions, including interpretations and formulas, go to the Forex Indicators web pages.
Add an Overlay or Indicator
1. Click the drop-down arrow for the menu located in the bottom-left corner of the graph.

Using Graph Features
55
Note: If you can't see this menu, you may need to switch to the advanced chart view.
Click the Chart Options button located in the top-right corner above the graph, and select Advanced Chart View from its menu.
2. Select the overlay or indicator type from the menu that appears. (For full descriptions of all the choices, go to the Forex Indicators web pages.)
3. A set of parameters appears to the right of the menu. These parameters are unique for each study. Default values are provided for your convenience. You can change these parameters if you want.
4. Click to add the study to the chart area.
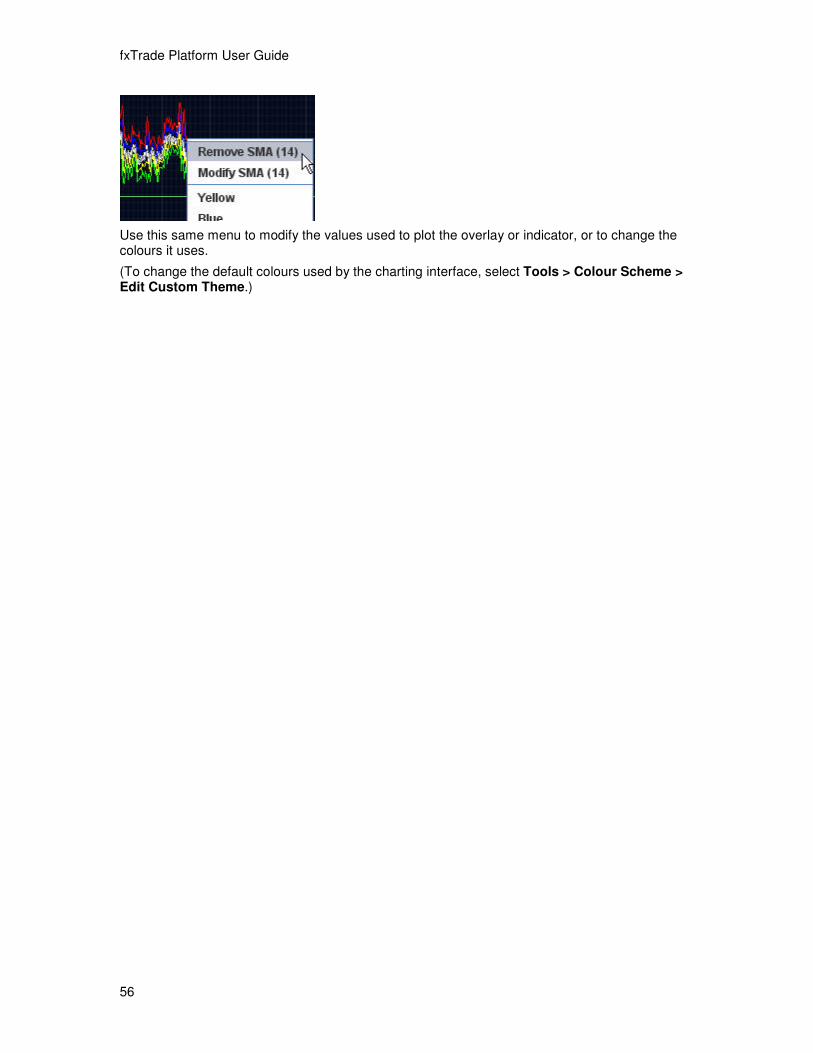
Modify or Remove an Overlay or Indicator To remove an overlay or indicator from the graph, click over it and select Remove from the pop-up menu that appears:
fxTrade Platform User Guide
56
Use this same menu to modify the values used to plot the overlay or indicator, or to change the colours it uses.
(To change the default colours used by the charting interface, select Tools > Colour Scheme > Edit Custom Theme.)

57
fxTrade Interface
Action Buttons The fxTrade Platform provides the following action buttons in a panel on the left side. Click a button to invoke the action (it will display an fxTrade window, or another browser window):
Opens the Buy/Sell window where you can request a market or limit order.
Opens a new browser window with access to 4CAST news, commentary, and analysis.
Opens a new browser window with the latest currency news.
Opens the Transaction History report in a new browser window. The Transaction History shows all transactions since you started trading on fxTrade, with the option to filter the list by choosing date ranges.
Opens a new browser window with access to FXMessage, OANDA's online forum that allows you to participate in discussions with other traders and currency trading experts.
Hide Action Buttons
To hide or show the action buttons, select the Tools > View > Action Buttons menu item.

fxTrade Platform User Guide
58
Account Summary
In This Section
� What Is The Account Summary?
� Account Summary Actions
� What's Shown in the Account Summary's Basic View?
� What's Added to the Account Summary's Extended View?
What Is The Account Summary?
The Account Summary is a small table on the main fxTrade window that provides a summary of your account status. The information displayed in the Account Summary is continuously updated in real time and is always shown in your home currency (indicated in parentheses next to the Account Summary title).
Account Summary Actions
� Click for the basic view.
� Click for the extended view.
� Click to open the Account Summary in a separate window.
� Click to collapse the Account Summary. (You may want to do this to see more quotes listed in the Quote List/Quote Panel.)
� Click to expand the Account Summary when it's collapsed.
Note: To hide the Account Summary completely, select Tools > View > Account Summary.
What's Shown in the Account Summary's Basic View?
Account Summary Basic View
(To go to the extended view, click the icon.)
The following fields are shown in both the Basic view and the Extended View:
Balance The amount of cash in your account. Your balance changes when you realize a profit or loss on your positions, earn/pay interest, or deposit/withdraw funds. This value does not change with the current exchange rate on your open positions.
Unrealized P&L
The current profit or loss total for all your open trades. If you were to close all of your open trades at this exact point in time, this amount would be "realized" and added to the Realized P&L.
(Unrealized P&L does not include interest earned or paid on your trades or account balance.)

fxTrade Interface
59
Box Resale Value
The amount you would receive if you sold all your Box Options at their current resale value.
Realized P&L
The amount of profit or loss you have incurred with your trading activity to date. This value changes when you realize profits or losses on your open positions.
(Realized P&L does not include any interest that has been earned or paid on your trades or account balance.)
Margin Used The amount of your account balance and Unrealized P&L that is reserved for margin. This amount is equal to the Position Value multiplied by your margin ratio. The margin ratio is the inverse of leverage; for example, 50:1 leverage equals a 0.02 margin ratio.
See OANDA's margin rules for more information on how margin works. To verify the leverage used for your accounts, select Account > Account Details.
Margin Available
The amount of your Balance and Unrealized P&L available as margin for new trading transactions. It is equal to your Net Asset Value minus Margin Used.
What's Added to the Account Summary's Extended View?
Account Summary Extended View
(To go to the basic view, click the icon.)
The following fields are shown only in the Account Summary's extended view. (To go to the
extended view, click the icon at the top right corner of the Account Summary.)
Unrealized P&L (%)
The unrealized Profit and Loss shown as a percentage of your balance.
Net Asset Value
Your Account Balance, plus Unrealized P&L. When your Net Asset Value drops to half of the Margin Used (or, when it reaches the Margin Closeout value), a margin closeout is triggered.
Margin Alert The minimum required margin. If your Net Asset Value falls below this amount at 4 p.m. Eastern (New York) time, you are sent a margin alert.

fxTrade Platform User Guide
60
Margin Closeout
The Margin Used divided by two. A margin closeout will occur if your Net Asset Value falls to this amount.
Margin Percent
Your Net Asset Value divided by Position Value and multiplied by 100. This is another method of measuring how close your positions are to a margin closeout.
Depending on the leverage, your choice of trading pairs, and other regulatory requirements, you will get a margin closeout when your Margin Percent declines to 1.00 (if you have selected 50:1 leverage and traded only major pairs), 1.25 (if 40:1), 1.67 (if 30:1), 2.00 (if 25:1), 2.50 (if 20:1), or 5.00 (if 10:1).
Position Value
The value of your position(s) expressed in the current account's home currency.
<Number> buttons
The numbered buttons let you switch between your primary account and subaccounts. The values in the Account Summary change to reflect the values for each account.
(To enable these buttons, select Tools > Preferences, go to the Misc tab, and then click on the Show Sub Account Switcher check box.)

fxTrade Interface
61
Quote List and Quote Panel
In This Section
� What Are The Quote List and Quote Panel?
� How Rates Are Shown in the Quote List and Quote Panel
� Actions You Can Take from the Quote List and Quote Panel
� Place a Market Order with One Click from the Quote Panel
What Are The Quote List and Quote Panel?
The Quote List and Quote Panel show different views of the current OANDA buy/sell rates for currency pairs supported by the fxTrade Platform. These rates are updated in real time.
When there is movement in the exchange rate for a currency pair, the up/down (green/red) indicators alert you to the direction of change. These indicators help you track the currency pairs you're not currently viewing in the graph.
View the Quote List and Quote Panel by clicking on their respective tabs:
Quote List
Quote Panel
How Rates Are Shown in the Quote List and Quote Panel The first rate displayed is the bid (sell) rate (the rate at which you would sell the base currency and buy the quote currency). The second rate is the ask (buy) rate (the rate you would buy the base currency and sell the quoted currency). For more information on bid and ask rates, refer to the currency trading conventions page of the fxTrade web site tutorial.
Most currency pair quotes use five decimal places, with the fourth decimal place the "pip" and the fifth decimal place the "pipette." Some pairs use three decimal places (for example, XAU/USD or those with a quote currency of JPY, THB, or HUF). In this case, the pip is the second decimal place and the pipette is the third decimal place.
Actions You Can Take from the Quote List and Quote Panel
• Click the Quote List tab to switch to the list view of rates; click the Quote Panel tab to switch to the panel view of rates.
• Click to open a filter window to specify which rates you want to be displayed.
• Click on a currency pair's ask price to open a buy order window for that currency pair.

fxTrade Platform User Guide
62
• Click on a currency pair's bid price to open a sell order window for that currency pair.
• Click on a currency pair to open the graph for that currency pair in a new window.
• Click to open the Quote List and Quote Panel in a separate window.
• Select Tools > View > Quote List Panel to hide the Quote List and Quote Panel.
• Click, hold, and drag a currency pair to move its position in the list. (To keep your changes for future sessions, select Tools > Save Current Profile.)
Additional Actions from the Quote List
• Click to add an extra column showing the current spread for each pair. (Spread statistics for the previous week are available on the fxTrade web site.)
• You can either view the bid rate followed by the last few digits of the ask rate, or see the two rates in separate columns. (For separate columns, select Tools > User Preferences, go to the Misc tab, and check the Show Dual Bid/Ask Columns check box. Then select Tools > Save Current Profile to save the setting for future sessions.)
Place a Market Order with One Click from the Quote Panel
1. From the Quote Panel, click the One-Click Mode button:
The Quote Panel adds Units fields (as pictured above) where you can change the size of the trade. These fields are pre-filled with default values.
2. Scroll to the currency pair that you want to trade, verify and update the number of units you want to trade, and then click the BUY or SELL side of the quote.
3. By default, a verification window appears for you to confirm your trade. (To avoid seeing this window, deselect the Confirm One-Click Trades preference on the Trading tab of the User Preferences window.)

fxTrade Interface
63
Pull-Down Menus
In This Section
� Connection Menu
� Account Menu
� Tools Menu
� Resources Menu
� Help Menu
Connection Menu
Connect
Connects the fxTrade platform to the server. When the platform is connected, currency rates are displayed in real time and transactions are possible.
Disconnect Disconnects the fxTrade platform from the OANDA server. The fxTrade Platform remains open, but currency rates are no longer updated and transactions are not possible.
Lock Locks the platform. To access it again, you need to type your password.
Quit Logs you out and exits the fxTrade Platform.
Account Menu
Buy or Sell Opens a Buy/Sell window to issue market or limit orders.
Close All Lets you close either all active trades or all active orders. (If you close all active orders, Stop Loss and Take Profit orders associated with active trades are not affected.)
Full Transaction History
Opens a new window to view the extensive list of all transactions that have occurred in your account. (For details on this window, go to the Transaction History Window section.)
Account Details
Displays information on all of your accounts, including their margin rates.
Change Password
Lets you change your fxTrade password.

fxTrade Platform User Guide
64
Deposit Funds
(fxTrade only) Takes you to the Cash Management System, where you can add funds to your account.
Withdraw Funds
(fxTrade only) Takes you to the Cash Management System, where you can withdraw funds from your account.
Transfer Funds
(fxTrade only) Takes you to the Cash Management System, where you can transfer funds between your sub-accounts.
Add or Remove Funds
(fxTrade Practice only) Lets you add or remove funds from the current account. (Select a positive value to add funds, or a negative value to remove funds). For sub-accounts, the funds will be added to or removed from the primary account.
Reset Profit/Loss
(fxTrade Practice only) Resets your Profit & Loss value to zero. Your trades stay open.
Change Leverage
Lets you modify your account leverage.
(To see the current leverage, select Account > Account Details.)
Log in as Another User
Opens a window where you can log in as another user without having to log out first.
Create Sub-Account
Lets you create a sub-account. (Find out more about multicurrency accounts on the fxTrade web site.)
Change Account
Change from viewing one account to another. (Another way to switch accounts is to use the sub account switcher buttons in the extended view of the Account Summary.)
Change Profiles on Switch: This sub-menu choice enables accounts to appear with their associated profile (if you've set up different profiles for different accounts). For details, see Set Up Multiple Profiles.

fxTrade Interface
65
Tools Menu
View Lets you show or hide parts of the fxTrade window.
Font Size Lets you adjust the display font size ranging from 10-20 points. The default size is 10 points.
Colour Scheme
Lets you choose pre-defined colour schemes, or create your own.
Language Lets you change the language used in the interface.
Always on Top
Keeps the checked trading platform window types on the top of your computer screen, over top of windows from any other application.
PIP/Profit Calculator
Lets you enter information for a potential trade, then calculate the profit & loss for a specified closing rate.
User Preferences
Opens a window where you can change the defaults for the chart, quotes, trading windows, and other miscellaneous settings. For details, go to User Preferences.
Save Current Profile
Allows you to save the current settings in the current profile. You can also save the profile by pressing F12.
Profile Manager
Lets you create and manage multiple profiles. For details, see Set Up Multiple Profiles.

fxTrade Platform User Guide
66
Resources Menu
Each of these menu items opens a new browser window or tab.
FXNews Access continuously updated world and multi-topic news from various financial news sources, including Thomson Financial, UBS News, and 4CAST News.
UBS FX Strategy and Research
Access news and analysis from UBS.
4CAST News, Commentary and Analysis
Access current market news from 4CAST.
Economic Calendar
Access a PDF document with the current month's calendar of scheduled news and announcements relating to the forex market.
Interest Rates Find out current and historical interest rates for any currency supported on the fxTrade platform. These rates are used by OANDA to calculate the intra-day and/or daily interest rate.
Trading Forums
Access an interactive forum where you can share tips and learn from other currency traders.
Spread Statistics
View the bid/ask spreads for each of the currency pairs offered by OANDA. The spreads are plotted graphically over a 7-day time horizon for each currency pair. You can select which currency pairs are shown.
OANDA Forex Order Book
View a graph showing the distribution of all orders currently open in the fxTrade system.
Long-Short Ratios
View graphs showing the current trading activity in the fxTrade system for the major currency pairs.
FXDaily Create a multi-currency table of exchange rates.
FXGraph Access a tool where you can plot daily currency exchange rates for a specified period of days, weeks, months, or years, over any time period in the last ten years.

fxTrade Interface
67
FXHistory Obtain historical daily exchange rates since 1990 for over 164 world currencies.
FXMap View a colour-coded interactive world map that displays the strength of a country's currency compared to other world currencies.
FXMarketHours View the market hours for the major currency markets.
FXMath Access a variety of calculators useful for typical fxTrade actions.
FXTrends View a table of the change (trend) in currency exchange rates for the most actively traded currencies over the past day, week, month, and year.
Help Menu
Keyboard Shortcuts
View a list of available shortcuts. Alternatively, press the F1 key on your keyboard.
FX Trading Documentation and Help
Opens the Support and Learning section of the fxTrade web site. This section provides extensive documentation, help, and resources on currency trading and the forex market.
Contact Us Find out how to contact OANDA online or by phone.
Live Help Start an online chat session with an OANDA customer service representative.
About OANDA Access information about OANDA, the creator of the fxTrade platform.
About OANDA fxTrade
Lists who created the fxTrade platform.
Open Debug Window
If you encounter problems while using fxTrade, select this menu option to obtain data that can help diagnose your problem. You can copy and paste the content of this window and send it to OANDA fxTrade Technical Support.

fxTrade Platform User Guide
68
Transaction History Window The Transaction History window lets you download and view the entire transaction history for each of your accounts, starting with your very first trade. To view it, select Account > Full Transaction History (or click the History action button). Select the account you're interested in from its Account pull-down.
Transaction History Buttons
Click the following buttons, located at the top of the Transaction History window, to access various controls.
Filter: Allows you to filter your transaction report to show only those entries involving certain currency pairs or transaction types.
Range: You have three options when generating a transaction history report:
• Select a specific date.
• Select a time horizon: Since the beginning of the week, For the last 7 days, Since first of month, Since beginning of the year.
• Specify the start and end date for the period you want to view.
Profile: Customize which features of the transactions you would like shown in the Transaction History window.
Available features include: ticket, date, duration, transaction, pair, price, units, stop loss, take profit, transaction link, lower bound, upper bound, amount, interest, PL, and balance. The first two features (ticket and date) are always displayed; the rest are optional.
Format: The transaction history can be generated in either HTML or CSV format.
Help: Displays a separate window that explains how to use the buttons in this section.
Summary: Displays a summary of your account.
Account: Lets you select from a list of your accounts.

fxTrade Interface
69
Transaction History Buttons and Ranges.
Report Details
The Full Transaction History has up to 16 columns, as shown in the sample below. To add or remove columns, click the Filter button at the top of the Transaction History window.
Ticket: Uniquely identifies the transaction.
Date: The date and time of the transaction.
Expiry: Indicates limit order expiry dates.
Transaction: Identifies the type of transaction. (For a list of transaction types, see Activities Table.)
Pair: The currency pair associated with the transaction. In the event that the transaction type is Interest (earned on your account balance), the entry refers to the account currency.
Price: The currency exchange rate related to the transaction.
Units: The size of the transaction, in units, expressed in the base currency.
Stop Loss: The price specified as a stop loss. For more information about Stop Loss and Take Profit, see Place a Market Order.
Take Profit: The price specified as a take profit.
Tran Link: The transaction number of the original transaction. For example, the transaction number for a limit order in one row of the history report will also appear in the Transaction Link column of another row describing any activity related to this original limit order (for example, Modify Order, Order Fulfilled, Order Expired, and so on).

fxTrade Platform User Guide
70
Lower Bound: The price specified as the lower bound. For more information about bounds, see Place a Market Order.
Upper Bound: The price specified as the upper bound.
Interest: Interest paid on account balances, or net financing charges on a given trade.
P/L: The amount of profit and loss for the transaction.
Amount: This field shows two types of data depending on the transaction:
• The number of units of the base currency for trades. This value is not used in the P&L calculation and does not affect the value in the Account Balance field.
• A monetary amount shown in the account home currency, for monetary transactions other than trades (for example, for Box Options, interest credited and debited, or fund deposits and withdrawals). Interest amounts are added to or deducted from the account balance.
Balance: Shows the account balance at the conclusion of the transaction. This value is not affected by open trades; it is only updated when a trade is closed.

fxTrade Interface
71
User Preferences Window Click Tools > User Preferences to access the User Preferences window.
The window has five tabs:
� Chart Tab
� Quotes Tab
� Trading Tab
� Locale Tab
� Misc Tab
You can return all preferences to their default size/settings by clicking the Restore Defaults button, available on every tab. (If you click this button and want to return to your customized settings, restart the platform.)
Chart Tab
The Chart tab lets you customize chart features.
Draw Horizontal Graph Line: Check this box to show a horizontal crosshair running across the chart area at the cursor location.
Draw Vertical Graph Line: Check this box to show a vertical crosshair running across the chart area at the cursor location.
Draw Graph Information Box: Shows detailed rate information in the bottom-left corner of the graph for the time at the cursor location. This information varies with the type of graph you've selected.

fxTrade Platform User Guide
72
Auto-extend Trendlines Left: Left-extends trendlines to the beginning of the graph. (For information on trendlines, see Drawing Trendlines.)
Auto-extend Trendlines Right: Right-extends trendlines to the end of the graph.
Magnetic Trendlines: Automatically snaps trendlines to the exchange rate curve in the graph.
Default Trendline Colour: Choose the default trendline colour from a list of colours.
Trendline Style: Choose from a list of styles for trendlines (dotted line, solid line, and so on).
Ignore Weekend Data: Check this box to ignore weekend data when computing overlay/indicator data and to use the following controls:
Hide Weekend Data: Removes weekend data from the chart. (Available only when Ignore Weekend Data is checked.)
Weekend Start, Weekend End: Lets you define the weekend start and end times. (Available only when Ignore Weekend Data is checked.)
Quotes Tab
The Quotes tab lets you specify which currency pairs and commodities are shown in the fxTrade interface.
(To see a list of the 3-letter acronyms used for currency codes, go to the FXLookUp web page.)
The pairs and pair order shown in the Quote List on the right side of the Quotes tab reflect what appears in the fxTrade interface.
• To add currencies to the fxTrade interface, select them from the list on the left and click Add to add them to the Quote List. (To add all currencies, click Add All.)

fxTrade Interface
73
• To remove currencies from the fxTrade interface, select them from the Quote List on the right and click Remove. (To remove all currencies and start again, click Remove All.)
• To add or remove commodities, change the pull-down menu (located above the list on the left) to Commodities.
• To change the order in which currency pairs are displayed in the interface, from the Quote List on the right side, select each currency pair you want to move, and then click the arrows next to Move Up or Move Down.
Trading Tab
The Trading tab lets you change the default parameters that appear when you're making a trade.
Change Trading Settings for Individual Currency Pairs
The following settings apply to individual currency pairs (if you select a pair and click the Use Custom Settings box).
MARKET: Choose a currency pair from this list box if you want to use custom settings for that pair. Leave "DEFAULT" selected if you want the settings to apply to all pairs.
Use Custom Settings: Check this box if you want the settings to apply to the pair you selected from the MARKET list box. (This box is grayed out if the DEFAULT market is selected.)
After you customize settings for a particular currency pair, you can toggle between those settings and the default settings by clicking this check box on and off.
Default Order Size: The default order size used in any "units" field (for example, in the Buy/Sell window). Use the pull-down menu beside this field to set the number of units (for example, 10,000) of the base currency or the account currency, or the percentage of units available to trade.

fxTrade Platform User Guide
74
As an example for the percentage available to trade, if you have a USD account with 20:1 leverage, USD $10,000 of margin available, and you've set the default order size to 20%, then for currency pairs with the base currency of USD the following value will be displayed in the units field: (10,000 x 20) x 20% = 40,000 units.
For pairs where the base currency differs from the account's home currency, the default unit size reflects the current exchange rate of the base currency when converted to the home currency. In the previous example (with a USD home currency), if the EUR/USD rate at the time was 1.5000, then the default unit size in the Buy/Sell window for the EUR/USD pair would be (10,000 x 20) x 20% / 1.5000 = 26,666 units.
Default Box Purchase Price: The default purchase price provided when you request a Box Option. Choose from the number of units of the base currency, or the base currency equivalent.
Default Box Minimum Payment: The default minimum payment provided when you request a Box Option. Choose a percentage of payment.
Default Bounds: The default value that appears in the bounds fields of the Buy/Sell window. Choose from pips, a percentage, or a monetary amount.
Default Stop Loss: The default value that appears in the Stop Loss field. Choose from pips, a percentage, or a monetary amount.
Default Take Profit: The default value that appears in the Take Profit field. Choose from pips, a percentage, or a monetary amount.
Default Trailing Stop: For trailing stops, determines the default amount and units (pips, price, a set amount of the home currency, or a percentage of price, balance, or NAV).
Note: the trigger price is calculated from the bid price (for short market orders) or the sell price (for long market orders). That is, the trigger price is determined by the maximum trailing stop plus the spread.
Default Limit Order Duration: By default, limit orders expire after one week. Instead, you can set the default expiry period to a selected number of hours, days, or even a month.
Global Trading Settings
The following settings apply to all currency pairs:
Enable Bounds By Default: Automatically enables and populates the bounds fields in the Order window with the default bounds.
Enable Stop Loss By Default: Automatically enables and populates the stop loss field in the Order window with the default stop loss.
Enable Take Profit By Default: Automatically enables and populates the take profit field in the Order window with the default take profit.
Enable Trailing Stop By Default: Enables the trailing stop and uses the default trailing stop values every time the Limit Order and Market Order windows are opened, or for any one-click trades.
Show Confirmation Windows: Click if you want to see windows asking you to confirm your action after you buy, sell, close, or modify a trade order.
Confirm Position Reversal: Notifies you if a position is being reduced, closed, or reversed by a new trade. This notification will be issued even if confirmation windows are disabled.
Confirm One-Click Trades: When checked, provides a confirmation window for one-click trades that you make from the Quote Panel.
Locale Tab
The Locale tab lets you choose settings related to your language and geographic location.

fxTrade Interface
75
Language: Changes the text of the fxTrade interface to a different language. Choose from a list of available languages.
Number Format: Numbers are written in varying formats around the world. To change the number format shown in the fxTrade interface, choose your country and then choose your language (only those languages spoken in the country are shown). A sample number appears, showing you the number format that will be used in the fxTrade interface.
Time Zone: By default, the time zone matches the one set in your computer's operating system. To change the time zone, select the new time (London - Greenwich Mean Time +/- n hours). Because some regions use Daylight Savings Time at different times of the year, you also need to select your geographic area to ensure the system tracks time changes.
Sounds Tab
The Sounds tab lets you add your own sound alerts for various events. If you check an event, click Browse to locate a sound file to associate with that event. You can use any aiff, au, midi, or wav file located on your computer.

fxTrade Platform User Guide
76
Misc Tab
The Misc tab lets you choose a number of settings.

fxTrade Interface
77
Show Dual Bid/Ask Columns: When checked, shows the bid and ask prices in separate columns in the Quote List. When not checked, the last three digits of the ask price are shown after the bid price in the same column (for example, 1.56950/959).
Colour Coded Tables: Fills in the table rows with colour. By default, long positions are blue and short positions are orange.
Show Pipettes: Shows pipettes, or "fractional pips," in the tables, graphs, and current rate displays. If pipettes are hidden, the rates are rounded to the nearest pip for display purposes.
Sort Sub Accounts: When checked, sub-accounts are ordered alphabetically. When not checked, sub-accounts are typically ordered by creation date. (This order appears in both menus and the sub-account switcher.)
Show Sub Account Switcher: Shows buttons you can click to switch from one sub-account to another. These buttons appear in the Account Summary (when it's fully extended). They are numbered 1, 2, and so on, representing the order of the sub-accounts (as determined by the Sort Sub Accounts checkbox, above).
Default Account: Determines which subaccount is shown when you first log on the platform.
Lock Screen after: The fxTrade platform will be locked after the number of minutes you type in this field, and you will need to use your password to unlock it. Use a value of zero "0" if you want to disable screen locking.
A Note on Misc Tab Updates
The following controls were moved to other windows in the interface:
• Time Zone: This setting is now in the Locale tab.
• Show Action Buttons: To display the Action Buttons, use the Tools > View menu.

fxTrade Platform User Guide
78
• Profit Column Format: To show/hide the formats of the profit columns in a table, click
the button beside the table's scroll bars.

fxTrade Interface
79
Tables
Table Actions
The Table panel at the top of the fxTrade Platform window has six tabs you can use to access their respective tables:
� Trades: Lists your open trades (the default view).
� Orders: Lists all open limit orders as well as take profit (T/P) and stop loss (S/L) orders on open trades.
� Boxes: Lists details for all open Box Options. In particular, the resale value of open boxes is shown if you are interested in selling boxes before they expire.
� Positions: Lists aggregated positions by currency pair. For example, if you have three trades in USD/JPY, the Positions Table will show these trades aggregated into a single USD/JPY position.
� Exposure: Lists aggregated positions by currency.
� Activity: Lists the most recent transactions.
fxTrade tables interface, showing all tabs, with the Trades tab selected
Mouse Actions for Tables
You can change the information displayed in a table in several ways:
� Scrolling: The scroll bar is located on the right-hand side of the table. Use it (or use the scroll wheel on your mouse) to scroll up or down through the rows in the table.
� Sorting: Click on a column header to sort the table based on that column. Click once to sort the column in ascending order (larger numbers and later letters are further down the list). Click again to sort it in descending order (larger numbers and later letters are higher up the list).
� Resizing: Expand the table area in relation to the graph area by clicking and dragging the border between the table and the graph.
� Row Highlighting: For ease of reference, position the cursor over a particular row to highlight the row.
� Hiding: To hide the entire table area, select Tools > View > Tables.
Duplicating Tables
You can view tables in their own separate window to keep track of several tables at the same time.
From the main fxTrade window, click the button in the table's upper left corner. The current table (with its current configuration) appears in a separate window and remains in the fxTrade window.

fxTrade Platform User Guide
80
Configuring Tables
Click the button (located next to the scroll bars beside any table) to open the Table Configuration window for that table.
This window has three tabs:
� Columns: Lets you show or hide particular columns in the table.
� Types: Lets you show only particular types of table entries. For example, T/P (Take profit) or S/L (Stop Loss) orders, Short or Long positions, transaction types, and so on.
� Markets: Lets you add or remove particular currency pairs (markets) from the table.
Trades Table
The Trades table shows a list of your open trades:
Note: If you don't see all these columns, click the button beside the table to add them from the Table Configuration window.
Trades Table Columns
First column: Indicates whether the trade is a long (buy) or a short (sell).

fxTrade Interface
81
Ticket: The number that uniquely identifies an open trade. You can use this number as a reference for inquiries with OANDA, or to search for related transactions in the Transaction History database or Activity Log table.
Market: The currency pair involved in the trade.
Units: The trade size, or number of units of the base currency bought or sold.
S/L: The Stop Loss value for the trade. The trade will be closed automatically when/if the exchange rate crosses this value.
T/P: The Take Profit value for the trade. The trade will be closed automatically when/if the exchange rate crosses this value.
T/S: The Trailing Stop value for the trade. The trade will be closed automatically when/if the exchange rate crosses this value.
Price: The exchange rate at which the trade was executed (that is, became a trade).
Current: The current exchange rate for the trade's currency pair. The current bid rate is displayed for long positions; the current ask rate for short positions. This rate would apply if you closed your position at this point in time.
Profit: Refers to unrealized profit when positive and unrealized loss when negative. The profit and loss value is shown in the "Unrealized P&L" section of the Account Summary, and is continuously updated to reflect market conditions. When an open trade is closed, the unrealized profit (or loss) becomes "realized" and is added to (or subtracted from) your account balance.
Click the button above the table's scroll bar to select one or more profit formats:
� Profit: The difference between the opening rate and the current rate, expressed in the quote currency.
� Profit (Home Currency): The profit, expressed in your account's default, or home, currency.
� Profit (PIPS): The difference between the opening rate and the current market rate, expressed in pips.
� Profit (%): The difference between the opening rate and the current market rate, expressed as a percentage of the opening rate.
Close or Modify Trades
Click on a row with an open trade. A window appears showing two options:
• Close trade: Closes the trade.
• Modify trade: Lets you set stop loss/take profit limits or modify them.
(For other mouse actions when using this table, go to the top of this page.)
Orders Table
The Orders table shows a list of your currently open orders. An open order is a request that a trade should be opened or closed automatically if the exchange rate of the currency pair reaches a specified threshold.
The Orders table lists all open orders (orders that will become trades if the exchange rate reaches a threshold) and all take profit and stop loss orders on currently open trades. It doesn't list changes you made to open limit orders.

fxTrade Platform User Guide
82
Note: If you don't see all these columns, click the button beside the table to add them from the Table Configuration window.
Orders Table Columns
First column: Indicates whether the order is a buy (long) or a sell (short) limit order, or a take profit ("TP") or a stop loss ("SL") order on an open trade.
Ticket: The number that uniquely identifies an open order. You can use this number as a reference for inquiries with OANDA, or to search for related transactions in the Transaction History database or Activity Log table.
Market: The currency pair involved in the order.
Units: The size of the order, expressed in the base currency.
S/L: The stop loss value for the order. The resultant trade would be automatically closed when/if the exchange rate crossed this value.
T/P: The take profit value for the order. The resultant trade would be automatically closed when/if the exchange rate crossed this value.
T/S: The Trailing Stop value for the trade. The resultant trade would be automatically closed when/if the exchange rate crosses this value.
Price: The trade is executed (opened) when/if the exchange rate for the specified currency pair reaches this value.
Current: The current exchange rate for this order's currency pair. The current ask rate is displayed for long orders; the current bid rate for short orders.
Distance: The distance, in pips, between the order price and the current market price.
Expiry: The amount of time before the order is automatically cancelled. The following durations are available:
• 1 week (the default)
• Hours: 1, 2, 3, 4, 5, 6, 8, 12, 18
• Days: 1, 2
• Months: 1
• GTC: Good (un)Til Canceled (for stop loss and take profit orders only).
Cancel or Modify Orders
Click on a row with an order. A window appears showing two options:
• Cancel order: Cancels the order.
• Modify order: Lets you modify the exchange rates at which the trade will be executed, the number of units in the potential trade, the duration the order is to remain open, upper and lower bounds, or the take profit or stop loss limits.
(For other mouse actions when using this table, go to the top of this page.)

fxTrade Interface
83
Boxes Table
The Boxes Table displays a list of your open Box Options (price boxes). Box Options are not included in the Trades or Positions tables.
Note: If you don't see all these columns, click the button beside the table to add them from the Table Configuration window.
Boxes Table Columns
First column: Indicates whether the position is a hit or miss box.
Box ID: Uniquely identifies the Box Option.
Market: The currency pair for the Box Option.
Price: The price that was paid for the Box Option.
Payment: The payment amount if the Box Option is successful.
Resale: The amount you would receive if you sold the Box Option right now.
Start: Indicates when your Box Option begins. The start time corresponds to left side of your box.
End: Indicates when your Box Option ends. The end time corresponds to the right side of your box.
Max: The maximum exchange rate included in your Box Option. The maximum level corresponds to the top of your box.
Min: The minimum exchange rate included in your Box Option. The minimum level corresponds to the bottom of your box.
Sell Boxes
Click on a row with an open box to open a window in which you can sell the box for the current resale value.
(For other mouse actions when using this table, go to the top of this page.)
Positions Table The Positions Table displays a list of all your open positions except Box Options. It is similar to the Open Trades table, except that all trades for a given currency pair are aggregated into one line (a single "position").
Note: If you don't see all these columns, click the button beside the table to add them from the Table Configuration window.

fxTrade Platform User Guide
84
Positions Table Columns
First column: Indicates whether the position is a Long (buy) or a Short (sell).
Market: The position's currency pair.
Units: The size of the position, in base currency units.
Exposure: The overall exposure to the currency pair. This value represents the sum of all trades involving this currency pair.
Avg. Price: The weighted average exchange rate for all the trades that comprise this position.
Current: The current market exchange rate you would receive if you closed the position. (The bid rate is shown for long positions and the ask rate is shown for short positions.)
Profit: Unrealized profit (for positive values) or loss (for negative values). The profit/loss value is reflected in the "Unrealized P&L" section of the Account Summary, and is continuously updated to reflect the latest exchange rates. If this position were closed, the unrealized profit (or loss) would be "realized" and added to (or subtracted from) your account balance.
Click the button above the table's scroll bar to select one or more profit formats:
� Profit: The difference between the opening rate and the current rate, expressed in the quote currency.
� Profit (Home Currency): The profit, expressed in your account's default, or home, currency.
� Profit (PIPS): The difference between the opening rate and the current market rate, expressed in pips.
� Profit (%): The difference between the opening rate and the current market rate, expressed as a percentage of the opening rate.
Close All Trades in a Position
Click on a row with an open position to open a window where you can close the position. (This closes all open trades in the position.)
(For other mouse actions when using this table, go to the top of this page.)
Exposure Table
The Exposure Table displays the aggregated positions for individual currencies. All open positions for a currency are aggregated into a single line, which shows the net of all long and short positions for the currency. Only those currencies involved in open trades are shown in this table.
Note: If you don't see all these columns, click the button beside the table to add them from the Table Configuration window.
Exposure Table Columns

fxTrade Interface
85
First column: Indicates whether the exposure is Short or Long. (Nil indicates that the net effect of positions has created a zero, or nil, effect on a specific currency exposure. For instance, if you are short 10,000 EUR/JPY and long 10,000 EUR/USD, your EUR exposure is expressed as "nil".)
Market: The exposure's currency.
Units: The size of the exposure, in units of the exposure's currency.
Close a Currency Exposure
Click on a row to open a window in which you can close the exposure to that currency. When you close an exposure, it will simultaneously close all trades involving that currency. For example, closing an EUR exposure closes ALL trades involving EUR as either the base or quote currency.
(For other mouse actions when using this table, go to the top of this page.)
Activity Table The Activity Table shows a list of the most recent transactions on the account. This table displays either the previous five days of activity or previous five hundred transactions, whichever is smaller. To access a full list of past transactions, use the Transaction History.
Note: If you don't see all these columns, click the button beside the table to add them from the Table Configuration window.
Activity Table Columns
Ticket: Uniquely identifies the transaction.
Type: Identifies the type of transaction (see below for a full list with descriptions).
Market: The currency or currency pair associated with the transaction.
Units: The trade size, expressed in the base currency. The value "1" is shown for interest, Box Options, or other administrative entries.
Price: The currency exchange rate applied when buying or selling a currency pair, or the amount of interest earned or paid, where applicable.
Balance: The account balance after the transaction was processed.
Date/Time: The date and time of the transaction.
Types of Activity Transactions
Box Close Your Box Option was unsuccessful and you did not receive a payment. (That is, your hit-box was missed or your miss-box was hit.)
Box Payment Your Box Option was successful and you received a payment.

fxTrade Platform User Guide
86
(That is, your hit-box was hit or your miss-box was missed.)
Buy Box You bought a Box Option and the Purchase Price was deducted from your account balance.
Buy Market You entered a Buy Market order.
Buy Order You entered a Buy Limit order.
Buy Market Filled
Your Buy Entry order was filled.
Change Margin Your account's margin ratio was changed.
Change Order Your Limit Order was modified.
Change Trade The stop loss and/or take profit orders were changed for a given trade.
Close Position You closed a position.
Close Trade You closed a trade.
Fund Deposit A deposit was made to your account.
Fund Withdrawal
A withdrawal was made from your account.
Interest Interest was paid on the account balance, or was paid/charged for a given trade.
Margin Alert Issued
A margin alert was issued for your account, meaning that your account did not meet minimal margin requirements at the time the alert was issued. If your account continues to be issued margin alerts each consecutive day until the final date indicated by the margin alert, it will be closed out, resulting in an automatic closing of all open positions. For details, refer to the automated email that was sent to you.
Margin Alert Resolved
The margin alert was resolved on a subsequent day, either because you took action to improve your available margin or because the market turned in your favor.

fxTrade Interface
87
Margin Closeout
All open positions were closed because there was insufficient margin in your account, or you did not act to resolve a margin alert within the specified time period.
Order Cancelled (BV)
Orders can be submitted with lower and upper bounds. If the market price on execution falls outside these bounds, it is considered a "Bounds Violation" and the order is cancelled.
Order Cancelled (NSF)
Your order was cancelled because of "Non Sufficient Funds". (There wasn't enough money in your account to complete the order.)
Order Cancelled
Your Limit Order was cancelled at your request.
Order Expired Your Limit Order expired.
Order Filled Your Limit Order was filled.
Sell Box You sold your Box Option at its resale value before it expired.
Sell Market You entered a Sell Market order.
Sell Order You entered a Sell Limit order.
Sell Market Filled
Your Sell Entry order was filled.
Stop Loss A stop loss order was triggered, closing a long or short position.
Take Profit A take profit order was triggered, closing a long or short position.
Wire Fee A processing fee was charged to your account for transferring money from your fxTrade account to your bank account by wire.