futrex ® - 62 training tutorial. exit table of contents major components major components major...
TRANSCRIPT

FUTREXFUTREX®®- 62- 62
Training TutorialTraining Tutorial
exit
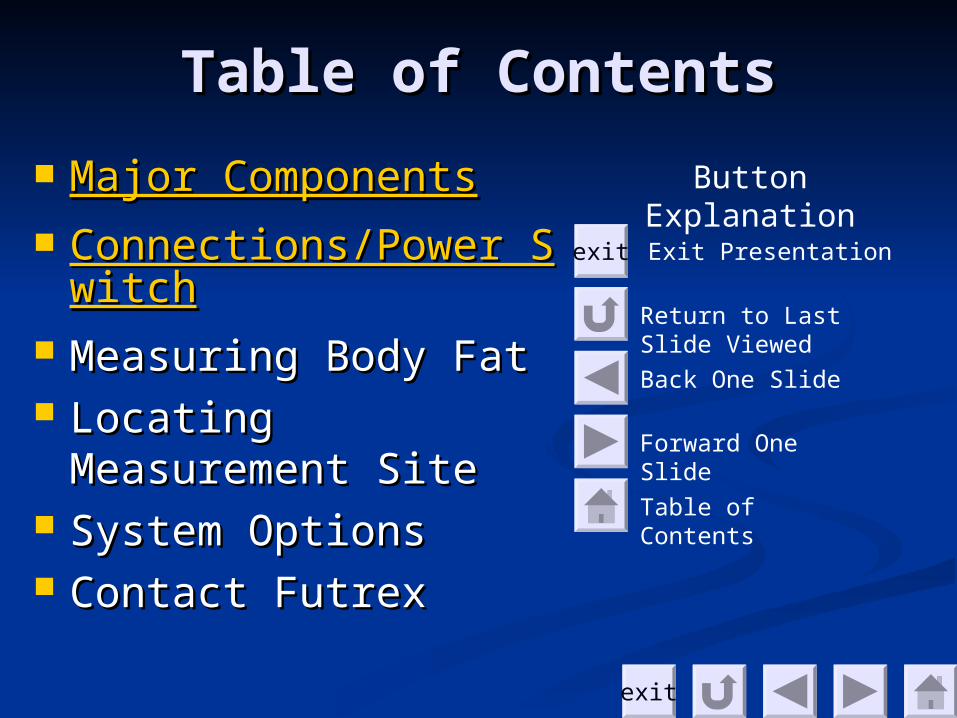
Table of ContentsTable of Contents
Major ComponentsMajor Components Connections/Power SConnections/Power S
witchwitch Measuring Body FatMeasuring Body Fat Locating Locating
Measurement SiteMeasurement Site System OptionsSystem Options Contact FutrexContact Futrex
exit
Button Explanation
Return to Last Slide Viewed
Exit Presentation
Back One Slide
Forward One Slide
Table of Contents
exit
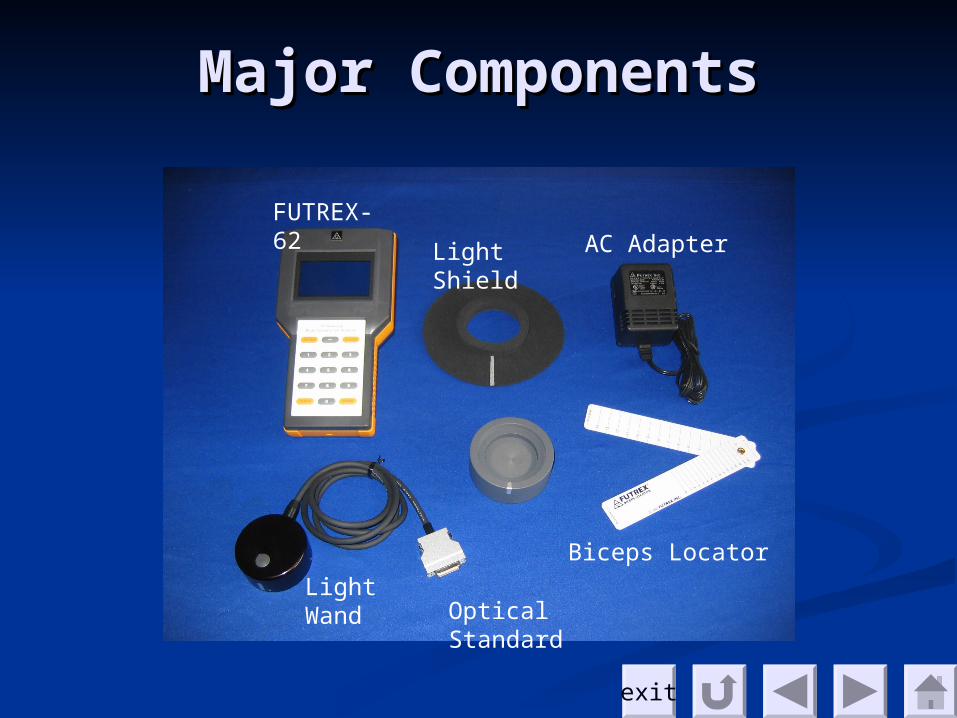
Major ComponentsMajor Components
FUTREX-62
Light Wand Optical
Standard
Light Shield
Biceps Locator
AC Adapter
exit
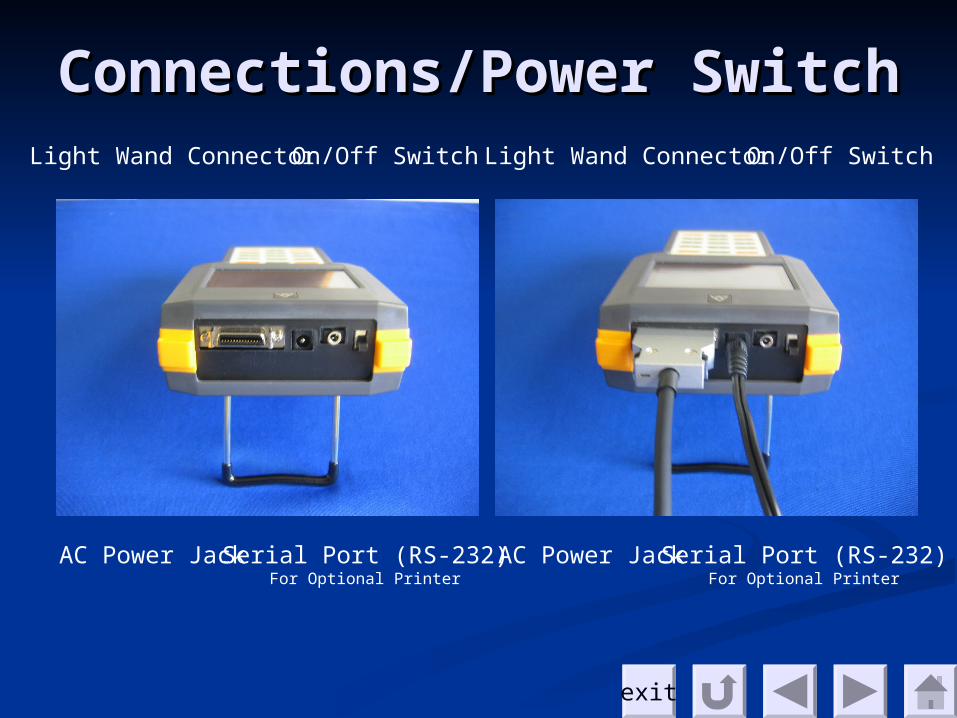
Connections/Power Connections/Power SwitchSwitchLight Wand ConnectorOn/Off Switch
AC Power JackSerial Port (RS-232)For Optional Printer
Light Wand ConnectorOn/Off Switch
AC Power JackSerial Port (RS-232)For Optional Printer
exit
Measuring Body FatMeasuring Body Fat
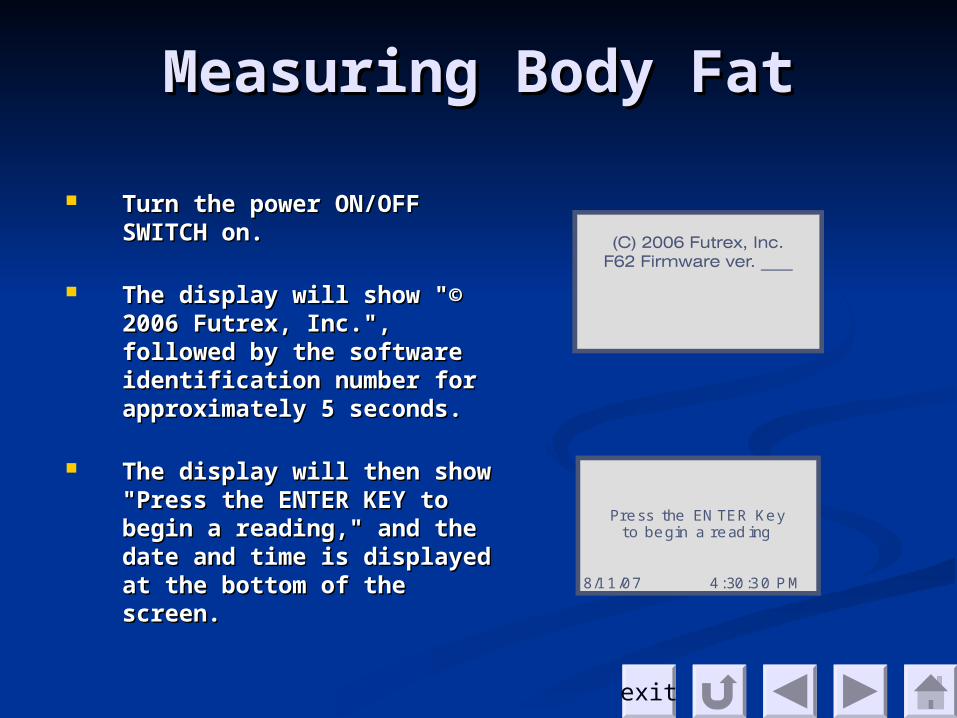
Turn the power ON/OFF Turn the power ON/OFF SWITCH on. SWITCH on.
The display will show "© The display will show "© 2006 Futrex, Inc.", 2006 Futrex, Inc.", followed by the software followed by the software identification number for identification number for approximately 5 seconds.approximately 5 seconds.
The display will then show The display will then show "Press the ENTER KEY to "Press the ENTER KEY to begin a reading," and the begin a reading," and the date and time is displayed date and time is displayed at the bottom of the at the bottom of the screen.screen.
Press the EN TER Keyto begin a read ing
8/11/07 4:30:30 P M

exit
Measuring Body FatMeasuring Body Fat Press the ENTER key to Press the ENTER key to
proceed with the body proceed with the body fat reading. fat reading.
The display will show The display will show “Press ZeroAdj key”“Press ZeroAdj key”
Place the light wand into Place the light wand into the Optical Standard as the Optical Standard as shown (be sure to align shown (be sure to align the silver stripes), and the silver stripes), and press the “ZeroAdj” Key.press the “ZeroAdj” Key.
The Display will flash The Display will flash “Reading…“Reading…””
exit
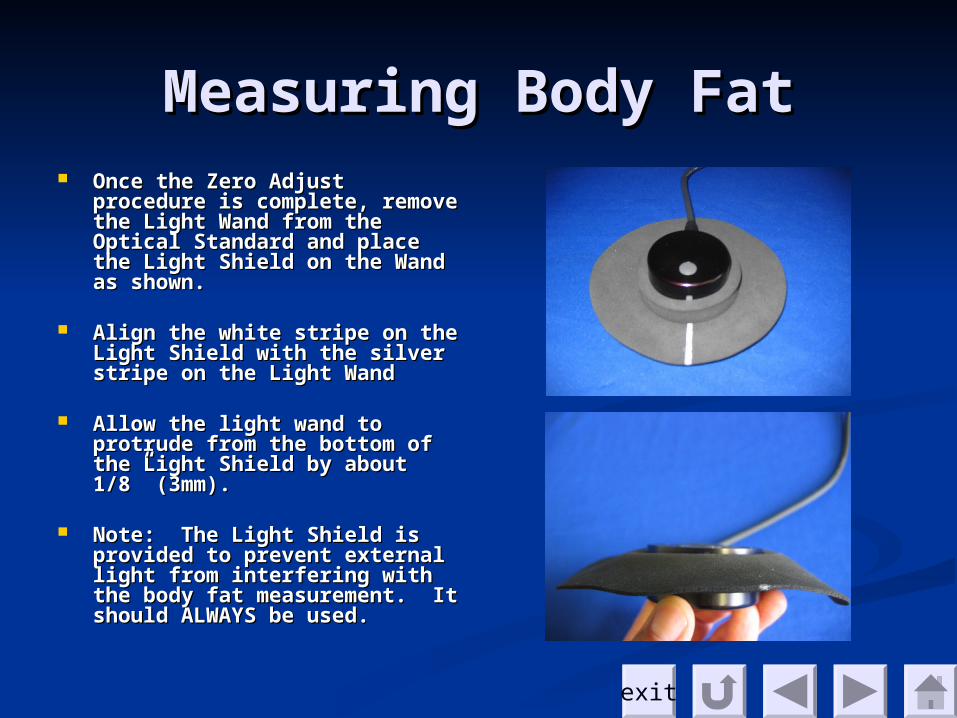
Measuring Body FatMeasuring Body Fat Once the Zero Adjust Once the Zero Adjust
procedure is complete, remove procedure is complete, remove the Light Wand from the the Light Wand from the Optical Standard and place Optical Standard and place the Light Shield on the Wand the Light Shield on the Wand as shown.as shown.
Align the white stripe on the Align the white stripe on the Light Shield with the silver Light Shield with the silver stripe on the Light Wandstripe on the Light Wand
Allow the light wand to Allow the light wand to protrude from the bottom of protrude from the bottom of the Light Shield by about 1/8” the Light Shield by about 1/8” (3mm).(3mm).
Note: The Light Shield is Note: The Light Shield is provided to prevent external provided to prevent external light from interfering with the light from interfering with the body fat measurement. It body fat measurement. It should ALWAYS be used.should ALWAYS be used.
exit
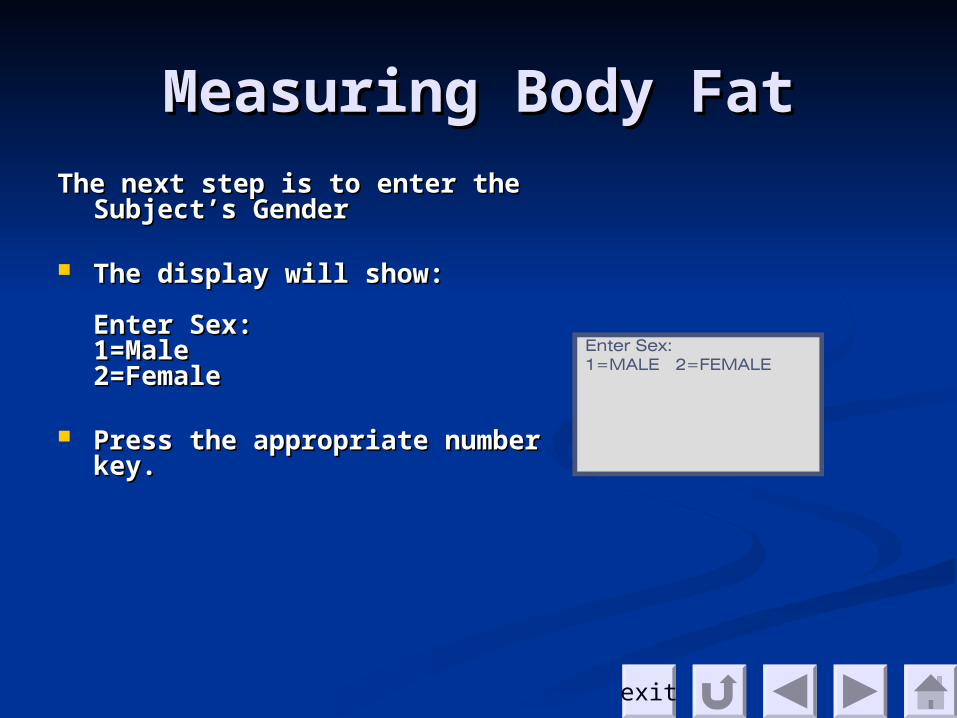
Measuring Body FatMeasuring Body FatThe next step is to enter the The next step is to enter the
Subject’s GenderSubject’s Gender
The display will show:The display will show:
Enter Sex:Enter Sex:1=Male1=Male2=Female2=Female
Press the appropriate number Press the appropriate number key.key.
exit
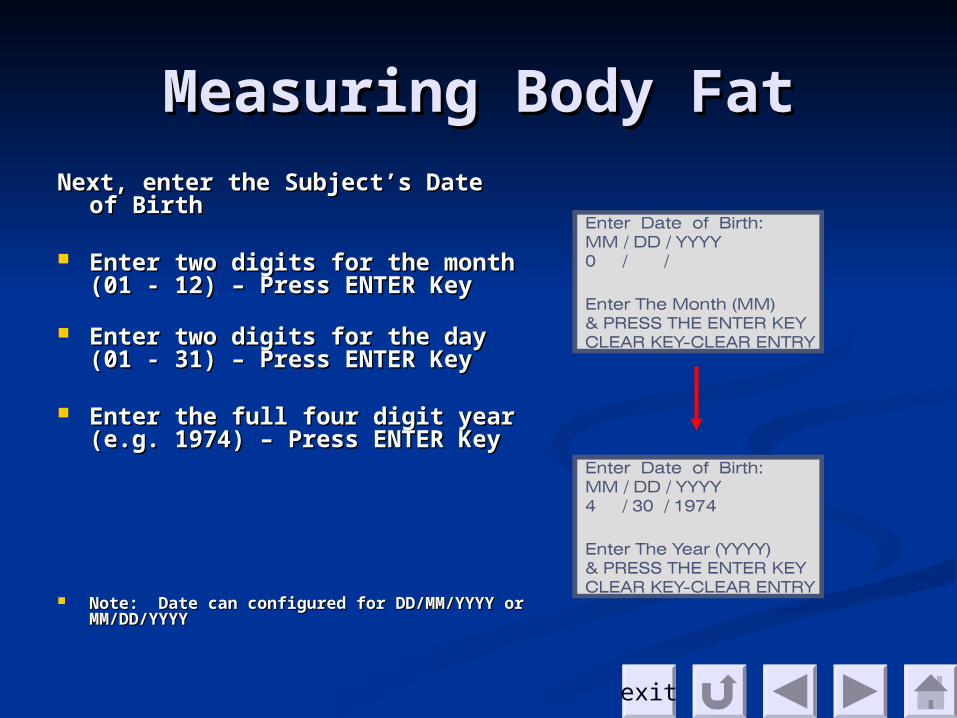
Measuring Body FatMeasuring Body FatNext, enter the Subject’s Date of Next, enter the Subject’s Date of
BirthBirth
Enter two digits for the monthEnter two digits for the month(01 - 12) – Press ENTER Key (01 - 12) – Press ENTER Key
Enter two digits for the dayEnter two digits for the day(01 - 31) – Press ENTER Key (01 - 31) – Press ENTER Key
Enter the full four digit year Enter the full four digit year (e.g. 1974) – Press ENTER Key (e.g. 1974) – Press ENTER Key
Note: Date can configured for DD/MM/YYYY Note: Date can configured for DD/MM/YYYY or MM/DD/YYYYor MM/DD/YYYY
exit
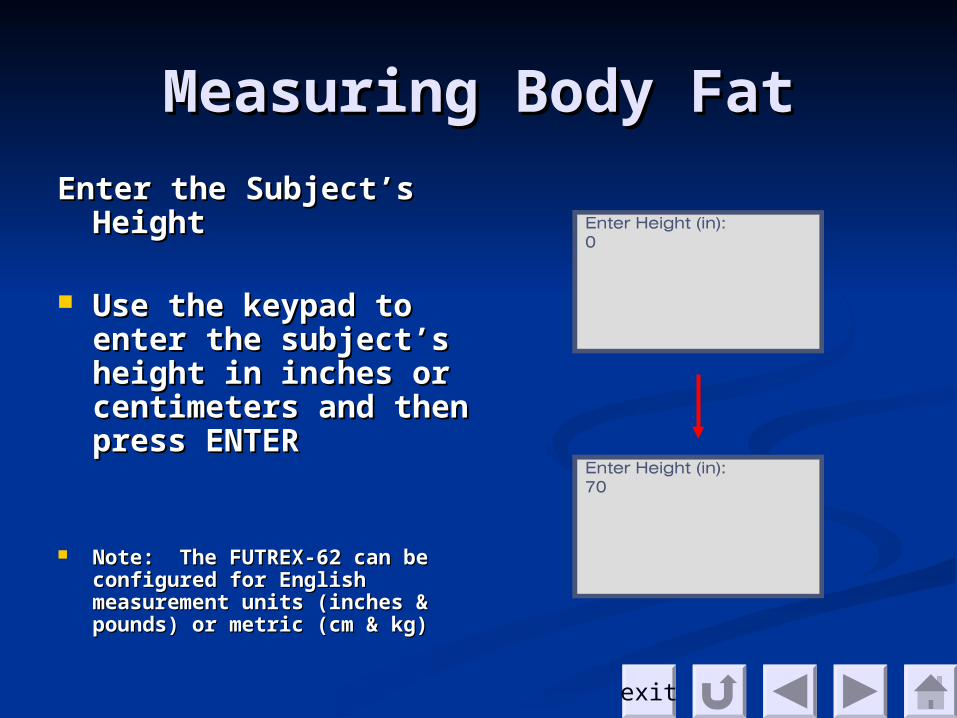
Measuring Body FatMeasuring Body Fat
Enter the Subject’s Enter the Subject’s HeightHeight
Use the keypad to Use the keypad to enter the subject’s enter the subject’s height in inches or height in inches or centimeters and then centimeters and then press ENTERpress ENTER
Note: The FUTREX-62 can be Note: The FUTREX-62 can be configured for English configured for English measurement units (inches & measurement units (inches & pounds) or metric (cm & kg)pounds) or metric (cm & kg)
exit
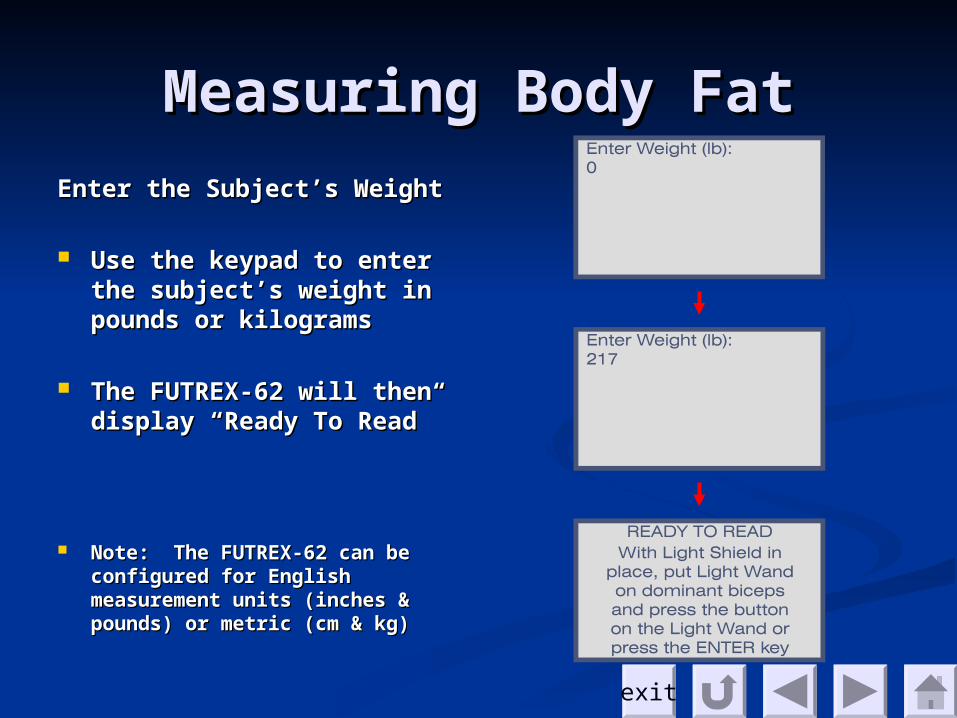
Measuring Body FatMeasuring Body Fat
Enter the Subject’s WeightEnter the Subject’s Weight
Use the keypad to enter Use the keypad to enter the subject’s weight in the subject’s weight in pounds or kilogramspounds or kilograms
The FUTREX-62 will then The FUTREX-62 will then display “Ready To Read”display “Ready To Read”
Note: The FUTREX-62 can be Note: The FUTREX-62 can be configured for English configured for English measurement units (inches & measurement units (inches & pounds) or metric (cm & kg)pounds) or metric (cm & kg)
exit
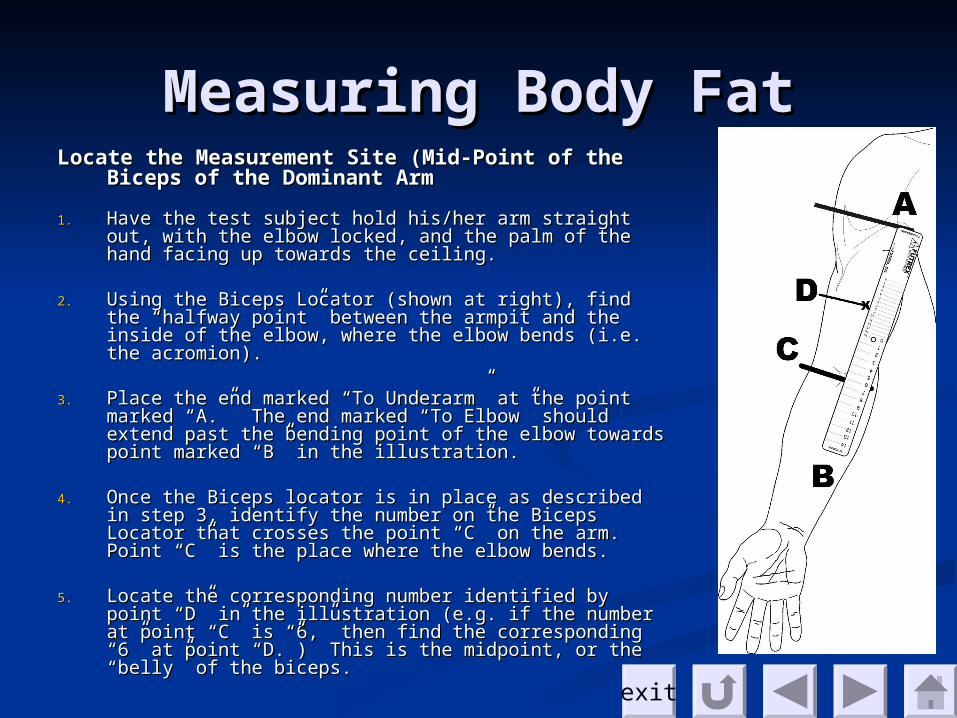
Measuring Body FatMeasuring Body FatLocate the Measurement Site (Mid-Point of the Locate the Measurement Site (Mid-Point of the
Biceps of the Dominant ArmBiceps of the Dominant Arm
1.1. Have the test subject hold his/her arm straight out, Have the test subject hold his/her arm straight out, with the elbow locked, and the palm of the hand with the elbow locked, and the palm of the hand facing up towards the ceiling.facing up towards the ceiling.
2.2. Using the Biceps Locator (shown at right), find the Using the Biceps Locator (shown at right), find the “halfway point” between the armpit and the inside of “halfway point” between the armpit and the inside of the elbow, where the elbow bends (i.e. the acromion).the elbow, where the elbow bends (i.e. the acromion).
3.3. Place the end marked “To Underarm” at the point Place the end marked “To Underarm” at the point marked “A.” The end marked “To Elbow” should marked “A.” The end marked “To Elbow” should extend past the bending point of the elbow towards extend past the bending point of the elbow towards point marked “B” in the illustration.point marked “B” in the illustration.
4.4. Once the Biceps locator is in place as described in Once the Biceps locator is in place as described in step 3, identify the number on the Biceps Locator that step 3, identify the number on the Biceps Locator that crosses the point “C” on the arm. Point “C” is the crosses the point “C” on the arm. Point “C” is the place where the elbow bends.place where the elbow bends.
5.5. Locate the corresponding number identified by point Locate the corresponding number identified by point “D” in the illustration (e.g. if the number at point “C” “D” in the illustration (e.g. if the number at point “C” is “6,” then find the corresponding “6” at point “D.”) is “6,” then find the corresponding “6” at point “D.”) This is the midpoint, or the “belly” of the biceps.This is the midpoint, or the “belly” of the biceps.
exit
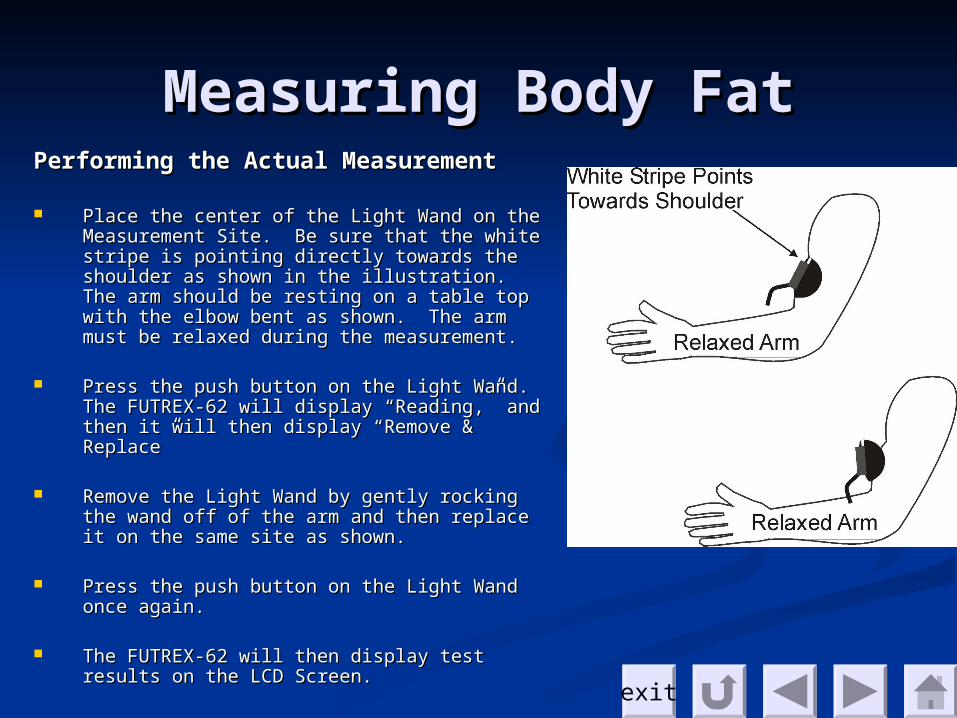
Measuring Body FatMeasuring Body FatPerforming the Actual MeasurementPerforming the Actual Measurement
Place the center of the Light Wand on the Place the center of the Light Wand on the Measurement Site. Be sure that the white Measurement Site. Be sure that the white stripe is pointing directly towards the stripe is pointing directly towards the shoulder as shown in the illustration. The shoulder as shown in the illustration. The arm should be resting on a table top with the arm should be resting on a table top with the elbow bent as shown. The arm must be elbow bent as shown. The arm must be relaxed during the measurement. relaxed during the measurement.
Press the push button on the Light Wand. Press the push button on the Light Wand. The FUTREX-62 will display “Reading,” and The FUTREX-62 will display “Reading,” and then it will then display “Remove & Replace”then it will then display “Remove & Replace”
Remove the Light Wand by gently rocking the Remove the Light Wand by gently rocking the wand off of the arm and then replace it on the wand off of the arm and then replace it on the same site as shown. same site as shown.
Press the push button on the Light Wand Press the push button on the Light Wand once again.once again.
The FUTREX-62 will then display test results The FUTREX-62 will then display test results on the LCD Screen.on the LCD Screen.
exit
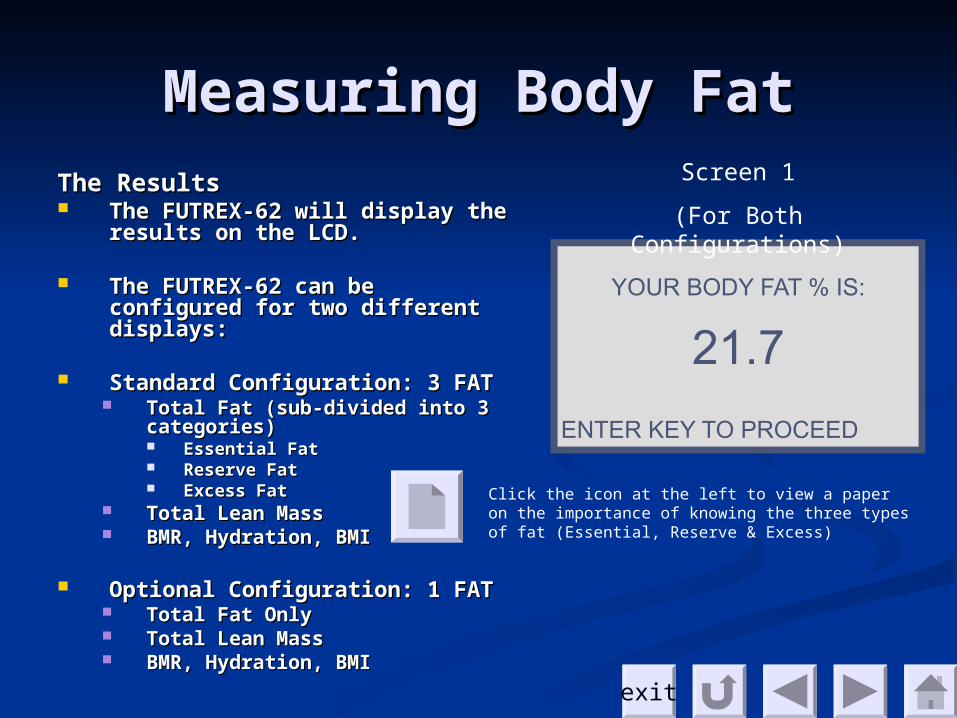
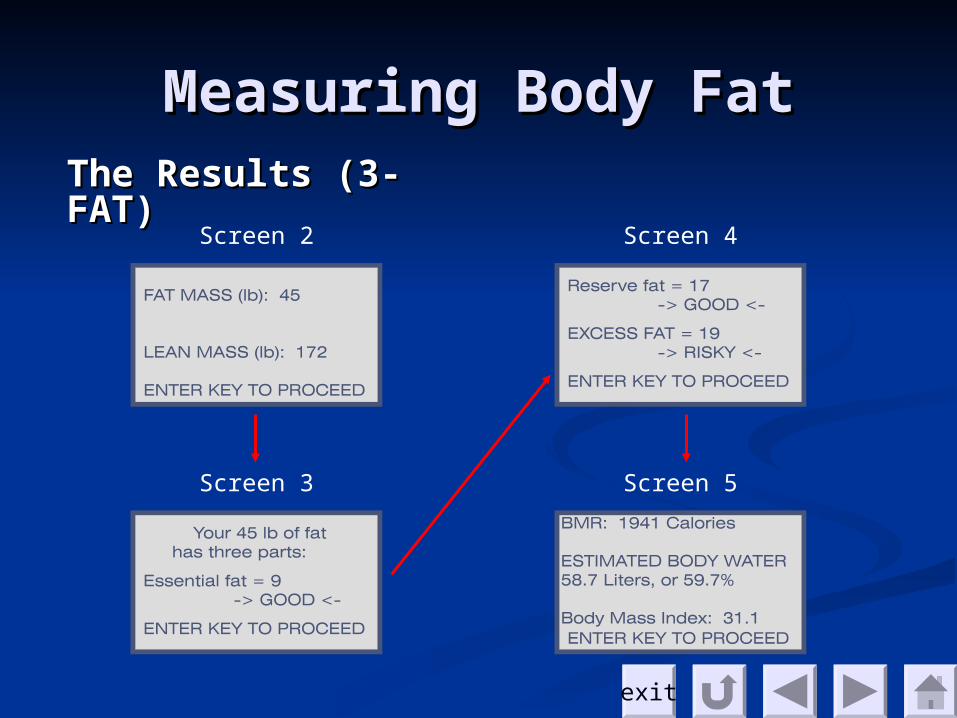
Measuring Body FatMeasuring Body FatThe Results The Results The FUTREX-62 will display the The FUTREX-62 will display the
results on the LCD.results on the LCD.
The FUTREX-62 can be The FUTREX-62 can be configured for two different configured for two different displays:displays:
Standard Configuration: 3 FATStandard Configuration: 3 FAT Total Fat (sub-divided into 3 Total Fat (sub-divided into 3
categories)categories) Essential FatEssential Fat Reserve FatReserve Fat Excess FatExcess Fat
Total Lean MassTotal Lean Mass BMR, Hydration, BMIBMR, Hydration, BMI
Optional Configuration: 1 FATOptional Configuration: 1 FAT Total Fat OnlyTotal Fat Only Total Lean MassTotal Lean Mass BMR, Hydration, BMIBMR, Hydration, BMI
Screen 1
(For Both Configurations)
Click the icon at the left to view a paper on the importance of knowing the three types of fat (Essential, Reserve & Excess)
exit
Screen 2
Measuring Body FatMeasuring Body Fat
Screen 3
Screen 4
Screen 5
The Results (3-The Results (3-FAT)FAT)

exit
Screen 2
Measuring Body FatMeasuring Body Fat
Screen 3
The Results (1-The Results (1-FAT)FAT)
exit
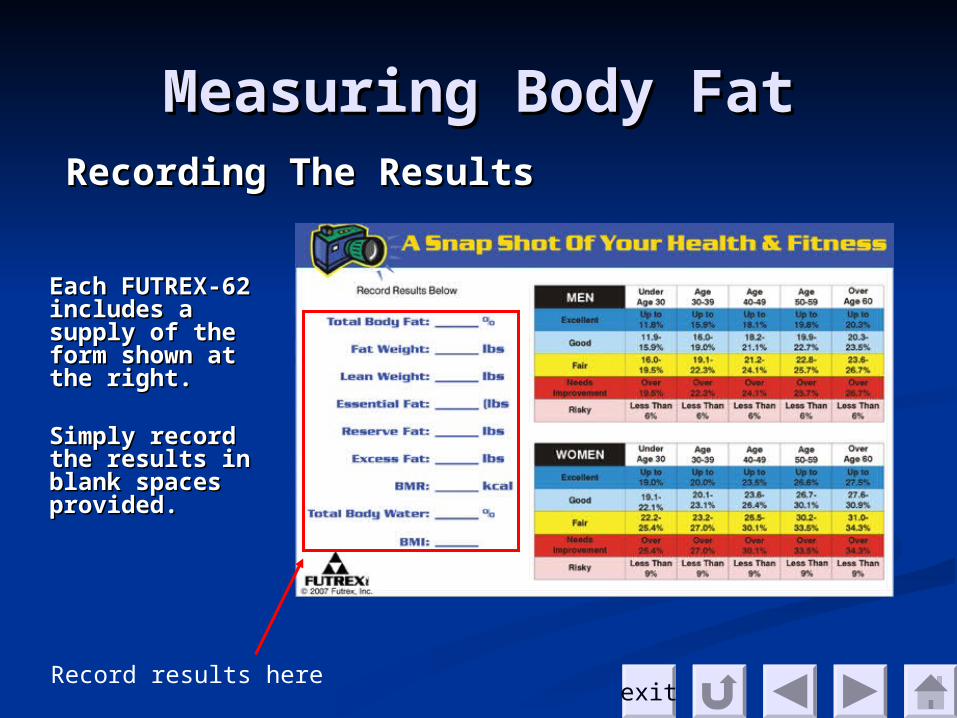
Measuring Body FatMeasuring Body FatRecording The ResultsRecording The Results
Each FUTREX-Each FUTREX-62 includes a 62 includes a supply of the supply of the form shown at form shown at the right.the right.
Simply record Simply record the results in the results in blank spaces blank spaces provided.provided.
Record results here

exit
Optional PrinterOptional Printer
Serial Port (RS-232)For Optional Printer
The optional printer package for the FUTREX-62 allows you to produce printed results like those pictured at the left.
If using the optional printer simply connect it to the FUTREX-62 using the serial cable that is included with the printer. The proper connection ports are shown below.
Click “Next” for more printer information
Note: When using the Optional Printer, the FUTREX-62 must be configured to turn the Printer Option “ON”

exit
Optional PrinterOptional PrinterTurning the Printer “ON” and “OFF”Hold the printer’s power button (circled in red in the photo at the left) for 1 to 3 seconds.
The printer will then power up and a green indicator light will appear just below the power button.
To switch the power “OFF,” hold the same power button down for 1-3 seconds.
The printer will then power down, and the green indicator light will go out.
Continue for more printer information

exit
Loading the PaperPosition the paper with the FUTREX logo facing out as shown in the illustration at the left.
• Guide the paper into the slot at the back of the printer.
• The printer will then “grab” the paper, and feed it into the proper starting location.
• Tear off any excess paper at the front of the printer
Continue for more printer information
Optional PrinterOptional Printer
exit
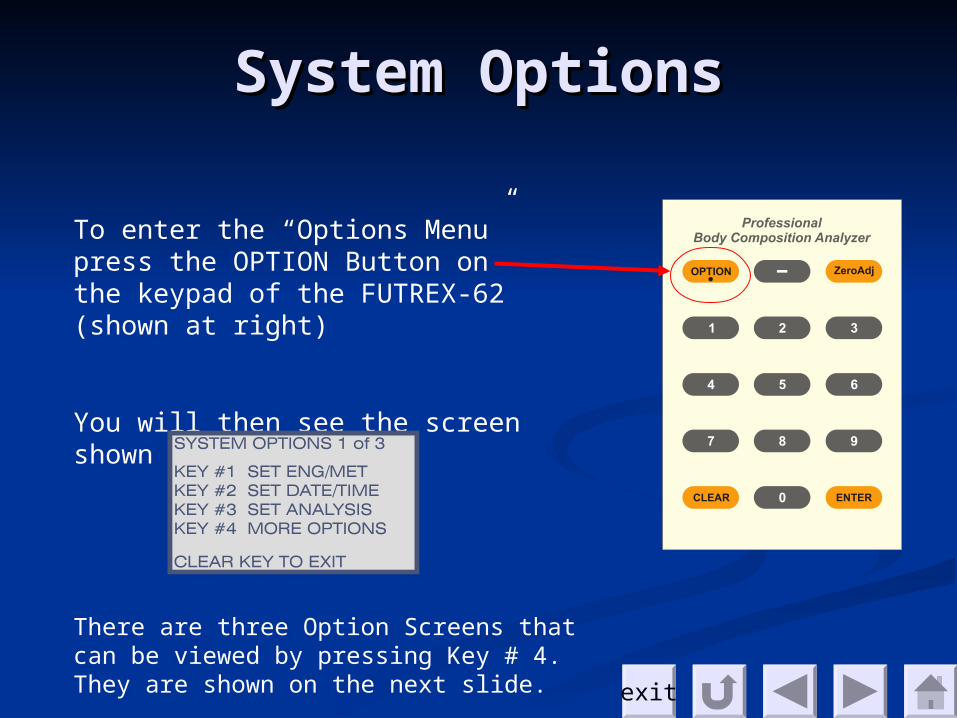
To enter the “Options Menu” press the OPTION Button on the keypad of the FUTREX-62 (shown at right)
You will then see the screen shown below:
There are three Option Screens that can be viewed by pressing Key # 4. They are shown on the next slide.
System OptionsSystem Options
exit
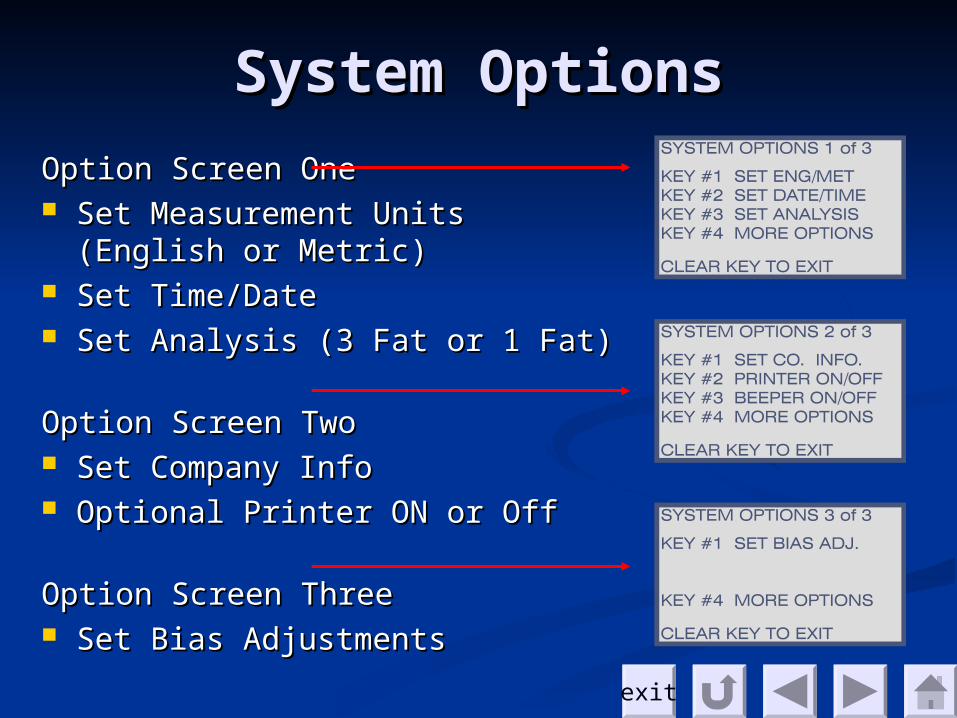
Option Screen OneOption Screen One Set Measurement Units (English Set Measurement Units (English
or Metric)or Metric) Set Time/DateSet Time/Date Set Analysis (3 Fat or 1 Fat)Set Analysis (3 Fat or 1 Fat)
Option Screen TwoOption Screen Two Set Company InfoSet Company Info Optional Printer ON or OffOptional Printer ON or Off
Option Screen ThreeOption Screen Three Set Bias AdjustmentsSet Bias Adjustments
System OptionsSystem Options
exit
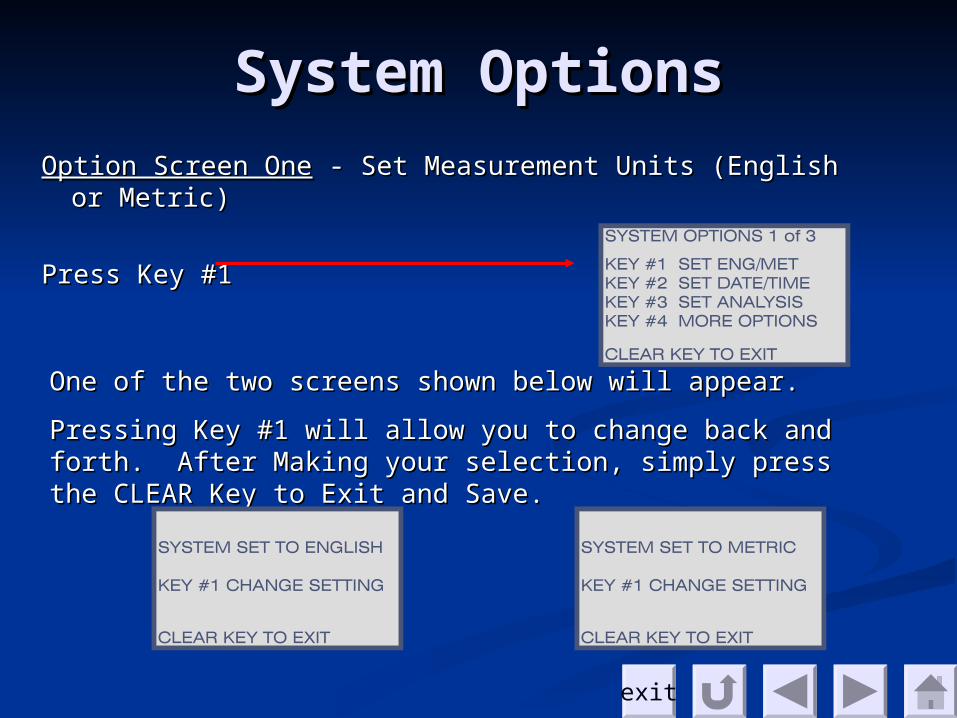
Option Screen OneOption Screen One - Set Measurement Units (English or - Set Measurement Units (English or Metric)Metric)
Press Key #1Press Key #1
One of the two screens shown below will appear. One of the two screens shown below will appear.
Pressing Key #1 will allow you to change back and forth. Pressing Key #1 will allow you to change back and forth. After Making your selection, simply press the CLEAR Key After Making your selection, simply press the CLEAR Key to Exit and Save.to Exit and Save.
System OptionsSystem Options
exit
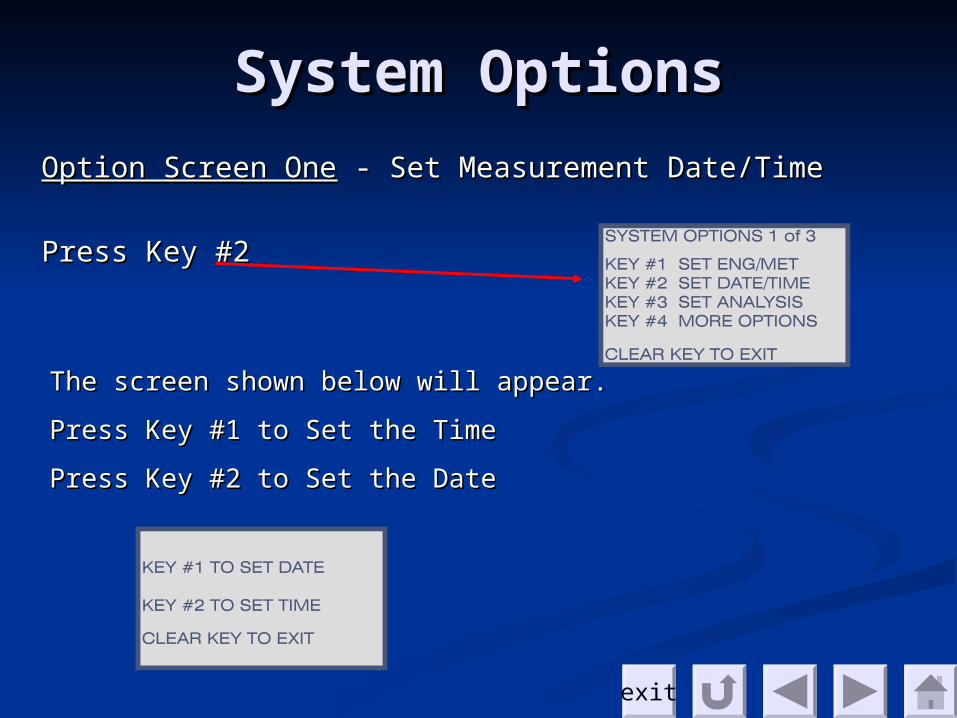
Option Screen OneOption Screen One - Set Measurement Date/Time - Set Measurement Date/Time
Press Key #2Press Key #2
The screen shown below will appear. The screen shown below will appear.
Press Key #1 to Set the TimePress Key #1 to Set the Time
Press Key #2 to Set the DatePress Key #2 to Set the Date
System OptionsSystem Options
exit
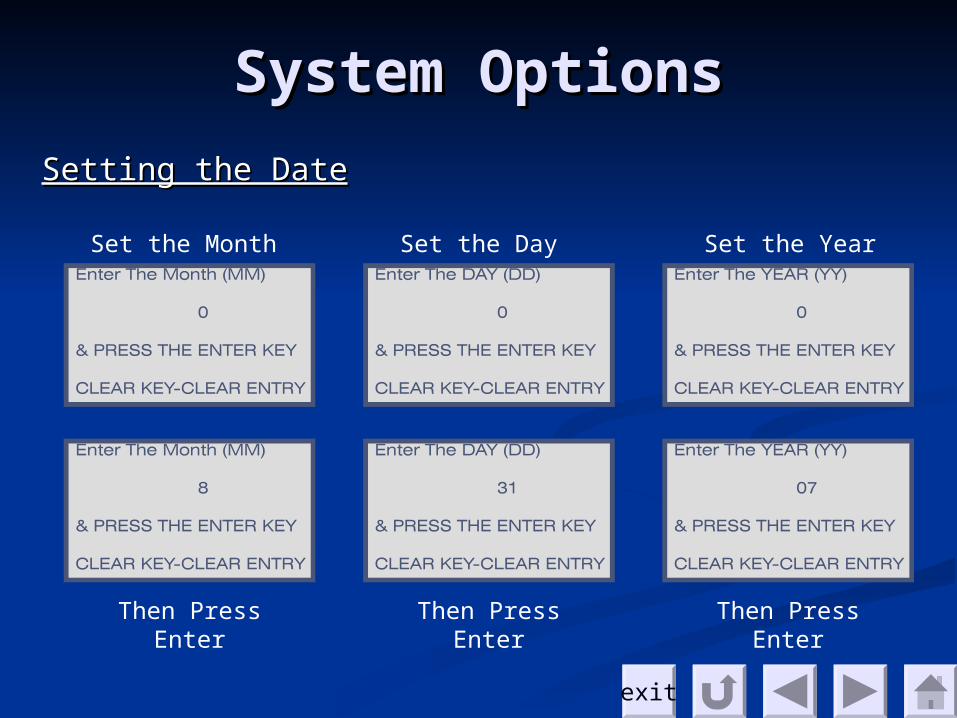
Setting the DateSetting the Date
Set the Month Set the Day Set the Year
Then Press Enter
Then Press Enter
Then Press Enter
System OptionsSystem Options
exit
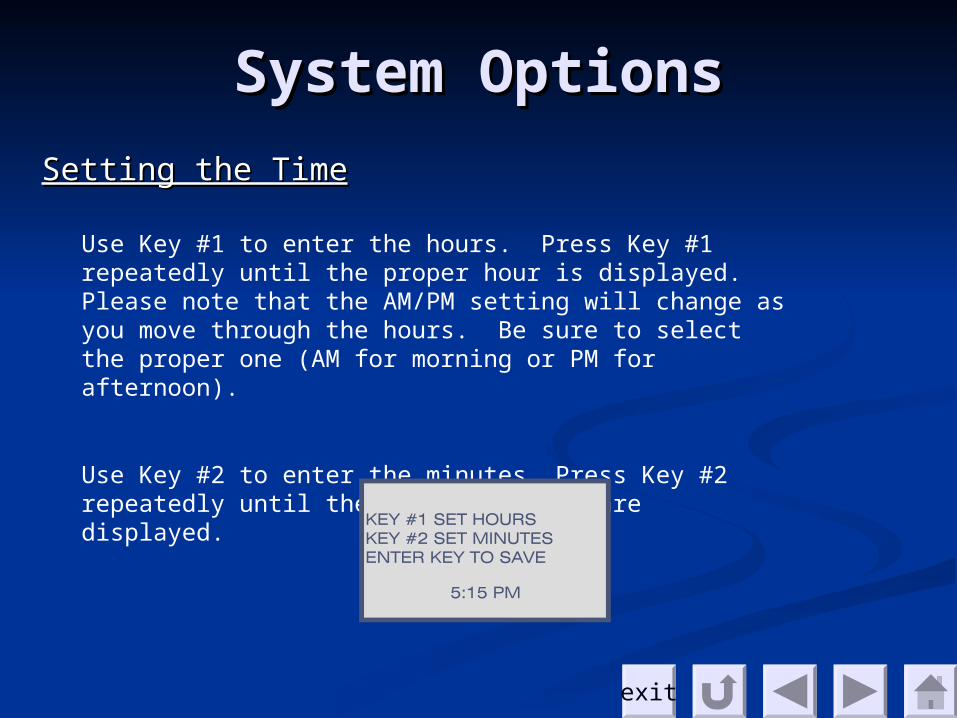
Setting the TimeSetting the Time
Use Key #1 to enter the hours. Press Key #1 repeatedly until the proper hour is displayed. Please note that the AM/PM setting will change as you move through the hours. Be sure to select the proper one (AM for morning or PM for afternoon).
Use Key #2 to enter the minutes. Press Key #2 repeatedly until the proper minutes are displayed.
System OptionsSystem Options
exit
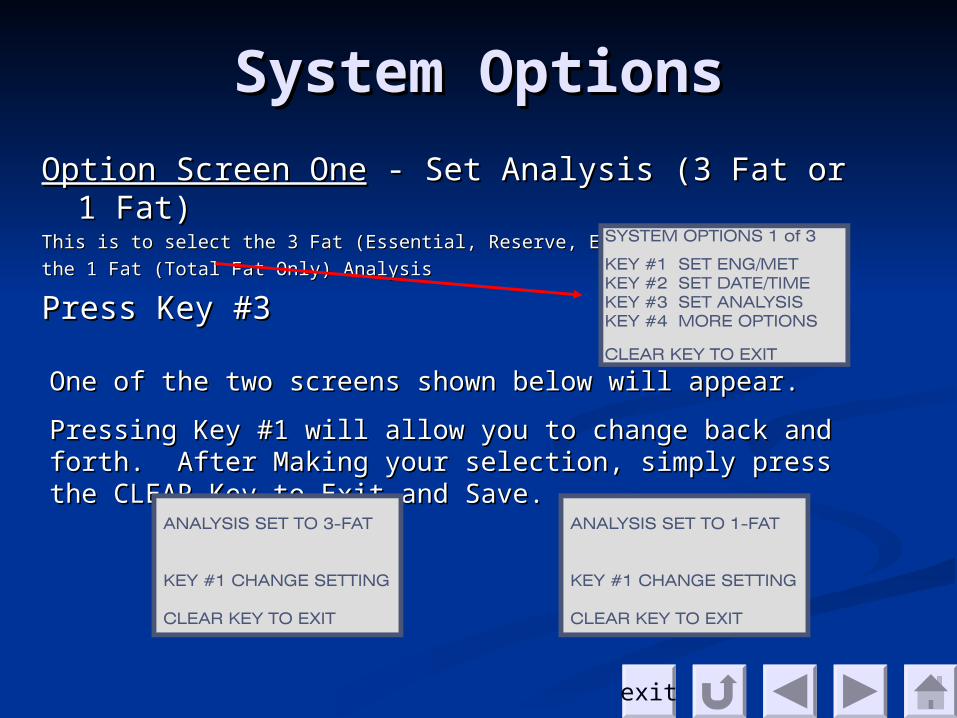
Option Screen OneOption Screen One - Set Analysis (3 Fat or 1 Fat) - Set Analysis (3 Fat or 1 Fat)This is to select the 3 Fat (Essential, Reserve, Excess), orThis is to select the 3 Fat (Essential, Reserve, Excess), or
the 1 Fat (Total Fat Only) Analysisthe 1 Fat (Total Fat Only) Analysis
Press Key #3Press Key #3
One of the two screens shown below will appear. One of the two screens shown below will appear.
Pressing Key #1 will allow you to change back and forth. Pressing Key #1 will allow you to change back and forth. After Making your selection, simply press the CLEAR Key After Making your selection, simply press the CLEAR Key to Exit and Save.to Exit and Save.
System OptionsSystem Options
exit
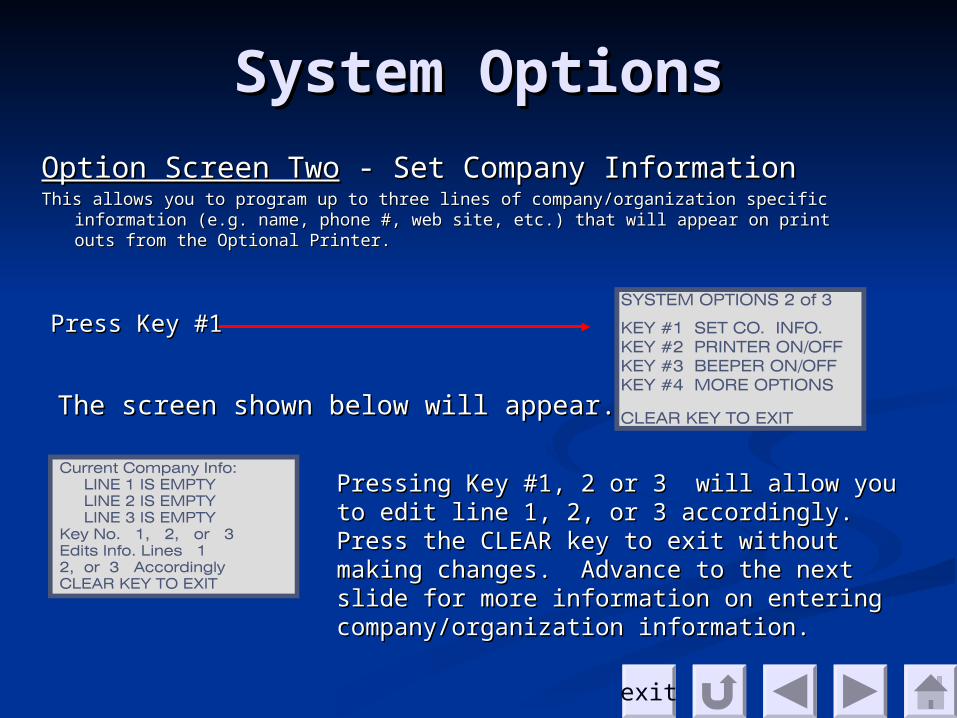
Option Screen TwoOption Screen Two - Set Company Information - Set Company InformationThis allows you to program up to three lines of company/organization specific information This allows you to program up to three lines of company/organization specific information
(e.g. name, phone #, web site, etc.) that will appear on print outs from the Optional (e.g. name, phone #, web site, etc.) that will appear on print outs from the Optional Printer.Printer.
The screen shown below will appear. The screen shown below will appear.
Pressing Key #1, 2 or 3 will allow you to edit Pressing Key #1, 2 or 3 will allow you to edit line 1, 2, or 3 accordingly. Press the CLEAR line 1, 2, or 3 accordingly. Press the CLEAR key to exit without making changes. Advance key to exit without making changes. Advance to the next slide for more information on to the next slide for more information on entering company/organization information.entering company/organization information.
Press Key #1Press Key #1
System OptionsSystem Options

exit
Entering Company InformationEntering Company InformationThe screens shown below show the various screens for The screens shown below show the various screens for selecting letters & symbols. selecting letters & symbols.
Navigate using the #7 Key Navigate using the #7 Key and #9 Key to select the letter and #9 Key to select the letter or symbol you desire. or symbol you desire.
The cursor will move between The cursor will move between screens as needed.screens as needed.
Press ENTER when the cursor Press ENTER when the cursor is below the desired letter. is below the desired letter.
When you have completed the When you have completed the entry for that Line, press entry for that Line, press ZeroAdj to exit and save.ZeroAdj to exit and save.
System OptionsSystem Options
exit
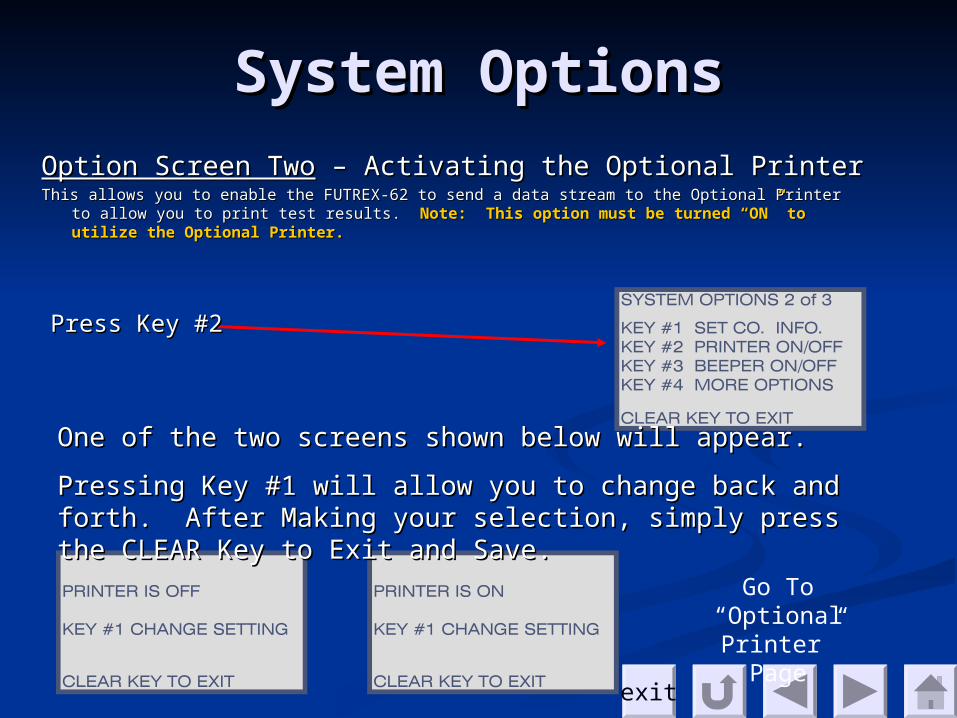
Option Screen TwoOption Screen Two – Activating the Optional Printer – Activating the Optional PrinterThis allows you to enable the FUTREX-62 to send a data stream to the Optional Printer to This allows you to enable the FUTREX-62 to send a data stream to the Optional Printer to
allow you to print test results. allow you to print test results. Note: This option must be turned “ON” to utilize Note: This option must be turned “ON” to utilize the Optional Printer.the Optional Printer.
Press Key #2Press Key #2
One of the two screens shown below will appear. One of the two screens shown below will appear.
Pressing Key #1 will allow you to change back and forth. Pressing Key #1 will allow you to change back and forth. After Making your selection, simply press the CLEAR Key After Making your selection, simply press the CLEAR Key to Exit and Save.to Exit and Save.
Go To “Optional
Printer” Page
System OptionsSystem Options
exit
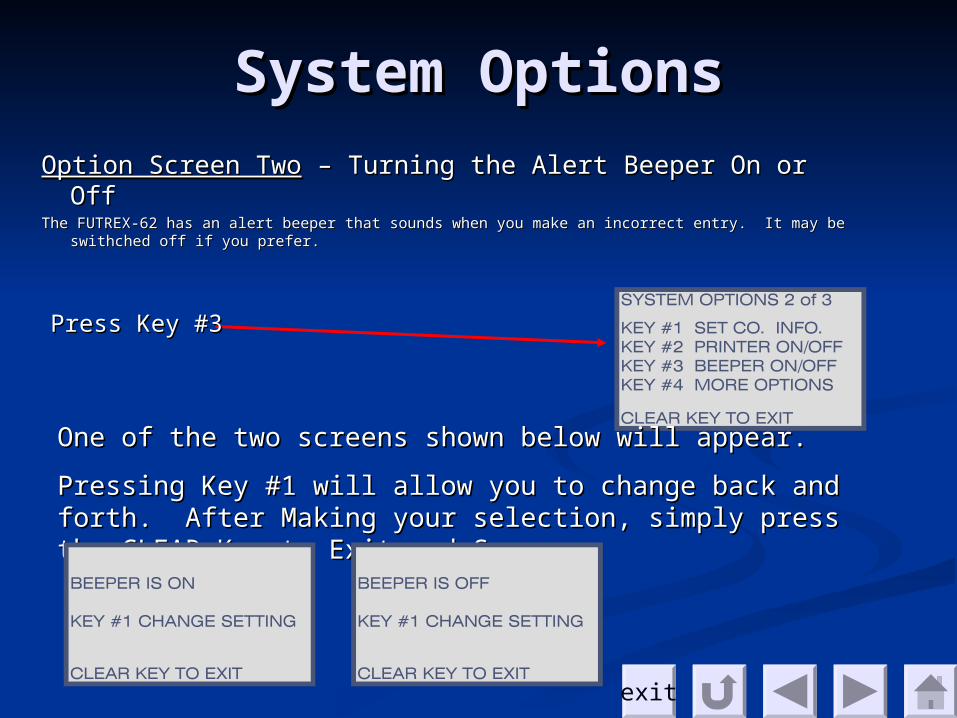
Option Screen TwoOption Screen Two – Turning the Alert Beeper On or Off – Turning the Alert Beeper On or OffThe FUTREX-62 has an alert beeper that sounds when you make an incorrect entry. It may be The FUTREX-62 has an alert beeper that sounds when you make an incorrect entry. It may be
swithched off if you prefer.swithched off if you prefer.
Press Key #3Press Key #3
One of the two screens shown below will appear. One of the two screens shown below will appear.
Pressing Key #1 will allow you to change back and forth. Pressing Key #1 will allow you to change back and forth. After Making your selection, simply press the CLEAR Key After Making your selection, simply press the CLEAR Key to Exit and Save.to Exit and Save.
System OptionsSystem Options
exit
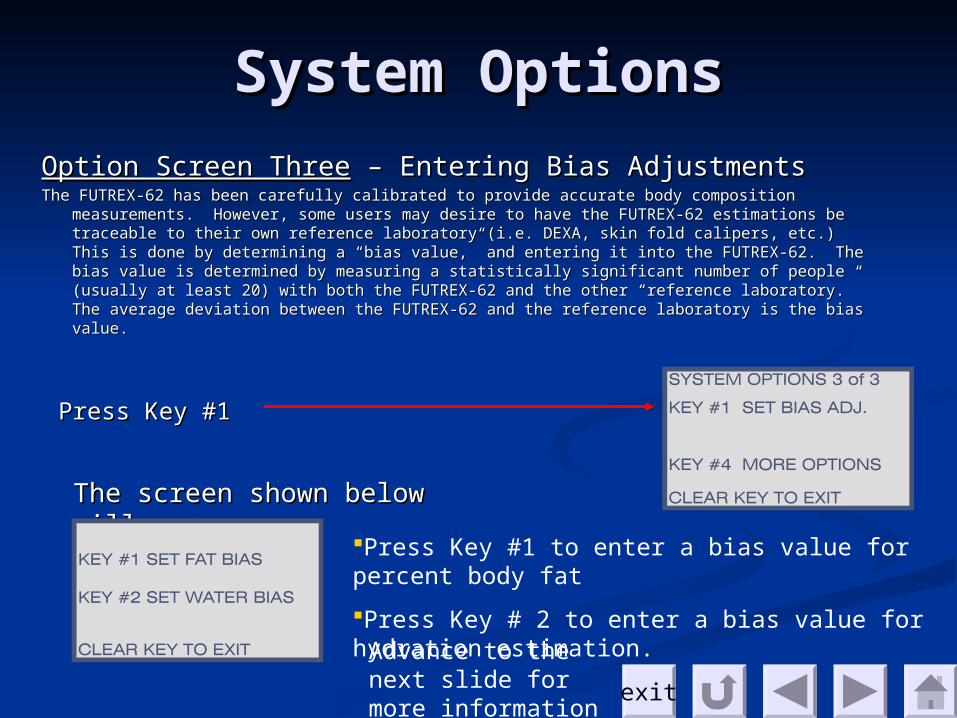
Option Screen ThreeOption Screen Three – Entering Bias Adjustments – Entering Bias AdjustmentsThe FUTREX-62 has been carefully calibrated to provide accurate body composition The FUTREX-62 has been carefully calibrated to provide accurate body composition
measurements. However, some users may desire to have the FUTREX-62 estimations measurements. However, some users may desire to have the FUTREX-62 estimations be traceable to their own reference laboratory (i.e. DEXA, skin fold calipers, etc.) This be traceable to their own reference laboratory (i.e. DEXA, skin fold calipers, etc.) This is done by determining a “bias value,” and entering it into the FUTREX-62. The bias is done by determining a “bias value,” and entering it into the FUTREX-62. The bias value is determined by measuring a statistically significant number of people (usually at value is determined by measuring a statistically significant number of people (usually at least 20) with both the FUTREX-62 and the other “reference laboratory.” The average least 20) with both the FUTREX-62 and the other “reference laboratory.” The average deviation between the FUTREX-62 and the reference laboratory is the bias value.deviation between the FUTREX-62 and the reference laboratory is the bias value.
Press Key #1Press Key #1
The screen shown below The screen shown below will appear.will appear.
Press Key #1 to enter a bias value for percent body fat
Press Key # 2 to enter a bias value for hydration estimation.Advance to the next
slide for more information
System OptionsSystem Options
exit
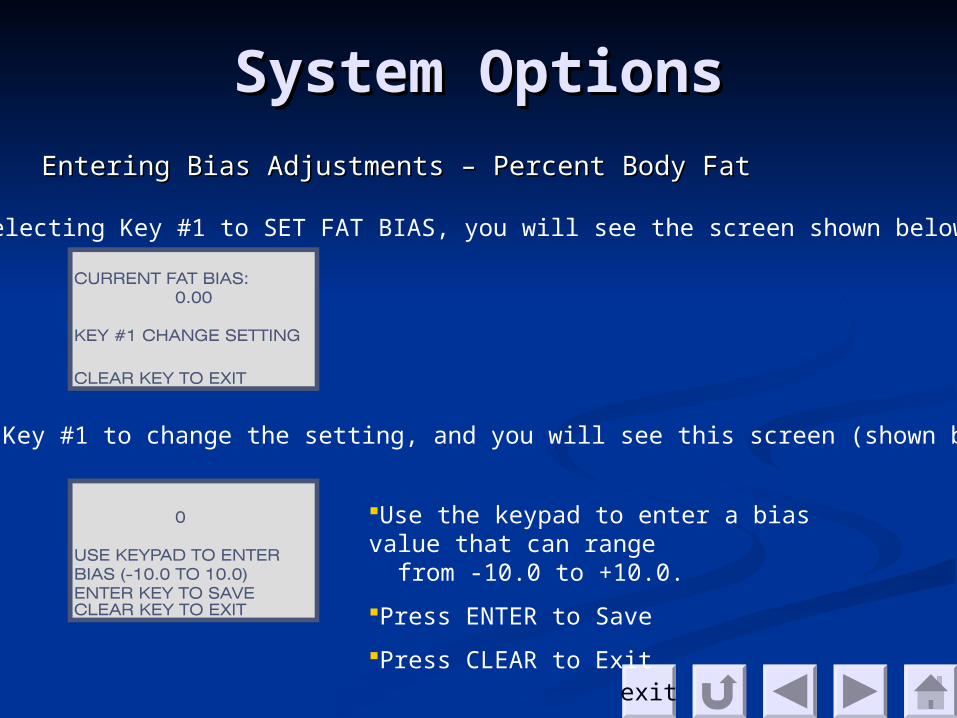
Entering Bias Adjustments – Percent Body FatEntering Bias Adjustments – Percent Body Fat
After Selecting Key #1 to SET FAT BIAS, you will see the screen shown below
Now press Key #1 to change the setting, and you will see this screen (shown below)
Use the keypad to enter a bias value that can range from -10.0 to +10.0.
Press ENTER to Save
Press CLEAR to Exit
System OptionsSystem Options
exit
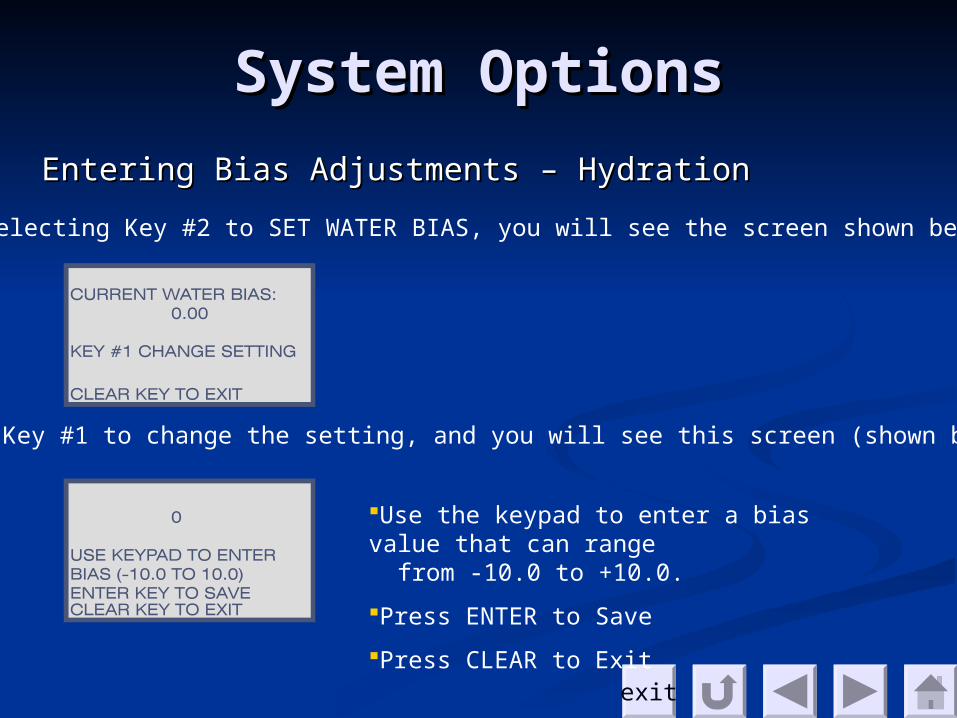
Entering Bias Adjustments – HydrationEntering Bias Adjustments – Hydration
After Selecting Key #2 to SET WATER BIAS, you will see the screen shown below
Now press Key #1 to change the setting, and you will see this screen (shown below)
Use the keypad to enter a bias value that can range from -10.0 to +10.0.
Press ENTER to Save
Press CLEAR to Exit
System OptionsSystem Options

exit
Physical Address:
130 Western Maryland Parkway, Hagerstown, MD 21740 USA
Telephone & Telefax:
Sales: Toll Free (US & Canada): 800-576-0295 • 301-791-9220
Customer Service: Toll Free (US & Canada): 800-545-1950 • 301-733-9369
FAX: 301-733-9398
Web & e-mail
Web site: www.futrex.com
E-mail: [email protected]
Contact FutrexContact Futrex