frequent fulcrum functions: the basics of scale’s
TRANSCRIPT

ORNL is managed by UT-Battelle, LLC for the US Department of Energy
Frequent Fulcrum Functions:The Basics of SCALE’s Graphical User InterfaceRobert A. Lefebvre
SCALE Users’ Group 2021
Nuclear Energy and Fuel Cycle Division
Oak Ridge National Laboratory, USA

2
SummaryThis tutorial introduces the Fulcrum graphical user interface and the basic functions that enhance the common activities of creating, editing, navigating, executing, and visualizing SCALE input files. This tutorial will help you become familiar with the Fulcrum input file text editor and the integrated input development environment features of autocompletion, automatic checking, cursor context, and input navigation. In addition, the Fulcrum and SCALE runtime environment will be reviewed to improve the understanding of job execution workflow.
* This tutorial does not cover data and geometry plotting. Please see the Advanced User Interface Capabilities tutorial for details regarding plotting data and geometry.
No prior experience with SCALE is required. You can follow along using SCALE 6.2 or 6.3-beta.

3
User Notice
This tutorial is intended to train users in the use of the Fulcrum input capabilities.
It is not intended to train users in the use of the SCALE code system’s cross section processing, criticality safety, depletion, shielding, sensitivity and uncertainty, or source term computational modules.
Schedules and contact information for specific tutorials and training courses can be found at https://www.ornl.gov/scale/scale-training

4
Outline
• Vision
• Overview
• Text Editor
• Document Navigation
• Input Autocompletion
• Automatic Input Checks
• Accelerators – Comments, Calculator, and Custom Workspaces

55
Fulcrum Mission Statement
Provide a cross-platform graphical user interface (GUI) designed to facilitate problem creation, modification, navigation, validation, and visualization, as well as output and data file interaction as needed by new and experiencedusers.

66
Fulcrum Components Overview

77
Fulcrum Components Discussed
Input Editor
Input Navigation
88
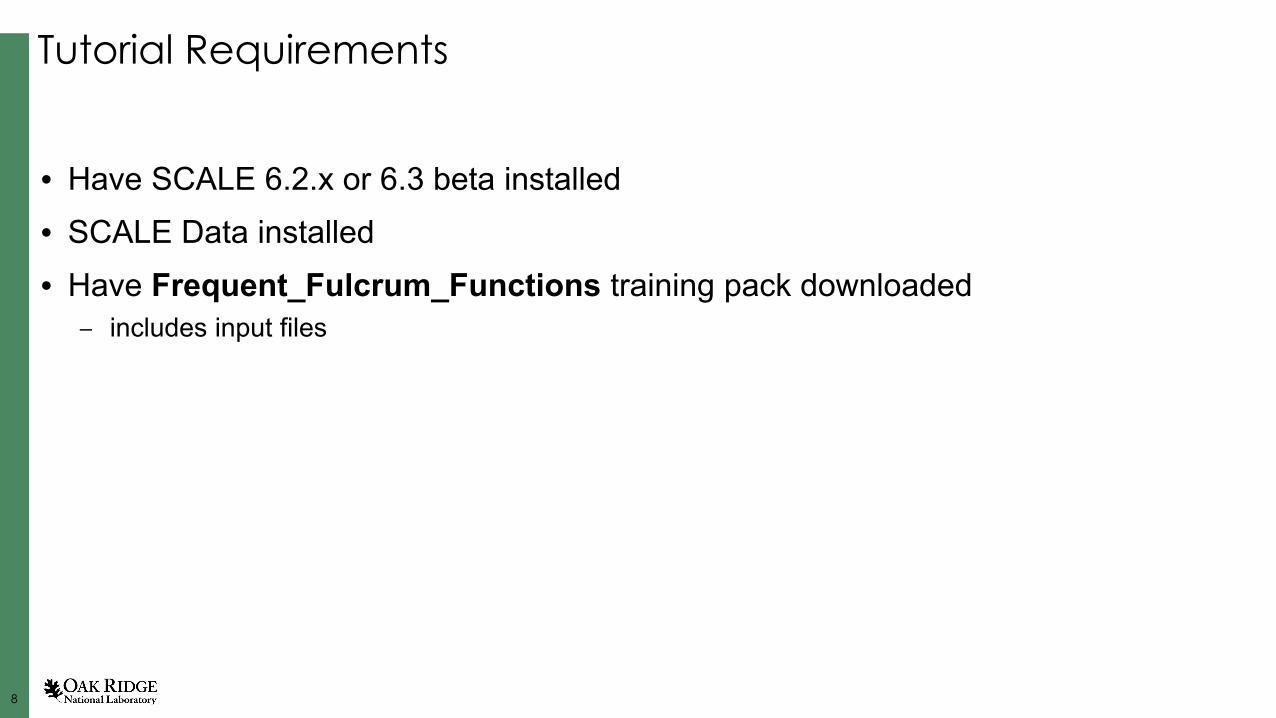
Tutorial Requirements
• Have SCALE 6.2.x or 6.3 beta installed • SCALE Data installed• Have Frequent_Fulcrum_Functions training pack downloaded
– includes input files

99
Fulcrum Startup Screen
• Start Fulcrum• Little to look at• Lean and mean• Always has a terminal/CMD
window in the backgroundthat contains log messages

1010
Headfirst – text editor• Open the Frequent_Fulcrum_Functions > problem1.inp• Text too small or too big?• Text not the right color?• Highlighted line annoying?• Highlighted line not the
right color?
To the Text Editor Settings!

1111
Fulcrum Text Editor Settings• Accessible from File > Settings… > Text Editor

1212
Fulcrum Text Editor Settings• Most settings are self-explanatory and can be adjusted as needed to suit your
preferences• Click the checkbox for Close text documents when all editors are closed
– Fulcrum supports multiple editor tabs per document, when the last tab is closed, the document is removed from the Navigation panel (list of open files)
• The SCALE input file extensions allows adding additional extensions that Fulcrum will recognize as input files– Input files must have one of these extensions to have the Fulcrum advanced text editor
capabilities applied – DON’T FORGET TO CREATE YOU INPUT FILE WITH AN EXTENSION
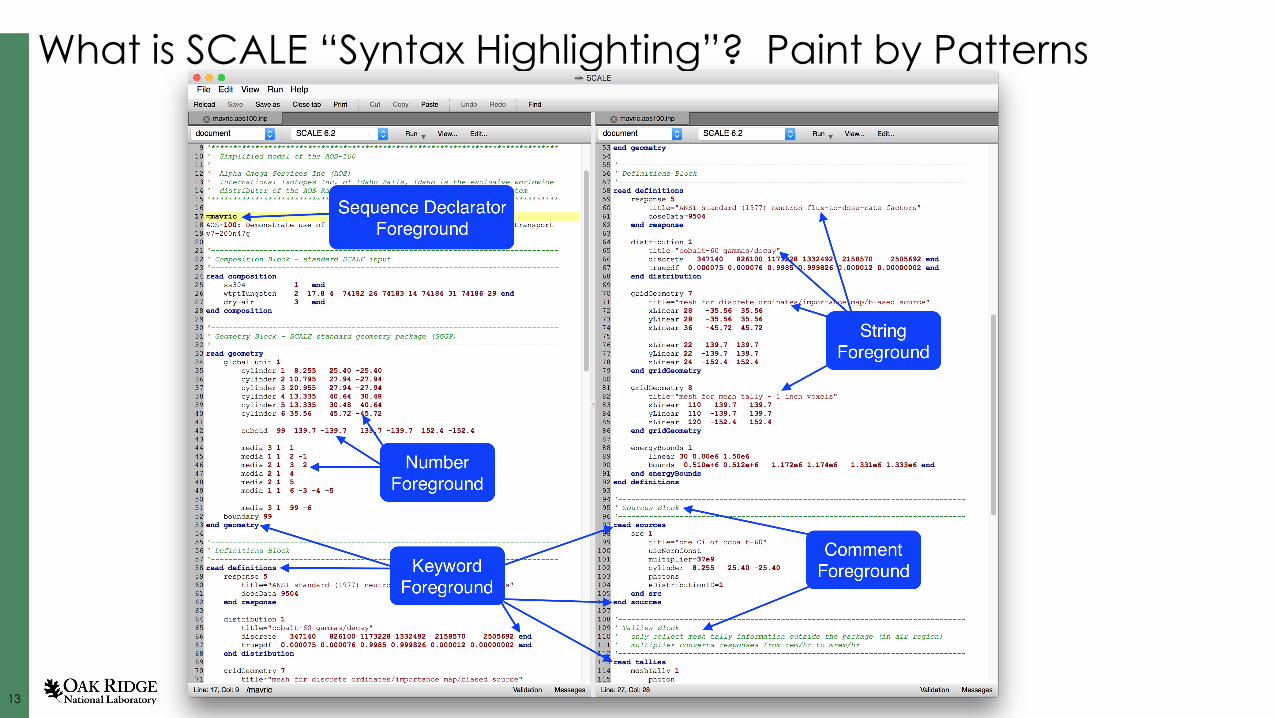
• “Syntax highlighting”?
1313
What is SCALE “Syntax Highlighting”? Paint by Patterns

1414
Headfirst – Input execution
• Click the Text Editor’s Run button • Observe the Messages panel button indicate messages are available for viewing
• Open the Messages panel via left-click and observe the job running (~1 minute)
• Where is my output file?– Introducing the Navigation panel!

1515
Fulcrum Document Navigation• Hierarchical Listing of Document
– Quick Navigation to input component– Plot creation
• Filter – Regular expression-based item filtering
• Dockable– Dock to main Fulcrum application– Float in separate window– Hide completely
• Open Associated Files– Lists files with matching extension-less filename– Streamlines opening associated files

1616
Headfirst – Opening results • Once your job is complete you can access results via the Navigation panel’s
Open Associated Files• In the Navigation panel right click on problem1.inp
• Observe the problem1.out output file is added to the Navigation panel and a new problem1.out text editor tab is displayed.

1717
Headfirst Checkpoint!
• You have verified SCALE and Fulcrum are operational on your machine’s Operating System
• You are aware of the configurability of the Fulcrum Text Editor via Text EditorSettings
• You know where the problem Run button is located so you can execute an input • You know where the Messages panel button is and when there are unread
messages• You have been introduced to the Navigation panel• You know how to see and open associated files via the Navigation panel’s Open
Associated Files… feature• Let’s look at the Text Editor Features in more depth• Questions!?

1818
Fulcrum Text Editor Features | Overview• Customizable Execution• Quick Navigation• Cursor Context• Execution Messages• Input Validity checks• Syntax highlights• Current block highlight• Context aware input
autocompletion• Synchronized and
split workspaces

1919
Cursor Context PSA - ‘The More You Know’ • Unsure of what a field is in the input?• Place the text cursor on the field and observe the full field’s name:
/xsproc / comps/atomcomp/roth
Sequence | block | record | field - theoretical density

2020
Quick Navigation • Primary input components (xslib, comps, cells, geometry, etc.) available via
Navigation panel and the text editor’s document navigation drop-down

2121
Quick Navigation | Hands On
• Double left-clicking an input component (xslib) in the Navigation panel to jump your cursor to that input component
• Left-clicking the text editor’s document navigationand select a desired input component (cells) – Observe block highlighting indicate the start and end
of the records

2222
Quick Navigation | Goto Definition
• A lot of input data in SCALE is referential– I.e., an identifier from associated input component– E.g., geometry record referencing a material via the material identifier
• Fulcrum provides a quick navigation to the definition of an input field– Right click an input field and select Goto Definition of <NAME>

2323
Goto Definition | Hands On• In problem1.inp on line 24 column 31, you will find the use of a mixture that fills
the pitch of the latticecell
• What defines mixture 8? • Right-click on the 8 and select
Goto definition of mixture
• Observe the input cursor jump to line 18, column 17, the definition of mixture 8: A nitrogen (n) standard composition at 560Kwith volume fraction (vf) of 0.00122.

2424
Input Autocompletion
Autocompletion provides you a jumpstart with input creation and editing via 3 constructs• Static/default input insertion
– Inserts boilerplate input that usually requires you to update fields for correctness
• Input substitution– Uses cursor context to present you with a list of input values to substitute for current value
• Configurable input insertion– Provides a graphical widget and resultant text preview
• Autocompletion is engaged via the control+space (CTRL+SPACE) keyboard sequence. Also, Edit > Autocomplete will display autocompletion

2525
Autocompletion | Hands On Static text • In problem1.inp add a new line after line 27
• Press the CTRL+SPACE key combination to activate autocompletion on line 28 and observe the list of available input components.
• Select infinite homogeneous medium (infhommed - basic)
• Observe the static text inserted with default mixture identifier of 1
• This mixture identifier needs to be updated– This introduces you to the input substitution variant of autocompletion

2626
Autocompletion | Hands On Input Substitution• Autocompletion that occurs on an existing input field will present a list of legal
values for that field that upon selection will substitute the field with the selected– Aids in quickly remembering and selecting values for a field
• Update the infhommed from 1 to 3 via autocompletion with your cursor at the 1 and selecting 3– This action lists all available mixtures from the composition block

2727
Autocompletion | Hands On Input Substitution Continued• The infhommed isn’t a great example, so let’s try compositions• Perform an autocomplete on
nitrogen (n) on line 18, column 4and observe the complete list ofavailable compositions be listed
• Press the right-arrow key to move the cursor after the n and observe the autocompletion list update

2828
Autocompletion | Hands On Input Substitution Continued
• Begin typing it (to form nit) and observe the list update
• Press RETURN or ENTER to select nitrogen

2929
Autocompletion | Configurable input• Configurable forms provide a graphical widget that presents a more interactive
experience that is accompanied by the resulting text that will be inserted– All configurable autocompletion options are clearly marked with (configurable) following their
description

3030
Autocompletion | Configurable input cont’d• Upon selecting a configurable
autocompletion option a graphical widget is displayed with widgets for each input field to allow toggleof input field values
• A Results table displays the resulting text that will be inserted
• More to follow in future exercises

3131
Input Validation | Automatic input checking• Fulcrum applies numerous input checks
to your input while you are editing– Results of input checks are listed in the
text editor’s Validation panel located in the lower right corner, adjacent to the Messages panel
– Left-clicking the message quick-navigatesto the error location

3232
Input Checking | Parse Vs Validation Errors
• Input checks can result in a parse or validation error• Input parse errors indicate something is wrong with the input structure
– An extra field is present causing input parsing to fail which – Can have collateral validation errors as a result of an incomplete understanding of the input
• Input validation errors indicate illegal input – E.g., missing required input fields, unallowed value, or incorrect type

3333
Input Validation | Simple examples

3434
Input Validation | Complex examples
• Referential error indicating the /xsproc/cells/lattice/pitch/dimension (1.2598) cannot be less than the clad diameter (cladd) dimension (1.94996) relatively located at “../../clad/dimension”.
• I.e., fueld < cladd < pitch

3535
Input Validation | Complex examples cont’d
• Referential error indicating the /xsproc/cells/lattice/pitch/mixture must exist at /xsproc/cells/lattice/pitch/../../../X. Equivalent to /xsproc/X
• I.e., /xsproc/comps/stdcomp/mixture

3636
Workspaces | Synchronized and split editors• Fulcrum takes advantage of the newer, more affordable, higher resolution, and
larger displays with the ability to split text editors into multiple workspaces– Both vertical and horizontal arrangements– Single and multi-document
• Text documents can be cloned by right-clicking the editor tab and selecting clone tab

3737
Workspaces | Split Editor continued• Split editor allows for viewing and editing associated input sections
– E.g., Composition and Cell data or Composition and geometry data

3838
Workspaces | Split Editor cont’d
• Rearranging workspaces is facilitated by click-and-drag of the desired tab to the new location
• Left-click and drag the right problem1.inp tab to the bottom-center of the left problem1.inp tab

3939
Workspaces | Split Editor cont’d• Splits can occur on to the bottom, left, right, or top of tab• Closing splits can be accomplished by closing the last tab or right-click and
selecting close all tabs
4040
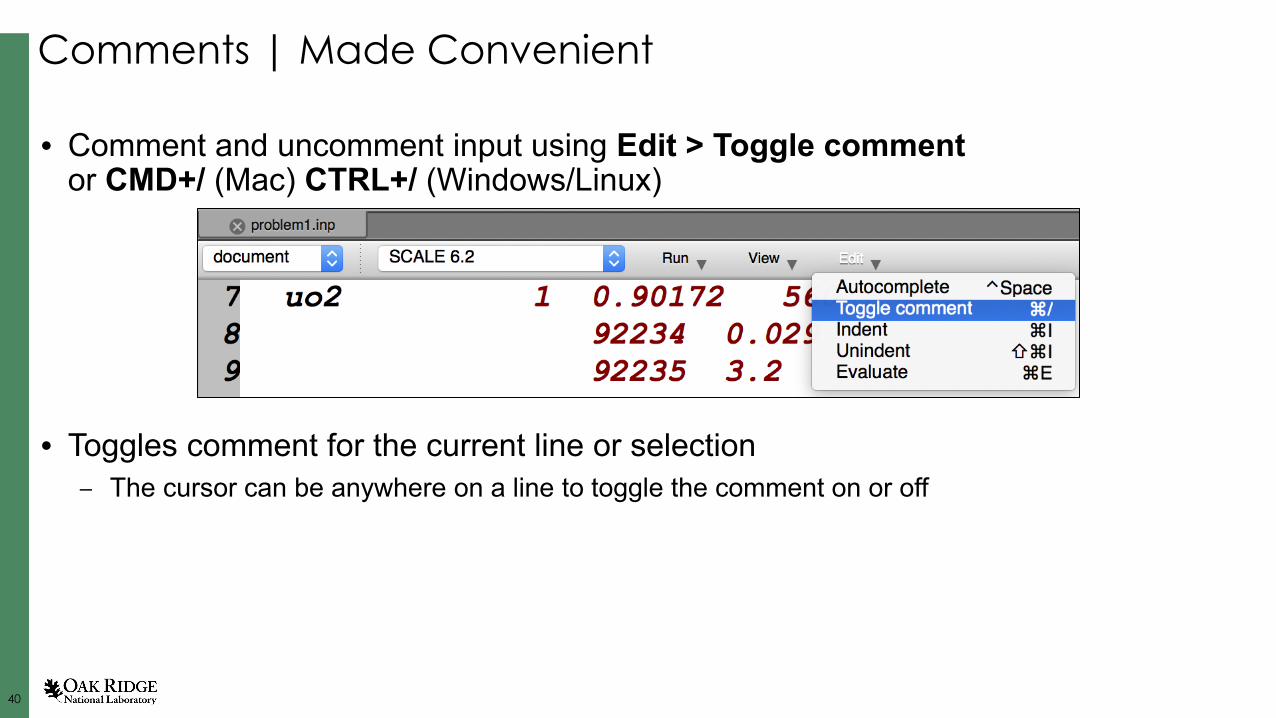
Comments | Made Convenient
• Comment and uncomment input using Edit > Toggle comment or CMD+/ (Mac) CTRL+/ (Windows/Linux)
• Toggles comment for the current line or selection– The cursor can be anywhere on a line to toggle the comment on or off

4141
• Comment-out unused composition records by selecting the lines
• Toggle comment via Edit > Toggle comment or CMD+/ (Mac) CTRL+/ (Windows/Linux)
Comments | In Practice

4242
Formatting related text into aligned columns allows for faster recognition and column-wise text operations. • Column selection via ALT+MOUSE SELECTION.• With column selection made, any edits are made to all columns for each row. • E.g., Update all isotope weight percent values to have a decimal digit.
Column Text Selection and Editing

4343
Expression Evaluation | Embedded Calculator• An integrated expression evaluation engine is available in Fulcrum• Accessible via Edit > Evaluate or CTRL+E (Windows/Linux) CMD+E (Mac)
• Arithmetic operators: +, -, *, /, ^• Supports typical functions:
sqrt(x) cos(x) sin(x) root(x) abs(x)
min(x1,x2,…) max(x1,x2,…) avg(x1,x2,…) sum(x1,x2,…) mul(x1,x2,…)floor(x) ceil(x) exp(x) log(x) logn(x)
log10(x) hyp(x,y) if(C,T,F) clamp(r1,v,r2) inrange(l,v,u)
sign(x) deg2rad(x) tan(x) equal(x,y) acos(x)
asin(x) atan(x) cosh(x) tanh(x) sec(x)
csc(x) cot(x) sinh(x) round(x) roundn(x,p)d2g(x) g2d(x) r2d(x) pi

4444
Expression Evaluation | In Practice• Calculate the fuel area given the fuel diameter of 0.8357• Enter a comment with pi*(fueld=0.8357/2.0)^2
• Select the text and evaluate it• I.e., Edit > Evaluate or
CMD+E (Mac) or CTRL+E (Windows/Linux)
4545
Text Editor Overview Checkpoint #2!
• You are now aware of the Fulcrum text editor’s Cursor Context to assist you in identifying and becoming familiar with SCALE input fields
• You are now practiced in quickly navigating using the Quick Navigation features including Goto Definition
• You are now practiced in performing input autocompletion including interactive field substitution– You are aware of Configurable autocompletion forms
• You are now aware of the input Validation panel and the automatic input checking performed– The difference between an input parse and validation error
• You are now practiced in cloning and rearranging tab workspace layout• Questions!?

4646
Exercise Preparation
• Close all files via clicking File > close all• Alternatively, closing files can be accomplished by one of the following operations
– Click File > Close– Right-click file in the Navigation panel and select close– Close the tab
• Only closes file if File > Settings > Text Editor > Close text documents when all editors are closed is enabled
• Ready to start our exercise, Lady Godiva

4747
Exercise | Lady Godiva• Interesting piece of history• Model a ‘simplified’ version• Exercise isn’t about criticality
analysis but Fulcrum functionality
• Use Fulcrum to create, edit, visualize, and execute input
https://ncsp.llnl.gov/LA13638/reports/046.ref_046.pdf

4848
Exercise | Lady Godiva - Simplified
• Create the Lady Godiva experiment using the CSAS6 criticality safety analysis sequence
• Lady Godiva consists of ~6.75 in diameter slightly elongate “sphere” or ellipsoid• Enriched to 90% 235U• Average density is “slightly less than 19 gm/cm3”• 15/16 in radius cylindrical channel• Use V7.1-252n cross-section library (xslib) • Use multiregion cell processing with vacuum right boundary condition• Use 10000 particles per generation in the parameters to CSAS
https://ncsp.llnl.gov/LA13638/reports/046.ref_046.pdf

4949
Lady Godiva | New File
• Click File > New file…• Navigate to the Frequent_Fulcrum_Functions folder • Name the file LadyGodiva.inp
– REMEMBER TO SPECIFY THE EXTENSION (.inp)– No extension means no input intelligence (no navigation, cursor context, autocompletion, etc.)

5050
Criticality Safety Analysis Sequence – CSAS6
• With your cursor in the text editor perform an autocompletion via the CTRL-SPACE keyboard sequence
• Select CSAS6 – Criticality safety analysis using KENO-VI

5151
Criticality Safety Analysis Sequence – CSAS6
• The default CSAS6 template has the required blocks (comps, geometry)
• Validation messages highlight our TODO list– The need to specifying compositions
(stdcomp, wtptcomp, etc.) – The need to specify geometry
(media, hole, etc.)– The fact that the default boundary region
identifier doesn’t point to an existing regionI.e., we need to create the boundary

5252
Title and Cross-Section Library
• Replace title-goes-here with Lady Godiva
• Replace xslib-goes-here with v7.1-252n– In 6.3 autocompletion is available

5353
Composition | 90% 235U, Slightly less than 19 gm/cm3
• Remove the TODO comment in the read comp block• Press CTRL-SPACE to display composition options• Select stdcomp – basic (configurable)• Update Composition to be uranium• Click the Theoretical Density checkbox• Specify a Theoretical Density of 18.95• Click the Isotopic Weight Percents checkbox• Click the Add row button• The default Isotope added is 238U (92238).
Update its Weight Percent to 10%• Click the Add row button, again• Change the Isotope to 235U (92235)• Change the Weight Percent to 90%

5454
Composition Review | 90% 235U, Slightly less than 19 gm/cm3
• Notice Temperature was automatically enabled by clicking Isotopic Weight Percents– This is because the input is position-
dependent and requires Temperature to be specified
– Theoretical Density hasa label (den=) so it is not required and not automatically enabled
• Review the Results panel– Note all parameters
• Press OK to insert the Result text into the comp block
5555
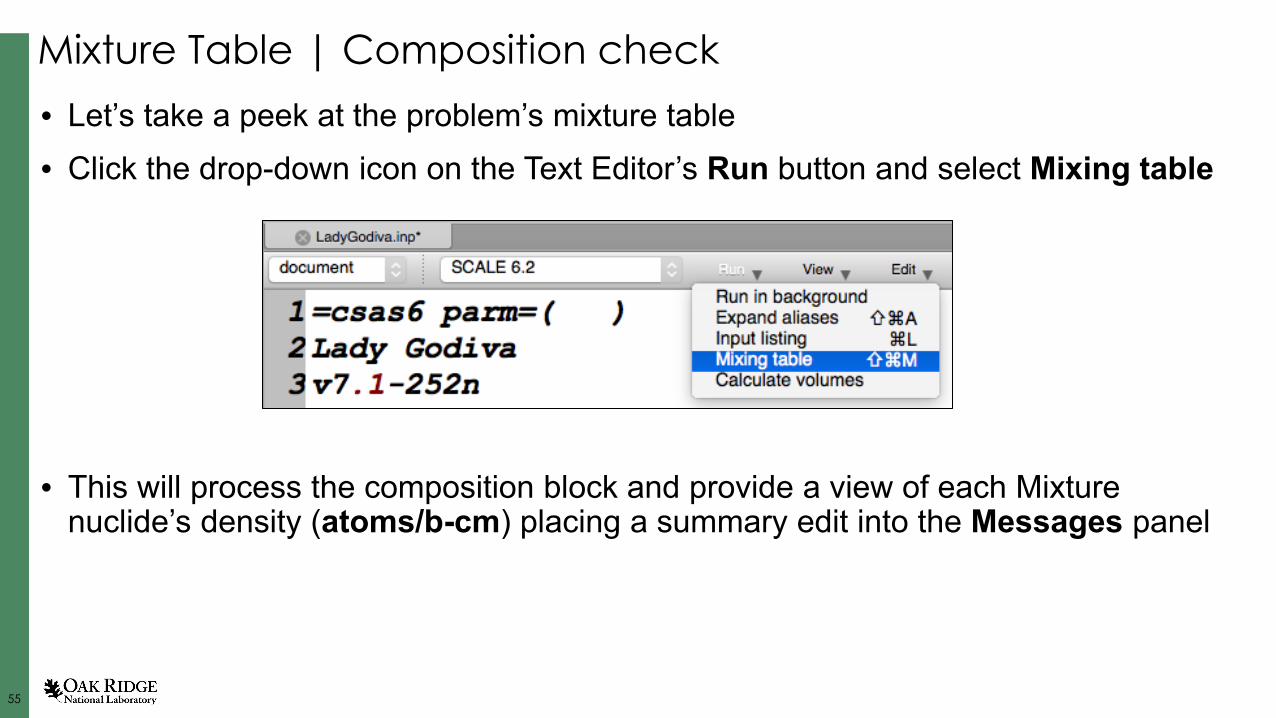
Mixture Table | Composition check• Let’s take a peek at the problem’s mixture table• Click the drop-down icon on the Text Editor’s Run button and select Mixing table
• This will process the composition block and provide a view of each Mixture nuclide’s density (atoms/b-cm) placing a summary edit into the Messages panel

5656
Mixture Table | Composition check cont’d• Open the Messages panel
and observe the Mixture table
• Verify the Mixture 1density (g/cc) is the sameas that provided in the comp block
• Close the Messages tab and click the Messagespanel button to hide it

5757
Cross-Section Processing | MultiRegion Cell• On a line after end comp but before read geometry perform an autocompletion
(CTRL-SPACE) and select the cells option.
• Remove the cells block TODO comment • With your cursor inside the cells block perform
an autocompletion (CTRL-SPACE) and select multiregion - spherical
• This inserts a default multiregion with placeholder values for mixture and radii

5858
Cross-Section Processing | MultiRegion Cell Cont’d• The default Multiregion has 3 mixture-radii pairs but we only need 1 pair
• Remove Mixture 2 and 3

5959
Cross-Section Processing | MultiRegion Cell Cont’d• SCALE users centimeters, not inches. There are 2.54 cm per in• Given the diameter of ~6.75 in, update the radius field to be
6.75 in * 2.54 cm / in / 2 (6.75 * 2.54 / 2) and select the equation
• Click the Edit > Evaluate button
• Observe the equation evaluate to the radius in cm
6060
Cross-Section Processing | MultiRegion Cell Review
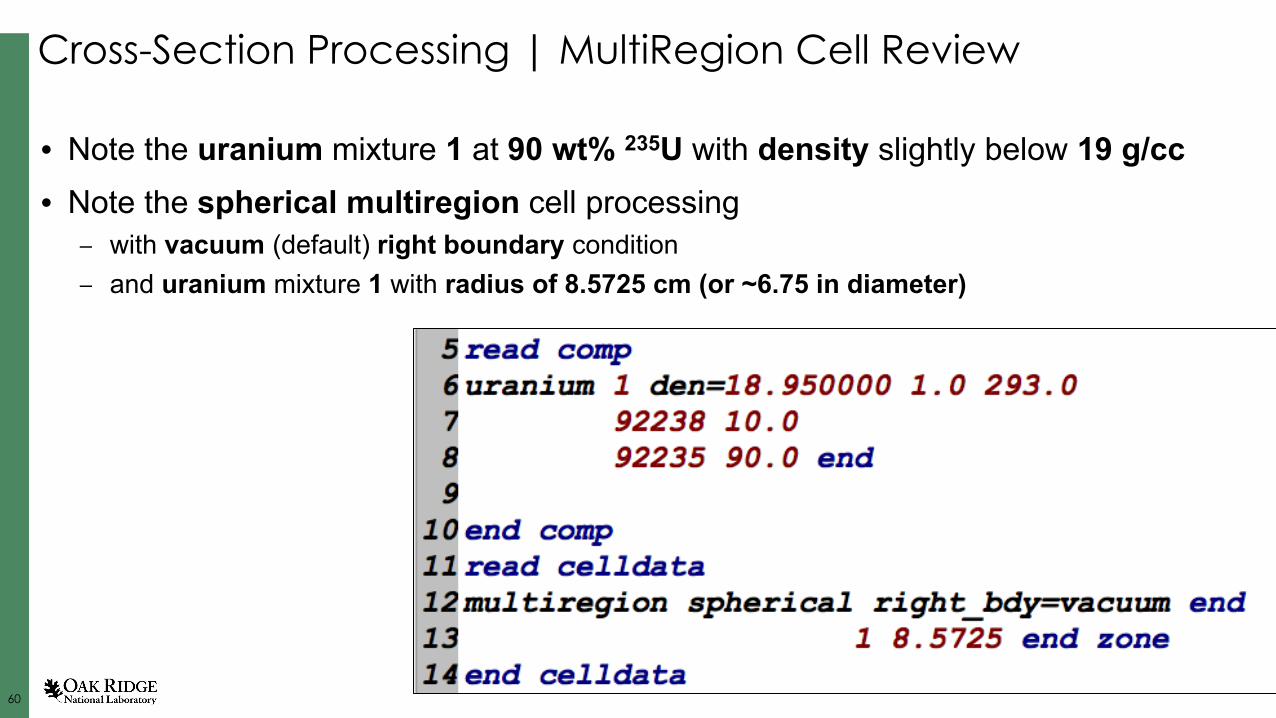
• Note the uranium mixture 1 at 90 wt% 235U with density slightly below 19 g/cc• Note the spherical multiregion cell processing
– with vacuum (default) right boundary condition– and uranium mixture 1 with radius of 8.5725 cm (or ~6.75 in diameter)

6161
Monte Carlo Parameters• CSAS6 uses the KENO VI Monte Carlo
transport code which has a parameterthat controls the number of particles per generation
• With your cursor after end cell and before read geometry perform anautocompletion (CTRL-SPACE) and select the parameters option
• Remove the TODO comment• Perform and autocompletion
(CTRL-SPACE) and find and selectthe number of particles per generation parameter

6262
Monte Carlo Parameters
• The default NPG is 1000• Update NPG to be 10000

6363
Lady Godiva | Geometry Simplified
• CSAS6 geometry models are composed of bounded regions of space called a Unit
• The entire geometry model is encompassed by the Global Unit, which is provided by default in the CSAS6 autocomplete option
• Each Unit must have a Boundary record that lists the geometry surface/volume that bound the unit of space
• For Lady Godiva you need a ‘slightly elongated sphere’ or ellipsoid with radiusof ~6.75 in and a 15/16 in radius cylindrical channel
• For the sake of simplicity the model will be encompassed by a box aka cuboid
6464
Lady Godiva | Slightly Elongated Sphere
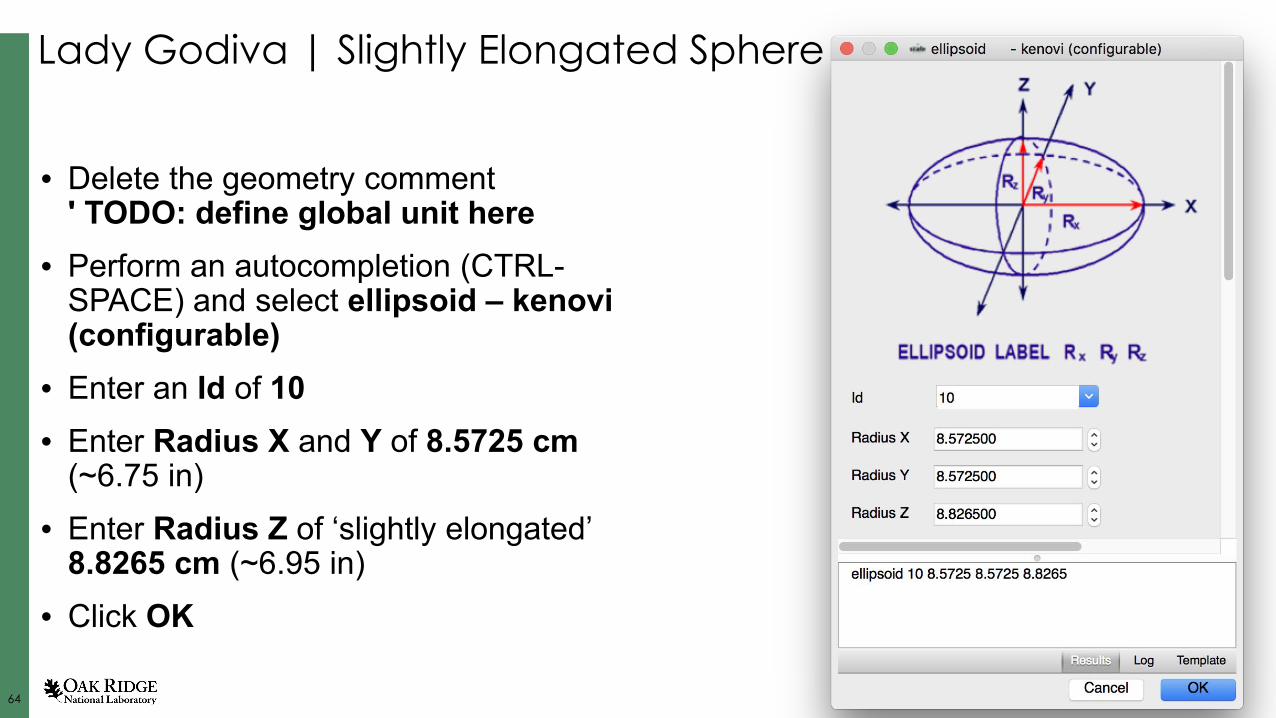
• Delete the geometry comment' TODO: define global unit here
• Perform an autocompletion (CTRL-SPACE) and select ellipsoid – kenovi(configurable)
• Enter an Id of 10• Enter Radius X and Y of 8.5725 cm
(~6.75 in)• Enter Radius Z of ‘slightly elongated’
8.8265 cm (~6.95 in)• Click OK

6565
Lady Godiva | Cylindrical Channel
• Perform an autocompletion (CTRL-SPACE) and select xcylinder
• Update the radius (dimensions/r) to be 15/16*2.54
• Evaluate the expression to convert to centimeters
• Update xtop and xbottom(dimensions/xt and xb) to 8.5725 (~6.75 in)
• Update Id to be 20

6666
Lady Godiva | Problem Extents• With your cursor on the next
empty line perform an autocompletion (CTRL-SPACE) and select cuboid
• Update the Id to be 30
• Update the plus_x/y/z and minus_x/y/z dimensions to be 9 and -9– Pro tip: use 6p9.0 to repeat 9.0
6 times with alternating sign

6767
Lady Godiva | Uranium Ellipsoid• With the geometry regions specified we
must specify the material that makes up the geometry. This is accomplished using the media record
• With your cursor on the next empty line perform an autocompletion (CTRL-SPACE) and select media – kenovi(configurable)
• Note the default Material is 1 which is the uranium mixture
• Click Add row to insert a new row into the Regions table
• The Regions table State column indicates the material is inside or outside of the listed region

6868
Lady Godiva | Uranium Ellipsoid cont’d
• Update the Id column value to the ellipsoid Id of 10
• Click Add row to insert a second row into the Regions table
• Update the Id column value to the xcylinder Id of 20 and update the State column value to be outside
• This indicates that mixture 10 (aka uranium) is to be inside the ellipsoid but outside the xcylinder– Note the negative sign indicates outside
• Click OK

6969
Lady Godiva | Void Channel
• With your cursor on the next empty line perform an autocompletion (CTRL-SPACE) and select media
• Update the mixture to 0 (aka void)• Note the Validation panel listing
the default region of 1 not existing• Click the Validation message to
navigate to the incorrect region• Perform autocompletion
(CTRL-SPACE) to list available region
• Select the xcylinder id of 20

7070
Lady Godiva | Void Extents• With your cursor on the next empty line
perform an autocompletion (CTRL-SPACE) and select media – kenovi (configurable)
• Update the Material to be void (aka 0)• Click Add row 3 times• Specify inside of cuboid 30 (extents)• Specify outside of xcylinder 20 (channel)• Specify outside of ellipsoid 10 (‘slightly
elongated sphere’)• Again, note outside is indicated with
negative sign on region id

7171
Lady Godiva | Boundary• Each Unit of space in KENOVI requires a boundary to be specified• A default boundary record is included with the csas6 autocompletion option so you
only need to update the region being referenced• Note the Validation panel
highlights this todo. • Click the validation error
message to goto the incorrect region
• Perform autocompletion (CTRL-SPACE) and selectthe cuboid 30 (extents)

7272
Lady Godiva | Geometry Review• Ellipsoid ‘slightly elongated sphere’• Xcylinder channel• Cuboid problem extents• Media indicate specific
mixture is inside and outside (-) of specific geometry regions
• Boundary encapsulates the Unit of space
• Note no validation errors, but because geometry specifications are complex additional checks are requiredin the form of visual verification
7373
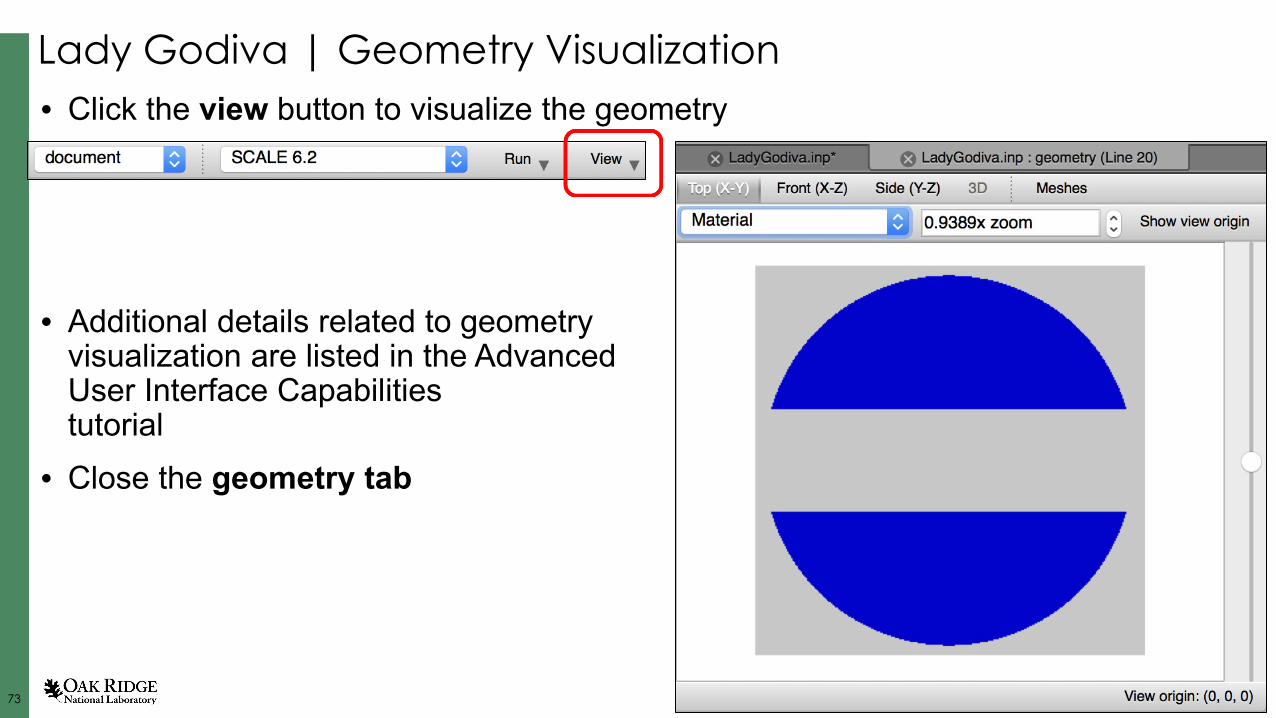
Lady Godiva | Geometry Visualization• Click the view button to visualize the geometry
• Additional details related to geometry visualization are listed in the Advanced User Interface Capabilitiestutorial
• Close the geometry tab
7474
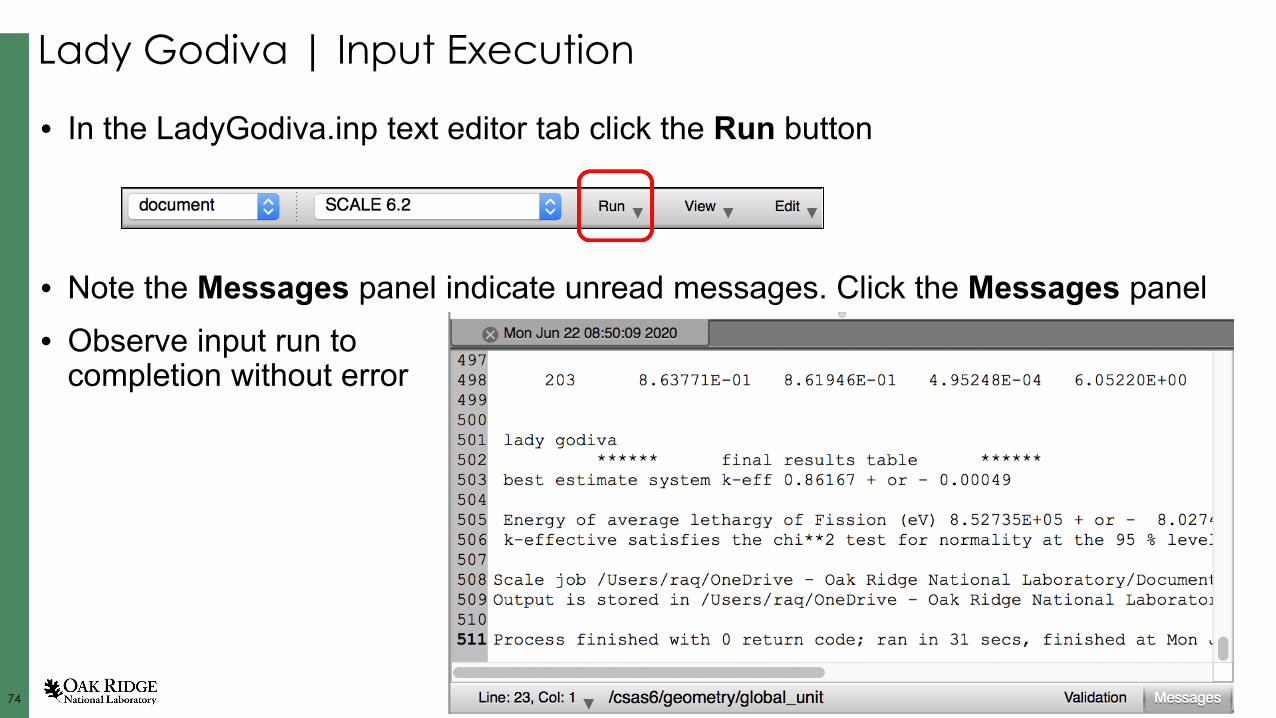
Lady Godiva | Input Execution
• In the LadyGodiva.inp text editor tab click the Run button
• Note the Messages panel indicate unread messages. Click the Messages panel• Observe input run to
completion without error
7575
Lady Godiva | Summary• You are now practiced using the Fulcrum text editor’s Cursor Context to assist
you in identifying and confidently editing SCALE input fields• You are now practiced in performing input autocompletion including interactive
field substitution and the use of Configurable autocompletion forms• You are now practiced in using the input Validation panel and the automatic
input checking to quickly address outstanding issues/todos• You are now practiced in using the integrated expression evaluation capability• You have successfully created a functioning criticality safety analysis sequence
input using KENO VI and executed the input• Questions?• Now, let’s look at better understanding the SCALE input execution
– Also known as the SCALE Runtime Environment (scalerte)
• Click File > Close all to prepare for the next exercise

7676
SCALE Runtime | Best Practices & Good to Knows
• The SCALE Runtime (SCALERTE) has been developed to assist users in executing jobs and retrieving results
• BUT, it can only assist you if you know how to best use it• This next exercise is to assist you in understanding and leveraging the
SCALERTE capabilities and includes best practices involving the following runtime variables– Input directory (INPDIR), – Output directory (OUTDIR), – Output base path (OUTBASE), – Return directory (RTNDIR), – file name without extension (BASENAME), – path to SCALE (SCALE), and – path to SCALE data (DATA)

7777
SCALE Runtime |Basics• Open the Frequent_Fulcrum_Functions/
runtime.inp problem file• Click the text editor’s Run button to launch
the job• Each job is run in a working directory with
access to the following runtime variables– SCALE path to the SCALE install– DATA path to the SCALE data directory– INPDIR path to directory containing the input
file– OUTDIR path to directory that will contain the
output file(s)– OUTBASE path to the output file excluding
the extension– BASENAME name of the input excluding the
extension– RTNDIR that of which we do not speak…

7878
SCALE Runtime |Comments on Flexibility• When launching an input, the SCALERTE copies the input to a working directory
– Good to know if providing custom data (E.g., cross section library)• Need to copy or link data into the working directory• Need to copy or link input-associated data (E.g., sensitivity data files, ORIGEN isotopics)
• When completing a job, the SCALERTE copies standard result data to the output directory– By default the output directory is the input directory
• But a user can change this via -o options. E.g., scalerte -o alternate_out_name…– Good to know for copying non-standard result data back to the output directory– OUTBASE allows for post-sequence shell commands to return data to the output directory with
a sensical name (e.g., ${OUTBASE}.f71, ${OUTBASE}.macrolib)– Good to know for write-protected input directory
• The SCALERTE allows for redirecting output to a different filename and directory

7979
SCALE Runtime |RTNDIR | Just Don’t!
– RTNDIR is the directory to which the execution/terminal prompt will return upon completion of the job
– Always use OUTDIR or OUTBASE– Never use RTNDIR
– RTNDIR has been an error perpetrated on you by the GeeWiz interface in part due to its inability to deal with multiple input files simultaneously
– Always always use OUTDIR or OUTBASE– Never ever use RTNDIR
– When an arbitrary user executes your input, they can override the output name • Using RTNDIR disregards the user’s request and can have unexpected results
– Just don’t use RTNDIR Always use OUTDIR or OUTBASE

8080
SCALE Runtime | Customized with Dated Output
• Click the SCALE 6.2 > Customize… menu item

8181
SCALE Runtime | Customized with Dated Output cont’d
• Click the Clone button to copy the current Configuration in preparation for adding a dated variant

8282
SCALE Runtime | Customized with Dated Output cont’d• Update the Name to be SCALE 6.2 - dated• Add -z option to the Arguments list to have SCALERTE timestamp each result
set• Click Apply and Ok

8383
SCALE Runtime | Dated Output
• Select the new SCALE 6.2 - dated• Click Text Editor’s Run button• Observe the OUTBASE now
includes the date(YYYY.MM.DDThh.mm.ss)
• This serves as a reminder that any user can execute your input and change the output name and directory– Always use OUTDIR and OUTBASE
for returning non-standard results

8484
Frequent Fulcrum Function Conclusion
• You are now exposed and practiced in using Fulcrum’s frequent functionalities for input editing
• Thank you for following along!
• Questions?