freeagent theater user guide - seagate.com theater user... · freeagent® | theater™ user guide 6...
TRANSCRIPT

FreeAgent® | Theater™ User Guide

FreeAgent® | Theater™ User Guide
© 2008 Seagate Technology LLC. All rights reserved. Seagate, Seagate Technology, the Wave logo, and FreeAgent are trademarks or registered trademarks of Seagate Technology LLC, or one of its affiliates. All other trademarks or registered trademarks are the property of their respective owners. When referring to hard drive capacity, one gigabyte, or GB, equals one billion bytes and one terabyte, or TB, equals one thousand billion bytes when referring to hard drive capacity. In addition, some of the listed capacity is used for formatting and other functions, and thus will not be available for data storage. Quantitative usage examples for various applications are for illustrative purposes. Actual quantities will vary based on various factors including file size, file format, features, and application software. Seagate reserves the right to change, without notice, product offerings or specifications.
Seagate Technology LLC 920 Disc Drive Scotts Valley CA 95066 U.S.A.

Contents
Contents
1. Overview . . . . . . . . . . . . . . . . . . . . . . . . . . . . . . . . . . . . . . . . . . . . . . . 5
Using FreeAgent | Theater . . . . . . . . . . . . . . . . . . . . . . . . . . . . . . . . . . . . . . 5FreeAgent | Theater Components . . . . . . . . . . . . . . . . . . . . . . . . . . . . . . 6
Navigating the FreeAgent | Theater Menus . . . . . . . . . . . . . . . . . . . . . . . . . 10
Selecting a Storage Drive . . . . . . . . . . . . . . . . . . . . . . . . . . . . . . . . . . . . . . 10
Organizing Media Files and Folders . . . . . . . . . . . . . . . . . . . . . . . . . . . . . . 10Preparing Background Music Files for Slideshows . . . . . . . . . . . . . . . . 11
2. Setting Up FreeAgent | Theater . . . . . . . . . . . . . . . . . . . . . . . . . . . . 12
Selecting a Screen Language . . . . . . . . . . . . . . . . . . . . . . . . . . . . . . . . . . . 12
Configuring Your Media Player . . . . . . . . . . . . . . . . . . . . . . . . . . . . . . . . . . 12Audio Setup . . . . . . . . . . . . . . . . . . . . . . . . . . . . . . . . . . . . . . . . . . . . . . 13Video Setup . . . . . . . . . . . . . . . . . . . . . . . . . . . . . . . . . . . . . . . . . . . . . . 13Resetting Your Media Player . . . . . . . . . . . . . . . . . . . . . . . . . . . . . . . . . 17System Setup . . . . . . . . . . . . . . . . . . . . . . . . . . . . . . . . . . . . . . . . . . . . 17Photo Slideshow Setup . . . . . . . . . . . . . . . . . . . . . . . . . . . . . . . . . . . . . 18Movie Setup . . . . . . . . . . . . . . . . . . . . . . . . . . . . . . . . . . . . . . . . . . . . . . 20
3. Playing Music . . . . . . . . . . . . . . . . . . . . . . . . . . . . . . . . . . . . . . . . . . 22
Supported Audio File Types . . . . . . . . . . . . . . . . . . . . . . . . . . . . . . . . . . . . 23
Playback Options . . . . . . . . . . . . . . . . . . . . . . . . . . . . . . . . . . . . . . . . . . . . 23
4. Playing Videos . . . . . . . . . . . . . . . . . . . . . . . . . . . . . . . . . . . . . . . . . . 24
Supported Video File Types . . . . . . . . . . . . . . . . . . . . . . . . . . . . . . . . . . . . 25
Video Display . . . . . . . . . . . . . . . . . . . . . . . . . . . . . . . . . . . . . . . . . . . . . . . 25Subtitle Formats . . . . . . . . . . . . . . . . . . . . . . . . . . . . . . . . . . . . . . . . . . 25Video Playback Features . . . . . . . . . . . . . . . . . . . . . . . . . . . . . . . . . . . . 26
5. Viewing Photos . . . . . . . . . . . . . . . . . . . . . . . . . . . . . . . . . . . . . . . . . 27
Viewing Individual Photos . . . . . . . . . . . . . . . . . . . . . . . . . . . . . . . . . . . . . . 27
Browsing Photo Thumbnails . . . . . . . . . . . . . . . . . . . . . . . . . . . . . . . . . . . . 28
Rotating Photos . . . . . . . . . . . . . . . . . . . . . . . . . . . . . . . . . . . . . . . . . . . . . . 29
Playing Photos and Videos from Compatible Digital Cameras . . . . . . . . . . 30
Playing a Slideshow . . . . . . . . . . . . . . . . . . . . . . . . . . . . . . . . . . . . . . . . . . 31
FreeAgent® | Theater™ User Guide 3

Contents
Slideshow Features . . . . . . . . . . . . . . . . . . . . . . . . . . . . . . . . . . . . . . . . 32
6. Using the FreeAgent | Theater Desktop Application . . . . . . . . . . . 33
Installing the FreeAgent | Theater Software . . . . . . . . . . . . . . . . . . . . . . . . 33
Using the FreeAgent | Theater Application . . . . . . . . . . . . . . . . . . . . . . . . . 34Accessing the FreeAgent Drive Features . . . . . . . . . . . . . . . . . . . . . . . 34Using the System Tray Status Icon . . . . . . . . . . . . . . . . . . . . . . . . . . . . 35Restoring the System Tray Status Icon . . . . . . . . . . . . . . . . . . . . . . . . . 36
7. Using Media Sync . . . . . . . . . . . . . . . . . . . . . . . . . . . . . . . . . . . . . . . 38
Using Simple Sync . . . . . . . . . . . . . . . . . . . . . . . . . . . . . . . . . . . . . . . . . . . 39
Using Custom Sync . . . . . . . . . . . . . . . . . . . . . . . . . . . . . . . . . . . . . . . . . . . 39
Managing Media Sync Settings . . . . . . . . . . . . . . . . . . . . . . . . . . . . . . . . . . 40Editing Media Sync Settings . . . . . . . . . . . . . . . . . . . . . . . . . . . . . . . . . 40Checking Sync Status . . . . . . . . . . . . . . . . . . . . . . . . . . . . . . . . . . . . . . 40Deleting Media Sync Settings . . . . . . . . . . . . . . . . . . . . . . . . . . . . . . . . 41
Using Automatic Sync . . . . . . . . . . . . . . . . . . . . . . . . . . . . . . . . . . . . . . . . . 41Turning Off Automatic Sync . . . . . . . . . . . . . . . . . . . . . . . . . . . . . . . . . . 41
8. About DivX® Certification . . . . . . . . . . . . . . . . . . . . . . . . . . . . . . . . 42
About DivX . . . . . . . . . . . . . . . . . . . . . . . . . . . . . . . . . . . . . . . . . . . . . . . . . 42
Index . . . . . . . . . . . . . . . . . . . . . . . . . . . . . . . . . . . . . . . . . . . . . . . . . . . . 43
FreeAgent® | Theater™ User Guide 4

1. Overview Using FreeAgent | Theater
1. Overview
The FreeAgent | Theater media player lets you use your TV to play digital media files copied from your compute. You use the FreeAgent | Go drive to collect videos, photos, and music from your computer and the FreeAgent | Theater media player to play them on your TV.
In addition to using the FreeAgent | Go drive with your media player, you can use the USB port on the front of the media player to connect any NTFS- or FAT32-formatted USB external storage device to the media player. You can also play images and videos directly from compatible digital cameras via a USB cable.
Using FreeAgent | Theater
You can use the FreeAgent | Theater media player without installing the FreeAgent | Theater application software by dragging media files from your computer to your FreeAgent drive and using the media player to play them on your TV. However, the FreeAgent | Theater application allows you to access your external drive features and to synchronize media folders on your drive with those on your PC.
To use the FreeAgent | Theater with a FreeAgent | Go drive,
1. If you want to use the FreeAgent | Theater application to manage and sync your media files, install the software on your computer from the FreeAgent | Theater Installation CD included with the FreeAgent | Theater.
2. Connect the PC dock to your computer and insert your FreeAgent | Go drive.
Figure 1: FreeAgent | Theater with FreeAgent | Go Drive
USB Port
FreeAgent | Go Drive
FreeAgent | Theater Media Player
FreeAgent® | Theater™ User Guide 5

1. Overview Using FreeAgent | Theater
3. If you’ve installed the software, use the FreeAgent | Theater desktop application to select the media files you want to play on your TV and follow the on-screen instructions to copy those files onto your FreeAgent drive.
— OR —
If you’ve chosen not to install the FreeAgent | Theater software, drag media files from your PC to your FreeAgent drive.
4. Remove the FreeAgent drive from the PC dock and insert it in the media player connected to your TV.
Note: If you haven’t connected the media player to your TV yet, follow the steps in the Setup Guide included in your shipping carton to connect the components.
5. Use the remote control to navigate through the media player menus to access and play your videos, photos, and music on your TV.
Note: The FreeAgent | Theater media player works with any NTFS- or FAT32- formatted USB external storage device or compatible digital camera connected to the USB port on the front of the media player.
FreeAgent | Theater Components
FreeAgent | Theater consists of these components:
• A media player that connects to your TV and works with both standard definition and high definition TVs
• A PC dock that connects to your computer
• A FreeAgent | Go external drive that connects directly to both the media player and the PC dock for easy transport of media files between computer and TV
• A remote control to navigate the FreeAgent | Theater TV interface
• A CD containing the FreeAgent | Theater application software and this FreeAgent | Theater User Guide
FreeAgent® | Theater™ User Guide 6

1. Overview Using FreeAgent | Theater
FreeAgent | Theater Media Player
Figure 2: FreeAgent | Theater Media Player: Front View
SELECT MENU />>
>
>
Navigate
Play/Pause StopPower
Eject button
IR lens
FreeAgent™ | Go drive in play position
USB port
Figure 3: FreeAgent | Theater Media Player: Rear View
Composite video
S-Video connector
Component video
AC3 coax audioconnector
DC connector
Reset button
Analog audio
PrPbY
FreeAgent® | Theater™ User Guide 7

1. Overview Using FreeAgent | Theater
FreeAgent | Go Drive and PC Dock
Remote Control
All media player features can be controlled using the remote control buttons. Certain functions can also be completed using the controls on the front of the media player.
Figure 4: PC Dock with FreeAgent | Go Drive Inserted
Figure 5: Remote Control
ANGLE
SUBTITLE
On/Off
A-B
AUDIO
TITLE
MOVIE
INFORMATION
OPTIONS
MENU RETURN
SELECT
PLAY/PAUSE
FORWARD
STOP
ZOOM
REPEAT
Navigation Buttons
REVERSE
PREVIOUS
NEXT
VOLUME+/VOLUME-
MUTE
FreeAgent® | Theater™ User Guide 8

1. Overview Using FreeAgent | Theater
Table 1: Remote Control Buttons
On/Off: Turn FreeAgent | Theater on and off. Navigation Buttons: Press the arrow buttons to navigate the menus.
ANGLE: Switch a movie angle or rotate a photo. << (REVERSE): Press to fast reverse the current playback.
Press repeatedly to select faster reverse speeds.
SUBTITLE: Activate available subtitles when playing DivX® files.
Supported subtitle formats: SRT, SMI, SUB, SSA
> / || (PLAY/PAUSE): Play or pause movies, music, and photos.
TITLE: Open the movie title menu. >> (FORWARD): Press to fast forward the current playback.
Press repeatedly to select faster forward speeds.
MOVIE: Open the movie main menu. VOLUME+/VOLUME-: Increase or decrease volume.
A-B: Select a start (A) and end (B) point in a video and replay that portion.
|<< (PREVIOUS): Return to the previous file when playing music or viewing photos or to the previous chapter in a video.
Page up in a file list.
AUDIO: Select a language for an audio track in a file. (STOP): Stop playback.
OPTIONS: Search Title/Chapter/Time.
Change from list to thumbnail view when viewing photos.
>>| (NEXT): Go to the next file when playing music or viewing photos or to the next chapter in a video.
Page down in a file list.
INFORMATION: Display media information such as file properties or elapsed time.
ZOOM: Zoom in or out when playing photos or movies. Press repeatedly to select higher zoom levels.
Photo zoom levels: 2x ,4x, 8x, 16xMovie zoom levels: 2x, 4x, 8x
MENU: Open the main menu for FreeAgent | Theater. REPEAT: Repeat a music selection or slideshow.
RETURN: Return to the previous screen when navigating menus.
Change from thumbnail to list view when viewing photos.
MUTE: Press to mute audio output; press again to resume audio.
SELECT: Confirm a menu selection or play the selected music, video, or photo file.
FreeAgent® | Theater™ User Guide 9

1. Overview Navigating the FreeAgent | Theater Menus
Navigating the FreeAgent | Theater Menus
Use the buttons and arrow keys on the remote control to navigate among the FreeAgent | Theater media player menus. Each media type has its own set of submenus that allow you to set up and control the playback of selected files. See the video, music, and photo sections of this user guide for detailed information about using those menus.
Selecting a Storage Drive
You can use the media player to play videos, music, and photos you’ve stored on either a FreeAgent | Go drive or another USB external storage device.
Step 1. On the main menu, select the device (FreeAgent Go or External Storage) containing the media you want to play on your TV.
If you select External Storage, make sure the external drive is connected to the USB port on the front of the media player.
Step 2. Navigate through the specific video, photo, and music menus to access fea-tures available for each media type.
Organizing Media Files and Folders
The FreeAgent | Theater stores all the media files and folders you’ve copied from your computer and displays your files in a structure similar to that seen
Figure 6: Main Menu
ALL VIDEOS PHOTOS MUSIC
FreeAgent Go
External Storage
Setup
FreeAgent® | Theater™ User Guide 10

1. Overview Organizing Media Files and Folders
on your computer. So before you copy media from your computer, it’s a good idea to take the time to organize your files in folders and sub-folders whose names tell you clearly what’s inside.
For example, you can create sub-folders in your My Pictures folder for each month or for important events, or create sub-folders in your My Music folder for various genres. Any system will work as long as you give your folders names that make sense to you and allow you to find the media files you’re looking for quickly and easily.
Preparing Background Music Files for Slideshows
If you want to be able to play background music with a slideshow of your pictures on your TV, you must put the desired music files in the same folder as the photos to be played in the slideshow before you copy your media files from your PC. The Setup menu on the media player will allow you to turn the Background Music option on or off, but you must prepare the slideshow folder on your computer.
For more suggestions on how to organize and label your media files, go to the Knowledge Base at www.seagate.com.
FreeAgent® | Theater™ User Guide 11

2. Setting Up FreeAgent | Theater Selecting a Screen Language
2. Setting Up FreeAgent | Theater
Although the FreeAgent | Theater media player is ready for use as soon as you plug it in, you can adjust the audio, video, system, photo, and movie settings for optimal use with your TV.
See the FreeAgent | Theater Setup Guide included in your product carton for instructions on how to connect the components.
Selecting a Screen Language
The first time you connect your media player to your TV, a language selection screen asks you to select your on-screen language from a list of available languages. You won’t see this screen again unless you reset your media player to the factory default settings.
Configuring Your Media Player
Use the Setup menu to configure the audio, video, system, photo, and movie settings for your media player.
To open the Setup menu,
Step 1. Select Setup on the main menu.
The Setup menu opens.
Figure 7: Main Menu
ALL VIDEOS PHOTOS MUSIC
FreeAgent Go
External Storage
Setup
FreeAgent® | Theater™ User Guide 12

2. Setting Up FreeAgent | Theater Configuring Your Media Player
Step 2. In the menu bar at the top of the screen, select the feature whose settings you want to adjust.
Step 3. To exit the Setup menu, press Return.
Audio Setup
To set up the way the audio portion of media files is played,
• Click Audio in the menu bar.
Audio Digital Output
SPDIF LPCM: Convert the multi-channel audio output into stereo.
SPDIF RAW: Play the digital audio without decoding.
Video Setup
To set up the way images are displayed on your TV,
Figure 8: Audio Setup Menu
AUDIO VIDEO SYSTEM PHOTOS MOVIE
Digital Output SPDIF LPCM
SPDIF RAW
FreeAgent® | Theater™ User Guide 13

2. Setting Up FreeAgent | Theater Configuring Your Media Player
• Click Video in the menu bar.
Aspect Ratio
Standard definition TVs display in a 4:3 aspect ratio; high definition TVs display in a 16:9 aspect ratio.
PAN SCAN 4:3: The standard definition broadcast television format.
Letter Box 4:3: Transfers a wide screen film to a 4:3 video display while maintaining the film’s original aspect ratio.
16:9: The same viewing area as a movie theater screen.
Brightness
Adjust the picture brightness to the desired level.
Contrast
Adjust the picture contrast to the desired level.
TV System
NTSC: American television standard
PAL: European television standard
Video Resolution
The media player transmits an analog video signal in both standard definition (SD) and high definition (HD) resolutions for American NTSC- and European PAL- compatible televisions.
You have four video resolution options, which are explained below:
Figure 9: Video Setup Menu
VIDEO SYSTEM PHOTOS MOVIE AUDIO
Aspect Ratio 16 : 9
Brightness 25
Contrast 25
TV System NTSC
Video Resolution 1080i
FreeAgent® | Theater™ User Guide 14

2. Setting Up FreeAgent | Theater Configuring Your Media Player
SD Interlace (composite and S-Video hookup)
SD Progressive (component hookup)
720p (HD)
1080i (HD)
Your choice depends upon several factors:
• What country you live in
• Whether you have a standard definition (SD) or high definition (HD) TV
• Whether you want to use a basic composite connection, a higher quality S-Video connection, or the highest quality component connection.
Note: Composite cables are included with your media player; S-Video and component cables are not.
Frequently Asked Questions About Video Resolution
What are 720p and 1080i? 720 and 1080 refer to the number of horizontal lines used to fill the screen. The more lines, the better the picture.The “p” refers to progressive scanning, while the “i” refers to interlaced scanning.
What do Progressive and Interlaced mean? These are the two basic video display methods and they define how the lines that make up the picture on your TV screen are drawn. Progressive scanning produces a smoother, sharper image and should be selected if your TV supports it.
What’s the difference between composite, S-Video, and component video connections? The media player supports three types of video connection:
• Composite video carries both color and brightness over a single cable and produces a fair picture quality.
• S-Video splits the video information into two signals, one for color and the other for brightness, and produces a good picture quality.
FreeAgent® | Theater™ User Guide 15

2. Setting Up FreeAgent | Theater Configuring Your Media Player
• Component video splits video information into three separate signals, two for color and one for brightness, and produces the best picture quality.
Video Resolution Options:
• SD Interlace (Composite and S-Video)
– American NTSC: 480i (for the USA, Canada, Mexico, Japan, Taiwan, South America, South Korea, the Philippines, and Puerto Rico)
– European PAL: 576i (for the U.K, Australia, Malaysia, Germany, China, Africa, South America, Indonesia, Yugoslavia, France, Eastern Europe, Russia, and Greece)
• SD Progressive (Component)
– American NTSC: 480p (for the USA, Canada, Mexico, Japan, Taiwan, South America, South Korea, the Philippines, and Puerto Rico)
– European PAL: 576p (for the U.K, Australia, Malaysia, Germany, China, Africa, South America, Indonesia, Yugoslavia, France, Eastern Europe, Russia, and Greece)
Note: HDTV maintains the same standards and regions as NTSC and PAL, but the signal is displayed digitally and the resolution increases to 720p and 1080i.
• 720p (HD): Better quality picture than SD interlace or SD progressive if your TV supports this format. Check your TV manual for supported formats.
• 1080i (HD): Better quality picture than 720p, SD interlace, or SD progressive if your TV supports this format. Check your TV manual for supported formats.
Problems with Video Resolution
Figure 10: Composite, S-Video, and Component Hookups
Composite Video Component Video S-Video
FreeAgent® | Theater™ User Guide 16
2. Setting Up FreeAgent | Theater Configuring Your Media Player
The higher the resolution your TV can support, the better your picture will be. If you select a high resolution but are unable to see a picture, select a lower resolution until a picture appears on your TV.
If you’re having trouble getting any picture at all on your TV, you might have a problem with your cable connections or a video resolution that’s set too high. If you’re sure your cables are connected properly and you still can’t get a picture, press the reset button on the rear of the media player to reset the device for your region. The reset causes the unit to display the lowest video resolution, which most televisions are capable of displaying.
Also press the Input button on your TV to switch to the input to which the media player is connected.
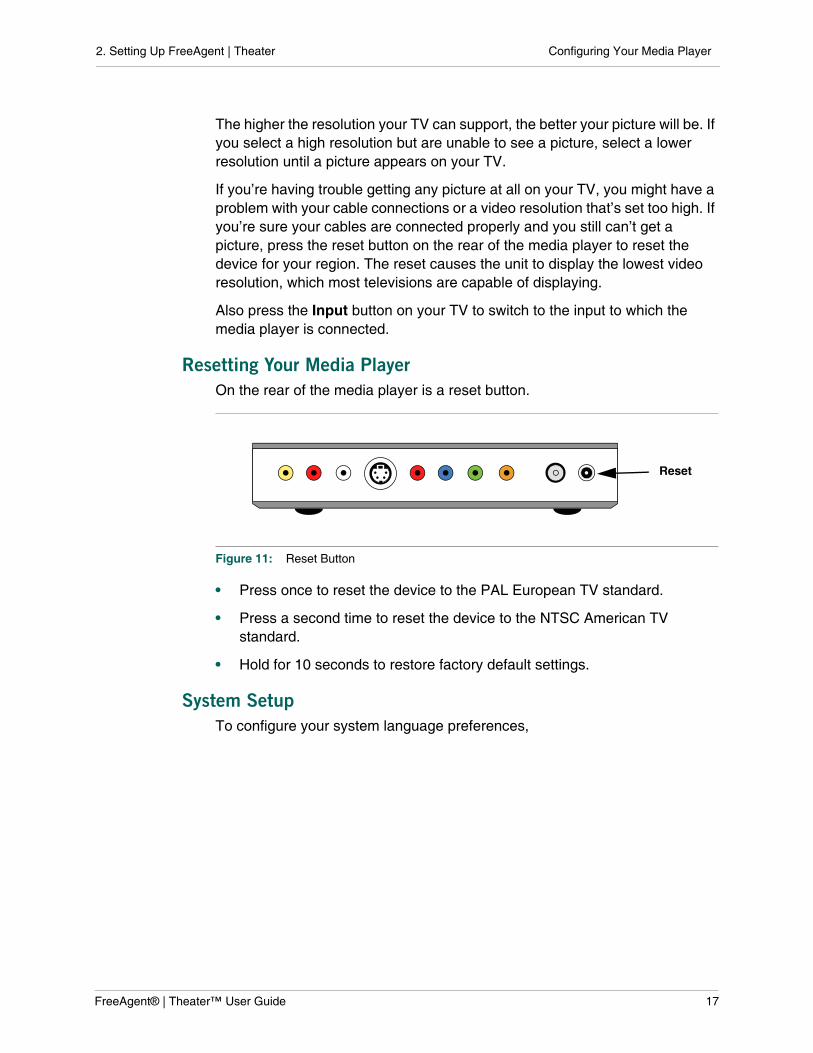
Resetting Your Media Player
On the rear of the media player is a reset button.
• Press once to reset the device to the PAL European TV standard.
• Press a second time to reset the device to the NTSC American TV standard.
• Hold for 10 seconds to restore factory default settings.
System Setup
To configure your system language preferences,
Figure 11: Reset Button
Reset
FreeAgent® | Theater™ User Guide 17

2. Setting Up FreeAgent | Theater Configuring Your Media Player
• Click System in the menu bar.
Version
System software version
Screen Language
Select the language to be used to display the Setup menu, information, and video subtitles.
Factory Default
Reset all Setup menu functions to the factory default and display the initial language selection screen.
Photo Slideshow Setup
To set up a slideshow,
Figure 12: System Setup Menu
SYSTEM PHOTOS MOVIE AUDIO VIDEO
Version 1.0
Screen Language English
Factory Default
FreeAgent® | Theater™ User Guide 18

2. Setting Up FreeAgent | Theater Configuring Your Media Player
• Click Photos in the menu bar.
Create a slideshow by selecting the amount of time each image is displayed and the transition effect as you move from one image to the next and turn on the Background Music option.
Timing
Set the amount of time each image in a slideshow remains on the screen:
• 2 seconds (default setting)
• 5 seconds
• 10 seconds
• 30 seconds
• 1 minute
• 2 minutes
• Off
Transition Effect
Choose the way one image is replaced by another during the slideshow:
• Cross Fade (default setting)
• Left to Right
• Top to Bottom
Figure 13: Slideshow Setup Menu
PHOTOS VIDEO SYSTEM MOVIE AUDIO
Slideshow Timing
Transition Effect
Background Music
2 Seconds
Cross Fade
On
FreeAgent® | Theater™ User Guide 19

2. Setting Up FreeAgent | Theater Configuring Your Media Player
• Waterfall
• Snake
• Dissolve
• Strip Left Down
• All Effect Shuffle
• Off
Note: If you select Off, your photos simply replace one another after the allotted amount of time with no transition effect.
Background Music
If you want to play background music with your slideshow, you must put the desired music files in the same folder as the photos to be played in the slideshow before you copy your media files from your PC.
• If the Background Music setting is Off, no background music plays automatically when you play a slideshow. However, you can play background music by first starting your music and then starting the slideshow. (Default Setting)
• If the Background Music setting is On and the folder containing the slideshow images also includes audio files or a playlist, that music is automatically played as background music when you play a slideshow.
Movie Setup
To configure your movie preferences,
FreeAgent® | Theater™ User Guide 20

2. Setting Up FreeAgent | Theater Configuring Your Media Player
• Click Movie in the menu bar.
Audio Language
Select the language for the default audio when playing a movie.
Subtitle
Select the language for the default subtitle when playing a movie.
If Off is selected, subtitles will not be displayed.
Menu Language
Select the language for the default menu when playing a movie.
Angle Mark
Display the angle mark on the screen for three seconds when playing a movie in which a scene has been shot from more than one angle.
If Off is selected, the angle mark will not be displayed.
Figure 14: Movie Setup Menu
MOVIE SYSTEM AUDIO VIDEO PHOTOS
Audio Language English
Subtitle English
Menu Language English
Angle Mark On
FreeAgent® | Theater™ User Guide 21

3. Playing Music
3. Playing Music
The FreeAgent | Theater media player provides a list of your songs arranged in alphabetical order by file name and can play a single file or a playlist of music files. You can also use your music as background for a photo slideshow.
While music is playing, the media player displays time (total length and elapsed time), title, artist, and album information from the ID3 tag of an MP3 file.
Note: Use the remote control to move among your music files and select listening options.
To play music,
Step 1. On the main menu, select the device (FreeAgent Go or External Storage) containing the music you want to play.
Step 2. Select Music in the menu bar.
The Music window displays a list of the music stored in the selected folder:
Step 3. Navigate to the desired music folder and select the audio file to be played.
A preview of the selected music displays information about the file.
Step 4. Press Select or Play/Pause to start the music.
Figure 15: Music Window
MUSIC ALL VIDEOS PHOTOS
/../
Audio File 1
Audio File 2
Audio File 3
Drive Name
Selected file nameFile Size
Artist: InfoTitle: InfoAlbum: InfoGenre: InfoYear: InfoTrack: Info
Page Number
FreeAgent® | Theater™ User Guide 22

3. Playing Music Supported Audio File Types
Step 5. Press Stop to stop the music and Return to return to the Music window.
Supported Audio File Types
The media player supports these audio file types:
• MP3
• AC3
• ASF
• OGG
• WAV
• WMA
• M3U
Playback Options
You can set the music in a selected folder to play in a variety of ways:
• Normal: Play all files consecutively.
• Shuffle: Randomly play all files in the folder until all files have played.
• Repeat One: Repeat the current track.
• Repeat All: Repeat all files in the folder in consecutive order.
• Shuffle Repeat: Randomly play all files in the folder, then repeat them once all files have played.
FreeAgent® | Theater™ User Guide 23

4. Playing Videos
4. Playing Videos
You can load videos from your computer onto a FreeAgent | Go drive, then insert the drive in the FreeAgent | Theater media player and play the videos on your TV. You have access to the same video menus and features as those available when you watch a video on your computer.
You can also drag media files from your computer onto any NTFS- or FAT32-formatted USB storage device and use the USB port on the front of the media player to connect that device to your TV.
Note: Use the remote control to move among your videos and select viewing options.
To play a video,
Step 1. On the main menu, select the device (FreeAgent Go or External Storage) containing the video you want to play.
Step 2. Select Videos in the menu bar.
The Videos window lists the videos stored in the selected folder:
Step 3. Navigate to the desired video.
A preview of the selected video is displayed.
Figure 16: Videos Window
VIDEOS PHOTOS MUSIC ALL
/../
Video File 1
Video File 2
Video File 3
Drive Name
Selected file nameFile Size
Page Number
Preview
FreeAgent® | Theater™ User Guide 24

4. Playing Videos Supported Video File Types
Step 4. Press Select or Play/Pause to display the video menu or start the video, depending upon the format in which the video was copied to the drive.
Note: If your video content is stored in a Video_TS folder, you can press Select or Play/Pause at the folder level to play the proper file inside the folder.
Step 5. Press Stop to stop the video and Return to return to the Video window.
Supported Video File Types
The media player supports these video file types:
• MPEG1:
– MPG/MPEG
– DAT
• MPEG2:
– MPG/MPEG
– VOB/ISO/IFO
– TS
– MKV
• DivX® files:
– AVI
– MOV (through DivX converter)
– MP4
– DivX
• XVID:
– AVI
Video Display
The media player supports a variety of subtitle formats and provides all common video control functions.
Subtitle Formats
The media player plays supported subtitle formats with a video.The subtitle file name must be the same as the video file name and the subtitle file and video file must reside in the same folder.
FreeAgent® | Theater™ User Guide 25

4. Playing Videos Video Display
The media player supports these subtitle formats:
• SMI/SAMI
• SRT
• SUB
Video Playback Features
The media player remote control provides all common video control functions:
• Main Menu
• Forward/Reverse (< / >): 2x, 4x, 8x, 16x, 32x:
– Press repeatedly to fast forward or fast reverse the video at increasingly greater speeds.
• Slow motion (1/2,1/4,1/8,1/16):
– Press PLAY/PAUSE to pause the video.
– Press FORWARD for play in slow motion. Press repeatedly for increasingly slow play.
– Press PLAY/PAUSE again to resume normal play.
• A - B Repeat:
– Set point A and point B and replay that portion of the video.
• Play/Stop/Pause
• Chapter forward/backward (<< / >>)
• Subtitles
• Repeat
• Zoom (2x, 4x, 8x)
• Angle Mark:
– If a scene has been shot from more than one angle, switch the video angle.
FreeAgent® | Theater™ User Guide 26

5. Viewing Photos Viewing Individual Photos
5. Viewing Photos
The FreeAgent | Theater media player allows you manage and display photos in a variety of ways:
• Display photos in a list view or a thumbnail view
• Rotate images
• Play photos and videos directly from compatible digital cameras on your TV
• Play a folder of photos as a slideshow complete with background music and transition effects
The media player displays images in the JPG/JPEG format up to 20 megapixels in size.
Note: Use the remote control to move among your photos and select viewing options.
Viewing Individual Photos
You can browse through your photos by scrolling through them in the Photos window. You don’t have to create a slideshow to view your photos; you can open a full-screen view of an individual picture.
To view individual photos,
Step 1. On the main menu, select the device (FreeAgent Go or External Storage) containing the photos you want to view.
Step 2. Select Photos in the menu bar.
FreeAgent® | Theater™ User Guide 27

5. Viewing Photos Browsing Photo Thumbnails
The Photos window displays a list of the photo folders stored in the selected folder:
Step 3. Navigate to the desired folder of photos and select a photo to view.
A preview of the selected photo is displayed.
Step 4. Press Select or Play/Pause to start a full-screen slideshow.
The image is scaled to fit your screen.
Step 5. Press Play/Pause to stop the slideshow on a particular photo and Select or Play/Pause to resume the slideshow.
Step 6. Press Return to go back to the Photos window.
Browsing Photo Thumbnails
If you take a lot of photos, it can be difficult to find a particular picture if you don’t remember which folder you’ve stored it in. You can browse the photos in a folder in thumbnail view to easily locate specific photos in your collection.
Note: Thumbnail view is available only when Photos is selected in the menu bar; it is not available when All is selected.
Figure 17: Photos Window
PHOTOS MUSIC ALL VIDEOS
/../
Photo File 1
Photo File 2
Photo File 3
Drive Name
Selected file nameFile Size
Page Number
Preview
FreeAgent® | Theater™ User Guide 28

5. Viewing Photos Rotating Photos
To browse photo thumbnails,
Step 1. On the main menu, select the device (FreeAgent Go or External Storage) containing the photos you want to view.
Step 2. Select Photos in the menu bar.
The Photos window displays a list of photo folders stored on the drive.
Step 3. Select a folder and press Options to display photos in a thumbnail view.
The photos in the selected folder are displayed in a thumbnail grid:
Note: Depending upon how many images are stored in a folder, it may take a few moments for the thumbnails to display.
Step 4. Using the four arrow keys to navigate through the thumbnails, select an image for a full-size view of the photo and press Select or Play/Pause.
The image is scaled to fit your screen.
Step 5. Press Return to display photos in a list view.
Rotating Photos
When you take a photo in landscape view rather than portrait view, that image is displayed on its side. You can rotate the photo 90 degrees to the left or right to display it in the upright position. Or you can rotate a photo to display it upside down or on its side for a special effect.
Figure 18: Photo Thumbnails
Folder Name
Page Number
PHOTOS MUSIC ALL VIDEOS
FreeAgent® | Theater™ User Guide 29
5. Viewing Photos Playing Photos and Videos from Compatible Digital Cameras
To rotate a photo,
Step 1. On the main menu, select the device (FreeAgent Go or External Storage) containing the photos you want to view.
Step 2. Select Photos in the menu bar.
The Photos window opens.
Step 3. Navigate to the desired folder of photos and select a photo to view.
A preview of the selected photo is displayed.
Step 4. Press Select or Play/Pause to start a full-screen slideshow.
The image is scaled to fit your screen.
Step 5. Press Play/Pause to stop the slideshow on a particular photo.
Step 6. Use the right and left arrow keys to rotate the image. Each click turns the image 90 degrees in the direction of the arrow key.
Note: The image rotation is not saved. To permanently rotate an image, you must open the folder on your computer and rotate the image.
Step 7. Press Select or Play/Pause to resume the slideshow.
Step 8. Press Return to go back to the Photos window and select another photo to rotate.
Playing Photos and Videos from Compatible Digital Cameras
You can connect a compatible digital camera to the media player with a USB cable to display photos and videos stored on the camera on your TV.
Not all digital cameras can be used with the media player. To find out if your camera is compatible, connect it to the USB port on the front of the media player and see if the camera is displayed in the list of external devices on your TV.
Not all video file types are compatible, either. To find out if a video on your camera can be viewed with the media player, click the video folder. If it doesn’t open, the video can’t be viewed via the media player. Remember that the only compatible photo file type is a jpg/jpeg 20 megapixels or smaller.
Note: Checking to see if a digital camera or file type is compatible with the media player will not harm it.
To play images from a compatible digital camera,
FreeAgent® | Theater™ User Guide 30

5. Viewing Photos Playing a Slideshow
Step 1. On the main menu, select External Storage.
Your digital camera is displayed in the External Storage list.
Step 2. Select your camera in the list and click on the camera’s memory card.
A list of the folders stored on your camera is displayed.
Step 3. Select All in the menu bar so that you can choose to play either photos or a video from your camera.
The All window opens.
Step 4. Select a folder to play the media stored in it.
Step 5. Press Select or Play/Pause to start a full-screen photo slideshow or play a compatible video.
Step 6. Press Return to go back to the All window.
Playing a Slideshow
Playing a slideshow is the easiest way to display all the images in a folder without having to navigate to and open each picture individually.
To create and play a slideshow,
• Use the Setup menu to select the time interval and transition effect for your photo display and turn on the background music option.
Note: You can accept the default Slideshow settings of a 2 second interval, a cross fade transition, and no background music without having to open the Setup menu.
• Use the Photos window to play the slideshow.
If you want to play music with your slideshow, you must put the desired music files in the same folder as the photos to be played in the slideshow before you copy your media files from your PC.
To play a slideshow,
Step 1. On the main menu, select the device (FreeAgent Go or External Storage) containing the photos you want to view.
Step 2. Select Photos in the menu bar.
The Photos window opens.
Step 3. Navigate to the desired folder of photos.
A photo preview for the photos in the selected folder is displayed.
Step 4. Press Select or Play/Pause to begin a full-screen slideshow.
FreeAgent® | Theater™ User Guide 31

5. Viewing Photos Playing a Slideshow
Step 5. Press Stop to stop the slideshow and return to the Photo menu.
Slideshow Features
• Zoom: 2x, 4x, 8x
• Repeat a slideshow: Toggle among Repeat All, Shuffle Repeat, Shuffle, and Normal.
You can repeat only files in the current folder, not files in sub-folders.
FreeAgent® | Theater™ User Guide 32

6. Using the FreeAgent | Theater Desktop Application Installing the FreeAgent | Theater Software
6. Using the FreeAgent | Theater
Desktop Application
FreeAgent | Theater comes with a CD containing the FreeAgent | Theater application software. The application includes Media Sync, a feature that allows you to automatically synchronize media files between your computer and a FreeAgent | Go drive or any NTFS- or FAT32-formatted USB external storage device. You can use FreeAgent | Theater without installing the FreeAgent | Theater software, but you can’t synchronize your media files without it.
Installing the FreeAgent | Theater Software
The FreeAgent | Theater application software can be found on the FreeAgent | Theater Installation CD included in the product box.
To install the FreeAgent | Theater application software,
Step 1. Insert the FreeAgent | Theater Installation CD in your computer.
The Select Language window opens.
Step 2. Click the language in which you want to install the application.
The main menu opens.
Step 3. Click Install FreeAgent | Theater.
The InstallShield Wizard Welcome window opens.
Step 4. Follow the onscreen instructions in the Wizard to install the software.
Step 5. Click Finish to complete the installation.
A FreeAgent | Theater icon appears on your desktop:
FreeAgent® | Theater™ User Guide 33

6. Using the FreeAgent | Theater Desktop Application Using the FreeAgent | Theater Application
Step 6. Double-click the icon to open the application:
Using the FreeAgent | Theater Application
The FreeAgent | Theater desktop application allows you to manage your connected external drives and USB devices and to use the Media Sync software to sync media files between your computer and your external drives.
Accessing the FreeAgent Drive Features
• My Drives lists all external drives connected to your computer.
• Settings allows you to manage your USB external drive features:
Note: You can use the FreeAgent | Theater application with any USB device, but only Seagate and Maxtor drives have access to all the Settings options. Other USB devices have access only to the software update for the desktop application.
– power setting
– drive health test
– drive light adjustment (FreeAgent drive only)
Figure 19: FreeAgent | Theater Application
FreeAgent® | Theater™ User Guide 34
6. Using the FreeAgent | Theater Desktop Application Using the FreeAgent | Theater Application
– application software updates
– product registration (Seagate and Maxtor drives only)
• Media Sync allows you to synchronize media files between your PC and external USB storage devices. For instructions on how to use Media Sync, refer to “Using Media Sync” in this user guide.
Note: The FreeAgent | Go drive comes with its own software, which includes a different Sync feature. There is no conflict between the FreeAgent | Theater’s MediaSync feature and the FreeAgent | Go drive’s Sync feature, but only MediaSync is designed to find media files on your PC and sync them with external drives for play on your TV.
Using the System Tray Status Icon
The FreeAgent | Theater Status icon in your system tray keeps you apprised of the status of your external drive and provides quick access to drive features.
To check the status of your drive, roll your mouse over the Status icon:
The color of the Status icon conveys this information:
Figure 20: FreeAgent | Theater Status Icon
Status Icon
Table 2: Status Icon Colors
Status Icon Color Status
Blue Drive connected
Green Drive connected
Sync idle
Gray No drive connected
Yellow Sync in progress
Red Sync failed
FreeAgent® | Theater™ User Guide 35

6. Using the FreeAgent | Theater Desktop Application Using the FreeAgent | Theater Application
Note: When a sync has failed, the red icon continues to display until the next successful sync.
To use the FreeAgent | Theater system tray menu,
Step 1. Click the Status icon to display the menu:
Step 2. Select the feature you want to access or select Exit to close the menu.
Restoring the System Tray Status Icon
If you select Exit on the system tray menu, the Status icon disappears from the system tray. To restore the Status icon to the system tray, go to
Figure 21: System Tray Menu
Status Icon
FreeAgent® | Theater™ User Guide 36

6. Using the FreeAgent | Theater Desktop Application Using the FreeAgent | Theater Application
Start > Programs > Seagate > FreeAgent > Theater > FreeAgent > Theater Status Icon
Figure 22: Restore Status Icon
FreeAgent® | Theater™ User Guide 37

7. Using Media Sync
7. Using Media Sync
To use Media Sync, install the FreeAgent | Theater software on your computer and select folders to sync with your external drive. From then on, whenever you connect the drive to your PC, the media folders on the drive are synchronized with the media folders on your PC.
For example, suppose you sync a photo folder from your PC to your external drive for play on your TV. Then you add new images to the photo folder on your PC. You can update the contents of the photo folder on your drive by reconnecting the drive to your PC.
There are two sync options:
Figure 23: FreeAgent | Theater Media Sync
Simple Sync Custom Sync
Sync media files in XP My Documents folder or Vista Personal folder
Select one or more folders to sync
Sync all media file types Select media file types to sync
Sync automatically Select automatic or manual sync
FreeAgent® | Theater™ User Guide 38

7. Using Media Sync Using Simple Sync
Using Simple Sync
Simple Sync is pre-configured to automatically sync all compatible media files in your XP My Documents or Vista Personal Folder folder. Newer file versions always overwrite older versions.
To select Simple Sync,
• In the Media Sync window, click Simple Sync.
The Simple Sync Confirmation window opens.
Your XP My Documents folder or Vista Personal Folder folder is now synchronized with your FreeAgent drive.
Using Custom Sync
Custom Sync allows you to select specific folders and media file types for synchronization and to choose sync settings.
To configure Custom Sync,
Step 1. In the Media Sync window, click Custom Sync.
The Folder Selection window opens.
Step 2. Select the folders to be synchronized.
Step 3. Click Next.
The File Types window opens.
Step 4. Select the types of media files you want to sync:
• Photos (jpeg jpg)
• Music (asf ac3 m3u mp3 ogg wav wma)
• Videos (avi dat divx iso ifo mkv mov mp4 mpg mpeg ts vob)
Step 5. Click Next.
The Media Sync Rules window opens.
Step 6. Set your Sync Rules:
• Sync automatically each time a file changes
— OR —
• Sync manually using the Sync Now button in the Sync window
Step 7. Click Finish.
The Media Sync settings window opens.
FreeAgent® | Theater™ User Guide 39

7. Using Media Sync Managing Media Sync Settings
Managing Media Sync Settings
Use the Media Sync Settings window to edit your sync settings, check the sync status, or delete your sync settings.
Editing Media Sync Settings
To change any of your sync settings,
Step 1. In the Media Sync window, click Edit Sync Settings,
Step 2. Use the Media Sync windows to add or remove folders from sync and change your file type and Sync Rules selections.
Checking Sync Status
To check the status of a sync,
Step 1. In the Media Sync window, click Check Sync Status.
The Sync Status window opens.
Listed are the names of the computers on which sync was set up, the date of the last sync, and the Automatic Sync setting (On or Off).
Step 2. Click OK to return to the Media Sync window.
Figure 24: FreeAgent | Theater Media Sync Settings
FreeAgent® | Theater™ User Guide 40

7. Using Media Sync Using Automatic Sync
Deleting Media Sync Settings
Note: Deleting your Media Sync settings will not delete the media files stored on your drive.
To delete your sync settings and create a new set,
Step 1. In the Media Sync window, click Delete Sync Settings.
The Delete Sync Settings Confirmation window opens.
Step 2. Click Delete.
The original Media Sync window opens.
Step 3. To create new sync settings, select Simple Sync or Custom Sync.
Using Automatic Sync
The Automatic Sync feature continuously tracks file changes in synchronized folders and automatically synchronizes revised versions by overwriting older versions with newer versions. Your external drive must be connected during Automatic Sync.
By default, Automatic Sync is turned on.
Turning Off Automatic Sync
You can turn off Automatic Sync and control when files are synchronized rather than synchronizing files automatically.
To turn off Automatic Sync,
Step 1. In the Media Sync window, click the Automatic Sync Off button.
Step 2. To sync manually when Automatic Sync is off,
• Click Sync Now in the lower right corner of the Media Sync window.
— OR —
• Select Sync Now from the system tray FreeAgent | Theater menu.
FreeAgent® | Theater™ User Guide 41

FreeAgent® | Theater™ User Guide 42
8. About DivX® Certification About DivX
8. About DivX® Certification
FreeAgent | Theater is an official DivX® certified product with the DivX Home Theater Profile. It plays all versions of DivX video (including DivX 6) with standard playback of DivX media files.
DivX Certified products are officially tested by the creators of DivX and guaranteed to play all versions of DivX video, including DivX 6. Certified products qualify for one of several DivX Profiles that designate the type of video the product supports, from compact portable video to high-definition video.
About DivX
DivX is a popular media technology created by DivX, Inc. DivX media files contain highly compressed video with high visual quality that maintains a relatively small file size. DivX files can also include advanced media features like menus, subtitles, and alternate audio tracks. Many DivX media files are available for download online, and you can create your own using your personal content and easy-to-use tools from DivX.com.
MOV and AVI files can be played on FreeAgent | Theater if they are run through the DivX Converter application. The DivX Converter is available on www.DivX.com.

Index
Index
Numerics
1080i 16720p 16720p vs 1080i 15A
A - B repeat 26angle mark 26aspect ratio 14
16 by 9 14Letter Box 14PAN SCAN 14
audio digital output 13SPDIF LPCM 13SPDIF RAW 13
audio setup 13audio digital output 13
Automatic Sync 41B
background music 20C
certification, by DivX 42check sync status 40composite vs component vs s-video 15Custom Sync 39D
delete Media Sync settings 41DivX® 42F
factory default 18forward/reverse 26FreeAgent | Go drive and PC dock 8FreeAgent | Theater 5, 12
application software 5, 33audio setup 13components 6configure 12
desktop application 33, 34install software 33Media Sync 38menus 10movie setup 20music display 22overview 5remote control 8select a storage drive 10setup 12slideshow setup 18video setup 13
FreeAgent | Theater desktop application 33drive features 34features 34Media Sync 35My Drives window 34restore system tray status icon 36settings 34system tray menu 36system tray status icon 35
FreeAgent | Theater media player 7reset 17
FreeAgent | Theater setup 12audio 13movie 20select screen language 12slideshow 18system 17video 13
FreeAgeny | Theater
system setup 17I
interlaced vs progressive 15L
Letter Box 14
FreeAgent® | Theater™ User Guide 43

Index
M
manage Media Sync settings 40media player, reset 17Media Sync 38
Automatic Sync 41check sync status 40Custom Sync 39delete settings 41edit settings 40settings 40Simple Sync 39
movie setup 20angle mark 21audio language 21menu language 21subtitle language 21
O
organize media files and folders 10prepare background music files for slideshow 11
P
PAN SCAN 14photo slideshow 31photo slideshow setup 18
background music 20timing 19transition effect 19
photo thumbnails 28play music 22
audio file types 23playback options 23
play photos and videos from digital camera 30play slideshow 31play videos 24
supported video file types 25prepare background music files for slideshow 11, 20, 31progressive vs interlaced 15R
remote control 8
reset media player 17rotate photos 29S
screen language 18SD interlace 16SD progressive 16select screen language 12setup, audio 13setup, movie 20setup, slideshow 18setup, system 17setup, video 13Simple Sync 39slideshow features 32
repeat 32zoom 32
slideshow setup 18background music 20timing 19transition effect 19
slow motion 26supported audio file types 23supported video file types 25supported video subtitle formats 25system setup 17
factory default 18movie setup 20screen language 18version 18
system software version 18system tray status icon 35, 36T
thumbnails 28turn off Automatic Sync 41TV system 14
NTSC 14PAL 14
V
version, system software 18
FreeAgent® | Theater™ User Guide 44

Index
video display 25supported subtitle formats 25
video playback 26A - B repeat 26angle mark 26forward/reverse 26slow motion 26
video resolution 141080i 16720p 16SD interlace 16SD progressive 16
video resolution FAQs 15video resolution options 16video resolution problems 16
video setup 13aspect ratio 14brightness 14contrast 14TV system 14video resolution 14
view photos 27browse photo thumbnails 28play photos and videos from digital camera 30play slideshow 31rotate photos 29supported file type 27view individual photos 27
view photos without slideshow mode 27
FreeAgent® | Theater™ User Guide 45