formal report of project 2: advanced multimeter using vhdl130b124250... · 2015-04-23 · o vhdl...
TRANSCRIPT

1
EECE 280 & APSC 201
Formal Report of
Project 2: Advanced Multimeter using VHDL
Group: B7
Kelvin A
Jae Yeong B
Amelia C
Chao J
Rohit S
Instructor: Dr. Joseph Yan (EECE 280)
Dr. Jesus Calvino (EECE280)
Mrs. Debby Altow (APSC 201)
Submission date: Nov 30th, 2012

2
Abstract
This report provides the Introduction, Mechanism Description, A Set of Instructions, Evaluation
of the Complete System, Testing Methodologies, Conclusion, and Reference of an advanced
multimeter using VHDL. The multimeter can measure voltage in the range ± 29.000 DC volts,
current in the ranges ±870.00 DC mili-Amperes, resistance in the range 10 to 4M ohms, and Beta
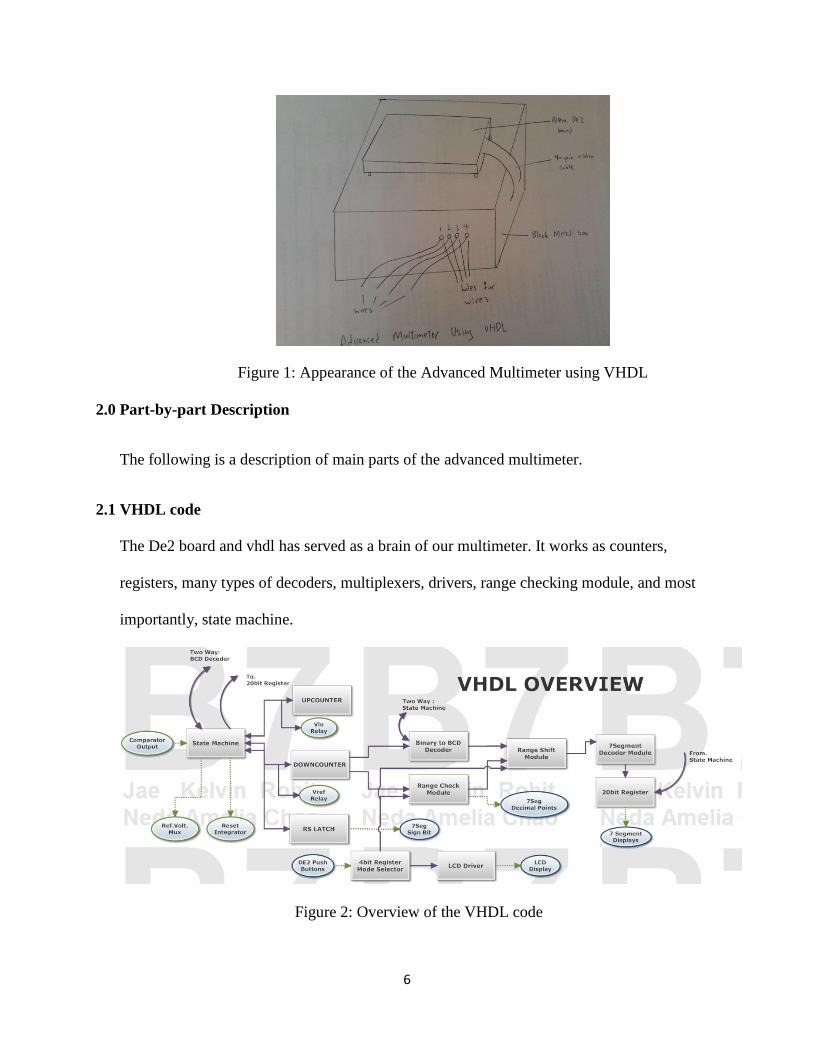
of NPN and PNP transistors, with 5 digits display. The physical configuration of this multimeter
is a black metal box enclosing the electric circuit boards and supporting an Altera DE2 board on
top.

3
Table of Contents
Table of Contents page 3
Introduction page 4
Mechanism Description page 5- 15
Introduction page 5
Part-by-Part Description page 6-15
o VHDL code page 6-9
o Power Supply page 9-10
o Voltmeter page 10
o Ammeter page 11-12
o Ohmmeter page 12-13
o Beta β Calculator page 13-14
o Metal Enclosure page 14-15
Conclusion page 15
A Set of Instructions page 16
Evaluation of the Complete System page 17-19
Reference page 20
Bibliography page 21

4
Introduction
The objective of project 2 was to design, build and test a high-resolution multimeter comparable
in performance to the multimeters available at the UBC EECE laboratories. The Altera DE2
board was an integral part of the project as it was used to implement the logic component of our
circuit (programmed via VHDL) and was also utilized for its LED and LCD displays to
showcase the functionalities of our multimeter. The basic design of the VHDL code was a
system to
1) Control the flows of the following states- Reset/Display, Count-Up, Set-Sign, Countdown,
and Binary-BCD Decoding
2) Manipulate the four registers to fluctuate between the ohmmeter, voltmeter, ammeter and the
Beta calculations.
3) Use the LCD drivers to signal the current state
The DE2 board was synchronized with a simple voltmeter circuit, which consisted of an
integrating operational amplifier, comparator, multiplexer and relay switches to perform the
tasks written in the VHDL code. The voltmeter served as a platform in which all the other
components relied on. The ohmmeter required the voltmeter and was built by providing a
constant current of 0.01 mA through the unknown resistor. By measuring the voltage across the
resistor, the value was calculated using the formula R=V/0.01mA. The ammeter also relied on
the voltmeter and was built using a difference and inverting amplifier. We as a group also built
our own power source that could provide our circuit with positive and negative voltages. The
basic building block for the power source was a transformer to step down the AC voltage.
Various other components were then used to convert the AC voltage to DC voltage. The negative

5
voltages were then achieved by using different sides of the diode bridge. Armed with knowledge
of circuit theory, our group was successfully able to construct a complicated yet efficient circuit.
Mechanism Description
1.0 Introduction
The advanced multimeter using VHDL (AMR) is an electrical apparatus most commonly
used in electrical engineering. AMR can change to different modes, which are voltmeter,
ammeter, ohmmeter, and beta β calculator. It is built by chips soldering on silicon electric
circuit boards, and run by Altera DE2 board. We use VHDL to control the function of the
DE2 board. Then the DE2 board will send signals to the electric circuit board. A black
rectangular box encloses all electric circuit boards. The DE2 board is put on top of the box.
The major parts of AMR are:
VHDL code
Power Supply
Voltmeter
Ammeter
Ohmmeter
Beta β Calculator
Metal Enclosure
6
Figure 1: Appearance of the Advanced Multimeter using VHDL
2.0 Part-by-part Description
The following is a description of main parts of the advanced multimeter.
2.1 VHDL code
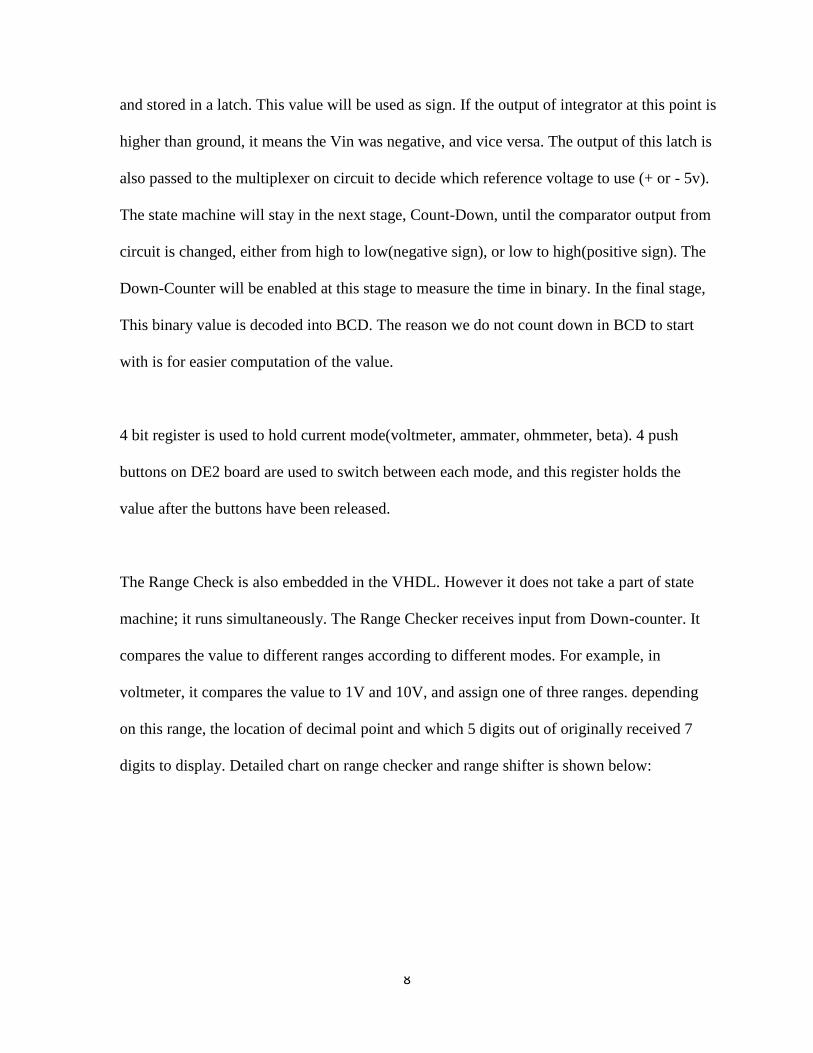
The De2 board and vhdl has served as a brain of our multimeter. It works as counters,
registers, many types of decoders, multiplexers, drivers, range checking module, and most
importantly, state machine.
Figure 2: Overview of the VHDL code

7
Figure 3: State Machine in VHDL
The state machine has five states: Reset/Display, Count-Up,Set-Sign,Count-Down, and
Binary-BCD Decoding. When it is in Resetting state, it will reset the integrator by shortening
capacitor, reset all registers (with exception to Down Counter, which is reset in Count-Up),
and store the new 5 digit BCD value to register for display. This display stores this value
until the end of next cycle, when it receives a new value. In Count-Up stage, up-counter is
enabled to measure 500ms, while DE2 board outputs signal to enable Vin to be passed to
integrator. after 500ms has passed, the counter will signal the state machine to proceed to
next state. In the state Set-Sign, the output of comparator from voltmeter circuit is inverted
8
and stored in a latch. This value will be used as sign. If the output of integrator at this point is
higher than ground, it means the Vin was negative, and vice versa. The output of this latch is
also passed to the multiplexer on circuit to decide which reference voltage to use (+ or - 5v).
The state machine will stay in the next stage, Count-Down, until the comparator output from
circuit is changed, either from high to low(negative sign), or low to high(positive sign). The
Down-Counter will be enabled at this stage to measure the time in binary. In the final stage,
This binary value is decoded into BCD. The reason we do not count down in BCD to start
with is for easier computation of the value.
4 bit register is used to hold current mode(voltmeter, ammater, ohmmeter, beta). 4 push
buttons on DE2 board are used to switch between each mode, and this register holds the
value after the buttons have been released.
The Range Check is also embedded in the VHDL. However it does not take a part of state
machine; it runs simultaneously. The Range Checker receives input from Down-counter. It
compares the value to different ranges according to different modes. For example, in
voltmeter, it compares the value to 1V and 10V, and assign one of three ranges. depending
on this range, the location of decimal point and which 5 digits out of originally received 7
digits to display. Detailed chart on range checker and range shifter is shown below:

9
Figure 4: Chart of the Range Check
The last module in VHDL is LCD Driver. It acts as a driver to write one of five messages on
LCD display. Four messages indicate the mode and units, and one as a welcome screen. The
ASCII codes are pre-coded into VHDL, and message is determined by current mode.
Figure 5: LCD Display of the DE2 board
Mode Value Range Description Decimal Location Displayed Range (Decimal Digits) Example
Voltmeter 0 ~ 9,999 0v ~ 1v 1 4 downto 0 .12345 (V)
Voltmeter 10,000 ~ 99,999 1v ~ 10v 2 5 downto 1 1.2345 (V)
Voltmeter 100,000+ 10v ~ 20v 3 6 downto 2 12.345 (V)
Ammeter 0 ~ 9,999 0 ~ 10mA 2 4 downto 0 1.2345 (mA)
Ammeter 10,000 ~ 99,999 10 ~ 100mA 3 5 downto 1 12.345 (mA)
Ammeter 100,000+ 100 ~ 200mA 4 6 downto 2 123.45 (mA)
Ohmmeter 0~999 0 ~ 999 ohms NONE 2 downto 0 & "E0" 123E0 (ohm)
Ohmmeter 1,000 ~ 9,999 1k ~ 10k ohms 2 3 downto 1 & "E3" 1.23E3 (ohm)
Ohmmeter 10,000 ~ 99,999 10k ~ 100k
ohms 3 4 downto 2 & "E3" 12.3E3 (ohm)
Ohmmeter 100,000 ~ 999,999
100k ~ 1M ohms
NONE 5 downto 3 & "E3" 123E3 (ohm)
Ohmmeter 1,000,000+ 1M ohm + 2 6 downto 4 & "E6" 1.23E6 (ohm)
Beta - all values NONE "00" & 4 downto 2 00123

10
2.2 Power Supply
In order to power up all the chips in our circuit, we need to create a power supply. We use a
diode bridge circuit to step down and rectify the AC voltage from the transformer to get a full
wave rectified voltage. Then we add a decoupling capacitor to the circuit to reduce the ripple
voltage. The circuit will produce a constant DC voltage. ±16V and ±5V are required to
power up the circuit.
For +16V, we can directly use the rectified DC voltage. Using the other side of the diode
bridge, we can get -16V. We make 5V and -5v by using a LM7805 and LM7905 regulator.
The circuit of the power supply is shown below:
Figure 6: Schematic Diagram of Power Supply
2.3 Voltmeter
The voltmeter circuit is relatively simple and includes only few chips: integrating op amp,
comparator, and a multiplexer and few switches. the multiplexer is used to provide reference
voltage according to the sign of Vin, the 2 switches are used as a multiplexer to choose
between Vin and reference voltage (since the multiplexer chip is unable to handle more than

11
11 volts). The integrating op amp and and comparator as the main part of ADC. Also, a
switch was used to reset the integrator. The circuit communicates with the DE2 board to
work as a full voltmeter
Figure 7: Diagram of the Voltmeter Circuit
2.4 Ammeter
We designed the ammeter using two LM 358 chips functioning as a difference amplifier and
an inverting amplifier, a CD74HC4052 E multiplexer chip and resistors of various values. In
the first portion of the ammeter, the input current is provided to the first LM 358 chip and is
amplified by 10 and then inverted, obeying the formula Vout=Vth-Vin. Vth is 0, resulting in
a negative output. The output of the first operational amplifier (the difference amplifier) goes
into the second operational amplifier (the inverting amplifier) to give a final positive result.
Since we are intending to change the result from mili-amps to mili-volts, we have
incorporated a multiplexer which switches between three different channels, selecting three
different resistance values made available for the necessary conversion, to accommodate for
the required range of ± 2, ±20, and ± 200 mA. When channel 00 is selected, the output
voltage will be 10 mV if the input current was 1 mA since our resistor value is 1k ohm.
Channel 01 and 10 are connected to 10k ohm 100K ohm resistors, resulting in outputs of 100

12
mV and 1 V respectively. In order to obtain an one ohm resistor, we connect eleven 10 ohm
resistors in parallel before the difference amplifier. The value we obtained was 0.99 ohms,
which is very accurate in calculating the resulting voltage. The schematic design of the
ammeter is provided as below.
Figure 8: Schematic Diagram of Ammeter
2.5 Ohmmeter
We as a group implemented our ohmmeter to fluctuate between four ranges- 0 to 9 ohms, 10 ohms to19-
kilo ohms, 20-kilo ohms to 199-kilo ohms and 200-kilo ohms to 2-Mega ohms. This process was
achieved by creating four different constant current sources for each one of the ranges. Armed with a 4 to
1 CD74HC4052E multiplexer, the task was fairly simple. The current sources were created using the
following schematic diagram.

13
Figure 9: Schematic Diagram of a constant current source
For example, to calculate the value of an unknown resistor within the range of 200-kilo ohms to 2M-ohms,
we created a constant current source of 0.01mA. We calculated Re from the diagram above using the
formula [(5-0.7)/Re = 0.00001 Amps]. The Re calculated was then calibrated to suite our needs and
through trial and error we came up with the Re value of 233 kilo-ohms. Measuring the voltage across the
passive element and multiplying the voltage value by 10000 calculated the load resistance. The current
source and Re values for the different ranges are given below
1) 0-10ohms Current source of 10mA, Re value of 23 ohms
2) 10ohms to 20k-ohms Current source of 1mA, Re value of 230 ohms
3) 20k-ohms to 200k-ohms Current source of 0.1 mA, Re value of 23k-ohms
4) 200k-ohms to 2M-ohms Current source of 0.01mA, Re value of 233k-ohms
2.6 Beta β Calculator
There are two kinds of transistors we need to measure, NPN & PNP transistor. For both
transistors, we set the base current (Ib) to 0.1mA by using a constant current source circuit.
A variable resistor is used to make an accurate value for the resistor to make 0.1mA. As a
transistor can act as a current amplifier, Ic is amplified by β times Ib, i.e. Ic = β x Ib. Then

14
we measure the voltage across the 100ohm resistor(Vc1,Vc2) in the collector, and we will
know the current Ic because the voltage display divided by 100 will be the current value,
from the equation V=I x R. As Ib is set to 0.1mA, so the voltage display is actually showing
the beta value divided by 100.
The circuit of these two transistors are shown below:
Figure 10: Schematic Diagrams of Beta β Calculator
2.7 Metal Enclosure
The box that is used to enclose our multi-meter was bought at Lee’s Electronic Store. It is
then altered using the machines at the machine shop to accommodate the multi-meter to

15
our design. We first drill six holes on the lid of the box. This allows the Altera DE2 board to
be held firmly in place at the top of the box. There are holes drilled at the front and
backside of the box for the necessary wires to flow from the circuit boards and the
equipment to the transformer. The hole drilled in the backside of the box is made for three
wires inside the box to reach out. Four separate holes are drilled in the front-side of the box,
each allowing one wire to flow through. The holes are then smoothed to perfection. The
last step is to cut a square window at the side of box for the 40-pin ribbon cable to connect
to the Altera DE2 board. Different views of the box are shown below:
Figure 11: Top, Front, Right, Back views of the metal box
3.0 Conclusion
16
We use VHDL to run the DE2 board to control the voltmeter, ammeter, ohmmeter, and beta β
calculator circuits. The channel to these circuits is switched when we press a button on the board.
The power supply provides specific voltages for the chips in the circuits. Combining these
circuits together and putting them all into a black metal box, we build the advanced multimeter
using VHDL.
A Set of Instructions
1.0 Introduction
An advanced multimeter using VHDL (AMR) is an electrical apparatus most commonly used
in electrical engineering. AMR can change to different modes, which are voltmeter, ammeter,
ohmmeter, and beta β calculator. AMR is designed for electrical engineering students to
measure voltage, current, resistance, and beta β. The set-up time for the multimeter is
approximately 5 minutes. The required materials for using AMR are:
A programmed Altera DE2 board
An Altera DE2 power supply cable
A 40-pin ribbon cable
2.0 Step-by-Step Procedure
Using an AMR is divided into 7 steps.
2.1 Plug in one end of the power supply cable to the DE2 board, the other end to any
electric AC power supply of 120V, 60Hz
2.2 Plug in one end of the 40-pin ribbon cable to the silicon electric circuit board via the
rectangular hole on the right side of the box, the other end to the DE2 board JP2
junction
2.3 Press the red button on the DE2 board to turn it on
2.4 Move down the switch on the left of the DE2 board to change it to “Run” mode
2.5 Press the reset button KEY0
2.6 Press button KEY1 to switch the mode of measurement

17
2.7 Measure voltage by wire1, current by wire2, resistance by wire3, beta β by wire4
3.0 Conclusion
The procedure can be summarized into 3 parts, namely powering up the DE2 board, setting
the DE2 board to “Run” mode, and pressing button KEY1 to switch the mode of
measurement. If you have any questions about setting up AMR, please contact our technician
Kelvin Au via phone to 778-773-9809 or email to [email protected]
Evaluation of the Complete System
A. Testing
Voltmeter and VHDL
We start designing the project by writing our own VHDL code, which is essential to the
voltmeter. The VHDL code contains five states: Reset/Display, count-up, set-sign, count
down, and binary BCD decoding. We write our code using Quartus II and compile the code
to test if it is working before we run it on the DE2 board. We double check the Set-Sign state
of the state machine to ensure it can display positive and negative values. The VHDL code
we write compile and then we transfer the program into the DE2 board in Active Serial
Programming mode. The voltmeter is then connected to the DE2 board and we test it with
different values of current and voltage. The values displayed are accurate and it can display
both positive and negative values when we change the values from the power supply. We
can measure voltage in the range ± 29.000 DC volt.
Power Supply
18
In order to obtain negative voltages, we design the power supply such a way that the
electrolytic capacitors are connected in the opposite polarity. We use four 1000µF capacitors
as the main core of the power supply. We reverse the polarity when we test them on the
breadboard. We first use 100µF capacitors but the voltage we obtained is not -15V or -10V.
We design the power supply by trial and error and finally we settle with four 1000UF
capacitors. We also used MBR150-ND diodes to act as rectifier to convert the AC voltage
from power supply to full-wave AC voltage. The first trial we obtained -10V and -12V. We
then added 0.01UF capacitors and one regulator to the circuit and finally we obtain the
desired negative voltage. The polarities of the electrolytic capacitors are checked thoroughly
to ensure they were connected properly on the circuit board.
Ammeter
The design we came up with the ammeter is that we use a comparator, a multiplexer, 10 ohm
resistors, 1k ohm resistors and 100k ohm resistors. In order to obtain the 1 ohm resistor, we
connect eleven 10 ohm resistors in parallel. We obtain 1.03 ohm in our first stage when we
connect twelve 10 ohm resistors in parallel. In our second try we obtain 0.874ohm when we
used nine 10 ohm resistors. We design our circuit by trial and error and finally we settle to
used eleven 10 ohm resistors connected in parallel and the value we obtained is 0.99 ohm,
which is accurate and close to 1 ohm. The 1 ohm resistor is then connected to other parts of
the circuit.
Ohmmeter
We design the ohmmeter that it is able to fluctuate between four different ranges: 0 to 10
ohms, 10 ohms to 20k ohms, 20 ohms to 200k ohms, and 200k ohms to 2-Mega ohms.

19
According to Lab Module 4, we used two IN4148 diodes, one transistor and resistors of
different values to make a constant current source for the measurement. We set the input
voltage to be +5V. To obtain a constant current source of 0.01mA, we tried different values
of resistors by trial and error method. A lower resistor value was used for the first few trials
but the current we obtained was too high. So we decided to use a larger value for resistors in
order to obtain a lower current. We used two 100k ohms and one 47k ohms (in total of 247k
ohms) for Re and 0.47k ohms for Rd. We chose the load resistance, RL, to be 10k ohms.
The resistors and the diodes were connected to the transistor and finally we obtained a
constant current source of 0.01mA.
B. Strengths and Weaknesses of the Design
We designed the project in a unique way. We started preparing the project with writing our
own VHDL code, which is essential for the voltmeter. The codes compiled and worked well
as the DE2 board displayed the values of the power supply and the current correctly and
precisely. The power supply, which was designed and soldered on the circuit board, was
powered by the transformer and thus connected to the DE2 board. We obtained a very
accurate negative and positive voltage and were displayed on the oscilloscope. The ammeter
and ohmmeter worked as well when they were both connected to the DE2 board. We added
the one ohm resistor to the ammeter in order to obtain a precise and accurate result on the
DE2 board. The metal box was also fixed and made by our group members who are skillful
in mechanics.
The values displayed on our DE2 board fluctuated every 50ms but still reflected the accurate
values. We would also have to wait for about 3 seconds for the DE2 board to display the
values of the voltage and current accurately. The breadboards which we were using also

20
showed some resistance when we designed the ammeter. When we designed and built the
circuit on the breadboards, the current values displayed fluctuates and was sometimes
inaccurate. We changed the breadboards and finally we obtained the desired values. All
other designs were perfect and everything worked very well as the DE2 board displayed the
values accurately when we were measuring the values of current and voltage.

21
Reference
[1]"Slope (integrating) ADC." : DIGITAL-ANALOG CONVERSION. N.p., n.d. Fri. 20 Oct. 2012.
<http://www.allaboutcircuits.com/vol_4/chpt_13/8.html>.
[2] "Www.datasheetcatalog.com." Www.datasheetcatalog.com. 21 Oct. 2012 <
http://www.datasheetcatalog.org/datasheet/stmicroelectronics/1981.pdf >.
[3]"How Analog-to-Digital Converter (ADC) Works | Hardware Secrets." How Analog-to-Digital
Converter (ADC) Works | Hardware Secrets. N.p., n.d. Sat. 21 Oct. 2012.
<http://www.hardwaresecrets.com/article/How-Analog-to-Digital-Converter-ADC-
Works/317/8>.
[4]”Current Source”. Current source From Wikipedia, the free encyclopedia N.p. 14 Nov 2012.
Retrieved 20 Nov.2012< http://en.wikipedia.org/wiki/Current_source>
[5]”DE2 Development and Education Board User Manual.” Altera DE@ Board ALTERA. 16 Nov.
2012 < ftp://ftp.altera.com/up/pub/Webdocs/DE2_UserManual.pdf>
[6]”VHDL”. ALTERA VHDL. N.p., 2012, 10 Nov. 2012.
<http://www.altera.com/support/examples/vhdl/vhdl.html>

22
Bibliography
"Dual Slope ADC." Dual Slope ADC. N.p., n.d. Web. 22 Oct. 2012.
<http://www.asdlib.org/onlineArticles/elabware/Scheeline_ADC/ADC_ADC_Dual_Slope.html
>
"Slope (integrating) ADC." : DIGITAL-ANALOG CONVERSION. N.p., n.d. Web. 23 Oct. 2012.
<http://www.allaboutcircuits.com/vol_4/chpt_13/8.html>.
Irwin, J. David, and R. M. Nelms. Basic Engineering Circuit Analysis. Hoboken, NJ: J. Wiley &
Sons, 2005. Print.
"Current Source." Wikipedia. Wikimedia Foundation, 14 Nov. 2012. Web. 08 Nov. 2012.
<http://en.wikipedia.org/wiki/Current_source>.
"VHDL." Altera News. N.p., 2012. Web. 02 Dec. 2012.
<http://www.altera.com/support/examples/vhdl/vhdl.html>.