forest department sarawak - dagang net technologies … - user guide for fds... · forest...
TRANSCRIPT

Forest Department Sarawak Trader Admin Module
User Guide
Dagang Net Technologies Sdn. Bhd.
Tower 3, Avenue 5, The Horizon, Bangsar South, No. 8, Jalan Kerinchi, 59200 Kuala Lumpur
Tel: 603-2730 0200 Fax: 603-2713 2121

2
Table of Contents
Introduction ............................................................................................................................................ 3
Conventions ............................................................................................................................................ 4
1 Getting Started With ePermit........................................................................................................... 5
1.1 Logging In ................................................................................................................................ 5
1.2 Logging Out ............................................................................................................................. 7
1.3 Trader Admin Profile .............................................................................................................. 8
2 Managing User Account ................................................................................................................... 9
2.1 Add User Account ................................................................................................................... 9
2.2 Edit User Account ................................................................................................................. 12
2.3 Activate User Account .......................................................................................................... 14
2.4 Delete User Account ............................................................................................................. 15
3 Managing Applicant Details ............................................................................................................ 16
3.1 Add Applicant Details ........................................................................................................... 16
3.2 Edit Applicant Details ............................................................................................................ 18
3.3 Delete Applicant Details ....................................................................................................... 20
4 Managing Agent Details ................................................................................................................. 21
4.1 Add Agent Details ................................................................................................................. 21
4.2 Edit Agent Details ................................................................................................................. 23
4.3 Delete Agent Details ............................................................................................................. 25
5 Managing Importer / Exporter Details ........................................................................................... 26
5.1 Add Importer / Exporter Details ........................................................................................... 26
5.2 Edit Importer / Exporter Details ........................................................................................... 28
5.3 Delete Importer / Exporter Details ....................................................................................... 30
6 Managing Product Profile ............................................................................................................... 31
6.1 Add Product Profile .............................................................................................................. 31
6.2 Edit Product Profile ............................................................................................................... 33
6.3 Delete Product Profile .......................................................................................................... 35
7 Report ............................................................................................................................................. 36
7.1 Detailed Report ..................................................................................................................... 36
7.2 Summary Report ................................................................................................................... 38

3
Introduction
ePermit is a web-based value-added service provided by Dagang Net Technologies Sdn Bhd (DNT). It
enables importers, exporters and appointed forwarding agents to apply for permit from Other
Government Agencies (OGA) or commonly known as Permit Issuing Agencies and obtain the
approval online via the internet. Approved permits from OGA will be transmitted to Sistem
Maklumat Kastam (SMK) electronically for validation and cross reference purposes against Customs
declaration.
ePermit is designed to accommodate the specific requirements of each OGA, for example
consignment details, quota details, grading summary and product database. There are three
modules assigned to different groups of users such as Importers/Exporters, Forwarding Agents and
Other Government Agencies.
1 Trader (Importer/Exporter) Module
Enabling importers/exporters to apply for permit online and submit their applications for
approval via the Internet.
2 Forwarding Agent Module
Enabling appointed forwarding agents to apply for permit online on behalf of the
importers/exporters and submit their applications for approval via the Internet.
3 OGA Module
Enabling OGA to verify and approve the permit application received and sends the approved
permit electronically via the Internet. The module also enables OGA to access to daily
statistical report on approved and rejected permits.
In this guide, you will have a deeper understanding of ePermit system with step by step help. By the
end of this guide, you will benefit from the system as it reduces turnaround time, easy to use,
convenient and offers multi-tasking.

4
Conventions
Icon Description Function
Edit Profile To edit profile
Help To view quick guide
Search To search for a particular list
Show To show filtered search result
Add To add item or species
Delete To delete application or item
Reset To reset page
Cancel To cancel application
Close To close pop-up window
Save To save application or add item
Back To return to previous page
Activate To activate inactive user account
Generate Report To generate report
Print To print generated report
Checkbox To select application
Previous To go to next page of a list
Next To go to previous page of a list
Calendar To view calendar
Radio Button To select item

5
1 Getting Started With ePermit
1.1 Logging In
Before logging in, you must ensure that you have the correct username and password.
You may login via www.mytradelink.gov.my or epermit.dagangnet.com.
To login, please follow the steps below:
Step 1
Launch Internet Explorer Browser
In your PC desktop, double click the Internet Explorer (IE) to launch it.
Step 2
Enter URL (Uniform Resource Locator) At Address Bar
In Internet Explorer, go to address bar. Enter: http://epermit.dagangnet.com
Step 3
Disabling Pop-up Blocker
From the toolbar, select Tools > Pop-up Blocker > Turn Off Pop-up Blocker to
disable the Pop-up Blocker.
Internet Explorer
Enter Address
Turn-off Pop-up Blocker

6
Step 4
Enter Username And Password
1 Enter Username and Password.
2 Click on the checkbox Remember Password to disable automatic logout if
there were no activity above 30 minutes.
3 Click on the button to access the system.
4 The system will display the main screen.
Enter Username
Enter Password
Login Button

7
1.2 Logging Out
Once done with the system administrative tasks, you are advised to logout from ePermit.
To logout, please follow the steps below:
Step 1
Logging Out
Click the button to logout from ePermit.
Logout Button

8
1.3 Trader Admin Profile
You can edit your personal information, contact information and authentication information
by going to the Edit Profile screen.
To edit profile, please follow the steps below:
Step 1
Edit Profile
1 To edit your profile, click on the button.
2 Enter the necessary information into the field.
NOTE: Item labeled with * is compulsory.
3 To change your password, enter new password in the Password field.
4 Enter the new password again in the Confirm Password field to confirm your
password.
5 Click on the button to submit the profile once done.
Edit Profile Button

9
2 Managing User Account
2.1 Add User Account
You can add user account with user’s personal information, contact information and
authentication information.
To add user account, please follow the steps below:
Step 1
View Users Screen
1 Click on Users menu as shown.
2 View Users screen appears.
3 Click button.
4 Add User screen appears.
Users Menu
Add Button
10
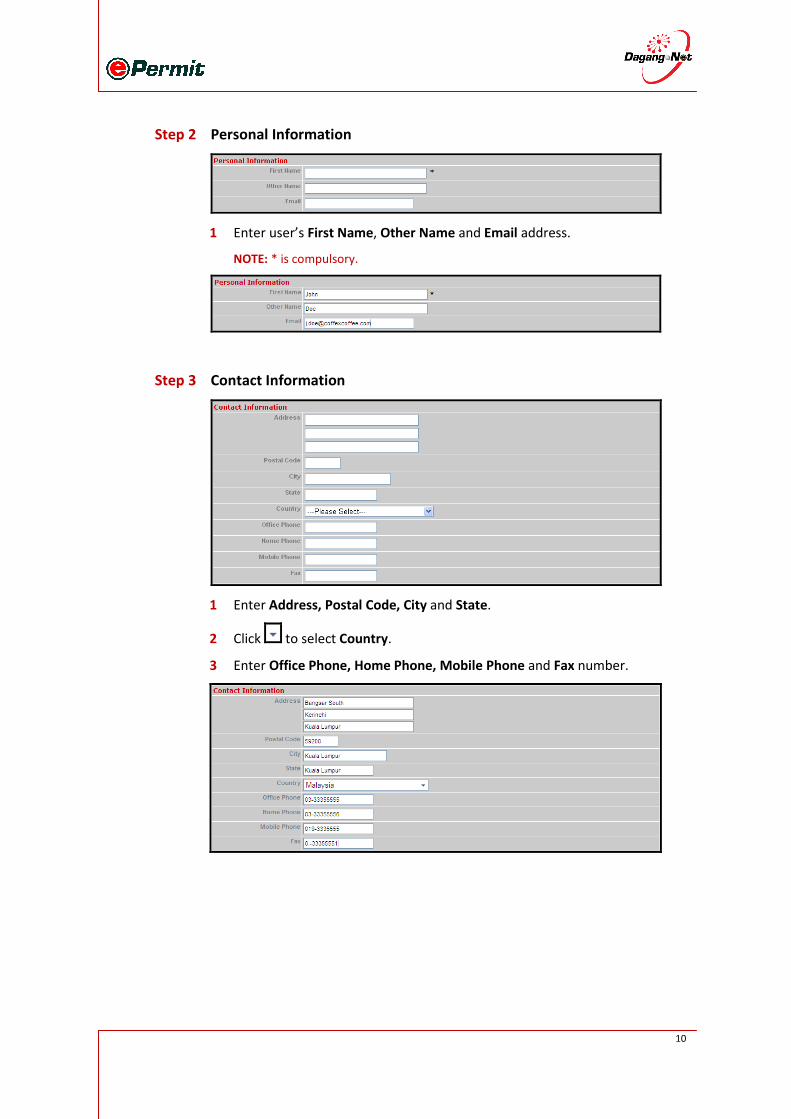
Step 2
Personal Information
1 Enter user’s First Name, Other Name and Email address.
NOTE: * is compulsory.
Step 3
Contact Information
1 Enter Address, Postal Code, City and State.
2 Click to select Country.
3 Enter Office Phone, Home Phone, Mobile Phone and Fax number.

11
Step 4
Authentication Information
1 Enter User Name and Password.
2 Re-enter password to Confirm Password.
3 Tick on the checkbox to activate this account.
Step 5
Save User Account
1 Click button to save user account.
or
Click button to reset all information entered previously.
or
Click button to cancel Add User account process.
2 User added successfully message screen appears.
3 Click button to complete process.

12
2.2 Edit User Account
You can edit user account if there any changes to its information.
To edit user account, please follow the steps below:
Step 1
View Users Screen
1 Click on Users menu as shown.
2 View Users screen appears.
3 Select the user account you want to edit and click on the user’s name.
4 Edit User screen appears.
Users Menu
Click User Name

13
Step 2
Edit User Screen
1 You can edit all the sections available such as User’s Personal Information,
Contact Information and Authentication Information.
2 Tick the checkbox to Activate this account or untick the checkbox to
Deactivate this user account.
3 Click button to save changes made.
or
Click button to reset changes made.
or
Click button to cancel Edit User process.
4 User updated successfully message screen appears.
5 Click button to complete process.

14
2.3 Activate User Account
You can activate user account which was deactivated or not activated during add user account
process.
To activate user account, please follow the steps below:
Step 1
Activate User Account
1 Click on Users menu as shown.
2 View Users screen appears.
3 If the user account was not active, tick on the checkbox to select user
account.
4 Click button to activate the user account.
5 User account’s status should be active as shown.
Users Menu
Status Not Active
Activate Button
Status Active

15
2.4 Delete User Account
You can delete user account which has not been in used and deemed unnecessary.
To delete user account, please follow the steps below:
Step 1
Delete User Account
1 Click on Users menu as shown.
2 View Users screen appears.
3 Select the user account that you want to delete and tick on the checkbox.
4 Click button.
5 Confirm Delete screen appears, to confirm deletion of the choosen user
account.
6 Click button to confirm delete or button to cancel.
Users Menu

16
3 Managing Applicant Details
3.1 Add Applicant Details
You can add applicant details such as applicant’s name, IC/passport no., designation, phone
no., fax no. and email.
To add applicant details, please follow the steps below:
Step 1
View Applicants Screen
1 Click on Applicants menu as shown.
2 View Applicants screen appears.
3 Click button.
4 Add Applicant screen appears.
Applicants Menu
Add Button

17
Step 2
Add Applicant
1 Enter Applicant Name, Applicant IC / Passport No., Applicant Designation,
Applicant Phone No., Applicant Fax No. and Applicant Email.
2 Click button to save Applicant details.
or
Click button to reset Applicant details.
or
Click button to cancel.
3 Applicant added successfully message screen appears.
4 Click button to complete process.

18
3.2 Edit Applicant Details
You can edit applicant details if there are any changes to it.
To edit applicant details, please follow the steps below:
Step 1
View Applicants Screen
1 Click on Applicants menu as shown.
2 View Applicants screen appears.
3 Select the applicant that you want to edit and click on the applicant’s name.
4 Edit Applicant screen appears.
Applicants Menu
Click Name
19
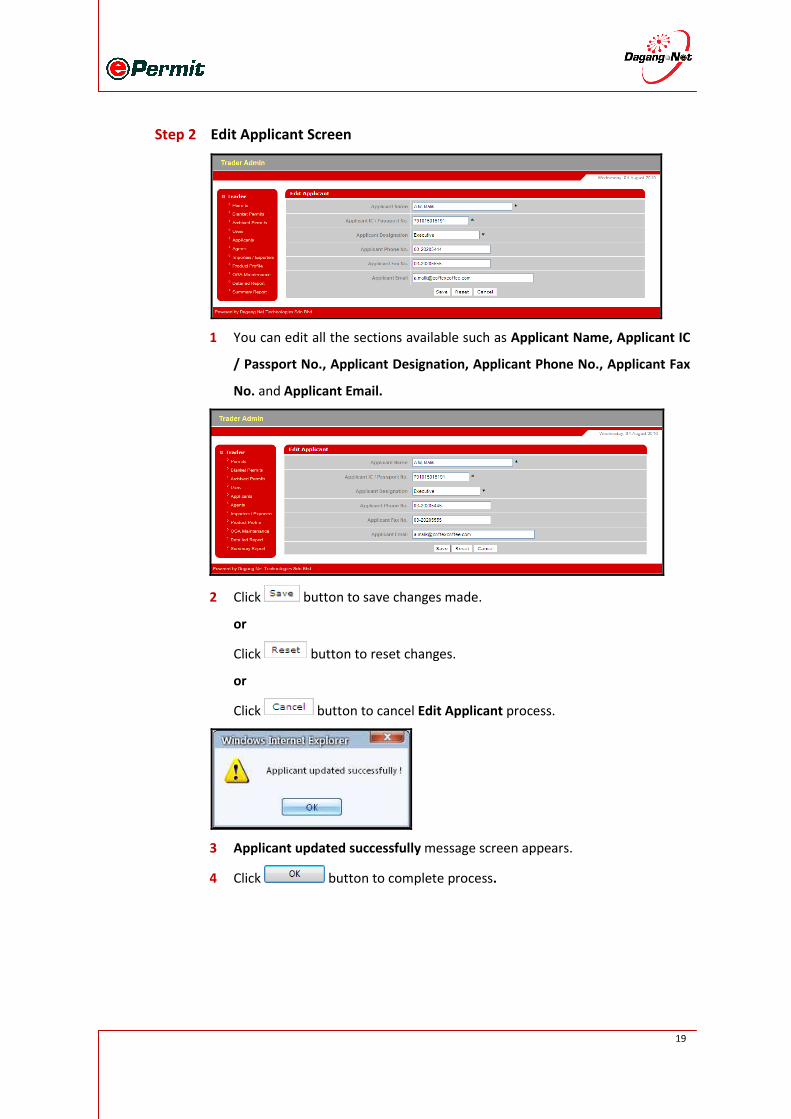
Step 2
Edit Applicant Screen
1 You can edit all the sections available such as Applicant Name, Applicant IC
/ Passport No., Applicant Designation, Applicant Phone No., Applicant Fax
No. and Applicant Email.
2 Click button to save changes made.
or
Click button to reset changes.
or
Click button to cancel Edit Applicant process.
3 Applicant updated successfully message screen appears.
4 Click button to complete process.
20
3.3 Delete Applicant Details
You can delete applicant details if the applicant is no longer valid.
To delete applicant details, please follow the steps below:
Step 1
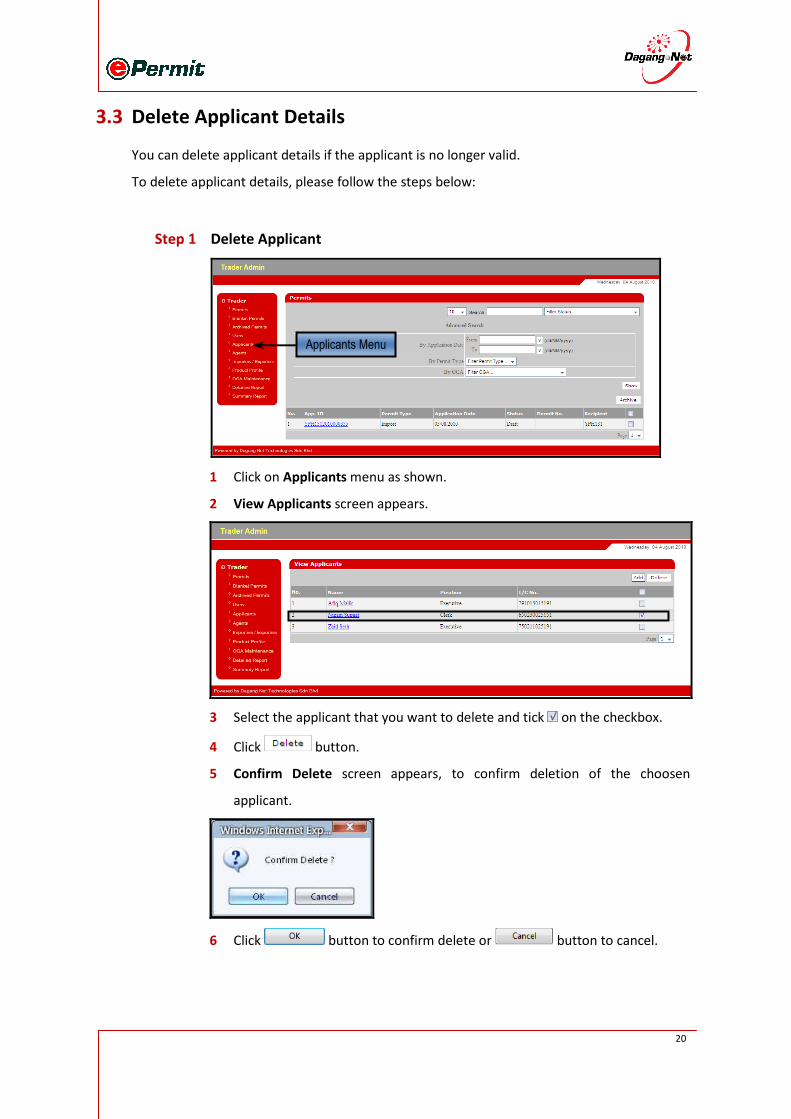
Delete Applicant
1 Click on Applicants menu as shown.
2 View Applicants screen appears.
3 Select the applicant that you want to delete and tick on the checkbox.
4 Click button.
5 Confirm Delete screen appears, to confirm deletion of the choosen
applicant.
6 Click button to confirm delete or button to cancel.
Applicants Menu

21
4 Managing Agent Details
4.1 Add Agent Details
You can add agent details such as agent’s code, name and address.
To add agent details, please follow the steps below:
Step 1
View Agents Screen
1 Click on Agents menu as shown.
2 View Agents screen appears.
3 Click button.
4 Add Agent screen appears.
Agents Menu
22
Step 2
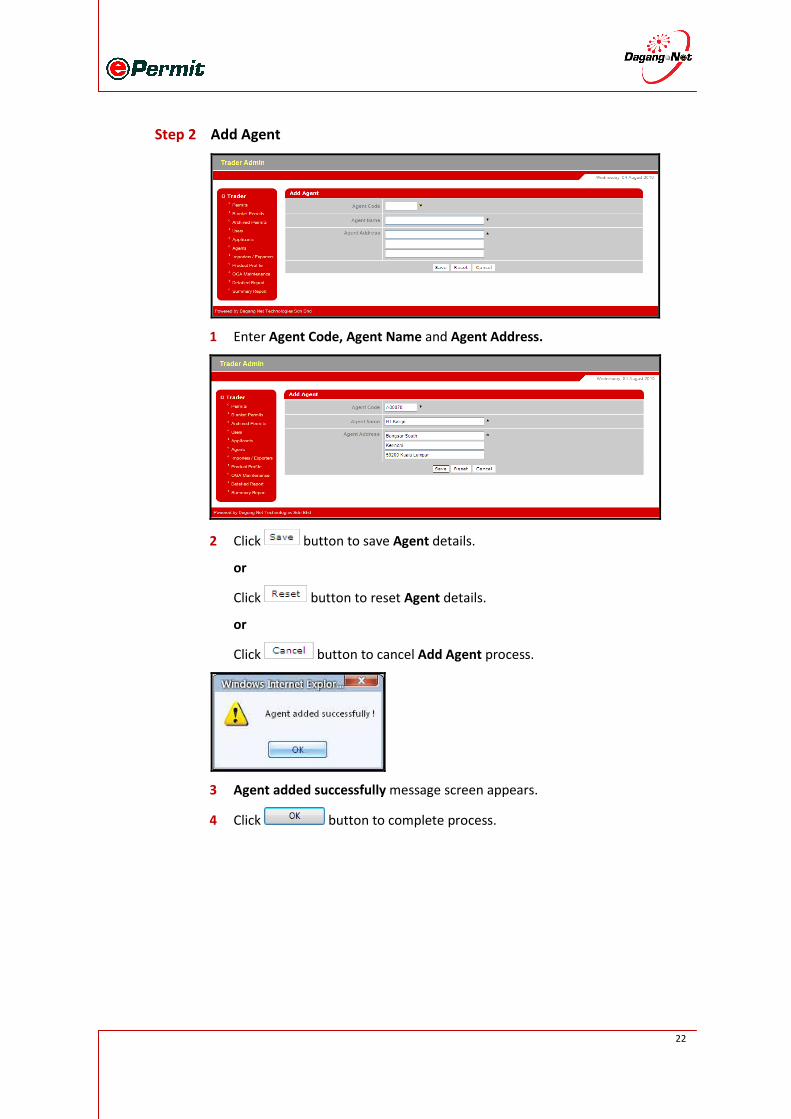
Add Agent
1 Enter Agent Code, Agent Name and Agent Address.
2 Click button to save Agent details.
or
Click button to reset Agent details.
or
Click button to cancel Add Agent process.
3 Agent added successfully message screen appears.
4 Click button to complete process.

23
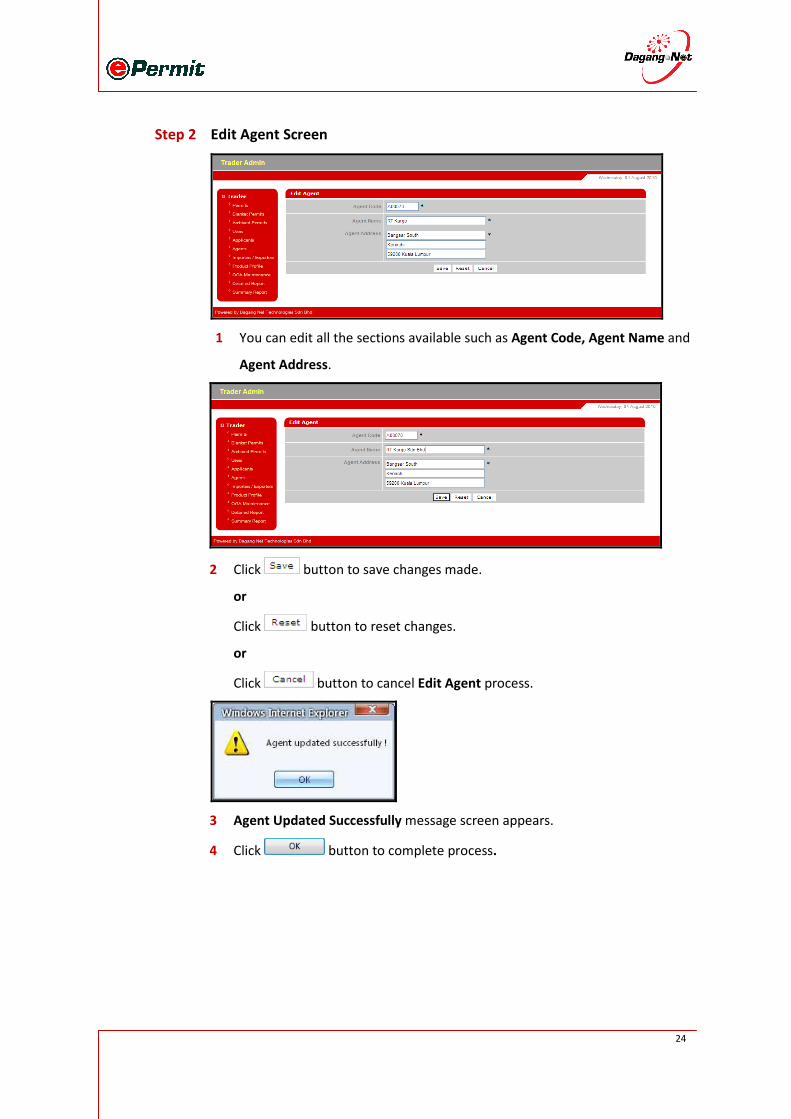
4.2 Edit Agent Details
You can edit agent details if there are any changes to it.
To edit agent details, please follow the steps below:
Step 1
View Agents Screen
1 Click on Agents menu as shown.
2 View Agents screen appears.
3 Select the agent that you want to edit and click on the agent’s name.
4 Edit Agent screen appears.
Agents Menu
Click Name
24
Step 2
Edit Agent Screen
1 You can edit all the sections available such as Agent Code, Agent Name and
Agent Address.
2 Click button to save changes made.
or
Click button to reset changes.
or
Click button to cancel Edit Agent process.
3 Agent Updated Successfully message screen appears.
4 Click button to complete process.
25
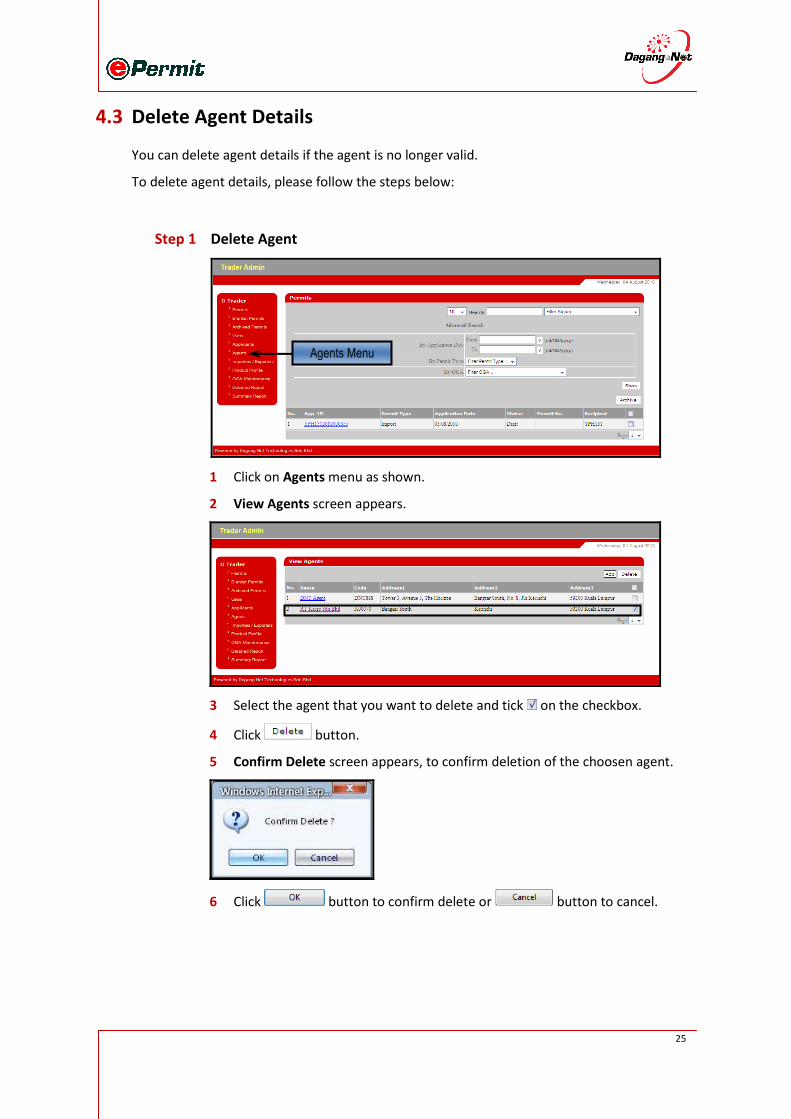
4.3 Delete Agent Details
You can delete agent details if the agent is no longer valid.
To delete agent details, please follow the steps below:
Step 1
Delete Agent
1 Click on Agents menu as shown.
2 View Agents screen appears.
3 Select the agent that you want to delete and tick on the checkbox.
4 Click button.
5 Confirm Delete screen appears, to confirm deletion of the choosen agent.
6 Click button to confirm delete or button to cancel.
Agents Menu

26
5 Managing Importer / Exporter Details
5.1 Add Importer / Exporter Details
You can add an importer or an exporter details such as its type, name, code and address.
To add importer / exporter details, please follow the steps below:
Step 1
View Importers / Exporters Screen
1 Click on Importers / Exporters menu as shown.
2 View Importers / Exporters screen appears.
3 Click button.
4 Add Importer / Exporter screen appears.
Importers/Exporters Menu

27
Step 2
Add Importer / Exporter
1 Click the radio button to select Importer / Exporter Type.
2 Enter Name, Code and Importer / Exporter Address.
3 Click button to save Importer / Exporter details.
or
Click button to reset Importer / Exporter details.
or
Click button to cancel.
4 Importer / Exporter Added Successfully message screen appears.
5 Click button to complete process.
28
5.2 Edit Importer / Exporter Details
You can edit importer/exporter details if there are any changes to it.
To edit importer / exporter details, please follow the steps below:
Step 1
View Importers / Exporters Screen
1 Click on Importers / Exporters menu as shown.
2 View Importers / Exporters screen appears.
3 Select the importer / exporter that you want to edit and click on the
importer’s / exporter’s name.
4 Edit Importer / Exporter screen appears.
Importers / Exporters Menu
Click Name
29
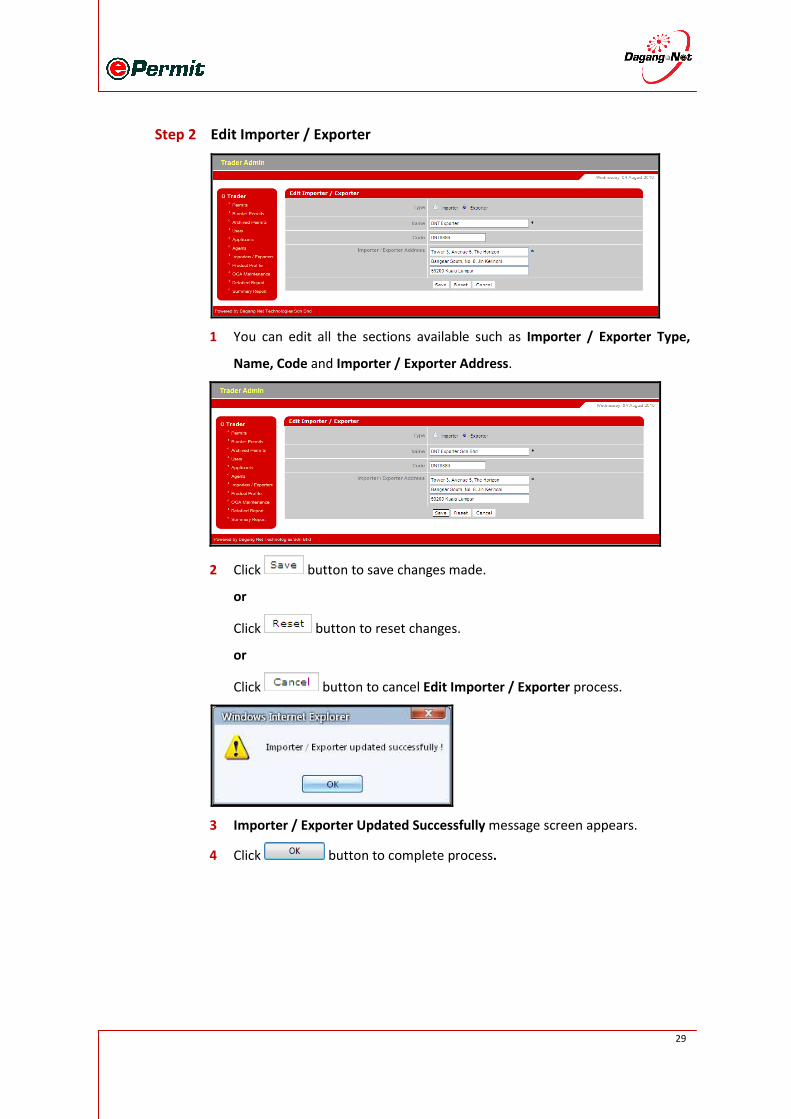
Step 2
Edit Importer / Exporter
1 You can edit all the sections available such as Importer / Exporter Type,
Name, Code and Importer / Exporter Address.
2 Click button to save changes made.
or
Click button to reset changes.
or
Click button to cancel Edit Importer / Exporter process.
3 Importer / Exporter Updated Successfully message screen appears.
4 Click button to complete process.

30
5.3 Delete Importer / Exporter Details
You can delete importer / exporter details if the importer / exporter are no longer valid.
To delete importer / exporter details, please follow the steps below:
Step 1
Delete Importer / Exporter
1 Click on Importers / Exporters menu as shown.
2 View Importers / Exporters screen appears.
3 Select the importer / exporter that you want to delete and tick on the
checkbox.
4 Click button.
5 Confirm Delete screen appears, to confirm deletion of the choosen
importer/exporter.
6 Click button to confirm delete or button to cancel.
Importers / Exporters Menu

31
6 Managing Product Profile
6.1 Add Product Profile
You can add product profile with product details such as product code, tariff code, item
description and tariff UOM.
To add product profile, please follow the steps below:
Step 1
View Product Profile Screen
1 Click on Product Profile menu as shown.
2 View Product Profile screen appears.
3 Click button.
4 Add Product Profile screen appears.
Product Profile Menu
Add Button
32
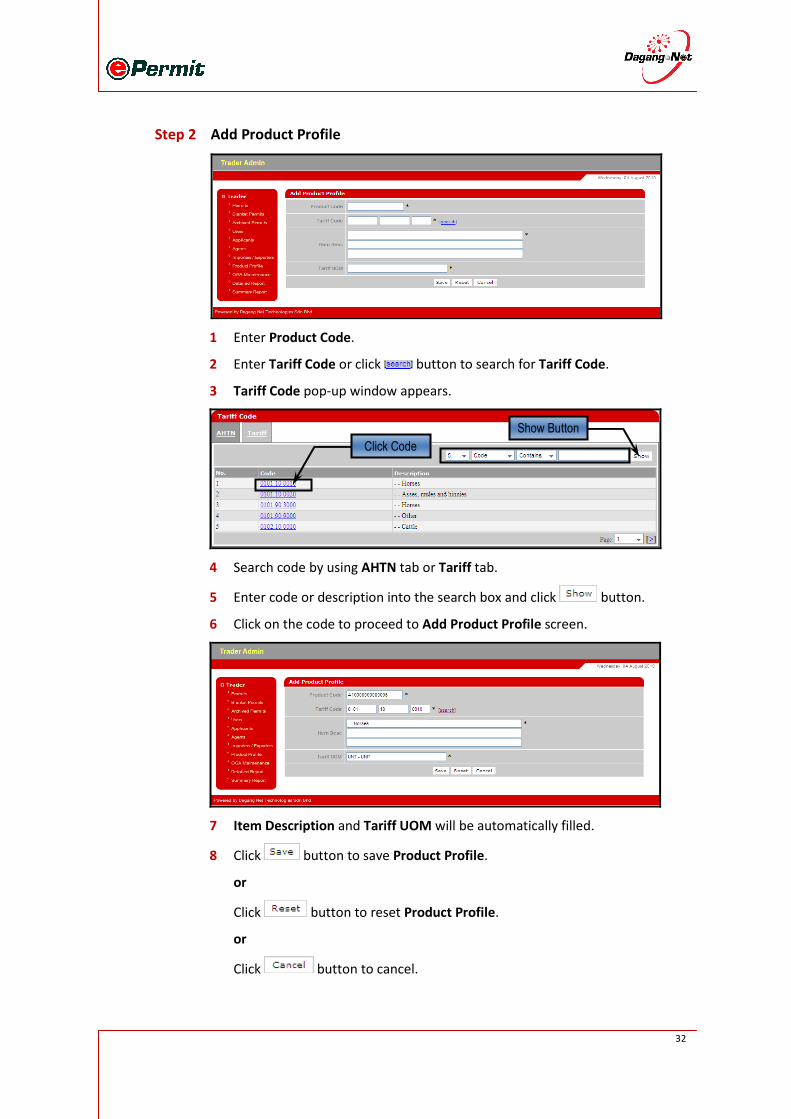
Step 2
Add Product Profile
1 Enter Product Code.
2 Enter Tariff Code or click button to search for Tariff Code.
3 Tariff Code pop-up window appears.
4 Search code by using AHTN tab or Tariff tab.
5 Enter code or description into the search box and click button.
6 Click on the code to proceed to Add Product Profile screen.
7 Item Description and Tariff UOM will be automatically filled.
8 Click button to save Product Profile.
or
Click button to reset Product Profile.
or
Click button to cancel.
Show Button
Click Code

33
9 Product added successfully message screen appears.
10 Click button to complete process.
6.2 Edit Product Profile
You can edit product profile if there are any changes to it.
To edit product profile, please follow the steps below:
Step 1
View Product Profile Screen
1 Click on Product Profile menu as shown.
2 View Product Profile screen appears.
3 Select the product code that you want to edit.
4 Edit Product Profile screen appears.
Product Profile Menu
Click Product Code

34
Step 2
Edit Product Profile
1 You can edit all the sections available such as Product Code, Tariff Code,
Item Description, and Tariff UOM.
2 Once done with the changes, click button to save the changes.
or
Click button to reset changes.
or
Click button to cancel Edit Product Profile process.
3 Product updated successfully message screen appears.
4 Click button to complete process.

35
6.3 Delete Product Profile
You can delete product profile if the product is no longer valid.
To delete product profile details, please follow the steps below:
Step 1
Delete Product Profile
1 Click on Product Profile menu as shown.
2 View Product Profile screen appears.
3 Select the product code that you want to delete and and tick on the
checkbox.
4 Click button.
5 Confirm Delete screen appears, to confirm deletion of the choosen product
code.
6 Click button to confirm delete or button to cancel.
Product Profile Menu
36
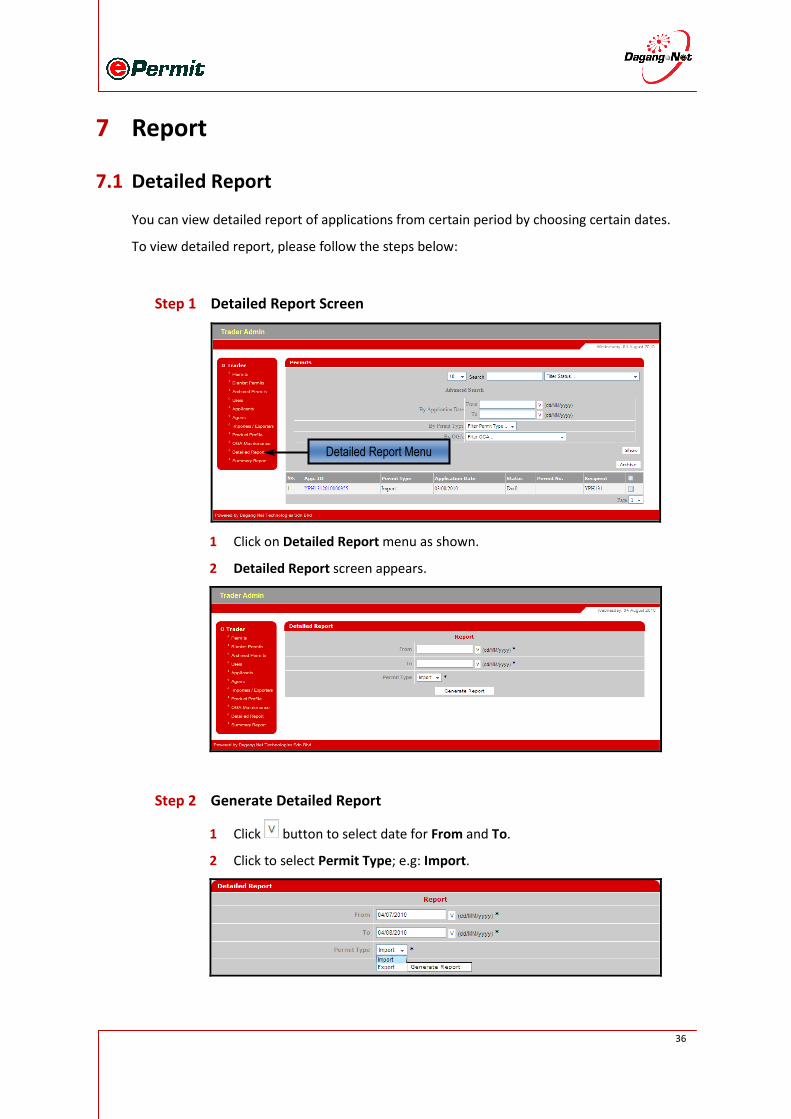
7 Report
7.1 Detailed Report
You can view detailed report of applications from certain period by choosing certain dates.
To view detailed report, please follow the steps below:
Step 1
Detailed Report Screen
1 Click on Detailed Report menu as shown.
2 Detailed Report screen appears.
Step 2
Generate Detailed Report
1 Click button to select date for From and To.
2 Click to select Permit Type; e.g: Import.
Detailed Report Menu
37
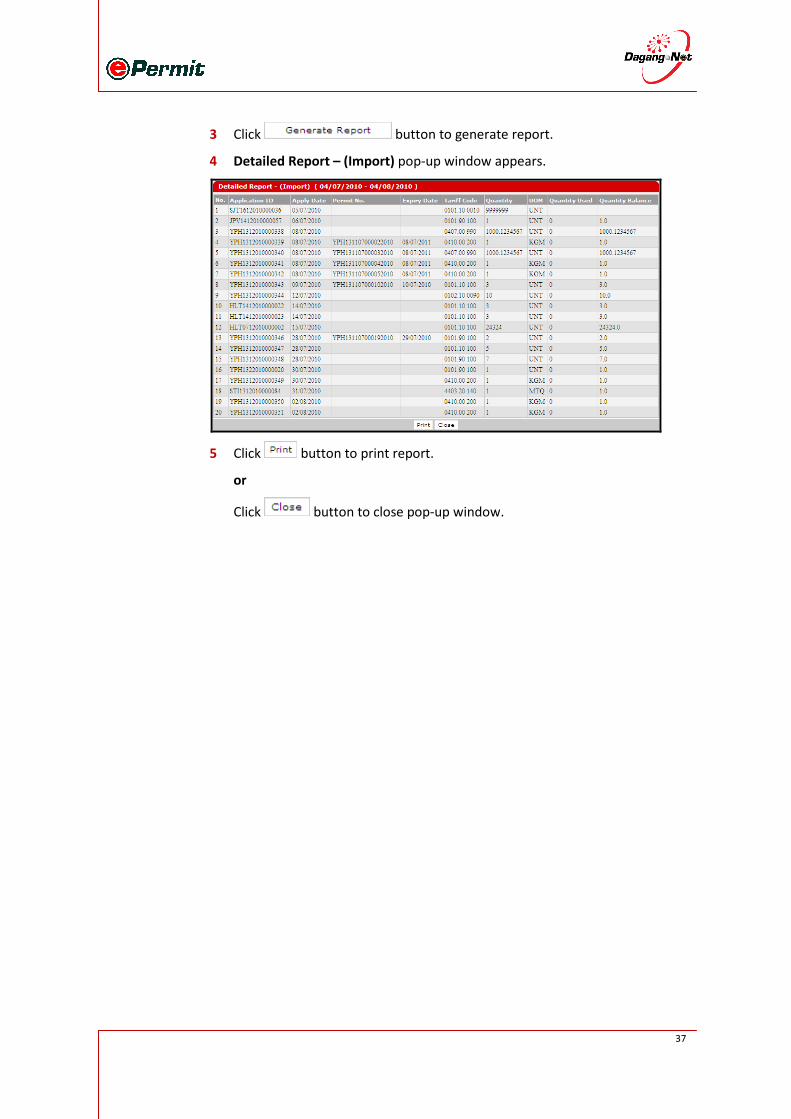
3 Click button to generate report.
4 Detailed Report – (Import) pop-up window appears.
5 Click button to print report.
or
Click button to close pop-up window.

38
7.2 Summary Report
You can view a summarized report of applications from certain period by choosing certain
dates.
To view summary report, please follow the steps below:
Step 1
Summary Report Screen
1 Click on Summary Report menu as shown.
2 Summary Report screen appears.
Step 2
Generate Summary Report
1 Click button to select date for From and To.
2 Click button to generate report.
3 Summary Report pop-up window appears.
Summary Report Menu

39
4 Click button to print report.
or
Click button to close pop-up window.