first grade life science unit plants and how they...
TRANSCRIPT

First Grade Life Science Unit
Plants and How They Grow
Heather Brown and Allison Crump
Experiment 1 Life Science
First Grade Alli Crump
Explore-
Problem: The Effect of Sunlight on Lima Bean Growth
Hypothesis: If a lima bean plant is exposed to sunlight, then it will grow taller than if it is not exposed to sunlight.
Materials: 8-ounce Styrofoam cups for planting (enough for each student to have one) lima bean seeds (one seed for each cup) potting soil (250cc (1 cup) for each pot) tap water graduated cylinder metric ruler space with full sunlight space with no sunlight pencil science notebook
Methods:
1. Give each student a lima bean and have them discuss their observations and wonderings within a group of 4-5 students. Share these as a class (assessment).
2. Discuss the experiment with the class and have students make a hypothesis about the effect of sunlight on lima bean growth in their science notebooks. (assessment-teacher can check notebook to discover student thinking)
3. Each student will receive an 8-ounce Styrofoam cup in which to plant a lima bean. 4. Use a pencil to poke a small hole in the bottom of the cup. 5. Place 125cc (1/2 cup) of the soil in the cup. 6. Place the lima bean on top of the soil. 7. Cover the lima bean with the remainder of the soil (to the top of the cup). 8. Place half of the class’ cups on one tray (labeled with student’s name and “no sunlight”) and the other
half on another tray (labeled with student’s name and “sunlight”). 9. Use the graduated cylinder to measure 75mL of water. 10. Pour the water over the soil and ensure all parts of the soil obtain water. 11. Place half of the classes’ plants in a dark closet with no light exposure. 12. Place the other half of the plants on a window sill in the same room. *Plants should be kept in the
same room to keep a constant temperature for both groups. 13. After day 1, students will water their plants with 15 mL of water each day for the remainder of the
experiment. 14. Use the attached notebooking form to record qualitative observations and quantitative measurements
of the height of the plants in centimeters. 15. Students will work in pairs when observing and discussing their plants. Each pair will consist of a plant
exposed to sunlight and a plant not exposed to sunlight.
16. Students will monitor their plants daily and begin to record observations and measurements when the plant is visible. Record the day the plant becomes visible. (ex. If the plant is visible on Day 5, record “Day 5” on the chart.
17. Continue the experiment for at least three weeks. 18. Throughout the experiment, allow each pair of students to discuss with and observe the plants of at
least two other pairs of students to compare and contrast results.
*About ten trials of this experiment will be conducted simultaneously depending on the number of students in the class. (10 plants with sunlight, 10 plants with no sunlight)
Control: The lima bean plants with exposure to sunlight
Dependent Variable: Growth of Lima Beans in Centimeters
Independent Variable: Sunlight Exposure (sunlight vs. no sunlight)
Anticipated Data Set and Discussion: It is anticipated that the lima bean plants exposed to sunlight will grow at a slightly more rapid rate than those with no sunlight exposure. They may grow taller and healthier than the plants not exposed to sunlight. The leaves on these plants will be a deeper green that those on the plants with no sunlight exposure. The plants not exposed to sunlight will most likely still grow. However, they will most likely be pale yellow in color.
Suggestions for Altering the Experiment:
This experiment could be altered by changing the amount of time the plants are exposed to sunlight. The students could grow plants in a full day of sunlight, half a day in sunlight, a quarter of the day in sunlight, and no sunlight and compare the differences in these four plants.
Elaborate-
Students could use their knowledge from this experiment to answer the question/clear up the possible misconception that plants must have only light from the sun in order to survive. Can plants survive with other types of light? Students could work in teams to research different types of lighting (used to grow plants or not traditionally used for plants) and create a new experiment determining which light source is best for growing healthy plants.
Students could also use what they learned from this experiment to test other types of plants and determine whether or not those seeds produce similar results.
The class could research different types of plants and the amount of lighting they need (full sun, partial, shade, etc.) Students could plant a few of these plants from each category around the schoolyard determining the best places for these plants. Students could monitor the plants to determine whether or not the places they chose for the plants were appropriate.
Assessments and Notebooking: Students will use science notebooks to record observations and measurements on a daily basis with this experiment. The teacher can assess students’ gained knowledge and misconceptions based on the data from these notebooks. Throughout the experiment student will discuss many questions with partners, share observations with the class, and draw conclusions based on the data. The teacher can assess students and clear up misconceptions by observing and conferring with students.

Plants and How They Grow
Problem: The Effect of Sunlight on Plant Growth
My Hypothesis:
If__________________________________________________________________________,
then _______________________________________________________________________.
My Observations and Measurements:
Day and Date (ex. Day 5-
4/12/13)
Height of Plant (cm)
Color of Plant (Be specific.)
Other Observations
cm

Day and Date (ex. Day 5-
4/12/13)
Height of Plant (cm)
Color of Plant (Be specific.)
Other Observations
Was your hypothesis supported? YES NO Discuss this with your partner.
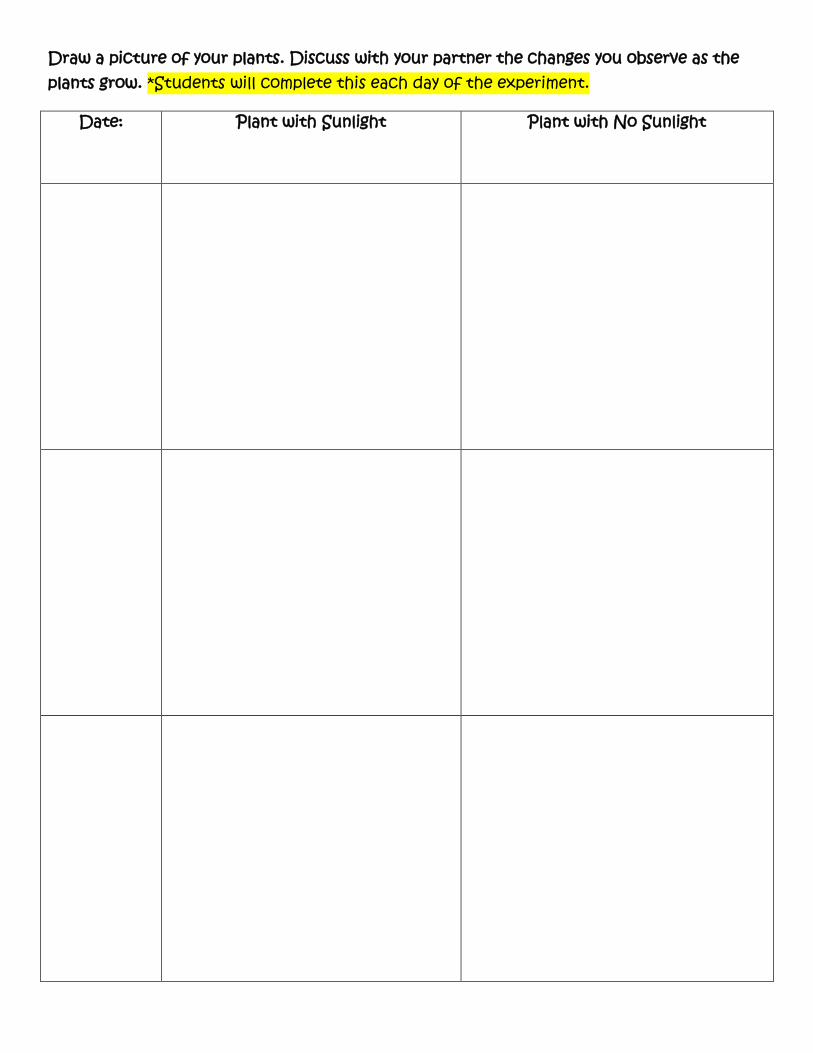
Draw a picture of your plants. Discuss with your partner the changes you observe as the plants grow. *Students will complete this each day of the experiment.
Date: Plant with Sunlight Plant with No Sunlight
Experiment 2 Life Science
First Grade Alli Crump
Explore-
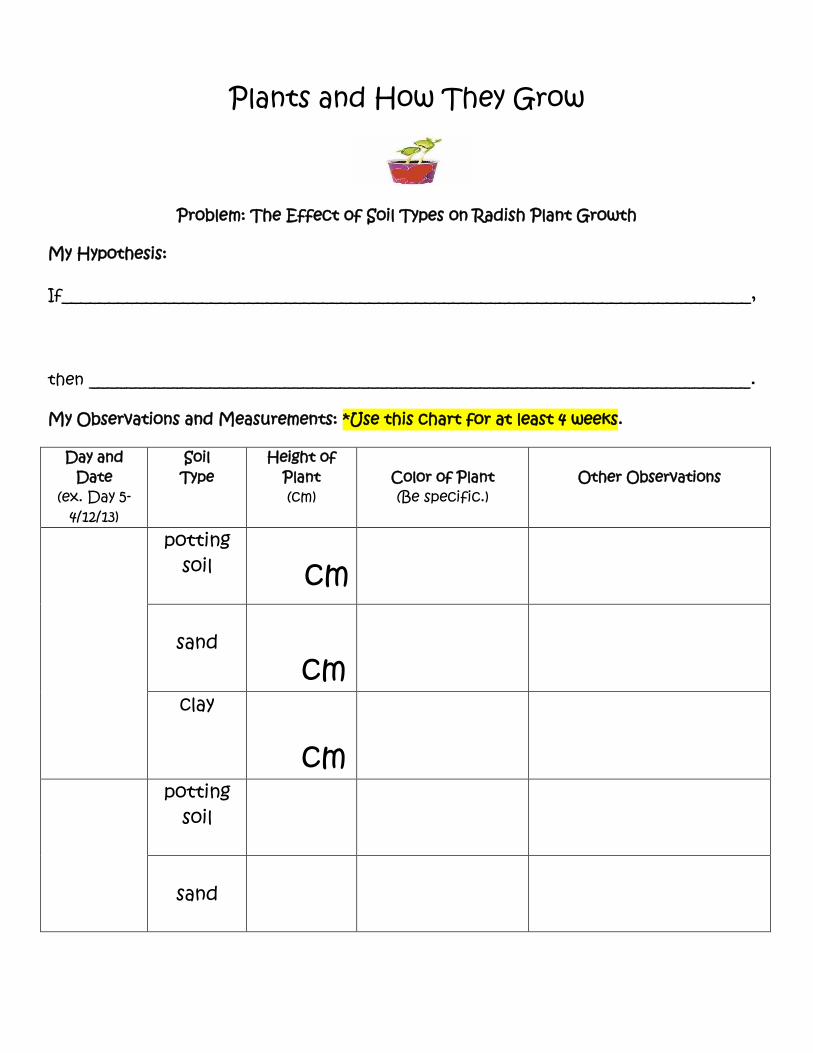
Problem: The Effect of Soil Types on Radish Plant Growth
Hypothesis: If a radish seed is planted in potting soil, then it will grow taller than if it is planted in clay or sand.
Materials: 8-ounce Styrofoam cups (each group will need 3 cups) radish seeds (two seeds for each cup) potting soil, sand, clay (250cc (1 cup) for each cup- each group will have a cup of each type of “soil”) tap water graduated cylinder metric ruler space with full sunlight pencil science notebook
Methods:
1. Give each group one cup of potting soil, sand, and clay and have them discuss their observations and wonderings within a group of 4-5 students. Share these as a class (assessment).
2. Discuss the experiment with the class and have students make a hypothesis about the effect of different types of soil on radish seed growth in their science notebooks. (assessment-teacher can check notebook to discover student thinking)
3. Give each group of students 3 cups for planting. 4. Use a pencil to poke a small hole in the bottom of each cup. 5. Place 125cc (1/2 cup) of the potting soil in one cup, 125cc (1/2 cup) of the sand in one cup, and 125cc
(1/2 cup) of the clay in one cup. 6. Place two radish seeds on top of the “soils” in each cup. 7. Cover the radish seeds with the remainder of the “soils” (to the top of the cup). 8. Use the graduated cylinder to measure 75mL of water to pour in each cup. 9. Pour the water over the soil in each cup and ensure all parts of the soil obtain water. 10. Label the cups with the group’s name and type of soil. 11. Keep all the plants outside in the sunlight or on a window ledge in the classroom. 12. After day 1, students will water their plants with 15 mL of water each day for the remainder of the
experiment. *If water is not absorbing each day, water the plants every other day or every three days. Ensure you are watering the plants the same amount each day.
13. Use the attached notebooking form to record qualitative observations and quantitative measurements of the height of the plants in centimeters.
14. Students will work with their groups to observe and measure the progress of their plants. 15. Students will monitor their plants daily and begin to record observations and measurements when the
plants are visible. 16. Continue the experiment for at least four weeks. 17. Throughout the experiment, allow each group of students to discuss with and observe the plants of at
least two other groups of students to compare and contrast results.
*Students will conduct 3 or more trials simultaneously because each group in the class will be doing the same experiments. Students will have the opportunity to observe, discuss, and share about their plants on a regular basis.
Control: The radish seeds in regular potting soil Dependent Variable: Growth of Radish Seeds in Centimeters
Independent Variable: Types of Soils (potting soil, sand, clay)
Anticipated Data Set and Discussion: It is anticipated that the radish seeds will grow best in the potting soil because it usually contains more nutrients for the plants. The sand and clay may produce similar result due to the amount of water being absorbed. Potting soil absorbs water more quickly than sand and clay. Therefore, the amount of water may be too much for the sand and clay affecting plant growth.
Suggestions for Altering the Experiment: Students could test different brands of potting soil, different types of sand, different types of clay, or even different types of soil (organic, added fertilizer, etc.). Students could also plant different types of seeds (flowers, vegetables, grasses) to determine which soils work best with specific plants.
Elaborate- Students could take their knowledge from the experiment and apply it to a real world situation by creating a persuasive advertisement (commercial, flyer) encouraging others to buy certain types of soil depending on what is best for their plants. They could invite parents in to give them tips on buying soil. The class could plant a few small flower pots using the soil they feel is best for each pot. They can then take other classes to tour the plants describing the planting process and why they chose the specific soil for each plant. Assessments and Notbooking: Students will use science notebooks to record observations and measurements on a daily basis with this experiment. The teacher can assess students’ gained knowledge and misconceptions based on the data from these notebooks. Throughout the experiment student will discuss many questions with partners, share observations with the class, and draw conclusions based on the data. The teacher can assess students and clear up misconceptions by observing and conferring with students. Teachers can also use the product from the “elaborate” portion of this experiment to assess students knowledge of types of soils.
Plants and How They Grow
Problem: The Effect of Soil Types on Radish Plant Growth
My Hypothesis:
If__________________________________________________________________________,
then _______________________________________________________________________.
My Observations and Measurements: *Use this chart for at least 4 weeks.
Day and Date
(ex. Day 5- 4/12/13)
Soil Type
Height of Plant (cm)
Color of Plant (Be specific.)
Other Observations
potting soil
cm
sand
cm
clay cm
potting soil
sand

clay
Day and Date
(ex. Day 5- 4/12/13)
Height of Plant (cm)
Color of Plant (Be specific.)
Other Observations
potting soil
sand
clay
potting soil
sand
clay
potting soil
sand
clay
Was your hypothesis supported? YES NO Discuss this with your partner.

Experiment 3 Life Science
First Grade Heather Brown
Explore-
Problem: The effect of water on plant growth
Hypothesis: If a plant is exposed to too much or too little of water, then the plant will not survive.
Materials:
*24 lima beans * Tap water *Pencil *Measuring cylinder *Soil (250 cc per cup)
*Grow Lab *Metric ruler *Notebook *12 clear 12 oz. (360 mL) cups *12 plastic plates *X-acto knife (only to be used by teacher)
Methods:
1. Puncture two holes in the bottom of each cup with the X-acto knife for drainage and place each on plastic plate
2. Fill each cup with 250 cc of soil 3. Split class into groups of 6 named group A, B, C, and D and within that group they will partner up and
be in charge of a plant 4. Each group will use a pencil to create two holes 3 cm deep, add one lima bean to each hole 5. Cover lima beans with soil 6. Partners will then water their plants based on the group they are in:
Group A – 10 mL of water Group B – 20 mL of water Group C – 30 mL of water Group D – 40 mL of water
7. Each group will place their plant in the Grow Lab 8. Students will record their initial observations in their Plant Growth Recording Journal 9. After day 1, partners will water their plants daily based on what group they are in:
Group A – Water 0 mL daily Group B – Water 5 mL daily Group C – Water 10 mL daily Group D – Water 20 mL daily
10. Students will daily record in their Plant Growth Recording Journal. They will be required to measure in centimeters once the plant has germinated, draw a picture of what it looks like, record observations and write if their predictions have changed.
11. Each Friday the groups will record the growth of their lima bean on the Class Growth Chart - Water 12. At the end of the 3 weeks each group will record their final measurements (in cm) on Class Growth
Chart and have a class discussion on results 13. Teacher will facilitate a class graph showing the growth results
Control: The control is the plant with 10 mL of water initially that is watered with 0 mL per day
Dependent Variable: The dependent variable is the height of the lima bean plants
Independent Variable: The independent variable is the amount of water used every day
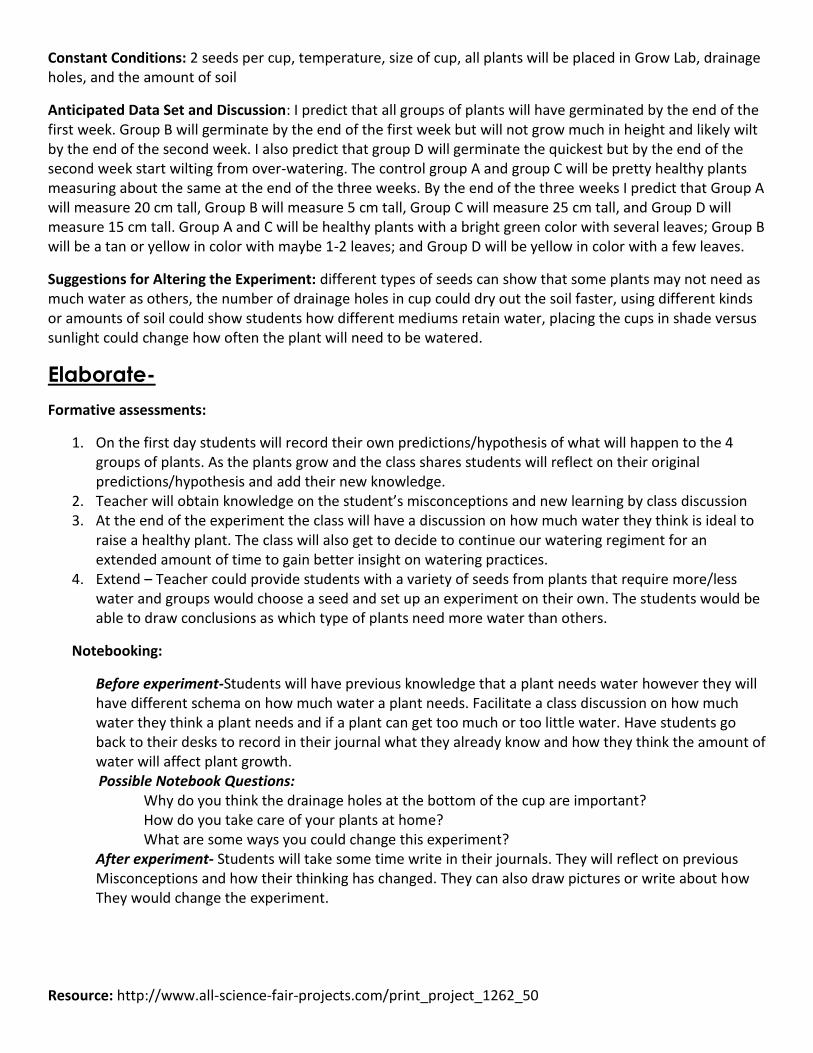
Constant Conditions: 2 seeds per cup, temperature, size of cup, all plants will be placed in Grow Lab, drainage holes, and the amount of soil
Anticipated Data Set and Discussion: I predict that all groups of plants will have germinated by the end of the first week. Group B will germinate by the end of the first week but will not grow much in height and likely wilt by the end of the second week. I also predict that group D will germinate the quickest but by the end of the second week start wilting from over-watering. The control group A and group C will be pretty healthy plants measuring about the same at the end of the three weeks. By the end of the three weeks I predict that Group A will measure 20 cm tall, Group B will measure 5 cm tall, Group C will measure 25 cm tall, and Group D will measure 15 cm tall. Group A and C will be healthy plants with a bright green color with several leaves; Group B will be a tan or yellow in color with maybe 1-2 leaves; and Group D will be yellow in color with a few leaves.
Suggestions for Altering the Experiment: different types of seeds can show that some plants may not need as much water as others, the number of drainage holes in cup could dry out the soil faster, using different kinds or amounts of soil could show students how different mediums retain water, placing the cups in shade versus sunlight could change how often the plant will need to be watered.
Elaborate-
Formative assessments:
1. On the first day students will record their own predictions/hypothesis of what will happen to the 4 groups of plants. As the plants grow and the class shares students will reflect on their original predictions/hypothesis and add their new knowledge.
2. Teacher will obtain knowledge on the student’s misconceptions and new learning by class discussion 3. At the end of the experiment the class will have a discussion on how much water they think is ideal to
raise a healthy plant. The class will also get to decide to continue our watering regiment for an extended amount of time to gain better insight on watering practices.
4. Extend – Teacher could provide students with a variety of seeds from plants that require more/less water and groups would choose a seed and set up an experiment on their own. The students would be able to draw conclusions as which type of plants need more water than others.
Notebooking:
Before experiment-Students will have previous knowledge that a plant needs water however they will have different schema on how much water a plant needs. Facilitate a class discussion on how much water they think a plant needs and if a plant can get too much or too little water. Have students go back to their desks to record in their journal what they already know and how they think the amount of water will affect plant growth.
Possible Notebook Questions: Why do you think the drainage holes at the bottom of the cup are important? How do you take care of your plants at home? What are some ways you could change this experiment?
After experiment- Students will take some time write in their journals. They will reflect on previous Misconceptions and how their thinking has changed. They can also draw pictures or write about how They would change the experiment.
Resource: http://www.all-science-fair-projects.com/print_project_1262_50
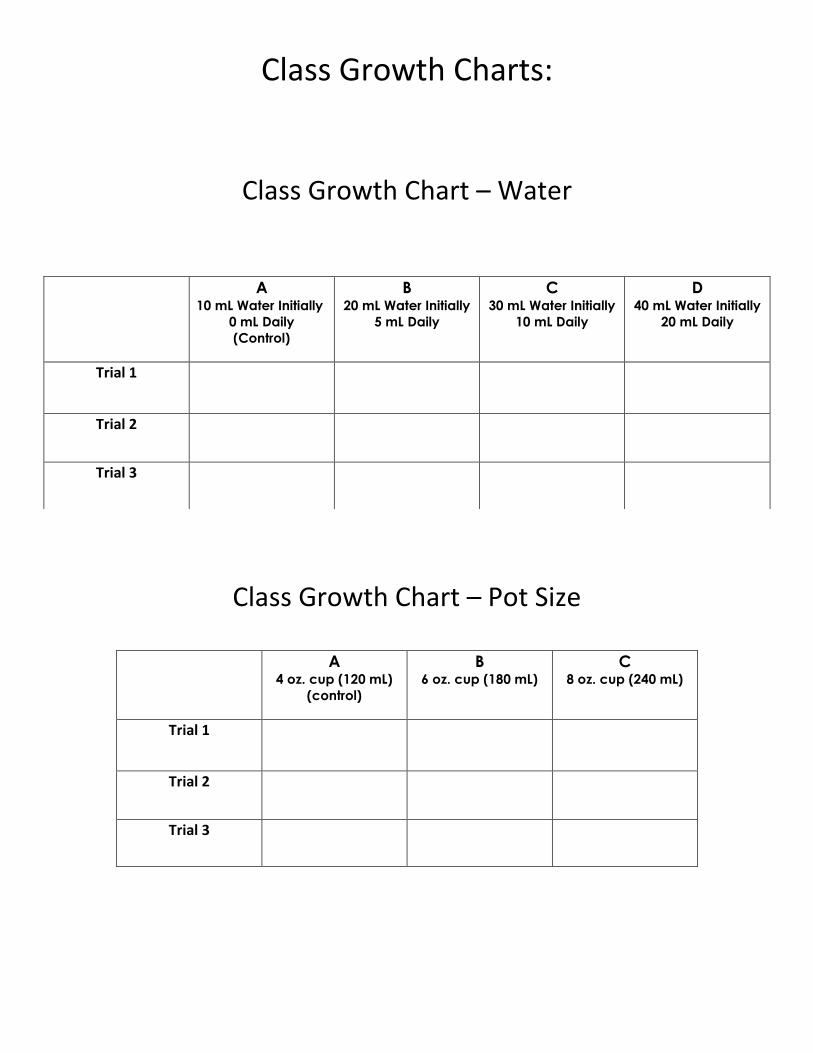
Class Growth Charts:
Class Growth Chart – Water
Class Growth Chart – Pot Size
A 10 mL Water Initially
0 mL Daily
(Control)
B 20 mL Water Initially
5 mL Daily
C 30 mL Water Initially
10 mL Daily
D 40 mL Water Initially
20 mL Daily
Trial 1
Trial 2
Trial 3
A 4 oz. cup (120 mL)
(control)
B 6 oz. cup (180 mL)
C 8 oz. cup (240 mL)
Trial 1
Trial 2
Trial 3

My Plant Growth Recording Journal Name _________________________ Day __________ Group ________
My plant is centimeters tall today!
Draw a picture:
Other Observations:
Predictions:

Experiment 4 Life Science
First Grade Heather Brown
Explore-
Problem: The effect of pot size on plant growth
Hypothesis: If a plant’s root system does not have enough room, then the plant’s growth will be stunted.
Materials:
*9 grown zinnia plants * Tap water *Pencil *Measuring cylinder *Soil *Grow Lab *Metric ruler *Notebook *3 clear 4 oz. (120 mL) cups, 3 clear 6 oz. (180 mL) cups, 3 clear 8 oz. (240 mL) cups *9 plastic plates *X-acto knife (only to be used by teacher)
Methods:
1. Puncture two holes in the bottom of each cup with the X-acto knife for drainage and place each on plastic plate
2. Split class into groups of 7-8 named group A, B, and C and within that group they will partner (groups of 2-3) up and be in charge of a plant
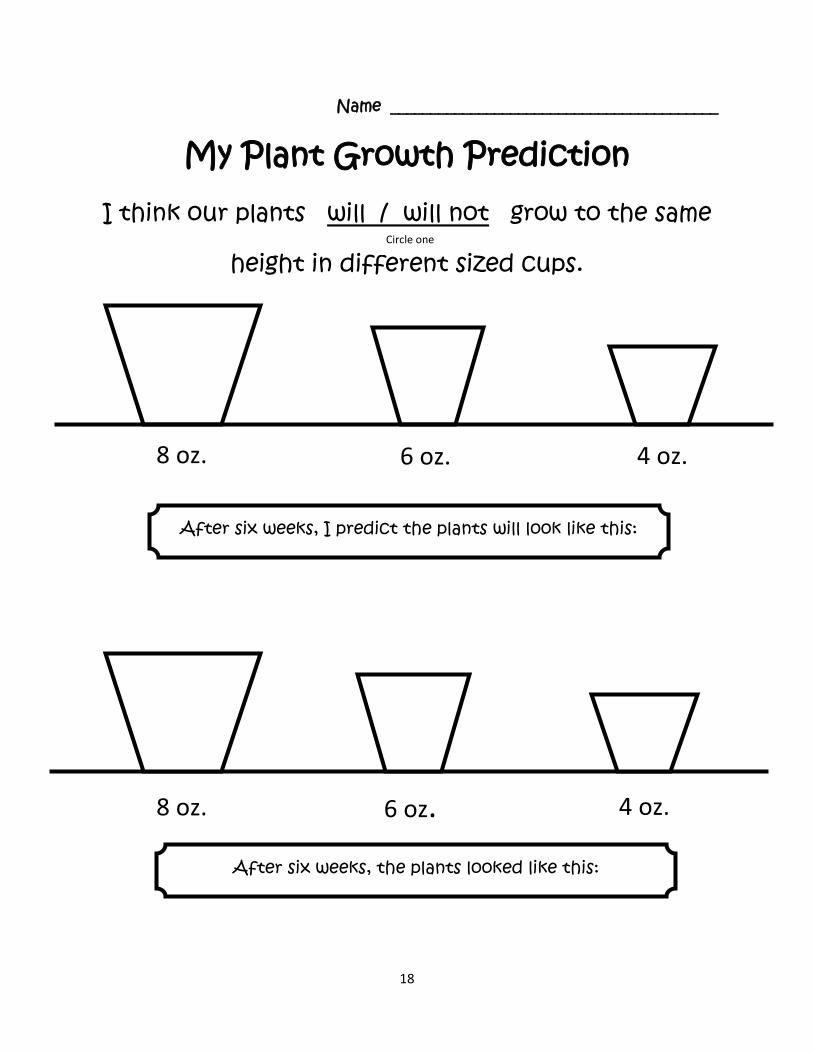
3. Each set of partners will receive a zinnia plant and they will remove it from the container 4. The students will place the plant in their designated sized cup and fill with soil to stabilize flower 5. Partners will then water their plants with 40 mL of water 6. Each group will place their plant in the Grow Lab 7. Students will use their Plant Growth Prediction page to draw a picture of what they think the plants
will look like after 6 weeks and circle whether or not they think that pot size affects plant growth. 8. After day 1, partners will water their plants daily with 10 mL of water 9. Students will measure their flower on Fridays as well as observe the plant quality and record in their
journal 10. At the end of the 6 weeks each group will record their final measurements (in cm) on Class Growth
Chart and have a class discussion on results –discuss whether the plants are healthy/not healthy 11. Teacher will facilitate a class graph showing the growth results
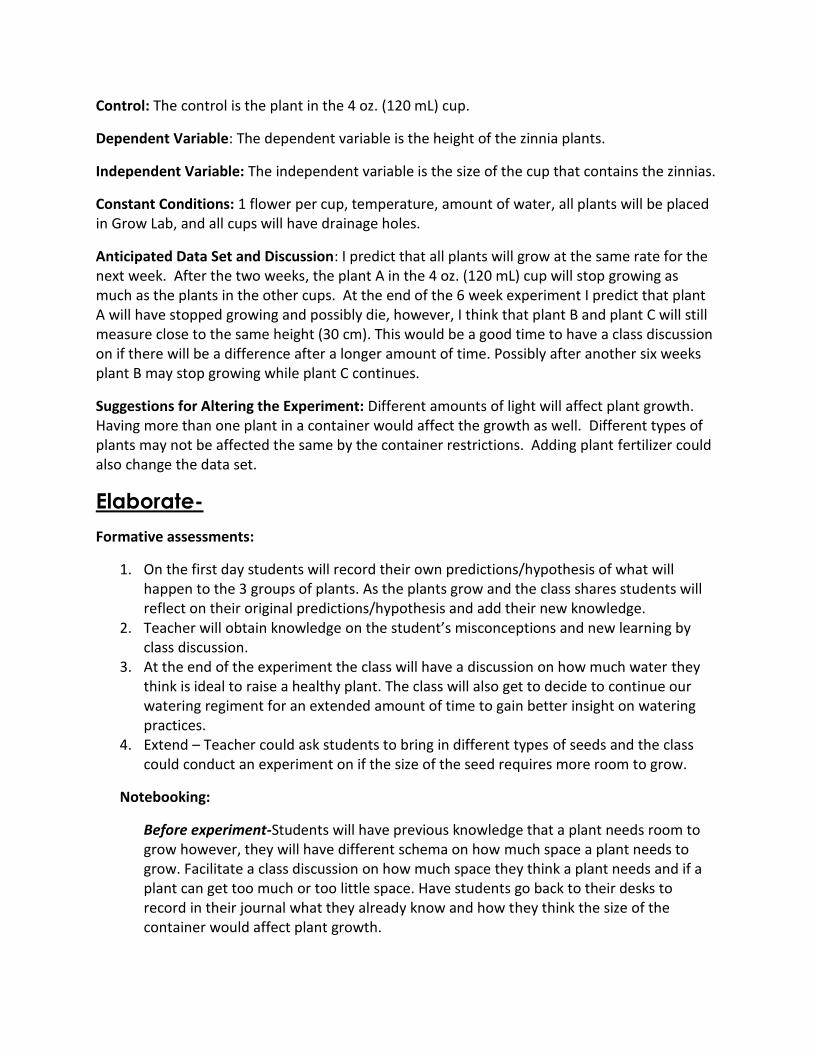
Control: The control is the plant in the 4 oz. (120 mL) cup.
Dependent Variable: The dependent variable is the height of the zinnia plants.
Independent Variable: The independent variable is the size of the cup that contains the zinnias.
Constant Conditions: 1 flower per cup, temperature, amount of water, all plants will be placed in Grow Lab, and all cups will have drainage holes.
Anticipated Data Set and Discussion: I predict that all plants will grow at the same rate for the next week. After the two weeks, the plant A in the 4 oz. (120 mL) cup will stop growing as much as the plants in the other cups. At the end of the 6 week experiment I predict that plant A will have stopped growing and possibly die, however, I think that plant B and plant C will still measure close to the same height (30 cm). This would be a good time to have a class discussion on if there will be a difference after a longer amount of time. Possibly after another six weeks plant B may stop growing while plant C continues.
Suggestions for Altering the Experiment: Different amounts of light will affect plant growth. Having more than one plant in a container would affect the growth as well. Different types of plants may not be affected the same by the container restrictions. Adding plant fertilizer could also change the data set.
Elaborate-
Formative assessments:
1. On the first day students will record their own predictions/hypothesis of what will happen to the 3 groups of plants. As the plants grow and the class shares students will reflect on their original predictions/hypothesis and add their new knowledge.
2. Teacher will obtain knowledge on the student’s misconceptions and new learning by class discussion.
3. At the end of the experiment the class will have a discussion on how much water they think is ideal to raise a healthy plant. The class will also get to decide to continue our watering regiment for an extended amount of time to gain better insight on watering practices.
4. Extend – Teacher could ask students to bring in different types of seeds and the class could conduct an experiment on if the size of the seed requires more room to grow.
Notebooking:
Before experiment-Students will have previous knowledge that a plant needs room to grow however, they will have different schema on how much space a plant needs to grow. Facilitate a class discussion on how much space they think a plant needs and if a plant can get too much or too little space. Have students go back to their desks to record in their journal what they already know and how they think the size of the container would affect plant growth.

17
Possible Notebook Questions: What would this experiment look like with other types of plants?
After experiment- Students will take some time write in their journals. They will reflect on previous misconceptions and how their thinking has changed. They can also draw pictures or write about how they would change the experiment. The students will add the My Plant Growth Prediction to their notebooks. They could add another set of cups to predict what the plants will look like after x amount of time.
18
Name _________________________________________
My Plant Growth Prediction
I think our plants will / will not grow to the same
height in different sized cups.
8 oz.
8 oz.
6 oz.
6 oz.
4 oz.
4 oz.
After six weeks, I predict the plants will look like this:
Circle one
After six weeks, the plants looked like this:
19
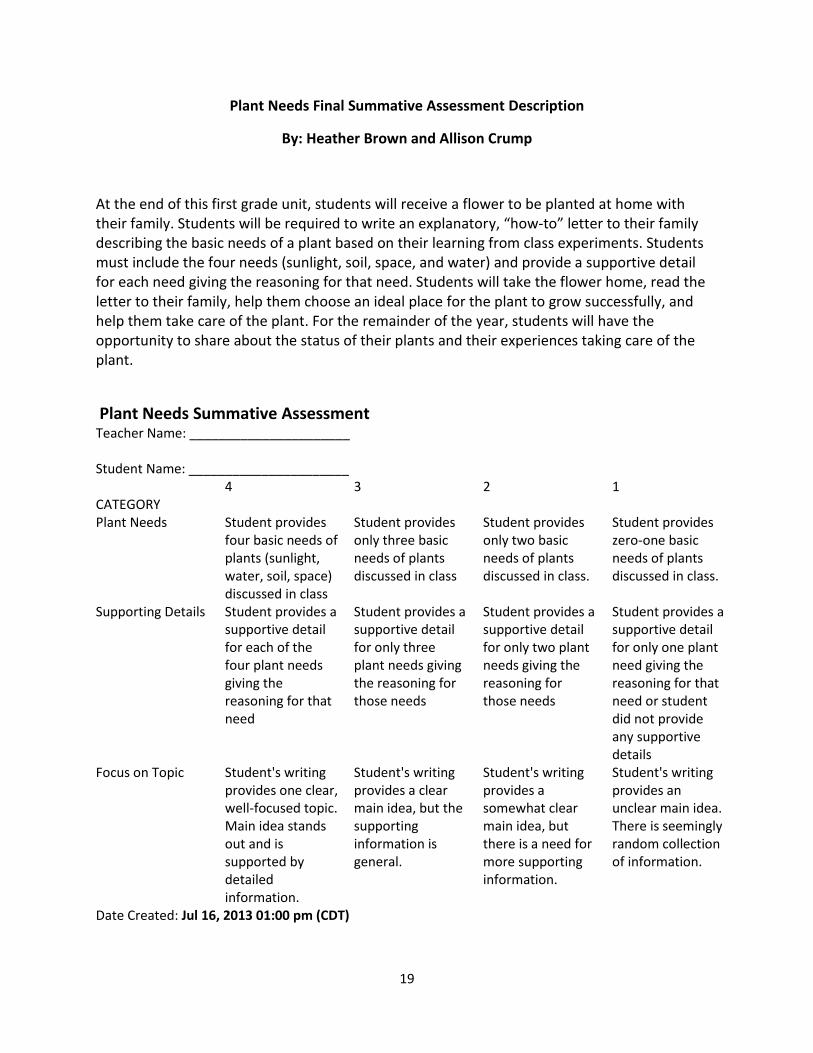
Plant Needs Final Summative Assessment Description
By: Heather Brown and Allison Crump
At the end of this first grade unit, students will receive a flower to be planted at home with their family. Students will be required to write an explanatory, “how-to” letter to their family describing the basic needs of a plant based on their learning from class experiments. Students must include the four needs (sunlight, soil, space, and water) and provide a supportive detail for each need giving the reasoning for that need. Students will take the flower home, read the letter to their family, help them choose an ideal place for the plant to grow successfully, and help them take care of the plant. For the remainder of the year, students will have the opportunity to share about the status of their plants and their experiences taking care of the plant.
Plant Needs Summative Assessment Teacher Name: ______________________ Student Name: ______________________ CATEGORY
4 3 2 1
Plant Needs Student provides four basic needs of plants (sunlight, water, soil, space) discussed in class
Student provides only three basic needs of plants discussed in class
Student provides only two basic needs of plants discussed in class.
Student provides zero-one basic needs of plants discussed in class.
Supporting Details Student provides a supportive detail for each of the four plant needs giving the reasoning for that need
Student provides a supportive detail for only three plant needs giving the reasoning for those needs
Student provides a supportive detail for only two plant needs giving the reasoning for those needs
Student provides a supportive detail for only one plant need giving the reasoning for that need or student did not provide any supportive details
Focus on Topic Student's writing provides one clear, well-focused topic. Main idea stands out and is supported by detailed information.
Student's writing provides a clear main idea, but the supporting information is general.
Student's writing provides a somewhat clear main idea, but there is a need for more supporting information.
Student's writing provides an unclear main idea. There is seemingly random collection of information.
Date Created: Jul 16, 2013 01:00 pm (CDT)