fire science - precisionexams.com · bleve (boiling liquid ... rollover/flameover 4. flashover 3....
TRANSCRIPT

PRECISION EXAMS
EXAM INFORMATION
Items
100
Points
100
Prerequisites
NONE
Grade Level
11-12
Course Length
ONE YEAR
Career Cluster
HUMAN SERVICES
Performance Standards
INCLUDED
Certificate Available
YES
DESCRIPTION
Fire science is a foundational course in the fire science
pathway; it is recommended for high school students in
grades 11 and 12. The course provides a basis for
students to earn the BOF certification after high school,
when they meet minimum age requirements, complete
additional course work, and are employed/affiliated
with the fire service. The class also lays the groundwork
for students wishing to pursue post-secondary education
in fire science. Students enrolled in this course will have
the opportunity to obtain American Heart Association
healthcare provider CPR certification. Major course
topics include; orientation and organization, fire
behavior, building construction, safety, communication,
self-contained breathing apparatus (SCBA),
extinguishers, ladders, hose and appliances, nozzles and
streams, and water supply.
EXAM BLUEPRINT
STANDARD PERCENTAGE OF EXAM
1- Orientations & Organization 10%
2- Fire Behavior 15%
3- Building Construction 15%
4- Safety 15%
5- Communications 5%
6- SCBA 15%
7- Extinguishers 5%
8- Ladders 5%
9- Hose & Appliances 5%
10- Nozzles & Streams 5%
11- Water Supply 5%
Fire Science

© Precision Exams 5210.1819 www.precisionexams.com Page | 2
Fire Science
STANDARD 1
STUDENTS WILL UNDERSTAND ORIENTATION AND ORGANIZATION.
Objective 1 Identify the organization of the fire department
1. Organizational Principles:
1. Unity of Command (Chain of Command)
2. Span of Control
3. Division of Labor
4. Discipline
2. Organization charts showing (chain of command)
1. Fire department organizational structure
3. ICS, Incident Command System
1. Incident organizational structure
4. Fire Companies Functions:
1. Engine
2. Truck
3. Rescue Squad/Company
4. Brush Company
5. Haz-Mat
6. EMS
7. Special Rescue
Objective 2 Identify the basic firefighter’s role as a member of the fire service
1. Fire Fighter Roles:
1. Volunteer
2. Paid-on-call
3. Career
4. Combination
5. Federal and Military
6. Private
2. Fire Companies Roles:
1. Engine
2. Truck
3. EMS
4. Brush Company
Objective 3 Identify the mission of the fire service
1. Fire service mission — To save lives and protect property
1. Saving people whose lives are threatened
2. Protecting the lives of firefighters involved in the incident
3. Programs to prevent fires can help accomplish the mission
1. Fire prevention and code enforcement
2. Public education
2. Tactical
1. Life Safety (protecting the lives of our firefighters and public) (Pets and Livestock)

© Precision Exams 5210.1819 www.precisionexams.com Page | 3
Fire Science
2. Incident Stabilization
3. Property Conservation
Objective 4 Identify the primary functions of Standard Operating Procedures / Guidelines
1. Policy
2. Procedure
3. Orders/Directives
4. S.O.P.'s
STANDARD 2
STUDENTS WILL UNDERSTAND FIRE BEHAVIOR.
Objective 1 Define key terminology related to Fire
1. Fire / Combustion
2. Heat
3. Ignition Temperature
4. Flammable Limits / Flammable Range
5. Vapor Density
6. Solubility (Miscibility)
7. Flash Point
8. BLEVE (Boiling Liquid Expanding Vapor Explosion)
9. Oxygen (Oxidizing Agent)
10. Oxidizer
11. Oxidation
12. Thermal Layering
13. Pyrolysis
14. Plume
15. Endothermic Reaction
16. Exothermic Reaction
17. Fire Triangle
18. Fire Tetrahedron
19. British Thermal Unit (BTU)
20. Fahrenheit (oF)
21. Celsius (oC)
22. Flameover (Rollover)
23. Flame Point (Fire Point)
24. Flashover
25. Lower Flammable Limit (LFL)
26. Smoke
27. Upper Flammable Limit (UFL)
28. Specific Gravity
29. Surface-to-Mass Ratio
Objective 2 Identify the components of the Fire Triangle and the Fire Tetrahedron)
1. Fire Triangle
1. Heat
2. Fuel

© Precision Exams 5210.1819 www.precisionexams.com Page | 4
Fire Science
3. Oxygen
2. Fire Tetrahedron
1. Heat
2. Reducing Agent (Fuel)
3. Oxidizing Agent (Oxygen)
4. Chemical Chain Reaction
Objective 3 Identify the relationship of the concentration of oxygen to combustibility and life safety.
1. Recognize that both fire and humans need oxygen for survival
2. As oxygen levels decrease, the survival of both humans and fire diminish.
Objective 4 Identify the products of combustion commonly found in structure fires that create or indicate a
hazard.
Essential topics:
1. Carbon Monoxide
2. Hydrogen Chloride
3. Hydrogen Cyanide
4. Carbon Dioxide
5. Phosgene
6. Ammonia
7. Chlorine
Objective 5 Identify the potential consequences of exposure to products of combustion.
1. Heat
2. Smoke
3. Elevated temperatures
4. Decreased oxygen levels
5. Fire gases
1. Carbon monoxide (CO) - Toxin - impacts at cellular level binds with hemoglobin and
inhibits body's use of oxygen. Accumulative effect. Requires medical intervention and time
to recover.
2. Hydrogen Cyanide (HCN) - Toxin - impacts at cellular level. Accumulative effect. Requires
medical intervention and time to recover.
3. Carbon dioxide (CO2) - Asphyxiate - displaces oxygen available to the
6. body. Requires quality air to recover.
Objective 6 Identify the methods of heat transfer.
1. Conduction
2. Convection
3. Radiation
Objective 7 Identify the physical state of matter in which fuels are commonly found.
1. Solid
2. Liquid
3. Gas
Objective 8 Identify common fire conditions
Fire development in a compartment
1. Incipient stage
1. piloted ignition
2. non-piloted ignition
3. mushrooming

© Precision Exams 5210.1819 www.precisionexams.com Page | 5
Fire Science
2. Growth stage
1. thermal layering
2. isolated flames (ghosting)
3. rollover/flameover
4. flashover
3. Fully developed stage
4. Decay stage (hot smoldering)
1. ventilation controlled
2. back draft
Objective 9 Identify the process of thermal layering as it relates to a structure fire.
1. Thermal Layering - a tendency of gases to form into layers according to temperatures. (Also
known as heat stratification and thermal balance.)
2. The hottest gases tend to be on the top layer, while cooler gases form the lower layer.
3. This takes place only within a compartment (structure fire)
Objective 10 Identify how to avoid disturbing thermal layering
1. Key terms
1. Thermal balance, heat stratification
2. Neutral plane
3. Inversion
2. Key concepts
1. Direct fire attack method
2. Solid fire stream, straight stream, narrow fog stream
3. Coordinated fire attack and ventilation effort
Objective 11 Identify the development and prevention of a backdraft.
1. Development of backdraft
1. Low oxygen level
2. High heat
3. High fuel concentration
4. Smoldering fire
2. Prevention of backdraft
1. Recognize warning signs
1. Little or no visible flame
2. Grayish-yellow smoke
3. Pressurized smoke
4. Smoke-stained windows
5. Inwardly drawn smoke
6. Puffing smoke
2. Vertical ventilation
STANDARD 3
STUDENTS WILL UNDERSTAND BUILDING CONSTRUCTION.
Objective 1 Identify common structural components of buildings.
1. Arch
2. Beam

© Precision Exams 5210.1819 www.precisionexams.com Page | 6
Fire Science
3. Girder
4. Lintel
5. Column
6. Truss
7. Joist
8. Rafter
9. Ridge beam or ridgepole
Objective 2 Identify basic structural characteristics of the following types of building construction.
1. Fire Resistive (Type I)
2. Non-Combustible (Type II)
3. Ordinary (Type III)
4. Heavy Timber (Type IV)
5. Wood Frame (Type V)
Objective 3 Identify the methods of framing used in Type V construction.
1. Post and Beam Construction.
2. Balloon Frame Construction.
3. Platform Frame Construction.
4. Lightweight Wood Frame Construction.
Objective 4 Identify the components of a truss.
1. Top Chord
2. Bottom Chord
3. Web Members
4. Gusset Plates
Objective 5 Identify hazards associated with truss and lightweight construction
1. Roof Collapse
1. Bowstring
2. Lightweight Truss Systems
2. Floor Collapse
1. Lightweight Truss Systems
3. Time
1. Limited time for fire operations.
Objective 6 Identify dangerous conditions created by fire and fire suppression activities.
1. Conditions that contribute to the spread and intensity of the fire.
1. Fuel Load.
2. Open Stairwells.
3. Open Floor Plans.
4. Wind Driven Fires.
2. Conditions that make the building susceptible to collapse.
1. Lightweight construction - wood and steel.
2. Age of building.
3. Weather.
4. Water weight - added by fire suppression operations.
Objective 7 Identify indicators of building collapse
1. Sagging Roofs or Floors
2. Leaning Exterior Walls
3. Fire Burning in Void Spaces

© Precision Exams 5210.1819 www.precisionexams.com Page | 7
Fire Science
4. Truss Exposed to Fire
5. Steel Bar Joists Exposed to Fire
6. Plumbing Vent Pipes That Begin to Extend Up
7. Walls Out of Plumb
8. Multiple Floor Fire
9. Chimney Where the Adjoining Wall or Roof has Burned Away
Objective 8 Identify the effects of the fire on the building materials
1. Wood - loses mass as the material burns, and the loss of mass weakens the wood member
until it fails.
2. Masonry - subject to spalling (fragments of concrete dislodged under heat conditions caused
by fire).
3. Cast Iron - may fracture or spall when exposed to high temperatures or when heated and
cooled by fire streams.
4. Steel - when heated, the steel loses strength and expands (lengthens).
Objective 9 Identify the different types of wall construction
1. Load-bearing Wall
2. Non-loadbearing Wall
3. Curtain Wall
4. Parapet Wall
Objective 10 Identify the types of loads as they apply to building construction
1. Axial Load - pass through the center of a particular section or supporting member at a right
angle to the cross section of the supporting member.
2. Torsional Load - are parallel to the cross section of the supporting member, typically a column
that does not pass through the long axis of the structural member.
3. Eccentric Load - are imposed on a structural member at some point other
4. than the center section of the supporting member.
Objective 11 Identify the types of loads that can be imposed on a structure
1. Dead Load
2. Live Load
3. Impact Load
4. Fire Load
Objective 12 Identify the different types of floor construction
1. Concrete Slab Floor
2. Terrazzo Floor
3. Dimensional Lumber Wood Joist Floor
4. Truss Floor
1. Wood
2. Steel
STANDARD 4
STUDENTS WILL UNDERSTAND SAFETY.
Objective 1 Identify the importance of physical fitness and a healthy lifestyle to performance of the duties of a
firefighter
1. Physical Fitness:
1. More Productive

© Precision Exams 5210.1819 www.precisionexams.com Page | 8
Fire Science
2. Reduce Strains and Sprains (50% FF Injuries)
3. Reduce Stress
4. Reduce Heart Attack and Stroke
2. Healthy Lifestyle:
1. Proper Nutrition
2. Proper Exercise
Objective 2 Identify the responsibilities of a fire department as required by NFPA 1500, Standard on Fire
Department Occupational Safety and Health Program
1. Recognize Health and Safety as Official Objectives
2. Provide Safe and Healthy Work Environment
3. Promote Safety Throughout the Fire Service
4. Create Safety and Health Policies and Procedures
1. Develop an Organizational Plan
2. Develop a Risk Management Plan
3. Develop a Safety and Health Policy
4. Define Role and Responsibilities of Members
5. Establish a Safety and Health Committee
6. Keep Records of all Job Related Accidents, Illnesses, Exposures, and Fatalities
7. Appoint a Department Health and Safety Officer
8. Develop Safety and Health related SOPs
Objective 3 Identify the function of the personal protective equipment
1. Helmet - Protects the head from impact as well as from scalding water and other products of
combustion.
2. Protective Hood - Protects portions of the firefighter's face, ears, and neck not covered by
the helmet of coat collar from heat.
3. Protective Coat and Trousers (garments) - Protect trunk and limbs against cuts, abrasions, and
burn injuries; protects from heat and cold, and provides limited protection from corrosive
liquids.
4. Gloves - Protect the hands from cuts, abrasions, and burn injuries.
5. Safety Shoes or Boots (footwear) - Protect the feet from burn injuries and puncture wounds.
6. Eye Protection - Protects the wearer's eyes from hazards encountered during structural fire
operations such as flying particles or liquids.
7. Hearing Protection - Limits noise-induced hearing loss when firefighters engaged in structural
fire-fighting are exposed to extremely loud environments such as the use of power saws,
pneumatic chisels, and gas- powered fans.
8. Self-Contained Breathing Apparatus (SCBA) (Respiratory Protection) - Protects the face and
lungs from heat, smoke, and other toxic products of combustion, and airborne contaminants;
also provides some eye protection.
9. Personal Alert Safety System (PASS) - Provides and audible means by
10. which a lost, trapped, or incapacitated firefighter can be located.
Objective 4 Identify the care, maintenance, and limitations of personal protective
1. Protective Clothing must be maintained per Manufacturer’s Specifications
2. If Protective Clothing becomes contaminated, it Should Not be worn until properly laundered
per the manufacturer's recommended maintenance procedure
3. Inspect and Clean PPE Regularly
4. Repair / Replace any Damage PPE
5. Clean outer shells and liners regularly to remove contamination, grime, and perspiration

© Precision Exams 5210.1819 www.precisionexams.com Page | 9
Fire Science
6. Required to clean and dry PPE at least every six months in accordance with
7. the manufacturer's recommendations
8. SCBA should be checked before and after each use, daily if possible, or weekly
9. SCBA Cylinder should filled to at least 90% of capacity
10. SCBA gauges, alarms, valves should be in good condition an working properly
11. SCBA harness and hose assemblies should be in good working condition
12. SCBA PASS device should be working properly
13. Clean SCBA and Sanitize Mask after each use
Objective 5 Identify procedures for safely operating at emergency scenes
1. Requires an Incident Management System
1. Most Departments Use NIMS-ICS
2. Must Include Risk Management Plan
3. Must Include Personnel Accountability System
2. Limit Emergency Operations to those that can be safely conducted by available personnel
3. Requires Rapid Intervention (RIT) for Firefighters in distress
4. Requires Rehab for Firefighters During Emergencies
5. Requires Limiting Firefighter Activities and Exposure to Violence During Civil Disturbances
6. Requires Post-Incident Analysis
Objective 6 Identify the hazards related to electric, gas and water emergencies and actions that can be taken
to mitigate electric, gas, and water emergencies
1. Electric
1. Potential Electrical Shock Hazard
2. De-Energize source can help extinguish fire
3. Toxic fumes from burning electrical components
4. Alternate / Secondary Power supplies / feeds
2. Gas
1. Potential Explosion
2. Ignition Source
3. Vapor Density (Natural Gas / LPG)
4. Contribute to fire intensity
3. Water
1. Excess Water Damage
2. Flooding Lower Areas
3. Reaction with Electrical
Objective 7 Identify methods for shutting off utility services to a building
1. Electrical
1. Contact Service Provider
2. Utilize Maintenance Personnel
3. Shut Off Main Disconnect
4. Shut Off Main Circuit Breakers
5. Tag Out / Lock Out or Station a FF at Breaker Box
6. Pull Meter (Caution)
2. Gas
1. Contact Service Provider
CUtilize Maintenance Personnel
2. Shut Off Main Control Valve (Usually Quarter Turn)

© Precision Exams 5210.1819 www.precisionexams.com Page | 10
Fire Science
3. Shut Off Main Control Valve on Tank (LPG Tanks)
3. Water
1. Contact Service Provider
2. Utilize Maintenance Personnel
3. Shut Off Main Supply Line (Entry Point)
4. Shut Off Underground Valve (Curb Box - Special Wrench)
Objective 8 Identify safety equipment for riding on fire apparatus and its use
1. Full Protective Clothing - Donned
2. Restraint Devices - Seatbelts for All Personnel
3. Hearing Protection - Noise Levels Exceed 90 dB
4. Non-Enclosed Cabs Also Require:
1. Safety Bars or Gates
2. Helmet
3. Goggles
Objective 9 Identify the components of a firefighter rehabilitation system
1. Rest – During Crew Rotation
1. Sit Down
2. Check Vital Signs
3. Mentally Disengage from Event
2. Active Cooling
3. Hydration
4. Medical Monitoring
5. Nourishment
Objective 10 Identify the proper use of personal accountability system at an emergency incident
1. Written Guidelines for Tracking and Inventory of All Members at Incident
2. All Members Must Actively Participate
3. IC is Responsible for Overall Accountability and Maintain an Accountability Worksheet
Throughout the Incident
4. IC must Maintain an Awareness of the Location and Function of all Assigned Companies
5. Branch / Division / Group Supervisors must Supervise and Account for All Companies under
their Command
6. Company Officers are Responsible for All Company Members
7. Accountability appropriate to size and complexity of incident must be maintained through
Span-of-Control Requirements
8. Access to Scene Must be Controlled
9. Department Must Adopt a Personnel Accountability System and Use it on every Emergency
Incident
10. Procedures Must be Adopted for Evacuating Personnel from an area where Imminent Hazards
are Found
11. Must Appoint an Incident Safety Officer
Objective 11 Demonstrate the donning of the following articles of PPE as part of an ensemble in less than 60
seconds.
1. Helmet (With face shield)
2. Hood
3. Boots
4. Gloves

© Precision Exams 5210.1819 www.precisionexams.com Page | 11
Fire Science
5. Protective Coat
6. Protective Trousers
Objective 12 Don the following articles of PPE
1. PASS Devise (If not integrated in SCBA)
2. Eye Protection
3. Hearing Protection
Objective 13 Demonstrate the proper doffing of the PPE ensemble and preparing it for reuse.
1. Remove PPE Protective Clothing
2. Inspect PPE for damage and need for cleaning
3. Clean Equipment as needed and remove damaged Equipment from service and report to
Officer, if applicable
4. Place Clothing in a Ready state.
Standard 4 Performance Evaluation included below (Optional)
STANDARD 5
STUDENTS WILL UNDERSTAND COMMUNICATION.
Objective 1 Distinguish between mutual aid and automatic aid
1. Mutual Aid – Reciprocal assistance from one fire and emergency services agency to another
during an emergency based upon a prearrangement between agencies involved and generally
made upon the request of the receiving agency.
2. Automatic Aid – Written agreement between two or more agencies to automatically dispatch
predetermined resources to any fire or other emergency reported in the geographic area
covered by the agreement. These areas are generally where the boundaries between
jurisdictions meet or where jurisdictional “Islands” exist.
Objective 2 Identify fire department radio procedures
1. Routine Traffic:
1. Use Clear Text
2. No Open-Ended Communications
3. Must Always Have a Response to any Communication
4. Reply / Repeat any Order Communication
5. Clear, Calm, Moderate Voice
6. Avoid Excited Voice or Shouting
7. Concise and to the Point Communications
2. Emergency Traffic:
1. MADAY Emergency Communications
2. Stop All Communications
3. Clear Air Waves
4. LUNAR Report for MADAY
5. Location, Unit number, Needs/problem, Air level, Resources needed
3. Establish Evacuation Signals:
1. Announcement Over Radio
2. Audible Signals (3 Long Blasts on Air Horn)
Objective 3 Demonstrate the following prescribed fire department radio procedures: Routine traffic
1. Select Proper Frequency
© Precision Exams 5210.1819 www.precisionexams.com Page | 12
Fire Science
2. Monitor Radio Traffic until Clear
3. Hold Microphone 1 to 2 inches from Mouth at 45-degree angle
4. Depress and Hold Transmit Button until Through with Transmission
5. Announce Routine Radio Traffic
6. Release Transmit Button
7. Follow Department Routine Traffic SOPs
Objective 4 Demonstrate the following prescribed fire department radio procedures: Emergency traffic
1. Select Proper Frequency
2. Hold Microphone 1 to 2 inches from Mouth at 45-degree angle
3. Depress and Hold Transmit Button until Through with Transmission
4. Announce “Emergency Traffic” for Break In Message Interrupting Air Traffic as Necessary
5. Transmit Emergency Traffic Message following Department SOPs
6. Release Transmit Button
7. Repeat Emergency Message Until Command Verifies Information Given
Objective 5 Demonstrate the following prescribed fire department radio procedures:
Emergency mayday
1. Select Proper Frequency
2. Hold Microphone 1 to 2 inches from Mouth at 45-degree angle
3. Depress and Hold Transmit Button until Through with Transmission
4. Announce “MAYDAY” for Break In Message Interrupting Air Traffic as Necessary
5. i.e... MAYDAY, MAYDAY, MAYDAY
6. Transmit Emergency Traffic Message following Department SOPs
7. Release Transmit Button
8. Repeat Emergency Message Until Command Verifies Information Given
9. After Transmitting MAYDAY Activate PASS Device and follow Dept SOPs for Positioning or
Actions
Objective 6 Demonstrate the following prescribed fire department radio procedures: Emergency evacuation
signal
1. Select Proper Frequency
2. Hold Microphone 1 to 2 inches from Mouth at 45-degree angle
3. Depress and Hold Transmit Button until Through with Transmission
4. Announce “Emergency Traffic” for Break In Message Interrupting Air Traffic as Necessary
1. i.e. Emergency Traffic, Emergency Traffic, Emergency Traffic
5. Transmit Emergency Traffic Message following Department SOPs
a. Announce “Evacuation Order / Message”
b. May Repeat “Evacuation Order / Message” Several Times to
6. Make Sure Everyone Hears the “Evacuation Order / Message”
7. Release Transmit Button
8. Radio Orders may also include Audible Signals such as Air Horns or Sirens
9. Command Should Request a Personnel Accountability Report (PAR) When an Evacuation
Signal is Ordered, to Account for ALL Companies / Personnel
Standard 5 Performance Evaluation included below (Optional)

© Precision Exams 5210.1819 www.precisionexams.com Page | 13
Fire Science
STANDARD 6
STUDENTS WILL UNDERSTAND SELF-CONTAINED BREATHING APPARATUS.
Objective 1 Identify the hazardous environments requiring the use of respiratory protection
1. Respiratory hazards
1. Toxic atmospheres described as immediately dangerous to life or health are known as
IDLH atmospheres.
2. OSHA considers the interior of a burning building to be an IDLH
2. atmosphere.
3. Four common respiratory hazards associated with fires and other emergencies:
1. Oxygen deficiency
2. Elevated temperatures
3. Smoke
4. Toxic atmosphere (with and without fire)
Objective 2 Identify the physical requirements of the SCBA user
1. Physical Factors:
1. Physical Condition
2. Agility
3. Facial Features
2. Medical Factors:
1. Neurological Functioning
2. Muscular/Skeletal Condition
3. Cardiovascular Conditioning
4. Respiratory Functioning
3. Mental Factors:
1. Adequate Training in the Equipment used
2. Self-confidence
3. Emotional Stability
Objective 3 Identify the uses and limitations of SCBA
1. Limitations of Equipment:
1. limited visibility
2. decreased ability to communicate
3. increased weight
4. decreased mobility
2. Limitations of user (air supply)
1. physical condition of user
2. degree of physical exertion
3. emotional stability of user
4. working condition of apparatus
5. cylinder pressure before use
6. training/experience of user
3. Air management
1. The air supply left after low-air alarm sounds may not allow
4. enough time to exit.

© Precision Exams 5210.1819 www.precisionexams.com Page | 14
Fire Science
1. Firefighters should comply with the accountability system in use, maintain situational
awareness, and manage air supply.
2. The ultimate responsibility for safety rests with the firefighter. Firefighters are responsible
for managing their own air supply
Objective 4 Identify the components, functions, and safety features of SCBA
1. Open Circuit:
1. Harness Assembly
2. Air Cylinder(s)(minutes and pressures)
3. Regulator (RIC/UAC)
4. Face piece
5. PASS (personal alert safety system)
2. Open-Circuit Airline
3. Closed-Circuit
Objective 5 Identify the inspection procedures to be used when wearing and working with SCBA
1. Cylinder pressure
2. All Gauges
3. Low-pressure Alarm
4. All hose connections
5. Face piece
6. Harness system
7. All valves
8. any PASS devices
Objective 6 Identify safety procedures to be used when wearing and working with SCBA
1. Determine need. Is there a problem?
2. Place left hand on face piece
3. Slide hand down mask - check regulator
4. Check air saver or "on" switch
5. Check by-pass or purge valve, is it open or closed?
6. Follow line from regulator to pressure reducer - check for problems. Is there a rip or tear in
the line?
7. Check if cylinder valve is in open position
8. Check if cylinder is securely connected to high pressure line
9. Correct any problems found in check as you find them
10. If not able to correct problem, leave area at once with assistance to safe area (call for a
"Mayday" and consider buddy breathing, this will be changed for different manufactures)
Objective 7 Identify the emergency procedures to be used in the event of SCBA failure
1. SOP's for AHJ, and manufacture
2. Do Not Panic
3. Conservation of Air
4. Use Radio (Mayday, location-etc.)
5. Activate PASS Device
6. Change location from IDLH to a safe area)
Objective 8 Identify the methods of donning and doffing an SCBA while wearing personal protective
equipment
1. Over the Head method
2. Coat method
Objective 9 Identify the techniques for exiting through a restricted opening

© Precision Exams 5210.1819 www.precisionexams.com Page | 15
Fire Science
1. Reduce Profile (loosen straps)
2. Dump Tank/Harness if absolutely necessary
1. Maintain contact/control with regulator at all times
3. Swim Technique
4. Swim Method for Entanglement
Objective 10 Identify the procedure for changing a low / empty SCBA cylinder
1. On the firefighter’s back
2. Off the firefighter, on the ground
Objective 11 Identify the procedures for cleaning and sanitizing an SCBA
1. Inspect for damage
2. Harness assembly
3. Air Cylinder
4. Regulator
5. Facepiece
6. PASS devices
7. Reassemble and inspect the entire SCBA before placing back in use.
Objective 12 Identify the components and purpose of an SCBA fill system
1. Cascade system
2. Filled directly from Compressor, Air Fill Station
Objective 13 Identify the operating principles of an SCBA refilling system
1. Shielded Fill Station
2. Control Overheating of Cylinders
3. Full Cylinder, not over pressurized
Objective 14 Demonstrate the donning of SCBA while wearing full protective equipment in less than 60
seconds using the over the head method.
1. The specific SCBA manufacturer's recommendations for donning and use of the SCBA should
always be followed.
2. General procedure for donning of SCBA;
1. position of firefighter
2. Open cylinder valve fully
3. Check cylinder and regulator pressure gauges
4. Grab the harness for proper lift up and over your head
5. Proper release of harness for proper placement on your back
6. Fasten all straps; chest, shoulders and then waist.
7. Don facepiece
8. Test facepiece
9. Don hood
10. connect air
11. Activate external PASS device
12. Finish donning PPE.
Objective 15 Demonstrate the donning of SCBA while wearing full protective equipment in less than 60
seconds using the regular coat method.
1. The specific SCBA manufacturer's recommendations for donning and use of the SCBA should
always be followed.
2. General donning procedures:
1. Position yourself

© Precision Exams 5210.1819 www.precisionexams.com Page | 16
Fire Science
2. Open cylinder
i. Listen for activation of the integrated PASS Alarm
3. Check cylinder and regulator pressure gauges
4. Grasp top of left shoulder strap of the SCBA with the left hand and raise the SCBA
overhead
5. Guide left elbow through the loop formed by the left shoulder strap and swing SCBA
around left shoulder.
6. Guide right arm through the loop formed by the right shoulder strap allowing the SCBA
to come to rest in proper position
7. Fasten all straps: chest, shoulders and waist
8. Don facepiece: straps, proper seal and operate exhalation valve
9. Don hood; no exposed skin
10. Connect air supply to facepiece
11. Activate external PASS device
12. Finish donning PPE
Objective 16 Demonstrate the donning of SCBA while wearing full protective equipment in less than 60
seconds with face piece – face piece mounted regulator.
1. Fully extend the straps on the facepiece
2. Place your chin in the chin pocket
3. Fit the facepiece to your face, bringing the straps and/or webbing over your head
4. Tighten the lowest two straps; if there are more straps, tighten the top straps last
5. Check for proper seal
6. Put protective hood up so it covers all bare skin. Don your helmet and secure the chin strap
7. Install the regulator on your facepiece
Objective 17 Demonstrate the doffing of SCBA and placing it in the ready position while wearing full protective
equipment.
1. Department's SOP and the manufacturer's recommendation.
2. Off air
3. Remove SCBA, keeping control of the regulator, (in front of you)
4. Close cylinder valve completely
5. Bleed air from system
6. Check air cylinder pressure, replace if 90% or less rated capacity
7. Return all straps, valves and components back to ready state
8. Inspect SCBA and facepiece for damage
9. Clean equipment as needed and remove damaged equipment from service, and report to
company officer
10. Place SCBA back in the proper storage area, for immediate use
Objective 18 Demonstrate and document the cleaning and sanitizing of SCBA components.
1. Prepare cleaning solution, buckets, etc. per manufacturer's guidelines and departmental
policies
2. Clean all the SCBA components separately
3. After equipment is clean, inspect for damage, repair the damage and/or replace
4. Place all components in a manner and location so that they can dry
5. Reassemble all SCBA components, placing them in a state of readiness
Objective 19 Demonstrate the inspection procedures for the main components of SCBA.
1. Identify all components of the SCBA are present:

© Precision Exams 5210.1819 www.precisionexams.com Page | 17
Fire Science
2. Insect all components of SCBA for cleanliness and damage
3. Immediately clean dirty components if found. If damage remove from service and report to an
officer.
4. Check that cylinder is full (90-100% of capacity)
5. Open the cylinder valve slowly; to verify operation of the low-air alarm and absence of audible
air leaks
6. If air leaks are detected; determine corrections needed or if malfunction the SCBA shall be
removed for service
7. Check all pressure gauges and/or indicators (i.e. heads-up display) are providing similar
pressure readings ( check with manufacturers' guidelines)
8. Check the function of all modes of PASS device
9. Don facepiece; to check for seal and operate the exhalation valve
10. Don regulator and check function by taking normal breaths
11. Check bypass and/or purge valve
12. Remove facepiece and prepare all the components of SCBA for immediate reuse
Objective 20 Demonstrate the use of the SCBA in conditions of obscured visibility.
1. Remain low, better your visibility; crawling, and if firefighter can see the floor a crouched or
"duck" walk.
2. Check the environment and closely monitor conditions for change, use of thermal imaging
technology, also probing with a tool.
3. Never remove the facepiece
4. Maintain an awareness of location
5. Ventilate as you advance, if condition will allow
6. Check for outside openings; windows and doors (may provide means of escape)
7. Always maintain direct contact with your team and/or partner at all times, this can be done by
use of a tag line between firefighters.
8. Never enter a hostile environment alone
Objective 21 Demonstrate the following emergency procedures to be used in the event of SCBA failure: Use of
emergency bypass or purge valve.
1. Location of SCBA by-pass and/or purge valve
2. Don SCBA and facepiece
3. Use as directed by the manufacturer of SCBA
4. Operate by-pass and/or purge valve
1. using both hands, one at a time
2. using both hands, one at a time with eyes closed
Objective 22 Demonstrate the following emergency procedures to be used in the event of SCBA failure:
Conservation of air.
Essential Topics:
1. Don SCBA and facepiece, On Air
2. Follow dept. SOP's for this situation
3. Do not panic
4. Control breathing
1. In through your nose and out your mouth
2. Crack your by-pass and/or purge valve for a short time
3. Alert your partner that you have a problem
Objective 23 Demonstrate the following emergency procedures to be used in the event of SCBA failure: RIC /
UAC.
1. RIC/UAC Rapid intervention team/Universal Air Connection

© Precision Exams 5210.1819 www.precisionexams.com Page | 18
Fire Science
2. Filling unshielded cylinders while a firefighter is wearing the SCBA is prohibited. However, a
Rapid intervention crew/team (RIC/RIT) rescuing a trapped or incapacitated firefighter may be
granted an exception to this rule.
3. The following three criteria must be met before filling a worn SCBA:
1. NIOSH-approved RIC Universal Air Connection (UAC) fill option are used
2. A risk assessment has been conducted to limit safety hazards and ensure that necessary
equipment is fully operational.
3. There is an imminent threat to the safety of the downed
4. firefighter, and immediate action is required to prevent loss of life or serious injury.
Objective 24 Demonstrate techniques for maximizing the use of the air capacity of a SCBA under work
conditions
1. Know your SCBA
2. Train with your SCBA
3. Know your work time, allowing for entry and exit time
4. Know that the standard rate for consumption for a typical adult under low exertion
5. Perform an Air Consumption test, to help with job/task efficiency
6. Know your personal limits and when to ask for help
7. Knowing your "point of no return"
8. Always remain calm, control your breathing rate (in through your nose and out your mouth),
taking shallow breaths.
Objective 25 Demonstrate the use of SCBA in exiting through areas with restricted openings in emergency
situations: Shifting.
1. Don SCBA and facepiece, On Air
2. Check opening with your hand
3. Change your body position, rotate your body 45 degrees try again
4. Loosen right shoulder strap
5. Loosen waist strap
6. Shift their tank to your left shoulder, this will REDUCE PROFILE
7. On through with right shoulder first
Objective 26 Demonstrate the use of SCBA in exiting through areas with restricted openings in emergency
situations: Dumping.
1. Don SCBA and Facepiece, ON Air
2. Check opening with your hand
3. If nothing works to exit restricted opening, then “Dump Tank”
4. Firefighter rolls to your left side
5. Loosens right shoulder strap, loosen and remove waist strap
6. Roll out of the SCBA completely
7. Rotate the SCBA so that he cylinders valve is facing away from the firefighter
8. All straps need to be collected on top of the SCBA neatly, to aid in redonning
9. The firefighter should then move with the SCBA in front but keeping it close to the body to
protect it and prevent the facepiece from being pulled off.
10. The firefighter should NEVER lose contact with the SCBA
11. Know your surroundings
12. When clear of the obstacle, the firefighter can redon the SCBA by laying out the straps and
rolling back into the SCBA
Objective 27 Demonstrate an air cylinder exchange while the SCBA is worn by a firefighter.
1. Don the SCBA and Facepiece, On Air
2. Firefighter On Air will lean forward in a stable position (hands on your knees)

© Precision Exams 5210.1819 www.precisionexams.com Page | 19
Fire Science
3. Firefighter will disconnect the regulator from the facepiece
4. You will close the cylinder valve, fully
5. Firefighter will release the air pressure from the high and low pressure hose
6. You will disconnect the high-pressure line from the cylinder
7. You will loosen the cylinder strap, remove empty cylinder from harness assembly
8. You will inspect replacement cylinder to ensure the cylinder is 90-100 % of rated capacity
9. You place new cylinder in harness assembly
10. You check the cylinder valve opening and the high-pressure hose fitting for debris
11. You will connect high pressure line to the cylinder
12. You will slowly open cylinder valve fully, listen for audible alarm and leaks
1. (on some SCBA’s an audible does not sound, know your equipment)
13. Firefighter will don regulator and take normal breaths
14. Firefighter will check the pressure on the remote gauge and/or indicators
Objective 28 Demonstrate an air cylinder exchange while the SCBA is not worn by a firefighter.
1. Place SCBA on a firm surface
2. Close cylinder valve
3. Bleed off air pressure from high- and low-pressure hoses
4. Disconnect high pressure coupling from the cylinder
5. Remove the empty cylinder from harness assembly
6. Verify the replacement cylinder is 90-100% of rated capacity
7. Check cylinder valve opening and high pressure hose fitting for debris
8. Place the new cylinder into the harness assembly
9. Connect the high-pressure hose to the cylinder
10. Slowly open cylinder valve fully, listen for audible alarm and leaks
1. (on some SCBA’s an audible does not sound, know your equipment)
11. If air leaks are detected, determine if connections need to be tightened or if valves, donning
switch, etc. need to be adjusted. Otherwise SCBA with audible leaks due to malfunction shall
be removed from service, tagged, and reported.
Objective 29 Demonstrate the procedures for refilling SCBA cylinders from a Cascade System.
1. Check with manufacturers’ procedures for this activity, for your equipment
2. Check the hydrostatic test date of the cylinder that is to be filled
3. Inspect the SCBA cylinder for damage, such as deep nicks, cuts, gouges, or discoloration from
heat. Place the SCBA cylinder in a fragment-proof fill station
1. If damaged or out of hydrostatic test date, remove it from service
and tag it for future inspection and hydrostatic testing.
2. NEVER attempt to fill a cylinder that is damaged or that is out of hydrostatic test date.
4. Place the SCBA cylinder in a fragment-proof fill station
5. Connect the fill hose to the cylinder and close bleed valve on fill hose
6. Open the SCBA cylinder valve
7. Open the valve at the fill hose, the valve at the cascade system manifold, or the valve at both
locations if the system is so equipped
8. Open the valve of the cascade cylinder that has the least pressure but that has more than the
SCBA cylinder
9. Close the cascade cylinder valve when the pressure of the SCBA and the cascade cylinder
equalize
10. Close the valve or valves at the cascade system manifold and/or fill line
1. if the system if so equipped

© Precision Exams 5210.1819 www.precisionexams.com Page | 20
Fire Science
11. Close the SCBA cylinder valve
12. Open the hose bleeder valve to bleed off excess pressure between the cylinder valve and the
valve on the hose
1. (FAILURE to open the hose bleeder valve could result in O-ring damage)
13. Disconnect the fill hose from the SCBA cylinder
14. Remove the SCBA cylinder from the fill station
15. Return the SCBA cylinder to proper storage
Objective 30 Demonstrate the procedures for refilling SCBA cylinders from a compressor/purifying system.
1. Check with manufacturers’ procedures for this activity, for your equipment
2. Check the hydrostatic test date of the cylinder that is to be filled
3. Inspect the SCBA cylinder for damage, such as deep nicks, cuts, gouges, or discoloration from
heat. Place the SCBA cylinder in a fragment-proof fill station
1. If damaged or out of hydrostatic test date, remove it from service and tag it for future
inspection and hydrostatic testing.
2. NEVER attempt to fill a cylinder that is damaged or that is out of hydrostatic test date.
4. Place the SCBA cylinder in a fragment-proof fill station
5. Connect the fill hose to the cylinder and close bleed valve on fill hose
6. Open the SCBA cylinder valve
7. Turn on the compressor/purifier and open the outlet valve
8. Set the cylinder pressure adjustment on the compressor (if applicable) or manifold to the
desired full-cylinder pressure.
9. Open the manifold valve (if applicable), and again check the fill pressure
10. Open the fill station valve and begin filling the SCBA cylinder
11. Close the fill station valve when the SCBA cylinder is full
12. Close the SCBA cylinder valve
13. Open the hose bleed valve to bleed off excess pressure between the cylinder valve and the
valve on the fill station
1. (FAILURE to open the hose bleeder valve could result in O-ring damage)
14. Disconnect the fill hose from the SCBA cylinder
15. Remove the SCBA cylinder from the fill station
16. Return the SCBA cylinder to proper storage
Standard 6 Performance Evaluation included below (Optional)
STANDARD 7
STUDENTS WILL BE ABLE TO IDENTIFY AND USE EXTINGUISHERS.
Objective 1 Identify the system used to classify fire extinguishers including symbols and pictograms
1. Class Name
1. Ordinary Combustibles
2. Flammable and Combustible Liquids and Gasses
3. Electrical
4. Combustible Metals
5. Kitchen
2. Letter Symbol
1. Green Triangle

© Precision Exams 5210.1819 www.precisionexams.com Page | 21
Fire Science
2. Red Square
3. Blue Circle
4. Yellow Star
5. Black Hexagon
3. Image Symbol
1. Trash Can
2. Flammable Liquid Container
3. Electrical Outlet
4. Machining Gear
5. Frying Pan
4. Description
1. Wood, paper, plastic
2. Hydrocarbon and alcohol based liquids and gasses
3. Energized electrical equipment
4. Magnesium, potassium, etc.
5. Cooking oils
Objective 2 Identify the portable extinguisher rating system
1. Class A
1. Agent
2. Duration
3. Range
4. Test Fires
5. 1A-40A
2. Class B
1. Based on Square Footage b. 1B-640B
3. Class C
1. Comprised of A or B Fires
2. Rating confirms non-conductivity
3. Assigned in addition to rating for class A or B
4. Class D
1. Varies with type of metal being tested
2. No numerical rating
3. No multi-purpose rating
5. Class K
1. Saponification
2. Capable of extinguishing a minimum surface area of 2.25 square feet
6. Multiple Marking
1. Suitable for more than one class of fire
2. Three most common combinations
1. Class A-B-C
2. Class A-B
3. Class B-C
3. Ratings are independent
Objective 3 Identify the types of fire extinguishers
1. Pump-Type Water Extinguishers
2. Stored-Pressure Water Extinguishers
© Precision Exams 5210.1819 www.precisionexams.com Page | 22
Fire Science
3. Wet Chemical Stored-Pressure Extinguishers
4. Aqueous Film Forming Foam (AFFF) Extinguishers
5. Clean Agent Extinguishers
6. Carbon Dioxide Extinguishers
7. Dry Chemical Extinguishers
8. Handheld Units
9. Wheeled Units
Objective 4 Identify the appropriate extinguisher and its application technique for various classes of fire
1. Selection Factors
1. Classification
2. Rating
3. Hazards
4. Atmospheric conditions
5. Life hazards
6. Ease of handling extinguisher
7. Availability of trained personnel
2. Using Portable Fire Extinguishers
1. Operational Check
2. External condition
1. Hose/nozzle
2. Weight
3. Pressure gauge
3. PASS method of Application
Objective 5 Demonstrate the extinguishment of the following classes of fires using the appropriate portable
fire extinguisher: Class A
1. Size-up fire
2. Pull pin of extinguisher to break inspection band
3. Test to ensure proper operation
4. Carry extinguisher to within stream reach of fire
5. Aim nozzle toward base of fire
6. Discharge extinguishing agent and sweep slowly back and forth across entire width of fire
7. Cover entire area with agent until fire is completely extinguished
8. Back away from the fire area
9. Tag extinguisher for recharge and inspection
Objective 6 Demonstrate the extinguishment of the following classes of fires using the appropriate portable
fire extinguisher: Class B
1. Size-up fire
2. Pull pin of extinguisher to break inspection band
3. Test to ensure proper operation
4. Carry extinguisher to within stream reach of fire
5. Aim nozzle toward base of fire
6. Discharge extinguishing agent and sweep slowly back and forth across entire width of fire
avoiding splashing liquid fuels
7. Cover entire area with agent until fire is completely extinguished
8. Back away from the fire area
9. Tag extinguisher for recharge and inspection

© Precision Exams 5210.1819 www.precisionexams.com Page | 23
Fire Science
Standard 7 Performance Evaluation included below (Optional)
STANDARD 8
STUDENTS WILL IDENTIFY AND USE LADDERS.
Objective 1 Identify the primary materials used in the construction of ladders
1. Metal Ladders
2. Wood Ladders
3. Fiberglass Ladders
Objective 2 Identify the components of a ladder
1. Beam
2. Bed Section (base section)
3. Butt (heel or base)
4. Butt Spurs
5. Dogs (see Pawls)
6. Fly Section
7. Foot Pads
8. Guides
9. Halyard
10. Heat-sensor Label
11. Heel (see Butt)
12. Hooks
13. Locks (see Pawls)
14. Main Section (bed or base section)
15. Pawls (dogs or ladder locks)
16. Protection plates
17. Pulley
18. Rails
19. Rungs
20. Shoes (see footpads)
21. Stops
22. Tip (top)
23. Truss block
Objective 3 Identify techniques for safe ladder operations
1. Develop and maintain adequate upper body strength
2. Wear a full body harness with belay line when training on ladders
3. Operate ladders according to departmental training and procedures
4. Wear protective gear, including gloves and helmet, when working with ladders
5. Choose the proper ladder for the job and load the ladder
6. Use leg muscles, not back or arm muscles, when lifting ladders below the waist
7. Use an adequate number of firefighters for each carry and raise
8. Do not raise any ladders to within 10 feet of electrical wires
9. Check ladder placement for the proper angle
10. Be sure that the hooks of the pawls are seated over the rungs
11. Be sure that the ladder is stable before climbing

© Precision Exams 5210.1819 www.precisionexams.com Page | 24
Fire Science
12. Be careful when moving ladders sideways
13. Heel the ladder or secure it at the top
14. Climb smoothly and rhythmically
15. Do not overload the ladder
a. One firefighter every 10 feet
b. One per section
16. Tie in to ground ladders with a leg lock or ladder belt when working from the ladder
17. Do not relocate a positioned ladder unless ordered to do so
18. Use ladders for their intended purposes only
19. Inspect ladders for damage and wear after each use
Objective 4 Identify the types of ladders
1. Single Ladders (wall or straight ladders)
2. Roof Ladders (single ladder equipped with folding hooks)
3. Folding Ladders (Attic Ladders)
4. Extension Ladders
5. Pole Ladders (Bangor Ladders)
6. Combination Ladders
7. Pompier Ladders (scaling ladders)
Objective 5 Identify the use of common types of ladders
1. Single Ladders (wall or straight ladders)... Used for quick access to windows and roofs on one-
and two-story buildings
2. Roof Ladders (single ladder equipped with folding hooks)... Used to anchor the ladder over
the ridge of a pitched roof so that a firefighter may stand on the ladder for roof work
(distributes the firefighter's weight and helps prevent slipping)
3. Folding Ladders (Attic Ladders)... Used for interior attic access
4. Extension Ladders... Used where a specific length adjustment is needed to
1. access windows and roofs
5. Pole Ladders (Bangor Ladders)... Used when desired length exceeds the reach of standard
extension ladders (40 feet or longer)
6. Combination Ladders... Used as a self-supporting step ladder (A-frame) and as a single or
extension ladder
7. Pompier Ladders (scaling ladders)... Used to climb from floor to floor, via exterior windows,
on a multistory building
Objective 6 Identify the selection process for using ladders
1. Key concepts
1. The base of the ladder should be placed away from the building approximately one-
quarter of the vertical distance from the ground to the point of contact with the wall
2. Typically, a residential story averages about 10 feet, and the distance from the floor to the
windowsill averages about 3 feet
3. Typically, a commercial story averages about 12 feet, and the
4. distance from the floor to the windowsill averages about 4 feet
5. When laddering to the roof, extend the ladder (three to five rungs) above the roof edge
6. Place the tip of a ladder about even with the top of the window and to the windward side
to gain access to a narrow window or for ventilation
7. Place the tip of the ladder just below the windowsill for rescue
8. For lengths of 35 feet or less, reach is approximately 1 foot less than the designated length
9. For lengths over 35 feet, reach is approximately 2 feet less than

© Precision Exams 5210.1819 www.precisionexams.com Page | 25
Fire Science
10. the designated length
2. General selection guidelines
1. First-story roof… 16 to 20 foot ladder
2. Second-story window… 20 to 28 foot ladder
3. Second-story roof… 28 to 35 foot ladder
4. Third-story window or roof… 40 to 50 foot ladder
5. Fourth-story roof… over 50 foot ladder
Objective 7 Demonstrate selecting the following ground ladder based upon a given situation: Folding, roof,
straight, extension, combination
1. Selection dependent upon the following:
1. Estimating height of window
2. Estimating height of roofline
2. Placement affects size and type selection
1. Tip must extend 5 rungs above roofline
2. Ladders for window access must be longer than those for rescue
3. Tip at ledge for rescue
4. Tip even with top of window for access
5. Need for deployment on roof or for interior attic access
6. Roof ladders provide a means of anchoring ladder on roof ridge
7. Folding ladders can be carried in narrow passageways and
8. deployed in scuttle holes or small rooms
Objective 8 Demonstrate the one firefighter from an apparatus carry.
1. Ladder is mounted in bracket.
2. Center of ladder is located.
3. Fire fighter places an arm between two rungs of the ladder just to one side of middle rung.
4. Beam of ladder is lifted and rested on shoulder.
5. Ladder is carried butt end first.
Objective 9 Demonstrate the one firefighter from the ground carry.
1. Ladder is standing on beam.
2. Center of ladder is located.
3. Fire fighter places an arm between two rungs of the ladder just to one side of middle rung.
4. Beam of ladder is lifted and rested on shoulder.
5. Ladder is carried butt end first.
Objective 10 Demonstrate the two-firefighter method – low should carry from the flat racking.
1. Ladder is mounted in Flat Racked compartment.
2. Both fire fighters are positioned on same side and face the compartment.
3. Firefighters Slide the ladder out of the compartment (usually from the rear of the vehicle)
4. Firefighters will position themselves one near the butt and one near the tip (to position for
carrying ladder).
5. Both fire fighters place one arm between two rungs of ladder and on command lift the ladder
onto their shoulders.
6. Ladder is carried butt first
7. Fire fighter at butt covers spur with gloved hand.
Objective 11 Demonstrate the two-firefighter method – low shoulder carry from vertical racking.
1. Ladder is mounted in bracket.
2. Both fire fighters are positioned on same side and face the butt end.

© Precision Exams 5210.1819 www.precisionexams.com Page | 26
Fire Science
3. Both fire fighters place one arm between two rungs of ladder and on command lift the ladder
onto their shoulders.
4. Ladder is carried butt first
5. Fire fighter at butt covers spur with gloved hand.
Objective 12 Demonstrate the two-firefighter suitcase carry.
1. Ladder is placed on ground on beam.
2. Both fire fighters are positioned on same side and face the butt end.
3. Both reach down and grasp the upper beam of the ladder.
4. On command, both pick up ladder carry it , butt forward, at arm’s length.
5. Fire fighter at butt covers spur with gloved hand.
Objective 13 Demonstrate the three-fighter method – flat shoulder carry from the ground.
1. Ladder is placed flat on ground.
2. Two fire fighters stand on one side of ladder at butt and tip ends.
3. The third fire fighter is positioned on opposite side at middle of ladder.
4. All face tip end.
5. All bend down and grasp closest rung at arm’s length.
6. On command, all pick up ladder and pivot toward butt when ladder reaches chest height.
7. Ladder beam is placed on shoulders.
Objective 14 Demonstrate the three-firefighter arm’s length method – flat carry.
1. Ladder is placed flat on ground.
2. Two fire fighters stand on one side of ladder at butt and tip ends.
3. The third fire fighter is positioned on opposite side at middle of ladder.
4. All face butt end.
5. All bend down and grasp closest rung at arm’s length.
6. On command, all pick up ladder and carry it at arm’s length.
7. Fire fighter at butt covers spur with gloved hand.
Objective 15 Demonstrate the three-firefighter suitcase carry.
1. Ladder is placed on beam on ground.
2. All Fire fighters are on same side.
3. A firefighter is positioned at the butt, tip and middle of ladder.
4. All face butt end.
5. All bend down and grasp upper beam of ladder.
6. On command, all pick up ladder and carry it at arm’s length.
7. Fire fighter at butt covers spur with gloved hand.
Objective 16 Demonstrate the four-firefighter arm’s length – flat carry.
1. Bed section of ladder is flat on ground.
2. Fire fighters stand at corners on each side of ladder, two at tip and two at butt.
3. All fire fighters face butt end.
4. On leader’s command, all kneel and grasp the closest rung at arm’s length.
5. On command, all pick up ladder and carry butt end forward.
6. Spur is covered by fire fighters at tip with gloved hand.
Objective 17 Demonstrate the four-firefighter flat shoulder carry.
1. Bed section of ladder is flat on ground.
2. Fire fighters stand at corners on each side of ladder, two at tip and two at butt.
3. All fire fighters face tip end.
4. On leader’s command, all kneel and grasp the closest rung at arm’s length.

© Precision Exams 5210.1819 www.precisionexams.com Page | 27
Fire Science
5. On command, all stand, raising the ladder.
6. As ladder reaches chest height, all pivot and face butt end.
7. Ladder is placed on shoulders.
8. Spur is covered by fire fighters at tip with gloved hand.
Objective 18 Demonstrate the roof ladder carry and raise.
1. Ladder carried to desired work area.
2. Hooks are deployed.
3. Ladder is faced outward against ground ladder.
4. Fire fighter climbs ladder until shoulder is midpoint of the roof ladder.
5. Fire fighter reaches through rungs.
6. Roof ladder is hoisted onto shoulder.
7. Fire fighter climbs to top of ladder.
8. Use appropriate method of securing to ladder.
9. Roof ladder removed from shoulder.
10. Ladder is pushed hand-over-hand on beam onto roof and hooks away from ground ladder
11. Ladder is pushed up roof with hooks down until edge of peak is cleared.
Objective 19 Demonstrate the one firefighter extension ladder raise.
1. Work area visually inspected.
2. Ladder butt lowered to ground – butt spurs against wall.
3. Fire fighter positions to raise ladder.
4. Ladder raised hand-over-hand until parallel against wall.
5. Ladder butt positioned for correct climbing angle.
Objective 20 Demonstrate the two-firefighter extension ladder raise.
1. Butt end is placed on ground by firefighter 1
2. Firefighter 2 rests ladder beam on shoulder.
3. Ladder is heeled on bottom rung by firefighter 1.
4. Rung or beam is grasped from crouching position by firefighter 1
5. Firefighter 1 leans back
6. Firefighter 2 steps beneath the ladder.
7. Firefighter 2 grasps convenient rung with both hands.
8. Firefighter 2 advances hand-over-hand down the rungs to place the ladder in a vertical
position.
9. Firefighter 1 grasps successively higher rungs as the ladder nears a vertical position.
10. Firefighter 1 and firefighter 2 face each other.
11. Ladder is heeled.
12. Firefighter 1 grasps the halyard.
13. Firefighter 1 extends the fly section with a hand-over-hand method until ladder tip reaches
desire elevation.
14. Firefighter 2 grasps the beams
15. Both firefighters lower the ladder against building at correcting climbing angle.
16. The halyard is tied off.
Objective 21 Demonstrate the two-firefighter extension ladder raise – TIP position.
1. Butt end is placed on ground by firefighter 1
2. Firefighter 2 rests ladder beam on shoulder.
3. Ladder is heeled on bottom rung by firefighter 1.
4. Rung or beam is grasped from crouching position by firefighter 1

© Precision Exams 5210.1819 www.precisionexams.com Page | 28
Fire Science
5. Firefighter 1 leans back
6. Firefighter 2 steps beneath the ladder.
7. Firefighter 2 grasps convenient rung with both hands.
8. Firefighter 2 advances hand-over-hand down the rungs to place the ladder in a vertical
position.
9. Firefighter 1 grasps successively higher rungs as the ladder nears a vertical position.
10. Firefighter 1 and firefighter 2 face each other.
11. Ladder is heeled.
12. Firefighter 1 grasps the halyard.
13. Firefighter 1 extends the fly section with a hand-over-hand method until ladder tip reaches
desire elevation.
14. Firefighter 2 grasps the beams
15. Both firefighters lower the ladder against building at correcting climbing angle.
16. The halyard is tied off.
Objective 22 Demonstrate the two-firefighter ladder beam raise – HEEL position.
1. Ladder beam at is placed on ground at butt end by firefighter 1
2. Firefighter 2 rests ladder beam on shoulder.
3. Ladder is heeled on butt spur by firefighter 1.
4. Upper beam is grasped by firefighter 1. Back leg is extended for counter balance.
5. Firefighter 2 advances hand-over-hand down the beam toward the butt end to place the
ladder in a vertical position.
6. The ladder is pivoted to position the fly section toward the structure for wooden ladders,
away from the structure for metal ladders.
7. The halyard is used to extend the ladder to the desired elevation.
8. Both firefighters lower the ladder against building at correct climbing angle.
9. The halyard is tied off.
Objective 23 Demonstrate the two-firefighter ladder beam raise – TIP position.
1. Ladder beam at is placed on ground at butt end by firefighter 1
2. Firefighter 2 rests ladder beam on shoulder.
3. Ladder is heeled on butt spur by firefighter 1.
4. Upper beam is grasped by firefighter 1. Back leg is extended for counter balance.
5. Firefighter 2 advances hand-over-hand down the beam toward the butt end to place the
ladder in a vertical position.
6. The ladder is pivoted to position the fly section toward the structure for wooden ladders,
away from the structure for metal ladders.
7. The halyard is used to extend the ladder to the desired elevation.
8. Both firefighters lower the ladder against building at correct climbing angle.
9. The halyard is tied off. The ladder is pivoted to position the fly section toward the structure
for wooden ladders, away from the structure for metal ladders.
10. The halyard is used to extend the ladder to the desired elevation.
11. Both firefighters lower the ladder against building at correct climbing angle.
12. The halyard is tied off.
Objective 24 Demonstrate the three-firefighter extension ladder raise – TIP #1 position.
1. Ladder beam at is placed on ground at butt end by firefighter 1
2. Firefighter 2 rests ladder beam on shoulder.
3. Ladder is heeled on butt spur by firefighter 1.

© Precision Exams 5210.1819 www.precisionexams.com Page | 29
Fire Science
4. Upper beam is grasped by firefighter 1. Back leg is extended for counter balance.
5. Firefighter 2 advances hand-over-hand down the beam toward the butt end to place the
ladder in a vertical position.
6. The ladder is pivoted to position the fly section toward the structure for wooden ladders,
away from the structure for metal ladders.
7. The halyard is used to extend the ladder to the desired elevation.
8. Both firefighters lower the ladder against building at correct climbing angle.
9. The halyard is tied off. The ladder is pivoted to position the fly section toward the structure
for wooden ladders, away from the structure for metal ladders.
10. The halyard is used to extend the ladder to the desired elevation.
11. Both firefighters lower the ladder against building at correct climbing angle.
12. The halyard is tied off.
Objective 25 Demonstrate the three-firefighter extension ladder raise – TIP #2 position.
1. Firefighter 1 is located at the ladder butt.
2. Firefighters 2 and 3 are located at the ladder tip.
3. Verify visual check of terrain and overhead obstruction prior to placement and raise.
1. Ladder beam at is placed on ground at butt end by firefighter 1. Firefighter 2 and 3 rest
the ladder flat on their shoulders.
2. Ladder is heeled at butt end by firefighter 1
3. Firefighter 1 grasps convenient rung from crouching position.
4. Firefighter 1 leans back.
5. Firefighters 2 and 3 advance in union with outside hands on beam and inside hands on
rungs toward the butt end to raise the ladder to a vertical position.
6. Firefighters 2 and 3 place foot against butt spur.
7. Ladder is stabilized by firefighters 2 and 3 with both hands on beam.
8. Firefighter 1 grasps halyard.
9. Firefighter 1 places the toe of one foot on butt spur.
10. Firefighter 1 uses the halyard is used to extend the ladder to the desired elevation.
11. All firefighters lower the ladder against building
12. The halyard is tied off
Objective 26 Demonstrate the three-firefighter extension ladder raise – HEEL position.
1. Firefighter 1 is located at the ladder butt.
2. Firefighters 2 and 3 are located at the ladder tip.
3. Verify visual check of terrain and overhead obstruction prior to placement and raise.
1. Ladder beam at is placed on ground at butt end by firefighter 1. Firefighter 2 and 3 rest
the ladder flat on their shoulders.
2. Ladder is heeled at butt end by firefighter 1
3. Firefighter 1 grasps convenient rung from crouching position.
4. Firefighter 1 leans back.
5. Firefighters 2 and 3 advance in union with outside hands on beam and inside hands on
rungs toward the butt end to raise the ladder to a vertical position.
6. Firefighters 2 and 3 place foot against butt spur.
7. Ladder is stabilized by firefighters 2 and 3 with both hands on beam.
8. Firefighter 1 grasps halyard.
9. Firefighter 1 places the toe of one foot on butt spur.
10. Firefighter 1 uses the halyard is used to extend the ladder to the desired elevation.

© Precision Exams 5210.1819 www.precisionexams.com Page | 30
Fire Science
11. All firefighters lower the ladder against building at desired climbing angle.
12. The halyard is tied off.
Objective 27 Demonstrate the four-firefighter extension ladder flat raise – HEEL #1 position.
1. Firefighters 1 and 2 are located at the ladder butt.
2. Firefighters 3 and 4 are located at the ladder tip.
1. Ladder beam at is placed on ground at butt end by firefighters 1and 2. Firefighters 3 and 4
rest the ladder flat at their shoulders.
2. Ladder is heeled at butt end by firefighter s 1 and 2.
3. Firefighters 1 and 2 grasp convenient rung from crouching position.
4. Firefighters 1 and 2 lean back.
5. Firefighters 3 and 4 advance in union with outside hands on beam and inside hands on
rungs toward the butt end to raise the ladder to a vertical position.
6. All firefighters place foot against butt spur.
7. Ladder is stabilized by firefighters 2, 3 and 4 with both hands on beam.
8. Firefighter 1 grasps halyard.
9. Firefighter 1 places the toe of one foot on butt spur.
10. Firefighter 1 uses the halyard is used to extend the ladder to the desired elevation.
11. All firefighters lower the ladder against building at correct climbing angle.
12. The halyard is tied off
Objective 28 Demonstrate the four-firefighter extension ladder flat raise – HEEL #2 position.
1. Verify visual check of terrain and overhead obstruction prior to placement and raise.
2. Firefighters 1 and 2 are located at the ladder butt.
3. Firefighters 3 and 4 are located at the ladder tip.
1. Ladder beam at is placed on ground at butt end by firefighters 1and 2. Firefighters 3 and 4
rest the ladder flat at their shoulders.
2. Ladder is heeled at butt end by firefighter s 1 and 2.
3. Firefighters 1 and 2 grasp convenient rung from crouching position.
4. Firefighters 1 and 2 lean back.
5. Firefighters 3 and 4 advance in union with outside hands on beam and inside hands on
rungs toward the butt end to raise the ladder to a vertical position.
6. All firefighters place foot against butt spur.
7. Ladder is stabilized by firefighters 2, 3 and 4 with both hands on beam.
8. Firefighter 1 grasps halyard.
9. Firefighter 1 places the toe of one foot on butt spur.
10. Firefighter 1 uses the halyard is used to extend the ladder to the desired elevation.
11. All firefighters lower the ladder against building at correct climbing angle.
12. The halyard is tied off.
Objective 29 Demonstrate climbing the full length of each type of ladder
1. Straight / Wall Ladder , Extension Ladder , Folding / Attic Ladder
1. Verify climbing angle
2. Minimize shifting/bouncing
3. Eyes forward
4. Proper Hand Placemen
5. Three points of contact
Objective 30 Demonstrate rising and placement of a ladder for hoseline deployment.
1. Position firefighter(s) on ladder with no more than one firefighter per ladder section

© Precision Exams 5210.1819 www.precisionexams.com Page | 31
Fire Science
2. Firefighter operating nozzle secures to ladder with leg lock or safety harness
3. Place nozzle through rung of ladder, extending the hose at least one foot in front of
firefighter’s body.
4. Tie off hose with a clove hitch
5. Ensure slack is secured in the hose
6. Ensure nozzle is opened when secured
7. Ensure fire stream is directed at the designated target
8. Ensure nozzle is opened and closed slowly to prevent water hammer
Objective 31 Demonstrate caring hand tools while ascending and descending a ladder.
1. Wear full protective equipment properly
2. Check ladder for appropriate angle
3. Grasp tool securely in one hand and hold hand and tool against beam of ladder
4. Wrap other hand around beam and begin climb
5. Climb is smooth and safe
6. Maintain contact between free hand and beam by sliding tool along opposite beam
Objective 32 Demonstrate working off a ladder using appropriate safety devices and methods
Essential Topics:
1. Verify correct climbing angle.
2. Climb to desired height.
3. Select use of ladder belt OR Leg Lock
1. Step up one additional rung above desired height
2. Extend leg between rungs on opposite side where work will take place
3. Bend knee and bring foot back under rung and through to the climbing side of ladder
4. Secure foot against beam or next lower rung of ladder. Using this for support step down
one rung with opposite foot.
Objective 33 Demonstrate raising and placement of a ladder for window ventilation operations.
1. Select correct raise for task at hand
2. Verify climbing angle
3. Ladder placement along side window on windward side
4. Tip of ladder set even with top of window
Objective 34 Demonstrate raising and placement of a ladder for flat roof ventilation operations.
1. Select correct raise for task at hand
2. Verify climbing angle
3. Ladder placement not blocking doors, openings, etc.
4. Tip of ladder set five rungs above roof line
Objective 35 Demonstrating mounting and dismounting a ladder from and into a window.
1. Select correct raise for task at hand
2. Verify climbing angle
3. Ladder placement not at doors, openings, etc.
4. Ensure point of entry is stable
5. Maintain 3 points of contact with ladder
6. When re-mounting utilize appropriate technique
1. Smoke condition - back out feet first
2. Better conditions sit on window sill, legs out, rolling onto ladder
Objective 36 Demonstrate mounting and dismounting a ladder from and onto a roof.
1. Select correct raise for task at hand
2. Verify climbing angle

© Precision Exams 5210.1819 www.precisionexams.com Page | 32
Fire Science
3. Ladder placement not at doors, openings, etc.
4. Maintain 3 points of contact with ladder
5. Ensure roof is stable before shifting weight from ladder
Objective 37 Demonstrate assisting a conscious victim down a ladder.
1. Correct ladder position.
2. Ladder secured for climb
3. Victim lowered from window to rescuer on ladder
4. Victim positioned for carry
5. Rescuer and victim descend ladder
Objective 38 Demonstrate the inspection procedure for ground ladders.
After each use and monthly
1. Heat sensor labels
2. Rungs for damage and wear
3. Rung tightness
4. Bolts and Rivets
5. Welds
6. Beams and Rungs
7. Pawl assemblies
8. Halyard
9. Pulleys
10. Guides
11. Wooden ladders
1. Finish
2. Darkening of Varnish
3. Deterioration
4. Splintered parts
5. Water damage
6. Smooth shoes
Objective 39 Demonstrate the proper procedure for cleaning a ladder.
1. Soft bristle brush
2. Running water
3. Mild Soap
a. Tar, grease, oil
4. Wiped Dry
5. Inspect for damage during cleaning
Objective 40 Demonstrate maintenance procedures for different types of ground ladders.
1. Kept free from moisture
2. Stored away from vehicle exhaust or engine heat
3. Stored away from exposure to elements
4. Not painted
1. Exception is the top and bottom 18" for ID purposes
Standard 8 Performance Evaluation included below (Optional)
© Precision Exams 5210.1819 www.precisionexams.com Page | 33
Fire Science
STANDARD 9
STUDENTS WILL UNDERSTAND HOSE AND APPLIANCES.
Objective 1 Identify the construction features of fire hose
1. Materials (cotton, nylon, Rayon vinyl, Poly-mired vinyl, Polyester)
2. Methods (braided, wrapped, woven, hard suction)
Objective 2 Identify the construction features of fire hose couplings
1. Drop Forged
2. Extruded
3. Cast
4. Threaded
5. Storz
Objective 3 Identify the types and sizes of fire hose
1. Small Diameter Hose
2. Medium Diameter Hose
3. Large Diameter Hose
4. Intake Hose
Objective 4 Identify the types and uses of hose rolls
1. Straight Roll
2. Donut Roll
3. Twin Donut Roll
4. Self-locking Twin Donut Roll
Objective 5 Identify forward and reverse lays
1. Forward Lay
2. Reverse Lay
Objective 6 Identify the appliances carried on a pumper as required by NFPA 1901, Standard for Pumper Fire
Apparatus
1. Valve
2. Wye
3. Siamese
4. Water Thief
5. Hydrant Valve
6. Fittings
7. Strainer
8. Master Stream Device
9. Foam Delivery Equipment
10. Tools
Objective 7 Demonstrate major types of hose rolls.
1. Straight Roll
2. Donut Roll
3. Twin Donut Roll
4. Self-Locking Twin Donut Roll
Objective 8 Demonstrate coupling and uncoupling techniques.
1. Single Firefighter Foot Tilt Method

© Precision Exams 5210.1819 www.precisionexams.com Page | 34
Fire Science
2. Two Firefighter Method
3. Single Firefighter Knee Press Method
4. Two Firefighter Stiff Arm Method
Objective 9 Demonstrate methods to move hose lines into position.
1. Hose Carry / Shoulder Load (Flat or Horseshoe)
2. Hose Carry / Shoulder Load (Flat or Accordion)
4. Hose Drag Method 1
5. Hose Drag Method 2
Objective 10 Demonstrate the loading and deployment of hose loads.
1. Accordion Load
2. Horseshoe Load
3. Reverse Horseshoe Load
4. Flat Load
5. Minuteman Load
6. Dutchman
Objective 11 Demonstrate the function of a hose clamp.
1. Standard Hose Clamp
2. Field Hose Clamp Maneuver
Objective 12 Demonstrate the techniques for lengthening a hose line using the following equipment.
1. Hose Clamp
2. Break – Apart Nozzle
Objective 13 Demonstrate techniques for replacing a section of hose.
1. Kink Method
2. Clamp Method
Objective 14 Demonstrate the use of key hose appliances.
1. 2½ inch Hydrant Valve
2. Double – Gated Reducing Leader Wye
3. Master Stream Device, 1000GPM Minimum
4. Double Male Adapter
5. Double Female Adapter
Objective 15 Demonstrate advancing a charged 1 ½ inch and 2 ½ inch attack line from a pumper as a member
of a hose team.
1. Into a structure at ground level
Objective 16 Demonstrate carrying an attack line into a structure.
1. The duck walk
2. Nozzle positioning
3. Backup position
4. Door position duties during the advance
Objective 17 Demonstrate the procedures for cleaning and maintaining fire hose.
1. Visual Inspection hose and couplings
2. Wash dirty hose and dry hose
Objective 18 Demonstrate the procedures for cleaning and maintaining couplings.
1. Visual Inspection:
1. Look for thread damage
2. Look for pliable rubber gasket in female couplings
3. Apply silicone lubricant to the swivel

© Precision Exams 5210.1819 www.precisionexams.com Page | 35
Fire Science
Objective 19 Demonstrate connecting hoseline(s) from a fire pumper to a fire department connection
1. Confirm Order with Officer to connect line(s) to FDC.
2. Extend hoseline from pumper discharge to the FDC with male thread toward FDC
connection.
3. Lay down hose fitting at FDC, protecting male fittings.
4. Remove caps from FDC.
5. Inspect the FDC for debris, check threads, check gasket and replace if necessary.
6. Connect hose lines to the outlets. (Lowest First)
7. Tighten connections with spanner wrench.
8. Report to Officer the completion of assignment.
Objective 20 Demonstrate connecting a 3 inch or smaller hose to a hydrant.
1. As a Safety Precaution – Tighten Hydrant Caps Not used
2. Turn outlet nut counterclockwise and remove cap from one outlet
3. Connect 3 inch or smaller hose to hydrant outlet
Objective 21 Demonstrate connecting a 4 ½ inch or larger soft sleeve intake hose to a hydrant.
1. Examine hydrant
2. Remove hydrant cap and inspect threads
3. Look in nozzle(wet barrel) or barrel(dry barrel) for debris
4. Flush hydrant
5. Connect supply hose to hydrant
6. Open hydrant fully when told to do so
Objective 22 Demonstrate connecting a 4 ½ inch or larger hard intake hose to a hydrant.
1. Confirm order with officer to make hydrant connection.
2. Remove intake hose from pumper.
3. Connect the intake hose to the hydrant or apparatus (depending on local preference), turning
connection clockwise and making hand tight.
4. Connect opposite end to the hydrant or apparatus, turning connection clockwise and making
hand tight.
Objective 23 Demonstrate advancing a 1 ½ inch and 2 ½ inch attack line from a pumper as a member of a
team: to an upper floor by hoisting.
1. Tie a closed clove hitch behind first coupling
2. Tie safety knot
3. Take a bight in the rope and pass it through the bale and over the nozzle
Objective 24 Demonstrate unloading non-preconnected wyed hoseline.
1. Hose load finishes (Reverse horseshoe load)
2. Grasp the inner fold of the load and nozzle in one hand
3. Grasp the wye appliance in the other hand
4. Step down from the tailboard and pull the hose assembly to the ground, positioning yourself in
view of the driver's mirror
5. Anchor the hose assembly with one knee
6. Signal the driver to "Go"
Objective 25 Demonstrate unloading a pre-connected hoseline Flat Load.
1. Approach the bay
2. Place the larger dog ear around shoulder
3. Hold the small dog ear in one hand and the nozzle in the other hand

© Precision Exams 5210.1819 www.precisionexams.com Page | 36
Fire Science
4. Walk away from the engine toward tour destination
5. Drop the loop from your hand when it gets taut
6. Drop the loop from your shoulder when it becomes taut
7. Take the nozzle and move to your destination
Objective 26 Demonstrate unloading pre-connected hoseline Minuteman.
1. Grab entire hose bundle placing the bottom off the load and nozzle on shoulder
2. Make your way to your objective as the hose pays out with your forward progress
3. Flake out the rest of your working line
4. Call for water
Objective 27 Demonstrate hand laying 300 feet of supply line (2 ½ inch or 3 inch) from a pumper to a water
source utilizing two or three firefighters.
1. FF # 1 - Attach a nozzle to the end of the hose if desired.
a. FF #1 - Assist other FFs with loading hose on their shoulders.
2. FF # 2 - Position on the tailboard facing the direction of travel.
3. FF # 2 - Place the initial fold of hose over the shoulder so the nozzle can be held at chest
height.
4. FF # 2 - Bring the hose from behind back over the shoulder so that the rear fold ends at the
back of the knee.
5. FF # 2 - Make a fold in front that ends at the knee height and bring the hose back over the
shoulder.
a. (Repeat Step 4 & 5 until appropriate amount of hose is loaded on shoulder)
6. FF # 2 - Move forward approximately 15 feet.
7. FF # 3 - Position on the tailboard facing the direction of travel.
8. FF # 3 - Load hose onto the shoulder in the same manner as FF # 2, making knee-high folds,
until an appropriate amount of hose is loaded on shoulder.
9. FF # 1 - Uncouple the hose from the hose bed, and hand the coupling to the last firefighter.
Objective 28 Demonstrate inspecting couplings for damage.
1. Visual Inspection-look for:
1. Damaged threads
2. Corrosion
3. Slippage of the hose
4. Swivel not rotating freely
5. Missing lugs
6. Loose external gasket
Standard 9 Performance Evaluation included below (Optional)
STANDARD 10
STUDENTS WILL UNDERSTAND NOZZLES AND STREAMS.
Objective 1 Define fire stream
1. A stream of water or other extinguishing agent after it leaves a fire hose and nozzle, until it
reaches the desired point
Objective 2 Identify the purpose of a fire stream
1. Cooling
2. Provide Protection
© Precision Exams 5210.1819 www.precisionexams.com Page | 37
Fire Science
Objective 3 Identify the various uses of water as an extinguishing agent
1. Cooling
1. Latent Heat of Vaporization
2. Smothering
Objective 4 Identify the types of fire stream nozzles
1. Smooth Bore Nozzle
2. Fog Nozzle
3. Combination Nozzle
Objective 5 Identify the water flow / GPM of handlines and master streams
1. Fire stream classification
1. Low-volume stream... Less than 40 gpm
2. Handline stream... 40 to 350 gpm
1. 1 1/2" handline = 60-150 gpm
2. 1 3/4" handline = 95-200 gpm
3. 2 1/2" handline = 200-325 gpm
3. Master stream... Greater than 350 gpm
1. 3" supply line = 0-500 gpm
2. 4" supply line = 0-1,200 gpm
3. 5" supply line = 0-2,000 gpm
Objective 6 Define nozzle reaction
1. Nozzle Reaction: As water is discharged and flowing from the nozzle, an equal and opposite
reaction is realized by the nozzle operator.
Objective 7 Identify methods of water application
1. Direct method of attack
2. Indirect method of attack
3. Combination method of attack
Objective 8 Identify the principles of both Class A and Class B foam as an extinguishing agent
1. Class A Foam
2. Class B Foam (Synthetic & Protein)
Objective 9 Identify the methods by which foam prevents or controls a hazard
1. Separating... Creates a barrier between the fuel and the fire
2. Cooling... Lowers the temperature of the fuel and adjacent surfaces
3. Smothering... Suppresses the release of flammable vapors reducing the
1. possibility of ignition or reignition
4. Penetrating... Lowers the surface tension of water and allows it to penetrate deep-seated fires
Objective 10 Identify the principle by which foam is generated
1. Key terms
1. Foam concentrate-Raw foam liquid before the introduction of water and air
2. Foam proportioned (educator)-Device that introduces foam concentrate into the water
stream to make a foam solution
3. Foam solution-Mixture of foam concentrate and water before the introduction of air
4. Foam (finished foam)-Completed product after air is introduced into the foam solution
2. Key concepts
1. Proportioning and aeration
2. Foam expansion
3. Foam concentrates

© Precision Exams 5210.1819 www.precisionexams.com Page | 38
Fire Science
1. Class A
2. Class B
3. Special application foams
4. Foam Proportioning methods
1. Induction
2. Injection
3. Patch-mixing
4. Premixing
5. Foam proportions
1. Portable foam proportions
2. apparatus-mounted proportions
3. impressed-air foam Systems (CAFS)
6. Foam delivery devices
1. Handline nozzles
2. medium- and high-expansion foam generating devices
7. Causes for poor-quality foam, or failure to generate foam
Objective 11 Demonstrate the following methods of water application.
1. Direct
2. Indirect
3. Combination
Objective 12 Demonstrate the procedure of bleeding / purging air from a handline.
1. Prior to entering the fire area, the nozzle must be opened fully to let the air out and to make
sure the line is supplied with sufficient water flow and pressure before commencing the attack.
Objective 13 Demonstrate the use of nozzles carried on a fire pumper.
1. Smooth Bore Nozzle
2. Combination Nozzle
Objective 14 Demonstrate the procedure of opening and closing a nozzle.
1. Open nozzle away from everyone
2. Open nozzle by pulling bale toward you
3. Open nozzle all the way
4. Keep nozzle open until all the air is out of hose
5. Close nozzle by pushing bale away from you
6. Open and close nozzle slowly so you don't create a water hammer effect
Objective 15 Demonstrate the procedure of adjusting the stream pattern on a fog nozzle.
1. Open nozzle away from everyone
2. Open nozzle by pulling bale toward you
3. Open nozzle all the way
4. Keep nozzle open until all the air is out of hose
5. Close nozzle by pushing bale away from you
6. Open and close nozzle slowly so you don't create a water hammer effect
Objective 16 Demonstrate the procedure of opening and closing a solid stream nozzle.
1. The nozzle bale should be a slightly bent arm's reach out in front of the nozzle operator
2. The line should be on the side of the nozzle operators dominate arm
3. The forward, or left, hand controls flow and directs the stream
4. The forward hand controls the bale
5. Once the bale has been operated, the hand moves to the hose behind the last male hose butt
6. The hand must be in an underhand position on the hose
© Precision Exams 5210.1819 www.precisionexams.com Page | 39
Fire Science
7. Overcome reaction force when opening the nozzle
8. Open and close the bale slowly as to not cause a water hammer
Objective 17 Demonstrate the procedure of inspecting a nozzle.
1. Clean nozzles after each use
2. Inspect nozzles after each use:
1. Check that the waterway is clear of obstructions
2. Make sure the bale works properly
3. Check to make sure there are no dents or nicks in the tip of the nozzle
4. Make sure there are no missing parts
5. Worn out gaskets must be replaced
Standard 10 Performance Evaluation included below (Optional)
STANDARD 11
STUDENTS WILL UNDERSTAND WATER SUPPLY.
Objective 1 Identify the water sources and the components of a water distribution system in the local
community.
1. Ground Water:
1. Aquifers
2. Underground Rivers
3. Springs
2. Surface Water:
1. Rivers
2. Lakes
3. Ponds
3. Components of Water Distribution System:
1. Means of Moving Water:
1. Direct Pumping
2. Gravity Systems
3. Combination Systems
2. Water Treatment Facilities:
1. Remove Contaminants
2. Filter Particulates
3. dd Chlorine (Purification) (Haz-Mat)
4. Add Fluoride (Prevent Tooth Decay)
4. Elevated Water Storage Tanks:
5. Distribution Systems: (Mains)
1. Primary Feeders
2. Secondary Feeders
3. Distributors
4. Water Main Valves:
5. Indicating Valves:
1. OS&Y - Outside Stem & Yoke
2. PIV - Post Indicator Valve (Open /Shut)

© Precision Exams 5210.1819 www.precisionexams.com Page | 40
Fire Science
3. Butterfly Valve
6. Non-Indicating Valves:
1. Gate Valve (Number of Turns)
2. Butterfly Valve
Objective 2 Identify the characteristics and operation of fire hydrants
1. Fire Hydrant Characteristics:
1. Outside Parts Cast Iron
2. Internal Working Parts Bronze
3. Valve Facings Rubber, Leather, Composite Materials
4. Must Open/Close Slowly to Prevent Damage
5. Dry Barrel Hydrant:
1. Prolonged Periods of Subfreezing Weather
2. Main Valve located below Frost Line
3. Hydrant Barrel Empty between Top and Main Valve
4. Stem Nut Turned Counter Clockwise to Open Main Valve
5. Drain Holes are located near the bottom of the Hydrant
6. Must be Fully Opened or Fully Closed to Prevent “Undermining” the Hydrant Base
through the Drain Holes
6. Wet Barrel Hydrant:
1. Known as Frost-Free Hydrants
2. Usually Installed in Warmer Climates
3. Horizontal Compression-Type Valves on Each Outlet
4. The Barrel is Always filled with Water
2. Fire Hydrant Operation:
1. Dry Barrel Hydrant:
1. Remove Caps from Ports being Used
2. Inspect Hydrant and Port for Debris and Damage
3. urn Stem Nut Counter-Clockwise to begin Flow of Hydrant to Insure Flow of Water,
and to Flush Hydrant
4. Turn Stem Nut Clockwise to Stop Water Flow of Hydrant
5. Attach Supply Hose(s) to Hydrant Port(s)
6. Wait for Signal to Charge Hydrant
7. Fully Open Hydrant by Turning Stem Nut until Stem Nut will No Longer Turn
8. To Shut Down Hydrant Turn Stem Nut Clockwise Slowly until Valve Closes and the
Stem Nut No Longer Turns
9. Relieve any Pressure
10. Remove Supply Hoses from the Port(s)
11. Re-Place Caps on All Ports Except One
12. Insure Water Drains from the Barrel by verifying a Vacuum is Created at the Port
13. Replace the Remaining Cap
2. Wet Barrel Hydrant:
1. Remove Caps from Ports being Used
2. Inspect Hydrant and Port for Debris and Damage
3. urn Stem Nut Opposite Side of Port Counter-Clockwise to begin Flow of Hydrant to
Insure Flow of Water, and to Flush Hydrant
4. Turn Stem Nut Opposite Side of Port Clockwise to Stop Water Flow of Hydrant
5. Attach Supply Hose(s) to Hydrant Port(s)
© Precision Exams 5210.1819 www.precisionexams.com Page | 41
Fire Science
6. Wait for Signal to Charge Hydrant
7. Fully Open Hydrant by Turning Stem Nut Opposite Side of Port until Stem Nut will
No Longer Turn
8. To Shut Down Hydrant Turn Stem Nut Clockwise Slowly until Valve Closes and the
Stem Nut will No Longer Turn
9. Relieve any Pressure
10. Remove Supply Hoses from the Port(s)
11. Replace All Caps on All Ports
Objective 3 Identify causes of increased resistance of friction loss in water distribution systems and hydrants
1. Pipe Diameter
2. Pipe Materials
3. Mineral Encrustation
4. Sediment
5. Partially Closed Valves
6. Dead-End Hydrants
Objective 4 Identify conditions which may reduce hydrant effectiveness
1. Main Pipe Diameter
2. Distribution System Pressure
3. Dead-End Hydrants
4. Partially Open Valves
5. Discharge Openings:
1. 2-1/2 Ports
2. Steamer Ports
Objective 5 Demonstrate connecting a small intake hose to a hydrant and fully opening and closing the
hydrant.
1. As a Safety Precaution – Tighten Hydrant Caps Not used
2. Turn outlet nut counterclockwise and remove cap from one outlet
3. Connect small intake hose to hydrant outlet
4. Open the hydrant Fully
5. Close the hydrant Fully
6. Relieve pressure
7. Remove small intake hose from hydrant outlet
8. Replace cap on outlet
Objective 6 Demonstrate the hydrant to pumper hose connections for forward lay.
FF # 1
1. Grab sufficient amount of hose to reach the hydrant.
2. Step down from the tailboard and face the hydrant with all the equipment necessary to make
the hydrant connection.
3. Approach the hydrant and loop the hydrant in accordance with SOPs.
4. Signal Driver/Operator to proceed driving to the fire.
5. Remove cap from hydrant.
6. Place the hydrant wrench on the valve stem operating nut.
7. Remove the hose loop from the hydrant.
8. Connect the hose to the outlet nearest the fire.
9. Open the hydrant fully when the appropriate order or signal is given.
10. Return to the apparatus, tighten leaking couplings, and push the hose toward the curb along
the way.
© Precision Exams 5210.1819 www.precisionexams.com Page | 42
Fire Science
FF # 2
1. After completing the hose lay to the scene, apply the hose clamp on the supply line 20 feet
behind the apparatus.
2. Give the signal to charge the line.
3. Uncouple the hose from the bed (allowing enough hose to reach the pump inlet).
4. Connect the hose to the pump.
5. Release the hose clamp.
Objective 7 Demonstrate the hydrant to pumper hose connections for a reverse lay.
FF # 1
1. Pull sufficient hose to reach the intake valve on the attack pumper.
2. Anchor the hose.
3. Apply a hose clamp to the hose at the attack pumper.
FF # 2
1. After the pumper stops at the water source, make an intake hose connection.
2. Pull the remaining length of the last section of hose from the hose bed.
3. Disconnect the couplings and return the male to the hose bed.
4. Connect the supply hose to the discharge valve.
Objective 8 Demonstrate the proper procedure for making hydrant connections for a soft sleeve or large
diameter hose.
1. Confirm order with officer to make hydrant connection.
2. Remove necessary equipment from the pumper.
3. Remove the hydrant cap by turning it counterclockwise and use a spanner wrench if the cap is
tight.
4. Inspect the hydrant for exterior damage and check for debris or damage in inside outlet.
5. Place the hydrant wrench on hydrant nut, with handle pointing away from outlet.
6. If Necessary - Place reducer adapter (Steamer/Storz) on hydrant, turning clockwise and
making hand tight.
7. Remove intake hose from the pumper
8. Connect the intake hose to the pump intake, turning clockwise and making hand tight.
9. Stretch the intake hose to the hydrant, placing two full twists in the hose to prevent kinking.
10. Make the hydrant connection to the steamer outlet or outlet with adapter, turning clockwise
and making hand tight.
11. Open the hydrant slowly until hose is full (Fully Open).
12. Tighten any leaking connections using rubber mallet or spanner wrench.

© Precision Exams 5210.1819 www.precisionexams.com Page | 43
Fire Science
Fire Science Performance Standards (Optional)
Table of Contents
FS1-4.11: Don PPE For Use at an Emergency ........................................................................................................... 43
FS1-4.13: Doff PPE and Prepare for Reuse ................................................................................................................ 45
FS1-5.3: Routine Radio Traffic ...................................................................................................................................... 48
FS1-5.5: Emergency Radio Traffic (Mayday) .............................................................................................................. 49
FS1-6.14: Donning of SCBA .......................................................................................................................................... 51
FS1-6.19: Inspecting SCBA ............................................................................................................................................. 55
FS1-6.25: Shifting SCBA .................................................................................................................................................. 58
FS1-6.28: Changing SCBA Cylinder, Single Person .................................................................................................. 61
FS1-7.5: Demonstrate Extinguishment of CLASS A Fire ........................................................................................ 65
FS1-7.6: Demonstrate Extinguishment of CLASS B Fire ........................................................................................ 66
FS1-8.11: Demonstrate the Two-Firefighter Low Shoulder Carry...................................................................... 68
FS1-8.20: Two Firefighter Extension Ladder Raise (Flat Raise) ............................................................................ 69
FS1-9.7: Hose Rolls ......................................................................................................................................................... 72
FS1-9.10: Hose Loads ..................................................................................................................................................... 75
FS1-9.26: Deploying Minuteman ................................................................................................................................... 80
FS1-10.11 Methods of Fire Attack: Direct, Indirect, Combination ...................................................................... 82
FS1-10.14 Opening and Closing a Nozzle .................................................................................................................. 84
FS1-4.11: Don PPE For Use at an Emergency Students will Demonstrate the donning of the following articles of PPE as part of an ensemble in less than 60 seconds: PASS
device (if not integrated in SCBA), eye protection, hearing protection.
Overview
• Performance assessment in which an individual student demonstrates the ability to properly, safely,
and efficiently don their personal protective equipment within the national accepted time allotment
(The NFPA® requires that protective clothing be donned in one minute.)
• This is a baseline assessment that focuses on a specific, individual skill.
• The assessment typically would take place during the course.
• Students should be provided with the scorecard (next page) in advance, with corresponding
instruction and opportunity for practice using the same equipment they will use for the assessment.
Starting Position:
• The student will start the activity wearing the “station uniform” per local course requirements.

© Precision Exams 5210.1819 www.precisionexams.com Page | 44
Fire Science
• The complete PPE ensemble should be laid out and checked for service ready to don for the start of
this activity:
o Bunker pants
o Structural firefighting boots
o Nomex hood (as available), see step #2 in scorecard
o Turnout coat
o Gloves (structural or utility/extrication)
o Helmet
• When the student is ready the assessment administrator shall give the command “GO” and start the
stopwatch.
• Throughout the activity, the assessment administrator will be evaluating the student using the
performance task scorecard provided.
• At the completion of Step 5 (Don gloves), the assessment administrator will stop the stopwatch, then
score Step 6 (time limit)
Equipment & Materials
• Full Protective clothing (excluding SCBA)
• Stopwatch
Task Assessment Growth Levels
Proficient
100%
Developing
90-99%
Marginal
70-89%
Unsatisfacto
ry
< 70%
4.11 Demonstrate the donning
of PPE as an ensemble in less
than 60 seconds
12 points 11 points 8-10 points < 8 points
Assessment Instructions To begin the assessment, the instructor/assessment administrator will confirm that:
• The student is wearing “station uniform” per local course requirements.
• The complete PPE ensemble is laid out and checked for service, ready to don:
o Bunker pants
o Structural firefighting boots
o Nomex hood (as available), see step #2 in scorecard
o Turnout coat
o Gloves (structural or utility/extrication)
o Helmet
• When the student is ready the assessment administrator shall give the command “GO” and start the
stopwatch.
• Observe the student’s performance and record the appropriate score and any comments for each
step.
• At the completion of Step 5 (don gloves), the assessment administrator will stop the stopwatch, then
score Step 6 (time limit)

© Precision Exams 5210.1819 www.precisionexams.com Page | 45
Fire Science
Table 1. Criteria Scorecard: Donning PPE For Use at An Emergency
Criteria Scorecard: Donning PPE For Use at An
Emergency
2 points each Comments
1 • Don boots and pants including inside and outside
closures and suspenders in place (2 points)
• If boots and pants are on, but inside and outside
closures not fastened and/or suspenders not up (1
point)
2 • Don hood (may be down around the neck) (2
points)
• If no hood is available, student should state aloud
that he/she would don hood to receive points.
3 • Don coat, including inside and outside closures and
collar up with closure fastened (2 points)
• If coat is on, but inside and outside closures are not
fastened and/or collar down or not fastened (1
point)
4 • Don helmet fastening chin strap and having flaps
down. (2 points)
• If helmet is on, but chin strap not fastened or flaps
up (1 point)
5 Don gloves (over gauntlets if equipped) (2 points)
6 Donning shall be completed in 60 seconds or less (2
points)
ASSESSMENT TOTAL 12 POINTS POSSIBLE
FS1-4.13: Doff PPE and Prepare for Reuse Students will demonstrate the proper doffing of the PPE ensemble and preparing it for reuse
Overview • Performance assessment in which an individual student demonstrates the ability to properly doff their PPE,
inspect it for damage, identify when the PPE needs to be laundered and what to do if the PPE needs repair.
The student shall place their PPE in a ready state so they may don the PPE when needed.
• This is a baseline assessment that focuses on a specific, individual skill.
• The assessment typically would take place during the course.
• Students should be provided with the scorecard (next page) in advance, with corresponding instruction and
opportunity for practice using the same equipment they will use for the assessment.
Step #3: Student should state factors that would require laundering
In the classroom/assessment setting, visible contamination, grime, perspiration, or soot (factors that require
laundering) typically would not be found. Therefore, during this step THE ASSESSMENT ADMINISTRATOR ASKS
THE STUDENT, “THE ASSESSMENT ADMINISTRATOR ASKS THE STUDENT, “WHAT FACTORS MAY BE
PRESENT THAT WOULD REQUIRE LAUNDERING?”

© Precision Exams 5210.1819 www.precisionexams.com Page | 46
Fire Science
Step #4: The student should state the appropriate method of cleaning
THE ASSESSMENT ADMINISTRATOR ASKS THE STUDENT, “WHAT IS THE APPROPRIATE METHOD OF
CLEANING THE PPE?”
Step #5: The student should state action to take if damage is found.
In the classroom/assessment setting, equipment typically would not be damaged. Therefore, during this step THE
ASSESSMENT ADMINISTRATOR ASKS THE STUDENT, “WHAT SHOULD YOU DO IF DAMAGE TO PPE IS
FOUND?”
Step #6: Place clothing in a ready state.
Before starting the assessment, the assessment administrator should inform or remind the student the local
instructions for the designated area where the PPE components should be placed
Starting Position:
• The student will start the activity with complete PPE ensemble on:
o Bunker pants
o Structural firefighting boots
o Nomex hood (as available)
o Turnout coat
o Gloves (structural or utility/extrication)
o Helmet
• When the student is ready the assessment administrator shall give the command “GO” and start the
assessment.
Equipment & Materials
• Full Protective clothing donned (excluding SCBA)
Task Assessment Growth Levels
Proficient
100%
Developing
90-99%
Marginal
70-89%
Unsatisfacto
ry
< 70%
4.13 Demonstrate the proper
doffing of the PPE ensemble
and preparing it for reuse
12 points 11 points 8-10 points < 8 points
Assessment Instructions To begin the assessment, the instructor/assessment administrator will:
• Confirm that the student is wearing the complete PPE ensemble:
o Bunker pants
o Structural firefighting boots
o Nomex hood (as available)
o Turnout coat
o Gloves (structural or utility/extrication)
o Helmet

© Precision Exams 5210.1819 www.precisionexams.com Page | 47
Fire Science
• Inform/remind the student the designated area where the PPE components should be placed (Step #6)
• Tell the student, “During the assessment you will need to verbally state answers to questions I ask.”
• When the student is ready the assessment administrator shall give the command “GO” and start the
assessment.
• The assessment administrator shall:
o Observe the student’s performance and record appropriate score and any comments for each
step.
o Ask the student questions during Steps #3, #4, and #5 as indicated on the scorecard.
Table 2. Criteria Scorecard: Doff PPE and Prepare for Reuse
Criteria Scorecard: Doff PPE and Prepare for Reuse 2 points each Comments
1 Remove protective clothing in the reverse order of
donning their PPE: Gloves, Helmet, Hood, Coat, Pants,
Boots (2 points)
2 Inspect all components of PPE for damage and the need
for cleaning.
• Full points for putting hands on all the components
of the PPE, to inspect it for cleanliness and damage.
• No points for only doing a visual, without putting
hands on all the components of the PPE.
3 Identify factors and the appropriate times when PPE
needs to be laundered (2 points)
THE ASSESSMENT ADMINISTRATOR ASKS
THE STUDENT, “WHAT FACTORS MAY BE
PRESENT OR TIME WOULD REQUIRE
LAUNDERING?”
Full points for stating any visible contamination, grime,
perspiration, or soot, or a minimum of twice a year.
4 State the procedure for laundering the PPE.
THE ASSESSMENT ADMINISTRATOR ASKS
THE STUDENT, “WHAT IS THE
APPROPRIATE METHOD OF CLEANING THE
PPE?”
Students should describe the appropriate method of
cleaning their PPE including removing the liners from the
shells and turning the liners inside out (2 points)

© Precision Exams 5210.1819 www.precisionexams.com Page | 48
Fire Science
FS1-5.3: Routine Radio Traffic Students will demonstrate the following prescribed fire department radio procedures: Routine traffic.
Overview Radio communication is a critical component of fire department operations. This performance evaluation guides
the student through the proficiencies required in the task of transmitting a routine radio message that is clear and
understandable.
Students should be provided with the scorecard (next page) in advance, with corresponding instruction and
opportunity for practice using the same equipment they will use for the assessment.
One of the following types of routine radio messages should be used for the assessment:
• Command from Engine 1. Do you have an assignment for us?
• Dispatch from Engine 1 we are on scene.
• Operations from Engine 1. We have water on the fire.
• Operations from Truck 1. Ventilation has been completed.
Step #1: The assigned frequency will be determined by the course instructor, as appropriate for
situation/location where assessment takes place. Students and other assessment administrators (as applicable)
should be informed of this frequency at the time of the assessment.
Step #5: The appropriate language for department codes, SOPs, or class procedures to be used for this
assessment will be determined by the course instructor. Students and other assessment administrators (as
applicable) should be informed in advance by instructor on what message to communicate during drill.
Equipment & Materials
• Portable radios issued to students by instructor
5 State the procedure that would be followed if damage to
PPE is found.
THE ASSESSMENT ADMINISTRATOR ASKS
STUDENT, “WHAT SHOULD YOU DO IF
DAMAGE TO PPE IS FOUND?
Full points if they state that damaged PPE shall be
removed from service, tagged, and reported to the
officer (2 points)
6 Place clothing in a ready state.
Full points if pants are pushed around boots with
suspenders on top, jacket hung on proper hanger,
helmets hung and gloves and hood stored properly (2
points)
ASSESSMENT TOTAL 12 POINTS POSSIBLE

© Precision Exams 5210.1819 www.precisionexams.com Page | 49
Fire Science
Assessment Instructions At the time of the assessment, the instructor/assessment administrator will:
• Take the radio equipment to the assessment site.
• Let the student know the assigned radio frequency to be used for this assessment.
• Tell the student the message they should communicate in Step #5 (see list on page 1)
• Tell the student to begin. Observe the student’s performance for each step. Record appropriate
scores and any comments.
Table 3. Criteria Scorecard: Routine Radio Traffic
Criteria Scorecard: Routine Radio Traffic 2 points each Comments
1 Rotate the selector knob to assigned frequency.
• Correctly rotates the selector knob on portable
radio to the assigned frequency as specified by the
assessment administrator (2 points)
2 Monitor for radio traffic until air is clear.
• Monitors radio traffic until clear before transmitting
a message (2 points)
3 Hold the microphone: in transmit position, 1 to 2 inches
(25 mm to 50 mm) from your mouth, at a 45-degree
angle
• Holds the microphone correctly in all three aspects
(2 points)
4 Depress the transmit button, holding down until through
with transmission
• Depresses the transmit button, holding down until
through with transmission (2 points)
5 Transmit the assigned routine traffic message using
appropriate language for department codes, SOPs, or
class procedures (per assessment administrator
instructions).
• Transmits a routine traffic message, correctly using
department codes, SOPs, or class procedures (2
points)
ASSESSMENT TOTAL 10 POINTS POSSIBLE
FS1-5.5: Emergency Radio Traffic (Mayday) Students will demonstrate the following prescribed fire department radio procedures: Emergency Mayday signal
Task Assessment Growth Levels
Proficient
100%
Developing
90-99%
Marginal
70-89%
Unsatisfacto
ry
< 70%
5.3 – Routine Radio Traffic 10 points 9 points 7-8 points < 7 points
© Precision Exams 5210.1819 www.precisionexams.com Page | 50
Fire Science
Overview Radio communication is a critical component of fire department operations. This performance evaluation guides
the student through the proficiencies required in the task of transmitting an emergency Mayday radio message that
is clear and understandable.
Students should be provided with the scorecard (next pages) in advance, with corresponding instruction and
opportunity for practice using the same equipment they will use for the assessment.
Step #1: The assigned frequency will be determined by the course instructor, as appropriate for
situation/location where assessment takes place. Students and other assessment administrators (as applicable) will
be informed of this frequency at the time of the assessment.
Steps #4 and #5a: The appropriate language for department codes, SOPs, or class procedures to be used for
this assessment will be determined by the course instructor. Students and other assessment administrators (as
applicable) will be informed in advance of the message to be used during this assessment.
Step #6: Verification of message will be accomplished by the assessment administrator responding to message
stating the message was received.
Equipment & Materials • Portable radios issued to students by instructor
• PASS alarm attached to self-contained breathing apparatus (SCBA)
Task Assessment Growth Levels
Proficient
100%
Developing
90-99%
Marginal
70-89%
Unsatisfacto
ry
< 70%
5.5 Emergency Mayday 18 16-17 13-15 < 13
Assessment Instructions At the time of the assessment, the instructor/assessment administrator will:
• Confirm that the radio equipment is ready to use at the assessment site.
• Tell he student the assigned radio frequency to be used for this assessment.
• Tell the student the message they should communicate in Steps #4 and #5a.
• Inform the student that you will verify the message in Step 6.
• Tell the student to begin. Observe the student’s performance for each step. Record appropriate
scores and any comments.
Criteria Scorecard 2 points each Comments
1 Correctly rotates the selector knob on portable radio to
the assigned frequency as specified by the assessment
administrator (2 points)
2 Holds the microphone correctly in all three aspects: in
transmit position, 1 to 2 inches (25 mm to 50 mm) from
your mouth, at a 45-degree angle
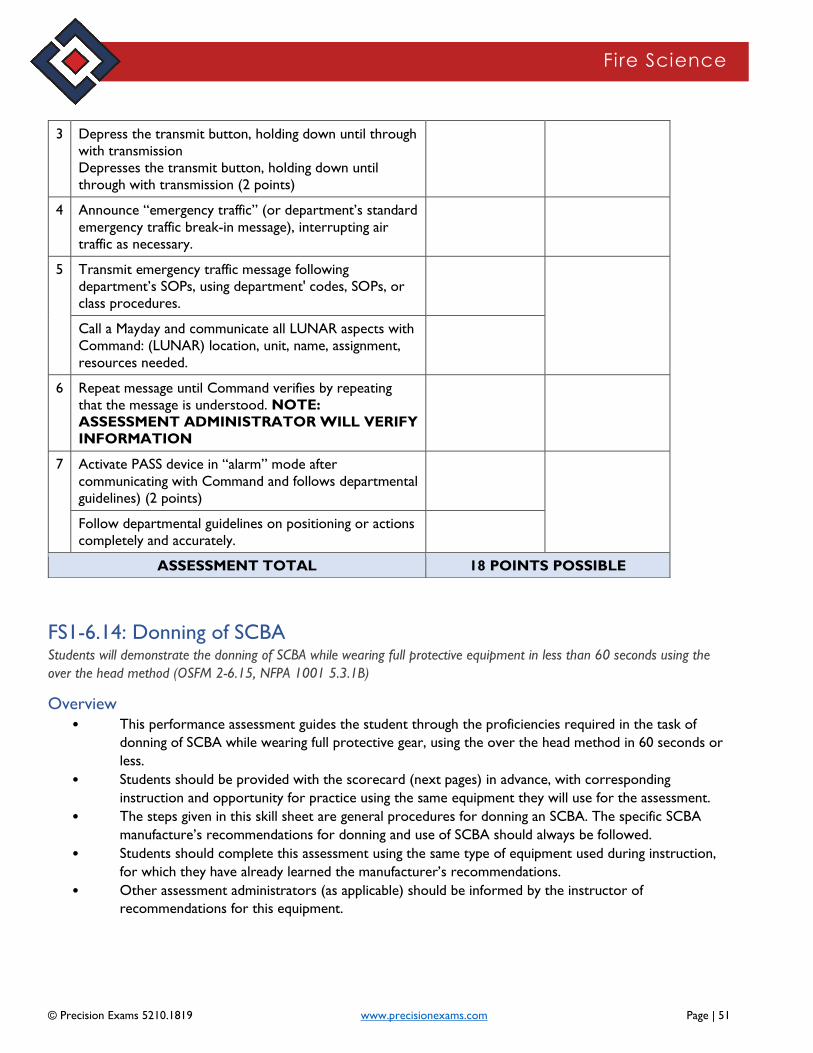
© Precision Exams 5210.1819 www.precisionexams.com Page | 51
Fire Science
FS1-6.14: Donning of SCBA Students will demonstrate the donning of SCBA while wearing full protective equipment in less than 60 seconds using the
over the head method (OSFM 2-6.15, NFPA 1001 5.3.1B)
Overview • This performance assessment guides the student through the proficiencies required in the task of
donning of SCBA while wearing full protective gear, using the over the head method in 60 seconds or
less.
• Students should be provided with the scorecard (next pages) in advance, with corresponding
instruction and opportunity for practice using the same equipment they will use for the assessment.
• The steps given in this skill sheet are general procedures for donning an SCBA. The specific SCBA
manufacture’s recommendations for donning and use of SCBA should always be followed.
• Students should complete this assessment using the same type of equipment used during instruction,
for which they have already learned the manufacturer’s recommendations.
• Other assessment administrators (as applicable) should be informed by the instructor of
recommendations for this equipment.
3 Depress the transmit button, holding down until through
with transmission
Depresses the transmit button, holding down until
through with transmission (2 points)
4 Announce “emergency traffic” (or department’s standard
emergency traffic break-in message), interrupting air
traffic as necessary.
5 Transmit emergency traffic message following
department’s SOPs, using department' codes, SOPs, or
class procedures.
Call a Mayday and communicate all LUNAR aspects with
Command: (LUNAR) location, unit, name, assignment,
resources needed.
6 Repeat message until Command verifies by repeating
that the message is understood. NOTE:
ASSESSMENT ADMINISTRATOR WILL VERIFY
INFORMATION
7 Activate PASS device in “alarm” mode after
communicating with Command and follows departmental
guidelines) (2 points)
Follow departmental guidelines on positioning or actions
completely and accurately.
ASSESSMENT TOTAL 18 POINTS POSSIBLE

© Precision Exams 5210.1819 www.precisionexams.com Page | 52
Fire Science
Starting Position:
• The student will start the activity with the following protective gear on:
o Bunker pants
o Structural firefighting boots
o Turnout coat
o Nomex hood
• The students’ helmet and structural firefighting gloves are at their side ready to be donned at the end
of the activity
• The complete SCBA with face shield should be laid out and checked out for service ready to don for
the start of this activity.
When the student is ready the assessment administrator shall give the command “GO” and start the stopwatch.
Throughout the activity, the assessment administrator will be evaluating the student using the performance task
check list provided.
At the completion of Step 9 (hood, helmet, and gloves), the assessment administrator will stop the stopwatch,
then score Step 10 (time limit)
Equipment & Materials • Full protective gear (see above list)
• Complete SCBA with face shield
• PASS device (if available)
o If this device is not available, clarify step #8 with student – that they are to state they are checking
this even though it is not there
• Stop watch
Task Assessment Growth Levels
Proficient
100%
Developing
90-99%
Marginal
70-89%
Unsatisfacto
ry
< 70%
6.14 Donning SCBA 30 points 27-29 points 21-26 points < 21 points
Assessment Instructions To begin the assessment, the instructor/assessment administrator will confirm that:
• The student is wearing the following protective gear:
o Bunker pants
o Structural firefighting boots
o Turnout coat
o Nomex hood
• The students’ helmet and structural firefighting gloves are at their side ready to be donned at the end
of the activity
• The complete SCBA with face shield is laid out and checked out for service ready to don for the start
of this activity.
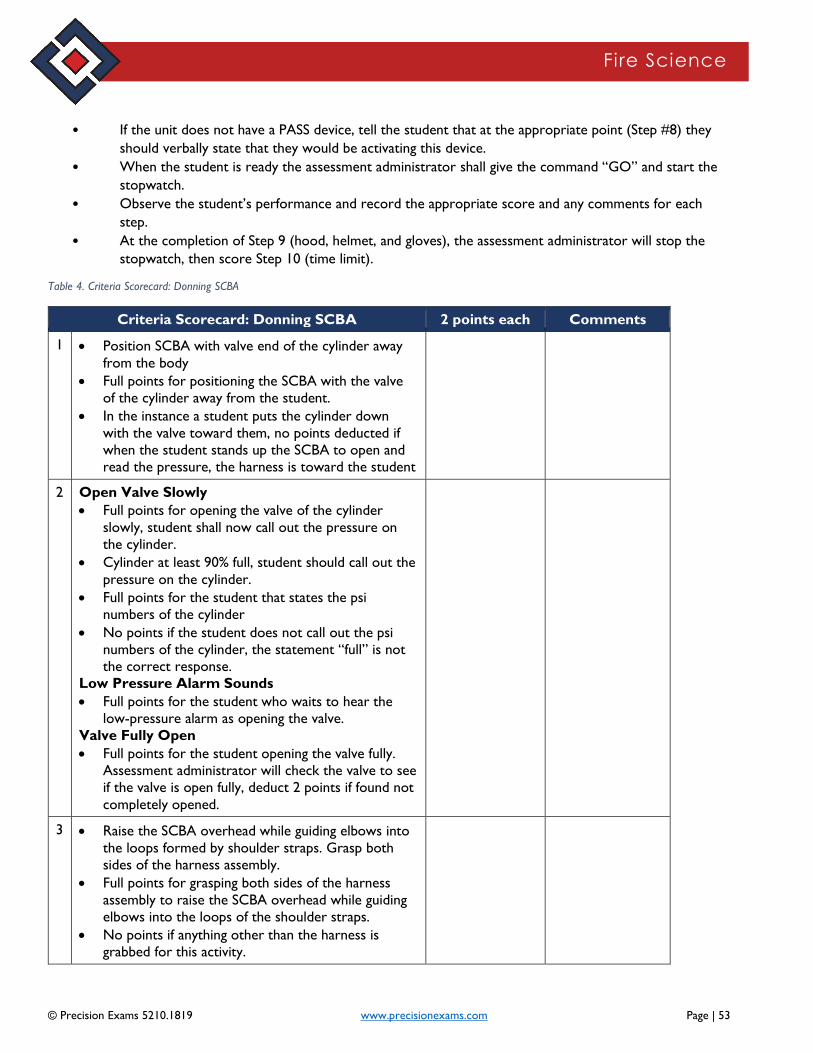
© Precision Exams 5210.1819 www.precisionexams.com Page | 53
Fire Science
• If the unit does not have a PASS device, tell the student that at the appropriate point (Step #8) they
should verbally state that they would be activating this device.
• When the student is ready the assessment administrator shall give the command “GO” and start the
stopwatch.
• Observe the student’s performance and record the appropriate score and any comments for each
step.
• At the completion of Step 9 (hood, helmet, and gloves), the assessment administrator will stop the
stopwatch, then score Step 10 (time limit).
Table 4. Criteria Scorecard: Donning SCBA
Criteria Scorecard: Donning SCBA 2 points each Comments
1 • Position SCBA with valve end of the cylinder away
from the body
• Full points for positioning the SCBA with the valve
of the cylinder away from the student.
• In the instance a student puts the cylinder down
with the valve toward them, no points deducted if
when the student stands up the SCBA to open and
read the pressure, the harness is toward the student
2 Open Valve Slowly
• Full points for opening the valve of the cylinder
slowly, student shall now call out the pressure on
the cylinder.
• Cylinder at least 90% full, student should call out the
pressure on the cylinder.
• Full points for the student that states the psi
numbers of the cylinder
• No points if the student does not call out the psi
numbers of the cylinder, the statement “full” is not
the correct response.
Low Pressure Alarm Sounds
• Full points for the student who waits to hear the
low-pressure alarm as opening the valve.
Valve Fully Open
• Full points for the student opening the valve fully.
Assessment administrator will check the valve to see
if the valve is open fully, deduct 2 points if found not
completely opened.
3 • Raise the SCBA overhead while guiding elbows into
the loops formed by shoulder straps. Grasp both
sides of the harness assembly.
• Full points for grasping both sides of the harness
assembly to raise the SCBA overhead while guiding
elbows into the loops of the shoulder straps.
• No points if anything other than the harness is
grabbed for this activity.

© Precision Exams 5210.1819 www.precisionexams.com Page | 54
Fire Science
4 Release the harness assembly and allow the SCBA to
slide down the back.
• Full points for releasing the harness assembly and
allowing the SCBA to slide down the back into
position.
• No points if the SCBA is dropped at this point of
the activity or if a strap is missed
5 Fasten chest strap, buckle waist strap, and adjust
shoulder straps.
• Full points for fastening shoulder/chest straps, then
buckling waist strap, and then adjusting
shoulder/chest straps if needed.
• No points if not completed in this exact order.
6 Don facepiece
• Full points for donning facepiece correctly per
manufacturer’s recommendations.
• Check facepiece seal (negative seal check) No air
leakage.
• Full points for donning facepiece with no leak and
performing the negative seal check per
manufacturer’s recommendations.
• No points if the student does not perform the
negative seal check.
7 Connect air supply to face shield. Take normal breaths.
• Full points for connecting the regulator to the face
shield, in proper position according to
manufacturer’s recommendations, then taking a
normal breath to open the air flow for breathing.
• No points if the regulator is not locked into
position.
8 Activate PASS device
• Full points for activating PASS device.
• If a PASS device is not available to activate, full
points if student verbally states that they are
activating the device.
• No points if this step is missed.
9 Don hood, helmet, and gloves
• Full points donning the hood now, then helmet, and
then gloves to finish the activity
• No points if not done in this exact order.
• No skin exposed around face shield
• Full points if the hood is in proper position with no
skin exposed around face shield
• No points if skin is exposed anywhere around the
face shield.

© Precision Exams 5210.1819 www.precisionexams.com Page | 55
Fire Science
10 Donning shall be completed in 60 seconds or less
Full points for donning of the SCBA by the over the
head method in 60 seconds or less
No points if donned in more than 60 seconds.
ASSESSMENT TOTAL 30 POINTS POSSIBLE
FS1-6.19: Inspecting SCBA Students will demonstrate the inspection procedures for the main components of SCBA.
Overview This performance evaluation will guide the student through the proficiencies required in the task of inspecting
SCBA and preparing the SCBA for reuse. Students should be provided with the scorecard (next pages) in advance,
with corresponding instruction and opportunity for practice using the same equipment they will use for the
assessment.
The steps given in this assessment are general procedures for inspecting SCBA and preparing SCBA for reuse. The
specific SCBA manufacture’s recommendations should always be followed.
• Students should complete this assessment using the same type of equipment used during instruction,
for which they have already learned the manufacturer’s recommendations. They should be reminded
to always follow the recommendations for the specific SCBA unit that your class is using. For example,
on some SCBA, the audible alarm does not sound when the cylinder valve is opened and not all
facepieces are designed for a seal check without the regulator being attached and activated.
• Other assessment administrators (as applicable) should be informed by the instructor of
recommendations for this equipment.
• Step #3: Student states what to do if dirty or damaged components are found
• In the classroom/assessment setting, dirty or damaged components typically would not be found.
Therefore, during this step THE ASSESSMENT ADMINISTRATOR ASKS THE STUDENT, “WHAT
SHOULD YOU DO IF YOU DIRTY OR DAMAGED COMPONENTS ARE FOUND?”
• Step #6: The student should state the procedure that would be followed if a leak is detected and the
malfunction cannot be corrected in the field.
• In the classroom/assessment setting, a leak typically would not be detected. Therefore, during this step
THE ASSESSMENT ADMINISTRATOR ASKS THE STUDENT, “WHAT SHOULD YOU DO IF A
LEAK IS DETECTED AND THE MALFUNCTION CANNOT BE CORRECTED IN THE FIELD?”
• Step #13: Place SCBA components so that they can be accessed quickly for donning in the event of a
reported emergency. If the location is not available, student should state the location where the
components should be placed
• Before starting the assessment, the assessment administrator should inform or remind the student the
local instructions for the designated area where the SCBA components should be placed
Equipment & Materials • Full protective gear (Optional, as determined by instructor)
• Complete SCBA with facepiece
• PASS device (if available) If this device is not available, clarify step #8 with student – they are to state
they are checking this even though it is not there.
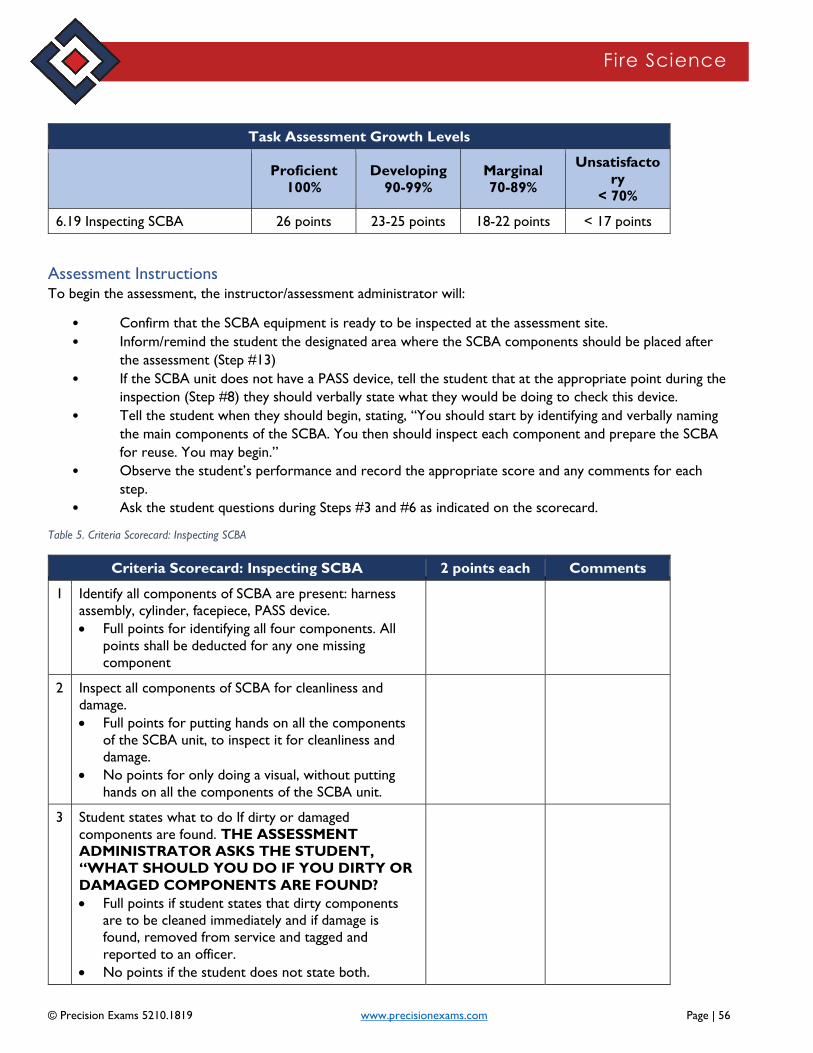
© Precision Exams 5210.1819 www.precisionexams.com Page | 56
Fire Science
Task Assessment Growth Levels
Proficient
100%
Developing
90-99%
Marginal
70-89%
Unsatisfacto
ry
< 70%
6.19 Inspecting SCBA 26 points 23-25 points 18-22 points < 17 points
Assessment Instructions To begin the assessment, the instructor/assessment administrator will:
• Confirm that the SCBA equipment is ready to be inspected at the assessment site.
• Inform/remind the student the designated area where the SCBA components should be placed after
the assessment (Step #13)
• If the SCBA unit does not have a PASS device, tell the student that at the appropriate point during the
inspection (Step #8) they should verbally state what they would be doing to check this device.
• Tell the student when they should begin, stating, “You should start by identifying and verbally naming
the main components of the SCBA. You then should inspect each component and prepare the SCBA
for reuse. You may begin.”
• Observe the student’s performance and record the appropriate score and any comments for each
step.
• Ask the student questions during Steps #3 and #6 as indicated on the scorecard.
Table 5. Criteria Scorecard: Inspecting SCBA
Criteria Scorecard: Inspecting SCBA 2 points each Comments
1 Identify all components of SCBA are present: harness
assembly, cylinder, facepiece, PASS device.
• Full points for identifying all four components. All
points shall be deducted for any one missing
component
2 Inspect all components of SCBA for cleanliness and
damage.
• Full points for putting hands on all the components
of the SCBA unit, to inspect it for cleanliness and
damage.
• No points for only doing a visual, without putting
hands on all the components of the SCBA unit.
3 Student states what to do If dirty or damaged
components are found. THE ASSESSMENT
ADMINISTRATOR ASKS THE STUDENT,
“WHAT SHOULD YOU DO IF YOU DIRTY OR
DAMAGED COMPONENTS ARE FOUND?
• Full points if student states that dirty components
are to be cleaned immediately and if damage is
found, removed from service and tagged and
reported to an officer.
• No points if the student does not state both.

© Precision Exams 5210.1819 www.precisionexams.com Page | 57
Fire Science
4 Student checks the cylinder and states that it is full at
90%-100% of capacity.
• Full points if the student visibly checks the cylinder
pressure and verbally states that the cylinder is full
at 90 to 100% of capacity.
• No points if the student does not both visibly
check and state.
5 Open the cylinder valve slowly; verify the operation of
the low air alarm and the absence of audible air leaks.
• Full points for opening the cylinder valve slowly,
verifying the operation of the low air alarm and the
absence of audible air leaks.
• No points if any part of this step is missed
6 The student should state the procedure that would be
followed if a leak is detected and the malfunction
cannot be corrected in the field. THE
ASSESSMENT ADMINISTRATOR ASKS THE
STUDENT, “WHAT SHOULD YOU DO IF A
LEAK IS DETECTED AND THE
MALFUNCTION CANNOT BE CORRECTED
IN THE FIELD?”
• Full points if they state that an SCBA with audible
leaks due to malfunctions shall be removed from
service, tagged, and reported to the officer.
7 Check that gauges and/or indicators (i.e. heads-up
display) are providing similar pressure readings.
Manufacturer’s guidelines determine the acceptable
range.
• Full points if the student visibly checks that gauges
and/or indicators provide similar pressure readings
(Generally within 100 psi.)
• No points if the student does not check all gauges
and/or indicators.
8 Check function (all modes) of PASS device. If there is
no PASS device on the unit, the student should verbally
state that they would check the PASS device at this
point.
• Full points for the student that checks the functions
(all Modes) of the PASS device of their unit.
• If a PASS device is not available to check, full points
if student states that they are checking the device
• No points if not checked for the unit that is in use
or stated.
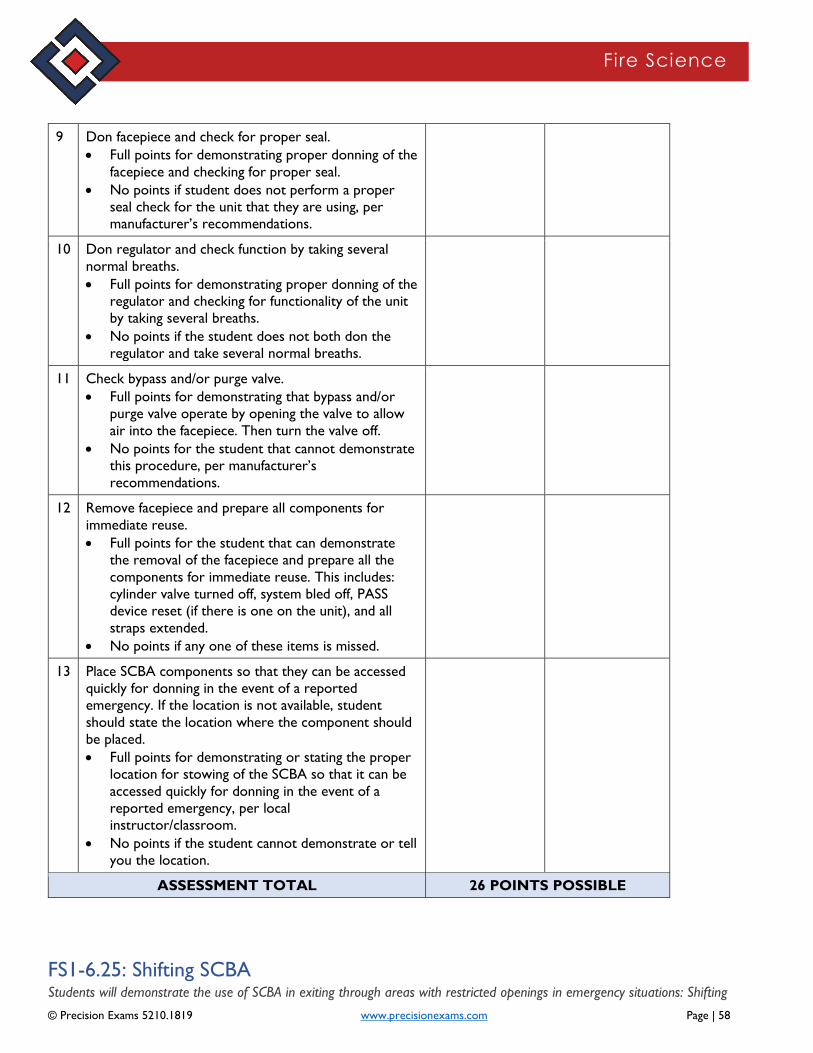
© Precision Exams 5210.1819 www.precisionexams.com Page | 58
Fire Science
9 Don facepiece and check for proper seal.
• Full points for demonstrating proper donning of the
facepiece and checking for proper seal.
• No points if student does not perform a proper
seal check for the unit that they are using, per
manufacturer’s recommendations.
10 Don regulator and check function by taking several
normal breaths.
• Full points for demonstrating proper donning of the
regulator and checking for functionality of the unit
by taking several breaths.
• No points if the student does not both don the
regulator and take several normal breaths.
11 Check bypass and/or purge valve.
• Full points for demonstrating that bypass and/or
purge valve operate by opening the valve to allow
air into the facepiece. Then turn the valve off.
• No points for the student that cannot demonstrate
this procedure, per manufacturer’s
recommendations.
12 Remove facepiece and prepare all components for
immediate reuse.
• Full points for the student that can demonstrate
the removal of the facepiece and prepare all the
components for immediate reuse. This includes:
cylinder valve turned off, system bled off, PASS
device reset (if there is one on the unit), and all
straps extended.
• No points if any one of these items is missed.
13 Place SCBA components so that they can be accessed
quickly for donning in the event of a reported
emergency. If the location is not available, student
should state the location where the component should
be placed.
• Full points for demonstrating or stating the proper
location for stowing of the SCBA so that it can be
accessed quickly for donning in the event of a
reported emergency, per local
instructor/classroom.
• No points if the student cannot demonstrate or tell
you the location.
ASSESSMENT TOTAL 26 POINTS POSSIBLE
FS1-6.25: Shifting SCBA Students will demonstrate the use of SCBA in exiting through areas with restricted openings in emergency situations: Shifting

© Precision Exams 5210.1819 www.precisionexams.com Page | 59
Fire Science
Overview This performance assessment guides the student through the proficiencies required in the task of exiting through
areas with restricted openings in emergency situations. Students should be provided with the scorecard (next
pages) in advance, with corresponding instruction and opportunity for practice using the same equipment they will
use for the assessment.
Students must be familiar with the SCBA used in their school/area.
Remind the student that the scenario that is used forces them to pass through a restricted opening to exit a
possible hazardous atmosphere. This performance task is an extreme situation and is meant to also teach the
student the ability to call a MAYDAY and attempt to rescue themselves. Remind students to remain calm, think
about their surroundings, and think about their options.
Step #7: In the classroom/assessment setting, students typically would be able to pass through the restricted
opening. Therefore, during this step the assessment administrator asks the student what they should do if they are
unable to pass through the restricted opening.
Equipment & Materials
• Obstacle course with constricted openings/exits/passage: The obstacle course used should have a standard
stud wall that should be used to teach and assess this skill. The studs should be spaced 16 inches (406 mm) on
center.
• Full protective gear
• SCBA
Task Assessment Growth Levels
Proficient
100%
Developing
90-99%
Marginal
70-89%
Unsatisfacto
ry
< 70%
6.25 Shifting SCBA 22 points 19-21 points 14-18 points < 14 points
Assessment Instructions To begin the assessment, the instructor/assessment administrator will:
• Confirm that the protective gear, SCBA, and constricted passage (stud wall 16” on center) are ready
to use for the assessment.
• Inform/remind the student to follow the recommendations for the specific equipment and to always
follow the instructor’s directions and all safety procedures of the classroom.
• When it’s time to start, tell the student, “This performance task simulates an extreme situation. It is
important to remain calm, think about your surroundings, and think about your options. You will start
by donning the protective gear and SCBA. You’ll then proceed through the constricted passage and
follow the appropriate procedures to adjust the equipment. After exiting the area you’ll doff the gear.
At that point, I will ask you some questions. You may begin.”
• Observe the student’s performance and record the appropriate score and any comments for each
step.
• Ask the student the questions during Step #7 as indicated on the scorecard.
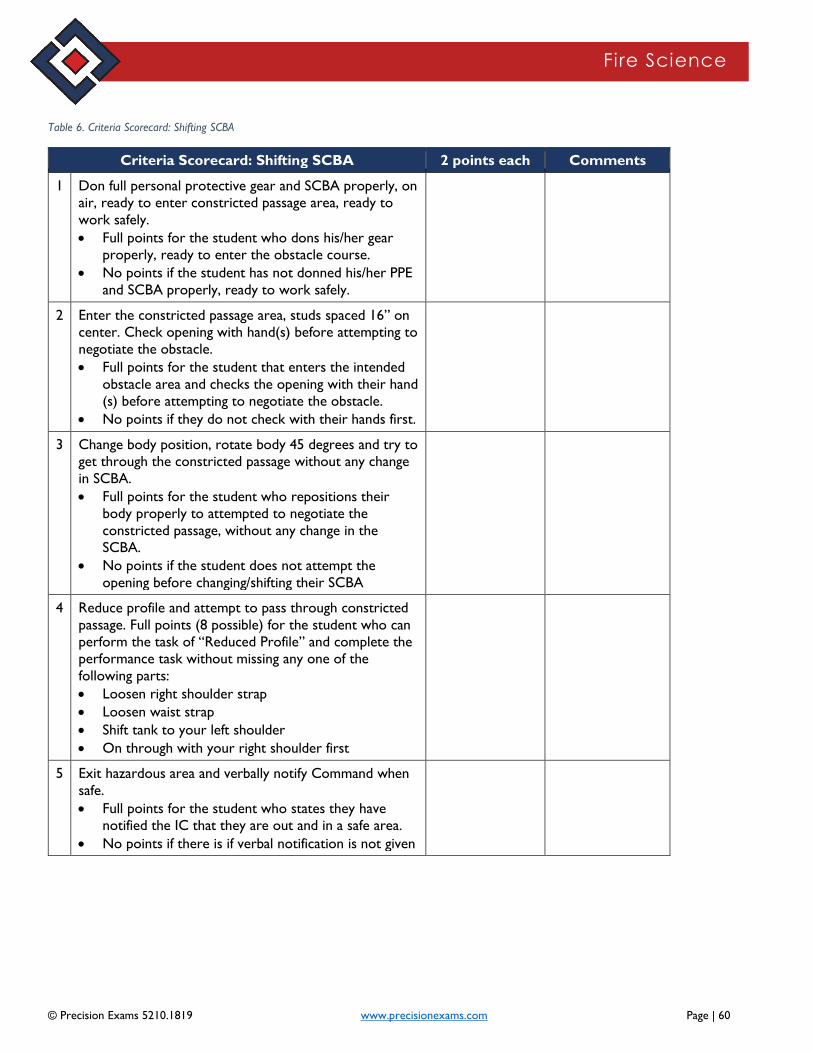
© Precision Exams 5210.1819 www.precisionexams.com Page | 60
Fire Science
Table 6. Criteria Scorecard: Shifting SCBA
Criteria Scorecard: Shifting SCBA 2 points each Comments
1 Don full personal protective gear and SCBA properly, on
air, ready to enter constricted passage area, ready to
work safely.
• Full points for the student who dons his/her gear
properly, ready to enter the obstacle course.
• No points if the student has not donned his/her PPE
and SCBA properly, ready to work safely.
2 Enter the constricted passage area, studs spaced 16” on
center. Check opening with hand(s) before attempting to
negotiate the obstacle.
• Full points for the student that enters the intended
obstacle area and checks the opening with their hand
(s) before attempting to negotiate the obstacle.
• No points if they do not check with their hands first.
3 Change body position, rotate body 45 degrees and try to
get through the constricted passage without any change
in SCBA.
• Full points for the student who repositions their
body properly to attempted to negotiate the
constricted passage, without any change in the
SCBA.
• No points if the student does not attempt the
opening before changing/shifting their SCBA
4 Reduce profile and attempt to pass through constricted
passage. Full points (8 possible) for the student who can
perform the task of “Reduced Profile” and complete the
performance task without missing any one of the
following parts:
• Loosen right shoulder strap
• Loosen waist strap
• Shift tank to your left shoulder
• On through with your right shoulder first
5 Exit hazardous area and verbally notify Command when
safe.
• Full points for the student who states they have
notified the IC that they are out and in a safe area.
• No points if there is if verbal notification is not given

© Precision Exams 5210.1819 www.precisionexams.com Page | 61
Fire Science
6 Student states that they are clear of the hazardous area
and can now doff SCBA and personal protective gear.
Doff the gear.
• Full points for the student who states that they are
clear of the hazardous area and then doffs their
SCBA and PPE
• No points if the student does not state that they are
now clear of the hazardous area, before doffing their
gear.
7 THE ASSESSMENT ADMINISTRATOR ASKS THE
STUDENT, “WHAT IF YOU CANNOT PASS
THROUGH THE RESTRICTED OPENING? WHAT
SHOULD YOU DO?”
• Student states that they would communicate with
Command and call a Mayday, using (LUNAR)
location, unit, name, assignment, resources needed.
• Full points to the student who states all the
components: notify IC, call a Mayday and
communicate LUNAR
• No points if any one of these is not stated
• Student states that they would activate PASS device
in “alarm” mode after communicating with
Command.
• Full points to the student who states that they
would activate PASS device in “alarm” mode after
communicating with IC.
• No points if this is not verbally stated
ASSESSMENT TOTAL 22 POINTS POSSIBLE
FS1-6.28: Changing SCBA Cylinder, Single Person Students will demonstrate an air cylinder exchange while the SCBA is not worn by a firefighter.
Overview This performance assessment guides the student through the proficiencies required in the task of changing an
SCBA cylinder. Changing cylinders can be either a one-person or a two-person job. This assessment is for the
one-person method for changing a cylinder.
Students should be provided with the scorecard (next pages) in advance, with corresponding instruction and
opportunity for practice using the same equipment they will use for the assessment.
Reminders verbally given to all students immediately prior to the assessment:
• Remind the student to always follow the recommendations for the specific cylinders your department
uses. On some SCBA, the audible alarm does not sound when the cylinder valve is opened. Students
must know the operation of the unit that they are using.
•

© Precision Exams 5210.1819 www.precisionexams.com Page | 62
Fire Science
• Remind the student that they should always check the cylinders’ capacity to maintain a 90-100% on
the cylinders’ capacity, their life may depend upon it!
• Remind the student to not cut corners! The student should follow a consistent routine for all aspects
of PPE/SCBA.
Step #6: Remove the empty cylinder from harness assembly. Before starting the assessment, the assessment
administrator should inform or remind the student the local instructions for (1) how to mark the spent cylinder
and (2) the designated area where the spent cylinder should be placed.
Step #8: Checking for debris in line. In the classroom/assessment setting, debris typically would not be found in
the line. Therefore, during this step the assessment administrator asks the sutdnet what they should do if they find
debris in the line.
Step #12: Malfunction that cannot be corrected in the field. The assessment administrator should ask the student
what they should do if an audible leak is detected and the malfunction cannot be corrected in the field.
Equipment & Materials • Full protective gear (optional), determined by assessment administrator
• SCBA unit, as determined by instructor
• Replacement cylinder 90-100% of capacity
• Salvage cover – the designated area where spent cylinder should be placed
Task Assessment Growth Levels
Proficient
100%
Developing
90-99%
Marginal
70-89%
Unsatisfacto
ry
< 70%
6.28 Changing cylinder 28 points 25-27 points 19-24 points < 19 points
Assessment Instructions To begin the assessment, the instructor/assessment administrator will:
• Take the SCBA equipment to be changed to the assessment site.
• Inform/remind the student the local instructions for (1) how to mark the spent cylinder and (2) the
designated area where the spent cylinder should be placed (Step #6)
• When it’s time to begin, tell the student, “Your task is to change the SCBA cylinder following the
recommendations for this type of cylinder, as learned in class. You should always check the cylinder’s
capacity to maintain a 90-100% capacity, your life may depend upon it! When you get to this part of
the process, you should verbally state the capacity. Do not cut corners! You may begin.”
• Observe the student’s performance for each step. Record the appropriate scores and any comments.
• Ask the student questions during Steps #8 and #12 as indicated on the scorecard.

© Precision Exams 5210.1819 www.precisionexams.com Page | 63
Fire Science
Table 7. Criteria Scorecard: Changing cylinder
Criteria Scorecard: Changing cylinder 2 points each Comments
1 Place the SCBA unit on a firm surface
• Full points for placing the SCBA unit laying down on
any solid surface
• Standing the SCBA unit up should be a one point
deduction, because this is not a recommended
practice
2 Close the cylinder valve
• Full points for closing the cylinder valve fully by
pushing in on the valve and then turning clockwise.
• If the student does not get the valve closed fully, but
self- corrects before continuing to the next step: no
deductions.
3 Bleed air pressure from high- and low-pressure hoses.
• Full points for bleeding the air pressure from high
and low pressure hoses, down to the point when
the low air alarm stops sounding.
• No points if the unit is not bled to the point when
the alarm sounds.
4 Disconnect the high-pressure line from the cylinder.
• Full points for disconnecting the high-pressure line
from the cylinder.
• No points if student attempts to disconnect the
high-pressure line/coupling nut without having bled
the pressure in step #3.
5 Release clamp(s) on empty cylinder
• Full points for releasing the clamp (s) on empty
cylinder. No points if clamps are not released.
Note: Steps 4 and 5 can be done in reverse order
without any deductions (i.e., Step 5 can be done
first, followed by Step 4.)
6 Remove the empty cylinder from harness assembly.
Mark the spent cylinder, per local instructions. Place on
ground or salvage cover, in designated area, per local
instructions.
• Full points for removing the empty cylinder from the
harness, marking it appropriately, and placing it in
the proper location.
• One point deducted for not marking the empty
cylinder correctly, per local instructions
• One point deducted for not placing the empty
cylinder in the designated area, per local instructions

© Precision Exams 5210.1819 www.precisionexams.com Page | 64
Fire Science
7 State that the replacement cylinder is 90-100% of rated
capacity.
• Full points for checking the replacement cylinder
and stating that it is 90-100% of rated capacity.
• No points if not both checked and verbally stated
at this point in the task.
8 Check the cylinder valve opening and the high-pressure
hose fitting for debris
• Full points for checking the cylinder valve opening
and the high-pressure hose fitting for debris.
• One point deduction if the student only does one
and not the other.
THE ASSESSMENT ADMINISTRATOR ASKS
THE STUDENT, “WHAT SHOULD YOU DO
IF YOU FIND DEBRIS IN THE LINE? The student
should state the procedure that would be followed if
debris was found in the high-pressure line.
• Full points for stating they should quickly open and
close cylinder valve
• No points if they state an incorrect procedure.
9 Place the new cylinder into the backpack with the
cylinder outlet in the correct position. Lock the
cylinder in place.
• Full points for proper placement of the new, full,
cylinder into the harness.
• Full points for completing both points of lock
down.
• One point deduction if the student misses either of
the points of lock down.
10 Connect the high-pressure hose to the cylinder and
hand-tighten
• Full points for connecting the high-pressure hose to
the cylinder, hand tighten only.
• No points if cross threading
11 Slowly and fully open the cylinder valve and listen for an
audible alarm and leaks as the system pressurizes.
• Full points for slowly and fully opening of the
cylinder valve and listening for audible alarm(s) and
leaks as the system pressurizes
• No partial points. All or none.

© Precision Exams 5210.1819 www.precisionexams.com Page | 65
Fire Science
12 THE ASSESSMENT ADMINISTRATOR ASKS THE
STUDENT, “WHAT IF AN AUDIBLE LEAK IS
DETECTED AND THE MALFUNCTION CANNOT
BE CORRECTED IN THE FIELD?”
The student should state the procedure that would be
followed if a leak is detected and the malfunction
cannot be corrected in the field.
• Full points if the student states that the SCBA
should be removed from service, tagged, and
reported to the officer.
• No points if the student does not state any one of
the three actions, or states any other procedure.
ASSESSMENT TOTAL 28 POINTS POSSIBLE
FS1-7.5: Demonstrate Extinguishment of CLASS A Fire Students will demonstrate the extinguishment of the following classes of fires using the appropriate portable fire
extinguisher: Class A
Overview • A firefighter needs to be aware of the distinct types of fire extinguishers, their use and limitations, and
proper and effective application.
• In this performance assessment, an individual student demonstrates the ability to properly and safely
use a stored pressure water extinguisher to extinguish a CLASS A fire.
• Baseline assessment that focuses on a specific, individual skill.
• Assessment takes place during the course.
• Students should be provided with the scorecard (next pages) in advance, with corresponding
instruction and opportunity for practice using the same equipment they will use for the assessment.
Equipment & Materials • Full Protective clothing
• Stored pressure water extinguisher
• Small Class A fire or facsimile, suitable size for an extinguisher
• Tags for labeling spent cylinder
Task Assessment Growth Levels
Proficient
100%
Developing
90-99%
Marginal
70-89%
Unsatisfacto
ry
< 70%
FS1-7.5 Demonstrate
extinguishment of CLASS A
fire
20 points 17-19 points 13-16 points < 13 points
Assessment Instructions To begin the assessment, the instructor/assessment administrator will:
• Take the stored pressure water extinguisher and tag to the assessment site.
• Prepare the small Class A fire or facsimile.

© Precision Exams 5210.1819 www.precisionexams.com Page | 66
Fire Science
• Tell the student to begin. Observe the student’s performance for each step. Record the appropriate
scores and any comments.
Table 8. Criteria Scorecard: Extinguishment of CLASS A fire
Criteria Scorecard: Extinguishment of CLASS A fire 2 points each Comments
1 Size up fire, ensuring that it is safe to fight with an
extinguisher.
• Full points for stating why the fire is safe to fight
with a Class A Extinguisher (2 points)
2 Pull pin at top of extinguisher to break the inspection
band (2 points)
3 Test to ensure proper operation.
• Point nozzle horn in safe direction (1 point)
• Discharge very short test burst (1 point)
4 Carry extinguisher to within stream reach of fire.
• Appropriate escape route identified and stated (1
point)
• Approach upwind of fire (1 point)
5 Aim nozzle toward base of fire (2 points)
6 Discharge extinguishing agent (2 points)
• Squeeze handle and sweep slowly back and forth
across entire width of fire (2 points)
7 Cover entire area with water until fire is completely
extinguished (2 points)
8 Exit fire area in safe manner, ensuring situational
awareness/does not turn away from fire area (2 points)
9 Tag extinguisher for recharge and inspection (2 points)
ASSESSMENT TOTAL 20 POINTS POSSIBLE
FS1-7.6: Demonstrate Extinguishment of CLASS B Fire Students will demonstrate the extinguishment of the following classes of fires using the appropriate portable fire
extinguisher: Class B (OSFM 2-7.7, NFPA 1001 5.3.16B)
Overview • A firefighter needs to be aware of the diverse types of fire extinguishers, their use and limitations, and
proper and effective application.
• In this performance assessment, an individual student demonstrates the ability to properly and safely
use a dry chemical (ABC) extinguisher to extinguish a CLASS B fire.
• Baseline assessment that focuses on a specific, individual skill.
• Assessment takes place during the course.

© Precision Exams 5210.1819 www.precisionexams.com Page | 67
Fire Science
• Students should be provided with the scorecard (next pages) in advance, with corresponding
instruction and opportunity for practice using the same equipment they will use for the assessment.
Equipment & Materials • Full Protective clothing
• Dry Chemical (ABC) extinguisher
• Small Class B fire or facsimile, suitable size for an extinguisher
• Tags for labeling spent cylinder
Task Assessment Growth Levels
Proficient
100%
Developing
90-99%
Marginal
70-89%
Unsatisfacto
ry
< 70%
FS1-7.6 Demonstrate
extinguishment of CLASS B fire 20 points 17-19 points 13-16 points < 13 points
Assessment Instructions To begin the assessment, the instructor/assessment administrator will:
• Take the dry chemical (ABC) extinguisher and tag to the assessment site.
• Prepare the small Class B fire or facsimile.
• Tell the student to begin. Observe the student’s performance for each step. Record the appropriate
scores and any comments.
Criteria Scorecard: Operating a Dry Chemical
(ABC) Extinguisher
2 points each Comments
1 Size up fire, ensuring that it is safe to fight with an
extinguisher.
• Full points for stating why the fire is safe to fight
with a dry chemical (ABC) extinguisher (2 points)
2 Pull pin at top of extinguisher to break the inspection
band (2 points)
3 Test to ensure proper operation.
• Point nozzle horn in safe direction (1 point)
• Discharge very short test burst (1 point)
4 Carry extinguisher to within stream reach of fire.
• Appropriate escape route identified (1 point)
• Approach upwind of fire (1 point)
5 Aim nozzle toward base of fire (2 points)
6 Discharge extinguishing agent (2 points)
• Squeeze handle and sweep slowly back and forth
across entire width of fire (2 points)
7 Cover entire area with water until fire is completely
extinguished (2 points)

© Precision Exams 5210.1819 www.precisionexams.com Page | 68
Fire Science
8 Exit fire area in safe manner, ensuring situational
awareness/does not turn away from fire area (2 points)
9 Tag extinguisher for recharge and inspection (2 points)
ASSESSMENT TOTAL 20 POINTS POSSIBLE
FS1-8.11: Demonstrate the Two-Firefighter Low Shoulder Carry Students will demonstrate the two firefighter-low shoulder carry.
Overview • Performance assessment in which students, as part of a two-person team, demonstrate the ability to
properly and safely remove/carry an extension or single ladder.
• Baseline assessment that focuses on satisfactory demonstration of skill as part of a two-person team.
• Assessment takes place during the course.
• Each student shall be evaluated in the role of “Firefighter #1” and as “Firefighter #2”. Students will
perform this carry two times, with one of the students as Firefighter #1 the first time and the other as
Firefighter #1 the second time.
• For the assessment, TWO copies of pages 2-4 of this document will be needed:
o Two scorecards (pages 2-3) Complete one scorecard during each performance.
o Two student “Score Summary Sheets” (page 4) Fill out one summary sheet for each student after
the two performances are done.
• Students should be provided with the scorecard (next pages) in advance, with corresponding
instruction and opportunity for practice using the same equipment they will use for the assessment.
Equipment & Materials
• Full Protective clothing
• One 24-foot (8 m) extension or single ladder
Task Assessment Growth Levels
Proficient
100%
Developing
90-99%
Marginal
70-89%
Unsatisfacto
ry
< 70%
8.11 Demonstrate the two
firefighter-low shoulder carry 34 points 27-33 points 24-26 points < 24 points
Assessment Instructions To begin the assessment, the instructor/assessment administrator will:
• Take the ladder and two copies of the scorecard to the assessment site.
• Explain to the two students that they will perform this carry two times, with one of them as
Firefighter #1 the first time and the other as Firefighter #1 the second time.
• Clarify which student will begin as Firefighter #1. Label the scorecard accordingly.
• Tell the students to begin.
• Observe the students’ performance for each step. Record the appropriate scores and any comments
for both students.
• Repeat with the roles reversed. Use the second scorecard.

© Precision Exams 5210.1819 www.precisionexams.com Page | 69
Fire Science
• Transfer the scores earned by each student to a “Score Summary Sheet” (page 4) for that individual
student. Share the scorecards with details with both students.
Table 9. Criteria Scorecard: Demonstrate the two firefighter-low shoulder carry
Criteria Scorecard: Demonstrate the two
firefighter-low shoulder carry
2 points each
Comments Firefighter
1
Firefighter
2
1 Both Firefighters: Kneel on the same side of
the ladder facing the tip (2 points).
2 Both Firefighters: Grasp a convenient rung
with the near hand, palm forward (2 points).
3 Both Firefighters: Stand the ladder on edge
(2 points)
4 Firefighter #1: Give the command to
“shoulder the ladder” (2 points).
5 Both Firefighters: Stand, starting in a squat
position and lifting the ladder with the legs,
rather than the back (2 points)
6 Both Firefighters: Tilt the far beam upward
as the ladder and the firefighters rise (2
points)
7 Both Firefighters: Pivot and place the free
arm between two rungs.
• Both firefighters facing the butt (1
point)
• Lifting smoothly and continuously (1
point)
8 Both Firefighters: Place the upper beam on
the shoulders (2 points).
ASSESSMENT TOTAL 18 points
possible
16 points
possible
34 points
possible
FS1-8.20: Two Firefighter Extension Ladder Raise (Flat Raise) Demonstrate the two-firefighter extension ladder raise (flat raise)
Overview • Performance assessment in which students, as part of a two-person team, demonstrate the ability to
properly and safely position, raise, and secure a 24-foot or 28-foot extension ladder.
• Baseline assessment that focuses on satisfactory demonstration of skill as part of a two-person team.
• Assessment takes place during the course.
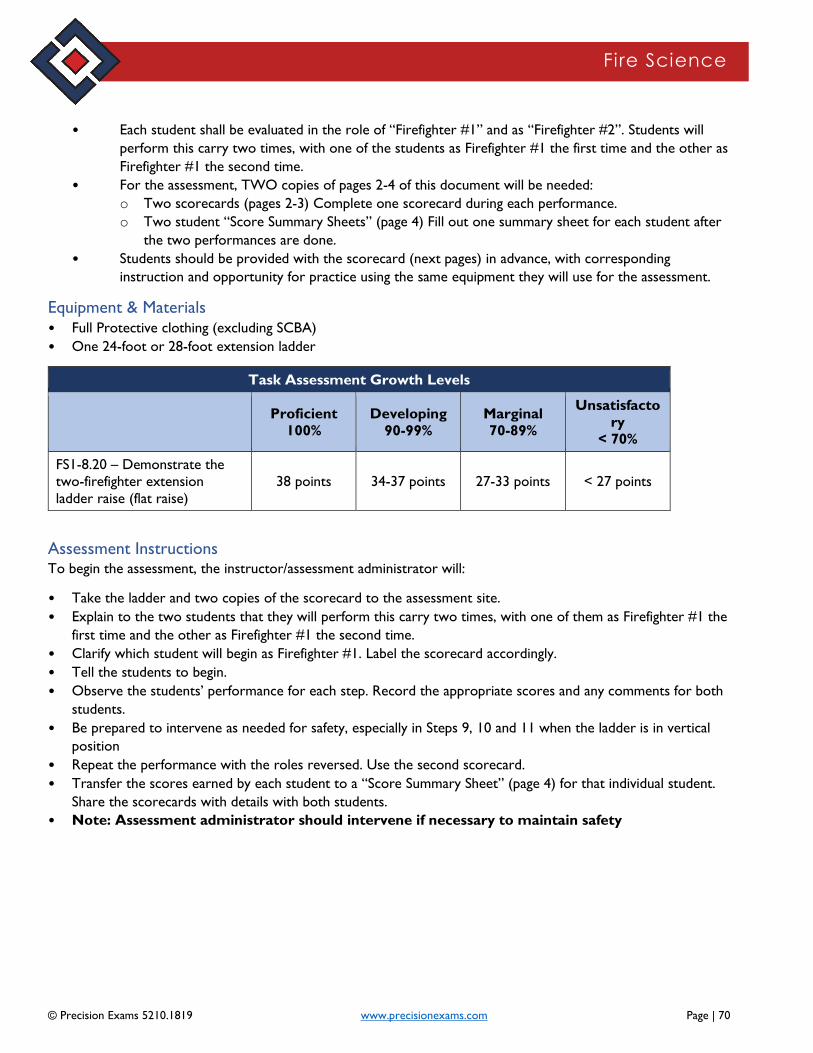
© Precision Exams 5210.1819 www.precisionexams.com Page | 70
Fire Science
• Each student shall be evaluated in the role of “Firefighter #1” and as “Firefighter #2”. Students will
perform this carry two times, with one of the students as Firefighter #1 the first time and the other as
Firefighter #1 the second time.
• For the assessment, TWO copies of pages 2-4 of this document will be needed:
o Two scorecards (pages 2-3) Complete one scorecard during each performance.
o Two student “Score Summary Sheets” (page 4) Fill out one summary sheet for each student after
the two performances are done.
• Students should be provided with the scorecard (next pages) in advance, with corresponding
instruction and opportunity for practice using the same equipment they will use for the assessment.
Equipment & Materials • Full Protective clothing (excluding SCBA)
• One 24-foot or 28-foot extension ladder
Task Assessment Growth Levels
Proficient
100%
Developing
90-99%
Marginal
70-89%
Unsatisfacto
ry
< 70%
FS1-8.20 – Demonstrate the
two-firefighter extension
ladder raise (flat raise)
38 points 34-37 points 27-33 points < 27 points
Assessment Instructions To begin the assessment, the instructor/assessment administrator will:
• Take the ladder and two copies of the scorecard to the assessment site.
• Explain to the two students that they will perform this carry two times, with one of them as Firefighter #1 the
first time and the other as Firefighter #1 the second time.
• Clarify which student will begin as Firefighter #1. Label the scorecard accordingly.
• Tell the students to begin.
• Observe the students’ performance for each step. Record the appropriate scores and any comments for both
students.
• Be prepared to intervene as needed for safety, especially in Steps 9, 10 and 11 when the ladder is in vertical
position
• Repeat the performance with the roles reversed. Use the second scorecard.
• Transfer the scores earned by each student to a “Score Summary Sheet” (page 4) for that individual student.
Share the scorecards with details with both students.
• Note: Assessment administrator should intervene if necessary to maintain safety

© Precision Exams 5210.1819 www.precisionexams.com Page | 71
Fire Science
Table 10. Criteria Scorecard: Demonstrate the two firefighter-low shoulder carry
Criteria Scorecard: Demonstrate the two-
firefighter extension ladder raise (flat
raise).
2 points each
Comments Firefighter
1
Firefighter
2
1 Firefighter #1: Place the butt end on the
ground (2 points).
2 Firefighter #2: Rest the ladder beam on a
shoulder (2 points).
3 Firefighter #1: Heel the ladder by standing
on the bottom rung (2 points).
4 Firefighter #1: Crouch down to grasp a
convenient rung or the beams with both
hands (2 points).
5 Firefighter #1: Lean back (2 points)
6 Firefighter #2: Step beneath the ladder (2
points)
7 Firefighter #2: Grasp a convenient rung with
both hands (2 points)
8 Firefighter #2: Advance hand-over-hand
down the rungs toward the butt end until
the ladder is in a vertical position (2 points)
9 Firefighter #1: Grasp successively higher
rungs or higher on the beams as the ladder
comes to a vertical position until standing
upright (2 points)
10 Both Firefighters: Face each other (2 points)
Ladder should be in a vertical position.
11 Both Firefighters: Heel the ladder by placing
toes against the beams (2 points) Ladder
should be in a vertical position.
12 Firefighter #1: Grasp the halyard (2 points)
13 Firefighter #1: Extend the fly section with a
hand-over-hand motion until the tip reaches
the desired elevation. Engage the ladder
locks (2 points)
14 Firefighter #2: Grasp the beams (2 points)
15 Both Firefighters: Lower the ladder gently
onto the building.
• Place one foot against a butt spur or on
the bottom rung using the proper
heeling method (2 points)

© Precision Exams 5210.1819 www.precisionexams.com Page | 72
Fire Science
16 Firefighter #2: Ties the halyard utilizing a
clove hitch with safety (2 points)
ASSESSMENT TOTAL 20 points
possible
18 points
possible
38 points
possible
FS1-9.7: Hose Rolls Students will demonstrate the following types of hose rolls: straight roll, donut roll, twin donut roll, and self-locking twin
donut roll
Overview • Performance and Product assessment in which an individual student demonstrates abilities to properly roll the
hose in each of four ways: Straight Roll, Donut Roll, Twin Donut Roll, and Self- Locking Twin Donut Roll
• This is an intermediate assessment. It is a structured task that requires two or three specified baseline skills
• Assessment takes place during the course.
• For this assessment, students will take a 50-foot section of hose and roll it in accordance to the given
objective. Certain rolls require a step by step process to accomplish the task. These steps must be done in
order.
• The assessment emphasizes the quality of the final, rolled hose. Various techniques can be used to do the rolls,
depending on what has been taught in class.
• Students should be provided with the scorecard (next pages) in advance, with corresponding instruction and
opportunity for practice using the same equipment they will use for the assessment.
Straight Roll, Step 1
THE ASSESSMENT ADMINISTRATOR REQUESTS EITHER AN IN-SERVICE OR AN OUT-OF-SERVICE
STRAIGHT ROLL. This should be randomly determined. Possible techniques:
• Print each option on a 3X5 card. Student draws.
• Student rolls a dice/die
o Even number = in-service
o Odd number = out-of-service
• Student flips a coin
o Head = in-service
o Tail = out-of-service
Equipment & Materials
• 50-foot section of 1¾”, 2½”, and/or 3” hose line
• A pair of gloves (leather, utility, or structural firefighting)
Task Assessment Growth Levels
Proficient
100%
Developing
90-99%
Marginal
70-89%
Unsatisfacto
ry
< 70%
9.7 Hose Rolls: Straight Roll,
Donut Roll, Twin Donut Roll,
and Self-Locking Twin Donut
Roll
28 points 25-27 points 19-24 points < 19 points

© Precision Exams 5210.1819 www.precisionexams.com Page | 73
Fire Science
Using a technique taught in class, the student will achieve a quality straight roll as requested: in-
service or out of service.
Table 11. Criteria Scorecard: Hose Rolls: In-Service or Out of Service - Straight Roll
Criteria Scorecard: Hose Rolls: In-Service
or Out of Service - Straight Roll 2 points each Comments
1 THE ASSESSMENT
ADMINISTRATOR REQUESTS
EITHER AN IN-SERVICE OR AN
OUT-OF-SERVICE STRAIGHT ROLL.
Based on the type of roll requested, student
starts at one coupling and rolls the hose
along the ground until they get to the other
coupling.
• In-Service: Student begins at the male
coupling and rolls toward the female
coupling (2 points); OR
• Out of Service: Student begins at the
female coupling and rolls hose toward
the male coupling (2 points)
2 Tight, flat roll
• Hose is tight (1 point)
• Hose is flat (no cinnamon roll) (1 point)
ASSESSMENT TOTAL 4 points possible
Using a technique taught in class, the student will achieve a quality donut roll.
Table 12. Criteria Scorecard: Hose Rolls: Donut Roll
Criteria Scorecard: Hose Rolls: Donut Roll 2 points each Comments
1 Hose position. Start in appropriate position
depending on the technique being used.
• Laid straight, offset from center (2
points); OR
• Male coupling pulled back within 3 feet
of female coupling (2 points); OR
• Straight line, starting 2 feet toward the
male (2 points); OR
• Another acceptable method, per
instructor (2 points)

© Precision Exams 5210.1819 www.precisionexams.com Page | 74
Fire Science
2 Joined couplings
• Male coupling’s thread ends up on the
inside of the female coupling and is
protected (1 point)
• Male coupling at 12 o’clock, female in 3
o’clock to 6 o’clock position (90 to 180
degrees) (1 point)
3 • Hose is tight (1 point)
• Hose is flat (no cinnamon roll) (1 point).
ASSESSMENT TOTAL 6 points possible
Using a technique taught in class, the student will achieve a quality twin donut roll.
Table 13. Criteria Scorecard: Hose Rolls: Donut Roll
Criteria Scorecard: Hose Rolls: Twin
Donut Roll 2 points each Comments
1 Fold the hose in half so male and female
couplings are side by side (2 points)
2 Roll the hose toward the couplings, forming
two rolls side by side (2 points)
3 • Hose is tight (1 point)
• Hose is flat (no cinnamon roll) (1 point).
ASSESSMENT TOTAL 6 points possible
Using a technique taught in class, the student will achieve a quality self-locking twin donut roll.
Table 14. Criteria Scorecard: Hose Rolls: Self-Locking Twin Donut Roll
Criteria Scorecard: Hose Rolls: Self-
Locking Twin Donut Roll 2 points each Comments
1 Fold the hose in half and leave the male and
female couplings.
• Two equal rolls of the same hose, one
with the male coupling, and the other
with the female coupling (2 points)
2 Grab the folded end and move it forward
about 3 feet.
• Create two large loops on each side (2
points)
3 Roll the hose back toward the couplings,
forming two rolls side by side (2 points)

© Precision Exams 5210.1819 www.precisionexams.com Page | 75
Fire Science
4 Complete the roll and grab one of the loops
and pull some of the slack through, making
one large loop and one small loop (2
points).
5 Feed the large loop through the small loop
and pull tight, making a self-locking loop that
forms a carrying loop (2 points).
6 • Hose is tight (1 point)
• Hose is flat (no cinnamon roll) (1 point)
ASSESSMENT TOTAL 12 points possible
Score Summary
Hose Roll Type Possible Points
Straight 4
Donut 6
Twin Donut 6
Self-Locking Twin Donut 12
TOTAL 28
FS1-9.10: Hose Loads Students will demonstrate the loading of the following hose loads: Accordion, Horseshoe, Flat, Minuteman, and Dutchman
Overview • Performance and Product assessment in which an individual student demonstrates abilities to properly load
and deploy the following five hose loads: Accordion, Horseshoe, Flat, Minuteman, and Dutchman
• This is an intermediate assessment. It is a structured task that requires two or three specified baseline skills
• Assessment takes place during the course.
• The assessment emphasizes the quality of the final, loaded hose. Various techniques can be used to do the
loads, depending on what has been taught in class.
• Students should be provided with the scorecard (next pages) in advance, with corresponding instruction and
opportunity for practice using the same equipment they will use for the assessment.
Equipment & Materials • 1 ¾”, 2 ½”, and/or 3” hose
• Smooth Bore or Combination Nozzle
• Fire Engine
• A pair of gloves (leather, utility, or structural firefighting)

© Precision Exams 5210.1819 www.precisionexams.com Page | 76
Fire Science
Task Assessment Growth Levels
Proficient
100%
Developing
90-99%
Marginal
70-89%
Unsatisfacto
ry
< 70%
9.10 Hose Loads: Accordion,
Horseshoe, Flat, Minuteman,
Dutchman
52 points 47-51 points 36-46 points < 36 points
Using a technique taught in class, the student will achieve a quality accordion hose load.
Table 15. Criteria Scorecard: Hose Load: Accordion
Criteria Scorecard: Hose Load: Accordion 2 points each Comments
1 For the Accordion Load start by placing the
coupling at the rear of the hose bed, along
either the left or right edge. Lay the hose on
its edge, toward the front of the hose bed.
• Coupling is at the rear of the hose bed;
hose is layered on its edge toward the
front of the hose bed (2 points)
2 Upon reaching the front of the hose bed, fold
the hose back over itself and lay it back
toward the rear of the bay
• Hose is folded back over itself and laid
back toward the rear of the bay (2 points)
3 Continue this pattern until the entire hose bay
is full.
• Entire hose bay is filled with one layer of
hose (2 points)
4 For a second layer, offset the last fold to
elevate the layer and continue loading in an
accordion fashion.
• Second layer is elevated and continues in
an accordion fashion (2 points)
5 Finish the load so the coupling is near the end
of the bed and can be reached from the
ground, but back far enough so it is secure.
• Coupling is near end of the bed, can be
reached from the ground, back far enough
to be secure (2 points)
ASSESSMENT
TOTAL
10 points possible
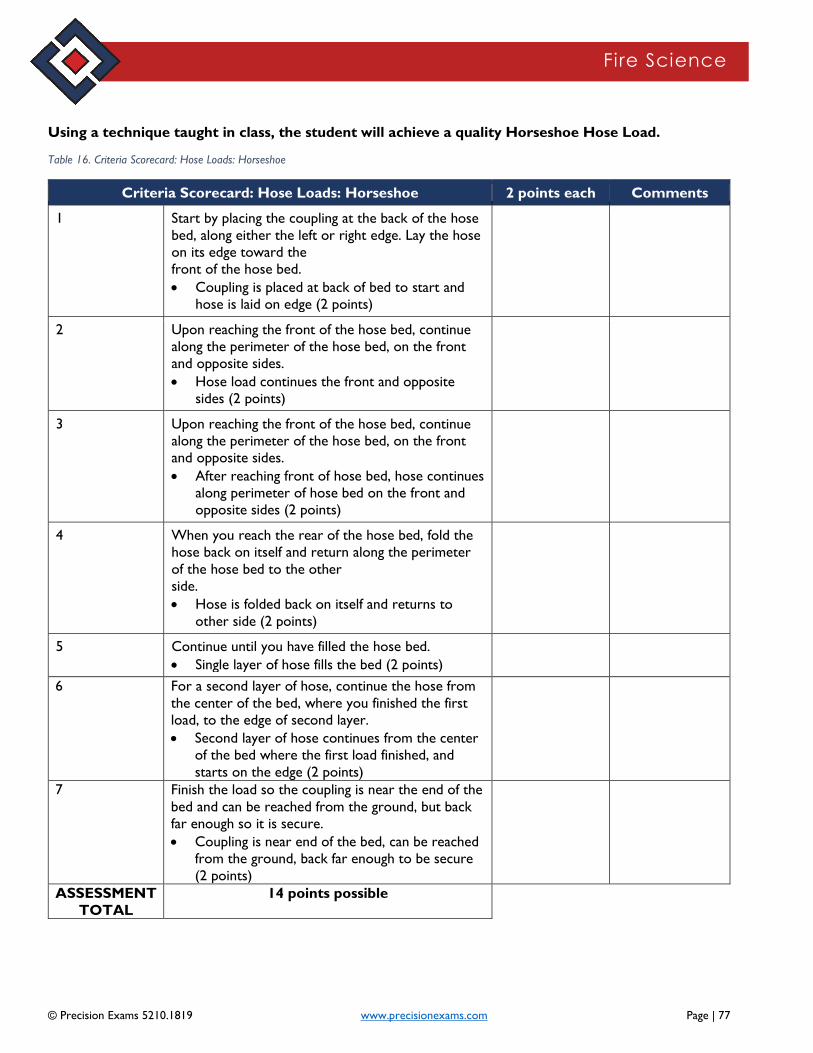
© Precision Exams 5210.1819 www.precisionexams.com Page | 77
Fire Science
Using a technique taught in class, the student will achieve a quality Horseshoe Hose Load.
Table 16. Criteria Scorecard: Hose Loads: Horseshoe
Criteria Scorecard: Hose Loads: Horseshoe 2 points each Comments
1 Start by placing the coupling at the back of the hose
bed, along either the left or right edge. Lay the hose
on its edge toward the
front of the hose bed.
• Coupling is placed at back of bed to start and
hose is laid on edge (2 points)
2 Upon reaching the front of the hose bed, continue
along the perimeter of the hose bed, on the front
and opposite sides.
• Hose load continues the front and opposite
sides (2 points)
3 Upon reaching the front of the hose bed, continue
along the perimeter of the hose bed, on the front
and opposite sides.
• After reaching front of hose bed, hose continues
along perimeter of hose bed on the front and
opposite sides (2 points)
4 When you reach the rear of the hose bed, fold the
hose back on itself and return along the perimeter
of the hose bed to the other
side.
• Hose is folded back on itself and returns to
other side (2 points)
5 Continue until you have filled the hose bed.
• Single layer of hose fills the bed (2 points)
6 For a second layer of hose, continue the hose from
the center of the bed, where you finished the first
load, to the edge of second layer.
• Second layer of hose continues from the center
of the bed where the first load finished, and
starts on the edge (2 points)
7 Finish the load so the coupling is near the end of the
bed and can be reached from the ground, but back
far enough so it is secure.
• Coupling is near end of the bed, can be reached
from the ground, back far enough to be secure
(2 points)
ASSESSMENT
TOTAL
14 points possible

© Precision Exams 5210.1819 www.precisionexams.com Page | 78
Fire Science
Using a technique taught in class, the student will achieve a quality flat hose load.
Table 17. Criteria Scorecard: Hose Loads: Flat
Criteria Scorecard: Hose Loads: Flat 2 points each Comments
1 Start by placing the coupling at the front of the hose
bed, along either the left or right edge. Lay the hose flat
toward the rear of the bed.
• Coupling at front and hose lays flat (2 points)
2 At the rear of the bed, fold the hose over on itself,
laying it flat up to the front of the hose bed.
• Hose folds over on itself (2 points)
3 When folding the hose over for the second pass, offset
the rear fold to lay the hose next to the previous fold.
• The rear fold is offset (2 points)
4 Continue this pattern, moving back and forth along the
hose bed, until the hose is completely loaded.
• Pattern continues throughout the load (2 points)
5 For a second layer of hose, continue the hose from the
center of the bed, where you finished the first load, to
the edge of the second layer.
• Second layer of hose continues from the center of
the bed where the first load finished, and starts on
the edge (2 points)
6 Finish the load so the coupling is near the end of the
bed and can be reached from the ground, but back far
enough so it is secure.
• Coupling is near end of the bed, can be reached
from the ground, back far enough to be secure (2
points)
ASSESSMENT TOTAL 12 points possible

© Precision Exams 5210.1819 www.precisionexams.com Page | 79
Fire Science
Using a technique taught in class, the student will achieve a quality Minuteman hose load.
Table 18. Criteria Scorecard: Hose Loads: Minuteman
Criteria Scorecard: Hose Loads: Minuteman 2 points each Comments
1 Start by connecting the first 50 ft. length to proper
discharge, load a portion of the hose on the bottom of
the bed, place the remainder of the length aside for
later loading.
• Hose connects to proper discharge and places
remainder aside (2 points)
2 Next, join the remaining two lengths together, forming
a 100 feet length. Place a nozzle on the male end, and
place the nozzle in the pre-connected bed on the side
of the direction of pull.
• Hose lengths are joined together, with nozzle on
male end and nozzle placed on side of direction of
pull (2 points)
3 Once the nozzle is placed, flat load the rest of the 100-
ft. length on top of the nozzle.
• Length is on top of nozzle (2 points)
4 Once all the 100-ft. length is loaded, couple the female
coupling to the male coupling from the first 50 ft.
length.
• Male and female are coupled together at the
correct location (2 points)
5 Finally, flat load the rest of the original 50 ft. length of 1
1/2” or 1 3/4” attack hose with the nozzle attached.
The finished load should be flat upon completion with
no twists.
• Nozzle is attached and hose is flat (2 points)
ASSESSMENT TOTAL 10 points possible
Using a technique taught in class, the student will achieve a quality Dutchman hose load.

© Precision Exams 5210.1819 www.precisionexams.com Page | 80
Fire Science
Table 19. Criteria Scorecard: Hose Loads: Dutchman
Criteria Scorecard: Hose Loads: Dutchman 2 points each Comments
1 Explain the purpose of this load. THE
ASSESSMENT ADMINISTRATOR ASKS THE
STUDENT, “WHAT IS THE PURPOSE OF
THIS LOAD? WHAT ARE YOU TRYING TO
AVOID?”
• States that this load is used to try to avoid a
coupling from flipping in the hose bed when
deployed (2 points)
2 Fold over an extra length of hose, thus shortening the
hose.
• Extra length of hose is folded over and hose is
shortened appropriately (2 points)
3 Reposition the coupling to allow it to deploy directly
off the hose bed and will not flip when it comes out of
the bed.
• Coupling is repositioned to allow it to deploy
directly off the hose bed without flipping (2 points)
ASSESSMENT TOTAL 6 points possible
Score Summary
Hose Load Type Possible Points
Accordion 10
Horseshoe 14
Flat 12
Minuteman 10
Dutchman 6
TOTAL 52
FS1-9.26: Deploying Minuteman Demonstrate unloading pre-connected hose line Minuteman
Overview • Performance and Product assessment in which an individual student demonstrates abilities to properly
demonstrate deploying the Minuteman Load.
• This is an intermediate assessment. It is a structured task that requires two or three specified baseline
skills
• Assessment takes place during the course.
• The assessment emphasizes the demonstration of deploying a minuteman load.

© Precision Exams 5210.1819 www.precisionexams.com Page | 81
Fire Science
• Students should be provided with the scorecard (next pages) in advance, with corresponding
instruction and opportunity for practice using the same equipment they will use for the assessment.
Step #2. Move toward your objective indicated by the assessment administrator, as the hose plays out with your
movement. Before starting the assessment, the assessment administrator should inform the student
the location of the objective.
Equipment & Materials • 1¾” hose lines
• Smooth Bore or Combination Nozzle
• Fire Engine
• A pair of gloves (leather, utility, or structural firefighting)
Task Assessment Growth Levels
Proficient
100%
Developing
90-99%
Marginal
70-89%
Unsatisfacto
ry
< 70%
9.16 Deploying Minuteman 8 points 7 points 6 points < 6 points
Assessment Instructions To begin the assessment, the instructor/assessment administrator will:
• Confirm that the needed equipment and materials are ready for the student’s use at the assessment site.
• Inform/remind the student the objective location.
• Tell the student to begin. Observe the student’s performance. Record the appropriate score and any
comments for each step.
Table 20. Criteria Scorecard: Deploying the Minuteman Load
Criteria Scorecard: Deploying the Minuteman Load 2 points each Comments
1 Grab the entire bundle from the hose bed, placing the
bottom of the load and nozzle on your shoulder.
• Entire bundle of hose on shoulder (2 points)
2 Move toward your objective (location indicated by the
assessment administrator) as the hose plays out with
your movement.
• Moving toward objective while hose plays out (2
points)
3 Upon arrival of objective, flake out the remainder of
the working line that is left on your shoulder.
• All hose is flaked out (2 points)
4 Hold on to nozzle and call for water.
• Water is received at nozzle (2 points)
ASSESSMENT TOTAL 8 points possible

© Precision Exams 5210.1819 www.precisionexams.com Page | 82
Fire Science
FS1-10.11 Methods of Fire Attack: Direct, Indirect, Combination Students will demonstrate proficiencies required for applying three types of water application for fire attack: direct, indirect,
and combination.
Overview • The student will take an attack line and demonstrate each type of water application. Each type requires a step
by step process to achieve the different methods of fire attack.
• This is an intermediate assessment. It is a structured task that requires two or three specified baseline skills
• Assessment takes place during the course.
• Students should be provided with the scorecard (next pages) in advance, with corresponding instruction and
opportunity for practice using the same equipment they will use for the assessment.
Equipment & Materials • 1 ¾” or 2 ½” hose line
• Smooth Bore Nozzle or Combination Nozzle
• Fire Engine
• Prop to simulate burning solid fuel (direct method)
• Prop to simulate concealed space with small opening where no life hazard is present (indirect method)
• Prop to simulate space with floor, walls, ceiling (combination method)
Task Assessment Growth Levels
Proficient
100%
Developing
90-99%
Marginal
70-89%
Unsatisfacto
ry
< 70%
10.11 Methods of Fire Attack:
direct, indirect, combination 20 points 18-19 points 14-17 points < 14 points
Assessment Instructions To begin the assessment, the instructor/assessment administrator will:
• Confirm that the needed equipment and materials are ready for the student’s use at the assessment site.
• Inform/remind the student the location of the Prop to simulate burning solid fuel (direct method)
• Inform/remind the student the location of the Prop to simulate concealed space with small opening where no
life hazard is present (indirect method)
• Inform/remind the student the location of the Prop to simulate space with floor, walls, ceiling (combination
method)
• Inform/remind the student the location of the small opening into a concealed space where no life hazard is
present.
• Tell the student to begin. Observe the student’s performance. Record the appropriate score and any
comments for each step.

© Precision Exams 5210.1819 www.precisionexams.com Page | 83
Fire Science
Table 21. Criteria Scorecard: Fire Attack Method: Direct
Criteria Scorecard: Fire Attack Method: Direct 2 points each Comments
1 Open the Smooth Bore or Combination Nozzle set on
straight stream (turned to the right) slowly by pulling
handle back towards you.
• Student opens the smooth bore nozzle or
combination nozzle set on straight stream (turned to
the right) and slowly pulls the handle back toward
them (2 points)
• Student opens the smooth bore or combination
nozzle set on straight stream (turned to the right)
and does not pull the handle back slowly (1 point).
2 Applies a solid stream directly on the burning solid fuels
or simulation of burning solid fuels (2 points)
3 Shut Smooth Bore Nozzle or Combination down slowly
by pushing handle away from you
• Correctly shuts smooth bore nozzle down slowly by
pushing handle away from them (2 points)
• Shuts smooth bore or combination nozzle down but
pushes handle down fast (1 point)
ASSESSMENT TOTAL 6 POINTS POSSIBLE
Table 22. Criteria Scorecard: Fire Attack Method: Indirect
Criteria Scorecard: Fire Attack Method: Indirect 2 points each Comments
1 Open the Combination Nozzle (turned slightly to the
left) slowly by pulling handle back towards you.
• Student opens the combination nozzle (turned
slightly to the left) slowly by pulling handle back
toward them (2 points)
• Student open the combination nozzle (turned slightly
to the left) by pulling the handle back fast (1 point)
2 Applies stream through small opening into a concealed
space where no life hazard is present for 1 minute (2
points).
3 • Shuts combination nozzle down slowly by pushing
handle away from them (2 points)
• Shut combination nozzle down by pushing handle
away fast (rather than slowly) (1 point)
4 Cover opening with a fog pattern of water to allow the
water to be converted into steam (2 points)
ASSESSMENT TOTAL 8 POINTS POSSIBLE

© Precision Exams 5210.1819 www.precisionexams.com Page | 84
Fire Science
Table 23. Criteria Scorecard: Fire Attack Method: Combination
Criteria Scorecard: Fire Attack Method:
Combination
2 points each Comments
1 Open the Smooth Bore Nozzle or Combination Nozzle
set on straight stream (turned to the right) slowly by
pulling handle back towards you.
• Student opens the smooth bore nozzle or
combination nozzle and set on straight stream
(turned to the right) slowly by pulling handle back
toward them (2 points)
• Student opens the smooth bore nozzle or
combination nozzle and set on straight stream
(turned to the right) by pulling the handle back
toward them fast (0 points)
2 Rotate stream in a clockwise manner hitting the ceiling,
walls, and floor.
• Rotates stream in a clockwise manner hitting the
ceiling, walls, and floor (2 points)
• If direction is not clockwise or if any one portion
(ceiling, walls, or floor) is not hit correctly (1 point)
• Incorrect direction and/or more than one portion
incorrect (0 points)
3 Shut Smooth Bore or Combination Nozzle down slowly
by pushing handle away from you
• Student shuts smooth bore or combination nozzle
down slowly by pushing handle away from them (2
points)
• Student shuts smooth bore or combination nozzle
down by pushing handle away fast (1 point)
ASSESSMENT TOTAL 6 POINTS POSSIBLE
Score Summary
Fire Attack Type Possible Points
Direct 6
Indirect 8
Combination 6
TOTAL 20
FS1-10.14 Opening and Closing a Nozzle Students will demonstrate abilities to properly open and close a nozzle, using a charged attack line.

© Precision Exams 5210.1819 www.precisionexams.com Page | 85
Fire Science
Overview • Performance assessment in which an individual student demonstrates abilities to properly open and close a
nozzle, using a charged attack line.
• Baseline assessment that focuses on a specific, individual skill.
• Assessment takes place during the course.
• Students should be provided with the scorecard (next page) in advance, with corresponding instruction and
opportunity for practice using the same equipment they will use for the assessment.
Equipment & Materials • Smooth Bore or Combination Nozzle
• 1¾”, 2½”, and/or 3” hose lines
• Fire Engine
Task Assessment Growth Levels
Proficient
100%
Developing
90-99%
Marginal
70-89%
Unsatisfacto
ry
< 70%
FS1-10.14 Opening and closing
a nozzle 6 points 5 points 4 points < 4 points
Assessment Instructions To begin the assessment, the instructor/assessment administrator will:
• Confirm that the needed equipment and materials are ready for the student’s use at the assessment
site.
• Tell the student to begin. Observe the student’s performance. Record the appropriate score and any
comments for each step.
Table 24. Criteria Scorecard: Opening and closing a nozzle
Criteria Scorecard: Opening and closing a nozzle 2 points each Comments
1 Holds the nozzle so that the bale is at arm’s length while
maintaining a solid stance (2 points)
2 • Opens the water supply by pulling the bale toward
them slowly (2 points)
• Opens the water supply by pulling the bale toward
them fast (1 point)
3 • Turns off the nozzle by pushing forward on the bale.
When shutting down the nozzle, does so slowly to
prevent water hammer (2 points)
• Turns off the nozzle by pushing forward on the bale
fast (1 point)
ASSESSMENT TOTAL 6 POINTS POSSIBLE