facetime how to guide
TRANSCRIPT

Digital Access Support Team – Rachaelle, Michael, Beth, Ashleigh & Alison
Contact: 01206 282 452/01255 686 497 Email: [email protected] Website: www.colchester.gov.uk/digitalaccesssupport
FaceTime How to Guide
This “How to guide” will provide you with guidance on how to set up FaceTime, how to make a FaceTime call and how to make a group FaceTime call, allowing you to interact with family, friends and work colleagues. FaceTime is a video calling application made by Apple. You can also use it for voice calls. You can use it from any Apple device such as iPhone, iPad, iPod touch or Mac, to call anyone else using any one of those devices. FaceTime is a free app that is unique to Apple devices and it comes pre-installed on your device. With the ability to chat in a group, which allows up to 32 participants for as long as you need, there is no limit for call length. For more information on FaceTime you can visit the Apple Support website press here or go to https://support.apple.com/en-gb/HT204380 for FaceTime support for iPhone, iPod and iPad. For FaceTime support for Mac you can press here or visit https://support.apple.com/en-gb/guide/facetime/welcome/mac In this guide you will find information on the following:
FaceTime: ........................................................................................................................................ 3
Downloading FaceTime: ............................................................................................................... 3
Set up FaceTime: ......................................................................................................................... 5
Using FaceTime: .............................................................................................................................. 7
Making a FaceTime call: ............................................................................................................... 7
Other buttons on the screen: ...................................................................................................... 10
Accept a FaceTime call: ............................................................................................................. 10
Leave a FaceTime call:............................................................................................................... 11
Other buttons: .............................................................................................................................. 12
Settings: ......................................................................................................................................... 12
Changing Audio and Video settings: ........................................................................................... 12
Voicemail: ................................................................................................................................... 13
Recent calls: ............................................................................................................................... 13
Group calls: ................................................................................................................................ 14
Start a Group FaceTime call from the Messages app: ............................................................... 15
Joining a FaceTime group call: ................................................................................................... 16
Adding someone to a Group FaceTime call: ............................................................................... 16
Contacts: ........................................................................................................................................ 18

Page 2 of 44
Adding Contacts: ........................................................................................................................ 18
Messages: ..................................................................................................................................... 19
iMessage, SMS and MMS text: .................................................................................................. 19
Send a message: ........................................................................................................................ 20
Reply to a message: ................................................................................................................... 20
Replying from the Lock screen: .................................................................................................. 20
Change a name and/or photo: .................................................................................................... 21
Deleting a message or conversation: ......................................................................................... 23
Turn on Hide alerts: .................................................................................................................... 25
Find attachments from a conversation: ....................................................................................... 26
Add photo Attachments: ............................................................................................................. 28
Send and Sharing Location: ....................................................................................................... 29
iMessage: ................................................................................................................................... 30
Sending a Group Message: ........................................................................................................ 30
Naming Group conversation: ...................................................................................................... 31
Add/Remove a person to a group conversation: ......................................................................... 32
Leaving a Group conversation: ................................................................................................... 33
Mute Messages: ......................................................................................................................... 34
Using other “Apps”: ..................................................................................................................... 35
Using Siri: ................................................................................................................................... 35
Other Functions: ............................................................................................................................ 36
Using Call Waiting: ..................................................................................................................... 36
Block unwanted callers: .............................................................................................................. 37
Change Alert Styles: ................................................................................................................... 39
Apple Mac: ..................................................................................................................................... 40
Using Messages: ........................................................................................................................ 40
Having a conversation: ............................................................................................................... 40
Delete a message or conversation: ............................................................................................ 43
Control click: ............................................................................................................................... 43
References: ................................................................................................................................... 44

Page 3 of 44
FaceTime: FaceTime is pre-installed on Apple devices for example iPhone, iPad, iPod touch and Mac 3. This means that you should not need to download it to your device as it should already be on the home screen. Look on your device for the FaceTime app icon. In the example picture we have below you will locate the app at the top left-hand corner on the home screen.
Home screen
If you are unable to see the FaceTime app icon on your device, it may have been accidently deleted. However, it can be re installed. Downloading FaceTime: Open the App Store on your phone this is usually a blue box with a white “A” shape in it, the “A” looks as though it has been put together by 3 lolly sticks.
App Store icon
FaceTime app

Page 4 of 44
When you have located the icon press the search button which is located along the bottom of the screen and looks like a magnifying glass.
App Store menu
Type “FaceTime” into the search bar located at the top of the screen. Then press the enter key on your keyboard or the blue search button located in the bottom right corner of your device.
Search bar
Once it has completed the search several options will appear that resemble “FaceTime”.
Search options
Select the correct option “FaceTime” the white camcorder in a green box and press this to open it up to download. If you are downloading Facetime onto an Apple Mac, the icon looks a little different to the Apple devices. It is still a green box with a camcorder but there is an additional white circle with a green phone on the icon as well. If FaceTime is already downloaded on to your device there will be a box with blue words on it that spell “OPEN” if it is not already on your device, it will spell out “GET”.
FaceTime app
Page 5 of 44
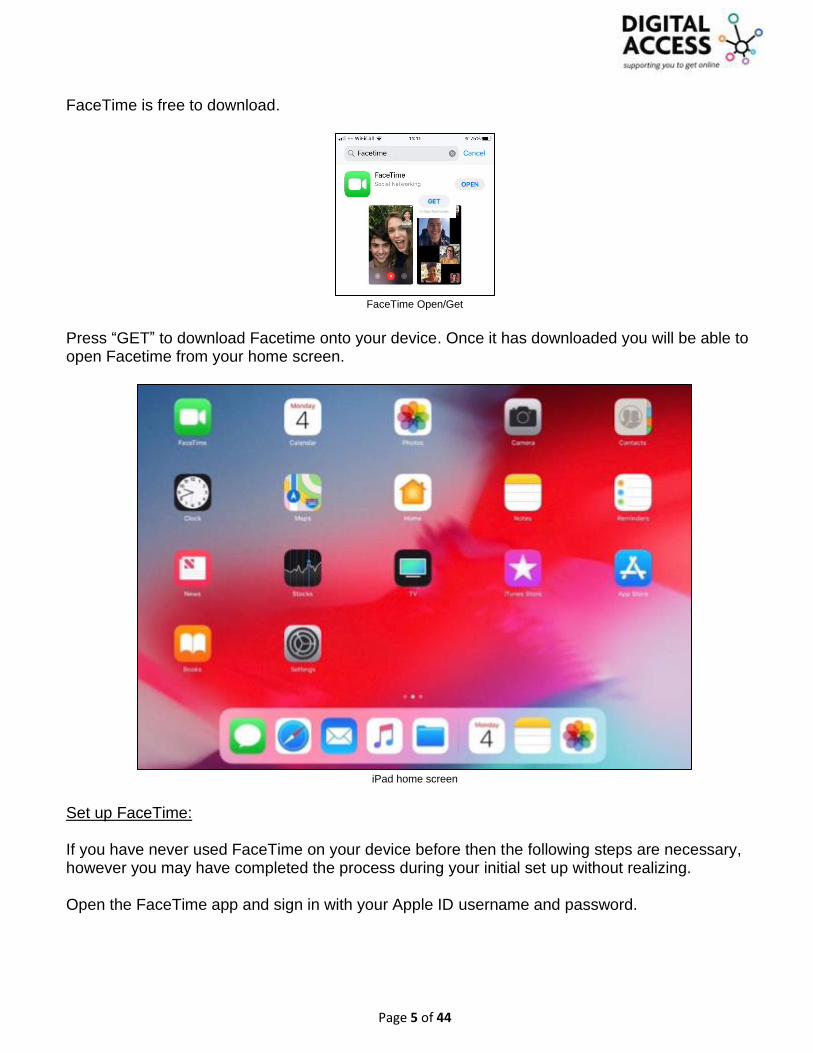
FaceTime is free to download.
FaceTime Open/Get
Press “GET” to download Facetime onto your device. Once it has downloaded you will be able to open Facetime from your home screen.
iPad home screen
Set up FaceTime: If you have never used FaceTime on your device before then the following steps are necessary, however you may have completed the process during your initial set up without realizing. Open the FaceTime app and sign in with your Apple ID username and password.

Page 6 of 44
FaceTime sign in screen
This can also be done from Settings. Open Settings then scroll down the list of items until you find FaceTime.
Settings
FaceTime Settings screen
When you go into FaceTime for the first time then just complete and follow as requested, this includes adding your Apple log in detail. Once complete FaceTime is now set up and ready to use. If using an iPhone, FaceTime will automatically register the phone number.

Page 7 of 44
To register an email address, go to Settings, scroll to find and then press on FaceTime, within the “You can be reached by FaceTime at” add other numbers as well as any email addresses you want to be associated with the account.
FaceTime settings
Using FaceTime: Making a FaceTime call: To make a FaceTime call, the person you are calling must have an Apple device and you will need to have either the other person's phone number or a registered email address to make contact. If you plan to use these contacts regularly then store them in your devices address book, which is also referred to as “Phone” book but on the Apple device it is known as “Contacts”.
Address Book
Open the FaceTime app on your device. In the FaceTime app, tap the blue plus button This will be found at the top righthand side of the screen.
Blue cross on FaceTime

Page 8 of 44
When you select it, the screen will change, and you are requested to type the person's phone number or email address.
Type contact details here
If you have the person's phone number or email address saved in your “Contacts”, you can start typing their name and details will automatically appear or you can press the little blue circle to open the address the book and select individuals.
Typing a contact to FaceTime
If you have used the “Contacts” then when you see the details you want tap the name, number, or address. If you have manually entered them when you have completed entering the details to begin the call, then select either “Call” or “Video”.
Call – This allows you to make a verbal telephone call only, so you only hear the others.
Video – This allows you to make a visual telephone call, so you will not only hear others, but you will also see them. During the call you can swap from Audio to Video at any time by just selecting the relevant button on the screen. If you are making a regular mobile phone call via the “Phone” app, then at any time you can swap this to a FaceTime call by selecting the Facetime button on the screen.

Page 9 of 44
Phone call screen
After selecting your contact to make your FaceTime call, if it is a video call you are making you will see yourself on the screen and a smaller icon, you’re your contacts name, this will flash on the screen until the person answers.
FaceTime Call Screen
When the call is answered the main screen will populate the video of the person you have called and in the top corner there will be a smaller video screen of you the caller.

Page 10 of 44
Other buttons on the screen: Camera on/off – turn your camera on or off so that the other person can either see you or they cannot. If there is a line through the image of the camcorder then the video is off. Mute – turn your sound on or off so that the other person can either hear you or they cannot. If there is a line through the image of the microphone, then the sound is off. Flip – This allows you to reverse or flip your screen so that the screen will no longer show you but change camera to the front of the phone and will show whatever it can see there.
Accept a FaceTime call: When someone FaceTime’s you, the screen will populate with the following:
• Name or Number of the person at the top of the screen who would like to FaceTime you.
• Remind Me: is a “Remind Me Later” option, which lets you safely avoid answering calls when it's inconvenient without having to worry you'll forget to return them late.
• Message: instead of answering the call if inconvenient you can send a message instead.
• Decline: if you do not want to the answer the call you press the red circle with white phone image this will terminate the call immediately.
• Accept: if you wish to answer the call then press the green circle with white phone and the call will automatically connect.
Please note that occasionally instead of pressing the “Decline” and “Accept” buttons you need to swipe them upwards.
Initial call screen

Page 11 of 44
If you get a call whilst the phone is locked: Using your finger drag the slider across the screen. To do this, put your finger on the white circle with a green phone button then using your finger move/swipe it across to the right, the phone call will now be answered.
Swipe to answer
Leave a FaceTime call: To end a call press on the screen, then tap on the red X that appears. This may vary slightly with each device.
iPhone screen iPad screen

Page 12 of 44
Other buttons: This button lets you to take a photograph of the screen.
The small video screen can be moved around, on your touch screen using your finger drag it to where you want to replace it to.
Video screen
Settings: Changing Audio and Video settings: You can change the audio and video settings in the FaceTime app at any time during a call. To change your settings, tap the screen, then to see more options use your finger to swipe the screen up or tap one of these options:
Tap Camera off to turn the camera off. Tap it again to turn it back on. If there is a line through the picture, then the camera is off.
Tap Flip to switch to the rear camera. Tap it again to switch back to the front-facing camera. Front Facing camera will show your face on the screen, the rear camera will show what the phone sees in front of it.
Tap Mute to turn off the sound. Tap Mute again to turn the sound back on. If there is a line through the microphone, then the sound is off. Tap this to adjust the volume of the device’s speaker.
Swipe up for other settings

Page 13 of 44
To add another person to the call, select “Add Person +”, this will open the option for you to manually enter or select from the device’s contacts other people. You can have up to 32 people in a FaceTime call.
Voicemail: To send a call directly to voicemail you must do one of the following:
Call screen
• If the device is unlocked, tap Decline. Unlocked means open, you are doing something on it.
• If device is locked, press the side button or Sleep/Wake button (depending on your model)
twice quickly.
The sleep/wake button is used to put your device’s screen to sleep or to wake it up. It is also how you turn it on or off. To put it to sleep or wake it up, just press the button. To turn it on or off, press and hold the button for a few second.
• To be reminded to return the call, tap Remind Me, then choose when you want to be
reminded.
• To respond with a text message instead of answering, tap Message, then choose a reply or tap Custom.
Recent calls: FaceTime keeps a log of the numbers you have been on a call with recently, you will be able to see this list when you open the FaceTime app.

Page 14 of 44
You can press the number or name of the contact to call them again. Rather than searching every time you want to call someone.
Recent Call List
To store the details to your “address book” on the Phone app press the “i” to the right of the caller’s details and this will populate with information about the call – date, time, contact number. Top right-hand side there is the text “Edit”, select this and add a name where requested and then select “Done”. The contact will now automatically appear in your phone’s contacts, under the name you have added.
Phone app
Group calls: Group FaceTime makes it easy to chat with multiple people at the same time. You can start a Group FaceTime from the app or from a group conversation in the Messages app. Up to 32 people can be added to a group FaceTime call. The tile of the person speaking gets larger automatically, so you’ll never lose track of the conversation. The steps below explain how to create a group FaceTime call which is very similar to creating a normal Facetime call. Step 1. Open FaceTime app on your device.

Page 15 of 44
FaceTime app
Step 2. Tap the plus button in the upper-right corner. Step 3. Enter the name or number of a person you want to call or press the blue + in the circle to access the address book to select people.
Blue + and enter name screen
Step 4. Repeat to add up to 30 additional contacts.
Step 4. Tap Audio or Video to place your FaceTime call. Start a Group FaceTime call from the Messages app: In a group conversation in “Messages”, you can start Group FaceTime directly from the group conversation.
Messages App
Open Messages and start a group conversation. Or go to an existing group conversation. Tap the contacts at the top of the group conversation to produce a further menu of “Audio”, “FaceTime” and “Info”. Tap FaceTime, then your visual call will start.

Page 16 of 44
Joining a FaceTime group call: There are a couple of ways for you to join a Group FaceTime call that someone else has invited you to and it has already started: Tap the notification from the notification centre or the Lock screen, then tap the green camcorder icon.
To join a Group FaceTime call from Messages, tap the notification at the top of your screen or tap “Join” from the group conversation in Messages. After you tap “Join”, you're automatically connected.
To join a call from the FaceTime app, just go to the active call in FaceTime, then tap the green camcorder.
FaceTime Notifications
Adding someone to a Group FaceTime call: On the screen of the call you are on, tap the “Add” button add icon. This will be the + Enter the contact's name, phone number or email address then tap “Add Person” to add them to the FaceTime call.

Page 17 of 44
Add Person
When you add someone to your call, you can tap “Ring” next to their name so their device alerts them of the incoming call, so they are able to accept the call and join you. When someone is added to a Group FaceTime call, they can't be removed from the call. The person who was added to the call needs to end the Group FaceTime call for themselves. If during your call one of the participants or you lose signal/connection then the screen will show as “Reconnecting” and the device will try to reconnect you to the call, if successful this will automatically happen, if not the call will disconnect.
Reconnecting screen
If this happens and you are disconnected, you will have to manually rejoin the call.

Page 18 of 44
Contacts: Adding Contacts: On your device you will have an “Address Book” for you to store names, addresses, emails, birthdays, make notes and much more. The contacts that you put in this “Address Book” will populate your contacts in any of the communication apps that you use on your device. The “Address Book” is the “Contacts” app on your phone
Contacts app
To add an individual’s details, open the contacts app.
Open contacts app
At the top of the screen, there is a blue + (add button)

Page 19 of 44
This will bring up a new contact card, enter the name of the contact by pressing in the “First name” section, this will also populate the keyboard.
New contact
Enter the phone number and any other information you have that you want to add by pressing on the green circle with the white + (“add button”). When you have added all the information and picture if you wish by selecting “Add Photo” and following the instruction, press “Done” to save the information. Messages: You can use Messages to send texts, photos, videos and audio messages, this is a pre-installed app on your device, it is a white speech bubble with a green background. iMessage, SMS and MMS text: You can use the Messages app on your Apple device to send messages. Those messages are sent as iMessage or SMS/MMS messages. iMessage’s are texts, photos or videos that you send to another Apple device over Wi-Fi or mobile-data networks and these messages will appear on the screen in blue text bubbles.

Page 20 of 44
iMessage
If you aren’t using iMessage, you can use SMS/MMS messages. SMS are typed text messages – MMS are messages with a picture or video (Multi-Media) These messages can be sent to any other phone type as well as Apple devices. SMS/MMS messages appear in green text bubbles on the devices screen. These types of messages are part of your phone contract and will be included in “your bundle”.
SMS Message
Send a message: Open Messages via your messages appthis is a white speech bubble in a green box.
Tap on the picture that looks like a white square with a pencil coming out of the top right corner, this will start a new message.
Or open up an existing conversation, then tap in the text field to begin to type your message. Tap the white up arrow to send the message. Reply to a message: Open Messages. This is a white speech bubble in a green box. From the list of various chats, you must select the one you want to reply to. The conversation will now appear. Tap the text field, then type your message.
Tap the white up arrow in the blue circle to send.
Replying from the Lock screen: The Lock screen, which shows the current time and date and your most recent notifications, appears when you turn on or wake iPhone.

Page 21 of 44
From the Lock screen, you can see notifications, open Camera and Control Center, get information from your favorite apps at a glance, and more. Firmly press the notification message on the “Lock Screen” that you want to reply to. This will either open the message directly or prompt you to put in your passcode to unlock the phone and populate the message onto the screen.
Locked Screen notification
When the message opens type your response message. Then tap the white up arrow in a blue circle to send your message.
Reply message
Change a name and/or photo: With the most recent Apple devices, you are able to share your name and photo when you start or respond to a new message.

Page 22 of 44
Personal Profile
You can do this using either an Animoji, Memoji or a custom image for your photo. For more information on Animoji and Memoji you can visit the Apple Support website press here or go to https://support.apple.com/en-gb/HT208986. Update your Messages profile:
Open the Messages app.
Messages App
If your phone is compatible, then you will see 3 dots at the top of the screen tap on these.
Message 3 dot screen

Page 23 of 44
From the menu press on “Edit Name and Photo”.
Edit Name and Photo
Tap the image circle to choose an image or photo. Then tap the text fields where the name appears or update the name. When complete tap “Done” to save.
Personal Profile
Your name and photo can be shared with anyone using iMessage, but you'll be asked to confirm that you want to share with someone when sending or replying to a new message. You can also turn the option of sharing on and off by open messages and tapping the 3 dots selecting “Edit Name and Photo” and then moving the toggle off, if it is green it is active if it is grey it is inactive. Deleting a message or conversation:
When you delete a message or conversation from your device, then it is gone, and you are unable to get it back. So make sure that you save important information from your messages.
To delete a message:
Open up the message app and select the message conversation you want to delete by touching and holding that message, then select “More”.
Page 24 of 44
Delete message screen - More
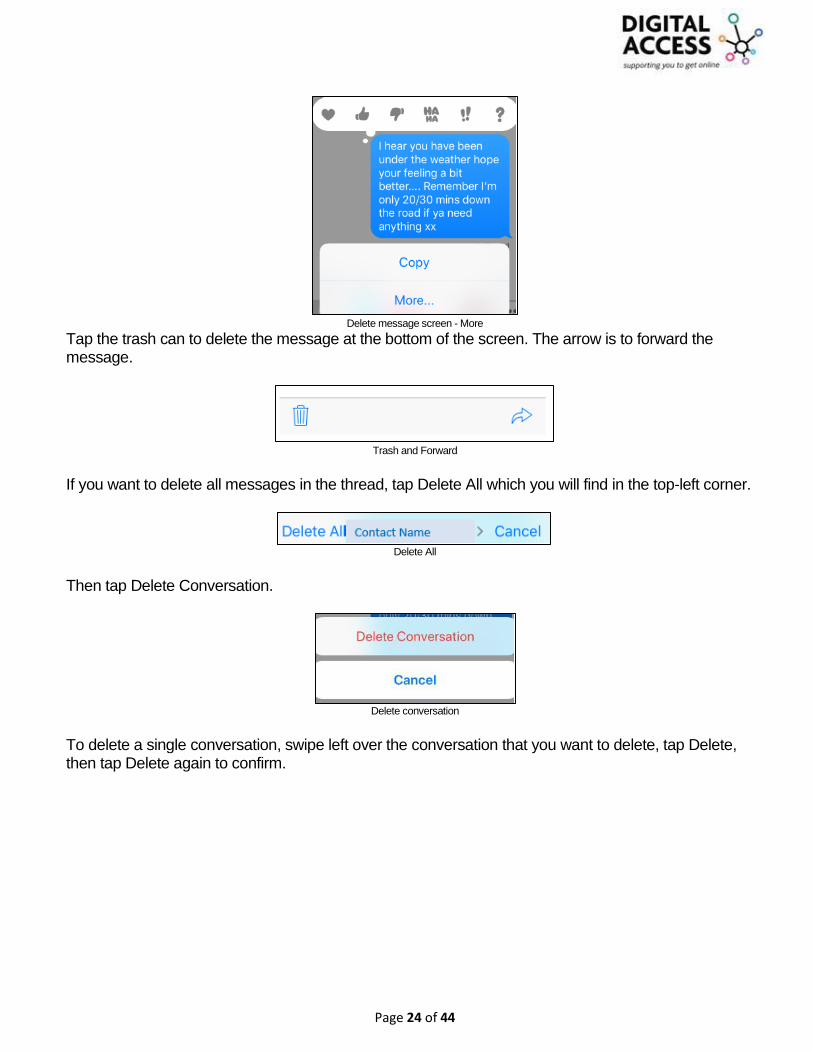
Tap the trash can to delete the message at the bottom of the screen. The arrow is to forward the message.
Trash and Forward
If you want to delete all messages in the thread, tap Delete All which you will find in the top-left corner.
Delete All
Then tap Delete Conversation.
Delete conversation
To delete a single conversation, swipe left over the conversation that you want to delete, tap Delete, then tap Delete again to confirm.
Page 25 of 44
Delete option
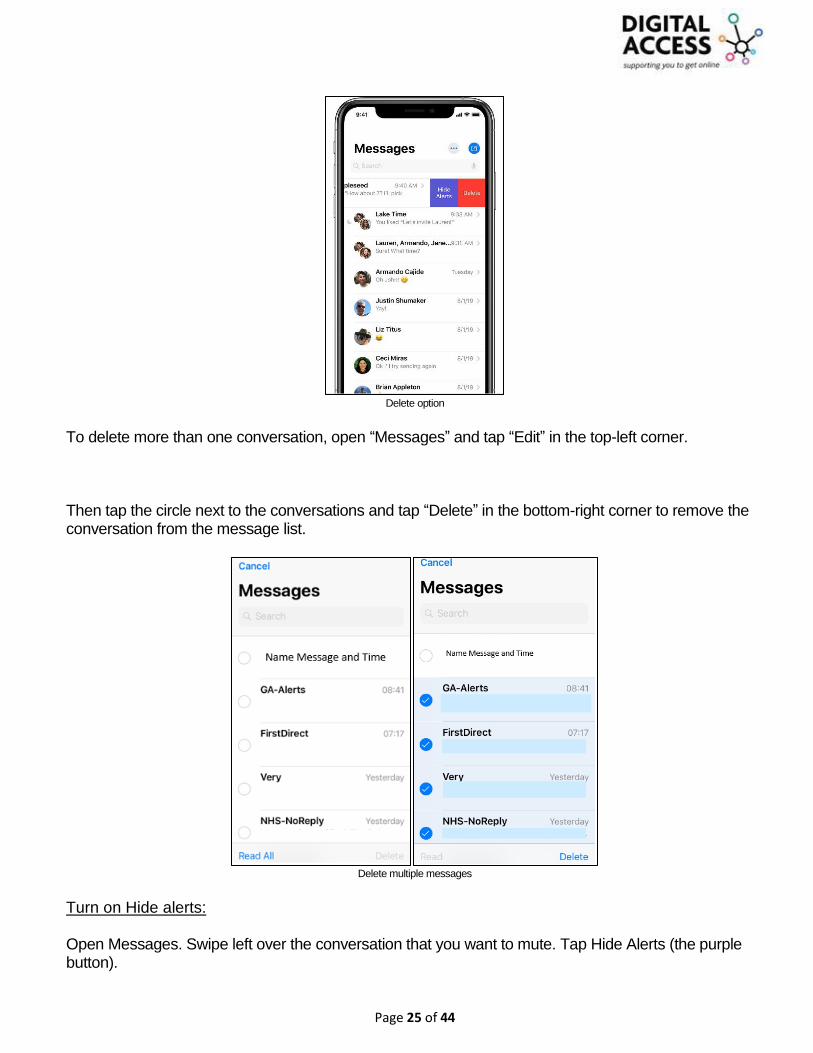
To delete more than one conversation, open “Messages” and tap “Edit” in the top-left corner. Then tap the circle next to the conversations and tap “Delete” in the bottom-right corner to remove the conversation from the message list.
Delete multiple messages
Turn on Hide alerts: Open Messages. Swipe left over the conversation that you want to mute. Tap Hide Alerts (the purple button).

Page 26 of 44
Hide option
When “Hide” is on, a crescent moon will appear next to the conversation. This will stop notifications for that conversation only not all conversations on your device. You will still receive notifications for other messages. Find attachments from a conversation: From the “Message” app open the message that has the attachment on it. Tap the name of the contact at the top of the message, then tap the “i” icon If you are unable to find the “i” icon press on the name for a menu to appear this will have the options for you to call or FaceTime the person, as well as have the info icon.
Menu button
You will see all images and attachments that you have shared between you. Touch and hold an image or attachment to show options like Copy, Save and More. If you don’t have the “i” at the top of screen, then just press on the image to populate the “Save” option.

Page 27 of 44
Save Image
You can also tap onto the image so that it opens full size. Then in the top right corner you will see a blue box with an up arrow, select on this for other options to populate.
Other options
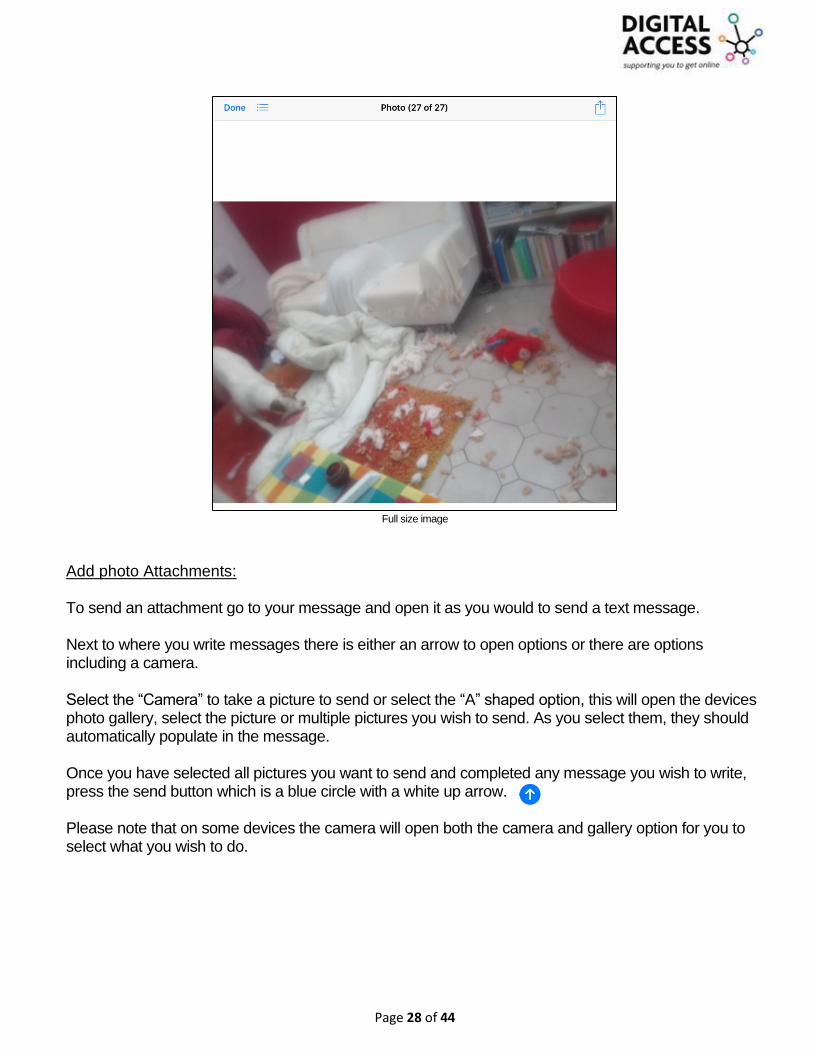
To save the image select “Save Image” this will automatically save to your devices photo gallery. You will also note that it will provide you with how many photos are within the conversation at the top left corner, in this example it is “Photo (27 or 27)”. The image we are using is the 27th picture sent out of 27 pictures.
Page 28 of 44
Full size image
Add photo Attachments: To send an attachment go to your message and open it as you would to send a text message. Next to where you write messages there is either an arrow to open options or there are options including a camera. Select the “Camera” to take a picture to send or select the “A” shaped option, this will open the devices photo gallery, select the picture or multiple pictures you wish to send. As you select them, they should automatically populate in the message. Once you have selected all pictures you want to send and completed any message you wish to write, press the send button which is a blue circle with a white up arrow. Please note that on some devices the camera will open both the camera and gallery option for you to select what you wish to do.

Page 29 of 44
Select picture options
Send and Sharing Location: To send or share your location in a message: Open messages and in the text exchange tap the name of the contact at the top of the conversation. Tap the “i” information button this will open up the information about the contact. Tap on the “Send My Current Location”. Your recipient will see your location on the map. Or you can tap on “Share My Location” then choose the length of time that you want to share your location for: one hour, till the end of the day or for always.
Share location

Page 30 of 44
iMessage: iMessage’s appear in your “Message” app as blue text bubbles, they go through Apple and not your device contract provider, they are also protected by end-to-end encryption. In a group iMessage, everyone can:
• Send and receive photos, videos and audio messages.
• See all responses from the group.
• Send and receive message effects, such as sketches, animations, bubble effects and more.
• Share their location with the group.
• Give the group a name, add or remove people from the group, mute notifications or leave the group.
Group iMessage
Sending a Group Message:
Open up the Messages app, at the top of the screen select the new message a white square with a pencil.
Type or select the names of those you want to add to the conversation, type your text and then press the blue circle with the white up arrow to send.

Page 31 of 44
Group message
Please note that if you want to change the group status to share pictures and videos you will need to go into your settings, find messages and turn on MMS messaging for this to work.
Remember “SMS” are typed text messages and “MMS” are messages with a picture or video these are also referred to as “Multi-Media Messages”.
Naming Group conversation: To give you group a name so that it stands out more and easier to find, open the group conversation in the messages app.
Group information
Tap on the information of the group chat this is found at the top of the screen, press on this and follow the instruction to enter the group name and then press “Done”.
Name group options
Page 32 of 44
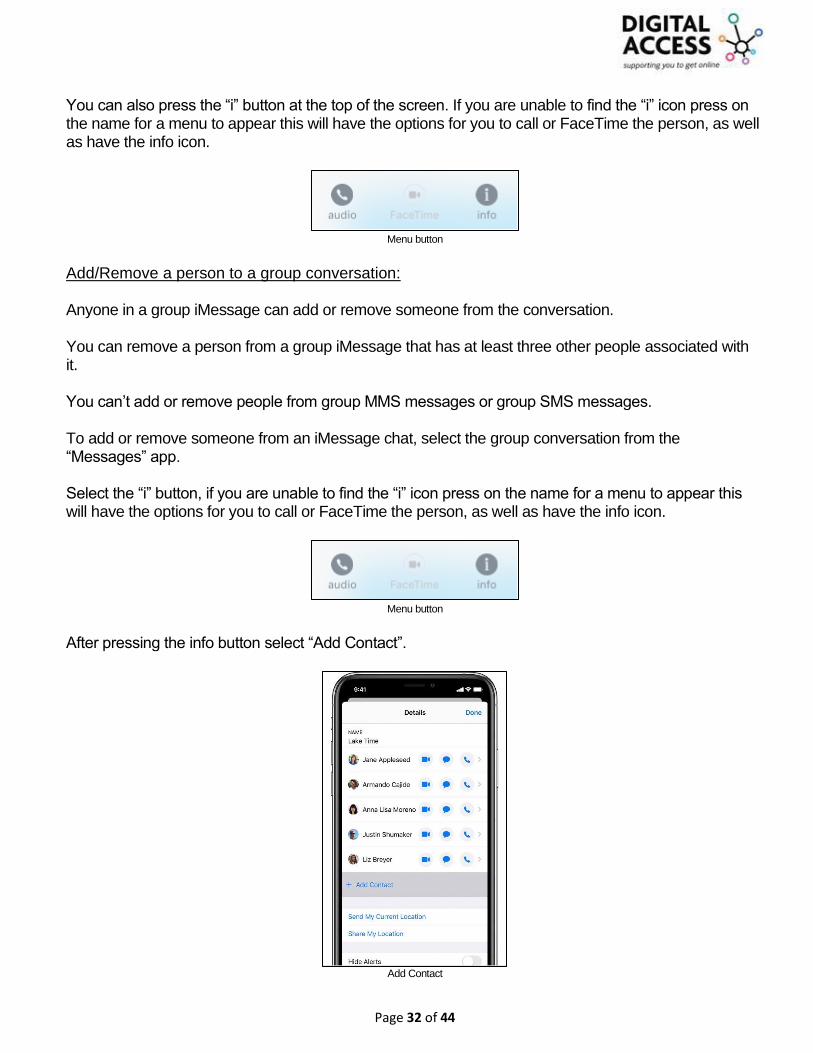
You can also press the “i” button at the top of the screen. If you are unable to find the “i” icon press on the name for a menu to appear this will have the options for you to call or FaceTime the person, as well as have the info icon.
Menu button
Add/Remove a person to a group conversation: Anyone in a group iMessage can add or remove someone from the conversation. You can remove a person from a group iMessage that has at least three other people associated with it. You can’t add or remove people from group MMS messages or group SMS messages. To add or remove someone from an iMessage chat, select the group conversation from the “Messages” app. Select the “i” button, if you are unable to find the “i” icon press on the name for a menu to appear this will have the options for you to call or FaceTime the person, as well as have the info icon.
Menu button
After pressing the info button select “Add Contact”.
Add Contact

Page 33 of 44
Add the details of the contact and then press “Done” to save the information. To remove them in the same way that you have to added someone using the information screen select the name you wish to remove and swipe to the left, this will populate a remove button, press on this. When finished press “Done” to save changes.
Remove contact
Leaving a Group conversation: In the Messages app go to and open the group chat that you want to leave, open the information menu by pressing the “i” button. If you are unable to find the “i” icon press on the name for a menu to appear this will have the options for you to call or FaceTime the person, as well as have the info icon.
Menu button
Scroll down the screen and press on “Leave this Conversation”.

Page 34 of 44
Leave the conversation
The option to “Leave” or “Cancels” populates select the one you require.
Leave option
Mute Messages: To mute the notifications you receive for messages, open the messages app and go to the conversation you wish to mute. Open the information “i” option. If you are unable to find the “i” icon press on the name for a menu to appear this will have the options for you to call or FaceTime the person, as well as have the info icon.
Menu button
Scroll down and select “Hide Alerts” by swiping the toggle to the right to turn it on and make it green or turn it off by swiping to the left and making it grey.

Page 35 of 44
Hide Alerts
When “Hide Alerts” is on, you will find a crescent moon next to the conversation. “Hide Alerts” stops notifications for a specific group text only, it is not for all conversations on your device, you will still receive all other messages and notifications. Using other “Apps”: While you’re on a call using the FaceTime app , you can use other apps, go to the home screen and from there select the app you want to open When you want to return to the FaceTime screen tap the green bar at the top of the screen.
Return to FaceTime
Using Siri: Activate Siri and then request Siri to make a FaceTime call by Saying “FaceTime” or “FaceTime George”. If required wait for Siri to prompt you before speaking and saying your contacts name. Then just wait for Siri to complete the action.

Page 36 of 44
Hey Siri FaceTime George Hey Siri FaceTime
Other Functions:
Using Call Waiting: If you are on a call when another call comes in, this can be a “Phone” call or “FaceTime” call, you can choose from the following options as to what to do: Selecting the button options on the left will end the call you are currently on and accept the incoming call. Selecting the middle option will decline the call. Selecting the button options on the right will accept the incoming call and place the current call on hold.
Call Screen

Page 37 of 44
Block unwanted callers: Occasionally there will be times when you need to block a caller. In FaceTime you can do this, and it will block calls and messages from the contact or number. This can be done two ways: To do this go to “Settings” on your device. Scroll down the list until you find “FaceTime” and press on this for the settings screen to open.
Settings and FaceTime
Select “Call Blocking & Identification”, this will open and populate a list of all blocked numbers and/or contacts. At the bottom of this list you will find the option “Block Contact” select this to block the number.

Page 38 of 44
Blocked contacts
Or alternatively in the “FaceTime” app you can press the info button to the side of the caller’s details.
FaceTime call list
This will populate the information menu, on here at the bottom of the screen you will find “Block this Caller” option press this to block the caller.
FaceTime block caller

Page 39 of 44
To unblock a contact, repeat the same steps but instead of selecting Block this Caller this will change to Unblock this Caller.
Unblock caller
Change Alert Styles: To add or change the way in which you are alerted of a notification go to “Settings”, scroll to “Notifications”, then under “Notification Style” find FaceTime. Here you can change the type of alert and banner style; you are also able to turn sounds and badges on or off. Lock Screen – if this is selected then you will see notifications on your locked screen. Notification Centre – if this is selected then all your notifications from all apps will appear in one place the Notification Centre. Banners – if this is selected then you will see notification at the top of your open screen. Banner Style – Lets you choose if these are “Temporary” or “Persistent”, a temporary banner will remain for a few seconds and then disappear off the screen, a persistent banner will stay on the screen until you tap it or dismiss it. Sounds – Lets you choose the sound of the notification from a list of many sounds. Badges – Turn these on or off. Badges indicate that a new message, email, notification or voicemail is waiting. Each app with any new unread information has a white number with a red background in the upper ring hand corner of the app icon, this is a “Badge”. Notification Grouping – Select Automatic, By App or Off. Notification groups collect sets of different notifications together and groups them, this helps the Notification Centre be better organised and more efficient so that the user can see more notification at the same time. If you have the notification settings for FaceTime set up the same as the “FaceTime notification settings” image then all of your Apple devices will ring as it would if it were receiving a phone call, notifications will appear on your lock screen, in your notification centre and as badges and banners on your screen.

Page 40 of 44
Apple Mac: Using Messages: Messages is the text-messaging software included with your Mac. Use it to send messages with iMessage or to send SMS/MMS messages through your iPhone/iPad. With Messages for Mac, you can send unlimited messages to any “Apple” device including: Mac, iPhone, iPad or iPod touch. Any device that uses iMessage, Apple's secure-messaging service.
Messages for Mac
As iMessage is the Apple messaging service you automatically get with your Apple device, as you set it up you generate your Apple ID. It is possible that the first time you open the Messages for Mac app you will be asked to sign in. This is your Apple ID credentials. This will usually be the same information that you use for iCloud, iTunes, App Store, etc.
Apple ID log on Messages for Mac
Having a conversation: Open the message app on your Mac and at the top of the screen next to the search bar you will find the new message box a grey square and pencil.
New message on Mac
Page 41 of 44
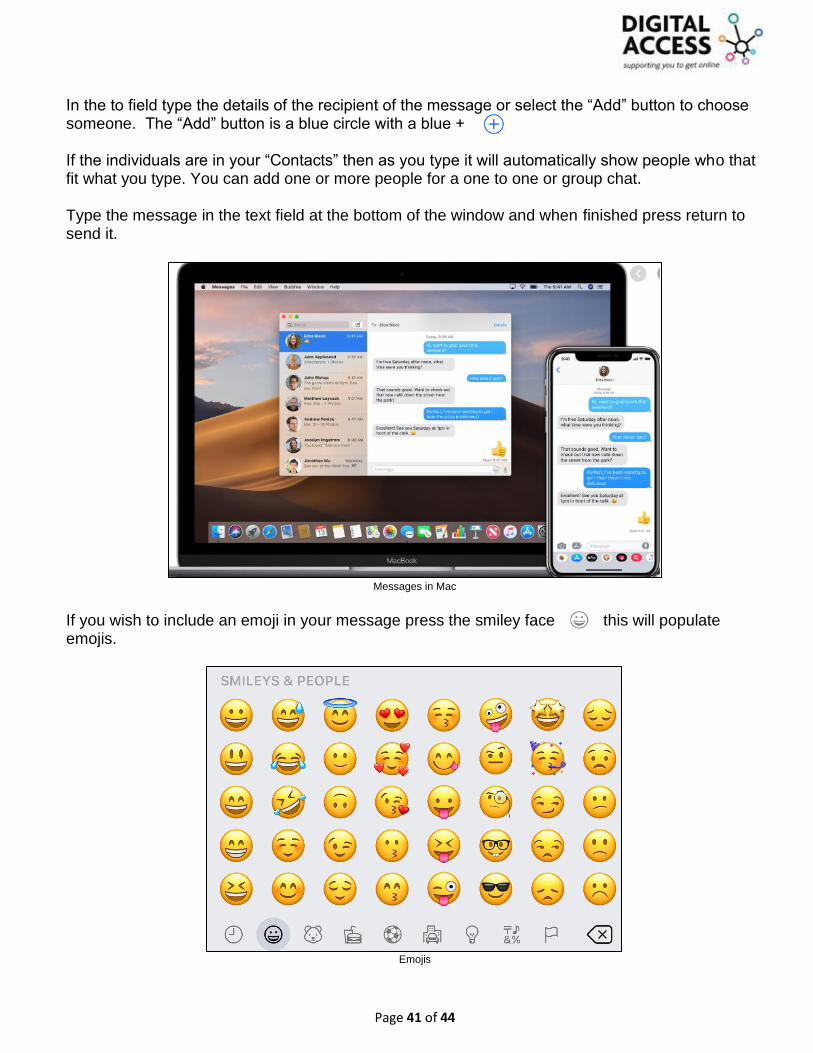
In the to field type the details of the recipient of the message or select the “Add” button to choose someone. The “Add” button is a blue circle with a blue + If the individuals are in your “Contacts” then as you type it will automatically show people who that fit what you type. You can add one or more people for a one to one or group chat. Type the message in the text field at the bottom of the window and when finished press return to send it.
Messages in Mac
If you wish to include an emoji in your message press the smiley face this will populate emojis.
Emojis

Page 42 of 44
To include an image or other file, just drag it or copy/paste this into the message field. To include an audio recording press the microphone and record your message. Within your message in the top corner of the screen the option “Details” appears, this allows you to do the following: Choose not to be disturbed Use FaceTime for audio call Use FaceTime for video call Share a Screen
See the recipient’s location (if this is being shared with you)
Review photos and files from the conversation
Add a group name
Add others to the group
Leave the group
Remove people from the group if there are 4+
Details example
With macOS Sierra or later, you can also use Siri to send, read and reply to Messages: to do this open Siri and then say your instruction. For example:
• “Send a message to Susan and Johnny saying I'll be late" • “Tell Johnny Appleseed the show is about to start” • “Text a message to 01234 567 890”
• “Read the last message from Brian Park” • “Read my new messages”.
• “Reply that's great news” • “Tell him I'll be there in 10 minutes”
Page 43 of 44
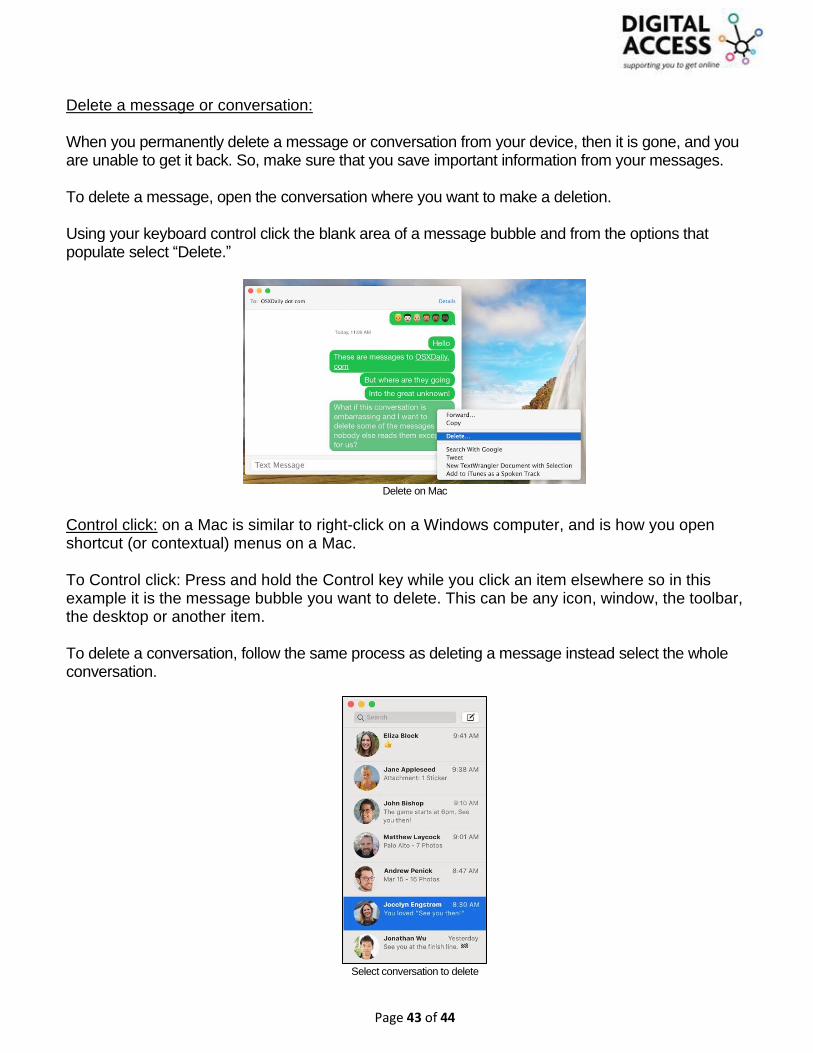
Delete a message or conversation: When you permanently delete a message or conversation from your device, then it is gone, and you are unable to get it back. So, make sure that you save important information from your messages. To delete a message, open the conversation where you want to make a deletion. Using your keyboard control click the blank area of a message bubble and from the options that populate select “Delete.”
Delete on Mac
Control click: on a Mac is similar to right-click on a Windows computer, and is how you open shortcut (or contextual) menus on a Mac. To Control click: Press and hold the Control key while you click an item elsewhere so in this example it is the message bubble you want to delete. This can be any icon, window, the toolbar, the desktop or another item. To delete a conversation, follow the same process as deleting a message instead select the whole conversation.
Select conversation to delete

Page 44 of 44
References: For more guidance on how to use your Apple device visit https://support.apple.com/en-gb select the type of device you have and then either scroll to find, select an option or search for the information you require.
Apple Support Homepage