exchangeaway video shooting tips
TRANSCRIPT
7/28/2019 Exchangeaway Video Shooting Tips
http://slidepdf.com/reader/full/exchangeaway-video-shooting-tips 1/6
Digital video guide
©2009 Adobe Systems Incorporated Video shooting tips 1
Video shooting tipsWith a camcorder of choice in hand, it’s time to venture off and shoot videos. This guide presents a collection of tips
and some specialized advice from a TV news chief photographer.
Get a closing shot
Your closing images stick in people’s minds. Be constantly on the lookout for that one shot or sequence that wraps
up your story effectively. It could be as simple as someone closing a door, capping a pen, petting a dog, turning out
the lights, or releasing a butterfly from cupped hands.
Get an establishing shot
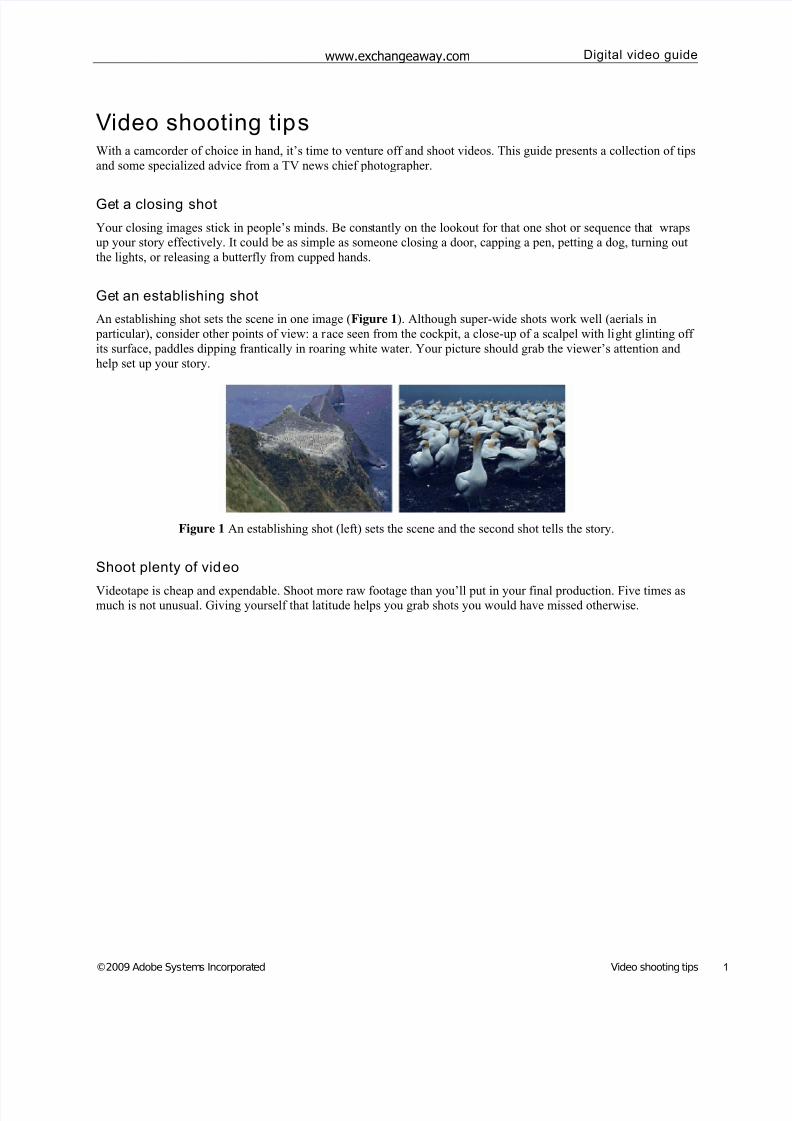
An establishing shot sets the scene in one image (Figure 1). Although super-wide shots work well (aerials in
particular), consider other points of view: a race seen from the cockpit, a close-up of a scalpel with light glinting off
its surface, paddles dipping frantically in roaring white water. Your picture should grab the viewer’s attention and
help set up your story.
Figure 1 An establishing shot (left) sets the scene and the second shot tells the story.
Shoot plenty of video
Videotape is cheap and expendable. Shoot more raw footage than you’ll put in your final production. Five times asmuch is not unusual. Giving yourself that latitude helps you grab shots you would have missed otherwise.
www.exchangeaway.com
7/28/2019 Exchangeaway Video Shooting Tips
http://slidepdf.com/reader/full/exchangeaway-video-shooting-tips 2/6
Digital vi deo guide
2 Video shooting tips ©2009 Adobe Systems Incorporated
Adhere to the rule of thirds
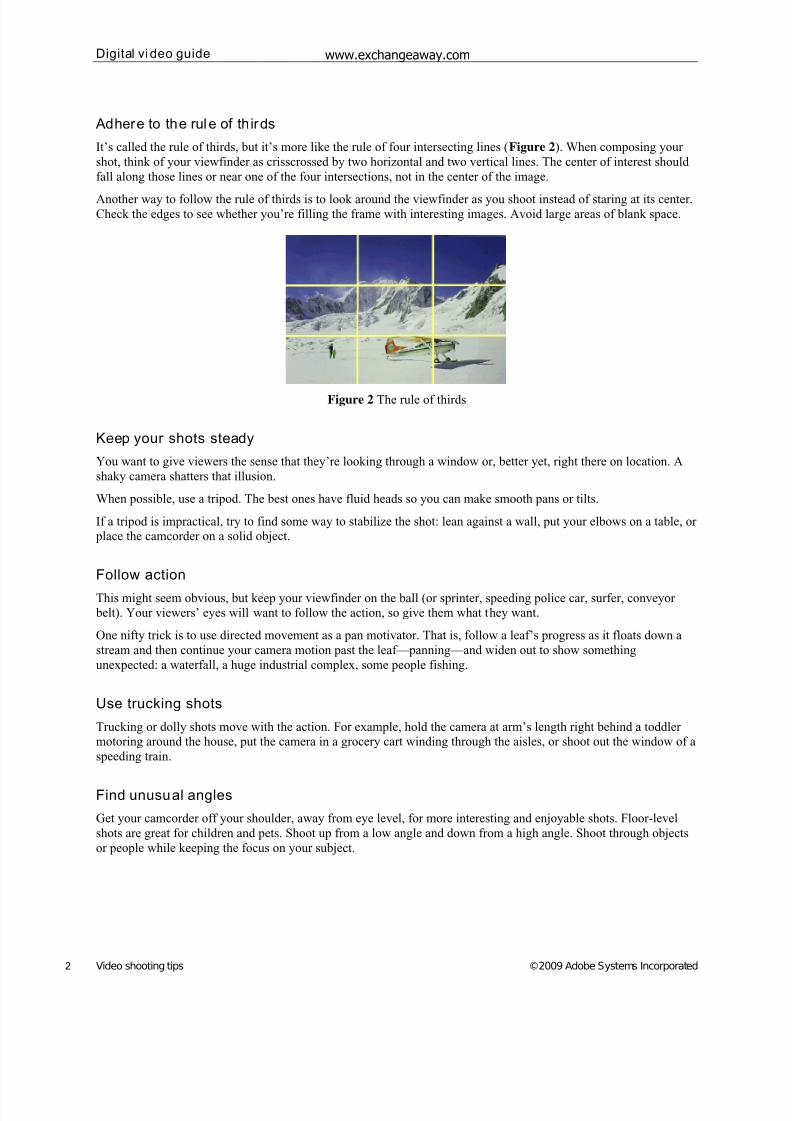
It’s called the rule of thirds, but it’s more like the rule of four intersecting lines ( Figure 2). When composing your
shot, think of your viewfinder as crisscrossed by two horizontal and two vertical lines. The center of interest should
fall along those lines or near one of the four intersections, not in the center of the image.
Another way to follow the rule of thirds is to look around the viewfinder as you shoot instead of staring at its center.Check the edges to see whether you’re filling the frame with interesting images. Avoid large areas of blank space.
Figure 2 The rule of thirds
Keep your shots steady
You want to give viewers the sense that they’re looking through a window or, better yet, right there on location. A
shaky camera shatters that illusion.
When possible, use a tripod. The best ones have fluid heads so you can make smooth pans or tilts.
If a tripod is impractical, try to find some way to stabilize the shot: lean against a wall, put your elbows on a table, or
place the camcorder on a solid object.
Follow action
This might seem obvious, but keep your viewfinder on the ball (or sprinter, speeding police car, surfer, conveyor
belt). Your viewers’ eyes will want to follow the action, so give them what they want.
One nifty trick is to use directed movement as a pan motivator. That is, follow a leaf’s progress as it floats down a
stream and then continue your camera motion past the leaf—panning—and widen out to show something
unexpected: a waterfall, a huge industrial complex, some people fishing.
Use trucking shots
Trucking or dolly shots move with the action. For example, hold the camera at arm’s length right behind a toddler
motoring around the house, put the camera in a grocery cart winding through the aisles, or shoot out the window of a
speeding train.
Find unusual angles
Get your camcorder off your shoulder, away from eye level, for more interesting and enjoyable shots. Floor-level
shots are great for children and pets. Shoot up from a low angle and down from a high angle. Shoot through objects
or people while keeping the focus on your subject.
www.exchangeaway.com
7/28/2019 Exchangeaway Video Shooting Tips
http://slidepdf.com/reader/full/exchangeaway-video-shooting-tips 3/6
Digital video guide
©2009 Adobe Systems Incorporated Video shooting tips 3
Lean forward or backward
Don’t use the zoom lens as a crutch. A better way to move in close or out away from a subject is literally to lean in
or out. For example, start by leaning way in with a tight shot of a woodcarver’s hands. Then, while still recording,
lean way back (perhaps widening your zoom lens as well) to reveal that the carver is working in a sweatshop full of
folks hunched over their handiwork.
Get wide shots and tight shots
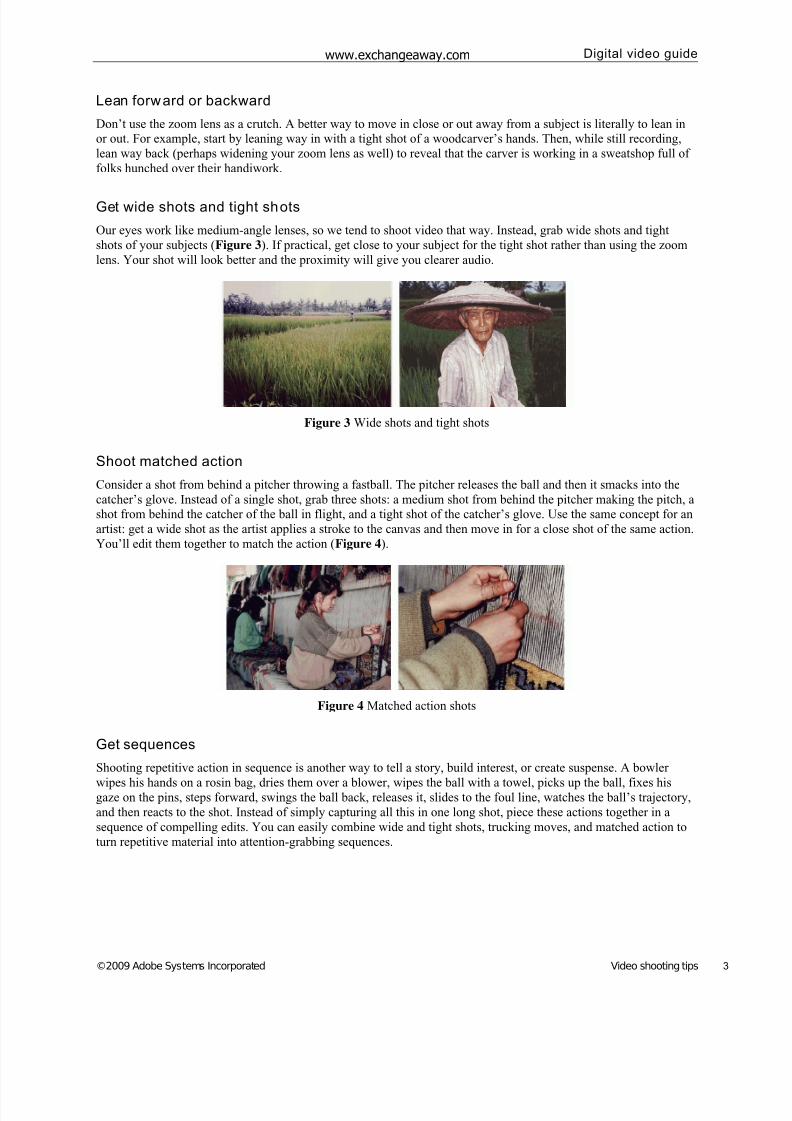
Our eyes work like medium-angle lenses, so we tend to shoot video that way. Instead, grab wide shots and tight
shots of your subjects (Figure 3). If practical, get close to your subject for the tight shot rather than using the zoom
lens. Your shot will look better and the proximity will give you clearer audio.
Figure 3 Wide shots and tight shots
Shoot matched action
Consider a shot from behind a pitcher throwing a fastball. The pitcher releases the ball and then it smacks into the
catcher’s glove. Instead of a single shot, grab three shots: a medium shot from behind the pitcher making the pitch, a
shot from behind the catcher of the ball in flight, and a tight shot of the catcher’s glove. Use the same concept for an
artist: get a wide shot as the artist applies a stroke to the canvas and then move in for a close shot of the same action.
You’ll edit them together to match the action (Figure 4).
Figure 4 Matched action shots
Get sequences
Shooting repetitive action in sequence is another way to tell a story, build interest, or create suspense. A bowler
wipes his hands on a rosin bag, dries them over a blower, wipes the ball with a towel, picks up the ball, fixes hisgaze on the pins, steps forward, swings the ball back, releases it, slides to the foul line, watches the ball’s trajectory,
and then reacts to the shot. Instead of simply capturing all this in one long shot, piece these actions together in a
sequence of compelling edits. You can easily combine wide and tight shots, trucking moves, and matched action to
turn repetitive material into attention-grabbing sequences.
www.exchangeaway.com
7/28/2019 Exchangeaway Video Shooting Tips
http://slidepdf.com/reader/full/exchangeaway-video-shooting-tips 4/6
Digital vi deo guide
4 Video shooting tips ©2009 Adobe Systems Incorporated
Avoid fast pans and snap zooms
These moves fall into MTV and amateur video territory. Few circumstances call for such stomach-churning
camerawork. Minimize pans and zooms that remind viewers they’re watching TV.
If you do zoom or pan, do it for a purpose: to reveal something, to follow someone’s gaze to the subject of interest,
or to continue the flow of action (as in the floating leaf example). A slow zoom in, with only a minimal change to
the focal length, can add drama to a sound bite. Again, do it sparingly.Note: Don’t let this no-fast-moves admonition force you to stop rolling while you zoom or pan. If you see
something that warrants a quick close-up shot or you need to suddenly pan to grab some possibly fleeting footage,
keep rolling. You can edit around that sudden movement later. If you stop recording to make the pan or zoom or
adjust the focus, you might lose whatever it was you were trying so desperately to shoot. And you will miss any
accompanying natural sound.
Shoot cutaways
Avoid jump cuts by shooting cutaways. A jump cut is an edit that creates a disconnect in the viewer’s mind. A
cutaway —literally a shot that cuts away from the current shot—fixes jump cuts.
Cutaways are common in interviews where you might want to edit together two 10-second sound bites from the
same person, making the interviewee appear to move suddenly. To avoid that jump cut—that sudden disconcertingshift—make a cutaway of the interview. It could be a wide shot, a hand shot, or a reverse-angle shot of the
interviewer over the interviewee’s shoulder. Then edit in the cutaway over the juncture of the two sound bites to
cover the jump cut.
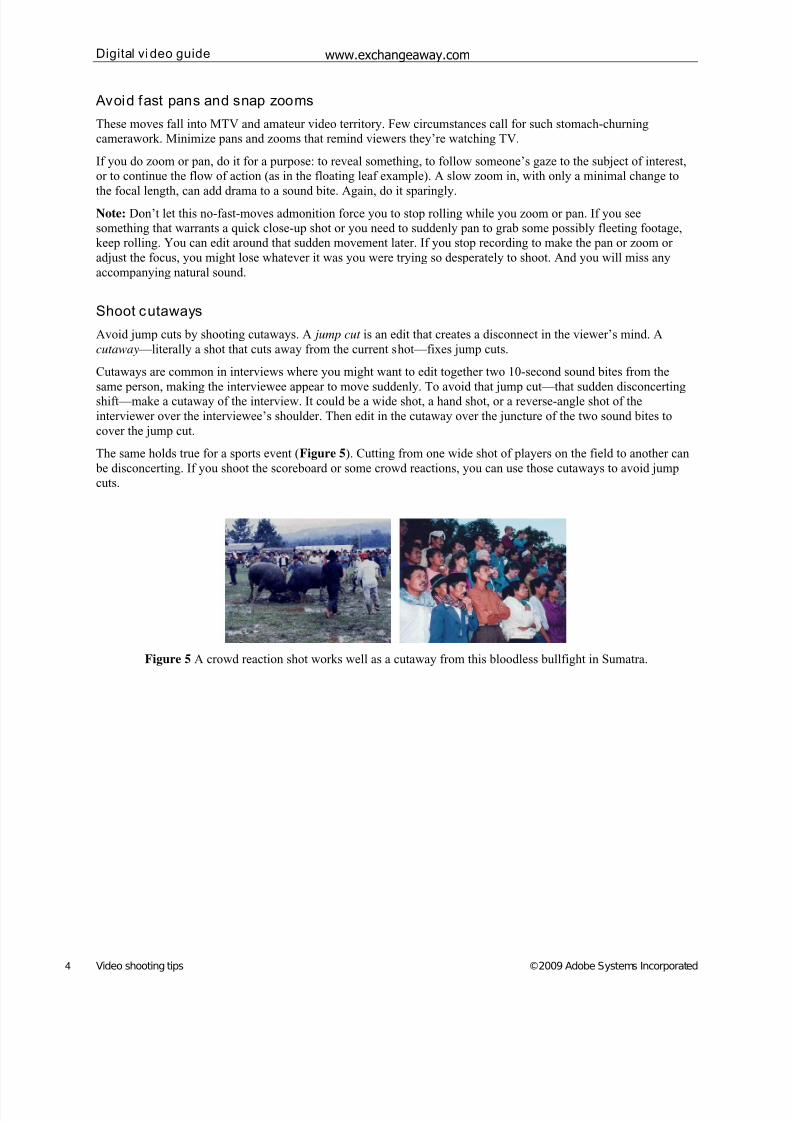
The same holds true for a sports event (Figure 5). Cutting from one wide shot of players on the field to another can
be disconcerting. If you shoot the scoreboard or some crowd reactions, you can use those cutaways to avoid jump
cuts.
Figure 5 A crowd reaction shot works well as a cutaway from this bloodless bullfight in Sumatra.
www.exchangeaway.com

7/28/2019 Exchangeaway Video Shooting Tips
http://slidepdf.com/reader/full/exchangeaway-video-shooting-tips 5/6
Digital video guide
©2009 Adobe Systems Incorporated Video shooting tips 5
Don’t break the plane
Breaking the plane causes another viewer disconnect. If you’re shooting in one direction, you don’t want your next
shot to be looking back at your previous camera location (Figure 6). For instance, if you’re shooting an interview
with the camera peering over the left shoulder of the interviewer, shoot your reverse cutaways over the interviewee’s
right shoulder. That keeps the camera on the same side of the plane—an imaginary vertical wall running through the
interviewer and interviewee.To shoot over your interviewee’s left shoulder would break that plane, meaning viewers would expect to see the
camera that took the previous shot.
Figure 6 The plane is an imaginary vertical wall running, in this case, through the interviewer and interviewee.
In general, you want to keep all your camera positions on one side of the plane, even when shooting large-scale
events such as football games. Although viewers won’t expect to see another camera (consciously or
unconsciously), they might lose track of the direction of play.
There are exceptions. When videotaping a rock group performance, for example, camera crewmembers typically
scramble all over the stage, grabbing shots from multiple angles and even appearing on camera themselves.
Note: If you conduct formal, sit-down interviews with more than one person for the same piece, consider shooting
each subject from a different side of the interviewer. Shoot one subject with the camera positioned over the
interviewer’s left shoulder. For the next interview, move the camera behind the interviewer’s right shoulder. This
avoids a subtle jump cut that happens when you edit bites from two individuals who are facing the same direction.
www.exchangeaway.com
7/28/2019 Exchangeaway Video Shooting Tips
http://slidepdf.com/reader/full/exchangeaway-video-shooting-tips 6/6
Digital vi deo guide
6 Video shooting tips ©2009 Adobe Systems Incorporated
Use lights
Lights add brilliance, dazzle, and depth to otherwise bland, flat scenes. Consider using an onboard camcorder fill
light and—if you have the time, money, patience, or personnel—a full lighting kit with a few colored gels. In a
pinch, be creative about increasing available light. Open curtains, turn on all the lights, bring some desk lamps into
the room. One caveat: Low-light situations can be dramatic, and flipping on a few desk lamps can destroy that mood
in a moment.
Grab good bites
Your narrator presents the facts. The people in your story present the emotions, feelings, and opinions. Don’t rely on
interview sound bites to tell who, what, where, when, and how. Let those bites explain the why.
For example, your narrator should be the one to say “It was opening night and this was her first solo.” Let the singer,
recalling this dramatic moment, say, “My throat was tight and my stomach was tied in knots.”
Although your interviews might be lengthy, use only short sound bites in your final production. The bites should be
punctuation marks, not paragraphs.
Note: Make exceptions for idiosyncratic characters. Some characters you’ll videotape are so compelling, quirky, or
humorous that your best bet is to let them do the primary narrating. Then consider scenes you can use to illustrate
their commentary so you don’t fill your entire video with a talking head.
Get plenty of natural sound
Think beyond images. Sound is tremendously important. Listen for sounds you can use in your project. Even if the
video quality is mediocre, grab that audio. Your camcorder’s onboard mic is not much more than a fallback.
Consider using additional mics: shotgun mics to narrow the focus of your sound and avoid extraneous noise,
lavalieres tucked out of sight for interviews, and wireless mics when your camera can’t be close enough to get just
what you need.
Stripe your tapes
Adobe Premiere Pro can automate much of the video capture process. But if your digital videotape has a gap in its
timecode, automated capture might not work.Gaps typically occur when you eject a partially recorded tape and then reinsert it, resetting the timecode to zero and
leaving an unrecorded portion on the tape. With gaps, Premiere Pro can’t automatically capture clips you’ve logged.
Stripe your tapes before shooting to resolve this issue. Place a fresh tape in your camcorder, cap your lens, press
Record, and wait for your camcorder to record the entire tape. This lays down continuous timecode from beginning
to end and avoids duplicate timecodes or breaks in the timecode on the tape.
Rewind the tape and you’re ready to go. Now, as you use your camcorder, new video is recorded over the black
video you recorded, but the timecode doesn’t change.
Plan your shoot
When you consider a video project, plan what you need to shoot to tell the story. How long will it be, how many
shots will you need, who will you interview, what kind of mics and lights will you use, and how will you control theenvironment. Or will you need to respond to changing circumstances? Sporting events and concerts have a rhythm
and flow that allow for detailed planning. A student anti-war protest can shift directions with no warning, requiring
you to quickly change your tactics.
In any event, no matter how you envision the finished project, be willing to make changes as the situation warrants.
www.exchangeaway.com