excel 10 2. 3. , select
TRANSCRIPT
Copyright © 2011 by Pearson Education Inc. publishing as Prentice Hall. All rights reserved.From Skills for Success with Microsoft® Excel 2010 Comprehensive
Share Workbooks and Create Macros | Microsoft Excel Chapter 10 More Skills: SKILL 12 | Page 1 of 7
� The Ribbon is designed to make it easy to access the commands that you use most often in Excel.
� You can create a custom tab, which can be divided into groups and added to the Ribbon like the default tabs. This tab can contain your favorite groups or your favorite commands.
� Changes made to the Ribbon apply to the local installation of the application and not to a particular file.
To complete this workbook, you will need the following file:� e10_Parks
You will save your files as:� Lastname_Firstname_e10_Parks_Group� Lastname_Firstname_e10_Parks_Tab
1. Start Excel, and then open the student data file e10_Parks. In the Message Bar, read themessage, and then click Enable Content.
Macros can be used to add harmful content to your computer. Excel disables macros(unless you allow them to run) to minimize the possibility that harmful content willinfect your system.
2. Display the File tab, and then click Options.
3. In the Excel Options dialog box, in the left pane, click Customize Ribbon, and then underMain Tabs, select Home.
ExcelCHAPTER 10
More Skills 12 Modify the Ribbon

Copyright © 2011 by Pearson Education Inc. publishing as Prentice Hall. All rights reserved.From Skills for Success with Microsoft® Excel 2010 Comprehensive
Share Workbooks and Create Macros | Microsoft Excel Chapter 10 More Skills: SKILL 12 | Page 2 of 7
4. Click New Group, and compare your screen with Figure 1.
Selecting the Home option will allow you to add a command to a new group on theHome tab.
Figure 1
Main Tabs
Customize Ribbon
New Group
5. Under Main Tabs, under Home, right-click New Group (Custom), and then click Rename.In the Rename dialog box, type My Macros and then click OK.
6. Under Main Tabs, click My Macros, click the Choose commands from arrow, and thenclick Popular Commands. In the left pane, click Macros, and then click Add.
7. Click the Choose commands from arrow, and then click Macros. In the left pane, clickAddFooter, and then click the Add button. In the left pane, click FileInformation, and then click the Add button.

8. Compare your screen with Figure 2, and then click OK.
You have created a custom group on the Home tab that contains the three commandsyou selected. The commands will open the Macros dialog box or run the selectedmacros for this workbook. The group will remain available whenever Excel is opened,even though the two macros apply only to the Parks workbook.
Copyright © 2011 by Pearson Education Inc. publishing as Prentice Hall. All rights reserved.From Skills for Success with Microsoft® Excel 2010 Comprehensive
Share Workbooks and Create Macros | Microsoft Excel Chapter 10 More Skills: SKILL 12 | Page 3 of 7
Figure 2
Commands to add
Add button
9. On the Home tab, in the My Macros group, click AddFooter.

10. Click the View tab, and then in the Workbook Views group, click Page Layout. Scroll down so that the footer is visible, and then display the Home tab. Compare your screenwith Figure 3.
Copyright © 2011 by Pearson Education Inc. publishing as Prentice Hall. All rights reserved.From Skills for Success with Microsoft® Excel 2010 Comprehensive
Share Workbooks and Create Macros | Microsoft Excel Chapter 10 More Skills: SKILL 12 | Page 4 of 7
Figure 3
Footer inserted
Custom group
11. With the Home tab displayed, click Start , click All Programs, and then open theAccessories folder. Click Snipping Tool, click the New button arrow, and then click Full-screen Snip. Save the snip in your Excel Chapter 10 folder as Lastname_Firstname_e10_Parks_Group and then Close the Snipping Tool window.
12. Switch to Normal view, display the File tab, and then click Options. In the Excel Options dialog box, in the left pane, click Customize Ribbon.
13. Under Main Tabs, select Home, and then click New Tab, and then under Main Tabs, underHome, right-click New Tab (Custom), and then click Rename. In the Rename dialog box,type Your Name—using your real name—and then click OK.
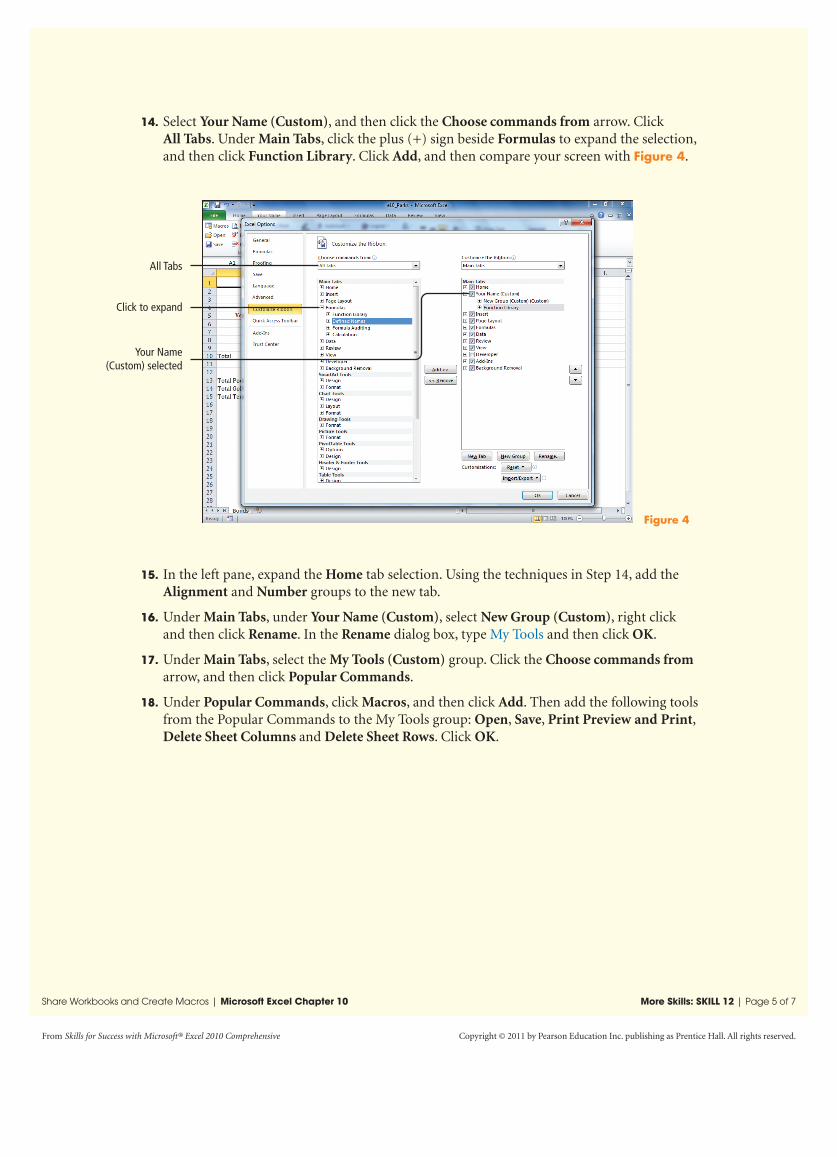
14. Select Your Name (Custom), and then click the Choose commands from arrow. Click All Tabs. Under Main Tabs, click the plus (+) sign beside Formulas to expand the selection,and then click Function Library. Click Add, and then compare your screen with Figure 4.
Copyright © 2011 by Pearson Education Inc. publishing as Prentice Hall. All rights reserved.From Skills for Success with Microsoft® Excel 2010 Comprehensive
Share Workbooks and Create Macros | Microsoft Excel Chapter 10 More Skills: SKILL 12 | Page 5 of 7
Figure 4
All Tabs
Click to expand
Your Name(Custom) selected
15. In the left pane, expand the Home tab selection. Using the techniques in Step 14, add theAlignment and Number groups to the new tab.
16. Under Main Tabs, under Your Name (Custom), select New Group (Custom), right clickand then click Rename. In the Rename dialog box, type My Tools and then click OK.
17. Under Main Tabs, select the My Tools (Custom) group. Click the Choose commands fromarrow, and then click Popular Commands.
18. Under Popular Commands, click Macros, and then click Add. Then add the following toolsfrom the Popular Commands to the My Tools group: Open, Save, Print Preview and Print,Delete Sheet Columns and Delete Sheet Rows. Click OK.

19. Display the Your Name tab, and then compare your screen with Figure 5.
You have created a custom tab and added groups and commands to the tab.This method makes the commands you use regularly available without your having to switch between tabs.
Copyright © 2011 by Pearson Education Inc. publishing as Prentice Hall. All rights reserved.From Skills for Success with Microsoft® Excel 2010 Comprehensive
Share Workbooks and Create Macros | Microsoft Excel Chapter 10 More Skills: SKILL 12 | Page 6 of 7
Figure 5
Your Name tab
Groups added
My Tools group

20. On the Your Name tab, in the My Tools group, click Macros. In the Macro dialog box,select FileInformation, and then click Run.
The FileInformation macro runs, inserting your name and the page number in the header and then automatically closing the Macro dialog box.
21. Switch to Page Layout view, and compare your screen with Figure 6.
Copyright © 2011 by Pearson Education Inc. publishing as Prentice Hall. All rights reserved.From Skills for Success with Microsoft® Excel 2010 Comprehensive
Share Workbooks and Create Macros | Microsoft Excel Chapter 10 More Skills: SKILL 12 | Page 7 of 7
Figure 6
Your Nameadded
22. With the Your Name tab displayed, click Start , click All Programs, and then open the Accessories folder. Click Snipping Tool, click the New button arrow, and then clickFull-screen Snip. Save the snip in your Excel Chapter 10 folder as Lastname_Firstname_e10_Parks_Tab and then Close the Snipping Tool window.
23. Display the File tab, and then click Options. In the Excel Options dialog box, in the left pane, click Customize Ribbon. Click the Reset button, and then click Reset all customizations. Read the message, and then click Yes. Click OK. Notice that the custom tab Your Name has been removed from the Ribbon.
24. Exit Excel without saving the workbook, and then print or submit the snips as directed byyour instructor.
� You have completed More Skills 12