ex. no. 11 installing linux and software linux and... · by default, linux is installed from the...
TRANSCRIPT

Ex. No. 11 INSTALLING LINUX AND SOFTWARE Date :
Q1. INSTALLING LINUX
Now your PC should boot from the CD-ROM or the installation boot floppy. After a few files are opened and decompressed, Linux installation screen should appear, with the following prompt:
[F1-Main] [F2-Options] [F3-General] [F4-Kernel] [F5-Rescue] boot:
To start the installation process from the boot : prompt, there are three basic options:
• Graphical mode By default, Linux is installed from the CDs in graphical mode. If you're installing from the CDs, just press the ENTER key at the boot : prompt.
• Text mode The linux text option starts a low-intensity graphical installation known as text mode that all but the most graphically challenged computers can handle.
• Network installation You can use the installation CD or boot floppy to install RHEL over a network connection. If you're booting from the installation CD, enter linux askmethod at the boot: prompt. This tells the RHEL installation CD to ask you whether you want to install from the CD or from a network server.
The instructions below are based on NFS server based installation. (First configure NFS Server)
A. Pre Installation Steps
1. Boot your computer from boot CD 2. When you see the boot : prompt, enter the linux askmethod command. 3. Select your language. English is the default; 4. Select a keyboard type. 5. Choose your installation method. ie.; NFS image option. 6. Configure your IP address information. If you have a DHCP server on your network,
the default should be sufficient. Otherwise, deselect the Use Dynamic IP Configuration option, and enter at least an IP address and Netmask.
7. Next, you'll direct your computer to the remote NFS server. You can enter the
hostname or IP address of the NFS server, as well as the shared directory.
8. Now you'll see the first Linux graphical installation screen. Click Next to continue.
© M. Eliazer 68

9. Select between automatic and manual partitioning. Always recommended to select the Manually Partition With Disk Druid option and click Next to continue.
10. Basic Partitioning
(i) In the Disk Druid Menu, click New. Enter /boot in the Mount Point text box. Enter 100MB in the Size(MB) text box. and click OK.
(ii) Repeat the basic process described in step (i) with the other noted partitions: /tmp,
/var, and /home. (iii) Now create a swap partition. Click New to open the Add Partition window. Click
the File System Type drop-down box and select Swap. As you'll see, the Mount Point text box is now grayed out. Enter the required size (512MB ie; atleast ½ of RAM size) in the Size(MB) text box and click OK.
(iv) Allocate the remaining space to the root directory (/) partition. Click New to open
the Add Partition window. Enter / in the Mount Point text box. Under Additional Size Options, select Fill To Maximum Allowable Size and click OK.
Once you've finished creating the desired partitions, click Next to continue.
11. Configure the boot loader. It can help you configure how your BIOS find Linux and other operating systems on your computer. GRUB is the default.
12. Configure network. You can either configure the IP address information shown
manually, or you can leave this task to a DHCP server. Make your selections and click Next to continue.
13. Configure a standard firewall for your computer. Generally, you won't need to
configure a firewall for a workstation inside a LAN. Firewalls are generally located on computers that serve as junctions, or routers between networks such as a LAN and the Internet
14. Select additional languages if you need and click Next to continue. 15. Select your time zone.
16. Type password for the root user and click Next to continue. 17. Now you'll see a Package Installation Defaults screen. Select the 'Customize the set of
packages to be installed' option and click Next to continue.
18. Select the package groups that you'll need and click Next to continue.
Finally, you're taken to a summary screen. You can click Back in this screen to return to a previous step. Otherwise, click Next to start the installation process.
© M. Eliazer 69

B. Post installation steps
1. Once the installation process is complete, you're taken to a screen where you can create a customized boot disk (if you need)
2. Configure your video card. A large number of different manufacturers, models,
and generic options are available. You can also set the available memory in your video card
3. Configure your Monitor. You can set the make and model of your monitor. If you
don't see your monitor in the list, there are also a large variety of generic CRT and LCD monitors available.
4. Do Graphics Configuration.
5. OS now reboots your computer. Linux is now installed. At first time boot, you'll
get to configure a few more components during this process. C. First Boot configuration Steps
1. You'll need to agree to the license agreement.
2. Set the date and time
3. Configure regular login account
4. Click the Play Test Sound button to confirm sound card functioning.
5. If you want to register with the Red Hat Network, select Yes. But the defaults are
generally sufficient.
6. If you have additional software to install, insert CD and click Next to continue.
7. You'll now see the Finish Setup screen, which tells you that 'Your system is now set up and ready to use.'. Click Next to finish the process.
Congratulations! Installation is now complete.
© M. Eliazer 70
Q2. INSTALLING SOFTWARE The RPM Package Manager The primary functions of the RPM are ♦ Querying, installing, and uninstalling software ♦ Maintaining a database that stores various items of information about the packages ♦ Packaging other software into an RPM form Querying 1. To query all the packages installed in the system
# rpm –qa This will give you a long listing of software installed.
2. To query for a Specific Package
# rpm –q bash This is to verify whether the package bash is installed or not 3. To query more information about a package # rpm -qi bash 4. To list the configuration files (if any) that comes with the bash package
# rpm -qc bash Installing 5. To install the package
# rpm -ivh gcc-4.* This will install gcc packages
Here i install v verbose ie; displaying information about installation h displaying # symbol to show the installation progress 6. To upgrade the package
# rpm -Uvh gcc-4.* This will upgrade old gcc package with new one 7. To freshen the package
# rpm -Fvh gcc-4.* This will remove the existing gcc package and install as a fresh package
Uninstalling 8. To remove a particular package from the system # rpm –e gcc-4.*
© M. Eliazer 71
Yum Package Yum is one of the newer methods of software management on Linux systems. Yum is an automatic updater and package installer/remover for RPM systems. It automatically computes dependencies and figures out what things should occur to install packages. Yum Package Configuration Step 1:
copy all packages from cd's/dvd to any location #mount /dev/cdrom /mnt #cp -vr /mnt/Server /var/ftp/pub #eject
Step 2: install createrepo rpm #rpm -ivh /var/ftp/pub/Server/createrepo0.4.4-2.noarch.rpm
Step 3: create yum database #createrepo –g /var/ftp/pub/Server/repodata/comps-rhel5-server-core.xml /var/ftp/pub/Server/ #rm -rf /var/ftp/pub/Server/.olddata #createrepo -g /var/ftp/pub/Server/repodata/comps-rhel5- server-core.xml /var/ftp/pub/Server/
Step 4: create yum repository file in /etc/yum.repos.d/ directory #vi /etc/yum.repos.d/sample.repo [Server] name=server packages baseurl=file:///var/ftp/pub/Server gpgcheck=0
Step 5: clean yum cache and list all packages #yum clean all #yum list all
Remote package install configuration for Client Step 1:
create yum repository file #vi /etc/yum.repos.d/sample.repo [Server] name=server packages baseurl=ftp://192.168.0.10/pub/Server gpgcheck=0
Step 2:
clean yum cache and list all packages #yum clean all #yum list all
Installing, Removing and listing packages using Yum To install httpd package # yum install httpd To uninstall httpd package # yum remove httpd
© M. Eliazer 72
To list all the installed packages # yum list installed To list all the packages available in the server # yum list available Q3. COMPILE AND INSTALL GNU SOFTWARE In this section, we are going to see the way to install the package from its source file. Step 1. Getting and Unpacking the Package
a) First get the source file either from CD or download it from internet. Save the file in the directory /usr/local/src # wget http://ftp.gnu.org/gnu/hello/hello-2.3.tar.gz
b) Use the tar command to unpack and decompress the file
# tar -xvzf hello-2.3.tar.gz c) A new directory, called hello-2.3, should have been created for you during the untarring. Now change to the new directory. # cd hello-2.3 ; ls
Step 2. Looking for Documentation Read the documentation files such as ‘README and INSTALL’ for installation instructions # less INSTALL or # vi INSTALL
Step 3. Configuring the Package The configuration scripts will be available in the name ‘configure’. Now execute the configuration file. # ./configure By default, most packages use /usr/local. Each component in the package will install into the appropriate directory in /usr/local. If you want to change the directory, use the option –prefix as below # ./configure --prefix /tmp/local
Step 4. Compiling the Package Compile the package using the following command
# make Step 5. Installing the Package
Once the compile completes successfully, install the package as below # make install
This will install the package into the default location
© M. Eliazer 73
Step 6. Testing the Software Test the software by running the file
# /usr/local/bin/hello Step 7. Cleanup
Once the package is installed, you can do some cleanup to get rid of all the temporary files created during the installation. # cd /usr/local/src Now use the rm command to remove the actual directory, like so: # rm -rf hello-2.3
Verified by
Staff In-charge Sign : Date :
Ex. No. 12 MANAGING USERS Date :
What is User ? • Under Linux, every file and program must be owned by a user. Each user has a unique identifier
called a user ID (UID). Each user must also belong to at least one group, a collection of users
© M. Eliazer 74
established by the system administrator. Users may belong to multiple groups. Like users, groups also have unique identifiers, called group IDs (GIDs).
• Each user’s rights can be defined in one of two ways: as those of a normal user or the root user. Normal users can access only what they own or have been given permission to run. The root user is allowed to access all files and programs in the system, whether or not root owns them. The root user is often called a superuser.
WHERE USER INFORMATION IS KEPT?
Linux keeps all user information in the following files.
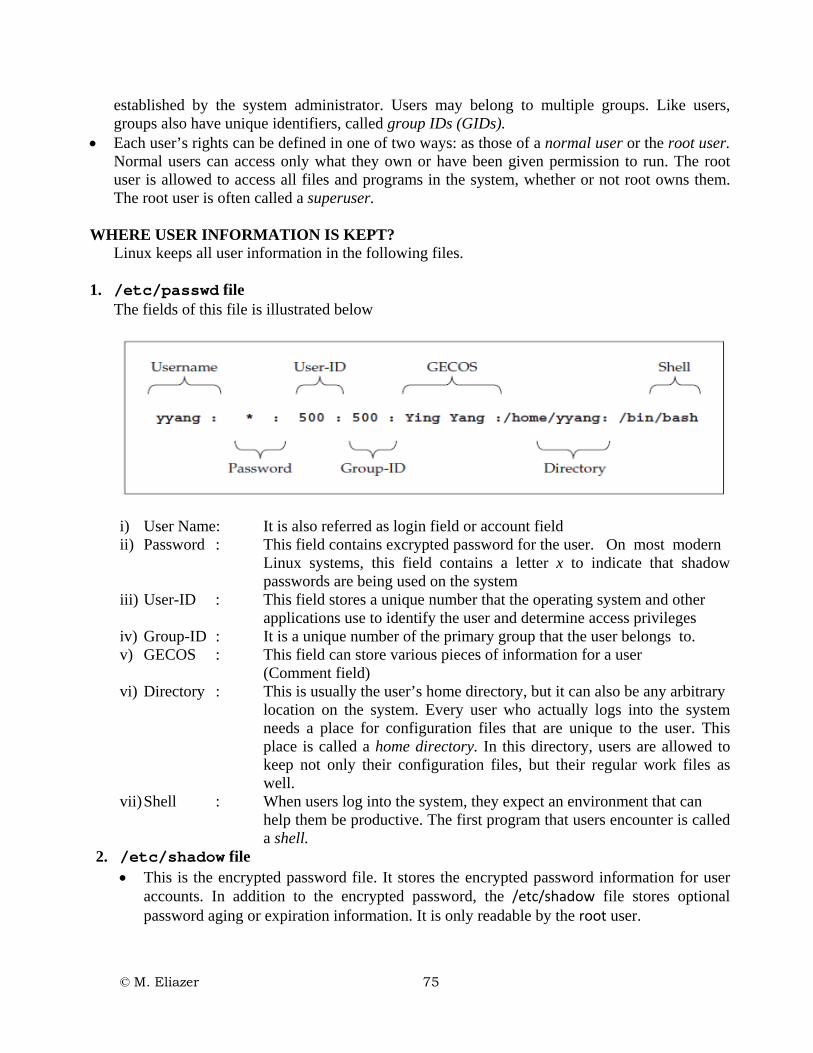
1. /etc/passwd file The fields of this file is illustrated below
i) User Name: It is also referred as login field or account field ii) Password : This field contains excrypted password for the user. On most modern
Linux systems, this field contains a letter x to indicate that shadow passwords are being used on the system
iii) User-ID : This field stores a unique number that the operating system and other applications use to identify the user and determine access privileges
iv) Group-ID : It is a unique number of the primary group that the user belongs to. v) GECOS : This field can store various pieces of information for a user
(Comment field) vi) Directory : This is usually the user’s home directory, but it can also be any arbitrary
location on the system. Every user who actually logs into the system needs a place for configuration files that are unique to the user. This place is called a home directory. In this directory, users are allowed to keep not only their configuration files, but their regular work files as well.
vii) Shell : When users log into the system, they expect an environment that can help them be productive. The first program that users encounter is called a shell.
2. /etc/shadow file • This is the encrypted password file. It stores the encrypted password information for user
accounts. In addition to the encrypted password, the /etc/shadow file stores optional password aging or expiration information. It is only readable by the root user.
© M. Eliazer 75

• Just as in the /etc/passwd file, each line in the /etc/shadow file represents information about a user. The lines are made up of various standard fields, with each field delimited by a colon. The fields are
Login name Encrypted password Days since January 1, 1970, that password was last changed Days before password may be changed Days after which password must be changed Days before password is to expire that user is warned Days after password expires that account is disabled Days since January 1, 1970, that account is disabled A reserved field
• A sample entry from the /etc/shadow file is shown here for the user account judith: judith:$1$HEWdPIJ.$qX/RbB.TPGcyerAVDlF4g.:12830:0:99999:7:::
3. /etc/group file • The /etc/group file contains a list of groups, with one group per line. Each group entry in
the file has four standard fields, with each field colon-delimited. • Each user on the system belongs to at least one group, that being the user’s default group.
Users may then be assigned to additional groups if needed. • You will recall that the /etc/passwd file contains each user’s default group ID (GID). This
GID is mapped to the group’s name and other members of the group in the /etc/group file. • The fields of each line in the /etc/group file are
o Group name : The name of the group o Group password : This is optional, but if set, it allows users who are not part
of the group to join o Group ID (GID) : The numerical equivalent of the group name o Group members : A comma-separated list
• A sample group entry in the /etc/group file is shown here : bin:x:1:root,bin,daemon
• This entry is for the “bin” group. The GID for the group is 1, and its members are root, bin, and daemon.
USER MANAGEMENT TOOLS The command line tools for the user management are useradd, usermod, userdel, groupadd, groupmod and groupdel. 1. Useradd
- User can be added with this tool #useradd options username
© M. Eliazer 76

Some of the options are -c comment : to add comment -d homedir : to change the home directory -e date : to specify the expiry date of a login (format : yyyy mm dd) -s shell : to change the shell -u uid : to specify user defied user-id ex. #useradd –d /usr/moses moses
- Add user with user name moses with home directory as /usr/moses Note : After adding user, it is mandatory to set a password for the user. ie; #passwd moses
2. Usermod - User information can be modified with this tool #usermod options username
- Options are same as useradd but additionally we have one more option ‘-l’ ie; -l newname : to rename user name.
3. Userdel
- Users can be removed from the system #userdel username
4. Groupadd - Adds groups to /etc/group file #groupadd options groupname
The options are -g gid : to specify the group-id for the new group -r : to create system group -f : to exit without error if the group is already exists
5. Groupmod - To modify the group information #groupmod options groupname
© M. Eliazer 77

- Options are similar to groupadd tool
6. Groupdel
- To remove a group from the system #groupdel groupname
GUI Tool for user management
#system-config-users
- This utility helps us to add, mod and del users with GUI.
USERS AND ACCESS PERMISSIONS Linux determines whether a user or group has access to files, programs, or other resources on a system by checking the overall effective permissions on the resource. The traditional permissions model in Linux is simple—it is based on four access types, or rules. The possible access types are
• (r) Read permission • (w) Write permission • (x) Execute permission • (-) No permission or no access
In addition, these permissions can be applied to three classes of users. The classes are • User The owner of the file or application • Group The group that owns the file or application • Others Users that are not belonging to the group
Understanding SetUID and SetGID Programs
Normally, when a program is run by a user, it inherits all of the rights that the user has. If the user can’t read the /var/log/messages file, neither can the program. Note that this permission can be different from the permissions of the user who owns the program file. For example, the ls program is owned by the root user. Its permissions are set so that all users of the system can run the program. Thus, if the user judith runs ls, that instance of ls is bound by the permissions granted to the user judith, not root. However, there is an exception. Programs can be tagged with what’s called a SetUID bit, which allows a program to be run with permissions from the program’s owner, not the user who is running it.
Using ls as an example again, setting the SetUID bit on it and having the file owned by root means that if the user judith runs ls, that instance of ls will run with root permissions, not with judith’s permissions.
The SetGID bit works the same way, except instead of applying the file’s owner, it is applied to the file’s group setting.
To enable the SetUID bit or the SetGID bit, you need to use the chmod command. To make a program SetUID, prefix whatever permission value you are about to assign it with a 4.
© M. Eliazer 78

To make a program SetGID, prefix whatever permission you are about to assignit with a 2. For example, to make /bin/ls a SetUID program, you would use this command :
# chmod 4755 /bin/ls
Q1. Create user kiruba with user-id 555. #
Q2. Create user keerthana with home directory /user/keerthan # Q3. Create user kisanu. The account must be expired on 31-Dec-2011. #
Q4. Modify the user-id of kiruba as 777.
#
Q5. Remove the user keerthana from the system. # Q6. Create a group tiger with group-id 555. # Q7. Create a system group lion. # Q8. Remove the group lion from the system. #
Q9. Set SUID for the file f1 in your directory. #
Q10. Set SGID for the sub directory d1.
# Verified by
Staff In-charge Sign : Date :
Ex. No. 13 PARTITION MANAGEMENT Date :
FILE SYSTEM
© M. Eliazer 79

Although all the files in your Linux system are connected into one overall directory tree, parts of that tree may reside on different storage devices such as hard drives or CD-ROMs. Files on a particular storage device are organized into what is referred to as a file system. A file system is a formatted device, with its own tree of directories and files. Your Linux directory tree may encompass several file systems, each on different storage devices. On a hard drive with several partitions, you would have a file system for each partition. The files themselves are organized into one seamless tree of directories, beginning from the root directory. For example, if you attach a CD-ROM to your system, a pathname will lead directly from the root directory on your hard disk partition's file system to the files in the CD-ROM file system.
A file system has its files organized into its own directory tree. You can think of this as a subtree that must be attached to the main directory tree. The tree remains separate from your system's directory tree until you specifically connect it. For example, a floppy disk with Linux files has its own tree of directories. You need to attach this subtree to the main tree on your hard drive partition. Until they are attached, you cannot access the files on your floppy disk.
i-Node The most fundamental building block of many Linux file systems is the i-node. An i-node is a control structure that points either to other i-nodes or to data blocks. The control information in the i-node includes the file’s owner, permissions, size, time of last access, creation time, group ID, and so on. Popular Linux File system
- ext3 and ReiserFS are the popular file systems used by many linux distributors - ext3 is an enhanced extension of ext2 - Journaling file system included in ext3 but the same is not in ext2 - Journaling file systems work by first creating an entry of sorts in a log (or journal)
of changes that are about to be made before actually committing the changes to disk. Once this transaction has been committed to disk, the file system goes ahead and modifies the actual data or metadata. This results in an all-or-nothing situation; that is, either all or none of the file system changes get done.
The /etc/fstab File As mentioned earlier, /etc/fstab is a configuration file that mount can use. This file contains a list of all partitions known to the system. During the boot process, this list is read and the items in it are automatically mounted with the options specified therein. Here’s the format of entries in the /etc/fstab file:
/dev/device /dir/to/mount fstype Parameters fs_freq fs_passno Following is a sample /etc/fstab file: /dev/VolGroup00/LogVol00 / ext3 defaults 1 1 LABEL=/boot /boot ext3 defaults 1 2 devpts /dev/pts Devpts gid=5,mode=620 0 0 tmpfs /dev/shm tmpfs defaults 0 0
© M. Eliazer 80

/dev/VolGroup00/LogVol02 /home ext3 defaults 1 2 proc /proc proc defaults 0 0 sysfs /sys sysfs defaults 0 0 /dev/VolGroup00/LogVol03 /tmp ext3 defaults 1 2 /dev/VolGroup00/LogVol01 swap swap defaults 0 0 /dev/sr0 /media/cdrom auto user,noauto,exec 0 0
PARTITION CREATION Step 1:
list the partitions # fdisk -l
Step 2: create a partition # fdisk /dev/hda Command (m for help): n
First cylinder (37174865,default 3717): <ENTER> Last cylinder +sizeM or +sizeK (37174865, default 4865): +1000M
Command (m for help): w Step 3:
refresh the kernel partition table #partprobe
Step 4:
format the partition # mkfs.ext3 /dev/hda7
Step 5: create a mount point mkdir /data # mount /dev/hda7 /data
Partition deletion Step 1:
#fdisk /dev/hda Command (m for help): p ….. …. …. Command (m for help): d Partition number (17): 7 Command (m for help): w
Step 2: #partprobe
LOGICAL VOLUME MANAGEMENT (LVM)
For easier hard disk storage management, you can set up your system to use the Logical Volume Manager (LVM), creating LVM partitions that are organized into logical volumes to which free space is automatically allocated. Logical Volumes provide a more flexible and
© M. Eliazer 81
powerful way of dealing with disk storage, organizing physical partitions into logical volumes in which you can easily manage disk space. Disk storage for a logical volume is treated as one pool of memory, though the volume may in fact contain several hard disk partitions spread across different hard disks. Adding a new LVM partition merely increases the pool of storage accessible to the entire system.
Following are some important volume management terms. Physical Volume (PV) : This typically refers to the physical hard disk Volume Group (VG) : Volume groups are used to house one or more physical volumes
and logical volumes into a single administrative unit. VGs are simply a collection of PVs. Logical Volume (LV) : This perhaps is the trickiest LVM concept to grasp,because
logical volumes (LVs) are the equivalent of disk partitions in a non-LVM world. LVs are created out of the space available in VGs. To the administrator, an LV appears as one contiguous partition independent of the actual PVs that make it up.
Extents : There are two kinds of extents: physical extents and logical extents. Physical volumes (PVs) are said to be divided into chunks, or units of data, called “physical extents.” And logical volumes (LVs) are said to be divided into chunks, or units of data, called “logical extents.”
The steps involved with creating a logical volume can be summarized this way: 1. Create a partition of the type Linux LVM . 2. Create physical volumes from the partition. 3. Assign the physical volumes to volume group. (Create volume group if not exists) 4. Create logical volumes within the volume group. 5. Create file system for the logical volume 6. Mount the logical volume to the new directory
Logical Volume Creation Step 1:
create 2 partitions #fdisk /dev/hda Command (m for help): p … … … Command (m for help): n Command action
e extended p primary partition(1-4)
p Partition number (1-4) : 3 First cylinder (25004865,default 2500): <ENTER> Last cylinder or +sizeM or +sizeK (25004865,default 4865): +1000M Command (m for help): t Partition number (1-4) : 3
© M. Eliazer 82

Hex code (Type L to list codes) : 8e Command (m for help): n Command action
e extended p primary partition(1-4)
p Partition number (1-4) : 4 First cylinder (26234865, default 2623): <ENTER> Last cylinder or +sizeM or +sizeK (26234865, default 4865): +500M Command (m for help): t Partition number (1-4) : 4 Hex code (Type L to list codes) : 8e Command (m for help): w #partprobe
Step 2:
convert the partitions into physical volume #pvcreate /dev/hda7 /dev/hda8 display pv information #pvdisplay /dev/hda7 /dev/hda8
Step 3: create volume group that hold 2 physical volumes #vgcreate vgsample /dev/hda7 /dev/hda8 display vg information #vgdisplay vgsample
Step 4:
create a logical volume #lvcreate n data L 700M vgsample display lv information #lvdisplay /dev/vgsample/data
Step 5: format the logical volume #mkfs.ext3 /dev/vgsample/data
Step 6:
Mount logical volume to the directory #mkdir /data #mount /dev/vgsample/data /data
© M. Eliazer 83

Extend a Logical Volume Size Step 1:
#umount /data #lvextend L +100M /dev/vgsample/data #lvdisplay /dev/vgsample/data
Step 2:
format only extended portition of lv that is 100MB #e2fsck f /dev/vgsample/data #resize2fs /dev/vgsample/data
Reduce a Logical Volume Size #umount /data #lvreduce L 100M /dev/vgsample/data # lvdisplay /dev/vgsample/data
Extend a Volume Group Step 1:
create a partition using fdisk covert that partition into pv #pvcreate /dev/hda9
Step 2:
add created partition into existing volume group #vgextend vgsample /dev/hda9 # vgdisplay
Remove Logical volume #umount /dev/vgsample/data #lvremove /dev/vgsample/data
Remove a Volume Group Before removing Volume Group, remove all lv in volume group #vgremove vgsample
Remove Physical Volumes #pvremove /dev/hda7 /dev/hda8 /dev/hda9
Q1. Create a partition of size 200 MB and mount it with a new directory /test Q2. Create a volume group VG1 of size greater than 400 MB. Also create two logical volumes (namely LV1 and LV2) of size 200 MB each and mount them with the directories /data1 and /data2 respectively.
© M. Eliazer 84
Q3. Reduce the size of logical volume LV1 by 50 MB and extend the logical volume LV2 by 50MB. Q4. Extend the volume group VG1 with another physical volume. Q5. Delete all physical volumes that are used in the volume group VG1.
Verified by
Staff In-charge Sign : Date :
Ex. No. 14 NETWORK CONFIGURATIONS Date :
© M. Eliazer 85
MODULES AND NETWORK INTERFACES Network driver has to be initialized and registered with kernel for accessing network card in
Linux. Typically, Ethernet devices register themselves as being eth X, where X is the device number. The first Ethernet device is eth0, the second is eth1, and so on.
Depending on how your kernel was compiled, the device drivers for your network interface
cards may have been compiled as a module. If the driver is configured as a module and you have auto-loading modules set up, you will need to tell the kernel the mapping between device names and the module to load in the /etc/modprobe.conf file. For example, if your eth0 device is an Intel PRO/1000 card, you would add the following line to your /etc/modprobe.conf file:
alias eth0 e1000 where e1000 is the name of the device driver. NETWORK CONFIGURATION Network configuration can be down as below.
Method -1 : Using ifconfig program The ifconfig program is primarily responsible for setting up your network interface cards (NICs).
The format of the ifconfig command is as follows:
ifconfig device address options where device is the name of the Ethernet device (for instance, eth0), address is the IP address you wish to apply to the device, and options are one of the following:
Option Description up Enables the device. This option is implicit. down Disables the device. netmask address Sets the netmask to this interface to address.
If a value is not supplied, ifconfig calculates the netmask from the class of the IP address. A class A address gets a netmask of 255.0.0.0, class B gets 255.255.0.0, and class C gets 255.255.255.0.
broadcast address Sets the broadcast address to this interface to address. Example : To list the NIC configuration details : #ifconfig To set the eth0 device to the IP address 192.168.1.42: #ifconfig eth0 192.168.1.42
Because 192.168.1.42 is a class C address, the calculated default netmask will be 255.255.255.0 and the broadcast address will be 192.168.1.255.
If the IP address you are setting is a class A or class B address that is subnetted differently, you will need to explicitly set the broadcast and netmask addresses on the command line, like so:
© M. Eliazer 86
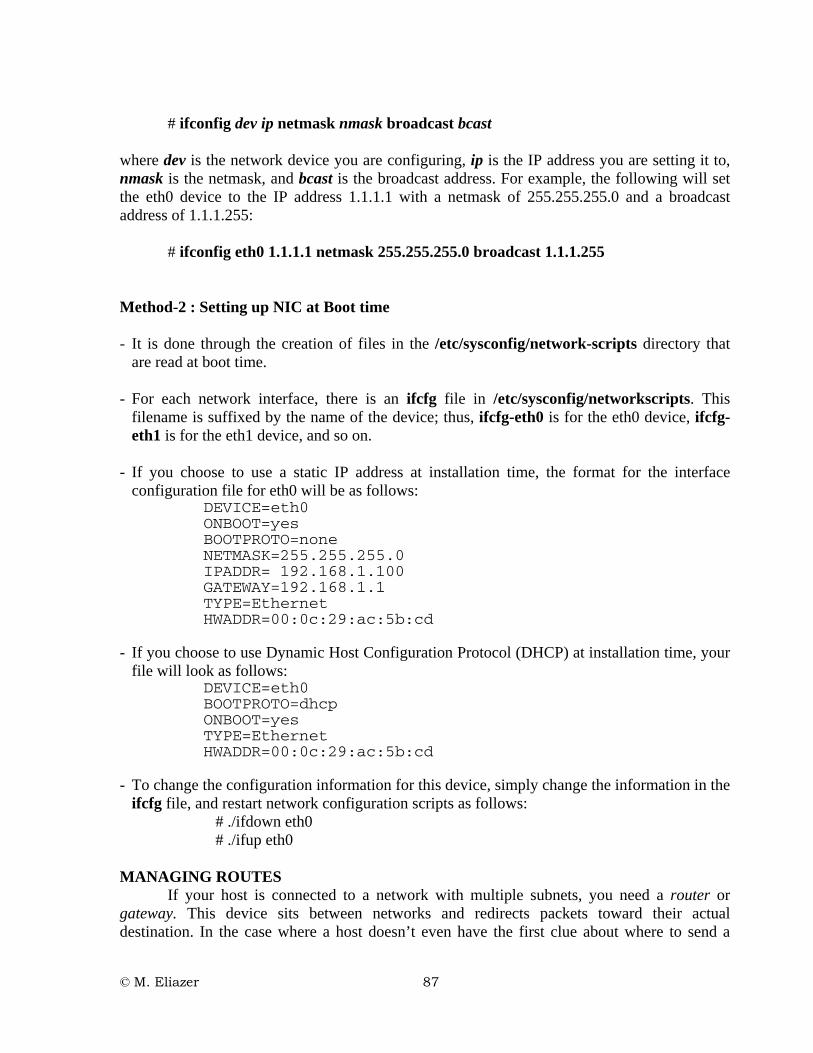
# ifconfig dev ip netmask nmask broadcast bcast
where dev is the network device you are configuring, ip is the IP address you are setting it to, nmask is the netmask, and bcast is the broadcast address. For example, the following will set the eth0 device to the IP address 1.1.1.1 with a netmask of 255.255.255.0 and a broadcast address of 1.1.1.255:
# ifconfig eth0 1.1.1.1 netmask 255.255.255.0 broadcast 1.1.1.255
Method-2 : Setting up NIC at Boot time
- It is done through the creation of files in the /etc/sysconfig/network-scripts directory that
are read at boot time. - For each network interface, there is an ifcfg file in /etc/sysconfig/networkscripts. This
filename is suffixed by the name of the device; thus, ifcfg-eth0 is for the eth0 device, ifcfg-eth1 is for the eth1 device, and so on.
- If you choose to use a static IP address at installation time, the format for the interface
configuration file for eth0 will be as follows: DEVICE=eth0 ONBOOT=yes BOOTPROTO=none NETMASK=255.255.255.0 IPADDR= 192.168.1.100 GATEWAY=192.168.1.1 TYPE=Ethernet HWADDR=00:0c:29:ac:5b:cd
- If you choose to use Dynamic Host Configuration Protocol (DHCP) at installation time, your
file will look as follows: DEVICE=eth0 BOOTPROTO=dhcp ONBOOT=yes TYPE=Ethernet HWADDR=00:0c:29:ac:5b:cd
- To change the configuration information for this device, simply change the information in the
ifcfg file, and restart network configuration scripts as follows: # ./ifdown eth0 # ./ifup eth0
MANAGING ROUTES
If your host is connected to a network with multiple subnets, you need a router or gateway. This device sits between networks and redirects packets toward their actual destination. In the case where a host doesn’t even have the first clue about where to send a
© M. Eliazer 87

packet, it uses its default route. This path points to a router, which ideally does have an idea of where the packet should go, or at least knows of another router that can make smarter decisions. Following route command is used to add or delete route.
# route cmd type addy netmask mask gw gway dev dn Parameter Description cmd Either add or del, depending on whether you are adding or deleting a
route. If you are deleting a route, the only other parameter you need is addy.
type Either -net or -host, depending on whether addy represents a network address or a router address.
addy The destination network to which you want to offer a route. netmask mask Sets the netmask of the addy address to mask. gw gway Sets the router address for addy to gway. Typically used for the default
route. dev dn Sends all packets destined to addy through the network device dn as set
by ifconfig. Examples To set the default route on a sample host, which has a single Ethernet device and a default gateway at 192.168.1.1:
# route add -net default gw 192.168.1.1 dev eth0 To sets up a host route so that all packets destined for the remote host 192.168.2.50 are sent through the first PPP device:
# route add -host 192.168.2.50 netmask 255.255.255.255 dev ppp0 To delete the route destined for 192.168.2.50:
# route del 192.168.2.50 Displaying Routes There are several ways with which you can display your route table:
1. route Using route is one of the easiest ways to display your route table.
2. netstat
Normally, the netstat program is used to display the status of all of the network connections on a host. However, with the -r option, it can also display the kernel routing table.
3. ip route
As previously mentioned, the iproute package provides advanced IP routing and network device configuration tools. Linux-based system can actually maintain and use
© M. Eliazer 88

several routing tables at the same time. The previous route command that we saw was actually only displaying and managing only one of the default routing tables on the system, i.e., the main table. For example, to view the contents of table main (as displayed by the route command), you would type
# ip route show table main
To view the contents of all the routing tables on the system, type # ip route show table all
Q1. Using ifconfig utility, configure the network card with static IP address 192.168.0.12. Q2. Disable the NIC configuration and edit the network configuration file to configure NIC with dynamic IP. Finally enable NIC configuration. Q3. Set the default route on a sample host, which has a single Ethernet device and a default gateway at 192.168.0.1. Q4. Delete the route destined for 192.168.0.66 Q5. Display all routing tables in the system.
Verified by
Staff In-charge Sign : Date :
Ex. No. 15 FIREWALL Date :
© M. Eliazer 89

NETFILTER Netfilter provide a simple means of making decisions on how a packet should flow.
Netfilter is configured by a tool called iptables. The iptables tool makes it easy to list, add, and remove rules as necessary from the system. Netfilter infrastructure can be classified into several types of operations (tables): network address translation (NAT),mangle, raw, and filter.
• The NAT table is responsible for handling network address translation, that is, making or
changing IP addresses to a particular source or destination IP address. The most common use for this is to allow multiple systems to access another network from a single IP address.
• The mangle table is responsible for altering or marking packets.
• The raw table is used for configuring exemptions from connection tracking. The rules specified in the raw table operate at a higher priority than the rules in other tables.
• Finally, the filter table is responsible for providing basic packet filtering. This can be used to selectively allow or block traffic according to whatever rules you apply to the system.
NAT
NAT can be broken down into three categories: Source NAT (SNAT), Destination NAT(DNAT), and Masquerading.
• SNAT is responsible for changing what the source IP address and port are so that a packet
appears to be coming from an administrator-defined IP. This is most commonly used in the case where a private network needs to use an externally visible IP address.
• DNAT is responsible for changing the destination IP address and port so that a packet is redirected to another IP address. This is useful for situations where administrators wish to hide servers in a private network.
• Masquerading is simply a special case of SNAT. This is useful in situations where there are multiple systems inside of a private network that need to share a single dynamically assigned IP address to the outside world. Masquerading will make all of the packets appear as if they have originated from the NAT device’s IP address.
IP CHAINS
For each table, there exists a series of chains that a packet goes through. A chain is simply a list of rules that act on a packet flowing through the system. There are five predefined chains in Netfilter: PREROUTING, FORWARD, POSTROUTING, INPUT, and OUTPUT.
Each of the predefined chains can invoke rules that are in one of the predefined tables (NAT, mangle, or filter). Not all chains can invoke any rule in any table; each chain can only invoke rules in a defined list of tables.
Following figure shows the relationship between various chains of Netfilter.
© M. Eliazer 90

• PREROUTING chain is the first thing a packet hits when entering the system. • FORWARD chain is invoked only in the case when IP forwarding is enabled and the
packet is destined for a system other than the host itself • INPUT chain is invoked only when a packet is destined for the host itself • OUTPUT chain is invoked when packets are sent from applications running on the host
itself. • POSTROUTING chain is used to alter source IP address for the purposes of Source NAT. Following table represents the relationship between the tables and each IP chain.
CONFIGURING NETFILTER
© M. Eliazer 91

To list the rules defined in the system # iptables –L To save the netfilter configuration # iptables save The iptables Command Syntax :
#iptables -t TableName commands rules-spec action
- Table name can be Filter, NAT or Mangle Commands Option Function -A chain Appends a rule to a chain. -D chain [ rulenum] Deletes matching rules from a chain. Deletes rule
rulenum (1 = first) from chain. -I chain [rulenum] Inserts in chain as rulenum (default 1 = first). -R chain rulenum Replaces rule rulenum (1 = first) in chain. -L [chain] Lists the rules in chain or all chains. -E [chain] Renames a chain. -F [chain] Deletes (flushes) all rules in chain or all chains. -R chain Replaces a rule; rules are numbered from 1. -Z [chain] Zero counters in chain or all chains. -N chain Creates a new user-defined chain. -X chain Deletes a user-defined chain. -P chain target Changes policy on chain to target.
Rules Specifications Option Function -p proto Specifies a protocol, such as TCP, UDP, ICMP,
or ALL. -s address Source address to match. - -sport port Source port specification. You can specify a range
of ports using the colon, port:port. -d address Destination address to match. - -dport port Destination port specification.
© M. Eliazer 92
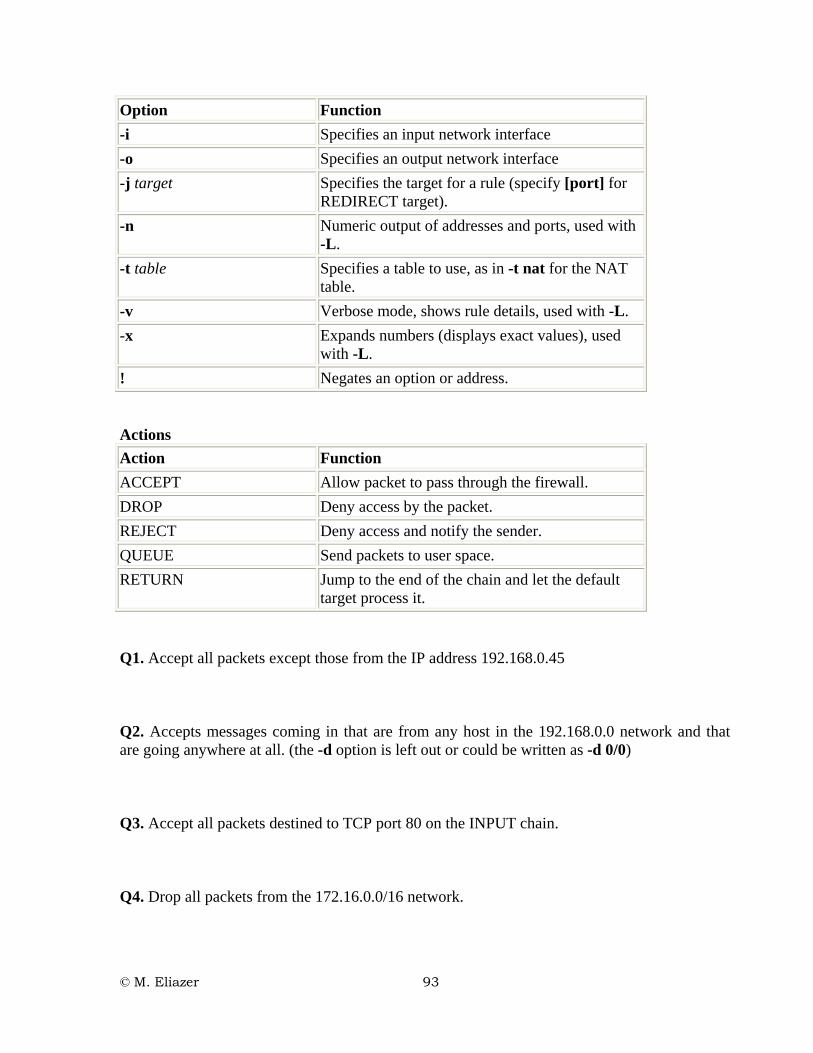
Option Function -i Specifies an input network interface -o Specifies an output network interface -j target Specifies the target for a rule (specify [port] for
REDIRECT target). -n Numeric output of addresses and ports, used with
-L. -t table Specifies a table to use, as in -t nat for the NAT
table. -v Verbose mode, shows rule details, used with -L. -x Expands numbers (displays exact values), used
with -L. ! Negates an option or address.
Actions Action Function ACCEPT Allow packet to pass through the firewall. DROP Deny access by the packet. REJECT Deny access and notify the sender. QUEUE Send packets to user space. RETURN Jump to the end of the chain and let the default
target process it. Q1. Accept all packets except those from the IP address 192.168.0.45 Q2. Accepts messages coming in that are from any host in the 192.168.0.0 network and that are going anywhere at all. (the -d option is left out or could be written as -d 0/0) Q3. Accept all packets destined to TCP port 80 on the INPUT chain. Q4. Drop all packets from the 172.16.0.0/16 network.
© M. Eliazer 93

Q5. Allow all packets going through the FORWARD chain that are destined for the 10.100.93.0/24 network. Q6. Accept any packets coming in from eth0 and going out to eth1. Q7. Drop any IP fragments coming in on the INPUT chain. Q8. Save the rules that are added. Q9. List the rules along with rule number. Q10. Remove all the rules from filter table. Verified by
Staff In-charge Sign : Date :
© M. Eliazer 94

Ex. No. 16 CONFIGURING DNS Date :
Domain Name Service • Use to resolve IP address and hostname • The /etc/hosts file keeps its information in a simple tabular format in a plain-text file.
The IP address is in the first column, and all the related hostnames are in the second column. The third column is typically used to store the short version of the hostname. Only white space separates the fields
How DNS Works The DNS structure is like that of an inverted tree (upside-down tree); this, therefore, means that the root of the tree is at the top and its leaves and branches are at the bottom. At the top of the inverted domain tree is the highest level of the DNS structure, called the root domain and represented by the simple dot (.).
ex. mail.yahoo.com. . root domain com top level domain yahoo second level domain mail third level domain
The in-addr.arpa Domain DNS allows resolution to work in both directions. Forward resolution converts names into IP addresses, and reverse resolution converts IP addresses back into hostnames. The process of reverse resolution relies on the in-addr.arpa domain, where “arpa” is an acronym for “Address Routing and Parameters Area.” Types of Servers a) Primary servers are the ones considered authoritative for a particular domain. An
authoritative server is the one on which the domain’s configuration files reside. b) Secondary servers work as backups and as load distributors for the primary name servers. c) Caching servers contains no configuration files for any particular domain. Rather, when a
client host requests a caching server to resolve a name, that server will check its own local cache first. If it cannot find a match, it will find the primary server and ask it.
DNS Record Types DNS database files consists of records. Different types of DNS records are listed below. 1. SOA: Start of Authority
The SOA record starts the description of a site’s DNS entries. The format of this entry is as follows: 1) domain.name. IN SOA ns.domain.name. hostmaster.domain.name. ( 2) 1999080801 ; serial number 3) 10800 ; refresh rate in seconds (3 hours) 4) 1800 ; retry in seconds (30 minutes) 5) 1209600 ; expire in seconds (2 weeks) 6) 604800 ; minimum in seconds (1 week) 7) )
© M. Eliazer 95

2. NS: Name Server
The NS record is used for specifying which name servers maintain records for this zone. The format of this record is as follows : IN NS ns1.domain.name.
3. A: Address Record
The A record is used to provide a mapping from hostname to IP address. The format of an A address is : Host_name IN A IP-Address
4. PTR: Pointer Record
The PTR record is for performing reverse name resolution, thereby allowing someone to specify an IP address and determine the corresponding hostname. The format for this record is similar to the A record, except with the values reversed: IP-Address IN PTR Host_name
5. MX: Mail Exchanger
The MX record is in charge of telling other sites about your zone’s mail server. The format of the MX record is as follows:
domainname. IN MX weight Host_name
6. CNAME: Canonical Name
CNAME records allow you to create aliases for hostnames. A CNAME record can be regarded as an alias.
DNS Tools a) host : allows you to resolve hostnames into IP addresses b) dig : tool for gathering information about DNS servers c) nslookup : used to query our local name server for information about a host d) whois : used for determining ownership of a domain e) nsupdate : used to submit Dynamic DNS update requests to a DNS server f) rndc : ‘remote name daemon control’ – used for controlling the name
server and also debugging problems with the name server.
© M. Eliazer 96

DNS Configuration Server side Step 1: Install the packages
#yum install bind bind-chroot bind-utils
Step 2:
create dns configuration file in /var/named/chroot #vi /var/named/chroot/etc/named.conf options {
directory “/var/named”; }; zone “leena.com” {
type master; file “leena.com.db”;
};
zone “0.168.192.inaddr.arpa” { type master; file “192.168.0.db”;
}; Step 3:
check Syntax of configuration file #namedcheckconf –t /var/named/chroot
Step 4:
create orward lookup zone file under /var/named/chroot
#vi /var/named/chroot/var/named/leena.com.db $TTL 86400 @ IN SOA system1.leena.com. [email protected]. (
1 ;serial no 10M ;slave refresh interval 10M ;slave retry interval 1W ;expire interval 1D) ;Minimum ttl
@ IN NS system1.leena.com. @ IN A 192.168.0.10 system1 IN A 192.168.0.10 sys1 IN A 192.168.0.1 sys2 IN A 192.168.0.2
Step 5:
check syntax of forward lookup zone file #namedcheckzone leena.com.
/var/named/chroot/var/named/leena.com.db
© M. Eliazer 97
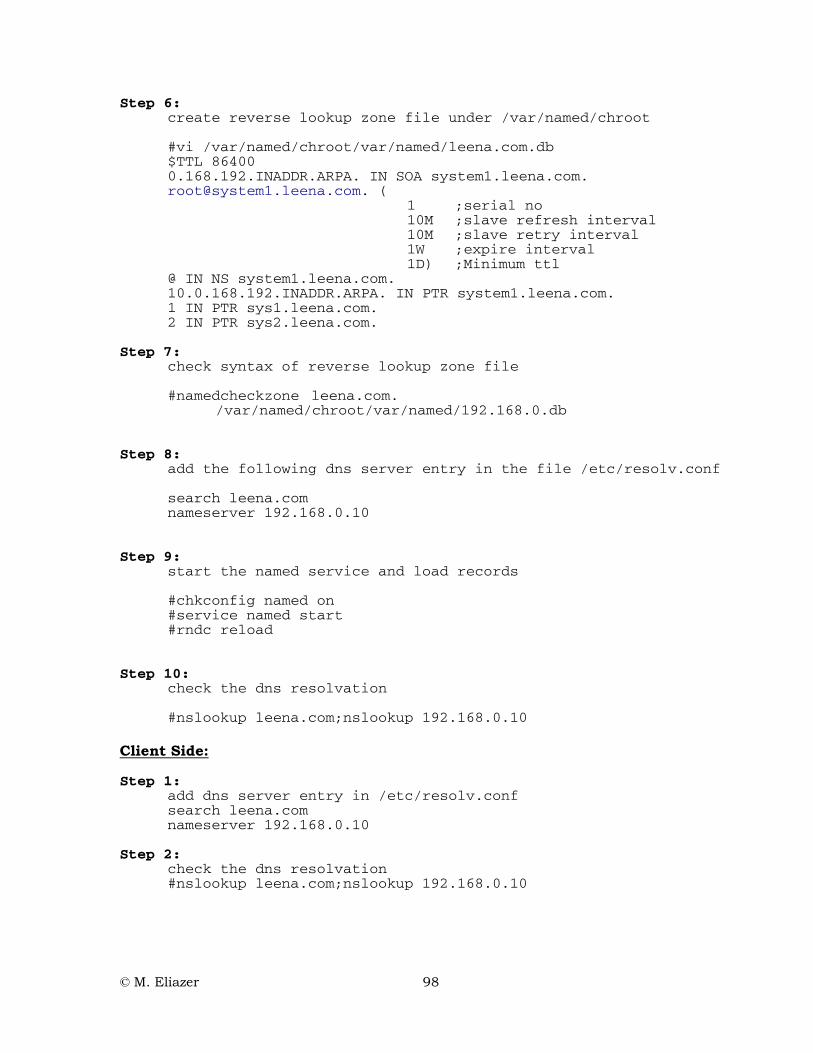
Step 6: create reverse lookup zone file under /var/named/chroot
#vi /var/named/chroot/var/named/leena.com.db $TTL 86400 0.168.192.INADDR.ARPA. IN SOA system1.leena.com. [email protected]. (
1 ;serial no 10M ;slave refresh interval 10M ;slave retry interval 1W ;expire interval 1D) ;Minimum ttl
@ IN NS system1.leena.com. 10.0.168.192.INADDR.ARPA. IN PTR system1.leena.com. 1 IN PTR sys1.leena.com. 2 IN PTR sys2.leena.com.
Step 7:
check syntax of reverse lookup zone file #namedcheckzone leena.com.
/var/named/chroot/var/named/192.168.0.db Step 8:
add the following dns server entry in the file /etc/resolv.conf search leena.com nameserver 192.168.0.10
Step 9:
start the named service and load records #chkconfig named on #service named start #rndc reload
Step 10:
check the dns resolvation #nslookup leena.com;nslookup 192.168.0.10
Client Side: Step 1:
add dns server entry in /etc/resolv.conf search leena.com nameserver 192.168.0.10
Step 2:
check the dns resolvation #nslookup leena.com;nslookup 192.168.0.10
© M. Eliazer 98

Verified by
Staff In-charge Sign : Date :
Ex. No. 17 CONFIGURING FTP and HTTP Date :
FILE TRANSFER PROTOCOL (FTP)
Service : vsftpd Ports : data port(20), control port(21) Configuration files : /etc/vsftpd/vsftpd.conf
Two modes of operation • Active mode
In this mode, the client connects from an ephemeral port (number greater than 1024) to the FTP server’s command port (port 21). When the client is ready to transfer data, the server opens a connection from its data port (port 20) to the Internet Protocol (IP) address and
© M. Eliazer 99

ephemeral port combination provided by the client. The key here is that the client does not make the actual data connection to the server but instead informs the server of its own port by issuing the PORT command; the server then connects back to the specified port.
• Passive mode
The FTP client issues the PASV command to indicate that it wants to access data in the passive mode, and the server then responds with an IP address and an ephemeral port number on itself to which the client can connect in order to do the data transfer. The PASV command issued by the client tells the server to “listen” on a data port that is not its normal data port (i.e., port 20) and to wait for a connection rather than initiate one. The key difference here is that it is the client that initiates the connection to the port and IP address provided by the server.
FTP Configuration Server(ip 192.168.0.254)Side Step 1:
install ftp package #yum install vsftpd
Step 2: restart the service #chkconfig vsftpd on #service vsftpd restart
Client Side Step 3:
User login [root@sys5 ~]# lftp –u priya 192.168.0.254 Password: lftp [email protected]:~> << use ftp commands here >> Guest login [root@sys5 ~]# lftp 192.168.0.254 lftp 192.168.0.254:~>
Ftp Commands ls list files pwd to see the present working directory bye to quit get filename to get a file from ftp server put filename to transfer a file to ftp server mget / mput to transfer multiple files Deny users login via the ftp Server Side Step 1:
edit the configuration file #vi /etc/vsftpd/vsftpd.conf
© M. Eliazer 100
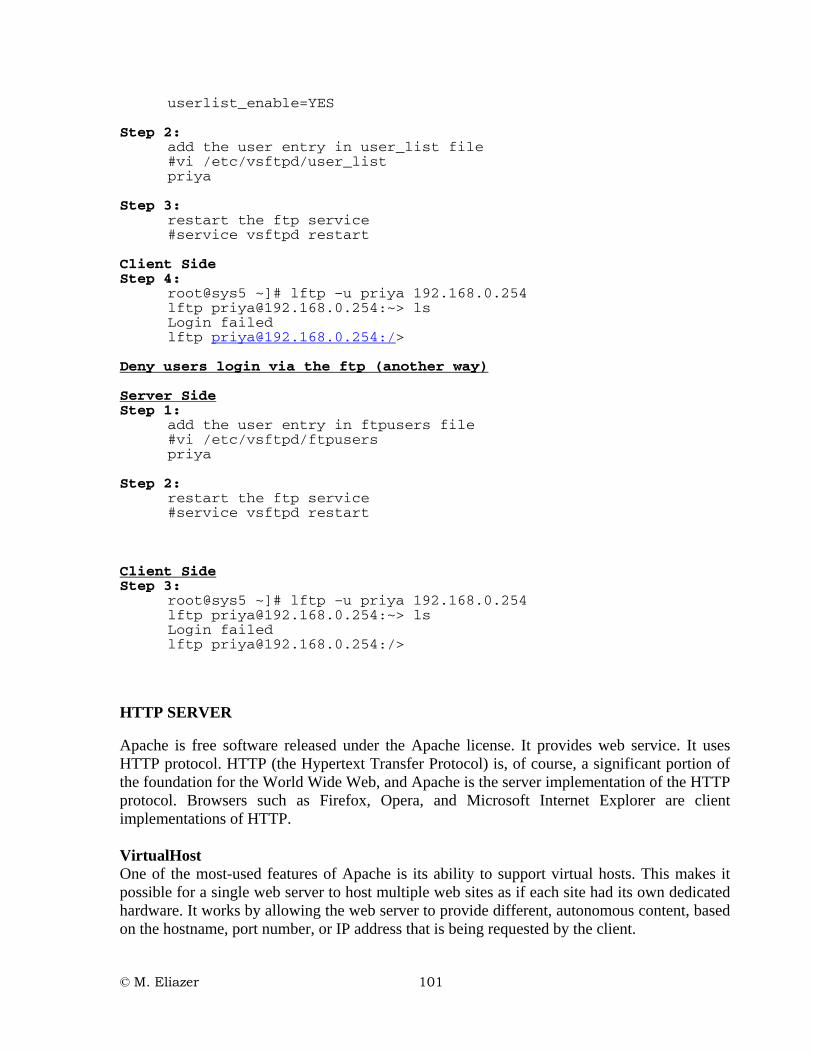
userlist_enable=YES Step 2:
add the user entry in user_list file #vi /etc/vsftpd/user_list priya
Step 3:
restart the ftp service #service vsftpd restart
Client Side Step 4:
root@sys5 ~]# lftp –u priya 192.168.0.254 lftp [email protected]:~> ls Login failed lftp [email protected]:/>
Deny users login via the ftp (another way) Server Side Step 1:
add the user entry in ftpusers file #vi /etc/vsftpd/ftpusers priya
Step 2:
restart the ftp service #service vsftpd restart
Client Side Step 3:
root@sys5 ~]# lftp –u priya 192.168.0.254 lftp [email protected]:~> ls Login failed lftp [email protected]:/>
HTTP SERVER Apache is free software released under the Apache license. It provides web service. It uses HTTP protocol. HTTP (the Hypertext Transfer Protocol) is, of course, a significant portion of the foundation for the World Wide Web, and Apache is the server implementation of the HTTP protocol. Browsers such as Firefox, Opera, and Microsoft Internet Explorer are client implementations of HTTP. VirtualHost One of the most-used features of Apache is its ability to support virtual hosts. This makes it possible for a single web server to host multiple web sites as if each site had its own dedicated hardware. It works by allowing the web server to provide different, autonomous content, based on the hostname, port number, or IP address that is being requested by the client.
© M. Eliazer 101

HTTP Configuration Server Side Step 1:
Configure dns Step 2:
Install http packages #yum install httpd
Step 3:
Create html file
#vi /var/www/html/main.html <html>
<head><title>Sample Web Page</title></head> <body>
<font size=”40” color=”FF0000”> <marquee>This is Home Page of Leena.com</marquee> </font>
</body> </html>
Step 4:
Add html page to http configuration file #vi /etc/httpd/conf/httpd.conf Directory Index main.html index.html index.html.var
Step 5:
restart the http service #chkconfig httpd on #service httpd restart
Client Side Step 6:
add dns entries in /etc/resolv.conf #vi /etc/resolv.conf search leena.com nameserver 192.168.0.10
Step 6:
open firefox and type the following url in address bar http://system1.leena.com
© M. Eliazer 102
Apache virtual hosting configuration Server Side Step 1:
add host the entries in dns #cat>>/var/named/chroot/var/named/leena.com.db www IN CNAME system1.leena.com mail IN CNAME system1.leena.com <control+d> reload the dns entries #rndc reload
Step 2:
Install http packages #yum install httpd
Step 3:
Create html files #vi /var/www/html/main.html <html> <head><title>Sample Web Page</title></head> <body><font size=”40” color=”FF0000”> <marquee>This is Home Page of Leena.com</marquee> </font></body></html>
#mkdir /var/www/mail #vi /var/www/mail/mail.html <html> <head><title>Sample Web Page</title></head> <body><font size=”40” color=”00FF00”> <marquee>Welcome Mail Page of Leena.com</marquee> </font></body></html>
Step 4:
Add html page to http configuration file
#vi /etc/httpd/conf/httpd.conf Directory Index mail.html main.html index.html index.html.var NameVirtualHost 192.168.0.10:80 <VirtualHost 192.168.0.10:80>
Servername www.leena.com. DocumentRoot /var/www/html
</VirtualHost> <VirtualHost 192.168.0.10:80>
Servername mail.leena.com.
© M. Eliazer 103
DocumentRoot /var/www/mail </VirtualHost>
Step 5:
restart the http service #service httpd restart
Client Side
add dns entries in /etc/resolv.conf #vi /etc/resolv.conf search leena.com nameserver 192.168.0.10
Step 6:
open firefox and type the following url in address bar http://www.leena.com http://mail.leena.com
Verified by
Staff In-charge Sign : Date :
Ex. No. 18 CONFIGURING MAIL SERVICES Date :
Simple Mail Transfer Protocol (SMTP) The SMTP protocol defines the method by which mail is sent from one host to another. That’s it. It does not define how the mail should be stored. It does not define how the mail should be displayed to the recipient. The SMTP protocol requires only that a host be able to send straight ASCII text to another host. Typically, this is done by contacting the SMTP port (port 25) on a mail server. You can do this using the Telnet program. For example, [root@serverA /root]# telnet mailserver 25 where the host mailserver is the recipient’s mail server. The 25 that follows mailserver tells. Telnet that you want to communicate with the server’s port 25 rather than the normal port 23. (Port 23 is used for remote logins, and port 25 is for the SMTP server.) The mail server will respond with a greeting message such as this: 220 mail ESMTP Postfix You are now communicating directly with the SMTP server.
© M. Eliazer 104

Some SMTP commands 1. HELO 2. MAIL FROM: 3. RCPT TO: 4. DATA • The HELO command is used when a client introduces itself to the server. The parameter to
HELO is the hostname that is originating the connection. • The MAIL FROM: command requires the sender’s e-mail address as its argument. • The RCPT TO: command requires the receiver’s e-mail address as an argument. • Now that the server knows who the sender and recipient are, it needs to know what • message to send. This is done by using the DATA command. And that’s all there is to it.
To close the connection, enter the QUIT command. Mail service has three distinct components. The mail user agent (MUA) is what the user sees and interacts with, such as the Eudora, Outlook, Evolution, and Mutt programs. An MUA is responsible only for reading mail and allowing users to compose mail. The mail transport agent (MTA) handles the process of getting the mail from one site to another; Sendmail and Postfix are MTAs. Finally, the mail delivery agent (MDA) is what takes the message, once received at a site, and gets it to the appropriate user mailbox. SENDMAIL SERVER CONFIGURATION Server Side Step 1:
Install packages #yum install sendmail sendmail-cf sendmail-doc
Step 2:
a) Edit configuration file
#vim /etc/mail/sendmail.mc …. dnl #DAEMON_OPTIONS(`Port=smtp,Addr=127.0.0.1, Name=MTA’)dnl … MASQUERADE_AS(`srm.com’)
…. FEATURE(masquerade_envelope)dnl …. FEATURE(masquerade_entire_domain)dnl
© M. Eliazer 105

b) Edit the file local-host-names as follow #vim /etc/mail/local-host-names srm.com elias.srm.com elias
Step 3:
restart the sendmail service #chkconfig sendmail on #service sendmail restart
Client Side Step 4:
send mail to user #mail –v –s “test” [email protected] sample mail . cc:
POP and IMAP The idea behind POP is simple: A central mail server is managed such that it remains online at all times and can receive mail for all of its users. Mail that is received is queued on the server until a user connects via POP and downloads the queued mail. The mail on the server itself can be stored in any format (e.g., mbox), so long as the POP protocol is adhered to. When a user wants to send an e-mail, the e-mail client relays it through the central mail server via Simple Mail Transfer Protocol (SMTP). This allows the client to disconnect from the network and gives the well-connected mail server the task of dealing with forwarding the message to the correct destination server, taking care of retransmits, delays, etc. Early users of POP found certain aspects of the protocol too limiting. Such features as being able to keep a master copy of a user’s e-mail on the server with only a cached copy on the client were missing. This led to the development of the Internet Message Access Protocol (IMAP) protocol. Three modes of IMAP • online mode is akin to having direct file system access to the mail store (e.g., having read
access to /var/mail). • offline mode is how POP works, where the client is assumed to be disconnected from the
network except when explicitly pulling down its e-mail. In offline mode, the server normally does not retain a copy of the mail.
• Disconnected mode works by allowing users to retain cached copies of their mail stores. When connected, any incoming/outgoing e-mail is immediately recognized and synchronized; however, when the client is disconnected, changes made on the client are kept until reconnection, when synchronization occurs. Because the client only retains a
© M. Eliazer 106

cached copy, a user can move to a completely different client and resynchronize his or her e-mail.
By using the IMAP protocol, you will have a mail server that will support all three above modes. Some POP commands are • USER • PASS Some IMAP commands are • LOGIN • LIST • STATUS • EXAMINE/SELECT • CREATE/DELETE/RENAME • LOGOUT Dovecot is used for imap and pop3 configuration IMAP and POP Configuration Server Side Step 1:
install and configure sendmail or postfix Step 2:
install the dovecot #yum install dovecot
Step 3:
a) edit the dovecot.conf file #vim /etc/dovecot.conf b) enable the following lines protocols = imap imaps pop3 pop3s ssl_cert_file = /etc/pki/dovecot/certs/dovecot.pem ssl_key_file = /etc/pki/dovecot/private/dovecot.pem
© M. Eliazer 107

Step 4: restart the sendmail or postfix and dovecot #service postfix restart #chkconfig dovecot on #service dovecot restart #netstat tulpn | grep dovecot
Client Side Step 5:
#mutt f imap://[email protected] #mutt f imaps://[email protected] #mutt f pop://[email protected] #mutt f pops://[email protected]
Verified by
Staff In-charge Sign : Date :
© M. Eliazer 108
Ex. No. 19 CONFIGURING SSH and NFS Date :
SECURE SHELL (SSH) Telnet protocol is used for remote login but it transmits the entire session (logins, passwords, and all) in clear text. So it is unsecure. So we use Secure Shell (SSH) protocol for secure remote login. Public-key Cryptography Secure Shell relies on a technology called public-key cryptography. It works similarly to a safe deposit box at the bank: You need two keys to open the box, or at least multiple layers of security/checks have to be crossed. In the case of public-key cryptography, you need two mathematical keys: a public one and a private one. Your public key can be published on a public web page, printed on a T-shirt, or posted on a billboard in the busiest part of town. Anyone who asks for it can have a copy. On the other hand, your private key must be protected to the best of your ability. It is this piece of information that makes the data you want to encrypt truly secure. Every public key/private key combination is unique. SSH Configuration Server Side Step 1 : Install the service # yum install sshd Step 2 : Edit the configuration file #vi /etc/ssh/sshd_config
- any modification can be done in this file Step 3 : Restart the service # service sshd restart Client Side Step 4 : Connect to the server using server IP # ssh 192.168.0.1
© M. Eliazer 109

Applications 1. Secure Copy (SCP) Secure Copy (scp) is meant as a replacement for the rcp command, which allows you to do remote copies from one host to another. ex.
#scp .bashrc serverA:/home/yyang 2. Secure FTP (SFTP) Secure FTP is a subsystem of the ssh daemon. You access the Secure FTP server by using the sftp command-line tool. To sftp from a system named hostA to an SFTP server running on serverA as the user yyang, type
# sftp yyang@serverA NETWORK FILE SHARING SYSTEM (NFS) Network File System (NFS) is the UNIX/Linux way of sharing files and applications across the network. The NFS concept is somewhat similar to that of Microsoft Windows disk sharing, in that it allows you to attach to a disk and work with it as if it were a local drive—a handy tool for sharing files and large storage space among users Components of NFS NFS protocol rely heavily on RPCs to handle communications between clients and servers. RPC services in Linux are managed by the portmap service. As mentioned before, this ancillary service is no longer needed in NFSv4. The following list shows the various RPC processes that facilitate the NFS service under Linux. The RPC processes are mostly relevant only in NFS versions 2 and 3, but mention is made wherever NFSv4 applies.
1. rpc.statd This process is responsible for sending notifications to NFS clients whenever the NFS server is restarted without being gracefully shut down. It provides status information about the server to rpc.lockd when queried. This is done via the Network Status Monitor (NSM) RPC protocol. It is an optional service that is started automatically by the nfslock service on a Fedora system. It is not used in NFSv4.
2. rpc.rquotad As its name suggests, rpc.rquotad supplies the interface between NFS
and the quota manager. NFS users/clients will be held to the same quota restrictions that would apply to them if they were working on the local file system instead of via NFS.
3. rpc.mountd When a request to mount a partition is made, the rpc.mountd daemon
takes care of verifying that the client has enough permission to make the request. This permission is stored in the /etc/exports file. (The upcoming section “The /etc/exports
© M. Eliazer 110

Configuration File” tells you more about the /etc/exports file.) It is automatically started by the NFS server init scripts. It is not used in NFSv4.
4. rpc.nfsd The main component to the NFS system, this is the NFS server/daemon. It
works in conjunction with the Linux kernel to either load or unload the kernel module as necessary. It is, of course, still relevant in NFSv4.
5. rpc.lockd The rpc.statd daemon uses this daemon to handle lock recovery on crashed
systems. It also allows NFS clients to lock files on the server. It is the nfslock service, no longer used in NFSv4.
6. rpc.idmapd This is the NFSv4 ID name-mapping daemon. It provides this
functionality to the NFSv4 kernel client and server by translating user and group IDs to names, and vice versa.
7. rpc.svcgssd This is the server-side rpcsec_gss daemon. The rpcsec_gss protocol
allows the use of the gss-api generic security application programming interface (API) to provide advanced security in NFSv4.
8. rpc.gssd This provides the client-side transport mechanism for the authentication
mechanism in NFSv4. Soft Vs Hard Mounts By default, NFS operations are hard, which means they continue their attempts to contact the server indefinitely. This arrangement is not always beneficial, however. It causes a problem if an emergency shutdown of all systems is performed. If the servers happen to get shut down before the clients, the clients’ shutdowns will stall while they wait for the servers to come back up. Enabling a soft mount allows the client to time out the connection after a number of retries Common Uses of NFS
1. To hold popular programs. If you are accustomed to Windows, you’ve probably worked with applications that refuse to be installed on network shares. For one reason or another, these programs want every system to have its own copy of the software—a nuisance, especially if you have a lot of machines that need the software.
2. To hold home directories. Another common use for NFS partitions is to hold home
directories. By placing home directories on NFS-mountable partitions, it’s possible to configure the Automounter and NIS or LDAP so that users can log into any machine in the network and have their home directory available to them.
3. For shared mail spools. A directory residing on the mail server can be used to store all of the user mailboxes, and the directory can then be exported via NFS to all hosts on the network. In this setup, traditional UNIX mail readers can read a user’s e-mail straight from the spool file stored on the NFS share.
© M. Eliazer 111

NFS Server configuration Server Side Step 1:
Install nfs packages #yum install nfsutils
Step 2:
Edit exports file To share a folder ex:/share
#vim /etc/exports /share *(rw)
Step 3: restart the nfs service #chkconfig nfs on #service nfs restart
Client Side Step 4:
list server shares
#showmount –e 192.168.0.20 Step 5:
mount the share folder in local
#mount 192.168.0.20:/share /mnt Verified by
Staff In-charge Sign : Date :
© M. Eliazer 112
Ex. No. 20 CONFIGURING NIS Date :
NETWORK INFORMATION SYSTEM (NIS) The Network Information Service is really just a simple database that clients can query. It contains a series of independent tables. Each table is created from straight text files (such as /etc/passwd), which are tabular in nature and have at least one column that is unique for every row (a database of key/value pairs). NIS keeps track of these tables by name and allows querying to happen in one of two ways:
- Listing the entire table - Pulling a specific entry to match a search for a given key
Once the databases are established on the server, clients can query the server for database entries. Typically this happens when a client is configured to look to the NIS map when an entry cannot be found in the client’s local database. A host may have a simple file containing only those entries needed for the system to work in single-user mode (when there is no network connectivity)—for example, the /etc/passwd file. When a program makes a request to look up user password information, the client checks its local passwd file and sees that the user doesn’t exist there; the client then makes a request to the NIS server to look for a corresponding entry in the passwd table. If the NIS does have an entry, it is returned to the client and then to the program that requested the information in the first place. The program itself is unaware that NIS was used. The same is true if the NIS map returns an answer that the user password entry does not exist. The program would be passed the information without its knowing how much activity had happened in between. NIS Server Configuration Server Side Step 1:
install the nis server package #yum install ypserv
Step 2:
#nisdomainname plx.com
edit the network file #vim /etc/sysconfig/network NISDOMAIN=plx.com
Step 3:
create a directory with the name of domain name #mkdir /var/yp/plx.com
Step 4:
add users #mkdir /profile #useradd d
© M. Eliazer 113
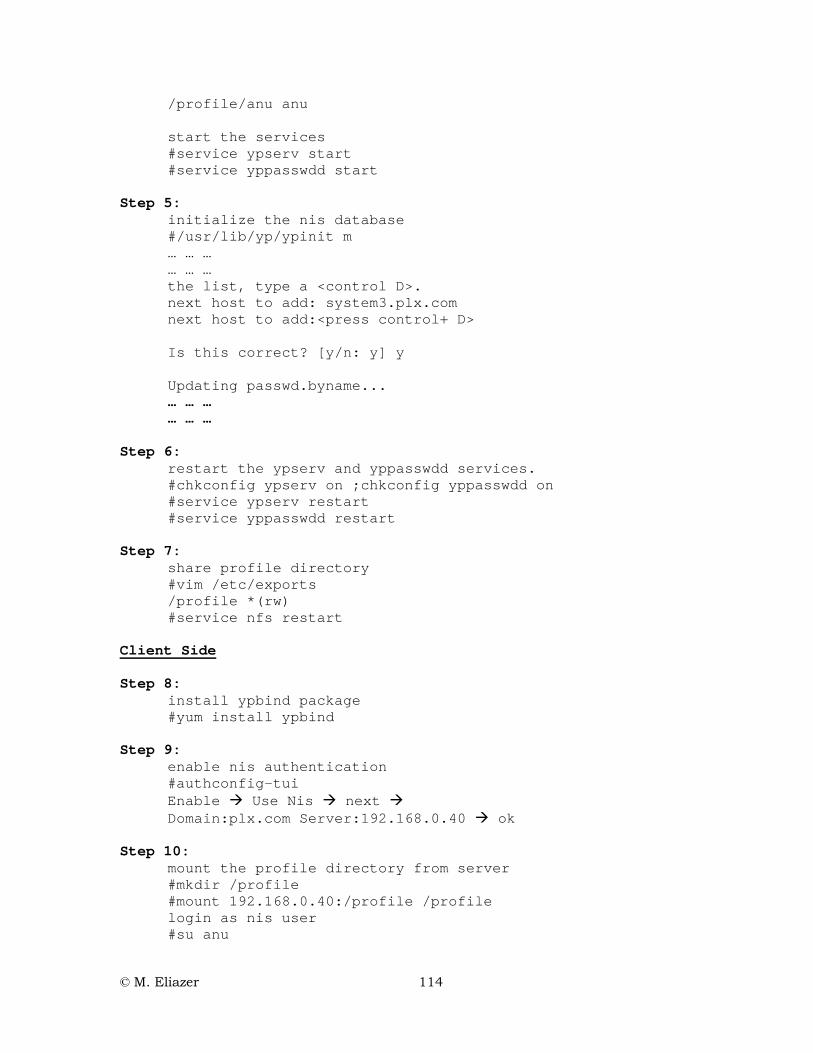
/profile/anu anu start the services #service ypserv start #service yppasswdd start
Step 5:
initialize the nis database #/usr/lib/yp/ypinit m … … …
… … … the list, type a <control D>. next host to add: system3.plx.com next host to add:<press control+ D> Is this correct? [y/n: y] y Updati
… … … ng passwd.byname...
… … … Step 6:
restart the ypserv and yppasswdd services. #chkconfig ypserv on ;chkconfig yppasswdd on #service ypserv restart #service yppasswdd restart
Step 7:
share profile directory #vim /etc/exports /profile *(rw) #service nfs restart
Client Side Step 8:
install ypbind package #yum install ypbind
Step 9:
enable nis authentication #authconfig-tui
Enable Use Nis next Domain:plx.com Server:192.168.0.40 ok
Step 10:
mount the profile directory from server #mkdir /profile #mount 192.168.0.40:/profile /profile login as nis user #su anu
© M. Eliazer 114

Update the NIS database (in server) Step 1:
add new user #useradd -d /profile/nis1 nis1;passwd nis1 #cd /var/yp #make #service ypserv restart
NIS Tools
1. ypcat - dumps the contents of NIS map 2. ypwhich - returns the name of NIS server 3. ypmatch - similar to ypcat but need a key to do 4. yppasswd - to set password for NIS user
Verified by
Staff In-charge Sign : Date :
© M. Eliazer 115

B I B L I O G R A P H Y The following books and materials were referred during the preparation of this work book and suggested for further reading Stephen G. Kochan, Patrick Wood – “Unix Shell Programming” – Pearson Education –
Third Edition – 2003.
Steve Shah, Wale Soyinka – “Linux Administration – A beginners Guide” – TataMcGraw-
Hill – Fourth Edition – 2005
Christopher Negus – “Redhat Linux 9 Bible” – willey Publishing Inc – 2003
Richard L. Petersen - Red Hat: The Complete Reference Enterprise Linux & Fedora
Edition: The Complete Reference - McGraw-Hill – 2004.
Michael Jang - RHCE Red Hat Certified Engineer Linux Study Guide - McGraw-Hill –
Fourth Edition – 2004
Tammy Fox – Redhat Enterprise Linux Administration – Sams Publishing – 2007.
Redhat Certified Engineer (RHCE) certification Study Material – Redhat Inc. - 2005
www.linuxhomenetworking.com – Linux networking and administration details
© M. Eliazer 116

© M. Eliazer 117
I N D E X A alias 67 architecture 1 arguments 25 arithmetic 24 B bash 5 C case 31 chmod 9 D dns 95 E ed 12 elif 31 environment 9 eval 61 exit 28 expression 13 F file system 5 filter 15 for loop 36 ftp 100 function 65 G gnu 73 grep 16 H http 102 I if 28 ifconfig 86 imap 107 inode 80
installing 68 ipchains 90 iptables 92 K kernel 2 L lvm 82 M mangle 90 modules 86 N nat 90 netfilter 90 nfs 110 nis 113 null 34 O operators 29 P partition 81 piping 9 pop 107 printf 49 process 10 profile 54 Q quotations 20 R read 45 redirection 8 route 88 rpm 71 S sendmail 106
set 59 setuid 78 shell 2 shift 27 smtp 105 ssh 109 subshell 53 T tr 15 trap 62 type 67 U unix 1 until loop 38 users 75 utility 2 V variables 19 vi 11 W while loop 37 Y yum 72