european new car assessment programme (euro …...3.2.9 install the right and left buttock weights....
TRANSCRIPT

EUROPEAN NEW CAR ASSESSMENT PROGRAMME
(Euro NCAP)
REAR WHIPLASH TEST PROTOCOL
Version 1.1
October 2018

Copyright 2018 ©Euro NCAP - This work is the intellectual property of Euro NCAP. Permission is granted for
this material to be shared for non-commercial, educational purposes, provided that this copyright statement
appears on the reproduced materials and notice is given that the copying is by permission of Euro NCAP. To
disseminate otherwise or to republish requires written permission from Euro NCAP.

EUROPEAN NEW CAR ASSESSMENT PROGRAMME (Euro NCAP)
TEST PROTOCOL – ADULT OCCUPANT PROTECTION
Table of Contents
1 TEST OF REAR SEAT WHIPLASH ASSESSMENT ........................................................... 1
1.1 Introduction ................................................................................................................................. 1
1.2 Definitions .................................................................................................................................... 1
2 VEHICLE SETUP ................................................................................................................... 3
2.1 Vehicle Preparation ..................................................................................................................... 3
2.2 Second and Third Row Seating Setup ....................................................................................... 3
3 TEST PROCEDURE ............................................................................................................... 5
3.1 Determination of Seat Centreline C/LO .................................................................................... 5
3.2 H-Point Installation ..................................................................................................................... 5
3.3 HPM Measurement ..................................................................................................................... 7
3.4 Head Restraint Measurement ..................................................................................................... 7
3.5 Non-use Position Measurement ................................................................................................ 12
ANNEX A HEAD RESTRAINT POSITION DEFINITIONS .................................................... 15
ANNEX B DISCOMFORT METRIC MEASURING DEVICE ................................................. 18
Version 1.1
October 2018 1
1 TEST OF REAR SEAT WHIPLASH ASSESSMENT
1.1 Introduction
Whiplash injuries in second and third row seats are rare compared with those in front
seats, mainly because occupation rates of rear seats are relatively low. Nevertheless,
current legislation does not require the presence of a head restraint in any seating
position other than the front outboard seats. Where restraints are fitted in the rear,
current requirements for height and position are inadequate, leading to designs which
provide little or no protection in the event of a rear collision. This is especially the
case when restraints are not properly adjusted, resulting in geometries which are far
too low and too rearward to provide protection.
This protocol defines how seats in the second row and successive rows1 are statically
assessed for whiplash injury prevention. The protocol assesses head restraint geometry
with regard to backset, height and non-use position effectiveness. For height, the
methodology is taken from the proposed Global Technical Regulation (GTR7) and a
minimum height requirement is taken as a basis for scoring in this protocol. When the
GTR enters legislation, Euro NCAP may make its requirements regarding height more
demanding.
1.2 Definitions
Throughout this protocol the following terms are used:
A-Surface: surface of a head restraint that is nearest to the occupant.
Discomfort metric: a geometrical requirement in terms of size and location for
shingled non-use position head restraint designs.
Non-use position: a head restraint position at which the height does not comply with
the minimum head restraint height requirements of UN-ECE Regulation 17-08.
Use position: a head restraint position at which the height complies with the minimum
head restraint height requirements of UN-ECE Regulation 17-08.
1 The protocol also applies to front row outboard (only) seats of vehicles categorised as ‘Heavy Vehicle’ according to
the ‘Vehicle Specification, Selection, Testing and Retesting’ (VSSTR) protocol. In this case, points can be scored
only if a head restraint is fitted as standard equipment in all M1 variants with a centre seating position.

Version 1.1
October 2018 2
Highest Use Position: the highest locking use position. If a restraint has non-locking
positions above the highest locking position, then the highest locking position is still
considered as the highest position,
Lowest Use Position: the lowest locking or stowed use position i.e. the lowest locking
or stowed position in which the head restraint still meets the minimum height
requirements of UN-ECE Regulation 17-08.
Mid Use Position: the locking position at the geometric mid between the highest use
position and the lowest use position, or the notch position closest to the geometric mid
as determined by the method in Annex A.
Shingled head restraint: a non-use position design where the rear surface of the head
restraint overlaps the seatback when the head restraint is adjusted to the non-use
position.
C/LO: the centreline of a seating position, extending onto the top surface of the head
restraint where applicable.
HLE: the distance from the R-point to the lower edge of the head restraint measured
along the torso line.
S: is the maximum thickness of the head restraint (as determined within 25 mm of the
head restraint lower edge) measured perpendicular to the torso line between TH and
TS from line P.
P: is a line parallel to the torso line which intersects the head restraint at TS.
TH: is the line perpendicular to the torso line and tangent to the lower edge of the head
restraint.
TS: is the line parallel to and 25 mm from TH.

Version 1.1
October 2018 3
2 VEHICLE SETUP
Before assessment, the manufacturer will be asked to provide ride heights for the
vehicle in the unladen kerb state. Ensure that the differences between ride-heights are
the same as those provided by the manufacturer. The absolute values of ride-heights
do not matter.
Make sure the vehicle is stable by supporting the vehicle on the jacking points as
shown in the vehicle hand book.
2.1 Vehicle Preparation
2.1.1 If the vehicle is equipped with a foldable roof, sunroof, sunroof blind, position to the
closed position. Retract any rear glazing blinds.
2.1.2 Do not remove floor mats when fitted as standard.
2.1.3 Set all first row seats fully forward and into the highest position.
2.2 Second and Third Row Seating Setup
2.2.1 The manufacturer will be asked to provide seat adjustment information before the
assessment is done (this information does not need to be in the vehicle handbook). Set
all seat adjustments to the positions specified by the manufacturer.
2.2.2 Where the manufacturer has not provided seat adjustment specifications, or for
particular adjustments where no specifications have been provided, set the seat using
all or some of steps 2.2.2.1 through 2.2.2.14 (see also Annex A for details of how to
set head restraint positions).
2.2.2.1 Seat Track – Set to the most rearward position intended for occupant use.
2.2.2.2 Seat Height – Set to the lowest position.
2.2.2.3 Seatback – Set to a position to give a nominal HPM torso angle of 25°2.
2.2.2.4 Seat Tilt – Set to a mid position.
2.2.2.5 Seat Cushion Height – Set to the lowest position.
2.2.2.6 Seat Cushion Tilt – Set to mid position.
2 20° in the case of vehicles categorized as ‘Heavy Vehicle’ (see VSSTR) protocol

Version 1.1
October 2018 4
2.2.2.7 Lumbar Support – Set to the retracted and lowest position.
2.2.2.8 Upper seat back – Set to the most rearward position.
2.2.2.9 Cushion Extension – Set to the retracted position.
2.2.2.10 Side Bolsters – Set to the retracted position on the seat base and seat back.
2.2.2.11 Head Restraint Vertical Position – Set to the lowest locking use position.
2.2.2.12 Head Restraint Horizontal Position – Set to the mid position.
2.2.2.13 Head Restraint Tilt Position – Set to a mid position.
2.2.2.14 For third row assessment, set all second row seats into their fully forward and highest
position if possible.

Version 1.1
October 2018 5
3 TEST PROCEDURE
If the seat to be assessed has never been sat upon, a person of mass 75±10kg shall sit
on the seat two times for one minute to flex the seat cushion and seat back.
3.1 Determination of Seat Centreline C/LO
3.1.1 Refer to manufacturer specifications for the C/LO.
3.1.2 If manufacturer specifications are not available, find C/LO as follows:
3.1.2.1 For seats with defined bolsters, or individual auxiliary seats, C/LO is the centreline of
the seat.
3.1.2.2 For bench seats (or other) seats, C/LO is the middle of the head restraint. If a head
restraint is not fitted, find C/LO between the belt anchors.
3.1.2.3 If the C/LO cannot be found with the procedures 3.1.2.1 through 3.1.2.2 the C/LO is
located 381mm outboard from the vehicle centreline.
3.2 H-Point Installation
3.2.1 Place a piece of muslin cloth on the seat. Tuck the edge of the cloth into the seat
pan/back join, but allow plenty of slack.
3.2.2 Place the seat and back assembly of the H-point machine on the seat at the centre line
of the seat.
3.2.3 Apply thigh weights.
3.2.4 If it is possible to install the T bar and lower legs assemblies without interference with
parts of the vehicle interior, this should be done as described in the following sub-
sections. However, if installation of the lower leg assemblies and/or the T bar causes
interference with parts of the vehicle interior in a way that is likely to influence the
position of the H point, do not install the legs and/or T bar. In this situation, every
effort should be made to ensure that the HPM does not slide forward on the seat base.
3.2.4.1 Attach the shoe and lower leg assemblies to the cushion pan assembly, individually at
the knee joint or by using the T-bar lateral segment and lower leg assembly. Use 50th
percentile lower leg segments and 50th percentile thigh segments.
3.2.4.2 The T-bar lateral segment should be parallel to the Y-axis of the vehicle and
perpendicular to the XZ-plane of the vehicle unless specified differently by the
manufacturer.

Version 1.1
October 2018 6
3.2.4.3 Position both shoes together, or up to 127mm to either side of C/LO to clear
obstructions.
3.2.4.4 With both shoes touching the floor, extend both shoes forward of the HPM while
keeping the T-Bar laterally leveled.
3.2.4.5 Apply lower leg weights.
3.2.5 Tilt the back pan forwards to the end stop and draw the machine away from the seat-
back.
3.2.6 Allow the machine to slide back until it is stopped by contacting the seat back.
3.2.7 Apply a 100 ± 10N load twice to the back and pan assembly positioned at the
intersection of the hip angle intersection to a point just above the thigh bar housing.
3.2.8 Return the machine back to the seat back.
3.2.9 Install the right and left buttock weights.
3.2.10 Apply the torso weights alternately left and right.
3.2.11 Tilting the back pan forward to a vertical position, the assembly shall be rocked from
side to side over a 10° arc, 5° in each direction. Where seat side bolsters prevent
movement of up to 5°, the assembly should be rocked as far as permissible. This
rocking shall be repeated twice, making a total of three complete cycles. Care should
be taken to maintain support of the T-bar during the rocking action, and to ensure that
no inadvertent exterior loads are applied. Ensure that the movements of the HPM feet
not restricted during this step. If the feet change position, they should be allowed to
remain in that attitude for the time being. Return the machine back to the seat back.
3.2.12 Check the lateral spirit level and if necessary apply a lateral force to the top of the
machine back, sufficient to level the seat pan of the machine.
3.2.13 If applicable, position the shoes as described in 3.2.4.3 through 3.2.4.4
3.2.14 Apply a rearward force not more than 25N at the top of the torso angle bar.
3.2.15 Release the applied force and apply again until the hip angle readout shows identical
values.
3.2.16 Measure and record in the test details the position of the H-point relative to some
easily identifiable part of the vehicle structure.
3.2.17 Measure and record in the test details the angle of the seat assembly of the H-point
machine and the position of the seat cushion front end.

Version 1.1
October 2018 7
3.3 HPM Measurement
All CMM measurements are relative to the manufacturer specified car alignment
coordinate system or a suitable Cartesian coordinate system if not specified. Record all
measurements to 0.1mm precision. For the purposes of this protocol the X-Axis is
positive rearward and the Z-Axis is positive upward.
3.3.1 With a CMM or other means measure and record the X, Y and Z-coordinates for the
left and right H-points.
3.3.2 Compare the left hand and right hand X and Z-coordinates. If the related X and Z-
coordinates are not within 5.0mm of each other repeat the H-point machine
installation.
3.3.3 Measure and record the torso angle in the vehicle XZ-plane on the calibrated block
attached to the weight hanger bar to 0.1 degree precision.
3.3.4 Repeat the H-point machine installation two more times.
3.3.5 Calculate the average for the three HPM installations measurements (HPM H-point
coordinates and torso angle). Record these values.
3.3.6 If the average values recorded in 3.3.5 are within the following tolerances of the
manufacturer specified values:
Torso angle: ± 3°
HPM X and Z: ± 25mm,
then the manufacturer-defined values shall be used in all subsequent calculations.
Otherwise, the recorded average values shall be used.
3.4 Head Restraint Measurement
3.4.1 Contact Point and Backset
In this section, the distance between the head restraint and the back of the 50th
percentile male head (backset) is determined at two head restraint positions: mid
position and worst case (lowest and most rearward). The backset in the mid position
is subsequently used in 3.4.2.1 as part of the determination of the intersection point
(IP).
3.4.1.1 Mark a line showing the C/LO ±5mm along the A-Surface of the head restraint.

Version 1.1
October 2018 8
3.4.1.2 Using the values of torso angle and H point determined in section 3.3, calculate the
Contact Point Z-coordinate, CP Z, which represents the height of the rearmost point of
the head of a 50th percentile male.
𝐶𝑃 𝑍 = 504.5 cos(𝑇𝑜𝑟𝑠𝑜 𝐴𝑛𝑔𝑙𝑒 − 2.6) + 203 + 𝐻𝑃𝑀 𝑍
3.4.1.3 Set the head restraint to the mid position (see definitions and Annex A). For head
restraints with locking tilt positions, it will be necessary to mark and measure CP with
the restraint in the most forward and most rearward positions in order to find its
location and coordinates with the head restraint in the mid-tilt position (see also Annex
A)
3.4.1.4 Use a CMM or other means to mark the CP Z-coordinate (±2.5mm) on the C/LO line.
This point is known as the Contact Point, CP.
3.4.1.4.1 If the CP Z-coordinate cannot be marked on the A-Surface of the head restraint
(because the head restraint is below the CP Z-coordinate), record the CP Z-coordinate
as the highest point on the C/LO line. If more than one point is at the highest point
record the most forward point.
3.4.1.4.2 If the CP Z-coordinate cannot be marked on the A-Surface of the head restraint as the
CP Z-coordinate relates to a gap in the head restraint, CP will be determined using a
165mm diameter sphere with its centre at the same height as the CP Z-coordinate.
When the sphere is making first contact with the head restraint, CP is designated as the
rearmost point of the sphere in the gap area (see Figure 3.1).
Figure 3.1 Definition of CP when there is a gap in the head restraint.

Version 1.1
October 2018 9
Figure 3.2 Contact Point.
3.4.1.5 Record the X-coordinate of the Contact Point. Record this as (CP X).
3.4.1.6 Calculate the CP X-coordinate relative to the HPM X-coordinate, (ΔCP X)mid.
(𝜟𝑪𝑷 𝑿)𝒎𝒊𝒅 = 𝑪𝑷 𝑿𝒎𝒊𝒅 − 𝑯𝑷𝑴 𝑿
Figure 3.3 Calculation of Backset.
3.4.1.7 Set the head restraint to the Lowest Use and most rearward position (see definitions
and Annex A).
3.4.1.8 Repeat steps 3.4.1.4 to 3.4.1.6 to calculate (ΔCP X)wc

Version 1.1
October 2018 10
(𝜟𝑪𝑷 𝑿)𝑾𝑪 = 𝑪𝑷 𝑿𝑾𝑪 − 𝑯𝑷𝑴 𝑿
3.4.2 Intersection Point
Here, the ‘Intersection Point’ is established. To do this, the position of the contact
point CP is extended rearward by a distance corresponding to the difference between
the rearmost point of a 50th percentile male and a 95th percentile male. The point on
the restraint corresponding to this X coordinate is marked as IP on the head restraint,
when the restraint is in its highest position.
3.4.2.1 Calculate the Intersection Point X-coordinate, IP X, which represents the additional
distance in X between the back of the head of a 50th percentile male and a 95th
percentile male.
𝐼𝑃 𝑋 = 88.5 ∙ sin(𝑇𝑜𝑟𝑠𝑜 𝐴𝑛𝑔𝑙𝑒(3.3.5) − 2.6) + 5 + 𝐶𝑃 𝑋(3.4.1.5)3
3.4.2.2 Place the head restraint in the Highest Use and mid-tilt position (see definitions and
ANNEX A).
3.4.2.3 On the surface given by the C/LO line, find the highest point and record the related X-
coordinate.
3 This formula derives from the subtraction of two goniometric formulae which, respectively, give the X position of
the back of the head of a large male and that of a mid-sized male:
(593 ∙ sin(𝑇𝑜𝑟𝑠𝑜 𝐴𝑛𝑔𝑙𝑒 − 2.6) + 76) − (504.5 ∙ sin(𝑇𝑜𝑟𝑠𝑜 𝐴𝑛𝑔𝑙𝑒 − 2.6) + 71)
= 88.5 ∙ sin(𝑇𝑜𝑟𝑠𝑜 𝐴𝑛𝑔𝑙𝑒 − 2.6) + 5

Version 1.1
October 2018 11
Figure 3.4 Intersection Point.
3.4.2.4 Use a CMM or other means to mark the IP X-coordinate in 3.4.2.1 (±2.5mm) on the
C/LO line. If the IP X-coordinate is rearward of the X-coordinate value in 3.4.2.3,
record the X-coordinate in 3.4.2.3 as IP X.
3.4.2.5 On the surface given by the C/LO line and the IP X point, record the Z-coordinate of
the IP X mark (3.4.2.4). Record this point as Intersection Point Z (IP Z).
3.4.2.6 Calculate the IP X-coordinate relative to the HPM X-coordinate, (ΔIP X)high.
(𝛥𝐼𝑃 𝑋)ℎ𝑖𝑔ℎ = 𝐼𝑃 𝑋 − 𝐻𝑃𝑀 𝑋
3.4.2.7 Calculate the IP Z-coordinate relative to the HPM Z-coordinate, (ΔIP Z)high.
(𝛥𝐼𝑃 𝑍)ℎ𝑖𝑔ℎ = 𝐼𝑃 𝑍 − 𝐻𝑃𝑀 𝑍
3.4.2.8 Place the head restraint in the Lowest Use and most rearward position (see definitions
and Annex A).
3.4.2.9 Using the same method as above, calculate ΔIP X and ΔIP Z for this head restraint
position and record as (ΔIP X)WC and (ΔIP Z)WC
3.4.3 Effective Height
In this section, the effective height of the Intersection Point is determined in the
highest and in the worst-case (lowest and most rearward) head restraint positions.
3.4.3.1 Calculate the Effective Height for the highest and for the worst-case (lowest, most
rearward) in-use positions, using the appropriate values determined in sections 3.4.2.6
to 3.4.2.9.
𝑬𝒇𝒇𝒆𝒄𝒕𝒊𝒗𝒆 𝑯𝒆𝒊𝒈𝒉𝒕
= (𝜟𝑰𝑷 𝑿) ∙ 𝐬𝐢𝐧(𝑻𝒐𝒓𝒔𝒐 𝑨𝒏𝒈𝒍𝒆) + (𝜟𝑰𝑷 𝒁) ∙ 𝐜𝐨𝐬( 𝑻𝒐𝒓𝒔𝒐 𝑨𝒏𝒈𝒍𝒆)

Version 1.1
October 2018 12
Figure 3.5 Effective Height.
3.4.3.2 Record the values as (Effective Height)high and (Effective Height)WC.
3.5 Non-use Position Measurement4
3.5.1 Automatic Return Head Restraints
3.5.1.1 Weight-based systems
3.5.1.1.1 Set the head restraint in the non-use position.
3.5.1.1.2 Position a 5th percentile female Hybrid III test dummy in the seat aligned with the
CL/O and parallel to the XZ-plane.
3.5.1.1.3 Hold the dummy's thighs down and push rearward on the upper torso to maximize the
dummy's pelvic angle.
3.5.1.1.4 Place the tibias as near to 90° to the thighs as possible. Push rearward on the dummy's
knees to force the pelvis into the seat so there is no gap between the pelvis and the seat
back or until the back of the dummy's calves touch the front of the seat cushion.
3.5.1.1.5 Start the vehicle engine. Record whether or not the head restraint moves to a use
position.
4 The assessment of non-use position does not apply to the front-row seats of vehicles categorised
as ‘Heavy Vehicle’ according to the ‘Vehicle Specification, Selection, Testing and Retesting’
(VSSTR) protocol.

Version 1.1
October 2018 13
3.5.1.2 Capacitance-based systems
3.5.1.2.1 Set the head restraint in the non-use position.
3.5.1.2.2 Turn on the ignition or start the vehicle engine.
3.5.1.2.3 Sit a person of mass 75+/-10kg in the seat.
3.5.1.2.4 Record whether or not the head restraint moves to a use position.
3.5.1.2.5 Repeat 1.1.1.2.4 and 1.1.1.2.5 in different types of clothing (light summer clothing;
thick, padded winter clothing) to ensure repeatable operation of the automatic return
system.
3.5.2 60° Rotation Evaluation
3.5.2.1 Set the head restraint in the lowest use locking position.
3.5.2.2 Position a digital inclinometer (which can measure to a precision of 0.1°) on a suitable
surface of the head restraint. Record the angle measurement.
3.5.2.3 Fold or retract the head restraint forwards to the non-use position and record the angle
again.
3.5.2.4 Subtract the angle recorded in 3.5.2.3 from the angle recorded in 3.5.2.2.
3.5.3 10° Torso Line Change
3.5.3.1 Set the head restraint into the non-use position.
3.5.3.2 Install the HPM following procedures 3.2.1to 3.2.17 and record the torso angle.
3.5.3.3 Subtract the torso angle measured in 3.5.3.2 from the torso angle measured in 3.3.3.
and record the value.
3.5.4 Discomfort Metric
3.5.4.1 Set the head restraint into the non-use position.
3.5.4.2 On the surface given by the C/LO line, find the lowest point on the head restraint (TH)
and record the related X-coordinate and Z-coordinate.
3.5.4.3 Calculate the X-coordinate recorded in 3.5.4.2 relative to the HPM X-coordinate,
(ΔX).
𝛥𝑋 = 𝑋3.5.4.2 − 𝐻𝑃𝑀 𝑋
3.5.4.4 Calculate the Z-coordinate recorded in 3.5.4.2 relative to the HPM Z-coordinate, (ΔZ).

Version 1.1
October 2018 14
𝛥𝑍 = 𝑍3.5.4.2 − 𝐻𝑃𝑀 𝑍
3.5.4.5 Calculate HLE (the height of the lowest point on the head restraint (TH) relative to the
HPM H-Point), using:
𝑯𝑳𝑬 = 𝜟𝑿 ∙ 𝐬𝐢𝐧(𝑻𝒐𝒓𝒔𝒐 𝑨𝒏𝒈𝒍𝒆) + 𝜟𝒁 ∙ 𝐜𝐨𝐬( 𝑻𝒐𝒓𝒔𝒐 𝑨𝒏𝒈𝒍𝒆)
3.5.4.6 Using the measuring device in (Annex B) determine the thickness (S).
Figure 3.6 Discomfort Metric Geometric Requirements.

Version 1.1
October 2018 15
ANNEX A HEAD RESTRAINT POSITION DEFINITIONS
The protocol refers to several head restraint positions – highest, lowest, mid, most rearward etc.
This Annex defines how to establish these positions of the restraint.
A.1 Vertical Adjustments
A.1.1 Highest Use Position
A.1.1.1 The highest position is considered to be the highest locking position. If a restraint has a
non-locking position above the highest locking position, then the highest locking
position is still considered as the highest position.
Figure A.1: Highest Use Position.
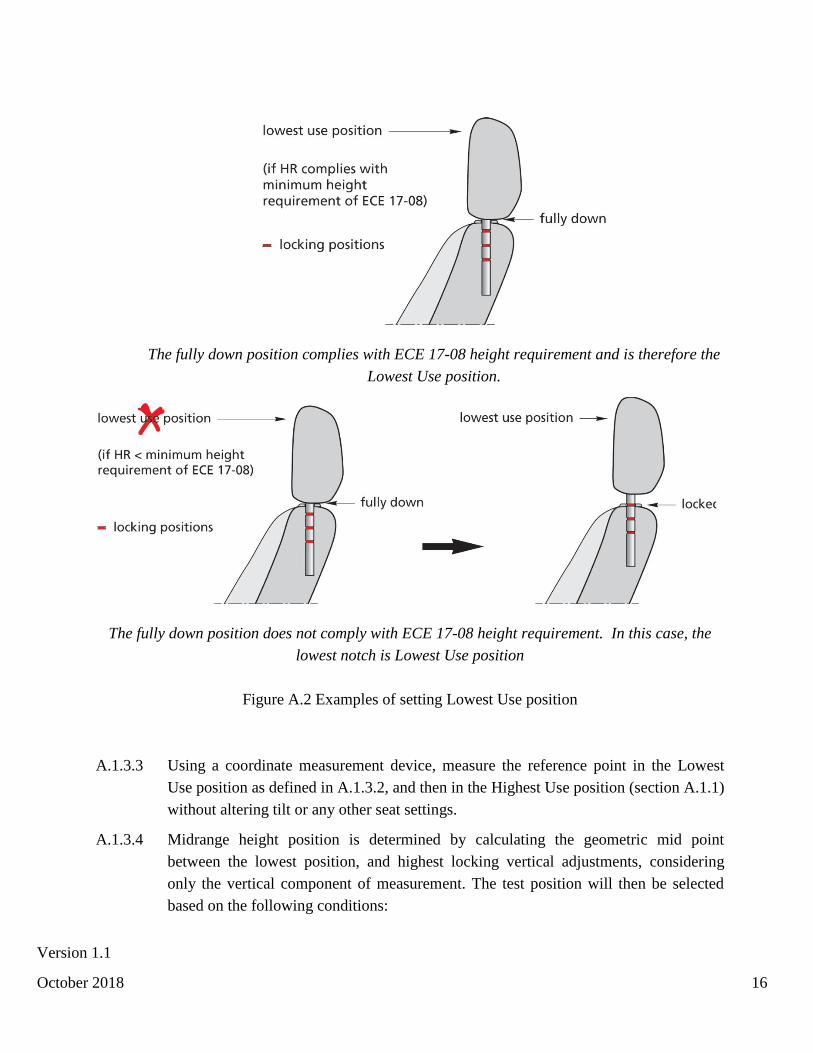
A.1.2 Lowest Use Position
A.1.2.1 The lowest in-use position is considered to be the lowest locking or stowed position in
which the restraint meets the minimum height requirements of ECE 17-08. See Figure
A.2 below.
A.1.3 Mid Position
A.1.3.1 Mark a repeatable reference point on the top of the head restraint. This point is
typically the highest point on the centreline of the head restraint.
A.1.3.2 Place the head restraint in the Lowest Use position as defined in A.1.2.
Version 1.1
October 2018 16
The fully down position complies with ECE 17-08 height requirement and is therefore the
Lowest Use position.
The fully down position does not comply with ECE 17-08 height requirement. In this case, the
lowest notch is Lowest Use position
Figure A.2 Examples of setting Lowest Use position
A.1.3.3 Using a coordinate measurement device, measure the reference point in the Lowest
Use position as defined in A.1.3.2, and then in the Highest Use position (section A.1.1)
without altering tilt or any other seat settings.
A.1.3.4 Midrange height position is determined by calculating the geometric mid point
between the lowest position, and highest locking vertical adjustments, considering
only the vertical component of measurement. The test position will then be selected
based on the following conditions:

Version 1.1
October 2018 17
A.1.3.5 Place the head restraint at the geometric mid point if a locking position exists there.
A.1.3.6 If there is no locking position at the geometric mid point, raise the head restraint by up
to 10mm. If a locking position exists within this 10mm of travel, that position will be
the test position.
A.1.3.7 If there is no locking position within 10mm above the geometric mid point, lower the
head restraint to the next lowest locking position.
A.1.3.8 If there is no locking position before the lowest or stowed position is reached, then the
head restraint should be positioned fully down. This will only be the case if the head
restraint complies with the height requirements of ECE 17-08 in the fully down
position (i.e. fully down is the Lowest Use position)
A.1.3.9 Once the vertical test position has been determined, ensure the head restraint is
returned to rearmost tilt position.
A.1.4 Examples of Single Notch Head Restraint
A) Lowest/Stowed Position meets ECE 17-08 height requirements
• The Highest Use position is at the notch.
• In the fully lowered/stowed position, the head restraint complies with the height
requirements of ECE 17-08. Therefore, this is the Lowest Use position.
• There is no notch at the geometric mid between Highest Use and Lowest Use
positions.
• The method of 1.1.3 is followed: if the notch is within 10mm upward of the
geometric mid, the notch position becomes the Mid Position (as well as being
the Highest Use position); otherwise the Mid Position becomes the fully
lowered/stowed position.
B) Lowest/Stowed Position does not meet ECE 17-08 height requirements
• The Highest Use position is at the notch.
• In the fully lowered/stowed position, the head restraint does not comply with the
height requirements of ECE 17-08. The first locking position in which the head
restraint complies with ECE 17-08 is at the notch. The notch position therefore
becomes the Lowest Use position.
• The notch position is both the Highest Use and Lowest Use positions.
• The notch position also becomes the Mid Position

Version 1.1
October 2018 18
A.2 Tilt Adjustment
A.2.1 The following procedure should be used for locking horizontal adjustments only. For
non-locking tilt adjustments, the head restraint should always be tilted fully rearward.
A.2.1.1 Most rearward tilt position shall be that which results in greatest backset
measurement of the Contact Point CP. In the situation where the head restraint cannot
be placed at most rearward tilt (e.g. due to a return spring), the most “most rearward
tilt” shall be the most rearward position in which the tilt can be locked.
A.2.1.2 Most forward tilt position shall be that which results in the smallest backset
measurement of the Contact Point CP. It shall be determined by finding the most
forward locking tilt position. Non-locking positions located further forward than the
most forward lock are disregarded.
A.2.1.3 Midrange tilt position is determined by calculating the geometric mid point between
the most rearward tilt and most forward locking horizontal adjustments, considering
the backsets measured. Midrange tilt setting shall be undertaken using the same
rationale as used in A.1.3. A locking position shall be sought within a window 10mm
forwards from the geometric mid point. If a lock is found within this window, that
position shall be considered the test position. In the absence of a lock within this range
the head restraint should be moved rearwards until the next locking position is
reached. If no locking positions are reached before the fully rearward tilt position, then
fully rearward tilt shall be the position used.
ANNEX B DISCOMFORT METRIC MEASURING DEVICE
Example of a pass/fail gauge to be used with an inclinometer to examine if a shingled head
restraint in the non-use position meets the thickness requirement (S), at a height of 25mm above
the lowest point on the head restraint along the torso angle line.

Version 1.1
October 2018 19
Figure B.1. Discomfort Metric gauge design example (all dimension in mm).
Figure B.2. Using the gauge with an inclinometer