esm manager 2 - umass amherst · esm manager 2 easy to use interface software user manual ....
TRANSCRIPT
EnviroTech LLC 1517 Technology Drive Tel: (757) 549 8474 Suite 101 Fax: (757) 410 2382 Chesapeake, VA 23320 Email: [email protected] USA Web: www.n-virotech.com
ESM Manager 2 Easy to Use Interface Software
User Manual

EnviroTech LLC ESM Manager 2 – Issue 1.0 – 25 January 2005
EnviroTech LLC ESM Manager 2 – Issue 1.0 – 25 January 2005
EnviroTech LLC 1517 Technology Drive, Suite 101 Chesapeake, VA 23320 Tel: (757) 549 8474 Fax: (757 410 2382 Web: www.n-virotech.com Email: [email protected]
Title ESM Manager 2 Software User Manual Issue 1.0 Status Approved Dist. General Circ. ESM Users / Commercially Confidential Author Mark Rawlinson Date 25 January 2004
Rev Change Author Date Status 1.0 Original MBR 25 January 2005 Approved
Copyright EnviroTech LLC
EnviroTech LLC ESM Manager 2 – Issue 1.0 – 25 January 2005
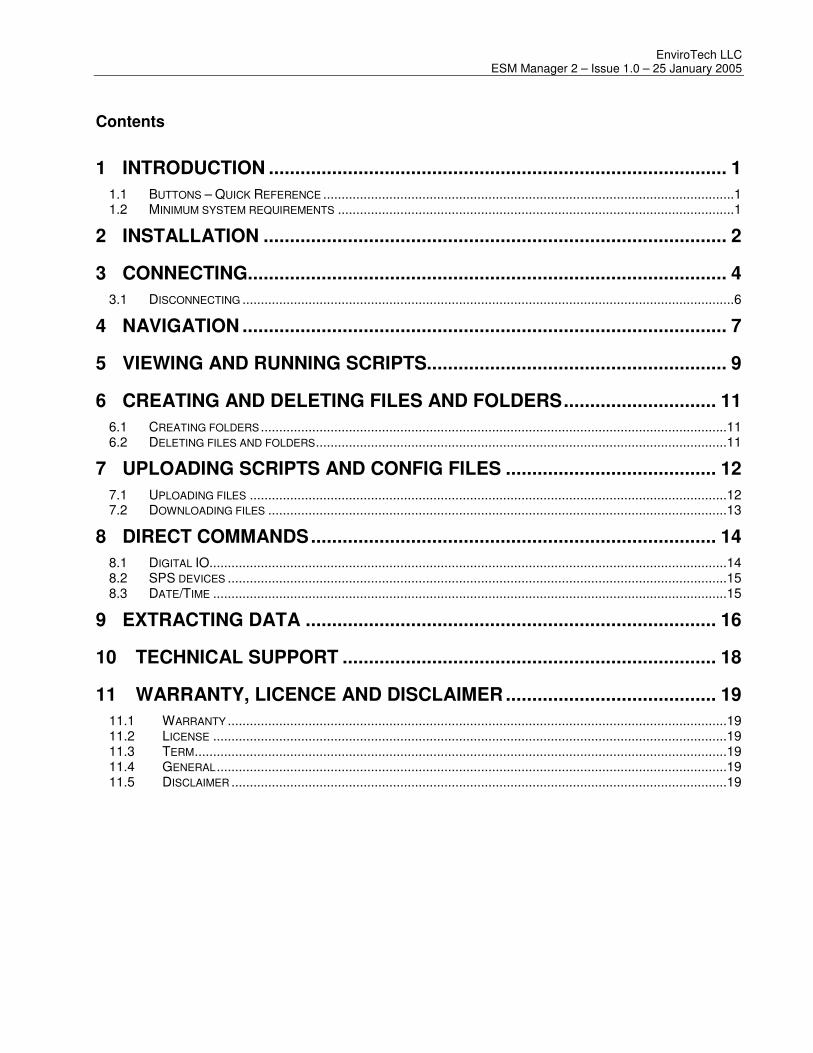
Contents
1 INTRODUCTION ....................................................................................... 1
1.1 BUTTONS – QUICK REFERENCE ................................................................................................................1 1.2 MINIMUM SYSTEM REQUIREMENTS ............................................................................................................1
2 INSTALLATION ........................................................................................ 2
3 CONNECTING........................................................................................... 4
3.1 DISCONNECTING ......................................................................................................................................6
4 NAVIGATION ............................................................................................ 7
5 VIEWING AND RUNNING SCRIPTS......................................................... 9
6 CREATING AND DELETING FILES AND FOLDERS............................. 11
6.1 CREATING FOLDERS ...............................................................................................................................11 6.2 DELETING FILES AND FOLDERS................................................................................................................11
7 UPLOADING SCRIPTS AND CONFIG FILES ........................................ 12
7.1 UPLOADING FILES ..................................................................................................................................12 7.2 DOWNLOADING FILES .............................................................................................................................13
8 DIRECT COMMANDS............................................................................. 14
8.1 DIGITAL IO.............................................................................................................................................14 8.2 SPS DEVICES ........................................................................................................................................15 8.3 DATE/TIME ............................................................................................................................................15
9 EXTRACTING DATA .............................................................................. 16
10 TECHNICAL SUPPORT ....................................................................... 18
11 WARRANTY, LICENCE AND DISCLAIMER ........................................ 19
11.1 WARRANTY ........................................................................................................................................19 11.2 LICENSE ............................................................................................................................................19 11.3 TERM.................................................................................................................................................19 11.4 GENERAL...........................................................................................................................................19 11.5 DISCLAIMER .......................................................................................................................................19
EnviroTech LLC ESM Manager 2 – Issue 1.0 – 25 January 2005
Page 1
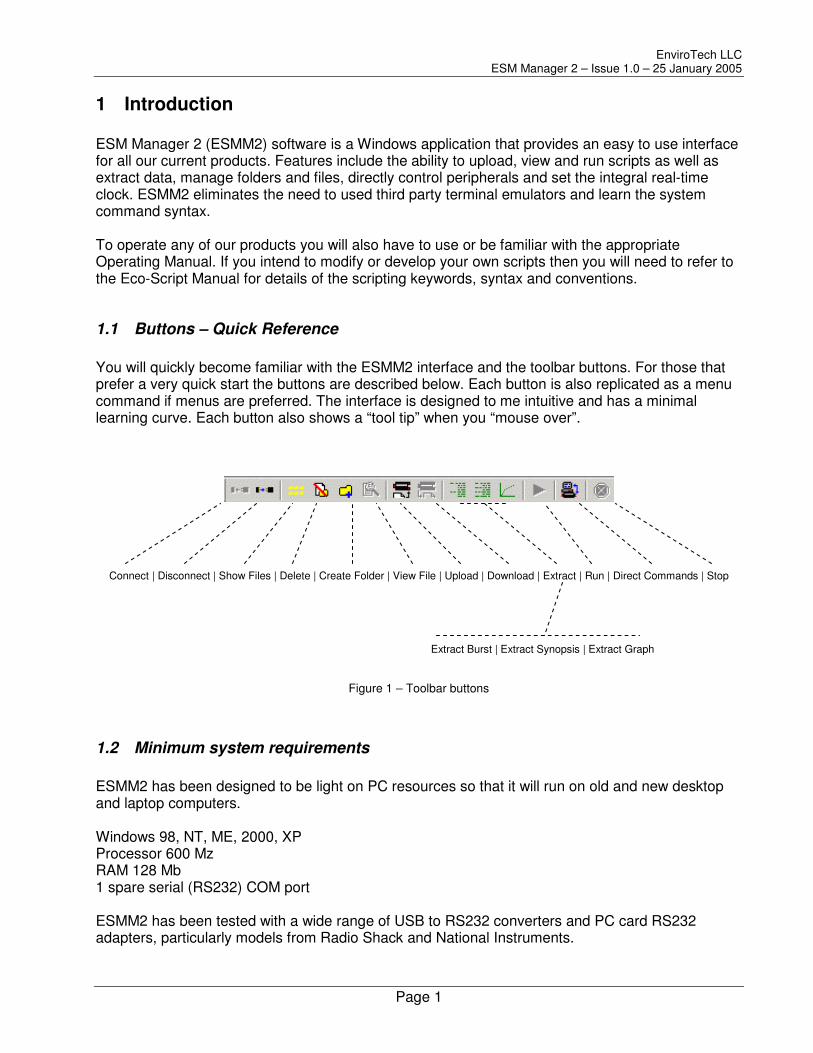
1 Introduction ESM Manager 2 (ESMM2) software is a Windows application that provides an easy to use interface for all our current products. Features include the ability to upload, view and run scripts as well as extract data, manage folders and files, directly control peripherals and set the integral real-time clock. ESMM2 eliminates the need to used third party terminal emulators and learn the system command syntax. To operate any of our products you will also have to use or be familiar with the appropriate Operating Manual. If you intend to modify or develop your own scripts then you will need to refer to the Eco-Script Manual for details of the scripting keywords, syntax and conventions.
1.1 Buttons – Quick Reference You will quickly become familiar with the ESMM2 interface and the toolbar buttons. For those that prefer a very quick start the buttons are described below. Each button is also replicated as a menu command if menus are preferred. The interface is designed to me intuitive and has a minimal learning curve. Each button also shows a “tool tip” when you “mouse over”.
Connect | Disconnect | Show Files | Delete | Create Folder | View File | Upload | Download | Extract | Run | Direct Commands | Stop
Extract Burst | Extract Synopsis | Extract Graph
Figure 1 – Toolbar buttons
1.2 Minimum system requirements ESMM2 has been designed to be light on PC resources so that it will run on old and new desktop and laptop computers. Windows 98, NT, ME, 2000, XP Processor 600 Mz RAM 128 Mb 1 spare serial (RS232) COM port ESMM2 has been tested with a wide range of USB to RS232 converters and PC card RS232 adapters, particularly models from Radio Shack and National Instruments.
EnviroTech LLC ESM Manager 2 – Issue 1.0 – 25 January 2005
Page 2
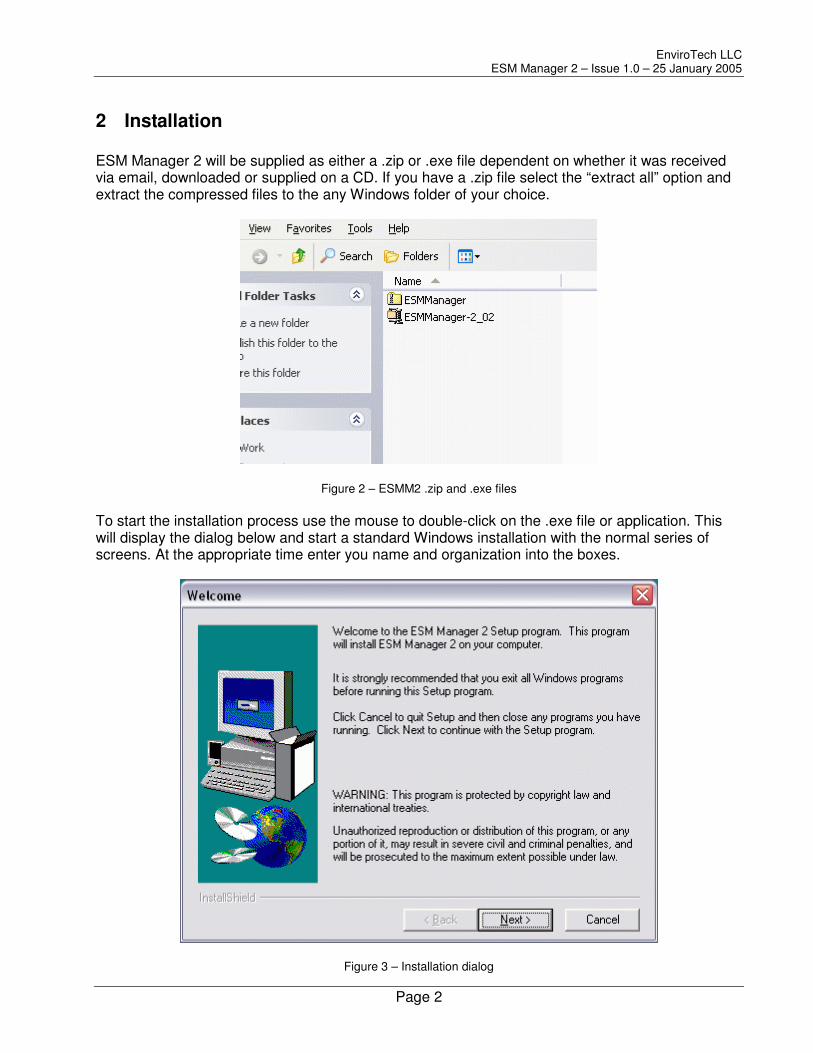
2 Installation ESM Manager 2 will be supplied as either a .zip or .exe file dependent on whether it was received via email, downloaded or supplied on a CD. If you have a .zip file select the “extract all” option and extract the compressed files to the any Windows folder of your choice.
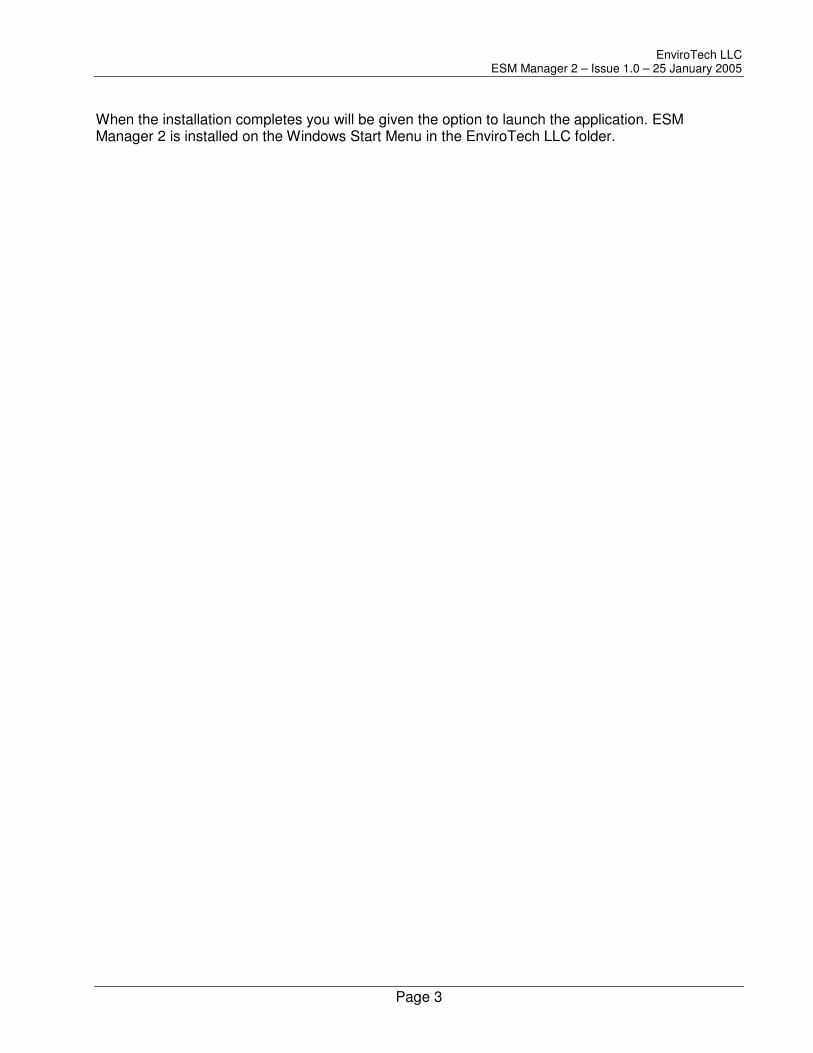
Figure 2 – ESMM2 .zip and .exe files To start the installation process use the mouse to double-click on the .exe file or application. This will display the dialog below and start a standard Windows installation with the normal series of screens. At the appropriate time enter you name and organization into the boxes.
Figure 3 – Installation dialog
EnviroTech LLC ESM Manager 2 – Issue 1.0 – 25 January 2005
Page 3
When the installation completes you will be given the option to launch the application. ESM Manager 2 is installed on the Windows Start Menu in the EnviroTech LLC folder.
EnviroTech LLC ESM Manager 2 – Issue 1.0 – 25 January 2005
Page 4
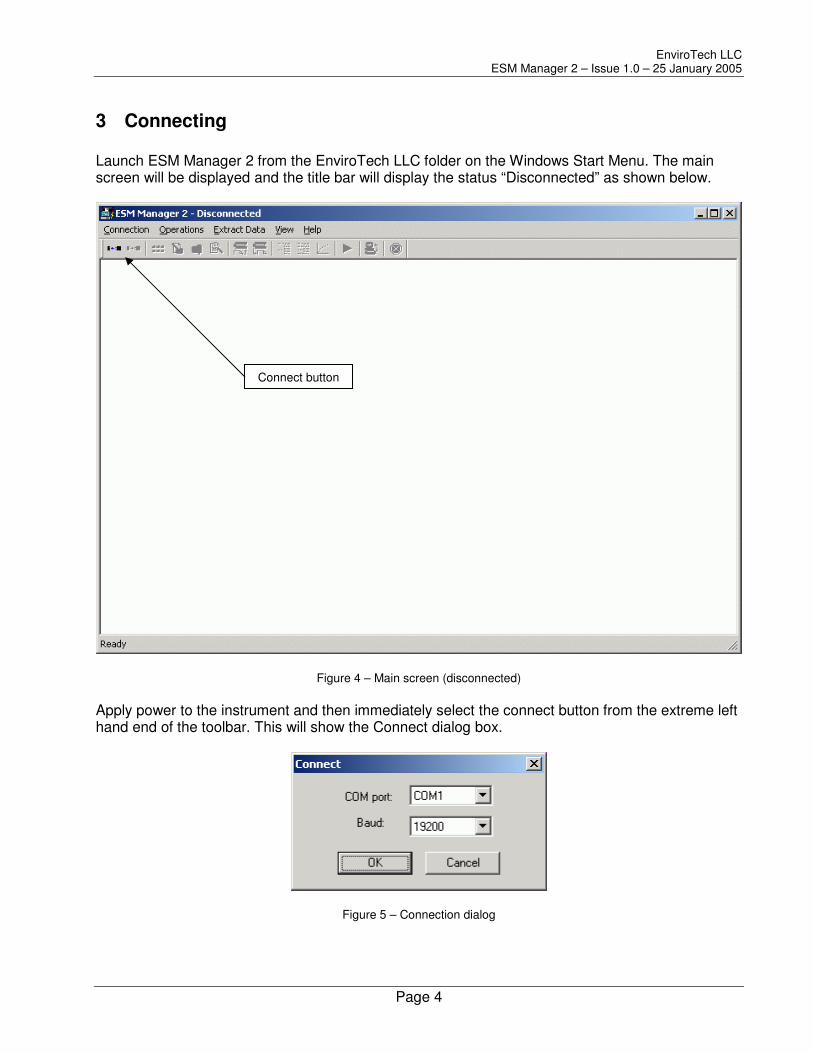
3 Connecting Launch ESM Manager 2 from the EnviroTech LLC folder on the Windows Start Menu. The main screen will be displayed and the title bar will display the status “Disconnected” as shown below.
Figure 4 – Main screen (disconnected) Apply power to the instrument and then immediately select the connect button from the extreme left hand end of the toolbar. This will show the Connect dialog box.
Figure 5 – Connection dialog
Connect button
EnviroTech LLC ESM Manager 2 – Issue 1.0 – 25 January 2005
Page 5
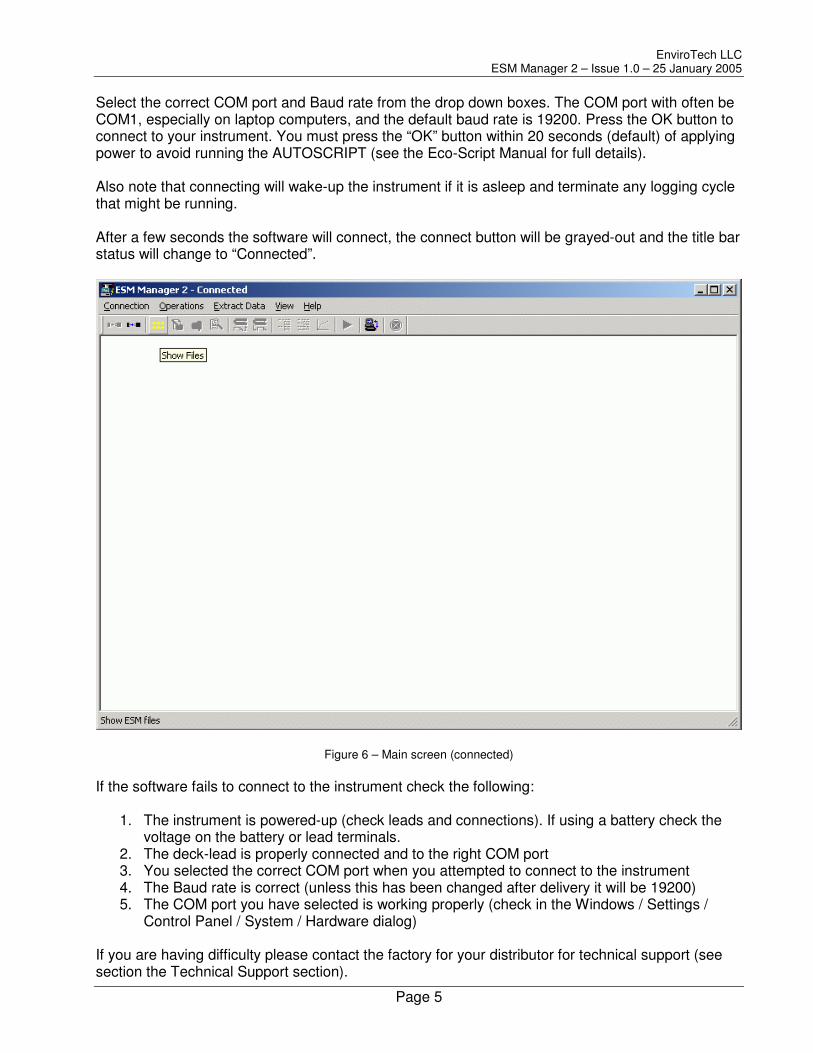
Select the correct COM port and Baud rate from the drop down boxes. The COM port with often be COM1, especially on laptop computers, and the default baud rate is 19200. Press the OK button to connect to your instrument. You must press the “OK” button within 20 seconds (default) of applying power to avoid running the AUTOSCRIPT (see the Eco-Script Manual for full details). Also note that connecting will wake-up the instrument if it is asleep and terminate any logging cycle that might be running. After a few seconds the software will connect, the connect button will be grayed-out and the title bar status will change to “Connected”.
Figure 6 – Main screen (connected) If the software fails to connect to the instrument check the following:
1. The instrument is powered-up (check leads and connections). If using a battery check the voltage on the battery or lead terminals.
2. The deck-lead is properly connected and to the right COM port 3. You selected the correct COM port when you attempted to connect to the instrument 4. The Baud rate is correct (unless this has been changed after delivery it will be 19200) 5. The COM port you have selected is working properly (check in the Windows / Settings /
Control Panel / System / Hardware dialog) If you are having difficulty please contact the factory for your distributor for technical support (see section the Technical Support section).
EnviroTech LLC ESM Manager 2 – Issue 1.0 – 25 January 2005
Page 6
3.1 Disconnecting The software can be disconnected from the instrument by pressing the Disconnect button.
… Disconnect button You may wish to disconnect if you are operating multiple instruments with only one COM port (you may run multiple instances of ESM Manager with multiple COM ports). Pressing the disconnect button has the effect of resetting the instrument. If the instrument remains powered then after the preset delay (20 seconds by default) the unit will attempt to run the AUTOSCRIPT file and start a deployment (see the Eco-Script Manual for further details). Even if the AUTOSCRIPT file is not set the unit will return to the first prompt regardless of the connection state of ESMM2.
To avoid starting a deployment or draining the battery unnecessarily please switch-off the power to the instrument or unplug the battery unless you intend to immediately reconnect.
EnviroTech LLC ESM Manager 2 – Issue 1.0 – 25 January 2005
Page 7
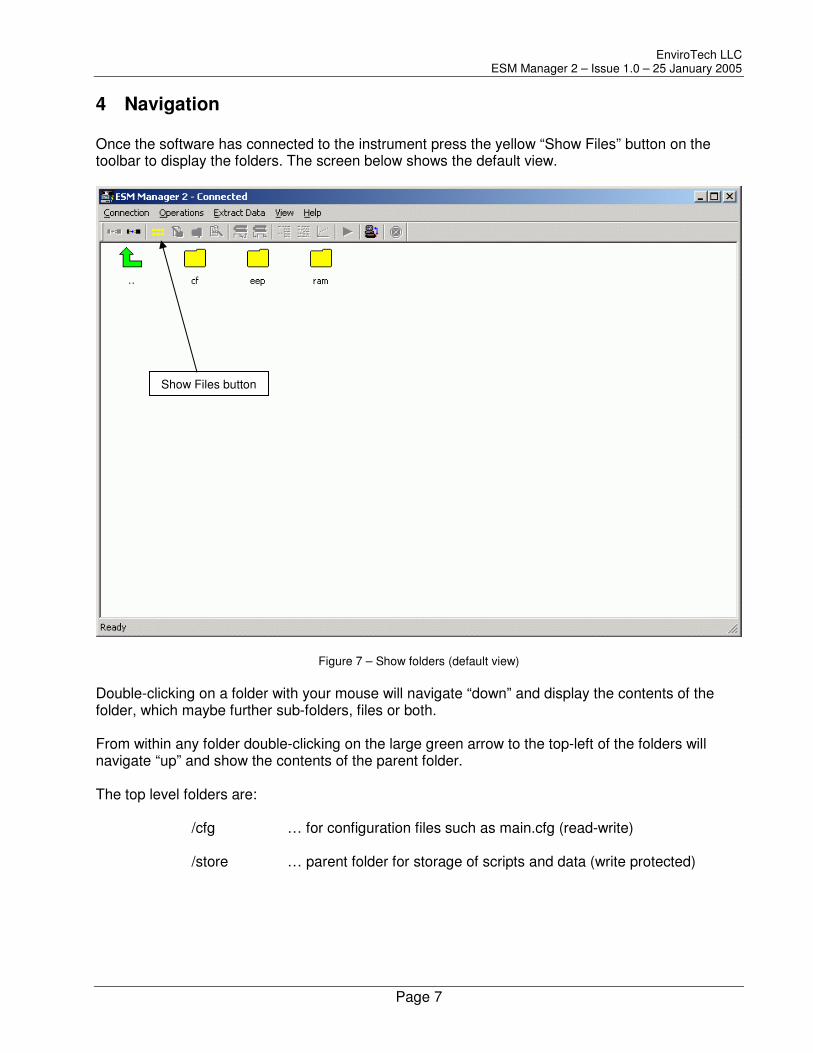
4 Navigation Once the software has connected to the instrument press the yellow “Show Files” button on the toolbar to display the folders. The screen below shows the default view.
Figure 7 – Show folders (default view) Double-clicking on a folder with your mouse will navigate “down” and display the contents of the folder, which maybe further sub-folders, files or both. From within any folder double-clicking on the large green arrow to the top-left of the folders will navigate “up” and show the contents of the parent folder. The top level folders are:
/cfg … for configuration files such as main.cfg (read-write) /store … parent folder for storage of scripts and data (write protected)
Show Files button
EnviroTech LLC ESM Manager 2 – Issue 1.0 – 25 January 2005
Page 8
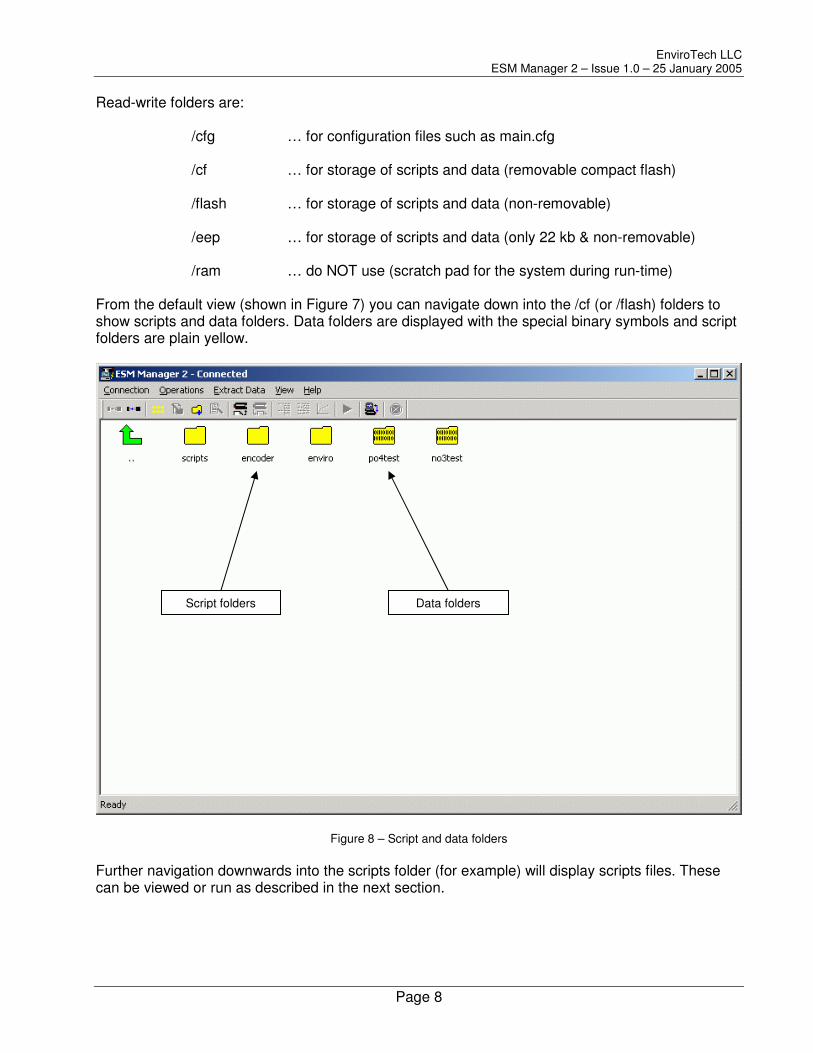
Read-write folders are:
/cfg … for configuration files such as main.cfg /cf … for storage of scripts and data (removable compact flash) /flash … for storage of scripts and data (non-removable) /eep … for storage of scripts and data (only 22 kb & non-removable) /ram … do NOT use (scratch pad for the system during run-time)
From the default view (shown in Figure 7) you can navigate down into the /cf (or /flash) folders to show scripts and data folders. Data folders are displayed with the special binary symbols and script folders are plain yellow.
Figure 8 – Script and data folders Further navigation downwards into the scripts folder (for example) will display scripts files. These can be viewed or run as described in the next section.
Script folders Data folders
EnviroTech LLC ESM Manager 2 – Issue 1.0 – 25 January 2005
Page 9
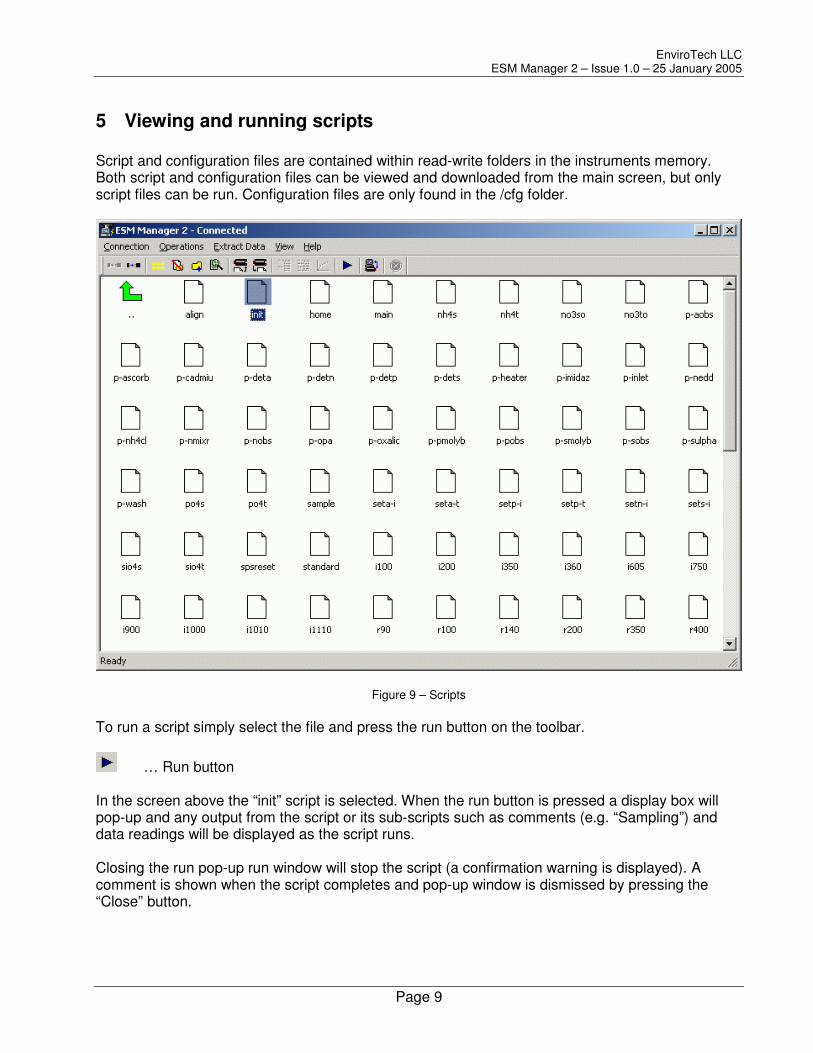
5 Viewing and running scripts Script and configuration files are contained within read-write folders in the instruments memory. Both script and configuration files can be viewed and downloaded from the main screen, but only script files can be run. Configuration files are only found in the /cfg folder.
Figure 9 – Scripts To run a script simply select the file and press the run button on the toolbar.
… Run button In the screen above the “init” script is selected. When the run button is pressed a display box will pop-up and any output from the script or its sub-scripts such as comments (e.g. “Sampling”) and data readings will be displayed as the script runs. Closing the run pop-up run window will stop the script (a confirmation warning is displayed). A comment is shown when the script completes and pop-up window is dismissed by pressing the “Close” button.

EnviroTech LLC ESM Manager 2 – Issue 1.0 – 25 January 2005
Page 10
Any script or configuration file can be viewed from the main screen. Select the file and then press the View button on the toolbar.
… View File button A pop-up window will display the contents of the file and you can scroll using the vertical scroll bar on the right hand side. It is not possible to edit files from the View window.
Figure 10 – File view window Once you have finished viewing the file press the “Close” button to dismiss the view window.
EnviroTech LLC ESM Manager 2 – Issue 1.0 – 25 January 2005
Page 11
6 Creating and deleting files and folders
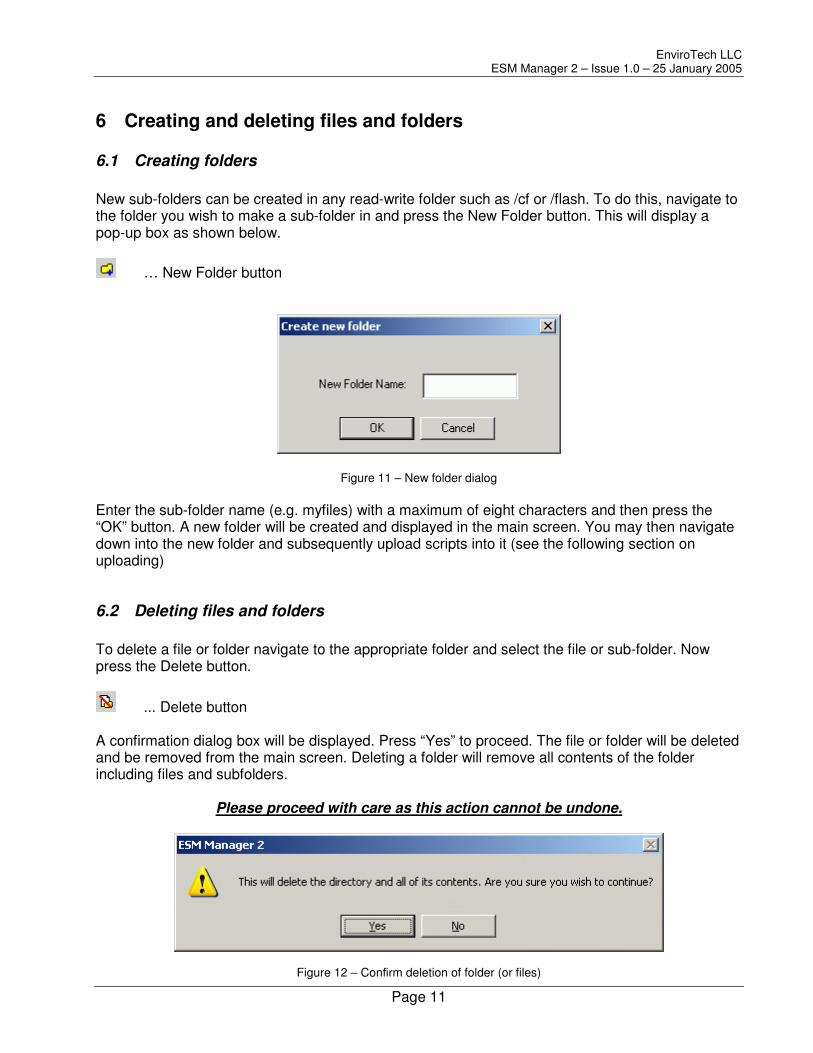
6.1 Creating folders New sub-folders can be created in any read-write folder such as /cf or /flash. To do this, navigate to the folder you wish to make a sub-folder in and press the New Folder button. This will display a pop-up box as shown below.
… New Folder button
Figure 11 – New folder dialog Enter the sub-folder name (e.g. myfiles) with a maximum of eight characters and then press the “OK” button. A new folder will be created and displayed in the main screen. You may then navigate down into the new folder and subsequently upload scripts into it (see the following section on uploading)
6.2 Deleting files and folders To delete a file or folder navigate to the appropriate folder and select the file or sub-folder. Now press the Delete button.
... Delete button A confirmation dialog box will be displayed. Press “Yes” to proceed. The file or folder will be deleted and be removed from the main screen. Deleting a folder will remove all contents of the folder including files and subfolders.
Please proceed with care as this action cannot be undone.
Figure 12 – Confirm deletion of folder (or files)
EnviroTech LLC ESM Manager 2 – Issue 1.0 – 25 January 2005
Page 12
7 Uploading scripts and config files Scripts and configuration files can be created in any text editor and uploaded to any read-write folder on your instrument. The ConTEXT editor is highly recommended and supplied with each of our products. A language definition file is also provided with ConTEXT and when installed scripts have a default extention of .eco. This allows ConTEXT to color-code or contextually display Eco-Script syntax to make editing easier. Once you have edited your scripts in ConTEXT (or any other good text editor) they may be uploaded to your instrument and run.
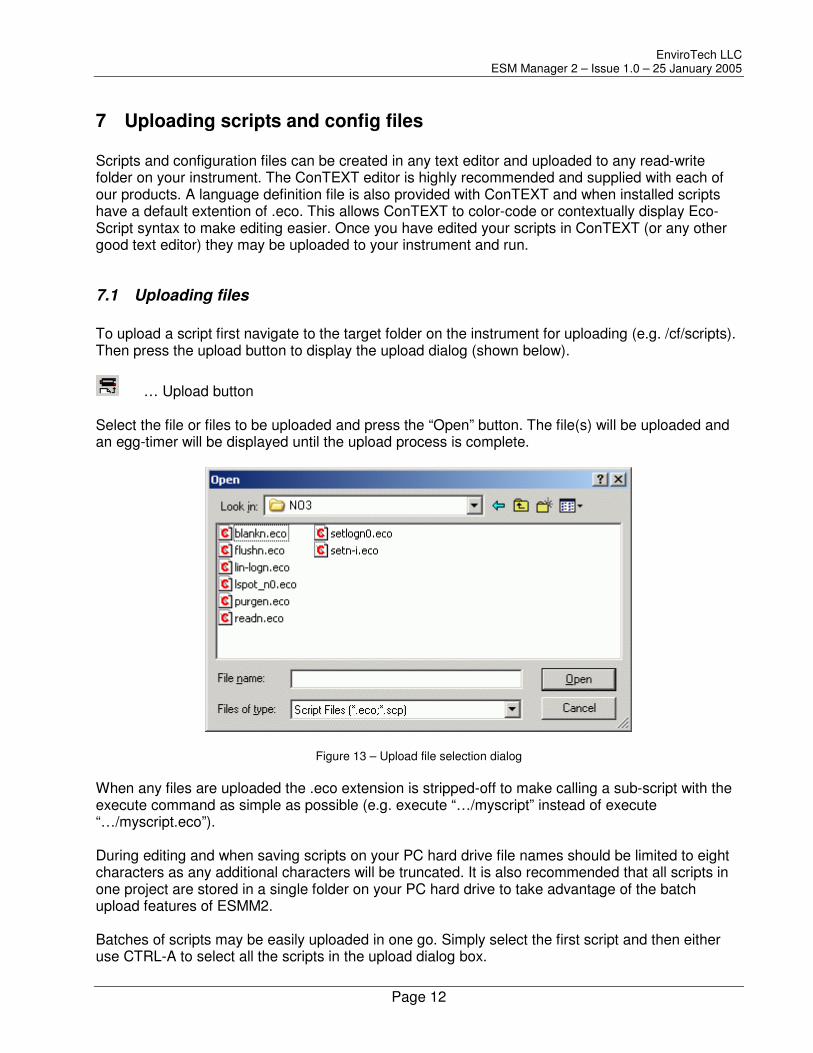
7.1 Uploading files To upload a script first navigate to the target folder on the instrument for uploading (e.g. /cf/scripts). Then press the upload button to display the upload dialog (shown below).
… Upload button Select the file or files to be uploaded and press the “Open” button. The file(s) will be uploaded and an egg-timer will be displayed until the upload process is complete.
Figure 13 – Upload file selection dialog When any files are uploaded the .eco extension is stripped-off to make calling a sub-script with the execute command as simple as possible (e.g. execute “…/myscript” instead of execute “…/myscript.eco”). During editing and when saving scripts on your PC hard drive file names should be limited to eight characters as any additional characters will be truncated. It is also recommended that all scripts in one project are stored in a single folder on your PC hard drive to take advantage of the batch upload features of ESMM2. Batches of scripts may be easily uploaded in one go. Simply select the first script and then either use CTRL-A to select all the scripts in the upload dialog box.
EnviroTech LLC ESM Manager 2 – Issue 1.0 – 25 January 2005
Page 13
Or you can choose a specific selection of files by holding down the CTRL button on your keyboard and single-clicking on each of the files you wish to upload. If you select a file by mistake simply keep your finger on the CTRL button and single-click on the file again to clear the selection.
7.2 Downloading files Scripts may be downloaded from the instrument to you hard drive for editing or back-up. Simply navigate to the file you wish to download and select the “Download” button from the toolbar.
… Download button A pop-up dialog will be displayed. You can navigate to the location on your PC hard where you wish to save the file. Then enter the file name with the appropriate .eco or .cfg extension and press the “Open” button. The file will be downloaded and an egg-time will be displayed until the operation is complete. FAQ: When is this useful? For example, if you have designed, edited and uploaded scripts on your desktop PC and you now wish to make some changes with your laptop (possible in the field) and you do not have the original scripts on the laptop hard drive this feature allows you to access and edit the files. They can subsequently be re-uploaded and then run.

EnviroTech LLC ESM Manager 2 – Issue 1.0 – 25 January 2005
Page 14
8 Direct commands The user has specific control of some of the hardware and peripherals in the instrument system via the Direct Command box. Direct commands allow the various power switches and digital outputs (often used for sensor gain control) to be manually controlled. In addition all SPS devices (typically motor and detectors) can be operated from the SPS boxes and the real-time clock in the instrument can be set. The Direct Commands panel is opened by pressing the Direct Commands button on the toolbar.
… Direct Commands button
8.1 Digital IO For most products the DIO value F000 will turn-on all SPS devices in the system. DIO 0000 turns them all off. To power-up the SPS devices enter “F000 in the DIO Value (Hex):” box and press the “Set Value” button.
Figure 14 – Direct commands panel
EnviroTech LLC ESM Manager 2 – Issue 1.0 – 25 January 2005
Page 15
8.2 SPS devices To control an SPS device first ensure that it is powered-up (see above). Enter the correct address (e.g. 00 for the linear or syringe motor) and then type in the command you wish to send to the SPS device. Now press the “Send Command” button. The response from the SPS device will be shown in the “SPS Response” box. This will be “OK” for operations such as motor movements and light settings. For device queries such as GS (get sample) the reading or value will be displayed.
8.3 Date/Time The date and time of the real-time clock onboard your instrument may be set to a specific time, the PC clock or GMT. Please note that the GMT setting is simply offset from your PC clock and any errors in the PC clock setting with respect to local time will be reflected in the GMT setting.
Please set your PC clock accurately before using the “Set To PC Time” or “Set To GMT Time” buttons.
EnviroTech LLC ESM Manager 2 – Issue 1.0 – 25 January 2005
Page 16
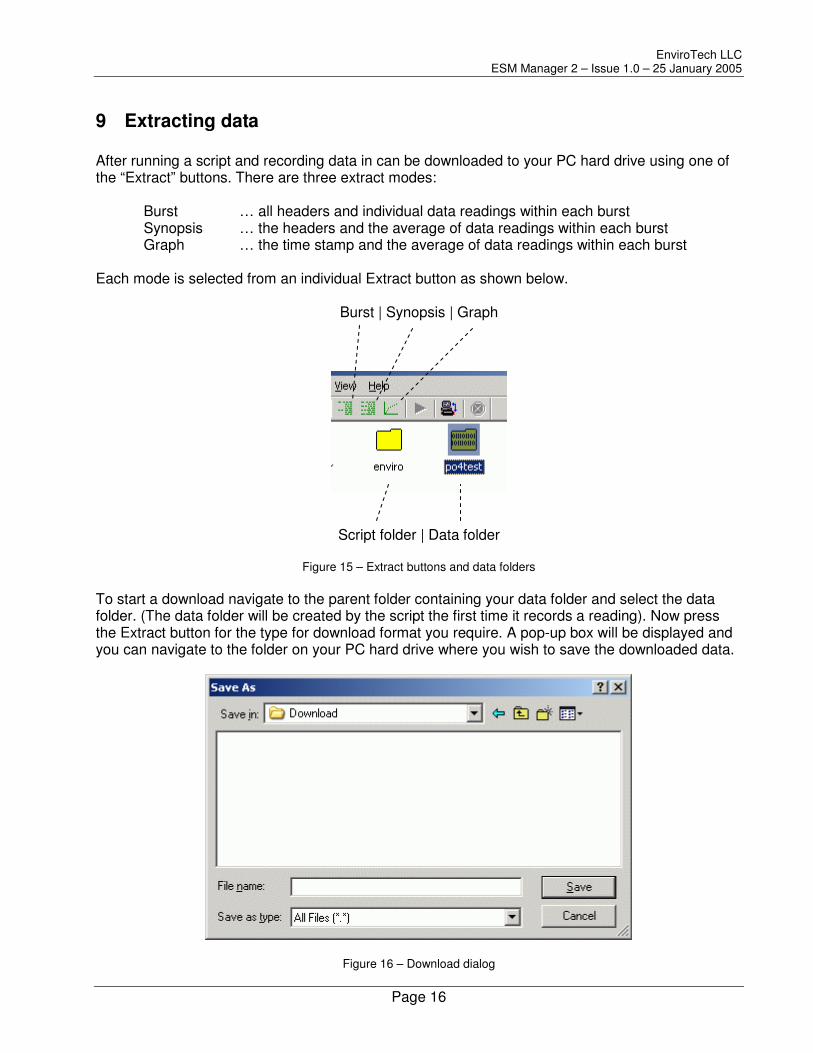
9 Extracting data After running a script and recording data in can be downloaded to your PC hard drive using one of the “Extract” buttons. There are three extract modes:
Burst … all headers and individual data readings within each burst Synopsis … the headers and the average of data readings within each burst Graph … the time stamp and the average of data readings within each burst
Each mode is selected from an individual Extract button as shown below.
Burst | Synopsis | Graph
Script folder | Data folder
Figure 15 – Extract buttons and data folders
To start a download navigate to the parent folder containing your data folder and select the data folder. (The data folder will be created by the script the first time it records a reading). Now press the Extract button for the type for download format you require. A pop-up box will be displayed and you can navigate to the folder on your PC hard drive where you wish to save the downloaded data.
Figure 16 – Download dialog
EnviroTech LLC ESM Manager 2 – Issue 1.0 – 25 January 2005
Page 17
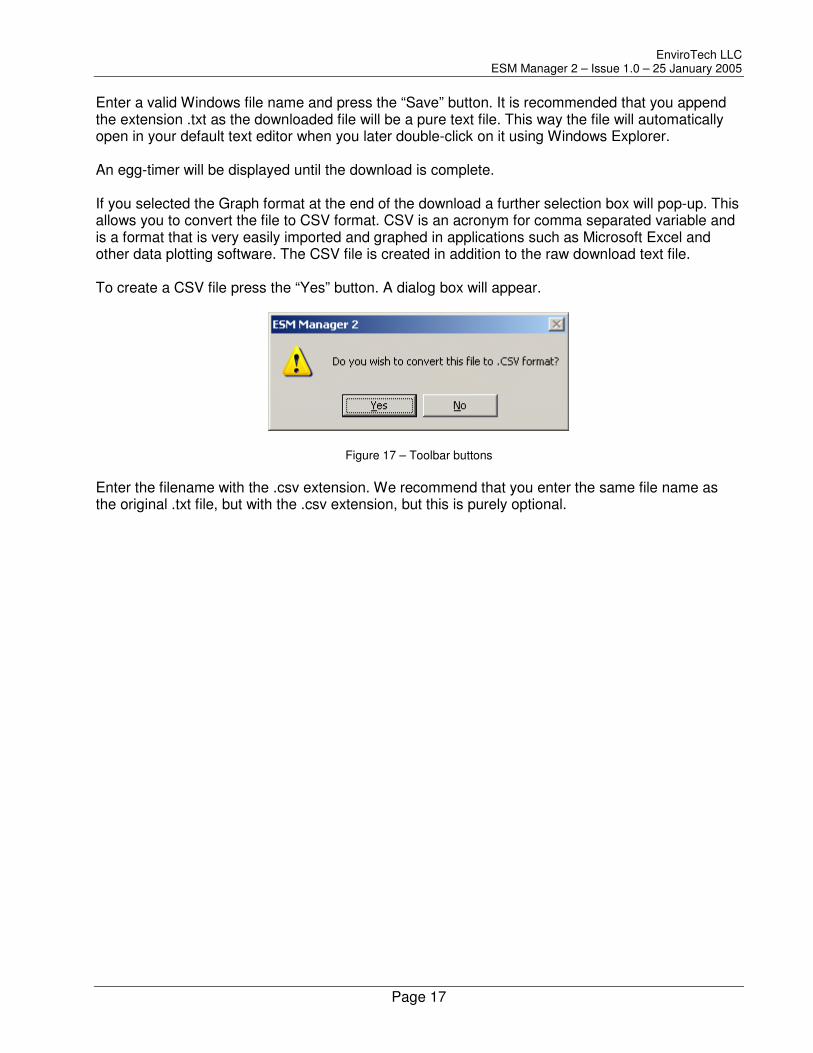
Enter a valid Windows file name and press the “Save” button. It is recommended that you append the extension .txt as the downloaded file will be a pure text file. This way the file will automatically open in your default text editor when you later double-click on it using Windows Explorer. An egg-timer will be displayed until the download is complete. If you selected the Graph format at the end of the download a further selection box will pop-up. This allows you to convert the file to CSV format. CSV is an acronym for comma separated variable and is a format that is very easily imported and graphed in applications such as Microsoft Excel and other data plotting software. The CSV file is created in addition to the raw download text file. To create a CSV file press the “Yes” button. A dialog box will appear.
Figure 17 – Toolbar buttons Enter the filename with the .csv extension. We recommend that you enter the same file name as the original .txt file, but with the .csv extension, but this is purely optional.
EnviroTech LLC ESM Manager 2 – Issue 1.0 – 25 January 2005
Page 18
10 Technical support If you have any problems with ESM Manager 2 software or your instrument please do not hesitate to contact us for technical support via one of the options below:
o On-line FAQ library
We have an extensive and searchable on-line library of frequently asked questions. This database is continuously updated. The FAQ’s can be viewed by selecting the “Browse FAQs” button on our website Help Page.
o On-line Help Desk
You can enter a trackable trouble-ticket at our on-line Help Desk by selecting the “Contact Help!!” button on our website Help Page. Your request will be automatically routed to the best people to help you. Help tickets entered this way will never get lost or be forgotten. Please help us to help you by using this facility.
o Email Help Desk queries
As an alternative to the on-line Help Desk a new trouble-ticket can simply be emailed to our help email address.
o Telephone contact
Please feel free to contact us via telephone during business hours (8:00 – 5:00 US Eastern Standard Time)
o Emergency contact
For emergencies and especially out of hours assistance please use our automatic pager system by sending a short email to our emergency contact address. The maximum message length should be 130 characters and please include your name and a contact number where we can get back to you.
Website Help Page
Browse FAQ’s or enter a trouble ticket www.n-virotech.com/help.htm
Help Desk system email
Phone and fax T: 757 549 8474 F: 757 410 2382
Hours of business 8:00 - 5:30 US EST
Emergency Out of Hours Pager
In an emergency send a very short email message starting with contact details to: [email protected]
EnviroTech LLC ESM Manager 2 – Issue 1.0 – 25 January 2005
Page 19
11 Warranty, licence and disclaimer
11.1 Warranty ESM Manager 2 software is distributed “as is” without warranty of any kind, either expressed or implied, including but not limited to the implied warranties of merchantability and fitness for a particular purpose. Neither EnviroTech LLC nor any of its distributors assume any liability for any alleged or actual damages arising from the use of this product.
11.2 License YOU MAY Make as many copies of this software as you wish for the express purpose of using them in association with one or more of our hardware products. Each copy will be subject to the same terms and conditions
YOU MAY NOT modify, distribute (for commercial gain or otherwise), reverse engineer, decompile, disassemble or create derivative works of, or transfer the software, or any copy, in whole or in part, except as expressly provided for in this license.
11.3 Term The licence is effective until terminated. You may terminate it at any time by destroying the software together with all copies in any form. It will also terminate upon conditions set forth elsewhere in the agreement or if you fail to comply with any term or condition of this agreement. You agree upon such termination to destroy the software with all copies in any form.
11.4 General You may not sublicense, assign, or transfer the license or the software except as expressly provided for in this agreement. Any attempt to otherwise sublicense, assign, or transfer any of the rights, duties, or obligations hereunder is void. You acknowledge that you have read this agreement, understand it, and agree to be bound by its terms and conditions. You further agree that it is the complete and exclusive statement of the agreement between us that supersedes any proposal or prior agreement, oral or written, relating to the subject matter of this agreement. EnviroTech LLC software only grants the use of this software by means of this agreement. EnviroTech LLC specifically retains ownership of the software.
11.5 Disclaimer All information in this manual is believed to be accurate and reliable. However, no responsibility is assumed by EnviroTech LLC for errors or omissions. While every effort has been made to ensure that this document is correct, errors can occur. If you find any errors or omissions please let us know immediately. EnviroTech LLC reserves the right to change product design, operation, specifications and documentation without notice.