epson edge print...notes on manuals meaning of symbols cimportant: important must be followed to...
TRANSCRIPT
Operation GuideCMP0101-05 EN

Copyrights and Trademarks
No part of this publication may be reproduced, stored in a retrieval system, or transmitted in any form or by any means, electronic, mechanical,photocopying, recording, or otherwise, without the prior written permission of Seiko Epson Corporation. The information contained herein is designedonly for use with this Epson printer. Epson is not responsible for any use of this information as applied to other printers.
Neither Seiko Epson Corporation nor its affiliates shall be liable to the purchaser of this product or third parties for damages, losses, costs, or expensesincurred by the purchaser or third parties as a result of accident, misuse, or abuse of this product or unauthorized modifications, repairs, or alterations tothis product, or (excluding the U.S.) failure to strictly comply with Seiko Epson Corporation's operating and maintenance instructions.
Seiko Epson Corporation shall not be liable for any damages or problems arising from the use of any options or any consumable products other than thosedesignated as Original Epson Products or Epson Approved Products by Seiko Epson Corporation.
Seiko Epson Corporation shall not be held liable for any damage resulting from electromagnetic interference that occurs from the use of any interface cablesother than those designated as Epson Approved Products by Seiko Epson Corporation.
EPSON and EPSON EXCEED YOUR VISION or EXCEED YOUR VISION and their logos are registered trademarks or trademarks of Seiko EpsonCorporation.
Microsoft® and Windows® are registered trademarks of Microsoft Corporation.
Mac, macOS are registered trademarks of Apple Inc.
Intel® is a registered trademark of Intel Corporation.
Adobe, Illustrator, Photoshop, Acrobat, Reader, PostScript® and PostScript logo are either registered trademarks or trademarks of Adobe SystemsIncorporated in the United States and/or other countries.
X-Rite is trademark or registered trademark of X-Rite, Incorporated in the United States and/or other countries. ©2008 X-Rite, Incorporated. All rightsreserved. i1 is trademark of X-Rite.
Monotype is a trademark of Monotype Imaging, Inc. registered in the United States Patent and Trademark Office and may be registered in certainjurisdictions.
Albertus, Arial, Gill Sans, Joanna and Times New Roman are trademarks of The Monotype Corporation.
Coronet is a registered trademark of Ludlow Type Foundry.
ITC AvantGarde, ITC Bookman, ITC Lubalin, ITC Mona Lisa Recut, ITC Symbol, ITC Zapf Chancery and ITC Zapf Dingbats are trademarks ofInternational Typeface Corporation.
Clarendon, Helvetica, New Century Schoolbook, Optima, Palatino, Stemple Garamond, Times and Univers are trademarks of Linotype Library GmbHand/or its subsidiaries.
Marigold and Oxford are trademarks of AlphaOmega Typography.
Antique Olive is a trademark of Marcel Olive and may be registered in certain jurisdictions.
Epson Edge Print Operation Guide
Copyrights and Trademarks
2

Eurostile is trademark of Nebiolo.
NewYork, Apple Chancery, Chicago, Geneva, Hoefler Text and Monaco are trademarks of Apple Computer, Inc.
General Notice: Other product names and font names used herein are for identification purposes only and may be trademarks of their respective owners. Epsondisclaims any and all rights in those marks.
© 2017 Seiko Epson Corporation. All rights reserved.
Epson Edge Print Operation Guide
Copyrights and Trademarks
3

Contents
Copyrights and Trademarks
Notes on ManualsMeaning of Symbols. . . . . . . . . . . . . . . . . . . . . . . . 7Screenshots used in this manual. . . . . . . . . . . . . . . 7Viewing PDF Manuals. . . . . . . . . . . . . . . . . . . . . . 7
Configuration of main screen
Printing procedure (first step)Preparing to print. . . . . . . . . . . . . . . . . . . . . . . . . 12Printing procedure. . . . . . . . . . . . . . . . . . . . . . . . 13Stopping printing. . . . . . . . . . . . . . . . . . . . . . . . . 13
Introduction to functions on the Job Setting menuStarting the Job Setting menu. . . . . . . . . . . . . . . . 15Introduction to Layout. . . . . . . . . . . . . . . . . . . . . 15Introduction to Color Settings. . . . . . . . . . . . . . . . 17Introduction to Color Replacement. . . . . . . . . . . . 18Introduction to Mark. . . . . . . . . . . . . . . . . . . . . . 18Introduction to Crop. . . . . . . . . . . . . . . . . . . . . . . 18Introduction to Tiling. . . . . . . . . . . . . . . . . . . . . . 19Introduction to Step and Repeat. . . . . . . . . . . . . . 19Introduction to Layer Setting. . . . . . . . . . . . . . . . . 20
Deciding the order of printing/RIP, and then sorting the Job ListSpecifying batch printing/RIP processing. . . . . . . . 21Deciding the order and printing/RIP processing. . . . . . . . . . . . . . . . . . . . . . . . . . . . . . . . . . . . . . 21
Printing with the optimum settings for the media being used (printing using EMX)Preparing to print. . . . . . . . . . . . . . . . . . . . . . . . . 22Preparing EMX files. . . . . . . . . . . . . . . . . . . . . . . 22Preparing the printer. . . . . . . . . . . . . . . . . . . . . . . 24Printing procedure. . . . . . . . . . . . . . . . . . . . . . . . 24Stopping printing. . . . . . . . . . . . . . . . . . . . . . . . . 25
Printing with decided settings (hot folder printing)What is a hot folder. . . . . . . . . . . . . . . . . . . . . . . . 26Procedure to create a hot folder. . . . . . . . . . . . . . . 26Cautions when printing with hot folders. . . . . . . . 27Printing procedure. . . . . . . . . . . . . . . . . . . . . . . . 27Unregistering a hot folder. . . . . . . . . . . . . . . . . . . 27Disabling a hot folder. . . . . . . . . . . . . . . . . . . . . . 27Changing the Quick Sets set in hot folders. . . . . . . 28
Reprinting a job that has been printed onceReprinting procedure. . . . . . . . . . . . . . . . . . . . . . 29Organizing the Printed Job list. . . . . . . . . . . . . . . . 29
Basic job settings
Setting the layout
Using media efficiently without waste (nested printing)Creating nested jobs. . . . . . . . . . . . . . . . . . . . . . . 37Canceling nested jobs. . . . . . . . . . . . . . . . . . . . . . 38Things to confirm before doing nested printing. . . . . . . . . . . . . . . . . . . . . . . . . . . . . . . . . . . . . . 38Setting margins for each job in nested jobs. . . . . . . 38
Dividing a large image into parts to print it (tiling)How to divide an image. . . . . . . . . . . . . . . . . . . . . 40When you want to print guidelines on the overlapfor pasting. . . . . . . . . . . . . . . . . . . . . . . . . . . . . . 41When not printing a specified tile. . . . . . . . . . . . . 42When color deviation at the seams stands out. . . . . 42
Epson Edge Print Operation Guide
Contents
4

Printing only the necessary parts of an image (Crop)
Printing repeating pattern (Step and Repeat)How to create patterns. . . . . . . . . . . . . . . . . . . . . 45If gaps occur between images you printed. . . . . . . . 46
Replacing a job's Output ColorColor replacement procedure. . . . . . . . . . . . . . . . 47Setting the Output Color from an output-coloradjustment chart. . . . . . . . . . . . . . . . . . . . . . . . . . 48Setting the measured color sample as the OutputColor. . . . . . . . . . . . . . . . . . . . . . . . . . . . . . . . . . 49
Printing layers (printing White/Metallic Silver)How to create print data. . . . . . . . . . . . . . . . . . . . 51Automatically generating, then printing, the layerfor printing WH/MS. . . . . . . . . . . . . . . . . . . . . . . 51
Layer type. . . . . . . . . . . . . . . . . . . . . . . . . . . . . 51Automatic generation procedure. . . . . . . . . . . . 53Layer printing procedure. . . . . . . . . . . . . . . . . . 53
Combining and printing color data with WH/MSprint data. . . . . . . . . . . . . . . . . . . . . . . . . . . . . . . 53
Preparing the data. . . . . . . . . . . . . . . . . . . . . . . 53Procedure for combining jobs. . . . . . . . . . . . . . 54Layer printing procedure. . . . . . . . . . . . . . . . . . 54
Making and printing layered printing data withimage processing software. . . . . . . . . . . . . . . . . . . 55
How to do White/Silver settings in Illustrator. . . . . . . . . . . . . . . . . . . . . . . . . . . . . . . . . . . . 55How to do White/Silver settings in Photoshop. . . . . . . . . . . . . . . . . . . . . . . . . . . . . . . . . . . . 57Layer printing procedure. . . . . . . . . . . . . . . . . . 59
When layers are misaligned and the backgroundimage overruns. . . . . . . . . . . . . . . . . . . . . . . . . . . 59
Using Color CollectionEditing/adding spot colors. . . . . . . . . . . . . . . . . . . 61
Editing/adding procedure. . . . . . . . . . . . . . . . . 61Setting the measured color sample as theOutput Color. . . . . . . . . . . . . . . . . . . . . . . . . . 62To create spot colors that differ from theoriginal imported or added spot colors. . . . . . . . 62To delete unwanted spot colors. . . . . . . . . . . . . 62
To enable only required spot colors. . . . . . . . . . 62Applying priority levels to groups. . . . . . . . . . . 62
Importing spot color files. . . . . . . . . . . . . . . . . . . 63Exporting spot colors. . . . . . . . . . . . . . . . . . . . . . 63
Color SettingsOverview of input settings. . . . . . . . . . . . . . . . . . . 65Overview of output settings. . . . . . . . . . . . . . . . . . 66Confirming print results for wide color gamutinput color profile when creating data. . . . . . . . . . 67
Printing with Frame line and trim marks
Creating job settings that are often used (Quick Sets)Procedure to create Quick Sets. . . . . . . . . . . . . . . . 70Editing Quick Sets. . . . . . . . . . . . . . . . . . . . . . . . . 71Reusing Quick Sets that you created. . . . . . . . . . . . 71
Exporting Quick Sets. . . . . . . . . . . . . . . . . . . . . 71Importing Quick Sets to be added. . . . . . . . . . . 71
Setting Quick Sets as the default job settings. . . . . . 72
Creating print information suitable for the media being usedCreating one based on the print information in anEMX file you have acquired. . . . . . . . . . . . . . . . . . 73
Editing and adding Print Quality. . . . . . . . . . . . 73Deleting Print Quality. . . . . . . . . . . . . . . . . . . . 75
Creating print information based on genericprint information. . . . . . . . . . . . . . . . . . . . . . . . . 75Reuse the created print information. . . . . . . . . . . . 76
Exporting print information. . . . . . . . . . . . . . . 76Importing and adding print information. . . . . . 76
Troubleshooting & TipsWhen you want to change the initial settings ofMedia Size. . . . . . . . . . . . . . . . . . . . . . . . . . . . . . 77When you want to create non-standard mediasizes (custom media sizes). . . . . . . . . . . . . . . . . . . 77When you want to change the media's left andright margins when printing. . . . . . . . . . . . . . . . . 77When synchronizing media settings and printinformation. . . . . . . . . . . . . . . . . . . . . . . . . . . . . 77
Epson Edge Print Operation Guide
Contents
5

When a PDF, which contains data in whichtransparent images are layered with images thathave been set with spot colors, cannot be printedcorrectly. . . . . . . . . . . . . . . . . . . . . . . . . . . . . . . . 78When you want to change the interface languageor the length units. . . . . . . . . . . . . . . . . . . . . . . . . 78When the print heads start and stop duringprinting. . . . . . . . . . . . . . . . . . . . . . . . . . . . . . . . 78When Error appears in Status on Job List andprinting is not done. . . . . . . . . . . . . . . . . . . . . . . . 79
Confirming the details of errors. . . . . . . . . . . . . 79Changing the memory size used by the RIPserver. . . . . . . . . . . . . . . . . . . . . . . . . . . . . . . . 79
When you want to change amount usablecapacity in the storage device. . . . . . . . . . . . . . . . . 79When you want to register or unregister a printerthat is being managed. . . . . . . . . . . . . . . . . . . . . . 80
Registration and changes. . . . . . . . . . . . . . . . . . 80Procedure to unregister. . . . . . . . . . . . . . . . . . . 81When you want to add models to use afterinstallation. . . . . . . . . . . . . . . . . . . . . . . . . . . . 81
When you want to register with an added license. . . . . . . . . . . . . . . . . . . . . . . . . . . . . . . . . . . . . . 81When you want to replace the RIP server'scomputer. . . . . . . . . . . . . . . . . . . . . . . . . . . . . . . 81
Procedure to delete the license. . . . . . . . . . . . . . 82Registering the license after replacing thecomputer. . . . . . . . . . . . . . . . . . . . . . . . . . . . . 82
Backup and Restore. . . . . . . . . . . . . . . . . . . . . . . . 85Backup. . . . . . . . . . . . . . . . . . . . . . . . . . . . . . . 85Restore. . . . . . . . . . . . . . . . . . . . . . . . . . . . . . . 85
Updating the software. . . . . . . . . . . . . . . . . . . . . . 85Checking for updates and updating. . . . . . . . . . 86Receiving notices about updates. . . . . . . . . . . . . 86
Uninstalling the software. . . . . . . . . . . . . . . . . . . . 86
Operating environment
Supported data formats
Supported colorimeters
Epson Edge Print Operation Guide
Contents
6

Notes on Manuals
Meaning of Symbols
c Important: Important must be followed toavoid damage to this product.
Note: Notes contain useful oradditional information on theoperation of this product.
U Indicates related referencecontent.
Screenshots used in thismanual
The screenshots may differ slightly from the screens youare using. Also, they may be changed without notice.Please be aware of this when using the manual.
Viewing PDF Manuals
This section uses the Adobe Reader DC as an example toexplain the basic operations for viewing the PDF inAdobe Reader.
A Click to print the PDF manual.
B Each time it is clicked the bookmarks are hidden orshown.
C Click the title to open the relevant page.
Click [+] to open the titles lower in the hierarchy.
D If the reference is in blue text, click the blue text toopen the relevant page.
To return to the original page, do the following.
For Windows
While pressing the Alt key, press the key.
For Mac
While pressing the command key, press the key.
Epson Edge Print Operation Guide
Notes on Manuals
7

E You can enter and search for keywords, such as thenames of items you want to confirm.
For Windows
Right click on a page in the PDF manual and selectFind in the menu that is displayed to open the searchtoolbar.
For Mac
Select Find in the Edit menu to open the searchtoolbar.
F To enlarge the text in the display that is too small tosee well, click . Click to reduce the size. Tospecify a part of an illustration or screenshot toenlarge, do the following.
For Windows
Right click on the page in the PDF manual and selectMarquee Zoom in the menu that is displayed. Thepointer changes to a magnifying glass, use it tospecify the range of the place you want to enlarge.
For Mac
Click View menu - Zoom - Marquee Zoom in thisorder to change the pointer to a magnifying glass.Use the pointer as a magnifying glass to specify therange of the place you want to enlarge.
G Opens the previous page or next page.
Epson Edge Print Operation Guide
Notes on Manuals
8

Configuration of main screen
The main screen appears when you start this software.
The configuration and functions of the main screen are shown below.
Names of parts Functions
(1) Menu bar You can do settings and operations in the various menus.
By clicking or in the title line, you can show or hide the menu bar.
(2) Job toolbar You can do the following operations for jobs that you select in the Job List/Printed JobLists (4).
: Select and add print data to the Job List.
/ : Create a single nest job from multiple jobs that you select.
When you select a nest job, changes to and you can do UnNest.
U “Using media efficiently without waste (nested printing)” on page 37
: Delete selected jobs from the list.
: Do only RIP processing to selected jobs.
: Do RIP while printing selected jobs. When you select a job for which RIP is alreadycomplete, only printing is done.
: Stop printing or RIP processing that is being executed.
/ : Put the selected job on hold. Held jobs are not printed when you set the Auto Printswitching button (8) to to do Auto printing.
When you select a job being held, changes to and you can cancel the hold. If youcancel a hold during automatic printing, the job becomes idle and is printed at the end ofthe queue.
(3) List switching button Switch the Job List/Printed Job Lists.
The name of the currently selected list is shown in a frame.
Epson Edge Print Operation Guide
Configuration of main screen
9

Names of parts Functions
(4) Job List/Printed Job Lists In the Job List, a thumbnail, name of the source data, and the status are shown for jobs thatare printing or waiting to be printed. Jobs that are finished printing are automaticallymoved to the Printed Job list.
You can do the following operations in both lists.
❏ You can change the content by opening the right click menu on the list title.
❏ You can do the same operations as in the Job toolbar (2) by opening the right clickmenu on the name of a job.
You can minimize or expand an area by clicking or , which are to the top left of thelist titles.
(5) Preview area You can check a preview of a job that you select in the Job List (4).
Decide the layout of nested jobs and set Layout, Tiling, and Crop in the Job Setting Menu(7) as you check the job in this preview area.
The white area shows the media. The width of the media changes according to thesettings in (Basic Settings) - Media Size in the Job Settings menu. The distance fromthe left and right edges of the media to the dotted lines are the margins. You can changethe margins in Manage Preset in the Tool menu.
U “When you want to change the media's left and right margins when printing” onpage 77
You can do the layout as you check the printing position with the scale. You can changethe units (mm/inch) of the scale in Preferences in the Tool menu.
U “When you want to change the interface language or the length units” onpage 78
You can also drag the preview image to change the printing position.
By clicking or at the bottom of the preview area, you can reduce or enlarge thepreview area display. To reduce or enlarge the printout, do the Layout settings in the JobSettings menu.
U “Setting the layout” on page 33
By clicking or on the left top of the area, you can minimize or expand the area.
(6) Switch printer tab Shows the status and name of printers that are registered in this software.
Click a tab to change the printer to operate. The white tab is the printer that is currentlybeing operated.
The meanings of the status icons is as follows.
: Printing is possible (ready).
: Currently printing.
: Warning or something has occurred.
: Error has occurred.
: Currently doing an operation other than printing, such as cleaning the heads oroperating the panel.
: The power is off or not connected.
By clicking the on the bottom right of the screen, you can check the detailed status ofthe printer that is selected. Depending on the model you are using, may be disabled.
Epson Edge Print Operation Guide
Configuration of main screen
10

Names of parts Functions
(7) Job Setting menu & Settingarea
Do settings for the idle job that is selected in the Job List (4), such as printing, layout, andInput/output profile.
The icons on the right are the Job Setting menu. The content of the setting area changesdepending on the items that are selected. U “Introduction to functions on the JobSetting menu” on page 15
Clicking the in the top right of the setting area closes the setting area so the previewarea is enlarged by that amount. To open the setting area, click one of the items in the JobSetting menu.
When the setting area is closed, you can minimize/maximize the menu area by draggingthe menu's left edge to the left or right.
(8) Auto Print switchingbutton
Each time this button is clicked, it turns on or off.
By setting it to , the print jobs start printing in order just by adding print data to theJob List (4). When there is an idle job in the Job List, the idle job is printed in order, too.
By setting it to , the jobs are not printed until after the print data is added to the JobList, selected, and then printed.
When multiple jobs are put together and nesting or RIP is done before printing, set to do the nesting and RIP work, and then change it to .
Epson Edge Print Operation Guide
Configuration of main screen
11

Printing procedure(first step)
You need to register the following two items to printwith this software.
Media Settings
Register to the printer the setting values for the heatertemperature, Platen Gap, Media Tension etc., that areappropriate for the media you are using.
Print Information
Register in the software the media's ICC profile, numberof passes, resolution, etc.
However, to do the settings to get the optimumprintouts on the media you are using by finding theoptimum values for each of the multiple setting items iscomplicated, and requires an extreme amount of timeand work.
This section explains a method to easily print, withoutcomplex registrations, by using print information formedia types that are already registered to the softwareand the functions for registering media settings that areinstalled as standard in the printer.
Preparing to print
Doing Easy Media Setup on the printer
You can register appropriate media setting values byjust selecting a media type that is suitable for the mediayou are using in Easy Media Setup in the setting menu.
U “Procedure for Easy Media Setup” in the User'sGuide (online manual)
Depending on the model you are using, Easy MediaSetup may not be supported. In this case, save theoptimum media settings according to the media beingused. See the manual provided with the printer forinformation about saving the media settings.
Checking the operating environment
Check the following points.
❏ The printer and the RIP server (computer on whichthis software is installed) are connected correctlyand the power is on.
❏ The software is running.
❏ The printer you are using is registered in thissoftware.See the following to register a new printer.U “When you want to register or unregister aprinter that is being managed” on page 80
❏ Media is loaded on the printer and it is ready toprint.
❏ The media setting that is selected for the currentprinter is either registered in Easy Media Setup or isa media settings ID to which was saved theoptimum media settings in Customize Settings.Furthermore, do not select the media setting [00RIP Settings] because it cannot be used with thissoftware.You can check the media setting that is currently seton the printer in the status display screen on thecontrol panel.
Preparing the print data
Prepare print data in a data format that is compatiblewith the software.
See the following for the compatible data formats.
U “Supported data formats” on page 88
Generally, we recommend PDF for the followingreasons.
❏ There are no broken links to images or disruptedlayouts.
❏ Text does not need to be outlined.
Epson Edge Print Operation Guide
Printing procedure (first step)
12

❏ The appearance does not change, even for differentversions of image processing software.
Printing procedure
A Click (Add) in the Job toolbar and add theprint data to the Job List.Or, drag and drop the print data onto the Job List.
The name of the data and a thumbnail for theprint data that was added appear in the Job List.
Note:When you click (Add) and select the print data,you can also select Quick Sets at the same time.
Quick Sets are a saved batch of print job settings.Jobs are generated according to these settings.
U “Creating job settings that are often used(Quick Sets)” on page 70
B Select a job to print from the Job List.
An image of the printout appears in the previewarea.
C Click (Basic Settings) in the Job Settingmenu.
The setting area changes to Basic Settings, andyou can set the media size, media name (printinformation), and print quality (resolution andnumber of passes).
See the following for detailed information aboutbasic settings.
U “Basic job settings” on page 30
D Click (Print) in the Job toolbar to startprinting.
During printing, Printing appears in the Statuscolumn in the Job List. A progress bar for theremaining print time also appears in the previewarea.
Jobs that are finished printing are automaticallymoved to the Printed Job list.
See the following for how to use the Printed Joblist.
U “Reprinting a job that has been printed once”on page 29
When there are multiple jobs in the Job List, youcan decide on the order to print jobs and flexiblychange the order of the print jobs in the Job List.
U “Deciding the order of printing/RIP, andthen sorting the Job List” on page 21
Note:Check the status of the switch printer tab beforestarting to print. You cannot print if the status iconis one of the following.
: Error has occurred.
: Currently doing an operation other thanprinting, such as cleaning the heads or operatingthe panel.
: The power is off or not connected.
Prepare the printer for printing.
Use the Job Setting menu to enlarge or reduce jobs, toprint only a portion of an image, or to print an imagethat is wider than the media.
Introduction to various functions U “Introduction tofunctions on the Job Setting menu” on page 15
Stopping printing
Use the following procedure to stop printing while a jobis printing.
A Select the job to stop printing from the Job List,and click (Cancel) in the Job toolbar.Or, open the right click menu on the name of thejob to stop printing and select Cancel.
Epson Edge Print Operation Guide
Printing procedure (first step)
13

B When the confirmation screen appears, clickYes.
Epson Edge Print Operation Guide
Printing procedure (first step)
14

Introduction tofunctions on the JobSetting menu
Starting the Job Settingmenu
A Select a job in the Job List, and then click on anicon in the Job Setting menu according to whatyou want to do.
(Job Info): You can check detailed informationabout the selected job, such as settings andprint status.
(Basic Settings): You can do basic printsettings.
U “Basic job settings” on page 30
(Layout): Set the way the images are arrangedon the media.
(Color Settings): Set the input profile and theoutput profile.
(Color Replacement): When images set withspot colors are included in the job, set theOutput Color for the spot colors.
(Mark): Set the trim mark and the frame line tocut the area surrounding the image. You canalso print comments and print information asjob labels.
(Crop): Set the print range when printing onlythe part of an image that you need.
(Tiling): Set the method to divide an imagewhen dividing a large image for printing.
(Step and Repeat): Set the method forprinting a row of a single image in a repeatingpattern.
(Layer Setting): Appears only when a modelthat features White/Metallic Silver ink isselected as the printer you are using. Adjustlayer misalignments and image overrunwhen printing layers and select the colors,which are used in the combined WH/MS layerjob, to print with WH/MS.
B The setting area changes depending on the iconyou select.
Introduction to Layout
See the following for detailed information about Layoutsettings.
U “Setting the layout” on page 33
Setting number of copies
You can print the same job multiple times by setting thenumber of copies.
Jobs that have a number of copies set are treated asnested jobs.
See the following for detailed information about nestingjobs.
U “Using media efficiently without waste (nestedprinting)” on page 37
Epson Edge Print Operation Guide
Introduction to functions on the Job Setting menu
15

Reduce and enlarge settings
You can reduce or enlarge the size of images byspecifying a size or a ratio.
By clicking , you can enlarge or reduce the image tothe full width of the media.
Position settings
You can specify the coordinates (horizontal and verticalpositions) of the upper left corner of the image to setwhere on the media the image is printed.
You can also drag images into the preview area, roughlydecide their position, and then specify an exact positionusing coordinate values.
Rotate settings
You can rotate an image by specifying the orientation ofrotation.
You can print without wasting media by rotating longimages so their long dimension is across the width of themedia.
You can print a reflected image by checking MirrorImage.
Epson Edge Print Operation Guide
Introduction to functions on the Job Setting menu
16

Mirror Image is already selected when dye sublimationink printer is selected. Arrangement settings
You can do arrangements efficiently on the media to beable to cut with ease and print without wasting spacewhen setting one job with multiple copies, or whenmultiple jobs are nested.
Introduction to ColorSettings
You can set the input profile and the output profile asneeded.
If the input profile is embedded in the print data, selectGive Priority to Embedded Profile to apply theembedded profiles. If a profile is not set, apply the inputprofile set in this section.
You can also fine-tune the density and tone of theoutput color in the tone curve.
See the following for detailed information about ColorSettings.
U “Color Settings” on page 65
Epson Edge Print Operation Guide
Introduction to functions on the Job Setting menu
17

Introduction to ColorReplacement
Even if you set the color value for the Process color andthe same spot color name in the application softwarewhen creating the print data file, the printed color(Output Color) may look different, depending on theenvironment and media type used. In such cases, youcan replace the output color by making adjustments tomatch the tone.
The settings for color replacement are valid only for thecurrent job selected in the Job List.
You can adjust the density of the WH or MS when youselect a model featuring White/Metallic Silver ink as theprinter you are using.
See the following for details on Color Replacement.
U “Replacing a job's Output Color” on page 47
Introduction to Mark
Set the trim mark and the frame line to cut the areasurrounding the image. You can select from two types oftrim marks.
You also can leave job information on the printouts.
See the following for details on Mark.
U “Printing with Frame line and trim marks” onpage 69
Introduction to Crop
You can print just a part of an image by specifying thesize and position to clip.
You can set the range of the part to clip from an image inthe preview area and then specify the exact coordinatevalues and size.
See the following for detailed information about Crop.
Epson Edge Print Operation Guide
Introduction to functions on the Job Setting menu
18

U “Printing only the necessary parts of an image(Crop)” on page 43
Introduction to Tiling
If an image is larger than the media is wide, you candivide the image (tiling) and print it. You can printimages by specifying the number of tiles or the size oftiles.
To reduce or enlarge the size of the image to print, do theLayout settings in in the Job Settings menu.
See the following for detailed information about Tiling.
U “Dividing a large image into parts to print it (tiling)”on page 40
Introduction to Step andRepeat
You can print a row of a single image in a repeatingpattern.
You can print patterns on the entire media by specifyingthe way to line up the image.
Do (Layout) in the Job Settings menu to reduce orenlarge the size of the image on which to base thepattern.
See the following for detailed information about Stepand Repeat.
Epson Edge Print Operation Guide
Introduction to functions on the Job Setting menu
19

U “Printing repeating pattern (Step and Repeat)” onpage 45
Introduction to LayerSetting
This appears only when a model that features White/Metallic Silver ink is selected as the printer you areusing.
You can automatically generate a layer for printingWH/MS based on a job from the Job List.
Also, if an image set in White/Silver is misaligned with acolor image in the results of printing layers, or if animage with a white background extends outside thecolor image, make adjustments.
See the following for more details about Layer Setting.
U “Printing layers (printing White/Metallic Silver)”on page 51
Epson Edge Print Operation Guide
Introduction to functions on the Job Setting menu
20

Deciding the order ofprinting/RIP, andthen sorting the JobList
When there are multiple jobs in the Job List, you canspecify batch printing or decide on an order, and thenspecify printing. You can specify a batch or decide anorder in the same way when doing just RIP processing,too.
You can sort the jobs in the Job List by deciding theorder or by indicating an order when you specify RIPprocessing.
Specifying batch printing/RIP processing
A Select jobs to print or to do RIP processing fromthe Job List.
While pressing the Shift key, click on the first andlast jobs.
B Click (Print) or (RIP) in the Job toolbar.
Deciding the order andprinting/RIP processing
To decide the order and print/process RIP, rearrangethe jobs in order in the Job List, and then print/processRIP.
A Open the right click menu on the Job Name forwhich you want to change the order on the JobList, and then select the item, such as Up, tochange the order.
Rearrange all of the jobs for which you want tochange the order.
B Click (Print) or (RIP) in the Job toolbar.
Note:Each time you click on the title row of a column in the JobList, the list is rearranged in ascending/descending orderrelative to those items.
For example, you can click on Job Name to sort by thename of the job, or click on Added Date to sort by the datethe job was added to the list.
Epson Edge Print Operation Guide
Deciding the order of printing/RIP, and then sorting the Job List
21

Printing with theoptimum settings forthe media being used(printing using EMX)
To print with the optimum settings for the media youare using, you need to register the print information andthe media setting values appropriate for the media youare using in the printer and the software.
This is because media has various uniquecharacteristics. For example, there is media that needslarge amounts of ink or that requires time to dry. If youdo not print with the settings that match the media, theprint results will not be satisfactory.
However, to do the settings to get the optimumprintouts on the media you are using by finding theoptimum values for each of the multiple setting items iscomplicated, and requires an extreme amount of timeand work.
Here, we use the print files (EMX files) provided freefrom Epson to explain a method to easily print and getthe print quality of the expert settings.
Depending on the model you are using, EMX files maynot be provided. If this happens, refer to the following toprint.
U “Printing procedure (first step)” on page 12
Preparing to print
Checking the operating environment
Check the following points.
❏ The printer and the RIP server (computer on whichthis software is installed) are connected correctlyand the power is on.
❏ The RIP server is connected to the internet.
❏ The software is running.
❏ The printer you are using is registered in thissoftware.See the following to register a new printer.U “When you want to register or unregister aprinter that is being managed” on page 80
❏ Media is loaded on the printer and it is ready toprint.
Preparing the print data
Prepare print data in a data format that is compatiblewith the software.
See the following for the compatible data formats.
U “Supported data formats” on page 88
Generally, we recommend PDF for the followingreasons.
❏ There are no broken links to images or disruptedlayouts.
❏ Text does not need to be outlined.
❏ The appearance does not change, even for differentversions of image processing software.
Preparing EMX files
An EMX file is a print settings file for each media typeand includes the following information that is necessaryto print appropriately on commercially available media.
Print Information
The setting values that are registered in the software,such as the media's ICC profile, number of passes, andresolution.
Epson Edge Print Operation Guide
Printing with the optimum settings for the media being used (printing using EMX)
22

Media Settings
The setting values that are registered to the printer forthe heater temperature, Platen Gap, Media Tension etc.,that are appropriate for the media you are using.
In this section, we explain the procedure to acquire andregister EMX files in the software.
To acquire an EMX file, the RIP server must beconnected to the internet.
A Click Tool menu - Manage Preset - (ManagePrint Info) in this order.
The screen changes to the Manage Print Infoscreen.
B Click (Add).
Adding Print Information starts.
C Select Acquire EMX File and click Proceed.
A list of the EMX files provided for free by Epsonis displayed.
D Select the EMX file that is compatible with themedia you are using.
Select one EMX file. You cannot select multipleEMX files at one time.
The EMX files that you have already acquired aregreyed out and cannot be selected.
The ones that show Update Available in Statusindicate that an EMX has been updated after youacquired it.
If you select and acquire an EMX that showsUpdate Available, the file that was alreadyacquired is overwritten.
E Click Proceed.
You can copy the media setting value for theacquired EMX file to the printer. To copy the file,select Copy Media settings and proceed to step6.
If you are not copying the file, then proceed tostep 7.
F Select where to copy the media setting valueswithin the EMX file, and then click Execute.
The media IDs (1 to 30) that are registered to theselected printer appear, so specify where to copythe media setting values (media IDs) within theEMX file acquired in step 4.
Selecting a number that is blank adds the values.Selecting a number that has already beenregistered overwrites the registered information.
G Click Finish.
Acquisition and registration are done.
When registration is finished, the registeredprint information is added to the printinformation list.
Print information is identified by the medianame.
The on the left of the media name indicatesthat it is enabled. Print information that isenabled can be selected by its Media Name in (Basic Settings) in the Job Setting menu. If thereare so many items displayed for a Media Namethat it becomes difficult to choose, select printinformation that is not needed in this screen andclick (Deactivate). The on the left side ofthe media name disappears and the printinformation is disabled.
You can customize settings based on acquired printinformation or create new print information.
See the following for detailed information about editingand adding print information.
U “Creating print information suitable for the mediabeing used” on page 73
Epson Edge Print Operation Guide
Printing with the optimum settings for the media being used (printing using EMX)
23

Preparing the printer
After acquiring the EMX file, do Media Adjust from theprinter's settings menu.
When you do Media Adjust, the registered mediasettings are optimized to match the individualdifferences of the printer.
If you do not execute Media Adjust, banding orgraininess may appear in the print results.
Media Adjust is done in the printer's settings menu. Anoverview of the procedure is shown below.
A Load the media you are actually using on theprinter.
When you have finished loading the media, thesetting screen about the media you have loadedappears in the screen of the control panel.
B In the Select Media screen displayed on thescreen of the control panel, select the number youselected when you registered the media settingsvalues in Epson Edge Dashboard.
OK Done
12345
Select Media
When the media information settings arecomplete, the status screen is displayed.
Confirm that the specified media ID is displayedand that Ready is displayed.
C Execute Media Adjust in the setting menu.
See the following for a detailed procedure.
U “Media Adjust” in the User's Guide (onlinemanual)
Printing procedure
A Click (Add) in the Job toolbar and add theprint data to the Job List.Or, drag and drop the print data onto the Job List.
The name of the data and a thumbnail for theprint data that was added appear in the Job List.
Note:When you click (Add) and select the print data,you can also select Quick Sets at the same time.
Quick Sets are a saved batch of print job settings.Jobs are generated according to these settings.
U “Creating job settings that are often used(Quick Sets)” on page 70
B Select a job to print from the Job List.
An image of the printout appears in the previewarea.
C Click (Basic Settings) in the Job Settingmenu.
The setting area changes to Basic Settings, andyou can set the media size, media name (printinformation), and print quality (resolution andnumber of passes).
See the following for detailed information aboutbasic settings.
U “Basic job settings” on page 30
Epson Edge Print Operation Guide
Printing with the optimum settings for the media being used (printing using EMX)
24

D Click (Print) in the Job toolbar to startprinting.
To print large jobs
While it depends on the performance of yourserver, with large jobs, such as long jobs or nestedjobs, the print heads may stop and start duringprinting. If this happens, see the following and doRIP processing before printing.
U “When the print heads start and stop duringprinting” on page 78
When you want to print jobs in order in batches
When there are multiple jobs in the Job List, youcan decide on an order and then specify batchprinting.
When you have specified batch printing, you cansort the Job List in the order for printing.
U “Deciding the order of printing/RIP, andthen sorting the Job List” on page 21
During printing, Printing appears in the Statuscolumn in the Job List. A progress bar for theremaining print time also appears in the previewarea.
Note:Check the status of the switch printer tab beforestarting to print. You cannot print if the status iconis one of the following.
: Error has occurred.
: Currently doing an operation other thanprinting, such as cleaning the heads or operatingthe panel.
: The power is off or not connected.
Prepare the printer for printing.
Jobs that are finished printing are automaticallymoved to the Printed Job list.
See the following for how to use the Printed Joblist.
U “Reprinting a job that has been printed once”on page 29
Use the Job Setting menu to enlarge or reduce jobs, toprint only a portion of an image, or to print an imagethat is wider than the media.
Introduction to various functions U “Introduction tofunctions on the Job Setting menu” on page 15
Stopping printing
Use the following procedure if you want to stop printingwhile a job is printing.
A Select the job to stop printing from the Job List,and click (Cancel) in the Job toolbar.Or, open the right click menu on the name of thejob to stop printing and select Cancel.
B When the confirmation screen appears, clickYes.
Epson Edge Print Operation Guide
Printing with the optimum settings for the media being used (printing using EMX)
25

Printing with decidedsettings (hot folderprinting)
What is a hot folder
If you register a printer and job settings that you oftenuse as a hot folder, you can automatically use those printsettings by just dragging and dropping print data intothe hot folder.
The features of a hot folder are shown below.
❏ You do not need to start the software on thecomputer from which you are specifying printing.
❏ This is useful for routine work that is done every daythat does not need individual settings for each job.
Because of this, if you create a number of individual hotfolders for each of the job settings that are often usedevery day, then you can print from a computer on thenetwork, how you want by just dragging and droppingprint data to the hot folder with the settings you want toprint.
The method to create a hot folder is explained below.
Procedure to create a hotfolder
Creating a hot folder is done in the two following steps.
1. Create a batch of job settings to set in a hot folder,and then save them as Quick Sets.
You can create Quick Sets by doing all the settingsthat are needed in a dialog box.
2. Create a hot folder by using the Registering HotFolder wizard.
A Click Tool menu - Manage Preset - (QuickSets) - (Add) in this order, to create theQuick Sets to set in the hot folder.
You can create settings for (Basic Settings), (Layout), and (Color Settings) from the
Job Setting menu as Quick Sets.
For details, U “Creating job settings that areoften used (Quick Sets)” on page 70
B Click Tool menu - Preferences - (HotFolder) - (Register) in this order.
The Registering Hot Folder wizard starts; followthe onscreen instructions to add a hot folder.
If you select Share a Folder (Everyone) in theRegistering Hot Folder wizard, then the hotfolder you create becomes a shared folder. Youcan access the RIP server (computer on whichthis software is installed) and all of the computerson the network. It is convenient to createshortcuts to the hot folders that are needed on thedesktops of the computers that use the hotfolders.
c Important:If you select Share a Folder (Everyone) in theRegistering Hot Folder wizard, then access ispossible from the RIP server and all computerson the network.
For security reasons, you can set access rightsto the shared folder to limit the users that haveaccess.
Note:You can search for the shared folders that have beencreated on the RIP server as shown below.
❏ WindowsSelecting the RIP server computer on thenetwork using Explorer displays the hotfolders.
❏ MacOpen Connect to Server and click RIP serverin the list to display the hot folders.
Epson Edge Print Operation Guide
Printing with decided settings (hot folder printing)
26

Cautions when printingwith hot folders
Putting print data into a hot folder adds it to the Job Listof the printer that is set as the output printer of the hotfolder.
Note the following points when using hot folders.
We recommend using the printer that was definedwhen creating the hot folder for printing from hotfolders only.
If you set print data to Nest or Tiling on the Job List of aprinter that is set as the output printer in a hot folder,then the print data that is added to the hot folder mayinterrupt the work that is in progress in someunexpected way.
We recommend using them with Auto Print set to ON.
Each time (Auto Print) is clicked, it switchesbetween and .
If you set , then each time print data is put in thehot folder, it is printed in order.
By setting it to , the jobs are not printed untilsome time when print is executed after a job is added tothe Job List.
Printing procedure
A Prepare to print with the software and printer.
U “Preparing to print” on page 22
B Drag and drop the print data to the hot folder youwant to use.
If you have set Auto Print to , thenprinting starts in the order in which the job wasadded.
If you have set it to , then select the job inthe Job List and click (Print) to print.
Unregistering a hot folder
You can unregister a hot folder that is no longer neededwith the following procedure.
You must unregister hot folders in the following cases.
❏ When you have already registered 50 hot folders.You cannot register more than 50 hot folders.Unregister the hot folders you do not need andorganize them so there are less than 50.
❏ When you unregister a printer that is set as theoutput printer for a hot folder.You cannot unregister a printer while the hot folderis registered. First unregister the hot folder, andthen unregister the printer.
A Click Tool menu - Preferences - (HotFolder) in this order.
B Select the hot folder to unregister in the list, andthen click (Unregister).
C When the confirmation message appears, clickYes.
Even if you unregister a hot folder, the folder itselfremains without being deleted.
To reregister a folder as a hot folder after it has beenunregistered, in the Hot Folder screen, click (Register) to specify the folder in Specify Folder.
If you do not need the folder, delete it in Explorer.
Disabling a hot folder
Disable hot folders when you will not be using them for awhile. You can drag and drop print data into thedisabled hot folder as normal, but it just collects in thehot folder and is not sent to the Job List. If you changethe setting to enabled, the collected print data is added tothe Job List in order.
A Click Tool menu - Preferences - (HotFolder) in this order.
Epson Edge Print Operation Guide
Printing with decided settings (hot folder printing)
27

B In the list, click Enable to clear the checkbox ofthe hot folder to disable it.
To return it to enabled, click the checkbox toselect Enable checkbox.
Changing the Quick Setsset in hot folders
A Click Tool menu - Preferences - (HotFolder) in this order.
B Select the hot folder for which to change theQuick Sets in the list, and then click (Change).
C A change dialog box appears; select the changedQuick Sets.
Epson Edge Print Operation Guide
Printing with decided settings (hot folder printing)
28

Reprinting a job thathas been printedonce
Jobs that are finished printing are automatically movedfrom the Job List to the Printed Job list.
To reprint a job that has been printed once, select the jobyou want from the Printed Job list, and print it.
You can select one of the following to print from thePrinted Job list.
❏ ReprintPrinting is done as is, using the job settings fromwhen it was printed previously.Because the RIP processing has already been done,it can print faster than the first time it was printed.
❏ Change Settings and PrintThe selected job is added to the Job List and printedwith new job settings.RIP processing is done again, and then printing isdone.
Reprinting procedure
A Prepare to print with the software and printer.
U “Preparing to print” on page 22
B In the main screen, click the print tab of theprinter on which to print, and then click thePrinted Job button.
Switch to the Printed Job list.
C Select the job you want to reprint from thePrinted Job list and do one of the following.
To reprint
Click (Reprint) in the Job toolbar.
Or, open the right click menu on the name of thejob to reprint and select Reprint.
Reprinting starts.
To check the status, such as jobs that are waiting,click the Job List button to switch to the Job List.
Changing settings and printing
Open the right click menu on the name of the jobto reprint and select Change Settings andPrint.
The job is added to the Job List.
Click Job List to switch to the Job List, select thejob that you added, and then do the job settings.
See the following for detailed information aboutjob settings.
U “Basic job settings” on page 30
U “Setting the layout” on page 33
Organizing the PrintedJob list
If many jobs have collected on the Printed Job list, thenthe print data and the intermediate files (combinationsof RIP processed data and job settings files) are all kept,which can cause a lack of available memory on the RIPserver.
We recommend periodically deleting unneeded jobs byusing the following procedure.
A In the main screen, click the print tab of theprinter on which to print, and then click thePrinted Job button.
Switch to the Printed Job list.
B Select the job to delete from the Printed Job list,and click (Delete) in the Job toolbar.Or, open the right click menu on the name of thejob to delete and select Delete.
C In the confirmation message, click Yes.
Epson Edge Print Operation Guide
Reprinting a job that has been printed once
29
Basic job settings
This section explains the basic job settings.
A Select a job for which to do the basic settings fromthe Job List.
B Click (Basic Settings) in the Job Settingmenu.
The setting area changes to Basic Settings.
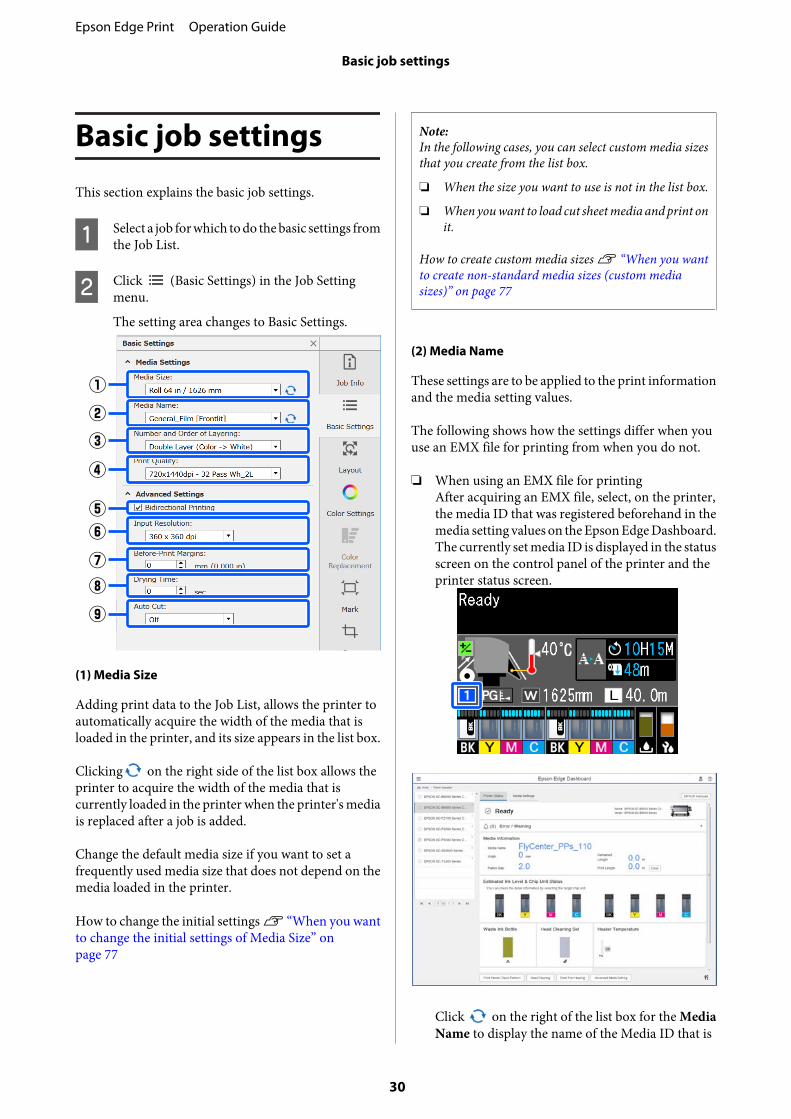
(1) Media Size
Adding print data to the Job List, allows the printer toautomatically acquire the width of the media that isloaded in the printer, and its size appears in the list box.
Clicking on the right side of the list box allows theprinter to acquire the width of the media that iscurrently loaded in the printer when the printer's mediais replaced after a job is added.
Change the default media size if you want to set afrequently used media size that does not depend on themedia loaded in the printer.
How to change the initial settings U “When you wantto change the initial settings of Media Size” onpage 77
Note:In the following cases, you can select custom media sizesthat you create from the list box.
❏ When the size you want to use is not in the list box.
❏ When you want to load cut sheet media and print onit.
How to create custom media sizes U “When you wantto create non-standard media sizes (custom mediasizes)” on page 77
(2) Media Name
These settings are to be applied to the print informationand the media setting values.
The following shows how the settings differ when youuse an EMX file for printing from when you do not.
❏ When using an EMX file for printingAfter acquiring an EMX file, select, on the printer,the media ID that was registered beforehand in themedia setting values on the Epson Edge Dashboard.The currently set media ID is displayed in the statusscreen on the control panel of the printer and theprinter status screen.
Click on the right of the list box for the MediaName to display the name of the Media ID that is
Epson Edge Print Operation Guide
Basic job settings
30

currently set in the printer. The print informationthat corresponds with that Media Name is used toprocess jobs.If the corresponding print information is notregistered in the software, appears on the rightside of the list box. If is displayed, do a Sync inManage Print Info.For details about synchronization, U “Whensynchronizing media settings and printinformation” on page 77
❏ When not using an EMX file for printingThe printer's current media settings change to theMedia ID that was registered in Easy Media Setupor to any setting saved using Customize Settings.Furthermore, do not select the media setting [00RIP Settings] because it cannot be used with thissoftware.In the list box for the Media Name, select the mediatype that correlates with the media that is loaded, ormatch it to the media type that was selected in EasyMedia Setup.
(3) Number and Order of Layering
This appears only when a model that features White/Metallic Silver ink is selected as the printer you areusing.
From the list box, set the print order for color imagesand the images set to White/Silver when images set toWhite/Silver are included in the jobs.
When images set to White/Silver are not included in thejob, set this to Single Layer (Color Only).
(4) Print Quality
Select a mode that is suitable for both quality and printspeed.
Align the mouse pointer on the list box so you canconfirm the currently selected number of passes and theoutput resolution for the print quality.
Note:If Backlit Film is selected in Media Name, a mode isselected in Print Quality that has “High Quality” afterthe number of passes. Selecting a mode that has “HighQuality” produces print results with great granularity.
However, banding may occur, depending on theenvironment, media, and image that you use. If you areworried about banding, change to a mode that does nothave “High Quality”.
In Print Quality, you can add modes, and change theoutput resolution, number of passes, and the printdensity.
See the following for detailed information about PrintQuality.
U “Creating print information suitable for the mediabeing used” on page 73
(5) Bidirectional Printing
If you clear this check mark then printing is done in onlyone direction; the print heads only print when movingin one direction. The print quality is improved, butprinting is slower than normal.
If ruled lines are misaligned or unevenness occurs, usingone-direction printing may solve the problem.
(6) Input Resolution
You may be able to select 360 × 360 dpi and 720 × 720dpi depending on the selected print information.
In these cases, select 720 × 720 dpi when you want toprint small characters in high definition.
(7) Before-Print Margins
Enter the length of the margin that is inserted as amargin between the next job when printingcontinuously.
Insert a before-print margin when printouts arewrapped and attached to a panel or something.
(8) Drying Time
When doing continuous printing, the time that is sethere is the waiting time before the next job startsprinting. This can prevent ink from smudging onto theback of printouts while they are wound up duringcontinuous printing. When printing on sizes larger thanA2, we recommend setting a drying time in DryingTime Per Pass in the Setting Menu on the printer.
For details about the setting menu, U the User's Guide(online manual)
(9) Auto Cut
This appears only when a model equipped with abuilt-in cutter is selected as the printer you are using.
Epson Edge Print Operation Guide
Basic job settings
31

Set this to Normal Cut to automatically cut each printedpage at a preset cut position.
The software's settings have priority over the printer'scut settings.
Epson Edge Print Operation Guide
Basic job settings
32

Setting the layout
This section explains the how to set up the layout toprint on the media.
A Select a job for which to do the layout settingsfrom the Job List.
B Click (Layout) in the Job Setting menu.
The setting area changes to Layout.
When you want to print more than one copy
Enter the number of copies you want to print inCopies.
Jobs that have a multiple number of copies set aretreated as nested jobs.
U “Using media efficiently without waste (nestedprinting)” on page 37
When you want to enlarge or reduce printouts
There are the following three methods to enlarge andreduce printouts.
❏ Specifying a size to enlarge or reduce printoutsTo enlarge or reduce the printout, enter the size ofthe Width and the Height in mm or inch inReduce/Enlarge.Each time is clicked, it switches between and .
locks the aspect ratio when enlarging andreducing printouts.
does not lock the aspect ratio.
❏ Specifying a ratio to enlarge or reduce printoutsTo enlarge or reduce the printout, enter the ratio ofthe Width and the Height in % in Reduce/Enlarge.Each time is clicked, it switches between and .
locks the aspect ratio when enlarging andreducing printouts.
does not lock the aspect ratio.
❏ Enlarging or reducing the printout to the full widthof the mediaBy clicking , you can automatically enlarge orreduce the image to the full width of the currentlyset media.To return the image to its original size, set 100% forthe Width and Height.Example of enlarging the printout to the full widthof the media
You can also enlarge or reduce the printout by draggingthe edge of the image in the preview area.
Epson Edge Print Operation Guide
Setting the layout
33

When you want to change the position
Specify the position using the coordinates of the image'supper left corner. Enter the Horizontal and Verticalvalues in the following diagram for the Left TopPosition to specify the position.
You can also drag the image into the preview area tospecify the position.
During layout, if one image overlaps another image, theouter edges of the images turn red, as a warning that theyare overlapping.
When you want to rotate or reflect images
You can reduce wasted media by rotating long images sothey go across the width of the media when printed.
Example of 90˚ Counter Clockwise rotation
In addition, you can check Mirror Image to print areflected image of the image, such as for windowdisplays.
Mirror Image is already selected when dye sublimationink printer is selected.
When you want to place an image in the center
Clicking (Centering Horizontally) or (Centering Vertically) automatically centers the mediato the width or length of the media.
is only enabled when the following custom mediasize is selected for Media Size in (Basic Settings) inthe Job Setting menu.
Size added when Cut Sheet in Custom Media SizeSetting is selected
Example for Centering Horizontally
When you want to arrange an image efficiently
There are the following three ways to efficiently arrangenested jobs on the media.
❏ Automatically arranging images efficientlySelect Tight in Arrangement Option and click to automatically rotate images, etc., to arrange
Epson Edge Print Operation Guide
Setting the layout
34

images effectively on the media. You can change theinterval at which jobs are arranged in Job Interval.
❏ Arrange by aligning with the reference imageSelect multiple images to align, and then click thefollowing icon to arrange them the way you like.
Arrange by aligning with the left side of the imagepositioned at upper left corner
Arrange by aligning with the right side of theimage positioned at upper right corner
Arrange by aligning with the upper side of imagepositioned at the very top
Arrange by aligning with the lower side of imagepositioned at the very bottom
Example of when a nested job is selected and isclicked
Epson Edge Print Operation Guide
Setting the layout
35

❏ Arrange by specifying the spacing between imagesYou can arrange the images quickly and efficientlyby using Right and Bottom in combination.
Epson Edge Print Operation Guide
Setting the layout
36

Using mediaefficiently withoutwaste (nestedprinting)
You can print in batches by checking images in thepreview areas to position multiple jobs on the media sothere are no unneeded margins.
By doing this, you can use media without waste.
Positioning multiple jobs is called a “Nest”. When youhave nested jobs in a group they are called a “Nestedjob”.
With this software, multiple jobs are positioned andhandled as a nested job as shown below.
❏ Selecting multiple individual jobs for nestingIn the Job List, appears on the left side of thename of the job.
❏ Setting multiple copies with (Layout) in the JobSetting menu
❏ Jobs from multiple pages, such as a PDFIn the Job List, appears on the left side of thename of the job.
The following jobs cannot be nested.
❏ Multiple page PDFs
❏ Jobs that are already nested
Creating nested jobs
The following explains the procedure to select multipleindividual jobs and to nest them.
A Select multiple jobs to nest from the Job List.
You can select jobs in one of the following ways.
Select multiple consecutive jobs
While pressing the Shift key, click on the first andlast jobs.
Select multiple nonconsecutive jobs
While pressing the Ctrl key, the various targetedjobs.
B Click (Nest) in the Job toolbar.Or, open the right click menu on the name of theselected job and select Nest.
Each of the jobs selected in the Job List are movedto the lower level and the nest icon ( ) appearsto indicate they are nested jobs.
All the selected jobs appear in the preview area.
The default setting value for the interval for eachjob in a nested job is 10 mm. To change thisinterval, select Job Interval.
U “Setting margins for each job in nested jobs”on page 38
You can add jobs to a nested job by dragging anddropping a job that is not nested from the Job Listinto the level below the nested jobs.
C Set the position of the images.
The following are the three main ways to set theposition.
Automatically arranging images efficiently
U “Setting the layout” on page 33
Arrange by aligning with the reference image
U “Setting the layout” on page 33
Epson Edge Print Operation Guide
Using media efficiently without waste (nested printing)
37

Arranging images while confirming theirpositions in the preview area
You can change the positions by dragging anddropping the images. You can also positionimages by rotating, enlarging, or reducing themwith (Layout) in the Job Setting menu. Thesettings set with (Layout) before nesting aremaintained after nesting is set.
Canceling nested jobs
You can cancel nested jobs and return them to normaljobs with the following procedure.
A Select the root to the nested job (the line in which is displayed to the left of the job name) in Job
List and click (UnNest) in the job toolbar.Or, open the right click menu on the name of theselected job and select UnNest.
Selecting some jobs in a nested job and thenclicking UnNest return only the selected jobs tonormal jobs.
Things to confirm beforedoing nested printing
Because multiple jobs are printed in a batch when doingnested printing, we recommend confirming the amountof media and ink that is remaining and the time(estimated) to print the job beforehand.
A Confirm the overall print length with the scale inthe preview area.
B Click (Job Info) in the Job Setting menu tocheck the Print Time (Estimated), which isdisplayed in the setting area.
C Click on the bottom right of the screen.
The printer's status screen is displayed.
Confirm that the remaining media is longer thanthe overall length of the print job that youconfirmed in step 1.
Depending on the model you are using, maybe disabled.
Confirm that there is sufficient charge remainingin the chip unit.
Setting margins for eachjob in nested jobs
Follow the procedure below to set the default values forthe margins of each job in the nested jobs.
When it is necessary to change the interval between jobs,select the targeted nested jobs, and then change themusing Job Interval in (Layout).
A Click Tool menu - Manage Preset - (OptionsSettings) in this order.
Epson Edge Print Operation Guide
Using media efficiently without waste (nested printing)
38

B Set the margin values using theRight andBottom in Job Interval.
The job interval is the margin added betweeneach job when a different job is arranged below orto the right of a job, as shown below. Margins arenot added to jobs that are positioned on the rightedge or at the very bottom.
is Right margin
is Bottom margin
C When the settings are complete, click Apply.
Epson Edge Print Operation Guide
Using media efficiently without waste (nested printing)
39

Dividing a largeimage into parts toprint it (tiling)
When printing a large image that is wider than themedia on which you are printing, you can divide thelarge image into several parts and print it on the media.
You can also add overlaps for pasting so that afterprinting the image can be pasted together into oneimage.
The procedure for dividing an image is explained below.
How to divide an image
A Select a job to divide from the Job List.
B Click (Tiling) in the Job Setting menu.
The setting area changes to Tiling settings.
C Select Enable Setting.
The settings items are enabled.
D Set the size of the divisions in Tiling Setting.
Each of the divided images are called “tiles”.
To set the number of pieces in which to divide theimage, select Specify by Number of Tiles.
To set the size of tiles and then divide the image,select Specify by Tile Size.
To set the number of tiles, advance to step 5.
To set the size of tiles, advance to step 7.
E Set how many divisions to make in Number ofTiles.
Example: 3 divisions in Horizontal
Example: 2 divisions in Horizontal and Vertical
F You can make fine adjustments to the size of tilesthat you are dividing.
If you want to avoid generating a pasted edge inany position, such as where the eye is located inthe example of 3 divisions in Horizontal in step 5,use the following procedure to select the upperleft tile and adjust the tile size.
(1) Use the mouse cursor to click the tile you wantor specify the position of the tile you want inTile to Specify Size.
The tile targeted to be adjusted is indicated by alight blue frame.
(2) To adjust the size, drag the light blue frame orenter a value in Tile size.
Epson Edge Print Operation Guide
Dividing a large image into parts to print it (tiling)
40

Advance to step 8, and set the overlap.
G Set the size of divisions in Specify by Tile Size.
Example: Set to A2 size
Example: Set to Width 1000 mm and Height 700mm in User Defined
H Set the overlap for pasting the images together inOverlapping Settings.
(1) Set where to set the overlap in OverlappingPosition.
(2) Set the width of the overlap in OverlappingDimension.
Boundary lines for the overlap are printed as ablack line. If you have trouble, such as havingdifficulty seeing the black line on a blackbackground, you can change the thickness of theline and the grayscale and adjust the line to beeasier to see.
Example: Overlapping Dimension is 10 mmand the Overlapping Position is on the left side
I When the settings for dividing the image arecomplete, select something other than (Tiling) in the Job Setting menu to change thepreview area into the print preview.
Example: When (Job Info) is selected
When you want to printguidelines on the overlapfor pasting
If you set Print on Image and Margins or Print only onMargins for Print Overlapping Line in the Tilingsettings, then boundary lines are printed for the overlapfor pasting on the image, which can be used as guides topaste the image together.
Epson Edge Print Operation Guide
Dividing a large image into parts to print it (tiling)
41

Example: Print on Image and Margins is set
Example: Print only on Margins is set
When not printing aspecified tile
You can cancel printing with the following procedurewhen you do not want to print a specific tile after animage is divided in the Tiling settings.
A Open the right click menu on the tile not to print.
B Click Print and clear the checkbox.
Check the checkbox to print.
When color deviation atthe seams stands out
When the color deviation at the seams when images arepasted together is conspicuous, select the Rotate EvenTiles 180˚ checkbox in the Tiling settings.
The tiles are alternately printed reflected top to bottomso the discoloration becomes less conspicuous.
Epson Edge Print Operation Guide
Dividing a large image into parts to print it (tiling)
42

Printing only thenecessary parts of animage (Crop)
You can specify parts of images and print them.
This function is applicable for printing important partsof a large image to check the image quality and colormatching.
The procedure to clip the parts of images that you needis explained below.
A Select a job to clip from the Job List.
B Click (Crop) in the Job Setting menu.
The setting area changes to Crop settings.
C Select Enable Setting.
The setting items are enabled and the clip framesappear in the preview area.
D Set the range to print.
Drag the clipping points to specify the range inthe preview area.
You can move the clip frame by dragging thelines of the clip frame. When the clip framebecomes the same size as the image, it cannot bemoved.
E You can do fine adjustments to the size andposition of the clip range.
You can do detailed settings to the size andposition by entering numerical values in Size andLeft Top Position in the setting area.
Epson Edge Print Operation Guide
Printing only the necessary parts of an image (Crop)
43

F When the settings for the clip range are complete,select something other than (Crop) in the JobSetting menu to change the preview area into theprint preview.
Example: When (Job Info) is selected
Epson Edge Print Operation Guide
Printing only the necessary parts of an image (Crop)
44

Printing repeatingpattern (Step andRepeat)
You can create and print repeating patterns by placing 1image and shifting it vertically and horizontally.
The procedure for setting up a pattern is explainedbelow.
How to create patterns
A Select the job (image) on which to base thepattern from the Job List.
B Click (Step and Repeat) in the Job Settingsmenu.
The setting area changes to the Step and Repeatsettings.
C Select Enable Setting.
The settings items are enabled.
D Set the size of the area on which to place theimage.
Selecting Layout Area Size lines up and placesthe image in the specified size.
If you select a Width for the Layout Area Sizethat is wider than the media's width, the imagethat extends beyond the media's width is notprinted.
E Set whether to shift the position of the image.
Select in Layout Pattern when simplyrepeating the image without shifting it.
Example: Shifted 1/2 vertically
Example: Shifted 1/3 horizontally
Example: Shifted 50 mm vertically
Epson Edge Print Operation Guide
Printing repeating pattern (Step and Repeat)
45

F You can set from which position of the image thepattern starts.
You can drag the pattern in the preview area andset the position if, for example, you want to startfrom a position at which the flower petals are notcut off.
You can also set and change the numerical valuesin Start Point.
G When the pattern is complete, select somethingother than (Step and Repeat) in the JobSetting menu to change the preview area into theprint preview.
Example: When (Job Info) is selected
If gaps occur betweenimages you printed
You can set Overlapping Amount and do adjustmentswhen dark lines are visible when the images overlap, orwhen there is a space and white lines are visible whenprinting, even though the images look perfectly joinedin the preview area.
Example: 2-mm wide vertical, white lines appearbetween the images
White lines occur because there are horizontal spacesbetween the images. Set 2 in Right in OverlappingAmount.
Example: 2-mm wide vertical, dark lines appearbetween the images
Dark lines occur because images overlap horizontally.Set -2 in Right in Overlapping Amount.
Set Bottom in Overlapping Amount when horizontallines appear between the top and bottom of images.
Epson Edge Print Operation Guide
Printing repeating pattern (Step and Repeat)
46

Replacing a job'sOutput Color
Even if you set the color value and the same Spot Colorin the print data, the color of the printed results (OutputColor) may look different due to the environment andmedia that was used to print.
In Color Replacement, you can change the OutputColor for the following colors that are used in the jobselected from the Job List.
❏ All spot colors used in the jobOnly if the data format of the job is PDF, EPS, orPS
❏ Colors extracted with the Eyedropper in the jobThis function is available for all data supported bythe software.
Note:
❏ Except for when printing WH/MS using a modelthat features White ink (hereafter called WH) and/or Metallic Silver ink (hereafter called MS), a colorthat is set as a Spot Color in the print data isconverted to a Process color before printing is done.Spot Color: Used by commercial printers; specifiesspecial ink that is pre-mixed in advanceProcess color: Method to specify a color bycombining the basic CMYK ink
❏ The preview and print results may differ due to partsthat were set to overprint in jobs that include animage set to White/Silver.
The following are the three main ways to set the OutputColor using color replacement.
❏ Checking printouts to set color valuesU “Color replacement procedure” on page 47
❏ Selecting the intended Output Color from anoutput-color adjustment chartU “Setting the Output Color from an output-color adjustment chart” on page 48
❏ Connecting a compatible colorimeterYou can set the results of a measured color sampleas its Output Color.U “Supported colorimeters” on page 89U “Setting the measured color sample as theOutput Color” on page 49
Use the color collection to do settings for the OutputColor for jobs, in general.
U “Using Color Collection” on page 61
Color replacementprocedure
A Select the job in which to do color replacementfrom the Job List.
An image of the printout appears in the previewarea.
B Click (Color Replacement) in the JobSettings menu.
The settings area switches to Color ReplacementSettings.
If you are using a color that is registered in thejob's Color Collection, the Output Color set tothat color appears.
C Change the Output Color.
To do color replacement, be sure to set theOutput Color as the color value for C,M,Y,K. Ifyou are also setting the density for ink other thanC,M,Y,K, such as WH or MS, select CMYK +WH/CMYK + MS in Specify Output Color.
Epson Edge Print Operation Guide
Replacing a job's Output Color
47

Changing the Output Color of a colorregistered in the Color Collection
(1) Select the color to change, and then click (Edit).
(2) Information about the color you selectedappears in Details. Set the color value ordensity in C, M, Y, K, and WH or MS, and thenset the Output Color.
When you want to replace any color in theimage
(1) Click (Eyedropper).
The cursor changes into the Eyedropper.
(2) Click the image on the preview and align theEyedropper with the color you want to replace.
The extracted color is added to the ColorReplacement Settings.
(3) Select the color that was added, and then click (Edit).
Information about the color you selectedappears in Details. Set the color value in C, M,Y, K, and WH or MS, and then set the OutputColor.
It may not be possible to extract the color usingthe Eyedropper in places in which multiple spotcolors are mixed or in places in which White orSilver is set.
After changing the Output Color, actually print theimage and check the tones.
Setting the Output Colorfrom an output-coloradjustment chart
An output-color adjustment chart is for jobs that use achart to print the intended Output Color and colorpatches of matching tones. Print the job for theoutput-color adjustment chart, and then choose theintended Output Color from it. The color value is clearlymentioned on each color patch. Set the color value forthe selected color in Output Color.
Because red becomes stronger going toward the rightthroughout the color patches and yellow becomesstronger going toward the top, the layout of the colorpatches gets closer to dark red as it approaches the upperright patches.
The following explains an example of how to use theeyedropper tool to extract color from a job and create anoutput-color adjustment chart for the job.
A Select the job for which to do color replacementfrom the Job List, and then click (ColorReplacement) on the Job Settings menu.
The settings area switches to Color ReplacementSettings.
Epson Edge Print Operation Guide
Replacing a job's Output Color
48

B Select the spot color that you want to replacefrom the list.You can also select the color you want byextracting it using the Eyedropper.
To extract the color, click the (Eyedropper),and then click the image on the preview and alignthe Eyedropper with the color you want toreplace.
The information for the extracted color appearsin Details.
C Click (Edit), and then click Output-ColorAdjustment Chart while Edit is enabled.
The Output-Color Adjustment Chart Dialogappears.
D Set the Total number of patches and Colordifference between patches, and then click Addjob.
The output-color adjustment chart for the job isadded to the Job List.
E Select the output-color adjustment chart for thejob from the Job List and print it.
The way to print this is the same as a typical job.
When you actually print the chart, print it usingthe same print settings and media. However, donot change the (Basic Settings) or (ColorSettings). If you change these settings, theoutput-color adjustment chart will not printusing the correct tones and you cannot do a colorreplacement with correct results.
F Select the Output Color from the output-coloradjustment chart you printed, and then set thecolor value with (Color Replacement) on theJob Settings menu.
In Input Color, select the color you extracted instep 2, and then set the color values of the coloryou selected from the output-color adjustmentchart to C, M, Y, and K in Details.
To do color replacement, be sure to set theOutput Color as the color value for C,M,Y,K. TheLab values and the C,M,Y,K color values bothappear on the output-color adjustment chart. Besure to check the color values for C,M,Y,K.
After changing the Output Color, actually print theimage and check the tones.
Setting the measuredcolor sample as theOutput Color
Before doing the following operations, connect thecolorimeter to the RIP server so that you can use it. Seethe manual supplied with the colorimeter for moreinformation about connecting and using thecolorimeter.
A Select the job for which to do color replacementfrom the Job List, and then click (ColorReplacement) on the Job Settings menu.
The settings area switches to Color ReplacementSettings.
B Select the color to change, and then click (Edit).
Epson Edge Print Operation Guide
Replacing a job's Output Color
49

C Click Color Measurement in Details.
Follow the on-screen instructions to do a colorcalibration, and then measure the color sample.
Complete the color measurement to change thecolor values of the Output Color according to thecolor measurement results.
After changing the Output Color, actually print theimage and check the tones.
Epson Edge Print Operation Guide
Replacing a job's Output Color
50

Printing layers(printing White/Metallic Silver)
This can only be done when a model that features Whiteink (hereafter called WH)/Metallic Silver ink (hereaftercalled MS) is selected as the printer you are using.
The workflow up to printing layers is as follows.
Confirming whether the printer's Color Mode isset to the target color (WH/MS)
U User's Guide, included with the printer
Creating data for multi-layered printing
Prepare the parts to be printed with WH/MS as print data.
U “How to create print data” on page 51
Printing
U “Automatically generating, then printing, the layer forprinting WH/MS” on page 51
U “Combining and printing color data with WH/MS printdata” on page 53
U “Making and printing layered printing data with imageprocessing software” on page 55
How to create print data
There are the following two methods for creating datafor multi-layered printing.
Automatically generating the layer for printing WH/MS
You can automatically generate the following threelayers (data) based on the jobs in the Job List.
❏ Whole Area
❏ Image
❏ Excluding Image
See the following for how to do the detailed operations.
U “Automatically generating, then printing, the layerfor printing WH/MS” on page 51
Creating and combining color data and WH/MS printdata using image processing software
Add both the color data made using image processingsoftware and the WH/MS print data to the Job List inthis software, and then combine them in a job forlayered printing.
See the following for how to do the operations.
U “Combining and printing color data with WH/MSprint data” on page 53
Doing White/Silver settings with image processingsoftware
In the image processing software, set White/Silver forthe part to print with WH and the part to print with MS,respectively.
Do the White/Silver settings, and then see the followingfor how to create print data.
U “Making and printing layered printing data withimage processing software” on page 55
Automaticallygenerating, then printing,the layer for printing WH/MS
Layer type
You can generate three types of layers with automaticlayer generation.
The following example images are used to explain howto generate a layer for printing WH.
Epson Edge Print Operation Guide
Printing layers (printing White/Metallic Silver)
51

The checkered part of the image is the transparent part.To make it easy to understand, we will explain theprocedure using an image printed on green media.
Example:
❏ Whole AreaThis generates a layer for printing WH under theentire image. When printed, the whole area isprinted WH, and then the image is printed on top.
❏ ImageThis generates a layer for printing in which WH isprinted only under the image. When printed, WH is
printed where the image appears, and then theimage is printed on top of that.
When you select Image, you can use the checkboxto select whether to include the white parts of theimage in the layer for printing WH. By selectingthis, a white layer is also created to print WH for thewhite parts (CMYK = 0,0,0,0 or RGB = 255,255,255)of the image, such as the eyes and other parts of thecat shown below.
❏ Excluding ImageThis generates a layer for printing WH in all partsexcept the image. When printed, the part around
Epson Edge Print Operation Guide
Printing layers (printing White/Metallic Silver)
52

the image is printed in WH, and then the image isprinted on top of that.
Automatic generation procedure
A Click (Add) on the toolbar to add the printdata.Or, drag and drop the print data onto the Job List.
B In the Job List, select the job for which automaticlayer generation will be done.
An image of the printout appears in the previewarea.
C Click (Basic Settings) in the Job Settingsmenu.
The setting area switches to Basic Settings.
D When printing layers, set the layer order inNumber and Order of Layering.
You can select different colors according to theColor Mode of the printer you are using.
If you set two layers, the No Data layer is addedunder the layer in the image data from the JobList. If you set three layers, two No Data layers areadded.
E Select No Data from the Job List, and then click (Layer Setting) on the Job Settings menu.
The settings area switches to Layer Setting.
F In Creating Method, select the type of layer togenerate.
The generated layer is added to the Job List.
If you set three layers in step 4, the generatedlayer is automatically copied, and completes thedata for multi-layer printing with three layers.
Layer printing procedure
A Select the root for the layered job (row thatdisplays the print image as an icon) in the JobList.
B Click (Basic Settings) in the Job Settingsmenu, and then select the print quality in PrintQuality.
The print qualities that can be selected differaccording to the settings in Number and Orderof Layering.
You can change the details for the print quality inManage Print Info.
U “Creating print information suitable for themedia being used” on page 73
C Confirm other settings and click (Print) tostart printing.
Combining and printingcolor data with WH/MSprint data
Preparing the data
You can create the part to print in WH/MS and the partto print in color using separate data of the same size inthe image processing software, combine the parts in thissoftware, and then print.
Epson Edge Print Operation Guide
Printing layers (printing White/Metallic Silver)
53
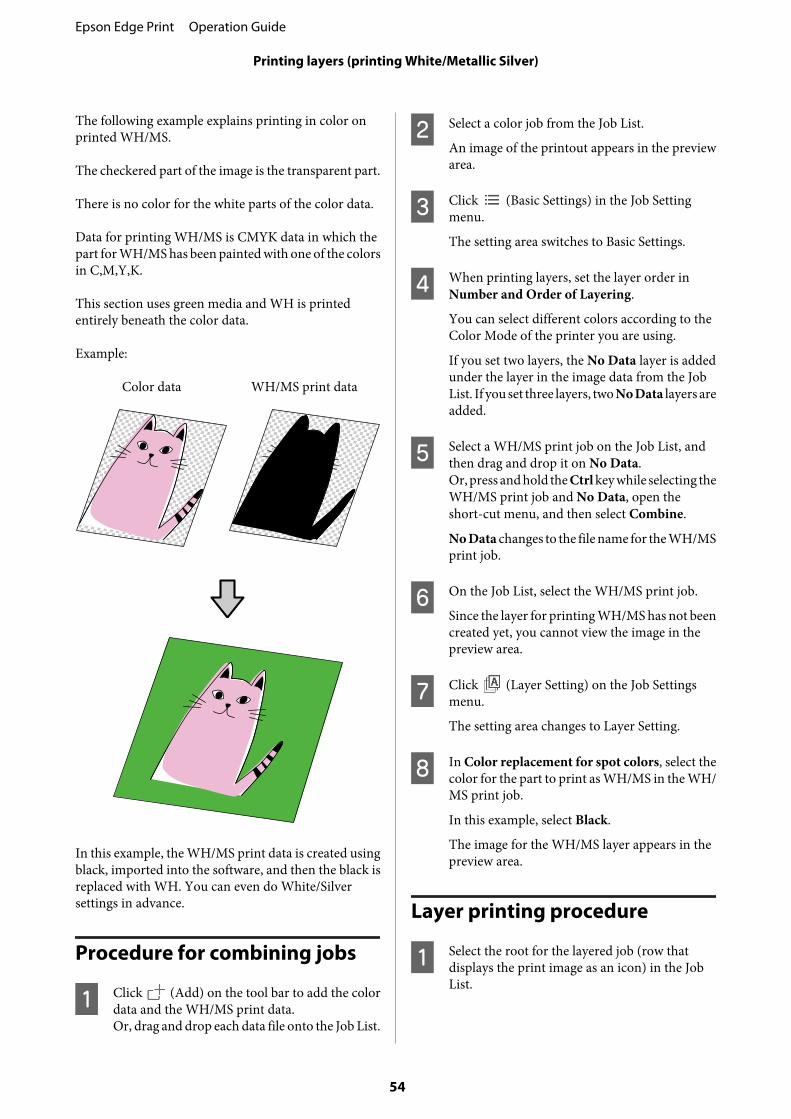
The following example explains printing in color onprinted WH/MS.
The checkered part of the image is the transparent part.
There is no color for the white parts of the color data.
Data for printing WH/MS is CMYK data in which thepart for WH/MS has been painted with one of the colorsin C,M,Y,K.
This section uses green media and WH is printedentirely beneath the color data.
Example:
Color data WH/MS print data
In this example, the WH/MS print data is created usingblack, imported into the software, and then the black isreplaced with WH. You can even do White/Silversettings in advance.
Procedure for combining jobs
A Click (Add) on the tool bar to add the colordata and the WH/MS print data.Or, drag and drop each data file onto the Job List.
B Select a color job from the Job List.
An image of the printout appears in the previewarea.
C Click (Basic Settings) in the Job Settingmenu.
The setting area switches to Basic Settings.
D When printing layers, set the layer order inNumber and Order of Layering.
You can select different colors according to theColor Mode of the printer you are using.
If you set two layers, the No Data layer is addedunder the layer in the image data from the JobList. If you set three layers, two No Data layers areadded.
E Select a WH/MS print job on the Job List, andthen drag and drop it on No Data.Or, press and hold the Ctrl key while selecting theWH/MS print job and No Data, open theshort-cut menu, and then select Combine.
No Data changes to the file name for the WH/MSprint job.
F On the Job List, select the WH/MS print job.
Since the layer for printing WH/MS has not beencreated yet, you cannot view the image in thepreview area.
G Click (Layer Setting) on the Job Settingsmenu.
The setting area changes to Layer Setting.
H In Color replacement for spot colors, select thecolor for the part to print as WH/MS in the WH/MS print job.
In this example, select Black.
The image for the WH/MS layer appears in thepreview area.
Layer printing procedure
A Select the root for the layered job (row thatdisplays the print image as an icon) in the JobList.
Epson Edge Print Operation Guide
Printing layers (printing White/Metallic Silver)
54

B Confirm other settings and click (Print) tostart printing.
Making and printinglayered printing data withimage processingsoftware
In this section, we explain the procedure for setting theprint data for White/Silver in the image processingsoftware (Adobe), creating data for multi-layeredprinting, and then printing using this software.
Such as in , the main vector data for graphics andtexts are set in Adobe Illustrator (hereafter calledIllustrator).
Such as in , the main raster data for photos andgraphics are set in Adobe Photoshop (hereafter calledPhotoshop).
U “How to do White/Silver settings in Illustrator” onpage 55
U “How to do White/Silver settings in Photoshop” onpage 57
How to do White/Silver settings in Illustrator
Image is used as an example to explain theprocedure for using Adobe Illustrator CC(2015) to setWhite to the parts being printed with WH.
A Start up Illustrator and open the print data.
B Click Window - Swatches, in order, and thenclick (New Swatch).
C Save the spot color to be used in the White settingin Swatches, and then click OK.
As shown below, specify the spot color name, aswell as the color to print from the screen inIllustrator.
Epson Edge Print Operation Guide
Printing layers (printing White/Metallic Silver)
55

(1) Swatch Name
Input the spot color name as follows, accordingto the color to be printed. The following input iscase sensitive.
For printing WH: White
For printing MS: Silver
(2) Color Type
Select Spot Color.
(3) Color Mode
Select CMYK, and then specify the color toprint from the screen in Illustrator. Werecommend specifying a bright color that is notused in any other colored part because it isdifficult to identify the background color if youuse white (all CMYK at 0%). (In the examplediagram, the color is set as a very light purplishgray.) It is actually printed as WH.
D Select images to print using WH, and thenspecify the spot color you saved to the Swatchesin step 3 to color them.
E Click, in order, Window - Attributes, and thenset how to print the parts where the imagesoverlap.
By selecting or clearing overprint, you can setwhether to apply color to the parts of the imagesthat overlap, as shown below.
When checked
To print a color image in a layer on a whitebackground, such as for window graphics, applyoverprint while the image is selected. Each partwhere the images overlap is also printed.
Epson Edge Print Operation Guide
Printing layers (printing White/Metallic Silver)
56

When not checked
When the image overlaps, the overlapping partsthat make up the bottom layer are not printed inthe print order set in this software. (Overprint isdisabled.)
Note:The above image shows when Overprint Preview isselected in Separations Preview, and the CMYKlayer is not displayed, so it is easy to understand theresults of printing with WH.Separations Preview is displayed by clickingSeparations Preview in the Window.
F When you are finished with the White settings,save the data in PDF format.
Select Acrobat 8 (PDF 1.7), and then save thedata.
How to do White/Silver settings in Photoshop
Image is used as an example to explain theprocedure for using Adobe Photoshop CC(2019) to setWhite to the parts being printed with WH.
A Start up Photoshop and open the print data.
B Click Window - Layer.
C Right click on a layer that includes parts that areprinted in WH, and then click Duplicate Layer.
The image is copied and there are now two imagelayers.
D On the Layer, select the original image layer, andthen delete the part that is printed in WH.
There are two ways to select only the part that isprinted in WH. For more information, see theonline help for Photoshop.
❏ Use the (Quick Selection tool) or (Magic Wand tool) for selecting things.
❏ After using the Select tool to select an area thatincludes WH, use Select - Color Range tospecify the color for WH.
E On the Layer, select the copied layer and clickSelect - Inverse, and then delete all the partsexcept those printed in WH.
The parts that are not printed in WH disappearso that parts where there is nothing are selected.
F Click Window - Channel.
Epson Edge Print Operation Guide
Printing layers (printing White/Metallic Silver)
57

G Click (Save selection as channel).
The parts that are printed in WH are masked.(The red colored parts are the masked areas.)
H While Alpha channel is selected click the menuand then click Channel Options.
I Set the spot color to be used in the White settingsas Spot Color, and then click OK.
As shown below, specify the spot color name, aswell as the color to print from the screen inPhotoshop.
(1) Name
Input the channel name as follows, accordingto the color to be printed. The following input iscase sensitive.
For printing WH: White
For printing MS: Silver
(2) Color Indicates
Select Spot Color.
(3) Color
Specify the color from the screen in Photoshopfor the parts to print with WH. (Red is set in theexample image.) It is actually printed as WH.
To print the part where the gelato is white usingonly WH:
To avoid printing unnecessary color ink, hide thecopied layer in the Layer window, and thenproceed to step 10. Only the alpha channelremains and printing can be done using onlyWH.
To print the part where the gelato is white asWH and overlay color ink for the shadows:
Proceed to step 10.
Epson Edge Print Operation Guide
Printing layers (printing White/Metallic Silver)
58

J When you are finished with the White settings,save the data in PDF format.
Select Acrobat 8 (PDF 1.7), and then save thedata.
Layer printing procedure
A Click (Add) on the toolbar, and then add theprint data that includes the image set to White/Silver.Or, drag and drop the print data onto the Job List.
Print data that has been added to the Job Listappears under the root, separated by color (color,White/Silver).
B Select the root for the layered job (row thatdisplays the print image as an icon) in the JobList.
An image of the printout appears in the previewarea.
C Click (Basic Settings) in the Job Settingmenu.
The setting area switches to Basic Settings.
D In Number and Order of Layering, set the orderin which to print color images, images set toWhite, and images set to Silver.
You can select different colors according to theColor Mode of the printer you are using.
When set to three layers, duplicate colors areprinted repeatedly using the same data,according to the selected details.
For example, when set to Triple Layer (Color ->White -> White), the color image is printed, andthen the image set to White is printed twice in arow.
Select a color on the Job List that you want toconfirm (color, White/Silver) to show only theimage for the selected color.
E Select Print Quality in Print Quality.
You can select different print qualities accordingto the settings in Number and Order of Layeringin step 4.
You can change the details for the print quality inManage Print Info.
U “Creating print information suitable for themedia being used” on page 73
F Confirm other settings and click (Print) tostart printing.
When layers aremisaligned and thebackground imageoverruns
You can use the following procedure to do adjustmentsif the background of the image overruns, or if theposition of the automatically generated image or theimage set to White/Silver is misaligned with that of theprinted results or the color image.
Confirm by printing the adjusted results again.
A In the Job List, select a job, whose colors haveoverrun or whose multiple layers are misaligned,to adjust.
Only the image for the selected color appears inthe preview area.
B On the Job Setting menu, click (LayerSetting).
The setting area changes to Layer Setting.
C To adjust misalignments, input the shifted valuesin either Horizontal or Vertical in Align LayerPositions.
To move upwards from the current position,specify movement in the vertical direction using- (minus) values.
To move to the left of the current position,specify movement in the horizontal directionusing - (minus) values.
Epson Edge Print Operation Guide
Printing layers (printing White/Metallic Silver)
59

D To adjust overrunning, input the valueincreased/decreased of the overrun in AdjustEnlargement Amount of Image.
To reduce the size of the current image (reducingoverrun), specify - (minus) values.
To increase the size (increasing overrun), specifywith plus values.
Epson Edge Print Operation Guide
Printing layers (printing White/Metallic Silver)
60

Using ColorCollection
To print the same spot color frequently in multiple jobs,you should register its information, such as the name ofthe spot color and its Output Color, in Color Collection.If you are setting the same spot color in the print data,you can manage Output Color in batch because theOutput Color registered in Color Collection is appliedto all jobs to be printed, in general.
Being able to do color replacement is limited to jobs inthe following data formats.
❏ EPS
❏ PS
If a spot color that is not registered in Color Collection isset in an image in the data, it is printed with the toneregistered in Illustrator and Photoshop.
Because you can register separate groups for spot colorsin Color Collection, you can also register a differentOutput Color for the same spot color, changing itaccording to the media type. If you do this, enable onlythe necessary groups and set their priority level. Doingthis determines the most applicable color for the OutputColor when printing a spot color.
U “To enable only required spot colors” onpage 62
U “Applying priority levels to groups” on page 62
You can export spot colors that are registered in theColor Collection by group.
You can import the following files to the ColorCollection.
❏ Files that have been exported (.epcc)
❏ Adobe Color Book files from Illustrator (.acb)
❏ Swatches library files from Photoshop (.aco)
U “Exporting spot colors” on page 63
U “Importing spot color files” on page 63
See the following for how to register spot colors in ColorCollection.
Editing/adding spotcolors
There are the following two main methods for adding anew Output Color to a spot color and for changing theOutput Color of a registered spot color.
❏ Checking printouts to set color valuesU “Editing/adding procedure” on page 61
❏ Setting the results of a measured color sample as anOutput ColorThis can only be done if the supported colorimeteris connected.U “Supported colorimeters” on page 89U “Setting the measured color sample as theOutput Color” on page 62
Editing/adding procedure
A Click, in order, the Tool menu - Manage Preset - (Color Collection) - (Edit).
Click (Add) to add.
If you selected Add, follow the wizard and specifya group name.
Inputting a group name creates a new group.
You can also select a pre-existing group namefrom the combo box.
The information for the selected spot colorappears in Details.
B Select either Lab values or CMYK from SpecifyOutput Color.
If you frequently change the media type whileprinting, apply the Lab values.
CMYK is suitable if you rarely change the mediatype on which you print and you want to printusing fixed color values.
Epson Edge Print Operation Guide
Using Color Collection
61

If you are also setting the density for ink otherthan C,M,Y,K, such as WH or MS, select CMYK+ WH/CMYK + MS in Specify Output Color.
The input box changes according to the selectedspecification method.
C Input color definition values to be used as OutputColor.
D After input is complete, click OK.
Setting the measured color sample as the Output Color
Before doing the following operations, connect thecolorimeter to the RIP server so that you can use it. Seethe manual supplied with the colorimeter for moreinformation about connecting and using thecolorimeter.
A To change the values, click the spot color nameyou want to edit from the list, and then click (Edit).Click (Add) to add.
If you selected Add, follow the wizard and specifya group name.
Inputting a group name creates a new group. Youcan also select a pre-existing group name fromthe combo box.
B In Specify Output Color, select either a Labvalue or an ink color.
The input box changes according to the selectedspecification method.
C Click Color Measurement.
Follow the on-screen instructions to do a colorcalibration, and then measure the color sample.
Complete the color measurement to change thecolor values of the Output Color according to thecolor measurement results.
After changing the Output Color, actually print theimage and check the tones.
To create spot colors that differ from the original imported or added spot colors
In the list, select the spot colors you want as the original,and then click (Copy).
A copy is created, so edit the copied spot colors.
To delete unwanted spot colors
In the list, select the group or spot colors that are notneeded, and then click (Delete).
To enable only required spot colors
You can use the following procedure to set groups forwhich the following jobs to print do not apply: whenregistering multiple color definitions with the same spotcolor name; when changing the Output Color accordingto the media using the same spot color name; or whencreating groups based on the media type.
Select a group that does not apply to a job in the list, andthen click (Deactivate).
The check to the left of the group name is erased anddisabled. If you want to enable it, select the group nameagain and click (Active).
Applying priority levels to groups
When managing spot colors by dividing them intomultiple groups, you can put the groups in prioritylevels and specify the spot colors that apply to a job to beprinted.
Epson Edge Print Operation Guide
Using Color Collection
62

A Select the group name for which to specify itspriority level, and then click / .
The following organizational diagram explainsan example of spot colors that are registered andseparated by groups.
If you want to apply BBBB of Group3 to a job toprint, select Group3, and then click .
Group3 increases in priority by one.
B Select Group3, and then click once again.
Group3 moved to the top spot in the list. The firstin the list has the highest priority level. Thefurther down, the lower the priority level. In thisexample, although the spot color BBBB is alsoregistered to Group1, if there were an image withspot color BBBB set to a job, the output colorsetting for spot color BBBB in Group3 would beapplied.
If an image with spot color AAAA set to the samejob were included, the output color settings forspot color AAAA in Group1 would be applied.Similarly, if an image set with the spot colorDDDD were included, the output color settingsfor spot color DDDD in Group2 would beapplied. In this way, spot colors with the samename are applied from the group with the highestpriority on the list.
Importing spot color files
The files that can be imported are as follows.
❏ Files that have been exported (.epcc)
❏ Adobe Color Book files from Illustrator (.acb)
❏ Swatches library files from Photoshop (.aco)
A Click the Tool menu - Manage Preset - (Color Collection) - (Import), in this order.
Importing Color Collection wizard begins.
B Select a file to Import.
You can import the Adobe Color Book files (.acb)for Illustrator and the Swatches library files (.aco)for Photoshop.
C Specify the group name to be added.
You can manage spot colors by splitting theminto groups. Inputting a group name creates anew group.
You can also select a pre-existing group namefrom the combo box.
D Click Finish.
The spot colors that were imported into the listare added.
Exporting spot colors
You can reuse spot colors by exporting them by group,and then importing them on another computer onwhich this software installed.
A Click, in order, the Tool menu - Manage Preset -(Color Collection).
Epson Edge Print Operation Guide
Using Color Collection
63

B On the list, select and right click on the group toexport, and then select Export from the menuthat appears.
C Select where to save the file, and then save it.
The extension for the saved file is (.epcc).
Epson Edge Print Operation Guide
Using Color Collection
64

Color Settings
You can do settings for print data (input) and do settingsfor jobs (output) in Color Settings.
A Select a job in which to set the colors from the JobList.
B Click (Color Settings) in the Job Settingmenu.
The setting area changes to Color Settings.
Overview of input settings
Set a suitable color space (CMYK/RGB) according tothe color space used for the print data.
If you cannot confirm the color space, set both.
Input profile settings
To reproduce the colors of the print data as closely aspossible when printing, do the settings, as shown below,according to the conditions of the print data.
Note:If you select Print Quality, with DeviceLinkProfile set, in
(Basic Settings) on the Job Settings menu,DeviceLinkProfile appears to the right of the CMYK andRGB display. When DeviceLinkProfile is open, youcannot do input settings.
❏ For applying the profile of print data that is a PDF inwhich the input profile is embedded and printingSelect Give Priority to Embedded Profile. ForPDF, you can set whether to embed/not embed aprofile for each image in the data. Input profilesettings for this software are applied for images forwhich a profile is not embedded.
Note:If multiple input profiles are embedded in the data,the print results may differ from the preview.
❏ When the print data does not have an embeddedinput profile, or if you do not know what kind ofinput profile was usedWe recommend clearing the Give Priority toEmbedded Profile checkbox, and selecting thefollowing input profile.
When you want to print with vibrant colors
CMYK EpsonWideCMYK_Ver2.icc*1
RGB AdobeRGB1998.icc
When you want to do regular printing
CMYK Select a profile for regular printing
RGB EwsRGB.icm*2 etc.
*1 Wide color gamut input color profile provided by Epson. Youcan print with a wider color gamut than the colors in regularprinting. We recommend this when you want to print withvibrant colors, such as for signage applications.Do the following settings to confirm the appearance of theprint results while you are creating the data.U “Confirming print results for wide color gamut inputcolor profile when creating data” on page 67
*2 Profile for sRGB color space provided by Epson.
Epson Edge Print Operation Guide
Color Settings
65

Note:When you want to use some other input profile you haveprepared, if you save it to the following folder in advance,you can select from the list box.
❏ For CMYKC:\ProgramData\EPSON\Epson Edge Print\Color\Common\icc\cmyk
❏ For RGBC:\ProgramData\EPSON\Epson Edge Print\Color\Common\icc\rgb
Setting Rendering Intent
You can select from the following conversion methodsfor when you convert a color space from an input profileto an output profile.
Perceptual
Converted according to the balance of the entire image.Applicable for photographic images.
Relative Colorimetric
Converted so the input and output color gamutcoordinates are the same, plus the white point (colortemperature) coordinate values are the same. This is oftenused for color matching.
Saturation
Converted so the vividness of the colors is given priorityover the accuracy of the colors. This is applicable forbusiness graphics in which use of bright colors is favored,such as for graphs and diagrams.
Absolute Colorimetric
Converted to maintain the accuracy of colors. This isapplicable when the accuracy of colors is important, suchas for printing the color of logos.
Other color settings
Black Point Compensation
Select this checkbox if you feel that the shadow gradationsare lost when a color space is converted from an inputprofile to an output profile.
Pure Black
Select this checkbox when you want to output images thatare just black, such as pure black text or lines.
By selecting this checkbox, the parts of the print data thatare pure black (CMYK: (0, 0, 0, 100%), RGB: (0, 0, 0)) areoutput with just black.
There is no effect on halftones (CMYK: (0, 0, 0, 50%), RGB:(30, 30, 30) etc.).
Preserve Black
This can only be set with CMYK data.
Select this checkbox when you want to output only black,regardless of the value for the parts of the data that aresingle-color black (CMYK: (0, 0, 0, X%) where the X% is anyvalues from 1 to 100%).
Preserve CMYK Primaries
This can only be set with CMYK data.
Select this checkbox when you want to output primarycolors for the parts of the print data that are only in cyan,magenta, yellow, or black.
The primary colors depend on the color of the ink in theprinter.
Overview of outputsettings
Epson Edge Print Operation Guide
Color Settings
66

Changing media profiles
Media profiles are also called output profiles, and theyare used when a job is output to the printer.
There is normally no reason to change them because theoptimum media profile is set to the media that is selectedin Media Name in (Basic Settings) in the Job Settingmenu.
When they need to be changed, select the profile youwant from the list box, and then set it.
Tone curve settings
You can fine-tune the density and the tone of the OutputColor in Tone Curve.
Select the color you want to adjust in Channel, and thendo adjustments by doing the following procedure.
(1) Click on the Tone Curve line, and then set a workpoint. You can add multiple work points.
You can delete work points that are not needed byselecting them and pressing the Delete key.
(2) Drag the work point to make adjustments.
Clicking the Reset button allows you to undo theadjustment results.
The adjusted results are reflected in the preview area.
Confirming print resultsfor wide color gamut inputcolor profile whencreating data
The following section introduces the method to confirmprint results in the preview display when you changethem temporarily using the following operations whileyou create the print data. The settings in the work spaceof the image processing software are not changed.
This explanation uses Windows 7 in Adobe IllustratorCC(2015) as an example.
A Install the Epson wide color gamut input profileon the computer you are using.
Copy EpsonWideCMYK_Ver2.icc, which is inthe following folder on the RIP server, and save itto the computer you are using.
Drive of the storage device \Color\Common\icc\cmyk
WindowsRight click EpsonWideCMYK_Ver2.icc andselect Install.
MacCopy EpsonWideCMYK_Ver2.icc to thefollowing folder.Library - ColorSync - Profiles
B Start up Adobe Illustrator and open the printdata.
Epson Edge Print Operation Guide
Color Settings
67

C Click Edit - Assign Profile, in this order.
D Select EpsonWideCMYK_Ver2 in Profile andclick OK.
The color displayed in the preview updates tocomply with the profile.
E After confirming, close Adobe Illustratorwithout saving the print data.
Closing Adobe Illustrator cancels the specifiedprofile.
When you save print data the Epson wide colorgamut input profile is embedded, and it ischanged from the original state.
Epson Edge Print Operation Guide
Color Settings
68

Printing with Frameline and trim marks
In Mark, you can do job label settings and mark settingsfor cutting.
You can select the mark for cutting from Frame line andtwo types of trim marks.
❏ Trim mark 1
❏ Trim mark 2
Job labels are such information as settings whenprinting and the time and date RIP was done, and can beadded to images and printed.
The following explains the procedure to attach a Frameline, trim mark, or job label around an image, and thenprint it.
A On the Job List, select a job for which to do Marksettings.
B Click (Mark) in the Job Settings menu.
The settings area switches to Mark.
C Select a mark to add in Mark type.
The selected mark is reflected in the preview area.To change the margins between an image and amark, specify them in Margins. To set a markaway from an image, specify it using a positivevalue. To set a mark inside the image, such as ifyou do not want to cut beyond the edge, specify a- (minus) value.
When Margins are set to -3 mm for bothHorizontal and Vertical
D To add a job label, select Job label.
E Select the items to print as the job label.
Epson Edge Print Operation Guide
Printing with Frame line and trim marks
69

Creating job settingsthat are often used(Quick Sets)
Quick Sets are saved as a batch of job settings.
It is efficient to create Quick Sets for frequently usedsettings that are the same every day, such as for routinework, so you do not need to do the job settings everytime.
You can set Quick Sets you have created in hot folders,and use them as default settings when adding jobs.
See the following for detailed information about hotfolders.
U “Printing with decided settings (hot folderprinting)” on page 26
Procedure to create QuickSets
A Click Tool menu - Manage Preset - (QuickSets) - (Add), in this order.
B Enter the name of the Quick Sets and click OK.
A settings dialog box appears.
C Do the job settings.
If necessary, select the tab and do the settings.The setting details apply to the settings in (Basic Settings), (Layout), (ColorSettings), (Mark), and (Layer Setting) inthe Job Settings menu.
See the following for detailed information aboutthe various settings.
Basic Settings U “Basic job settings” onpage 30
Layout U “Setting the layout” on page 33
Color Settings U “Color Settings” on page 65
Mark U “Printing with Frame line and trimmarks” on page 69
Layer SettingU “When layers are misalignedand the background image overruns” onpage 59
Functions limited to Quick Sets
The following points are settings that are limitedto Quick Sets.
❏ Basic Settings - PDF Overprint SimulationBy checking PDF Overprint Simulation,printing is done after the colors arepseudo-blended for the tones of the image setto overprint in the data during overprinting.This is only done when an image in the data isset to overprint.
Note:If you check PDF Overprint Simulation, spot colorinformation in the PDF data may not be preserved.For example, you may not be able to print using thecorrect tones for data in which other images arelayered with images set to PANTONE or White/Silver.
❏ Color Replacement - Deactivated Spot ColorSettingClear the checkbox to disable colorreplacement when you want to replace a coloraccording to the settings for Output Color setin Color Collection, or when you want to adjustthe Output Color in (Color Replacement)in the Job Settings menu.
❏ Color Replacement - Use the enabled groupsin the color collection.By clearing the checkbox, you can select, fromall of the groups in Color Collection, the groupthat you want to use as a replacement for theoutput color in (Color Replacement) on theJob Settings menu. To enable group selection,select the checkbox on the list. The settings inthe Quick Sets have priority, regardless of thesettings that are enabled/disabled in ColorCollection.
❏ Other - Status setting of added jobSelect a checkbox to put the job you added onhold. Held jobs are not printed during AutoPrint.
❏ Other - MemoYou can enter notes about settings.
D When the settings are complete, click OK.
The Quick Sets you added to the list aredisplayed.
Epson Edge Print Operation Guide
Creating job settings that are often used (Quick Sets)
70

Editing Quick Sets
When you want to change Quick Sets that have beencreated
In the list, select the Quick Sets to be changed, and thenclick (Edit).
When you want to create another Quick Sets basedon Quick Sets previously created
In the list, select the Quick Sets you want as the original,and then click (Copy).
A copy is created, so edit the copied Quick Sets.
To delete unneeded Quick Sets
In the list, select the Quick Sets that are not needed, andthen click (Delete).
Reusing Quick Sets thatyou created
You can print using shared job settings by savingacquired or created Quick Sets to a file, and thenuploading that file to another computer on which thissoftware is installed.
This section explains the procedures for saving (Export)and importing (Import).
Exporting Quick Sets
A Click, in order, the Tool menu - Manage Preset - (Quick Sets).
B On the list, select the Quick Sets to be reused byright clicking, and then select Export on themenu that appears.
C Select where to save the file, and then save it.
The extension for the saved file is (.epqs).
Importing Quick Sets to be added
Preparing to import
If a computer to which Quick Sets are being importeddoes not have the equivalent of the following data in theexported Quick Sets, that data is automatically replacedwith the settings for system Quick Sets (Quick Sets thatcontain the manufacturer's settings).
❏ Print information for the media
❏ Groups enabled in Color Collection
❏ Optional input profile
To import Quick Sets under exactly the same conditionsas the exported Quick Sets, first do the following tomake the conditions the same as when exported, andthen import the Quick Sets.
❏ Importing print informationIf print information for the media that is set in BasicSettings - Media Name of the exported Quick Setsdoes not exist on the computer to which the QuickSets are being imported, import the printinformation in advance.See the following for details about exporting andimporting print information.U “Reuse the created print information” onpage 76
❏ Importing Color Collection groupsIf Color Collection groups that were enabled inColor Replacement of the exported Quick Sets donot exist on the computer to which the Quick Setsare being imported, import the groups in advance.See the following for details about exporting andimporting the Color Collection.U “Exporting spot colors” on page 63U “Importing spot color files” on page 63
❏ Saving the optional input profile to a specifiedfolderIf an optional input profile is selected in ColorSettings - Profile of the exported Quick Sets, savethe same input profile in advance to a specifiedfolder on the computer to which the Quick Sets arebeing imported.The specified folders are shown below.
❏ For CMYK
Epson Edge Print Operation Guide
Creating job settings that are often used (Quick Sets)
71

C:\ProgramData\EPSON\Epson Edge Print\Color\Common\icc\cmyk
❏ For RGBC:\ProgramData\EPSON\Epson Edge Print\Color\Common\icc\rgb
Procedure for importing
You can import and add Quick Sets files (.epqs) by doingthe following procedure.
A Click, in order, the Tool menu - Manage Preset - (Quick Sets) - (Import).
Import Quick Sets begins.
B Select a file to import.
C Click Finish.
The Quick Sets that are imported into the list areadded.
Setting Quick Sets as thedefault job settings
Other than being used in a hot folder, the Quick Sets thatare added can also be used as initial settings when a job isadded to the Job List.
The procedure to set defaults is shown below.
A In the list, select the Quick Sets that you want, andthen click (Default).Or, open the right click menu on the name of theQuick Sets that you want and select Default.
✓ is displayed to the left of the name of the QuickSets that was set as the default.
B To change the default setting to a different QuickSets, in the list, select the Quick Sets that you wantto change, and then click (Default).
Epson Edge Print Operation Guide
Creating job settings that are often used (Quick Sets)
72

Creating printinformation suitablefor the media beingused
By using the EMX files provided free from Epson, youcan easily do optimum printing on commerciallyavailable media.
When you are using media for which there is nocompatible EMX file, you can create print informationfiles in one of the following ways.
❏ Editing an already acquired EMX file for a type ofmedia that is similar to the media you are usingSee the following for detailed information aboutacquiring EMX files.U “Preparing EMX files” on page 22
❏ Selecting a similar media type from the genericprint information that is provided with the softwareand then editing it for the media you are using
If you can get a media profile from the manufacturer ofthe media you are using, you can use that.DeviceLinkProfile is also compatible.
Creating one based on theprint information in anEMX file you haveacquired
To create print information for the media you are usingbased on the print information in an EMX you haveacquired, copy the print information you want, and thencreate it. You cannot edit print information for EMXfiles directly.
A Click Tool menu - Manage Preset - (ManagePrint Info), in this order.
B In the list, select the media name of the printinformation that is the copy source, and thenclick (Copy).
The copy is created below the selected medianame.
C Select the print information created in step 2, andthen click (Edit).
An editing dialog box appears. Edit the settings asnecessary.
Media ID
Normally, use the Current Media Settingunchanged. When you want to set it for a specificMedia ID, select the Media ID you want.
Print Quality
Normally, an appropriate print mode is assignedto each mode.
You can edit, add, and delete Print Quality.
See the following for details.
U “Editing and adding Print Quality” onpage 73
U “Deleting Print Quality” on page 75
D When the settings are complete, click OK.
Editing and adding Print Quality
A In the list, select the Print Quality to be changed,and then click Edit to change it.To add, simply click Add.
Epson Edge Print Operation Guide
Creating print information suitable for the media being used
73

B Select Print Quality and Print Mode according tothe wizard.
When a model featuring WH/MS is selected asthe printer you are using, select the Number ofLayers intended for the Number of Layers. Thedetails for the Print Mode change according tothe Number of Layers selected.
You can change the amount of ink by selectingthe Print Mode, and then clicking Adjust.Proceed to step 3.
If you are not adjusting the Print Mode, proceedto step 6.
C You can adjust the Output Color and the amountof ink in Color. Set the density by dragging tothe left or right.
The initial position of is the current density.Moving it to the right makes the density moredense. However, too much density could causesmudging and smears when printing.
When selecting a model featuring WH/MS as theprinter you are using, you can adjust the densityby selecting White/Metallic Silver, according tothe Color Mode selected.
You can fine-tune the density and the tone of theOutput Color in Tone Curve.
Select the color you want to adjust in Channel,and then do adjustments by doing the followingprocedure.
(1) Click on the Tone Curve line, and then set awork point. You can add multiple work points.
You can delete work points that are not neededby selecting them and pressing the Delete key.
(2) Drag the work point to make adjustments.
Clicking the Reset button allows you to undothe adjustment results.
Selecting Print Quality and the media that wasadjusted in (Basic Settings) reflects theresults of the adjustment in the preview area.
D In Other, you can change Input Resolution,Before-Print Margins, and Drying Time.
Input Resolution
Select the resolution for when the images in theprint data are processed by the software.
Normally, it is 360 × 360 dpi.
When necessary, select 720 × 720 dpi, such aswhen the source image is high quality or if theimage is for a poster that is viewed up close.
Before-Print Margins
Enter the length of the margin that is inserted as amargin between the next job when printingcontinuously.
This is useful when printouts are wrapped andattached to a panel or something.
Epson Edge Print Operation Guide
Creating print information suitable for the media being used
74

Drying Time
When doing continuous printing, the time that isset here is the waiting time before the next jobstarts printing. This can prevent ink fromsmudging onto the back of printouts while theyare wound up during continuous printing. Whenprinting on sizes larger than A2, we recommendsetting a drying time in Drying Time Per Pass inthe Setting Menu on the printer.
For details about the setting menu, U the User'sGuide (online manual)
E When the settings are complete, click OK.
F Click Proceed and select a media profile.
To use the media profile you have prepared, clickBrowse and specify the file path to the mediaprofile.
If you are using a DeviceLinkProfile provided bythe manufacturer of the media, click Extendsettings so that you can do the settings as needed.
G Click Finish.
Deleting Print Quality
A In the list, select the Print Quality that is notneeded, and then click Delete.
B When the confirmation message appears, clickYes.
C Click OK.
Creating printinformation based ongeneric print information
This section explains the procedure to create printinformation for the media you are using based on thegeneric print information that is provided with thesoftware.
Creating print information is done in a wizard, so it canbe easily done by following the onscreen instructions.
A Click Tool menu - Manage Preset - (ManagePrint Info) - (Add), in this order.
Adding Print Information starts.
B Select Create New and click Proceed.
C Follow the onscreen instructions to select anitem.
Enter the name used for the print informationyou are going to create in Media Name andVendor.
D Select a similar media type.
E Click Finish.
The print information that is created is added tothe list, and the contents of the print informationare shown in Details.
When you want to change the contents, select the printinformation that was added to the list, and then click
(Edit).
For details, see step 3 and onwards in the following.
U “Creating one based on the print information in anEMX file you have acquired” on page 73
Epson Edge Print Operation Guide
Creating print information suitable for the media being used
75

Reuse the created printinformation
You can reuse print information by saving the acquiredor created print information to a file, and thenuploading that file to another computer on which thissoftware installed.
This section explains the procedures for saving (Export)and importing (Import).
Exporting print information
A Click Tool menu - Manage Preset - (ManagePrint Info), in this order.
B On the list, right click the media name for theprint information you want to reuse, and thenselect Export File on the menus that appears.
C Select where to save the file, and then save.
The extension for the saved file is (.epml).
Importing and adding print information
You can import and add EMX files (.emx) and printinformation files (.epml) by doing the followingprocedure.
A Click Tool menu - Manage Preset - (ManagePrint Info) - (Add), in this order.
Adding Print Information starts.
B Select Import File, and then click Proceed.
C Click Browse, specify a place to which the file issaved, and then import the file you want.
D Click Proceed.
After importing the EMX file (.emx), or the printinformation file (.epml) that was exported via anapplication software other than this software,copy the media setting values to the printer. Ifyou do not copy the media setting values to theprinter, you will not be able to do optimumprinting when you select imported and addedmedia name for printing. After importing theprint information file (.epml) that was exportedusing this software, the file name is greyed out soyou cannot select it because there is no need tocopy it.
To copy the file, select Copy Media settings andproceed to step 5.
If you are not copying the file, then proceed tostep 6.
E Select where to copy the file, and then clickSpecify copy destination.
The media settings (1 to 30) registered to theselected printer appear. Select where to copy themedia setting values, and then click OK.
Selecting a number that is blank adds the values.Selecting a number that has already beenregistered overwrites the registered information.
After importing multiple files, repeat the processof selecting where to copy the files and selectingwhere to copy the media IDs, and then copy all ofthe media setting values that you want to copy.
F Click Finish.
The print information that is imported is addedto the list, and the contents of the printinformation are shown in Details.
Epson Edge Print Operation Guide
Creating print information suitable for the media being used
76

Troubleshooting &Tips
When you want to changethe initial settings ofMedia Size
You can change the size that is normally used in MediaSize in (Basic Settings) in the Job Setting menu.
A Click Tool menu - Manage Preset - (OptionsSettings) in this order.
B Clear the checkbox for Acquire Media Size fromPrinter, select the size you want from the list box,and then click Apply.
When you want to createnon-standard media sizes(custom media sizes)
To print on cut sheet media or special width roll media,use the following procedure to create a custom mediasize. After that, you can select it from Media Size in (Basic Settings) in the Job Setting menu.
A Click Tool menu - Manage Preset - (OptionsSettings) in this order.
B Click Custom Media Size Setting.
The Custom Media Size Setting dialog opens.
C When you click (Add), the Custom MediaSize is added to the list, so you can give it anyname.
D In Media Form, select Roll or Cut Sheet andenter a size.
When Roll is selected, you can only enter MediaWidth.
When you want to changethe media's left and rightmargins when printing
You can set the side margins on the printer's settingsmenu, as well. The larger value is given priority in thesettings for this software and printer. Side margins seton the printer are not reflected in the preview area forthis software. If side margins that are wider are set on theprinter, you cannot check overprint areas. Overprintareas are not printed.
A Click Tool menu - Manage Preset - (OptionsSettings) in this order.
B Set value for the margins for the Right and Left atMargins.
C When the settings are complete, click Apply.
When synchronizingmedia settings and printinformation
When the The media settings for printer have beenupdated. message appears, or when the iconappears to the right of the Media Name list box in (Basic Settings) in the Job Settings menu, the printinformation that corresponds to the media settingvalues registered in the printer are not registered in thesoftware.
Follow the steps below to synchronize them.
Depending on the model you are using,synchronization may be disabled.
A Click Tool menu - Manage Preset - (ManagePrint Info), in this order.
B Click (Sync).
A confirmation screen appears.
C Click Execute.
Epson Edge Print Operation Guide
Troubleshooting & Tips
77

When a PDF, whichcontains data in whichtransparent images arelayered with images thathave been set with spotcolors, cannot be printedcorrectly
You can avoid this with any one of the following threemethods.
❏ Enabling PDF Overprint Simulation, and thenprinting againClick, in order, the Tool menu - Manage Preset -
(Quick Sets). Select PDF OverprintSimulation in the Basic Settings tab.U “Procedure to create Quick Sets” on page 70
❏ Resaving the file to EPS using image processingsoftware
❏ Using image processing software to create a PDF inwhich the transparency effect is appliedExample: For Illustrator, select the layered image,and then execute the “Flattener” process.
When you want to changethe interface language orthe length units
You can change the length units and the interfacelanguage used in the software.
A Click Tool menu - Preferences - (General),in this order.
B Select the language to which to change to inLanguage.
C Select the length units to which to change to inLength Unit.
D When the settings are complete, click Apply.
When the print heads startand stop during printing
Do printing after raster image processing (ripping) hasfinished.
A Select the job you want to print from the Job List.
B Click (RIP) in the Job toolbar.
When RIP starts, Ripping appears in the Statuscolumn in the Job List.
Wait until Ripped appears in the Status column.
C Select the job you want to print from the Job List,and click (Print) in the Job toolbar.
If the measures above do not resolve the problem
Check the settings for the Epson communication driver(EPSON SC-XXXXX Series Comm Driver) that isinstalled. See the following for how to check the settings.We use Windows10 as an example.
(1) Select, in order, Start - All Apps - Windows System-Control Panel - Devices and Printers.
(2) Select and right click on the printer you want fromthe list, and then select Printer properties on themenu that appears.
(3) Open the Advanced tab and check whether Printdirectly to the printer is selected. If it is not selected,select it.
Epson Edge Print Operation Guide
Troubleshooting & Tips
78

When Error appears inStatus on Job List andprinting is not done
A postscript error may have occurred. Use the followingprocedure to confirm the details of the error, and resolveit if necessary.
Confirming the details of errors
A Select a job to confirm in the Job List, and thenclick (Job Info) in the Job Setting menu.
Detailed information about the selected job isdisplayed in the setting area.
B Click History and confirm the RIP Consolecolumn.
When %%[ Error: invalidfont;OffendingCommand: xxxxxxxx ]%% appears
When Error:invalidfont occurs, a font is notembedded or a font that does not exist in thesystem was specified. Embed the font in thesource data or change it to a different font.
The xxxxxxx part changes according to thestatus.
When something other than what is aboveappears
See the following page and increase the amountof memory used by the RIP server.
Changing the memory size used by the RIP server
A Click Tool menu - Preferences - (RIPServer), in this order.
B Select a larger size in RIP Memory.
If you increase the amount of memory, and thesame error appears, change to a memory that isone level larger.
C When the settings are complete, click Apply.
When you want to changeamount usable capacity inthe storage device
You can change the available storage capacity in thelocation where the print data and intermediate files(files that integrate the job settings and the data that hasbeen ripped) are stored.
Or, you can also set a processing method for when thereis little memory available in the memory device.
A Click Tool menu - Preferences - (RIPServer), in this order.
B Set the available capacity in Max Capacity inData Storage.
Epson Edge Print Operation Guide
Troubleshooting & Tips
79

C Select Near-full Option for the processingmethod for when there is little capacity availablein the storage device.
When Notice is selected: An error is displayed asa notice when the capacity is almost full.
When Delete Old Jobs is selected: Old data isautomatically deleted when the capacity is full.
D When the settings are complete, click Apply.
When you want to registeror unregister a printerthat is being managed
With this software, you can register four printers to bemanaged.
Select the printer you want on the tab at the bottom ofthe screen if multiple printers are registered.
Registration and changes
When you register a printer with the software, the sameprinter is registered automatically in the Epson EdgeDashboard.
When you register a printer to be managed in the EpsonEdge Dashboard, it is not automatically registered onthe software. If necessary, register it to the software.
Registration procedure
A Click Tool menu - Preferences - (Printer) - (Register) in this order.
A list of connected printers that are not registeredin the software appears.
Models that are not supported do not appear,even if they are Epson printers.
You can also click Search by IP Address andenter an IP address directly to search for it.
Note:When registering printers with differentmodels
The model of the printer that is selected when thissoftware is installed appears on a list. When addingmodels to use after installation, refer to thefollowing and install model information, etc., forthe model you are adding. After adding the printer,the added model will appear on the list as asupported model.
U “When you want to add models to use afterinstallation” on page 81
B Select the printer you want from the list.
The registered name of the printer selected in thelist appears in Printer Name.
C Click Register.
Changes to registered details
The registered name can be edited after registration.Also, after registering a printer model that features WH/MS or a printer for which the Black ink can be changed,synchronize any changes you make with the printer ifyou have changed the type of Black ink or changed theprinter's Color Mode settings. If the printer's settingsand the settings for the software do not match, printingcannot be done correctly.
On the list, select the printer to which you want to makechanges, click (Change), and then change theregistered name, Color Mode, or type of Black ink.
Epson Edge Print Operation Guide
Troubleshooting & Tips
80
Procedure to unregister
By unregistering a printer, all the following contentrelated to work done previously on the printer is deleted.
❏ Jobs on the Job List
❏ Jobs on the Printed Job list
❏ Acquired and added print information
❏ Added Quick Sets
Additionally, when you unregister a registered printer,it is also deleted from the registered printers in theEpson Edge Dashboard, as well as from the Devices andPrinters window in Windows.
When the printer to unregister is set as the outputprinter in a hot folder, unregister the hot folder beforeunregistering the printer.
You cannot unregister a printer if you do not unregisterthe hot folder.
U “Unregistering a hot folder” on page 27
A Click Tool menu - Preferences - (Printer), inthis order.
B Select the printer to unregister in the list, andthen click (Unregister).Or, open the right click menu on the icon of theprinter to unregister and select Unregister.
C When the confirmation message appears, clickYes.
When you want to add models to use after installation
Use the following procedures to install modelinformation, etc., for models that you are adding.
The following work does not require you to reregister ordelete the registered license.
A Set up a computer on which the current softwareis installed by using a software CD that iscompatible with the model you are adding.
The compatible model names are written on thepackage of the software.
B Advance to the wizard, according to the screen,select the model to add on the Select Modelscreen, and then continue the installation.
Printers that have already been installed appearin grey on the Select Model screen.
C After the installation is complete, start thesoftware and register the printer.
When you want to registerwith an added license
Use the following procedure when you have added alicense, such as if you have purchased a new printer.
A Click Tool menu - Preferences - (License) - (Add), in this order.
The License Authentication wizard starts. Followthe on-screen instructions.
For details about the License Authenticationwizard, see step 4 and onwards in the following.
Skip this, because printers are not registered.
When the RIP server is connected to the internet
U “When connected to the internet” onpage 82
When the RIP server is not connected to theinternet
U “When not connected to the internet” onpage 83
When you want to replacethe RIP server's computer
Use the following procedure to replace the RIP server'scomputer.
Epson Edge Print Operation Guide
Troubleshooting & Tips
81

1. Before replacing it, delete the registration of thelicense for the RIP server.
2. Install this software on the replacement computer,and then register the license.
c Important:If you do not delete the registered licensebeforehand, then you cannot use the software on thereplacement computer.
If something happens, such as the computer used forthe RIP server malfunctions, and you cannot deletethe registered license for this software, contact yourlocal Epson support.
Procedure to delete the license
The computer must be connected to the internet whenyou delete the registration of the license.
You cannot delete a registration while not connected tothe internet.
Note:If the RIP server is in an environment that is notconnected to the internet, and you need to unregister thelicense, contact your local Epson support.
A Click Tool menu - Preferences - (License), inthis order.
A list of registered licenses appears.
B Select the license for which to delete registrationin the list, and then click (Delete).
C When the confirmation message appears, clickYes.
See the following when you uninstall the software.Uninstallation must be done after you delete theregistration of the license.
U “Uninstalling the software” on page 86
Registering the license after replacing the computer
Registration of the license is done in a wizard format.
The registration procedure is different depending onwhether or not the computer, in which the license isbeing registered, is connected to the internet.
The Serial Number of the software must be entered forthe license authentication. The Serial Number is on alabel stuck to the inside of the package for the software.
Have the package handy before you start this operation.
U “When connected to the internet” on page 82
U “When not connected to the internet” onpage 83
Note:If you have multiple licenses, we recommend registeringthe licenses for printers that are not registered in thissoftware, too. You can register licenses for up to fourprinters with the software. The software can be used moreefficiently when multiple licenses are registered.
When connected to the internet
A Install this software on the replacementcomputer.
U Setup Guide
B Click , which was created on the desktop, tostart the software.
C When the request message for licenseauthentication appears, click Start.
The License Authentication wizard starts.
Epson Edge Print Operation Guide
Troubleshooting & Tips
82

Note:If you click Skip, license authentication is not done,and you can use the software for a 30 day trial.
During the trial period, a message counting downthe usage period appears each time the software isstarted.
You can use the official version by clicking StartLicense Authentication in the message screen, andthen doing the license authentication.
When the 30 day trial period is over, you cannot usethe software unless you do the licenseauthentication.
D Select Online and click Proceed.
E Enter the serial number and click Proceed.
The serial number is on a label stuck to the insideof the package for the software.
Enter it correctly.
F When License authentication completed.appears, click Finish.
G When a message requesting printer registrationappears, click Start.
The RIP server and printers connected via anetwork or USB appear in a list.
Models that are not supported do not appear,even if they are Epson printers.
You can also click Search by IP Address andenter an IP address directly to search for it.
H Select the printer you want from the list.
The registered name of the printer selected in thelist appears in Printer Name. If you want tochange the registered name, enter the name afterchanging it.
I Click Register.
After printer registration is done, the mainscreen of the software appears and you can startusing it.
When not connected to the internet
A Install this software on the replacementcomputer.
U Setup Guide
B Click , which was created on the desktop, tostart the software.
C When the request message for licenseauthentication appears, click Start.
The License Authentication wizard starts.
Note:If you click Skip, license authentication is not done,and you can use the software for a 30 day trial.
During the trial period, a message counting downthe usage period appears each time the software isstarted.
You can use the official version by clicking StartLicense Authentication in the message screen, andthen doing the license authentication.
When the 30 day trial period is over, you cannot usethe software unless you do the licenseauthentication.
D Click Offline - Proceed, in this order.
E Enter the serial number and click Proceed.
The serial number is on a label stuck to the insideof the package for the software.
Enter it correctly.
Epson Edge Print Operation Guide
Troubleshooting & Tips
83

By clicking Proceed, the URL, serial number, andhardware key appear on the screen.Without changing anything, proceed to step 6.
F Access the following URL via one of thefollowing devices that can connect to theinternet.
❏ Smartphone
❏ Tablet
❏ Computer
https://license.cp.epson.com/
G When the screen shows the website for issuinglicense authentication keys, click (or tap) Start.
H Enter the Serial Number and the Hardware Key.
Correctly enter the Serial Number and theHardware Key that are displayed on the screenthat appears in step 5.
I Clip (or tap) Issue.
When the authentication is complete, the licenseauthentication key appears.
Enter this authentication key in the LicenseAuthentication wizard for the RIP server. Whenyou are using a smartphone or a tablet, save ascreenshot or just advance to step 10.
When you are using a computer, write it downwithout making a mistake.
When you are doing multiple licenseauthentications, continue to do the operation toissue authentication keys. Click (or tap) Issue theauthentication key with another serialnumber. and then repeat steps 8 and 9.
J Click Proceed in the License Authenticationwizard screen (the screen that appears in step 5)on the RIP server.
The screen changes to the Enter LicenseAuthentication Key screen.
K Enter the license authentication key thatappeared in step 9, and click Proceed.
If you had multiple license keys issued as a batchon the site that issues license keys, be sure tocorrectly enter the authentication key thatcorresponds to the Hardware Key.
L When License authentication completed.appears, click Finish.
M When a message requesting printer registrationappears, click Start.
The RIP server and printers connected via anetwork or USB appear in a list.
Models that are not supported do not appear,even if they are Epson printers.
You can also click Search by IP Address andenter an IP address directly to search for it.
N Select the printer you want from the list.
Epson Edge Print Operation Guide
Troubleshooting & Tips
84

The registered name of the printer selected in thelist appears in Printer Name. If you want tochange the registered name, enter the name afterchanging it.
O Click Register.
After printer registration is done, the mainscreen of the software appears and you can startusing it.
Backup and Restore
You can save all of the software's settings (includingregistered printers) to a backup file.
If the computer on which the software is installedhappens to become damaged, you can continue to keepthe same settings from before by doing a Restore of thebackup file you saved using the software that wasinstalled on a new computer.
Backup
A Click the Tool menu - Backup and Restore, inthis order.
The Backup and Restore wizard begins.
B Select Backup, and then click Proceed.
C Select a location to save the backup files, and thenclick Proceed.
D Select where to save the file, and then save.
The extension for the saved file is (.dat).
Restore
Precautions when doing a Restore
Check the following points before doing a Restore.
❏ If you do a Restore, all of the current conditions thatare currently set in the software will change to theconditions at the time of the Backup.
❏ If you do a Restore, any current jobs imported intothe Job List and any jobs in the Printed Job list willbe deleted.
❏ You cannot do a Restore if the printer installeddiffers from the one installed when the Backup wasdone.When installing the software to a new computer,select the same printer type (model) as before. If,when installing the software, the printer type(model) was omitted, add the model.U “Registration procedure” on page 80
Restore procedure
A Click the Tool menu - Backup and Restore, inthis order.
The Backup and Restore wizard begins.
B Select Restore, and then click Proceed.
C Specify the location at which the backup to do theRestore is saved, and then open the target file.
D Associate printers that are connected.
Association automatically finishes when the portfor the connected printer is the same both atBackup and Restore. Click Proceed to proceed tostep 7.
If the port that is connected is different, (NoSettings) appears. Proceed to step 5 to associatemanually.
E Select a printer for which (No Settings) isdisplayed, and then click Register.
A list of connected printers that are not registeredin the software appears.
F Select a printer, and then click Register.
Select a printer to register to the list.
You can also click Search by IP Address andenter an IP address directly to search for it.
G After the Restore is complete, click Finish.
Updating the software
This software is updated as needed to make it moreuseful and to improve functions.
Epson Edge Print Operation Guide
Troubleshooting & Tips
85

You can use the following procedure to confirmwhether updates have been done and to update to thelatest version of the software.
There is also a function to notify you when the softwarehas been updated.
Checking for updates and updating
A Check the following status.
❏ The RIP server is connected to the internet.
❏ The printer and the RIP server are connectedcorrectly and the power is on.
B Start EPSON Software Updater on the RIPserver.
Click Start > All Programs (or Programs) >Epson Software > EPSON Software Updater.
Note:You can also start by clicking the printer icon on thedesktop taskbar and selecting Software Update.
C Select the printer you want in the Select theproduct you are using. list box that appears.
The updated software is displayed in Otheruseful software.
D Select the Epson Edge Print check box and clickInstall 1 item.
Follow the on-screen instructions to continue.
c Important:Do not turn off the computer or printer whileupdating.
Receiving notices about updates
A Start EPSON Software Updater on the RIPserver.
B Click Auto update settings.
C Select the interval check for updates in theInterval to check for the target printer, and thenclick OK.
Uninstalling the software
c Important:❏ Log into a “Computer administrator” account
(an account with administrative privileges).
❏ Enter the administrator password whenprompted and then proceed with the remainderof the operation.
❏ Exit any other applications that may berunning.
A Before uninstalling the software, delete all thelicenses that are registered in this software.
If you uninstall the software while the licenses areregistered, an error occurs and you cannotexecute the uninstallation.
U “Procedure to delete the license” onpage 82
B Click Start (right-click Start) - Control Panel -Programs and Features, in this order.
C Select Epson Edge Print and click Uninstall.
Epson Edge Print Operation Guide
Troubleshooting & Tips
86

Operating environment
The software can be used in the following environments. (as of April 2017)
The supported OS and other elements may change.
For the latest information, see the Epson Web site.
Operating system (OS) Windows 7 SP1 / Windows 7 SP1 x64
Windows 8 / Windows 8 x64
Windows 8.1 / Windows 8.1 x64
Windows 10/ Windows 10 x64
*64 bit is recommended
CPU Core2Duo 3.0 GHz or more
Free memory 2 GB or more
Hard disk drive(free space during installation)
50 GB or more
Communication interface Hi-Speed USB
Ethernet 100Base-TX/1000Base-T
Display resolution 1280×1024 or more
Epson Edge Print Operation Guide
Operating environment
87

Supported data formats
The following print data formats are supported. (as of April 2017)
Supported data formats may be added or changed.
For the latest information, see the Epson Web site.
Supported formats Explanation
PS PostScript Level3
EPS Encapsulated PostScript
Embed linked images.
PDF PDF 1.7 Adobe Extension Level3
Password protection is not supported
TIFF Baseline and progressive are supported
Supported compression formats: JPEG/LZW/ZIP/G3/G4
Multipage TIFF are supported
Alpha channel is skipped.
JPEG Baseline and progressive are supported
JPEG2000 is not supported
PNG Baseline and progressive are supported
Alpha channel is skipped.
CALS-G4 CALS Type1 format is supported
Epson Edge Print Operation Guide
Supported data formats
88

Supported colorimeters
The following spectrophotometers from X-Rite Incorporated are supported.
i1 Pro2
Epson Edge Print Operation Guide
Supported colorimeters
89