episode 23 - how to get started with mailchimp · mailchimp account and imported your current email...
TRANSCRIPT

! of !1 26
EPISODE 23: HOW TO GET STARTED WITH MAILCHIMP

HOW TO GET STARTED WITH MAILCHIMP
Want to play a fun game?
Every time you hear the phrase “email list” take a drink. You’ll be passed out in no time.
Everyone knows you need to grow your email list. What most people don’t know is what to do once they have a list. There are 3 important things you have to do with your email list...
Thing #1. Help them
Thing #2. Segment them
Thing #3. Sell to them
The tricky part is, effectively selling your products is 100% predicated on doing #1 and #2. Screw up on them, and you’re done.
That’s why using an effective email list provider, like Mailchimp, comes in.
MailChimp allows you to do all three of these things. Best part is, it’s free.
! of !2 26

In this month's PlatformU How To, we’re going to show you how to get started with MailChimp.
By the end you’ll have a thorough guide to….
• Understanding exactly how to use MailChimp to help and grow your relationship with your audience
• Discovering exactly how to segment your audience based on their preferences
• Using a step-by-step formula to sell your product to your email list
This how-to is going to go beyond just showing your the technicalities of setting up your email list on MailChimp. We’re going to dive into how to actually help your email list and provide real value to them, how to segment your list so that your subscribers get information tailored specifically to them, and how to sell a product or service to your list.
Ready to get going?
! of !3 26

Help Them
One of the biggest #epicfails I see business owners make when they are getting started with email marketing is emailing their list too little.
I know, I know… you don’t want to be annoying.
However, you also want your audience to KNOW who you are.
When you are first getting started, I recommend emailing your list once a week. Here’s the exact strategy I recommend using to do that:
Step #1: Blog 250 Words Per Day
Pumping out a massive blog every week is overwhelming to most people. I get it, that’s a LOT of time writing.
But, what if you broke down that writing into small segments each day?
Your goal in this step is to start writing 250 words per day. It’s okay if the blog posts suck at first. You are getting into a habit here.
When I first started Videofruit, I made the commitment that I was going to become a world class writer. So, I committed to writing 250 words per day every day for the next 6 months.
Look at what happened during my first few months of blogging …
! of !4 26
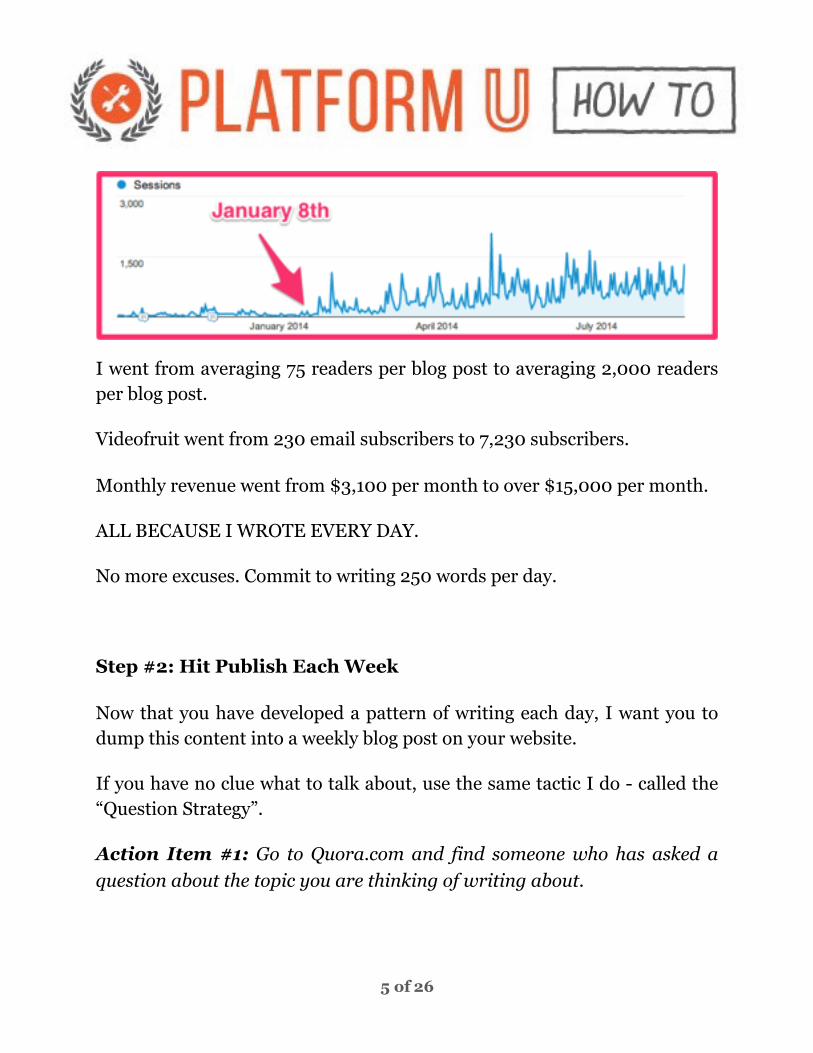
I went from averaging 75 readers per blog post to averaging 2,000 readers per blog post.
Videofruit went from 230 email subscribers to 7,230 subscribers.
Monthly revenue went from $3,100 per month to over $15,000 per month.
ALL BECAUSE I WROTE EVERY DAY.
No more excuses. Commit to writing 250 words per day.
Step #2: Hit Publish Each Week
Now that you have developed a pattern of writing each day, I want you to dump this content into a weekly blog post on your website.
If you have no clue what to talk about, use the same tactic I do - called the “Question Strategy”.
Action Item #1: Go to Quora.com and find someone who has asked a question about the topic you are thinking of writing about.
! of !5 26

For instance, if I were thinking of writing a blog post about keeping up motivation during the “startup” phase of a business, I would look for questions in Quora.com with search terms like “lost my motivation startup”.
Action Item #2: Ask the Quora.com question in a social media post.
The goal here is to see if you get more interaction with this social media post then you do others. If your audience is engaging with it, then it’s worth writing about.
For instance, I could write a Tweet like this:
! of !6 26

Action Item #3: Wait a day and see if your engagement increases.
By using a social media scheduling tool like Buffer, I noticed that most of the tweets I was getting on my personal account would get 3-5 clicks.
However, some of my Tweets were 5-10x more popular than others.
While most tweets got 3 clicks others received 15-30.
Here is an example:
! of !7 26

These traffic engagement spikes validate that my audience is interested in reading about this topic. So, if you get extra engagement on your question, there’s a high probability that people are interested in this topic.
You can do this process on repeat - just schedule tweets in Buffer about topics that you THINK would be popular and measure the response.
Buffer analytics = Blog Post Ideas
Step #3: Send Out a Weekly Campaign Email
Here’s where we get to MailChimp!
If you are just starting out with email marketing, Mailchimp is a great tool for you because it is FREE for up to 2,000 email subscribers. It’s also super simple to figure out and they have a super thorough Getting Started Guide to help you jump in.
In this how-to, I’m going to assume that you have already signed up for a Mailchimp account and imported your current email subscribers.
Once you’ve done that - it’s time to send out an email campaign! (Psst… a “campaign” is just what MailChimp calls a one-time email that you send out to your list).
I recommend doing this once a week, to announce that you’ve published a new post on your blog.
! of !8 26

Here are the action items you’ll take to send out that first email “campaign”:
Action Item #1: Create a new campaign.
You’ll do this by clicking on the “Campaigns” tab on the top of your account and then clicking “Create Campaign”.
You’ll be prompted to put in the name of the campaign (you can just put the date) and what type of campaign it will be. Normally, you’ll be selecting a “regular” campaign.
! of !9 26

Action Item #2: Designate the recipients.
The first step when you create your campaign is Recipients. You’ll decide here who will receive your campaign.
You can send the email to your entire list, or use MailChimp’s segmentation tools to send to a segment of the list. For your weekly campaign emails - you’ll want to be sending these out to your entire list.
! of !10 26

Action Item #3: Fill out campaign info
In the Setup step, you’ll enter general info like the email subject line, From name, and From email address.
! of !11 26

Action Item #4: Select your template
I recommend just using one of the basic templates provided for you.
Action Item #5: Add your content
Now that you’ve selected your recipients and named your campaign, you’ll proceed to the Design step. You can use MailChimp’s email designer to add text and pictures to your email. Play around and have some fun here. You can send out an email with just text or have pictures to explain some of the details of your email.
Remember, though - The most important part of this email isn’t how pretty it looks. What is important is that it compels the reader to click through and actually read your blog post.
! of !12 26

Action Item #5: Send your campaign
Once you’ve finished writing your campaign, you can head over to the “Confirm” page where you’ll select the delivery method for your campaign.
You can send it immediately or schedule it for a specific date and time to be sent out.
Segment Them
There’s three main reasons to have an email list:
• To connect with your audience
• To evaluate what they want from you
• To make money
You are going to connect with your audience every time that you send out that weekly email campaign.
But it can’t just stop there…
! of !13 26

If you want to make money from your list, you have to know what your list is interested in.
Enter - the Content Upgrade.
What is a content upgrade?
You’ve probably seen a content upgrade before without realizing what it was…
Ever read a blog, get to the bottom and see a box like this?
! of !14 26

Or this?
These handy little forms that you find at the end of a blog post are called “content upgrades”.
A content upgrade is some kind of bonuses content that is unique to the specific content they are reading in your blog, that they can get in exchange for their email address.
One of the BEST ways to get more subscribers to your email list is to have a unique content upgrade for each of your blog posts.
! of !15 26

This doesn’t have to be complex and you don’t have to write an entire ebook. A content upgrade can be as simple as a checklist, infographics, or top 10 list that’s related to your topic.
Let’s take a look at how to add content upgrades to your blog posts:
Step #1: Create a list field inside of MailChimp
This will allow you to track who downloads each bonus. You will not be creating a new list for each opt-in bonus.
All of your bonus download subscribers will dump into the same list and you will put an indicator on their contact record so you can know who has downloaded what.
That ‘indicator’ will be placed in a list field. You know how you can store someone’s first name, last name, email, and other information inside of your email program? Those are list fields.
Well you can also create new fields to store other stuff in as well. We’re going to create a new one to track whether or not someone has downloaded your bonus.
To create a new list field…
• Login to your account
• Click “Lists” on the top menu
• Chose the list that you want your new subscribers to go into
! of !16 26

• Next, click Settings in the menu and then chose “Lists fields and Merge Tags”
• Now, click the “Add Field” button. Then, click “Text.”
You’ve created a new list field (yay!).
Now it’s time to set it up.
I always name my list field after the blog posts that it is associated with.
For example, if I am writing a post called the “Spike Formula” then I’ll name the list field “Spike Formula [Bonus].”
You need to do three things now:
• Name your bonus
• Make sure the “Visible?” field is NOT checked
! of !17 26

• Click save
Step #2: Create the opt-in form inside of a LeadBox
Now let’s head over to LeadPages to get that piece setup. You can also use a different landing page software or create these from scratch… but I 100% recommend LeadPages for this step.
Once you are logged into your account you’ll need to:
• Click “LeadBoxes” in the upper right hand corner
• Click “Create LeadBox”
• Name your LeadBox (Use the same name as your merge field in the last step)
! of !18 26

• Integrate it with MailChimp (here’s an article that explains exactly how to do that).
• Customize the wording of your LeadBox.
Step #3: Embed your LeadBox form on your website
All we need to do now is copy and paste a little code.
After you name your LeadBox and save it, click the “Publish” button in the upper right corner of the page. You’ll then see a button that says “Get Code”
This will give you a box with a bunch of weird looking code inside of it.
It should look like this…
! of !19 26

Now open up the WordPress post you want to embed your LeadBox into. Then find the text or image which you want to use to initiate your LeadBox and paste the code where that text or image is.
That will make the text or image clickable and initiate the LeadBox once clicked by your readers.
Annnd, you’re done!
Now, anytime someone downloads your post specific bonus their contact record inside of MailChimp will be labeled accordingly.
All of your contacts will be stored nice and neat in one list and you’re life will be much easier.
Step #4: Deliver the Content Upgrade
Up to now we’ve covered how to configure everything to capture the email address, save it in one united list inside of MailChimp, and properly tag each contact record so that you can identify who has downloaded what.
But what about delivering the actual content upgrade itself?
After all, that is what they signed up for in the first place.
The quickest and easiest way to set this up is to send them directly to the bonus.
Setting this up is pretty simple.
! of !20 26

When you are inside of your Leadbox and have the Integrations open, you can select to send the user to a default Leadpages thank you page and upload your content upgrade file.
Step #5: Analyze your content upgrades to see what your audience wants to buy from you.
Once you have been sending out blog posts for a few months, you can start to check out your analytics to see which of your content upgrades are getting the most attention.
! of !21 26

Which emails have the highest open and click through rates?
Which of your blog posts are getting the most comments?
MailChimp makes it easy to find out your email information with their analytics. Simply click on the “Campaigns” tab in the top menu and you can see your open and click rates listed for you next to each sent campaign.
Evaluating this information will help you to discover what your audience is most interested in.
Sell to Them
Once you are noticing trends in what your audience is interested in, you can start to develop a product, service, coaching program, or course to sell to them.
I normally don’t recommend selling to your list until you’ve reached 1,000 email subscribers or you’ve been consistently blogging for at least a year.
! of !22 26

Remember, the first step to making money from your email list is providing REAL value to them. Do this consistently and you will see much better results once you do start to sell to them.
Once you are ready to start selling to your list, I recommend using the Problem, Agitate, Solve method to get them to buy. Here’s how it works:
Step #1: Use the PAS system to prep your audience to buy from you.
Right before your start selling to your audience, I recommend using the PAS (Problem, Agitate, Solve) method to prime them to buy from you.
This can be done by sending out three separate email campaigns within MailChimp. I recommend sending these all within a 10 day time span.
Here’s how you use PAS to set the state for your product launch:
I first heard about the PAS framework from this Copyblogger article. And then when I went through Derek Halpern’s course Yes Engines (highly recommended), he expounded upon it even further and taught me how to apply the framework to a pre-launch series.
! of !23 26
What is the PAS framework?
(P)roblem
(A)gitate
(S)olve
Let me explain…
The PAS framework works because it increases your readers’ desire for your product by elevating your product from something they would “kind of like to have one day” to something they “have to have right now.”
Instead of jumping in and talking about your product right away, you are going to use three emails (or videos or podcasts or webinars) to talk about the problem, agitate or amplify the problem even more and then give them a quick solution to their problem.
Once you have done THAT, you will be ready to present an even more robust solution to their problem… your product.
This is how I did that in my very first course launch:
Email #1: Problem: In this email I told a personal story and used it to highlight two of the main drawbacks of a service-based business.
Email #2: Agitate: In this email I quickly recapped the first email and then went on to share 5 more mistakes you need to avoid when starting your business. No solutions were offered.
! of !24 26

Email #3: Solve: In this email I recapped the first two emails, introduced my solution to the problems and mistakes from the first two emails (building an email list) and then taught a quick strategy that readers could use right then to start building their list.
The result of this 3-email sequence was profound.
I received 400+ replies to these 3 emails.
People saying things like…
Bottom line, this works.
You can use the PAS system to begin selling your product or service to your email list.
! of !25 26

NOW IT’S YOUR TURN
Email marketing doesn’t have to be confusing or expensive. Using a tool like MailChimp, you can actually make money from your email list with little to no cost.
Here’s how you do that again:
Help Them: Begin writing 250 words per day and sending out a weekly blog post to your email list.
Segment Them: Using MailChimp and Leadpages, create unique content upgrades for each blog post to get more email subscribers.
Sell to Them: Using the PAS formula, start selling your service, product, coaching program, or course to your email list.
So, here’s your challenge…
I want you to start TODAY by writing your 250 words.
No excuses.
If you want to be a better writer, build and email list, and start making money online - it all starts with writing on a consistent basis. Once you’ve written every day for 7 days straight, you can send out your first email campaign in MailChimp to announce your blog post!
Head on over to the Platform University Forums and tell us what YOU are going to start writing about this week!
! of !26 26