en instructions for use | pl instrukcja obsługi tr
TRANSCRIPT

Swing maxi™
EN Instructions for use | PL Instrukcja obsługi
TR Kullanım talimatları
BPA Bisphenol-A
freeEFFICIENCY
Thank you for choosing the Swing maxi breast pump. Breast milk is the natural choice for your baby, but there are reasons and situations where breastfeeding is not possible. For over 50 years, it has been Medela’s conviction that these mothers and babies can be supported. In close co-operation with breastfeeding experts, Medela, one of the market leaders, has researched and developed breast pumps that perfectly meet breastfeeding mothers needs. For mothers who insist on the best for their babies and themselves. Because you care.
Dziękujemy za wybranie odciągacza pokarmu Swing maxi. Mleko matki jest najlepsze dla każdego dziecka, jednak czasami z różnych przyczyn bezpośrednie karmienie piersią nie jest możliwe. Już od ponad 50 lat firma Medela z wielkim zaangażowaniem wspiera matki i ich nowonarodzone dzieci w takiej sytuacji. Firma Medela, jeden z liderów rynkowych, przeprowadzi-ła badania we współpracy z ekspertami w dziedzinie karmienia piersią i opracowała odciągacze pokarmu, które są optymalnie dostosowane do potrzeb kobiet karmiących piersią. Dla matek, które pragną tego, co najlepsze dla siebie i swoich niemowląt. Bo Tobie zależy.
Swing maxi Süt Pompasını seçtiğiniz için teşekkür ederiz. Anne sütü bebeğiniz için en doğal tercihtir; ancak doğrudan emzirmenin mümkün olmadığı durumlar ve nedenler vardır. Medela 50 yılı aşkın bir süredir bu durumdaki anne ve bebekleri desteklemektedir. Medela, pazar liderle-rinden biri olarak, emzirme konusunda uzman kişilerle yakın işbirliği içinde, emziren annelerin gereksinimlerini en mükemmel şekilde karşılayan süt pompalarını araştırmakta ve geliştirmektedir. Bebekleri ve kendileri için en iyi çözümü isteyen annelere. Çünkü sizin için önemli.

EN4–31
PL 32-59
TR60–87

1. Intended Use / Contraindication / Population 5
2. Meaning of symbols 6
3. Important safety information 8
4. Product description 10
5. Cleaning 12
5.1 Before using for the first time and after every use 12
5.2 Before using for the first time and once a day 14
5.3 Cleaning the motor unit 15
6. Preparing for pumping 16
6.1 Mains operation 16
6.2 Battery operation 16
6.3 Assembling the pump set 18
7. Expression 20
7.1 Preparing for single pumping 20
7.2 Pumping 20
7.3 Preparing for hands-free expression with Easy Expression Bustier 22
7.4 Preparing for double pumping 24
8. Storing and thawing breast milk 26
8.1 Storage 26
8.2 Freezing 26
8.3 Thawing 26
9. Feeding breast milk 27
10. Troubleshooting 28
11. Warranty / disposal 29
12. Complete care during breastfeeding time 30
13. EMC / Technical description 88
14. Technical specifications 94
Table of Contents
4

The intended use and indications of breast pumpsBreast pumps are intended to be used by lactating women in the hospital or homeenvironment for expressing breast milk. Breast pumps are indicated to alleviate thesymptoms of engorgement by expressing milk. In case of mastitis breast pumpssupport the healing process by removing breast milk from the affected breast.Breast pumps are indicated to relieve sore and cracked nipples and to bring out flator inverted nipples. Also breast pumps enable mothers to provide breast milk forbabies who cannot feed directly at the breast for a variety of reasons such aslatch-on problems, cleft palate or premature babies.
Intended patient population / userAdolescent paediatric or adult lactating women. Many women find it convenient, oreven necessary, to use a breast pump to express and store their breast milk once they have returned to work, are travelling or are otherwise separated from their baby.Women are often delighted to learn that a breast pump can be used as a supplementto breastfeeding and that some pumps are designed to mimic the suckling of anursing baby.
Contraindications There are no known contraindications for the Swing maxi breast pump.
1. Intended use / Contraindication / Population
5

WarningCan lead to serious injury or death.
CautionCan lead to minor injury.
i NoteCan lead to material damage.
i InfoUseful or important information that is not related to safety.
Symbols on the packaging
This symbol indicates that the material is part of a recovery/recycling process.
This symbol indicates a carton package.
This symbol indicates to keep the device away from sunlight.
This symbol indicates to handle the fragile device with care.
This symbol indicates the temperature limitation for operation, transport and storage.
This symbol indicates the humidity limitation for operation, transport and storage.
This symbol indicates the atmospheric pressure limitation for operation, transport and storage.
This symbol indicates to keep the device dry.
This symbol indicates that the packaging contains products intended to come in contact with food according to regulation 1935/2004.
This symbol indicates unique GSI Global Trade Item Numbers (GTIN)
This symbol indicates do not dispose the device together with unsorted municipal waste (for EU only).
This symbol indicates to follow instructions for use.
Symbols on the device
This symbol indicates to follow instructions for use.
This symbol indicates the compliance with the essential requirements of the Council Directive 93/42/EEC of 14 June 1993 concerning medical devices.
2. Meaning of symbols
The warning symbol identifies all instructions that are important for safety. Failure to observe these instructions can lead to injury or damage to the breast pump! When used in conjunction with the following words, the warning symbol stands for:
6

This symbol indicates the manufacturer.
This symbol indicates do not dispose the device together with unsorted municipal waste (for EU only).
This symbol indicates the compliance with additional USA and Canada safety requirements for medical electrical equipment.
This symbol indicates a type BF applied part.
SN This symbol indicates manufacturer's serial number of the device.
This symbol indicates the positioning of battery cell.
This symbol indicates the protection against ingress of solid foreign objects and against harmful effects due to the ingress of water.
This symbol indicates the date of manufacture (four digits for the year and two digits for the month).
Symbols on the mains adapter
This symbol indicates that the mains adapter is a class II device.
This symbol indicates the compliance with China Compulsory Certification.
This symbol indicates that the mains adapter is safety tested.
This symbol indicates that the mains adapter is for indoor use only.
This symbol indicates the compliance with USA and Canada safety requirements.
This symbol indicates the compliance with Federal Communications Commission requirements.
This symbol indicates polarity of d.c. power connector.
N136
This symbol indicates the compliance with AUS/NZ regulatory requirements (Regulaltory compliance mark).
This CE-mark indicates the compliance with the low voltage and electromagnetic compatibility directive.
This symbol indicates to not dispose the device together with unsorted municipal waste (for EU only). The solid bar symbol indicates that mains adapter is put on the market after 13 August 2005.
This symbol indicates the compliance with Japanese safety requirements.
This symbol indicates the compliance with energy efficiency requirements.
This symbol indicates alternating current.
This symbol indicates direct current.
7

3. Important safety information
Failure to follow these instructions/safety information can lead to danger from the device. Subject to technical changes.
Device
Danger of electrocution! Keep the device dry! Never immerse in water or other liquids!
The Swing maxi breast pump is not heat-resistant: keep away from radia-tors and open flames.
Do not expose the motor unit to direct sunlight.
Repairs must be performed only by an authorised service agencyDo not repair yourself! No modifications to the device are permitted.
Never use a damaged device. Replace damaged or worn parts.
MAX. 250 h The operating life of the Swing maxi breast pump is 250 hours.
The service life is two years.
Electrical use
Separation from the mains is only assured through the disconnection of the mains adapter from the wall socket outlet.
Keep the mains adapter away from heated surfaces.
Do not reach for any electrical device if it has fallen into water. Unplug immediately.
The breast pump should never be left unattended when plugged into a power source.
8

Use
Use the Swing maxi breast pump only for its intended use as described in this manual.
Never operate an electrical device if it has a damaged cord or plug, if it is not working properly, if it has been dropped or damaged, or dropped into water.
Do not use the Swing maxi breast pump while bathing or showering.
Do not use the Swing maxi breast pump while sleeping or overly drowsy.
This is a single user product. Use by more than one person may present a health risk.
Do not drive whilst hands-free pumping.
Supervision is necessary when the Swing maxi breast pump is used in the vicinity of children.
Contact your lactation consultant or physician if you experience problems or pain.
Portable and mobile radio frequency communications equipment can affect the Swing maxi breast pump.
Important:l Plastic bottles and component parts become brittle when frozen and may break
when dropped.l Also, bottles and component parts may become damaged if mishandled, e.g. dropped,
over-tightened, or knocked over.l Take appropriate care in handling bottles and components.
l Do not use the breast milk if bottles or components become damaged.
9

2x PersonalFit breast shield M (24mm)(for other breast shield sizes see Chapter 12, page 30)
2x Freestyle connectors (breast shield base, membrane, transparent cap)
2x bottle
2x bottle stand
2x Calma multi lid1x Calma Solitaire
4. Product description
Spare parts and accessories available for order can be found on page 30
10
2x Calma multi lid
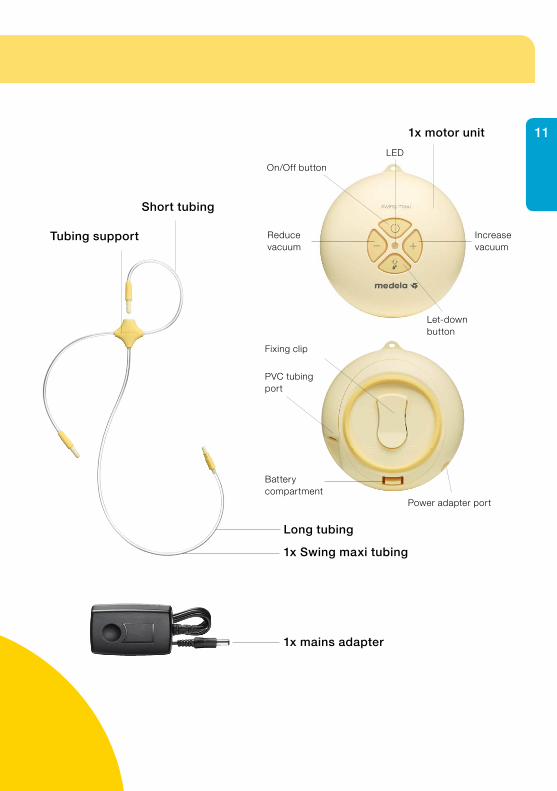
Long tubing
1x mains adapter
1x motor unit
On/Off button
Reduce vacuum
Increase vacuum
Let-down button
LED
1x Swing maxi tubing
Tubing support
Short tubing
Power adapter port
PVC tubing port
Battery compartment
Fixing clip
11

4
1
i
5.1 Before using for the first time and after every use
Disassemble the pump set into individual parts.
Rinse all parts with cold, clear water (approx. 20 °C) for 10 – 15 seconds.
l Only use drinking-quality water for cleaning.
l Take apart and wash all parts that come in contact with the breast and breast milk immediately after use to avoid dry up of milk residues and to prevent growth of bacteria.
l The pump set requires no main-tenance.
l Take care not to damage parts of the pump set during cleaning.
l If the individual components of the pump set are cleaned in a dish-washer parts may be discoloured by food pigments. This has no impact on the function.
Note
Caution
5. Cleaning
12
2 3
5
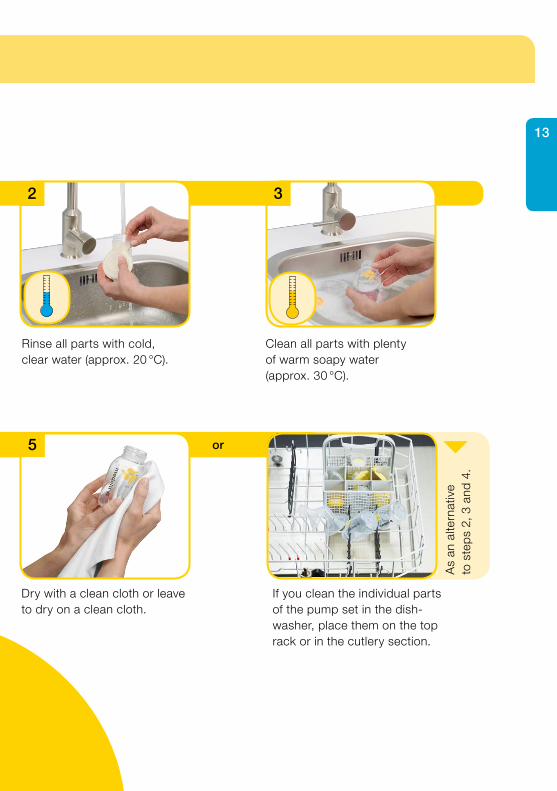
Rinse all parts with cold, clear water (approx. 20 °C).
If you clean the individual parts of the pump set in the dish-washer, place them on the top rack or in the cutlery section.
Clean all parts with plenty of warm soapy water (approx. 30 °C).
Dry with a clean cloth or leave to dry on a clean cloth.
As
an a
ltern
ativ
e
to s
tep
s 2,
3 a
nd 4
.
or
13

1
i
3
Mor
e in
form
atio
n on
p
age
12,
chap
ter
5.1
step
s 2–
4
5.2 Before using for the first time and once a day
Disassemble the pump set into individual parts.
Dry with a clean cloth or leave to dry on a clean cloth.
l Only use drinking-quality water for cleaning.
l Take apart and wash all parts that come in contact with the breast and breast milk immediately after use to avoid dry up of milk residues and to prevent growth of bacteria.
l When boiling, a tea spoon of citric acid may be added to avoid a build-up of limescale.
l Store the pump set in a clean bag/container until next use. Or store it in clean paper or a cloth.
Caution
Note
5. Cleaning
14
2a 2b
1
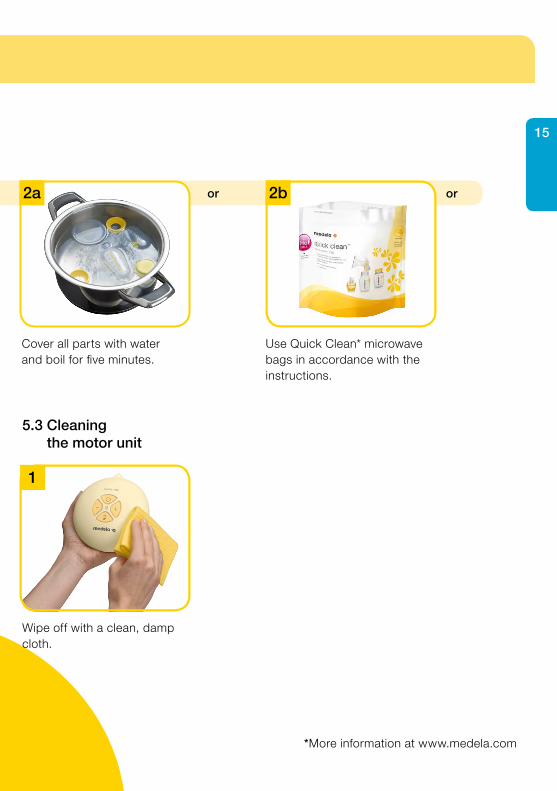
Cover all parts with water and boil for five minutes.
Use Quick Clean* microwave bags in accordance with the instructions.
or
*More information at www.medela.com
Wipe off with a clean, damp cloth.
5.3 Cleaning the motor unit
or
15

1
1
i
Plug the mains adapter cord into the motor unit.
6.1 Mains operation
6. Preparing for pumping
l re 6.2 Battery operation: The batteries do not need to be removed when the main adapter is used for pumping.
l Regularly check the condition of the batteries in the motor unit.
l If Swing maxi will remain unused for a longer period of time, remove the batteries from the battery compartment.
l Batteries last for two to three pumping sessions (approx. 1 ½ hours pumping time).
6.2 Battery operation
Open the battery compart-ment on the back in the direction of the arrow.
l re 6.1 Mains operation: Follow the exact order of the steps.
l Only use the mains adapter supplied with the Swing maxi.
l Make sure the voltage of the mains adapter is compatible with the power source.
Info
Warning16

2
2 3
6.2 Battery operation
Plug the mains adapter into the mains socket.
Insert six AAA Micro 1.5 V batteries.
Close the battery compartment.
17

1
4i
i
Carefully insert the light yellow membrane into the base of the breast shield.
6. Preparing for pumping
l Wash hands thoroughly (at least one minute) with soap and water before touching the breast and pump parts.
Screw bottle into connector.
6.3 Assembling the pump set
l Carry out all the steps with care and assemble the pump set correctly. Otherwise a good vacuum may not be achieved.
l Use Medela original accessories only.
l Check pump set components for wear or damage before use and replace if necessary.
l All components must be completely dry before use.
Caution
Info
Note
18

5
2
6
3
Fasten the transparent cap to the connector. ➙ Make sure that all three
snaps (top and side) are engaged.
Insert the short tubing into the transparent cap as far as it will go.
Insert the long tubing into the motor unit.
Push the breast shield onto the connector.
19

1
1
7. Expression
Insert the unused short tubing into the tubing holder.
7.1 Preparing for single pumping
Switch on the breast pump with .
➙ The stimulation phase lasts a maximum of two minutes. The stimulation phase will then automatically change to the expression phase.
7.2 Pumping
l re step 2 (chapter 7.1): Answer the following questions to find out whether the available breast shield size will fit:l Is your nipple moving freely in
the tunnel? l Is minimal or no areolar tissue
being pulled into the tunnel of the breast shield?
l Do you see a gentle, rhythmical motion in the breast with each cycle of the pump?
l Do you feel the breast emptying all over?
l Is your nipple pain-free?
If the answer to any of these ques-tions is “No” or if you experience problems or pain during expression, consult your breastfeeding and lactation consultant or midwife.
Caution
i
l re step 3 (chapter 7.1): Do not hold the pump set by the bottle. This can lead to blockage of the milk ducts and engorgement.
l Wipe the breast with a warm washcloth (do not use alcohol).
Note
20
12 3
12 3
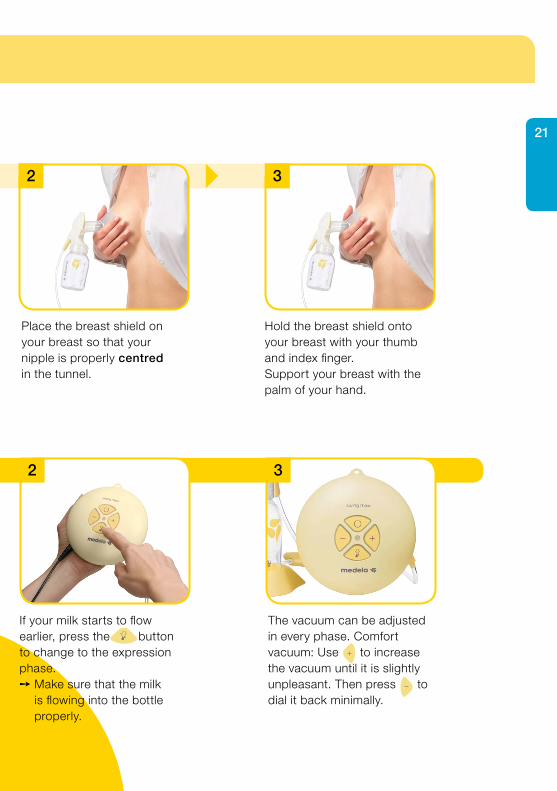
Hold the breast shield onto your breast with your thumb and index finger. Support your breast with the palm of your hand.
Place the breast shield on your breast so that your nipple is properly centred in the tunnel.
The vacuum can be adjusted in every phase. Comfort vacuum: Use to increase the vacuum until it is slightly unpleasant. Then press to dial it back minimally.
If your milk starts to flow earlier, press the button to change to the expression phase.➙ Make sure that the milk
is flowing into the bottle properly.
21

i
i
4
1
7. Expression
Switch off the breast pump with .
l Always disconnect the Swing maxi from the power source after expression.
l Only fill the bottle to the 150 ml mark.
l Contact your midwife or lactation consultant if you can express only minimal or no milk or if expression is painful.
l The Swing maxi switches off auto-matically if the pump has been running for 30 minutes without any manipulations.
l Do not kink the tubing during expression.
Overview of LEDs
lights up On
does not light up Off
even, regular flashing Stimulation phase
light constantly on Expression phase
rapid flashing Min./Max. vacuum
Put on the Easy Expression Bustier and leave the zip open slightly.
7.3 Preparing for hands-free expression with the Easy Expression Bustier*
Note
Caution
Info
22

15 6
2 3
Use the stand to prevent the bottle from tipping over.
Close the bottle with a lid.➙ Follow the instructions in
Chapter 8 “Storing and thawing breast milk”.
Place the breast shield on your breast under the bustier such that your nipple is centred in the tunnel of the breast shield.
Close the zip and insert the connector onto the breast shield.
Mor
e in
form
atio
n on
p
age
20,
Cha
pter
7.2
.C
lean
in a
ccor
dan
ce
with
Cha
pter
5,
p
age
12.
*Optional, see Chapter 12, page 30
23

1
4
i
7. Expression
Place the breast shield on your breast so that your nipple is properly centred in the tunnel.
l re step 2: Do not hold the pump set by the bottle. This can lead to blockage of the milk ducts and engorgement.
7.4 Preparing for double pumping
Place the second breast shield on your breast so that your nipple is properly centred in the tunnel.
Mor
e on
pag
e 20
, C
hapt
er 7
.2,
step
3
l Double pumping saves time and increases the energy content of the milk. Milk production is increased and maintained long-term.
Caution
Info
24

12 3
Hold the breast shield onto your breast with your thumb and index finger. Support your breast with the palm of your hand.
Switch on the breast pump with .➙ The stimulation phase lasts
a maximum of two minutes. The stimulation phase will then automatically change to the expression phase.
25

8. Storing and thawing breast milk
8.1 StorageStorage guidelines for freshly expressed breast milk
( For healthy term babies )
Room temperature
Refrigerator Freezer Thawed breast milk
4 − 6 hours at 19 to 26 ° C ( 66 to 78 ° F )
3 − 8 days at 4 ° C ( 39 ° F )
or lower
6 − 12 months –18 to – 20 °C ( 0 to –4 ° F )
In refrigerator for 10 h max. Do not refreeze !
l Do not store breast milk in the door of the refrigerator. lnstead choose the coldest part of the refrigerator (this is at the back of the glass shelf above the vegetable compartment).
l You can freeze expressed breast milk in milk bottles or “Pump & Save” bags. Do not fill the bottles or bags more than ¾ full to allow space for possible expansion.
I Label the bottles or “Pump & Save” bags with the date of expression.
Do not thaw frozen breast milk or do not warm breast milk in a microwave or a pan of boiling water to avoid loss of vitamins, minerals and other important components and to prevent bums.
I ln order to preserve the components of the breast milk, thaw the milk in the refrigerator overnight. Alternatively, you can hold the bottle or “Pump & Save” bag under warm water (max. 37 °C).
I Gently swirl the bottle or “Pump & Save” bag to mix any fat that has separated. Avoid shaking or stirring the milk.
8.2 Freezing
8.3 Thawing
Warning
26

i
FEEDING
PUMPING
RESEARCH BASED SUPPORT FOR BREASTFEEDING MOTHERS
Invented by Medela
Supportingbabies feedingbehaviour
Moremilk inless timeS
UC
KING
2-P
HA
SE
CA
LM
A
STIMULATION
EXPRESSIO
N
MILK FLOW
You can find detailed informationabout Calma on the Medela website(www.medela.com).
9. Feeding breast milk
Medela recommends Calma* for feeding breast milk.
Calma – unique feeding solution for breast milk.
Info
As a result of its comprehensive research work, Medela is one of the first companies in the world to incorporate babies‘ breastfeeding behaviour into its 2-Phase Ex-pression and Calma innovations. 2-Phase Expression is based on the baby‘s natural suckling rhythm so that more milk can be expressed in less time. Short, stimulating patterns are followed by longer ones, provid-ing optimal milk flow. The unique Calma breast milk teat allows the baby to pause and breathe during feeding whilst maintaining the suck-ling behaviour learned at the breast. Developed for a great breastfeeding experience.
With Calmal your baby can feed, pause and
breathe regularly.l milk will only flow when a vacuum is
created.l your baby‘s natural feeding behaviour
will be maintained supporting easy transition back to the breast.
27

10. Troubleshooting
Problem Solution
If the motor is not running
Check presence of mains current. Check the position of the batteries in the battery compartment.
If there is loss of power during battery operation
Replace batteries.
If there is low or no suction
Check all connections.Engage cap correctly at the three connection points.Hold the breast shield, not the connector or bottle, while expressing.Ensure the breast shield forms a complete seal around the breast.During single pumping, insert the unused tubing into the tubing holder. Do not kink the tubing. There should be no water in the tubing.All components must be completely dry.
The pump becomes wet
Unplug the mains adapter from the socket.Switch off the pump.Do not place the pump upside down. Control panel must point upwards.Store the pump in a dry, warm place for 24 hours.
Note:Do not expose the pump to direct sunlight.Do not accelerate the drying process by use of heat.
If condensation appears in the tubing
Rinse out the tubing. Shake out any water droplets.Hang up the tubing to air-dry.
28

Warranty
The “International Warranty” brochure contains detailed warranty information.
Disposal
The unit is made of various metal and plastics. Before disposal, the device is to be rendered unusable and it must not be disposed of as unsorted municipal waste in accordance with local regulations. Use your local return and collection system for waste electrical and electronic equipment (incl. batteries). Improper disposal may have harmful effects on the environment and on public health.
11. Warranty / disposal
29

Spare parts
Article number Product
099.0271099.0272099.0273099.0274800.0840200.1693
Swing maxi / Freestyle (100-240V; 12V, 50-60Hz, 0,6 A) EuroSwing maxi / Freestyle (100-240V; 12V, 50-60Hz, 0,6 A) UK and US / JPSwing maxi / Freestyle (100-240V; 12V, 50-60Hz, 0,6 A) AUS / NZSwing maxi / Freestyle (100-240V; 12V, 50-60Hz, 0,6 A) CNSwing Battery cover 5 pcs.Freestyle Connector with valve 5 pcs.
099.0270 Swing maxi Motor Unit
099.0275 Swing maxi Tubing
Accessories
Article number Product
008.0033*008.0034*008.0035*008.0036*008.0037*
PersonalFit breast shield SPersonalFit breast shield MPersonalFit breast shield LPersonalFit breast shield XLPersonalFit breast shield XXL
008.0074008.0075
Breast milk bottle 150 mlBreast milk bottle 250 ml
008.0145 Calma Solitaire
200.1756200.0625
Cooling BagCity Style Bag
008.0217008.0220008.0224008.0225
Easy Expression Bustier white SEasy Expression Bustier white MEasy Expression Bustier white LEasy Expression Bustier white XL
Other Medela products are available on the www.medela.com web site.
The following accessories for the Swing maxi are available from Medela distribution partners by specifying the product number.
12. Complete care during breastfeeding time
* If the result of expression is unsatisfactory or expression is painful, contact your midwife or lactation consultant. A different size of PersonalFitTM breast shield may help make expression more comfortable and successful.
30

Breast care
Evidencebased
research
Feeding
Breast milk management
Collecting
Pumping
31
1. Przeznaczenie/przeciwwskazania/populacja 33
2. Znaczenie symboli 34
3. Ważne informacje na temat bezpieczeństwa 36
4. Opis produktu 38
5. Mycie 40
5.1 Przed pierwszym użyciem, a następnie po każdym użyciu 40
5.2 Przed pierwszym użyciem, a następnie raz dziennie 42
5.3 Czyszczenie modułu silnika 43
6. Przygotowanie do odciągania pokarmu 44
6.1 Praca z zasilaniem sieciowym 44
6.2 Praca z zasilaniem bateryjnym 44
6.3 Składanie zestawu osobistego 46
7. Odciąganie 48
7.1 Przygotowanie do odciągania pojedynczego (z jednej piersi) 48
7.2 Odciąganie pokarmu 48
7.3 Przygotowanie do odciągania bez użycia rąk przy użyciu gorsetu
Easy Expression Bustier 50
7.4 Przygotowanie do odciągania podwójnego (z dwóch piersi) 52
8. Przechowywanie i rozmrażanie pokarmu 54
8.1 Przechowywanie 54
8.2 Zamrażanie 54
8.3 Rozmrażanie 54
9. Karmienie mlekiem matki 55
10. Rozwiązywanie problemów 56
11. Gwarancja/utylizacja 57
12. Kompleksowa oferta produktów wspomagających
karmienie piersią 58
13. Kompatybilność energetyczna (EMC)/opis techniczny 88
14. Specyfikacje techniczne 94
Spis treści
32

1. Przeznaczenie/przeciwwskazania/populacja
Przeznaczenie i wskazania do używania odciągaczy pokarmuOdciągacze pokarmu są przeznaczone do użytku przez kobiety karmiące w warun-kach szpitalnych lub domowych do odciągania mleka. Są wskazane do łagodzenia objawów obrzęku piersi przez odciąganie mleka. W przypadku zapalenia piersi odciągacze wspomagają proces leczenia przez usunięcie mleka z chorej piersi. Mają przynosić ulgę podrażnionym lub popękanym brodawkom sutkowym, a także wycią-gać płaskie lub wklęsłe brodawki sutkowe. Odciągacze umożliwiają też karmienie mlekiem matki dzieci, które z różnych przyczyn nie mogą być karmione bezpośrednio z piersi — ze względu na problemy z przystawianiem, rozszczep podniebienia lub wcześniactwo.
Docelowa populacja pacjentów / użytkownikMłode dziewczęta i dorosłe kobiety karmiące piersią. Wiele kobiet uważa odciągaczeza wygodne, a nawet niezbędne akcesoria do odciągania i przechowywania pokarmupo powrocie do pracy, w trakcie podróży lub w przypadku separacji z dzieckiem z innych przyczyn. Kobiety są zadowolone, że odciągany pokarm może być używany jako uzupełnienie karmienia piersią. Cieszą się, że niektóre odciągacze naśladują naturalny odruch ssania wykonywany przez dziecko.
Przeciwwskazania Nie ma żadnych przeciwwskazań do używania odciągacza pokarmu Swing maxi.
33
OstrzeżenieMoże prowadzić do poważnego zranienia lub śmierci.
PrzestrogaMoże prowadzić do drobnego zranienia.
i UwagaMoże prowadzić do szkody materialnej.
i InformacjePrzydatne lub ważne informacje niezwiązane z bezpieczeństwem.
Symbole na opakowaniu
Ten symbol oznacza, że materiał podlega procesowi odzyskiwania/recyklingu.
Ten symbol oznacza opakowanie kartonowe.
Ten symbol oznacza, że należy przechowywać urządzenie z dala od światła słonecznego.
Ten symbol oznacza, że urządzenie jest delikatne i należy się z nim obchodzić ostrożnie.
Ten symbol oznacza ograniczenie temperatury podczas pracy, transportu i przechowywania urządzenia.
Ten symbol oznacza ograniczenie wilgotności podczas pracy, transportu i przechowywania urządzenia.
Ten symbol oznacza ograniczenie ciśnienia atmosferycznego podczas pracy, transportu i przechowywania urządzenia.
Ten symbol oznacza, że urządzenie należy przechowywać w suchym miejscu.
Ten symbol oznacza, że opakowanie zawiera produkty dopuszczone do kontaktu z żywnością zgodnie z rozporządzeniem 1935/2004.
Ten symbol oznacza numer GTIN (GSI Global Trade Item Numbers).
Ten symbol oznacza, że nie należy wyrzucać urządzenia razem z nieposortowanymi odpadami komunalnymi (dot. tylko UE)
Ten symbol oznacza, że należy postępować według instrukcji obsługi.
Symbole na urządzeniu
Ten symbol oznacza, że należy postępować według instrukcji obsługi.
Ten symbol oznacza zgodność z podstawowymi wymaganiami Dyrektywy Rady 93/42/EEC z 14 czerwca 1993 roku dotyczącej wyrobów medycznych.
2. Znaczenie symboli
Symbol ostrzeżenia oznacza wszelkie instrukcje ważne dla bezpieczeństwa. Niezastoso-wanie się do tych instrukcji może prowadzić do zranienia się lub uszkodzenia odciągacza pokarmu. Używany w połączeniu z następującymi słowami, symbol ostrzegawczy oznacza:
34

Ten symbol oznacza producenta.
Ten symbol oznacza, że nie należy wyrzucać urządzenia razem z nieposortowanymi odpadami komunalnymi (dot. tylko UE)
Ten symbol oznacza zgodność z dodatkowymi amerykańskimi i kanadyjskimi wymogami bezpieczeństwa dotyczącymi wyrobów medycznych.
Ten symbol oznacza część aplikacyjną typu BF.
SN Ten symbol oznacza numer seryjny urządzenia nadany mu przez producenta.
Ten symbol oznacza umiejscowienie ogniwa baterii.
Ten symbol oznacza ochronę przed przedostawaniem się ciał stałych oraz przed szkodliwymi skutkami przedostawania się wody.
Ten symbol oznacza datę produkcji (cztery cyfry oznaczające rok i dwie cyfry oznaczające miesiąc).
Symbole na zasilaczu sieciowym
Ten symbol oznacza, że zasilacz sieciowy jest urządzeniem klasy II.
Ten symbol oznacza zgodność z certyfikacją CCC (China Compulsory Certification).
Ten symbol oznacza, że zasilacz sieciowy został przetestowany pod kątem bezpie-czeństwa.
Ten symbol oznacza, że zasilacz sieciowy jest przeznaczony wyłącznie do użytku wewnątrz budynków.
Ten symbol oznacza zgodność z amerykańskimi i kanadyjskimi wymogami bezpieczeństwa.
Ten symbol oznacza zgodność z wymogami Federalnej Komisji Łączności.
Ten symbol oznacza biegunowość złącza zasilania DC.
N136
Ten symbol oznacza zgodność z wymogami regulacyjnymi Australii/Nowej Zelandii (znak zgodności regulacyjnej).
Ten znak CE oznacza zgodność z dyrektywą niskonapięciową i kompatybilności elektromagnetycznej.
Ten symbol oznacza, że nie należy wyrzucać urządzenia razem z nieposortowany-mi odpadami komunalnymi (dot. tylko UE). Pełny pasek oznacza, że zasilacz został wprowadzony na rynek po 13 sierpnia 2005 roku.
Ten symbol oznacza zgodność z japońskimi wymogami bezpieczeństwa.
Ten symbol oznacza zgodność z wymogami dotyczącymi efektywności energetycznej.
Ten symbol oznacza prąd zmienny.
Ten symbol oznacza prąd stały.
35

3. Ważne informacje na temat bezpieczeństwa
Nieprzestrzeganie tych instrukcji/informacji dotyczących bezpieczeństwa może prowadzić do zagrożeń ze strony urządzenia. Informacje mogą ulegać zmianom od strony technicznej.
Urządzenie
Niebezpieczeństwo porażenia prądem! Przechowywać urządzenie w suchym miejscu! Nigdy nie zanurzać w wodzie ani innych płynach!
Odciągacz pokarmu Swing maxi nie jest termoodporny: trzymać z dala od grzejników i otwartego ognia.
Nie wystawiać modułu silnika na działanie bezpośredniego światła słonecznego.
Naprawy mogą być wykonywane wyłącznie przez autoryzowany serwisNie naprawiać urządzenia samodzielnie! Nie dopuszcza się żadnych modyfi-kacji urządzenia.
Nigdy nie używać uszkodzonego urządzenia. Uszkodzone lub zużyte części należy wymienić.
MAX. 250 h Czas działania odciągacza pokarmu Swing maxi to 250 godzin.
Okres eksploatacyjny to dwa lata.
Użycie z zasilaniem elektrycznym
Odłączenie od sieci jest zagwarantowane jedynie przez wyciągnięcie zasila-cza z gniazdka ściennego.
Zasilacz sieciowy trzymać z dala od gorących powierzchni.
Nie sięgać po żadne urządzenie elektryczne, które wpadło do wody. Natychmiast odłączyć je od zasilania.
Nigdy nie zostawiać odciągacza bez dozoru, gdy jest podłączony do źródła zasilania.
36

Użytkowanie
Używać odciągacza tylko zgodnie z przeznaczeniem, tak jak to opisano w niniejszej instrukcji.
Nigdy nie używać urządzenia elektrycznego, które ma uszkodzony kabel lub wtyczkę, nie działa poprawnie, spadło lub jest uszkodzone albo wpadło do wody.
Nie używać odciągacza Swing maxi w czasie kąpieli ani pod prysznicem.
Nie używać odciągacza Swing maxi podczas snu ani w stanie nadmiernego zmęczenia.
Jest to produkt do użytku osobistego. Używanie przez więcej niż jedną osobę może stanowić zagrożenie dla zdrowia.
Nie należy prowadzić pojazdów podczas odciągania pokarmu bez użycia rąk.
Używanie odciągacza Swing maxi w obecności dzieci wymaga nadzoru.
W przypadku wystąpienia problemów lub bólu w czasie odciągania należy skontaktować się z doradcą laktacyjnym lub lekarzem.
Przenośne i ruchome urządzenia komunikacyjne działające na częstotliwości radiowej mogą oddziaływać na odciągacz pokarmu Swing maxi.
Ważne:I Plastikowe butelki i elementy nakrętki mogą stać się łamliwe na skutek
zamrożenia i pęknąć w razie upadku.I Butelki i elementy nakrętki mogą ulec uszkodzeniu na skutek nieprawidłowego
obchodzenia się z nimi, tj. upuszczenia, nadmiernego dokręcenia lub potrącenia.I Butelki i elementy nakrętki należy traktować z należytą dbałością.I Nie należy używać mleka, jeśli butelki lub elementy nakrętki uległy uszkodzeniu.
37

2 lejki PersonalFit w rozmiarze M (24 mm)(inne rozmiary lejków: patrz rozdział 12, strona 58)
2 konektory do Freestyle (podstawa lejka, membrana, przezroczysta nasadka)
2 butelki
2 podstawki pod butelki
2 nakrętki wielofunkcyjne Calma
1 smoczek Calma
4. Opis produktu
Wykaz części zamiennych i akcesoriów dostępnych na zamówienie można znaleźć na stronie 58.
38

2 nakrętki wielofunkcyjne Calma
Długi dren
1 zasilacz sieciowy
1 silniczek
Wyłącznik
Zmniejszenie podciśnienia
Zwiększe-nie podci-śnienia
Przycisk wypływu pokarmu
Dioda LED
1 zestaw drenów do Swing maxi
Łącznik drenu
Krótki dren
Port zasilacza
Port drenu PVC
Komora baterii
Klips mocujący
39

4
1
i
5.1 Przed pierwszym użyciem, a następnie po każdym użyciu
Rozłożyć zestaw osobisty na elementy składowe.
Płukać wszystkie elementy w zimnej, czystej wodzie (o temp. ok. 20 °C) przez 10–15 sekund.
l Do mycia używać wyłącznie wody pitnej.
l Natychmiast po użyciu rozłożyć odciągacz i umyć wszystkie części, które miały kontakt z piersią i pokar-mem, aby uniknąć zasychania pozosta-łości pokarmu oraz zapobiec namnaża-niu się bakterii.
l Silniczek nie wymaga żadnych czynności konserwacyjnych.
l Uważać, aby nie uszkodzić elementów zestawu osobistego podczas mycia.
l Jeśli elementy składowe zestawu osobistego są myte w zmywarce, mogą ulec przebarwieniu przez barwniki spożywcze. Nie ma to wpływu na działanie urządzenia.
Uwaga
Przestroga
5. Mycie
40

2 3
5
Płukać wszystkie elementy w zimnej, czystej wodzie (o temp. ok. 20 °C).
W przypadku mycia elemen-tów zestawu osobistego w zmywarce należy umieścić je w górnym koszu lub w sekcji przeznaczonej na sztućce.
Umyć wszystkie elementy dużą ilością ciepłej wody z mydłem (o temp. ok. 30 °C).
Osuszyć za pomocą czystej ściereczki lub pozosta-wić na czystej ściereczce do wyschnięcia.
Met
oda
alte
rnat
ywna
d
o kr
oków
2,
3 i 4
.
lub
41
1
i
3
Wię
cej i
nfor
mac
ji w
ro
zdzi
ale
5.1
na
stro
nie
40 (k
roki
2–4
)
5.2 Przed pierwszym użyciem, a następnie raz dziennie
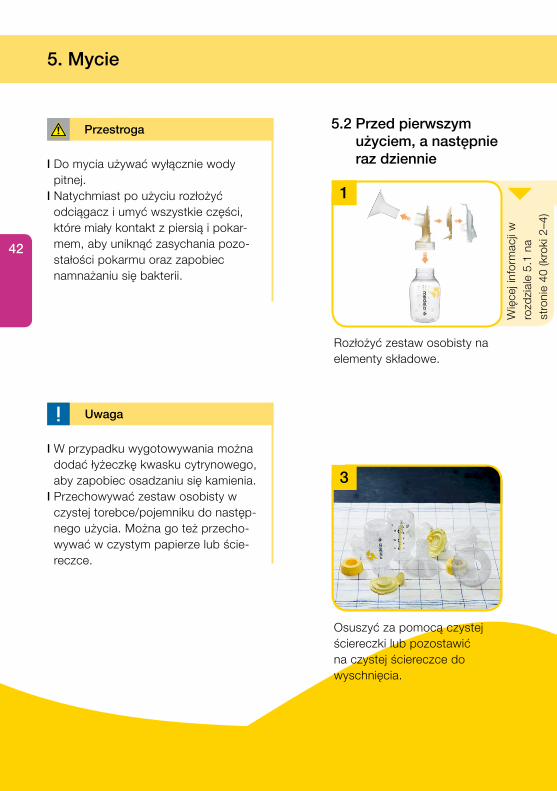
Rozłożyć zestaw osobisty na elementy składowe.
Osuszyć za pomocą czystej ściereczki lub pozostawić na czystej ściereczce do wyschnięcia.
l Do mycia używać wyłącznie wody pitnej.
l Natychmiast po użyciu rozłożyć odciągacz i umyć wszystkie części, które miały kontakt z piersią i pokar-mem, aby uniknąć zasychania pozo-stałości pokarmu oraz zapobiec namnażaniu się bakterii.
l W przypadku wygotowywania można dodać łyżeczkę kwasku cytrynowego, aby zapobiec osadzaniu się kamienia.
l Przechowywać zestaw osobisty w czystej torebce/pojemniku do następ-nego użycia. Można go też przecho-wywać w czystym papierze lub ście-reczce.
Przestroga
Uwaga
5. Mycie
42

2a 2b
1
Zanurzyć wszystkie elementy w wodzie i gotować je przez pięć minut.
Użyć torebek Quick Clean* w kuchence mikrofalowej zgodnie z instrukcjami.
lub
*Więcej informacji na stronie www.medela.com
Przetrzeć za pomocą czystej, wilgotnej ściereczki.
5.3 Czyszczenie modułu silnika
lub
43

1
1
i
Podłączyć przewód zasilacza sieciowego do modułu silnika.
6.1 Praca z zasilaniem sieciowym
6. Przygotowanie do odciągania pokarmu
l Dotyczy punktu 6.2 Praca z zasila-niem bateryjnym: Gdy do zasilania jest stosowany zasilacz sieciowy, nie trzeba wyciągać baterii.
l Regularnie sprawdzać stan baterii w module silnika.
l Jeśli odciągacz Swing maxi nie będzie używany przez dłuższy czas, wyjąć baterie z komory baterii.
l Baterie wystarczają na dwie do trzech sesji odciągania (na około 1,5 godziny odciągania).
6.2 Praca z zasilaniem bateryjnym
Otworzyć komorę baterii z tyłu urządzenia w kierunku wskazywanym przez strzałkę.
l Dotyczy punktu 6.1 Praca z zasila-niem sieciowym: Należy zachować dokładną kolejność poszczególnych czynności.
l Używać tylko zasilacza sieciowego do-starczonego z odciągaczem pokarmu Swing maxi.
l Upewnić się, że napięcie zasilacza sieciowego jest zgodne z napięciem źródła zasilania.
Informacje
Ostrzeżenie
44

2
2 3
Podłączyć zasilacz do gniazdka sieciowego.
Włożyć sześć baterii AAA o napięciu 1,5 V.
Zamknąć komorę baterii.
45

1
4i
i
Ostrożnie włożyć jasnożółtą membranę w łącznik konektora.
6. Przygotowanie do odciągania pokarmu
l Przed dotknięciem piersi i elementów zestawu osobistego należy starannie (przez co najmniej jedną minutę) myć ręce wodą i mydłem.
Wkręcić butelkę do konektora.
6.3 Składanie zestawu osobistego
l Wykonać starannie wszystkie czynności i złożyć poprawnie zestaw osobisty. W przeciwnym razie nie będzie można osiągnąć właściwego podciśnienia.
l Stosować tylko oryginalne akcesoria firmy Medela.
l Sprawdzić elementy zestawu osobi-stego pod kątem zużycia lub uszko-dzeń i w razie potrzeby wymienić je.
l Wszystkie elementy muszą być przed użyciem całkowicie suche.
Przestroga
Informacje
Uwaga
46

5
2
6
3
Przymocować przezroczystą osłonę do konektora. ➙ Upewnić się, że wszystkie
trzy zatrzaski (u góry i u dołu) wskoczyły na miejsce.
Włożyć dren do przezroczystej osłony do samego końca.
Włożyć dren do silniczka.
Wcisnąć lejek na konektor osłony.
47

1
1
7. Odciąganie
Włożyć nieużywany krótki dren do rozgałęziacza drenów.
7.1 Przygotowanie do odciągania pojedyn-czego (z jednej piersi)
Włączyć odciągacz za pomocą przycisku .➙ Faza stymulacji trwa maksy-
malnie dwie minuty. Następnie faza stymulacji jest automa-tycznie przełączana na fazę odciągania.
7.2 Odciąganie pokarmu
l Dotyczy kroku 2 (rozdział 7.1): Aby ustalić, czy dostępny lejek ma odpo-wiedni rozmiar, należy odpowiedzieć na następujące pytania:l Czy brodawka swobodnie porusza się
w kanale lejka? l Czy do kanału lejka został wciągnięty
jedynie niewielki fragment otoczki sut-ka lub nie została ona w ogóle wcią-gnięta?
l Czy podczas odciągania są odczuwal-ne delikatne, rytmiczne ruchy piersi?
l Czy czuć, że pierś całkowicie się opróżnia?
l Czy sutek nie boli?
Jeśli odpowiedź na którekolwiek z tych pytań brzmi „Nie” lub podczas odcią-gania występują problemy lub ból, nale-ży się skonsultować ze swoim doradcą laktacyjnym lub położoną.
Przestroga
i
l Dotyczy kroku 3 (rozdział 7.1): Nie trzymać zestawu osobistego za butelkę. Może to doprowadzić do zatkania kanalików mlekowych i obrzęku.
l Przemyć pierś ciepłą myjką (nie używać alkoholu).
Uwaga
48

12 3
12 3
Przytrzymywać lejek na piersi za pomocą kciuka i palca wskazującego. Podtrzymywać pierś dłonią.
Umieścić lejek na piersi, tak aby brodawka była właściwie wyśrodkowana w tunelu.
W każdej fazie można regulować podciśnienie. Komfortowe podci-śnienie: Za pomocą przycisku zwiększaj podciśnienie, aż stanie się nieco nieprzyjemne. Następnie naciśnij przycisk , aby je minimalnie zmniejszyć.
Gdy mleko zacznie wypływać, nacisnąć przycisk , aby zmienić tryb na fazę odciągania.➙ Upewnić się, że mleko spły-
wa poprawnie do butelki.
49

i
i
4
1
7. Odciąganie
Wyłączyć odciągacz za pomocą przycisku .
l Po zakończeniu odciągania zawsze odłączyć odciągacz Swing maxi od źródła zasilania.
l Napełniać butelkę tylko do oznacze-nia 150 ml.
l Jeśli uzyskuje się tylko niewielką ilość mleka, nie udaje się go w ogóle odcią-gnąć lub odciąganie jest bolesne, na-leży się skonsultować ze swoją położ-ną lub doradcą laktacyjnym.
l Jeśli odciągacz Swing maxi pracuje przez 30 minut bez żadnych zmian, wyłącza się automatycznie.
l Nie zginać ani nie skręcać drenów podczas odciągania.
Przegląd stanów diody LED
Świeci się Urządzenie włączone
Nie świeci się Urządzenie wyłączone
Równe regularne błyski Faza stymulacji
Świeci się światłem ciągłym
Faza odciągania
Szybkie błyskiMinimalne/maksy-malne podciśnienie
Założyć gorset Easy Expression Bustier i pozostawić suwak nieznacznie otwarty.
7.3 Przygotowanie do odciągania bez użycia rąk przy użyciu gorsetu Easy Expression Bustier*
Uwaga
Przestroga
Informacje
50

15 6
2 3
Użyć podstawki, aby zapo-biec przewróceniu butelki.
Zamknąć butelkę za pomocą nakrętki.➙ Postępować zgodnie z instruk-
cjami z rozdziału 8 — „Przecho-wywanie i rozmrażanie pokar-mu”.
Umieścić lejek na piersi pod gorsetem, tak aby brodawka była wyśrodkowana w tunelu lejka.
Zamknąć suwak i włożyć konektor do lejka.
Wię
cej i
nfor
mac
ji
w r
ozd
zial
e 7.
2 na
st
roni
e 48
.
Um
yć z
esta
w z
god
nie
z
pro
ced
urą
w
rozd
zial
e 5
na s
tron
ie 4
0.
*Opcjonalnie zob. rozdział 12 na stronie 58
51

1
4
i
7. Odciąganie
Umieścić lejek na piersi, tak aby brodawka była właściwie wyśrodkowana w tunelu.
l Dotyczy kroku 2: Nie trzymać zestawu osobistego za butelkę. Może to doprowadzić do za-tkania kanalików mlekowych i obrzęku.
7.4 Przygotowanie do odciągania podwójnego (z dwóch piersi)
Umieścić drugi lejek na piersi, tak aby brodawka była właści-wie wyśrodkowana w tunelu.
Wię
cej w
roz
dzi
ale
7.2
na s
tron
ie 4
8 (k
rok
3)
l Podwójne odciąganie pozwala zaosz-czędzić czas i zwiększa wartość ener-getyczną pokarmu. Zwiększa produkcję mleka i przedłuża utrzymanie laktacji.
Przestroga
Informacje
52

12 3
Przytrzymywać lejek na piersi za pomocą kciuka i palca wskazującego. Podtrzymywać pierś dłonią.
Włączyć odciągacz za pomocą przycisku .➙ Faza stymulacji trwa maksy-
malnie dwie minuty. Faza stymulacji zostaje następnie automatycznie przełączona na fazę odciągania.
53

8. Przechowywanie i rozmrażanie pokarmu
8.1 Przechowywanie
Wskazówki dotyczące przechowywania świeżo odciągniętego pokarmu(dla zdrowych niemowląt urodzonych o czasie)
W temperaturze pokojowej W lodówce W zamrażarce Rozmrożony pokarm
4–6 godz. w temp. od 19 do 26 °C (od 66 do 78 °F)
3–8 dni w temp. 4 °C (39 °F) lub niższej
6–12 miesięcy w temp od –18 do –20°C (od 0 do –4°F)
W lodówce maks. 10 godzin. Nie zamrażać ponownie!
l Nie przechowywać pokarmu na półkach drzwi lodówki. Należy w zamian wybrać tnajchłodniejsze miejsce w lodówce ( jest to tylna część szklanej półki nad komorą warzyw).
8.2 Zamrażanie
l Odciągnięty pokarm można zamrozić w butelkach na mleko lub torebkach „Pump & Save”*. Nigdy nie należy napełniać butelek ani torebek powyżej 3/4 objętości, aby pozostawić miejscena jej możliwezwiększenie.
l Butelki lub torebki „Pump & Save” należy oznaczyć datą odciągnięcia.
8.3 Rozmrażanie
Nie należy rozmrażać ani podgrzewać mleka matki w kuchence mikrofalowej ani w naczyniu z wrzącą wodą, aby uniknąć utraty witamin, minerałów oraz innych ważnych składników i aby zapobiec oparzeniu.
l Aby zachować składniki pokarmu, należy go rozmrażać, zostawiając na noc w lodówce. Można też trzymać butelkę bądź torebkę „Pump & Save” pod strumieniem bieżącej, ciepłej wody (o temp. maks. 37 °C).
l Należy delikatnie obracać butelkę lub torebkę „Pump & Save”, aby wymieszać tłuszcz, który się oddzielił. Należy unikaći potrząsania pokarmem oraz wzburzania go.
Ostrzeżenie
54

i
KARMIENIE
ODCIĄGAN
IE
OPARTE NA BADANIACH WSPARCIE DLA MATEK KARMIĄCYCH PIERSIĄ
Stworzone przez: Madela
Wsparcie podczas
karmienia niemowląt
Więcej mleka w krótszym czasieS
SA
NIE
2
-FA
ZOW
E
CA
LM
A
STYMULACJA
ODCIĄGA
NIE
PR
ZEPŁ
YW MLEKA
9. Karmienie mlekiem matki
Do karmienia mlekiem matki firma Medela zaleca używanie systemu Calma*.
Calma — wyjątkowe rozwiąza-nie w karmieniu odciągniętym mlekiem matki.
Informacje
W efekcie swoich wszechstronnych prac badawczych firma Medela jest jednym z pierwszych producentów na świecie, który wykorzystał zachowanie niemowląt podczas karmienia w swoich nowatorskich technologiach dwufa-zowego odciągania i Zestawu Calma.Technologia 2-fazowego odciągania pokarmu naśladuje naturalny rytm ssania dziecka, aby szybciej odcią-gać większą ilość mleka. Po krótkich, szybkich ruchach ssących następują ruchy długie, co gwarantuje optymal-ny wypływ pokarmu. Unikalny zestaw do karmienia Calma pozwala dziecku zrobić przerwę na oddech podczas jedzenia przy zachowaniu odruchu ssa-nia nabytego przy piersi. Opracowane, by zapewnić wspaniałe doświadczenie karmienia piersią.
Zalety systemu Calmal Dziecko może pić odciągnięte mleko,
robić przerwy i oddychać regularnie.l Mleko płynie tylko po wytworzeniu
podciśnienia.l Naturalny odruch ssania dziecka
zostaje zachowany, co pozwala na łatwy powrót do karmienia piersią.
Szczegółowe informacje na temat Zestawu Calma można znaleźć na stronie firmy Medela (www.medela.com).
55

10. Rozwiązywanie problemów
Problem Rozwiązanie
Silniczek nie działaSprawdzić obecność prądu sieciowego. Sprawdzić położenie baterii w komorze baterii.
Brak zasilania pod-czas pracy na baterii
Wymienić baterie.
Słabe ssanie lub jego całkowity brak
Sprawdzić wszystkie połączenia.Zamocować osłonę poprawnie na trzech punktach połączeniowych.Podczas odciągania trzymać za lejek, a nie za konektor ani butelkę.Upewnić się, że lejek przylega dokładnie do piersi.Podczas pojedynczego odciągania włożyć nieużywaną końcówkę drenu do uchwytu. Nie skręcać ani nie zginać drenów. W rurce nie może być wody.Wszystkie elementy muszą być całkowicie suche.
Odciągacz uległ zamoczeniu
Odłączyć zasilacz sieciowy od gniazdka.Wyłączyć odciągacz.Nie ustawiać silniczka do góry nogami. Panel sterowania musi być skierowany do góry.Umieścić silniczek w suchym, ciepłym miejscu na 24 godziny.
Uwaga:Nie wystawiać odciągacza na bezpośrednie działanie promieni słonecznych.Nie przyspieszać procesu schnięcia przy użyciu suszarki.
Jeśli w drenie pojawiła się ciecz kondensacyjna
Przepłukać dreny. Wytrząsnąć wszelkie krople wody.Powiesić dreny do wyschnięcia na powietrzu.
56

Gwarancja
Szczegółowe informacje o gwarancji zawiera broszura „Gwarancja międzynarodowa”.
Utylizacja
Ten produkt jest wykonany z różnych metali i tworzyw sztucznych. Przed utylizacją urządzenie musi zostać przekształcone na niezdatne do użytku i nie należy go wyrzucać razem z nieposortowanymi odpadami komunalnymi, zgodnie z lokalnymi regulacjami. Należy korzystać z lokalnego systemu zbiórki odpadów elektrycznych i elektronicznych (w tym baterii). Niewłaściwa utylizacja może mieć szkodliwy wpływ na środowisko oraz zdrowie publiczne.
11. Gwarancja/utylizacja
57

Części zamienne
Numer artykułu Produkt
099.0271099.0272
099.0273
099.0274800.0840200.1693
Swing maxi/Freestyle (100–240 V; 12 V, 50–60 Hz, 0,6 A) — EuropaSwing maxi/Freestyle (100–240 V; 12 V, 50–60 Hz, 0,6 A) — Wielka Brytania i USA/JaponiaSwing maxi/Freestyle (100–240 V; 12 V, 50–60 Hz, 0,6 A) — Australia/Nowa ZelandiaSwing maxi/Freestyle (100–240 V; 12 V, 50–60 Hz, 0,6 A) — CNElement zapasowy Swing, pokrywa komory na baterie (5 sztuk)Element zapasowy Freestyle, konektor z zaworem (5 sztuk)
099.0270 Silniczek do Swing maxi
099.0275 Dreny do Swing maxi
Akcesoria
Numer artykułu Produkt
008.0033*008.0034*008.0035*008.0036*008.0037*
Lejek PersonalFit, rozm. SLejek PersonalFit, rozm MLejek PersonalFit, rozm. LLejek PersonalFit, rozm. XLLejek PersonalFit, rozm. XXL
008.0074008.0075
Butelka na pokarm, 150 mlButelka na pokarm, 250 ml
008.0145 smoczek Calma
200.1756200.0625
Torba chłodzącaTorba City Style
008.0217008.0220008.0224008.0225
Gorset Easy Expression Bustier, biały, rozmiar SGorset Easy Expression Bustier, biały, rozmiar MGorset Easy Expression Bustier, biały, rozmiar LGorset Easy Expression Bustier, biały, rozmiar XL
Inne produkty firmy Medela są dostępne w witrynie internetowej www.medela.com.
Partnerzy dystrybucyjni firmy Medela oferują następujące akcesoria do odciągacza pokarmu Swing maxi, które można zamawiać za pomocą numerów katalogowych.
12. Kompleksowa oferta produktów wspomagających karmienie piersią
* Jeśli efekty odciągania nie są zadowalające lub odciąganie sprawia ból, należy się skontaktować z położną lub doradcą laktacyjnym. Dzięki różnym rozmiarom lejka PersonalFitTM do wyboru odciąganie może być wygodniejsze i efektywniejsze.
58

Odciąganie pokarmu
Kolekcjonowanie pokarmu
Transport i dezynfekcja
Podawanie pokarmu
Ochrona piersi
Innowacja
Wiedza oparta na badaniach
Profesjonalizm
Wsparcie
Kompe-tencja
Eduacja
59
1. Kullanım Amacı/Kontrendikasyon/Popülasyon 61
2. Sembollerin anlamı 62
3. Önemli güvenlik bilgileri 64
4. Ürün açıklaması 66
5. Temizleme 68
5.1 İlk defa kullanmadan önce ve her kullanımdan sonra 68
5.2 İlk kullanımdan önce ve günde bir kez 70
5.3 Motor ünitesini temizleme 71
6. Pompayı hazırlama 72
6.1 Şebeke ünitesiyle çalıştırma 72
6.2 Pil ile çalıştırma 72
6.3 Pompa setini monte etme 74
7. Sağım 76
7.1 Tekli pompayı hazırlama 76
7.2 Pompalama 76
7.3 Easy Expression Bustier ile ellerin serbest olduğu sağım hazırlığı 78
7.4 Çift pompalama hazırlığı 80
8. Anne sütünü saklama / çözme 82
8.1 Saklama 82
8.2 Dondurma 82
8.3 Çözme 82
9. Anne sütüyle besleme 83
10. Sorun giderme 84
11. Garanti / atma 85
12. Emzirme sırasında tam özen 86
13. EMC / Teknik Açıklama 88
14. Teknik Özellikler 94
İçindekiler
60

1. Kullanım Amacı/Kontrendikasyon/Popülasyon
Göğüspompalarının kullanım amacı ve endikasyonlarıGöğüspompaları, göğüsten akan sütü sağmak amacıyla, süt ver en kadınların hastaneveya ev ortamında kullanımına yönelik olarak tasarlanmıştır. Göğüspompaları konjesyonsemptomlarını hafifletmek amacıyla göğüsten akan sütü sağ mak için endikedir.Göğüspompaları, mastit gelişmesi durumunda iyileşme sür ecini desteklemek amacıy-la, etkilenen göğüsten süt sağımı yapmak için tasarlanmıştır. Yaralı veya çatlak meme baş larını rahatlatmak ve düz ya da içe dönük meme başlarını dışarı çıkarmak amacıyla kullanılması için endikedir. Göğüspompaları; annelere, kavrama sorunları, yarık dudaklılık veya prematüre doğum gibi çeşitli nedenlerle doğrudan göğüsten beslene-meyen bebeklere annesütü verme olanağı tanımaktadır.
Hedeflenen hasta popülasyonu / kullanıcıAdolesan pediatrik veya yetişkin emziren kadınlar. İşe dönen, seyahat halinde olanveya bir şekilde bebeklerinden ayrı kalan bir çok anne sütlerini sağıp saklamak için gö ğüspompası kullanmayı rahat hatta gerekli buluyor. Kadınlar genellikle göğüspom-pasının emzirmenin yerine geçebileceğini ve bazı pompaların emzir ilen bebeğin emzirme mimiklerine göre tasarlandığını öğrendiklerinde memnun oluyorlar.
KontrendikasyonlarıSwing maxi süt pompasının bilinen hiçbir kontr endikasyonu yoktur.
61
UyarıCiddi bir yaralanmaya veya ölüme neden olabilir.
DikkatKüçük bir yaralanmaya neden olabilir.
i NotMalzeme hasarına neden olabilir.
i BilgiGüvenlikle ilgili olmayan faydalı ve önemli bilgi.
Paket üzerindeki sembollerBu semboller malzemenin geri kazanılması/geri dönüştürülmesi sürecinin bir parçası olduğunu gösterir.
Bu sembol bir karton paketi gösterir.
Bu sembol cihazın güneş ışığından uzak tutulması gerektiğini gösterir.
Bu sembol cihazın kırılabileceğini ve dikkatli tutulması gerektiğini gösterir.
Bu sembol çalıştırma, taşıma ve saklama için sıcaklık sınırlaması olduğunu gösterir.
Bu sembol çalıştırma, taşıma ve saklama için nem sınırlaması olduğunu gösterir.
Bu sembol çalıştırma, taşıma ve saklama için atmosferik basınç sınırlaması olduğunu gösterir.
Bu sembol cihazın kuru tutulması gerektiğini gösterir.
Bu sembol,1935/2004 yönetmeliğine göre yiyecek ile temas etmesi amaçlananürünleri içeren ambalajı göstermektedir.
Bu sembol benzersiz GSI Global Ticaret Parça Numaralarını (GTIN) gösterir
Bu sembol cihazın işlenmemiş kentsel atıkla atılmaması gerektiğini gösterir (yalnızca AB için).
Bu sembol kullanım talimatlarının uygulanması gerektiğini gösterir.
Cihaz üzerindeki semboller
Bu sembol kullanım talimatlarının uygulanması gerektiğini gösterir.
Bu sembol medikal cihazlarla ilgili 14 Haziran 1993 tarihli Konsey Direktifi 93/42/EEC temel gereklilikleriyle uyumluluğunu gösterir.
2. Sembollerin anlamı
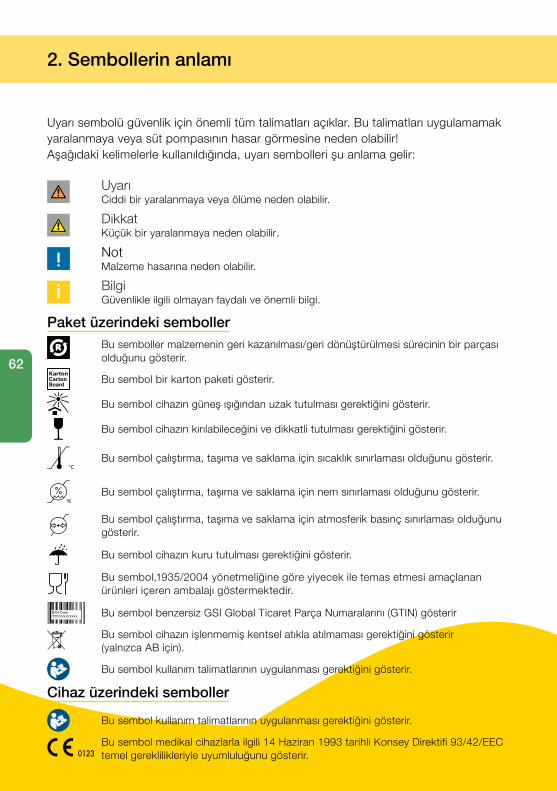
Uyarı sembolü güvenlik için önemli tüm talimatları açıklar. Bu talimatları uygulamamak yaralanmaya veya süt pompasının hasar görmesine neden olabilir! Aşağıdaki kelimelerle kullanıldığında, uyarı sembolleri şu anlama gelir:
62
Bu sembol üreticiyi gösterir.
Bu sembol cihazın işlenmemiş kentsel atıkla atılmaması gerektiğini gösterir (yalnızca AB için).
Bu sembol medikal elektrikli ekipman için Ek ABD ve Kanada güvenlik gereklilikleriyle uyumluluğunu gösterir.
Bu sembol tip BF uygulanmış parçaları gösterir.
SN Bu sembol cihazın üretici seri numarasını gösterir.
Bu sembol pil bölmesinin konumunu gösterir.
Bu sembol sert yabancı maddelerin girmesiyle ve su girmesiyle oluşabilecek tehlikeli etkilere karşı korumayı gösterir.
Bu sembol üretim tarihini (ay için iki basamak ve yıl için dört basamak) gösterir.
Elektrik adaptörü üzerindeki semboller
Bu sembol elektrik adaptörünün bir sınıf II cihazı olduğunu gösterir.
Bu sembol Çin Zorunlu Sertifikası ile uyumluluğunu gösterir.
Bu sembol elektrik adaptörünün güvenlik açısından test edildiğini gösterir.
Bu sembol elektrik adaptörünün yalnızca iç mekanda kullanılabileceğini gösterir.
Bu sembol ABD ve Kanada güvenlik gereklilikleriyle uyumunu gösterir.
Bu sembol Federal İletişim Komisyonu gereklilikleriyle uyumunu gösterir.
Bu sembol d.c. güç konnektörü polaritesini gösterir.
N136
Bu sembol AUS/NZ düzenleyici gereklilikleriyle uyumluluğunu gösterir (Düzenleyici uyumluluğu işareti).
Bu CE işareti, düşük voltaj ve elektromanyetik uygunluk direktifiyle uyumluluğunu gösterir.
Bu sembol cihazın işlenmemiş kentsel atıkla atılmaması gerektiğini gösterir (yalnızca AB için). Kalın çubuk sembolü elektrik adaptörünün 13 Ağustos 2005 tarihinden sonra piyasaya sunulacağını gösterir.
Bu sembol Japon güvenlik gereklilikleriyel uyumluluğunu gösterir.
Bu sembol enerji verimliliği gereklilikleriyle uyumluluğunu gösterir.
Bu sembol alternatif akımı gösterir.
Bu sembol doğrudan akımı gösterir.
63

3. Önemli güvenlik bilgileri
Bu talimatları/güvenlik bilgilerini uygulamamak cihazın zarar vermesine neden olabilir. Teknik değişikliklere tabidir.
Cihaz
Elektrik çarpması nedeniyle ölüm tehlikesi! Cihazı kuru tutun! Hiçbir zaman suya ya da diğer sıvılara batırmayın!
Swing maxi süt pompası ısıya dayanıklı değildir: radyatörlerden ve açık alevden uzak tutun.
Motor ünitesini doğrudan güneş ışığına maruz bırakmayın.
Onarımlar, yalnızca yetkili servis elemanı tarafından gerçekleştirilmelidir Kendiniz onarmayın! Cihazda hiçbir değişikliğe izin verilmez.
Hasarlı cihazı hiçbir zaman kullanmayın. Hasarlı veya yıpranmış parçaları yenisiyle değiştirin.
MAX. 250 h Swing maxi süt pompasının çalışma ömrü 250 saattir.
Hizmet ömrü iki yıldır.
Elektrik kullanımı
Cihazın elektrik şebekesiyle bağlantısının kesilmesi ancak elektrik adaptörünün prizden çıkarılması ile sağlanır.
Elektrik adaptörünü her zaman sıcak yüzeylerden uzak tutun.
Sıvı içine düşmüş bir elektrikli cihaza dokunmayın. Hemen fişini çekin.
Süt pompası bir güç kaynağına bağlandığında denetim altında tutulmalıdır.
64

Kullanım
Swing maxi süt pompasını yalnızca bu kılavuzda belirtilen kullanım amacı doğrultusunda kullanın.
Hasarlı kablo veya prizi olan, tam olarak çalışmayan, yere veya suya düşürülen ya da hasar gören elektrikli bir cihazı kesinlikle çalıştırmayın.
Swing maxi süt pompasını banyo veya duş esnasında kullanmayın.
Swing maxi süt pompasını uyurken veya çok uykuluyken kullanmayın.
Bu tek kişinin kullanımına mahsus bir üründür. Birden fazla kişi tarafından kullanılması sağlık riski doğurabilir.
Ellerinizi kullanmadan sağım yaparken, araç kullanmayın.
Swing maxi süt pompasını çocukların yakınında kullanırken dikkatli olun.
Sorun yaşıyorsanız ya da ağrınız varsa, emzirme danışmanı veya doktorunuzla iletişim kurun.
Portatif ve mobil radyo frekanslı haberleşme ekipmanları Swing Süt Pompası üzerinde etki yapabilir.
Önemli:I Plastik biberonlar ve bileşen parçaları donduğunda hassas olur ve düştüğünde kırılabilir.I Ayrıca, düşürülmesi, fazla sıkılması veya çarpılması gibi hatalı kullanımı biberon ve
bileşenlerine zarar verebilir.I Biberon ve bileşenlerini kullanırken dikkatli olun.I Biberon veya bileşenler hasar görmüşse anne sütünü kullanmayın.
65

2x PersonalFit™ Meme Hunisi M (24 mm)(diğer meme hunisi boyutları için bkz. Bölüm 12, sayfa 86)
2x Freestyle konnektörleri (meme hunisi tabanı, membran, saydam kap)
2x biberon
2x biberon standı
2x Calma çok katlı kapak1x Calma Solitaire
4. Ürün açıklaması
Sipariş etmek istediğiniz yedek parçaları ve aksesuarları sayfa 86‘da bulabilirsiniz.
66

2x Calma çok katlı kapak
Uzun hortum
1x elektrik adaptörü
1x motor ünitesi
Açma / Kapama düğmesi
Vakumu azalt
Vakumu artır
Sağım düğmesi
LED
1x Swing maxi hortum
Hortum desteği
Kısa hortum
Güç adaptörü portu
PVC hortum portu
Pil bölmesi
Sabitleme klipsi
67

4
1
i
5.1 İlk defa kullanmadan önce ve her kullanımdan sonra
Pompa setini parçalarına ayırın.
Tüm parçaları 10 – 15 saniye soğuk, temiz suyla (yaklaşık 20 °C) durulayın.
l Temizlik için yalnızca kaliteli içme suyu kullanın.
l Süt kalıntılarının kurumasını ve bakte-ri oluşumunu önlemek için, meme ve anne sütü ile temas eden tüm parça-ları kullandıktan hemen sonra sökün ve yıkayın.
l Pompa setinin bakıma ihtiyacı yoktur.l Temizleme sırasında pompa setinin
parçalarının hasar görmemesine dikkat edin.
l Pompanın ayrı bileşenleri bulaşık makinesinde yıkanırsa, parçalar yemek pigmentleri nedeniyle renk değiştirebi-lir. Bunun cihazın çalışmasına bir etkisi olmaz.
Not
Dikkat
5. Temizleme
68

2 3
5
Tüm parçaları soğuk, temiz suyla (yaklaşık 20 °C) durulayın.
Pompanın ayrı bileşenlerini bulaşık makinesinde temizler-seniz, üst rafa veya çatal bıçak bölümüne yerleştirin.
Tüm parçaları ılık bol köpüklü suyla (yaklaşık 30 °C) temizleyin.
Temiz bir bezle kurutun ya da temiz bir bez üzerinde kurumaya bırakın.
2, 3
ve
4. a
dım
lara
al
tern
atif
olar
ak.
veya
69

1
i
3
Dah
a fa
zla
bilg
i içi
n,
sayf
a 68
, b
ölüm
5.1
, ad
ım 2
–4
5.2 İlk kullanımdan önce ve günde bir kez
Pompa setini parçalarına ayırın.
Temiz bir bezle kurutun ya da temiz bir bez üzerinde kurumaya bırakın.
l Temizlik için yalnızca kaliteli içme suyu kullanın.
l Süt kalıntılarının kurumasını ve bakteri oluşumunu önlemek için, meme ve anne sütü ile temas eden tüm parçaları kullandıktan hemen sonra sökün ve yıkayın.
l Kireç taşı oluşumunu engellemek için bir çay kaşığı sitrik asit ilave edilebilir.
l Pompa setini bir sonraki kullanıma kadar temiz bir çantada/kapta saklayın. Veya temiz bir kağıt ya da bez içinde saklayın.
Dikkat
Not
5. Temizleme
70
2a 2b
1
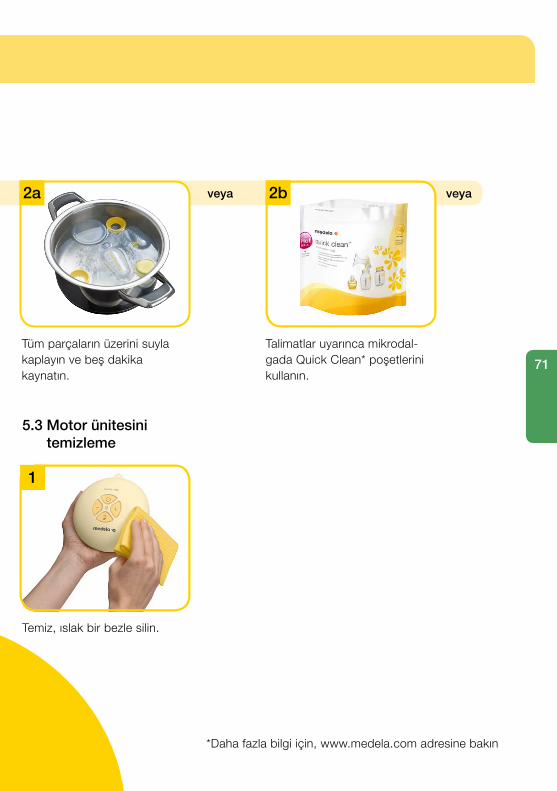
Tüm parçaların üzerini suyla kaplayın ve beş dakika kaynatın.
Talimatlar uyarınca mikrodal-gada Quick Clean* poşetlerini kullanın.
veya
*Daha fazla bilgi için, www.medela.com adresine bakın
Temiz, ıslak bir bezle silin.
5.3 Motor ünitesini temizleme
veya
71

1
1
i
Elektrik adaptörü kablosunu motor ünitesine takın.
6.1 Şebeke ünitesiyle çalıştırma
6. Pompayı hazırlama
l re 6.2 Pil ile çalıştırma: Pompalama işlemi elektrik adaptörüyle yapılırken pillerin çıkarılması gerekmez.
l Motor ünitesindeki pillerin durumunu düzenli olarak kontrol edin.
l Swing maxi uzun süre kullanılmaya-caksa, pilleri pil bölmesinden çıkarın.
l Piller iki ila üç pompalama boyunca kullanılabilir (yaklaşık 1 ½ saat pompalama süresi).
6.2 Pil ile çalıştırma
Arkadaki pil bölmesini ok yönünde açın.
l re 6.1 Şebeke ile çalıştırma: Adımların tam sırasını izleyin.
l Sadece Swing maxi ile tedarik edilen elektrik adaptörünü kullanın.
l Elektrik Adaptörü voltajının güç kaynağına uyduğundan emin olun.
Bilgi
Uyarı
72

2
2 3
Elektrik adaptörünü prize takın.
Altı AAA Micro 1.5 V pil yerleştirin.
Pil bölmesini kapatın.
73

1
4i
i
Açık sarı membranı dikkatli bir şekilde meme hunisinin tabanına takın.
6. Pompayı hazırlama
l Meme ve pompanın parçalarına do-kunmadan önce ellerinizi su ve sabunla (en az bir dakika) iyice yıkayın.
Biberonu konnektöre tutturun.
6.3 Pompa setini monte etme
l Tüm adımları dikkatli bir şekilde gerçekleştirin ve pompa setini düzgün takın. Aksi halde, iyi bir vakum gücü elde edilemez.
l Sadece Medela‘nın orijinal aksesuarla-rını kullanın.
l Kullanmadan önce pompa seti bile-şenlerini yıpranma veya hasara karşı kontrol edin ve gerekirse değiştirin.
l Kullanmadan önce tüm bileşenler tamamen kurutulmalıdır.
Dikkat
Bilgi
Not
74

5
2
6
3
Saydam kapağı konnektöre takın.➙ Üç kopçanın (üst ve yan) yeri-
ne oturduğundan emin olun.
Kısa hortumu gidebileceği kadar uzağa yerleştirin.
Uzun hortumu motor ünitesine takın.
Meme hunisini konektöre bastırın.
75
1
1
7. Sağım
Kısa hortumu hortum tutucusu-na takın.
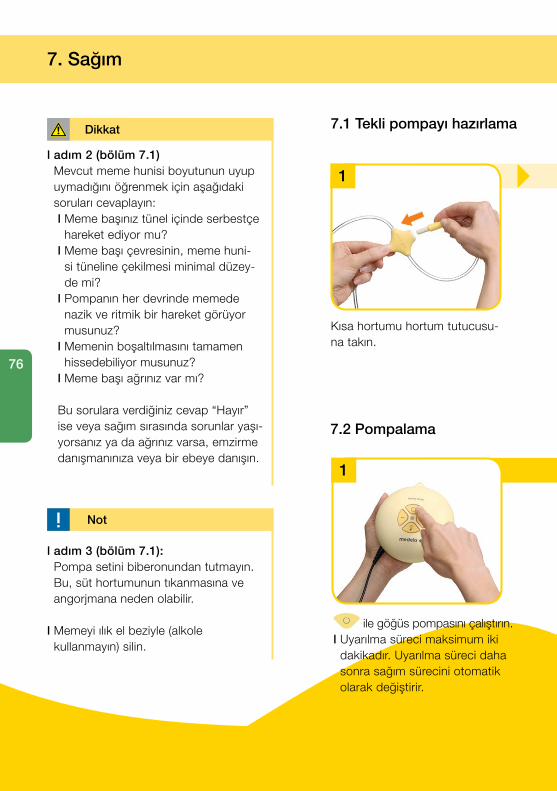
7.1 Tekli pompayı hazırlama
ile göğüs pompasını çalıştırın.l Uyarılma süreci maksimum iki
dakikadır. Uyarılma süreci daha sonra sağım sürecini otomatik olarak değiştirir.
7.2 Pompalama
l adım 2 (bölüm 7.1) Mevcut meme hunisi boyutunun uyup uymadığını öğrenmek için aşağıdaki soruları cevaplayın:l Meme başınız tünel içinde serbestçe
hareket ediyor mu? l Meme başı çevresinin, meme huni-
si tüneline çekilmesi minimal düzey-de mi?
l Pompanın her devrinde memede nazik ve ritmik bir hareket görüyor musunuz?
l Memenin boşaltılmasını tamamen hissedebiliyor musunuz?
l Meme başı ağrınız var mı?
Bu sorulara verdiğiniz cevap “Hayır” ise veya sağım sırasında sorunlar yaşı-yorsanız ya da ağrınız varsa, emzirme danışmanınıza veya bir ebeye danışın.
Dikkat
i
l adım 3 (bölüm 7.1): Pompa setini biberonundan tutmayın. Bu, süt hortumunun tıkanmasına ve angorjmana neden olabilir.
l Memeyi ılık el beziyle (alkole kullanmayın) silin.
Not
76

12 3
12 3
Meme hunisini baş parmak ve işaret parmağınız ile memeni-zin üzerinde tutun. Avucunuzla memenizi destekleyin.
Meme hunisini meme başınız tüneli düzgün bir şekilde orta-layacak şekilde göğsünüzün üzerine yerleştirin.
Vakum her aşamada ayarlana-bilir. Rahat vakum: Biraz rahat-sızlık verene kadar vakumu arttırmak için kullanın. Ardın-dan minimale almak için tuşuna basın.
Süt erken akmaya başlarsa, sa-ğım sürecini değiştirmek için
düğmesine basın.➙ Sütün biberona düzgün bir
şekilde aktığından emin olun.
77

i
i
4
1
7. Sağım
ile göğüs pompasını kapatın.
l Sağımdan sonra Swing maxi‘yi her zaman güç kaynağından kapatın.
l Biberonu yalnızca 150 ml işaretine kadar doldurun.
l Yalnızca çok az oranda sağım yapıyor-sanız veya hiç sağım yapamıyorsanız veya ağrınız varsa ebeyle ya da emzir-me danışmanınızla iletişim kurun.
l Pompa hiçbir değişiklik yapılmadan 30 dakika çalışırsa Swing maxi kendini otomatik olarak kapatır.
l Sağım sırasında hortumu kıvırmayın.
LED‘lere genel bakış
ışıklar yanıyor Açık
ışık yanmıyor Kapalı
düzenli, düzgün yanıp sönüyor
Uyarma fazı
ışık sürekli açık Sağım fazı
hızlı yanıp sönüyor Min./mak. vakum
Easy Expression Bustier‘ini giyin ve fermuarı hafifçe açık bırakın.
7.3 Easy Expression Bustier* ile eller serbest sağımı hazırlama
Not
Dikkat
Bilgi
78

15 6
2 3
Biberonun devrilmesini engel-lemek için tutucu kullanın.
Biberonun kapağını kapatın.➙ Bölüm 8, “Anne Sütünü Saklama
ve Çözme” konusunda yer alan talimatları uygulayın.
Meme hunisini büstiyerin altındaki memenizin üzerinde, meme başınız meme hunisinin tünelini ortalayacak şekilde.
Fermuarı kapatın ve konnektö-rü meme hunisine takın.
Dah
a fa
zla
bilg
i içi
n,
sayf
a 76
, B
ölüm
7.2
.S
ayfa
68‘
dek
i Böl
üm
5‘e
uygu
n te
miz
leyi
n.
*İsteğe bağlı, bkz. Bölüm 12, sayfa 86
79
1
4
i
7. Sağım
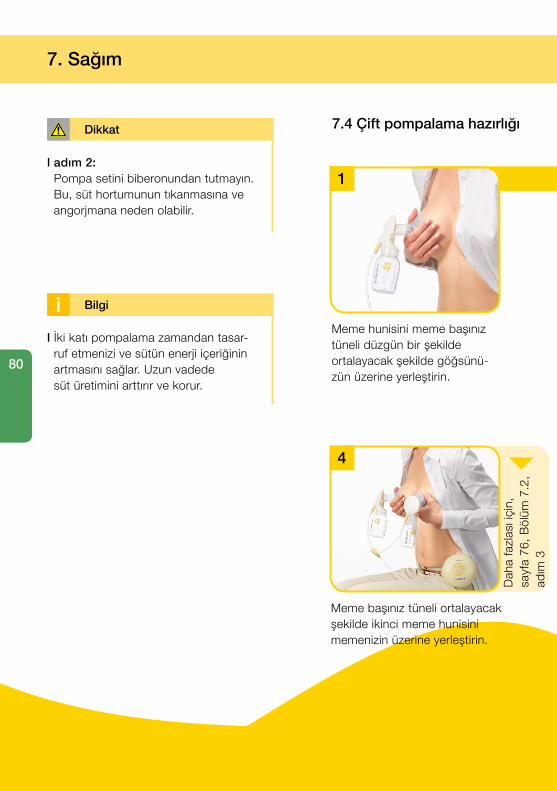
Meme hunisini meme başınız tüneli düzgün bir şekilde ortalayacak şekilde göğsünü-zün üzerine yerleştirin.
l adım 2: Pompa setini biberonundan tutmayın. Bu, süt hortumunun tıkanmasına ve angorjmana neden olabilir.
7.4 Çift pompalama hazırlığı
Meme başınız tüneli ortalayacak şekilde ikinci meme hunisini memenizin üzerine yerleştirin.
Dah
a fa
zlas
ı içi
n,
sayf
a 76
, B
ölüm
7.2
, ad
ım 3
l İki katı pompalama zamandan tasar-ruf etmenizi ve sütün enerji içeriğinin artmasını sağlar. Uzun vadede süt üretimini arttırır ve korur.
Dikkat
Bilgi
80

12 3
Meme hunisini baş parmak ve işaret parmağınız ile memenizin üzerinde tutun. Avucunuzla memenizi destek-leyin.
ile göğüs pompasını çalıştırın.➙ Uyarılma süreci maksimum
iki dakikadır. Daha sonra uyarıl-ma süreci otomatik olarak sağım sürecine geçer.
81

8.1 Saklama
Yeni sağılmış annesütünü saklama önerileri(sağlıklı bebekler için)
Oda sıcaklığı Buzdolabı Buzluk Çözülmüş annesütü
19 ila 26 °C de (66 ila 78 °F) 4–6 saat
4 °C (39 °F) veya daha düşük sıcaklıkta 3–8 gün
6–12 ay–18 ila –20 °C (0 ila –4 °F)
Buzdolabında en fazla 10 saat. Dondurmayın!
l Annesütünü buzdolabının kapısında tutmayın. Bunun yerine buzdolabının en serin kısmını (sebze bölümünün üzeri) seçin.
8.2 Dondurma
l Sağılmış annesütünü biberonda veya "Pump & Save"* poşetlerinde dondurabilirsiniz. Genişleme olasılığı nedeniyle boş alan bırakmak için biberonu veya poşetleri 3/4 ten doldurmayın.
l Biberonlara veya "Pump & Save" poşetlerine sağılma tarihi etiketi yapıştırın.
8.3 Çözme
Dondurulmuş annesütünü vitamin, mineral ve diğer önemli içeriğin kaybını önlemek ve yanma tehlikesinden kaçınmak için mikrodalga fırında veya kaynar su dolu tencerede çözmeyin veya ısıtmayın.
l Annesütünü, bileşenlerini korumak için buzdolabında bir gece boyunca bekletin. Alternatif olarak, biberonu veya "Pump & Save" poşetini ılık suya (maks. 37 °C) tutabilirsiniz.
l Biberonu ya da "Pump & Save" poşetini ayrışmış yağı karıştırmak için hafifçe çalkalayın. Sütü sert bir şekilde çalkalamayıni ya da karıştırmayın.
Uyarı
8. Annesütünü saklama ve çözme
82

i
BESLEME
POMPALAMA
EMZİREN ANNELER İÇİN ARAŞTIRMAYA
DAYALI DESTEKMedela tarafından
tasarlanmıştır
Bebeklerin beslenme
davranışlarını destekleme
Daha kısa sürede daha fazla sütEM
ME
2 A
ŞA
MA
LI
CA
LM
A
UYARMA
SAĞIM
SÜT AKIŞI
9. Anne sütüyle besleme
Medela, anne sütüyle besleme için Calma* kullanılmasını önerir.
Calma – anne sütü için eşsiz beslenme çözümü
Bilgi
Kapsamlı araştırmalarının bir sonucu olarak, Medela, dünya çapında bebek - lerin annesütüyle beslenme davranışını 2-Phase Expression ve Calma yeniliğiy-le birleştiren ilk şirketlerden biri olmuş-tur. 2-Phase Expression, bebeğin doğal emme ritmini taklit ederek daha az sürede daha fazla süt elde edilmesini sağlar. Kısa, uyarıcı hareketleri daha uzun süreli hareketler izler ve böylece en uygun süt akışı sağlanır Eşsiz Cal-ma meme başı, beslenme sırasında öğrendiği emme davranışını sürdür-mesine yardım ederken bebeğin ara vermesini ve nefes almasını sağlar. Mükemmel bir emzirme deneyimi için geliştirilmiştir.
Calma ilel bebeğiniz düzenli olarak emebilir,
emmeye ara verebilir ve nefes alabilir.l yalnızca vakum uygulandığında süt
akışı olur.l memeye kolay geçiş sağlanarak
bebeğinizin doğal beslenme davranışı sürdürülebilir.
Medela Web sitesinde (www.medela.com) Calma hak-kında ayrıntılı bilgiler bulabilirsiniz
83
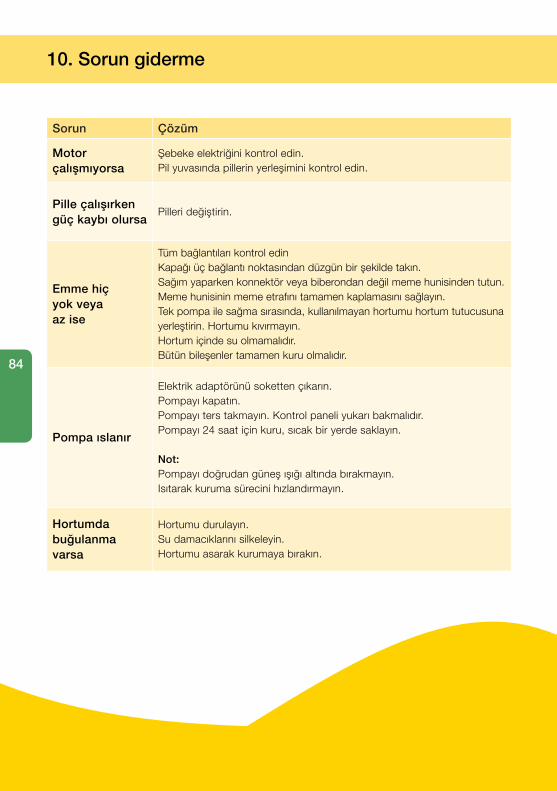
10. Sorun giderme
Sorun Çözüm
Motor çalışmıyorsa
Şebeke elektriğini kontrol edin. Pil yuvasında pillerin yerleşimini kontrol edin.
Pille çalışırken güç kaybı olursa
Pilleri değiştirin.
Emme hiç yok veya az ise
Tüm bağlantıları kontrol edinKapağı üç bağlantı noktasından düzgün bir şekilde takın.Sağım yaparken konnektör veya biberondan değil meme hunisinden tutun.Meme hunisinin meme etrafını tamamen kaplamasını sağlayın.Tek pompa ile sağma sırasında, kullanılmayan hortumu hortum tutucusuna yerleştirin. Hortumu kıvırmayın. Hortum içinde su olmamalıdır.Bütün bileşenler tamamen kuru olmalıdır.
Pompa ıslanır
Elektrik adaptörünü soketten çıkarın.Pompayı kapatın.Pompayı ters takmayın. Kontrol paneli yukarı bakmalıdır.Pompayı 24 saat için kuru, sıcak bir yerde saklayın.
Not:Pompayı doğrudan güneş ışığı altında bırakmayın.Isıtarak kuruma sürecini hızlandırmayın.
Hortumda buğulanma varsa
Hortumu durulayın. Su damacıklarını silkeleyin.Hortumu asarak kurumaya bırakın.
84

Garanti
„Uluslararası Garanti“ kitapçığında garanti ile ilgili ayrıntılı bilgiler bulunmaktadır.
İmha etme
Bu cihaz muhtelif metallerden ve plastikten yapılmıştır. İmha etmeden önce cihaz kullanılmaz hale getirilmeli ve yerel yönetmelik gereğince ayıklanmamış atık olarak imha edilmemelidir. Atık elektrikli ve elektronik cihazlar (pil dahil) için belediyenin toplama ve dönüştürme projesini kullanın. Uygun şekilde yapılmayan imha, çevre ve halk sağlığı için zararlı etki yapabilir.
11. Garanti / atma
85

Yedek parçalar
Madde numarası Ürün
099.0271099.0272099.0273099.0274800.0840200.1693
Swing maxi / Freestyle (100-240V; 12V, 50-60Hz, 0,6 A) AvrupaSwing maxi / Freestyle (100-240V; 12V, 50-60Hz, 0,6 A) UK ve US / JPSwing maxi / Freestyle (100-240V; 12V, 50-60Hz, 0,6 A) AUS / NZSwing maxi / Freestyle (100-240V; 12V, 50-60Hz, 0,6 A) CN5 Adet Swing Yedek Pil Kabı.5 Adet Valf İçeren Freestyle Yedek Konektörü.
099.0270 Swing maxi Motor Ünitesi
099.0275 Swing maxi Hortum
Aksesuarlar
Madde numarası Ürün
008.0033*008.0034*008.0035*008.0036*008.0037*
PersonalFit Meme Hunisi SPersonalFit Meme Hunisi MPersonalFit Meme Hunisi LPersonalFit Meme Hunisi XLPersonalFit Meme Hunisi XXL
008.0074008.0075
150 ml Emzikli Biberon250 ml Emzikli Biberon
008.0145 Calma Solitaire
200.1756200.0625
Soğutma ÇantasıCity Style Çanta
008.0217008.0220008.0224008.0225
Easy Expression Bustier beyaz SEasy Expression Bustier beyaz MEasy Expression Bustier beyaz LEasy Expression Bustier beyaz XL
Diğer Medela ürünleri www.medela.com web sitesinde mevcuttur.
Swing maxi için aşağıdaki aksesuarlar ürün numarası belirtilerek Medela dağıtım ortaklarından edinilebilir.
12. Emzirme sırasında tam bakım
* Sağımdan memnun kalmazsanız veya sağım ağrılı olursa, ebe ya da emzirme danışmanınızla iletişim kurun. Farklı boyutta PersonalFitTM meme hunisi daha rahat ve başarılı bir sağım yapılmasına yardımcı olabilir.
86

Pompalama
Toplama
Anne Sütü Yönetimi
Besleme
Meme Bakımı
Yenilik
Kanıta Dayalı Araştırmalar
Profesyoneller
Servis
UzmanlıkEğitim 87

The Swing maxi breast pump needs special precautions regarding EMC (Electro-magnetic compatibility) and needs to be installed and put into service according to the EMC information provided in these instructions for use.Wireless communications equipment such as wireless home network devices, mobile phones, cordless telephones and their base stations, walkie-talkies can affect the electric breast pump Swing maxi and should be kept at least a distance 1.0 m away from the equipment.Electromagnetic Compatibility (EMC, IEC 60601-1-2:2007, Table 1)
13. EMC / Technical description
Electromagnetic emissions
The electric breast pump Swing maxi is intended for use in the electromagnetic environment specified below. The customer or the user of the electric breast pump Swing maxi should assure that it is used in such an environment.
Emission tests ComplianceElectromagnetic environment – guidance
RF emissionsCISPR 11
Group 1
The electric breast pump Swing maxi uses RF energy only for its internal function. Therefore, its RF emissions are very low and are not likely to cause any interference in nearby electronic equipment.
RF emissionsCISPR 11
Class B
The electric breast pump Swing maxi is suitable for use in all establishments, including domestic establishments and those directly connected to the public low-voltage power supply network that supplies buildings used for domestic pur-poses.
Harmonic emissions IEC 61000-3-2
Class A
Voltage fluctuations / flicker emissionsIEC 61000-3-3
Not applica-ble a
a No significant voltage changes
Warning – The electric breast pump Swing maxi should not be used adjacent to or stacked with other equipment. If adjacent or stacked use is necessary,
the electric breast pump Swing maxi should be observed to verify normal operation in the configuration in which it will be used.
88
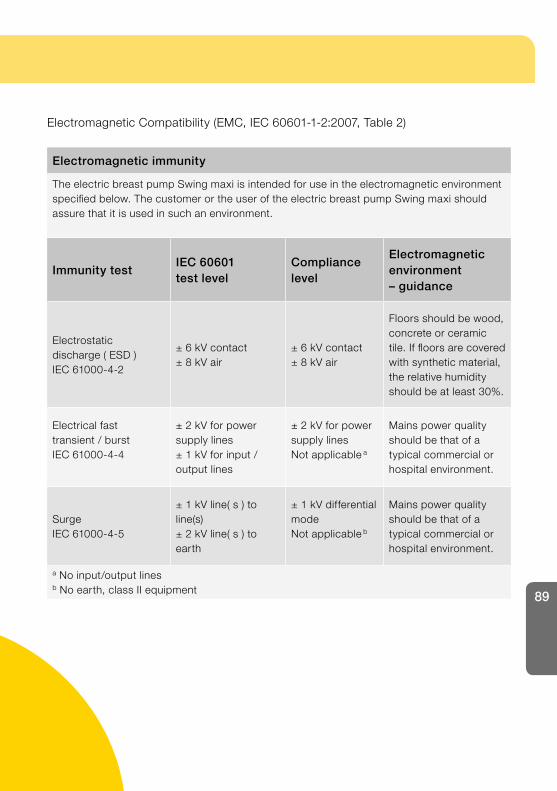
Electromagnetic immunity
The electric breast pump Swing maxi is intended for use in the electromagnetic environment specified below. The customer or the user of the electric breast pump Swing maxi should assure that it is used in such an environment.
Immunity testIEC 60601test level
Compliance level
Electromagnetic environment– guidance
Electrostaticdischarge ( ESD )IEC 61000-4-2
± 6 kV contact± 8 kV air
± 6 kV contact± 8 kV air
Floors should be wood, concrete or ceramic tile. If floors are covered with synthetic material, the relative humidity should be at least 30%.
Electrical fasttransient / burstIEC 61000-4-4
± 2 kV for powersupply lines± 1 kV for input /output lines
± 2 kV for powersupply linesNot applicable a
Mains power quality should be that of atypical commercial or hospital environment.
SurgeIEC 61000-4-5
± 1 kV line( s ) toline(s)± 2 kV line( s ) toearth
± 1 kV differentialmodeNot applicable b
Mains power quality should be that of atypical commercial or hospital environment.
a No input/output linesb No earth, class II equipment
Electromagnetic Compatibility (EMC, IEC 60601-1-2:2007, Table 2)
89
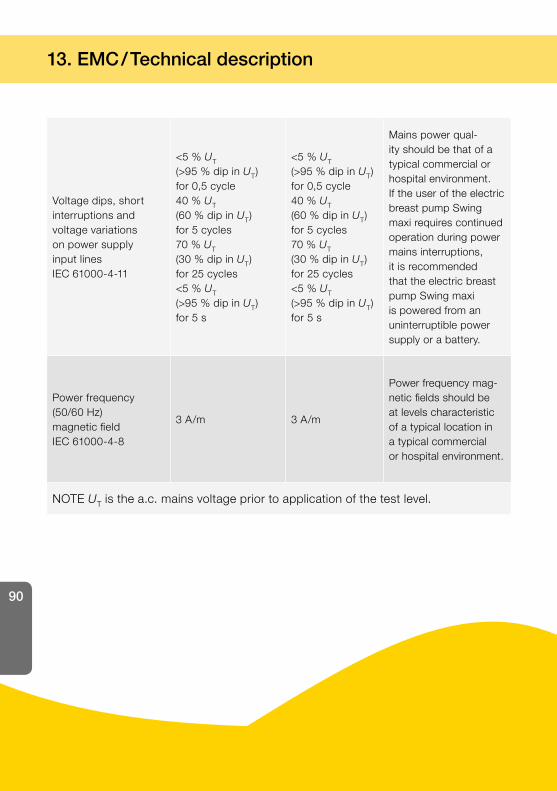
Voltage dips, shortinterruptions andvoltage variationson power supplyinput linesIEC 61000-4-11
<5 % UT
(>95 % dip in UT)for 0,5 cycle40 % UT
(60 % dip in UT)for 5 cycles70 % UT
(30 % dip in UT)for 25 cycles<5 % UT
(>95 % dip in UT)for 5 s
<5 % UT
(>95 % dip in UT)for 0,5 cycle40 % UT
(60 % dip in UT)for 5 cycles70 % UT
(30 % dip in UT)for 25 cycles<5 % UT
(>95 % dip in UT)for 5 s
Mains power qual-ity should be that of a typical commercial or hospital environment. If the user of the electric breast pump Swing maxi requires continued operation during power mains interruptions, it is recommended that the electric breast pump Swing maxi is powered from an uninterruptible power supply or a battery.
Power frequency(50/60 Hz)magnetic fieldIEC 61000-4-8
3 A/m 3 A/m
Power frequency mag-netic fields should be at levels characteristic of a typical location in a typical commercial or hospital environment.
NOTE UT is the a.c. mains voltage prior to application of the test level.
13. EMC / Technical description
90

Electromagnetic immunity
The electric breast pump Swing maxi is intended for use in the electromagnetic environment specified below. The customer or the user of the electric breast pump Swing maxi should assure that it is used in such an environment.
Immunity testIEC 60601test level
Compliance level
Electromagnetic environment – guidance
Conducted RFIEC 61000-4-6
Radiated RFIEC 61000-4-3
3 Vrms150 kHz to80 MHz
3 V/m80 MHz to2,5 GHz
3 Vrms
3 V/m
Portable and mobile RF communi-cations equipment should be used no closer to any part of the electric breast pump Swing maxi, including cables, than the recommended separation distance calculated from the equation applicable to the fre-quency of the transmitter.
Recommended separation distanced = 1,2√P
d = 1,2√P 80 MHz to 800 MHz d = 2,3√P 800 MHz to 2,5 GHz where P is the maximum output power rating of the transmitter in watts (W) according to the transmitter manufac-turer and d is the recommended sepa-ration distance in metres (m).Field strengths from fixed RF trans-mitters, as determined by an electro-magnetic site survey,a should be less than the compliance level in each fre-quency range.b
Interference may occur in the vicinity of equipment marked with the follow-ing symbol:
Electromagnetic Compatibility (EMC, IEC 60601-1-2:2007, Table 4)
91

a Field strengths from fixed transmitters, such as base stations for radio (cellular/cordless) tel-ephones and land mobile radios, amateur radio, AM and FM radio broadcast and TV broadcast cannot be predicted theoretically with accuracy. To assess the electromagnetic environment due to fixed RF transmitters, an electromagnetic site survey should be considered. If the meas-ured field strength in the location in which the electric breast pump Swing maxi is used ex-ceeds the applicable RF compliance level above, the electric breast pump Swing maxi should be observed to verify normal operation. If abnormal performance is observed, additional measures may be necessary, such as re-orienting or relocating the electric breast pump Swing maxi.b Over the frequency range 150 kHz to 80 MHz, field strengths should be less than 3 V/m.
Note 1 At 80 MHz and 800 MHz, the higher frequency range applies.Note 2 These guidelines may not apply in all situations. Electromagnetic propagation is
affected by absorption and reflection from structures, objects and people.
13. EMC /Technical description
92
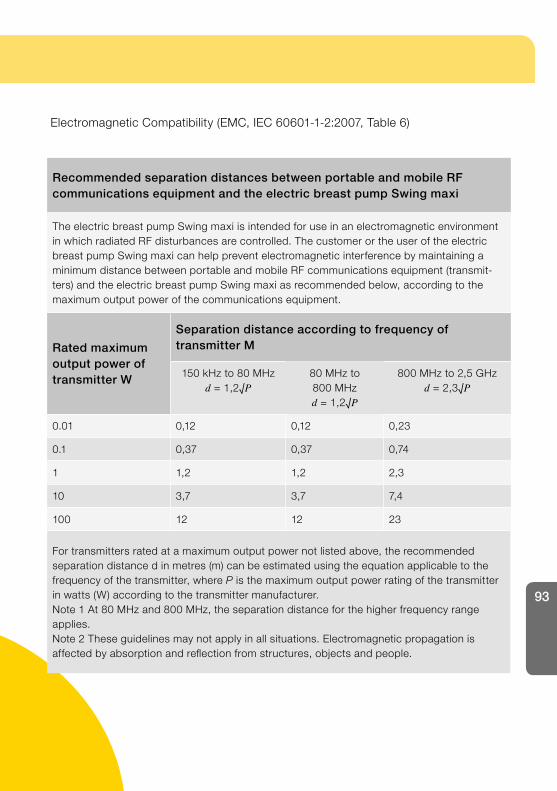
Recommended separation distances between portable and mobile RF communications equipment and the electric breast pump Swing maxi
The electric breast pump Swing maxi is intended for use in an electromagnetic environment in which radiated RF disturbances are controlled. The customer or the user of the electric breast pump Swing maxi can help prevent electromagnetic interference by maintaining a minimum distance between portable and mobile RF communications equipment (transmit-ters) and the electric breast pump Swing maxi as recommended below, according to the maximum output power of the communications equipment.
Rated maximum output power of transmitter W
Separation distance according to frequency of transmitter M
150 kHz to 80 MHzd = 1,2√P
80 MHz to 800 MHzd = 1,2√P
800 MHz to 2,5 GHzd = 2,3√P
0.01 0,12 0,12 0,23
0.1 0,37 0,37 0,74
1 1,2 1,2 2,3
10 3,7 3,7 7,4
100 12 12 23
For transmitters rated at a maximum output power not listed above, the recommended separation distance d in metres (m) can be estimated using the equation applicable to the frequency of the transmitter, where P is the maximum output power rating of the transmitter in watts (W) according to the transmitter manufacturer.Note 1 At 80 MHz and 800 MHz, the separation distance for the higher frequency range applies.Note 2 These guidelines may not apply in all situations. Electromagnetic propagation is affected by absorption and reflection from structures, objects and people.
Electromagnetic Compatibility (EMC, IEC 60601-1-2:2007, Table 6)
93

ref. master doc. 200.7496/F
vacuum (approx.)–20....–270 mmHg–3....–35 kPa45 … 120 cpm
Operation
Transport / Storage
6 x 1.5V, AlkalineAAA, Micro, LR03
Operation
121 x 129 x 57 mm
Transport / Storage
290 g
220 g
Transport / Storage / Operation
In Out
100-240V~ 50/60 Hz 12 V 1 A / 1.5 A
IntermittentIntermittent
14. Technical specifications
94

Notes
95

Medela AGLättichstrasse 4b6341 Baar, Switzerlandwww.medela.com
International SalesMedela AG Lättichstrasse 4b6341 BaarSwitzerlandPhone +41 41 562 51 51www.medela.com
PolandMedela Polska Sp. z o.o.Ul. Wybrzeże Gdyńskie 6D01-531 WarszawaPolandPhone +48 22 865 12 50Phone/Fax +48 22 865 82 [email protected]
© M
edel
a A
G/2
00.5
649/
2018
-04/
D