en fr - nespresso · 3 en us fr ca it will not drape over the counter top or table top where it can...
TRANSCRIPT

EN us IMPORTANT sAFEGuARDs ........................................................................ 2 FR cA cONsIGNEs DE sEcuRITE ......................................................................... 3 Es PREcAucIONEs DE sEGuRIDAD ................................................................ 4 BR MEDIDAs DE sEGuRANÇA......................................................................... 6 EN sAFETy PREcAuTIONs ............................................................................. 7 GR ΜΕΤΡΑ ΑΣΦΑΛΕΙΑΣ .................................................................................. 9 TR GÜVENLİK ÖNLEMLERİ ............................................................................. 11 FR cONsIGNEs DE sEcuRITE ......................................................................... 12

2
EN us IMPORTANT SAFEGUARDS
Is used to alert you to potential personal injury hazards. Obey all safety messages that follow this symbol to avoid possible injury or death.
wARNING Indicates a hazardous situation which, if not avoided, could result in death or serious injury.
cAuTION Indicates a hazardous situation which, if not avoided, could result in minor or moderate injury.
Is used to provide important information not related to personal injury. When you see this sign, please take note of the advice for the correct and safe use of your appliance.
Read all instructions1. Do not touch surfaces that become hot during
and after operation and descaling: telescopic hot water spout and milk spout. Use handles or knobs.
2. Always attach plug to appliance first, then plug cord into wall. To disconnect, turn any control to «off», then remove plug from wall outlet. Do not unplug by pulling the cord.
3. Do not let cord hang over edge of table or counter, or touch hot surfaces or sharp edges. Do not allow cord to dangle (risk of accident).
4. Do not operate any appliance with a damaged cord, or plug in after the appliance malfunctions, or has been damaged in any manner. Unplug cord immediately. Contact the Assistance Service of the Nespresso Club.
5. Do not place on or near a hot gas or electric burner, in a heated oven, radiators or range top. Always place on a stable and even surface. The surface must be resistant to heat and fluids, like water, coffee, descaler, or similar.
6. Do not use outdoors.7. Unplug from outlet when not in use and
before cleaning. Allow to cool before adding or removing parts, and before cleaning the appliance. Do not use any strong cleaning agent or solvent cleaner. Use a damp cloth and mild cleaning agent to clean the surface of the machine.
8. To protect against fire, electric shock and injury to persons, do not immerse cord, plugs or appliance in water or other liquid. Never touch cord with wet hands. Do not overfill water tank. Never put the appliance or part of it into dishwasher, except the Rapid Cappuccino System (R.C.S.).
9. WARNING: to reduce the risk of fire or electric shock, do not remove the cover. No user serviceable parts inside. Do not attempt to repair or modify the machine, doing so will void the warranty. Repair should be done by authorized service personnel only.
10. Do not put fingers under coffee outlet or milk spout, risk of scalding. The milk spout gets hot. Risk of burns. Use with care.
11. This is a household appliance only. Do not use
the appliance for other than the intented use. Any other use is to be considered improper and therefore dangerous.
12. Never allow the appliance to be used by children.
13. Do not lift lever during brewing cycles. Scalding may occur.
14. Never use a damaged or deformed capsule. Water could flow around the capsule when not perforated by the blades and damage appliance.
15. The use of accessory attachments not recommended by the appliance manufacturer may result in fire, electric shock or injury to persons. Always use the milk container (Rapid Cappuccino System) supplied with the machine. Risk of scalding if milk container is not inserted properly.
16. If coffee volumes are programmed higher than 150 ml (5 oz): let the machine cool down for 5 minutes before making the next coffee to prevent the risk of overheating!
17. Descale the machine when you see the descaling alert. Read the safety precautions on the descaling package carefully. The descaling solution can be harmful. Avoid contact with eyes, skin and surfaces. We recommend the Nespresso descaling kit available from the Nespresso Club as it is specifically adapted to your machine. Do not use other products (such as vinegar) that would affect the taste of the coffee. For any additional questions you may have regarding descaling, please contact your Nespresso Club.
18. This machine works with Nespresso capsules
available exclusively through the Nespresso Club.Your Nespresso machine’s proper functioning and lifetime are only guaranteed with the usage of Nespresso capsules.
19. This appliance is designed for Nespresso coffee capsules available exclusively through the Nespresso Club or your Nespresso authorized representative. Nespresso quality is only guaranteed when Nespresso capsules are used in Nespresso appliances.
short cord InstructionsThis appliance has a polarized plug (one blade is wider than the other). To reduce the risk of electric shock,this plug is intended to fit into a polarized outlet only one way. If the plug does not fit fully into the outlet,reverse the plug. If it still does not fit, contact a qualified electrican. Do not defeat the safety purpose of the polarized plug. a) A short power-supply cord or detachable
power-supply cord is to be provided to reduce risks resulting from becoming entangled in or tripping over a longer cord.
b) Longer detachable power-supply cords or extension cords are available and may be used if care is exercised in their use.
c) If an extension cord is used: 1) The marked electrical rating of the detachable
power supply cord or extension cord should be at least as great as the electrical rating of the appliance;
2) If the appliance is provided with 3- wire, grounding type cord, the extension should be a GROUNDING TYPE 3 - WIRE CORD.
3) The longer cord should be arranged so that
3
EN us
FR cA
it will not drape over the counter top or table top where it can be pulled on by children or tripped over.
SAVE THESE INSTRUCTIONSPass them on to any subsequent user.This Instruction Manual is also available as a PDF at nespresso.com
CONSIGNES DE SECURITE
Ce symbole est une alerte de sécurité. Il vous indique qu’il y a risque de blessure. Respectez toujours les consignes qui suivent l’apparition de ce symbole pour éviter tout risque de blessure ou de décès.
AVERTIssEMENT Indique une situation dangereuse qui, si elle n’est pas évitée, peut entraîner des blessures graves ou mortelles.
ATTENTION Indique une situation dangereuse qui, si elle n’est pas évitée, peut entraîner des blessures légères à modérées.
Lorsque vous voyez ce symbole, veuillez prendre note des conseils pour utiliser votre appareil de façon correcte et sécuritaire.
Lire toutes les instructions1. Ne pas toucher les surfaces qui deviennent
chaudes pendant ou après l’utilisation ou le détartrage de l’appareil (par exemple la buse téléscopique à eau chaude et la buse à lait).
2. Toujours brancher le cordon d’abord à l’appareil puis à la prise murale. Pour débrancher, mettre tous les contrôles à la position «off» puis retirer la fiche de la prise murale. Ne pas débrancher en tirant sur le cordon.
3. Ne pas laisser le cordon pendre sur le bord d’une table ou d’un comptoir ou de toucher des surfaces chaudes ou des bords tranchants. Ne pas laisser le cordon pendre (risque d’accident).
4. Ne pas utiliser un appareil dont le cordon ou la fiche est endommagé, ou après un mauvais fonctionnement de l’appareil ou s’il a été endommagé de quelque façon. Débrancher le cordon immédiatement. Communiquer avec le Service d’assistance du Club Nespresso.
5. Ne pas placer sur ou près d’un réchaud à gaz ou électrique, dans un four chauffé, sur des radiateurs ou sur une cuisinière. Toujours mettre sur une surface stable et uniforme. La surface doit être résistante à la chaleur et aux liquides comme l’eau, le café, le détartrant, etc.
6. Ne pas utiliser à l’extérieur. 7. Débrancher l’appareil lorsqu’il n’est pas utilisé
et avant de le nettoyer. Permettre à l’appareil de refroidir avant d’enlever ou d’installer des pièces et avant de le nettoyer. Ne jamais utiliser de détergent puissant pour nettoyer l’appareil. Utiliser un chiffon humide et un détergent doux pour nettoyer la surface de la machine.
8. Pour prévenir tout risque d’incendie, d’électrocution ou de blessure, ne jamais immerger le cordon, la fiche ou l’appareil dans de l’eau ou tout autre liquide. Ne jamais toucher au cordon avec les mains mouillées. Ne pas trop remplir le réservoir d’eau. Ne jamais mettre l’appareil ou un de ses composants dans un lave-vaisselle, à l’exception du Système Cappuccino Rapide (R.C.S.).
9. AVERTISSEMENT: pour réduire les risques d’incendie ou de choc électrique, ne pas retirer les couvercles de l’appareil. Aucune partie interne ne doit être manipulée par l’utilisateur. Toute réparation doit être effectuée uniquement que par un centre de service approuvé.
10. Ne pas placer les doigts sous la sortie du café ou la buse de lait car risque de brûlure. La buse lait devient chaude. Risque de brûlure. Utiliser avec précaution.
11. Cet appareil est un appareil électroménager uniquement. Ne pas utiliser l’appareil pour d’autres fonctions que celles indiquées. Le fabricant ne sera pas tenu responsable pour les dommages causés par un mauvais usage, mauvais traitement ou négligence.
12. Garder hors de la portée des enfants, et ne laisser jamais l’appareil en marche sans supervision.
13. Ne pas lever le levier pendant les cycles de préparation. Risque de brûlure.
14. Ne jamais utiliser une capsule endommagée ou déformée. L’eau pourrait s’écouler autour de la capsule alors qu’elle n’est pas perforée par les lames et pourrait endommager l’appareil.
15. L’utilisation d’accessoires non recommandés par le fabricant de l’appareil peut entraîner un incendie, une électrocution ou des blessures. Toujours utiliser le réservoir à lait (Système Cappuccino Rapide) fourni avec la machine. Risque de brûlure si le réservoir à lait n’est pas bien introduit.
16. Si des volumes de café supérieurs à 150 ml/5 oz sont programmés: laisser la

4
FR cA
Es
machine refroidir pendant 5 minutes avant de faire un autre café. Risque de surchauffe!
17. Détartrer la machine lorsque l’alerte de détartrage s’allume. Lire attentivement les consignes de sécurité sur l’emballage de détartrant. La solution de détartrage peut être nocive. Éviter tout contact avec les yeux, la peau ainsi que les surfaces de comptoir. Nous recommandons d’utiliser la trousse de détartrage Nespresso disponible auprès du Club Nespresso, étant donné qu’elle est spécialement conçue pour votre machine. Ne pas utiliser d’autres produits (comme du vinaigre) qui pourraient affecter le goût du café. Pour toute autre question concernant le détartrage, prière de contacter votre Club Nespresso.
18. Cette machine fonctionne avec les capsules Nespresso, disponibles en exclusivité au Club Nespresso. Le bon fonctionnement et la durée de vie de votre machine Nespresso ne sont garantis que lors de l’utilisation de capsules Nespresso.
19. Cet appareil est conçu pour les capsules de café Nespresso, disponibles exclusivement auprès du Club Nespresso ou de votre représentant autorisé Nespresso.
Instructions pour cordon court Cet appareil possède une fiche polarisée (une broche est plus large que l’autre). Pour réduire le risque d’électrocution, cette fiche ne s’insère que d’un seul sens dans une prise. Si la fiche ne s’insère pas totalement dans la prise, inverser celle-ci. Si la fiche ne s’insère toujours pas, appeler
un électricien qualifié. Ne pas tenter de modifier la fiche d’aucune façon. a) Un cordon d’alimentation court ou un cordon
d’alimentation détachable sera fourni pour réduire les risques de s’emmêler ou de trébucher sur un cordon plus long.
b) Des cordons d’alimentation détachables ou des rallonges sont disponibles et peuvent être utilisés s’ils le sont de façon sécuritaire.
c) Si un long cordon d’alimentation détachable ou une rallonge est utilisé:
1) La puissance nominale du cordon d’alimentation détachable ou de la rallonge doit être au moins égale à la puissance électrique nominale de l’appareil;
2) Si l’appareil est fourni avec un cordon électrique muni de 3 broches, de type mise à la terre, l’extension devrait être de type GROUNDING TYPE 3 - WIRE CORD.
3) Le cordon plus long doit être disposé de façon à ne pas pendre du comptoir ou de la table pour éviter qu’un enfant le tire ou qu’il trébuche.
CONSERVER CES INSTRUCTIONSLes transmettre à tout utilisateur ultérieur.ce mode d’emploi est également disponible en format PDF au nespresso.com
PRECAUCIONES DE SEGURIDAD
PREcAucIÓN Las precauciones de seguridad forman parte de la máquina. Léalas detenidamente antes de usar su nueva máquina por primera vez. Guárdelas en un lugar de fácil acceso para futuras consultas.
PREcAucIÓN Cuando vea este símbolo, consulte las instrucciones de seguridad para evitar posibles lesiones o daños.
INFORMAcIÒN Cuando vea este símbolo, consulte las instrucciones de seguridad para evitar posibles lesiones o daños.
• Esta máquina está destinada a la elaboración de bebidas según indica el presente manual.
• No la utilice para cualquier otro uso que no sea el indicado.
• Esta máquina ha sido diseñada para su uso de forma exclusiva en condiciones de temperatura no extremas y en interiores.
• Proteja la máquina de la luz solar directa, del contacto prolongado con salpicaduras de agua y de la humedad.
• Esta máquina está destinada para su uso exclusivamente doméstico y en aplicaciones similares como: pequeñas cocinas para empleados en tiendas, oficinas y otros entornos de trabajo; también para clientes de hoteles, moteles, albergues y otros alojamientos.
• Este aparato puede ser utilizado por niños de al menos 8 años de edad, siempre y cuando sean supervisados y hayan recibido instrucciones sobre el uso seguro del dispositivo, y sean plenamente conscientes de los peligros que implica dicho uso. La limpieza y el mantenimiento de los usuarios no deberán ser realizados por niños, a menos que sean mayores a 8 años y sean supervisados por un adulto.
• Mantenga el aparato y el cable fuera del alcance de niños menores de 8 años de edad.
• Este aparato puede ser utilizado por personas con capacidades físicas, sensoriales o mentales reducidas, o cuya experiencia o conocimiento no sea el suficiente, siempre y cuando sean supervisadas o hayan recibido instrucciones sobre el uso seguro del dispositivo y sean conscientes de los peligros.
• Los niños no deben utilizar el dispositivo como un juguete.
• El fabricante no asumirá ninguna responsabilidad y la garantía quedará anulada en caso de uso comercial o manipulación/utilización inadecuada de la máquina, así como por cualquier daño que resulte de su uso para otros propósitos, manejo incorrecto, reparación por parte de personal no cualificado o incumplimiento de las instrucciones.
Evite el riesgo de descargas eléctricas mortales y de incendios• En caso de emergencia, desenchúfela
inmediatamente del toma de corriente.• Enchufe la máquina únicamente a un toma de
corriente adecuado, de fácil acceso y con toma de tierra. La máquina solo debe conectarse

5
Estras su instalación. Asegúrese de que la tensión de red corresponda con la indicada en la placa de especificaciones. El uso de una conexión incorrecta anulará la garantía.
La máquina sólo debe conectarse tras su instalación• No tense el cable sobre bordes afilados; fíjelo o
déjelo colgar.• Manténgala apartada del calor y la humedad.• Si el cable está deteriorado, no utilice la máquina.• Si el cable de alimentación se encuentra dañado,
debe ser reemplazado por el fabricante, el servicio técnico o por personal calificado, a fin de evitar cualquier riesgo.
• Devuelva la máquina al Club Nespresso o a un representante autorizado Nespresso.
• Si necesita utilizar un cable de prolongación, emplee únicamente un cable conductor que tenga una sección de como mínimo 1.5 mm2 o sea adecuado a la potencia especificada.
• Para evitar daños graves, jamás coloque la máquina encima o al lado de superficies calientes como radiadores, fogones, hornos, hornillos de gas, llamas o similares.
• Colóquela siempre sobre una superficie horizontal, uniforme y estable. La superficie debe ser resistente al calor y a líquidos como agua, café, productos descalcificadores o similares.
• Desconecte la máquina de la red eléctrica cuando no vaya a utilizarla durante un periodo de tiempo prolongado. Desconéctela extrayendo el enchufe sin tirar del cable, ya que de lo contrario este podría resultar dañado.
• Antes de realizar cualquier operación de
mantenimiento o limpieza, desenchufe la máquina de la toma de corriente y deje que se enfríe.
• Nunca toque el cable con las manos mojadas.• Nunca sumerja la máquina total ni parcialmente,
en agua u otro líquido.• Nunca introduzca la máquina ni ninguna de sus
partes en un lavavajillas.• La combinación de agua y electricidad es
peligrosa y puede provocar descargas eléctricas mortales.
• No abra la máquina, ya que en su interior hay elementos bajo tensión.
• No introduzca ningún objeto por las aberturas, ya que podría provocar un incendio o una descarga eléctrica.
Evite posibles daños durante la utilización de la máquina• Nunca deje la máquina desatendida durante su
funcionamiento.• No utilice la máquina si presenta algún daño
o no funciona correctamente. Desenchúfela inmediatamente del toma corriente. Póngase en contacto con el Club Nespresso o con un representante autorizado Nespresso para su examen, reparación o ajuste.
• Una máquina dañada puede causar descargas eléctricas, quemaduras e incendios.
• Baje siempre la palanca completamente y nunca la levante durante su funcionamiento. Para evitar quemaduras.
• No coloque los dedos debajo de la salida de café, ya que podría sufrir quemaduras.
• No introduzca los dedos en el compartimento o el
tubo de las cápsulas, ya que podría sufrir lesiones.• No toque las superficies que se calientan durante
y después de la operación y descalcificación: pico telescoópico de agua caliente y pico de la leche. Utilice guantes o aisladores de calor.
• Si los volúmenes de café programados superan los 150 ml: dejar que la máquina se enfríe durante 5 minutos antes de tomar el próxima café. Riesgo de sobrecalentamiento!
• El agua puede fluir alrededor de la cápsula si esta no es perforada por las cuchillas y dañar la máquina. Nunca utilice una cápsula dañada o deformada.
• Si una cápsula queda atascada en el compartimento de las cápsulas, apague la máquina y desconéctela de la alimentación antes de realizar cualquier operación. Póngase en contacto con el Club Nespresso o con un representante autorizado Nespresso.
• Llene siempre el depósito de agua con agua fría potable.
• Vacíe el depósito de agua si no va a usar la máquina durante un largo periodo de tiempo, como por ejemplo durante unas vacaciones.
• Cambie el agua del depósito si la máquina no se ha utilizado durante un fin de semana o un periodo de tiempo similar.
• No utilice la máquina sin la bandeja ni la rejilla antigoteo para evitar que se produzcan derrames sobre las superficies próximas.
• No utilice productos de limpieza agresivos ni disolventes. Use un paño húmedo y un producto de limpieza suave para limpiar la superficie de la máquina.
• Al desembalar la máquina, retire y deseche la
película de plástico.• Esta máquina utiliza cápsulas de café Nespresso
disponibles exclusivamente a través del Club Nespresso o de su representante autorizado Nespresso. La calidad Nespresso queda exclusivamente garantizada si se utilizan cápsulas Nespresso en las máquinas Nespresso.
• Todas las máquinas Nespresso se someten a estrictos controles. La pruebas de fiabilidad se llevan a cabo en condiciones de funcionamiento reales sobre unidades seleccionadas de forma aleatoria. Por ello, algunas máquinas pueden mostrar señales de un uso previo.
• Nespresso se reserva el derecho de modificar las instrucciones sin previo aviso.
Descalcificación• El uso correcto del producto descalcificador
Nespresso ayuda a garantizar un funcionamiento correcto de su máquina durante su vida útil, lo que hará que su café tenga la misma calidad que el primer día. Para conocer el modo de empleo así como la cantidad de producto necesario, consulte el manual del usuario.
CONSERVE ESTAS INSTRUCCIONESEntrégueselas a cualquier posible futuro usuario.Este manual de instrucciones también está disponible en formato PDF en nespresso.com

6
BR MEDIDAS DE SEGURANÇA
cuIDADO As medidas de segurança fazem parte da máquina. Leia-as cuidadosamente antes de usar a sua nova máquina pela primeira vez. Guarde-as num local onde facilmente as possa encontrar mais tarde.
cuIDADO Quando visualizar este sinal, por favor consulte as medidas de segurança a fim de evitar riscos e danos.
INFORMAÇãO Quando visualizar este sinal, por favor atente-se à indicação para correta e segura utilização da sua máquina.
• A máquina foi criada para a preparação de bebidas de acordo com estas instruções.
• Não use a máquina para outros fins.• A máquina foi criada apenas para uma utilização
doméstica, com temperaturas normais.• Proteja a máquina dos efeitos da exposição solar,
do contato prolongado com água e umidade.• Esta máquina foi concebida apenas para
utilização doméstica e aplicações similares, tais como: áreas de copa de pessoal em lojas, escritórios e outros ambientes profissionais; por clientes em hotéis, motéis e outros espaços residenciais.
• O aparelho não se destina ao uso por pessoas com capacidades físicas sensoriaias ou mentais reduzidas, ou sem experiência ou conhecimento (incluindo crinaças), a menos que estejam sob supervisão ou tenham sido instruídas sobre o uso do aparelho por uma pessoa responsável por sua segurança. É necessário supervisão atenta quando o aparelho é usado próximo de crianças. Recomenda-se que as crianças sejam vigiadas para assegurar que não estejam brincando com o aparelho.
• O fabricante não assume nenhuma responsabilidade e a garantia não será aplicável em caso de utilização comercial, de manuseio inapropriado da máquina, de dano resultante de uma utilização para outros fins, de operação danosa, de reparação não profissional ou descumprimento das instruções.
Evite riscos de choque elétrico fatal e incêndio• Em caso de emergência: retire imediatamente o
plugue da tomada elétrica.• Ligue a máquina apenas a tomadas elétricas
apropriadas, acessíveis e com ligação terra. A máquina deve ser ligada apenas após instalação. Certifique-se que a tensão da fonte de energia é igual à indicada na placa de especificações. A utilização de uma ligação incorreta anula a garantia.
O equipamento poderá ser ligado apenas após instalação• Não arraste o cabo de energia sobre
extremidades afiadas, fixe-o ou deixe-o
pendurado.• Mantenha o cabo de energia longe de fontes
de calor e umidade.• Se o cabo de energia for danificado, ele deverá
ser substituído pelo fabricante, por um agente de serviços ou por profissionais igualmente qualificados, para evitar riscos.
• Se o cabo de energia está danificado, não use a máquina.
• Devolver a máquina ao Nespresso Club ou um agente autorizado Nespresso.
• Caso seja necessária uma extensão, use apenas um cabo com fio terra com condutor adequado à tomada elétrica.
• Para evitar a ocorrência de danos graves nunca coloque a máquina sobre ou junto a superfícies quentes tais como aquecedores, fogões, fornos, bicos de gás, chamas ou similares.
• Coloque sempre a máquina sobre uma superfície horizontal e estável. A superfície deve ser resistente ao calor e fluidos como a água, café, descalcificante ou similares.
• Desligue a máquina da tomada elétrica em longos períodos de não utilização. Desligue a máquina puxando pelo plugue e não pelo cabo elétrico, caso contrário o cabo poderá ser danificado.
• Antes da limpeza e manutenção, retire o plugue da tomada elétrica e deixe a máquina esfriar.
• Nunca toque no cabo elétrico com as mãos molhadas.
• Nunca submergir a máquina total ou parcialmente em água ou outro líquido.
• Nunca coloque a máquina ou parte da mesma na máquina de lavar louça.
• A combinação de eletricidade e água é perigosa e pode resultar em choque elétrico fatal.
• Não abra a máquina. Risco de tensão elétrica no interior!
• Não coloque nada em nenhuma abertura. Caso contrário, risco de incêndio ou choque elétrico!
Evite qualquer risco ao manusear a máquina• Nunca deixe a máquina sozinha durante a sua
utilização.• Não use a máquina se estiver danificada ou
caso não esteja em perfeitas condições de funcionamento. Remova imediatamente o plugue da tomada elétrica. Contate o Nespresso Club ou um representante Nespresso autorizado para verificação, reparação ou programação.
• Uma máquina danificada pode causar choque elétrico, queimaduras e incêndio.
• Feche sempre a alavanca por completo e nunca a levante durante a utilização. Risco de queimaduras.
• Não coloque os dedos debaixo da saída de café, risco de queimaduras.
• Não coloque os dedos no compartimento da cápsula ou no orifício da cápsula. Perigo de lesão!
• Não toque superficies que se aquecem antes ou durante o uso e descalcificação: pequeno bico de saída de água quente e leite. Use as alças ou os botões.
• Se o nível programado do café for acima de 150 ml: deixe a máquina esfriar por 5 minutos antes de fazer outro café. Risco de super aquecimento.
• Pode ocorrer perda de água à volta da cápsula quando esta não foi devidamente perfurada
7
BR
EN
pelas lâminas e danificar a máquina.• Nunca use uma cápsula danificada ou
deformada. Se uma cápsula estiver bloqueada no compartimento da cápsula, desligue a máquina e retire da alimentação elétrica antes de qualquer operação. Ligue para o Club Nespresso ou agente autorizado Nespresso.
• Encha sempre o reservatório de água com água fresca, potável e fria.
• Esvazie o reservatório de água caso a máquina não seja usada durante um longo período de tempo (férias, etc.).
• Substitua a água do reservatório de água quando a máquina não for usada durante um fim de semana ou um período de tempo similar.
• Não use a máquina sem a pingadeira e a respectiva grelha para evitar o derramamento de qualquer líquido nas superfícies do ambiente.
• Não use nenhum detergente com agente de limpeza forte ou solvente. Use um pano úmido e um agente de limpeza suave para limpar a superfície da máquina.
• Ao desembalar a máquina, retire e elimine a película de plástico da grelha de escoamento.
• Esta máquina está concebida para cápsulas Nespresso disponíveis exclusivamente através do Nespresso Club ou do seu agente autorizado Nespresso. Garantimos a qualidade Nespresso apenas quando as cápsulas Nespresso são utilizadas em máquinas Nespresso.
• Todas as máquinas Nespresso passam por controles rigorosos. São realizados testes de fiabilidade em condições reais em unidades selecionadas de forma aleatória. Algumas máquinas poderão, de fato, apresentar sinais de
utilização prévia.• A Nespresso reserva-se o direito de modificar
estas instruções sem aviso prévio.
Descalcificação• O agente descalcificante Nespresso, quando
usado corretamente, ajuda a assegurar o correto funcionamento da sua máquina durante o seu tempo de vida e a experiência de degustação do seu café tão perfeita como no primeiro dia. Para a quantidade correta e procedimento a seguir, consulte o manual de utilização incluído no kit descalcificante Nespresso.
GUARDE ESTAS INSTRUÇÕESEntregue-as ao utilizador seguinte.Este manual também está disponível em formato PDF no nespresso.com
S A F E T Y P R E C AU T I O N S
cAuTION: the safety precautions are part of the appliance. Read them carefully before using your new appliance for the first time. Keep them in a place where you can find and refer to them later on.
cAuTION: when you see this sign, please refer to the safety precautions to avoid possible harm and damage.
INFORMATION: when you see this sign, please take note of the advice for the correct and safe usage of your appliance.• The appliance is intended to prepare beverages
according to these instructions.• Do not use the appliance for other than its
intended use.• This appliance has been designed for indoor and
non-extreme temperature conditions use only. • Protect the appliance from direct sunlight effect,
prolonged water splash and humidity.• This appliance is intended to be used in
households and similar applications only such as: staff kitchen areas in shops, offices and other working environments, farm houses; by
clients in hotels, motels and other residential environments; bed and breakfast type environments.
• This appliance may be used by children of at least 8 years of age, as long as they are supervised and have been given instructions about using the appliance safely and are fully aware of the dangers involved. Cleaning and user maintenance shall not be made by children unless they are older than 8 and they are supervised by an adult.
• Keep the appliance and its cord out of reach of children under 8 years of age.
• This appliance may be used by persons with reduced physical, sensory or mental capabilities, or whose experience or knowledge is not sufficient, provided they are supervised or have received instruction to use the device safely and understand the dangers.
• Children should not use the device as a toy.• The manufacturer accepts no responsibility
and the warranty will not apply for any commercial use, inappropriate handling or use of the appliance, any damage resulting from use for other purposes, faulty operation, non-professionals’ repair or failure to comply with the instructions.
Avoid risk of fatal electric shock and fire• In case of an emergency: immediately remove
the plug from the power socket.• Only plug the appliance into suitable, easily
accessible, earthed mains connections. Make sure that the voltage of the power source is the same as that specified on the rating plate.

8
ENThe use of an incorrect connection voids the warranty.
The appliance must only be connected after installation• Do not pull the cord over sharp edges, clamp it or
allow it to hang down.• Keep the cord away from heat and damp.• If the supply cord is damaged, it must be
replaced by the manufacturer, its service agent or similarly qualified persons, in order to avoid all risks.
• If the cord is damaged, do not operate the appliance.
• Return the appliance to the Nespresso Club or to a Nespresso authorized representative.
• If an extension cord is required, use only an earthed cord with a conductor cross-section of at least 1.5 mm2 or matching input power.
• To avoid hazardous damage, never place the appliance on or beside hot surfaces such as radiators, stoves, ovens, gas burners, open flame, or similar.
• Always place it on a horizontal, stable and even surface. The surface must be resistant to heat and fluids, like water, coffee, descaler or similar.
• Disconnect the appliance from the mains when not in use for a long period. Disconnect by pulling out the plug and not by pulling the cord itself or the cord may become damaged.
• Before cleaning and servicing, remove the plug from the mains socket and let the appliance cool down.
• Never touch the cord with wet hands.• Never immerse the appliance or part of it in
water or other liquid.• Never put the appliance or part of it in a
dishwasher.• Electricity and water together is dangerous and
can lead to fatal electrical shocks.• Do not open the appliance.
Hazardous voltage inside!• Do not put anything into any openings. Doing so
may cause fire or electrical shock!
Avoid possible harm when operating the appliance• Never leave the appliance unattended during
operation.• Do not use the appliance if it is damaged or
not operating perfectly. Immediately remove the plug from the power socket. Contact the Nespresso Club or Nespresso authorized representative for examination, repair or adjustment.
• A damaged appliance can cause electrical shocks, burns and fire.
• Always completely close the lever and never lift it during operation. Scalding may occur.
• Do not put fingers under coffee outlet, risk of scalding.
• Do not put fingers into capsule compartment or the capsule shaft. Danger of injury!
• Do not touch surfaces that become hot during and after operation and descaling: telescopic hot water spout and milk spout. Use handles or knobs.
• If coffee volumes higher than 150 ml are programmed: let the machine cool down for 5
minutes before making the next coffee. Risk of overheating!
• Water could flow around a capsule when not perforated by the blades and damage the appliance.
• Never use a damaged or deformed capsule. If a capsule is blocked in the capsule compartment, turn the machine off and unplug it before any operation. Call the Nespresso Club or Nespresso authorized representative.
• Fill the water tank only with fresh and potable water.
• Empty water tank if the appliance will not be used for an extended time (holidays, etc.).
• Replace water in water tank when the appliance is not operated for a weekend or a similar period of time.
• Do not use the appliance without the drip tray and drip grid to avoid spilling any liquid on surrounding surfaces.
• Do not use any strong cleaning agent or solvent cleaner. Use a damp cloth and mild cleaning agent to clean the surface of the appliance.
• To clean machine, use only clean cleaning tools.• When unpacking the machine, remove the plastic
film and dispose.• This appliance is designed for Nespresso coffee
capsules available exclusively through the Nespresso Club or your Nespresso authorized representative.
• All Nespresso appliances pass stringent controls. Reliability tests under practical conditions are performed randomly on selected units. This can show traces of any previous use.
• Nespresso reserves the right to change instructions without prior notice.
Descaling• Nespresso descaling agent, when used correctly,
helps ensure the proper functioning of your machine over its lifetime and that your coffee experience is as perfect as the first day. For the correct amount and procedure to follow, consult the user manual included in the Nespresso descaling kit.
cAuTION: the descaling solution can be harmful. Avoid contact with eyes, skin and surfaces. Never use any product other than the Nespresso descaling kit available at the Nespresso Club to avoid damage to your machine. For any additional questions you may have regarding descaling, please contact your Nespresso Club.
SAVE THESE INSTRUCTIONSPass them on to any subsequent user.This instruction manual is also available as a PDF at nespresso.com

9
GRΜ Ε Τ ΡΑ Α Σ ΦΑ Λ Ε Ι Α Σ
ΠΡοΣοχή : τα μέτρα ασφάλειας αποτελούν μέρος της συσκευής. Διαβάστε τα προσεκτικά πριν χρησιμοποιήσετε τη νέα σας συσκευή για πρώτη φορά. Φυλάξτε τα σε μία θέση όπου μπορείτε να τα βρείτε εύκολα και να τα συμβουλεύεστε στο μέλλον.
ΠΡοΣοχή: όταν βλέπετε αυτό το σήμα, παρακαλούμε συμβουλευτείτε τα μέτρα ασφάλειας για να αποφευχθούν πιθανοί κίνδυνοι και βλάβες.
ΠΛήΡοΦοΡΙΕΣ: όταν βλέπετε αυτό το σήμα, παρακαλούμε λάβετε υπόψη σας τη συμβουλή που δίνεται για την ορθή και ασφαλή χρήση τηςσυσκευής σας• Η συσκευή προορίζεται για την παρασκευή
ροφημάτων σύμφωνα με τις συγκεκριμένες οδηγίες.
• Μην χρησιμοποιείτε τη συσκευή για άλλον σκοπό εκτός από αυτόν για τον οποίο προορίζεται.
• Η συσκευή αυτή έχει σχεδιαστεί για χρήση σε κλειστό χώρο και σε μη ακραίες συνθήκες θερμοκρασίας .
• Προστατέψτε τη συσκευή από την άμεση έκθεση σε ηλιακή ακτινοβολία, το συχνό πιτσίλισμα από νερό και την υγρασία.
• Η εν λόγω συσκευή προορίζεται να χρησιμοποιηθεί μόνο σε νοικοκυριά ή για παρόμοιες εφαρμογές, όπως: στο χώρο της κουζίνας του προσωπικού σε καταστήματα, γραφεία ή άλλα εργασιακά περιβάλλοντα, από πελάτες σε ξενοδοχεία, μοτέλ και άλλα περιβάλλοντα διαμονής, σε περιβάλλον τύπου «bed and breakfast».
• Η συσκευή αυτή μπορεί να χρησιμοποιηθεί από παιδιά ηλικίας τουλάχιστον 8 ετών, εφόσον επιβλέπονται και τους έχουν δοθεί οδηγίες σχετικά με τη χρήση της συσκευής με ασφάλεια και έχουν πλήρη επίγνωση των σχετικών κινδύνων. Ο καθαρισμός και η συντήρηση δεν πρέπει να γίνονται από παιδιά εκτός αν είναι ηλικίας άνω των 8 και επιτηρούνται από ενήλικα.
• Κρατήστε τη συσκευή και το καλώδιο μακριά από παιδιά κάτω των 8 ετών.
• Η συσκευή αυτή μπορεί να χρησιμοποιηθεί από άτομα με μειωμένες σωματικές, αισθητηριακές ή διανοητικές ικανότητες, ή των οποίων η εμπειρία ή η γνώση δεν είναι αρκετή, υπό τον όρο ότι επιβλέπονται ή έχουν λάβει οδηγίες να χρησιμοποιούν τη συσκευή με ασφάλεια και κατανοούν τους κινδύνους.
• Τα παιδιά δεν πρέπει να χρησιμοποιούν τη συσκευή ως παιχνίδι.
• Ο κατασκευαστής δεν αποδέχεται καμία ευθύνη και η εγγύηση δεν θα ισχύει σε περίπτωση οποιασδήποτε εμπορικής χρήσης, ακατάλληλης μεταχείρισης ή χρήσης της συσκευής, καθώς και οποιασδήποτε βλάβης, η οποία προκλήθηκε
από χρήση για άλλους σκοπούς, λανθασμένη λειτουργία, μη-επαγγελματική επισκευή ή αδυναμία συμμόρφωσης προς τις οδηγίες.
Αποφύγετε κινδύνους μοιραίου ηλεκτροσόκ και πυρκαγιάς• Σε περίπτωση εκτάκτου ανάγκης: Βγάλτε
αμέσως το φις από την πρίζα παροχής ρεύματος.
• Συνδέετε τη συσκευή μόνο σε κατάλληλη, εύκολα προσβάσιμη, γειωμένη παροχή ρεύματος. Η συσκευή θα πρέπει να συνδέεται με το ρεύμα μόνο μετά την εγκατάστασή της. Σιγουρευτείτε ότι η τάση της παροχής ρεύματος είναι η ίδια με την αναγραφόμενη στον πίνακα χαρακτηριστικών. Η χρήση ακατάλληλης σύνδεσης επισύρει ακύρωση της εγγύησης.
Μπορείτε να συνδέσετε τη συσκευή μόνον αφού γίνει η εγκατάσταση• Μην τραβάτε το καλώδιο πάνω από αιχμηρά
άκρα, χρησιμοποιήστε κατάλληλο τρόπο συγκράτησης ή αφήστε το να κρέμεται ελεύθερα.
• Κρατήστε το καλώδιο μακριά από θερμότητα και υγρασία.
• Εάν το καλώδιο του ρεύματος είναι κατεστραμμένο, θα πρέπει να αντικατασταθεί από τον κατασκευαστή, τον εξουσιοδοτημένο επισκευαστή του ή άλλο αντίστοιχης αρμοδιότητας άτομο, προκειμένου να αποφευχθούν όλοι οι κίνδυνοι.
• Εάν το καλώδιο είναι κατεστραμμένο, μην λειτουργείτε τη συσκευή.
• Επιστρέψτε τη συσκευή στο Nespresso Club ή σε εξουσιοδοτημένο αντιπρόσωπο της Nespresso.
• Εάν απαιτείται καλώδιο επέκτασης, χρησιμοποιήστε μόνο γειωμένο καλώδιο με διατομή αγωγού τουλάχιστον 1.5 mm2 ή που να ανταποκρίνεται στο παρεχόμενο ρεύμα.
• Για την αποφυγή επικίνδυνης βλάβης, μην τοποθετείτε ποτέ τη συσκευή πάνω ή δίπλα σε επιφάνειες με θερμότητα, όπως θερμαντικά σώματα, εστίες κουζίνας, καυστήρες γκαζιού, ανοιχτή φλόγα, ή παρόμοιες πηγές.
• Πάντα ακουμπάτε τη συσκευή πάνω σε μία οριζόντια, σταθερή κι ομαλή επιφάνεια. Η επιφάνεια θα πρέπει να είναι ανθεκτική σε θερμότητα και υγρά, όπως νερό, καφέ, καθαριστικό καθαλατώσεων ή παρόμοια.
• Αποσυνδέετε τη συσκευή από την παροχή ρεύματος, όταν δεν την χρησιμοποιείτε για μεγάλα διαστήματα. Όταν αποσυνδέετε τη συσκευή τραβήξτε το φις και όχι το ίδιο το καλώδιο, για να μην προκαλέσετε ζημιά στο καλώδιο.
• Πριν τον καθαρισμό ή τη συσκευή, βγάλτε το φις από την πρίζα κι αφήστε τη συσκευή να κρυώσει.
• Ποτέ μην πιάνετε το καλώδιο με βρεγμένα χέρια.• Ποτέ μην βυθίζετε τη συσκευή ή μέρος αυτής σε
νερό ή άλλο υγρό.• Ποτέ μην τοποθετείτε τη συσκευή ή μέρος αυτής
σε πλυντήριο πιάτων.• Ο συνδυασμός ηλεκτρισμού και νερού είναι
επικίνδυνος και μπορεί να προκαλέσει μοιραία ηλεκτροπληξία.
• Μην ανοίγετε τη συσκευή. Η τάση του ρεύματος στο εσωτερικό είναι επικίνδυνη!
• Μην τοποθετείτε τίποτα στα ανοίγματα της
10
GRσυσκευής. Εάν το κάνετε, μπορεί να προκαλέσετε φωτιά ή ηλεκτροσόκ!
Αποφεύγοντας πιθανή βλάβη κατά τη λειτουργία της συσκευής• Ποτέ μην αφήνετε τη συσκευή χωρίς επίβλεψη
όταν είναι σε λειτουργία.• Μην χρησιμοποιείτε τη συσκευή, εάν είναι
κατεστραμμένη ή δεν λειτουργεί στην εντέλεια. Βγάλτε αμέσως το φις από την πρίζα παροχής ρεύματος. Επικοινωνήστε με το Nespresso Club ή τον εξουσιοδοτημένο αντιπρόσωπο Nespresso για έλεγχο, επισκευή ή ρύθμιση της μηχανής σας.
• Μία κατεστραμμένη συσκευή μπορεί να προκαλέσει ηλεκτροσόκ, εγκαύματα και φωτιά.
• Πάντα κλείνετε τον μοχλό μέχρι το τέλος της διαδρομής του, και ποτέ μην τον σηκώνετε, ενώ η συσκευή είναι σε λειτουργία. Μπορεί να προκληθεί έγκαυμα.
• Μην βάζετε τα δάχτυλά σας κάτω από το στόμιο εκροής καφέ, κίνδυνος εγκαύματος.
• Μην βάζετε τα δάχτυλά σας στο τμήμα καψουλών ή στον αγωγό καψουλών. Κίνδυνος τραυματισμού!
• Ποτέ μην πιάνετε επιφάνειες οι οποίες θερμαίνονται κατά τη διάρκεια της λειτουργίας ή μετά την αφλάτωση: το τηλεσκοπικό στόμιο ζεστού νερού και το στόμιο γάλακτος.
• Αν ο όγκος του καφέ ξεπεράσει τα προγραμματισμένα 150 ml: αφήστε τη μηχανή να κρυώσει για 5 λεπτά πριν ετοιμάσετε τον επόμενο καφέ. Κίνδυνος υπερθέρμανσης!
• Το νερό μπορεί να ρέει γύρω από την κάψουλα, όταν αυτή δεν έχει διατρυθεί από τις λεπίδες, προκαλώντας βλάβη στη συσκευή.
• Ποτέ μην χρησιμοποιείτε μία κατεστραμμένη ή
παραμορφωμένη κάψουλα. Εάν μία κάψουλα έχει μπλοκάρει μέσα στο τμήμα καψουλών, σβήστε τη μηχανή και βγάλτε τη από την πρίζα πριν προβείτε σε οποιαδήποτε ενέργεια. Καλέστε το Nespresso Club ή έναν εξουσιοδοτημένο αντιπρόσωπο Nespresso.
• Γεμίστε το δοχείο νερού με φρέσκο πόσιμο νερό.• Αδειάζετε το δοχείο νερού, όταν η συσκευή δεν
πρόκειται να χρησιμοποιηθεί για μεγάλο διάστημα (διακοπές, κ.λπ.)
• Αντικαταστήστε το νερό στο δοχείο νερού, εάν η συσκευή δεν έχει λειτουργήσει για ένα Σαββατοκύριακο ή παρόμοιο χρονικό διάστημα.
• Μην χρησιμοποιείτε τη συσκευή χωρίς τον δίσκο και το πλέγμα αποστράγγισης για να αποφευχθεί η διαρροή υγρών σε γειτονικές επιφάνειες. Μην χρησιμοποιείτε κανένα δυνατό καθαριστικό προϊόν ή διάλυμα καθαρισμού. Χρησιμοποιείστε ένα βρεγμένο πανί και μαλακό καθαριστικό προϊόν για να καθαρίσετε τις επιφάνειες της μηχανής.
• Όταν θα βγάλετε τη συσκευή από τη συσκευασία της, αφαιρέστε και πετάξτε την πλαστική μεμβράνη που βρίσκεται στο πλέγμα αποστράγγισης.
• Για να καθαρίσετε τη μηχανή του καφέ, να χρησιμοποιείτε μόνο καθαρά εργαλεία καθαρισμού.
• Όταν βγάζετε τη μηχανή από τη συσκευασία αφαιρέστε την πλαστική μεμβράνη και πετάξτε τη.
• Η συσκευή έχει σχεδιαστεί για χρήση καψουλών καφέ Nespresso που διατίθενται αποκλειστικά από το Nespresso Club ή τον εξουσιοδοτημένο αντιπρόσωπό σας Nespresso. Η ποιότητα Nespresso
είναι εγγυημένη μόνο όταν χρησιμοποιούνται κάψουλες Nespresso στις συσκευές Nespresso.
• Όλες οι συσκευές Nespresso περνούν από αυστηρότατους ελέγχους. Τεστ αξιοπιστίας υπό συνθήκες πραγματικής χρήσης πραγματοποιούνται τυχαία σε επιλεγμένες μονάδες. Συνεπώς, ορισμένες συσκευές μπορεί να εμφανίζουν ίχνη προηγούμενης χρήσης.
• Η Nespresso διατηρεί το δικαίωμα να αλλάξει τις οδηγίες χωρίς πρότερη ειδοποίηση.
Αφαίρεση καθαλατώσεων• Το διάλυμα καθαρισμού καθαλατώσεων της
Nespresso, όταν χρησιμοποιείται σωστά, βοηθά στο να διασφαλιστεί η σωστή λειτουργία της μηχανής σας καθόλη τη διάρκεια ζωής της, και στο να είναι η εμπειρία καφέ τόσο τέλεια, όσο την πρώτη ημέρα που δοκιμάσατε τον καφέ. Για τη σωστή δοσολογία και διαδικασία που θα πρέπει να ακολουθήσετε, συμβουλευτείτε το εγχειρίδιο χρήσης που περιλαμβάνεται στο σετ καθαρισμού Nespresso.
ΠΡοΣοχή: η διαδικασία αφαλάτωσης μπορεί να είναι επιβλαβής. Αποφύγετε την επαφή με τα μάτια, το δέρμα και τις επιφάνειες. Για να αποφύγετε τη φθορά της μηχανής σας, μη χρησιμοποιείτε ποτέ άλλο προιόν πέραν του διαλύματος καθαρισμού καθαλατώσεων της Nespresso, που είναι διαθέσιμο από το Nespresso Club. Για οποιαδήποτε απορία σχετικά με την αφαλάτωση, παρακαλώ επικοινωνείστε με το Nespresso Club.
ΦΥΛΑΞΤΕ ΑΥΤΕΣ ΤΙΣ ΟΔΗΓΙΕΣΔώστε τες στον επόμενο χρήστη.Το συγκεκριμένο Εγχειρίδιο οδηγιών διατίθεται και σε μορφή αρχείου PDF στο nespresso.gr

11
TRG Ü V E N L İ K Ö N L E M L E R İ
DİKKAT: güvenlik önlemleri cihazın bir parçasıdır. yeni cihazınızı ilk defa kullanmadan önce bunları dikkatli bir şekilde okuyun. İleride gerekmesi durumunda başvurmak için kolay bulabileceğiniz bir yerde saklayın.
DİKKAT: bu işareti gördüğünüz zaman, lütfen olası bir hasarı önlemek için güvenlik önlemleri bölümüne bakın.
BİLGİ: bu işareti gördüğünüz zaman, lütfen kahve makinenizin doğru ve güvenli kullanımı için verilen tavsiyelere dikkat edin.
• Bu cihaz, belirtilen talimatlara göre içecek hazırlama amaçlıdır.
• Cihazı amaçlanan kullanım haricinde kullanmayın.
• Bu cihaz, sadece iç mekanda ve normal dışı olmayan sıcaklık koşullarında kullanım için tasarlanmıştır.
• Cihazı doğrudan güneş ışığının etkisinden, uzun süreli suyla temastan ve nemden koruyun.
• Bu cihaz, evde ve benzeri uygulamalarda
kullanım amaçlıdır. Örneğin: mağazalarda, bürolarda ve diğer çalışma ortamlarındaki personel mutfak alanlarında, çiftlik evlerinde, otellerde, motellerde ve diğer konaklama alanlarında, yatak ve kahvaltı sunulan ortamlarda müşterilerinin kullanımı için.
• Bu cihazı 8 yaşın üstündeki çocuklar, denetim altında, cihazı güvenli kullanım konusunda talimatlar verildikten ve mevcut tehlikeler konusunda iyice bilgilendirildikten sonra kullanabilir. Temizlik ve kullanıcı bakımı ancak 8 yaşından büyük ve yetişkin birinin gözetimindeki çocuklar tarafından yapılabilir.
• Cihazı kablosunu 8 yaşın altındaki çocukların ulaşamayacağı yerde tutun.
• Bu cihaz, denetim altında olması veya cihazı güvenli kullanma konusunda gerekli talimatların verilmesi ve tehlikeleri anlaması koşulu ile, fiziksel, duyusal veya zihinsel becerisi azalmış veya deneyimi ya da bilgisi yeterli olmayan kişiler tarafından kullanılabilir.
• Çocuklar cihazı oyuncak olarak kullanmamalıdır.• İmalatçı, cihazın ticari amaçlı kullanımı, uygun
olmayan şekilde taşınması veya kullanılması, diğer amaçlarla kullanımdan, hatalı kullanımdan, profesyonel olmayan kişilerce onarılmasından veya talimatlara uyulmamasından kaynaklanan hasar konusunda sorumluluk kabul etmez ve teminat vermez.
Ölümcül elektrik çarpması veya yangın riskinden kaçının • Acil durumda: zaman geçirmeden fişi prizden
çıkartın.• Cihazı sadece uygun, kolay erişilebilir,
topraklanmış prizlere takın. Elektrik kaynağının geriliminin anma değeri plakasında belirtilen gerilim ile aynı olduğundan emin olun. Hatalı bağlantı yapılması durumunda garanti geçersiz olacaktır.
cihaz ancak kurulumdan sonra elektriğe bağlanmalıdır• Kabloyu keskin kenarların üzerinden geçirmeyin,
kelepçelemeyin veya asılmasına izin vermeyin.• Kabloyu ısı ve nemden uzak tutun.• Eğer elektrik kablosu hasarlıysa, tüm riskleri
önlemek için, imalatçı, servis temsilcisi veya benzeri kalifiye kişiler tarafından değiştirilmelidir.
• Eğer kablo hasarlıysa, cihazı çalıştırmayın.• Nespresso Club ile iletişime geçin.• Eğer uzatma kablosu gerekirse, sadece en az 1,5
mm² veya eşdeğer girişli kondüktör ara kesitli topraklanmış bir kablo kullanın.
• Hasar görmemesi için, cihazı asla radyatör, soba, fırın, gaz brülörü, açık alev veya benzeri sıcak yüzeylere yerleştirmeyin.
• Cihazı her zaman yatay, sağlam ve düz bir yüzeye yerleştirin. Yüzey ısıya ve su, kahve, kireç çözücü vb. sıvılara dayanıklı olmalıdır.
• Cihazı uzun süre kullanmayacağınız zaman prizden çıkartın. Fişte çıkartırken kablodan tutarak değil, fişten tutarak çekin. Aksi takdirde kablo hasar görebilir.
• Temizlik ve bakım öncesinde, Fişi prizden çıkartın ve cihazı soğumaya bırakın.
• Kabloya asla ıslak ellerinizle dokunmayın.• Cihazı veya herhangi bir parçasını asla su veya
başka bir sıvı içinde bırakmayın.• Cihazı veya herhangi bir parçasını asla bulaşık
makinesine koymayın.• Elektrik ve su bir arada tehlikelidir ve ölümcül
elektrik çarpmasına neden olabilir.• Cihazın içini açmayın. İçeride tehlikeli gerilim
vardır!• Herhangi bir boşluktan içeri bir şey sokmayın.
Bu durum yangına veya elektrik çarpmasına neden olabilir!
cihazı çalıştırırken olası hasardan kaçının• Cihaz çalışırken asla başından ayrılmayın.• Eğer hasar görmüş veya düzgün çalışmıyorsa
cihazı kullanmayın. Zaman geçirmeden fişi prizden çıkartın. İnceleme, onarım veya ayarlama için Nespresso Club ile iletişime geçin.
• Hasarlı bir cihaz elektrik çarpmasına, yanıklara veya yangına neden olabilir.
• Kolu her zaman tamamen kapatın ve çalışırken asla kaldırmayın. Cildinizde yanık oluşturabilir.
• Parmaklarınızı kahve çıkış ağzının altına koymayın, yanma riski vardır.
• Parmaklarınızı kapsül bölmesine veya kapsül gövdesinin üzerine koymayın. Yaralanma tehlikesi vardır!
• Çalışma ve kireç çözme işlemi esnasında veya sonrasında ısınan yüzeylere (teleskopik sıcak su çıkış ağzı ve süt çıkış ağzı) dokunmayın. Tutma kollarını veya düğmeleri kullanın.
• Eğer 150 ml’nin üzerinde kahve hacimleri programlanırsa: bir sonraki kahveyi yapmadan önce makineyi 5 dakika soğumaya bırakın. Aşırı ısınma riski vardır!
• Bıçaklar tarafından delinmediği zaman kapsülün etrafından su akabilir ve bu durum cihaza zarar

12
TR
FR
verir.• Asla hasarlı veya deforme olmuş bir kapsül
kullanmayın. Eğer kapsül bölmesinde kapsül sıkışmışsa, herhangi bir işlem yapmadan önce makineyi kapatın ve fişini çekin. Nespresso Club ile iletişime geçin.
• Su haznesini sadece temiz su ve içme suyu ile doldurun.
• Eğer cihaz uzun süre kullanılmayacaksa, su haznesini boşaltın (tatillerde, vs.).
• Eğer cihaz bir hafta sonu veya benzeri bir süre boyunca çalıştırılmadıysa, su haznesindeki suyu değiştirin.
• Yüzeylere sıvı akmasını engellemek amacıyla, cihazı damlama tepsisi ve damlama ızgarası olmadan kullanmayın.
• Güçlü veya solventli temizlik maddeleri kullanmayın. Cihazın yüzeyini temizlemek için, nemli bir bez ve yumuşak temizlik maddesi kullanın.
• Makineyi temizlemek için, sadece temiz temizlik aletleri kullanın.
• Makineyi ambalajından çıkarttıktan sonra, plastik filmi çıkartın ve atın.
• Bu cihaz, sadece Nespresso Club veya yetkili Nespresso temsilciniz tarafından satılan Nespresso kahve kapsülleriyle kullanılmak için tasarlanmıştır. Nespresso kalitesi, Nespresso makinesinde sadece Nespresso kapsülleri kullanılması halinde garantilenir.
• Tüm Nespresso cihazları sıkı kontrollerden geçmektedir. Uygunluk testleri, pratikte, rastgele seçilmiş ünitelerde gerçekleştirilir. Bu durumda önceki kullanıma ait izler görülebilir.
• Nespresso önceden bildirim yapmadan talimatları
değiştirme hakkını saklı tutar.
Kireç çözme• Nespresso kireç çözücü, doğru şekilde
kullanıldığında, kullanım ömrü süresince makinenizin düzgün çalışmasını ve ilk günkü gibi mükemmel bir kahve deneyimi yaşamanızı sağlamaya yardımcı olur. Doğru miktar ve izlenecek prosedür için, Nespresso kireç çözme kitinde yer alan kullanım kılavuzunu inceleyin.
DİKKAT: • Kireç çözücü solüsyon zararlı olabilir. Gözler,
cilt ve yüzeyler ile temas etmesini önleyin. Makinenin hasar görmesini önlemek için, Nespresso Club’da mevcut olan Nespresso kireç çözme kitinden başka bir ürünü asla kullanmayın. Kireç çözme ile ilgili olası her türlü ilave sorunuz için, lütfen Nespresso Club ile iletişime geçin.
BU TALİMATLARI KAYDEDİNBunları diğer kullanıcılara da iletin.Bu talimat kılavuzu nespresso.com adresinde ayrıca PDF formatında da mevcuttur.
CO N S I G N E S D E S E C U R I T E
AVERTIssEMENT: les consignes de sécurité font partie de l’appareil. Veuillez les lire attentivement avant d’utiliser votre nouvel appareil. Gardez-les dans un endroit où vous pourrez les retrouver et vous y référer ultèrieurement.
AVERTIssEMENT: lorsque ce symbole apparaît, veuillez consulter les mesures de sécurité pour éviter d’éventuels dangers et dommages.
INFORMATION: lorsque ce symbole apparaît, veuillez prendre connaissance du conseil pour une utilisation sûre et conforme de votre appareil.• L’appareil est conçu pour préparer des boissons
conformément à ces instructions.• N’utilisez pas l’appareil pour d’autres usages
que ceux prévus.• Cet appareil a été conçu seulement pour
un usage intérieur, pour un usage dans des conditions de températures non extrêmes.
• Protégez votre appareil des effets directs des rayons du soleil, des éclaboussures d’eau et de l’humidité.
• Cet appareil est prévu seulement pour une utilisation domestique et des utilisations similaires comme: les espaces cuisine dans les magasins, les bureaux ou autres environnements de travail, les fermes; une utilisation par les clients dans les hôtels, les chambres d’hôtes et autres environnements résidentiels ou du type bed&breakfast.
• Cet appareil peut être utilisé par des enfants âgés d’au moins 8 ans, à condition qu’ils bénéficient d’une surveillance ou qu’ils aient reçu des instructions quant à l’utilisation de l’appareil en toute sécurité et qu’ils comprennent bien les dangers encourus. Le nettoyage et l’entretien par l’utilisateur ne doivent pas être effectués par des enfants, à moins qu’ils ne soient âgés de plus de 8 ans et qu’ils soient sous la surveillance d’un adulte.
• Conservez l’appareil et son câble hors de portée des enfants âgés de moins de 8 ans.
• Cet appareil peut être utilisé par des personnes dont les capacités physiques, sensorielles ou mentales sont réduites ou dont l’expérience ou les connaissances ne sont pas suffisantes, à condition qu’ils bénéficient d’une surveillance ou qu’ils aient reçu des instructions quant à l’utilisation de l’appareil en toute sécurité et en comprennent bien les dangers potentiels.
• Les enfants ne doivent pas utiliser l’appareil comme un jouet.
• Le fabricant décline toute responsabilité et la garantie ne s’appliquera pas en cas d’usage commercial, d’utilisations ou de manipulations inappropriées, de dommages résultant d’un usage incorrect, d’un fonctionnement erroné,

13
FRd’une réparation par un non professionnel ou du non respect des instructions.
Evitez les risques d’incendie et de choc électrique fatal• En cas d’urgence: débranchez immédiatement
l’appareil de la prise électrique.• Branchez l’appareil uniquement à des prises
adaptées, facilement accessibles et reliées à la terre. Assurez-vous que la tension de la source d’énergie soit la même que celle indiquée sur la plaque signalétique. L’utilisation d’un branchement inadapté annule la garantie.
L’appareil doit être connecté uniquement après l’installation• Ne tirez pas le cordon d’alimentation sur des
bords tranchants, attachez-le ou laissez-le pendre.
• Gardez le cordon d’alimentation loin de la chaleur et de l’humidité.
• Si le cordon d’alimentation est endommagé, il doit être remplacé par le fabricant, son agent après-vente ou des personnes de même qualification, afin d’éviter tous risques.
• Si le cordon d’alimentation est endommagé, ne faites pas fonctionner l’appareil.
• Retournez votre appareil au Club Nespresso ou à un revendeur Nespresso agréé.
• Si une rallonge électrique s’avère nécessaire, n’utilisez qu’un câble relié à la terre, dont le conducteur a une section d’au moins 1.5 mm2.
• Afin d’éviter de dangereux dommages, ne placez jamais l’appareil sur ou à côté de surfaces chaudes telles que les radiateurs, les cuisinières,
les fours, les brûleurs à gaz, les feux nus, ou des sources de chaleur similaires.
• Placez-le toujours sur une surface horizontale, stable et régulière. La surface doit être résistante à la chaleur et aux fluides comme: l’eau, café, le détartrant ou autres.
• Débranchez l’appareil de la prise électrique lorsqu’il n’est pas utilisé pendant une période prolongée.
• Débranchez en tirant par la fiche et non par le cordon d’alimentation ou il pourrait être endommagé.
• Avant le nettoyage et l’entretien de votre appareil, débranchez-le de la prise électrique et laissez-le refroidir.
• Ne touchez jamais le fil électrique avec des mains mouillées.
• Ne plongez jamais l’appareil, en entier ou en partie, dans l’eau ou dans d’autres liquides.
• Ne mettez jamais l’appareil ou une partie de celui-ci dans un lave-vaisselle.
• L’électricité et l’eau ensemble sont dangereux et peuvent conduire à des chocs électriques mortels.
• N’ouvrez pas l’appareil. Voltage dangereux à l’intérieur.
• Ne mettez rien dans les ouvertures. Cela pourrait provoquer un incendie ou un choc électrique!
Évitez les dommages possibles lors de l’utilisation de l’appareil• Ne laissez jamais l’appareil sans surveillance
pendant son fonctionnement.• N’utilisez pas l’appareil s’il est endommagé ou
ne fonctionne pas parfaitement. Débranchez-le
immédiatement de la prise électrique. Contactez le Club Nespresso ou un revendeur Nespresso agréé, pour la réparation ou le réglage de votre appareil.
• Un appareil endommagé peut provoquer des chocs électriques, brûlures et incendies.
• Refermez toujours bien complètement le levier et ne le soulevez jamais pendant le fonctionnement, des brûlures peuvent se produire.
• Ne mettez pas vos doigts sous la sortie café, il y a un risque de brûlure.
• Ne mettez pas vos doigts dans le compartiment à capsules ou dans le bac de récupération des capsules. Il existe un risque de blessure.
• Ne touchez pas les surfaces rendues chaudes durant ou après une préparation ou un détartrage: la buse eau chaude télescopique et la buse à lait. Utilisez les poignées ou boutons.
• Si la quantité de café programmée excède 150 ml; laissez la machine refroidir pendant 5 minutes avant de preparer un autre café. Risque de surchauffe!
• L’eau peut s’écouler autour d’une capsule, quand celle-ci n’a pas été perforée par les lames, et endommager l’appareil.
• N’utilisez jamais une capsule endommagée ou déformée. Si une capsule est bloquée dans le compartiment à capsules, éteignez l’appareil et débranchez-le avant toute opération. Appelez le Club Nespresso ou un revendeur Nespresso agréé.
• Remplissez toujours le réservoir avec de l’eau fraiche, potable et froide.
• Videz le réservoir d’eau si l’appareil n’est pas utilisé pendant une durée prolongée (vacances etc…).
• Remplacez l’eau du réservoir d’eau quand l’appareil n’est pas utilisé pendant un week-end ou une période de temps similaire.
• N’utilisez pas l’appareil sans le bac d’égouttage et sa grille afin d’éviter de renverser du liquide sur les surfaces environnantes.
• Ne nettoyez jamais votre appareil avec un produit d’entretien ou un solvant. Utilisez un chiffon humide et un détergent doux pour nettoyer la surface de l’appareil.
• Lors du déballage de l’appareil, retirer le film plastique sur la grille d’égouttage.
• Cet appareil est conçu pour des capsules de café Nespresso disponibles exclusivement via le Club Nespresso ou votre revendeur Nespresso agréé.
• Tous les appareils Nespresso sont soumis à des contrôles sévères. Des tests de fiabilité, dans des conditions réelles d’utilisation, sont effectués au hasard sur des unités sélectionnées. Certains appareils peuvent donc montrer des traces d’une utilisation antérieure.
• Nespresso se réserve le droit de modifier sans préavis la notice d’utilisation.
Détartrage• Lorsqu’il est utilisé correctement, le
détartrant Nespresso, permet d’assurer le bon fonctionnement de votre appareil tout au long de sa vie et vous permet de maintenir une expérience café aussi parfaite qu’au premier jour. Pour le dosage exact et la procédure à suivre, consultez le manuel d’utilisation inclus dans le kit de détartrage Nespresso.

14
FR AVERTIssEMENT: la solution de détartrage
peut être nocive. Évitez le contact avec les yeux, la peau et les surfaces. Nous préconisons le kit de détartrage Nespresso disponible auprès du Club Nespresso, dans la mesure où il est spécialement adapté à votre machine. Attention à ne pas utiliser d‘autres produits (du type vinaigre), qui laisseraient un goût au café et pourraient endommager la machine. Pour tout renseignement complémentaire sur le détartrage, veuillez contacter votre Club Nespresso.
CONSERVEZ LES INSTRUCTIONS SUIVANTESTransmettez-les aux utilisateurs ultérieurs.ce manuel d’instruction est également disponible en version PDF sur nespresso.com

15

لتجنب أعطال الماكينة، ال تستخدم أي مستحضر
إلزالة الترسبات سوى مستحضر نسبريسو
إلزالة الترسبات المتوفر في نادي نسبريسو. لمزيد
من األسئلة حول إزالة الترسبات، يرجى االتصال
بنادي نسبريسو.
احتفظ بهذه التعليماتمررها إلى أي مستخدم
الحقيتوفر دليل التعليمات
هذا كملف PDF على nespresso.com موقع
5
AR• ال تضع أصابعك في
منطقة إدخال الكبسولة أو في مجرى الكبسوالت
لتجنب خطر اإلصابة!• ال تلمس األسطح التي
تصبح ساخنة أثناء وبعد تشغيل الماكينة وإزالة
الترسبات: فوهة الماء الساخن وفوهة الحليب.
استخدم المقابض أو المفاتيح.
• في حال برمجة حجم القهوة بما يتجاوز 150
مل: اترك الماكينة لمدة 5 دقائق حتى تبرد قبل
تحضير الكوب التالي.خطر زيادة الحرارة!
• يمكن أن يتدفق الماء حول الكبسولة عندما ال تكون مثقوبة بالشفرات
فيؤدي إلى تعطل الماكينة.
• ال تستخدم أي كبسولة تالفة أو مشوهة. إذا
علقت كبسولة داخل حاوية الكبسوالت، أطفئ
الماكينة وافصلها
عن التيار الكهربائي قبل القيام بأي إجراء.
اتصل بنادي نسبريسو أو وكيل نسبريسو
المعتمد.• امأل خزان الماء بماء نقي
صالح للشرب فقط.• أفرغ خزان الماء إذا كنت ستترك الماكينة لفترة
طويلة دون استخدام )العطالت وغيرها(.
• غير الماء الموجود في الخزان عند ترك الماكينة
بال تشغيل ليومين أو أكثر.
• ال تستخدم الماكينة بدون صينية التقطير
ومصفاة التقطير لتتجنب تدفق أي سائل على األسطح المحيطة
بالماكينة.• ال تستخدم أي سائل
تنظيف أو مذيب قوي. استخدم قطعة قماش مبللة وسائل تنظيف خفيف لتنظيف سطح
الماكينة.
• لتنظيف الماكينة، استخدم مواد نظيفة
فقط. • عند فتح تغليف
الماكينة، قم بإزالة الشريط البالستيكي على صينية التقطير
ومصفاة التقطير.• هذه الماكينة مصممة
خصيصا لكبسوالت قهوة نسبريسو وهي متوفرة حصرا من خالل
نادي نسبريسو أو وكيل نسبريسو المعتمد. يتم
ضمان جودة نسبريسو فقط عندما تستخدم
كبسوالت نسبريسو في ماكينات نسبريسو.
• تخضع جميع ماكينات نسبريسو لضوابط
صارمة، وتجرى عليها اختبارات األداء تحت
الظروف العملية على وحدات مختارة بشكل
عشوائي مما يمكن أن يظهر آثار استخدام
مسبق على الماكينات
الجديدة.• تحتفظ نسبريسو بالحق
في تغيير التعليمات دون إشعار مسبق.
إزالة الترسبات• يساعد منتج إزالة
الترسبات من نسبريسو عند استعماله بشكل
صحيح على ضمان تشغيل الماكينة طيلة فترة استخدامها بحيث
تبقى لذة القهوة كما كانت في اليوم األول
من االستخدام. لمعرفة الكمية المناسبة
واإلجراءات التي يجب اتباعها، راجع دليل
االستخدام المرفق مع أدوات نسبريسو إلزالة
الترسبات.
تنبيه:• يمكن لمحلول إزالة
الترسبات أن يكون مؤذيا. تجنب مالمسته للعيون
أو الجلد أو األسطح. 4
ARبتفريغ أرضي. تأكد من
أن جهد التيار الكهربائي للمقبس يتطابق مع
ما هو مذكور على لوحة التصنيف. توصيل الماكينة بشكل خاطئ
يلغي الضمان.
يجب عدم وصل الماكينة بالكهرباء إال بعد
تركيبها• ال تسحب الكابل على
قه أو اتركه حواف حادة. علمتدل.
• حافظ على الكابل بعيدا عن الحرارة والرطوبة.
• إذا تعرض الكابل للتلف، فيجب استبداله من
قبل الشركة المصنعة أو وكيلها أو أشخاص
مؤهلين، وذلك لتجنب جميع المخاطر.
• ال تقم بتشغيل الماكينة إذا كان الكابل تالفا.• قم بإرجاع الماكينة
إلى نادي نسبريسو أو إلى وكيل نسبريسو
المعتمد.• إذا احتجت إلى تطويل الكابل، ال تستخدم إال
سلكا مزودا بتفريغ أرضي وبقطر ال يقل عن
1.5ملم مربع أو آخر مطابق لمدخالت الطاقة.
• لتجنب األضرار الخطرة، ال تضع الماكينة على أو بجوار األسطح الساخنة
مثل السخانات والمواقد واألفران ومواقد الغاز
واللهب المكشوف أو ما شابه ذلك.
• ضع الماكينة دائما على سطح أفقي ومستقر
ومستو. يجب أن يكون السطح مقاوما للحرارة
والسوائل، كالماء والقهوة أو ما شابه ذلك.• اافصل التيار الكهربائي
عن الماكينة عندما ال يكون قيد االستعمال
لفترة طويلة. قم بفصل التيار عن طريق سحب
القابس وليس عن طريق سحب الكابل نفسه كي
ال يتلف.• قبل التنظيف والصيانة،
قم بإزالة القابس من مأخذ التيار الكهربائي
واترك الماكينة حتى تبرد.
• ال تلمس الكابل بأيد مبللة.
• ال تضع الماكينة أو أي جزء منها في الماء أو
في أي سوائل أخرى.• ال تضع الماكينة أو أي جزء منها في غسالة
الصحون.• الكهرباء والماء يشكالن خطرا عند التقائهما مما
قد يؤدي إلى صدمات كهربائية قاتلة.
• ال تفتح الماكينة. التيار الكهربائي خطر!
• ال تضع أي شيء في أي فتحة. قد يتسبب ذلك
في نشوب حريق أو صدمة كهربائية!
تجنب األضرار المحتملة عند تشغيل الماكينة
• ال تترك الماكينة دون مراقبة أثناء تشغيلها.• ال تستخدم الماكينة إذا
كانت معطلة أو ال تعمل بشكل مثالي.
قم على الفور بإزالة المقبس من مأخذ
الطاقة.اتصل بنادي نسبريسو
أو وكيل نسبريسو المعتمد للقيام باإلصالح
أو الفحص أو التعديل. اتصل بنادي نسبريسو
أو ممثل نسبريسو المعتمد للقيام باإلصالح
أو الفحص أو التعديل.• يمكن أن تسبب
الماكينة المعطلة صدمات كهربائية أو
حروق أو اشتعال حرائق.• تأكد من إغالق المقبض بإحكام وال ترفعه إطالقا
أثناء التشغيل. قد يؤدي ذلك إلى حروق.
• ال تضع أصابعك تحت مخرج القهوة لتجنب
خطر الحروق.3
AR احتياطاتالسالمة
توخى الحذر - تعتبر احتياطات السالمة جزءا
من هذا الجهاز. اقرأ احتياطات السالمة بعناية
قبل استخدام الجهاز للمرة األولى، احتفظ
بها في مكان قريب كي تجدها عند الحاجة.
توخى الحذر - عند رؤية هذه العالمة، يرجى الرجوع
إلى احتياطات السالمة لتجنب أي أذى أو ضرر.
معلومات - عند رؤية هذه العالمة، يرجى
استيعاب الرسالة المتعلقة باالستخدام
الصحيح
اآلمن للجهاز.• الماكينة مصممة إلعداد
المشروبات وفقا لهذه التعليمات.
• ال تستخدم الماكينة ألغراض أخرى غير
المخصص لها.• لقد تم تصميم هذه الماكينة لالستعمال
داخل المباني وفي درجات حرارة غير شديدة.
• يجب حماية الماكينة من أشعة الشمس
المباشرة، ومن رذاذ الماء والرطوبة المستمرة.
• صممت هذه الماكينة لالستخدام في المنازل
وما شابهها، مثل: مطابخ الموظفين
في المتاجر، المكاتب والمتاجر وغيرها من
بيئات العمل، البيوت الزراعية، وكذلك من قبل
عمالء الفنادق والموتيالت وغيرها من المباني
السكنية وأماكن النوم وأماكن تناول اإلفطار.
• يمكن لألطفال فوق 8 سنوات استخدام
الماكينة شرط أن يكونوا تحت إشراف أو قدمت لهم تعليمات حول
استخدام الماكينة من قبل الشخص المسؤول عن سالمتهم. ال يسمح
لألطفال بتنظيف وصيانة الماكينة ما لم يتجاوزوا سن 8 سنوات مع مراقبتهم من قبل
أشخاص أكبر سنا.• احتفظ بالماكينة
وتوصيالتها بعيدا عن متناول األطفال تحت 8
سنوات.• الماكينة غير مصممة
لالستخدام من قبل ذوي قدرات جسدية أو حسية
أو عقلية منخفضة، أو تعوزهم الخبرة
والمعرفة، ما لم يكونوا تحت إشراف أو قدمت لهم تعليمات حول
استخدام الماكينة من قبل الشخص المسؤول
عن سالمتهم.• ال يجوز استخدام
الماكينة للعب من قبل األطفال.
• ال تتحمل الشركة المصنعة أي مسؤولية
وال ينطبق الضمان على استخدام الماكينة
بشكل غير مالئم، أو ألغراض تجارية أو عند
تعرض الماكينة ألضرار نتيجة استخدامها
ألغراض أخرى، أو تشغيلها بشكل
خاطئ أو إجراء عملية إصالح غير مؤهلة، أو عدم
التقيد بالتعليمات.
تجنب خطر حدوث صدمة كهربائية قاتلة
واندالع الحريق• في حاالت الطوارئ: قم
على الفور بإزالة الكابل من مقبس الكهرباء.
• ال تقم بتوصيل الماكينة إال بمقبس مناسب،
سهل االستخدام، ومجهز 2

2 AR احتياطات السالمة..............................................................................................
My Machine

EN - GR 4-21
TR - FR 22-39
A B C
1012
11
6
9
21
8
7
5
4
3
13
24
19
20
21
22
23
14 18
15 17
16
25
2827
26 29
31
25
3034
33
32
3

OV E RV I E W/Ε π ι σκό π η ση
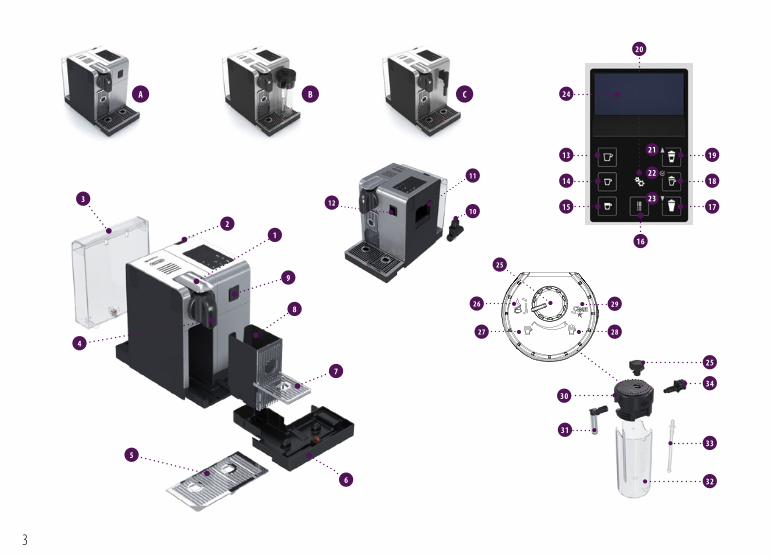
Display (preparations)/ Οθόνη (δυνατότητες παρασκευής)
13 Lungo/Lungo14 Espresso/Espresso15 Ristretto/Ristretto16 Hot water/Ζεστό νερό17 Warm milk/Ζεστό γάλα 18 Cappuccino/Cappuccino 19 Latte Macchiato/Latte Macchiato
Display (navigation)/ Οθόνη (πλοήγηση)
20 Menu/Μενού21 Scroll up when Menu is activated/
κύλιση πάνω όταν η λειτουργία Μενού ενεργοποιείται22 Option selection when Menu is activated/
Επιλογή Δυνατοτήτων όταν η λειτουργία Μενού ενεργοποιείται23 Scroll down when Menu is activated/
κύλιση κάτω όταν η λειτουργία Μενού ενεργοποιείται24 Text display/Εμφάνιση κειμένου
Rapid Cappuccino System (R.C.S.)/ Σύστημα Ταχείας Παρασκευής Cappuccino (R.C.S.)
25 Milk Froth regulator knob/περιστρεφόμενο κουμπί ρύθμισης Αφρού Γάλακτος
26 Insert position for Milk froth regulator knob/ Επιλέξτε τη θέση για τον Διακόπτη ρύθμισης αφρού γάλακτος
27 Min. froth/Ελάχ. αφρός.28 Max. froth/Μεγ. αφρός.29 «CLEAN»: automatic rinsing function/
"κΑΘΑΡισΜόσ”: αυτόματη λειτουργία ξεπλύματος30 Milk container Lid/καπάκι δοχείου γάλακτος31 Milk spout/στόμιο εκροής γάλακτος32 Milk container/Δοχείο γάλακτος33 Milk aspiration tube/σωλήνας απορρόφησης γάλακτος34 R.C.S. connector/στοιχείο σύνδεσης R.C.S.
Overview of machine/ Επισκόπηση της μηχανής
A Machine in coffee only configuration/ Μηχανή με διάταξη μόνο για παρασκευή καφέ
B Machine with Rapid Cappuccino System (for Cappuccino)/Μηχανή με σύστημα Ταχείας παρασκευής Cappuccino (για Cappuccino)
C Machine with hot water spout/ Μηχανή με στόμιο ζεστού νερού
1 Lever/Μοχλός2 ON/OFF button/κουμπί ON / OFF3 Water tank/Δοχείο νερού με φίλτρο σωματιδίων
(δεν αφαιρείται)4 Coffee outlet/στόμιο εκροής καφέ 5 Drip grid/σχάρα αποστράγγισης6 Drip tray/Δίσκος αποστράγγισης7 Pivoting cup support (not removable)/
κινούμενη βάση κουπών (δεν αφαιρείται)8 Used capsule container/Δοχείο χρησιμοποιημένων καψουλών9 Steam connector door/Θύρα συνδέσμου ατμού
10 Telescopic hot water spout/Τηλεσκοπικό στόμιο ζεστού νερού11 Hot water spout storage area/
Χώρος φύλαξης ζεστού νερού12 Steam connector/σύνδεσμος ατμού
4

EN
GR
CO N T E N T/π Ε Ρ ι Ε Χό Μ Ε ΝΑ
Nespresso, an exclusive system creating the perfect Espresso, time after time. All Nespresso machines are equipped with a unique extraction system that guarantees up to 19 bar pressure. Each parameter has been calculated with great precision to ensure that all the aromas from each Grand Cru can be extracted, to give the coffee body and create an exceptionally thick and smooth crema.
Nespresso, ένα αποκλειστικό σύστημα για να δημιουργείτε τον τέλειο Espresso, κάθε φορά. Όλες οι μηχανές Nespresso είναι εξοπλισμένες με ένα αποκλειστικό σύστημα εκχύλισης που εγγυάται πίεση έως και 19 bar. κάθε παράμετρος έχει υπολογιστεί με μεγάλη ακρίβεια εξασφαλίζοντας ότι όλα τα αρώματα κάθε Εκλεκτής ποικιλίας μπορούν να απελευθερωθούν, χαρίζοντας στον καφέ σώμα και δημιουργώντας μία εξαιρετικά παχιά και βελούδινη κρέμα.
HAnD wASHing Of RApiD CAppuCCinO SyStem (R.C.S.)/ΠλύΣιμΟ ΣΤΟ χΕρι ΤΟύ ΣύΣΤήμαΤΟΣ ΤαχΕιαΣ ΠαραΣκΕύήΣ CAppuCCinO (R.C.S.) ......................VOlume fACtORy SettingS/ΕργΟΣΤαΣιακΕΣ ρύθμιΣΕιΣ δΟΣΟλΟγιαΣ ..........DeSCAling/αφαιρΕΣή καθαλαΤώΣΕών ........................................................wAteR HARDneSS Setting/ρύθμιΣή ΣκλήρΟΤήΤαΣ νΕρΟύ ........................tROuBleSHOOting/ανΤιμΕΤώΠιΣή ΠρΟβλήμαΤών ....................................SpeCifiCAtiOnS/ΤΕχνικα χαρακΤήριΣΤικα .................................................DiSpOSAl AnD eCOlOgiCAl COnCeRnS/ διαθΕΣή αΠΟρριμμαΤών και ΠΕριβαλλΟνΤική μΕριμνα .......................... COntACt tHe Nespresso CluB/ΕΠικΟινώνια μΕ ΤΟ NespresssO CluB..........wARRAnty/ΕγγύήΣή ...................................................................................
OVeRView/ΕΠιΣκΟΠήΣή ..................................................................................pACkAging COntent/ΠΕριΕχΟμΕνα ΣύΣκΕύαΣιαΣ ..........................................menu nAVigAtiOn/ΠλΟήγήΣή ΣΤΟ μΕνΟύ ......................................................menu liSt/λιΣΤα μΕνΟύ ..................................................................................fiRSt uSe OR AfteR A lOng peRiOD Of nOn-uSe/ΠρώΤή χρήΣή μΕΤα αΠΟ μΕγαλή ΠΕριΟδΟ αχρήΣιαΣ .............................................................................COffee pRepARAtiOn/ΠαραΣκΕύή καφΕ .........................................................ASSemBling/DiSASSemBling Of RApiD CAppuCCinO SyStem (R.C.S.)/ ΣύναρμΟλΟγήΣή / αΠΟΣύναρμΟλΟγήΣή ΤΟύ ΣύΣΤήμαΤΟΣ ΤαχΕιαΣ ΠαραΣκΕύήΣ CAppuCCinO (R.C.S.) ...................................................................pRepARing CAppuCCinO AnD lAtte mACCHiAtO/ ΠαραΣκΕύαζΟνΤαΣ CAppuCCinO και lAtte mACCHiAtO ...................................DAily CARe/καθήμΕρινή φρΟνΤιδα ...............................................................
1415161718 19
20 20 21
CAutiOn: when you see this sign, please refer to the safety precautions to avoid possible harm and damage. infORmAtiOn: when you see this sign, please take note of the advice for the correct and safe usage of your coffee machine. ΠρΟΣΟχή: όταν βλέπετε αυτό το σήμα, παρακαλούμε συμβουλευτείτε τις οδηγίες προφύλαξης για να αποφευχθούν πιθανοί κίνδυνοι και βλάβες. ΠλήρΟφΟριΕΣ: όταν βλέπετε αυτό το σήμα, παρακαλούμε λάβετε υπόψη σας τη συμβουλή που δίνεται για την ορθή και ασφαλή χρήση
της μηχανή σας καφέ.
04060607
0810
10
1114
5

EN SAFETY PRECAUTIONS ............................................................................. 2 FR CONSIGNES DE SECURITE ......................................................................... 4 DE SICHERHEITSHINWEISE ........................................................................... 7 IT PRECAUZIONI DI SICUREZZA .................................................................... 10 ES PRECAUCIONES DE SEGURIDAD ................................................................ 12 PT MEDIDAS DE SEGURANÇA......................................................................... 15 NL VEILIGHEIDSMAATREGELEN ..................................................................... 18 GR ΜΈΤΡΑ ΑΣΦΑΛΈΙΑΣ .................................................................................. 20 HU BIZTONSÁGI ELŐÍRÁSOK .......................................................................... 22 CZ BEZPEČNOSTNÍ POKYNY .......................................................................... 25 PL ZASADY BEZPIECZEŃSTWA ....................................................................... 28 RU МЕРЫ ПРЕДОСТОРОЖНОСТИ ................................................................. 31
EN
GR
M E N U N AV I G AT I O N/π λό η Γ η ση σΤό Μ Ε Ν ό ύ
PAC k AG I N G CO N T E N T/π Ε Ρ ι Ε Χό Μ Ε ΝΑ σύ σκ Ε ύΑ σι Α σ
Coffee machineΜηχανή καφέ
«Welcome to Nespresso folder»Φάκελος καλωσορίσματος Nespresso
User manual Εγχειρίδιο χρήστη
Safety Instructions όδηγίες ασφαλούς χρήσης
Capsules set σετ καψουλών
Enter the Menu list/Μπείτε στη λίστα του Μενού Press shortly symbol/πιέστε σύντομα το σύμβολο .
Browse options/Επιλογές αναζήτησης/περιήγησης Press symbol/πιέστε το σύμβολο .
Select option/Ενεργοποιήστε την επιλογή Press symbol/πιέστε το σύμβολο .
Exit from the Menu list / Έξοδος από τη λίστα Μενού Scroll to [ExIT] option and select. Or quickly press symbol. κυλήστε ως την επιλογή [exit] κι επιλέξτε τη. Διαφορετικά πιέστε το σύμβολο για περισσότερο από 2 δευτερόλεπτα.
Exit from option and return to Menu list/ Έξοδος από την επιλογή και επιστροφή στη λίστα μενού Scroll to [ExIT] option and select. Or quickly press symbol. κυλήστε ως την επιλογή [ExIT] κι επιλέξτε τη. Διαφορετικά πατήστε γρήγορα το σύμβολο .
6

EN
GR
M E N U L I S T/λ ι σΤΑ Μ Ε Ν ό ύ
1 Select this option to set your preferred language. Follow machine screen instructions. Επιλέξτε αυτή τη δυνατότητα για να ορίσετε τη γλώσσα προτίμησής σας. Ακολουθήστε τις οδηγίες στην οθόνη της μηχανής.
2 Select this option once the descaling alert appears on the display. Refer to page 16. You will be guided throughout the descaling process. Επιλέξτε αυτή τη δυνατότητα όταν η ειδοποίηση αφαλάτωσης εμφανιστεί στην οθόνη. Συμβουλευτείτε τη σελίδα16. Θα σας δοθούν οδηγίες για όλη τη διαδικασία αφαλάτωσης.
3 Select this option to set the water hardness level at your location. Use the water hardness sticker provided to determine it. This will optimize the descaling frequency. Refer to page 17. Επιλέξτε αυτή τη δυνατότητα για να ορίσετε το επίπεδο σκληρότητας νερού της περιοχής σας. Για να μάθετε τη σκληρότητα του νερού χρησιμοποιήσετε το αυτοκόλλητο που σας παρέχεται. η επιλογή αυτή θα βελτιστοποιήσει τη συχνότητα αφαλατώσεων. Συμβουλευτείτε τη σελίδα 17.
4 Select this option to set the time after which the machine switches off automatically. (Possible options are 9 minutes, 30 minutes, 2 hours, 8 hours). Follow machine screen instructions. Επιλέξτε αυτή τη δυνατότητα για να ορίσετε μετά από πόσο χρόνο η μηχανή σας θα σβήνει αυτόματα. (Δυνατότητες επιλογής: μετά από 9 λεπτά, 30 λεπτά, 2 ώρες, 8 ώρες). Ακολουθήστε τις οδηγίες στην οθόνη της μηχανής.
5 Select this option to reset all parameters of the machine to factory settings. Επιλέξτε αυτή τη δυνατότητα για να επαναφέρετε όλες τις παραμέτρους της μηχανής στις εργοστασιακές ρυθμίσεις.
6 Select this option to empty the water inside the machine in case you need to send it for repair or before a long period of non use. Follow machine screen instructions. You will not be able to use the machine for 10 minutes after this process. Επιλέξτε αυτή τη δυνατότητα για να αδειάσετε το νερό που βρίσκεται μέσα στη μηχανή, σε περίπτωση που θέλετε να την στείλετε για επισκευή ή θα την αφήσετε για μεγάλο χρόνο αχρησιμοποίητη. Ακολουθήστε τις οδηγίες στην οθόνη της μηχανής. Δεν θα μπορείτε να χρησιμοποιήσετε τη μηχανή για 10 λεπτά μετά από αυτή τη διαδικασία.
7 Select this option to program the volume of your beverages (coffee cups, hot water and milk based preparations). Follow machine screen instructions. In addition, you can reset all the beverages volumes to factory settings as well. Επιλέξτε αυτή τη δυνατότητα για να προγραμματίσετε τον όγκο/δοσολογία των ροφημάτων σας (κουπών καφέ, παρασκευασμάτων με βάση το ζεστό νερό και το γάλα). Ακολουθήστε τις οδηγίες στην οθόνη της μηχανής. Μπορείτε επίσης να επαναφέρετε όλες τις δοσολογίες ροφημάτων στις εργοστασιακές ρυθμίσεις.
8 Select this option to get access of all machines settings at a glance. Επιλέξτε αυτή τη δυνατότητα για να έχετε πρόσβαση σε όλες τις ρυθμίσεις της μηχανής με μια ματιά.
9 Select this option to check the overall status of your machine. The consumption statistics are available either from the first use (absolute) or since the last descaling (relative). The serial number of machine is provided as well. Επιλέξτε αυτή τη δυνατότητα για να ελέγξετε τη γενική κατάσταση της μηχανής σας και να έχετε πρόσβαση σε προσωποποιημένες υπηρεσίες. Τα στατιστικά στοιχεία κατανάλωσης διατίθενται είτε από την πρώτη χρήση (απόλυτα) είτε από την τελευταία αφαλάτωση (σχετικά). Δίνεται επίσης ο σειριακός αριθμός της μηχανής σας.
10 Select this option to get the best advice on how to get optimal milk froth quality day after day. The internet link is provided to know more about this feature. Επιλέξτε αυτή τη δυνατότητα για να έχετε τις καλύτερες συμβουλές στο πως θα επιτύχετε τη βέλτιστη ποιότητα αφρού γάλακτος κάθε ημέρα. σας δινεται και το σχετικό link σε site για να γνωρίσετε περισσότερα για αυτό το χαρακτηριστικό.
11 Exit from the menu list and return to machine ready mode. Έξοδος από τη λίστα μενού και επιστροφή σε ετοιμότητα λειτουργίας μηχανής.
1ΓΛΩΣΣΑlanguage
2ΑΦΑΙΡΕΣΗ ΚΑΘΑΛΑΤΩΣΕΩΝdescaling
3ΣΚΛΗΡΟΤΗΤΑ ΝΕΡΟΥwater hardness
4ΑΥΤΟΜΑΤΗ ΑΠΕΝΕΡΓΟΠΟΙΗΣΗ auto power off
5ΕΡΓΟΣΤΑΣΙΑΚΕΣ ΡΥΘΜΙΣΕΙΣfactory settings
6ΑΔΕΙΑΣΜΑ ΣΥΣΤΗΜΑΤΟΣ ΥΓΡΩΝempty fluid system
7ΠΡΟΓΡΑΜΜΑΤΙΣΜΟΣ ΟΓΚΟΥvolume progr.
8ΠΛΗΡΟΦΟΡΙΕΣ ΡΥΘΜΙΣΕΩΝsettings info
9ΥΠΗΡΕΣΙΕΣmaintenance
10ΒΟΗΘΕΙΑ help
ΕΞΟΔΟΣexit 11
7

max
SET LANGUAGE
to continue
LANGUAGEActual value : EN
New value : [ ] to select
05
max
SET LANGUAGE
to continue
LANGUAGEActual value : EN
New value : [ ] to select
05
max
SET LANGUAGE
to continue
LANGUAGEActual value : EN
New value : [ ] to select
05
max
SET LANGUAGE
to continue
LANGUAGEActual value : EN
New value : [ ] to select
05
max
SET LANGUAGE
to continue
LANGUAGEActual value : EN
New value : [ ] to select
05
max
SET LANGUAGE
to continue
LANGUAGEActual value : EN
New value : [ ] to select
05
EN
GR
F I R S T U S E O R A F T E R A LO N G P E R I O D O F N O N - U S E/ π Ρ ώΤ η Χ Ρ η ση Μ Ε ΤΑ Α π ό Μ Ε ΓΑ λ η π Ε Ρ ι ό Δό ΑΧ Ρ η σι Α σ
CAutiOn: first read the safety precautions to avoid risks of fatal electrical shock and fire.
AVeRtiSSement: καταρχήν διαβάστε τα μέτρα ασφάλειας για την αποφυγή κινδύνων μοιραίας ηλεκτροπληξίας και πυρκαγιάς 1. Remove the water tank, drip tray, and capsule
container. Adjust the cable length and store the excess in the cable guide under the machine. 1. Αφαιρέστε το δοχείο νερού, το δίσκο αποστράγγισης και το δοχείο καψουλών. Ρυθμίστε το μήκος του καλωδίου και αποθηκεύστε αυτό που περισσεύει στον οδηγό του καλωδίου κάτω από τη μηχανή.
5. Insert the hot water spout. Switch machine ON. 5. προσθέστε το στόμιο ζεστού νερού. Ανάψτε τη μηχανή.
2. Put the machine in upright position, plug machine into mains. 2. Βάλτε τη μηχανή σε όρθια θέση και συνδέστε τη με την παροχή ρεύματος.
6. SET LANGUAGE: set your preferred language. Press to continue. 6. SET LANGUAGE: ορίστε τη γλώσσα της επιλογής σας. πατήστε για να συνεχίσετε.
3. The water tank can be carried by its cover. 3. Μπορείτε να μεταφέρετε το δοχείο νερού από το καπάκι του.
4. Rinse the water tank before filling with fresh potable water up to maximum level. 4. Ξεπλύντε το δοχείο νερού πριν το γεμίσετε με πόσιμο νερό έως την ένδειξη του ανώτατου επιπέδου.
8

max
SET LANGUAGE
to continue
LANGUAGEActual value : EN
New value : [ ] to select
05
max
First read the safety precautions to avoid risks of fatal electrical shock and fire
Remove the plastic films from grid, lever and machine panels.
Remove the water tank, drip tray, and capsule container. Adjust the cable length and store the excess in the cable guide under the machine.
Put the machine in upright position, plug machine into mains.
The water tank can be carried by its cover.
Rinse the water tank before filling with potable water up to maximum level.
Insert the hot water spout. Switch machine ON
Set your preferred language.Press to continue.
SET LANGUAGE
to continue
Select your language by scrolling the options using up/down arrow. Press to confirm.
LANGUAGE
Actual value : EN
New value : [ ]
to select
Coffee preparation
x3x3
110 ml
40 ml
25 ml
05 06
4°15”
Assembling / disassembling of Rapid Cappuccino system (R.C.S)
07
EN
GR
7. LANGUAGE: select your language by scrolling the options using arrow. Press to confirm.
7. LANGUAGE: επιλέξτε τη γλώσσα που επιθυμείτε χρησιμοποιώντας τα βέλη κύλισης πάνω/κάτω . πατήστε για να επιβεβαιώσετε την επιλογή σας.
F I R S T U S E O R A F T E R A LO N G P E R I O D O F N O N - U S E/ π Ρ ώΤ η Χ Ρ η ση Μ Ε ΤΑ Α π ό Μ Ε ΓΑ λ η π Ε Ρ ι ό Δό ΑΧ Ρ η σι Α σ
11. Disassemble the Rapid Cappuccino System (R.C.S.) and clean all components in the upper level of your dishwasher. In case a dishwasher is not available, refer to section Hand washing of Rapid Cappuccino System ( R.C.S.). 11. Αποσυναρμολογήστε το σύστημα Ταχείας παρασκευής Cappuccino (R.C.S.) και πλύντε όλα τα κομμάτια στο πάνω επίπεδο του πλυντηρίου πιάτων σας. σε περίπτωση που δεν διαθέτετε πλυντήριο πιάτων, συμβουλευτείτε την παράγραφο πλύσιμο με το χέρι του συστήματος Ταχείας παρασκευής Cappuccino ( R.C. S.).
infORmAtiOn: refer to section Assembling/Disassembling of Rapid Cappuccino System. ΠλήρΟφΟριΕΣ: συμβουλευτείτε την παράγραφο Συναρμολόγηση/Αποσυναρμολόγηση του
Συστήματος Ταχείας Παρασκευής Cappuccino (R.C.S.).
10. Rinsing: repeat three times through the hot water spout. Once finished, remove it and store it back in the storage area located on the machine right side. Close the steam connector door. 10. Ξέπλυμα: επαναλάβετε τρεις φορές μέσω του στομίου ζεστού νερού. Αφού τελειώσετε, αφαιρέστε το και φυλάξτε το στο χώρο αποθήκευσης που βρίσκεται στη δεξιά πλευρά της μηχανής. κλείστε τη θύρα σύνδεσης ατμού της μηχανής.
infORmAtiOn: machines are fully tested after being produced. Some traces of coffee powder could be found in rinsing water.
ΠλήρΟφΟριΕΣ: οι μηχανές ελέγχονται πλήρως μετά την παραγωγή. Ορισμένα ίχνη σκόνης καφέ μπορεί να βρεθούν στο νερό του ξεπλύματος.
9. Rinsing: place a container under coffee outlet and press the lungo button. Repeat three times. 9. Ξέπλυμα: τοποθετείστε ένα δοχείο κάτω από το στόμιο εκροής καφέ και πατήστε το κουμπί lungo. Επαναλάβετε τρεις φορές.
8. Once symbol is pressed, machine heats up. 8. Από τη στιγμή που θα πατήσετε το , η μηχανή αρχίζει να θερμαίνεται.
9

max
First read the safety precautions to avoid risks of fatal electrical shock and fire
Remove the plastic films from grid, lever and machine panels.
Remove the water tank, drip tray, and capsule container. Adjust the cable length and store the excess in the cable guide under the machine.
Put the machine in upright position, plug machine into mains.
The water tank can be carried by its cover.
Rinse the water tank before filling with potable water up to maximum level.
Insert the hot water spout. Switch machine ON
Set your preferred language.Press to continue.
SET LANGUAGE
to continue
Select your language by scrolling the options using up/down arrow. Press to confirm.
LANGUAGE
Actual value : EN
New value : [ ]
to select
Coffee preparation
x3x3
110 ml
40 ml
25 ml
05 06
4°15”
Assembling / disassembling of Rapid Cappuccino system (R.C.S)
07
EN
GR
CO F F E E P R E PA R AT I O N/π Α ΡΑ σκ Ε ύ η κ Α Φ Ε
A S S E M b L I N G/D I S A S S E M b L I N G O F R A P I D C A P P U CC I N O S YS T E M ( R.C.S .)/ σύΝΑΡΜόλόΓηση / ΑπόσύΝΑΡΜόλόΓηση Τόύ σύσΤηΜΑΤόσ ΤΑΧΕιΑσ πΑΡΑσκΕύησ CAPPUCCINO (R.C.S.)
1. Lift the lever completely and insert a Nespresso capsule. 1. Ανασηκώστε τελείως το μοχλό και εισάγετε την κάψουλα Nespresso.
2. Close the lever and place a cup under the coffee outlet. 2. κλείστε το μοχλό και τοποθετήστε μία κούπα κάτω από το στόμιο εκροής του καφέ.
3. Press the Ristretto (25 ml/0.75 oz), the Espresso (40 ml/1.35 oz) or the Lungo (110 ml/3.7 oz) button. Preparation will stop automatically. To stop the coffee flow or top up your coffee, press again. 3. πατήστε το κουμπί Ristretto (25 ml), Espresso (40 ml) ή Lungo (110 ml). η παρασκευή καφέ θα σταματήσει αυτόματα. Για να σταματήσετε την εκροή του καφέ ή για να απογεμίσετε τον καφέ σας, πατήστε ξανά.
4. Take the cup. Lift and close the lever to eject the capsule into the used capsule container. 4. πάρτε την κούπα. Ανασηκώστε και ξανακλείστε το μοχλό για να εξαχθεί η κάψουλα μέσα στο δοχείο χρησιμοποιημένων καψουλών.
1. Remove the milk container lid and unplug milk aspiration tube. 1. Αφαιρέστε το καπάκι του δοχείου γάλακτος και αποσυνδέστε τον σωλήνα απορρόφησης γάλακτος.
4. Remove the milk spout by pulling it off. 4. Αφαιρέστε το στόμιο εκροής γάλακτος τραβώντας το έξω.
2. Remove the milk froth regulator knob by turning it until and pulling it up. 2. Αφαιρέστε το διακόπτη ρύθμισης αφρού γάλακτος στρέφοντάς τον μέχρι το σύμβολο
και τραβώντας τοv πάνω.
3. Remove Rapid Cappuccino System connector by unlocking it from to and pulling it off. 3. Αφαιρέστε το στοιχείο σύνδεσης του συστήματος Ταχείας παρασκευής Cappuccino ξεκλειδώνοντάς το από τη θέση στη θέση
και τραβώντας το έξω.
nOte: during heat up, you can press any coffee buttons. The coffee will then flow automatically when the machine is ready.
ΣήμΕιώΣή: κατά τη διάρκεια της προθέρμανσης, μπορείτε να πατήσετε οποιοδήποτε κουμπί καφέ. Ο καφές θα αρχίσει να ρέει αυτόματα όταν η μηχανή είναι έτοιμη.
10

4°15”
Assembling / disassembling of Rapid Cappuccino system (R.C.S)
07
4°15”
Assembling / disassembling of Rapid Cappuccino system (R.C.S)
07
4°15”
Assembling / disassembling of Rapid Cappuccino system (R.C.S)
07
4°15”
Assembling / disassembling of Rapid Cappuccino system (R.C.S)
07
EN
GR
P R E PA R I N G C A P P U CC I N O A N D L AT T E MACC H I ATO/ π Α ΡΑ σκ Ε ύΑ Ζό Ν ΤΑ σ C A P P U CC I N O κ Α ι L AT T E MACC H I ATO
1. Fill the milk container with desired quantity of milk. 1. Γεμίστε το δοχείο γάλακτος με την επιθυμητή ποσότητα γάλακτος.
2. Close the milk container. Open the steam connector door by sliding it to the right. Connect the Rapid Cappuccino System to the machine. 2. κλείστε το δοχείο γάλακτος. Ανοίξτε τη θύρα σύνδεσης ατμού σύροντάς τη προς τα δεξιά. συνδέστε το σύστημα Ταχείας παρασκευής Cappuccino στη συσκευή.
3. Machine heats up for approximately 15 sec. 3. ό χρόνος θέρμανσης της μηχανής διαρκεί περίπου 15 δευτερόλεπτα.
4. Lift the lever completely and insert a Nespresso capsule. 4. Ανασηκώστε τελείως το μοχλό και εισάγετε την κάψουλα Nespresso.
CAutiOn: do not use the milk container for any other liquid other than milk or potable water. Do not use raw unpasteurised milk and be sure not to use milk after its expiration date as indicated on the packaging.
ΠρΟΣΟχή: μην χρησιμοποιήσετε το δοχείο γάλακτος για οποιοδήποτε άλλο υγρό εκτός από γάλα ή πόσιμο νερό.Μην χρησιμοποιήσετε φρέσκο γάλα και σιγουρευτείτε ότι για το γάλα που θα χρησιμοποιήσετε δεν έχει περάσει η ημερομηνία λήξης που αναγράφεται στη συσκευασία του.
infORmAtiOn: for a perfect milk froth, use skimmed or semi-skimmed milk at refrigerator temperature (about 4° C).
ΠλήρΟφΟριΕΣ: για τον τέλειο αφρό γάλακτος χρησιμοποιείστε αποβουτυρωμένο ή ημι-αποβουτυρωμένο γάλα σε θερμοκρασία ψυγείου (περίπου 4 βαθμούς C).
infORmAtiOn: when the milk container is empty, before refilling, thoroughly rinse it and the milk aspiration tube with potable water.
ΠλήρΟφΟριΕΣ: όταν το δοχείο γάλακτος αδειάσει, πριν το ξαναγεμίσετε, το ξεπλένετε καλά, όπως και τον σωλήνα απορρόφησης γάλακτος, με πόσιμο νερό.
11
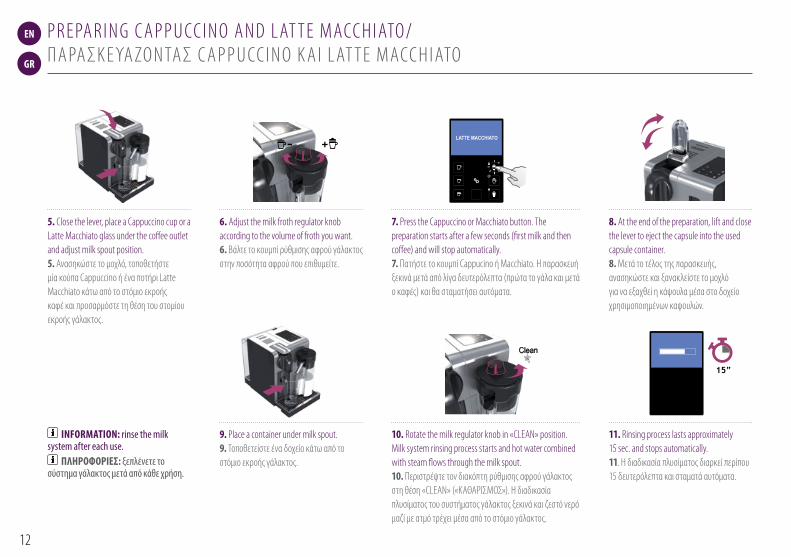
Preparing Cappuccino and Latte Macchiato
4°
i When the milk container is empty, before refilling, thoroughly rinse it and the milk aspiration tube with potable water.
Close the milk container. Open the steam connector door by sliding it to the right. Connect the Rapid Cappuccino System to the machine.
15”
+LATTE MACCHIATO
Clean
15”
i
Remove Rapid Cappuccino System connector by unlocking it from (sign ) to (sign) and pulling it off
Remove the milk container lid and unplug milk aspiration tube.
Remove the milk froth regulator knob by turning it until and pulling it up.
Remove the milk spout by pulling it off.
1 2 3 4
Assembling / disassembling of Rapid Cappuccino system (R.C.S)
RINSE MILK SYSTEM
07 08
EN
GR
P R E PA R I N G C A P P U CC I N O A N D L AT T E MACC H I ATO/ π Α ΡΑ σκ Ε ύΑ Ζό Ν ΤΑ σ C A P P U CC I N O κ Α ι L AT T E MACC H I ATO
infORmAtiOn: rinse the milk system after each use.
ΠλήρΟφΟριΕΣ: ξεπλένετε το σύστημα γάλακτος μετά από κάθε χρήση.
9. Place a container under milk spout. 9. Τοποθετείστε ένα δοχείο κάτω από το στόμιο εκροής γάλακτος.
10. Rotate the milk regulator knob in «CLEAN» position. Milk system rinsing process starts and hot water combined with steam flows through the milk spout. 10. περιστρέψτε τον διακόπτη ρύθμισης αφρού γάλακτος στη θέση «CLEAN» («κΑΘΑΡισΜόσ»). η διαδικασία πλυσίματος του συστήματος γάλακτος ξεκινά και ζεστό νερό μαζί με ατμό τρέχει μέσα από το στόμιο γάλακτος.
11. Rinsing process lasts approximately 15 sec. and stops automatically. 11. η διαδικασία πλυσίματος διαρκεί περίπου 15 δευτερόλεπτα και σταματά αυτόματα.
5. Close the lever, place a Cappuccino cup or a Latte Macchiato glass under the coffee outlet and adjust milk spout position. 5. Ανασηκώστε το μοχλό, τοποθετήστε μία κούπα Cappuccino ή ένα ποτήρι Latte Macchiato κάτω από το στόμιο εκροής καφέ και προσαρμόστε τη θέση του στομίου εκροής γάλακτος.
6. Adjust the milk froth regulator knob according to the volume of froth you want. 6. Βάλτε το κουμπί ρύθμισης αφρού γάλακτος στην ποσότητα αφρού που επιθυμείτε.
7. Press the Cappuccino or Macchiato button. The preparation starts after a few seconds (first milk and then coffee) and will stop automatically. 7. πατήστε το κουμπί Cappucino ή Macchiato. η παρασκευή ξεκινά μετά από λίγα δευτερόλεπτα (πρώτα το γάλα και μετά ο καφές) και θα σταματήσει αυτόματα.
8. At the end of the preparation, lift and close the lever to eject the capsule into the used capsule container. 8. Μετά το τέλος της παρασκευής, ανασηκώστε και ξανακλείστε το μοχλό για να εξαχθεί η κάψουλα μέσα στο δοχείο χρησιμοποιημένων καψουλών.
12

PRESS to confirm.The discaling agent flows alternately trough the coffee outlet, hot water nozzle and drip tray.
Descaling
Descaling process: Empty the drip tray and the used capsules container.
Rinsing process: Empty the drip tray and the used capsules container.
Refer to safety precautions
+100 ml500 ml
1 2 3
5 7 8
4
6
Lift and close the lever to eject any capsule in the used capsule container.
Descaling process: Fill water tank with 100 ml of Nespresso descaling agent and 500ml water.
Descaling process: Insert the hot water spout.
Enter the Menu, browse the options and select DESCALING. You will be guided throughout the whole process. Follow machine display instructions.
Descaling process: Place one container of minimum 1 litre under both the coffee outlet and the hot water spout.
4°
Volume factory settings
LANGUAGE
DESCALING
WATER HARDNESS
09 10
EN
GR
P R E PA R I N G C A P P U CC I N O A N D L AT T E MACC H I ATO/ π Α ΡΑ σκ Ε ύΑ Ζό Ν ΤΑ σ C A P P U CC I N O κ Α ι L AT T E MACC H I ATO
12. Once rinsing has finished, turn the milk froth regulator knob back in milk position. 12. Αφού ολοκληρωθεί το πλύσιμο, γυρίστε το διακόπτη ρύθμισης αφρού γάλακτος στη θέση γάλα.
13. Disconnect the R.C.S. from machine and place it immediately in the refrigerator. Close the machine steam connector door. 13. Αποσυνδέστε το σύστημα R.C.S. από τη μηχανή και βάλτε το αμέσως στο ψυγείο. κλείστε τη θύρα σύνδεσης ατμού της μηχανής.
15. And clean all components in the upper side of your dishwasher. In case a dishwasher is not available, refer to section Hand washing of Rapid Cappuccino System (R.C.S.). 15. και καθαρίστε όλα τα κομμάτια του στο πάνω επίπεδο του πλυντηρίου πιάτων σας. σε περίπτωση που δεν διαθέτετε πλυντήριο πιάτων, συμβουλευτείτε την παράγραφο πλύσιμο με το χέρι του συστήματος Ταχείας παρασκευής Cappuccino ( R.C. S.).
infORmAtiOn: refer to section «Assembling/Disassembling of Rapid Cappuccino system (R.C.S.)».
ΠλήρΟφΟριΕΣ: συμβουλευτείτε την παράγραφο «Συναρμολόγηση / Αποσυναρμολόγηση του Συστήματος Ταχείας Παρασκευής Cappuccino (R.C.S.)».
CAutiOn: this milk should not be kept for more than 2 days in the refrigerator. In the case the milk container is kept outside refrigerator for longer than 2 hours, disassemble the R.C.S. and clean all components (refer to dishwashing or hand washing recommendations).
ΠρΟΣΟχή: δεν πρέπει να κρατήσετε το γάλα αυτό για περισσότερες από 2 ημέρες στο ψυγείο.Σε περίπτωση που το δοχείο γάλακτος μείνει εκτός ψυγείου για περισσότερες από 2 ώρες, αποσυναρμολογήστε το R.C.S. και καθαρίστε όλα τα κομμάτια του (συμβουλευτείτε τις συστάσεις για πλύσιμο στο πλυντήριο πιάτων ή στο χέρι).
14. Every two days, disassemble the Rapid Cappuccino System. 14. κάθε δύο ημέρες να αποσυναρμολογείτε το σύστημα Ταχείας παρασκευής cappuccino,
13
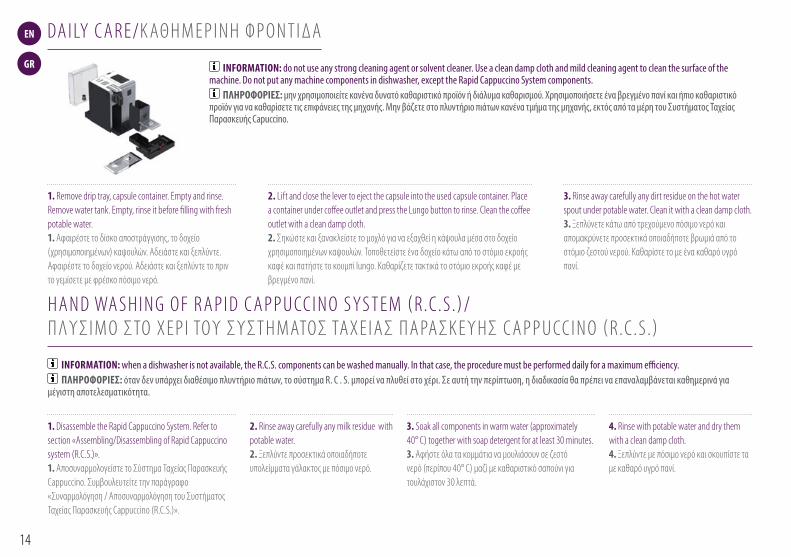
PRESS to confirm.The discaling agent flows alternately trough the coffee outlet, hot water nozzle and drip tray.
Descaling
Descaling process: Empty the drip tray and the used capsules container.
Rinsing process: Empty the drip tray and the used capsules container.
Refer to safety precautions
+100 ml500 ml
1 2 3
5 7 8
4
6
Lift and close the lever to eject any capsule in the used capsule container.
Descaling process: Fill water tank with 100 ml of Nespresso descaling agent and 500ml water.
Descaling process: Insert the hot water spout.
Enter the Menu, browse the options and select DESCALING. You will be guided throughout the whole process. Follow machine display instructions.
Descaling process: Place one container of minimum 1 litre under both the coffee outlet and the hot water spout.
4°
Volume factory settings
LANGUAGE
DESCALING
WATER HARDNESS
09 10
EN
GR
2. Lift and close the lever to eject the capsule into the used capsule container. Place a container under coffee outlet and press the Lungo button to rinse. Clean the coffee outlet with a clean damp cloth. 2. σηκώστε και ξανακλείστε το μοχλό για να εξαχθεί η κάψουλα μέσα στο δοχείο χρησιμοποιημένων καψουλών. Τοποθετείστε ένα δοχείο κάτω από το στόμιο εκροής καφέ και πατήστε το κουμπί lungo. καθαρίζετε τακτικά το στόμιο εκροής καφέ με βρεγμένο πανί.
3. Rinse away carefully any dirt residue on the hot water spout under potable water. Clean it with a clean damp cloth. 3. Ξεπλύνετε κάτω από τρεχούμενο πόσιμο νερό και απομακρύνετε προσεκτικά οποιαδήποτε βρωμιά από το στόμιο ζεστού νερού. καθαρίστε το με ένα καθαρό υγρό πανί.
1. Disassemble the Rapid Cappuccino System. Refer to section «Assembling/Disassembling of Rapid Cappuccino system (R.C.S.)». 1. Αποσυναρμολογείστε το σύστημα Ταχείας παρασκευής Cappuccino. συμβουλευτείτε την παράγραφο «συναρμολόγηση / Αποσυναρμολόγηση του συστήματος Ταχείας παρασκευής Cappuccino (R.C.S.)».
2. Rinse away carefully any milk residue with potable water. 2. Ξεπλύντε προσεκτικά οποιαδήποτε υπολείμματα γάλακτος με πόσιμο νερό.
3. Soak all components in warm water (approximately 40° C) together with soap detergent for at least 30 minutes. 3. Αφήστε όλα τα κομμάτια να μουλιάσουν σε ζεστό νερό (περίπου 40° C) μαζί με καθαριστικό σαπούνι για τουλάχιστον 30 λεπτά.
4. Rinse with potable water and dry them with a clean damp cloth. 4. Ξεπλύντε με πόσιμο νερό και σκουπίστε τα με καθαρό υγρό πανί.
DA I LY C A R E/κ ΑΘ η Μ Ε Ρ ι Ν η Φ Ρ ό Ν Τ ι Δ Α
infORmAtiOn: do not use any strong cleaning agent or solvent cleaner. Use a clean damp cloth and mild cleaning agent to clean the surface of the machine. Do not put any machine components in dishwasher, except the Rapid Cappuccino System components.
ΠλήρΟφΟριΕΣ: μην χρησιμοποιείτε κανένα δυνατό καθαριστικό προϊόν ή διάλυμα καθαρισμού. Χρησιμοποιήσετε ένα βρεγμένο πανί και ήπιο καθαριστικό προϊόν για να καθαρίσετε τις επιφάνειες της μηχανής. Μην βάζετε στο πλυντήριο πιάτων κανένα τμήμα της μηχανής, εκτός από τα μέρη του Συστήματος Ταχείας Παρασκευής Capuccino.
H A N D WA S H I N G O F R A P I D C A P P U CC I N O S YS T E M ( R.C.S .)/ π λ ύ σι Μ ό σΤό Χ Ε Ρ ι Τό ύ σύ σΤ η ΜΑΤό σ ΤΑΧ Ε ι Α σ π Α ΡΑ σκ Ε ύ η σ C A P P U CC I N O ( R.C.S .)
infORmAtiOn: when a dishwasher is not available, the R.C.S. components can be washed manually. In that case, the procedure must be performed daily for a maximum efficiency. ΠλήρΟφΟριΕΣ: όταν δεν υπάρχει διαθέσιμο πλυντήριο πιάτων, το σύστημα R. C . S. μπορεί να πλυθεί στο χέρι. Σε αυτή την περίπτωση, η διαδικασία θα πρέπει να επαναλαμβάνεται καθημερινά για
μέγιστη αποτελεσματικότητα.
1. Remove drip tray, capsule container. Empty and rinse. Remove water tank. Empty, rinse it before filling with fresh potable water. 1. Αφαιρέστε το δίσκο αποστράγγισης, το δοχείο (χρησιμοποιημένων) καψουλών. Αδειάστε και ξεπλύντε. Αφαιρέστε το δοχείο νερού. Αδειάστε και ξεπλύντε το πριν το γεμίσετε με φρέσκο πόσιμο νερό.
14
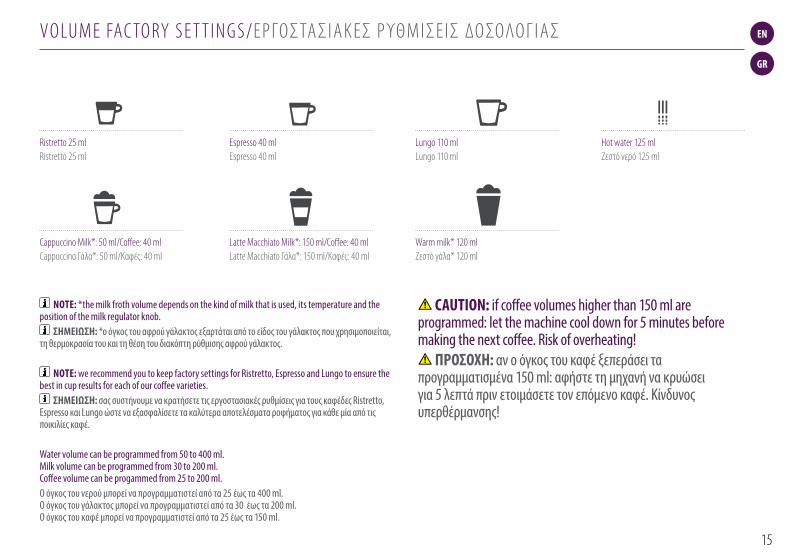
PRESS to confirm.The discaling agent flows alternately trough the coffee outlet, hot water nozzle and drip tray.
Descaling
Descaling process: Empty the drip tray and the used capsules container.
Rinsing process: Empty the drip tray and the used capsules container.
Refer to safety precautions
+100 ml500 ml
1 2 3
5 7 8
4
6
Lift and close the lever to eject any capsule in the used capsule container.
Descaling process: Fill water tank with 100 ml of Nespresso descaling agent and 500ml water.
Descaling process: Insert the hot water spout.
Enter the Menu, browse the options and select DESCALING. You will be guided throughout the whole process. Follow machine display instructions.
Descaling process: Place one container of minimum 1 litre under both the coffee outlet and the hot water spout.
4°
Volume factory settings
LANGUAGE
DESCALING
WATER HARDNESS
09 10
EN
GR
nOte: *the milk froth volume depends on the kind of milk that is used, its temperature and the position of the milk regulator knob.
ΣήμΕιώΣή: *ο όγκος του αφρού γάλακτος εξαρτάται από το είδος του γάλακτος που χρησιμοποιείται, τη θερμοκρασία του και τη θέση του διακόπτη ρύθμισης αφρού γάλακτος.
nOte: we recommend you to keep factory settings for Ristretto, Espresso and Lungo to ensure the best in cup results for each of our coffee varieties.
ΣήμΕιώΣή: σας συστήνουμε να κρατήσετε τις εργοστασιακές ρυθμίσεις για τους καφέδες Ristretto, Espresso και Lungo ώστε να εξασφαλίσετε τα καλύτερα αποτελέσματα ροφήματος για κάθε μία από τις ποικιλίες καφέ.
Water volume can be programmed from 50 to 400 ml. Milk volume can be programmed from 30 to 200 ml. Coffee volume can be progammed from 25 to 200 ml.Ο όγκος του νερού μπορεί να προγραμματιστεί από τα 25 έως τα 400 ml. Ο όγκος του γάλακτος μπορεί να προγραμματιστεί από τα 30 έως τα 200 ml. Ο όγκος του καφέ μπορεί να προγραμματιστεί από τα 25 έως τα 150 ml.
VO LUM E FAC TO RY S E T T I N G S/Ε Ρ Γό σΤΑ σι Α κ Ε σ Ρ ύΘ Μ ι σΕ ι σ Δό σόλό Γ ι Α σ
Ristretto 25 ml Ristretto 25 ml
Cappuccino Milk*: 50 ml/Coffee: 40 ml Cappuccino Γάλα*: 50 ml/καφές: 40 ml
Lungo 110 ml Lungo 110 ml
Latte Macchiato Milk*: 150 ml/Coffee: 40 ml Latte Macchiato Γάλα*: 150 ml/καφές: 40 ml
Espresso 40 ml Espresso 40 ml
Hot water 125 ml Ζεστό νερό 125 ml
Warm milk* 120 ml Ζεστό γάλα* 120 ml
CAutiOn: if coffee volumes higher than 150 ml are programmed: let the machine cool down for 5 minutes before making the next coffee. Risk of overheating!
ΠρΟΣΟχή: αν ο όγκος του καφέ ξεπεράσει τα προγραμματισμένα 150 ml: αφήστε τη μηχανή να κρυώσει για 5 λεπτά πριν ετοιμάσετε τον επόμενο καφέ. Κίνδυνος υπερθέρμανσης!
15
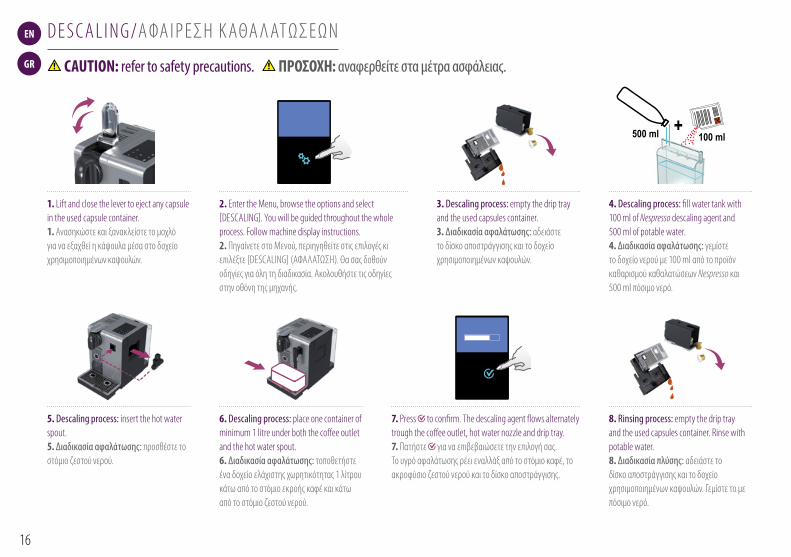
+100 ml500 ml
10
+100 ml500 ml
10
+100 ml500 ml
10
+100 ml500 ml
10
+100 ml500 ml
10
+100 ml500 ml
10
+100 ml500 ml
10
+100 ml500 ml
10
EN
GR
D E S C A L I N G/Α ΦΑ ι Ρ Ε ση κ ΑΘΑ λ ΑΤ ώ σΕ ώ Ν
1. Lift and close the lever to eject any capsule in the used capsule container. 1. Ανασηκώστε και ξανακλείστε το μοχλό για να εξαχθεί η κάψουλα μέσα στο δοχείο χρησιμοποιημένων καψουλών.
2. Enter the Menu, browse the options and select [DESCALING]. You will be guided throughout the whole process. Follow machine display instructions. 2. πηγαίνετε στο Μενού, περιηγηθείτε στις επιλογές κι επιλέξτε [DESCALING] (ΑΦΑλΑΤώση). Θα σας δοθούν οδηγίες για όλη τη διαδικασία. Ακολουθήστε τις οδηγίες στην οθόνη της μηχανής.
CAutiOn: refer to safety precautions. ΠρΟΣΟχή: αναφερθείτε στα μέτρα ασφάλειας.
7. Press to confirm. The descaling agent flows alternately trough the coffee outlet, hot water nozzle and drip tray. 7. πατήστε για να επιβεβαιώσετε την επιλογή σας. Το υγρό αφαλάτωσης ρέει εναλλάξ από το στόμιο καφέ, το ακροφύσιο ζεστού νερού και το δίσκο αποστράγγισης.
5. Descaling process: insert the hot water spout. 5. Διαδικασία αφαλάτωσης: προσθέστε το στόμιο ζεστού νερού.
6. Descaling process: place one container of minimum 1 litre under both the coffee outlet and the hot water spout. 6. Διαδικασία αφαλάτωσης: τοποθετήστε ένα δοχείο ελάχιστης χωρητικότητας 1 λίτρου κάτω από το στόμιο εκροής καφέ και κάτω από το στόμιο ζεστού νερού.
3. Descaling process: empty the drip tray and the used capsules container. 3. Διαδικασία αφαλάτωσης: αδειάστε το δίσκο αποστράγγισης και το δοχείο χρησιμοποιημένων καψουλών.
4. Descaling process: fill water tank with 100 ml of Nespresso descaling agent and 500 ml of potable water. 4. Διαδικασία αφαλάτωσης: γεμίστε το δοχείο νερού με 100 ml από το προϊόν καθαρισμού καθαλατώσεων Nespresso και 500 ml πόσιμο νερό.
8. Rinsing process: empty the drip tray and the used capsules container. Rinse with potable water. 8. Διαδικασία πλύσης: αδειάστε το δίσκο αποστράγγισης και το δοχείο χρησιμοποιημένων καψουλών. Γεμίστε το με πόσιμο νερό.
16

max
1”
1
2
3
4
5
11
max
1”
1
2
3
4
5
11
max
1”
1
2
3
4
5
11
max
1”
1
2
3
4
5
11
max
1”
1
2
3
4
5
11
max
1”
1
2
3
4
5
11
max
1”
1
2
3
4
5
11
max
1”
1
2
3
4
5
11
EN
GR
D E S C A L I N G/Α ΦΑ ι Ρ Ε ση κ ΑΘΑ λ ΑΤ ώ σΕ ώ Ν
2. Place the water hardness sticker under water for 1 second. 2. Τοποθετήστε το αυτοκόλλητο μέτρησης σκληρότητας νερού κάτω από νερό για 1 δευτερόλεπτο.
11. Press to confirm. The rinsing cycle continues alternately through the coffee outlet, hot water nozzle and drip tray until the water tank runs empty. 11. πατήστε για να επιβεβαιώσετε την επιλογή σας. ό κύκλος ξεπλύματος συνεχίζει εναλλάξ μέσα από το στόμιο καφέ, το ακροφύσιο ζεστού νερού και το δίσκο αποστράγγισης μέχρι να αδειάσει το δοχείο νερού.
3. The number of red squares indicates the water hardness level. 3. ό αριθμός στο κόκκινο τετράγωνο δείχνει το βαθμό σκληρότητας νερού.
12. Once the rinsing process is finished, the machine switches off. Rinse the hot water spout and clean it with a damp cloth. You have now finished descaling the machine. 12. Όταν η διαδικασία ξεπλύματος ολοκληρωθεί, η μηχανή σβήνει αυτόματα. Ξεπλύντε το στόμιο ζεστού νερού και καθαρίστε το με υγρό πανί. Τώρα ολοκληρώσατε το καθάρισμα της μηχανής από τις καθαλατώσεις.
4. Set the value accordingly. 4. Ρυθμίστε το βαθμό στη μηχανή αντίστοιχα.
WAT E R H A R D N E S S S E T T I N G/Ρ ύΘ Μ ι ση σκ λ η Ρ όΤ η ΤΑ σ Ν Ε Ρ ό ύ
1. Enter the menu, browse the options and select [WATER HARDNESS]. You will be guided to set the value. Follow machine display instructions. 1. πηγαίνετε στο Μενού, περιηγηθείτε στις επιλογές κι επιλέξτε [WATER HARDNESS] (σκληΡόΤηΤΑ ΝΕΡόύ). Θα σας δοθούν οδηγίες για να ορίσετε το βαθμό. Ακολουθήστε τις οδηγίες στην οθόνη της μηχανής.
9. Rinsing process: rinse and fill water tank with fresh potable water up to MAx level. 9. Διαδικασία πλύσης: ξεπλύντε και γεμίστε με πόσιμο νερό στο μέγιστο επίπεδο «MAx».
10. Rinsing process: place one container of minimum 1 litre under both the coffee outlet and the hot water spout. 10. Διαδικασία πλύσης: τοποθετήστε ένα δοχείο ελάχιστης χωρητικότητας 1 λίτρου κάτω από το στόμιο εκροής καφέ και κάτω από το στόμιο ζεστού νερού.
17

EN
GR
T R O U b L E S H O OT I N G
No light on display.➔ Check the mains, plug, voltage, and fuse. Press the ON button located behind the machine
display. In case of problems, call the Nespresso Club.
Machine too hot message, indicated in display.➔ In certain conditions, machine heater reaches high temperature, (ie. after an emptying of
the fluid system). Simply wait, machine will cool down automatically.
Coffee comes out very slowly.➔ Flow speed depends on the coffee variety.➔ Descale if necessary; see Descaling section.
Coffee is not hot enough.➔ Preheat cup.➔ Descale if necessary; see Descaling section.
Capsule area is leaking (water in capsule container). ➔ Position capsule correctly. If leakages occur, call the Nespresso Club.
Irregular blinking. ➔ Send appliance to repair or call the Nespresso Club.
No coffee, just water runs out (despite inserted capsule). ➔ In case of problems, call the Nespresso Club.
Lever cannot be closed completely.➔ Empty capsule container. Make sure that no capsule is blocked inside the capsule
container.
Quality of milk froth is not up to standard.
➔ For a perfect milk froth, use skimmed or semi-skimmed milk at refrigerator temperature (about 4° C).
➔ Rinse after each milk based preparation. Place a recipient under milk outlet, rotate the milk regulator knob until «CLEAN» position.
➔ Every two days, disassemble the R. C. S. and clean all components in the upper level of a dishwasher.
Machine needs repair message, indicated in display.➔ Contact the Nespresso Club or Nespresso authorized representative for examination,
repair or adjustment.
18

EN
GR
Α Ν Τ ι Μ Ε Τ ώ π ι ση π Ρ ό Β λ η ΜΑΤ ώ Ν
latissima proEUR,AUS,NZ: 220240 V, 50/60 Hz, 1300 W
US/CA: 120 V, 60 Hz, 1200 W
19 bar
6.5 kg
1,38 litre
500 ml
13-16 capsules
l=19,4 cm . L=33,2 cm . h=27,4 cm
Troubleshooting
Contact the Nespressso Club
For any additional information, in case of problems or simply to seek advise, call the Nespresso Club. Contact details of the Nespresso Club can be found in the 'Welcome to Nespresso' folder in your machine box or at nespresso.com
No light on displayCheck the mains, plug, voltage, and fuse. In case of problems, call the Nespresso Club.
Coffee comes out very slowly.Flow speed depends on the coffee variety.Perform a self check of the machine. Enter the menu list and select Maintenance. Follow instruction
Coffee is not hot enough.Preheat cup.Perform a self check of the machine. Enter the menu list and select Maintenance. Follow instruction
Capsule area is leaking (water in capsule container). Position capsule correctly. If leakages occur, call the Nespresso Club.
Irregular blinking.Send appliance to repair or call the Nespresso Club.
No coffee, just water runs out (despite inserted capsule).In case of problems, call the Nespresso Club.
Lever cannot be closed completelyEmpty capsule container. Make sure that no capsule is blocked inside the capsule container.
Quality of milk froth is not up to standard1) For a perfect milk froth, use skimmed or semi-skimmed milk at refrigerator temperature (about 4° C)2) Rinse after each milk based preparation. Place a recipient under milk outlet, rotate the milk regulator knob until “CLEAN” position.3) Every two days, disassemble the R. C. S. and clean all components in the upper level of a dishwasher
Warranty
Delonghi warrants this product against defects in materials and workmanship for a period of two years from the date of purchase. During this period, Delonghi will either repair or replace, at its discretion, any defective product at no charge to the owner. Replacement products or repaired parts will be guaranteed for only the unexpired portion of the original warranty or six months, whichever is greater. This limited warranty does not apply to any defect resulting from accident, misuse, improper maintenance, or normal wear and tear. Any defect resulting from the usage of non genuine Nespresso capsules will not be covered by this warranty. Except to the extent allowed by applicable law, the terms of this limited warranty do not exclude, restrictor modify, and are in addition to, the mandatory statutory rights applicable to the sale of the product to you. If you believe your product is defective, contact Nespresso for instructions on where to send or bring it for repair. Please visit our website at nespresso.com to discover more about Nespresso
Specifications
Pmax
Once the rinsing process is finished, the machine switches off. Clean the machine using a damp cloth. You have now finished descaling the machine.
9 10 11 12Rinsing process Rinse and fill water with fresh potable water up to MAX level.
Rinsing process Place one container of minimum 1 litre under both the coffee outlet and the hot water spout.
PRESS to confirm.The rinsing cycle continues trough the coffee outlet, hot water spout and drip tray until the water tank is empty.
Water hardness setting
1
programmed buttons blinks 3 times: water hardness is seti
1”2 3 4
1
2
3
4
5
Place the water hardness sticker under water for 1 second.
The number of red squares indicates the water harness level.
Set the value accordinglyEnter the menu, browse the options and select WATER HARDNESS.You will be guided to set the value.Follow machine display instructions.
max
max
Kg
11 12
euR, AuS, nZ: 220-240 V, 50/60 Hz, 1300 w/1400 wEUR,AUS,NZ: 220240 V, 50/60 Hz, 1300 W
US/CA: 120 V, 60 Hz, 1200 W
19 bar
6.5 kg
1,38 litre
500 ml
13-16 capsules
l=19,4 cm . L=33,2 cm . h=27,4 cm
Troubleshooting
Contact the Nespressso Club
For any additional information, in case of problems or simply to seek advise, call the Nespresso Club. Contact details of the Nespresso Club can be found in the 'Welcome to Nespresso' folder in your machine box or at nespresso.com
No light on displayCheck the mains, plug, voltage, and fuse. In case of problems, call the Nespresso Club.
Coffee comes out very slowly.Flow speed depends on the coffee variety.Perform a self check of the machine. Enter the menu list and select Maintenance. Follow instruction
Coffee is not hot enough.Preheat cup.Perform a self check of the machine. Enter the menu list and select Maintenance. Follow instruction
Capsule area is leaking (water in capsule container). Position capsule correctly. If leakages occur, call the Nespresso Club.
Irregular blinking.Send appliance to repair or call the Nespresso Club.
No coffee, just water runs out (despite inserted capsule).In case of problems, call the Nespresso Club.
Lever cannot be closed completelyEmpty capsule container. Make sure that no capsule is blocked inside the capsule container.
Quality of milk froth is not up to standard1) For a perfect milk froth, use skimmed or semi-skimmed milk at refrigerator temperature (about 4° C)2) Rinse after each milk based preparation. Place a recipient under milk outlet, rotate the milk regulator knob until “CLEAN” position.3) Every two days, disassemble the R. C. S. and clean all components in the upper level of a dishwasher
Warranty
Delonghi warrants this product against defects in materials and workmanship for a period of two years from the date of purchase. During this period, Delonghi will either repair or replace, at its discretion, any defective product at no charge to the owner. Replacement products or repaired parts will be guaranteed for only the unexpired portion of the original warranty or six months, whichever is greater. This limited warranty does not apply to any defect resulting from accident, misuse, improper maintenance, or normal wear and tear. Any defect resulting from the usage of non genuine Nespresso capsules will not be covered by this warranty. Except to the extent allowed by applicable law, the terms of this limited warranty do not exclude, restrictor modify, and are in addition to, the mandatory statutory rights applicable to the sale of the product to you. If you believe your product is defective, contact Nespresso for instructions on where to send or bring it for repair. Please visit our website at nespresso.com to discover more about Nespresso
Specifications
Pmax
Once the rinsing process is finished, the machine switches off. Clean the machine using a damp cloth. You have now finished descaling the machine.
9 10 11 12Rinsing process Rinse and fill water with fresh potable water up to MAX level.
Rinsing process Place one container of minimum 1 litre under both the coffee outlet and the hot water spout.
PRESS to confirm.The rinsing cycle continues trough the coffee outlet, hot water spout and drip tray until the water tank is empty.
Water hardness setting
1
programmed buttons blinks 3 times: water hardness is seti
1”2 3 4
1
2
3
4
5
Place the water hardness sticker under water for 1 second.
The number of red squares indicates the water harness level.
Set the value accordinglyEnter the menu, browse the options and select WATER HARDNESS.You will be guided to set the value.Follow machine display instructions.
max
max
Kg
11 12
max/μέγ. 19 bar
EUR,AUS,NZ: 220240 V, 50/60 Hz, 1300 W
US/CA: 120 V, 60 Hz, 1200 W
19 bar
6.5 kg
1,38 litre
500 ml
13-16 capsules
l=19,4 cm . L=33,2 cm . h=27,4 cm
Troubleshooting
Contact the Nespressso Club
For any additional information, in case of problems or simply to seek advise, call the Nespresso Club. Contact details of the Nespresso Club can be found in the 'Welcome to Nespresso' folder in your machine box or at nespresso.com
No light on displayCheck the mains, plug, voltage, and fuse. In case of problems, call the Nespresso Club.
Coffee comes out very slowly.Flow speed depends on the coffee variety.Perform a self check of the machine. Enter the menu list and select Maintenance. Follow instruction
Coffee is not hot enough.Preheat cup.Perform a self check of the machine. Enter the menu list and select Maintenance. Follow instruction
Capsule area is leaking (water in capsule container). Position capsule correctly. If leakages occur, call the Nespresso Club.
Irregular blinking.Send appliance to repair or call the Nespresso Club.
No coffee, just water runs out (despite inserted capsule).In case of problems, call the Nespresso Club.
Lever cannot be closed completelyEmpty capsule container. Make sure that no capsule is blocked inside the capsule container.
Quality of milk froth is not up to standard1) For a perfect milk froth, use skimmed or semi-skimmed milk at refrigerator temperature (about 4° C)2) Rinse after each milk based preparation. Place a recipient under milk outlet, rotate the milk regulator knob until “CLEAN” position.3) Every two days, disassemble the R. C. S. and clean all components in the upper level of a dishwasher
Warranty
Delonghi warrants this product against defects in materials and workmanship for a period of two years from the date of purchase. During this period, Delonghi will either repair or replace, at its discretion, any defective product at no charge to the owner. Replacement products or repaired parts will be guaranteed for only the unexpired portion of the original warranty or six months, whichever is greater. This limited warranty does not apply to any defect resulting from accident, misuse, improper maintenance, or normal wear and tear. Any defect resulting from the usage of non genuine Nespresso capsules will not be covered by this warranty. Except to the extent allowed by applicable law, the terms of this limited warranty do not exclude, restrictor modify, and are in addition to, the mandatory statutory rights applicable to the sale of the product to you. If you believe your product is defective, contact Nespresso for instructions on where to send or bring it for repair. Please visit our website at nespresso.com to discover more about Nespresso
Specifications
Pmax
Once the rinsing process is finished, the machine switches off. Clean the machine using a damp cloth. You have now finished descaling the machine.
9 10 11 12Rinsing process Rinse and fill water with fresh potable water up to MAX level.
Rinsing process Place one container of minimum 1 litre under both the coffee outlet and the hot water spout.
PRESS to confirm.The rinsing cycle continues trough the coffee outlet, hot water spout and drip tray until the water tank is empty.
Water hardness setting
1
programmed buttons blinks 3 times: water hardness is seti
1”2 3 4
1
2
3
4
5
Place the water hardness sticker under water for 1 second.
The number of red squares indicates the water harness level.
Set the value accordinglyEnter the menu, browse the options and select WATER HARDNESS.You will be guided to set the value.Follow machine display instructions.
max
max
Kg
11 12
~ 6.5 kg
1.3 l/λίτρα
0.5 l/λίτρα
13-16 capsules/κάψουλες
19.4 cm 27.4 cm 33.2 cm
SpeCifiCAtiOnS/ΤΕχνικα χαρακΤήριΣΤικα
Δεν υπάρχει φως στην οθόνη. ➔ Ελέγξτε την πρίζα, το φις, την τάση και την ασφάλεια. πατήστε το κουμπί ON που
βρίσκεται πίσω από την οθόνη της μηχανής. σε περίπτωση προβλημάτων, καλέστε το Nespresso Club.
Μήνυμα «υπερθέρμανση μηχανής», εμφανίζεται στην οθόνη.
➔ σε ορισμένες περιπτώσεις, το σύστημα θέρμανσης της μηχανής αγγίζει υψηλές θερμοκρασίες, (όπως μετά το άδειασμα του συστήματος υγρών). Απλά περιμένετε και η μηχανή θα κρυώσει αυτόματα.
ό καφές ρέει πολύ αργά.➔ η ταχύτητα της ροής εξαρτάται από την ποικιλία του καφέ.➔ κάντε αφαλάτωση αν είναι απαραίτητο· δείτε την ενότητα Αφαίρεση καθαλατώσεων.
ό καφές δεν είναι αρκετά ζεστός.➔ προθερμάνετε την κούπα.➔ κάντε αφαλάτωση αν είναι απαραίτητο· δείτε την ενότητα Αφαίρεση καθαλατώσεων.
ό χώρος καψουλών έχει διαρροή (νερό στο δοχείο καψουλών).
➔ Βάλτε την κάψουλα σωστά. Εάν υπάρχουν διαρροές, καλέστε το Nespresso Club.
Ακανόνιστο αναβόσβημα. ➔ στείλτε τη μηχανή για επισκευή ή καλέστε το Nespresso Club.Δεν ρέει καφές, μόνο νερό (παρότι έχει τοποθετηθεί κάψουλα καφέ).
➔ σε περίπτωση δυσκολιών, καλέστε το Nespresso Club
ό μοχλός δεν κλείνει τελείως.➔ Αδειάστε το δοχείο καψουλών. σιγουρευτείτε ότι δεν έχει μπλοκάρει κάποια κάψουλα μέσα
στο δοχείο καψουλών.
η ποιότητα του αφρού γάλακτος δεν είναι η προβλεπόμενη.
➔ Για τον τέλειο αφρό γάλακτος χρησιμοποιείστε αποβουτυρωμένο ή ημι-αποβουτυρωμένο γάλα σε θερμοκρασία ψυγείου (περίπου 4 βαθμούς C).
➔ Ξεπλένετε μετά από κάθε παρασκευή ροφήματος με γάλα. Τοποθετήστε ένα δοχείο κάτω από το στόμιο γάλακτος, στρέψτε το διακόπτη στη θέση «CLEAN» («κΑΘΑΡισΜόσ»).
➔ κάθε δύο ημέρες, αποσυναρμολογήστε το σύστημα R. C. S. και καθαρίστε όλα τα κομμάτια του συστήματος στο πάνω επίπεδο του πλυντηρίου πιάτων.
Μήνυμα «ανάγκη επισκευής μηχανής», εμφανίζεται στην οθόνη.
➔ Επικοινωνήστε με το Nespresso Club για εξέταση, επιδιόρθωση ή ρύθμιση.
19

EN
GR
For any additional information, in case of problems or simply to seek advise, call the Nespresso Club. Contact details of the Nespresso Club can be found in the «Welcome to Nespresso» folder in your machine box or at nespresso.com
Για οποιεσδήποτε επιπλέον πληροφορίες, σε περίπτωση προβλημάτων ή απλά για να ζητήσετε συμβουλές, καλέστε το Nespresso Club. Μπορείτε να βρείτε τα στοιχεία επικοινωνίας του Nespresso Club στο ντοσιέ 'καλωσορίσατε στη Nespresso' που βρίσκεται στη συσκευασία της μηχανής σας ή στη διεύθυνση www.nespresso.gr
CO N TAC T T H E N E S P R E S S O C LU b/Ε π ι κό ι Ν ώ Ν ι Α Μ Ε Τό N E S P R E S S S O C LU b
D I S P O S A L A N D E CO LO G I C A L CO N C E R N S/ΔιΑΘΕση ΑπόΡΡιΜΜΑΤώΝ κΑι πΕΡιΒΑλλόΝΤικη ΜΕΡιΜΝΑ
Disposal and environmental protection Your appliance contains valuable materials that can be recovered or recycled. Separation of the remaining waste materials into different types facilitates the recycling of valuable raw material. Leave the appliance at a collection point. You can obtain information on disposal from your local authorities.
διάθεση απορριμμάτων και Προστασία του περιβάλλοντος η συσκευή σας περιέχει πολύτιμα υλικά τα οποία μπορούν να επαναχρησιμοποιηθούν ή να ανακυκλωθούν. ό διαχωρισμός των εναπομεινάντων απορριμμάτων σε διαφορετικές κατηγορίες διευκολύνει την ανακύκλωση πολύτιμης πρώτης ύλης. Αφήστε τη συσκευή σας σε ένα σημείο συλλογής. πληροφορίες σχετικά με τη διάθεση απορριμμάτων μπορείτε να έχετε από τις τοπικές αρχές.
20

EN
GR
WA R R A N T Y/Ε Γ Γ ύ η ση
Nespresso guarantees this product against defects in materials and workmanship for a period of 2 years. The warranty period begins on the date of purchase and Nespresso requires presentation of the original proof of purchase to ascertain the date. During the warranty period, Nespresso will either repair or replace, at its discretion, any defective product at no charge to the owner. Replacement products or repaired parts will be warranted only for the unexpired portion of the original warranty or six months, whichever is greater. This limited warranty does not apply to any defect resulting from negligence, accident, misuse, or any other reason beyond Nespresso’s reasonable control, including but not limited to: normal wear and tear, negligence or failure to follow the product instructions, improper or inadequate maintenance, calcium deposits or descaling, connection to improper power supply, unauthorized product modification or repair, use for commercial purposes, fire, lightning, flood or other external causes. This warranty is valid only in the country of purchase or in such other countries where Nespresso sells and services the same model with identical technical specifications. Warranty service outside the country of purchase is limited to the terms and conditions of the corresponding warranty in the country of service. Should the cost of repairs or replacement not be covered by this warranty, Nespresso will advise the owner and the cost shall be charged to the owner. This limited warranty shall be the full extent of Nespresso’s liability however caused. Except to the extent allowed by applicable law, the terms of this limited warranty do not exclude, restrict or modify the mandatory statutory rights applicable to the sale of this product and are in addition to those rights. The limited warranty applies only to this single-branded Nespresso products. Products marked with both the Nespresso brand and another producer are governed exclusively by the warranty provided by that other producer. If you believe your product is defective, contact Nespresso for instructions on how to proceed with a repair. Any defect or dysfunction resulting from the use of non-genuine Nespresso capsules will be not covered by this warranty. Please visit our website at www.nespresso.com for contact details.
η Nespresso εγγυάται το συγκεκριμένο προϊόν έναντι αστοχίας υλικών και εργασίας για μία περίοδο ετών. η περίοδος ισχύς της εγγύησης ξεκινά κατά την ημερομηνία αγοράς και η Nespresso απαιτεί την επίδειξη της πρωτότυπης απόδειξης αγοράς για την επιβεβαίωση της ημερομηνίας. κατά τη διάρκεια της περιόδου εγγύησης, η Nespresso θα επισκευάσει ή θα αντικαταστήσει, κατά την κρίση της, οποιοδήποτε ελαττωματικό προϊόν. η συσκευή αυτή είναι σύμφωνη με την όδηγία ΕΕ 1999/44/EC. Τα αντικατασταθέντα προϊόντα ή τα επισκευασμένα μέρη καλύπτονται με εγγύηση, η οποία θα έχει διάρκεια τον χρόνο που απομένει από την αρχική εγγύηση ή έξι μήνες, όποιο διάστημα είναι μεγαλύτερο. η παρούσα περιορισμένη εγγύηση δεν ισχύει για οποιοδήποτε ελάττωμα είναι αποτέλεσμα αμέλειας, ατυχήματος, κακής χρήσης ή οποιοδήποτε άλλο λόγο ή αιτία εκτός του εύλογου ελέγχου της Nespresso, συμπεριλαμβανομένων, ενδεικτικά και όχι περιοριστικά,: της κανονικής φθοράς, της αμέλειας ή αδυναμίας συμμόρφωσης προς τις οδηγίες χρήσης του προϊόντος, της ακατάλληλης ή πλημμελούς συντήρησης, της ύπαρξης καθαλατώσεων ή του καθαρισμού καθαλατώσεων, της σύνδεσης σε ακατάλληλη παροχή ρεύματος, της μη εξουσιοδοτημένης τροποποίησης ή επισκευής του προϊόντος, της χρήσης για εμπορικούς σκοπούς, των περιπτώσεων πυρκαγιάς, κεραυνού, πλημμύρας ή άλλων εξωγενών αιτιών. η παρούσα εγγύηση ισχύει μόνο εντός της χώρας αγοράς ή σε χώρες όπου η Nespresso πουλά κι επισκευάζει το ίδιο μοντέλο με όμοιες τεχνικές προδιαγραφές. η επισκευή υπό εγγύηση εκτός της χώρας αγοράς περιορίζεται στους όρους και τις συνθήκες της αντίστοιχης εγγύησης στη χώρα επισκευής. στις περιπτώσεις όπου το κόστος επισκευής ή εγγύησης δεν καλύπτεται από την παρούσα εγγύηση, η Nespresso θα ενημερώσει σχετικά τον ιδιοκτήτη και το κόστος θα χρεωθεί στον ιδιοκτήτη. η παρούσα περιορισμένη εγγύηση συνιστά την πλήρη ευθύνη της Nespresso, όποια κι είναι η αιτία. Εκτός από το βαθμό που επιτρέπεται από την ισχύουσα νομοθεσία, οι όροι της παρούσας περιορισμένης εγγύησης δεν αποκλείουν, περιορίζουν ή τροποποιούν, αλλά ισχύουν επιπρόσθετα στα επιβεβλημένα νόμιμα δικαιώματα που αφορούν στην πώληση του προϊόντος σε εσάς. η περιορισμένη εγγύηση ισχύει μόνο για το συγκεκριμένο προϊόν Nespresso μιας μάρκας. Εάν πιστεύετε ότι το προϊόν σας είναι ελαττωματικό, επικοινωνήστε με τη Nespresso για οδηγίες στον τρόπο με τον οποίο θα προχωρήσετε σε επισκευή. όποιοδήποτε ελάττωμα ή δυσλειτουργία προκύπτει από τη χρήση μη αυθεντικών καψουλών Nespresso δεν καλύπτεται από την παρούσα εγγύηση. παρακαλούμε επισκεφτείτε το website μας στη διεύθυνση www.nespresso.gr για στοιχεία επικοινωνίας.
21

TR
FR
G E N E L b A k I ş/V U E D’E N S E M b L E
ekran (hazırlıklar)/ ecran (préparations)
13 Lungo/Lungo14 Espresso/Espresso15 Ristretto/Ristretto16 Sıcak su/Eau chaude17 Ilık süt/Lait chaud 18 Cappuccino/Cappuccino 19 Latte Macchiato/Latte Macchiato
ekran (gezinti)/ ecran (navigation)
20 Menü /Menu21 Menü devredeyken yukarı kaydırma/
Défilement vers le haut lorsque le Menu est activé22 Menü devredeyken opsiyon seçimi/
Sélection des options lorsque le Menu est activé23 Menü devredeyken aşağı kaydırma/
Défilement vers le bas lorsque le Menu est activé24 Metin ekranı/Ecran d’affichage
Hızlı Cappuccino Sistemi (R.C.S.)/ Rapid Cappuccino System (R.C.S.)
25 Süt köpüğü ayarlama düğmesi/bouton de réglage de mousse de lait
26 Süt köpürtme ayarlayıcısı için yerleştirme konumu/ Position d’insertion du bouton rotatif de réglage de mousse
27 Min. köpük/Mousse min.28 Maks. köpük/Mousse max.29 «CLEAN»: otomatik durulama fonksiyonu/
«CLEAN»: fonction de rinçage automatique30 Süt haznesi kapağı/Couvercle du réservoir à lait31 Süt çıkışı/buse à lait32 Süt haznesi/Réservoir à lait33 Süt çekme borusu/Tuyau d’aspiration de lait34 Hızlı Cappuccino Sistemi (R.C.S.)bağlantısı/Connecteur du R.C.S.
makineye genel Bakış/ Vue d’ensemble de la machine
A Makinenin yalnızca kahve modundaki konfigürasyonu / Machine en configuration Café uniquement
B Hızlı Cappuccino Sistemi özellikli Makine (Cappuccino için)/Machine avec le Rapid Cappuccino System (pour les Cappuccinos)
C Sıcak su çıkışı / Machine avec la buse Eau Chaude
1 kol/Levier2 AÇMA/kAPAMA düğmesi/bouton ON/OFF3 Su haznesi/Réservoir d’eau4 kahve çıkışı/Sortie Café 5 Damlama ızgarası/Grille d’égouttage6 Damlama tepsisi/bac d’égouttage7 Dönen fincan desteği (çıkartılamaz)/
Support-tasse basculant (non amovible)8 kullanılmış kapsül bölmesi/bac à capsules usagées9 buhar bağlantı kapağı/Porte d’accès au connecteur vapeur
10 Teleskopik sıcak su çıkışı/buse Eau Chaude télescopique11 Sıcak su çıkışı muhafaza alanı/
Espace de rangement de la buse eau chaude12 buhar bağlantısı/Connecteur vapeur
22

TR
FR
İ Ç E R İ k/CO N T E N T
Nespresso, her defasında mükemmel Espresso hazırlayan ayrıcalıklı bir sistemdir. Tüm Nespresso makinelerinde, 19 bar'a kadar basıncı garantileyen benzersiz bir sistem bulunur. kahveyi hazırlamak ve olağanüstü yoğun ve yumuşak kremayı oluşturmak için, her bir Grand Cru kahve aromasının özünün çıkartılabilmesi amacıyla, her bir parametre olağanüstü hassasiyetle hesaplanmıştır.
Nespresso est un système unique offrant un Espresso parfait, tasse après tasse. Toutes les machines Nespresso sont équipées d’un système d’extraction unique à très haute pression allant jusqu’à 19 bar. Chaque paramètre est calculé avec précision pour exprimer la totalité des arômes de chaque Grand Cru, lui donner du corps et offrir une créma d’une densité et d’une onctuosité incomparables.
HACİm fABRİkA AyARlARi/RéglAgeS uSine .................................................kİReÇ ÇöZme/DétARtRAge ..........................................................................Su SeRtlİĞİ AyARi/RéglAge De lA DuReté D'eAu .........................................SORun gİDeRme/DépAnnAge ......................................................................öZellİkleR/SpéCifiCAtiOnS ........................................................................İmHA etme Ve ekOlOJİk kAygilAR/ miSe Au ReBut et pROteCtiOn De l'enViROnnement .................................. Nespressso CluB İle İletİŞİme geÇİn/COntACteZ le CluB Nespresso .........SiniRli gARAntİ/gARAntie .........................................................................
genel BAkiŞ/Vue D'enSemBle .........................................................................AmBAlAJ İÇeRİĞİ/COntenu De l‘emBAllAge ....................................................menüDe geZİntİ/menu/nAVigAtiOn ...............................................................menü lİSteSİ/liSte Du menu ..........................................................................İlk kullAnim VeyA uZun SüRe kullAnilmAmA SOnRASinDA/pRemièRe utiliSAtiOn Ou ApRèS une lOngue péRiODe De nOn-utiliSAtiOn ..................kAHVe HAZiRlAmA/pRépARAtiOn CAfé ...........................................................HiZli CAppuCCinO SİStemİ'nİn tAkilmASi / ÇikARtilmASi (R.C.S.)/ mOntAge/DémOntAge Du RApiD CAppuCCinO SyStem (R.C.S.).........................CAppuCCinO Ve lAtte mACCHiAtO HAZiRlAmA/ pRépARAtiOn D'un CAppuCCinO et D'un lAtte mACCHiAtO .............................günlük BAkim/entRetien quOtiDien ............................................................HiZli CAppuCCinO SİStemİ'nİn elDe yikAnmASi (R.C.S.)/ lAVAge à lA mAin Du RApiD CAppuCCinO SyStem (R.C.S.) ................................
DİkkAt: bu işareti gördüğünüz zaman, lütfen olası bir hasarı önlemek için güvenlik tedbirleri bölümüne bakın. Bİlgİ: bu işareti gördüğünüz zaman, lütfen kahve makinenizin doğru ve emniyetli kullanımı için verilen tavsiyelere dikkat edin. AVeRtiSSement: lorsque ce symbole apparaît, veuillez consulter les consignes de sécurité pour éviter d’éventuels dangers et dommages. infORmAtiOn: lorsque ce symbole apparaît, veuillez prendre connaissance du conseil pour une utilisation sûre et conforme de votre
appareil.
22242425
2628
28
2932
32
333435 36 37
38 3839
23

EN SAFETY PRECAUTIONS ............................................................................. 2 FR CONSIGNES DE SECURITE ......................................................................... 4 DE SICHERHEITSHINWEISE ........................................................................... 7 IT PRECAUZIONI DI SICUREZZA .................................................................... 10 ES PRECAUCIONES DE SEGURIDAD ................................................................ 12 PT MEDIDAS DE SEGURANÇA......................................................................... 15 NL VEILIGHEIDSMAATREGELEN ..................................................................... 18 GR ΜΈΤΡΑ ΑΣΦΑΛΈΙΑΣ .................................................................................. 20 HU BIZTONSÁGI ELŐÍRÁSOK .......................................................................... 22 CZ BEZPEČNOSTNÍ POKYNY .......................................................................... 25 PL ZASADY BEZPIECZEŃSTWA ....................................................................... 28 RU МЕРЫ ПРЕДОСТОРОЖНОСТИ ................................................................. 31
TR
FR
M E N ü D E G E z I N T I/M E N U/N AV I G AT I O N
AM b A L A j I Ç E R I ğ I/CO N T E N U D E L‘E M b A L L AG E
kahve makinesiMachine à café
«Nespresso'ya hoş geldiniz klasörü»Pochette de bienvenue chez Nespresso
kullanım kılavuzu Mode d’emploi
Güvenlik Talimatları Consignes de sécurité
kapsül seti Assortiment de Grands Crus
Menü listesine girin/Entrer dans la liste du menu simgesine kısa süreli basın /Appuyez brièvement sur le symbole .
Seçeneklere göz atın/Défilement des options simgesine basın/Appuyez sur les symboles .
Seçenek seçin/Sélectionner une option simgesine basın /Appuyez sur le symbole .
Menü listesinden çıkın/ Sortir de la liste du menu [çıkış] seçeneğine kaydırın ve seçimi onaylayın. Veya simgesine basın. Faites défiler jusqu'à l'option [QUITTER] et valider la sélection. Ou appuyez sur le symbole .
Seçenekten çıkın ve Menü listesine geri dönün/ Sortir d'une option et retourner à la liste du menu [çıkış] seçeneğine kaydırın ve seçimi onaylayın. Veya simgesine basın. Faites défiler jusqu'à l'option [QUITTER] et valider la sélection. Ou appuyez sur le symbole .
24

TR
FR
M E N ü L I S T E S I/L I S T E D U M E N U
1 Tercih ettiğiniz dili ayarlamak için bu seçeneği seçin. Makine ekranındaki talimatları takip edin. Sélectionnez cette option pour choisir la langue. Suivez les instructions de l'écran de la machine.
2 Ekranda kireç çözme uyarısı belirdiğinde bu seçeneği seçin. Bakınız: sayfa 34. kireç çözme işleminde size yol gösterecektir. Sélectionnez cette option lorsque l'alerte détartrage apparait sur l'écran. Voir page 34. Vous serez guidé tout au long du process de détartrage.
3 Su sertlik seviyesini ayarlamak için bu seçeneği seçin.Suyun sertliğini belirlemek için, ürünle birlikte tedarik edilen su sertliği ölçüm çubuğunu kullanın. böylece kireç çözme sıklığı optimize edilecektir. Bakınız: sayfa 35. Sélectionnez cette option afin de régler la dureté d'eau correspondant à votre région. Utilisez la bande de test fournie pour déterminer la dureté de l'eau. Cela permettra d'optimiser la fréquence des détartrages. Voir page 35.
4 Makinenin ne kadar süre sonra kapanacağını ayarlamak için bu seçeneği seçin. (Olası seçenekler: 9 dakika, 30 dakika, 2 saat, 8 saat). Makine ekranındaki talimatları takip edin. Sélectionnez cette option pour régler la durée d'extinction automatique de la machine. (Les options possibles sont 9 minutes, 30 minutes, 2 heures, 8 heures). Suivez les instructions de l'écran de la machine.
5 Makinenin tüm parametrelerini sıfırlayıp fabrika ayarlarına geri döndürmek için bu seçeneği seçin. Sélectionnez cette option afin de revenir aux réglages usines de la machine.
6 Makineyi onarım amacıyla göndermeniz gerektiği durumda veya uzun süre kullanmayacağınız zaman makinenin içindeki suyu boşaltmak için bu seçeneği seçin.Makine ekranındaki talimatları takip edin. bu işlemden sonra makineyi 10 dakika boyunca kullanamayacaksınız. Sélectionnez cette option pour vidanger l'eau à l'intérieur de la machine au cas où vous auriez besoin de l'expédier pour réparation ou avant une longue période de non-utilisation. Suivez les instructions de l'écran de la machine. L'utilisation de la machine ne sera pas possible pendant 10 minutes après cette manipulation.
7 İçeceklerinizin hacmini (kahve fincanı, sıcak su ve sütlü karışımlar) programlamak için bu seçeneği seçin. Makine ekranındaki talimatları takip edin. Ayrıca, tüm içecek hacimlerini fabrika ayarlarına da geri döndürebilirsiniz. Sélectionnez cette option pour programmer la longueur de vos boissons (tasses de café, eau chaude et recettes à base de lait). Suivez les instructions de l'écran de la machine. De plus, vous pouvez aussi revenir aux réglages usines des longueurs de tasses.
8 Tüm makine ayarlarına tek bir bakışta erişmek için bu seçeneği seçin. Sélectionnez cette option pour accéder rapidement à tous les réglages machine.
9 Makinenizin genel durumunu kontrol etmek için bu seçeneği seçin. İlk kullanımdan itibaren (toplam) veya son kireç çözdürme işleminden (oransal) itibaren tüketim istatistikleri mevcuttur. Makinenin seri numarası da mevcuttur. Sélectionnez cette option afin de vérifier l'état général de votre machine. Les statistiques de consommations sont disponibles soit à partir de la première mise en service (totales), soit à partir du dernier détartrage (relatives). Le numéro de série de la machine est aussi accessible.
10 Her gün en iyi kalitede süt köpüğünün nasıl elde edileceği ile ilgili en iyi tavsiyeler için bu seçeneği seçin. bu özellik hakkında daha fazla bilgi için internet linki sunulmuştur. Sélectionnez cette option pour obtenir les meilleurs conseils pour réussir une qualité de mousse de lait optimale jour après jour. Le lien internet est fourni afin d'en connaitre plus sur cette fonctionnalité.
11 Menü listesinden çıkın ve makine hazır moduna geri dönün. Sortir de la liste du menu et revenir au mode «PRêTE» de votre machine.
1langueDİl
2DetartrageKİreÇ ÇÖZMe
3Durete eauSu SertlİĞİ
4arrêt autoMatiqueotoMatİK KaPanMa
5reglageS uSineFaBrİKa aYarlari
6viDer circuitSivi BoŞaltMa SİSteMİ
7voluMe Progr.HacİM Prog.
8inFo réglageSaYar BİlgİSİ
9MaintenanceBaKiM
10aiDe YarDiM
quitter ÇiKiŞ 11
25
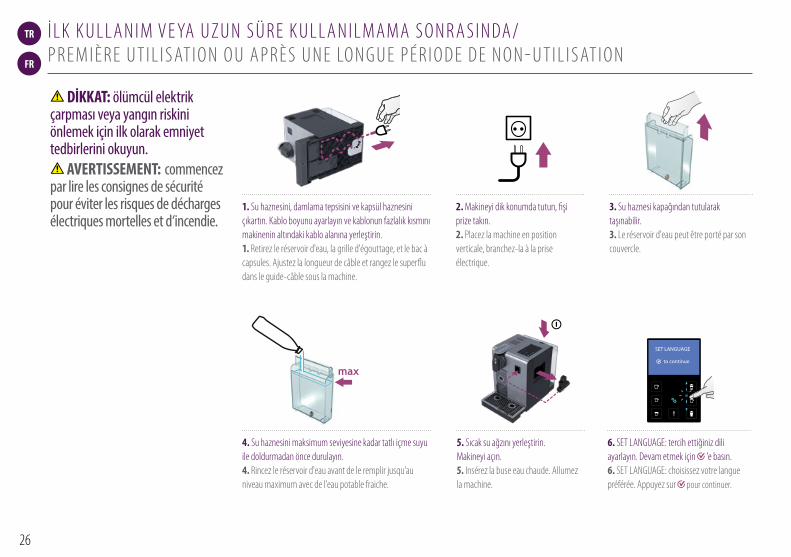
max
SET LANGUAGE
to continue
LANGUAGEActual value : EN
New value : [ ] to select
05
max
SET LANGUAGE
to continue
LANGUAGEActual value : EN
New value : [ ] to select
05
max
SET LANGUAGE
to continue
LANGUAGEActual value : EN
New value : [ ] to select
05
max
SET LANGUAGE
to continue
LANGUAGEActual value : EN
New value : [ ] to select
05
max
SET LANGUAGE
to continue
LANGUAGEActual value : EN
New value : [ ] to select
05
max
SET LANGUAGE
to continue
LANGUAGEActual value : EN
New value : [ ] to select
05
TR
FR
İ L k k U L L A N I M V E YA U z U N S ü R E k U L L A N I L MAMA S O N R A S I N DA/ P R E M I è R E U T I L I S AT I O N O U A P R è S U N E LO N G U E P é R I O D E D E N O N - U T I L I S AT I O N
DİkkAt: ölümcül elektrik çarpması veya yangın riskini önlemek için ilk olarak emniyet tedbirlerini okuyun.
AVeRtiSSement: commencez par lire les consignes de sécurité pour éviter les risques de décharges électriques mortelles et d‘incendie.
1. Su haznesini, damlama tepsisini ve kapsül haznesini çıkartın. kablo boyunu ayarlayın ve kablonun fazlalık kısmını makinenin altındaki kablo alanına yerleştirin. 1. Retirez le réservoir d'eau, la grille d'égouttage, et le bac à capsules. Ajustez la longueur de câble et rangez le superflu dans le guide-câble sous la machine.
5. Sıcak su ağzını yerleştirin. Makineyi açın. 5. Insérez la buse eau chaude. Allumez la machine.
2. Makineyi dik konumda tutun, fişi prize takın. 2. Placez la machine en position verticale, branchez-la à la prise électrique.
6. SET LANGUAGE: tercih ettiğiniz dili ayarlayın. Devam etmek için 'e basın. 6. SET LANGUAGE: choisissez votre langue préférée. Appuyez sur pour continuer.
3. Su haznesi kapağından tutularak taşınabilir. 3. Le réservoir d'eau peut être porté par son couvercle.
4. Su haznesini maksimum seviyesine kadar tatlı içme suyu ile doldurmadan önce durulayın. 4. Rincez le réservoir d'eau avant de le remplir jusqu'au niveau maximum avec de l'eau potable fraiche.
26

max
SET LANGUAGE
to continue
LANGUAGEActual value : EN
New value : [ ] to select
05
max
First read the safety precautions to avoid risks of fatal electrical shock and fire
Remove the plastic films from grid, lever and machine panels.
Remove the water tank, drip tray, and capsule container. Adjust the cable length and store the excess in the cable guide under the machine.
Put the machine in upright position, plug machine into mains.
The water tank can be carried by its cover.
Rinse the water tank before filling with potable water up to maximum level.
Insert the hot water spout. Switch machine ON
Set your preferred language.Press to continue.
SET LANGUAGE
to continue
Select your language by scrolling the options using up/down arrow. Press to confirm.
LANGUAGE
Actual value : EN
New value : [ ]
to select
Coffee preparation
x3x3
110 ml
40 ml
25 ml
05 06
4°15”
Assembling / disassembling of Rapid Cappuccino system (R.C.S)
07
TR
FR
7. LANGUAGE: okları ile kaydırma yaparak istediğiniz dili seçin. Onaylamak için 'e basın. 7. LANGUAGE: choisissez votre langue, faites défiler les options avec les . Appuyez sur pour confirmer.
İ L k k U L L A N I M V E YA U z U N S ü R E k U L L A N I L MAMA S O N R A S I N DA/ P R E M I è R E U T I L I S AT I O N O U A P R è S U N E LO N G U E P é R I O D E D E N O N - U T I L I S AT I O N
11. Hızlı Cappuccino Sistemi'ni (R.C.S.) çıkartın ve tüm bileşenleri bulaşık makinenizin üst sepetinde temizleyin. bulaşık makinesi olmaması durumunda, Hızlı Cappuccino Sistemi'nin (R.C.S.) elde yıkanması bölümüne bakınız. 11. Démontez le Rapid Cappuccino System (R.C.S.) et lavez tous les composants dans le panier supérieur de votre lave-vaisselle. Si vous ne disposez pas d'un lave-vaisselle, référez-vous à la section lavage à la main du Rapid Cappuccino System (R.C.S.).
Bİlgİ: hızlı Cappuccino Sistemi'nin Takılması /Çıkartılması bölümüne bakınız. infORmAtiOn: voir section Montage/Démontage du Rapid Cappuccino System.
10. Durulama: bu işlemi sıcak su çıkışında da üç defa tekrarlayın. İşlem bittiğinde, kabı alın ve makinenin sağ tarafında yer alan depolama alanına geri yerleştirin. buhar bağlantı kapağını kapatın. 10. Rinçage: répétez trois fois via la buse eau chaude. Une fois terminé, retirez-le et rangez le dans l'espace de rangement situé sur le côté droit de la machine. Fermez la porte d'accès au connecteur vapeur.
Bİlgİ: makineler üretildikten sonra tam bir testten geçmiştir. Durulama suyunda bir miktar kahve tozu bulunabilir.
infORmAtiOn: toutes nos machines sont entièrement testées après avoir été fabriquées. Des traces de poudre de café peuvent être visibles dans l'eau de rinçage.
9. Durulama: kahve çıkış ağzının altına bir kap koyun ve Lungo düğmesine basın. bu işlemi üç defa tekrarlayın. 9. Rinçage: placez un récipient sous la sortie café et appuyez sur la touche Lungo. Répétez trois fois cette opération.
8. 'ya basıldığında, makine ısınır. 8. Lorsque le symbole est appuyé, la machine chauffe.
27

max
First read the safety precautions to avoid risks of fatal electrical shock and fire
Remove the plastic films from grid, lever and machine panels.
Remove the water tank, drip tray, and capsule container. Adjust the cable length and store the excess in the cable guide under the machine.
Put the machine in upright position, plug machine into mains.
The water tank can be carried by its cover.
Rinse the water tank before filling with potable water up to maximum level.
Insert the hot water spout. Switch machine ON
Set your preferred language.Press to continue.
SET LANGUAGE
to continue
Select your language by scrolling the options using up/down arrow. Press to confirm.
LANGUAGE
Actual value : EN
New value : [ ]
to select
Coffee preparation
x3x3
110 ml
40 ml
25 ml
05 06
4°15”
Assembling / disassembling of Rapid Cappuccino system (R.C.S)
07
TR
FR
k A H V E H A z I R L AMA/P R é PA R AT I O N C A F é
H I z L I C A P P U CC I N O S İ S T E M İ'N İ N TA k I L MA S I/Ç I k A RT I L MA S I ( R.C.S .)/ M O N TAG E/D é M O N TAG E D U R A P I D C A P P U CC I N O S YS T E M ( R.C.S .)
1. kolu tamamen kaldırın ve bir Nespresso kapsülü yerleştirin. 1. Levez le levier complètement et insérez une capsule Nespresso.
2. kolu kapatın ve kahve çıkışının altına bir fincan yerleştirin. 2. Fermez le levier et placez une tasse sous la sortie café.
3. Ristretto (25 ml), Espresso (40 ml) veya Lungo (110 ml) düğmesine basın. Hazırlama işlemi otomatik olarak başlayacaktır. kahve akışını durdurmak veya kahvenizi tam doldurmak için tekrar basın. 3. Appuyez la touche Ristretto (25 ml), Espresso (40 ml) ou Lungo (110 ml). La préparation s'arrêtera automatiquement. Pour arrêter l'écoulement de votre café ou pour rallonger votre café, appuyez à nouveau.
4. Fincanı alın. kapsülü kullanılmış kapsül bölmesinden çıkartmak için kolu kaldırın ve kapatın. 4. Prenez la tasse. Levez et fermez le levier pour éjecter la capsule dans le bac à capsules usagées.
1. Süt haznesi kapağını açın ve süt çekme borusunu çıkartın. 1. Retirez le couvercle du réservoir à lait et retirez le tuyau d'aspiration de lait.
4. Süt çıkışını dışarı doğru çekerek çıkartın. 4. Retirez la buse à lait en la tirant.
2. Süt köpürtücü ayarlama düğmesini işaretine kadar döndürüp yukarı doğru çekerek çıkartın. 2. Retirez le bouton de réglage de mousse en le tournant jusqu'à et tirez-le.
3. Hızlı Cappuccino Sistemi bağlantısını işareti işaretinden işareti işaretine
getirerek kilidini açıp dışarı doğru çekerek çıkartın. 3. Retirez le connecteur du Rapid Cappuccino System en le déverrouillant de à et le tirant ensuite.
nOte: ısınma esnasında, herhangi bir kahve düğmesine basabilirsiniz. Makine hazır hale geldiğinde, kahve otomatik olarak akacaktır.
nOte: durant le chauffage de la machine, vous pouvez appuyer sur n'importe quelle touche café. Le café s'écoulera automatiquement dès que la machine sera prête.
28
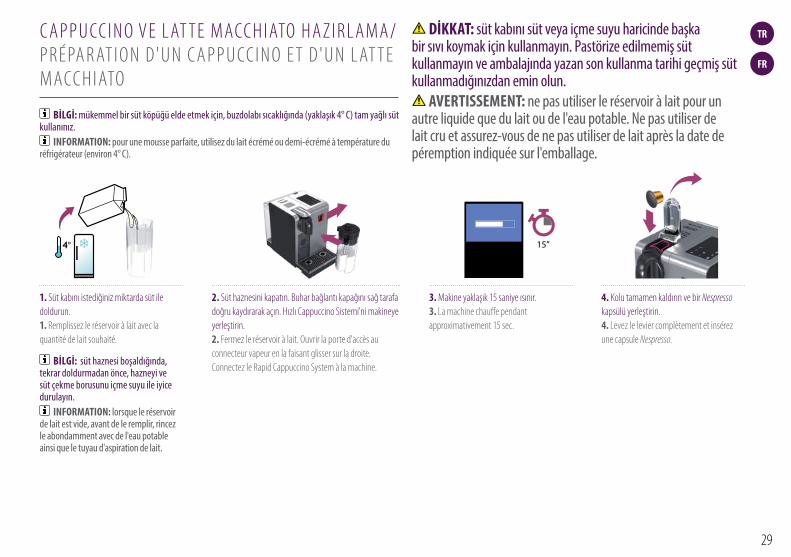
4°15”
Assembling / disassembling of Rapid Cappuccino system (R.C.S)
07
4°15”
Assembling / disassembling of Rapid Cappuccino system (R.C.S)
07
4°15”
Assembling / disassembling of Rapid Cappuccino system (R.C.S)
07
4°15”
Assembling / disassembling of Rapid Cappuccino system (R.C.S)
07
TR
FR
C A P P U CC I N O V E L AT T E MACC H I ATO H A z I R L AMA/ P R é PA R AT I O N D'U N C A P P U CC I N O E T D'U N L AT T E MACC H I ATO
1. Süt kabını istediğiniz miktarda süt ile doldurun. 1. Remplissez le réservoir à lait avec la quantité de lait souhaité.
2. Süt haznesini kapatın. buhar bağlantı kapağını sağ tarafa doğru kaydırarak açın. Hızlı Cappuccino Sistemi'ni makineye yerleştirin. 2. Fermez le réservoir à lait. Ouvrir la porte d'accès au connecteur vapeur en la faisant glisser sur la droite. Connectez le Rapid Cappuccino System à la machine.
3. Makine yaklaşık 15 saniye ısınır. 3. La machine chauffe pendant approximativement 15 sec.
4. kolu tamamen kaldırın ve bir Nespresso kapsülü yerleştirin. 4. Levez le levier complètement et insérez une capsule Nespresso.
DİkkAt: süt kabını süt veya içme suyu haricinde başka bir sıvı koymak için kullanmayın. Pastörize edilmemiş süt kullanmayın ve ambalajında yazan son kullanma tarihi geçmiş süt kullanmadığınızdan emin olun.
AVeRtiSSement: ne pas utiliser le réservoir à lait pour un autre liquide que du lait ou de l'eau potable. Ne pas utiliser de lait cru et assurez-vous de ne pas utiliser de lait après la date de péremption indiquée sur l'emballage.
Bİlgİ: mükemmel bir süt köpüğü elde etmek için, buzdolabı sıcaklığında (yaklaşık 4° C) tam yağlı süt kullanınız.
infORmAtiOn: pour une mousse parfaite, utilisez du lait écrémé ou demi-écrémé à température du réfrigérateur (environ 4° C).
Bİlgİ: süt haznesi boşaldığında, tekrar doldurmadan önce, hazneyi ve süt çekme borusunu içme suyu ile iyice durulayın.
infORmAtiOn: lorsque le réservoir de lait est vide, avant de le remplir, rincez le abondamment avec de l'eau potable ainsi que le tuyau d'aspiration de lait.
29

Preparing Cappuccino and Latte Macchiato
4°
i When the milk container is empty, before refilling, thoroughly rinse it and the milk aspiration tube with potable water.
Close the milk container. Open the steam connector door by sliding it to the right. Connect the Rapid Cappuccino System to the machine.
15”
+LATTE MACCHIATO
Clean
15”
i
Remove Rapid Cappuccino System connector by unlocking it from (sign ) to (sign) and pulling it off
Remove the milk container lid and unplug milk aspiration tube.
Remove the milk froth regulator knob by turning it until and pulling it up.
Remove the milk spout by pulling it off.
1 2 3 4
Assembling / disassembling of Rapid Cappuccino system (R.C.S)
RINSE MILK SYSTEM
07 08
TR
FR
C A P P U CC I N O V E L AT T E MACC H I ATO H A z I R L AMA/ P R é PA R AT I O N D'U N C A P P U CC I N O E T D'U N L AT T E MACC H I ATO
Bİlgİ: her kullanımdan sonra süt sistemini durulayın.
infORmAtiOn: rincez le système à lait après chaque utilisation.
9. Süt köpüğü ağzının altına bir kap yerleştirin. 9. Placez un récipient sous la buse à lait.
10. Süt ayarlama düğmesini döndürerek «CLEAN» konumuna getirin. Süt sistemi durulama işlemi başlar ve süt köpüğü ağzından buhar ile karışık sıcak su akar. 10. Tournez le bouton de réglage de mousse à lait sur la position «CLEAN». Le process de rinçage du système à lait démarre, de l'eau chaude et de la vapeur s'écoulent par la buse à lait.
11. Durulama işlemi yaklaşık 15 saniye sürer ve otomatik olarak durur. 11. Le process de rinçage dure environ 15 sec. et s'arrête automatiquement.
5. kolu kapatın ve kahve çıkışının altına bir Cappuccino fincanı veya Latte Macchiato bardağı yerleştirin ve süt köpüğü konumunu ayarlayın. 5. Fermez le levier, placez une tasse Cappuccino ou un verre à Latte Macchiato sous la sortie café et ajustez la position de la buse à lait.
6. Süt köpüğü ayarlama düğmesini istediğiniz köpük miktarına göre ayarlayın. 6. Ajustez le bouton de réglage de la mousse de lait au volume de mousse souhaité.
7. Cappuccino veya Macchiato düğmesine basın. birkaç saniye sonra hazırlama işlemi başlar (ilk önce süt, ardından kahve) ve otomatik olarak durur. 7. Appuyez la touche Cappuccino ou Macchiato. La préparation commence après quelques secondes (le lait en premier puis le café) et s'arrêtera automatiquement.
8. Hazırlama işlemi bitince, kullanılmış kapsül bölmesindeki kapsülü çıkartmak için kolu kaldırın ve kapatın. 8. Lorsque la préparation est terminée, levez et fermez le levier pour éjecter la capsule dans le bac à capsules usagées.
30

PRESS to confirm.The discaling agent flows alternately trough the coffee outlet, hot water nozzle and drip tray.
Descaling
Descaling process: Empty the drip tray and the used capsules container.
Rinsing process: Empty the drip tray and the used capsules container.
Refer to safety precautions
+100 ml500 ml
1 2 3
5 7 8
4
6
Lift and close the lever to eject any capsule in the used capsule container.
Descaling process: Fill water tank with 100 ml of Nespresso descaling agent and 500ml water.
Descaling process: Insert the hot water spout.
Enter the Menu, browse the options and select DESCALING. You will be guided throughout the whole process. Follow machine display instructions.
Descaling process: Place one container of minimum 1 litre under both the coffee outlet and the hot water spout.
4°
Volume factory settings
LANGUAGE
DESCALING
WATER HARDNESS
09 10
TR
FR
C A P P U CC I N O V E L AT T E MACC H I ATO H A z I R L AMA/ P R é PA R AT I O N D'U N C A P P U CC I N O E T D'U N L AT T E MACC H I ATO
12. Durulama işlemi bittiğinde, süt köpüğü ayarlama düğmesini yeniden süt konumuna getirin. 12. Une fois le rinçage terminé, tournez le bouton de réglage de mousse sur une position lait.
13. Hızlı Cappuccino Sistemi'ni (R.C.S.) makineden çıkartın ve zaman geçirmeden buz dolabına koyun. Makinenin buhar bağlantı kapağını kapatın. 13. Déconnectez le R.C.S. de la machine et placez-le de suite dans le réfrigérateur. Fermez la porte d'accès au connecteur vapeur.
15. Tüm bileşenleri bulaşık makinenizin üst sepetinde temizleyin. bulaşık makinesi olmaması durumunda, Hızlı Cappuccino Sistemi'nin elde yıkanması bölümüne bakınız. 15. Et lavez tous les composants dans le panier supérieur de votre lave-vaisselle. Si vous ne disposez pas d'un lave-vaisselle, référez-vous à la section lavage à la main du Rapid Cappuccino System (R.C.S.).
Bİlgİ: bakınız bölüm: «Hızlı Cappuccino Sistemi'nin (R.C.S.) Takılması/Çıkartılması».
infORmAtiOn: référez-vous à la section «Montage/Démontage du Rapid Cappuccino System (R.C.S.)».
DİkkAt: süt buzdolabında 2 günden fazla tutulmamalıdır. Süt haznesinin buzdolabı dışında 2 günden uzun süre tutulması durumunda, Hızlı Cappuccino Sistemi'ni (R.C.S.) parçalarına ayırın ve tüm bileşenleri temizleyin (Bulaşık makinesinde veya elde yıkama ile ilgili tavsiyelere bakın).
AVeRtiSSement: le lait ne doit pas être conservé plus de 2 jours dans le réfrigérateur. Si le réservoir à lait est conservé en dehors du réfrigérateur pendant plus de 2 heures, démontez le R.C.S. et nettoyez tous les composants (voir les recommandations de lavage au lave-vaisselle et lavage à la main).
14. Her iki günde bir, Hızlı Cappuccino Sistemi'nin parçalarını sökün. 14. Tous les deux jours, démontez le Rapid Cappuccino System.
31

PRESS to confirm.The discaling agent flows alternately trough the coffee outlet, hot water nozzle and drip tray.
Descaling
Descaling process: Empty the drip tray and the used capsules container.
Rinsing process: Empty the drip tray and the used capsules container.
Refer to safety precautions
+100 ml500 ml
1 2 3
5 7 8
4
6
Lift and close the lever to eject any capsule in the used capsule container.
Descaling process: Fill water tank with 100 ml of Nespresso descaling agent and 500ml water.
Descaling process: Insert the hot water spout.
Enter the Menu, browse the options and select DESCALING. You will be guided throughout the whole process. Follow machine display instructions.
Descaling process: Place one container of minimum 1 litre under both the coffee outlet and the hot water spout.
4°
Volume factory settings
LANGUAGE
DESCALING
WATER HARDNESS
09 10
TR
FR
2. kullanılmış kapsül haznesindeki kapsülü çıkartmak için kolu kaldırın ve kapatın. kahve çıkışının altına bir kap yerleştirin ve durulamak için Lungo düğmesine basın. kahve çıkışını temiz, nemli bir bez ile temizleyin. 2. Levez et fermez le levier pour éjecter la capsule dans le bac à capsules usagées. Placez un récipient sous la sortie café, appuyez sur la touche Lungo pour rincer. Nettoyez la sortie café à l'aide d'un chiffon propre et humide.
3. Sıcak su ağzındaki tüm kir artıklarını içme suyu ile dikkatli bir şekilde durulayın. Temiz, nemli bir bez ile temizleyin. 3. Rincez soigneusement sous l'eau potable tout résidu de saleté de la buse eau chaude. Nettoyez-le avec un chiffon propre et humide.
1. Hızlı Cappuccino Sistemi'nin parçalarını ayırın. bakınız bölüm: «Hızlı Cappuccino Sistemi'nin (R.C.S.) Takılması / Çıkartılması». 1. Démontez le Rapid Cappuccino System. Référez-vous à la section «Montage/Démontage du Rapid Cappuccino System (R.C.S.)».
2. Her türlü süt artığını içme suyu ile dikkatlice durulayın. 2. Rincez soigneusement tous les résidus de lait à l'eau potable.
3. Tüm bileşenleri en az 30 dakika süreyle sabunlu ılık suda (yaklaşık 40° C) bırakın. 3. Laissez tremper tous les composants dans de l'eau chaude (environ 40° C) mélangée à un détergent pendant minimum 30 minutes.
4. İçme suyu ile durulayın ve temiz, nemli bir bez ile kurutun. 4. Rincez à l'eau potable et essuyez-les à l'aide d'un chiffon propre.
G ü N Lü k b A k I M/E N T R E T I E N Q U OT I D I E N
Bİlgİ: güçlü temizlik maddeleri veya solventli temizleyiciler kullanmayın. Makinenin yüzeyini temizlemek için nemli bir bez ve yumuşak temizlik maddesi kullanın. Rapid Capuccino System bileşenleri haricindeki makine bileşenlerinin hiç birini bulaşık makinesine koymayın.
infORmAtiOn: n’utilisez pas des produits de nettoyage agressifs ou à base de solvants. Utilisez un chiffon humide et un agent nettoyant doux pour nettoyer la surface de la machine. Ne lavez aucun composant de la machine au lave-vaisselle, excepté les composants du Rapid Cappuccino System.
H I z L I C A P P U CC I N O S İ S T E M İ'N İ N E L D E Y I k A N MA S I ( R.C.S .)/ L AVAG E à L A MA I N D U R A P I D C A P P U CC I N O S YS T E M ( R.C.S .)
Bİlgİ: bulaşık makinesi olmadığında, Hızlı Cappuccino Sistemi (R.C.S.) Bileşenleri elde yıkanabilir. Bu durumda, maksimum verim için işlem her gün yapılmalıdır. infORmAtiOn: en l'absence de lave-vaisselle, les composants du R.C.S. peuvent être lavés à la main. Dans ce cas, le nettoyage doit être réalisé quotidiennement pour une meilleure efficacité.
1. Damlama tepsisini, kapsül bölmesini çıkartın. boşaltın ve durulayın. Su haznesini çıkartın. Taze içme suyu ile doldurmadan önce boşaltın, durulayın. 1. Retirez la grille d'égouttage et le bac à capsules. Videz-le et rincez-le. Retirez le réservoir d'eau. Videz-le, rincez-le avant de le remplir avec de l'eau potable fraiche.
32

PRESS to confirm.The discaling agent flows alternately trough the coffee outlet, hot water nozzle and drip tray.
Descaling
Descaling process: Empty the drip tray and the used capsules container.
Rinsing process: Empty the drip tray and the used capsules container.
Refer to safety precautions
+100 ml500 ml
1 2 3
5 7 8
4
6
Lift and close the lever to eject any capsule in the used capsule container.
Descaling process: Fill water tank with 100 ml of Nespresso descaling agent and 500ml water.
Descaling process: Insert the hot water spout.
Enter the Menu, browse the options and select DESCALING. You will be guided throughout the whole process. Follow machine display instructions.
Descaling process: Place one container of minimum 1 litre under both the coffee outlet and the hot water spout.
4°
Volume factory settings
LANGUAGE
DESCALING
WATER HARDNESS
09 10
TR
FR
nOt: * süt köpüğünün hacmi kullanılan sütün türüne, sıcaklığına ve süt ayarlayıcının konumuna bağlıdır.
nOte: *le volume de la mousse de lait dépend de la nature de lait utilisé, de sa température et de la position du bouton de réglage de mousse à lait.
nOt: her kahve türünde en iyi sonuçların alınmasını sağlamak amacıyla Ristretto, Espresso ve Lungo için fabrika ayarlarını korumanızı tavsiye ediyoruz.
nOte: nous vous recommandons de conserver les réglages usine pour le Ristretto, Espresso et Lungo afin d'assurer le meilleur résultat dans la tasse pour toutes nos variétés de cafés.
Su hacmi 50 - 400 ml arasında programlanabilir. Süt hacmi 30 - 200 ml arasında programlanabilir. Kahve hacmi 25 - 200 ml arasında programlanabilir.Le volume d'eau maximum peut être programmé de 50 à 400 ml. La volume de lait peut être programmé de 30 à 200 ml. Le volume de café peut être programmé de 25 à 200 ml.
H AC İ M FA b R İ k A AYA R L A R I/R é G L AG E S U S I N E
Ristretto 25 ml Ristretto 25 ml
Cappuccino Süt*: 50 ml/kahve: 40 ml Cappuccino Lait*: 50 ml/Café: 40 ml
Lungo 110 ml Lungo 110 ml
Latte Macchiato Süt*: 150 ml/kahve: 40 ml Latte Macchiato Lait*: 150 ml/Café: 40 ml
Espresso 40 ml Espresso 40 ml
Sıcak su 125 ml Eau chaude 125 ml
Ilık süt* 120 ml Lait chaud* 120 ml
DİkkAt: eğer 150 ml'nin üzerinde kahve hacimleri programlanırsa: bir sonraki kahveyi yapmadan önce makineyi 5 dakika soğumaya bırakın. Aşırı ısınma riski vardır!
AVeRtiSSement: si la quantité de café programmée excède 150 ml; laissez la machine refroidir pendant 5 minutes avant de préparer un autre café. Risque de surchauffe!
33
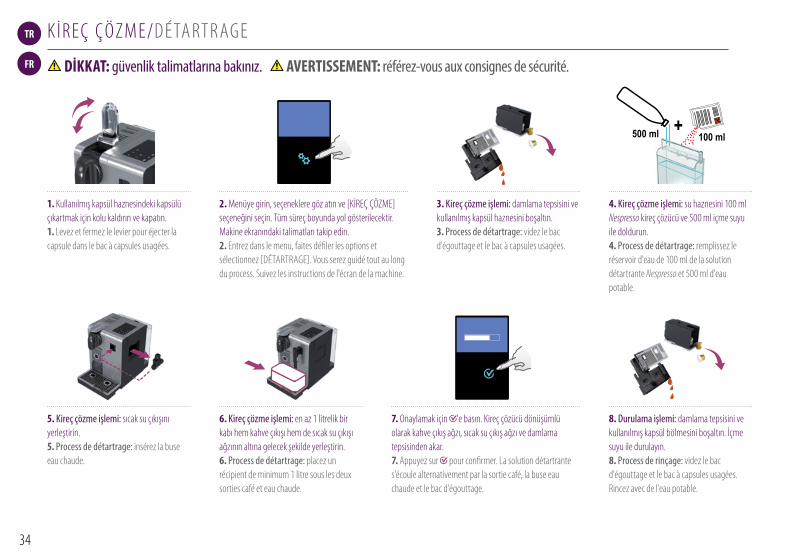
+100 ml500 ml
10
+100 ml500 ml
10
+100 ml500 ml
10
+100 ml500 ml
10
+100 ml500 ml
10
+100 ml500 ml
10
+100 ml500 ml
10
+100 ml500 ml
10
TR
FR
k İ R E Ç Çö z M E/D é TA RT R AG E
1. kullanılmış kapsül haznesindeki kapsülü çıkartmak için kolu kaldırın ve kapatın. 1. Levez et fermez le levier pour éjecter la capsule dans le bac à capsules usagées.
2. Menüye girin, seçeneklere göz atın ve [kİREÇ ÇözME] seçeneğini seçin. Tüm süreç boyunda yol gösterilecektir. Makine ekranındaki talimatları takip edin. 2. Entrez dans le menu, faites défiler les options et sélectionnez [DéTARTRAGE]. Vous serez guidé tout au long du process. Suivez les instructions de l'écran de la machine.
DİkkAt: güvenlik talimatlarına bakınız. AVeRtiSSement: référez-vous aux consignes de sécurité.
7. Onaylamak için 'e basın. kireç çözücü dönüşümlü olarak kahve çıkış ağzı, sıcak su çıkış ağzı ve damlama tepsisinden akar. 7. Appuyez sur pour confirmer. La solution détartrante s'écoule alternativement par la sortie café, la buse eau chaude et le bac d'égouttage.
5. Kireç çözme işlemi: sıcak su çıkışını yerleştirin. 5. Process de détartrage: insérez la buse eau chaude.
6. Kireç çözme işlemi: en az 1 litrelik bir kabı hem kahve çıkışı hem de sıcak su çıkışı ağzının altına gelecek şekilde yerleştirin. 6. Process de détartrage: placez un récipient de minimum 1 litre sous les deux sorties café et eau chaude.
3. Kireç çözme işlemi: damlama tepsisini ve kullanılmış kapsül haznesini boşaltın. 3. Process de détartrage: videz le bac d'égouttage et le bac à capsules usagées.
4. Kireç çözme işlemi: su haznesini 100 ml Nespresso kireç çözücü ve 500 ml içme suyu ile doldurun. 4. Process de détartrage: remplissez le réservoir d'eau de 100 ml de la solution détartrante Nespresso et 500 ml d'eau potable.
8. Durulama işlemi: damlama tepsisini ve kullanılmış kapsül bölmesini boşaltın. İçme suyu ile durulayın. 8. Process de rinçage: videz le bac d'égouttage et le bac à capsules usagées. Rincez avec de l'eau potable.
34

max
1”
1
2
3
4
5
11
max
1”
1
2
3
4
5
11
max
1”
1
2
3
4
5
11
max
1”
1
2
3
4
5
11
max
1”
1
2
3
4
5
11
max
1”
1
2
3
4
5
11
max
1”
1
2
3
4
5
11
max
1”
1
2
3
4
5
11
TR
FR
k İ R E Ç Çö z M E/D é TA RT R AG E
2. Su sertliği ölçüm çubuğunu 1 saniye süreye suda tutun. 2. Placez la bande test sous l'eau pendant 1 seconde.
11. Onaylamak için 'e basın. Durulama işlemi, su haznesi boşalana kadar, kahve çıkışı, sıcak su çıkışı ve damlama tepsisinde dönüşümlü olarak devam eder. 11. Appuyez sur pour confirmer. Le cycle de rinçage continue alternativement par la sortie café, la buse eau chaude et le bac d'égouttage jusqu'à ce que le réservoir soit vide.
3. kırmızı karelerin sayısı suyun sertlik seviyesini belirtir. 3. Le nombre de carrés rouges indique le niveau de dureté d'eau.
12. Durulama işlemi bittiğinde, makine kapanır. Sıcak su çıkışını durulayın ve nemli bir bez ile temizleyin. Artık makinenin kireç çözme işlemi bitmiştir. 12. Lorsque le process de rinçage est terminé, la machine s'éteint. Rincez la buse eau chaude et nettoyez-la à l'aide d'un chiffon propre. Vous avez maintenant terminé le détartrage de votre machine.
4. Değeri buna göre ayarlayın. 4. Régler la valeur en fonction.
S U S E RT L İ ğ İ AYA R I/R é G L AG E D E L A D U R E T é D'E AU
1. Menüye girin, seçeneklere göz atın ve [SU SERTLİğİ] seçeneğini seçin. Değeri ayarlamak için yol gösterilecektir. Makine ekranındaki talimatları takip edin. 1. Entrez dans le menu, faites défiler les options et sélectionnez [DURETé EAU]. Vous serez guidé pour régler la valeur. Suivez les instructions de l'écran de la machine.
9. Durulama işlemi: su haznesini durulayın ve MAkS seviyesine kadar içme suyu ile doldurun. 9. Process de rinçage: rincez le réservoir d'eau et remplissez-le d'eau potable jusqu'au niveau MAx.
10. Durulama işlemi: en az 1 litrelik bir kabı hem kahve çıkışı hem de sıcak su çıkışının altına gelecek şekilde yerleştirin. 10. Process de rinçage: placez un récipient de minimum 1 litre sous les deux sorties café et eau chaude.
35

TR
FR
S O R U N G I D E R M E
Ekranda ışık yok.➔ Elektrik prizini, fişi, gerilimi ve sigortayı kontrol edin. Makine ekranının arka tarafında yer
alan ON düğmesine basın. Sorun olması halinde, Nespresso Club'ı arayın.
Ekranda makine çok sıcak mesajı görünüyor.➔ bazı koşullarda, makine ısıtıcısı yüksek sıcaklıklara ulaşır (örn; sıvı sisteminin
boşaltılmasından sonra). Sadece bekleyin, makine otomatik olarak soğuyacaktır.
kahve çok yavaş akıyor.➔ Akış hızı kahve türüne bağlıdır.➔ Eğer gerekirse kireç çözme işlemini uygulayın; bunun için kireç Çözme bölümüne bakın.
kahve yeteri kadar sıcak değil.➔ Fincanı önceden ısıtın.➔ Eğer gerekirse kireç çözme işlemini uygulayın; bunun için kireç Çözme bölümüne bakın.
kapsül alanında sızıntı var (kapsül bölmesinde su). ➔ kapsülü düzgün yerleştirin. Sızıntı olması halinde, Nespresso Club'ı arayın.
Işık düzensiz yanıp sönüyor. ➔ Cihazı onarıma gönderin veya Nespresso Club'ı arayın.kahve yok, sadece su akıyor (kapsül yerleştirilmesine rağmen).
➔ Sorun olması halinde, Nespresso Club'ı arayın.
kol tamamen kapatılamıyor. ➔ boş kapsül haznesinde kapsül sıkışmadığından emin olun.
Süt köpüğünün kalitesi standarda uygun değil.
➔ Mükemmel bir süt köpüğü elde etmek için, buzdolabı sıcaklığında (yaklaşık 4° C) tam yağlı süt kullanılması tavsiye edilir.
➔ Sütle yapılan her uygulamanın ardından durulayın. Süt çıkışının altına bir kap yerleştirin, süt ayarlama düğmesini «CLEAN» konumuna gelene kadar döndürün.
➔ İki günde bir, Hızlı Cappuccino Sistemi'nin (R.C.S.) parçalarını sökün ve tüm bileşenleri bulaşık makinesinin üst sepetinde temizleyin.
Ekranda makinenin onarıma ihtiyacı var mesajı görünüyor. ➔ İnceleme, onarım veya ayarlama için, Nespresso Club ile iletişime geçin.
36

TR
FR
D é PA N N AG E
latissima proEUR,AUS,NZ: 220240 V, 50/60 Hz, 1300 W
US/CA: 120 V, 60 Hz, 1200 W
19 bar
6.5 kg
1,38 litre
500 ml
13-16 capsules
l=19,4 cm . L=33,2 cm . h=27,4 cm
Troubleshooting
Contact the Nespressso Club
For any additional information, in case of problems or simply to seek advise, call the Nespresso Club. Contact details of the Nespresso Club can be found in the 'Welcome to Nespresso' folder in your machine box or at nespresso.com
No light on displayCheck the mains, plug, voltage, and fuse. In case of problems, call the Nespresso Club.
Coffee comes out very slowly.Flow speed depends on the coffee variety.Perform a self check of the machine. Enter the menu list and select Maintenance. Follow instruction
Coffee is not hot enough.Preheat cup.Perform a self check of the machine. Enter the menu list and select Maintenance. Follow instruction
Capsule area is leaking (water in capsule container). Position capsule correctly. If leakages occur, call the Nespresso Club.
Irregular blinking.Send appliance to repair or call the Nespresso Club.
No coffee, just water runs out (despite inserted capsule).In case of problems, call the Nespresso Club.
Lever cannot be closed completelyEmpty capsule container. Make sure that no capsule is blocked inside the capsule container.
Quality of milk froth is not up to standard1) For a perfect milk froth, use skimmed or semi-skimmed milk at refrigerator temperature (about 4° C)2) Rinse after each milk based preparation. Place a recipient under milk outlet, rotate the milk regulator knob until “CLEAN” position.3) Every two days, disassemble the R. C. S. and clean all components in the upper level of a dishwasher
Warranty
Delonghi warrants this product against defects in materials and workmanship for a period of two years from the date of purchase. During this period, Delonghi will either repair or replace, at its discretion, any defective product at no charge to the owner. Replacement products or repaired parts will be guaranteed for only the unexpired portion of the original warranty or six months, whichever is greater. This limited warranty does not apply to any defect resulting from accident, misuse, improper maintenance, or normal wear and tear. Any defect resulting from the usage of non genuine Nespresso capsules will not be covered by this warranty. Except to the extent allowed by applicable law, the terms of this limited warranty do not exclude, restrictor modify, and are in addition to, the mandatory statutory rights applicable to the sale of the product to you. If you believe your product is defective, contact Nespresso for instructions on where to send or bring it for repair. Please visit our website at nespresso.com to discover more about Nespresso
Specifications
Pmax
Once the rinsing process is finished, the machine switches off. Clean the machine using a damp cloth. You have now finished descaling the machine.
9 10 11 12Rinsing process Rinse and fill water with fresh potable water up to MAX level.
Rinsing process Place one container of minimum 1 litre under both the coffee outlet and the hot water spout.
PRESS to confirm.The rinsing cycle continues trough the coffee outlet, hot water spout and drip tray until the water tank is empty.
Water hardness setting
1
programmed buttons blinks 3 times: water hardness is seti
1”2 3 4
1
2
3
4
5
Place the water hardness sticker under water for 1 second.
The number of red squares indicates the water harness level.
Set the value accordinglyEnter the menu, browse the options and select WATER HARDNESS.You will be guided to set the value.Follow machine display instructions.
max
max
Kg
11 12
euR, AuS, nZ: 220-240 V, 50/60 Hz, 1300 wEUR,AUS,NZ: 220240 V, 50/60 Hz, 1300 W
US/CA: 120 V, 60 Hz, 1200 W
19 bar
6.5 kg
1,38 litre
500 ml
13-16 capsules
l=19,4 cm . L=33,2 cm . h=27,4 cm
Troubleshooting
Contact the Nespressso Club
For any additional information, in case of problems or simply to seek advise, call the Nespresso Club. Contact details of the Nespresso Club can be found in the 'Welcome to Nespresso' folder in your machine box or at nespresso.com
No light on displayCheck the mains, plug, voltage, and fuse. In case of problems, call the Nespresso Club.
Coffee comes out very slowly.Flow speed depends on the coffee variety.Perform a self check of the machine. Enter the menu list and select Maintenance. Follow instruction
Coffee is not hot enough.Preheat cup.Perform a self check of the machine. Enter the menu list and select Maintenance. Follow instruction
Capsule area is leaking (water in capsule container). Position capsule correctly. If leakages occur, call the Nespresso Club.
Irregular blinking.Send appliance to repair or call the Nespresso Club.
No coffee, just water runs out (despite inserted capsule).In case of problems, call the Nespresso Club.
Lever cannot be closed completelyEmpty capsule container. Make sure that no capsule is blocked inside the capsule container.
Quality of milk froth is not up to standard1) For a perfect milk froth, use skimmed or semi-skimmed milk at refrigerator temperature (about 4° C)2) Rinse after each milk based preparation. Place a recipient under milk outlet, rotate the milk regulator knob until “CLEAN” position.3) Every two days, disassemble the R. C. S. and clean all components in the upper level of a dishwasher
Warranty
Delonghi warrants this product against defects in materials and workmanship for a period of two years from the date of purchase. During this period, Delonghi will either repair or replace, at its discretion, any defective product at no charge to the owner. Replacement products or repaired parts will be guaranteed for only the unexpired portion of the original warranty or six months, whichever is greater. This limited warranty does not apply to any defect resulting from accident, misuse, improper maintenance, or normal wear and tear. Any defect resulting from the usage of non genuine Nespresso capsules will not be covered by this warranty. Except to the extent allowed by applicable law, the terms of this limited warranty do not exclude, restrictor modify, and are in addition to, the mandatory statutory rights applicable to the sale of the product to you. If you believe your product is defective, contact Nespresso for instructions on where to send or bring it for repair. Please visit our website at nespresso.com to discover more about Nespresso
Specifications
Pmax
Once the rinsing process is finished, the machine switches off. Clean the machine using a damp cloth. You have now finished descaling the machine.
9 10 11 12Rinsing process Rinse and fill water with fresh potable water up to MAX level.
Rinsing process Place one container of minimum 1 litre under both the coffee outlet and the hot water spout.
PRESS to confirm.The rinsing cycle continues trough the coffee outlet, hot water spout and drip tray until the water tank is empty.
Water hardness setting
1
programmed buttons blinks 3 times: water hardness is seti
1”2 3 4
1
2
3
4
5
Place the water hardness sticker under water for 1 second.
The number of red squares indicates the water harness level.
Set the value accordinglyEnter the menu, browse the options and select WATER HARDNESS.You will be guided to set the value.Follow machine display instructions.
max
max
Kg
11 12
max/max. 19 bar
EUR,AUS,NZ: 220240 V, 50/60 Hz, 1300 W
US/CA: 120 V, 60 Hz, 1200 W
19 bar
6.5 kg
1,38 litre
500 ml
13-16 capsules
l=19,4 cm . L=33,2 cm . h=27,4 cm
Troubleshooting
Contact the Nespressso Club
For any additional information, in case of problems or simply to seek advise, call the Nespresso Club. Contact details of the Nespresso Club can be found in the 'Welcome to Nespresso' folder in your machine box or at nespresso.com
No light on displayCheck the mains, plug, voltage, and fuse. In case of problems, call the Nespresso Club.
Coffee comes out very slowly.Flow speed depends on the coffee variety.Perform a self check of the machine. Enter the menu list and select Maintenance. Follow instruction
Coffee is not hot enough.Preheat cup.Perform a self check of the machine. Enter the menu list and select Maintenance. Follow instruction
Capsule area is leaking (water in capsule container). Position capsule correctly. If leakages occur, call the Nespresso Club.
Irregular blinking.Send appliance to repair or call the Nespresso Club.
No coffee, just water runs out (despite inserted capsule).In case of problems, call the Nespresso Club.
Lever cannot be closed completelyEmpty capsule container. Make sure that no capsule is blocked inside the capsule container.
Quality of milk froth is not up to standard1) For a perfect milk froth, use skimmed or semi-skimmed milk at refrigerator temperature (about 4° C)2) Rinse after each milk based preparation. Place a recipient under milk outlet, rotate the milk regulator knob until “CLEAN” position.3) Every two days, disassemble the R. C. S. and clean all components in the upper level of a dishwasher
Warranty
Delonghi warrants this product against defects in materials and workmanship for a period of two years from the date of purchase. During this period, Delonghi will either repair or replace, at its discretion, any defective product at no charge to the owner. Replacement products or repaired parts will be guaranteed for only the unexpired portion of the original warranty or six months, whichever is greater. This limited warranty does not apply to any defect resulting from accident, misuse, improper maintenance, or normal wear and tear. Any defect resulting from the usage of non genuine Nespresso capsules will not be covered by this warranty. Except to the extent allowed by applicable law, the terms of this limited warranty do not exclude, restrictor modify, and are in addition to, the mandatory statutory rights applicable to the sale of the product to you. If you believe your product is defective, contact Nespresso for instructions on where to send or bring it for repair. Please visit our website at nespresso.com to discover more about Nespresso
Specifications
Pmax
Once the rinsing process is finished, the machine switches off. Clean the machine using a damp cloth. You have now finished descaling the machine.
9 10 11 12Rinsing process Rinse and fill water with fresh potable water up to MAX level.
Rinsing process Place one container of minimum 1 litre under both the coffee outlet and the hot water spout.
PRESS to confirm.The rinsing cycle continues trough the coffee outlet, hot water spout and drip tray until the water tank is empty.
Water hardness setting
1
programmed buttons blinks 3 times: water hardness is seti
1”2 3 4
1
2
3
4
5
Place the water hardness sticker under water for 1 second.
The number of red squares indicates the water harness level.
Set the value accordinglyEnter the menu, browse the options and select WATER HARDNESS.You will be guided to set the value.Follow machine display instructions.
max
max
Kg
11 12
~ 6.5 kg
1.3 litre/litre
0.5 litre/litre
13-16 kapsül/capsules
19.4 cm 27.4 cm 33.2 cm
öZellİkleR/SpéCifiCAtiOnS
Pas de lumière sur l'écran.➔ Vérifiez la prise, la fiche, la tension et fusible. Appuyez sur le bouton ON situé à l'arrière de
l'écran de la machine. En cas de problèmes, appelez le Club Nespresso.
L'écran indique «Machine trop chaude».➔ Dans certains cas, le système de chauffe de la machine atteint des hautes températures
(i.e. Après la vidange du circuit d'eau de la machine). Patientez simplement, la machine se refroidit automatiquement.
Le café s'écoule très lentement.➔ L'écoulement dépend de la variété de café.➔ Détartrez si nécessaire: voir le paragraphe Détartrage.
Le café n'est pas assez chaud.➔ Préchauffez la tasse.➔ Détartrez si nécessaire: voir le paragraphe Détartrage.
La cage à capsule fuit (de l'eau s'écoule directement dans le bac à capsules).
➔ Positionnez correctement la capsule. Si les fuites continuent, appelez le Club Nespresso.
Clignotement irrégulier. ➔ Envoyez votre appareil en réparation ou appelez le Club Nespresso.Aucun café ne s'écoule, uniquement de l'eau (bien qu'une capsule ait été introduite).
➔ En cas de problèmes, appelez le Club Nespresso.
Le levier ne peut pas être fermé complètement. ➔ Videz le bac à capsules. Vérifiez qu'aucune capsule n'est coincée dans le bac à capsules.
La qualité de la mousse de lait n'est pas conforme aux standards.
➔ Pour une parfaite mousse de lait, utilisez du lait écrémé ou demi-écrémé à température du réfrigérateur (environ 4° C).
➔ Rincez après chaque préparation à base de lait. Placez un récipient sous la buse à lait, tournez le bouton de réglage de la mousse de lait sur la position «CLEAN».
➔ Tous les deux jours, démontez le R.C.S. et lavez tous les composants dans le panier supérieur de votre lave-vaisselle.
L'écran affiche que la machine nécessite une réparation.➔ Contactez le Club Nespresso ou un représentant agréé pour un diagnostic, une réparation
ou un réglage.
37

TR
FR
Sorun olması halinde veya sadece tavsiye almak amacıyla, her türlü ilave bilgi için, Nespresso Club'ı arayın. Nespresso Club'ın iletişim bilgileri makineninizn kutusundan çıkan «Nespresso'ya Hoş Geldiniz» klasöründen veya nespresso.com adresinden bulunabilir.
Pour de plus amples informations, en cas de problème ou simplement pour demander des conseils, appelez le Club Nespresso. Les coordonnées du Club Nespresso sont indiquées dans la pochette de bienvenue chez Nespresso dans le carton de votre machine ou sur www.nespresso.com
N E S P R E S S S O C LU b İ L E İ L E T İ ş İ M E G E Ç İ N/CO N TAC T E z L E C LU b N E S P R E S S O
İ M H A E TM E V E E kO LOj İ k k AYG I L A R/M I S E AU R E b U T E T P R OT E C T I O N D E L'E N V I R O N N E M E N T
İmha etme ve Çevre koruma Cihazınız geri kazanılabilen veya geri dönüştürülebilen değerli maddeler içerir. kalan atık maddelerin farklı türlere ayrılması değerli ham maddelerin geri dönüşümünü kolaylaştırır. Cihazı bir toplama noktasına bırakın.İmha etme konusundaki bilgileri yerel yetkililerden alabilirsiniz.
mise au rebut et protection de l'environnement Votre appareil contient des matériaux précieux qui peuvent être récupérés ou recyclés. La séparation des déchets restants, en différentes catégories, facilite le recyclage des matières premières précieuses. Laissez votre appareil à un point de collecte. Vous pouvez obtenir des renseignements sur l’évacuation des déchets auprès de vos autorités locales.
38

TR
FR
S I N I R L I G A R A N T İ/G A R A N T I E
Nespresso 2 yıl süreyle malzeme ve işçiliklerden kaynaklanan her türlü kusura karşı bu ürünün garantisini verir. Garanti süresi satın alma tarihinde başlar ve tarihi ortaya çıkarmak için Nespresso'ya orijinal satış belgesini sunulması gerekir. Garanti süresince Nespresso, arızalı ürünleri, satın alana hiç bir ücret ödetmeden, sorumluluğu sadece kendisinde olacak şekilde onaracak veya yenisiyle değiştirecektir. Değiştirilen ürünler veya onarılan parçalar orijinal garantinin kalan süresi boyunca veya altı ay süreyle (hangisi daha uzunsa) garantili olacaktır. bu sınırlı garanti, ihmal, kaza, katalı kullanım veya Nespresso'nun kontrolü dışındaki başka bir nedenle ortaya çıkan bir hasarda geçerli değildir. bunlara normal aşınma ve yıpranma, ihmal veya ürün talimatlarına uyulmaması, uygun olmayan veya hatalı bakım, kireç birikmesi veya kireç çözme, uygun olmayan elektrik bağlantısı, yetkili olmayanlar tarafından üründe değişiklik veya onarım yapılması, ticari amaçlara kullanım, yangın, yıldırım düşmesi, sel veya harici nedenler dahildir ancak sadece bunlarla sınırlı değildir. bu garanti, sadece satın alınan ülkede veya Nespresso'nun aynı teknik özelliklere sahip aynı modeli sattığı veya bakım-onarımını yaptığı diğer ülkelerde geçerlidir. Satın alınan ülke dışındaki garanti hizmeti, o ülkedeki ilgili garanti şartları koşulları ile sınırlıdır. Onarım veya değiştirme ücretinin bu garantiye dahil olmaması durumunda, Nespresso ürünün sahibine haber verecek ve ücret ürünün sahibinden alınacaktır. bu sınırlı garantinin sorumluluğu, nedeni ne olursa olsun tamamen Nespresso'ya ait olacaktır. Yürürlükteki kanunlarca izin verilen kapsamlar haricinde, bu sınırlı garantinin şartları, bu ürünün satışında yürürlükte olan ve bunlara ek olan zorunlu yasal hakları hariç tutmaz, sınırlamaz veya değiştirmez. bu sınırlı garanti sadece tek markalı Nespresso ürünü için geçerlidir. Nespresso markası ile birlikte diğer üreticilerin markalarının yer aldığı ürünler diğer üreticinin sunduğu garanti kapsamındadır. Eğer ürününüzün hatalı olduğuna inanıyorsanız, onarımla ilgili talimatlar için Nespresso ile iletişim kurun. Orijinal olmayan Nespresso kapsüllerinin kullanımı sonucunda oluşan her türlü kusur veya işlev bozukluğu bu garanti kapsamı dışındadır. İletişim bilgileri için lütfen www.nespresso.com adresindeki web sitemizi ziyaret edin.
Nespresso garantit ce produit contre les défauts de matériels et de fabrication pour une période de deux années. La période de garantie commence à la date d’achat et Nespresso exige la présentation de la preuve originale d’achat pour en constater la date. Durant la période de garantie, Nespresso réparera ou remplacera, à sa discrétion, tout produit défectueux sans frais pour le propriétaire. Les produits échangés et les pièces réparées seront garantis uniquement pendant la durée restante de la garantie originale ou durant six mois, l’échéance la plus lointaine faisant foi. Cette garantie limitée ne s’applique pas à tout défaut résultant d’une négligence, d’un accident, d’une utilisation inadaptée ou de toute autre raison hors du contrôle raisonnable de Nespresso, y compris mais sans s’y limiter : l’usure normale, la négligence ou le non-respect du mode d’emploi du produit, l’entretien inadapté ou inadéquat, les dépôts calcaires ou le détartrage, le branchement à une sortie électrique inadaptée, la modification ou la réparation non autorisée du produit, l’utilisation à des fins commerciales, les dommages causés par le feu, la foudre, les inondations ou toute autre cause extérieure. Cette garantie n’est valable que dans le pays où l’appareil a été acheté et dans les pays où Nespresso vend et assure l’entretien du même modèle avec des caractéristiques techniques identiques. Le service de garantie hors du pays d’achat se limite aux conditions de la garantie correspondante dans le pays où l’entretien est effectué. Si le coût des réparations ou de remplacement n’est pas couvert par cette garantie, Nespresso informera le propriétaire qui devra honorer ces frais. Cette garantie limitée constituera l’intégralité de la responsabilité de Nespresso, quelque soit la cause. Les conditions de la présente garantie limitée s’ajoutent aux droits statutaires obligatoires applicables à la vente du produit et ne les excluent, ni ne les restreignent ou modifient en rien, sauf dans les limites autorisées par la loi. La garantie limitée ne s’applique qu’à ce produit de marque exclusive Nespresso. Les produits de marque Nespresso et d’autres fabricants sont régis par la garantie fournie par l’autre fabricant exclusivement. Si vous pensez que votre produit est défectueux, veuillez contacter Nespresso pour obtenir des renseignements concernant la marche à suivre pour le faire réparer. Tous défauts ou dysfonctionnement résultant de l’utilisation de capsules non authentifiées Nespresso ne seront pas couverts par cette garantie. Veuillez consulter notre site Internet au www.nespresso.com pour obtenir les coordonnées de contact.
39

AR
19

AR
إذا احتجت إلى أي معلومات إضافية، أو في حالة حدوث مشاكل أو لمجرد طلب النصح، اتصل بنادي نسبريسو. www.nespresso.com يمكنك االطالع على تفاصيل االتصال الخاصة بنادي نسبريسو في مجلد »مرحبا بكم في عالم نسبريسو« الموجود في صندوق الماكينة أو على موقع
اتصل بنادي نسبريسو
الكفالة
التخلص من النفايات وحماية البيئةالتخلص من النفايات وحماية البيئة
تحتوي الماكينة على مواد قيمة يمكن استردادها أو إعادة تدويرها.إن فصل النفايات المتبقية حسب أنواعها المختلفة يسهل عملية إعادة تدوير المواد الخام القيمة.
اترك الماكينة عند نقاط التجميع.يمكنك الحصول على معلومات عن كيفية التخلص من النفايات من السلطات المحلية.
تضمن نسبريسو هذا المنتج ضد عيوب المواد والعيوب الصناعية لمدة سنة واحدة. تبدأ فترة الضمان من تاريخ الشراء، وتطلب نسبريسو تقديم إثبات شراء أصلي للتأكد من التاريخ. خالل فترة الضمان، تقوم نسبريسو حسب تقديرها بإصالح أو استبدال أي منتج معطل مجانا. سيتم ضمان القطع أو األجزاء التي يتم تبديلها أو إصالحها طيلة المدة المتبقية من الضمان األصلي أو ستة أشهر، أيهما أطول. ال ينطبق هذا الضمان المحدود على أي عيوب ناتجة عن اإلهمال أو الحوادث أو سوء االستخدام، أو ألسباب أخرى خارجة
عن حدود سيطرة نسبريسو المعقولة، بما يشمل على سبيل المثال ال الحصر: التلف أو البلى الطبيعي، اإلهمال أو عدم اتباع تعليمات المنتج، الصيانة غير الالئقة أو غير الكافية، بقايا الكالسيوم أو الترسبات؛ توصيل الماكينة إلى تيار كهربائي غير مناسب، إجراء تعديل أو إصالح غير مرخص، استخدام الماكينة ألغراض تجارية، الحريق أو الفيضان
أو أسباب خارجية أخرى. يسري هذا الضمان في بلد الشراء فقط أو في بلدان أخرى حيث تبيع نسبريسو وتقدم خدماتها للطراز نفسه مع مواصفات فنية مطابقة. تخضع خدمة الضمان خارج بلد الشراء لشروط وظروف الضمان المقابلة في البلد الذي يتم تقديم الخدمة فيه. إذا لم تكن تكاليف التصليح أو االستبدال مغطاة بالضمان، ستقوم
ب عليه تحمل تكاليف اإلصالح. يمثل هذا الضمان المحدود أقصى ما يمكن أن تلتزم به نسبريسو مهما كان سبب الضرر. بخالف ما تسمح نسبريسو بإخبار المالك الذي سيتوجبه القوانين المعمول بها، فإن شروط هذا الضمان المحدود ال تستبعد أو تقيد أو تعدل الحقوق القانونية اإللزامية المطبقة على بيع هذا المنتج لك، بل تضاف إلى تلك القوانين.
هذا الضمان المحدود ينطبق فقط على منتج نسبريسو هذا والذي ال يحمل أي عالمة تجارية أخرى. تخضع المنتجات التي تحمل عالمة نسبريسو التجارية باإلضافة إلى العالمة التجارية لشركة أخرى لوثيقة الضمان التي تقدمها الجهة المنتجة األخرى على وجه الحصر. إذا كنت تعتقد أن المنتج الخاص بك معطل، قم باالتصال بنسبريسو للحصول على
تعليمات حول كيفية المضي قدما في عملية اإلصالح. لن يغطي الضمان أي عطل أو خلل ينتج عن استخدام كبسوالت نسبريسو غير أصلية. لمزيد من التفاصيل، يرجى زيارة www.nespresso.com موقعنا
18

AR
تحقق من التوصيالت الكهربائية، المأخذ الكهربائي، التيار الكهربائي والقاطع الكهربائي. اضغط على زر التشغيل الموجود خلف شاشة
الماكينة. في حالة حدوث مشاكل، اتصل بنادي نسبريسو.ال وجود ألضواء على الشاشة.
في ظروف معينة، يصل سخان الماكينة إلى درجة حرارة عالية )أي بعد إفراغ نظام السوائل(. انتظر قليال وستبرد الماكينة تلقائيا.
ظهور رسالة بارتفاع درجة حرارة الماكينة على الشاشة.
تعتمد سرعة تدفق القهوة على نوع القهوة.تخرج القهوة ببطء. قم بإجراء عملية إزالة الترسبات. راجع قسم إزالة الترسبات.
سخن الكوب مسبقا.القهوة ليست ساخنة بشكل كاف. قم بإجراء عملية إزالة الترسبات. راجع قسم إزالة الترسبات.
ضع الكبسولة بوضع صحيح.في حالة حدوث تسرب، اتصل بنادي نسبريسو.
هناك تسرب عند منطقة الكبسولة )يوجد ماء في حاوية الكبسوالت(.
وميض غير منتظم. أرسل الماكينة للتصليح أو اتصل بنادي نسبريسو.
يخرج الماء فقط بدون قهوة )رغم إدخال في حالة حدوث مشاكل، اتصل بنادي نسبريسو.كبسولة(.
أفرغ حاوية الكبسوالت.تأكد من عدم وجود أي كبسولة عالقة داخل حاوية الكبسوالت. ال يمكن إغالق المقبض كليا.
للحصول على رغوة حليب مثالية، استخدم الحليب قليل الدسم أو منزوع الدسم بدرجة حرارة البراد )حوالي 4 درجات مئوية(.
اغسل الماكينة بعد كل عملية تحضير لوصفات الحليب.ضع وعاء تحت فوهة الحليب، وأدر مقبض منظم الحليب إلى
."Clean" الوضعية كل يومين، فك نظام الكابوتشينو السريع، واغسل جميع األجزاء في
القسم العلوي من غسالة الصحون.
جودة رغوة الحليب ليست جيدة كما ينبغي.
اتصل بنادي نسبريسو أو وكيل نسبريسو الحصري للفحص أو اإلصالح أو التعديل.
ظهور رسالة على الشاشة بضرورة تصليح الماكينة.
المواصفات اكتشاف األعطال وإصالحهاlatissima pro
EUR,AUS,NZ: 220240 V, 50/60 Hz, 1300 W
US/CA: 120 V, 60 Hz, 1200 W
19 bar
6.5 kg
1,38 litre
500 ml
13-16 capsules
l=19,4 cm . L=33,2 cm . h=27,4 cm
Troubleshooting
Contact the Nespressso Club
For any additional information, in case of problems or simply to seek advise, call the Nespresso Club. Contact details of the Nespresso Club can be found in the 'Welcome to Nespresso' folder in your machine box or at nespresso.com
No light on displayCheck the mains, plug, voltage, and fuse. In case of problems, call the Nespresso Club.
Coffee comes out very slowly.Flow speed depends on the coffee variety.Perform a self check of the machine. Enter the menu list and select Maintenance. Follow instruction
Coffee is not hot enough.Preheat cup.Perform a self check of the machine. Enter the menu list and select Maintenance. Follow instruction
Capsule area is leaking (water in capsule container). Position capsule correctly. If leakages occur, call the Nespresso Club.
Irregular blinking.Send appliance to repair or call the Nespresso Club.
No coffee, just water runs out (despite inserted capsule).In case of problems, call the Nespresso Club.
Lever cannot be closed completelyEmpty capsule container. Make sure that no capsule is blocked inside the capsule container.
Quality of milk froth is not up to standard1) For a perfect milk froth, use skimmed or semi-skimmed milk at refrigerator temperature (about 4° C)2) Rinse after each milk based preparation. Place a recipient under milk outlet, rotate the milk regulator knob until “CLEAN” position.3) Every two days, disassemble the R. C. S. and clean all components in the upper level of a dishwasher
Warranty
Delonghi warrants this product against defects in materials and workmanship for a period of two years from the date of purchase. During this period, Delonghi will either repair or replace, at its discretion, any defective product at no charge to the owner. Replacement products or repaired parts will be guaranteed for only the unexpired portion of the original warranty or six months, whichever is greater. This limited warranty does not apply to any defect resulting from accident, misuse, improper maintenance, or normal wear and tear. Any defect resulting from the usage of non genuine Nespresso capsules will not be covered by this warranty. Except to the extent allowed by applicable law, the terms of this limited warranty do not exclude, restrictor modify, and are in addition to, the mandatory statutory rights applicable to the sale of the product to you. If you believe your product is defective, contact Nespresso for instructions on where to send or bring it for repair. Please visit our website at nespresso.com to discover more about Nespresso
Specifications
Pmax
Once the rinsing process is finished, the machine switches off. Clean the machine using a damp cloth. You have now finished descaling the machine.
9 10 11 12Rinsing process Rinse and fill water with fresh potable water up to MAX level.
Rinsing process Place one container of minimum 1 litre under both the coffee outlet and the hot water spout.
PRESS to confirm.The rinsing cycle continues trough the coffee outlet, hot water spout and drip tray until the water tank is empty.
Water hardness setting
1
programmed buttons blinks 3 times: water hardness is seti
1”2 3 4
1
2
3
4
5
Place the water hardness sticker under water for 1 second.
The number of red squares indicates the water harness level.
Set the value accordinglyEnter the menu, browse the options and select WATER HARDNESS.You will be guided to set the value.Follow machine display instructions.
max
max
Kg
11 12
euR, AuS, nZ: 220-240 V, 50/60 Hz, 1300 wEUR,AUS,NZ: 220240 V, 50/60 Hz, 1300 W
US/CA: 120 V, 60 Hz, 1200 W
19 bar
6.5 kg
1,38 litre
500 ml
13-16 capsules
l=19,4 cm . L=33,2 cm . h=27,4 cm
Troubleshooting
Contact the Nespressso Club
For any additional information, in case of problems or simply to seek advise, call the Nespresso Club. Contact details of the Nespresso Club can be found in the 'Welcome to Nespresso' folder in your machine box or at nespresso.com
No light on displayCheck the mains, plug, voltage, and fuse. In case of problems, call the Nespresso Club.
Coffee comes out very slowly.Flow speed depends on the coffee variety.Perform a self check of the machine. Enter the menu list and select Maintenance. Follow instruction
Coffee is not hot enough.Preheat cup.Perform a self check of the machine. Enter the menu list and select Maintenance. Follow instruction
Capsule area is leaking (water in capsule container). Position capsule correctly. If leakages occur, call the Nespresso Club.
Irregular blinking.Send appliance to repair or call the Nespresso Club.
No coffee, just water runs out (despite inserted capsule).In case of problems, call the Nespresso Club.
Lever cannot be closed completelyEmpty capsule container. Make sure that no capsule is blocked inside the capsule container.
Quality of milk froth is not up to standard1) For a perfect milk froth, use skimmed or semi-skimmed milk at refrigerator temperature (about 4° C)2) Rinse after each milk based preparation. Place a recipient under milk outlet, rotate the milk regulator knob until “CLEAN” position.3) Every two days, disassemble the R. C. S. and clean all components in the upper level of a dishwasher
Warranty
Delonghi warrants this product against defects in materials and workmanship for a period of two years from the date of purchase. During this period, Delonghi will either repair or replace, at its discretion, any defective product at no charge to the owner. Replacement products or repaired parts will be guaranteed for only the unexpired portion of the original warranty or six months, whichever is greater. This limited warranty does not apply to any defect resulting from accident, misuse, improper maintenance, or normal wear and tear. Any defect resulting from the usage of non genuine Nespresso capsules will not be covered by this warranty. Except to the extent allowed by applicable law, the terms of this limited warranty do not exclude, restrictor modify, and are in addition to, the mandatory statutory rights applicable to the sale of the product to you. If you believe your product is defective, contact Nespresso for instructions on where to send or bring it for repair. Please visit our website at nespresso.com to discover more about Nespresso
Specifications
Pmax
Once the rinsing process is finished, the machine switches off. Clean the machine using a damp cloth. You have now finished descaling the machine.
9 10 11 12Rinsing process Rinse and fill water with fresh potable water up to MAX level.
Rinsing process Place one container of minimum 1 litre under both the coffee outlet and the hot water spout.
PRESS to confirm.The rinsing cycle continues trough the coffee outlet, hot water spout and drip tray until the water tank is empty.
Water hardness setting
1
programmed buttons blinks 3 times: water hardness is seti
1”2 3 4
1
2
3
4
5
Place the water hardness sticker under water for 1 second.
The number of red squares indicates the water harness level.
Set the value accordinglyEnter the menu, browse the options and select WATER HARDNESS.You will be guided to set the value.Follow machine display instructions.
max
max
Kg
11 12
max/19 bar
EUR,AUS,NZ: 220240 V, 50/60 Hz, 1300 W
US/CA: 120 V, 60 Hz, 1200 W
19 bar
6.5 kg
1,38 litre
500 ml
13-16 capsules
l=19,4 cm . L=33,2 cm . h=27,4 cm
Troubleshooting
Contact the Nespressso Club
For any additional information, in case of problems or simply to seek advise, call the Nespresso Club. Contact details of the Nespresso Club can be found in the 'Welcome to Nespresso' folder in your machine box or at nespresso.com
No light on displayCheck the mains, plug, voltage, and fuse. In case of problems, call the Nespresso Club.
Coffee comes out very slowly.Flow speed depends on the coffee variety.Perform a self check of the machine. Enter the menu list and select Maintenance. Follow instruction
Coffee is not hot enough.Preheat cup.Perform a self check of the machine. Enter the menu list and select Maintenance. Follow instruction
Capsule area is leaking (water in capsule container). Position capsule correctly. If leakages occur, call the Nespresso Club.
Irregular blinking.Send appliance to repair or call the Nespresso Club.
No coffee, just water runs out (despite inserted capsule).In case of problems, call the Nespresso Club.
Lever cannot be closed completelyEmpty capsule container. Make sure that no capsule is blocked inside the capsule container.
Quality of milk froth is not up to standard1) For a perfect milk froth, use skimmed or semi-skimmed milk at refrigerator temperature (about 4° C)2) Rinse after each milk based preparation. Place a recipient under milk outlet, rotate the milk regulator knob until “CLEAN” position.3) Every two days, disassemble the R. C. S. and clean all components in the upper level of a dishwasher
Warranty
Delonghi warrants this product against defects in materials and workmanship for a period of two years from the date of purchase. During this period, Delonghi will either repair or replace, at its discretion, any defective product at no charge to the owner. Replacement products or repaired parts will be guaranteed for only the unexpired portion of the original warranty or six months, whichever is greater. This limited warranty does not apply to any defect resulting from accident, misuse, improper maintenance, or normal wear and tear. Any defect resulting from the usage of non genuine Nespresso capsules will not be covered by this warranty. Except to the extent allowed by applicable law, the terms of this limited warranty do not exclude, restrictor modify, and are in addition to, the mandatory statutory rights applicable to the sale of the product to you. If you believe your product is defective, contact Nespresso for instructions on where to send or bring it for repair. Please visit our website at nespresso.com to discover more about Nespresso
Specifications
Pmax
Once the rinsing process is finished, the machine switches off. Clean the machine using a damp cloth. You have now finished descaling the machine.
9 10 11 12Rinsing process Rinse and fill water with fresh potable water up to MAX level.
Rinsing process Place one container of minimum 1 litre under both the coffee outlet and the hot water spout.
PRESS to confirm.The rinsing cycle continues trough the coffee outlet, hot water spout and drip tray until the water tank is empty.
Water hardness setting
1
programmed buttons blinks 3 times: water hardness is seti
1”2 3 4
1
2
3
4
5
Place the water hardness sticker under water for 1 second.
The number of red squares indicates the water harness level.
Set the value accordinglyEnter the menu, browse the options and select WATER HARDNESS.You will be guided to set the value.Follow machine display instructions.
max
max
Kg
11 12
~ 6.5 kg
1.3 l/
0.5 l/
13-16 capsules/
19.4 cm 27.4 cm 33.2 cm
17

max
1”
1
2
3
4
5
11
max
1”
1
2
3
4
5
11
max
1”
1
2
3
4
5
11
max
1”
1
2
3
4
5
11
max
1”
1
2
3
4
5
11
max
1”
1
2
3
4
5
11
max
1”
1
2
3
4
5
11
max
1”
1
2
3
4
5
11
AR
2. ضع ملصق عسر الماء في الماء لمدة ثانية واحدة.
11. اضغط للتأكيد. تستمر دورة التنظيف بالتناوب عبر مصب القهوة، فوهة الماء
الساخن وصينية التنقيط حتى يفرغ خزان الماء.
3. يشير عدد المربعات الحمراء إلى مستوى عسر الماء.
12. بمجرد االنتهاء من عملية التنظيف، تتوقف الماكينة عن التشغيل تلقائيا. نظف فوهة
الماء الساخن ونظفها بقطعة قماش مبللة. وبهذا تنتهي عملية إزالة الترسبات.
4. حدد القيمة وفقا لذلك.
إعدادات عسر الماء
1. ادخل إلى القائمة، وحدد خيار عسر الماء )Water Hardness(. ستحصل على إرشادات لتحديد
القيمة. اتبع التعليمات على الشاشة.
9. عملية التنظيف: اغسل خزان الماء وأعد تعبئته بماء صالح
للشرب إلى الحد األقصى.
10. عملية التنظيف: ضع وعاء بحجم 1 ليتر على األقل تحت مصب
القهوة وفوهة الماء الساخن.
إزالة الترسبات
16

+100 ml500 ml
10
+100 ml500 ml
10
+100 ml500 ml
10
+100 ml500 ml
10
+100 ml500 ml
10
+100 ml500 ml
10
+100 ml500 ml
10
+100 ml500 ml
10
AR إزالة الترسبات
1. ارفع وأغلق المقبض إلخراج أي كبسولة في حاوية الكبسوالت
المستعملة.
2. انتقل إلى القائمة، وابحث عن خيار إزالة الترسبات "Descaling". ستحصل على إرشادات طوال العملية. اتبع التعليمات على الشاشة.
تنبيه: راجع احتياطات السالمة.
7. اضغط للتأكيد. سيتدفق سائل إزالة الترسبات من مصب القهوة وفوهة الماء
الساخن وصينية التنقيط.
5. إزالة الترسبات: أدخل فوهة الماء الساخن.
6. إزالة الترسبات: ضع وعاء بحجم 1 ليتر على األقل تحت مصب القهوة وفوهة الماء الساخن.
3. إزالة الترسبات: قم بإفراغ صينية التنقيط وحاوية الكبسوالت المستعملة.
4. إزالة الترسبات: امأل خزان الماء بـ 100 مل من سائل نسبريسو إلزالة
الترسبات و 500 مل ماء صالح للشرب.
8. عملية التنظيف: قم بإفراغ صينية التنقيط وحاوية الكبسوالت
المستعملة. اغسلها بماء صالح للشرب.
15

AR
مالحظة: *حجم رغوة الحليب تعتمد على نوع الحليب المستخدم، ودرجة حرارته، ووضعية مقبض منظم الحليب.
مالحظة: ننصحك بالحفاظ على إعدادات المصنع لكوب ريستريتو وإسبريسو ولونغو لضمان الحصول على أفضل نتيجة لقهواتنا.
يمكن برمجة حجم الماء بين 50 و 400 مل.يمكن برمجة حجم الحليب بين 30 و 200 مل.يمكن برمجة حجم القهوة بين 25 و 200 مل.
إعدادات المصنع لكميات السوائل
ريستريتو 25 مل
*كابوتشينوالحليب: 50 مل /
القهوة: 40 مل
لونغو 110 مل
*التيه مكياتو الحليب ١٥٠ مل ،
القهوة ٤٠ مل
ماء ساخن 125 ملإسبريسو 40 مل
*الحليب الدافئ 120 مل
تنبيه: إذا تم ضبط حجم القهوة إلى بما يفوق 150 مل: اترك الماكينة لتبرد لمدة 5 دقائق قبل تحضير
الكوب التالي. وإال واجهت خطر فرط التسخين.
14

PRESS to confirm.The discaling agent flows alternately trough the coffee outlet, hot water nozzle and drip tray.
Descaling
Descaling process: Empty the drip tray and the used capsules container.
Rinsing process: Empty the drip tray and the used capsules container.
Refer to safety precautions
+100 ml500 ml
1 2 3
5 7 8
4
6
Lift and close the lever to eject any capsule in the used capsule container.
Descaling process: Fill water tank with 100 ml of Nespresso descaling agent and 500ml water.
Descaling process: Insert the hot water spout.
Enter the Menu, browse the options and select DESCALING. You will be guided throughout the whole process. Follow machine display instructions.
Descaling process: Place one container of minimum 1 litre under both the coffee outlet and the hot water spout.
4°
Volume factory settings
LANGUAGE
DESCALING
WATER HARDNESS
09 10
AR
2. ارفع المقبض وأغلقه إلخراج الكبسولة إلى حاوية الكبسوالت المستعملة. ضع وعاء تحت مصب القهوة واضغط على زر لونغو لبدء الغسل. نظف مصب القهوة بقطعة قماش مبللة ونظيفة.
3. قم بإزالة بقايا األوساخ عن فوهة الماء الساخن بماء صالح للشرب. نظف الفوهة
بقطعة قماش مبللة ونظيفة.
1. فك نظام الكابوتشينو السريع. راجع قسم تجميع/فك نظام الكابتشينو
.(R.C.S.) .السريع
2. اغسل الماكينة بحذر من أي بقايا للحليب باستخدام ماء صالح
للشرب.
3. انقع جميع األجزاء في ماء دافئ )حوالي 40 درجة مئوية( مع المنظفات والصابون لمدة 30
دقيقة على األقل.
4. اغسل األجزاء بماء صالح للشرب وجففها بقطعة قماش مبللة
نظيفة.
العناية اليومية مالحظة: ال تستخدم أي سائل تنظيف أو مذيب قوي. استخدم قطعة قماش مبللة وسائل تنظيف خفيف لتنظيف
سطح الماكينة. ال تضع أي جزء من الماكينة في غسالة الصحون، باستثناء أجزاء نظام الكابوتشينو السريع.
(R.C.S.) غسل نظام الكابوتشينو السريع يدويا مالحظة: عند عدم توفر غسالة صحون، يمكن غسل نظام الكابوتشينو السريع يدويا. في هذه الحالة، يجب إجراء العملية يوميا للمحافظة على كفاءة الماكينة
بأقصى صورها.
1. قم بفك صينية التنقيط وحاوية الكبسوالت. أفرغ محتوياتها واغسلها. قم بفك خزان الماء.
أفرغه واغسله قبل ملئه بماء صالح للشرب.
13

Preparing Cappuccino and Latte Macchiato
4°
i When the milk container is empty, before refilling, thoroughly rinse it and the milk aspiration tube with potable water.
Close the milk container. Open the steam connector door by sliding it to the right. Connect the Rapid Cappuccino System to the machine.
15”
+LATTE MACCHIATO
Clean
15”
i
Remove Rapid Cappuccino System connector by unlocking it from (sign ) to (sign) and pulling it off
Remove the milk container lid and unplug milk aspiration tube.
Remove the milk froth regulator knob by turning it until and pulling it up.
Remove the milk spout by pulling it off.
1 2 3 4
Assembling / disassembling of Rapid Cappuccino system (R.C.S)
RINSE MILK SYSTEM
07 08
PRESS to confirm.The discaling agent flows alternately trough the coffee outlet, hot water nozzle and drip tray.
Descaling
Descaling process: Empty the drip tray and the used capsules container.
Rinsing process: Empty the drip tray and the used capsules container.
Refer to safety precautions
+100 ml500 ml
1 2 3
5 7 8
4
6
Lift and close the lever to eject any capsule in the used capsule container.
Descaling process: Fill water tank with 100 ml of Nespresso descaling agent and 500ml water.
Descaling process: Insert the hot water spout.
Enter the Menu, browse the options and select DESCALING. You will be guided throughout the whole process. Follow machine display instructions.
Descaling process: Place one container of minimum 1 litre under both the coffee outlet and the hot water spout.
4°
Volume factory settings
LANGUAGE
DESCALING
WATER HARDNESS
09 10
ARتحضير الكابتشينو والتيه ماكياتو
مالحظة: اغسل نظام الحليب بعد كل استخدام.
10. ضع مقبض منظم الحليب على وضعية 9. ضع وعاء تحت فوهة الحليب.التنظيف "Clean". تبدأ عملية غسل نظام
الحليب ويتدفق الماء الساخن مع البخار عبر فوهة الحليب.
11. تستغرق عملية الغسل 15 ثانية تقريبا، وتتوقف تلقائيا.
12. بمجرد االنتهاء من الغسل، ضع مقبض منظم الحليب على
وضعية الحليب.
13. افصل نظام الكابوتشينو السريع عن الماكينة وضعه في البراد مباشرة. أغلق باب موصل
البخار في الماكينة.
15. ونظف جميع األجزاء في الصف العلوي من غسالة الصحون. في
حال عدم وجود غسالة صحون، راجع قسم غسل نظام الكابتشينو
.)R.C.S.( .السريع يدويا
مالحظة: راجع قسم تجميع/فك نظام الكابتشينو السريع.
تحذير: ال ينبغي االحتفاظ بالحليب في البراد ألكثر من يومين.في حال إبقاء خزان الحليب خارج البراد ألكثر من ساعتين، قم بفك نظام الكابوتشينو
السريع ونظف جميع األجزاء )راجع نصائح الغسل اليدوي أو في غسالة الصحون(.
14. كل يومين، فك نظام الكابوتشينو السريع.
12

4°15”
Assembling / disassembling of Rapid Cappuccino system (R.C.S)
07
4°15”
Assembling / disassembling of Rapid Cappuccino system (R.C.S)
07
4°15”
Assembling / disassembling of Rapid Cappuccino system (R.C.S)
07
4°15”
Assembling / disassembling of Rapid Cappuccino system (R.C.S)
07
Preparing Cappuccino and Latte Macchiato
4°
i When the milk container is empty, before refilling, thoroughly rinse it and the milk aspiration tube with potable water.
Close the milk container. Open the steam connector door by sliding it to the right. Connect the Rapid Cappuccino System to the machine.
15”
+LATTE MACCHIATO
Clean
15”
i
Remove Rapid Cappuccino System connector by unlocking it from (sign ) to (sign) and pulling it off
Remove the milk container lid and unplug milk aspiration tube.
Remove the milk froth regulator knob by turning it until and pulling it up.
Remove the milk spout by pulling it off.
1 2 3 4
Assembling / disassembling of Rapid Cappuccino system (R.C.S)
RINSE MILK SYSTEM
07 08
AR
1. امأل خزام الحليب بالكمية المطلوبة من الحليب.
2. أغلق خزان الحليب. افتح باب موصل البخار عن طريق تحريكه إلى اليمين. قم بوصل نظام
الكابتشينو السريع بالماكينة.
3. ستقوم الماكينة بالتسخين لحوالي 15 ثانية.
4. ارفع المقبض كليا وأدخل كبسولة نسبريسو.
تنبيه: ال تستخدم خزان الحليب ألي سوائل أخرى غير الحليب أو الماء الصالح للشرب. ال تستخدم الحليب غير المبستر وتأكد من عدم استخدام الحليب بعد انتهاء صالحيته المبينة على العبوة.
مالحظة: للحصول على رغوة حليب مثالية، استخدم الحليب قليل الدسم أو منزوع الدسم بدرجة حرارة البراد )حوالي 4 درجات مئوية(.
مالحظة: عند انتهاء خزان الحليب، اغسل الخزان وأنبوب
شفط الحليب بماء صالح للشرب قبل إعادة تعبئة الخزان.
5. أغلق المقبض، وضع كوب كابتشينو أو التيه ماكياتو تحت
مصب القهوة واضبط اتجاه فوهة الحليب.
6. اضبط مقبض رغوة الحليب حسب كمية الرغوة التي تريدها.
7. اضغط على زر كابوتشينو أو ماكياتو. يبدأ التحضير بعد بضع
ثوان )الحليب أوال ثم القهوة( ويتوقف التحضير تلقائيا.
8. بعد االنتهاء من التحضير، ارفع المقبض وأغلقه إلخراج الكبسولة
إلى حاوية الكبسوالت المستعملة.
تحضير الكابتشينو والتيه ماكياتو
11

max
First read the safety precautions to avoid risks of fatal electrical shock and fire
Remove the plastic films from grid, lever and machine panels.
Remove the water tank, drip tray, and capsule container. Adjust the cable length and store the excess in the cable guide under the machine.
Put the machine in upright position, plug machine into mains.
The water tank can be carried by its cover.
Rinse the water tank before filling with potable water up to maximum level.
Insert the hot water spout. Switch machine ON
Set your preferred language.Press to continue.
SET LANGUAGE
to continue
Select your language by scrolling the options using up/down arrow. Press to confirm.
LANGUAGE
Actual value : EN
New value : [ ]
to select
Coffee preparation
x3x3
110 ml
40 ml
25 ml
05 06
4°15”
Assembling / disassembling of Rapid Cappuccino system (R.C.S)
07
AR
)R.C.S.( تجميع/فك نظام الكابتشينو السريع
1. ارفع المقبض تماما وضع كبسولة نسبريسو.
2. أغلق المقبض وضع كوبا تحت مصب القهوة.
3. اضغط على زر ريستريتو )25 مل/0.75 أوقية(، إسبريسو )40 مل/1.35 أوقية( أو زر لونغو )110 مل/3.7
أوقية(. سيتوقف التحضير تلقائيا عند االنتهاء. إليقاف تدفق القهوة أو زيادة كميتها، اضغط على الزر مرة أخرى.
4. زل الكوب. ارفع المقبض وأغلقه إلخراج الكبسولة إلى حاوية
الكبسوالت المستعملة.
1. قم بفك غطاء خزان الحليب وأنبوب شفط الحليب.
4. قم بفك فوهة الحليب عن طريق سحبها.
2. قم بإزالة مقبض منظم رغوة الحليب من خالل تدويره حتى
العالمة ، ثم سحبه.
3. قم بفك موصل نظام الكابوتشينو من خالل تدويره من
إلى إلى ثم سحبه.
مالحظة: أثناء التسخين، يمكنك الضغط على أي زر من أزرار القهوة. وعندها ستتدفق القهوة تلقائيا عندما تكون الماكينة جاهزة.
تحضير القهوة
10

max
First read the safety precautions to avoid risks of fatal electrical shock and fire
Remove the plastic films from grid, lever and machine panels.
Remove the water tank, drip tray, and capsule container. Adjust the cable length and store the excess in the cable guide under the machine.
Put the machine in upright position, plug machine into mains.
The water tank can be carried by its cover.
Rinse the water tank before filling with potable water up to maximum level.
Insert the hot water spout. Switch machine ON
Set your preferred language.Press to continue.
SET LANGUAGE
to continue
Select your language by scrolling the options using up/down arrow. Press to confirm.
LANGUAGE
Actual value : EN
New value : [ ]
to select
Coffee preparation
x3x3
110 ml
40 ml
25 ml
05 06
AR
مالحظة: يتم اختبار الماكينات بشكل كامل بعد االنتهاء من تصنيعها. لذلك قد تظهر بعض آثار القهوة
في الماء عند التنظيف.
مالحظة: راجع قسم تجميع/فك نظام الكابتشينو السريع.
10. التنظيف: كرر العملية ثالث مرات بتمرير الماء من خالل فوهة الماء الساخن. بعد االنتهاء، قم بفك الفوهة
وإعادتها إلى منطقة التخزين الموجودة على الجانب األيمن من الماكينة. أغلق باب موصل البخار.
9. التنظيف: ضع وعاء تحت مصب القهوة واضغط على زر لونغو. كرر العملية ثالث مرات.
االستخدام األول أو بعد فترة عدم االستخدام لمدة طويلة
11. قم بفك نظام الكابتشينو السريع ).R.C.S( ونظف جميع األجزاء في الصف العلوي من غسالة الصحون. في حال عدم وجود غسالة صحون، راجع قسم غسل
.)R.C.S.( نظام الكابتشينو السريع يدويا
9

max
SET LANGUAGE
to continue
LANGUAGEActual value : EN
New value : [ ] to select
05
max
SET LANGUAGE
to continue
LANGUAGEActual value : EN
New value : [ ] to select
05
max
SET LANGUAGE
to continue
LANGUAGEActual value : EN
New value : [ ] to select
05
max
SET LANGUAGE
to continue
LANGUAGEActual value : EN
New value : [ ] to select
05
max
SET LANGUAGE
to continue
LANGUAGEActual value : EN
New value : [ ] to select
05
max
SET LANGUAGE
to continue
LANGUAGEActual value : EN
New value : [ ] to select
05
max
SET LANGUAGE
to continue
LANGUAGEActual value : EN
New value : [ ] to select
05
4°15”
Assembling / disassembling of Rapid Cappuccino system (R.C.S)
07
AR
تحذير: اقرأ أوال احتياطات السالمة لتجنب مخاطر الصدمة الكهربائية والحريق.
1. أزل خزان الماء، صينية التنقيط وحاوية الكبسوالت. قم بتعديل طول الكيبل ووضع
القسم اإلضافي منه تحت الماكينة.
5. أدخل فوهة الماء الساخن. شغل الماكينة.
2. ضع الماكينة في وضع مستقيم، وقم بتوصيلها
بالتيار الكهربائي.
6. ضبط اللغة: اختر لغتك المفضلة. اضغط على
للمتابعة.
3. يمكن حمل خزان الماء بواسطة غطائه.
7. اللغة اختر لغتك المفضلة عن طريق الضغط على السهمين لالنتقال بين الخيارات. اضغط على
للتأكيد.
4. اغسل خزان الماء قبل ملئه بماء صالح للشرب حتى أقصى مستوى.
، تبدأ الماكينة 8. عند الضغط على زر بالتسخين.
االستخدام األول أو بعد فترة عدم االستخدام لمدة طويلة
8

AR
اضغط على هذا الخيار الختيار لغتك المفضلة. اتبع التعليمات على الشاشة.. 1
اضغط على هذا الخيار عند ظهور تنبيه إزالة الترسبات على الشاشة. راجع الصفحة 15. ستحصل على إرشادات خالل عملية إزالة الترسبات.
2
اضغط على هذا الخيار لتحديد مستوى عسر الماء في منطقتك. استخدم ملصق عسر الماء على الماكينة لتحديد ذلك.هذا سيحدد وقت تكرار عملية إزالة الترسبات. راجع الصفحة 16.
3
اضغط على هذا الخيار لضبط وقت إيقاف التشغيل التلقائي. )الخيارات الموجودة هي 9 دقائق، 30 دقيقة، ساعتين، 8 ساعات(. اتبع التعليمات على الشاشة.
4
اضغط على هذا الخيار السترجاع إعدادات المصنع. 5
اضغط على هذا الخيار لتفريغ الماكينة من الماء في حال كنت بحاجة إلرسالها للتصليح أو بسبب عدم استخدامها لفترة طويلة. اتبع التعليمات على الشاشة. لن تتمكن من استخدام الماكينة لمدة 10 دقائق بعد هذه العملية.
6
ادخل إلى هذا الخيار لبرمجة كمية السوائل )القهوة، الماء الساخن، وصفات الحليب(. اتبع التعليمات على الشاشة. باإلضافة إلى ذلك، يمكنك إعادة تعيين كافة كميات السوائل إلى إعدادات المصنع.
7
اضغط على هذا الخيار للوصول إلى جميع إعدادات الماكينة مباشرة. 8
اضغط على هذا الخيار لعرض الوضع العام لماكينتك. تتوفر إحصاءات االستهالك من أول استخدام )كامل( أو منذ آخر عملية إلزالة الترسبات )نسبية(. يتم توفير الرقم التسلسلي للماكينة أيضا.
9
اضغط على هذا الخيار للحصول على أفضل نصيحة حول طريقة للحصول على جودة مثالية لرغوة الحليب يوما بعد يوم.يتوفر رابط إنترنت لمعرفة المزيد عن هذه الميزة.
10
الخروج من القائمة والعودة إلى وضع الجهوزية. 11
اللغة
إزالة الترسيبات
عسر الماء
إيقاف التشغيل التلقائي
إعدادات المصنع
نظام تفريغ الماكينة منالسوائل
برمجة كمية السوائل
معلومات اإلعدادات
الصيانة
المساعدة
الخروج
1
2
3
4
5
6
7
8
9
10
11
القائمة
7

EN SAFETY PRECAUTIONS ............................................................................. 2 FR CONSIGNES DE SECURITE ......................................................................... 4 DE SICHERHEITSHINWEISE ........................................................................... 7 IT PRECAUZIONI DI SICUREZZA .................................................................... 10 ES PRECAUCIONES DE SEGURIDAD ................................................................ 12 PT MEDIDAS DE SEGURANÇA......................................................................... 15 NL VEILIGHEIDSMAATREGELEN ..................................................................... 18 GR ΜΈΤΡΑ ΑΣΦΑΛΈΙΑΣ .................................................................................. 20 HU BIZTONSÁGI ELŐÍRÁSOK .......................................................................... 22 CZ BEZPEČNOSTNÍ POKYNY .......................................................................... 25 PL ZASADY BEZPIECZEŃSTWA ....................................................................... 28 RU МЕРЫ ПРЕДОСТОРОЖНОСТИ ................................................................. 31
EN SAFETY PRECAUTIONS ............................................................................. 2 FR CONSIGNES DE SECURITE ......................................................................... 4 DE SICHERHEITSHINWEISE ........................................................................... 7 IT PRECAUZIONI DI SICUREZZA .................................................................... 10 ES PRECAUCIONES DE SEGURIDAD ................................................................ 12 PT MEDIDAS DE SEGURANÇA......................................................................... 15 NL VEILIGHEIDSMAATREGELEN ..................................................................... 18 GR ΜΈΤΡΑ ΑΣΦΑΛΈΙΑΣ .................................................................................. 20 HU BIZTONSÁGI ELŐÍRÁSOK .......................................................................... 22 CZ BEZPEČNOSTNÍ POKYNY .......................................................................... 25 PL ZASADY BEZPIECZEŃSTWA ....................................................................... 28 RU МЕРЫ ПРЕДОСТОРОЖНОСТИ ................................................................. 31
AR
تحديد الخيار:. اضغط على الرمز
تصفح الخيارات:اضغط على الرمز .
دخول القائمة:. اضغط على الرمز
الخروج من الخيار والعودة إلى القائمة:انتقل إلى خيار )الخروج( واضغط عليه. أو
. اضغط على الرمز
الخروج من القائمة:انتقل إلى خيار )الخروج( واضغط عليه. أو
. . اضغط على الرمز
محتويات علبة الماكينة
القائمة
مجلد »أهال بكم في عالم نسبريسو«
مجموعة من الكبسوالت تعليمات السالمة دليل المستخدم ماكينة القهوة
6

AR
........................................................... )R.C.S.( غسل نظام الكابوتشينو السريع يدويا
إعدادات المصنع لكميات السوائل....................................................................................
........................................................................................................................... إزالة الترسبات
.................................................................................................................. إعدادات عسر الماء
.................................................................................................. اكتشاف األعطال وإصالحها
المواصفات..................................................................................................................................
................................................................................ التخلص من النفايات وحماية البيئة
اتصل بنادي نسبريسو..........................................................................................................
الكفالة.........................................................................................................................................
1314151617 17 18 18 18
نظرة عامة........................................................................................................................................
محتويات علبة الماكينة.............................................................................................................
القائمة...............................................................................................................................................
القائمة...............................................................................................................................................
............................................ االستخدام األول أو بعد فترة عدم االستخدام لمدة طويلة.
............................................................................................................................... تحضير القهوة
....................................................................)R.C.S.( تجميع/فك نظام الكابتشينو السريع
تحضير الكابتشينو والتيه ماكياتو........................................................................................
العناية اليومية..............................................................................................................................
040606070810101113
المحتوىتحذير: عند رؤية هذه اإلشارة، يرجى الرجوع إلى احتياطات السالمة لتجنب حصول أي أذى أو ضرر. تعليمات: عند رؤية هذه اإلشارة، يرجى االطالع على نصائح االستخدام اآلمن والصحيح للماكينة.
نسبريسو هي نظام حصري يقدم ألذ قهوة إسبريسو، مرة بعد مرة.تم تجهيز جميع ماكينات نسبريسو بنظام استخالص فريد من نوعه يضمن ضغطا يصل إلى 19 بارا. وتم حساب كل معيار بقدر كبير من الدقة لضمان استخالص النكهة
كاملة من كبسوالت غران كرو، بما يمنح القهوة قوامها المثالي السلس.
5

الشاشة )التحضير(13 لونغو
14 إسبريسو
15 ريستريتو
16 ماء ساخن
17 حليب دافئ
18 كابوتشينو
19 التيه ماكياتو
الشاشة )التنقل بين الخيارات(20 القائمة
21 االنتقال لألعلى عند تنشيط القائمة
22 تحديد الخيار عند تنشيط القائمة
23 االنتقال لألسفل عند تنشيط القائمة
24 عرض النص
)R.C.S.( نظام الكابوتشينو السريع25 مقبض منظم رغوة الحليب
26 وضعية اإلدخال لمقبض منظم رغوة الحليب
27 الحد األدنى للرغوة
28 الحد األقصى للرغوة
29 التنظيف )CLEAN(: وظيفة التنظيف التلقائي
30 غطاء خزان الحليب
31 فوهة الحليب
32 خزان الحليب
33 أنبوب شفط الحليب
34 موصل نظام الكابوتشينو السريع
نظرة عامة على الماكينةA إعدادات تحضير القهوة
B الماكينة مع نظام الكابوتشينو السريع
)للكابوتشينو( C الماكينة مع فوهة الماء الساخن
1 المقبض
2 زر التشغيل/إيقاف التشغيل
3 خزان الماء
4 مصب القهوة
5 مصفاة التنقيط
6 صينية التنقيط
7 حامل كوب محوري )غير قابل للفك(
8 حاوية الكبسوالت المستعملة
9 باب موصل البخار
10 فوهة الماء الساخن
11 منطقة تخزين فوهة الماء الساخن
12 موصل البخار
نظرة عامة
4
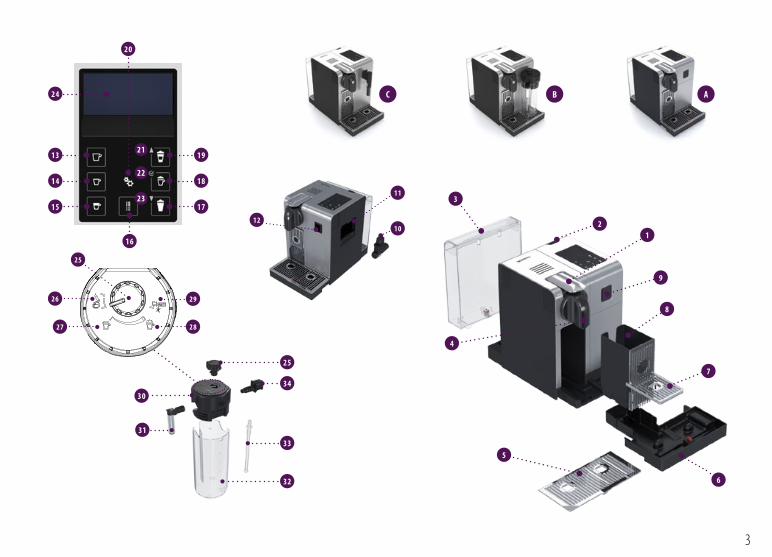
ABC
1012
11
6
9
21
8
7
5
4
3
13
24
19
20
21
22
23
14 18
15 17
16
25
2827
26 29
31
25
3034
33
32
4 3

19 - 4 AR

My Machine