embedded linux training lab book the packages needed for this lab: embedded linux training lab book...
TRANSCRIPT
Linux TrainingLab Book
Embedded Linux trainingLab book
Free Electronshttp://free-electrons.com
1 © 2004-2009, Free Electrons, http://free-electrons.com, Creative Commons License
Linux TrainingLab Book
About this document
This document can be found on http://free-electrons.com/doc/training/embedded-linux
It is is composed of several source documents that we aggregate for each training session. These individual source documents can be found on http://free-electrons.com/docs.
More details about our training sessions can be found on http://free-electrons.com/training.
Copying this document
© 2004-2010, Free Electrons, http://free-electrons.com.
This document is released under the terms of the Creative Commons Attribution-ShareAlike 3.0 license. This means you are free to download, distribute and even modify it, under certain conditions.
Corrections, suggestions, contributions and translations are welcome!
2 © Copyright 2004-2009, Free Electrons, http://free-electrons.com, Creative Commons License
© 2004-2010 Free Electrons, http://free-electrons.com Creative Commons License© 2004-2010 Free Electrons, http://free-electrons.com Creative Commons License
Ubuntu Linux installation
Installing Linux on your workstation
Our training labs are done with the Ubuntu 10.04 distribution (http://www.ubuntu.com/), one of the most popular GNU/Linux distributions. We are going the Desktop edition.
Note: if you go through these steps before the training session, you can get support by sending e-mail to [email protected].
Download Ubuntu
Go to the next paragraph if you read this at the beginning of the course. An Ubuntu cdrom will be given to you by your instructor.
If you wish to install Ubuntu Desktop 10.04 before the training session, get it from http://www.ubuntu.com/desktop/get-ubuntu/download and choose the 32 bit (i386) version.
Note that we don't support the 64 bit (amd64) version, because it won't be able to run some of the ready-made binaries we use during the practical labs.
Follow the instructions on the download page to burn a cdrom or to install Linux through a USB disk.
Freeing space on the hard drive
Do some cleaning up on your hard drive. In order to install Ubuntu and do the labs in good conditions, you will need 10 GB of free space. We can do the labs with as little as 5 GB of free space, but you will have to clean up generated files after each lab.
Defragmenting Windows partitions
Now, defragment your Windows partitions. Whatever installation option you choose, this will useful, either to make more space available for a separate Linux partition, or to get better performance if you choose to install Linux inside Windows.
Different setup options
There are several setup options to use Ubuntu for the training labs:
The best option is to install Ubuntu on your hard drive. It allows the system to be fast and offer all the features of a properly installed system. This option is described in the section “Installing Ubuntu”
The second option is to install Ubuntu inside a file in a Windows partition, using the Wubi installer available in the Ubuntu cdrom. At each boot, you will be given the choice between Windows and Linux. The advantage of this approach is that you won't have to modify your Windows partition, and that you can easily uninstall Linux when you no longer need it. The main drawback is that Linux filesystem performance may be degraded, because of the Windows filesystem overhead. This will particularly be true if your Windows filesystem is still heavily fragmented or almost full, as this often happens. Go to the “Installing Ubuntu inside Windows” section if you choose
© 2004-2010 Free Electrons, http://free-electrons.com Creative Commons License© 2004-2010 Free Electrons, http://free-electrons.com Creative Commons License
this option.
Important note: in our practical labs, we don't support Linux installations made in a virtual machine (VMware, VirtualBox, etc.). It's because we will need to access real hardware (serial port, USB, etc.), and this will be very difficult to do through a virtual machine.
Installing Ubuntu in free hard disk space
If you are allowed to install GNU/Linux on your PC, you may choose to install Ubuntu on your hard disk.
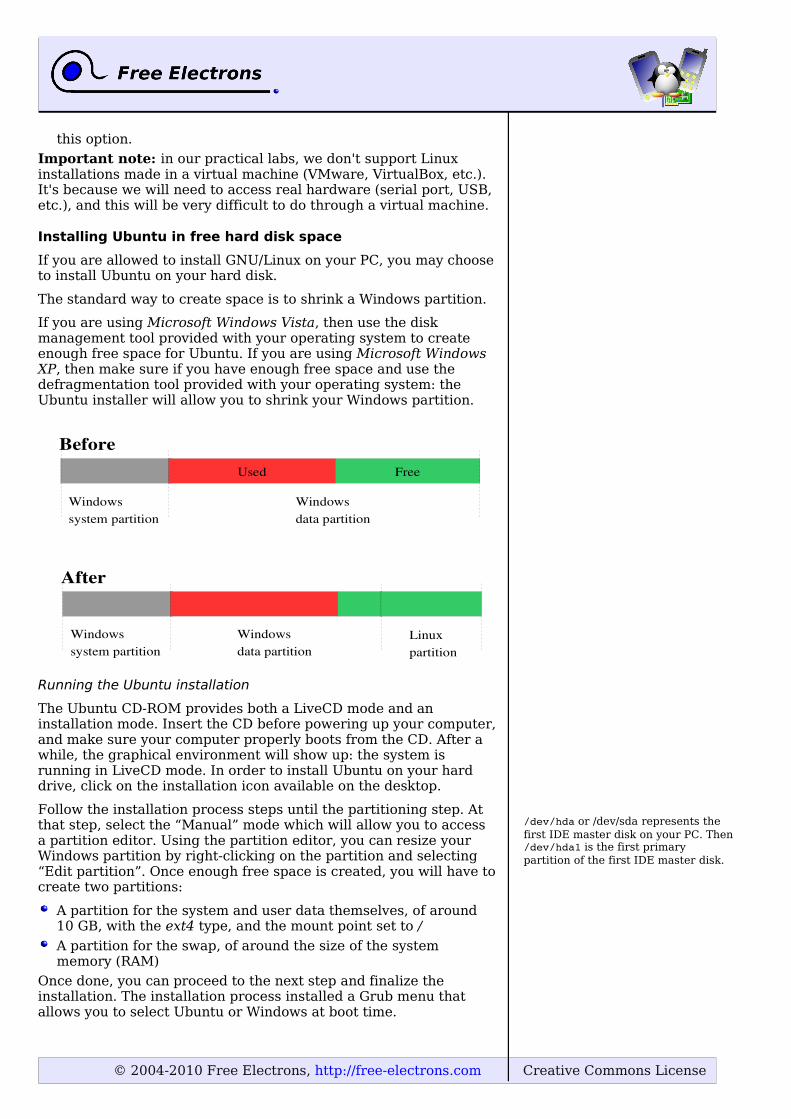
The standard way to create space is to shrink a Windows partition.
If you are using Microsoft Windows Vista, then use the disk management tool provided with your operating system to create enough free space for Ubuntu. If you are using Microsoft Windows XP, then make sure if you have enough free space and use the defragmentation tool provided with your operating system: the Ubuntu installer will allow you to shrink your Windows partition.
Running the Ubuntu installation
The Ubuntu CD-ROM provides both a LiveCD mode and an installation mode. Insert the CD before powering up your computer, and make sure your computer properly boots from the CD. After a while, the graphical environment will show up: the system is running in LiveCD mode. In order to install Ubuntu on your hard drive, click on the installation icon available on the desktop.
Follow the installation process steps until the partitioning step. At that step, select the “Manual” mode which will allow you to access a partition editor. Using the partition editor, you can resize your Windows partition by right-clicking on the partition and selecting “Edit partition”. Once enough free space is created, you will have to create two partitions:
A partition for the system and user data themselves, of around 10 GB, with the ext4 type, and the mount point set to /
A partition for the swap, of around the size of the system memory (RAM)
Once done, you can proceed to the next step and finalize the installation. The installation process installed a Grub menu that allows you to select Ubuntu or Windows at boot time.
/dev/hda or /dev/sda represents the first IDE master disk on your PC. Then /dev/hda1 is the first primary partition of the first IDE master disk.
Free
Windowssystem partition
Windowsdata partition
Used
Before
Windowssystem partition
Windowsdata partition
After
Linuxpartition
© 2004-2010 Free Electrons, http://free-electrons.com Creative Commons License© 2004-2010 Free Electrons, http://free-electrons.com Creative Commons License
Continue with the “Configure the network and repositories” paragraph.
Install Ubuntu inside Windows
Boot Windows and insert the Ubuntu cdrom.
Open the cdrom and choose Install inside Windows. In the Wubi installer, choose an installation drive with at least 5 GB of free space (10 GB is strongly recommended, if you don't want to clean up generated files at the end of each lab).
Choose at least a 5 GB installation size, or better, 10 GB.
Let the interface guide you then.
Configure network and Internet access
Make sure you can access the network properly. Ubuntu automatically uses DHCP to get an IP address from your network, so it usually just works flawlessly.
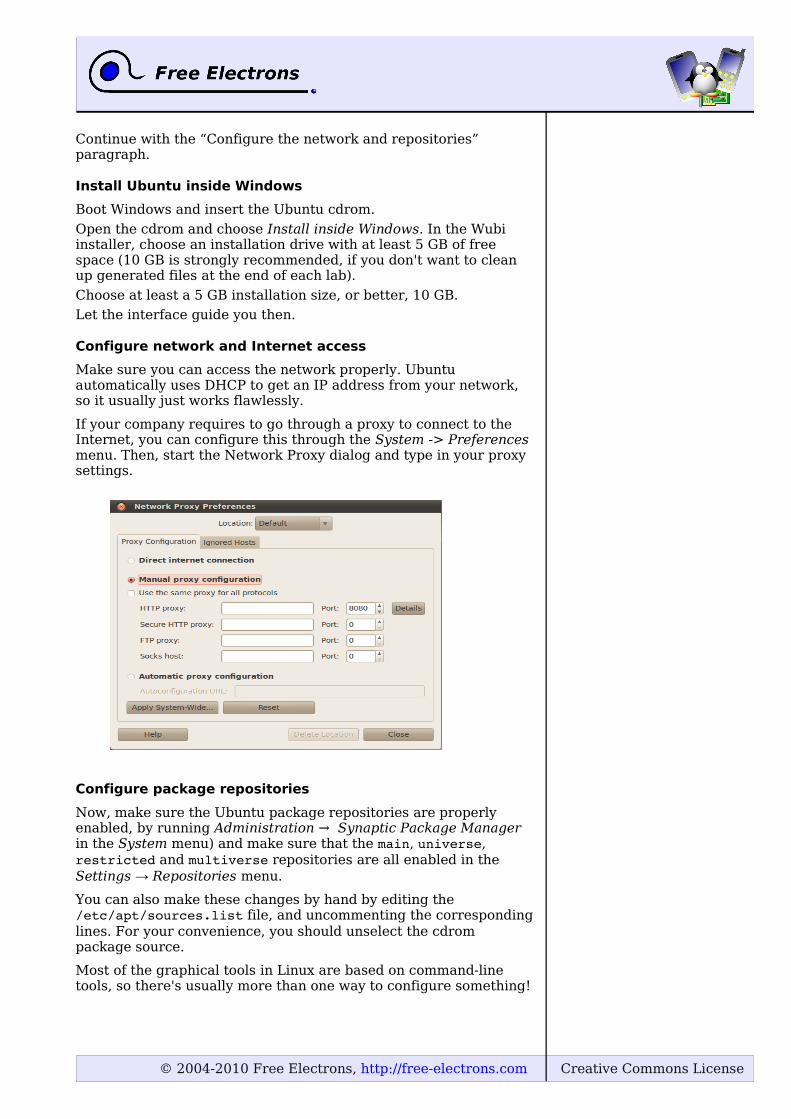
If your company requires to go through a proxy to connect to the Internet, you can configure this through the System -> Preferences menu. Then, start the Network Proxy dialog and type in your proxy settings.
Configure package repositories
Now, make sure the Ubuntu package repositories are properly enabled, by running Administration → Synaptic Package Manager in the System menu) and make sure that the main, universe, restricted and multiverse repositories are all enabled in the Settings → Repositories menu.
You can also make these changes by hand by editing the /etc/apt/sources.list file, and uncommenting the corresponding lines. For your convenience, you should unselect the cdrom package source.
Most of the graphical tools in Linux are based on command-line tools, so there's usually more than one way to configure something!

© 2004-2010 Free Electrons, http://free-electrons.com Creative Commons License© 2004-2010 Free Electrons, http://free-electrons.com Creative Commons License
Apply package updates
In Synaptic, hit the Reload button, which will download the latest version of the packages lists from the Ubuntu servers. This operation is the same as running sudo aptget update on the command line. Then, hit Mark all upgrades and then Apply. This will do the same as sudo aptget distupgrade in the command line.
eDepending on your network connection speed, this could take from several minutes to approximately one hour.
Once this is done, remove downloaded package update files:
sudo aptget clean
Please reboot your computer when you are done applying the updates. Rebooting is needed after applying
kernel updates, if there were any.
Cleaning downloaded package update files can save hundreds of megabytes. This is useful if free space is scarce.
© 2004-2010 Free Electrons, http://free-electrons.com Creative Commons License© 2004-2010 Free Electrons, http://free-electrons.com Creative Commons License
Training setup
Download files and directories used in practical labs
Install lab data
For the different labs in the training, your instructor has prepared a set of data (kernel images, kernel configurations, root filesystems and more). Download the tarball athttp://free-electrons.com/labs/embedded_linux.tar.bz2.
Then, from a terminal, extract the tarball using the following command:
cd (going to your home directory)sudo tar jxf embedded_linux.tar.bz2sudo chown R <user>.<user> felabs
Lab data are now available in a felabs directory in your home directory. For each lab there is a directory containing various data. This directory can also be used as a working space for each lab so that you properly keep the work on each lab well-separated.
Exit Synaptic if it is still open. If you don't, you won't be able to run aptget install commands, because only one package management tool is allowed at a time.
You are now ready to start the real practical labs!
Install extra packages
Ubuntu comes with a very limited version of the vi editor. Install vim, a improved version of this editor.
sudo aptget install vim
More guidelines
Can be useful throughout any of the labs
Read instructions and tips carefully. Lots of people make mistakes or waste time because they missed an explanation or a guideline.
Always read error messages carefully, in particular the first one which is issued. Some people stumble on very simple errors just because they specified a wrong file path and didn't pay enough attention to the corresponding error message.
Never stay stuck with a strange problem more than 5 minutes. Show your problem to your colleagues or to the instructor.
You should only use the root user for operations that require super-user privileges, such as: mounting a file system, loading a kernel module, changing file ownership, configuring the network. Most regular tasks (such as downloading, extracting sources, compiling...) can be done as a regular user.
If you ran commands from a root shell by mistake, your regular user may no longer be able to handle the corresponding generated files. In this case, use the chown R command to give back the new files to your regular user.Example: chown R myuser.myuser linux2.6.25
In Debian, Ubuntu and other derivatives, don't be surprised if
Embedded Linux kerneland driver development
Training lab book
Embedded Linux kerneland driver development
Training lab book
root permissions are required to extract the character and block device files contained in the lab structure.
© 2004-2010 Free Electrons, http://free-electrons.com Creative Commons License© 2004-2010 Free Electrons, http://free-electrons.com Creative Commons License
you cannot run graphical applications as root. You could set the DISPLAY variable to the same setting as for your regular user, but again, it's unnecessary and unsafe to run graphical applications as root.
Embedded Linux kerneland driver development
Training lab book
Embedded Linux kerneland driver development
Training lab book
© 2004-2010 Free Electrons, http://free-electrons.com Creative Commons License© 2004-2010 Free Electrons, http://free-electrons.com Creative Commons License
Sysdev - Building a cross-compiling toolchain
Objective: Learn how to compile your own cross-compiling toolchain for the uClibc C library.
After this lab, you will be able to
• Configure the crosstool-ng tool• Execute crosstool-ng and build up your own cross-compiling
toolchain
Setup
Go to the /home/<user>/felabs/sysdev/toolchain directory.
Make sure you have at least 2 GB of free disk space.
Install needed packages
Install the packages needed for this lab:
sudo aptget install autoconf automake libtoolsudo aptget install libncursesdev bison flex patchsudo aptget install cvs texinfo buildessentialsudo aptget clean
Getting Crosstool-ng
Get the latest 1.8.x release of Crosstool-ng at http://ymorin.is-a-geek.org/dokuwiki/projects/crosstool. Expand the archive right in the current directory, and enter the Crosstool-ng source directory.
Installing Crosstool-ng
We can either install Crosstool-ng globally on the system, or keep it locally in its download directory. We'll choose the latter solution. As documented in docs/overview.txt, do:
./configure localmakemake install
Then you can get Crosstool-ng help by running
./ctng help
Configure the toolchain to produce
A single installation of Crosstool-ng allows to produce as many toolchains as you want, for different architectures, with different C libraries and different versions of the various components.
Crosstool-ng comes with a set of ready-made configuration files for various typical setups: Crosstool-ng calls them «samples». They can be listed by using ./ctng listsamples.
We will use the armunknownlinuxuclibcgnueabi sample. It can be loaded by issuing:
./ctng armunknownlinuxuclibcgnueabi
Then, to refine the configuration, let's run the menuconfig interface:
Embedded Linuxsystem development
Training lab book
Embedded Linuxsystem development
Training lab book
© 2004-2010 Free Electrons, http://free-electrons.com Creative Commons License© 2004-2010 Free Electrons, http://free-electrons.com Creative Commons License
./ctng menuconfig
In Path and misc options:
● Change the prefix directory to/usr/local/xtools/${CT_TARGET}This is the place where the toolchain will be installed.
● Change the number of parallel jobs to 2 times the number of CPU cores in your workstation. Building your toolchain will be faster.
In Toolchain options:
● Set «Tuple's alias» to armlinux. This way, we will be able to use the compiler as armlinuxgcc instead of armunknownlinuxuclibcgnueabigcc, which is much longer.
In Debug facilities:
● Enable gdb, strace and ltrace. Remove the other options (dmalloc and duma). In gdb options, enable the “Cross gdb” and “Build a static gdbserver” options; the other options are not needed.
Explore the different other available options by traveling through the menus and looking at the help for some of the options. Don't hesitate to ask your trainer for details on the available options. However, remember that we tested the labs with the configuration described above.
Produce the toolchain
First, create the directory /usr/local/xtools/ and change its owner to your user, so that Crosstool-ng can write to it.
Then, create the directory $HOME/src in which Crosstool-NG will save the tarballs it will download.
Nothing is simpler:
./ctng build
And wait!
Testing the toolchain
You can now test your toolchain by adding /usr/local/xtools/armunknownlinuxuclibcgnueabi/bin/ to your PATH environment variable and compiling the simple hello.c program in your main lab directory with armlinuxgcc. You can use the file command on your binary to make sure it has correctly been compiled for the ARM architecture.
Cleaning up
To save almost 2 GB of storage space, remove the targets/ subdirectory in the Crosstool-ng directory.
Embedded LinuxSystem development
Training lab book
Embedded LinuxSystem development
Training lab book
© 2004-2010 Free Electrons, http://free-electrons.com Creative Commons License© 2004-2010 Free Electrons, http://free-electrons.com Creative Commons License
Lab – Using U-Boot
Objective: interact with U-Boot on the Beagle board
On the OMAP3530 platform, it is possible to compile and install one's own version of U-boot. See http://elinux.org/BeagleBoard#U-Boot for details.
In our case, a working version of U-Boot has been pre-installed on the board, so we won't have to worry about compiling and installing our bootloader. We will directly start interacting with the installed U-Boot.
On the web,
Setup
Go to the /home/<user>/felabs/sysdev/ubootomap/ directory.
MMC/SD card setup
Here are special instructions to format an MMC/SD card for the Beagle. This is not mandatory here as we are going to use U-boot from NAND flash. However, the MMC/SD card formated in this way will be useful to unbrick your Beagle board if you erase the first sectors of NAND flash by mistake. If this happens, it will allow to boot your own version of U-boot from your MMC/SD card.
To be used as a boot device, an MMC/SD card need to have a special geometry and a FAT 32 filesystem.
To obtain this, first connect your card reader to your workstation, with the MMC/SD card inside. Type the dmesg command to see which device is used by your workstation. Let's assume that this device is /dev/sdb.
sd 3:0:0:0: [sdb] 3842048 512byte hardware sectors: (1.96 GB/1.83 GiB)
Type the mount command to check your currently mounted partitions. If MMC/SD partitions are mounted, unmount them.
In a terminal open the block device with fdisk :
$ sudo fdisk /dev/sdb
Display the on-line help by pressing the m key:
Command (m for help): m Command action a toggle a bootable flag b edit bsd disklabel c toggle the dos compatibility flag d delete a partition l list known partition types m print this menu n add a new partition o create a new empty DOS partition table p print the partition table q quit without saving changes s create a new empty Sun disklabel
1
Linux TrainingLab Book
Linux TrainingLab Book
© 2004-2010 Free Electrons, http://free-electrons.com Creative Commons License© 2004-2010 Free Electrons, http://free-electrons.com Creative Commons License
t change a partition's system id u change display/entry units v verify the partition table w write table to disk and exit x extra functionality (experts only)
Print the current partition table typing p :
Command (m for help): p
Disk /dev/sdb: 1967 MB, 1967128576 bytes
Write down the total size.
Let's enter the expert mode for geometry settings :
Command (m for help): x
We must set the geometry to 255 heads, 63 sectors and calculate the number of cylinders corresponding to your MMC card.
Expert command (m for help) : hNumber of heads (1256, default 4): 255
Expert command (m for help) : s Number of sectors (163, default 62): 63Warning : setting sector offset for DOS compatibility
Now for the number of cylinders, we consider the global size (1967128576 bytes) then divide it by (255*63*512) which gives around 239.16 cylinders. We must round it down to 239.
Expert command (m for help) : cNumber of cylinders (11048576, default 4): 239
After these geometry settings, exit expert mode ('r' command) then print again the partition table to check geometry:
Command (m for help): p
Disk /dev/sdb: 1967 MB, 1967128576 bytes
If any partition exists, delete it ('d' command).
Now, let's create the boot partition :
Command (m for help): n Command action e extended p primary partition (14) p Partition number (14): 1 First cylinder (1239, default 1): 1 Last cylinder, +cylinders or +size{K,M,G} (1239, default 239): +64M
Mark it bootable:
Command (m for help): aPartition number (14): 1
Then we change its type to FAT32
Command (m for help): tSelected partition 1
2
Linux TrainingLab book
Linux TrainingLab book
© 2004-2010 Free Electrons, http://free-electrons.com Creative Commons License© 2004-2010 Free Electrons, http://free-electrons.com Creative Commons License
Hex code (type L to list codes): cChanged system type of partition 1 to c (W95 FAT32 (LBA))
Now write your changes and exit:
Command (m for help): w The partition table has been altered! ...
Format this new partition:
sudo mkfs.vfat n beagleboot F 32 /dev/sdb1
Then, remove and insert your card again.
Your MMC/SD card is ready to use in case a problem happens.
Setting up serial communication with the board
To communicate with the board through the serial port, install a serial communication program, such as minicom:
aptget install minicom
Run minicom s, to enter Minicom's setup interface. In the Serial port setup subsection, change the serial device to /dev/ttyS0 (or /dev/ttyUSB0 if you are using a serial to USB adapter), and make sure that hardware flow control is disabled.
Once this is done, select Exit, to leave the setup interface and access the serial console.
You should now see the U-Boot prompt:
OMAP3 beagleboard.org #
You may need to reset the board, in case it already booting an existing Linux kernel.
You can now use U-Boot. Run the help command to see the available commands.
If you wish to access Minicom's menu, press [Ctrl][a] followed by [z]. You can then choose to exit by pressing the [x] key, for example.
You can then connect to /dev/ttyUSB0 using Minicom and use U-Boot.
U-boot recovery
Later during this course, if you make a mistake reflashing NAND flash, you may end up with a board that no longer boots.
If this happens, it's possible to boot the board on an MMC/SD card formatted according to the instructions described earlier in this lab.
To do this, download the MLO and uboot.bin files from http://free-electrons.com/labs/beagle/ , and copy them to the first, FAT formatted partition of your MMC/SD card.
You now need to change the boot order and make the board ignore the NAND flash contents. To do it:
• Hold the USER button
• Press the RESET butter and release it
3
Linux TrainingLab Book
Linux TrainingLab Book
Now that minicom is configured, you will just have to run minicom instead of minicom s, next time you need it.
If you don't like Minicom's interface, you could also try other programs with a graphical user interface: cutecom and gtkterm (aptget install cutecom gtkterm). Users familiar with Hyperterminal on Windows may prefer these programs.

© 2004-2010 Free Electrons, http://free-electrons.com Creative Commons License© 2004-2010 Free Electrons, http://free-electrons.com Creative Commons License
• Release the RESET button
U-boot should now start MMC/SD bootloader, allowing you to repair MLO and uboot.bin on NAND flash:
mmc initfatload mmc 0:1 80000000 MLO
This loads the file from MMC 0 partition 1 to memory at address 0x80000000
nandecc hw
This command enables OMAP hardware ECC for writing to NAND since the X-Loader (MLO) is loaded by the ROMCODE, which uses it.
nand erase 0 80000
This command erases a 0x80000 byte long space of the NAND flash from offset 0
nand write 80000000 0 80000
This command writes data to the NAND flash. The source is 0x80000000 (where we've loaded the file to store in the flash) and the destination is offset 0 of the NAND flash. The length of the copy is 0x80000 bytes, which corresponds to the space we've just erased before. It is important to erase the flash space before trying to write on it, otherwise it won't work.
You can now do the same with U-Boot:
mmc initfatload mmc 0:1 80000000 uboot.binnandecc swnand erase 80000 160000nand write 80000000 80000 160000
After flashing uboot.bin, you can remove MMC card, then reset the Beagle board. Your board should boot again as it did in the past.
You will find more details on this recovery process on http://elinux.org/BeagleBoardRecovery
That's enough for the moment! We will boot a Linux kernel in a later lab.
4
Linux TrainingLab book
Linux TrainingLab book
© 2004-2010 Free Electrons, http://free-electrons.com Creative Commons License© 2004-2010 Free Electrons, http://free-electrons.com Creative Commons License
Kernel - Kernel sources
Objective: Learn how to get the kernel sources and patch them.
After this lab, you will be able to
Get the kernel sources from the official location
Apply kernel patches
Setup
Go to the /home/<user>/felabs/sysdev/kernel directory.
Get the sources
Go to the Linux kernel web site (http://www.kernel.org/) and identify the latest stable version.
Just to make sure you know how to do it, check the version of the Linux kernel running on your machine.
We will use linux2.6.35, which this lab was tested with.
To practice the patch command later, download the full 2.6.34 sources. Unpack the archive, which creates a linux2.6.34 directory.
Apply patches
Install the patch command, either through the graphical package manager, or using the following command line:
sudo aptget install patch
Download the 2 patch files corresponding to the latest 2.6.35 stable release: a first patch to move from 2.6.34 to 2.6.35 and a second patch to move from 2.6.35 to 2.6.35.x.
Without uncompressing them (!), apply the 2 patches to the linux2.6.34 directory.
View one of the 2 patch files with vi or gvim (if you prefer a graphic editor), to understand the information carried by such a file. How are described added or removed files?
Rename the linux2.6.34 directory to linux2.6.35.<n>.
Embedded Linuxkernel usage
Training lab book
Embedded Linuxkernel usage
Training lab book
For your convenience, you may copy the source URL from your web browser and then use wget to download the sources from the command line:
wget <url>
wget can continue interrupted downloads
Vim supports supports syntax highlighting for patch files
Did you know it? gvim can open compressed files on the fly!
© 2004-2010 Free Electrons, http://free-electrons.com Creative Commons License© 2004-2010 Free Electrons, http://free-electrons.com Creative Commons License
Embedded Linuxkernel usage
Training lab book
Embedded Linuxkernel usage
Training lab book

© 2004-2010 Free Electrons, http://free-electrons.com Creative Commons License© 2004-2010 Free Electrons, http://free-electrons.com Creative Commons License
Kernel – Configuration and compiling
Objective: get familiar with configuring and compiling the kernel
After this lab, you will be able to
Configure, compile and boot your kernel on a virtual PC.
Mount and modify a root filesystem image by adding entriesto the /dev/ directory.
Setup
Stay in the /home/<user>/felabs/sysdev/kernel directory from the previous lab.
Objectives
The goal of this lab is to configure, build and boot a kernel for a minimalistic, virtual PC, emulated by the qemu emulator (http://qemu.org)
Kernel configuration
Run make xconfig to start the kernel configuration interface. The kernel configuration interface is provided as source code in the kernel, make xconfig compiles it automatically, but requires libraries and headers. You will need to install the libqt3mtdev package, which contains the Qt development files, and the g++ package, the C++ compiler.
In the interface, toggle the Option > Show Name option. This is useful sometimes, when the parameter name is more explicit than its description, or when you're are following guidelines which give the parameter name itself.
Also try the Option > Show All Options and Option > Show Debug Info options. They let you see all the parameters which wouldn't appear otherwise, because they depend on the values of other parameters. By clicking on the description of such a parameter, you will see its preconditions and understand why it is not selectable.
We recommend to fold up all categories, so that you can clearly see how the different options are organized in a dozen of top-level categories.
Configure your kernel for a minimalistic PC:
• Pentium-Pro processor (CONFIG_M686)
• IDE hard disk. For this, you will need to enable support for the PCI bus (CONFIG_PCI), support for the Intel ESB, ICH, PIIX3 and PIIX4 PATA/SATA controllers (CONFIG_ATA_PIIX), and finally support for SCSI disk (CONFIG_BLK_DEV_SD). The kernel supports IDE disks through the SCSI stack, thanks to libata. So your IDE disk will actually appear as a SCSI disk in Linux.
• ext2 filesystem (CONFIG_EXT2_FS)
Embedded Linuxkernel usage
Training lab book
Embedded Linuxkernel usage
Training lab book
Also try with make menuconfig. Though it is not graphical, some people prefer this interface. As the menuconfig interface is based on the Ncurses library, you will have to install the libncursesdev package to use it.
We advise you to unselect all options at once, and add only the ones that you need. Get back to your slides to find how to do this efficiently!
© 2004-2010 Free Electrons, http://free-electrons.com Creative Commons License© 2004-2010 Free Electrons, http://free-electrons.com Creative Commons License
• Support for elf binaries (CONFIG_BINFMT_ELF)
• Specify a version suffix, so that you can identify your kernel in the running system by running uname ror cat /proc/version.
Take your time to have a look at other available features!
Don't hesitate to ask your trainer for more details about a given option.
Compile your kernel
Just run:
make
The qemu PC emulator
qemu is a fast tool which can emulate several processors (x86, ppc, arm, sparc, mips...) or even entire systems.
By using an emulator, you won't have to reboot your workstation over and over again to test your new kernel.
To install qemu on your system, simply install the qemu package.
Booting your kernel
You are now ready to (try to) boot your new kernel. We will use the data/linux_i386.img file as root filesystem.
Back to the main lab directory, run the run_qemu script (just adjust the path to the Linux kernel image):
qemu m 32 kernel linux<ver>/arch/x86/boot/bzImage \append "root=/dev/sda rw" \hda data/linux_i386.img
If the kernel doesn't manage to boot, and if the error message is explicit enough, try to guess what is missing in your kernel configuration, and rebuild your kernel.
Don't hesitate to show your issue to your trainer.
If you are really stuck, you can try with the rescue config file in the data/ directory, which your instructor is supposed to have checked.
If everything goes right, you should reach the message :
Freeing unused kernel memory: XXXk freed.
And nothing after. This happens because no console device file is available in the root filesystem. Without such a file, the shell has no way to interact with the hardware: reading what you type on the keyboard, and displaying the output of commands on the screen.
In our case, the device file the shell is trying to use is /dev/console. All you need is to create it!
Type [Ctrl] C in the terminal running qemu to stop the emulation or close the qemu window.
Adding a console device to the root filesystem
Use the following commands in
Embedded Linuxkernel usage
Training lab book
Embedded Linuxkernel usage
Training lab book
qemu is going to emulate a virtual PC with the following features:m: specifies its amount of RAM.hda: specifies the contents (and size!) of the virtual hard disk.kernel: kernel image to boot. qemu is here a bootloader too. Before starting the emulation, it copies the kernel file to the RAM of the virtual PC.append: options for the kernel. In particular, root=/dev/sda instructs the kernel to boot on the first SCSI hard disk of the virtual PC.
Here, we won't need to run the make install command. If we ran it, the kernel would be installed for the workstation PC, while our plans are to use an emulated PC.
© 2004-2010 Free Electrons, http://free-electrons.com Creative Commons License© 2004-2010 Free Electrons, http://free-electrons.com Creative Commons License
/home/<user>/felabs/sysdev/kernel to access the contents of the filesystem image:
mkdir fssudo mount o loop data/linux_i386.img fs/
Now, create the dev/console device that is missing. You can check the /dev/console device file on your training workstation to find out the file type as well as the major and minor device numbers.
Once this is done, unmount the root filesystem:sudo umount fs
Rerun your qemu command. Now, you should reach a command line shell.
Run a few commands in the virtual PC shell.
Kernel version
Query the version of the running kernel and make sure you find the version suffix that you specified at configuration time.
Conclusion
Well done! Now you know how to configure, compile and boot a kernel on a minimalistic PC.
Going further
If you completed your lab before the others...
• Add framebuffer console support to your kernel, and choose the VGA 16 color framebuffer driver. Then, add boot logo support. You should now see a penguin logo when your virtual PC boots.
• Add SMP (Symmetric Multi Processing) support to your kernel. Using the smp option of qemu, simulate a PC with 4 processors. You should now see 4 penguins on the framebuffer console, indicating the number of CPUs found on your system!
• Add framebuffer console rotation support to your kernel, and modify the kernel command line (append parameter again) to boot your kernel with a 90 degree anticlockwise rotation.
Embedded Linuxkernel usage
Training lab book
Embedded Linuxkernel usage
Training lab book
root permissions are required to create an entry in /mnt/, as well as to run the mount command
Whatever the architecture Linux runs on, major and minor device numbers are always the same.
To unmount a filesystem, remember that you must be outside of the directory where the filesystem is mounted. Otherwise umount will fail with Device or resource busy.
If you don't umount a filesystem or do not use special mount options, you can't be sure that your changes have already been committed on the physical media (the .img file in this case).
Don't be surprised if the whole kernel sources are recompiled after enabling SMP support. This changes many data structures throughout the kernel sources.
You will find details about how to use console rotation in the Documentation/fb/fbcon.txt file.

© 2004-2010 Free Electrons, http://free-electrons.com Creative Commons License© 2004-2010 Free Electrons, http://free-electrons.com Creative Commons License
Embedded Linuxkernel usage
Training lab book
Embedded Linuxkernel usage
Training lab book
© 2004-2010 Free Electrons, http://free-electrons.com Creative Commons License© 2004-2010 Free Electrons, http://free-electrons.com Creative Commons License
Kernel – Cross-compiling
Objective: Learn how to cross-compile a kernel for an OMAP target platform.
After this lab, you will be able to
Set up a cross-compiling environment
Configure the kernel Makefile accordingly
Cross compile the kernel for the Beagle arm board
Use U-Boot to download the kernel
Check that the kernel you compiled can boot the system
Setup
Go to the /home/<user>/felabs/sysdev/xkernel directory.
If you haven't done the previous labs, install the following packages: libqt3mtdev, g++
Also install ubootmkimage.
Target system
We are going to cross-compile and boot a Linux kernel for the TI OMAP Beagle board.
Getting the sources
We are going to use the Linux 2.6.35 sources for this lab. This time, we will use ketchup to fetch these sources.
First, create an empty linux2.6.35 directory and go into it. Now, run:
ketchup G 2.6.35
Cross-compiling environment setup
To cross-compile Linux, you need to install the cross-compiling toolchain. We will use the cross-compiling toolchain that we previously produced, so we just need to make it available in the PATH:
export PATH=/usr/local/xtools/armunknownlinuxuclibcgnueabi/bin:$PATH
Makefile setup
Modify the toplevel Makefile file to cross-compile for the arm platform using the above toolchain.
Linux kernel configuration
By running make help, find the proper Makefile target to configure the kernel for the OMAP Beagle board. Once found, use this target to configure the kernel with the ready-made configuration.
Don't hesitate to visualize the new settings by running make xconfig afterwards!
1
Linux TrainingLab Book
Linux TrainingLab Book
Ketchup would refuse to run in a non-empty directory which doesn't contain Linux sources.
© 2004-2010 Free Electrons, http://free-electrons.com Creative Commons License© 2004-2010 Free Electrons, http://free-electrons.com Creative Commons License
Integrating the root filesystem
You need a root filesystem to boot from. Configure your kernel to use root filesystem in data/rootfs/ as an initramfs.
Before compiling your kernel, replace ttyS0 by ttyS2 in data/rootfs/etc/inittab if needed. That's needed because OMAP3 uses ttyS2 as serial console device.
Cross compiling
You're now ready to cross-compile your kernel. Simply run:
make
and wait a while for the kernel to compile.
Look at the end of the kernel build output to see which file contains the kernel image.
However, the default image produced by the kernel build process is not suitable to be booted from U-Boot. A post-processing operation must be performed using the mkimage tool provided by U-Boot developers. This tool has already been installed in your system as part of the ubootmkimage package. To run the post-processing operation on the kernel image, simply run:
make uImage.
Setting up serial communication with the board
Plug the Beagle board on your computer. Start Minicom on /dev/ttyS0, or on /dev/ttyUSB0 if you are using a serial to USB adapter.
You should now see the U-Boot prompt:
OMAP3 beagleboard.org #
Load and boot the kernel using U-Boot
Copy the generated uImage file to the MMC card. Then boot the beagleboard and hook in U-Boot. Then do the following :
• Initialize the mmc subsystem:mmc init
• Load uImage from first partition of the MMC into RAM at address 0x80000000:fatload mmc 0 80000000 uImage
• Boot the kernel:bootm 0x80000000.
You should see Linux boot and reach a shell command line. Congratulations!
You can automate all this every time the board is booted or reset. To do it, run the reboot command in Linux to get back to U-boot, and run:
setenv bootcmd 'mmc init;fatload mmc 0 80000000 uImage;bootm 80000000'saveenv
2
Linux TrainingLab book
Linux TrainingLab book
See how simple this is compared to having to create your own filesystem!
See how simple this is compared to having to create your own filesystem!
© 2004-2010 Free Electrons, http://free-electrons.com Creative Commons License© 2004-2010 Free Electrons, http://free-electrons.com Creative Commons License
Flashing the kernel in NAND flash
In order to let the kernel boot on the board autonomously, we can flash it in the NAND flash available on the Beagle board. The NAND flash can be manipulated in U-Boot using the nand command, which features several subcommands. Run help nand to see the available subcommands and their options.
The NAND flash is logically split in three partitions by the Linux kernel, as defined in the omap3beagle_nand_partitions definition in the board-specific file arch/arm/machomap2/boardomap3beagle.c. The first 3 partitions are dedicated to X-loader, to U-boot and to its environment variables. The 4th partition, which is 4 MB big, from NAND address 0x280000 to 0x680000, is reserved for the kernel.
So, let's start by erasing the corresponding 4MB of NAND flash:
nandecc swnand erase 0x280000 0x400000
(NAND addr) (size)
Then, copy the kernel from the MMC/SD card into memory, using the same address as before.
Then, flash the kernel image:
nand write 0x80000000 0x280000 0x400000 (RAM addr) (NAND addr) (size)
Then, we should be able to boot the kernel from the NAND using:
nboot 0x80000000 0 0x280000 (RAM addr) (dev nb) (NAND addr)bootm 0x80000000
nboot reads the uImage header in flash, and only copies the right amount of data to RAM.
Now, you can make the board boot on NAND flash by default:
setenv bootcmd 'nboot 0x80000000 0 0x280000; bootm 0x80000000'saveenv
Now, power off the board, remove the MMC/SD card, and power it on again to check that it boots fine from NAND flash. Check that this is really your own version of the kernel that's running.
3
Linux TrainingLab Book
Linux TrainingLab Book
The easiest way to compute these start and end addresses is to read them in the kernel bootup messages!
Here, the size of the copy to NAND is a bit too pessimistic, but we know for sure that the kernel size won't exceed 4 MB (0x400000).
© 2004-2010 Free Electrons, http://free-electrons.com Creative Commons License© 2004-2010 Free Electrons, http://free-electrons.com Creative Commons License
Sysdev – A tiny embedded system
Objective: making a tiny yet full featured embedded system.
After this lab, you will
be able to configure and build a Linux kernel that boots on a directory on your workstation, shared through the network by NFS.
be able to create and configure a minimalistic root filesystem from scratch (ex nihilo, out of nothing, entirely hand made...) for the Beagle board
understand how small and simple an embedded Linux system can be.
be able to install BusyBox on this filesystem.
be able to create a simple startup script based on /sbin/init.
be able to set up a simple web interface for the target.
have an idea of how much RAM a Linux kernel smaller than 1 MB needs.
Lab implementation
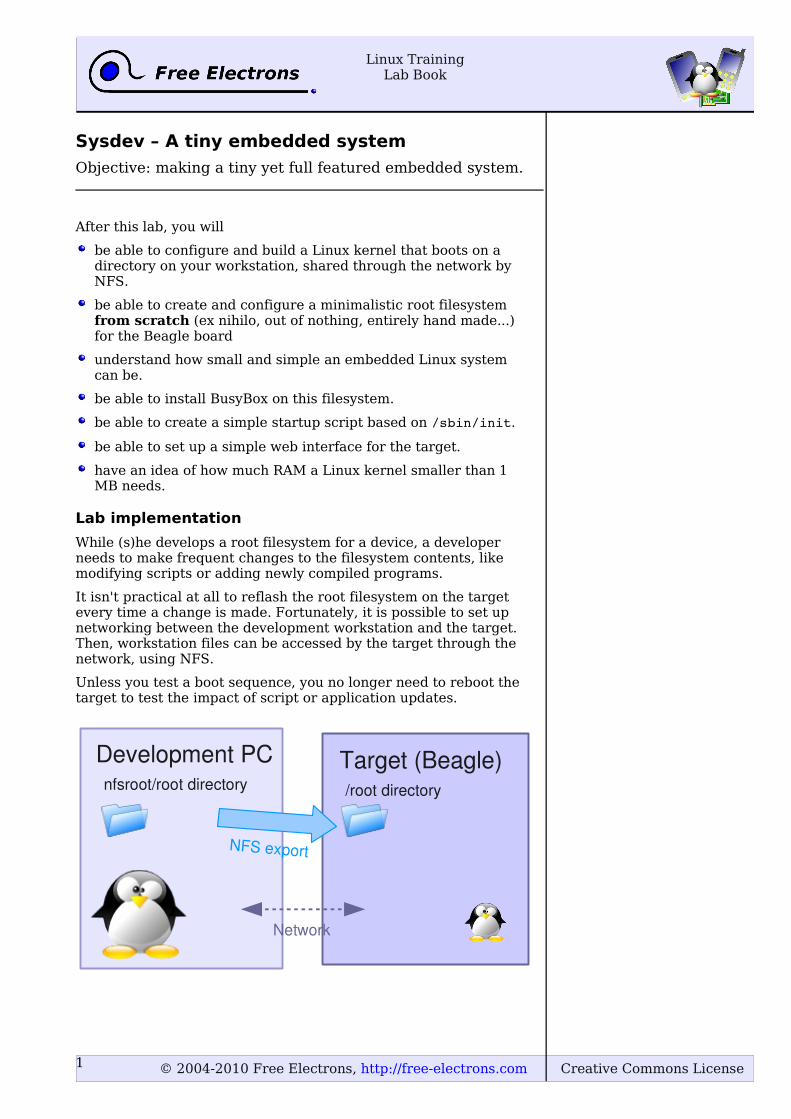
While (s)he develops a root filesystem for a device, a developer needs to make frequent changes to the filesystem contents, like modifying scripts or adding newly compiled programs.
It isn't practical at all to reflash the root filesystem on the target every time a change is made. Fortunately, it is possible to set up networking between the development workstation and the target. Then, workstation files can be accessed by the target through the network, using NFS.
Unless you test a boot sequence, you no longer need to reboot the target to test the impact of script or application updates.
1
Linux TrainingLab Book
Linux TrainingLab Book
Development PC Target (Beagle)/root directorynfsroot/root directory
Network
NFS export
© 2004-2010 Free Electrons, http://free-electrons.com Creative Commons License© 2004-2010 Free Electrons, http://free-electrons.com Creative Commons License
Setup
Go to the /home/<user>/felabs/sysdev/tinysystem/ directory.
Reuse the latest 2.6.35 release from the previous lab by copying them to the current directory.
Kernel configuration
Apply the default configuration settings for the board.
Check that it has the configuration options that enable booting on a root filesystem sitting on an NFS remote directory.
We will do networking using an USB to Ethernet adapter. To use this device, add the below configuration settings to your kernel:
• Multi-purpose USB Networking Framework (CONFIG_USB_USBNET=y)
• Inventra HDRC USB Peripheral (TI, ADI, ...) (CONFIG_USB_NET_AX8817X=y)
Compile your kernel and generate the uImage kernel image suitable for U-Boot. Copy this image to the MMC/SD card.
Root filesystem with Busybox
Create an nfsroot/ directory that will contain the root filesystem for the target.
Download the latest BusyBox 1.17.x release and configure it with the configuration file provided in the data/ directory.
At least, make sure you build BusyBox statically!
Build BusyBox using the toolchain that you used to build the kernel.
Install BusyBox in the root filesystem by running make install.
Setting up the NFS server
Install the NFS server by installing the nfskernelserver package if you don't have it yet. Once installed, edit the /etc/exports file as root to add the following lines, assuming that the IP address of your board will be 192.168.0.100:
/home/<user>/felabs/sysdev/tinysystem/nfsroot192.168.0.100(rw,no_root_squash,no_subtree_check)
The path and the options must be on the same line!
Then, restart the NFS server:
sudo /etc/init.d/nfskernelserver restart
Configure host-side networking
Insert the USB-Ethernet dongle in the USB host connector of your Beagle. With an Ethernet cable, connect this dongle to your PC (possibly using another USB-Ethernet dongle if you already use the Ethernet connector of your workstation for Internet access).
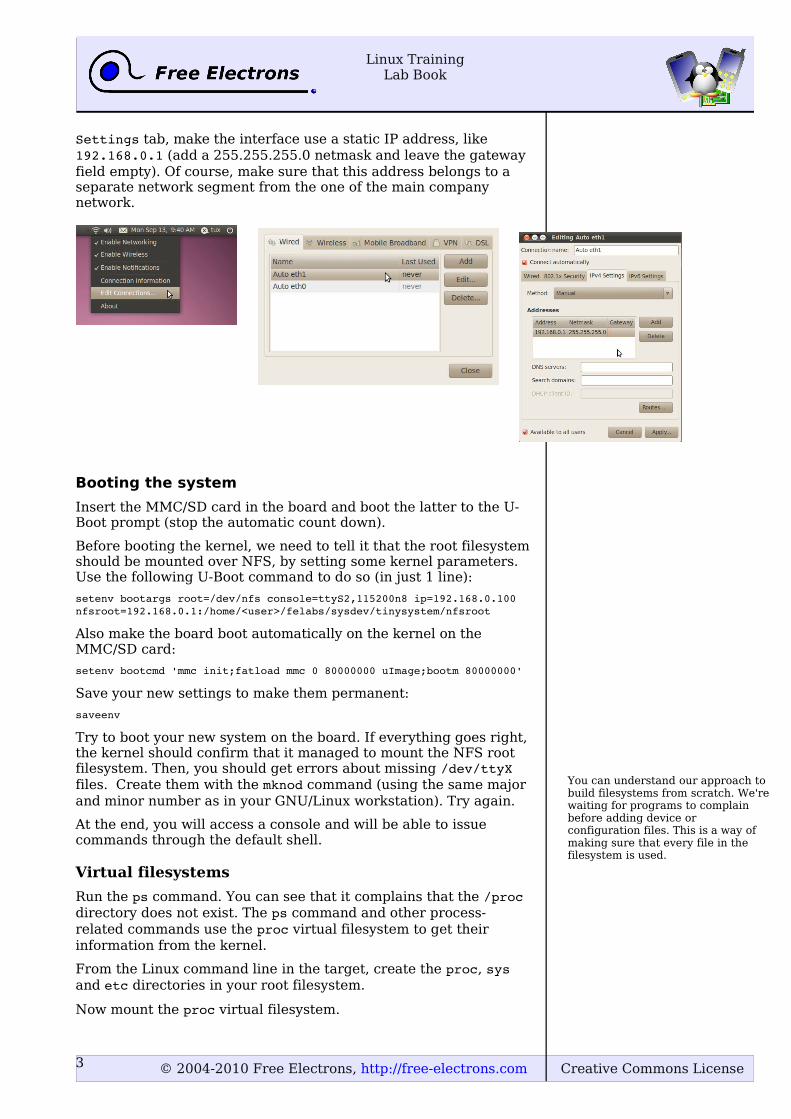
To configure the Ethernet interface on your workstation, right-click on the Network Manager tasklet on your desktop, and select Edit Connections. Select the wired network connection, and in the IPv4
2
Linux TrainingLab book
Linux TrainingLab book
Compiling Busybox statically in the first place makes it easy to set up the system, because there are no dependencies on libraries. Later on, we will set up shared libraries and recompile Busybox.
© 2004-2010 Free Electrons, http://free-electrons.com Creative Commons License© 2004-2010 Free Electrons, http://free-electrons.com Creative Commons License
Settings tab, make the interface use a static IP address, like 192.168.0.1 (add a 255.255.255.0 netmask and leave the gateway field empty). Of course, make sure that this address belongs to a separate network segment from the one of the main company network.
Booting the system
Insert the MMC/SD card in the board and boot the latter to the U-Boot prompt (stop the automatic count down).
Before booting the kernel, we need to tell it that the root filesystem should be mounted over NFS, by setting some kernel parameters. Use the following U-Boot command to do so (in just 1 line):
setenv bootargs root=/dev/nfs console=ttyS2,115200n8 ip=192.168.0.100 nfsroot=192.168.0.1:/home/<user>/felabs/sysdev/tinysystem/nfsroot
Also make the board boot automatically on the kernel on the MMC/SD card:
setenv bootcmd 'mmc init;fatload mmc 0 80000000 uImage;bootm 80000000'
Save your new settings to make them permanent:
saveenv
Try to boot your new system on the board. If everything goes right, the kernel should confirm that it managed to mount the NFS root filesystem. Then, you should get errors about missing /dev/ttyX files. Create them with the mknod command (using the same major and minor number as in your GNU/Linux workstation). Try again.
At the end, you will access a console and will be able to issue commands through the default shell.
Virtual filesystems
Run the ps command. You can see that it complains that the /proc directory does not exist. The ps command and other process-related commands use the proc virtual filesystem to get their information from the kernel.
From the Linux command line in the target, create the proc, sys and etc directories in your root filesystem.
Now mount the proc virtual filesystem.
3
Linux TrainingLab Book
Linux TrainingLab Book
You can understand our approach to build filesystems from scratch. We're waiting for programs to complain before adding device or configuration files. This is a way of making sure that every file in the filesystem is used.
© 2004-2010 Free Electrons, http://free-electrons.com Creative Commons License© 2004-2010 Free Electrons, http://free-electrons.com Creative Commons License
Now that /proc is available, test again the ps command.
Note that you can also halt your target in a clean way with the halt command, thanks to proc being mounted.
System configuration and startup
The first userspace that gets executed by the kernel is /sbin/init and its configuration file is /etc/inittab.
The docs/BusyBox.txt, generated during the BusyBox compilation process, contains the documentation of BusyBox. Unfortunately, due to the recent switch to an automatically generated documentation, some informations are missing. In particular, the information about the /etc/inittab file are only visible in the include/usage.h file.
Create a /etc/inittab file and a /etc/init.d/rcS startup script defined in /etc/inittab. In this startup script, mount the /proc and /sys filesystems.
Any issue after doing this?
Switching to shared libraries
Take the hello.c program supplied in the data directory. Cross-compile it for ARM, dynamically-linked with the libraries, and run it on the target.
You will first encounter a not found error caused by the absence of the lduClibc.so.0 executable, which is the dynamic linker required to execute any program compiled with shared libraries. Using the find command (see examples in your command memento sheet), look for this file in the toolchain install directory, and copy it to the lib/ directory on the target.
Then, running the executable again and see that the loader executes and finds out which shared libraries are missing. Similarly, find these libraries in the toolchain and copy them to lib/ on the target.
Once the small test program works, recompile Busybox without the static compilation option, so that Busybox takes advantages of the shared libraries that are now present on the target.
Implement a web interface for your device
Replicate data/www/ to the /www directory in your target root filesystem.
Now, run the BusyBox http server from the command line:/usr/sbin/httpd h /www/ &
If you use a proxy, configure your host browser so that it doesn't go through the proxy to connect to the target IP address, or simply disable proxy usage. Now, test that your web interface works well by opening http://192.168.0.100:80 on the host.
See how the dynamic pages are implemented. Very simple, isn't it?
4
Linux TrainingLab book
Linux TrainingLab book
docs/BusyBox.txt only exists if you ran the make command. It won't exist if you directly run make install.
Actually, you will probably have several instructive surprises when trying to implement this. Don't hesitate to share your questions with your instructor!
© 2004-2010 Free Electrons, http://free-electrons.com Creative Commons License© 2004-2010 Free Electrons, http://free-electrons.com Creative Commons License
How much RAM does your system need?
Check the /proc/meminfo file and see how much RAM is used by your system.
You can try to boot your system with less memory, and see whether it still works properly or not. For example, to test whether 6 MB are enough, boot the kernel with the mem=6M parameter. Linux will then use just 6 MB of RAM, and ignore the rest.
5
Linux TrainingLab Book
Linux TrainingLab Book
© 2004-2009 Free Electrons, http://free-electrons.com Creative Commons License© 2004-2009 Free Electrons, http://free-electrons.com Creative Commons License
Filesystems – Block file systems
Objective: configure and boot an embedded Linux system relying on block storage.
After this lab, you will be able to
Manage partitions on block storage.
Produce file system images.
Configure the kernel to use these file systems
Use the tmpfs file system to store temporary files
Goals
After doing the “A tiny embedded system” lab, we are going to copy the filesystem contents to the MMC flash drive. The filesystem will be split into several partitions, and your Beagle board will be booted with this MMC card, without using NFS any more.
Setup
Go to /home/<user>/felabs/sysdev/fs.
Reuse the kernel that you used in /home/<user>/felabs/sysdev/tinysystem.
Recompile it with support for SquashFS and ext3.
Boot your board with this new kernel and on the NFS filesystem you used in this previous lab.
MMC/SD disk partitioning
Using fdisk on your workstation,we are going to add 2 new partitions to the MMC/SD card used in the previous labs.
fdisk allows to partition block devices such as hard drives or USB flash drives. Partitioning consists of creating a descriptor table containing information on the different partitions on the device.
The first one will be used to store the root file system and does not require more than 1MB. The second partition will handle the target local storage and will the use all the remaining space on the MMC/SD card.
First create a primary partition to hold the root filesystem.
In fdisk, type:
Command (m for help): n Command action e extended p primary partition (14) p Partition number (14): 2 First cylinder (35239, default 35): 35 Last cylinder, +cylinders or +size{K,M,G} (35239, default 239): +1M
1
Linux TrainingLab Book
Linux TrainingLab Book
If you didn't do or complete the tinysystem lab, you can use the data/rootfs directory instead.
Accept the default value for the first cylinder. That's the first available sector.
© 2004-2009 Free Electrons, http://free-electrons.com Creative Commons License© 2004-2009 Free Electrons, http://free-electrons.com Creative Commons License
Now, create another primary partition to hold the general purpose filesystem storing user and application data. Its size can fill the remaining space on the card (accept the last cylinder proposed by default):
Command (m for help): n Command action e extended p primary partition (14) p Partition number (14): 3 First cylinder (36239, default 36): 36 Last cylinder, +cylinders or +size{K,M,G} (36239, default 239): 239Use 'w' to write your changes. To reload the new partition table, remove the MMC card and plug it in again.
Data partition on the MMC disk
Using the mkfs.ext3 create a journaled file system on the third partition of the MMC disk. Move the contents of the www/upload/files directory (in your target root filesystem) into this new partition.
Connect the MMC disk to your board while it's running Linux. Using the dmesg command, or having a look at the console, see how the kernel detects the partitions and which device names it gives to them.
Modify the setup scripts in your root filesystem to mount the third disk partition on /www/upload/files.
Reboot your target system and with the mount command, check that /www/upload/files is now a mount point for the third MMC disk partition. Also make sure that you can still upload new images, and that these images are listed in the web interface.
Adding a tmpfs partition for log files
For the moment, the upload script was storing its log file in /www/upload/files/upload.log. To avoid seeing this log file in the directory containing uploaded files, let's store it in /var/log instead.
Add the /var/log/ directory to your root filesystem and modify the startup scripts to mount a tmpfs filesystem on this directory.
Modify the www/cgibin/upload.cfg configuration file to store the log file in /var/log/upload.log. You will loose your log file each time you reboot your system, but that's OK in our system. That's what tmpfs is for: temporary data that you don't need to keep across system reboots.
Reboot your system and check that it works as expected.
Making a SquashFS image
We are going to store the root filesystem in a SquashFS filesystem in the second partition of the MMC disk.
In order to create SquashFS images on your host, you need to install the squashfstools package. Now create a SquashFS image
2
Linux TrainingLab book
Linux TrainingLab book
Before changing your startup scripts, you may also try your mount command in the running system, to make sure that it works as expected.
© 2004-2009 Free Electrons, http://free-electrons.com Creative Commons License© 2004-2009 Free Electrons, http://free-electrons.com Creative Commons License
of your NFS root directory.
Finally, using the dd command, copy the file system image to the second partition of the MMC disk.
Booting on the SquashFS partition
In the U-boot shell, configure the kernel command line to use the second partition of the MMC disk as the root file system. Also add the rootwait boot argument, to wait for the MMC disk to be properly initialized before trying to mount the root filesystem.
Check that your system still works. Congratulations if it does!
3
Linux TrainingLab Book
Linux TrainingLab Book
Caution: read this carefully before proceeding. You could destroy existing partitions on your PC!
Do not make the confusion between the device that is used by your board to represent your MMC disk (probably /dev/sda1), and the device that your workstation uses (probably /dev/sdb1).
So, don't use the /dev/sda1 device to reflash your MMC disk from your workstation. People have already destroyed their Windows partition by making this mistake.
If you don't do this, you will get a kernel panic, because of a failure to mount the root filesystem, being not ready yet.
Caution: read this carefully before proceeding. You could destroy existing partitions on your PC!
Do not make the confusion between the device that is used by your board to represent your USB-disk (probably /dev/sda1), and the device that your workstation uses (probably /dev/sdb1).
So, don't use the /dev/sda1 device to reflash your USB drive from your workstation. People have already destroyed their main Windows or Linux partition by making this mistake.

© 2004-2009 Free Electrons, http://free-electrons.com Creative Commons License© 2004-2009 Free Electrons, http://free-electrons.com Creative Commons License4
Linux TrainingLab book
Linux TrainingLab book
© 2004-2009 Free Electrons, http://free-electrons.com Creative Commons License© 2004-2009 Free Electrons, http://free-electrons.com Creative Commons License
Filesystems – Flash file systems
Objective: Understand flash file systems usage and their integration on the target.
After this lab, you will be able to
Prepare filesystem images and flash them.
Define partitions in embedded flash storage.
Setup
Stay in /home/<user>/felabs/sysdev/fs.
Install the mtdutils package, which will be useful to create JFFS2 filesystem images.
Goals
Instead of using an external MMC card as in the previous lab, we will make our system use its internal flash storage.
The root filesystem will still be in a SquashFS filesystem, but this time put on an MTD partition. Read/write data will be stored in a JFFS2 filesystem in another MTD partition.
Filesystem image preparation
Prepare a JFFS2 filesystem image from the /www/uploads/files directory from the previous lab, specifying an erase block size of 128KiB. Write down the size of the image file, and check that it is a multiple of the erase block size.
Modify the root filesystem to mount a JFFS2 filesystem on the third flash partition, instead of an ext3 filesystem on the third MMC disk partition. Update your SquashFS image.
Enabling NAND flash and filesystems
Recompile your kernel with support for JFFS2 and for support for MTD partitions specified in the kernel command line(CONFIG_MTD_CMDLINE_PARTS).
Also enable support for the flash chips on the board (MTD_NAND_OMAP2), but make sure that MTD_NAND_OMAP_PREFETCH is deselected (incompatible with SquashFS at the moment)
Update your kernel image on flash.
MTD partitioning and flashing
Memory layout and partitioning can be defined inside kernel sources, naturally in the arch/<arch>/<march>/<board>.c since it is board dependent. Nevertheless, during device development, it can be useful to define partitions at boot time, on the kernel command line.
Check the size of the SquashFS image of the root filesystem.
Enter the U-Boot shell and erase NAND flash, from offset 0x00680000, up to the end of the NAND flash (Erase size : 0x0f980000 bytes)
5
Linux TrainingLab Book
Linux TrainingLab Book
© 2004-2009 Free Electrons, http://free-electrons.com Creative Commons License© 2004-2009 Free Electrons, http://free-electrons.com Creative Commons License
Using the fatload command, download and flash the SquashFS image at the beginning of the erased flash area.
Using the fatload command, download and flash the JFFS2 image at the first MiB boundary following the end of the SquashFS image in flash.
Look at the way MTD partitions are defined in the kernel sources (arch/arm/mach-omap2/board-omap3beagle.c)
Set the bootargs variable so that you define 3 MTD partitions
● One that overlays the slots for the X-loader, U-Boot, U-Boot environment variables and the Linux kernel.
● One for the root filesystem (SquashFS)
● One for the data filesystem (jffs2)
Don't forget to make the root parameter point to the root filesystem in flash.
Boot the target, check that MTD partitions are well configured, and that your system still works as expected.
6
Linux TrainingLab book
Linux TrainingLab book
© 2004-2010 Free Electrons, http://free-electrons.com Creative Commons License© 2004-2010 Free Electrons, http://free-electrons.com Creative Commons License
Third party libraries and applications
Objective: Learn how to leverage existing libraries and applications: how to configure, compile and install them.
To illustrate how to use existing libraries and applications, we will extend the small root filesystem built in the “A tiny embedded system” lab to add the DirectFB graphic library and sample applications using this library. Because many boards do not have a display, we will test the result of this lab with Qemu.
We'll see that manually re-using existing libraries is quite tedious, so that more automated procedures are necessary to make it easier. However, learning how to perform these operations manually will significantly help you when you'll face issues with more automated tools.
Figuring out library dependencies
As most libraries, DirectFB depends on other libraries, and these dependencies are different depending on the configuration chosen for DirectFB. In our case, we will enable support for:
● PNG image loading;
● JPEG image loading;
● Font rendering using a font engine.
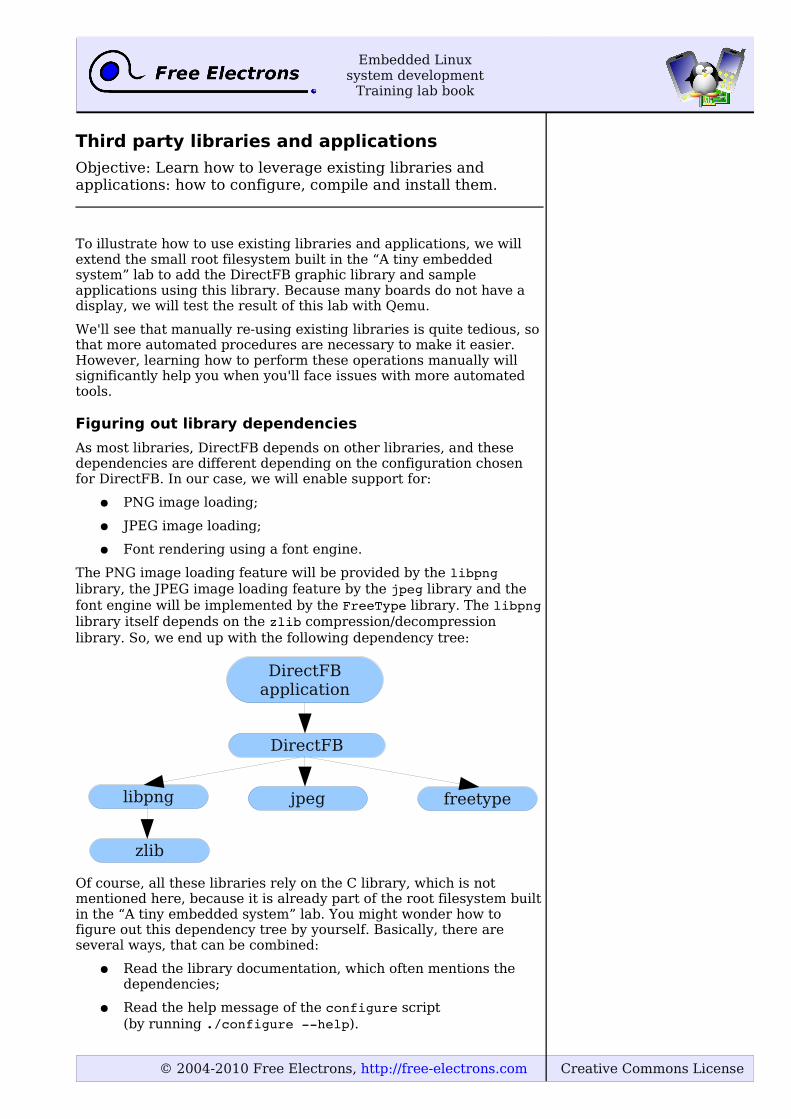
The PNG image loading feature will be provided by the libpng library, the JPEG image loading feature by the jpeg library and the font engine will be implemented by the FreeType library. The libpng library itself depends on the zlib compression/decompression library. So, we end up with the following dependency tree:
Of course, all these libraries rely on the C library, which is not mentioned here, because it is already part of the root filesystem built in the “A tiny embedded system” lab. You might wonder how to figure out this dependency tree by yourself. Basically, there are several ways, that can be combined:
● Read the library documentation, which often mentions the dependencies;
● Read the help message of the configure script(by running ./configure help).
Embedded Linuxsystem development
Training lab book
Embedded Linuxsystem development
Training lab book
DirectFBapplication
DirectFB
libpng jpeg freetype
zlib
© 2004-2010 Free Electrons, http://free-electrons.com Creative Commons License© 2004-2010 Free Electrons, http://free-electrons.com Creative Commons License
● By running the configure script, compiling and looking at the errors.
To configure, compile and install all the components of our system, we're going to start from the bottom of the tree with zlib, then continue with libpng, jpeg and FreeType, to finally compile DirectFB and the DirectFB sample applications.
Preparation
For our cross-compilation work, we will need to separate spaces:
● A «staging» space in which we will directly install all the packages: non-stripped versions of the libraries, headers, documentation and other files needed for the compilation. This «staging» space can be quite big, but will not be used on our target, only for compiling libraries or applications;
● A «target» space, in which we will copy only the required files from the «staging» space: binaries and libraries, after stripping, configuration files needed at runtime, etc. This target space will take a lot less space than the «staging» space, and it will contain only the files that are really needed to make the system work on the target.
To sum up, the «staging» space will contain everything that's needed for compilation, while the «target» space will contain only what's needed for execution.
So, in /home/<user>/felabs/sysdev/thirdparty, create two directories: staging and target.
For the target, we need a basic system with BusyBox, device nodes and initialization scripts. We will re-use the system built in the “A tiny embedded system” lab, so copy this system in the target directory:
sudo cp a /home/<user>/felabs/sysdev/tinysystem/nfsroot/* target/
The copy must be done as root, because the root filesystem of the “A tiny embedded system” lab contains a few device nodes.
Testing
Make sure the target/ directory is exported by your NFS server by adding the following line to /etc/exports:
/home/<user>/felabs/sysdev/thirdparty/target 172.20.0.2(rw,no_root_squash,no_subtree_check)
And restart your NFS server.
Install the Qemu emulator for non-x86 architectures by installing the qemukvmextras package.
Modify the /etc/qemuifup script so that it just contains 1 line:
/sbin/ifconfig $1 172.20.0.1
Then, run Qemu with the provided script:
./run_qemu
The system should boot and give you a prompt.
Embedded LinuxSystem development
Training lab book
Embedded LinuxSystem development
Training lab book
By default, Qemu configures bridged networking, but we will use a routed network instead.
© 2004-2010 Free Electrons, http://free-electrons.com Creative Commons License© 2004-2010 Free Electrons, http://free-electrons.com Creative Commons License
zlib
Zlib is a compression/decompression library available at http://www.zlib.net/. Download version 1.2.5, and extract it in /home/<user>/felabs/sysdev/thirdparty/.
By looking at the configure script, we see that this configure script has not been generated by autoconf (otherwise it would contain a sentence like « Generated by GNU Autoconf 2.62 »). Moreover, the project doesn't use automake since there are no Makefile.am files. So zlib uses a custom build system, not a build system based on the classical autotools.
Let's try to configure and build zlib:
./configuremake
You can see that the files are getting compiled with gcc, which generates code for x86 and not for the target platform. This is obviously not what we want, so we tell the configure script to use the ARM cross-compiler:
CC=armlinuxgcc ./configure
Of course, the armlinuxgcc cross-compiler must be in your PATH
prior to running the configure script. The CC environment variable is the classical name for specifying the compiler to use. Moreover, the beginning of the configure script tells us about this:
# To impose specific compiler or flags or# install directory, use for example: # prefix=$HOME CC=cc CFLAGS="O4" ./configure
Now when you compile with make, the cross-compiler is used. Look at the result of compiling: a set of object files, a file libz.a and set of libz.so* files.
The libz.a file is the static version of the library. It has been generated using the following command :
ar rc libz.a adler32.o compress.o crc32.o gzio.o uncompr.o deflate.o trees.o zutil.o inflate.o infback.o inftrees.o inffast.o
It can be used to compile applications linked statically with the zlib library, as shown by the compilation of the example program:
armlinuxgcc O3 DUSE_MMAP o example example.o L. libz.a
In addition to this static library, there is also a dynamic version of the library, the libz.so* files. The shared library itself is libz.so.1.2.5, it has been generated by the following command line :
armlinuxgcc shared Wl,soname,libz.so.1 o libz.so.1.2.5 adler32.o compress.o crc32.o gzio.o uncompr.o deflate.o trees.o zutil.o inflate.o infback.o inftrees.o inffast.o
And creates symbolic links libz.so and libz.so.1:
ln s libz.so.1.2.3 libz.so ln s libz.so.1.2.3 libz.so.1
Embedded Linuxsystem development
Training lab book
Embedded Linuxsystem development
Training lab book
© 2004-2010 Free Electrons, http://free-electrons.com Creative Commons License© 2004-2010 Free Electrons, http://free-electrons.com Creative Commons License
These symlinks are needed for two different reasons:
● libz.so is used at compile time when you want to compile an application that is dynamically linked against the library. To do so, you pass the lLIBNAME option to the compiler, which will look for a file named lib<LIBNAME>.so. In our case, the compilation option is -lz and the name of the library file is libz.so. So, the libz.so symlink is needed at compile time;
● libz.so.1 is needed because it is the SONAME of the library. SONAME stands for « Shared Object Name ». It is the name of the library as it will be stored in applications linked against this library. It means that at runtime, the dynamic loader will look for exactly this name when looking for the shared library. So this symbolic link is needed at runtime.To know what's the SONAME of a library, you can use:armlinuxreadelf d libz.so.1.2.5and look at the (SONAME) line. You'll also see that this library needs the C library, because of the (NEEDED) line on libc.so.0.The mechanism of SONAME allows to change the library without recompiling the applications linked with this library. Let's say that a security problem is found in zlib 1.2.5, and fixed in the next release 1.2.6. You can recompile the library, install it on your target system, change the link libz.so.1 so that it points to libz.so.1.2.6 and restart your applications. And it will work, because your applications don't look specifically for libz.so.1.2.5 but for the SONAME libz.so.1. However, it also means that as a library developer, if you break the ABI of the library, you must change the SONAME: change from libz.so.1 to libz.so.2.
Finally, the last step is to tell the configure script where the library is going to be installed. Most configure scripts consider that the installation prefix is /usr/local/ (so that the library is installed in /usr/local/lib, the headers in /usr/local/include, etc.). But in our system, we simply want the libraries to be installed in the /usr prefix, so let's tell the configure script about this:
CC=armlinuxgcc ./configure prefix=/usrmake
For the zlib library, this option may not change anything to the resulting binaries, but for safety, it is always recommended to make sure that the prefix matches where your library will be running on the target system.
Do not confuse the prefix (where the application or library will be running on the target system) from the location where the application or library will be installed on your host while building the root filesystem. For example, zlib will be installed in /home/<user>/felabs/sysdev/thirdparty/target/usr/lib/ because this is the directory where we are building the root filesystem, but once our target system will be running, it will see zlib in /usr/lib. The prefix corresponds to the path in the target system and never on the host. So, one should never pass a prefix like /home/<user>/felabs/sysdev/thirdparty/target/usr, otherwise at runtime, the application or library may look for files inside this directory on the target system, which obviously doesn't exist! By default, most build systems will install the application or library in
Embedded LinuxSystem development
Training lab book
Embedded LinuxSystem development
Training lab book

© 2004-2010 Free Electrons, http://free-electrons.com Creative Commons License© 2004-2010 Free Electrons, http://free-electrons.com Creative Commons License
the given prefix (/usr or /usr/local), but with most build systems (including autotools), the installation prefix can be overriden, and be different from the configuration prefix.
First, let's make the installation in the «staging» space:
make DESTDIR=../staging install
Now look at what has been installed by zlib :
• A manpage in /usr/share/man
• A pkgconfig file in /usr/lib/pkgconfig. We'll come back to these later
• The shared and static versions of the library in /usr/lib
• The headers in /usr/include
Finally, let's install the library in the «target» space:
1. Create the target/usr/lib directory, it will contain the stripped version of the library
2. Copy the dynamic version of the library. Only libz.so.1 and libz.so.1.2.5 are needed, since libz.so.1 is the SONAME of the library and libz.so.1.2.5 is the real binary:cp a libz.so.1* ../target/usr/lib
3. Strip the library:armlinuxstrip ../target/usr/lib/libz.so.1.2.5
Ok, we're done with zlib!
Libpng
Download libpng from its official website at http://www.libpng.org/pub/png/libpng.html. We tested the lab with version 1.4.3
Once uncompressed, we quickly discover that the libpng build system is based on the autotools, so we will work with a regular configure script.
As we've seen previously, if we just run ./configure, the build system will use the native compiler to build the library, which is not what we want. So let's tell the build system to use the cross-compiler:
CC=armlinuxgcc ./configure
Quickly, you should get an error saying:
configure: error: cannot run C compiled programs. If you meant to cross compile, use `host'. See `config.log' for more details.
If you look at config.log, you quickly understand what's going on:
configure:2942: checking for C compiler default output file name configure:2964: armlinuxgcc conftest.c >&5 configure:2968: $? = 0 configure:3006: result: a.out configure:3023: checking whether the C compiler works configure:3033: ./a.out ./configure: line 3035: ./a.out: cannot execute binary file
The configure script compiles a binary with the cross-compiler and then tries to run it on the development workstation. Obviously, it
Embedded Linuxsystem development
Training lab book
Embedded Linuxsystem development
Training lab book
© 2004-2010 Free Electrons, http://free-electrons.com Creative Commons License© 2004-2010 Free Electrons, http://free-electrons.com Creative Commons License
cannot work, and the system says that it «cannot execute binary file». The job of the configure script is to test the configuration of the system. To do so, it tries to compile and run a few sample applications to test if this library is available, if this compiler option is supported, etc. But in our case, running the test examples is definitely not possible. We need to tell the configure script that we are cross-compiling, and this can be done using the --build and --host options, as described in the help of the configure script:
System types: build=BUILD configure for building on BUILD
[guessed] host=HOST crosscompile to build programs to run
on HOST [BUILD]
The --build option allows to specify on which system the package is built, while the host option allows to specify on which system the package will run. By default, the value of the build option is guessed and the value of host is the same as the value of the --build option. The value is guessed using the ./config.guess script, which on your system should return i686pclinuxgnu. See http://www.gnu.org/software/autoconf/manual/html_node/Specifying-Names.html for more details on these options.
So, let's override the value of the --host option:
CC=armlinuxgcc ./configure host=armlinux
Now, we go a little bit further in the execution of the configure script, until we reach:
checking for zlibVersion in lz... no configure: error: zlib not installed
Again, we can check in config.log what the configure script is trying to do:
configure:12452: checking for zlibVersion in lz configure:12487: armlinuxgcc o conftest g O2 conftest.c lz lm >&5 /usr/local/xtools/armunknownlinuxuclibcgnueabi/armunknownlinuxuclibcgnueabi/sysroot/usr/bin/../lib/gcc/armlinuxuclibcgnueabi/4.3.3/../../../../armlinuxuclibcgnueabi/bin/ld: cannot find lz collect2: ld returned 1 exit status
The configure script tries to compile an application against zlib (as can be seen from the lz option) : libpng uses the zlib library, so the configure script wants to make sure this library is already installed. Unfortunately, the ld linker doesn't find this library. So, let's tell the linker where to look for libraries using the L option followed by the directory where our libraries are (in staging/usr/lib). This L option can be passed to the linker by using the LDFLAGS at configure time, as told by the help text of the configure script:
LDFLAGS linker flags, e.g. L<lib dir> if you havelibraries in a nonstandard directory <lib dir>
Let's use this LDFLAGS variable:
LDFLAGS=L/home/<user>/felabs/sysdev/thirdparty/staging/usr/lib \
Embedded LinuxSystem development
Training lab book
Embedded LinuxSystem development
Training lab book
© 2004-2010 Free Electrons, http://free-electrons.com Creative Commons License© 2004-2010 Free Electrons, http://free-electrons.com Creative Commons License
CC=armlinuxgcc ./configure host=armlinux
Let's also specify the prefix, so that the library is compiled to be installed in /usr and not /usr/local:
LDFLAGS=L/home/<user>/felabs/sysdev/thirdparty/staging/usr/lib \ CC=armlinuxgcc ./configure host=armlinux \ prefix=/usr
Then, run the compilation using make. Quickly, you should get a pile of error messages, starting with:
In file included from png.c:13: png.h:470:18: error: zlib.h: No such file or directory
Of course, since libpng uses the zlib library, it includes its header file! So we need to tell the C compiler where the headers can be found: there are not in the default directory /usr/include/, but in the /usr/include directory of our «staging» space. The help text of the configure script says:
CPPFLAGS C/C++/Objective C preprocessor flags,e.g. I<include dir> if you have headersin a nonstandard directory <include dir>
Let's use it:
LDFLAGS=L/home/<user>/felabs/sysdev/thirdparty/staging/usr/lib \ CPPFLAGS=I/home/<user>/felabs/sysdev/thirdparty/staging/usr/include \ CC=armlinuxgcc ./configure host=armlinux \ prefix=/usr
Then, run the compilation with make. Hopefully, it works!
Let's now begin the installation process. Before really installing in the staging directory, let's install in a dummy directory, to see what's going to be installed (this dummy directory will not be used afterwards, it is only to verify what will be installed before polluting the staging space):
make DESTDIR=/tmp/libpng/ install
The DESTDIR variable can be used with all Makefiles based on automake. It allows to override the installation directory: instead of being installed in the configurationprefix, the files will be installed in DESTDIR/configurationprefix.
Now, let's see what has been installed in /tmp/libpng/:
./usr/lib/libpng.la → libpng12.la
./usr/lib/libpng14.a
./usr/lib/libpng14.la
./usr/lib/libpng14.so → libpng14.so.14.3.0
./usr/lib/libpng14.so.14 → libpng12.so.14.3.0
./usr/lib/libpng14.so.14.3.0
./usr/lib/libpng.a → libpng14.a
./usr/lib/libpng.la → libpng14.la
./usr/lib/libpng.so → libpng14.so
./usr/lib/pkgconfig/libpng.pc → libpng14.pc
./usr/lib/pkgconfig/libpng14.pc
./usr/share/man/man5/png.5
./usr/share/man/man3/libpngpf.3
Embedded Linuxsystem development
Training lab book
Embedded Linuxsystem development
Training lab book
© 2004-2010 Free Electrons, http://free-electrons.com Creative Commons License© 2004-2010 Free Electrons, http://free-electrons.com Creative Commons License
./usr/share/man/man3/libpng.3
./usr/include/pngconf.h → libpng14/pngconf.h
./usr/include/png.h → libpng14/png.h
./usr/include/libpng14/pngconf.h
./usr/include/libpng14/png.h
./usr/bin/libpngconfig → libpng14config
./usr/bin/libpng14config
So, we have:
● The library, with many symbolic links
○ libpng14.so.14.3.0, the binary of the current version of library
○ libpng14.so.14, a symbolic link to libpng14.so.14.3.0, so that applications using libpng14.so.14 as the SONAME of the library will find nit and use the current version
○ libpng14.so is a symbolic link to libpng14.so.14.3.0. So it points to the current version of the library, so that new applications linked with -lpng14 will use the current version of the library
○ libpng.so is a symbolic link to libpng14.so. So applications linked with -lpng will be linked with the current version of the library (and not the obsolete one since we don't want anymore to link applications against the obsolete version!)
○ libpng14.a is a static version of the library
○ libpng.a is a symbolic link to libpng14.a, so that applications statically linked with libpng.a will in fact use the current version of the library
○ libpng14.la is a configuration file generated by libtool which gives configuration details for the library. It will be used to compile applications and libraries that rely on libpng.
○ libpng.la is a symbolic link to libpng14.la: we want to use the current version for new applications, once again.
● The pkgconfig files, in /usr/lib/pkgconfig/. These configuration files are used by the pkgconfig tool that we will cover later. They describe how to link new applications against the library.
● The manual pages in /usr/share/man/, explaining how to use the library.
● The header files, in /usr/include/, needed to compile new applications or libraries against libpng. They define the interface to libpng. There are symbolic links so that one can choose between the following solutions:
○ Use #include <png.h> in the source code and compile with the default compiler flags
○ Use #include <png.h> in the source code and compile with -I/usr/include/libpng14
○ Use #include <libpng14/png.h> in the source and compile with the default compiler flags
● The /usr/bin/libpng14-config tool and its symbolic link
Embedded LinuxSystem development
Training lab book
Embedded LinuxSystem development
Training lab book
© 2004-2010 Free Electrons, http://free-electrons.com Creative Commons License© 2004-2010 Free Electrons, http://free-electrons.com Creative Commons License
/usr/bin/libpng-config. This tool is a small shell script that gives configuration informations about the libraries, needed to know how to compile applications/libraries against libpng. This mechanism based on shell scripts is now being superseded by pkg-config, but as old applications or libraries may rely on it, it is kept for compatibility.
Now, let's make the installation in the «staging» space:
make DESTDIR=/home/<user>/felabs/sysdev/thirdparty/staging/ install
Then, let's install only the necessary files in the «target» space, manually:
cp a staging/usr/lib/libpng14.so.0* target/usr/libarmlinuxstrip target/usr/lib/libpng14.so.14.3.0
And we're finally done with libpng!
libjpeg
Now, let's work on libjpeg. Download it from http://www.ijg.org/files/jpegsrc.v8.tar.gz and extract it.
Configuring libjpeg is very similar to the configuration of the previous libraries :
CC=armlinuxgcc ./configure host=armlinux \prefix=/usr
Of course, compile the library:
make
Installation to the «staging» space can be done using the classical DESTDIR mechanism, thanks to the patch applied previously:
make DESTDIR=/home/<user>/felabs/sysdev/thirdparty/staging/ install
And finally, install manually the only needed files at runtime in the «target» space:
cp a staging/usr/lib/libjpeg.so.8* target/usr/lib/armlinuxstrip target/usr/lib/libjpeg.so.8.0.0
Done with libjpeg!
FreeType
The FreeType library is the next step. Grab the tarball from http://www.freetype.org. We tested the lab with version 2.4.2 but more other versions may also work. Uncompress the tarball.
The FreeType build system is a nice example of what can be done with a good usage of the autotools. Cross-compiling FreeType is very easy. First, the configure step:
CC=armlinuxgcc ./configure host=armlinux \prefix=/usr
Then, compile the library:
make
Install it in the «staging» space:
Embedded Linuxsystem development
Training lab book
Embedded Linuxsystem development
Training lab book
© 2004-2010 Free Electrons, http://free-electrons.com Creative Commons License© 2004-2010 Free Electrons, http://free-electrons.com Creative Commons License
make DESTDIR=/home/<user>/felabs/sysdev/thirdparty/staging/ install
And install only the required files in the «target» space:
cp a staging/usr/lib/libfreetype.so.6* target/usr/lib/armlinuxstrip target/usr/lib/libfreetype.so.6.6.0
Done with FreeType!
DirectFB
Finally, with zlib, libpng, jpeg and FreeType, all the dependencies of DirectFB are ready. We can now build the DirectFB library itself. Download it from the official website, at http://www.directfb.org/. We tested version 1.4.5 of the library. As usual, extract the tarball.
Before configuring DirectFB, let's have a look at the available options by running ./configure help. A lot of options are available. We see that:
● Support for Fbdev (the Linux framebuffer) is automatically detected, so that's fine;
● Support for PNG, JPEG and FreeType is enabled by default, so that's fine;
● We should specify a value for withgfxdrivers. The hardware emulated by Qemu doesn't have any accelerated driver in DirectFB, so we'll pass withgfxdrivers=none;
● We should specify a value for withinputdrivers. We'll need keyboard (for the keyboard) and linuxinput to support the Linux Input subsystem. So we'll pass -withinputdrivers=keyboard,linuxinput
So, let's begin with a configure line like:
CC=armlinuxgcc ./configure host=armlinux \prefix=/usr withgfxdrivers=none \withinputdrivers=keyboard,linuxinput
In the output, we see:
*** JPEG library not found. JPEG image provider will not be built.
So let's look in config.log for the JPEG issue. By search for «jpeg», you can find:
configure:24701: armlinuxgcc o conftest O3 ffastmath pipe D_REENTRANT conftest.c ljpeg ldl lpthread >&5 /usr/local/xtools/armunknownlinuxuclibcgnueabi/armunknownlinuxuclibcgnueabi/sysroot/usr/bin/../lib/gcc/armlinuxuclibcgnueabi/4.3.3/../../../../armlinuxuclibcgnueabi/bin/ld: cannot find ljpeg
Of course, it cannot find the jpeg library, since we didn't pass the proper LDFLAGS and CFLAGS telling where our libraries are. So let's configure again with:
LDFLAGS=L/home/<user>/felabs/sysdev/thirdparty/staging/usr/lib \ CPPFLAGS=I/home/<user>/felabs/sysdev/thirdparty/staging/usr/include \ CC=armlinuxgcc ./configure host=armlinux \ prefix=/usr withgfxdrivers=none \
Embedded LinuxSystem development
Training lab book
Embedded LinuxSystem development
Training lab book

© 2004-2010 Free Electrons, http://free-electrons.com Creative Commons License© 2004-2010 Free Electrons, http://free-electrons.com Creative Commons License
withinputdrivers=keyboard,linuxinput
Ok, now at the end of the configure, we get:
JPEG yes ljpeg PNG yes I/usr/include/libpng12 lpng12[…]
FreeType2 yes I/usr/include/freetyp2 lfreetype
It found the JPEG library properly, but for libpng and freetype, it has added I options that points to the libpng and freetype libraries installed on our host (x86) and not the one of the target. This is not correct!
In fact, the DirectFB configure script uses the pkgconfig system to get the configuration parameters to link the library against libpng and FreeType. By default, pkgconfig looks in /usr/lib/pkgconfig/ for .pc files, and because the libfreetype6dev and libpng12dev packages are already installed in your system (it was installed in a previous lab as a dependency of another package), then the configure script of DirectFB found the libpng and FreeType libraries of your host!
This is one of the biggest issue with cross-compilation : mixing host and target libraries, because build systems have a tendency to look for libraries in the default paths. In our case, if libfreetype6dev was not installed, then the /usr/lib/pkgconfig/freetype2.pc file wouldn't exist, and the configure script of DirectFB would have said something like «Sorry, can't find FreeType».
So, now, we must tell pkgconfig to look inside the /usr/lib/pkgconfig/ directory of our «staging» space. This is done through the PKG_CONFIG_PATH environment variable, as explained in the manual page of pkgconfig.
Moreover, the .pc files contain references to paths. For example, in /home/<user>/felabs/sysdev/thirdparty/staging/usr/lib/pkgconfig/freetype2.pc, we can see:
prefix=/usr exec_prefix=${prefix} libdir=${exec_prefix}/lib includedir=${prefix}/include [...]Libs: L${libdir} lfreetype Cflags: I${includedir}/freetype2 I${includedir}
So we must tell pkg-config that these paths are not absolute, but relative to our «staging» space. This can be done using the PKG_CONFIG_SYSROOT_DIR environment variable.
Unfortunately, This is only possible with pkgconfig >= 0.23, which is not yet available in the Ubuntu distribution. So start by installing the pkgconfig Ubuntu package available in the data/ directory of the lab:
sudo dpkg i data/pkgconfig_0.231_i386.deb
Then, let's run the configuration of DirectFB again, passing the PKG_CONFIG_PATH and PKG_CONFIG_SYSROOT_DIR environment
Embedded Linuxsystem development
Training lab book
Embedded Linuxsystem development
Training lab book
© 2004-2010 Free Electrons, http://free-electrons.com Creative Commons License© 2004-2010 Free Electrons, http://free-electrons.com Creative Commons License
variables:
LDFLAGS=L/home/<user>/felabs/sysdev/thirdparty/staging/usr/lib \ CPPFLAGS=I/home/<user>/felabs/sysdev/thirdparty/staging/usr/include \ PKG_CONFIG_PATH=/home/<user>/felabs/sysdev/thirdparty/staging/usr/lib/pkgconfig/ \ PKG_CONFIG_SYSROOT_DIR=/home/<user>/felabs/sysdev/thirdparty/staging/ \ CC=armlinuxgcc ./configure host=armlinux \ prefix=/usr withgfxdrivers=none \ withinputdrivers=keyboard,linuxinput
Ok, now, the lines related to Libpng and FreeType 2 looks much better:
PNG yesI/home/<user>/felabs/sysdev/thirdparty/staging/usr/include/libpng14 lpng14
FreeType2 yesI/home/<user>/felabs/sysdev/thirdparty/staging/usr/include/freetype2 lfreetype
Let's build DirectFB with make. After a while, it fails, complaining that X11/Xlib.h and other related header files cannot be found. In fact, if you look back the the ./configure script output, you can see:
X11 support yes lX11 lXext
Because X11 was installed on our host, DirectFB ./configure script thought that it should enable support for it. But we won't have X11 on our system, so we have to disable it explicitly. In the ./configure help output, one can see :
enablex11 build with X11 support [default=auto]
So we have to run the configuration again with the same arguments, and add disablex11 to them.
The build now goes further, but still fails with another error :
/usr/lib/libfreetype.so: could not read symbols: File in wrong format
As you can read from the above command line, the Makefile is trying to feed an x86 binary (/usr/lib/libfreetype.so) to your ARM toolchain. Instead, it should have been using usr/lib/libfreetype.so found in your staging environment.
This happens because the libtool .la files in your staging area need to be fixed to describe the right paths in this staging area. So, in the .la files, replace libdir='/usr/lib' by libdir='/home/<user>/felabs/sysdev/thirdparty/staging/usr/lib'. Restart the build again, preferably from scratch (make clean then make) to be sure everything is fine.
Finally, it builds !
Now, install DirectFB to the «staging» space using:
make DESTDIR=/home/<user>/felabs/sysdev/thirdparty/staging/ install
And so the installation in the «target» space:
● First, the libraries:cp a staging/usr/lib/libdirect1.4.so.5*
Embedded LinuxSystem development
Training lab book
Embedded LinuxSystem development
Training lab book
© 2004-2010 Free Electrons, http://free-electrons.com Creative Commons License© 2004-2010 Free Electrons, http://free-electrons.com Creative Commons License
target/usr/lib
cp a staging/usr/lib/libdirectfb1.4.so.5* target/usr/lib
cp a staging/usr/lib/libfusion1.4.so.5* target/usr/lib
armlinuxstrip target/usr/lib/libdirect1.4.so.5.0.0
armlinuxstrip target/usr/lib/libdirectfb1.4.so.5.0.0
armlinuxstrip target/usr/lib/libfusion1.4.so.5.0.0
● Then, the plugins that are dynamically loaded by DirectFB. We first copy the whole /usr/lib/directfb1.45/ directory, then remove the useless files (.la) and finally strip the .so files:
cp a staging/usr/lib/directfb1.45/ target/usr/lib
find target/usr/lib/directfb1.45/ name '*.la' exec rm {} \;
find target/usr/lib/directfb1.45/ name '*.so' exec armlinuxstrip {} \;
DirectFB examples
To test that our DirectFB installation works, we will use the example applications provided by the DirectFB project. Start by downloading the tarball at http://www.directfb.org/downloads/Extras/DirectFB-examples-1.2.0.tar.gz and extract it.
Then, we configure it just as we configured DirectFB:
LDFLAGS=L/home/<user>/felabs/sysdev/thirdparty/staging/usr/lib \ CPPFLAGS=I/home/<user>/felabs/sysdev/thirdparty/staging/usr/include \ PKG_CONFIG_PATH=/home/<user>/felabs/sysdev/thirdparty/staging/usr/lib/pkgconfig/ \ PKG_CONFIG_SYSROOT_DIR=/home/<user>/felabs/sysdev/thirdparty/staging/ \ CC=armlinuxgcc ./configure host=armlinux \ prefix=/usr
Then, compile it with make. Soon a compilation error will occur because “bzero” is not defined. The “bzero” function is a deprecated BSD function, and memset should be used instead. The GNU C library still defines “bzero”, but by default, the uClibc library doesn't provide “bzero” (to save space). So, let's modify the source code in src/df_knuckles/matrix.c to change the line:
#define M_CLEAR(m) bzero(m, MATRIX_SIZE)
to
#define M_CLEAR(m) memset(m, 0, MATRIX_SIZE)
Embedded Linuxsystem development
Training lab book
Embedded Linuxsystem development
Training lab book
© 2004-2010 Free Electrons, http://free-electrons.com Creative Commons License© 2004-2010 Free Electrons, http://free-electrons.com Creative Commons License
Run the compilation again, it should succeed.
For the installation, as DirectFB examples are only applications and not libraries, we don't really need them in the «staging» space, but only in the «target» space. So we'll directly install in the «target» space using the installstrip make target. This make target is usually available with autotools based build systems. In addition to the destination directory (DESTDIR variable), we must also tell which strip program should be used, since stripping is an architecture-dependent operation (STRIP variable):
make STRIP=armlinuxstrip \DESTDIR=/home/<user>/felabs/sysdev/thirdparty/target/
installstrip
Final setup
Start the system in Qemu using the run_qemu script, and try to run the df_andi program, which is one of the DirectFB examples.
The application will fail to run, because the pthread library (which is a component of the C library) is missing. This library is available inside the toolchain. So let's add it to the target:
cp a /usr/local/xtools/armunknownlinuxuclibcgnueabi/armunknownlinuxuclibcgnueabi/sysroot/lib/libpthread* target/lib/
Then, try to run df_andi again. It will complain about libdl, which is used to dynamically load libraries during application execution. So let's add this library to the target:
cp a /usr/local/xtools/armunknownlinuxuclibcgnueabi/armunknownlinuxuclibcgnueabi/sysroot/lib/libdl* \
target/lib
When running df_andi again, it will complain about libgcc_s, so let's copy this library to the target:
cp a /usr/local/xtools/armunknownlinuxuclibcgnueabi/armunknownlinuxuclibcgnueabi/sysroot/lib/libgcc_s* target/lib
Now, the application should no longer complain about missing library. But when started, should complain about inexisting /dev/fb0 device file. So let's create this device file:
sudo mknod target/dev/fb0 c 29 0
Next execution of the application will complain about missing /dev/tty0 device file, so let's create it:
sudo mknod target/dev/tty0 c 4 0
Finally, when running df_andi, another error message shows up:
Unable to dlopen '/usr/lib/directfb1.20/interfaces/IDirectFBImageProvider/libidirectfbimageprovider_png.so' !
File not found→
DirectFB is trying to load the PNG plugin using the dlopen() function, which is part of the libdl library we added to the target system before. Unfortunately, loading the plugin fails with the «File
Embedded LinuxSystem development
Training lab book
Embedded LinuxSystem development
Training lab book
© 2004-2010 Free Electrons, http://free-electrons.com Creative Commons License© 2004-2010 Free Electrons, http://free-electrons.com Creative Commons License
not found» error. However, the plugin is properly present, so the problem is not the plugin itself. What happens is that the plugin depends on the libpng library, which itself depends on the mathematic library. And the mathematic library libm (part of the C library) has not yet been added to our system. So let's do it:
cp a /usr/local/xtools/armunknownlinuxuclibcgnueabi/armunknownlinuxuclibcgnueabi/sysroot/lib/libm* target/lib
Now, you can try and run the df_andi application!
Embedded Linuxsystem development
Training lab book
Embedded Linuxsystem development
Training lab book
© 2004-2010 Free Electrons, http://free-electrons.com Creative Commons License© 2004-2010 Free Electrons, http://free-electrons.com Creative Commons License
cd D
Using a build system, example with Buildroot
Objectives: discover how a build system is used and how it works, with the example of the Buildroot build system. Build a Linux system with libraries and make it work inside Qemu.
Setup
Go into the /home/<user>/felabs/sysdev/buildroot/ directory, which already contains some data needed for this lab, including a kernel image.
Get Buildroot and explore the source code
The official Buildroot website is available at http://www.buildroot.net. Download the stable 2010.08 version which we have tested for this lab. Uncompress the tarball and go inside the buildroot directory.
Several subdirectories or files are visible, the most important ones are:
• boot contains the Makefiles and configuration items related to the compilation of common bootloaders (Grub, U-Boot, Barebox, etc.)
• configs contains a set of predefined configurations, similar to the concept of defconfig in the kernel.
• docs contains the documentation for Buildroot. You can start reading buildroot.html which is the main Buildroot documentation;
• linux contains the Makefile and configuration items related to the compilation of the Linux kernel
• Makefile is the main Makefile that we will use to use Buildroot: everything works through Makefiles in Buildroot;
• package is a directory that contains all the Makefiles, patches and configuration items to compile the userspace applications and libraries of your embedded Linux system. Have a look at various subdirectories and see what they contain;
• target contains patches and other items specific to particular hardware platforms
• toolchain contains the Makefiles, patches and configuration items to generate the cross-compiling toolchain.
Configure Buildroot
In our case, we would like to:
• Generate an embedded Linux system for ARM;
• Use an already existing external toolchain instead of having Buildroot generating one for us;
• Integrate Busybox, DirectFB and DirectFB sample applications in our embedded Linux system;
• Integrate the target filesystem into both an ext2 filesystem
Embedded Linuxsystem development
Training lab book
Embedded Linuxsystem development
Training lab book
© 2004-2009 Free Electrons, http://free-electrons.com Creative Commons License© 2004-2009 Free Electrons, http://free-electrons.com Creative Commons License
image and a tarball
To run the configuration utility of Buildroot, simply run:
make menuconfig
Set the following options:
• Target Architecture: ARM
• Target Architecture Variant: arm926t.
• Target ABI: EABI
• Build options
○ Number of jobs to run simultaneously: choose 2 or 4, for example, to speed up compiling, especially if you have a dual-core system.
• Toolchain
○ Toolchain type: External toolchain
○ External toolchain C library: uClibc
○ We must tell Buildroot about our toolchain configuration, so: enable Large File Support, RPC. Buildroot will check these parameters anyway.
○ External toolchain path: use the toolchain you built:/usr/local/xtools/armunknownlinuxuclibcgnueabi
• Package selection for the target
○ Keep Busybox (default version) and keep the Busybox configuration proposed by Buildroot;
○ In Graphics libraries and applications
• Select DirectFB. Buildroot will automatically select the necessary dependencies.
• Remove touchscreen support from DirectFB
• Select DirectFB examples
• Select all the DirectFB examples
• Target filesystem options
○ Select ext2 root filesystem
○ Select tar root filesystem
Exit the menuconfig interface. Your configuration has now been saved to the .config file.
Generate the embedded Linux system
Just run
make
It fails quickly because we lack the gettext and subversion packages, so install them. Buildroot will first create a small environment with the external toolchain, then download, extract, configure, compile and install each component of the embedded system.
All the compilation has taken place in the output/ directory. Let's
Embedded LinuxSystem development
Training lab book
Embedded LinuxSystem development
Training lab book
© 2004-2010 Free Electrons, http://free-electrons.com Creative Commons License© 2004-2010 Free Electrons, http://free-electrons.com Creative Commons License
cd D
explore its contents :
• build, is the directory in which each component built by Buildroot is extract, and where the build actually takes place
• host, is the directory where Buildroot installs some components for the host. As Buildroot don't want to depend on too many things installed in the developer machines, it installs some tools needed to compile the packages for the target. In our case it installed pkgconfig (since the version of the most may be ancient) and tools to generate the root filesystem image (genext2fs, makedevs, fakeroot)
• images, which contains the final images produced by Buildroot. In our case it's just an ext2 filesystem image and a tarball of the filesystem, but depending on the Buildroot configuration, there could also be a kernel image or a bootloader image. This is where we find rootfs.tar and rootfs.ext2, which are respectively the tarball and an ext2 image of the generated root filesystem.
• staging, which contains the “build” space of the target system. All the target libraries, with headers, documentation. It also contains the system headers and the C library, which in our case have been copied from the cross-compiling toolchain.
• target, is the target root filesystem. All applications and libraries, usually stripped, are installed in this directory. However, it cannot be used directly as the root filesystem, as all the device files are missing: it is not possible to create them without being root, and Buildroot has a policy of not running anything as root.
• toolchain, is the location where the toolchain is built. However, in our configuration, we re-used an existing toolchain, so this directory contains almost nothing.
Run the generated system
We will use the kernel image in data/ and the filesystem image generated by Buildroot in the ext2 format to boot the generated system in Qemu. We start by using a Qemu-emulated ARM board with display support, allowing to test graphical applications relying on the DirectFB library. Later, we will be able move to a real board if your hardware also has a graphical display.
The run_qemu script contains what's needed to boot the system in Qemu.
Log in (root account, no password), run demo programs:
df_andidf_dokdf_fire...
Going further
• Add dropbear (SSH server and client) to the list of packages built by Buildroot, add the network emulation in Qemu, and log to your target system in Qemu using a ssh client on your
Embedded Linuxsystem development
Training lab book
Embedded Linuxsystem development
Training lab book
© 2004-2009 Free Electrons, http://free-electrons.com Creative Commons License© 2004-2009 Free Electrons, http://free-electrons.com Creative Commons License
development workstation. Hint: you will have to set a non-empty password for the root account on your target for this to work.
• Add a new package in Buildroot for the GNU Gtypist game. Read the Buildroot documentation to see how to add a new package. Finally, add this package to your target system, compile it and run it in Qemu.
Tests on real hardware
If you have real ARM hardware with graphical output capability, test your root filesystem on it. You can:
• Either copy the ext2 image to a block device that can be accessed by your hardware (flash card reader, USB drive...)
• Or mount the ext2 image and copy its contents to a flash partition on your board.
If you want to log in on the serial console, uncomment the ttyS0 line in /etc/inittab. If your system uses a different device file for the serial console, modify this line accordingly.
Of course, you will also have to use a kernel compiled for your board.
Special instructions for the Beagle board
If you are using the Beagle board,
• Connect your board to an DVI-D or HDMI display
• Edit etc/inittab, uncomment the line with ttyS0 and replace all the occurrences of ttyS0 by ttyS2
• Rebuild your Linux kernel with the following settings:CONFIG_OMAP2_DSS=yFB_OMAP2=yCONFIG_PANEL_GENERIC=yLOGO=y (optional)
• Add the following settings to the boot arguments:
• console=tty0(allows you to have both a framebuffer and serial console)
• vram=12M (video RAM)
• omapfb.mode=dvi:640x480MR16@60 (example for the Pico Projector. You may first try to do without this parameter, and then specify a mode that your monitor supports.
• omapdss.def_disp=dvi (default output for the Omap Display SubSystem driver)
Embedded LinuxSystem development
Training lab book
Embedded LinuxSystem development
Training lab book
© 2004-2010 Free Electrons, http://free-electrons.com Creative Commons License© 2004-2010 Free Electrons, http://free-electrons.com Creative Commons License
Sysdev - Application development and remote debugging
Objective:Compile and run your own DirectFB application on the target. Use strace and ltrace to diagnose program issues. Use gdbserver and a cross-debugger to remotely debug an embedded application
Setup
Go to the /home/<user>/felabs/sysdev/appdev directory.
Compile your own application
In this part, we will re-use the system built during the «Buildroot lab» and add to it our own application.
First, instead of using an ext2 image, we will mount the root filesystem over NFS to make it easier to test our application. So, create a qemurootfs/ directory, and inside this directory, uncompress the tarball generated by Buildroot in the previous lab (in the output/images/ directory). Don't forget to extract the archive as root since the archive contains device files.
Then, adapt the run_qemu script to your configuration, and verify that the system works as expected.
Now, our application. In the lab directory the file data/app.c contains a very simple DirectFB application that displays the data/background.png image for five seconds. We will compile and integrate this simple application to our Linux system.
Let's try to compile the application:
armlinuxgcc o app app.c
It complains that it cannot find the directfb.h header. This is normal, since we didn't tell the compiler where to find it. So let's use pkg-config to query the pkg-config database about the location of the header files and the list of libraries needed to build an application against DirectFB:
export PKG_CONFIG_PATH=/home/<user>/felabs/sysdev/buildroot/output/staging/usr/lib/pkgconfig
export PKG_CONFIG_SYSROOT_DIR=/home/<user>/felabs/sysdev/buildroot/output/staging/
armlinuxgcc o app app.c $(/home/<user>/felabs/sysdev/buildroot/output/host/usr/bin/pkgconfig libs cflags directfb)
Compiling fails again, because the compiler could not find the library. The simplest solution to fix this issue is to use the sysroot feature of the cross-compiling toolchain: we can tell the toolchain against which directory the paths like /usr/lib, /lib or /usr/include should be interpreted.
Embedded Linuxsystem development
Training lab book
Embedded Linuxsystem development
Training lab book

© 2004-2010 Free Electrons, http://free-electrons.com Creative Commons License© 2004-2010 Free Electrons, http://free-electrons.com Creative Commons License
armlinuxgcc sysroot /home/<user>/felabs/sysdev/buildroot/output/staging/ o app app.c $(/home/<user>/felabs/sysdev/buildroot/output/host/usr/bin/pkgconfig libs cflags directfb)
Our application is now compiled! Copy the generated binary and the background.png image to the NFS root filesystem (in the root/ directory for example), start your system, and run your application !
Debugging setup
For the debugging part we don't need an emulated LCD anymore, so we will move back to your ARM board. Boot your ARM board over NFS on the filesystem produced in the «Tiny embedded system» lab, with the same kernel.
Setting up gdbserver, strace and ltrace
gdbserver, strace and ltrace have already been compiled for your target architecture as part of the cross-compiling toolchain. Find them in the installation directory of your toolchain. Copy these binaries to the /usr/bin/ directory in the root filesystem of your target system.
Enabling job control
In this lab, we are going to run a buggy program that keeps hanging and crashing. Because of this, we are going to need job control, in particular [Ctrl] [C] allowing to interrupt a running program.
At boot time, you probably noticed that warning that job control was turned off:
/bin/sh: can't access tty; job control turned off
This happens when the shell is started in the console. The system console cannot be used as a controlling terminal.
A work around is to start this shell in ttyS0 (the first serial port) by modifying the /etc/inittab file:
Replace::askfirst:/bin/sh (implying /dev/console)byttyS0::askfirst:/bin/sh (using /dev/ttyS0)
Also create /dev/ttyS0 and reboot. You should no longer see the “Job control turned off” warning, and should be able to use [Ctrl] [C].
Using strace
strace allows to trace all the system calls made by a process: opening, reading and writing files, starting other processes, accessing time, etc. When something goes wrong in your application, strace is an invaluable tool to see what it actually does, even when you don't have the source code.
With your cross-compiling toolchain, compile the data/vistaemulator.c program, and copy the resulting binary to the /root directory of the root filesystem (you might need to create this
Embedded LinuxSystem development
Training lab book
Embedded LinuxSystem development
Training lab book
Caution: if your board uses a serial port device different from /dev/ttyS0, don't forget to use the correct name instead of ttyS0 (example: ttyS2 on the Beagle board).
© 2004-2010 Free Electrons, http://free-electrons.com Creative Commons License© 2004-2010 Free Electrons, http://free-electrons.com Creative Commons License
directory if it doesn't exist yet).
armlinuxgcc o vistaemulator data/vistaemulator.ccp vistaemulator path/to/root/filesystem/root
Back to target system, try to run the /root/vistaemulator program. It should hang indefinitely!
Interrupt this program by hitting [Ctrl] [C].
Now, running this program again through the strace command and understand why it hangs. You can guess it without reading the source code!
Now add what the program was waiting for, and now see your program proceed to another bug, failing with a segmentation fault.
Using ltrace
Try to run the program through ltrace. You will see that another library is required to run this utility. Find this library in the toolchain and add it to your root filesystem again.
Now, ltrace should run fine and you should see what the program does: it tries to consume as much system memory as it can!
Using gdbserver
We are now going to use gdbserver to understand why the program segfaults.
Compile vistaemulator.c again with the g option to include debugging symbols. Keep this binary on your workstation, and make a copy in the /root directory of the target root filesystem. Then, strip the binary on the target to remove the debugging symbols. They are only needed on your host, where the cross-debugger will run:
armlinuxstrip path/to/root/filesystem/root/vistaemulator
Then, on the target side, run vistaemulator under gdbserver. gdbserver will listen on a TCP port for a connection from GDB, and will control the execution of vista-emulator according to the GDB commands:
gdbserver localhost:2345 vistaemulator
On the host side, run armlinuxgdb (also found in your toolchain):
armlinuxgdb vistaemulator
You can also start the debugger through the ddd interface:
ddd debugger armlinuxgdb vistaemulator
GDB starts and loads the debugging information from the vistaemulator binary that has been compiled with g.
Then, we need to tell where to find our libraries, since they are not present in the default /lib and /usr/lib directories on your workstation. This is done by setting GDB sysroot variable:
(gdb) set sysroot /usr/local/xtools/armunknownlinuxuclibcgnueabi/armunknownlinuxuclibcgnueabi/sysroot/
And tell gdb to connect to the remote system:
(gdb) target remote <targetipaddress>:2345
Embedded Linuxsystem development
Training lab book
Embedded Linuxsystem development
Training lab book
© 2004-2010 Free Electrons, http://free-electrons.com Creative Commons License© 2004-2010 Free Electrons, http://free-electrons.com Creative Commons License
Then, use gdb as usual to set breakpoints, look at the source code, run the application step by step, etc. Graphical versions of gdb, such as ddd can also be used in the same way. In our case, we'll just start the program and wait for it to hit the segmentation fault:
(gdb) continue
You could then ask for a backtrace to see where this happened:
(gdb) backtrace
This will tell you that the segmentation fault occurred in a function of the C library, called by our program. This should help you in finding the bug in our application.
What to remember
During this lab, we learned that...
● Compiling an application for the target system is very similar to compiling an application for the host, except that the cross-compilation introduces a few complexities when libraries are used.
● It's easy to study the behavior of programs and diagnose issues without even having the source code, thanks to strace and ltrace.
● You can leave a small gdbserver program (300 KB) on your target that allows to debug target applications, using a standard GDB debugger on the development host.
● It is fine to strip applications and binaries on the target machine, as long as the programs and libraries with debugging symbols are available on the development host.
Embedded LinuxSystem development
Training lab book
Embedded LinuxSystem development
Training lab book
© 2007-2010 Free Electrons, http://free-electrons.com Creative Commons License© 2007-2010 Free Electrons, http://free-electrons.com Creative Commons License
Real-time - Timers and scheduling latency
Objective: Learn how to measure time and use high resolution timers. Measure scheduling latency.
After this lab, you will
Be able to measure time and create your own high resolution timers.Be able to start processes with real-time priority.Have compared scheduling latency on your system, between a standard kernel and a kernel with real-time preempt patches.
Setup
Go to the /home/<user>/felabs/realtime/rttest directory.
On your development workstation, install the manpagesposix, manpagesposixdev, they contain the POSIX API documentation that might be useful when doing real-time programming.
We are going to use the 2.6.33.7 kernel sources, which were used to test this lab.
Please stay with a 2.6.33.x version, as this is the most recent version with PREEMPT_RT support.
Patch the kernel with ipconfigdelay.patch located in rttest/data directory.
Install netcat on your host, by running:
aptget install netcat
Download CodeSourcery's 2009q1 toolchain at:
http://www.codesourcery.com/sgpp/lite/arm/portal/release858
Choose “IA32 GNU/Linux TAR”
Untar it.
Add /home/<user>/felabs/realtime/rttest/arm2009q1/bin to your PATH.
In /home/<user>/felabs/realtime/rttest/nfsroot/inittab replace ttyS0 by ttyS2.
Kernel configuration
Configure this kernel with the configbeaglev2.6.33 configuration file available on rttest/data directory.
We use a network connection over USB and with this kernel version the device may not be available when IP-Config try to configure networks. That's why we applied a patch. This patch add a kernel parameter which mimics the "rootdelay" option before mounting the root file system. Add the following command to your kernels parameters:
ipconfdelay=2
Boot the Beagle board by mounting the root filesystem available at /home/<user>/felabs/realtime/rttest/nfsroot/ with NFS.
1
Real Time inembedded Linux systems
Training lab book
Real Time inembedded Linux systems
Training lab book
We are using a glibc toolchain because glibc has better support for the POSIX RT API than uClibc. In our case, when we created this lab, uClibc didn't support the clock_nanosleep function used in our rttest.c program.
© 2007-2010 Free Electrons, http://free-electrons.com Creative Commons License© 2007-2010 Free Electrons, http://free-electrons.com Creative Commons License
Using high-resolution timers
Have a look at the rttest.c source file available in root/ in the nfsroot/ directory. See how it shows the resolution of the CLOCK_MONOTONIC clock.
Now compile this program:armnonelinuxgnueabigcc o rttest rttest.c lrt
Execute the program on the board. Is the clock resolution good or bad? Compare it to the timer tick of your system, as defined by CONFIG_HZ.
Obviously, this resolution will not provide accurate sleep times, and this is because our kernel doesn't use high-resolution timers. So let's enable the following options in the kernel configuration:
● CONFIG_HIGH_RES_TIMERS
Recompile your kernel, boot your Beagle board with the new version, and check the new resolution. Better, isn't it ?
Testing the non-preemptible kernel
Now, do the following tests:
● Test the program with nothing special and write down the results.
● Test your program and at the same time, add some workload to the board, by running doload 300 on the board, and using netcat 192.168.0.100 5566 on your workstation when you see the message “Listening on any address 5566” in order to flood the network interface of the Beagle board (where 192.168.0.100 is the IP address of the Beagle board)
● Test your program again with the workload, but by running the program in the SCHED_FIFO scheduling class at priority 99, using the chrt command.
Testing the preemptible kernel
Recompile your kernel with CONFIG_PREEMPT enabled, which enables kernel preemption (except for critical sections protected by spinlocks).
Re-do the simple tests with this new preemptible kernel and compare the results.
Testing the real-time patch
Get the PREEMPT_RT patch corresponding to your kernel version from http://www.kernel.org/pub/linux/kernel/projects/rt/, and apply it to the kernel source code. Configure the kernel with CONFIG_PREEMPT_RT and recompile it. The kernel should now be fully preemptible, including in critical sections, and tasks can have higher priorities than interrupts.
Re-do the simple tests with this real-time preemptible kernel and compare the results.
2
Real Time inembedded Linux systems
Training lab book
Real Time inembedded Linux systems
Training lab book
© 2007-2010 Free Electrons, http://free-electrons.com Creative Commons License© 2007-2010 Free Electrons, http://free-electrons.com Creative Commons License
Using mdev
Objective: Practicing with BusyBox mdev
After this lab, you will be able to
Use mdev to populate the /dev directory with device files corresponding to devices present on the system.Use mdev to automount external disk partitions.
Root filesystem
We will reuse the root filesystem from the “Tiny system” lab.
Kernel settings
Reuse the Linux kernel from the “Tiny system” lab. If you prefer to start from fresh sources, use the configuration supplied in the data directory.
Now add or modify the below settings to your kernel:
● Enable loadable module support: CONFIG_MODULES=y
● Module unloading: CONFIG_MODULE_UNLOAD=y
● Support for Host-side USB: CONFIG_USB=mMake sure this is set as a module!
● OHCI HCD support: CONFIG_USB_OHCI_HCD=m
● USB Mass Storage support: CONFIG_USB_STORAGE=m
● And any other feature that could be needed on your hardware to access your hot-pluggable device.
Compile your kernel. Install the modules in your root filesystem using:
make INSTALL_MOD_PATH=<rootdirpath> modules_install
Booting the system
Boot your system through NFS with the given root filesystem.
To make sure that module loading works, try to load the usbstorage module:
modprobe usbstorage
First mdev tests
We are first going to use mdev to populate the /dev directory with all devices present at boot time.
Modify the /etc/init.d/rcS script to mount a tmpfs filesystem on /dev/, and run mdev s to populate this directory with all minimum device files. Very nice, isn't it?
Using mdev as a hotplug agent
Using the guidelines in the lectures, and BusyBox documentation, use mdev to automatically create all the /dev/sd[az][19]* device files when a USB disk is inserted, corresponding to the disk itself
Embedded LinuxSystem Development
Training lab book
Embedded LinuxSystem Development
Training lab book

© 2004-2010 Free Electrons, http://free-electrons.com Creative Commons License© 2004-2010 Free Electrons, http://free-electrons.com Creative Commons License
and its partitions.
Also make sure these device files are also removed automatically when the flash drive is removed.
Automatic mounting
Refine your configuration to also mount each partition automatically when a USB disk is inserted, and to do the opposite after the disk is removed.
Embedded Linuxsystem development
Training lab book
Embedded Linuxsystem development
Training lab book
You could use /media/<devname> as mount point for each partition.

© 2004-2010 Free Electrons, http://free-electrons.com Creative Commons License© 2004-2010 Free Electrons, http://free-electrons.com Creative Commons License
Backing up your lab files
Objective: clean up and make an archive of your lab directory
End of the training session
Congratulations. You reached the end of the training session. You now have plenty of working examples you created by yourself, and you can build upon them to create more elaborate things.
In this last lab, we will create an archive of all the things you created. We won't keep everything though, as there are lots of things you can easily retrieve again.
Create a lab archive
Go to the directory containing your felabs directory:cd $HOME
Now, run a command that will do some clean up and then create an archive with the most important files:
• Kernel configuration files
• Other source configuration files (BusyBox, Crosstool-ng...)
• Kernel images
• Toolchain
• Other custom files
Here is the command:
./felabs/archivelabs
At end end, you should have a felabs<user>.tar.lzma archive that you can copy to a USB flash drive, for example. This file should only be a few hundreds of MB big.
Linux TrainingLab Book
Linux TrainingLab Book