elevation series discover se3 tablet console -...
TRANSCRIPT
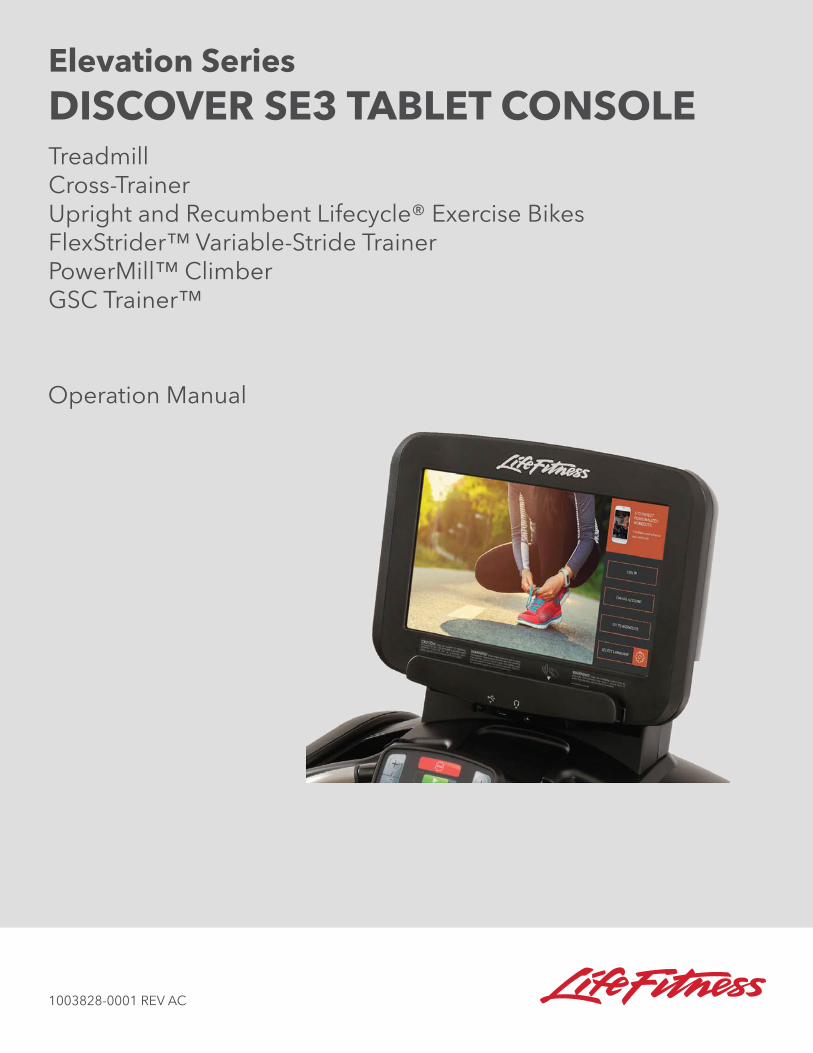
Operation Manual
1003828-0001 REV AC
Elevation SeriesDISCOVER SE3 TABLET CONSOLETreadmillCross-TrainerUpright and Recumbent Lifecycle® Exercise BikesFlexStrider™ Variable-Stride TrainerPowerMill™ ClimberGSC Trainer™

1
CORPORATE HEADQUARTERSColumbia Centre III, 9525 West Bryn Mawr Avenue, Rosemont, Illinois 60018 • U.S.A.
847.288.3300 • FAX: 847.288.3703Service phone number: 800.351.3737 (toll-free within U.S.A., Canada)
Global Website: www.lifefi tness.com
INTERNATIONAL OFFICESAMERICAS
North AmericaLife Fitness, Inc.Columbia Centre III9525 West Bryn Mawr AvenueRosemont, IL 60018 U.S.ATelephone: (847) 288 3300Fax: (847) 288 3703Service Email: customersupport@lifefi tness.comService Website: www.lifefi tness.com/partsSales/Marketing Email:
commercialsales@lifefi tness.comOperating Hours: 7:00 am-6:00 pm (CST)
BrazilLife Fitness BrasilAv. Cidade Jardim, 900Jd. PaulistanoSão Paulo, SP 01454-000BRAZILSAC: 0800 773 8282Telephone: +55 (11) 3095 5200Fax: +55 (11) 3095 5201Service Email: suporte@lifefi tness.com.brSales/Marketing Email: lifefi tness@lifefi tness.com.brService Operating Hours:
9:00 - 17:00 (BRT) (Monday-Friday)Store Operating Hours:
9:00 -20:00 (BRT) (Monday-Friday)10:00 - 16:00 (BRT) (Saturday)
Latin America & Caribbean*Life Fitness Inc.Columbia Centre III9525 West Bryn Mawr AvenueRosemont, IL 60018 U.S.ATelephone: (847) 288 3300Fax: (847) 288 3703Service Email: customersupport@lifefi tness.comSales/Marketing Email:
commercialsales@lifefi tness.comOperating Hours: 7:00am-6:00pm (CST)______________________________________
EUROPE, MIDDLE EAST, & AFRICA
(EMEA)
Netherlands & LuxemburgLife Fitness Atlantic BVBijdorpplein 25-312992 LB BarendrechtTHE NETHERLANDSTelephone: (+31) 180 646 666Fax: (+31) 180 646 699Service Email: service.benelux@lifefi tness.comSales/Marketing Email:
marketing.benelux@lifefi tness.comOperating Hours: 9.00h-17.00h (CET)
United Kingdom & IrelandLife Fitness UK LTDQueen AdelaideEly, Cambs, CB7 4UBTelephone: General Offi ce (+44)1353.666017Customer Support (+44) 1353.665507Fax: (+44) 1353.666018Service Email: uk.support@lifefi tness.comSales/Marketing Email: life@lifefi tness.comOperating Hours:
General Offi ce: 9.00am - 5.00pm (GMT)Customer Support:
8.30am - 5.00pm (GMT)
Germany & SwitzerlandLife Fitness Europe GMBHSiemensstraße 385716 UnterschleißheimGERMANYTelephone: (+49) 89.31 77 51.0 (Germany)(+41) 0848 000 901 (Switzerland)Fax: (+49) 89.31 77 51.99 (Germany)(+41) 043 818 07 20 (Switzerland)Service Email: kundendienst@lifefi tness.comSales/Marketing Email:
kundenberatung@lifefi tness.comOperating Hours: 08.30 -16.30h (CET)
AustriaLife Fitness AustriaVertriebs G.m.b.H.Dückegasse 7-9/3/361220 ViennaAUSTRIATelephone: (+43) 1.61.57.198Fax: (+43) 1.61.57.198.20Service Email: kundendienst@lifefi tness.comMarketing/Sales Email:
kundenberatung@lifefi tness.comOperating Hours: 08:30-16.30.h (MEZ)
SpainLife Fitness IBERIAC/Frederic Mompou 5,1º1ª08960 Sant Just Desvern BarcelonaSPAINTelephone: (+34) 93.672.4660Fax: (+34) 93.672.4670Service Email: servicio.tecnico@lifefi tness.comSales/Marketing Email: info.iberia@lifefi tness.comOperating Hours:
9.00h-18.00h (Monday-Thursday)8.30h-15.00h (Friday)
BelgiumLife Fitness Benelux NVParc Industrial de Petit-Rechain4800 VerviersBELGIUMTelephone: (+32) 87 300 942Fax: (+32) 87 300 943Service Email: service.benelux@lifefi tness.comSales/Marketing Email:
marketing.benelux@lifefi tness.comOperating Hours: 9.00h -17.00h (CET)
All Other EMEA Countries & Distributor Business C-EMEA*Bijdorpplein 25-312992 LB BarendrechtTHE NETHERLANDSTelephone: (+31) 180 646 644Fax: (+31) 180 646 699Service Email: service.db.cemea@lifefi tness.comSales/Marketing Email:
marketing.db.cemea@lifefi tness.comOperating Hours: 9.00h-17.00h (CET)____________________________________
ASIA PACIFIC (AP)
JapanLife Fitness JapanJapan Nippon Brunswick Bldg., #8F5-27-7 SendagayaShibuya-Ku, TokyoJapan 151-0051Telephone: (+81) 3.3359.4309Fax: (+81) 3.3359.4307Service Email: service@lifefi tnessjapan.comSales/Marketing Email: sales@lifefi tnessjapan.comOperating Hours: 9.00h-17.00h (JAPAN)
Hong KongLife Fitness Asia Pacifi c LTD32/F, Global Trade Square21 Wong Chuk Hang RoadHONG KONGTelephone: (+852) 2575.6262Fax: (+852) 2575.6894Service Email: HongKongEnquiry@lifefi tness.comSales/Marketing Email:
Marketing.HK.Asia@lifefi tness.comOperating Hours: 9.00h-17.00hService Operating Hours: 9.00h-18.00h
All Other Asia Pacifi c countries &distributor business Asia Pacifi c*Life Fitness Asia Pacifi c LTD32/F, Global Trade Square21 Wong Chuk Hang RoadHONG KONGTelephone: (+852) 2575.6262Fax: (+852) 2575.6894Service Email: HongKongEnquiry@lifefi tness.comSales/Marketing Email:
Marketing.HK.Asia@lifefi tness.comOperating Hours: 9.00h-17.00hService Operating Hours: 9.00h-18.00h
* Also check www.lifefitness.com for local representation or distributor/dealer.
2
Table of Contents
Important Safety Instructions 5
Discover SE3 Manual Icons 13
Discover SE3 Console Overview 14
Home Screen Overview 15
Log In 16
Create LFconnect Account 17
Select Language 18
Workout Selection - Quick Start 19
Choose Workout - Interactive Courses 20
Workout Setup - Interactive Courses 21
Choose Workout - Goals 23
Goals - Terrains 24
Workout Setup -Heart Rate Goal 25
Heart Rate Goal Workouts 26
Choose Workout - Fitness Tests 27
Life Fitness Fit Test 29
Data Entry Options 31
Workout Mode Overview 38
Menu 40
Expanded Stats 43
Pause Workout 49
Cool Down 50
Workout Summary 51
Select Entertainment 52
Systems Option Menu 55
Confi guration Menu 56
Confi guration Menu - Manager 57
TV Setup 60
DTV 61
STB IPTV 62
Pro:Idiom 65
Open IPTV 69
Preventive Maintenance Tips 70
Troubleshooting 71
Specifi cations 73
Warranty 75
3
Before using this product, it is essential to read this ENTIRE operation manual and ALL assembly instructions.It describes equipment setup and instructs members on how to use it correctly and safely.
Avant d’utiliser ce produit, il est indispensable de lire ce manuel d’utilisation dans son INTÉGRALITÉ, ainsi que TOUTES les instructions d’installations.
Ce manuel explique comment installer l’équipement et comment l’utiliser correctement et sans danger.
FCC Warning - Possible Radio / Television Interference
Note: This equipment has been tested and found to comply with the limits for a Class A digital device, pursuant to part 15 of the FCC rules. These limits are designed to provide reasonable protection against harmful interference when the equipment is operated in a commercial environment. This equipment generates, uses and can radiate radio frequency energy, and if not installed and used in accordance with the instruction manual, may cause harmful interference to radio communications. Operation of this equipment in a residential area is likely to cause harmful interference in which case the user will be required to correct the interference at his own expense.
EN 957 Class SB (treadmill and PowerMill climber only): Professional and / or commercial use.EN 957 Class SA (bikes, cross-trainer, GSC Trainer and FlexStrider variable stride trainer only): Professional and / or com-mercial use.
CAUTION: Any changes or modifi cations to this equipment could void the product warranty.
MISE EN GARDE : tout changement ou toute modifi cation de ce matériel peut annuler la garantie du produit.
Any service, other than cleaning or user maintenance, must be performed by an authorized service representative.
Cross-Trainers only:
For EN 957-9 Class A accuracy testing, input mechanical power was measured by connecting the resistance device (generator) with the console to a dynamometer. Torque test data was recorded across the available speed and resistance level settings. The mechanical resistance was then determined by a deceleration test without a user riding it, measuring precisely the starting speed and time until the pedals stopped moving. The torque required to stop the unit was then calculated from the system inertia, input speed, and time to stop then added to dynamometer data to obtain total system torque. From measured torque and speed, the input mechanical power and variance from displayed power were calculated. At level 10 and a constant 55 RPM, displayed wattage was 107 watts, with a 4.7% variance from input power on the test equipment. At level 12 and a constant 80 RPM, displayed wattage was 136 watts, with a 1.6% variance from input power on the test equipment.
FlexStrider Variable Stride Trainer only:
For EN 957-9 Class A accuracy testing, input mechanical power was measured by connecting the resistance device (generator) withthe console to a dynamometer. Torque test data was recorded across the available speed and resistance level settings. The mechanical resistance was then determined by a deceleration test without a user riding it, measuring precisely both motions exhibited by the product: 1) The rotational deceleration measured from the starting speed and time, at minimum stride, until the rotating mechanism comes to a stop, and 2) The angular deceleration measured from a starting angle and time until the pedal leg lever assembly comes to a stop. The torque required to stop the unit was then calculated from the system inertia, input speed, angle, and time to stop, and then added to the dynamometer data to obtain the total system torque. From measured torque and speed, the input mechanical power and variance from displayed power were calculated. At level 10 and a constant 40 RPM, displayed wattage was 128 watts, with a 2.1% variance from input power on the test equipment. At level 15 and a constant 60 RPM, displayed wattage was 167 watts, with a 4.6% variance from input power on the test equipment.
GSC Trainer only:
For EN 957-9 Class A accuracy testing, power at the crankshaft of the GSC Trainer was measured by connection to a dynamometer. The crank was rotated and torque measured throughout the speed range (60-160 Strides per Minute) and power range (0 to 100% Resistance) of the product. Accuracy of the resulting watts displayed on the console and actual watts calculated from the Crank Speed and Crank Torque measured by the dynamometer were found to be within the tolerance of EN 957-6 Class A (+/- 5 Watts up to 50 Watts, and +/- 10% over 50 Watts.)
4
This Operation Manual describes the functions of the following products:
Elevation Series Discover SE3 Treadmill Elevation Series Discover SE3 Cross-Trainer
Elevation Series Discover SE3 Recumbent Lifecycle® Exercise BikeElevation Series Discover SE3 Upright Lifecycle® Exercise Bike
Elevation Series Discover SE3 FlexStrider™ Variable Stride TrainerElevation Series Discover SE3 PowerMill™ Climber
Elevation Series Discover SE3 GSC Trainer™
See “Specifi cations” in this manual for product specifi c features.
Statements of Purpose: The Life Fitness Treadmill is an exercise machine that enables users to walk or run, in place, indoors on a mov-
ing surface.
The Life Fitness Cross-Trainer is an exercise machine that combines low-impact elliptical pedaling with push / pull arm motion to provide an effi cient, effective total body workout indoors.
The Life Fitness Lifecycle Exercise Bike is a machine that simulates the movements of riding a bicycle indoors at various speeds and levels of resistance.
The Life Fitness FlexStrider Variable-Stride Trainer is a commercial exercise machine that allows exercisers to instantly choose the length of an elliptical stride for a total-body, low-impact workout.
The Life Fitness PowerMill Climber is a commercial exercise machine that enables users to scale a revolving staircase at a wide variety of speeds.
The Life Fitness GSC Trainer offers three distinct motions — glide, stride and climb — in one machine.
CAUTION: Health-related injuries may result from incorrect or excessive use of exercise equipment. Life Fitness STRONGLY recommends seeing a physician for a complete medical exam before undertaking an exercise program, particularly if the user has a family history of high blood pressure or heart disease, is over the age of 45, smokes, has high cholesterol, is obese, or has not exercised regularly in the past year.
If, at any time while exercising, the user experiences faintness, dizziness, pain, or shortness of breath, he or she must stop well immediately.
MISE EN GARDE: Liés à la santé des blessures peuvent résulter de l’utilisation incorrecte ou excessive de l’équipement d’exercice. Life Fitness recommande FORTEMENT de consulter un médecin pour subir un examen médical complet avant de commencer tout programme d’exercice, et tout particulièrement si l’utilisateur a des antécédents familiaux d’hypertension ou de troubles cardiaques, s’il a plus de 45 ans, s’il fume, s’il a du cholestérol, s’il est obèse ou n’a pas fait d’exercice régulièrement depuis un an.
Si, pendant l’utilisation de l’appareil, l’utilisateur ressent un malaise, des vertiges, des vertiges, des douleurs ou des diffi cultés à respirer, il doit s’arrêter immédiatement.
5
IMPORTANT SAFETY INSTRUCTIONSRead all instructions before using Life Fitness products.
ALL PRODUCTS
CAUTION: Any changes or modifi cations to this equipment could void the product warranty.
DANGER: To reduce the risk of electrical shock, always unplug Life Fitness products before cleaning or at-tempting any maintenance activity.
WARNING: To reduce the risk of burns, fi re, electric shock, or injury, it is imperative to connect each product to a properly grounded electrical outlet.
WARNING: Heart rate monitoring systems may be inaccurate. Over exercising may result in serious injury or death. If you feel faint, stop exercising immediately.
Never operate a Life Fitness product if it has a damaged power cord or electrical plug, or if it has been dropped, damaged, or even partially immersed in water. Contact Life Fitness Customer Support Services.
Position the product so that the power cord plug to the wall is accessible to the user. Make sure that the power cord is not knotted or twisted and that it is not trapped under any equipment or other objects.
If the electrical supply cord is damaged, it must be replaced by the manufacturer, an authorized service agent, or a similarly qualifi ed person to avoid a hazard.
Always follow the console instructions for proper operation.
This appliance is not intended for use by persons (including children) with reduced physical, sensory, or mental capabilities, or lack of experience or knowledge unless they have supervision or been given instruction con-cerning the use of the appliance by a person responsible for their safety.
Do not use this product outdoors, near swimming pools or in areas of high humidity.
Never operate a Life Fitness product with the air openings blocked. Keep air openings free of lint, hair, or any other obstructing material.
Never insert objects into any opening in these products. If an object should drop inside, turn off the power, unplug the power cord from the outlet, and carefully retrieve it. If the item cannot be reached, contact Life Fit-ness Customer Support Services.
Never place liquids of any type directly on the unit, except in an accessory tray or holder. Containers with lids are recommended.
Do not use these products in bare feet. Always wear shoes. Wear shoes with rubber or high-traction soles. Do not use shoes with heels, leather soles, cleats or spikes. Make sure no stones are embedded in the soles.
Keep all loose clothing, shoelaces, and towels away from moving parts.
Do not reach into, or underneath, the unit or tip it on its side during operation.
Keep children away from the products.
Do not allow other people to interfere in any way with the user or equipment during a workout.
Allow LCD consoles to “normalize” with respect to temperature for one hour before plugging the unit in and using.
Use these products for their intended use as described in this manual. Do not use attachments that have not been recommended by the manufacturer.
Read all warnings on each product prior to starting a workout.
If warnings are missing or damaged, please contact Life Fitness immediately for replacement warning labels. Warning labels are shipped with every product and should be installed before product is used. Life Fitness is not responsible for missing or damaged warning labels.
Health and Environmental Regulations Warning - This product may contain chemicals known to the State of California to cause cancer, birth defects, or other reproductive harm. For more information related to the Eu-ropean Commission Regulation (EC) No. 1907/2006 (REACH) and the California Safe Drinking Water and Toxic Enforcement Act of 1986 (Proposition 65), please visit https://www.lftechsupport.com/web/guest/environmen-tal-regulations-information.
6
IMPORTANT SAFETY INSTRUCTIONSTREADMILL
WARNING: Keep the area 6.5 ft. (2 m) by 3 ft. (0.9 m) behind the Life Fitness treadmill clear of any obstructions, including walls, furniture, and other equipment.
WARNING: Be sure the emergency stop lanyard is clipped to the user and in proper po-sition on the treadmill before beginning any workout.
WARNING: The belt centering adjustment must be performed if the belt is not between the marks indicating the maximum allowed lateral positions. Refer to Elevation Series 95T Treadmill Assembly Instructions.
CAUTION: Risk of injury to persons – to avoid injury, use extreme caution when stepping onto or off of a moving belt. Read assembly instruction manual before using.
The product should never be left unattended when plugged in. Disconnect from the electrical outlet when not in use, and before putting on or taking off parts. To disconnect, turn power OFF at the ON/OFF switch, then re-move plug from electrical outlet.
Keep the power cord away from heated surfaces. Do not pull the equipment by the power cord or use the cord as a handle. Do not run the power cord on the fl oor under or along the side of the treadmill. Refer to Elevation Series 95T Treadmill & PCS Treadmill Discover SE3, Discover SI, & Explore Assembly Instructions.
Handrails may be held to enhance stability as needed, but are not for continuous use.
Never mount or dismount the treadmill while the running belt is moving. Use the handrails whenever addi-tional stability is required. In case of an emergency, such as tripping, grasp the handrails, and place the feet on the side platforms.
Never walk or jog backwards on the treadmill.
Do not use this product in areas where aerosol spray products are being used or where oxygen is being ad-ministered. Such substances create the danger of combustion and explosion.
The system causes immobilization of the treadmill when a pre-defi ned hard key sequence has been activated. This sequence is currently defi ned as 3 STOP key presses followed by 3 SPEED DOWN ARROW key presses on the activity zone keypad. To prevent false toggling of the Immobilized feature, this sequence must be done in a 5-10 second period.
In conformity with the European Union Machinery Directive 2006/42/EC, this equipment unloaded runs at sound pressure levels below 70 dB (A) at the average operating speed of 12 km/hr. Noise emission under load is higher than without load.
CROSS-TRAINER & FLEXSTRIDER
WARNING: Ensure that there is at least 1 ft. (0.3 m) of clearance in front of the Life Fit-ness Cross-Trainer and at least 2 ft. (0.6m) on the side.
WARNING: Ensure that there is at least 2 ft. (0.6 m) of clearance behind and on each side of the Life Fitness FlexStrider.
7
IMPORTANT SAFETY INSTRUCTIONSCROSS-TRAINER & FLEXSTRIDER
WARNING: The Cross-Trainer and FlexStrider are not equipped with a free-wheeling fea-ture. Therefore, the products cannot be stopped immediately.
Do not stand or sit on the rear plastic covers of the Cross-Trainer.
Do not stand on center tube of the Cross-Trainer.
The individual human power required to perform an exercise may be different than the mechanical power displayed on the Cross-Trainer and FlexStrider.
Use caution when mounting or dismounting the Cross-Trainer and FlexStrider. Before mounting, use the mov-ing arms to bring the pedal nearest to you to the lowest position. Use the stationary handlebars whenever ad-ditional stability is required. While exercising, hold onto the moving arms.
Never face backward while using the Cross-Trainer or FlexStrider.
LIFECYCLE EXERCISE BIKES
WARNING: Allow a distance of 16 in. (41 cm) between the widest part of the bike and other objects on either side. Provide at least 3 ft. (0.9 m) between the front or rear of the Life Fitness bike to any other objects and 2 ft. (0.6 m) in the direction the equipment is accessed from.
Do not stand or sit on plastic shrouds.
Use caution when mounting or dismounting the Lifecycle Exercise Bike. Use the stationary handlebar whenever additional stability is required.
GSC TRAINER
WARNING: Ensure that there is at least 23.6” (0.6m) of clearance behind the Life Fitness GSC Trainer and at least 12” (30 cm) on the sides.
WARNING: The GSC Trainer is not equipped with a free-wheeling feature. Therefore, the product cannot be stopped immediately. Do not stand or sit on the rear plastic covers.
WARNING: Moving parts and fall hazard. To avoid serious injury wait until foot plates come to a complete stop before getting off the unit.
The individual human power required to perform an exercise may be different than the mechanical power displayed on the GSC Trainer.
Use caution when mounting or dismounting the GSC Trainer. Before mounting, use the moving arms to bring the foot plate nearest to you to the lowest position. Use the stationary handlebars whenever additional stability is required. While exercising, hold onto moving arms.
Never face backwards while using the GSC Trainer.

8
IMPORTANT SAFETY INSTRUCTIONSPOWERMILL CLIMBER
WARNING: Allow at least 3 ft. (1 m) of clearance behind the Life Fitness PowerMill Climber and 1 ft. ( 0.3 m ) on each side.
Handrails may be held to enhance stability as needed, but are not for continuous use.
The product should never be left unattended when plugged in. Disconnect from the electrical outlet when not in use, and before putting on or taking off parts. To disconnect, turn power OFF at the ON/OFF switch, then re-move plug from electrical outlet.
Never walk or jog backwards on the PowerMill Climber.
Unlike bikes, cross-trainers, or the traditional paddle stairclimbers, this is a motorized product. This motorized product causes stair steps to descend at variable rates and therefore operates on different planes simultane-ously. While operating the product during a typical workout, the user is forced to fully concentrate on coordi-nating his or her efforts on the moving stairs. Therefore, the user cannot see if anyone or any thing approaches from the rear. For these reasons this unit is designed for use only in a controlled setting. The PowerMill Climber is not designed for use in the home and should not be used in an environment where children or animals might have access.
When it is necessary to immobilize the product, set the display to read SELECT WORKOUT. (Press the PAUSE / STOP key twice if not already there.) Hold down the LEVEL DOWN arrow key and press the PAUSE / STOP key. The product now displays “IMMOBILIZED”. The product can’t be operated in this state. The motor is disabled. The product will remain in this state across resets, power cycles, etc. To restore normal operation, repeat the same key sequence: hold down the LEVEL DOWN arrow key and press the PAUSE / STOP key. The product will display “SELECT WORKOUT”.
SAVE THESE INSTRUCTIONS FOR FUTURE REFERENCE.
9
CONSIGNES DE SÉCURITÉ IMPORTANTESLire toutes les instructions avant d’utiliser les appareils Life Fitness.
TOUS LES APPAREILS
MISE EN GARDE: Tout changement et toute modifi cation de ce matériel peut an-nuler la garantie du produit.
DANGER:Pour réduire les risques de décharge électrique, toujours débrancher cet appareil Life Fitness avant lenettoyage ou toute mesure d’entretien.
AVERTISSEMENT:Pour réduire les risques de brûlures, d’incendies, de décharges électriques ou de blessures, chaque appareil doit absolument être branché sur une prise électrique correctement mise à la terre.
AVERTISSEMENT:Des systèmes de surveillance de fréquence cardiaque peuvent être inexacts. Trop d’exercices peuvent entraîner des blessures sérieuses, voire mortelles. En cas de sensation d’évanouissement, arrêter immédiatement l’entraînement.
Ne jamais faire fonctionner un produit Life Fitness dont la fi che ou le cordon d’alimentation est endommagé, ni aucun appareil qui serait tombé ou aurait été endommagé ou même partiellement plongé dans l’eau. Appeler le service clientèle de Life Fitness.
Placer ce produit de manière à ce que l’utilisateur puisse accéder à la fi che du cordon d’alimentation. Assurez-vous que le cordon d’alimentation n’est pas noué ou tordu et qu’il n’est pas coincé sous un autre appareil ou sous tout autre objet.
Si le cordon d’alimentation électrique est endommagé, il doit être remplacé par le fabricant, par un réparateur agréé ou par une personne qualifi ée afi n d’éviter tout danger.
Les instructions de la console doivent toujours être suivies pour obtenir un fonctionnement correct.
Cet appareil n’est pas prévu pour être utilisé par des personnes (y compris les enfants) dont les capacités phy-siques, sensorielles ou mentales sont réduites, ou des personnes dénuées d’expérience ou de connaissance, sauf si elles ont pu bénéfi cier, par l’intermédiaire d’une personne responsable de leur sécurité, d’une surveil-lance ou d’instructions préalables concernant l’utilisation de l’appareil.
Ne pas utiliser ce produit à l’extérieur, près d’une piscine ou dans des endroits très humides.
Ne jamais faire fonctionner d’appareil Life Fitness dont les orifi ces d’aération seraient bloqués. Les garder ex-empts de peluches, de cheveux ou de toute obstruction.
• Ne jamais rien insérer dans les ouvertures de cet appareil. Si un objet tombe à l’intérieur de l’appareil, couper l’alimentation électrique, débrancher le cordon de la prise et le récupérer avec précaution. S’il est impossible de l’atteindre, communiquer avec le service à la clientèle de Life Fitness.
Ne jamais placer aucun liquide directement sur l’appareil, sauf dans le plateau pour accessoires ou un support prévu à cet effet. Il est recommandé d’utiliser des conteneurs munis de couvercles.
Ne pas utiliser cet appareil pieds nus. Toujours porter des chaussures. Porter des chaussures avec des semelles en caoutchouc ou fournissant une très bonne adhérence. Ne pas utiliser de chaussures à talons, à semelles en cuir ou munies de crampons. S’assurer qu’aucun caillou n’est incrusté dans les semelles.
Éloigner les vêtements lâches, les lacets et les serviettes des pièces en mouvement.
Ne pas placer les mains sous l’appareil ou dans l’appareil, et ne pas le renverser sur le côté pendant le fonc-tion-nement.
Ne laisser personne déranger de quelque manière que ce soit l’utilisateur ou interférer avec l’équipement du-rant un entraînement.
10
CONSIGNES DE SÉCURITÉ IMPORTANTES Laisser les consoles ACL se « normaliser » pendant une heure quant à la température avant le branchement et
l’utilisation de l’appareil.
Cet appareil ne doit être employé que pour l’usage auquel il est destiné, conformément aux directives du manuel. Ne pas utiliser d’accessoires qui ne sont pas recommandés par le fabricant.
Lisez tous les avertissements sur chaque produit avant de démarrer un exercice.
Si les avertissements sont absents ou endommagés, veuillez contacter immédiatement Life Fitness afi n de les faire remplacer. Les étiquettes d’avertissement sont livrées avec chaque produit et doivent être installées avant leur utilisation. Life Fitness ne peut être tenu responsable lorsque des étiquettes d’avertissement sont absentes ou endommagées.
Réglementation en matière de santé et d’environnement : avertissement - Cet appareil contient des produits chimiques considérés par l’État de Californie comme étant cancérigènes et causant des malformations congénitales et d’autres troubles de l’appareil reproducteur. Pour plus d’informations sur la réglementation européenne (EC) No. 1907/2006 (REACH) et sur le California Safe Drinking Water and Toxic Enforcement Act de 1986 (Proposition 65), consultez la page https://www.lftechsupport.com/web/guest/environmental-regulations-information.
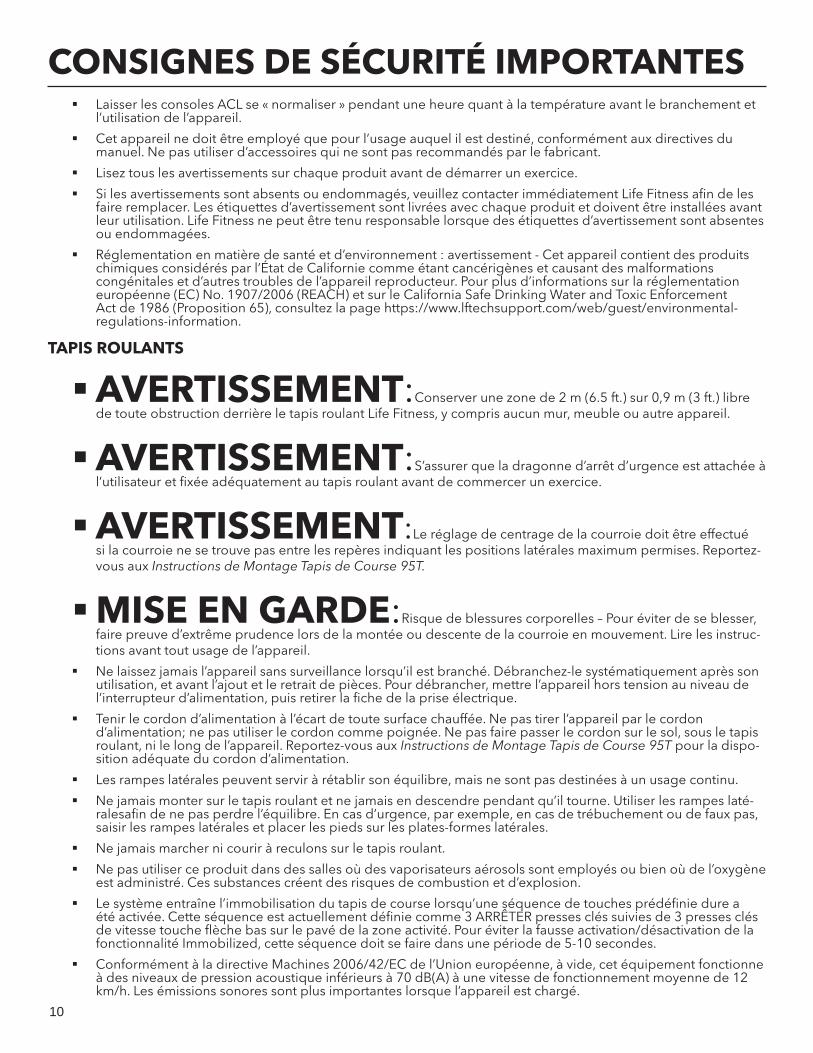
TAPIS ROULANTS
AVERTISSEMENT:Conserver une zone de 2 m (6.5 ft.) sur 0,9 m (3 ft.) libre de toute obstruction derrière le tapis roulant Life Fitness, y compris aucun mur, meuble ou autre appareil.
AVERTISSEMENT:S’assurer que la dragonne d’arrêt d’urgence est attachée à l’utilisateur et fi xée adéquatement au tapis roulant avant de commercer un exercice.
AVERTISSEMENT:Le réglage de centrage de la courroie doit être effectué si la courroie ne se trouve pas entre les repères indiquant les positions latérales maximum permises. Reportez-vous aux Instructions de Montage Tapis de Course 95T.
MISE EN GARDE:Risque de blessures corporelles – Pour éviter de se blesser, faire preuve d’extrême prudence lors de la montée ou descente de la courroie en mouvement. Lire les instruc-tions avant tout usage de l’appareil.
Ne laissez jamais l’appareil sans surveillance lorsqu’il est branché. Débranchez-le systématiquement après son utilisation, et avant l’ajout et le retrait de pièces. Pour débrancher, mettre l’appareil hors tension au niveau de l’interrupteur d’alimentation, puis retirer la fi che de la prise électrique.
Tenir le cordon d’alimentation à l’écart de toute surface chauffée. Ne pas tirer l’appareil par le cordon d’alimentation; ne pas utiliser le cordon comme poignée. Ne pas faire passer le cordon sur le sol, sous le tapis roulant, ni le long de l’appareil. Reportez-vous aux Instructions de Montage Tapis de Course 95T pour la dispo-sition adéquate du cordon d’alimentation.
Les rampes latérales peuvent servir à rétablir son équilibre, mais ne sont pas destinées à un usage continu.
Ne jamais monter sur le tapis roulant et ne jamais en descendre pendant qu’il tourne. Utiliser les rampes laté-ralesafi n de ne pas perdre l’équilibre. En cas d’urgence, par exemple, en cas de trébuchement ou de faux pas, saisir les rampes latérales et placer les pieds sur les plates-formes latérales.
Ne jamais marcher ni courir à reculons sur le tapis roulant.
Ne pas utiliser ce produit dans des salles où des vaporisateurs aérosols sont employés ou bien où de l’oxygène est administré. Ces substances créent des risques de combustion et d’explosion.
Le système entraîne l’immobilisation du tapis de course lorsqu’une séquence de touches prédéfi nie dure a été activée. Cette séquence est actuellement défi nie comme 3 ARRÊTER presses clés suivies de 3 presses clés de vitesse touche fl èche bas sur le pavé de la zone activité. Pour éviter la fausse activation/désactivation de la fonctionnalité Immobilized, cette séquence doit se faire dans une période de 5-10 secondes.
Conformément à la directive Machines 2006/42/EC de l’Union européenne, à vide, cet équipement fonctionne à des niveaux de pression acoustique inférieurs à 70 dB(A) à une vitesse de fonctionnement moyenne de 12 km/h. Les émissions sonores sont plus importantes lorsque l’appareil est chargé.
11
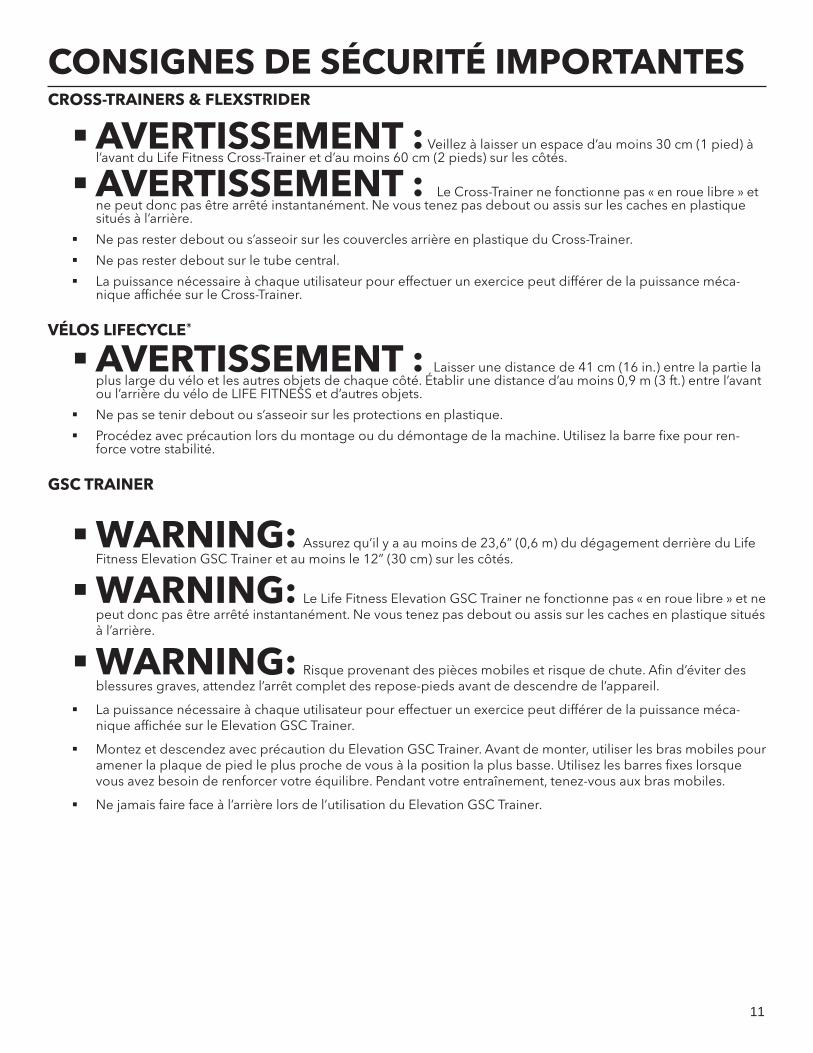
CONSIGNES DE SÉCURITÉ IMPORTANTESCROSS-TRAINERS & FLEXSTRIDER
AVERTISSEMENT : Veillez à laisser un espace d’au moins 30 cm (1 pied) à l’avant du Life Fitness Cross-Trainer et d’au moins 60 cm (2 pieds) sur les côtés.
AVERTISSEMENT : Le Cross-Trainer ne fonctionne pas « en roue libre » et ne peut donc pas être arrêté instantanément. Ne vous tenez pas debout ou assis sur les caches en plastique situés à l’arrière.
Ne pas rester debout ou s’asseoir sur les couvercles arrière en plastique du Cross-Trainer.
Ne pas rester debout sur le tube central.
La puissance nécessaire à chaque utilisateur pour effectuer un exercice peut différer de la puissance méca-nique affi chée sur le Cross-Trainer.
VÉLOS LIFECYCLE®
AVERTISSEMENT : Laisser une distance de 41 cm (16 in.) entre la partie la plus large du vélo et les autres objets de chaque côté. Établir une distance d’au moins 0,9 m (3 ft.) entre l’avant ou l’arrière du vélo de LIFE FITNESS et d’autres objets.
Ne pas se tenir debout ou s’asseoir sur les protections en plastique.
Procédez avec précaution lors du montage ou du démontage de la machine. Utilisez la barre fi xe pour ren-force votre stabilité.
GSC TRAINER
WARNING: Assurez qu’il y a au moins de 23,6” (0,6 m) du dégagement derrière du Life Fitness Elevation GSC Trainer et au moins le 12” (30 cm) sur les côtés.
WARNING: Le Life Fitness Elevation GSC Trainer ne fonctionne pas « en roue libre » et ne peut donc pas être arrêté instantanément. Ne vous tenez pas debout ou assis sur les caches en plastique situés à l’arrière.
WARNING: Risque provenant des pièces mobiles et risque de chute. Afi n d’éviter des blessures graves, attendez l’arrêt complet des repose-pieds avant de descendre de l’appareil.
La puissance nécessaire à chaque utilisateur pour effectuer un exercice peut différer de la puissance méca-nique affi chée sur le Elevation GSC Trainer.
Montez et descendez avec précaution du Elevation GSC Trainer. Avant de monter, utiliser les bras mobiles pour amener la plaque de pied le plus proche de vous à la position la plus basse. Utilisez les barres fi xes lorsque vous avez besoin de renforcer votre équilibre. Pendant votre entraînement, tenez-vous aux bras mobiles.
Ne jamais faire face à l’arrière lors de l’utilisation du Elevation GSC Trainer.

12
CONSIGNES DE SÉCURITÉ IMPORTANTESPOWERMILL™ CLIMBER
AVERTISSEMENT : Gardez une distance d’au moins 1 m (3 ft.) libre de toute obstruction derrière le PowerMill Climber, y compris aucun mur, meuble ou autre appareil, et de 0.3 m (1 ft.) de chaque côté du PowerMill Climber.
Les rampes latérales peuvent servir à rétablir son équilibre, mais ne sont pas destinées à un usage continu.
Ne laissez jamais l’appareil sans surveillance lorsqu’il est branché. Débranchez-le systématiquement après son utilisation, et avant l’ajout et le retrait de pièces. Pour débrancher, mettre l’appareil hors tension au niveau de l’interrupteur d’alimentation, puis retirer la fi che de la prise électrique.
Ne jamais marcher ni courir à reculons sur le PowerMill Climber.
À la différence des vélos, cross-trainers et steppers traditionnels à pédale, il s’agit d’un appareil motorisé. Cet appareil motorisé permet de faire descendre les marches d’escalier à des vitesses variables et opère donc à différents niveaux simultanément. Au cours d’un entraînement classique sur cet appareil, l’utilisateur doit se concentrer afi n de coordonner ses efforts sur les escaliers en mouvement. Il n’a donc pas la possibilité de voir si quelqu’un ou quelque chose s’approche par l’arrière. Cette unité est dès lors uniquement conçue pour être utilisée dans un environnement contrôlé. Le PowerMill Climber n’est pas conçu pour être utilisé à domicile et ne doit en aucun cas être utilisé dans un environnement auquel les enfants ou animaux ont accès.
Si vous devez immobiliser l’appareil, réglez l’affi chage sur SÉLECTIONNER EXERCICE. (Pour ce faire, appuyez deux fois sur la touche PAUSE / STOP.) Maintenez la touche NIVEAU VERS LE BAS enfoncée et appuyez sur la touche PAUSE / STOP. L’appareil affi che désormais le message « IMMOBILISÉ ». En mode Immobilisé, l’appareil ne peut être utilisé. Le moteur est désactivé. L’appareil restera immobilisé, même s’il est réinitialisé, mis hors tension, puis à nouveau sous tension, etc. Le mode de fonctionnement normal ne peut être rétabli qu’au moyen de la même séquence de touches : maintenez la touche NIVEAU VERS LE BAS enfoncée et appuyez sur la touche PAUSE / STOP. L’appareil affi che désormais « SÉLECTIONNER EXERCICE ».
CONSERVER CES INSTRUCTIONS POUR TOUT USAGE ULTÉRIEUR.
13
DISCOVER SE3 MANUAL ICONSThe Elevation Series Discover SE3 manual covers information for multiple cardio products. To help differentiate we use the following icons.
PowerMill-only feature
FlexStrider-only feature
Treadmill-only feature
Cross-Trainer-only feature
Bike-only feature
GSC-Only Feature
14
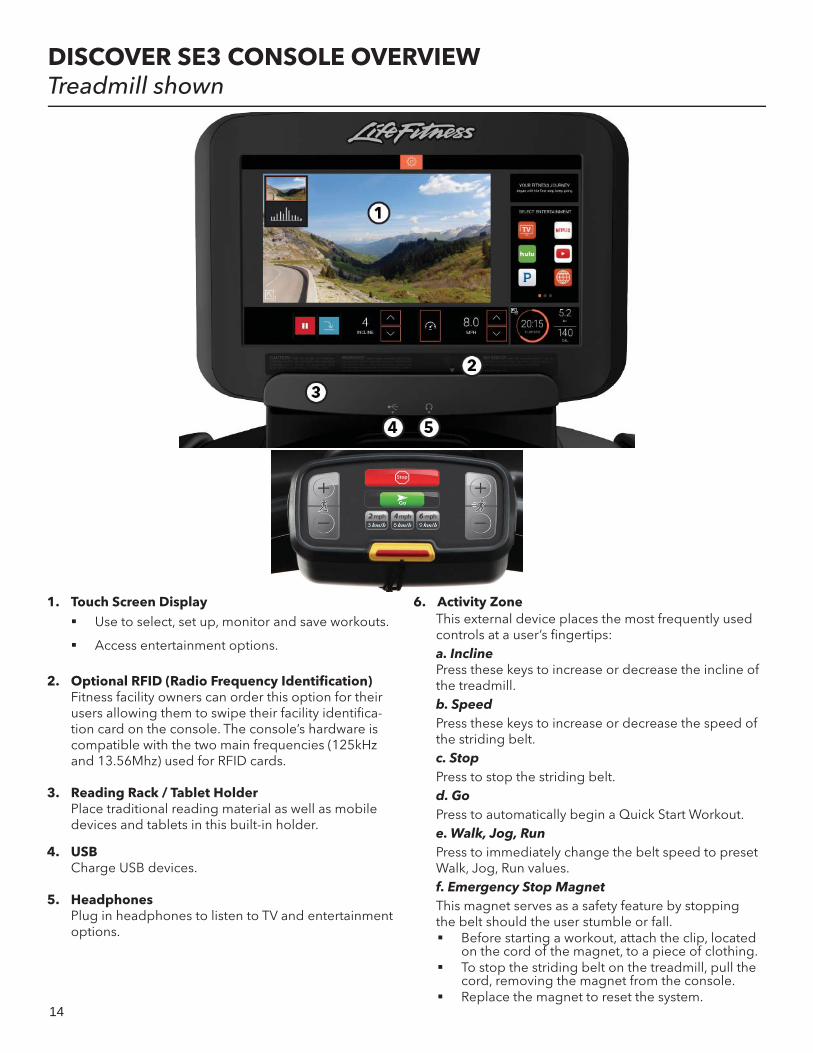
DISCOVER SE3 CONSOLE OVERVIEWTreadmill shown
1. Touch Screen Display Use to select, set up, monitor and save workouts.
Access entertainment options.
2. Optional RFID (Radio Frequency Identifi cation)Fitness facility owners can order this option for their users allowing them to swipe their facility identifi ca-tion card on the console. The console’s hardware is compatible with the two main frequencies (125kHz and 13.56Mhz) used for RFID cards.
3. Reading Rack / Tablet Holder Place traditional reading material as well as mobile devices and tablets in this built-in holder.
4. USBCharge USB devices.
5. HeadphonesPlug in headphones to listen to TV and entertainment options.
6. Activity Zone This external device places the most frequently used controls at a user’s fi ngertips: a. Incline Press these keys to increase or decrease the incline of the treadmill. b. Speed Press these keys to increase or decrease the speed of the striding belt. c. Stop Press to stop the striding belt. d. Go Press to automatically begin a Quick Start Workout. e. Walk, Jog, Run Press to immediately change the belt speed to preset Walk, Jog, Run values. f. Emergency Stop Magnet This magnet serves as a safety feature by stopping the belt should the user stumble or fall.
Before starting a workout, attach the clip, located on the cord of the magnet, to a piece of clothing.
To stop the striding belt on the treadmill, pull the cord, removing the magnet from the console.
Replace the magnet to reset the system.
15
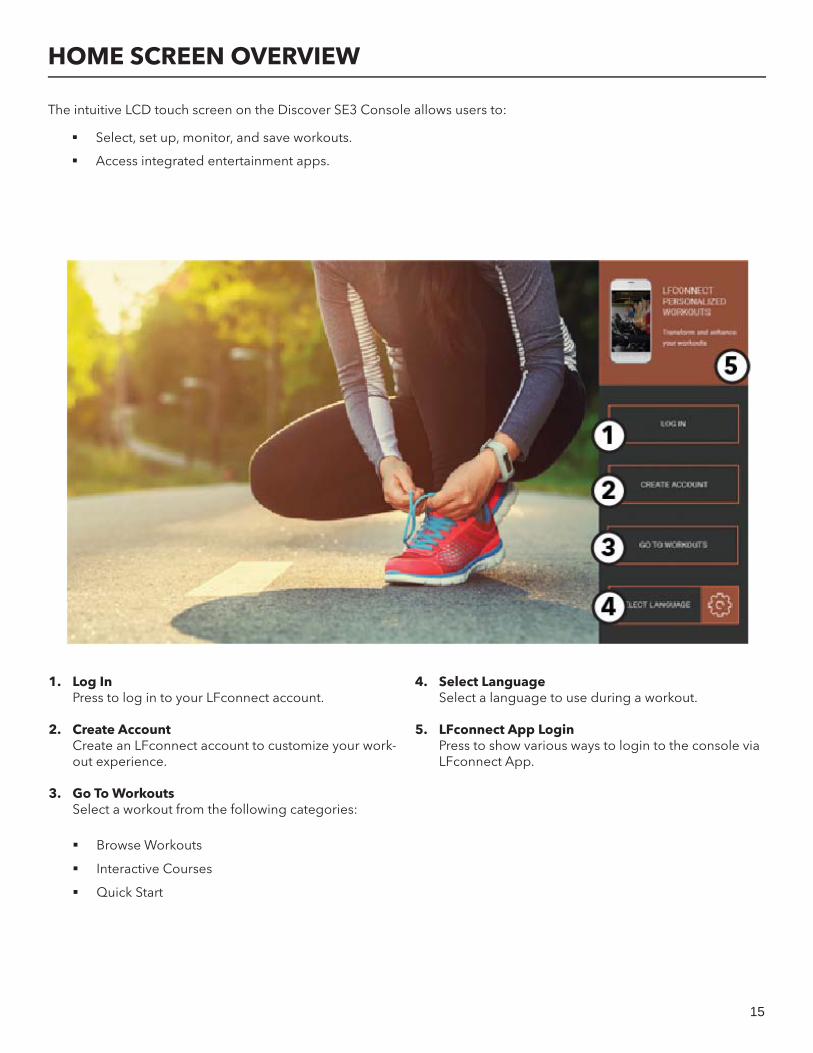
HOME SCREEN OVERVIEW
The intuitive LCD touch screen on the Discover SE3 Console allows users to:
Select, set up, monitor, and save workouts.
Access integrated entertainment apps.
1. Log In Press to log in to your LFconnect account.
2. Create Account Create an LFconnect account to customize your work-out experience.
3. Go To WorkoutsSelect a workout from the following categories: Browse Workouts
Interactive Courses
Quick Start
4. Select LanguageSelect a language to use during a workout.
5. LFconnect App LoginPress to show various ways to login to the console via LFconnect App.
16
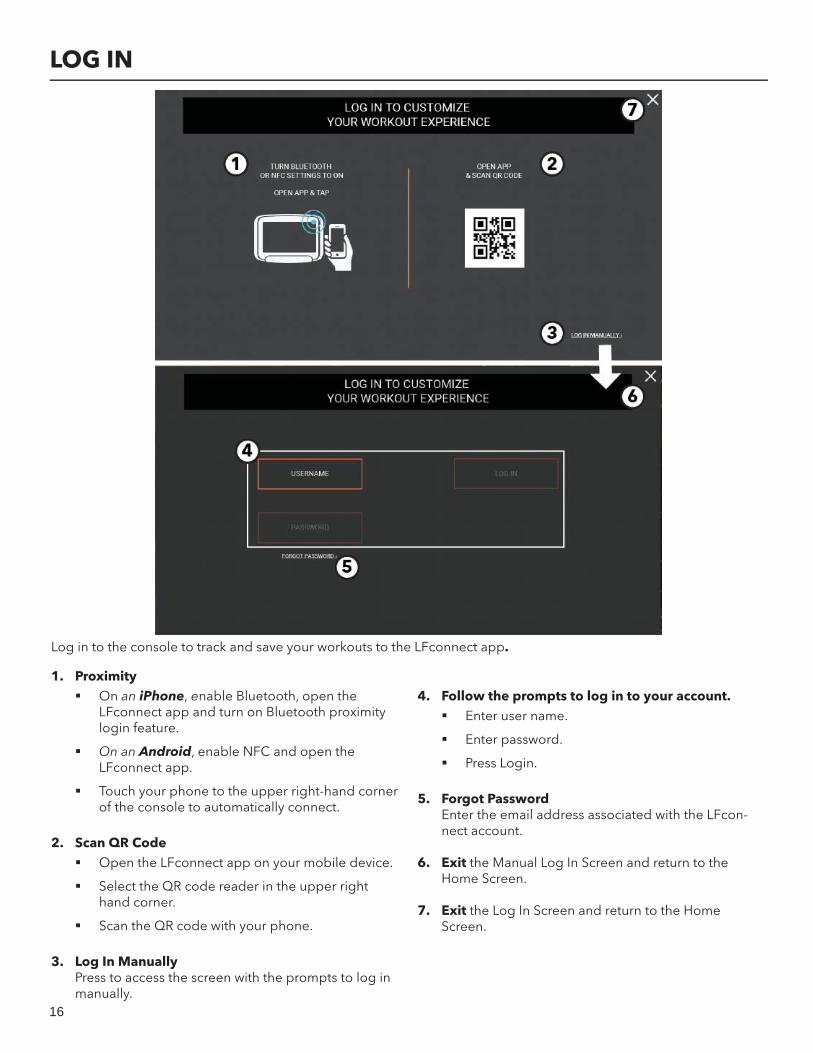
LOG IN
Log in to the console to track and save your workouts to the LFconnect app.
1. Proximity On an iPhone, enable Bluetooth, open the
LFconnect app and turn on Bluetooth proximity login feature.
On an Android, enable NFC and open the LFconnect app.
Touch your phone to the upper right-hand corner of the console to automatically connect.
2. Scan QR Code Open the LFconnect app on your mobile device.
Select the QR code reader in the upper right hand corner.
Scan the QR code with your phone.
3. Log In ManuallyPress to access the screen with the prompts to log in manually.
4. Follow the prompts to log in to your account. Enter user name.
Enter password.
Press Login.
5. Forgot PasswordEnter the email address associated with the LFcon-nect account.
6. Exit the Manual Log In Screen and return to the Home Screen.
7. Exit the Log In Screen and return to the Home Screen.
17
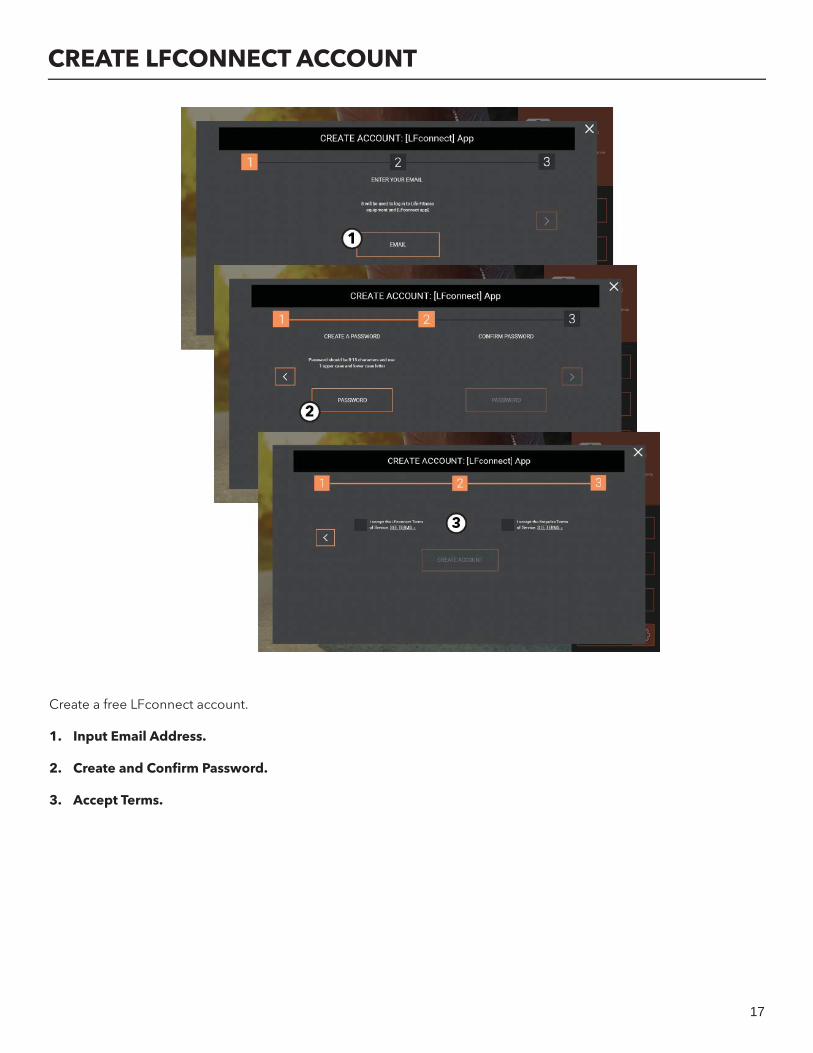
CREATE LFCONNECT ACCOUNT
Create a free LFconnect account.
1. Input Email Address.
2. Create and Confi rm Password.
3. Accept Terms.
18
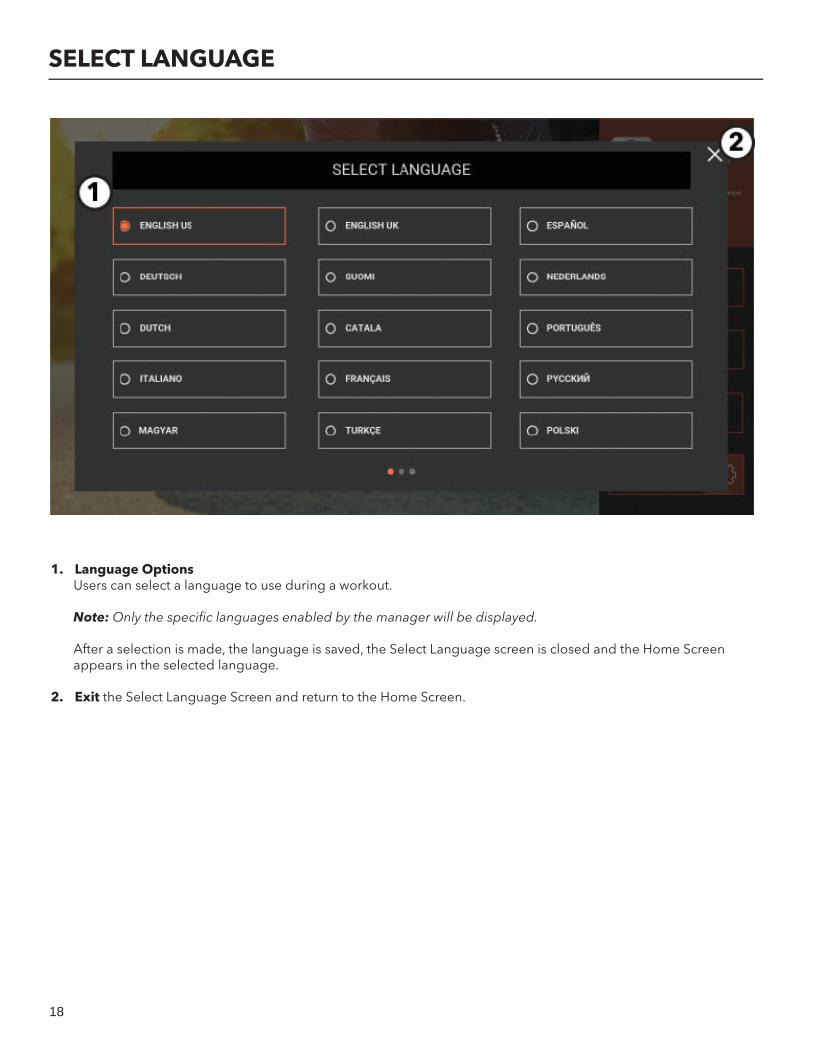
SELECT LANGUAGE
1. Language Options Users can select a language to use during a workout.
Note: Only the specifi c languages enabled by the manager will be displayed.
After a selection is made, the language is saved, the Select Language screen is closed and the Home Screen appears in the selected language.
2. Exit the Select Language Screen and return to the Home Screen.
19
WORKOUT SELECTION - QUICK START
1. Select QUICK START A workout countdown “3, 2, 1” screen appears.
Users can make adjustments to the workout after starting a workout.
A Quick Start workout begins at a speed of 0.5 mph / 0.8 kph and an incline of 0.0%.
A Quick Start workout begins at Level 6.
A Quick Start workout begins at 20 Steps Per Minute (SPM).
2. Logged In User InformationUser name appears in upper right-hand corner.
Note: User must be logged into LFconnect to see information.
3. Logged In DataPrevious saved workout data, including time, distance, and calories, is displayed.
Note: User must be logged into LFconnect to see information.
20
CHOOSE WORKOUT - INTERACTIVE COURSES
The Interactive Courses are video courses, shot in fi rst person perspective through landscapes, cityscapes, and events from around the world. This feature interacts with the fi tness equipment to provide an immersive experience.
Note: The course will speed up or slow down with the speed of the treadmill. The incline of the treadmill automatically increases or decreases to correspond with the virtual hills on the course.
1. Select INTERACTIVE COURSES as Workout Option
2. Course Options Choose from available courses.
3. RunSocial RunSocial courses have the RunSocial app icon in the upper right-hand corner. When connected to the internet, you can compete with other runners in your facility or around the world using virtual avatars (as long as you and they are on the same course at the same time).
21
WORKOUT SETUP - INTERACTIVE COURSES
1. Choose Goal Time
Distance
2. Back ArrowPress to return to previous screen.
3. Preset Time ValuesChoose from default values.
4. Time Keypad Press to use a numeric keypad to input a workout time value.
5. Level (if applicable)Press to choose a preset level or input a level value.
6. Enter Weight
Press to use a numeric keypad to input a weight value.
7. Choose Measurement Unit Metric
Imperial
8. NextPress to go to the next setup screen.
9. Exit the Setup Screen and return to the Interactive Courses Workout Selection Screen.
10. Course Markers?Choose a starting point for the course.
11. Start Interactive CourseA workout countdown “3, 2, 1” screen appears and then the course begins.
22
WORKOUT SETUP - INTERACTIVE COURSES - RUNSOCIAL
RunSocial combines virtual running with real-world video routes. Run the routes with friends, coworkers, or others around the world in real time. Treadmill incline adjusts to match the video route.
1. Choose Goal Time
Distance
2. Select Workout Time ValueChoose a preset value or use numeric keypad to input time value.
3. Enter WeightPress to use a numeric keypad to input a weight value.
4. Choose Measurement Unit Metric
Imperial5. Start
Press to begin workout.
23
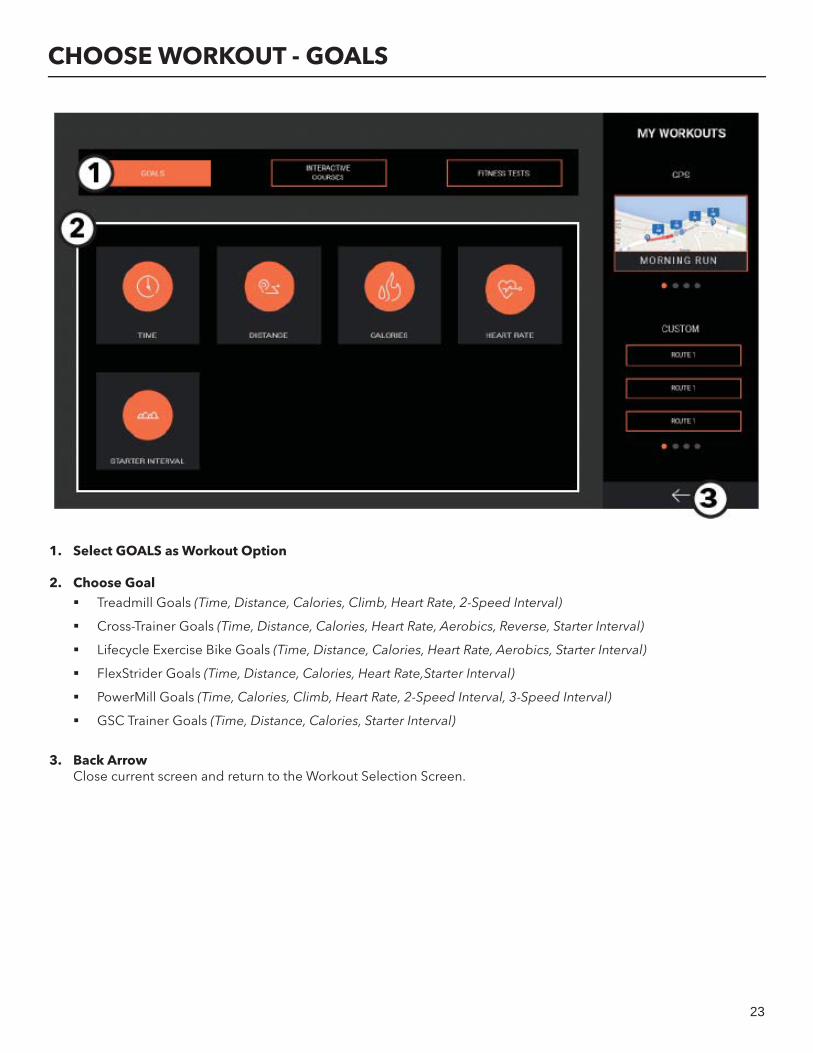
CHOOSE WORKOUT - GOALS
1. Select GOALS as Workout Option
2. Choose Goal Treadmill Goals (Time, Distance, Calories, Climb, Heart Rate, 2-Speed Interval)
Cross-Trainer Goals (Time, Distance, Calories, Heart Rate, Aerobics, Reverse, Starter Interval)
Lifecycle Exercise Bike Goals (Time, Distance, Calories, Heart Rate, Aerobics, Starter Interval)
FlexStrider Goals (Time, Distance, Calories, Heart Rate,Starter Interval)
PowerMill Goals (Time, Calories, Climb, Heart Rate, 2-Speed Interval, 3-Speed Interval)
GSC Trainer Goals (Time, Distance, Calories, Starter Interval)
3. Back ArrowClose current screen and return to the Workout Selection Screen.

24
GOALS - TERRAINS
1. Choose Terrain Flat is a constant effort workout in which the user
can change incline, level or speed at any time.
Hill is an interval training workout. Intervals are periods of intense aerobic exercise separated by regular periods of lower-intensity exercise. The overall duration of the workout determines the length of each interval.
Rolling Hills is a rolling hill workout with low in-tensity levels.
Random is an interval training workout of con-stantly changing intensity levels that occur in no regular pattern or progression.
25
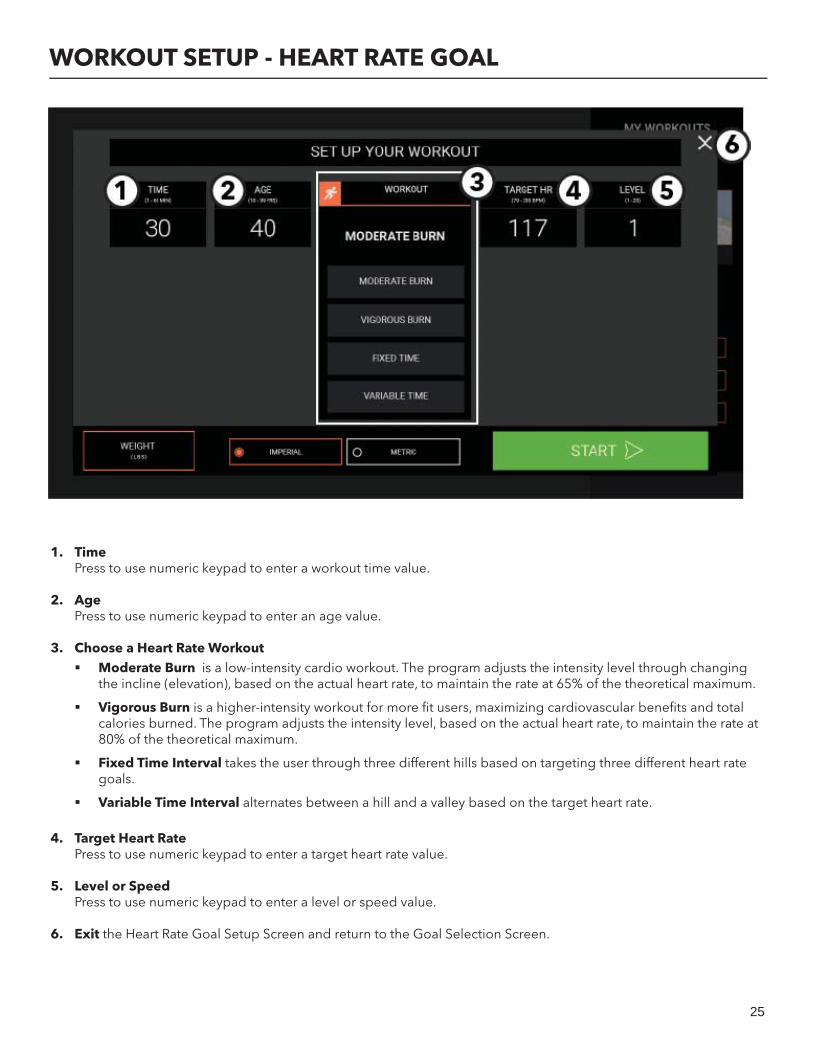
WORKOUT SETUP - HEART RATE GOAL
1. TimePress to use numeric keypad to enter a workout time value.
2. AgePress to use numeric keypad to enter an age value.
3. Choose a Heart Rate Workout Moderate Burn is a low-intensity cardio workout. The program adjusts the intensity level through changing
the incline (elevation), based on the actual heart rate, to maintain the rate at 65% of the theoretical maximum.
Vigorous Burn is a higher-intensity workout for more fi t users, maximizing cardiovascular benefi ts and total calories burned. The program adjusts the intensity level, based on the actual heart rate, to maintain the rate at 80% of the theoretical maximum.
Fixed Time Interval takes the user through three different hills based on targeting three different heart rate goals.
Variable Time Interval alternates between a hill and a valley based on the target heart rate.
4. Target Heart RatePress to use numeric keypad to enter a target heart rate value.
5. Level or SpeedPress to use numeric keypad to enter a level or speed value.
6. Exit the Heart Rate Goal Setup Screen and return to the Goal Selection Screen.
26
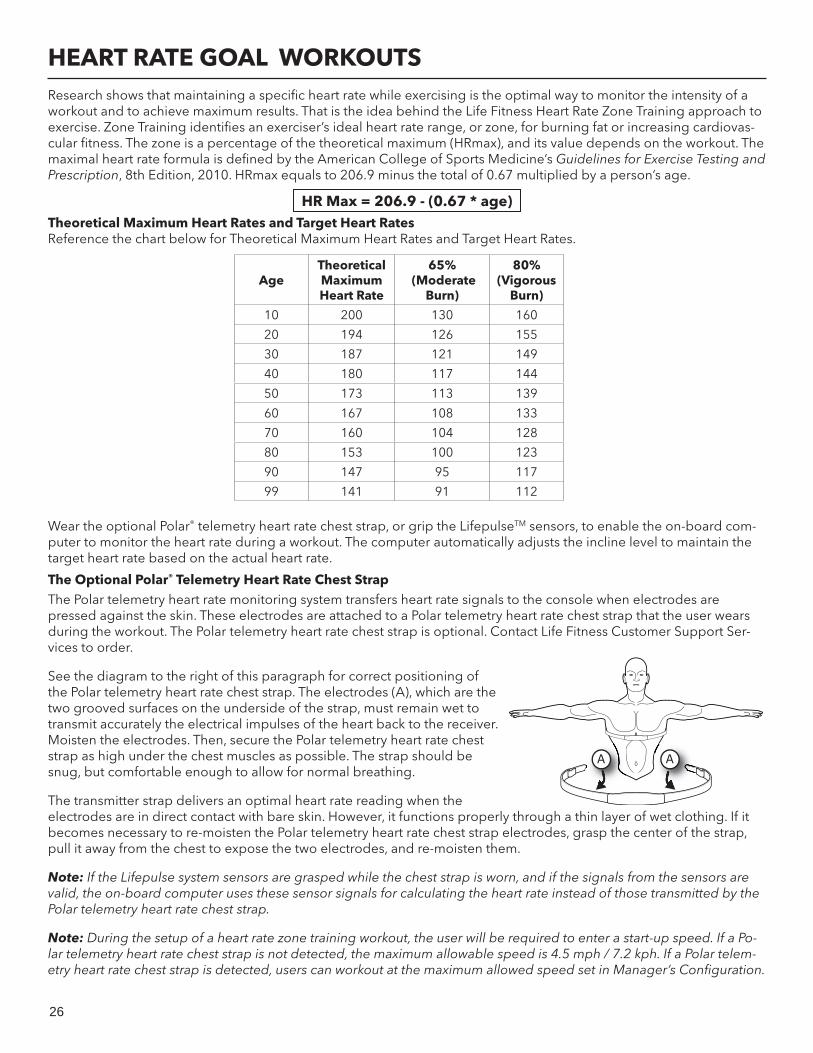
HEART RATE GOAL WORKOUTSResearch shows that maintaining a specifi c heart rate while exercising is the optimal way to monitor the intensity of a workout and to achieve maximum results. That is the idea behind the Life Fitness Heart Rate Zone Training approach to exercise. Zone Training identifi es an exerciser’s ideal heart rate range, or zone, for burning fat or increasing cardiovas-cular fi tness. The zone is a percentage of the theoretical maximum (HRmax), and its value depends on the workout. The maximal heart rate formula is defi ned by the American College of Sports Medicine’s Guidelines for Exercise Testing and Prescription, 8th Edition, 2010. HRmax equals to 206.9 minus the total of 0.67 multiplied by a person’s age.
Theoretical Maximum Heart Rates and Target Heart RatesReference the chart below for Theoretical Maximum Heart Rates and Target Heart Rates.
Wear the optional Polar® telemetry heart rate chest strap, or grip the LifepulseTM sensors, to enable the on-board com-puter to monitor the heart rate during a workout. The computer automatically adjusts the incline level to maintain the target heart rate based on the actual heart rate.
The Optional Polar® Telemetry Heart Rate Chest StrapThe Polar telemetry heart rate monitoring system transfers heart rate signals to the console when electrodes are pressed against the skin. These electrodes are attached to a Polar telemetry heart rate chest strap that the user wears during the workout. The Polar telemetry heart rate chest strap is optional. Contact Life Fitness Customer Support Ser-vices to order.
See the diagram to the right of this paragraph for correct positioning of the Polar telemetry heart rate chest strap. The electrodes (A), which are the two grooved surfaces on the underside of the strap, must remain wet to transmit accurately the electrical impulses of the heart back to the receiver. Moisten the electrodes. Then, secure the Polar telemetry heart rate chest strap as high under the chest muscles as possible. The strap should be snug, but comfortable enough to allow for normal breathing.
The transmitter strap delivers an optimal heart rate reading when the electrodes are in direct contact with bare skin. However, it functions properly through a thin layer of wet clothing. If it becomes necessary to re-moisten the Polar telemetry heart rate chest strap electrodes, grasp the center of the strap, pull it away from the chest to expose the two electrodes, and re-moisten them.
Note: If the Lifepulse system sensors are grasped while the chest strap is worn, and if the signals from the sensors are valid, the on-board computer uses these sensor signals for calculating the heart rate instead of those transmitted by the Polar telemetry heart rate chest strap.
Note: During the setup of a heart rate zone training workout, the user will be required to enter a start-up speed. If a Po-lar telemetry heart rate chest strap is not detected, the maximum allowable speed is 4.5 mph / 7.2 kph. If a Polar telem-etry heart rate chest strap is detected, users can workout at the maximum allowed speed set in Manager’s Confi guration.
HR Max = 206.9 - (0.67 * age)
AgeTheoretical Maximum Heart Rate
65% (Moderate
Burn)
80% (Vigorous
Burn)
10 200 130 160
20 194 126 155
30 187 121 149
40 180 117 144
50 173 113 139
60 167 108 133
70 160 104 128
80 153 100 123
90 147 95 117
99 141 91 112
A A
27
HEART RATE GOAL WORKOUTS
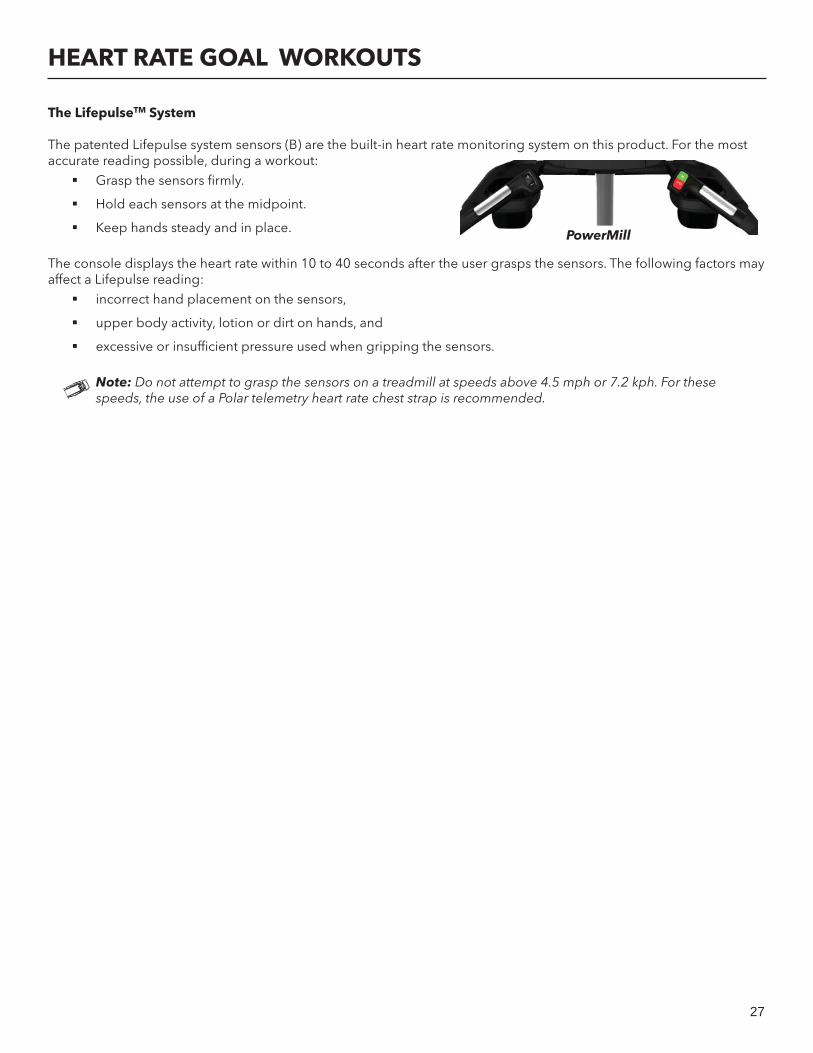
The LifepulseTM System
The patented Lifepulse system sensors (B) are the built-in heart rate monitoring system on this product. For the most accurate reading possible, during a workout:
Grasp the sensors fi rmly.
Hold each sensors at the midpoint.
Keep hands steady and in place.
The console displays the heart rate within 10 to 40 seconds after the user grasps the sensors. The following factors may affect a Lifepulse reading:
incorrect hand placement on the sensors,
upper body activity, lotion or dirt on hands, and
excessive or insuffi cient pressure used when gripping the sensors.
Note: Do not attempt to grasp the sensors on a treadmill at speeds above 4.5 mph or 7.2 kph. For these speeds, the use of a Polar telemetry heart rate chest strap is recommended.
PowerMill
28
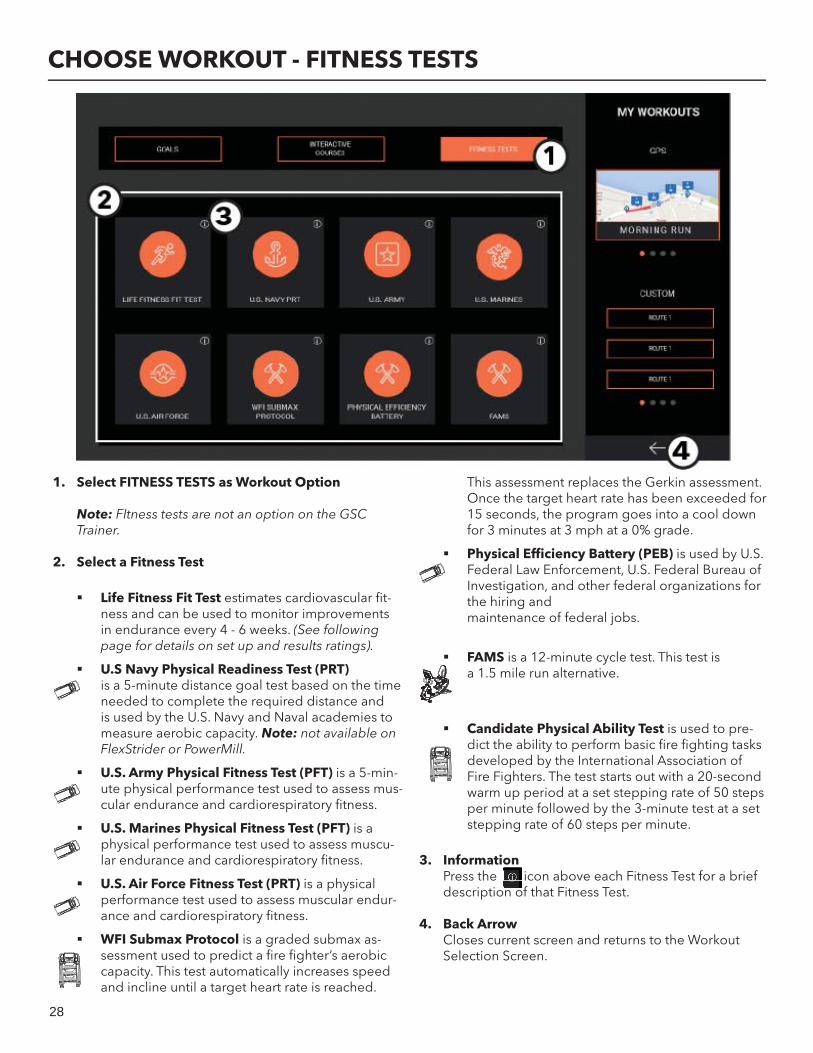
CHOOSE WORKOUT - FITNESS TESTS
1. Select FITNESS TESTS as Workout Option
Note: FItness tests are not an option on the GSC Trainer.
2. Select a Fitness Test
Life Fitness Fit Test estimates cardiovascular fi t-ness and can be used to monitor improvements in endurance every 4 - 6 weeks. (See following page for details on set up and results ratings).
U.S Navy Physical Readiness Test (PRT)is a 5-minute distance goal test based on the time needed to complete the required distance and is used by the U.S. Navy and Naval academies to measure aerobic capacity. Note: not available on FlexStrider or PowerMill.
U.S. Army Physical Fitness Test (PFT) is a 5-min-ute physical performance test used to assess mus-cular endurance and cardiorespiratory fi tness.
U.S. Marines Physical Fitness Test (PFT) is a physical performance test used to assess muscu-lar endurance and cardiorespiratory fi tness.
U.S. Air Force Fitness Test (PRT) is a physical performance test used to assess muscular endur-ance and cardiorespiratory fi tness.
WFI Submax Protocol is a graded submax as-sessment used to predict a fi re fi ghter’s aerobic capacity. This test automatically increases speed and incline until a target heart rate is reached.
This assessment replaces the Gerkin assessment. Once the target heart rate has been exceeded for 15 seconds, the program goes into a cool down for 3 minutes at 3 mph at a 0% grade.
Physical Effi ciency Battery (PEB) is used by U.S. Federal Law Enforcement, U.S. Federal Bureau of Investigation, and other federal organizations for the hiring and maintenance of federal jobs.
FAMS is a 12-minute cycle test. This test is a 1.5 mile run alternative.
Candidate Physical Ability Test is used to pre-dict the ability to perform basic fi re fi ghting tasks developed by the International Association of Fire Fighters. The test starts out with a 20-second warm up period at a set stepping rate of 50 steps per minute followed by the 3-minute test at a set stepping rate of 60 steps per minute.
3. InformationPress the icon above each Fitness Test for a brief description of that Fitness Test.
4. Back ArrowCloses current screen and returns to the Workout Selection Screen.
29
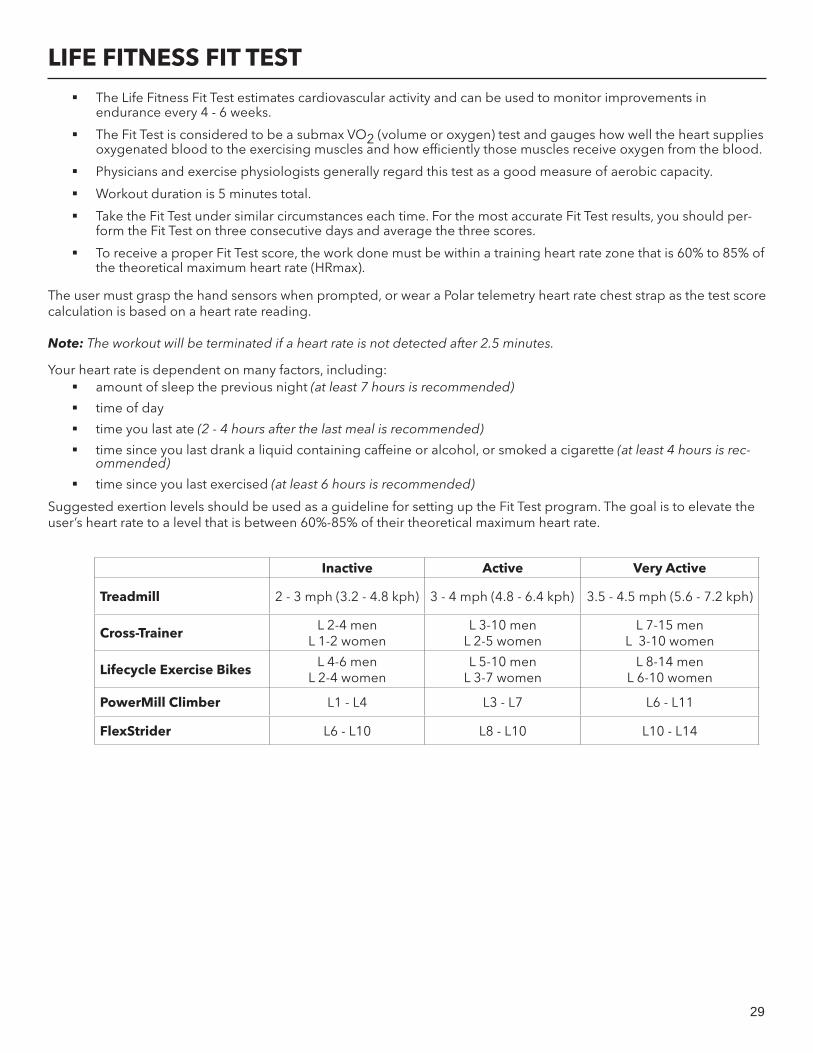
Inactive Active Very Active
Treadmill 2 - 3 mph (3.2 - 4.8 kph) 3 - 4 mph (4.8 - 6.4 kph) 3.5 - 4.5 mph (5.6 - 7.2 kph)
Cross-Trainer L 2-4 menL 1-2 women
L 3-10 menL 2-5 women
L 7-15 menL 3-10 women
Lifecycle Exercise Bikes L 4-6 menL 2-4 women
L 5-10 menL 3-7 women
L 8-14 menL 6-10 women
PowerMill Climber L1 - L4 L3 - L7 L6 - L11
FlexStrider L6 - L10 L8 - L10 L10 - L14
LIFE FITNESS FIT TEST
The Life Fitness Fit Test estimates cardiovascular activity and can be used to monitor improvements in endurance every 4 - 6 weeks.
The Fit Test is considered to be a submax VO2 (volume or oxygen) test and gauges how well the heart supplies oxygenated blood to the exercising muscles and how effi ciently those muscles receive oxygen from the blood.
Physicians and exercise physiologists generally regard this test as a good measure of aerobic capacity.
Workout duration is 5 minutes total.
Take the Fit Test under similar circumstances each time. For the most accurate Fit Test results, you should per-form the Fit Test on three consecutive days and average the three scores.
To receive a proper Fit Test score, the work done must be within a training heart rate zone that is 60% to 85% of the theoretical maximum heart rate (HRmax).
The user must grasp the hand sensors when prompted, or wear a Polar telemetry heart rate chest strap as the test score calculation is based on a heart rate reading.
Note: The workout will be terminated if a heart rate is not detected after 2.5 minutes.
Your heart rate is dependent on many factors, including: amount of sleep the previous night (at least 7 hours is recommended)
time of day
time you last ate (2 - 4 hours after the last meal is recommended)
time since you last drank a liquid containing caffeine or alcohol, or smoked a cigarette (at least 4 hours is rec-ommended)
time since you last exercised (at least 6 hours is recommended)
Suggested exertion levels should be used as a guideline for setting up the Fit Test program. The goal is to elevate the user’s heart rate to a level that is between 60%-85% of their theoretical maximum heart rate.
30
LIFE FITNESS FIT TESTWithin each suggested range, use these additional guidelines:
Lower Half of Range Upper Half of Range
higher age lower age
lower weighthigher weight
(in cases of excessive weight, use lower half of range)
shorter taller
After the 5-minute FIT TEST is completed, a FIT TEST score and rating will be displayed.
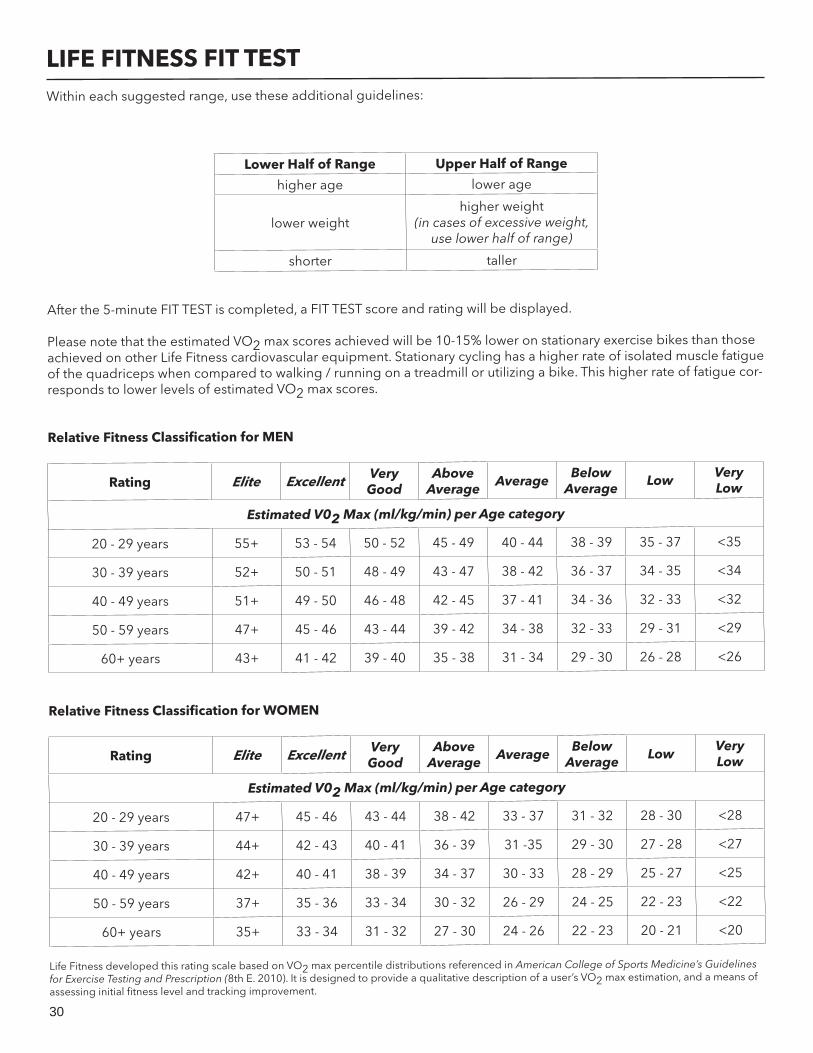
Please note that the estimated VO2 max scores achieved will be 10-15% lower on stationary exercise bikes than those achieved on other Life Fitness cardiovascular equipment. Stationary cycling has a higher rate of isolated muscle fatigue of the quadriceps when compared to walking / running on a treadmill or utilizing a bike. This higher rate of fatigue cor-responds to lower levels of estimated VO2 max scores.
Relative Fitness Classifi cation for MEN
Rating Elite Excellent Very Good
AboveAverage
AverageBelow
AverageLow
Very Low
Estimated V02 Max (ml/kg/min) per Age category
20 - 29 years 55+ 53 - 54 50 - 52 45 - 49 40 - 44 38 - 39 35 - 37 <35
30 - 39 years 52+ 50 - 51 48 - 49 43 - 47 38 - 42 36 - 37 34 - 35 <34
40 - 49 years 51+ 49 - 50 46 - 48 42 - 45 37 - 41 34 - 36 32 - 33 <32
50 - 59 years 47+ 45 - 46 43 - 44 39 - 42 34 - 38 32 - 33 29 - 31 <29
60+ years 43+ 41 - 42 39 - 40 35 - 38 31 - 34 29 - 30 26 - 28 <26
Relative Fitness Classifi cation for WOMEN
Rating Elite Excellent Very Good
AboveAverage
AverageBelow
AverageLow
Very Low
Estimated V02 Max (ml/kg/min) per Age category
20 - 29 years 47+ 45 - 46 43 - 44 38 - 42 33 - 37 31 - 32 28 - 30 <28
30 - 39 years 44+ 42 - 43 40 - 41 36 - 39 31 -35 29 - 30 27 - 28 <27
40 - 49 years 42+ 40 - 41 38 - 39 34 - 37 30 - 33 28 - 29 25 - 27 <25
50 - 59 years 37+ 35 - 36 33 - 34 30 - 32 26 - 29 24 - 25 22 - 23 <22
60+ years 35+ 33 - 34 31 - 32 27 - 30 24 - 26 22 - 23 20 - 21 <20
Life Fitness developed this rating scale based on VO2 max percentile distributions referenced in American College of Sports Medicine’s Guidelines for Exercise Testing and Prescription (8th E. 2010). It is designed to provide a qualitative description of a user’s VO2 max estimation, and a means of assessing initial fi tness level and tracking improvement.
31
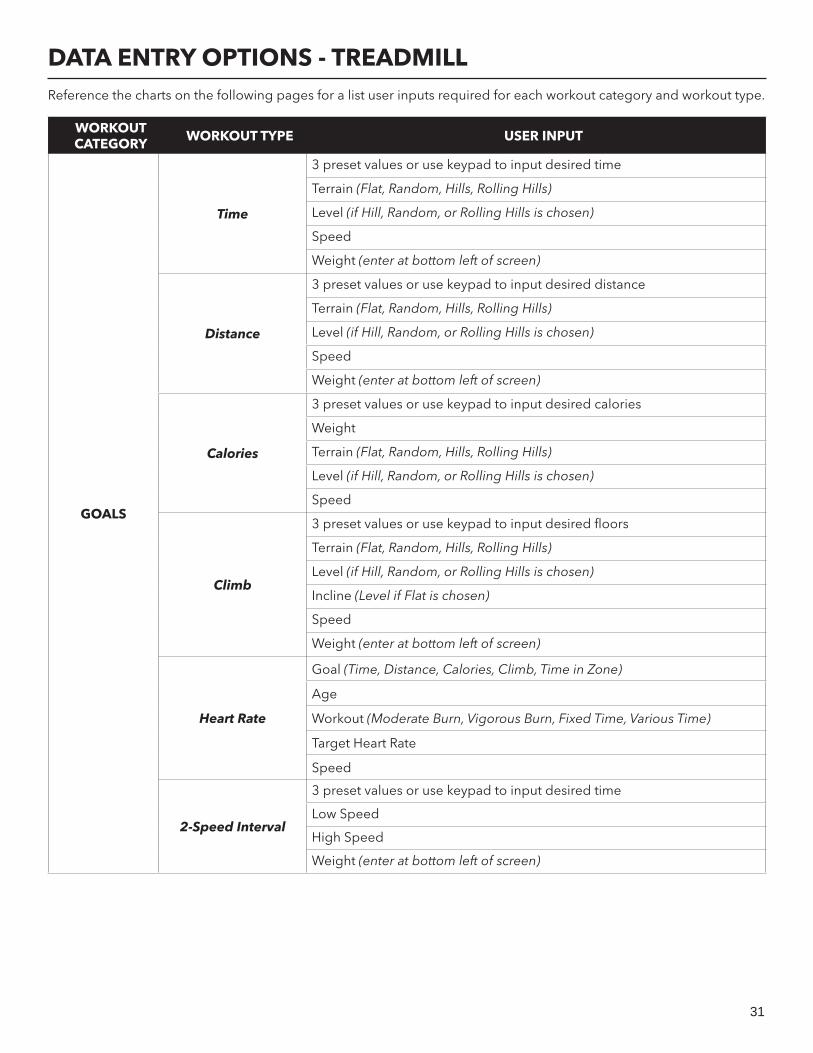
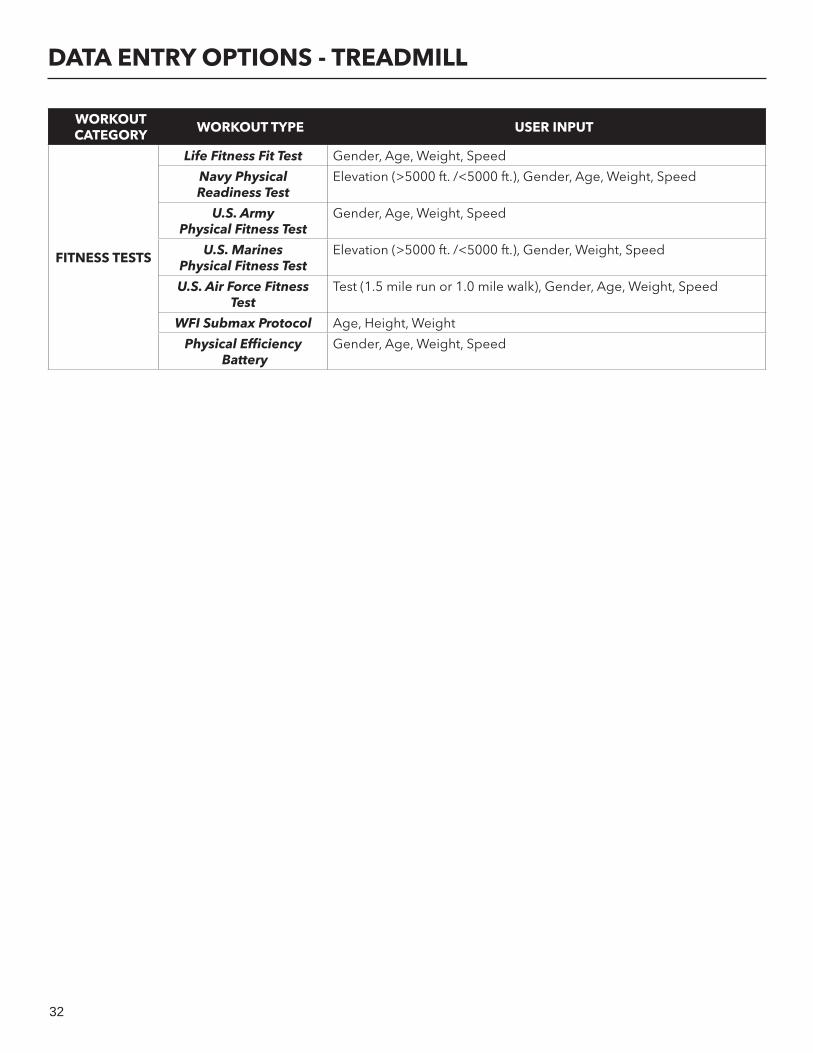
DATA ENTRY OPTIONS - TREADMILLReference the charts on the following pages for a list user inputs required for each workout category and workout type.
WORKOUT CATEGORY WORKOUT TYPE USER INPUT
GOALS
Time
3 preset values or use keypad to input desired time
Terrain (Flat, Random, Hills, Rolling Hills)
Level (if Hill, Random, or Rolling Hills is chosen)
Speed
Weight (enter at bottom left of screen)
Distance
3 preset values or use keypad to input desired distance
Terrain (Flat, Random, Hills, Rolling Hills)
Level (if Hill, Random, or Rolling Hills is chosen)
Speed
Weight (enter at bottom left of screen)
Calories
3 preset values or use keypad to input desired calories
Weight
Terrain (Flat, Random, Hills, Rolling Hills)
Level (if Hill, Random, or Rolling Hills is chosen)
Speed
Climb
3 preset values or use keypad to input desired fl oors
Terrain (Flat, Random, Hills, Rolling Hills)
Level (if Hill, Random, or Rolling Hills is chosen)
Incline (Level if Flat is chosen)
Speed
Weight (enter at bottom left of screen)
Heart Rate
Goal (Time, Distance, Calories, Climb, Time in Zone)
Age
Workout (Moderate Burn, Vigorous Burn, Fixed Time, Various Time)
Target Heart Rate
Speed
2-Speed Interval
3 preset values or use keypad to input desired time
Low Speed
High Speed
Weight (enter at bottom left of screen)
32
DATA ENTRY OPTIONS - TREADMILL
WORKOUT CATEGORY WORKOUT TYPE USER INPUT
FITNESS TESTS
Life Fitness Fit Test Gender, Age, Weight, Speed
Navy Physical Readiness Test
Elevation (>5000 ft. /<5000 ft.), Gender, Age, Weight, Speed
U.S. Army Physical Fitness Test
Gender, Age, Weight, Speed
U.S. Marines Physical Fitness Test
Elevation (>5000 ft. /<5000 ft.), Gender, Weight, Speed
U.S. Air Force Fitness Test
Test (1.5 mile run or 1.0 mile walk), Gender, Age, Weight, Speed
WFI Submax Protocol Age, Height, Weight
Physical Effi ciency Battery
Gender, Age, Weight, Speed

33
DATA ENTRY OPTIONS - CROSS-TRAINER & BIKES
WORKOUT CATEGORY WORKOUT TYPE USER INPUT
GOALS
Time
3 preset values or use keypad to input desired time
Terrain (Flat, Random, Hills, Rolling Hills)
Level
Weight (enter at bottom left of screen)
Distance
3 preset values or use keypad to input desired distance
Terrain (Flat, Random, Hills, Rolling Hills)
Level
Weight (enter at bottom left of screen)
Calories
3 preset values or use keypad to input desired calories
Weight
Terrain (Flat, Random, Hills, Rolling Hills)
Level
Heart Rate
Goal (Time, Distance, Calories, Time in Zone)
Age
Workout (Moderate Burn, Vigorous Burn, Fixed Time)
Target Heart Rate
Level
Weight (enter at bottom left of screen)
Aerobics
Goal (Time, Distance, Calories)
Level
Weight (enter at bottom left of screen)
Starter interval
3 preset values or use keypad to input desired time
Level
Weight (enter at bottom left of screen)
Reverse Goal (Time, Distance, Calories)
Level
Weight (enter at bottom left of screen)
FITNESS TESTS
Life Fitness Fit Test Gender, Age, Weight, Level
Navy PhysicalReadiness Test
Elevation (>5000 ft. /<5000 ft.), Gender, Age, Weight, Level
FAMS
Gender, Weight, Level
34
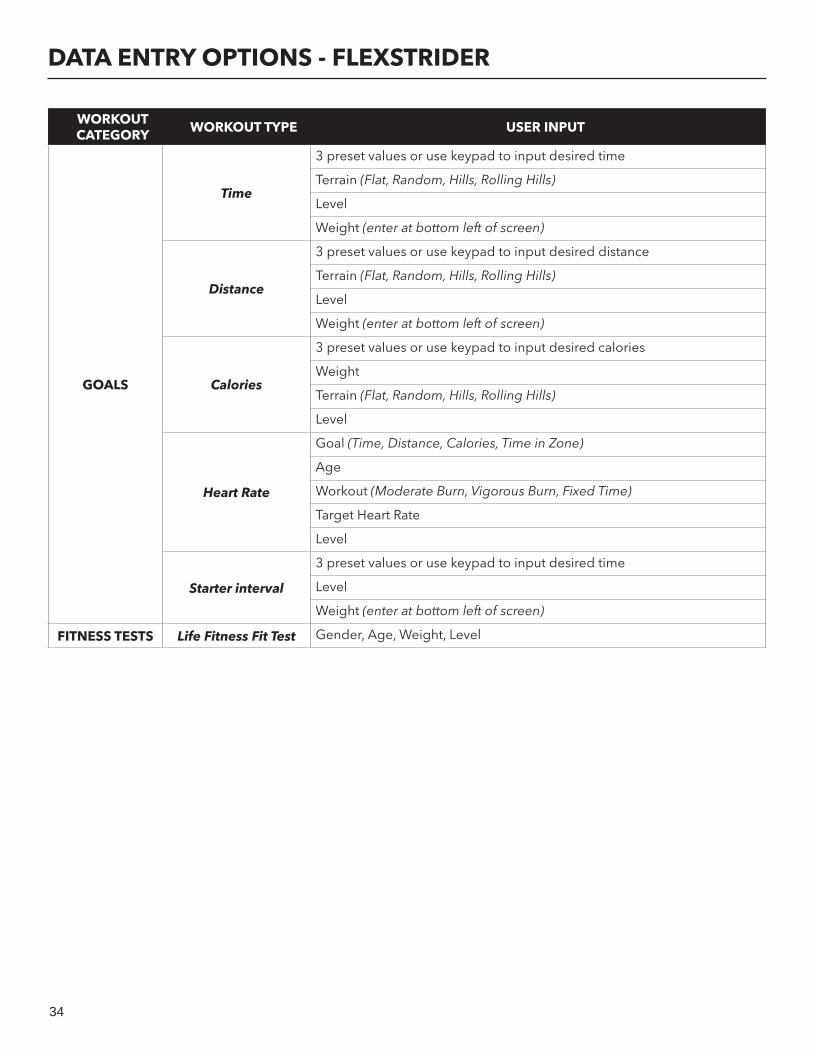
DATA ENTRY OPTIONS - FLEXSTRIDER
WORKOUT CATEGORY WORKOUT TYPE USER INPUT
GOALS
Time
3 preset values or use keypad to input desired time
Terrain (Flat, Random, Hills, Rolling Hills)
Level
Weight (enter at bottom left of screen)
Distance
3 preset values or use keypad to input desired distance
Terrain (Flat, Random, Hills, Rolling Hills)
Level
Weight (enter at bottom left of screen)
Calories
3 preset values or use keypad to input desired calories
Weight
Terrain (Flat, Random, Hills, Rolling Hills)
Level
Heart Rate
Goal (Time, Distance, Calories, Time in Zone)
Age
Workout (Moderate Burn, Vigorous Burn, Fixed Time)
Target Heart Rate
Level
Starter interval
3 preset values or use keypad to input desired time
Level
Weight (enter at bottom left of screen)
FITNESS TESTS Life Fitness Fit Test Gender, Age, Weight, Level
35
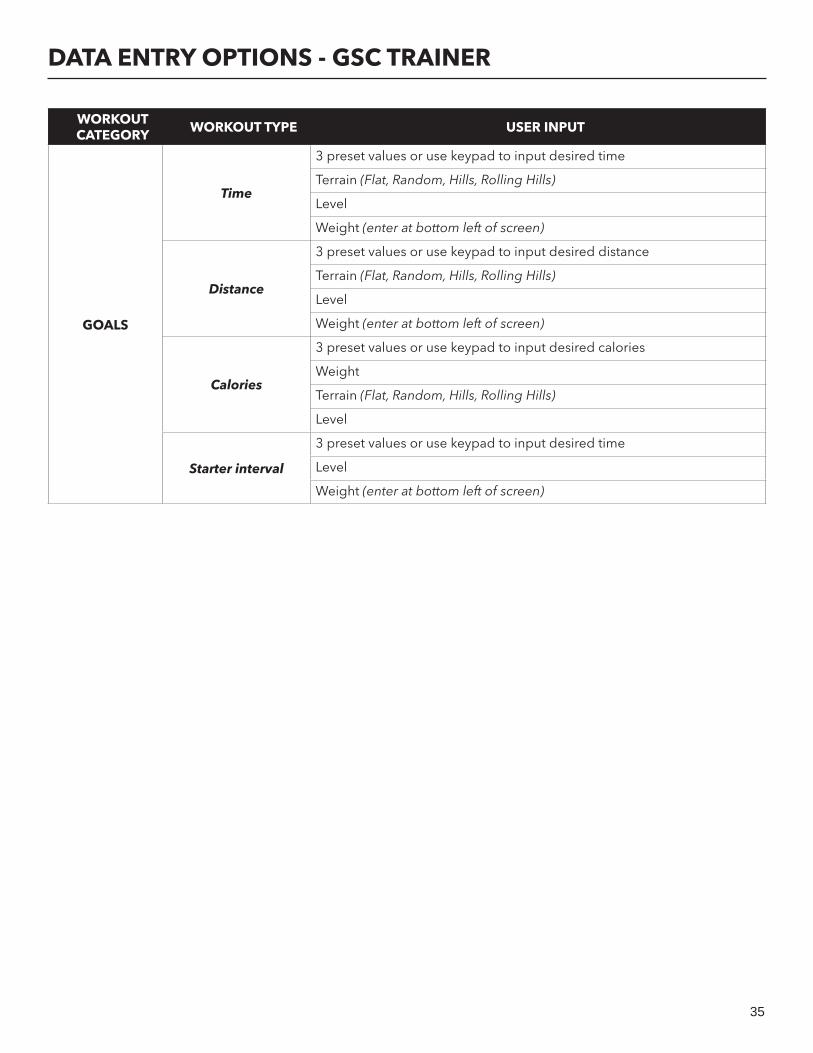
DATA ENTRY OPTIONS - GSC TRAINER
WORKOUT CATEGORY WORKOUT TYPE USER INPUT
GOALS
Time
3 preset values or use keypad to input desired time
Terrain (Flat, Random, Hills, Rolling Hills)
Level
Weight (enter at bottom left of screen)
Distance
3 preset values or use keypad to input desired distance
Terrain (Flat, Random, Hills, Rolling Hills)
Level
Weight (enter at bottom left of screen)
Calories
3 preset values or use keypad to input desired calories
Weight
Terrain (Flat, Random, Hills, Rolling Hills)
Level
Starter interval
3 preset values or use keypad to input desired time
Level
Weight (enter at bottom left of screen)

36
DATA ENTRY OPTIONS - POWERMILL
WORKOUT CATEGORY WORKOUT TYPE USER INPUT
GOALS
Time
3 preset values or use keypad to input desired time
Terrain (Flat, Random, Hills, Rolling Hills)
Speed or Level (if Flat is chosen)
Level (if Hill, Random or Rolling Hills is chosen)
Weight (enter at bottom left of screen)
Calories
3 preset values or use keypad to input desired calories
Weight
Terrain (Flat, Random, Hills, Rolling Hills)
Speed or Level (if Flat is chosen)
Level (if Hill, Random or Rolling Hills is chosen)
Climb
3 preset values or use keypad to input desired fl oors
Terrain (Flat, Random, Hills, Rolling Hills)
Speed or Level (if Flat is chosen)
Level (if Hill, Random or Rolling Hills is chosen)
Heart Rate
Goal (Time, Calories, Climb, Time in Zone)
Age
Workout (Moderate Burn, Vigorous Burn, Fixed Time, Various Time)
Target HR
Level
Intervals
3 time preset values or use keypad to input desired time
Number of Intervals (2 or 3)
Low Speed
Medium Speed (only for 3-Speed Interval)
High Speed
FITNESS TESTS
Life Fitness Fit Test Gender, Age, Weight, Level
WFI Submax Protocol Age, Height, Weight
CPAT - no inputs -
37
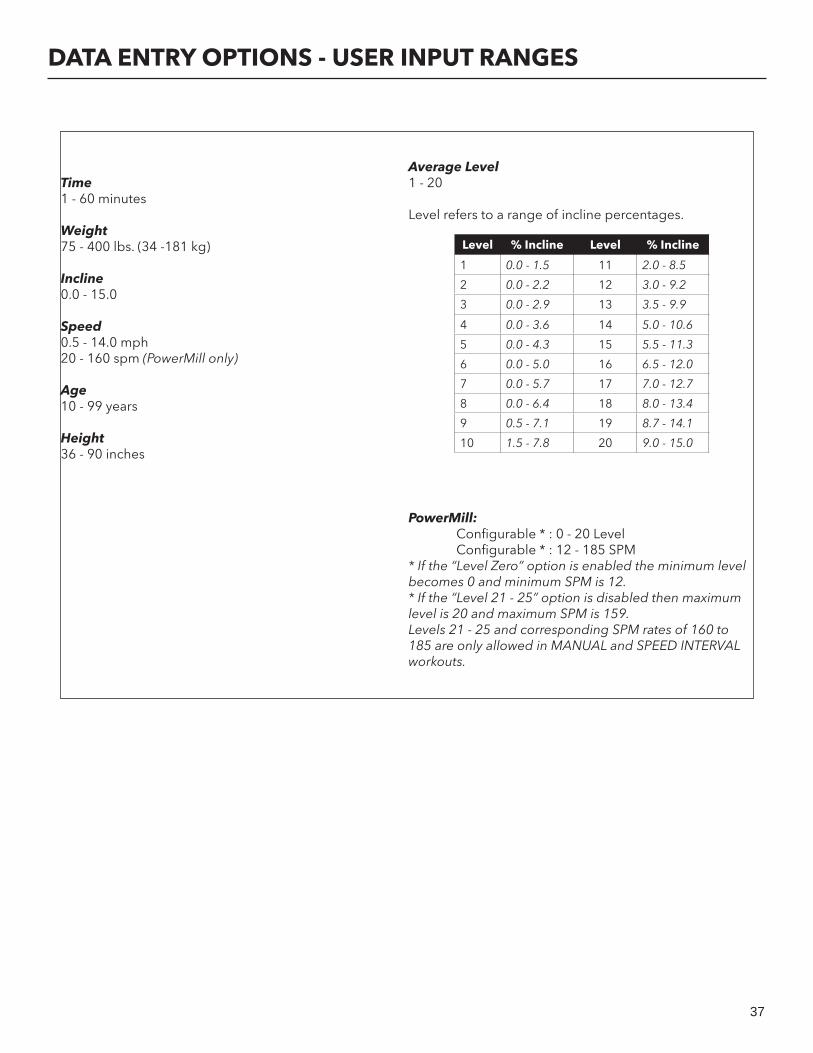
DATA ENTRY OPTIONS - USER INPUT RANGES
Time 1 - 60 minutes Weight 75 - 400 lbs. (34 -181 kg) Incline 0.0 - 15.0 Speed 0.5 - 14.0 mph 20 - 160 spm (PowerMill only)
Age 10 - 99 years
Height 36 - 90 inches
Average Level 1 - 20
Level refers to a range of incline percentages.
PowerMill: Confi gurable * : 0 - 20 Level Confi gurable * : 12 - 185 SPM* If the “Level Zero” option is enabled the minimum level becomes 0 and minimum SPM is 12. * If the “Level 21 - 25” option is disabled then maximum level is 20 and maximum SPM is 159.Levels 21 - 25 and corresponding SPM rates of 160 to 185 are only allowed in MANUAL and SPEED INTERVAL workouts.
Level % Incline Level % Incline
1 0.0 - 1.5 11 2.0 - 8.5
2 0.0 - 2.2 12 3.0 - 9.2
3 0.0 - 2.9 13 3.5 - 9.9
4 0.0 - 3.6 14 5.0 - 10.6
5 0.0 - 4.3 15 5.5 - 11.3
6 0.0 - 5.0 16 6.5 - 12.0
7 0.0 - 5.7 17 7.0 - 12.7
8 0.0 - 6.4 18 8.0 - 13.4
9 0.5 - 7.1 19 8.7 - 14.1
10 1.5 - 7.8 20 9.0 - 15.0

38
WORKOUT MODE OVERVIEWTreadmill Classic Workout Profi le View shown
1. Workout Profi le Views Choose the Interactive or Classic View.
An orange frame surrounding a workout profi le view represents the current view.
2. Current Workout Profi le ViewClassic view is shown.
3. Screen Size Toggle Press to toggle between Standard (shown) and Full Workout View screen sizes.
4. Stop / Pause Press to pause a workout.
Choose Cool Down, Resume or End Workout. Note (International Platinum Club Series Prod-ucts Only):Treadmill will go into Energy Saving Mode after 5 minutes of inactivity. To wake up the console, step on the treadmill belt. The treadmill will automatically wake up and the console will light up. Waking up the treadmill takes approxi-mately 50 seconds after stepping onto the belt.
5. Cool Down Press during workout to begin a cool down
period.
Choose Cool Down, Resume or End Workout.
6. Incline
Use the Up and Down arrows to increase and decrease incline by 0.5% intervals.
Level
Use the Up and Down arrows to increase and de-crease levels by 1.
Level controls both incline and resistance settings.
7. Preset Speed
Press to select a preset speed.
Preset Resistance Level
Press to select a preset resistance level.
Press to select a preset incline and resistance level.
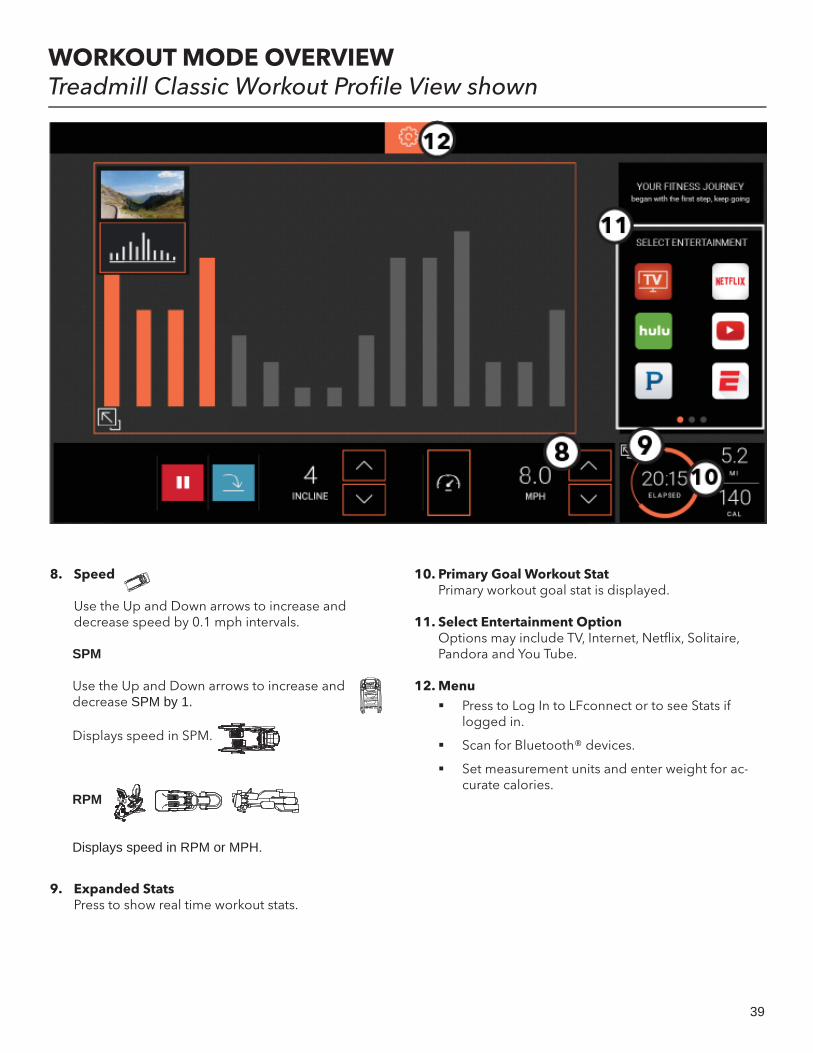
39
WORKOUT MODE OVERVIEWTreadmill Classic Workout Profi le View shown
8. Speed
Use the Up and Down arrows to increase and decrease speed by 0.1 mph intervals.
SPM Use the Up and Down arrows to increase and decrease SPM by 1. Displays speed in SPM.
RPM Displays speed in RPM or MPH.
9. Expanded StatsPress to show real time workout stats.
10. Primary Goal Workout StatPrimary workout goal stat is displayed.
11. Select Entertainment OptionOptions may include TV, Internet, Netfl ix, Solitaire, Pandora and You Tube.
12. Menu Press to Log In to LFconnect or to see Stats if
logged in.
Scan for Bluetooth® devices.
Set measurement units and enter weight for ac-curate calories.

40
MENU - LOGGED IN / PROFILE
Press the Menu icon anytime during a workout.
1. Logged In / Profi le MenuPress Logged In / Profi le icon to do the following: log into LFconnect
view previously saved stats (if logged in)
2. StatsView previous saved workout stats and averages.
3. Menu iconPress to exit Logged In / Profi le screen and return to Workout Profi le View.

41
MENU - BLUETOOTH DEVICES
Press the Menu icon anytime during a workout.
1. Bluetooth Devices MenuPress Bluetooth icon to view the Bluetooth Devices Menu.
2. ScanScan for available Bluetooth devices.
Note: For Bluetooth headphones, make sure your headphones are in pairing mode. Headphones using a low energy Bluetooth signal or single ear headphones are not compatible.
3. Available DevicesScroll through the list of available Bluetooth devices.
4. Plus SignClick the plus symbol to pair your device.
42
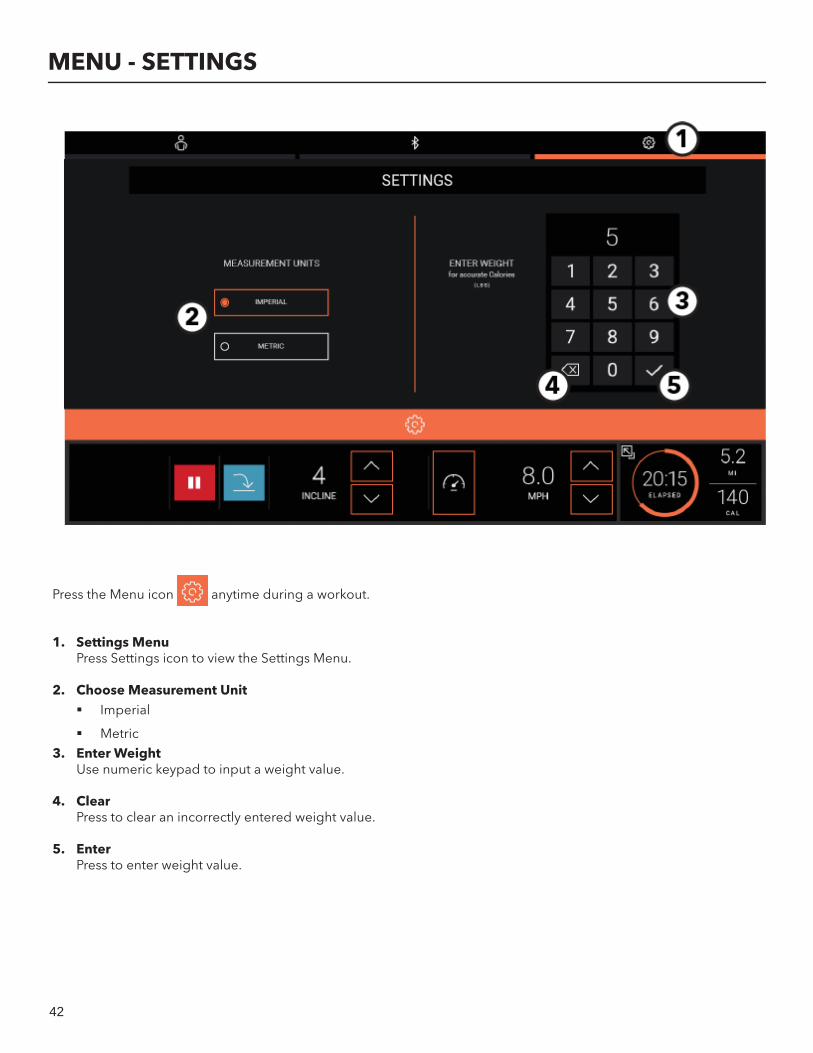
MENU - SETTINGS
Press the Menu icon anytime during a workout.
1. Settings MenuPress Settings icon to view the Settings Menu.
2. Choose Measurement Unit Imperial
Metric3. Enter Weight
Use numeric keypad to input a weight value.
4. ClearPress to clear an incorrectly entered weight value.
5. EnterPress to enter weight value.
43
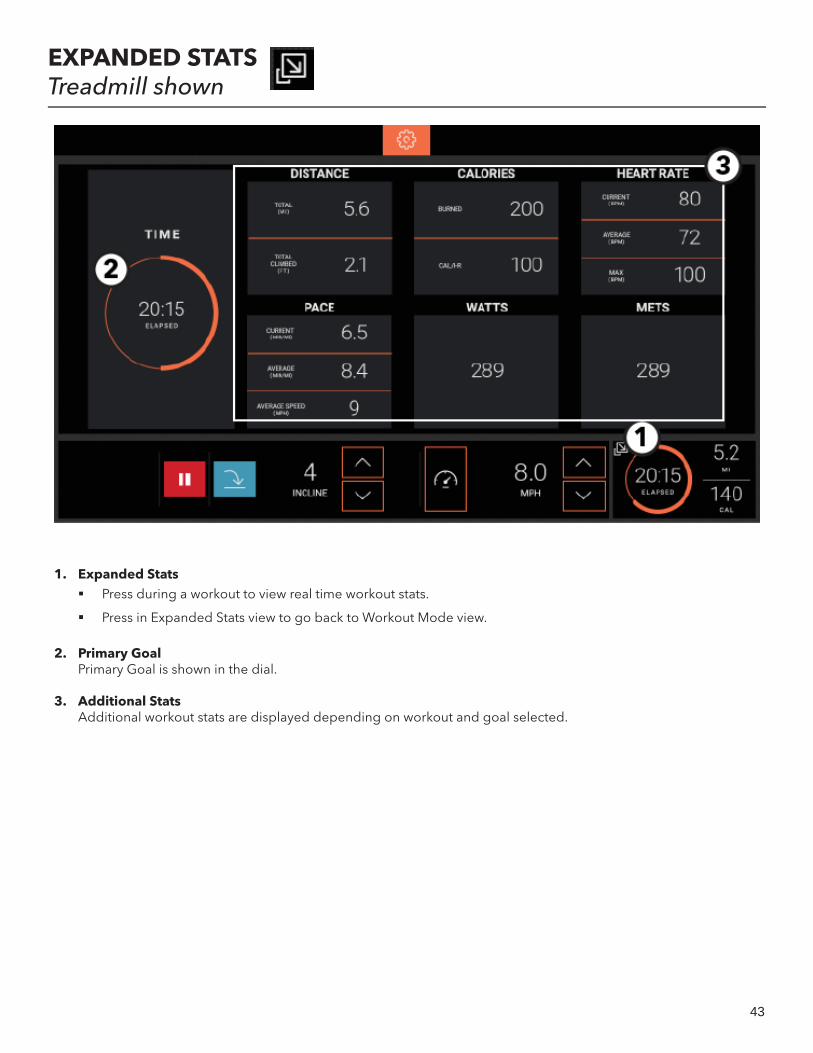
EXPANDED STATSTreadmill shown
1. Expanded Stats Press during a workout to view real time workout stats.
Press in Expanded Stats view to go back to Workout Mode view.
2. Primary Goal Primary Goal is shown in the dial.
3. Additional StatsAdditional workout stats are displayed depending on workout and goal selected.
44
EXPANDED STATS - TREADMILL
Base Primary Goal in Dial Expanded Stats
Treadmill
Time
Time (if in HR Workout)
Time In Zone (if in HR Workout)
Distance (total and climbed)
Calories (burned and calories per hour)
Heart Rate (current, average HR (BPM), max HR)
Pace (current, average time/speed, average speed)
METs
Watts
Time In Zone
Time (elapsed)
Distance (total and climbed)
Calories (burned and calories per hour)
Heart Rate (current, average HR (BPM), max HR)
Pace (current and average time/speed, average speed)
METs
Watts
Distance
Time (elapsed) and Time in Zone (if in HR workout)
Distance (climbed)
Calories (burned and calories per hour)
Heart Rate (current, average HR (BPM), max HR)
Pace (current, average time/speed, average speed)
METs
Watts
Distance Climbed
Time (elapsed) and Time in Zone (if in HR workout)
Distance (total)
Calories (burned and calories per hour)
Heart Rate (current, average HR (BPM), max HR)
Pace (current, average time/speed, average speed)
METs
Watts
Calories
Time (elapsed) and Time in Zone (if in HR workout)
Distance (total and climbed)
Calories (calories per hour)
Heart Rate (current, average HR (BPM), max HR)
Pace (current, average time/speed, average speed)
METs
Watts
45
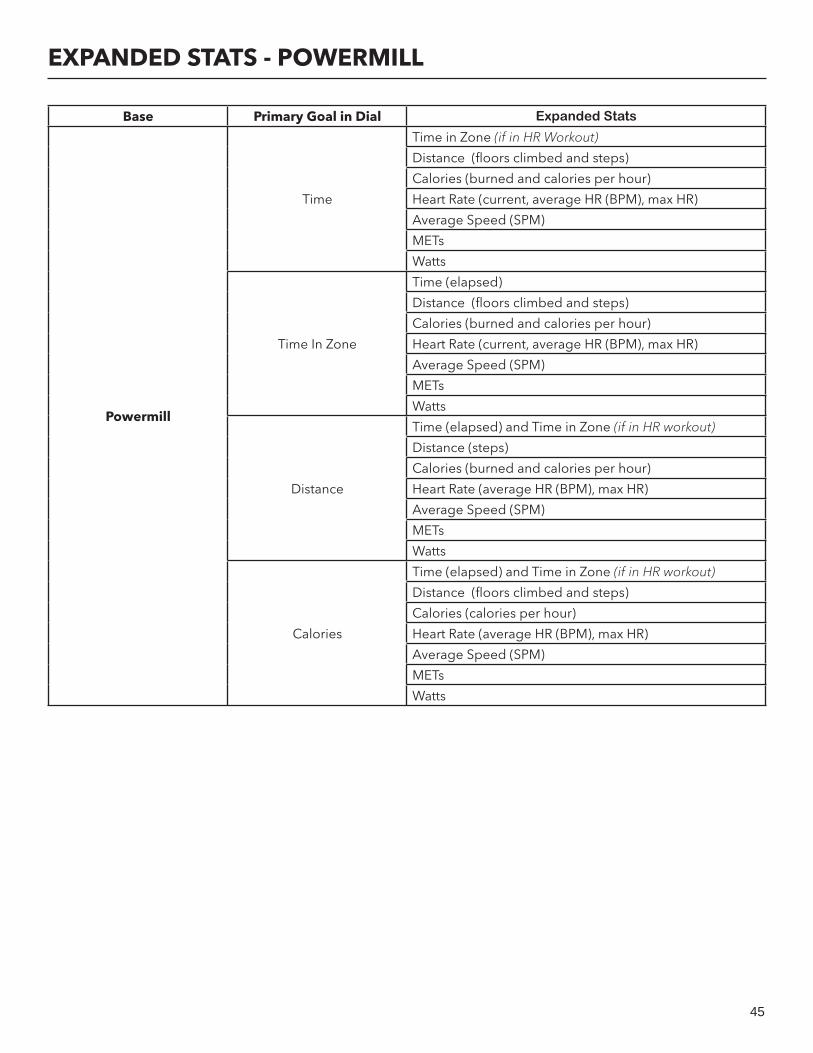
EXPANDED STATS - POWERMILL
Base Primary Goal in Dial Expanded Stats
Powermill
Time
Time in Zone (if in HR Workout)
Distance (fl oors climbed and steps)
Calories (burned and calories per hour)
Heart Rate (current, average HR (BPM), max HR)
Average Speed (SPM)
METs
Watts
Time In Zone
Time (elapsed)
Distance (fl oors climbed and steps)
Calories (burned and calories per hour)
Heart Rate (current, average HR (BPM), max HR)
Average Speed (SPM)
METs
Watts
Distance
Time (elapsed) and Time in Zone (if in HR workout)
Distance (steps)
Calories (burned and calories per hour)
Heart Rate (average HR (BPM), max HR)
Average Speed (SPM)
METs
Watts
Calories
Time (elapsed) and Time in Zone (if in HR workout)
Distance (fl oors climbed and steps)
Calories (calories per hour)
Heart Rate (average HR (BPM), max HR)
Average Speed (SPM)
METs
Watts
46
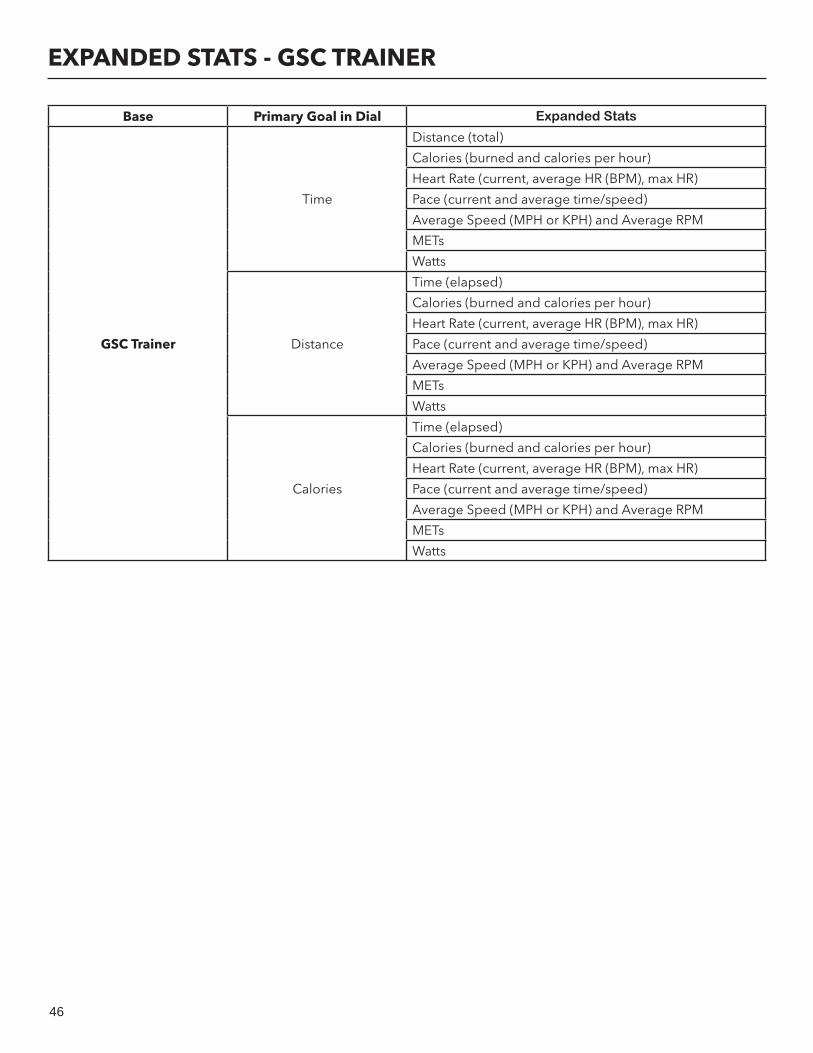
EXPANDED STATS - GSC TRAINER
Base Primary Goal in Dial Expanded Stats
GSC Trainer
Time
Distance (total)
Calories (burned and calories per hour)
Heart Rate (current, average HR (BPM), max HR)
Pace (current and average time/speed)
Average Speed (MPH or KPH) and Average RPM
METs
Watts
Distance
Time (elapsed)
Calories (burned and calories per hour)
Heart Rate (current, average HR (BPM), max HR)
Pace (current and average time/speed)
Average Speed (MPH or KPH) and Average RPM
METs
Watts
Calories
Time (elapsed)
Calories (burned and calories per hour)
Heart Rate (current, average HR (BPM), max HR)
Pace (current and average time/speed)
Average Speed (MPH or KPH) and Average RPM
METs
Watts

47
EXPANDED STATS - CROSS-TRAINER & BIKES
Base Primary Goal in Dial Expanded Stats
Cross-Trainers & Bikes
Time
Time (if in HR Workout)
Time in Zone (if in HR Workout)
Distance (total)
Calories (burned and calories per hour)
Heart Rate (current, average HR (BPM), max HR)
Pace (current and average time/speed)
Average Speed (MPH or KPH) and Average RPM
METs
Watts
Time In Zone
Time (elapsed)
Distance (total)
Calories (burned and calories per hour)
Heart Rate (current, average HR (BPM), max HR)
Pace (current and average time/speed)
Average Speed (MPH or KPH) and Average RPM
METs
Watts
Distance
Time (elapsed) and Time in Zone (if in HR workout)
Calories (burned and calories per hour)
Heart Rate (current, average HR (BPM), max HR)
Pace (current and average time/speed)
Average Speed (MPH or KPH) and Average RPM
METs
Watts
Calories
Time (elapsed) and Time in Zone (if in HR workout)
Distance (total)
Calories (calories per hour)
Heart Rate (current, average HR (BPM), max HR)
Pace (current and average time/speed)
Average Speed (MPH or KPH) and Average RPM
METs
Watts
48
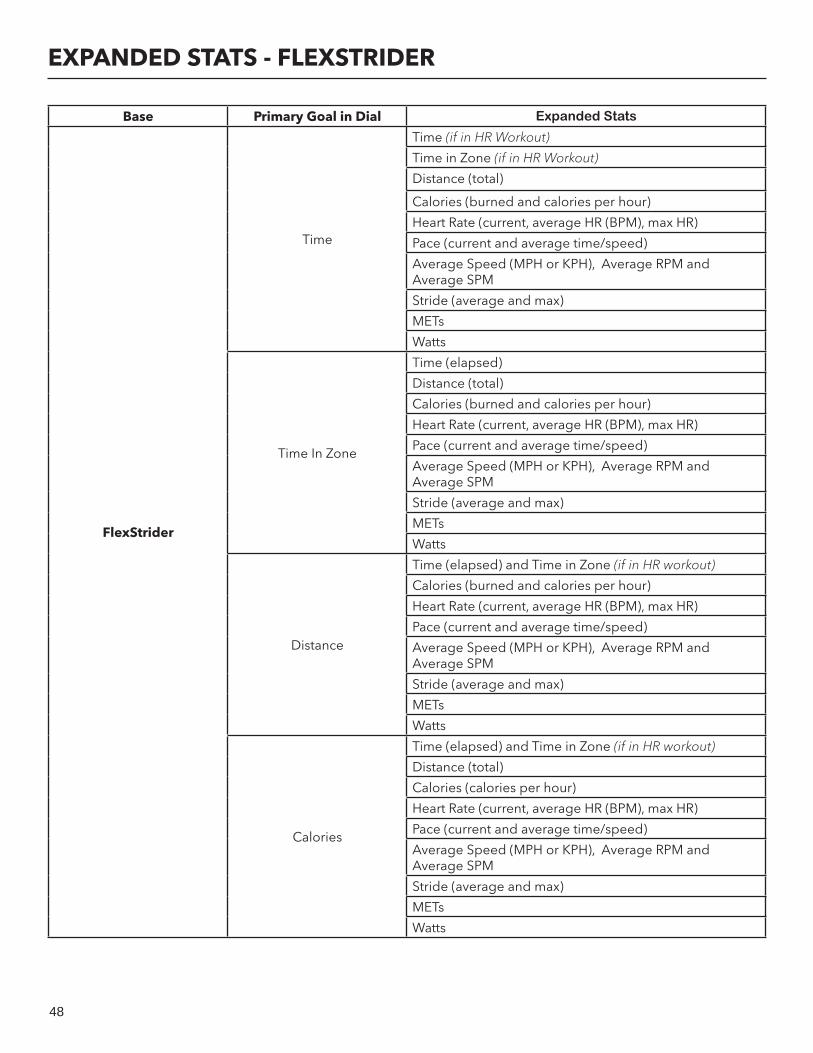
EXPANDED STATS - FLEXSTRIDER
Base Primary Goal in Dial Expanded Stats
FlexStrider
Time
Time (if in HR Workout)
Time in Zone (if in HR Workout)
Distance (total)
Calories (burned and calories per hour)
Heart Rate (current, average HR (BPM), max HR)
Pace (current and average time/speed)
Average Speed (MPH or KPH), Average RPM and Average SPM
Stride (average and max)
METs
Watts
Time In Zone
Time (elapsed)
Distance (total)
Calories (burned and calories per hour)
Heart Rate (current, average HR (BPM), max HR)
Pace (current and average time/speed)
Average Speed (MPH or KPH), Average RPM and Average SPM
Stride (average and max)
METs
Watts
Distance
Time (elapsed) and Time in Zone (if in HR workout)
Calories (burned and calories per hour)
Heart Rate (current, average HR (BPM), max HR)
Pace (current and average time/speed)
Average Speed (MPH or KPH), Average RPM and Average SPM
Stride (average and max)
METs
Watts
Calories
Time (elapsed) and Time in Zone (if in HR workout)
Distance (total)
Calories (calories per hour)
Heart Rate (current, average HR (BPM), max HR)
Pace (current and average time/speed)
Average Speed (MPH or KPH), Average RPM and Average SPM
Stride (average and max)
METs
Watts
49
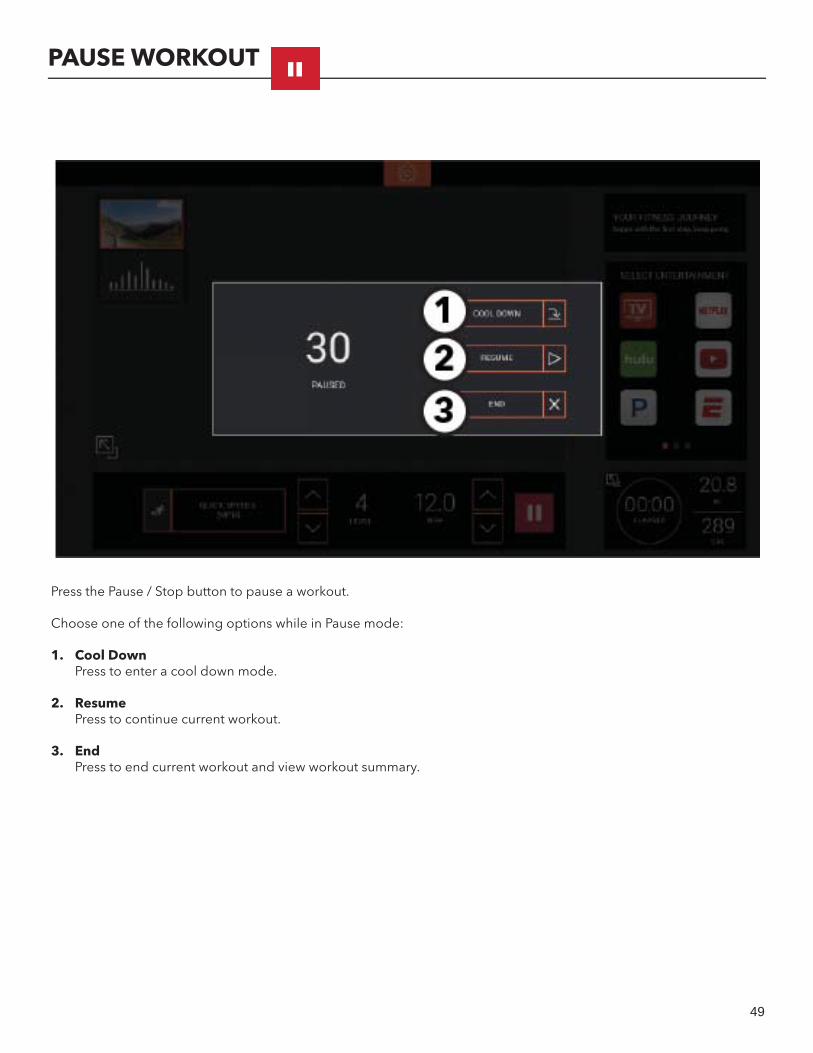
PAUSE WORKOUT
Press the Pause / Stop button to pause a workout.
Choose one of the following options while in Pause mode:
1. Cool DownPress to enter a cool down mode.
2. ResumePress to continue current workout.
3. EndPress to end current workout and view workout summary.
50
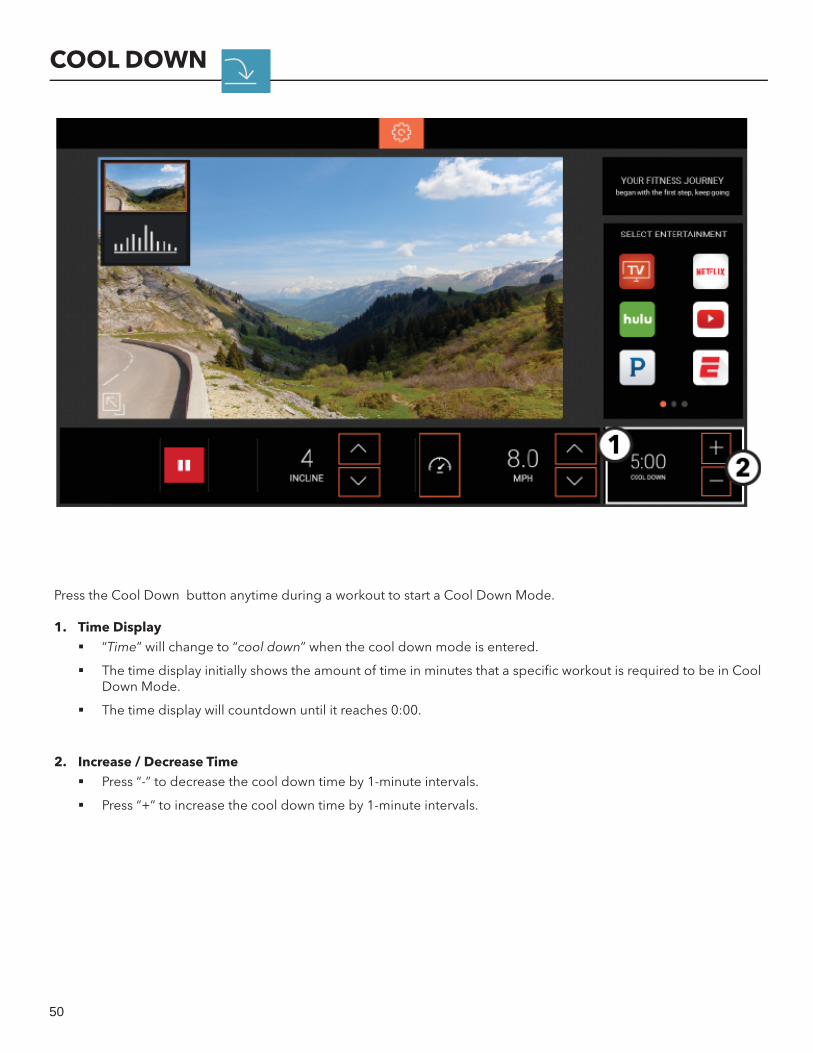
COOL DOWN
Press the Cool Down button anytime during a workout to start a Cool Down Mode.
1. Time Display “Time” will change to “cool down” when the cool down mode is entered.
The time display initially shows the amount of time in minutes that a specifi c workout is required to be in Cool Down Mode.
The time display will countdown until it reaches 0:00.
2. Increase / Decrease Time Press “-” to decrease the cool down time by 1-minute intervals.
Press “+” to increase the cool down time by 1-minute intervals.
51
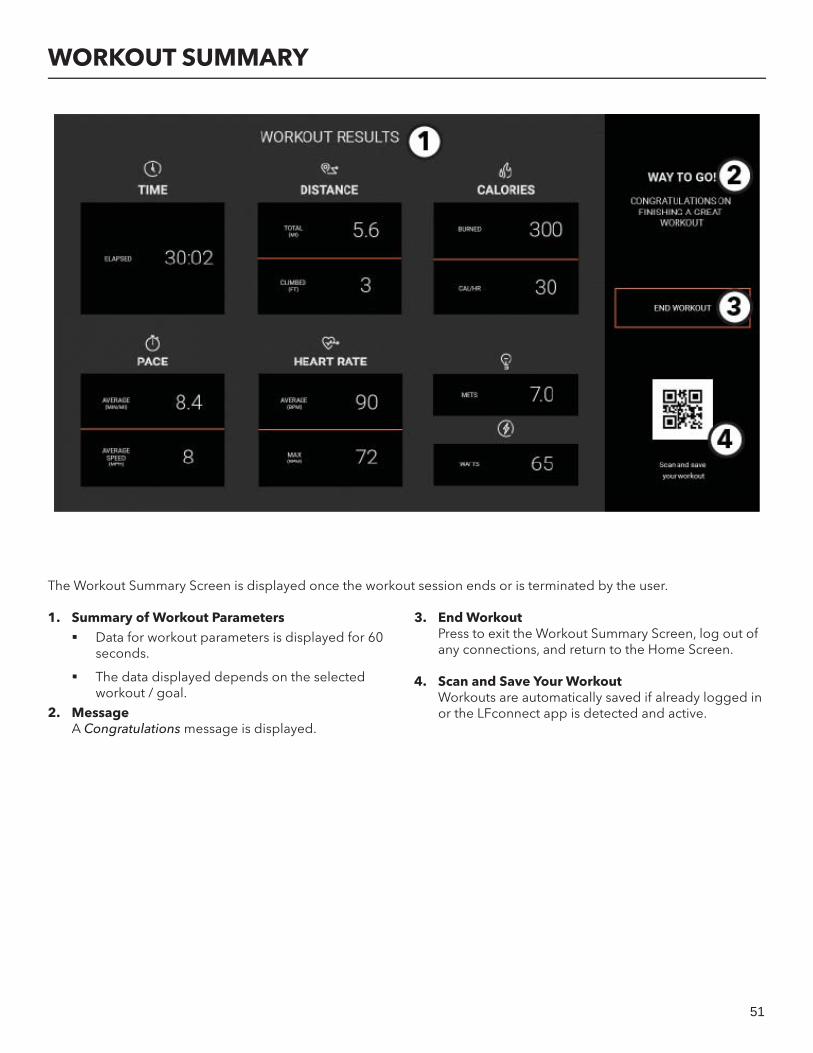
WORKOUT SUMMARY
The Workout Summary Screen is displayed once the workout session ends or is terminated by the user.
1. Summary of Workout Parameters Data for workout parameters is displayed for 60
seconds.
The data displayed depends on the selected workout / goal.
2. MessageA Congratulations message is displayed.
3. End Workout Press to exit the Workout Summary Screen, log out of any connections, and return to the Home Screen.
4. Scan and Save Your WorkoutWorkouts are automatically saved if already logged in or the LFconnect app is detected and active.
52
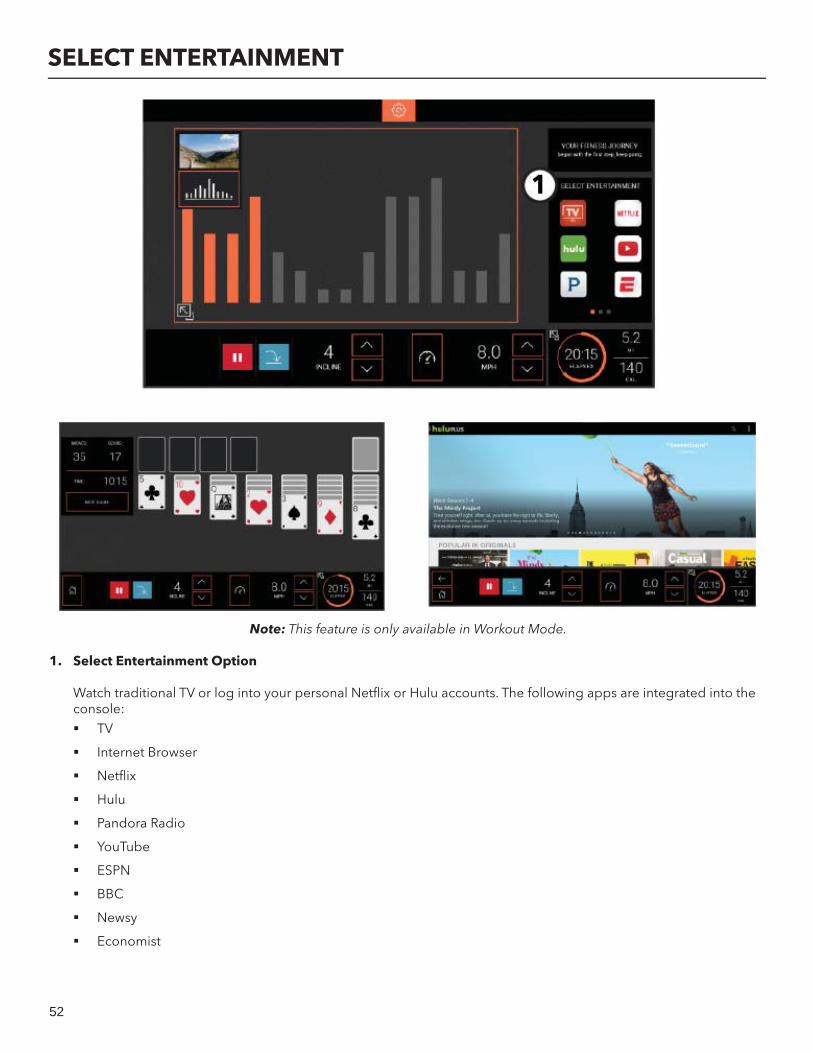
SELECT ENTERTAINMENT
Note: This feature is only available in Workout Mode.
1. Select Entertainment Option
Watch traditional TV or log into your personal Netfl ix or Hulu accounts. The following apps are integrated into the console: TV
Internet Browser
Netfl ix
Hulu
Pandora Radio
YouTube
ESPN
BBC
Newsy
Economist
53
SELECT ENTERTAINMENT - TV FULL SCREEN WITH CHANNEL LIST
Note: This feature is only available in Workout Mode.
1. TV OptionChoose to watch TV during a workout session.
2. Channel Up and Down Arrows Press “Up Arrow” to go ahead one channel
number.
Press “Down Arrow” to go back one channel number.
3. CC (Closed Caption)Press to turn Closed Caption On / Off.Note: DVB-T2 tuner confi gurations replace Closed Captioning with Subtitles. Press Subtitles to turn On /Off.
4. SAP (Secondary Audio Programming)Press to activate Secondary Audio Programming.Note: SAP broadcasting must be available for usage.
5. Previous Channel Press the Previous Channel button to jump back to the previous channel viewed.
6. Channel ListList of all available channels.
7. Channel List and Channel Keypad TogglePress to toggle between Channel List and Channel Keypad.
8. Screen Size Toggle Press to toggle between Full and Minimized screen sizes.
9. Press to go to Home View.
10. TV Audio Controls (Speaker icon displays only when headphones are plugged into the headphone jack or Bluetooth head-phones are paired.) Press corresponding icons to increase and decrease volume.
54
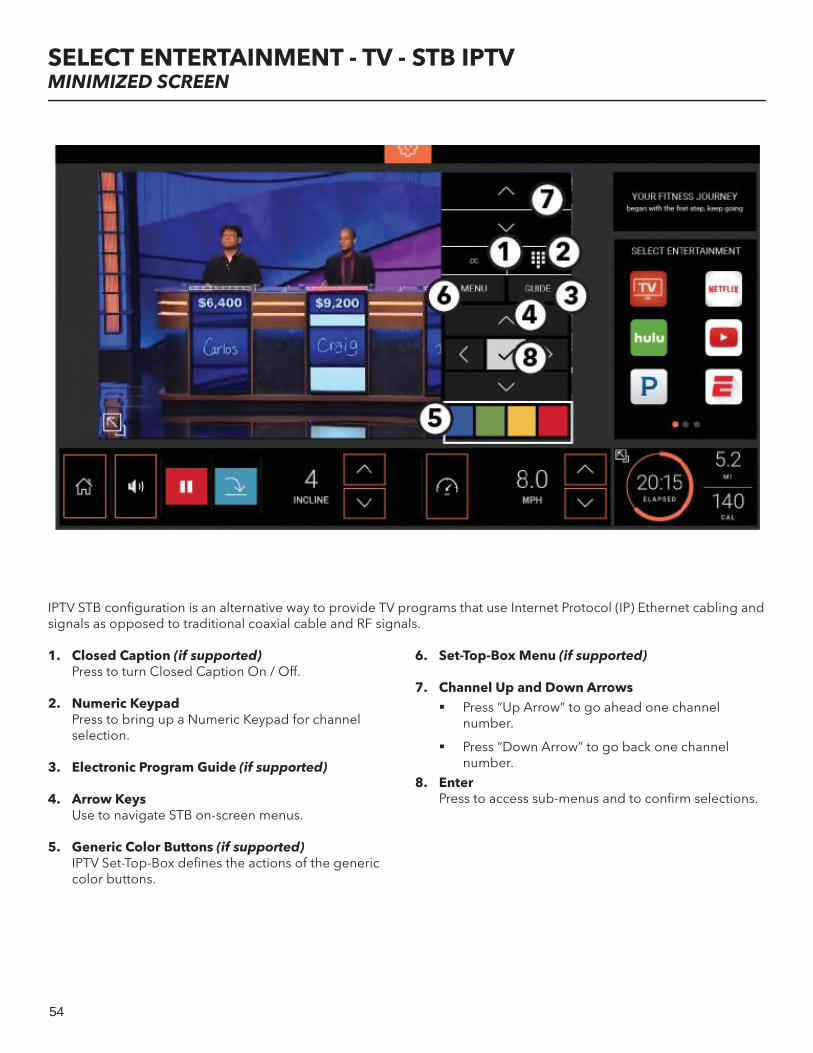
SELECT ENTERTAINMENT - TV - STB IPTVMINIMIZED SCREEN
IPTV STB confi guration is an alternative way to provide TV programs that use Internet Protocol (IP) Ethernet cabling and signals as opposed to traditional coaxial cable and RF signals.
1. Closed Caption (if supported)Press to turn Closed Caption On / Off.
2. Numeric KeypadPress to bring up a Numeric Keypad for channel selection.
3. Electronic Program Guide (if supported)
4. Arrow KeysUse to navigate STB on-screen menus.
5. Generic Color Buttons (if supported)IPTV Set-Top-Box defi nes the actions of the generic color buttons.
6. Set-Top-Box Menu (if supported)
7. Channel Up and Down Arrows Press “Up Arrow” to go ahead one channel
number.
Press “Down Arrow” to go back one channel number.
8. EnterPress to access sub-menus and to confi rm selections.
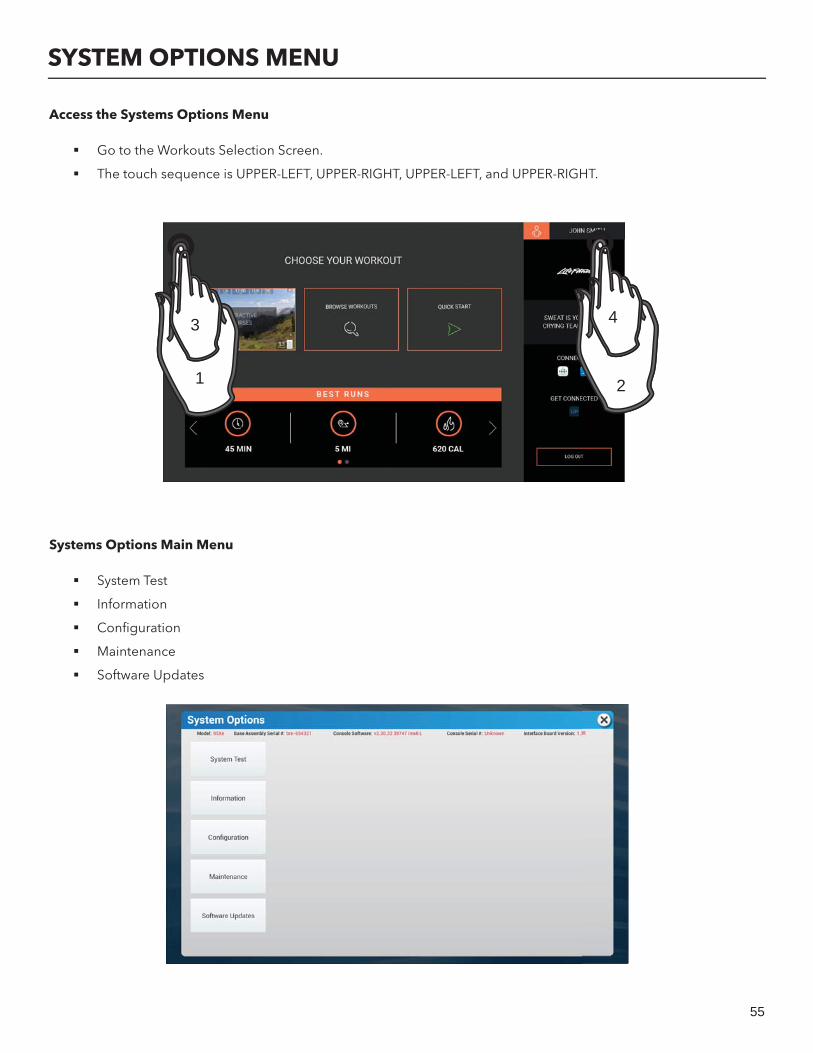
55
SYSTEM OPTIONS MENU
Access the Systems Options Menu
Go to the Workouts Selection Screen.
The touch sequence is UPPER-LEFT, UPPER-RIGHT, UPPER-LEFT, and UPPER-RIGHT.
Systems Options Main Menu
System Test
Information
Confi guration
Maintenance
Software Updates
2
3 4
1
56
The Confi guration Menu allows fi tness facility managers to confi gure basic functionality of the product as well as network and media settings. The button of the selected option is blue. When a selection is made that option’s menu screen appears to the right.
ManagerSet unit defaults.
Media Center TV
Lifescape
Audio Setup Touch Screen Confi gurationFollow the instructions on the screen to recalibrate the Touch Screen. Contact Life Fitness Customer Support Services if repeated attempts at calibration were unsuc-cessful.
Wireless Connectivity Enable or disable Wireless Connectivity.
Option to add wireless network.
Disable wireless connectivity to change the frequency band.
AppsFeatured apps on the console are listed.
NetworkChoose network.
Date / TimeSet date and time.
Export / Import Settings Export settings to USB stick.
Import settings from USB stick.
EthernetEthernet advanced settings
Bluetooth Enable/Disable Bluetooth.
RFID Enable RFID.
Select tag type.
Media Setup Equipment type (treadmill or non tread)
Archive media fi les
Available Space & Required Space
SYSTEM OPTIONS MENU: CONFIGURATION MENU
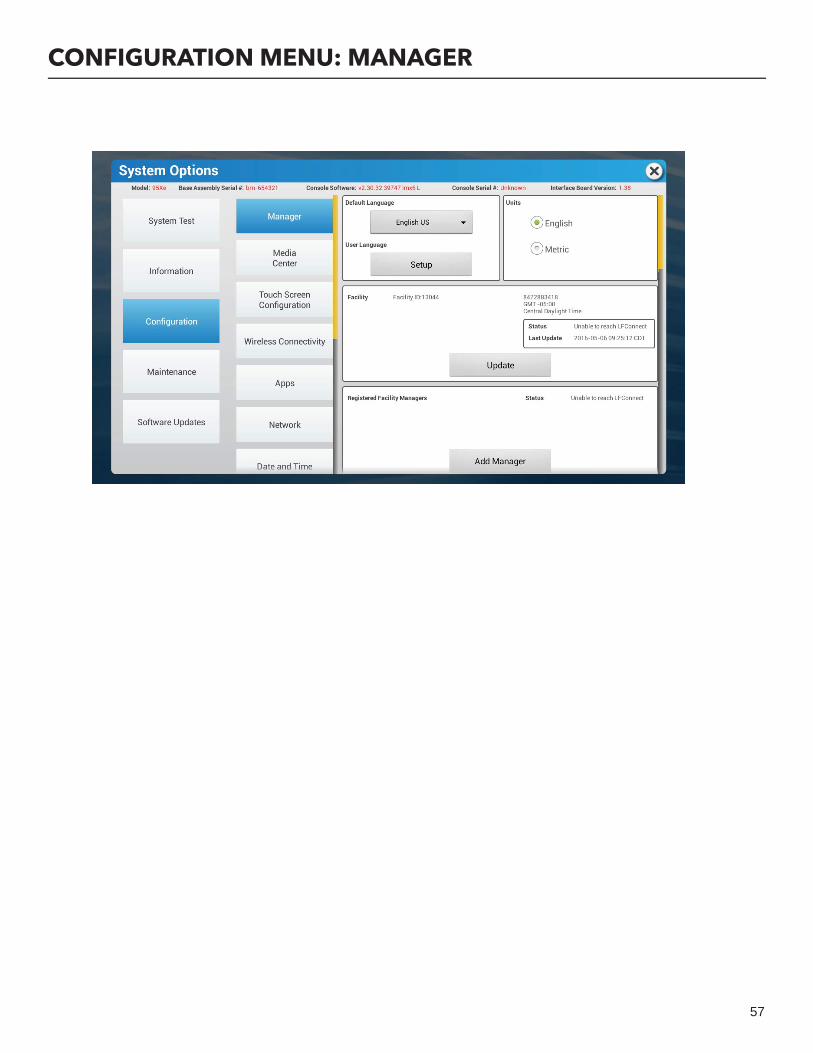
57
CONFIGURATION MENU: MANAGER
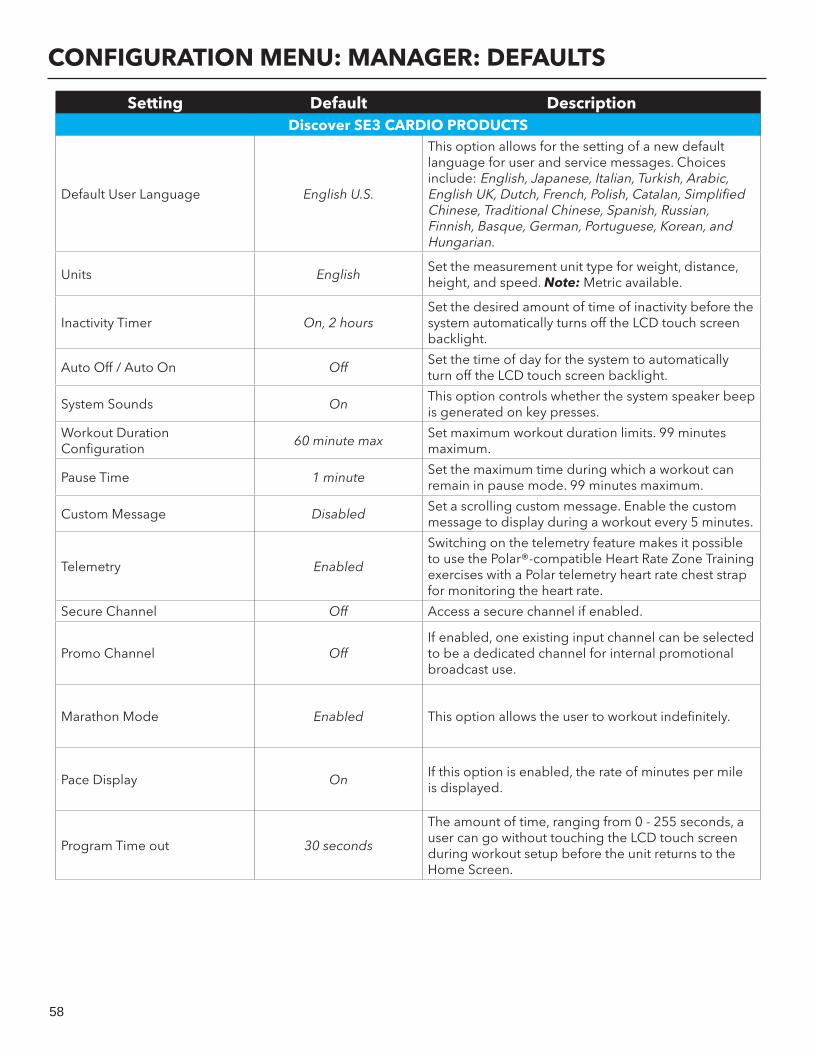
58
CONFIGURATION MENU: MANAGER: DEFAULTS
Setting Default DescriptionDiscover SE3 CARDIO PRODUCTS
Default User Language English U.S.
This option allows for the setting of a new default language for user and service messages. Choices include: English, Japanese, Italian, Turkish, Arabic, English UK, Dutch, French, Polish, Catalan, Simplifi ed Chinese, Traditional Chinese, Spanish, Russian, Finnish, Basque, German, Portuguese, Korean, and Hungarian.
Units EnglishSet the measurement unit type for weight, distance, height, and speed. Note: Metric available.
Inactivity Timer On, 2 hoursSet the desired amount of time of inactivity before the system automatically turns off the LCD touch screen backlight.
Auto Off / Auto On OffSet the time of day for the system to automatically turn off the LCD touch screen backlight.
System Sounds OnThis option controls whether the system speaker beep is generated on key presses.
Workout DurationConfi guration
60 minute maxSet maximum workout duration limits. 99 minutes maximum.
Pause Time 1 minuteSet the maximum time during which a workout can remain in pause mode. 99 minutes maximum.
Custom Message DisabledSet a scrolling custom message. Enable the custom message to display during a workout every 5 minutes.
Telemetry Enabled
Switching on the telemetry feature makes it possible to use the Polar®-compatible Heart Rate Zone Training exercises with a Polar telemetry heart rate chest strap for monitoring the heart rate.
Secure Channel Off Access a secure channel if enabled.
Promo Channel OffIf enabled, one existing input channel can be selected to be a dedicated channel for internal promotional broadcast use.
Marathon Mode Enabled This option allows the user to workout indefi nitely.
Pace Display OnIf this option is enabled, the rate of minutes per mile is displayed.
Program Time out 30 seconds
The amount of time, ranging from 0 - 255 seconds, a user can go without touching the LCD touch screen during workout setup before the unit returns to the Home Screen.
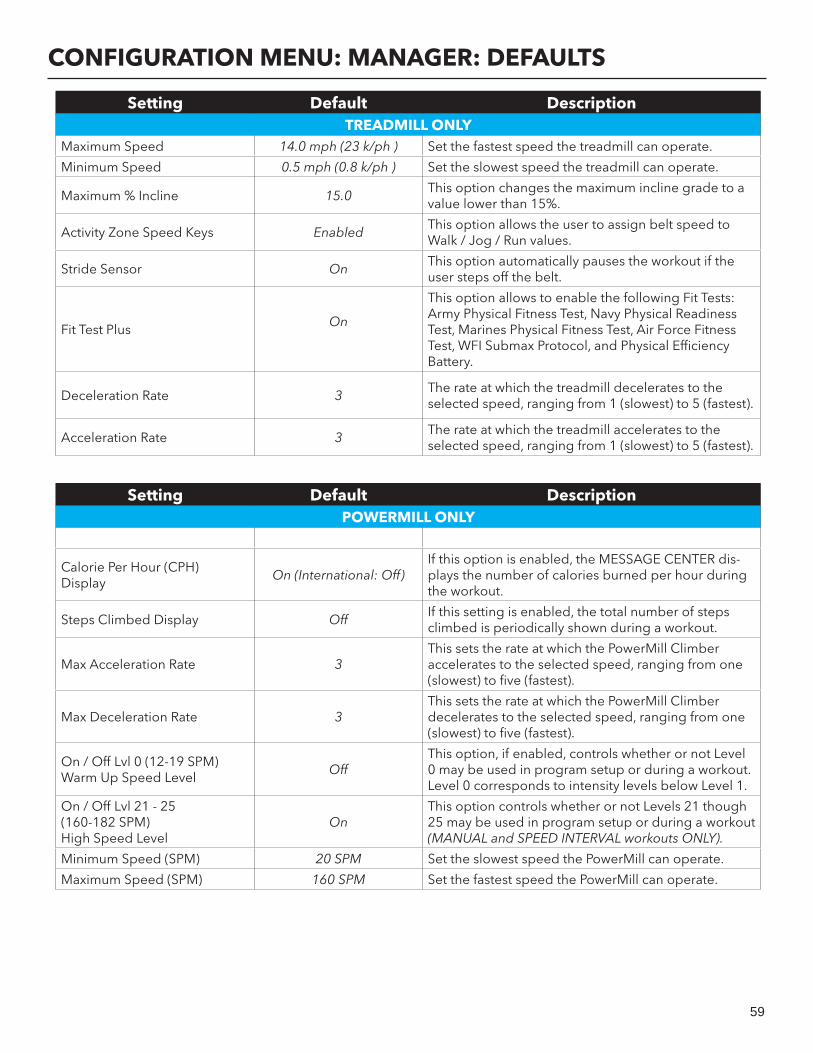
59
CONFIGURATION MENU: MANAGER: DEFAULTS
Setting Default DescriptionTREADMILL ONLY
Maximum Speed 14.0 mph (23 k/ph ) Set the fastest speed the treadmill can operate.
Minimum Speed 0.5 mph (0.8 k/ph ) Set the slowest speed the treadmill can operate.
Maximum % Incline 15.0This option changes the maximum incline grade to a value lower than 15%.
Activity Zone Speed Keys EnabledThis option allows the user to assign belt speed to Walk / Jog / Run values.
Stride Sensor OnThis option automatically pauses the workout if the user steps off the belt.
Fit Test PlusOn
This option allows to enable the following Fit Tests: Army Physical Fitness Test, Navy Physical Readiness Test, Marines Physical Fitness Test, Air Force Fitness Test, WFI Submax Protocol, and Physical Effi ciency Battery.
Deceleration Rate 3The rate at which the treadmill decelerates to the selected speed, ranging from 1 (slowest) to 5 (fastest).
Acceleration Rate 3The rate at which the treadmill accelerates to the selected speed, ranging from 1 (slowest) to 5 (fastest).
Setting Default DescriptionPOWERMILL ONLY
Calorie Per Hour (CPH) Display
On (International: Off)If this option is enabled, the MESSAGE CENTER dis-plays the number of calories burned per hour during the workout.
Steps Climbed Display OffIf this setting is enabled, the total number of steps climbed is periodically shown during a workout.
Max Acceleration Rate 3This sets the rate at which the PowerMill Climber accelerates to the selected speed, ranging from one (slowest) to fi ve (fastest).
Max Deceleration Rate 3This sets the rate at which the PowerMill Climber decelerates to the selected speed, ranging from one (slowest) to fi ve (fastest).
On / Off Lvl 0 (12-19 SPM)Warm Up Speed Level
OffThis option, if enabled, controls whether or not Level 0 may be used in program setup or during a workout. Level 0 corresponds to intensity levels below Level 1.
On / Off Lvl 21 - 25 (160-182 SPM)High Speed Level
OnThis option controls whether or not Levels 21 though 25 may be used in program setup or during a workout (MANUAL and SPEED INTERVAL workouts ONLY).
Minimum Speed (SPM) 20 SPM Set the slowest speed the PowerMill can operate.
Maximum Speed (SPM) 160 SPM Set the fastest speed the PowerMill can operate.
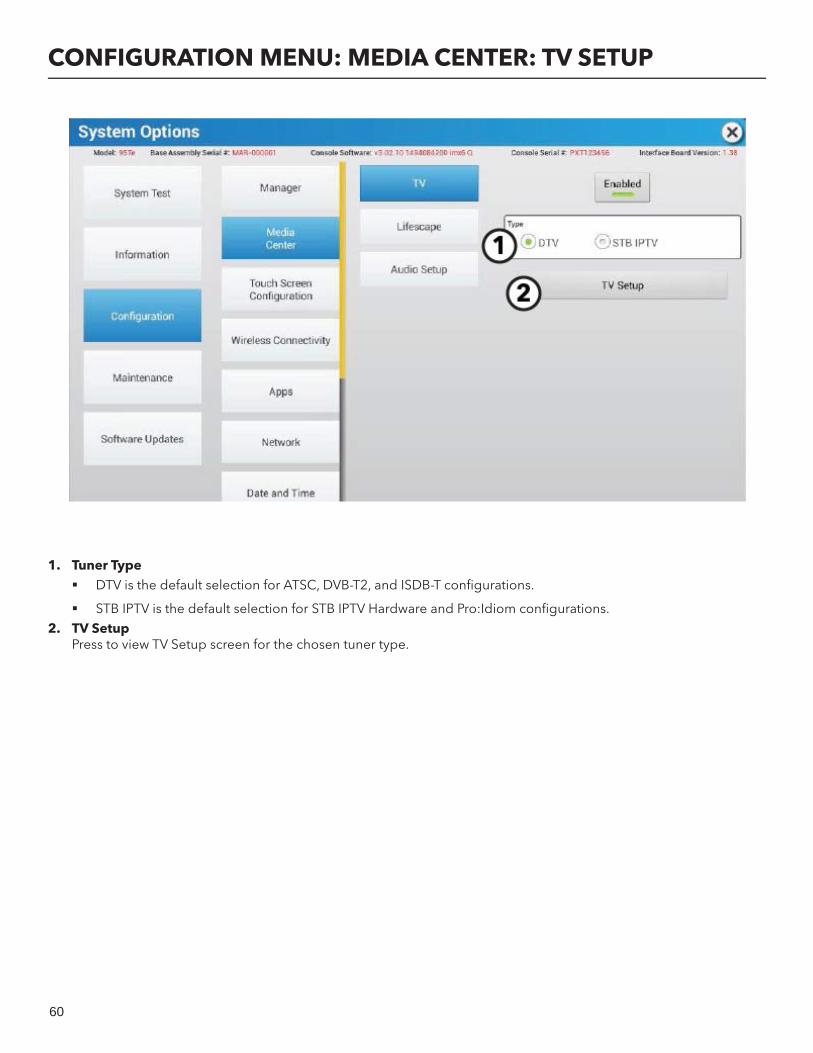
60
CONFIGURATION MENU: MEDIA CENTER: TV SETUP
1. Tuner Type DTV is the default selection for ATSC, DVB-T2, and ISDB-T confi gurations.
STB IPTV is the default selection for STB IPTV Hardware and Pro:Idiom confi gurations.2. TV Setup
Press to view TV Setup screen for the chosen tuner type.

61
CONFIGURATION MENU: MEDIA CENTER: TV SETUP: DTV
1. PMODE Set Picture Mode
2. ZoomPicture Size
3. EPG (if available)Lists current and upcoming programs for selected channels.
4. MuteSilence TV audio.
5. KeypadUse for manual channel input. Use the hyphen (-) to input major-minor channel numbering.
6. PrevPress to view previous channel.
7. Volume keysUse to increase (+) or decrease (-) volume specifi c for the tuner.
8. SAP (if available)Press to activate Secondary Audio Programming.
9. CC Press to turn Closed Caption (or Subtitles) On / Off.
10. Channel keysUse to move channels up (+) or down (-).
11. DisplayCurrent channel information is shown.
12. Navigation arrowsUse to navigate the TV Tuner Setup menu options.
13. ENTERMake Selections.
14. EXITPress to exit the TV Setup menu.
15. Access Tuner Setup Menu Tuner Setup
Video
Channel
V Chip
16. ResetResets tuner to default state.
17. Create Channel ListCreate a list of channels for users to access during workouts.
18. Upload Channel List Uploads Channel list to LFconnect (if connected) and instantly to all other units in the facility if units are connected to the internet.
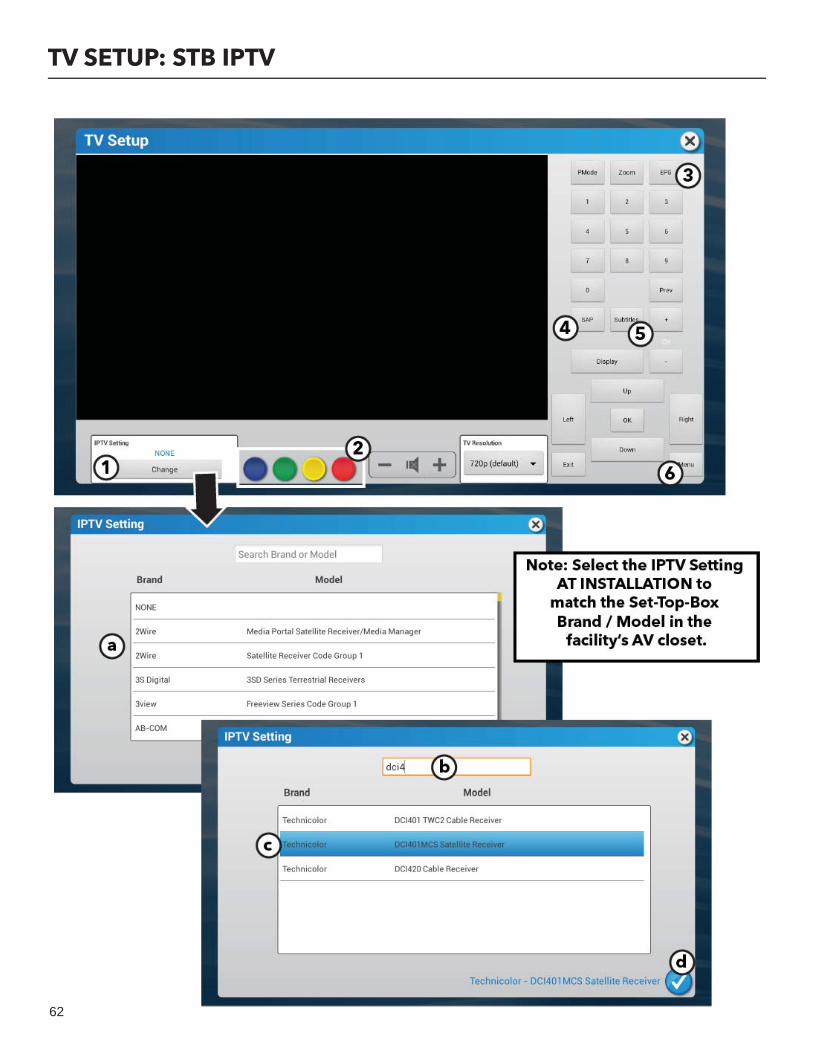
62
TV SETUP: STB IPTV
63
TV SETUP: STB IPTV
These commands are sent to the corresponding Set-Top Boxes. The Set-Top-Boxes determine the actions. See the Set-Top-Box manufacturer’s documentation for detailed functionality descriptions.
1. IPTV SettingSelect the Set-Top Boxes IR control codes.
Search for the Set-Top Box Brand and Model.a. Scroll through the list of Brands and Models.
ORb. Type the name of the Brand or Model in the Search box.
c. Select the row with your desired Brand and Model.
d. The selected Brand and Model is displayed.
Note: Select the IPTV Setting at INSTALLATION to match Set-Top-Box Brand / Model in the facility’s AV Closet.
Note: There may be multiple rows for the same Brand and Model. Each row will have different Set-Top-Box remote control codes so multiple rows may need to be attempted during confi guration.
Note: Rows containing the model description “Legacy Product - do not use for new console installs” should not be selected manually during installation of new con-soles regardless of whether the corresponding Set-Top-Box is new or not.
2. Generic Color buttonsSet-Top-Box defi nes the actions.
3. EPG (if available)Lists current and upcoming programs for selectedchannels.
4. SAP (if available)Toggles between Normal and SAP Audio Channel.
5. SubtitlesPress to turn Subtitles On/Off.
6. MenuSet-Top-Box Menu (if available)

64
TV SETUP: STB IPTV
7. TV ResolutionChange TV resolution.
The TV resolution default setting is selected.
The TV resolution change only applies within the TV Setup menu and will be reset back to the default after exiting the TV Tuner Setup menu.
For troubleshooting during installation, the console resolution may be changed but ONLY while in the TV
Setup menu. The resolution will reset back to the default after exiting the TV Tuner Setup menu.

65
TV SETUP: PRO:IDIOM
To access the Pro:Idiom Tuner Setup Menu, use tuner type STB IPTV.
1
2
4
5
3
6
1. EPG Press to access the electronic program guide.
2. SubtitlesPress to turn Subtitles On / Off.
3. Channel keysUse to move channels up (+) or down (-).
4. DisplayCurrent channel information is shown.
5. EXITPress to exit the Tuner Setup menu.
6. Access Tuner Setup Menu Tuner Setup
Video
Channel
V Chip
For the IPTV Setting, the default should be set to Technicolor DCI401MCS Satellite Receiver. If control of the Pro:Idiom solution is not working, please make sure this setting is correct.
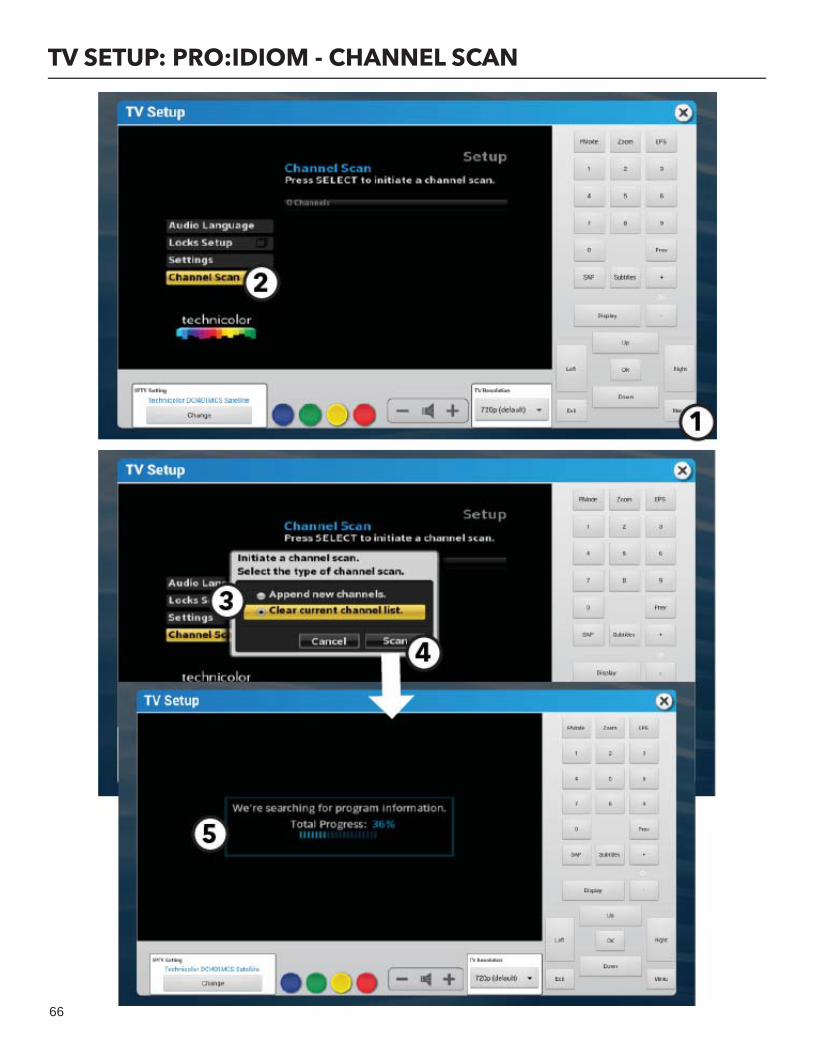
66
TV SETUP: PRO:IDIOM - CHANNEL SCAN

67
TV SETUP: PRO:IDIOM - CHANNEL SCAN
1. MenuPress to access TV Tuner Setup menu.
2. Channel ScanUse the UP and DOWN keys to scroll to the CHANNEL SCAN option. Press OK to enter the selection.
3. Select Channel Scan TypeChoose CLEAR CURRENT CHANNEL LIST.
4. ScanPress to begin channel scan.
5. Progress ScreenDisplays scan progress.
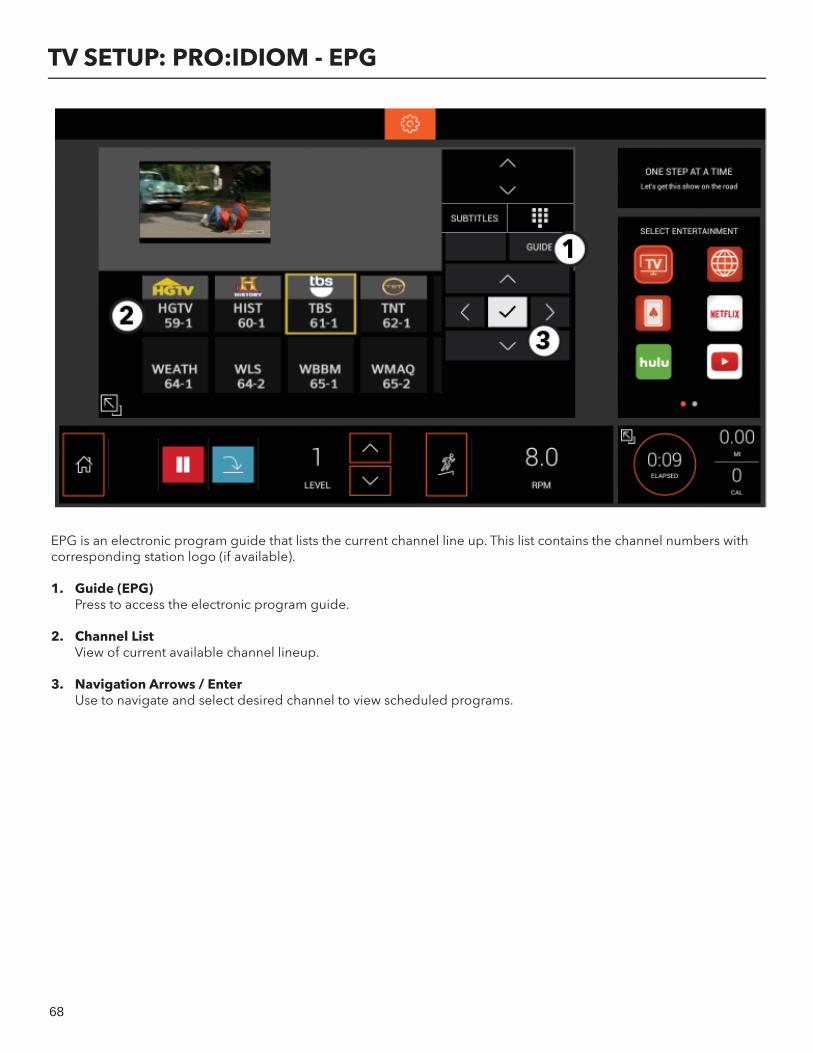
68
TV SETUP: PRO:IDIOM - EPG
EPG is an electronic program guide that lists the current channel line up. This list contains the channel numbers with corresponding station logo (if available).
1. Guide (EPG)Press to access the electronic program guide.
2. Channel ListView of current available channel lineup.
3. Navigation Arrows / EnterUse to navigate and select desired channel to view scheduled programs.
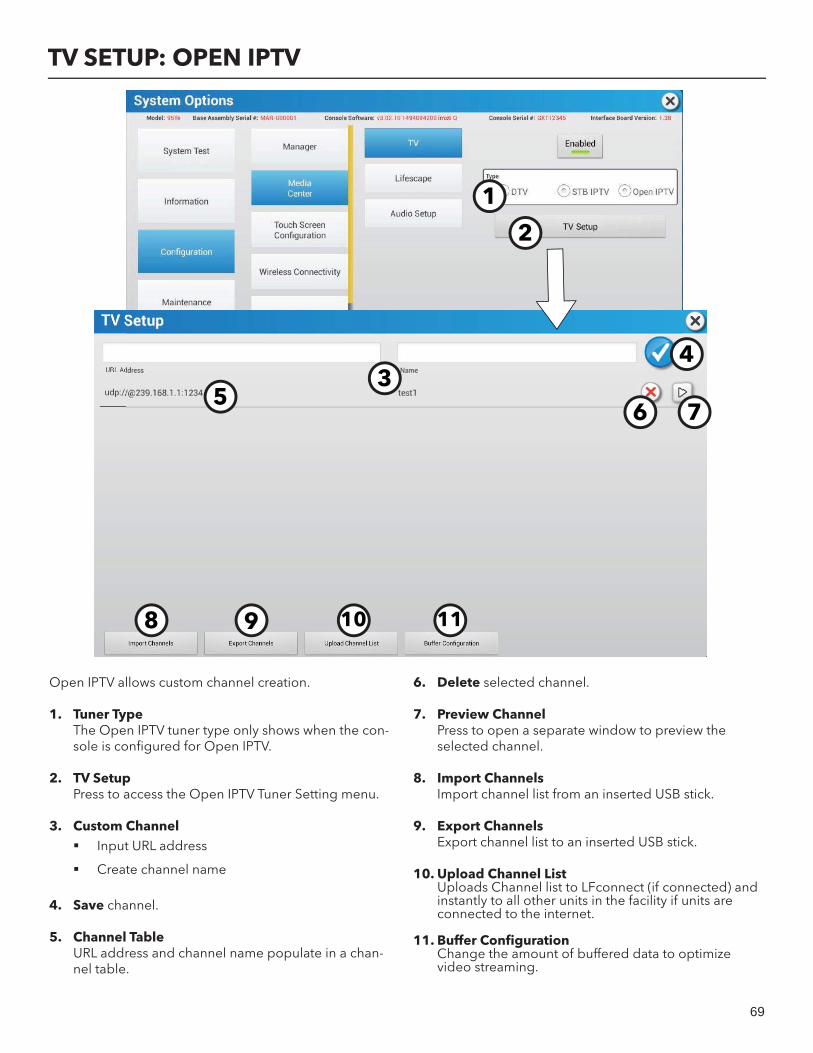
69
TV SETUP: OPEN IPTV
1
2
34
56 7
8 9 10 11
Open IPTV allows custom channel creation.
1. Tuner TypeThe Open IPTV tuner type only shows when the con-sole is confi gured for Open IPTV.
2. TV SetupPress to access the Open IPTV Tuner Setting menu.
3. Custom Channel Input URL address
Create channel name
4. Save channel.
5. Channel TableURL address and channel name populate in a chan-nel table.
6. Delete selected channel.
7. Preview ChannelPress to open a separate window to preview the selected channel.
8. Import ChannelsImport channel list from an inserted USB stick.
9. Export ChannelsExport channel list to an inserted USB stick.
10. Upload Channel ListUploads Channel list to LFconnect (if connected) and instantly to all other units in the facility if units are connected to the internet.
11. Buffer Confi gurationChange the amount of buffered data to optimize video streaming.
70
PREVENTIVE MAINTENANCE TIPSLife Fitness products are backed by the engineering excellence and reliability of Life Fitness and are one of the most rugged and trouble-free pieces of exercise equipment on the market today. Commercial Life Fitness equipment are among the most popular of aerobic trainers in health clubs, colleges and military facilities worldwide.
Note: Safety of the equipment can be maintained only if the equipment is examined regularly for damage or wear. Keep the equipment out of use until defective parts are repaired or replaced.
REMARQUE: pour conserver un matériel sûr, il convient de l’inspecter régulièrement afi n de déceler tout signe d’usure ou d’endommagement. N’utilisez pas l’appareil tant que les pièces défectueuses n’ont pas été réparées ou remplacées.
The following preventive maintenance tips will keep the Life Fitness product operating at peak performance: Locate the product in a cool, dry place.
Clean the display console and all exterior surfaces with an approved or compatible cleaner (see Life Fitness Approved Cleaners) and a microfi ber cloth.
Long fi ngernails may damage or scratch the surface of the console; use the pad of the fi nger to press the se-lection buttons on the console.
Life Fitness Approved Cleaners (United States Availability Only)
Two preferred cleaners have been approved by Life Fitness reliability experts: PureGreen 24 and Gym Wipes. Both cleaners will safely and effectively remove dirt, grime and sweat from equipment. PureGreen 24 and the Antibacte-rial Force formula of Gym Wipes are both disinfectants that are effective against MRSA and H1N1. PureGreen 24 is available in a spray which is convenient for gym staff to use. Apply the spray to a microfi ber cloth and wipe down the equipment. Use PureGreen 24 on the equipment for at least 2 minutes for general disinfection purposes and at least 10 minutes for fungus and viral control. Gym Wipes are large, durable pre-moistened wipes to use on the equipment before and after workouts. Use Gym Wipes on the equipment for at least 2 minutes for general disinfection purposes.
Contact Customer Support Services to order these cleaners (1-800-351-3737 or email: customersupport@lifefi tness.com).
Life Fitness Compatible CleanersMild soap and water or a mild non-abrasive household cleaner can also be used to clean the display and all exterior surfaces. Use a soft microfi ber cloth only. Apply the cleaner to the microfi ber cloth before cleaning. DO NOT use am-monia or acid based cleaners. DO NOT use abrasive cleaners. DO NOT use paper towels. DO NOT apply cleaners directly to the equipment surfaces.
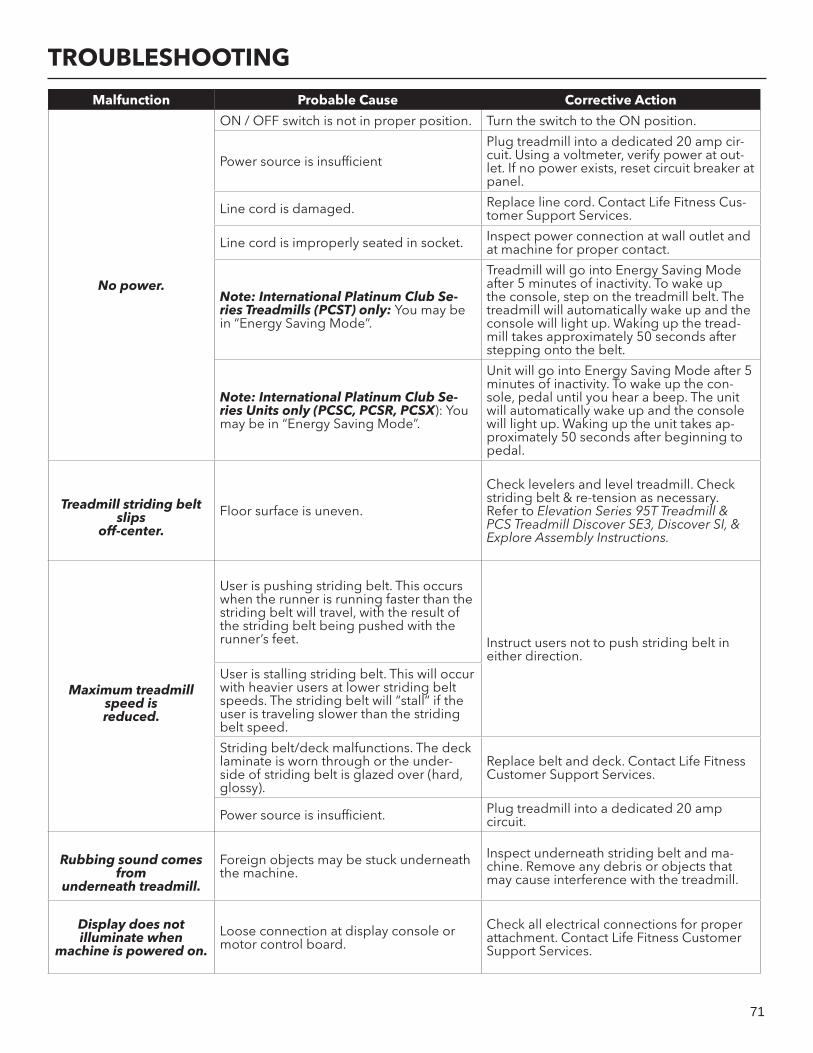
71
TROUBLESHOOTING
Malfunction Probable Cause Corrective Action
No power.
ON / OFF switch is not in proper position. Turn the switch to the ON position.
Power source is insuffi cient
Plug treadmill into a dedicated 20 amp cir-cuit. Using a voltmeter, verify power at out-let. If no power exists, reset circuit breaker at panel.
Line cord is damaged. Replace line cord. Contact Life Fitness Cus-tomer Support Services.
Line cord is improperly seated in socket. Inspect power connection at wall outlet and at machine for proper contact.
Note: International Platinum Club Se-ries Treadmills (PCST) only: You may be in “Energy Saving Mode”.
Treadmill will go into Energy Saving Mode after 5 minutes of inactivity. To wake up the console, step on the treadmill belt. The treadmill will automatically wake up and the console will light up. Waking up the tread-mill takes approximately 50 seconds after stepping onto the belt.
Note: International Platinum Club Se-ries Units only (PCSC, PCSR, PCSX): You may be in “Energy Saving Mode”.
Unit will go into Energy Saving Mode after 5 minutes of inactivity. To wake up the con-sole, pedal until you hear a beep. The unit will automatically wake up and the console will light up. Waking up the unit takes ap-proximately 50 seconds after beginning to pedal.
Treadmill striding belt slips
off-center.Floor surface is uneven.
Check levelers and level treadmill. Check striding belt & re-tension as necessary. Refer to Elevation Series 95T Treadmill & PCS Treadmill Discover SE3, Discover SI, & Explore Assembly Instructions.
Maximum treadmill speed is reduced.
User is pushing striding belt. This occurs when the runner is running faster than the striding belt will travel, with the result of the striding belt being pushed with the runner’s feet. Instruct users not to push striding belt in
either direction.User is stalling striding belt. This will occur with heavier users at lower striding belt speeds. The striding belt will “stall” if the user is traveling slower than the striding belt speed.
Striding belt/deck malfunctions. The deck laminate is worn through or the under-side of striding belt is glazed over (hard, glossy).
Replace belt and deck. Contact Life Fitness Customer Support Services.
Power source is insuffi cient. Plug treadmill into a dedicated 20 amp circuit.
Rubbing sound comes from
underneath treadmill.
Foreign objects may be stuck underneath the machine.
Inspect underneath striding belt and ma-chine. Remove any debris or objects that may cause interference with the treadmill.
Display does not illuminate when
machine is powered on.Loose connection at display console or motor control board.
Check all electrical connections for proper attachment. Contact Life Fitness Customer Support Services.
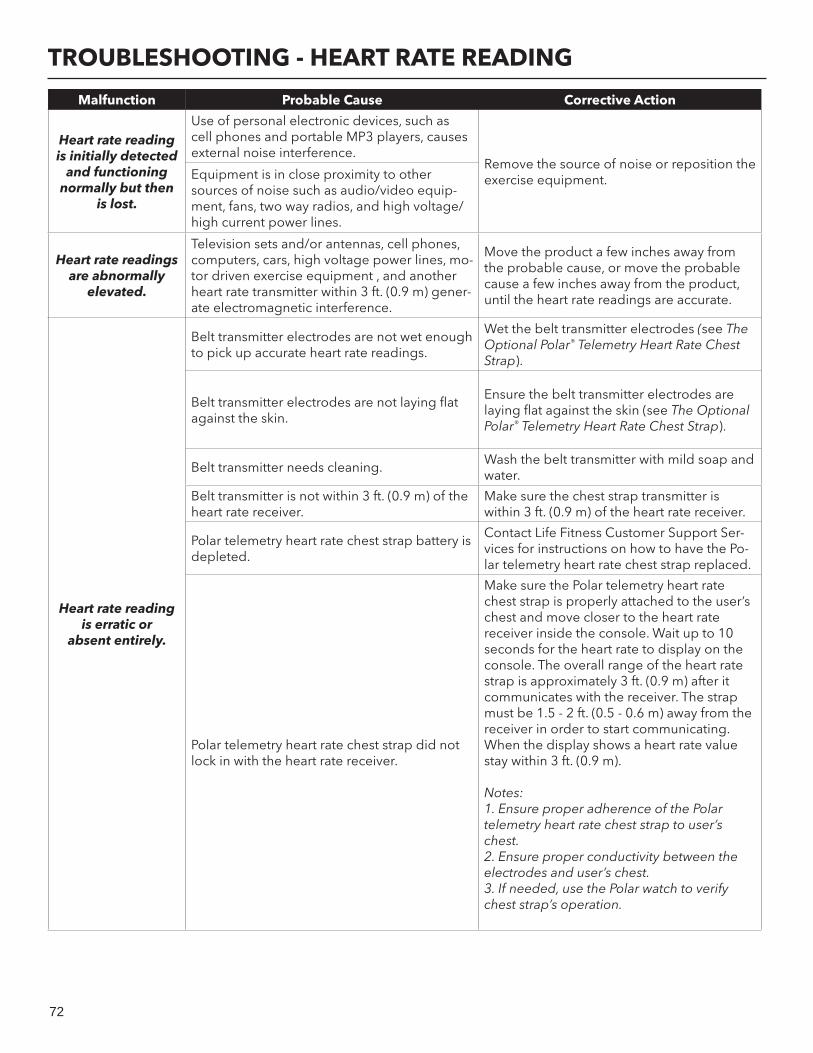
72
TROUBLESHOOTING - HEART RATE READING
Malfunction Probable Cause Corrective Action
Heart rate reading is initially detected
and functioning normally but then
is lost.
Use of personal electronic devices, such as cell phones and portable MP3 players, causes external noise interference.
Remove the source of noise or reposition the exercise equipment.Equipment is in close proximity to other
sources of noise such as audio/video equip-ment, fans, two way radios, and high voltage/high current power lines.
Heart rate readings are abnormally
elevated.
Television sets and/or antennas, cell phones, computers, cars, high voltage power lines, mo-tor driven exercise equipment , and another heart rate transmitter within 3 ft. (0.9 m) gener-ate electromagnetic interference.
Move the product a few inches away from the probable cause, or move the probable cause a few inches away from the product, until the heart rate readings are accurate.
Heart rate reading is erratic or
absent entirely.
Belt transmitter electrodes are not wet enough to pick up accurate heart rate readings.
Wet the belt transmitter electrodes (see The Optional Polar® Telemetry Heart Rate Chest Strap).
Belt transmitter electrodes are not laying fl at against the skin.
Ensure the belt transmitter electrodes are laying fl at against the skin (see The Optional Polar® Telemetry Heart Rate Chest Strap).
Belt transmitter needs cleaning.Wash the belt transmitter with mild soap and water.
Belt transmitter is not within 3 ft. (0.9 m) of the heart rate receiver.
Make sure the chest strap transmitter is within 3 ft. (0.9 m) of the heart rate receiver.
Polar telemetry heart rate chest strap battery is depleted.
Contact Life Fitness Customer Support Ser-vices for instructions on how to have the Po-lar telemetry heart rate chest strap replaced.
Polar telemetry heart rate chest strap did not lock in with the heart rate receiver.
Make sure the Polar telemetry heart rate chest strap is properly attached to the user’s chest and move closer to the heart rate receiver inside the console. Wait up to 10 seconds for the heart rate to display on the console. The overall range of the heart rate strap is approximately 3 ft. (0.9 m) after it communicates with the receiver. The strap must be 1.5 - 2 ft. (0.5 - 0.6 m) away from the receiver in order to start communicating. When the display shows a heart rate value stay within 3 ft. (0.9 m).
Notes: 1. Ensure proper adherence of the Polar telemetry heart rate chest strap to user’s chest. 2. Ensure proper conductivity between the electrodes and user’s chest.3. If needed, use the Polar watch to verify chest strap’s operation.
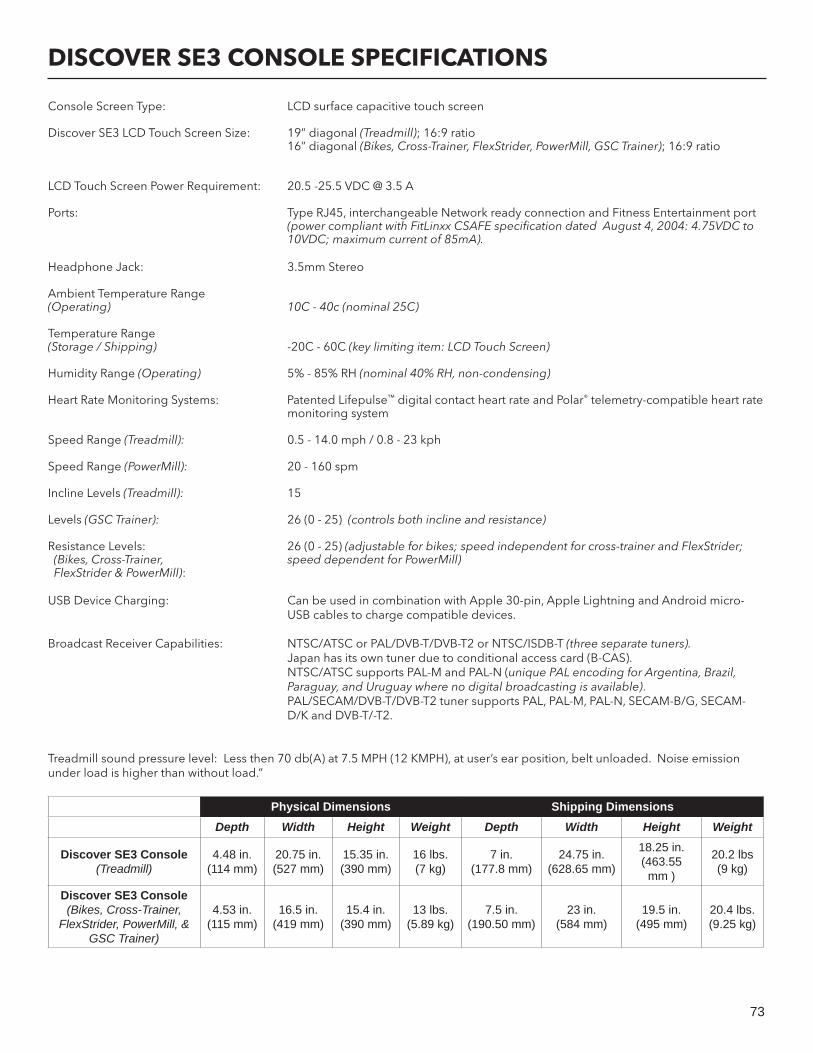
73
DISCOVER SE3 CONSOLE SPECIFICATIONS
Console Screen Type: LCD surface capacitive touch screen
Discover SE3 LCD Touch Screen Size: 19” diagonal (Treadmill); 16:9 ratio 16” diagonal (Bikes, Cross-Trainer, FlexStrider, PowerMill, GSC Trainer); 16:9 ratio
LCD Touch Screen Power Requirement: 20.5 -25.5 VDC @ 3.5 A
Ports: Type RJ45, interchangeable Network ready connection and Fitness Entertainment port (power compliant with FitLinxx CSAFE specifi cation dated August 4, 2004: 4.75VDC to 10VDC; maximum current of 85mA).
Headphone Jack: 3.5mm Stereo
Ambient Temperature Range (Operating) 10C - 40c (nominal 25C)
Temperature Range (Storage / Shipping) -20C - 60C (key limiting item: LCD Touch Screen)
Humidity Range (Operating) 5% - 85% RH (nominal 40% RH, non-condensing)
Heart Rate Monitoring Systems: Patented Lifepulse™ digital contact heart rate and Polar® telemetry-compatible heart rate monitoring system Speed Range (Treadmill): 0.5 - 14.0 mph / 0.8 - 23 kph
Speed Range (PowerMill): 20 - 160 spm Incline Levels (Treadmill): 15
Levels (GSC Trainer): 26 (0 - 25) (controls both incline and resistance)
Resistance Levels: 26 (0 - 25) (adjustable for bikes; speed independent for cross-trainer and FlexStrider; (Bikes, Cross-Trainer, speed dependent for PowerMill) FlexStrider & PowerMill): USB Device Charging: Can be used in combination with Apple 30-pin, Apple Lightning and Android micro- USB cables to charge compatible devices.
Broadcast Receiver Capabilities: NTSC/ATSC or PAL/DVB-T/DVB-T2 or NTSC/ISDB-T (three separate tuners). Japan has its own tuner due to conditional access card (B-CAS). NTSC/ATSC supports PAL-M and PAL-N (unique PAL encoding for Argentina, Brazil, Paraguay, and Uruguay where no digital broadcasting is available). PAL/SECAM/DVB-T/DVB-T2 tuner supports PAL, PAL-M, PAL-N, SECAM-B/G, SECAM- D/K and DVB-T/-T2.
Treadmill sound pressure level: Less then 70 db(A) at 7.5 MPH (12 KMPH), at user’s ear position, belt unloaded. Noise emission under load is higher than without load.”
Physical Dimensions Shipping DimensionsDepth Width Height Weight Depth Width Height Weight
Discover SE3 Console (Treadmill)
4.48 in. (114 mm)
20.75 in. (527 mm)
15.35 in. (390 mm)
16 lbs. (7 kg)
7 in. (177.8 mm)
24.75 in. (628.65 mm)
18.25 in. (463.55
mm )
20.2 lbs (9 kg)
Discover SE3 Console (Bikes, Cross-Trainer,
FlexStrider, PowerMill, & GSC Trainer)
4.53 in. (115 mm)
16.5 in. (419 mm)
15.4 in. (390 mm)
13 lbs. (5.89 kg)
7.5 in. (190.50 mm)
23 in. (584 mm)
19.5 in. (495 mm)
20.4 lbs. (9.25 kg)
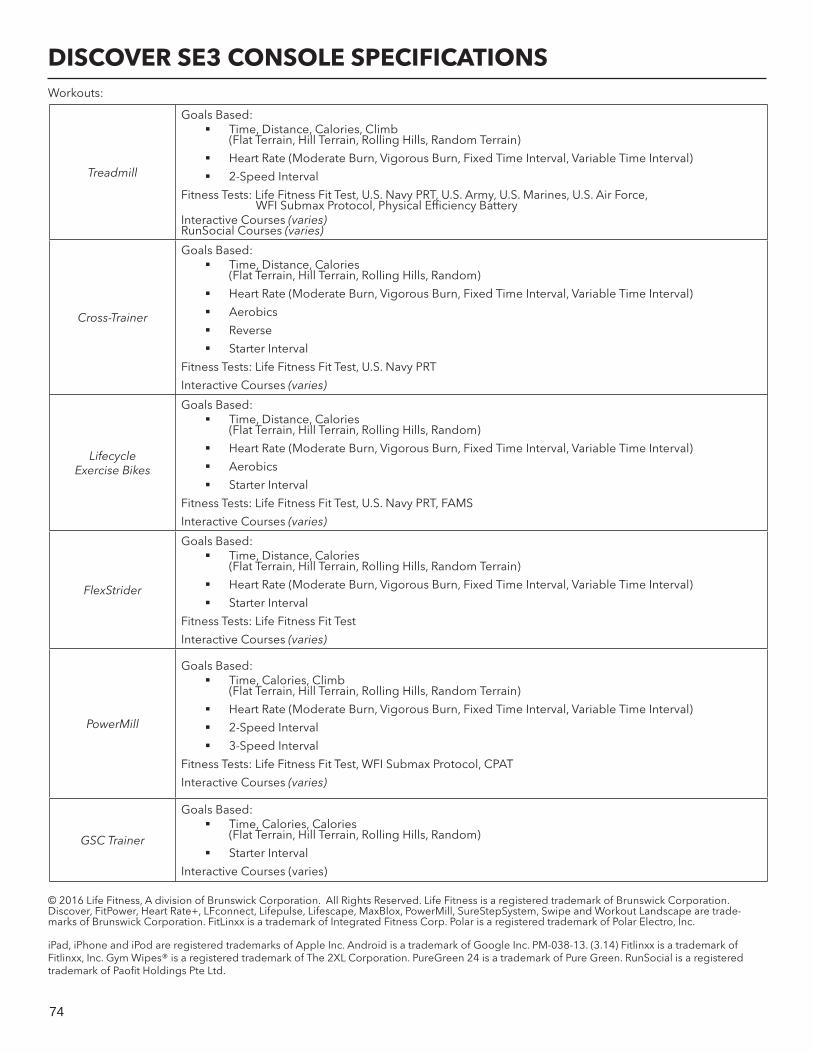
74
DISCOVER SE3 CONSOLE SPECIFICATIONSWorkouts:
© 2016 Life Fitness, A division of Brunswick Corporation. All Rights Reserved. Life Fitness is a registered trademark of Brunswick Corporation. Discover, FitPower, Heart Rate+, LFconnect, Lifepulse, Lifescape, MaxBlox, PowerMill, SureStepSystem, Swipe and Workout Landscape are trade-marks of Brunswick Corporation. FitLinxx is a trademark of Integrated Fitness Corp. Polar is a registered trademark of Polar Electro, Inc.
iPad, iPhone and iPod are registered trademarks of Apple Inc. Android is a trademark of Google Inc. PM-038-13. (3.14) Fitlinxx is a trademark of Fitlinxx, Inc. Gym Wipes® is a registered trademark of The 2XL Corporation. PureGreen 24 is a trademark of Pure Green. RunSocial is a registered trademark of Paofi t Holdings Pte Ltd.
Treadmill
Goals Based: Time, Distance, Calories, Climb
(Flat Terrain, Hill Terrain, Rolling Hills, Random Terrain)
Heart Rate (Moderate Burn, Vigorous Burn, Fixed Time Interval, Variable Time Interval)
2-Speed Interval
Fitness Tests: Life Fitness Fit Test, U.S. Navy PRT, U.S. Army, U.S. Marines, U.S. Air Force, WFI Submax Protocol, Physical Effi ciency BatteryInteractive Courses (varies)RunSocial Courses (varies)
Cross-Trainer
Goals Based: Time, Distance, Calories
(Flat Terrain, Hill Terrain, Rolling Hills, Random)
Heart Rate (Moderate Burn, Vigorous Burn, Fixed Time Interval, Variable Time Interval)
Aerobics
Reverse
Starter Interval
Fitness Tests: Life Fitness Fit Test, U.S. Navy PRT
Interactive Courses (varies)
Lifecycle Exercise Bikes
Goals Based: Time, Distance, Calories
(Flat Terrain, Hill Terrain, Rolling Hills, Random)
Heart Rate (Moderate Burn, Vigorous Burn, Fixed Time Interval, Variable Time Interval)
Aerobics
Starter Interval
Fitness Tests: Life Fitness Fit Test, U.S. Navy PRT, FAMS
Interactive Courses (varies)
FlexStrider
Goals Based: Time, Distance, Calories
(Flat Terrain, Hill Terrain, Rolling Hills, Random Terrain)
Heart Rate (Moderate Burn, Vigorous Burn, Fixed Time Interval, Variable Time Interval)
Starter Interval
Fitness Tests: Life Fitness Fit Test
Interactive Courses (varies)
PowerMill
Goals Based: Time, Calories, Climb
(Flat Terrain, Hill Terrain, Rolling Hills, Random Terrain)
Heart Rate (Moderate Burn, Vigorous Burn, Fixed Time Interval, Variable Time Interval)
2-Speed Interval
3-Speed Interval
Fitness Tests: Life Fitness Fit Test, WFI Submax Protocol, CPAT
Interactive Courses (varies)
GSC Trainer
Goals Based: Time, Calories, Calories
(Flat Terrain, Hill Terrain, Rolling Hills, Random)
Starter Interval
Interactive Courses (varies)
75
WARRANTY INFORMATION
WHAT IS COVERED.This LIFE FITNESS commercial exercise equipment (“Product”) is warranted to be free of all defects in material and workmanship.
WHO IS COVERED.The original purchaser or any person receiving a newly pur-chased Product as a gift from the original purchaser. Warranty will be voided on subsequent transfers.
HOW LONG IS IT COVERED.All coverage is provided by specifi c Product according to the guidelines listed on the following page.
WHO PAYS TRANSPORTATION & INSURANCE FOR SERVICE.If the Product or any covered part must be returned to a service facility for repairs, We, LIFE FITNESS, will pay all transportation and insurance charges for the fi rst year. You are responsible for transportation and insurance charges during the second and third years (if applicable).
WHAT WE WILL DO TO CORRECT COVERED DEFECTS.We will ship to you any new or rebuilt replacement part or com-ponent, or, at our option, replace the Product. Such replacement parts are warranted for the remaining portion of the original warranty period.
WHAT IS NOT COVERED.Any failures or damage caused by unauthorized service, misuse, accident, negligence, improper assembly or installation, debris resulting from any construction activities in the Product’s envi-ronment, rust or corrosion as a result of the Product’s location, alterations or modifi cations without our written authorization or by failure on your part to use, operate and maintain the Product as set out in your Operation Manual (“Manual”).
One type RJ45 interchangeable Network ready and Fitness Entertainment port is supplied with the Product. This port complies with the FitLinxx CSAFE specifi cation dated August 4, 2004 stating: 4.75VDC to 10VDC; maximum current of 85mA. Any Product damage caused by a load exceeding this FitLinxx CSAFE specifi cation is not covered by warranty.
All terms of this warranty are void if this product is moved beyond the continental borders of the United States of America (excluding Alaska, Hawaii and Canada) and are then subject to the terms provided by that country’s local authorized LIFE FIT-NESS representative.
WHAT YOU MUST DO.Retain proof of purchase; use, operate and maintain the Product as specifi ed in the Manual; notify Customer Support Services of any defect within 10 days after discovery of the defect; if instructed, return any defective part for replacement or, if neces-sary, the entire Product for repair.
OPERATION MANUAL: It is VERY IMPORTANT THAT YOU READ THE MANUAL before operating the Product. Remember to perform the periodic maintenance requirements specifi ed in the Manual to assure proper operation and your continued satisfac-tion.
HOW TO GET REPLACEMENT PARTS & SERVICE.Refer to page one of this manual for your local service con-tact information. Reference your name, address and the serial number of your Product (consoles and frames may have sepa-rate serial numbers). They will tell you how to get a replacement part, or, if necessary, arrange for service where your Product is located.
EXCLUSIVE WARRANTY.THIS LIMITED WARRANTY IS IN LIEU OF ALL OTHER WARRAN-TIES OF ANY KIND EITHER EXPRESSED OR IMPLIED, INCLUD-ING BUT NOT LIMITED TO THE IMPLIED WARRANTIES OF MER-CHANTABILITY AND FITNESS FOR A PARTICULAR PURPOSE, AND ALL OTHER OBLIGATIONS OR LIABILITIES ON OUR PART. We neither assume nor authorize any person to assure for us any other obligation or liability concerning the sale of this Product. Under no circumstances shall we be liable under this warranty, or otherwise, of any damage to any person or property, includ-ing any lost profi ts or lost savings, for any special, indirect, secondary, incidental or consequential damages of any nature arising out of the use of or inability to use this Product. Some states do not allow the exclusion or limitation of implied warran-ties or of liability for incidental or consequential damages, so the above limitations or exclusions may not apply to you.
CHANGES IN WARRANTY NOT AUTHORIZED.No one is authorized to change, modify or extend the terms of this limited warranty.
EFFECT OF STATE LAWS.This warranty gives you specifi c legal rights and you may have other rights which vary from state to state.
OUR PLEDGE TO YOU.Our Products are designed and manufactured to the highest standards. We want you completely satisfi ed with our Products and will do everything possible under the terms of this warranty to keep you secure in knowing you have bought the best!

76
WARRANTY INFORMATION
Lifetime 10 Years 7 Years 3 Years 2 Years 1 Year 6 Months
Commercial Console
Electrical & Mechanical Parts
Labor
Overlay, Headphone Jack, & USB Port
Consumer Console(Home Use)
Electrical & Mechanical Parts
Labor
Overlay, Headphone Jack, & USB Port
Treadmill (95T)Frame, Lifespring™ Shock Absorbers, & Motor
Electrical Components
Mechanical Components & Labor
Treadmill (PCST) Motor & Frame
Electrical & Mechanical Parts
Labor
Cross-Trainer (95X) Electrical & Mechanical Parts
Labor
Cross-Trainer (PCSX) Frame
Electrical & Mechanical Parts
Labor
Recumbent Bike (95R)
Electrical & Mechanical Parts
Labor
Recumbent Bike (PCSR) Frame
Electrical & Mechanical Parts
Labor
Upright Bike (95C) Electrical & Mechanical Parts
Labor
Upright Bike (PCSC) Frame
Electrical & Mechanical Parts
Labor
FlexStrider (95FS) Electrical & Mechanical Parts
Labor
PowerMill (95PS) Electrical & Mechanical Parts
Labor
GSC Electrical & Mechanical Parts
Labor
Warranties outside the U.S. may vary.