electronic control software user...
TRANSCRIPT

www.alliancelaundry.comPart No. 12-08-278R11
December 2017
Electronic ControlSoftware User
Instructions

© Copyright, Alliance Laundry Systems LLC – DO NOT COPY or TRANSMIT
License Agreement
2 12-08-278R11
By installing this software you agree to the following provisions. If you do not agree with these provisions, return the software and all materials included with the software within thirty (30) days.
This is a license agreement and not an agreement for sale, Alliance Laundry Systems LLC (hereinafter “Alliance Laundry Systems”) hereby licenses this software to you under the following terms and conditions.
This agreement supersedes all prior agreements, proposals, and representations between you and Alliance Laundry Systems regarding all Alliance Laundry Systems Software products.
Customer agrees that aspects of the licensed materials, including the specific design and structure of individual programs, constitute trade secrets and/or copyrighted material of Alliance Laundry Systems. Customer agrees not to disclose, provide, or otherwise make available such trade secrets or copyrighted material in any form to any third party without the prior written consent of Alliance Laundry Systems. Customer agrees to implement reasonable security measures to protect such trade secrets and copyrighted material. Title to Software and documentation shall remain solely with Alliance Laundry Systems.
STANDARD USE LICENSE
YOU MAY:l Use this software on any compatible computer, provided the
computer is owned by you the licensee. This includes computers located in branch offices that support and manage laundry equipment.
YOU SHALL NOT:l Use, copy, or transfer copies of this software except as
provided in the License Agreement.l Alter, merge, modify or adapt this software in any way,
including disassembling or decompiling or reverse engineering.
l Loan, rent, lease, or sublicense this software or any copy.
This license is effective until terminated. It may be terminated by you by destroying the software media and all copies. It will terminate automatically if you fail to comply with any of the terms of this License Agreement, and on any such termination you will destroy the software media and any back-up copies.
Alliance Laundry Systems retains all rights not expressly granted. Nothing in this License Agreement constitutes a waiver of Alliance Laundry Systems' rights under the U.S. Copyright laws or any other federal or state law.
LIMITED WARRANTY
Alliance Laundry Systems warrants that the software will substantially conform to published specifications and to the documentation, provided that it is used on the computer hardware and with the operating system for which it was designed. Alliance Laundry Systems also warrants that the
documentation are free from defects in materials and workmanship. Alliance Laundry Systems will replace defective media or documentation or correct substantial software errors at no charge, provided you return the item to Alliance Laundry Systems within 90 days of the date of delivery. If Alliance Laundry Systems is unable to replace defective media or documentation or correct substantial software errors, Alliance Laundry Systems will refund the license fee. These are your sole remedies to any breach of warranty. Except as specifically provided above, Alliance Laundry Systems makes no warranty or representation, either expressed or implied, with respect to this software or documentation, including their quality, performance, merchantability, or fitness for a particular purpose.
Because software is inherently complex and may not be completely free of errors, you are advised to verify your work. In no event will Alliance Laundry Systems be liable for direct, indirect, special, incidental, or consequential damages arising out of the use or inability to use the software or documentation license.
The warranty and remedies set forth above are exclusive and in lieu of all others, oral or written, express or implied. No Alliance Laundry Systems dealer, distributor, agent or employee is authorized to make any modification or addition to this warranty.
Some states do not allow the exclusion or limitation of implied warranties or limitation of liability for incidental or consequential damages, so the above limitations or exclusions may not apply to you.
U.S. GOVERNMENT RESTRICTED RIGHTS
The software and documentation included are provided with RESTRICTED AND LIMITED RIGHTS. Use, duplication, or disclosure by the Government is subject to restrictions as set off in FAR § 52.277-14 (June 1987) Alternate III(g)(3)(June 1987), FAR § 52.277-19 (June 1987), or DFARS § 52.277-7013(c)(1)(ii)(June 1988), as applicable, Contractor/Manufacturer is Alliance Laundry Systems LLC, Shepard Street, Ripon, WI 54971.
GENERAL
Should you have any questions concerning this License, write to Software License Agreement, Alliance Laundry Systems LLC, Shepard Street, Ripon, WI 54971.
License Agreement

© Copyright, Alliance Laundry Systems LLC – DO NOT COPY or TRANSMIT
© Copyright 2017, Alliance Laundry Systems LLC
All rights reserved. No part of the contents of this book may be reproduced or transmitted in any form or by any means without the expressed written consent of the publisher.
12-08-278R11 3
Table of Contents
License Agreement .............................................................................. 2System Requirements .......................................................................... 5
System Requirements (PC) .......................................................... 5System requirements (PDA) ........................................................ 5
PC Application Installation ................................................................ 6Installation ................................................................................... 6SQL Server 2012 Installation ...................................................... 7Updating the PC Application ....................................................... 13Software Update Notifications .................................................... 14Downloading Software Instructions ............................................ 17Using the Windows Task Scheduler to Schedule aDatabase Backup ......................................................................... 18Opening the PC Application ........................................................ 22
Selecting the Application’s Display Language .................... 22Understanding the My Machines Structure .......................... 22Adding a Branch or Location ............................................... 23Editing a Branch or Location ............................................... 24Manual Machine Entry (Vended Software Only) ................ 26
Manually Entering a Machine ......................................... 26Adding a Manual Entry Collection .................................. 26
My Presets ................................................................................... 27Adding a Preset ..................................................................... 27Editing a Preset ..................................................................... 28
My PDAs ..................................................................................... 28Viewing My PDAs ............................................................... 28
PC Application (continued) ......................................................... 29My User-Defined Types .............................................................. 29
Adding Machine Types ........................................................ 29Editing Machine Types ......................................................... 29Assigning a User-Defined Type to a Machine ..................... 29
Infrared Communication .............................................................. 30No Idle Mode Time-Out .................................................. 31
Tools ............................................................................................ 31Receiving Information from the PDA ......................................... 32Sending Information to the PDA ................................................. 32Reports Menu .............................................................................. 32Help Menu ................................................................................... 34Start Menu Applications .............................................................. 34
PDA Application Installation .............................................................. 35Using Sync Center ................................................................ 35Installing the PDA Application ............................................ 35
Updating the PDA Application .................................................... 35

© Copyright, Alliance Laundry Systems LLC – DO NOT COPY or TRANSMIT4 12-08-278R11
Table of Contents (continued)
PDA Application .................................................................................. 36Opening the PDA Application ..................................................... 36Collecting Information from the Machine with the PDA ............ 36
Assigning New Machines to a Location ............................... 36Viewing My Machines .......................................................... 36Saving a Machine’s Programming ........................................ 37Manually Entering a Machine’s Audit Data ......................... 37
Programming the Machine ........................................................... 37Loading Machine Cycles ............................................. 37Loading Preset Cycles ................................................. 37Creating a New Preset ................................................. 37
Editing Cycles ....................................................................... 38Editing Pricing (Only Available For Vended Products) ....... 38Editing Globals ..................................................................... 38Downloading to Machine ...................................................... 38
Viewing Audit Data ..................................................................... 39Audit Data ........................................................................ 39Machine Info. ................................................................... 39Mach Config Tab ............................................................. 39
Viewing Machine Configuration .................................................. 39Viewing Machine Status ....................................................... 39
Maintenance ................................................................................. 40Setup Configuration ..................................................................... 40
Machine Programming – Getting Started ........................................... 41Technical Support ................................................................................ 44

© Copyright, Alliance Laundry Systems LLC – DO NOT COPY or TRANSMIT12-08-278R11 5
System Requirements
System Requirements (PC)
The PC Application has the following minimum recommended PC requirements:• Keyboard and mouse• Microsoft Windows 7• 2 GHz processor• 2 Gb RAM• XGA (1024x768)• 15 GB of available disk space• USB Port
System requirements (PDA)
The PDA software requires 5 MB of available storage space, depending on the processor and components installed on the PDA.Systems that support the PDA software include the following:
• Microsoft Windows Mobile 2003 or greater• Infrared communication window (IrDA) or standard SD expansion slot

© Copyright, Alliance Laundry Systems LLC – DO NOT COPY or TRANSMIT6 12-08-278R11
PC Application Installation
Installation
You must have administrator rights to install the PC application
1. Insert the USB drive into your PC.2. Navigate to the USB drive using “Windows Explorer” or “My Computer”.3. Double-click the Setup.exe file on the USB drive.4. You may be prompted to install additional components onto your PC before the PC Application
can be installed (e.g., Crystal Reports for .NET Framework 4.0, .Net Framework 4.0). If you are prompted, review the component’s licensing agreement and then click the Accept or Install button.
5. After the additional components are installed, the installer will start automatically.6. Follow the on-screen instructions to install the PC Application.7. After the software has been installed, click the Close button. A shortcut for the program is added
to the PC’s desktop and Start menu.

© Copyright, Alliance Laundry Systems LLC – DO NOT COPY or TRANSMIT12-08-278R11 7
PC Application Installation (continued)
SQL Server 2012 Installation
1. From the SQL Server Installation Center, click the New SQL Server stand-alone installation. The Install Setup Files page appears.
Figure 1 2. From the Install Setup Files page, click the Install button. The Installation Type page appears.
Figure 2
PHM1576R
PHM1577R

© Copyright, Alliance Laundry Systems LLC – DO NOT COPY or TRANSMIT8 12-08-278R11
PC Application Installation (continued)
3. From the Installation Type page, make sure the Perform a new installation of SQL Server 2012 radio button is selected and then click the Next button. The License Terms page appears.
Figure 3 4. From the License Terms page, click the I accept the license terms checkbox and then click the
Next button. The Feature Selection page appears.
Figure 4
PHM1578R
PHM1579R
© Copyright, Alliance Laundry Systems LLC – DO NOT COPY or TRANSMIT12-08-278R11 9
PC Application Installation (continued)
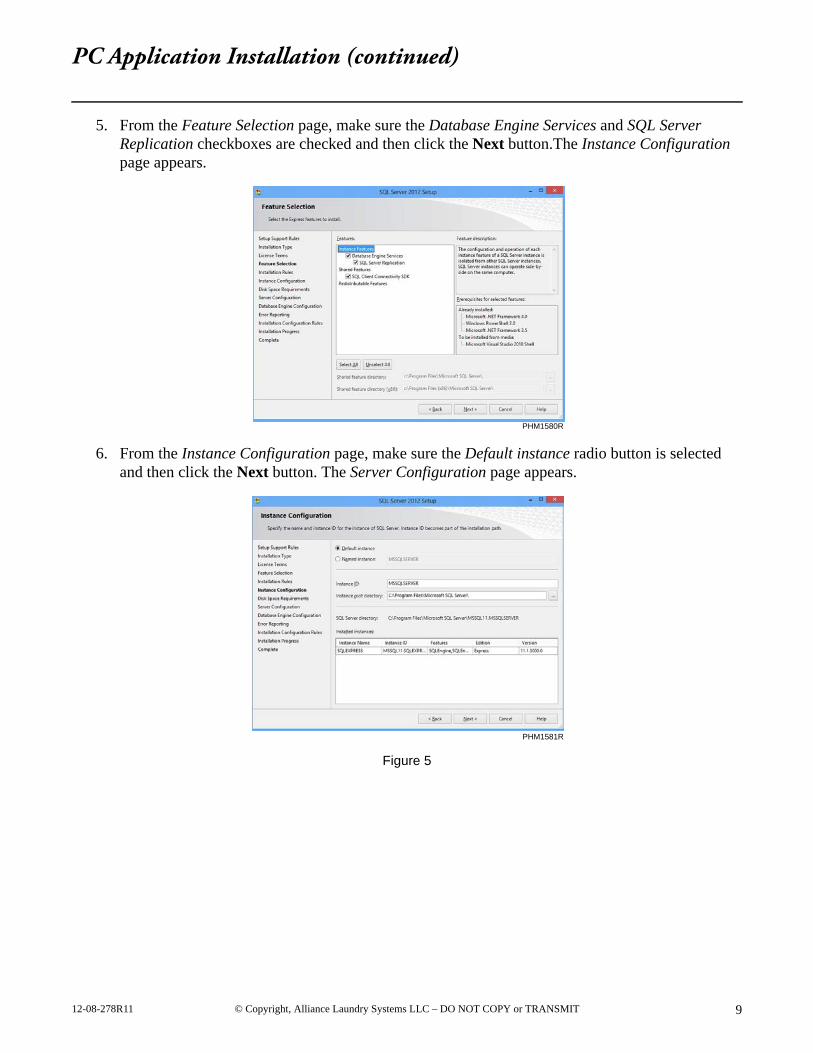
5. From the Feature Selection page, make sure the Database Engine Services and SQL Server Replication checkboxes are checked and then click the Next button.The Instance Configuration page appears.
6. From the Instance Configuration page, make sure the Default instance radio button is selected and then click the Next button. The Server Configuration page appears.
Figure 5
PHM1580R
PHM1581R

© Copyright, Alliance Laundry Systems LLC – DO NOT COPY or TRANSMIT10 12-08-278R11
PC Application Installation (continued)
7. From the Server Configuration page, click the Next button. The Database Engine Configuration page appears.
Figure 6 8. From the Database Engine Configuration page, make sure the Windows authentication mode
radio button is selected and then click the Next button. The Error Reporting page appears.
Figure 7
PHM1582R
PHM1583R
© Copyright, Alliance Laundry Systems LLC – DO NOT COPY or TRANSMIT12-08-278R11 11
PC Application Installation (continued)
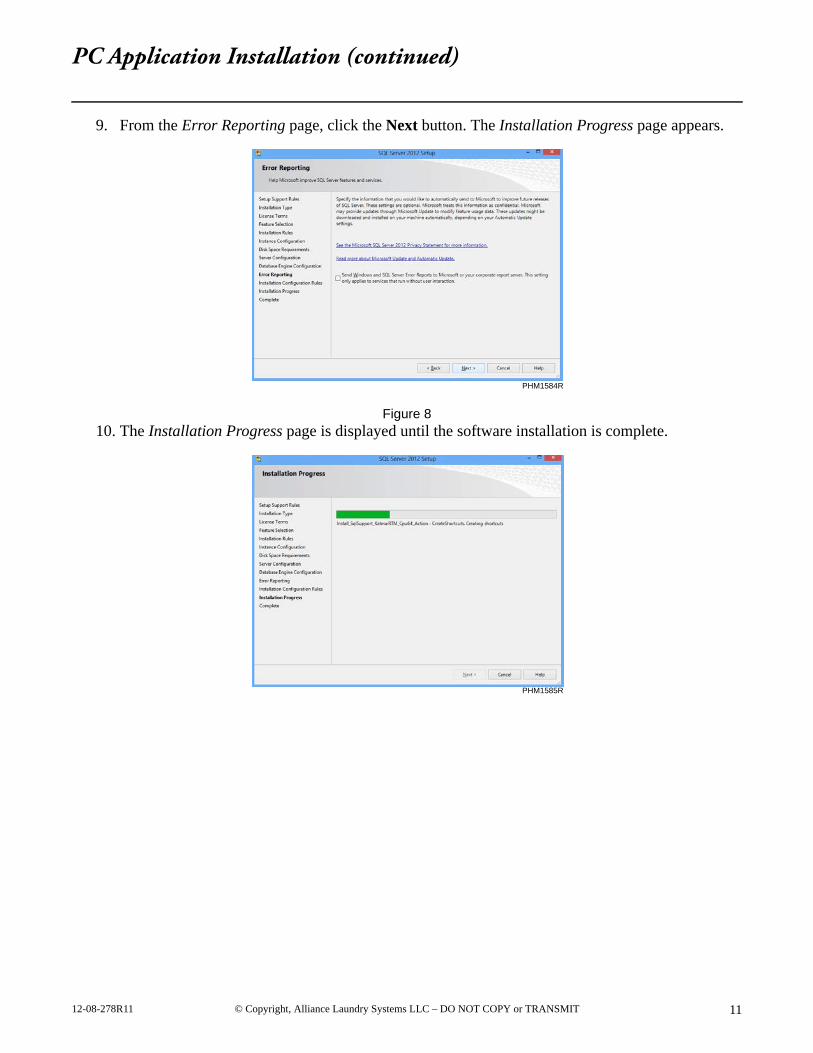
9. From the Error Reporting page, click the Next button. The Installation Progress page appears.
Figure 8 10. The Installation Progress page is displayed until the software installation is complete.
PHM1584R
PHM1585R

© Copyright, Alliance Laundry Systems LLC – DO NOT COPY or TRANSMIT12 12-08-278R11
PC Application Installation (continued)
When the software installation is complete, the Complete page appears.
Figure 9
PHM1586R

© Copyright, Alliance Laundry Systems LLC – DO NOT COPY or TRANSMIT12-08-278R11 13
PC Application Installation (continued)
Updating the PC Application
1. If using a PDA, transfer all data from the PDA to the PC by using the Receive... button in the PC application.
2. Make a back-up of the database. Under the PC’s Start menu, under All Programs, locate the Electronic Control Software menu and click Database Backup.
3. Insert the USB drive with the new version of the Electronic Control Software into the PC and follow the on-screen instructions.
4. The new version of the Electronic Control Software will install.5. Locate and double-click the Electronic Control Software shortcut on the PC’s desktop. If a
database update is required, the Database Setup utility will open. To update the database, click the Update button.

© Copyright, Alliance Laundry Systems LLC – DO NOT COPY or TRANSMIT14 12-08-278R11
PC Application Installation (continued)
Software Update Notifications
The software can be set to notify you when software updates available. 1. To set the software update frequency…
a. Under the Tools menu, click Options…. The Options window appears.b. From the Options window, click the Updates tab.
Figure 10 c. From the Auto Check Every: drop-down list, select the update check frequency.
NOTE: When a new software version is released, the software will display an update message.
Figure 11 2. To view the software updates manually…
a. Under the Tools menu, click Options…. The Options window appears.b. From the Options window, click the Updates tab.
Figure 12
PHM1605R
PHM1606R
PHM1605R

© Copyright, Alliance Laundry Systems LLC – DO NOT COPY or TRANSMIT12-08-278R11 15
PC Application Installation (continued)
c. Click the Advanced Update Manager checkbox. d. Close the Options window.e. Under the Help menu, click Check for update.
Figure 13 f. To download the updates, click the Download button.
NOTE: You will be prompted to select a path to save the install files.
Figure 14
CHM1599R
PHM1608R

© Copyright, Alliance Laundry Systems LLC – DO NOT COPY or TRANSMIT16 12-08-278R11
PC Application Installation (continued)
3. After the updates have downloaded, you can install the updates immediately or install them when the application closes.
Figure 15 4. Before the installation begins, the application will ask for a database backup. It is recommended
to do a backup before updating the software.
Figure 16 NOTE: The installation will begin after the “Database Backup” finishes and is closed.
PHM1609R
PHM1610R

© Copyright, Alliance Laundry Systems LLC – DO NOT COPY or TRANSMIT12-08-278R11 17
PC Application Installation (continued)
Downloading Software Instructions
NOTE: To download the software instructions, the Advanced Update Manager must be enabled on the Updates tab under Tools > Options.
1. Under the Help menu, click Check for update.... The Update Manager window appears.2. In the Update Manager window, click the Software Documents button. The list of available
software instructions appears.
Figure 17 3. Click the checkbox next to the desired software instructions. 4. Click the Download button.
NOTE: The software will ask where the download should be saved. When the download is complete, the application will open the directory containing the file.
PHM1625R

© Copyright, Alliance Laundry Systems LLC – DO NOT COPY or TRANSMIT18 12-08-278R11
PC Application Installation (continued)
Using the Windows Task Scheduler to Schedule a Database Backup
1. Open the Task Scheduler.2. Create a Basic Task.3. Name the task and then click the Next button.
Figure 18 4. Set the task frequency.
a. Under the When do you want the task to start? heading, click the radio button next to the desired task frequency.
Figure 19 b. Click the Next button.
5. Select the task time. a. Under the task frequency you have selected. For example, if you have selected Monthly, click
Monthly.
PHM1613R
PHM1614R

© Copyright, Alliance Laundry Systems LLC – DO NOT COPY or TRANSMIT12-08-278R11 19
PC Application Installation (continued)
b. Select the desired task time.NOTE: The available task times will be different depending on the task frequency that has been selected.
Figure 20
Figure 21
PHM1615R
PHM1616R
© Copyright, Alliance Laundry Systems LLC – DO NOT COPY or TRANSMIT20 12-08-278R11
PC Application Installation (continued)
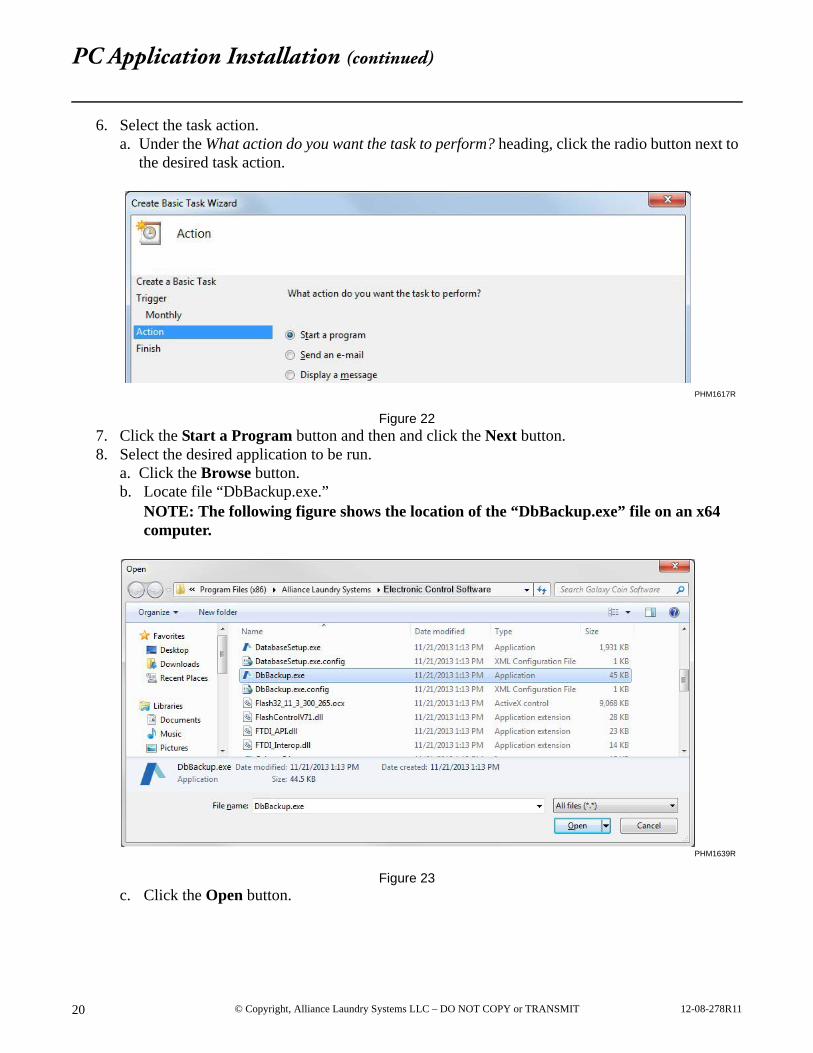
6. Select the task action.a. Under the What action do you want the task to perform? heading, click the radio button next to
the desired task action.
Figure 22 7. Click the Start a Program button and then and click the Next button.8. Select the desired application to be run.
a. Click the Browse button. b. Locate file “DbBackup.exe.”
NOTE: The following figure shows the location of the “DbBackup.exe” file on an x64 computer.
Figure 23 c. Click the Open button.
PHM1617R
PHM1639R

© Copyright, Alliance Laundry Systems LLC – DO NOT COPY or TRANSMIT12-08-278R11 21
PC Application Installation (continued)
d. Add the following text into the Add arguments (optional) textbox:"ACTION=B", "AUTOSTART=T", "AUTOCLOSE=T", "APPENDDATE=T"
Figure 24 e. Click the Next button.
9. Click the Finish button.
Figure 25
PHM1779R
PHM1639R

© Copyright, Alliance Laundry Systems LLC – DO NOT COPY or TRANSMIT22 12-08-278R11
PC Application Installation (continued)
NOTE: The backup will be created in the default path of your database. You can find this path by opening the Database Backup application and then clicking Backup.
Figure 26
Opening the PC Application
Double-click the application’s shortcut on your PC’s desktop or, under your PC’s start menu, click All Programs. Locate and click the software.
The first time the PC Application is opened, you will be prompted to enter your Software Security Code and/or install the database server. Follow the on-screen instructions.
Selecting the Application’s Display Language1. From the Tools menu, select Options.2. Select the Region tab.3. Select the desired application display language.
Understanding the My Machines Structure1. The first time the application is opened, the default My Machines structure is shown (i.e., My
Branch and My Location) in the tree view.
Definition:• Branch: This is a group of locations (e.g., Campus Laundries).• Location: This is the actual physical location of a laundry facility
(e.g. North Campus).
PHM1621R

© Copyright, Alliance Laundry Systems LLC – DO NOT COPY or TRANSMIT12-08-278R11 23
PC Application Installation (continued)
Adding a Branch or Location1. To add a Branch or Location to the My Machines structure, in the My Machines structure, select
the level above which you would like to add an item and click the New... button.
Figure 27
Example: To add another Location to the My Machines structure,a. In the My Machines structure, click My Branch (i.e., the level above My Location).b. Click the New location... button.
2. The New location window opens.
Figure 28
PHM1725R
PHM1726R

© Copyright, Alliance Laundry Systems LLC – DO NOT COPY or TRANSMIT24 12-08-278R11
PC Application Installation (continued)
3. Enter information into the New... window and click the OK button.
Example (Location): When adding a new Location, this window can be used to change the Location’s Branch and to add information about the Location (e.g., the Location’s name, contact information, address and notes).
Example (Branch): If adding a new Branch, in the New branch window, the only information that can be added is the Branch’s name and notes.
4. The new element is added to the My Machines structure.
Editing a Branch or Location1. To edit a Branch or Location, in the My Machines structure, right-click the branch or location you
would like to edit.
Example: To edit information about My Location, under My Branch, right-click My Location.2. From the pop-up menu, click Edit Location... or Edit Branch....The...information for :...window
opens.
Figure 29 PHM1727R

© Copyright, Alliance Laundry Systems LLC – DO NOT COPY or TRANSMIT12-08-278R11 25
PC Application Installation (continued)
3. Edit the information for the item as needed and click the OK button.
Example (Location): For Locations, the Branch assignment, name, contact information, address and notes can be edited.
Figure 30
Example (Branch): For Branches, the name and notes can be edited.
Figure 31
PHM1728R
PHM1729R

© Copyright, Alliance Laundry Systems LLC – DO NOT COPY or TRANSMIT26 12-08-278R11
PC Application (continued)
Manual Machine Entry (Vended Software Only)Manual machine entry provides a way to add machines to the tree view manually, without the use of a PDA.
Manually Entering a Machine1. In the tree view, click the location into which you would like to manually enter a machine.2. Click New Manual Entry Machine. The New manual entry machine window opens.3. In the Name: textbox, enter the name of the machine.4. In the Machine information section, enter the machine’s serial number, model and machine
type. Also specify if you would like the machine to use cumulative processing or not.5. In the Prices section, set the cycle, coin and start pulse values.6. In the Counters section, enter information into the necessary textboxes.7. Click the OK button.8. The machine is added under the location that was selected in the tree view.
Adding a Manual Entry Collection1. In the tree view, click the location that contains the manual entry machine into which you
would like to add a manual entry collection.2. In the location window, right-click the desired machine.3. From the pop-up window, click Add Manual Entry Collection.... The Add new manual entry
collection window opens.4. In the Counters section, enter information into the necessary textboxes.5. Click the OK button.

© Copyright, Alliance Laundry Systems LLC – DO NOT COPY or TRANSMIT12-08-278R11 27
PC Application (continued)
My Presets
A preset includes information such as pricing, cycles and machine configuration.
Adding a Preset1. In the tree view, click My Presets. 2. Under the New Preset information menu, select the type of preset.
The list of presets will vary depending on your version of the software.
Figure 32 The New... preset window opens.
3. In the Name: textbox, enter the name of the Preset.4. Click the OK button.
PHM1730R

© Copyright, Alliance Laundry Systems LLC – DO NOT COPY or TRANSMIT28 12-08-278R11
PC Application (continued)
Editing a Preset1. In the tree view structure, click My Presets. 2. From the list of presets, right-click the preset to be edited. From the pop-up menu, click Edit
Preset.... The Edit...preset “...” window opens.
Figure 33 3. Edit the preset.
The editable items under each programming tab vary by type of preset.
4. To close the Edit...preset “...” window, click the OK button (to save the changes) or the Cancel button.
My PDAs
My PDAs provides a detailed list of the PDAs that have communicated with the PC. This list includes PDA serial numbers as well as information about the last user of the PDA and shows when the information from the PDA was last downloaded to the PC.
Viewing My PDAs1. Under the Tools menu, click Options.... The Options window opens.2. Under the Application heading, click the Enable PDA tracking checkbox.3. To close the Options window, click OK. My PDAs is displayed in the tree view.
PHM1731R

© Copyright, Alliance Laundry Systems LLC – DO NOT COPY or TRANSMIT12-08-278R11 29
PC Application (continued)
My User-Defined Types
If option does not appear on your list, go to Tools > Options and place a check mark in the box for that option. Select OK to save.
My User-Defined Types can be used to add additional Machine Types.
Adding Machine Types1. To add an additional machine type, in the tree view, under My User-Defined Types, click the item
you would like to add.2. Click New ... Type. A New ... Type window opens.3. Fill in the desired information.4. Click the OK button to close the window and save the changes or the Cancel button to close the
window without saving the changes.
Editing Machine Types1. To edit a machine type, in the tree view, under My User-Defined Types, click the item you would
like to edit.2. In the ...Types window, right-click the user-defined type you would like to edit. A pop-up window
opens.3. Click Edit ... Type.... The Edit ... type ‘...’ window opens.4. Edit the information as needed.5. Click the OK button to close the window and save the changes or the Cancel button to close the
window without saving the changes.
Assigning a User-Defined Type to a Machine1. In the tree view, click the location that contains the desired machine.2. In the location window, right-click the desired machine.3. From the pop-up menu, mouse-over User-defined type.4. From the sub pop-up menu, click the user-defined type you would like to assign to the machine.

© Copyright, Alliance Laundry Systems LLC – DO NOT COPY or TRANSMIT30 12-08-278R11
PC Application (continued)
Infrared Communication
If option does not appear on your list, go to Tools > Options and place a check mark in the box for that option. Select OK to save.
To communicate between the PC and the machine’s control make sure the USB device is connected to the PC and select an option from the Infrared menu.
Collect Machine Data
Collect data from the machine.
After communicating with a new machine for the first time, the machine is added to “Unknown Location.” The machine must then be placed into the correct location.
Collect Machine Programming
Collect programming information from the machine.
Program Machine
Download, edit and upload presets to the machine.
Rapid Advance
Rapid advance to a step within a cycle.
Start Machine (Rapid Advance)*
Rapid advance to the beginning of a cycle.
Stop Machine (Rapid Advance)*
Rapid advance to the end of a cycle.
Advance to Ready Mode
Set the control back to available.
Clear Partial Vend*
If a partial vend has been entered, clear it from the control.
Pause Washer-Extractor Cycle*
Pause a cycle in progress.
Program Out of Order Mode
Change the machine display to show out of order.
Change Machine Serial Number...
Change the machine serial number stored on the machine’s control.
*Only applicable to Vended Software.

© Copyright, Alliance Laundry Systems LLC – DO NOT COPY or TRANSMIT12-08-278R11 31
PC Application (continued)
Change Machine Model Number...
Change the model number stored on the machine’s control.
Change Dryer/Tumbler Type**
Enter the capacity or pocket identification (i.e., upper or lower) into the machine’s control.
Manual Programming
Enable or disable manual programming of the machine’s control.
Security Code
Enable or disable the security code on the machine.
Synchronize Machine Clock
Change the machine’s date and time to match the PC’s date and time.
NOTE: Machine’s factory default time is set to Central Time.
Reset to Factory Defaults
Reset the machine’s control to the factory defaults.
Run Production Test
View information about the machine’s control and test some of the machine’s components.
Water Leak Detection Test*
Test for a water leak in the machine’s drain.
No Idle Mode Time-Out
Enable or disable display time-out during idle mode.
ToolsItems under the Tools menu include the following:
Export
Save branches, locations, machine data and presets as a transfer file (.ctf).
Presets can also be exported individually by right-clicking one or more presets and selecting Export Preset.
Import
Load branches, locations, machine data and presets from a transfer file (.ctf).
Options
Change the PC software’s settings, custom default presets and updates.*Only applicable for Washer-Extractor.**Only applicable for Dryer/Tumbler.

© Copyright, Alliance Laundry Systems LLC – DO NOT COPY or TRANSMIT32 12-08-278R11
PC Application (continued)
Receiving Information from the PDA
Before installing the Software onto a PDA, make sure Windows Mobile Device Center has been installed onto the PC and that the PDA is connected to the PC.
1. Make sure the PDA is connected to the PC.2. Under the PDA menu, click Receive data from PDA....3. Information is sent from the PDA to the PC and is displayed in the My Machines structure.
Sending Information to the PDA
Before installing the Software onto a PDA, make sure Windows Mobile Device Center has been installed onto the PC and that the PDA is connected to the PC.
1. Make sure the PDA is connected to the PC.2. Under the PDA menu, click Send data to PDA....3. Choose the information to send to the PDA.4. Information is sent from the PC to the PDA.
Reports MenuThe Reports Menu contains 5 report groups, which are as follows:
NOTE: Depending on the software version, some reports or groups of reports may not available.
General ReportsIncludes reports related to machine listing, security, location and presets.
• Machine Listing for “My Machines”• Machine Setup for “My Machines”• Machine Fill Time for “My Machines”• Machine Drain time for “My Machines”• Machine Last Programmed for “My Machines”• Location Listings for “My Machines”• Preset Listing• PDA Listing• Machine Type Listing
© Copyright, Alliance Laundry Systems LLC – DO NOT COPY or TRANSMIT12-08-278R11 33
PC Application (continued)
Audit ReportsIncludes reports detailing the operation, productivity, vending and security of the item highlighted in the tree view.
• Audit Operation for “My Machines”• Audit Productivity for “My Machines”• Audit Common Diagnostic for “My Machines”*• Audit Error Diagnostic for “My Machines”• Audit Total Vending for “My Machines”*• Audit Detailed Vending for “My Machines”*• Audit Additional Vending for “My Machines”*• Audit Additional Cycle for “My Machines”• Audit Average Vend for “My Machines”*• Audit Turns for “My Machines”*• Audit Special Vend for “My Machines”*• Audit Security for “My Machines”*
Lifetime ReportsOffers reports summarizing the operation and error diagnostics over the lifetime of the item highlighted in the tree view.
• Lifetime Operation for “My Machines”• Lifetime Error Diagnostic for “My Machines”
Pricing Reports*
Machine programming must be downloaded to print reports.
Displays the pricing information for every cycle on every machine.
• Pricing Detailed for “My Machines”• Pricing Overview for “My Machines”• Pricing Change for “My Machines”
Water Usage Reports
Machine programming must be downloaded to print reports.
Lists the approximate amount of water each machine uses per cycle.
• Water Usage Detailed for “My Machines”• Water Usage Overview for “My Machines”
NOTE: Actual water usage may vary based on load size and type.
*Only applicable to Vended Software.

© Copyright, Alliance Laundry Systems LLC – DO NOT COPY or TRANSMIT34 12-08-278R11
PC Application (continued)
Help MenuThe Help Menu includes the following:
User InstructionsUser Instructions... is a link to a PDF of these user instructions.
Check for update
Check for and download the latest software updates
What’s new
View the revisions made to each software version
AboutClick to open a window that shows the software’s version number.
Start Menu Applications
Elements of the PC application software (e.g., database setup, database backup and the user instructions) can be accessed through the PC’s Start menu.
• Database Setup: Create or update a database by entering the server and database name.• Database Backup: Allows the database to be backed up or restored.• User Instructions: Provides a PDF of these user instructions.

© Copyright, Alliance Laundry Systems LLC – DO NOT COPY or TRANSMIT12-08-278R11 35
PDA Application Installation
Using Sync Center
NOTE: Before installing the Software onto a PDA, make sure that a new sync partnership is set up in Sync Center.
1. Turn on PDA and plug into PC.2. Open the control panel and click Sync Center.3. On the left menu, select Set Up new sync partnerships.4. Select the name of PDA in list of available sync partnerships.5. Double-click on your device.6. Select either Connect without setting up your device or Set up your device.
NOTE: Once setup is complete, your PDA will sync automatically every time it is connected to the PC.
7. Select Sync.
Before installing the Software onto a PDA, make sure Windows Mobile Device Center has been installed onto the PC and that the PDA is connected to the PC.
Installing the PDA Application1. Open the PC Application by double-clicking the icon on your PC’s desktop or by selecting the
program from your PC’s Start menu.2. Under the PDA menu, click Install PDA Application.3. Follow the on-screen instructions to install the PDA Application.
If PDA menu is not present, select Tools/Options on Application Tab and check Show PDA Menu Items.
Updating the PDA Application
1. Update the PC Application as explained in the Updating the PC Application section.2. Start the PC Software by double-clicking the shortcut on the PC’s desktop.3. Under the PDA menu, click Install PDA Application....
c. Skip steps 1 through 3d. Complete Step 4: Install Software Applicatione. Complete Step 5: Transfer Software Keyf. Complete Step 6: Transfer Application Data to PDA

© Copyright, Alliance Laundry Systems LLC – DO NOT COPY or TRANSMIT36 12-08-278R11
PDA Application
Opening the PDA Application
1. From the Start menu, press Programs.2. From the Programs screen, select the program.
Collecting Information from the Machine with the PDA
1. From the home screen, press Collect. The Collection Options screen appears.2. Press Collect Machine Audit. The Collect Machine screen appears.3. Aim the PDA at the infrared communication window on the machine’s control. Press OK. The
machine’s data is uploaded from the machine’s control to the PDA. The My Machine screen is displayed if the machine has not been placed into a valid location.
Assigning New Machines to a Location1. The new machine will appear in Unknown Location.2. Create a new location if needed or use an existing location. Refer to Adding a Branch or Location
in the PC Application section.3. Press and hold the machine’s serial number on the screen. A pop-up window will appear.4. Select Cut and then press and hold the new location.5. Select Paste to put it into the new location.6. Close My Machines window.7. Continue collecting from other machines. All the machines that are collected that don’t have a
location will be automatically moved to this new location.8. To exit the auto location function, close the collection window.
Viewing My Machines1. From the home screen, press Collect. The Collection Options screen appears.2. Press My Machines. The My Machine screen appears. Refer to the Understanding the My
Machines Structure section in this guide.
Press and hold down on a machine until menu appears. Press View Audit to see audit data from the last collection, if available.
3. Press the Close button.

© Copyright, Alliance Laundry Systems LLC – DO NOT COPY or TRANSMIT12-08-278R11 37
PDA Application (Continued)
Saving a Machine’s Programming1. From the home screen, press Collect. The Collection Options screen appears.2. Press Save Machine Programming. The Communications screen appears.3. Aim the PDA at the infrared communication window on the machine’s control. Press OK. The
machine’s data is uploaded from the machine’s control to the PDA. The Collection Options screen is displayed.
Manually Entering a Machine’s Audit Data1. From the home screen, press Collect. The Collection Options screen appears.2. Press Manual Entry. The Select Machine screen appears.3. To add the programming for a new machine, press the New Machine button. The Machine
Information screen appears.4. Enter the machine’s serial number, model number and select it’s machine type. Press the
Counters tab to manually enter the machine’s counters or the Prices tab to change the machine’s vend, coin or start pulse values.
5. To save the machine information, press Save. The Collection Options screen appears.
The total counter values can only be viewed by sending the data to the PC.
Programming the Machine
1. From the home screen, press Program. The Programming Options screen appears.
Loading Machine Cycles
1. To upload and edit cycles from the machine, from the Programming Options menu, press Load From Machine. The Communications screen appears.
2. Aim the PDA at the infrared communication window on the machine’s control. Press OK. The Programming Options screen appears with a note at the bottom that states “... Programming Loaded”.
Loading Preset Cycles
1. To load preset cycles, from the Programming Options menu, press Load Preset.2. Select the type of preset to be loaded. Press OK.
Creating a New Preset
1. To create a new preset, from the File menu, press New Preset.2. To edit or save the preset, press Edit Machine Programming (see the Editing
Cycles section).3. To save the new preset to the database, under the File menu, press Save.

© Copyright, Alliance Laundry Systems LLC – DO NOT COPY or TRANSMIT38 12-08-278R11
PDA Application (Continued)
Editing Cycles1. To edit the cycles, from the Programming Options menu, press Edit Machine Programming.
The Programming screen appears.2. From the Programming screen, press Cycles. The Edit Cycles screen is displayed. Some models
list cycles as soon as Edit Machine Programming is selected. Press cycle that needs to be updated.3. From the cycle type drop-down lists, select the cycle type to be edited. Press and hold down on
cycle display’s menu to show water usage data or to copy cycle. Cycle can then be pasted to any other cycle.
4. From the stage drop-down list, select the stage to be edited.5. Edit the cycle’s stage.
The available programming tabs will vary by machine type.
6. To exit to Edit Cycles screen, press Save.
Editing Pricing (Only Available For Vended Products)1. To edit the cycle’s pricing, from the Programming Options menu, press Edit Machine
Programming. The Programing screen appears.2. From the Programming screen, press Pricing. The Pricing screen is displayed.3. Edit the pricing information.
The available pricing tabs will vary by machine type.
4. To exit to Pricing screen, press SAVE.
Editing Globals1. To edit the global settings, from the Programming Options menu, press Edit Machine
Programming. The Programing screen appears.2. From the Programming screen, press Globals. The Global Settings screen is displayed.3. Edit the global settings.
The available tabs will vary by machine type.
4. To exit to Global Settings screen, press SAVE.
Downloading to Machine1. To download edited cycles from the PDA to the machine, from the Programming Options menu,
press Download to Machine. The Communications screen appears.2. Aim the PDA at the infrared communication window on the machine’s control. Press OK.

© Copyright, Alliance Laundry Systems LLC – DO NOT COPY or TRANSMIT12-08-278R11 39
PDA Application (Continued)
Viewing Audit Data
1. From the home screen, press Machine Details. The Machine Details screen appears.2. From the Machine Details menu, press View Audit Data. The Communications screen appears.3. Aim the PDA at the infrared communication window on the machine’s control. Press OK. The
View Machine Data screen is displayed.
Audit Data Press the Select Audit Data tab. From the Select Audit Data drop-down list, select a report.
For example, to view the Cycle Related Audit report, from the Select Audit Data drop-down list, select Cycle Related Audit. The Cycle Related Audit report is displayed.
Machine Info.Press the Machine Info. tab. The machine’s model number, serial number, installation date, control serial number, control version number, output board number, node number and trim value are displayed.
Mach Config TabPress the Mach Config tab. The machine’s control configuration information is displayed.
4. To save the machine’s data into a text file, press Create File. The file is stored in My Documents\... Files.
Viewing Machine Configuration1. From the Machine Details menu, press View Machine Config. The Communications screen
appears.2. Aim the PDA at the infrared communication window on the machine’s control. Press OK. The
View Machine Data screen is displayed with the Mach Config tab selected. The machine’s control configuration information is displayed.
3. To save the control configuration information into a text file, press Create File.
Viewing Machine Status1. From the Machine Details menu, press View Machine Status. The Communications screen
appears.2. Aim the PDA at the infrared communication window on the machine’s control. Press OK. The
View Machine Data screen is displayed with the Mach Status tab selected. The status of the cycle in process on the machine is displayed.
3. To save the control status information into a text file, press Create File.

© Copyright, Alliance Laundry Systems LLC – DO NOT COPY or TRANSMIT40 12-08-278R11
PDA Application (Continued)
Maintenance
1. From the home screen, press Maintenance. The Maintenance screen appears.2. From the Maintenance Options menu, select an item. The menu includes items related to machine
setup and troubleshooting.
Setup Configuration
1. From the home screen, press Help. The Help menu appears.2. Press Setup Config. The Configuration Setup screen appears.
g. To change how the PDA uses the infared port, from the Comm Port drop-down list, select a different port OR press Scan for Port to have the PDA select a port.
h. To change speed at which the PDA communicates with the control, from the Baud Rate drop-down list, select a different option.
i. Press the Misc. tab to deselect “Show Unknown Location Machines” or “Enforce Strict Programming Rules”.
j. To change the colors of the buttons, press the Button Colors or Selected Color tabs.Press the up and down arrow buttons to modify the colors or press Select Defaults to change the colors back to the default.
k. To save the configuration setup changes, press Save.3. To view information about the last import or to manually import data from another device, press
Import Log.4. To view information about the last export or to manually export data to another device or for
emailing, press Export Log.

© Copyright, Alliance Laundry Systems LLC – DO NOT COPY or TRANSMIT12-08-278R11 41
Machine Programming – Getting Started
1. If the Infrared menu does not appear, enable it. a. From the Tools menu, click Options... Refer to Figure 34. The Options window appears.
Figure 34 b. From the Options window, under the Application tab, click the Show “Infrared” menu items
checkbox. Refer to Figure 35.
Figure 35 c. In the Options window, click the OK button. The Infrared menu appears.
2. From the Infrared menu, click Program Machine... Refer to Figure 36. The Filter preset list window appears.
Figure 36
CHM1560R
CHM1561R
CHM1562R

© Copyright, Alliance Laundry Systems LLC – DO NOT COPY or TRANSMIT42 12-08-278R11
Machine Programming – Getting Started (continued)
3. Make sure the USB device is connected to the PC.4. Aim the USB device’s box at the control’s infrared window and click Filter in the Filter preset
list window. Refer to Figure 37. The Machine programming through IR window appears and displays the control type and available prsets for the control.
Figure 37 5. If necessary, create a preset.
a. Create a new preset or download the control’s preset.i. To create a new preset, in the Machine programming through IR window, from the
New Preset menu, click the machine type’s preset. Refer to Figure 38. The preset window is displayed.
Figure 38 ii. To download the control’s preset, in the Machine programming through IR window,
from the New Preset menu, click Load Preset From Machine... Refer to Figure 38. The preset window is displayed.
CHM1581R
CHM1563R
New Machine Type’s Preset
Load Preset From Machine...

© Copyright, Alliance Laundry Systems LLC – DO NOT COPY or TRANSMIT12-08-278R11 43
Machine Programming – Getting Started (continued)
b. Edit the preset as needed.c. Click the OK button.
6. To send a preset to the control, in the Machine programming through IR window...a. Make sure the Send cycles checkbox is checked.b. Click the preset to be sent to the control.c. Aim the USB device’s box at the control’s infrared window and click the Send button.

© Copyright, Alliance Laundry Systems LLC – DO NOT COPY or TRANSMIT44 12-08-278R11
Technical Support
If service is required, contact the nearest Authorized Service Center. To find the nearest service center, visit us online at www.alliancelaundry.com.
If you are unable to locate an authorized service center contact:
Alliance Laundry Systems LLCShepard StreetP.O. Box 990Ripon, Wisconsin 54971-0990www.alliancelaundry.comPhone: +1 (920) 748-3121
Please have the following information available when you call.
Date Purchased _______________________________Software Name _______________________________Software Version _______________________________PC Operating System _______________________________PDA Operating System _______________________________