electriflame vr 3 sided electric fire
TRANSCRIPT

Page 1
Electriflame VR 3 Sided Electric Fire
Model No’s: Electriflame VR 750 3 Sided - B-1006977 - CEVR75RE Electriflame VR 1100 3 Sided - B-1006978 - CEVR11RE Electriflame VR 1400 3 Sided - B-1006979 - CEVR14RE
Packing Checklist
Electric Fire Remote Control Handset* Log Set Ember Ice Set Instruction Manual
*THIS PRODUCT REQUIRES 2 X AAA BATTERIES FOR USE IN THE HANDSET (NOT SUPPLIED)
IMPORTANT
PLEASE READ THESE INSTRUCTIONS CAREFULLY BEFORE INSTALLATION AND USE OF THIS ELECTRIC FIRE AND RETAIN FOR
FUTURE REFERENCE.
Children of less than 3 years should be kept away unless continuously supervised. Children aged from 3 years and less than 8 years shall only switch on/off the appliance provided that it has been placed or installed in its intended normal operating position and they have been given supervision or instruction concerning use of the appliance in a safe way and understand the hazards involved. Children aged from 3 years and less than 8 years shall not plug in, regulate and clean the appliance or perform user maintenance.
This appliance is not intended for use by persons (including children) with reduced physical, sensory or learning disabilities, or lack of experience and knowledge, unless given supervision or instruction concerning use of the appliance by a person responsible for their safety.
If the supply cord is damaged, it must be replaced by the manufacturer, its service agent or similarly
qualified persons in order to avoid a hazard.

Page 2
IMPORTANT SAFETY ADVICE
WHEN USING AN ELECTRICAL APPLIANCE, BASIC PRECAUTIONS SHOULD ALWAYS BE FOLLOWED TO REDUCE THE RISK OF FIRE, ELECTRIC SHOCK AND INJURY TO PERSONS, INCLUDING THE FOLLOWING IMPORTANT SAFETY ADVICE. DO NOT cover the heater, to avoid overheating of the product. DO NOT leave the heater unattended while it is in use. Always turn the appliance to the OFF position and switch off at the mains socket when not in use. DO NOT leave children unsupervised whilst the appliance is switched on. DO NOT operate this appliance with a damaged cord or plug, or after the appliance malfunctions, has been dropped or damaged in any way. Contact the manufacturer. DO NOT install a timer switch to operate the appliance. DO NOT use this appliance as a freestanding appliance. It must always be securely fixed in accordance with the manufacturer’s instructions. DO NOT insert or allow objects to enter any ventilation or exhaust openings on the appliance. To prevent a possible fire do not block air intakes or exhaust openings in any manner. DO NOT place this appliance near flammable materials, surfaces or substances, as there may be a risk of fire. Keep flammable materials, surfaces or substances at least 1 metre away from the front of the product. DO NOT switch on the fire if volatile vapours are present in the room. DO NOT use this appliance in any areas where petrol, paint or other flammable liquids are stored e.g. a garage or a workshop as the appliance contains components capable of producing a spark. DO NOT touch any hot surfaces such as the heater vent when the heater is in use to avoid burns and personal injury. DO NOT install the heater immediately below an electrical socket outlet DO NOT use outdoors. CAUTION- Some parts of this product can become hot during use and cause burns. Particular attention has to be given where children and vulnerable people are present. This appliance is for household use only

Page 3
Product Technical Data Sheet Supplier Name / Trademark CELSI
Supplier Model Identifier B-1006977, B-1006978, B-1006979 ELECTRIFLAME VR 3 SIDED 750, 1100 & 1400
Voltage 230v AC 50HZ
Fuse 13 Amp
Nominal Heat Output (Measured) 2.0 kW
Minimum Heat Output (Indicative) 1.0 kW
Maximum Continuous Heat Output 2.0 kW
Type of heat Output / Room Temperature Control With electronic room temperature
control plus week timer
Other Control Options With adaptive start control
Manufacturers Name and Address BFM Europe Ltd. Gordon Banks Drive, Trentham Lakes, Stoke-on-Trent, Staffs, ST4 4TJ
Tel: 01782 339000
Fire Dimensions B-1006977 B-1006978 B-1006979 Height 620mm 620mm 620mm Depth 330mm 330mm 330mm Width 780mm 1130mm 1430mm
IMPORTANT NOTE : IF INSTALLING THIS PRODUCT AS A 2 SIDED MODEL (L/H OR R/H) THEN PLEASE CONTACT THE MANUFACTURER FOR A SET OF REPLACEMENT TRANSIT BRACKETS. QUOTE PART NUMBERS 1167-1015639P (L/H) & 11671015642P (R/H) AS REQUIRED.

Page 4
Unpacking Remove and discard the plastic bag. Be responsible when handling the packing materials. Keep the original packaging for future transportation and/or storage. Check all accessories are removed from the packaging before storing it away for future use. KEEP PLASTIC BAGS AWAY FROM CHILDREN!
Unpacking log set and accessories
Choosing a suitable location This electric fire is designed to be fitted into a studded wall or supplied suite. The appliance must be kept away from any source of damp or moist conditions. Avoid any close contact with water.
Remove transit side panels.
4 screws on each.
Remove clamp from top of
glass panel by undoing 3
screws.
Carefully tilt glass panel forward so
top edge is clear of chassis and slide
upwards enough to clear location at
the bottom of the fire. You will now
have access to log set and
accessories.
Glass sucker clamp should
be used to reinstall the glass
panel once the logs have
been arranged.
Page 5
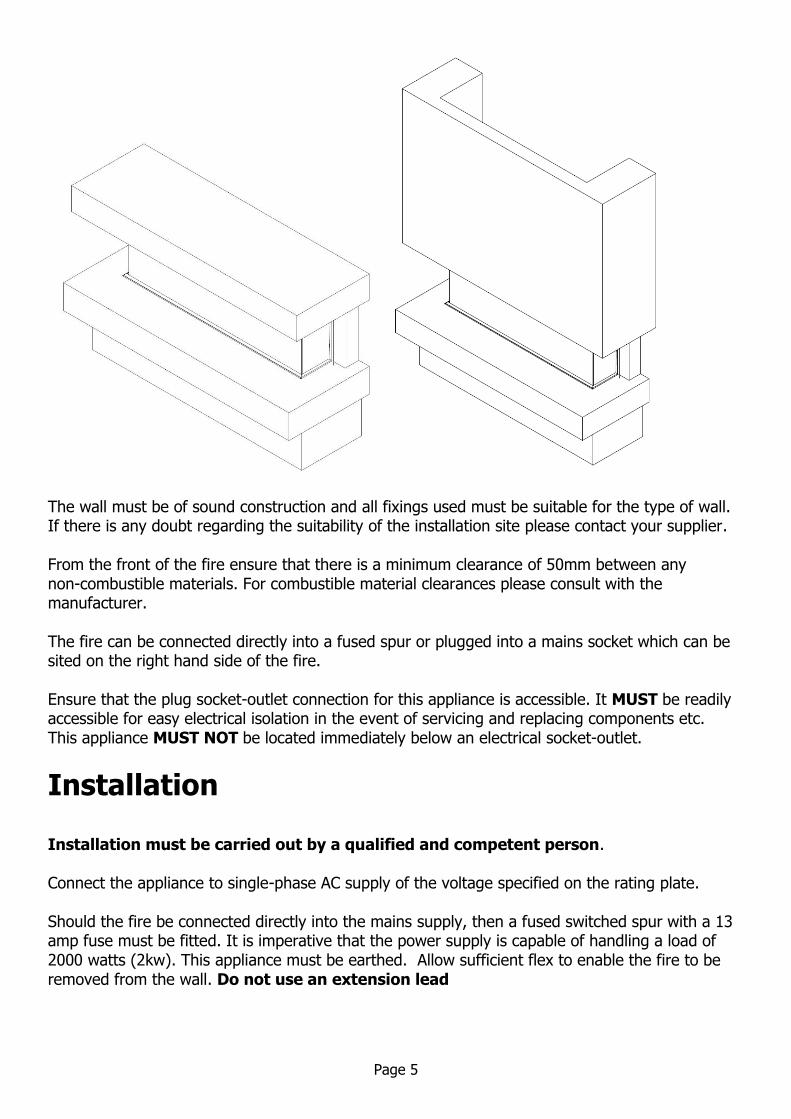
The wall must be of sound construction and all fixings used must be suitable for the type of wall. If there is any doubt regarding the suitability of the installation site please contact your supplier. From the front of the fire ensure that there is a minimum clearance of 50mm between any non-combustible materials. For combustible material clearances please consult with the manufacturer. The fire can be connected directly into a fused spur or plugged into a mains socket which can be sited on the right hand side of the fire. Ensure that the plug socket-outlet connection for this appliance is accessible. It MUST be readily accessible for easy electrical isolation in the event of servicing and replacing components etc. This appliance MUST NOT be located immediately below an electrical socket-outlet.
Installation
Installation must be carried out by a qualified and competent person.
Connect the appliance to single-phase AC supply of the voltage specified on the rating plate. Should the fire be connected directly into the mains supply, then a fused switched spur with a 13 amp fuse must be fitted. It is imperative that the power supply is capable of handling a load of 2000 watts (2kw). This appliance must be earthed. Allow sufficient flex to enable the fire to be removed from the wall. Do not use an extension lead

Page 6
Always ensure that all electrical work complies with the relevant Building Regulations and the Electrical Code of Practice. All electrical work should be carried out by a qualified electrician.
Wall Mounting Using a screwdriver remove the two screws that secure the wall mounting bracket to the top of the appliance and remove the wall mounting bracket and keep in a safe place Position the mounting bracket where the appliance is to be installed on the wall and ensure that the bracket is level. Mark the holes on the wall mounting bracket as shown below.
Fix bracket to wall using suitable size screws and wall plugs appropriate for the walls construction. Note heavy duty wall anchors or equivalent should be used when installing onto hollow/studded walls.
Hang the appliance onto the hooks at the bottom of the bracket and push the top of the appliance into the mounting bracket. Now fix the appliance to the mounting bracket by refitting the two screws which were removed at the beginning.

Page 7
Laying the Log & Embers Whilst supporting the front glass to prevent it from falling forward, remove the screws holding the glass top trim in place and then carefully remove the glass and put in a safe place. Take care when unpacking the Logs and the Ember Ice crystals supplied with your fire. Scatter the Ember Ice over the fire bed making sure the black and clear embers are mixed evenly. Place the logs onto the Ember ice crystals to give the desired effect. Refit the glass panel using the trim & screws previously removed.
1
2
3

Page 8
Operating the Fire
Manual Control This appliance can be operated manually using the controls situated on the right-hand underside of the upper canopy or by the included remote-control handset.
ON / OFF Power Switch This switch is used to turn the mains supply to the appliance ON or OFF. When the switch is in the ON position an indicator light located in the centre of the screen will glow amber to indicate the appliance is switched on and in standby mode. This needs to be in the ON position for both manual and remote operation. STANDBY Used to switch appliance ON or OFF into standby mode. FLAME Pressing this button will cycle through the 4 different flame brightness levels. HEATER Use this button to select Low Heat, High Heat or heater OFF When LOW heat is selected the indicator light will glow amber for 10 seconds. When HIGH heat is selected the indicator light will glow red for 10 seconds. Please note the heater will only operate when the room temperature is below the temperature set on the handset, which can be adjusted using the Temperature arrows on the Smart Control Panel. When the heater switches off the fan will still continue to run for a short period to allow the appliance to cool down. BLUE This button allows an additional blue flame effect to be switched on and off.

Page 9
Remote Control
Remove the battery / control panel cover by sliding completely down and insert 2 x AAA batteries ensuring the batteries are fitted correctly. Refit the cover by sliding back up to the original position. Please ensure old batteries are disposed of responsibly by contacting your local authority about recycling schemes. Ensure that the ON / OFF Power Switch on the fire is in the ON position. Point the remote-control handset directly towards the fire and press the appropriate button to operate the fire. Sliding the door down on the remote control will reveal the Smart Control panel which offers additional functions. Otherwise using the basic remote buttons will operate the fire in the same way as the manual control buttons with the exception of the blue flame function which can only be operated manually on the fire.

Page 10
Smart Control functions The Smart Control panel reveals additional buttons to allow the following functions
Set the Time of day Thermostatic temperature adjustment from 16 to 30°C Set 7-day timer with up to 3 programmable periods per day
Turn Adaptive Control On or Off Turn Off and clear timer settings
Setting the Time
1. Press the SYNC button, which will start the day cursor to blink. Using the time arrow buttons set to the current day e.g. Monday – 1, Tuesday – 2, Wednesday – 3 etc. Press SELECT to confirm the required day.
2. The hour setting will now be blinking, adjust using the time arrow buttons to the desired hour and confirm using the SELECT button.
3. The minute setting will now be blinking, adjust using the time arrow buttons to the desired minutes and confirm using the SELECT button.
Adjusting the desired temperature
Whilst the fire is switched on, use the Temperature Arrows to set the desired room temperature. A confirmation beep will be heard from the fire. If the room is already warmer than the temperature set then the heater will switch off until the thermostatic sensor detects a fall in temperature.
Setting the Timer function The timer function allows up to 3 timers to be programmed for use over a 7 day period.
1. Press the TIMER button to display the first timer, and then press the SELECT button to adjust Timer 1 programme.
Set Time ON 2. The hour setting will now be blinking, adjust using the time arrow buttons to the desired
hour to switch on the fire and confirm using the SELECT button. 3. The minute setting will now be blinking, adjust using the time arrow buttons to the desired
minutes to switch on the fire and confirm using the SELECT button. Set Days 4. The day cursor will now be blinking, use the time arrow buttons to highlight the required
day and press SET, additional days can be added using the time arrows and SET buttons. If you add a day in error, select the day and press the CANCEL button to unselect. Only when you have set all the days you require for the timer press SELECT to confirm.
Set Time OFF (this must be at least 30 minutes after the ON time) 5. The hour setting will now be blinking, adjust using the time arrow buttons to the desired
hour to switch off the fire and confirm using the SELECT button. 6. The minute setting will now be blinking, adjust using the time arrow buttons to the desired
minutes to switch off the fire and confirm using the SELECT button. 7. A confirmation beep will be heard from the fire to confirm Timer 1 programme is now set.
Page 11
To set Timer 2 & 3 or alter timer programme. 8. Repeatedly pressing the TIMER button will cycle through the 3 available timer programmes
displaying the set parameters. To change or set an additional timer programme choose the Timer number required and press the SELECT button.
9. Set the timer programme as before following steps 2 to 7. Switch Off and clear Timers When the timer icon is displayed on the remote-control handset the timer function is active. To switch off the timer function and clear all timer programmes press the TIMER OFF button. A confirmation beep will be heard from the fire. Adaptive Control Adaptive control works in conjunction with the timer programmes. When Adaptive Control is turned ON the fire monitors the room temperature in relation to the selected target temperature. If the room temperature is sufficiently lower that the selected temperature the Adaptive Control facility will instruct the fire to switch on up to 10 minutes earlier than the set time to ensure the room is at the required temperature at the set time.
IMPORTANT NOTE: If a confirmation beep is not heard after setting the timers or
adaptive control then turn the fire ON and OFF using the remote to ensure that the
latest settings have been sent to the fire. All settings will be lost from the fire if
disconnected from the mains or switched off at the fire power switch. Again, using the
remote to turn the fire ON and OFF will ensure the settings are sent to the fire.

Page 12
IMPORTANT This appliance is fitted with an automatic thermal cut-out safety feature to reduce the risk of damage to appliance due to overheating. If the appliance overheats the heater element will cut out whilst the fan will still continue to run to allow the fire to cool down sufficiently. Once the appliance has cooled down the thermal cut-out will reset itself and switch the heater back on. If the problem persists switch the appliance off and disconnect the power at the switch and plug socket. Check that the heater warm air outlets and the inlets are not obstructed (the outlets and inlets are situated on the underside of the upper canopy). If the fire is installed within a chimney ensure that the chimney is blocked off as any draught can cause this problem. If the heater is still not operating correctly disconnect the appliance and seek expert advice.
Maintenance Instructions
Always remove the plug from the socket-outlet and allow the heater to cool down before cleaning. User maintenance should only be carried out by a competent person. Light accumulated dust may be removed from the appliance with a soft dry cloth. The exterior surface of the appliance can be cleaned with a soft damp cloth (not dripping wet). Dry the exterior surface before operating the heater. Household glass cleaner can be used on the fire glass. WARNING! Do not immerse the heater in water. Do not use any cleaning chemicals such as detergents and abrasives. Do not allow the interior to get wet as this could create a hazard. In the event of malfunction contact the manufacturer, do not try to repair the heater yourself as this may result in a fire hazard or electric shock.
Environment
Do not dispose of electrical appliances as unsorted municipal waste. Use separate collection facilities. Contact your local government for information regarding the collection services available in your local area. If electrical appliances are disposed of in landfills or dumps hazardous substances can leak into the groundwater and get into the food chain, thus damaging your health and wellbeing. When replacing old appliances with new ones the retailer is legally obligated to take away your old appliance for disposal free of charge.

Page 13
Warranty Congratulations on the purchase of your electric fire. This fire by BFM Europe Ltd is guaranteed
for 5 years from the date of purchase against faulty materials or workmanship. Please note the 5
year guarantee comprises of 24 months of parts and labour with an extended 36 months of parts
only. If your appliance is found to be defective within 24 months from the date of purchase, we or
our authorized agent will repair the faulty component on site.
This warranty does not cover consumable items which have a limited lifespan. If a problem should occur, the nature of the problem together with the date of purchase and installer information should be immediately reported to the retailer that the appliance was purchased from. Proof of purchase will be required so the original invoice should be retained.
Issue 8
BFM Europe Ltd Gordon Banks Drive
Trentham Lakes Stoke-on-Trent
ST4 4TJ
Technical Queries: 01782 339039 Service Fault Enquiries: 01782 339008
1167-1010400