eft overview for australia and new zealand for the raiser ... · pdf filewhat is in this...
TRANSCRIPT

EFT Overview Guide for Australia and New Zealand

111109
©2009 Blackbaud, Inc. This publication, or any part thereof, may not be reproduced or transmitted in any form or by any means, electronic, or mechanical, including photocopying, recording, storage in an information retrieval system, or otherwise, without the prior written permission of Blackbaud, Inc.
The information in this manual has been carefully checked and is believed to be accurate. Blackbaud, Inc., assumes no responsibility for any inaccuracies, errors, or omissions in this manual. In no event will Blackbaud, Inc., be liable for direct, indirect, special, incidental, or consequential damages resulting from any defect or omission in this manual, even if advised of the possibility of damages.
In the interest of continuing product development, Blackbaud, Inc., reserves the right to make improvements in this manual and the products it describes at any time, without notice or obligation.
All Blackbaud product names appearing herein are trademarks or registered trademarks of Blackbaud, Inc.
All other products and company names mentioned herein are trademarks of their respective holder.
RE7-EFTOverviewAUS-111109

EFT Overview for Australia and New ZealandEFT OVERVIEW . . . . . . . . . . . . . . . . . . . . . . . . . . . . . . . . . . . . . 1
An Overview of EFT Processing . . . . . . . . . . . . . . . . . . . . . . . . . . . . . . . . . . . . . . . . . . 2Prepare for IATS/Ticketmaster . . . . . . . . . . . . . . . . . . . . . . . . . . . . . . . . . . . . . . . . . . . 2Configuration Settings . . . . . . . . . . . . . . . . . . . . . . . . . . . . . . . . . . . . . . . . . . . . . . . . . . 3Initialising the Blackbaud Payment Service . . . . . . . . . . . . . . . . . . . . . . . . . . . . . . . . . 8Automatically Generate Payments and Recurring Gifts in a Batch . . . . . . . . . . . . . 9Create EFT Transmission Files . . . . . . . . . . . . . . . . . . . . . . . . . . . . . . . . . . . . . . . . . . . 9Direct Debit Transmission Files . . . . . . . . . . . . . . . . . . . . . . . . . . . . . . . . . . . . . . . . . . 13Credit Card Transmission Files . . . . . . . . . . . . . . . . . . . . . . . . . . . . . . . . . . . . . . . . . . 19Commit a Batch . . . . . . . . . . . . . . . . . . . . . . . . . . . . . . . . . . . . . . . . . . . . . . . . . . . . . . . 19

What Is In This Guide?In the EFT Overview Guide for Australia and New Zealand, you learn about the process of electronic funds processing, including the tasks you need to accomplish before you even begin to use Electronic Funds Transfer. Topics covered in this brief guide include overviews of merchant account numbers and authorisation services such as IATS/Ticketmaster. You can also learn about the following:• “Automatically Generate Payments and Recurring Gifts in a Batch” on page 9• “Create EFT Transmission Files” on page 9• “Commit a Batch” on page 19
How Do I Use These Guides?
The Raiser’s Edge user guides contain examples, scenarios, procedures, graphics, and conceptual information. Side margins contain notes, tips, warnings, and space for you to write your own notes. To find help quickly and easily, you can access the Raiser’s Edge documentation from several places. User Guides. You can access PDF versions of the guides by selecting Help,
User Guides from the shell menu bar or by clicking Help on the Raiser’s Edge bar in the program. You can also access the guides on our Web site at www.blackbaud.com. From the menu bar, select Support, User Guides. In a PDF, page numbers in the Table of Contents, Index, and all cross-references are hyperlinks. For example, click the page number by any heading or procedure on a Table of Contents page to go directly to that page.
Help File. In addition to user guides, you can learn about The Raiser’s Edge by accessing the help file in the program. Select Help, The Raiser’s Edge Help Topics from the shell menu bar or press F1 on your keyboard from anywhere in the program. Narrow your search in the help file by enclosing your search in quotation marks on the Search tab. For example, instead of entering Load Defaults, enter “Load Defaults”. The help file searches for the complete phrase in quotes instead of individual words.
WE L C O M EIV
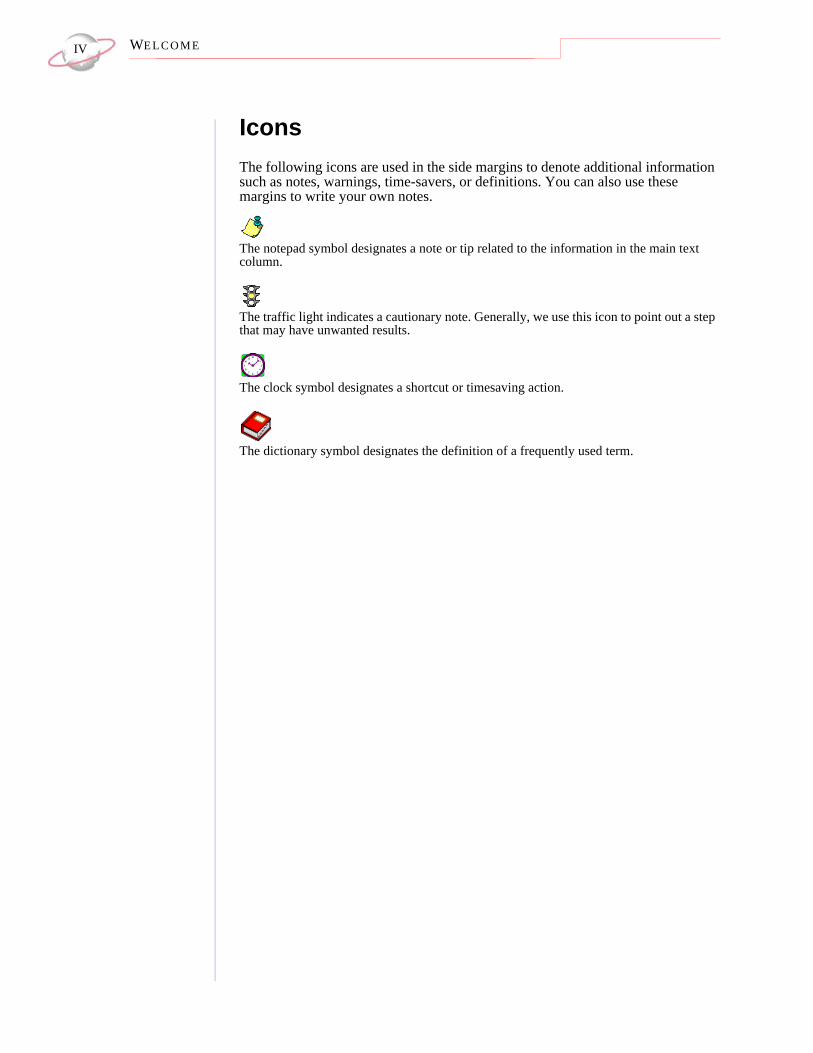
IconsThe following icons are used in the side margins to denote additional information such as notes, warnings, time-savers, or definitions. You can also use these margins to write your own notes.
The notepad symbol designates a note or tip related to the information in the main text column.
The traffic light indicates a cautionary note. Generally, we use this icon to point out a step that may have unwanted results.
The clock symbol designates a shortcut or timesaving action.
The dictionary symbol designates the definition of a frequently used term.
EFT Overview
Contents
An Overview of EFT Processing . . . . . . . . . . . . . . . . . . . . . . . . . . . . . . . . . . . .2Prepare for IATS/Ticketmaster . . . . . . . . . . . . . . . . . . . . . . . . . . . . . . . . . . . . .2Configuration Settings . . . . . . . . . . . . . . . . . . . . . . . . . . . . . . . . . . . . . . . . . . . . .3General . . . . . . . . . . . . . . . . . . . . . . . . . . . . . . . . . . . . . . . . . . . . . . . . . . . . . . . . . .3Financial Institutions . . . . . . . . . . . . . . . . . . . . . . . . . . . . . . . . . . . . . . . . . . . . . . .4Business Rules . . . . . . . . . . . . . . . . . . . . . . . . . . . . . . . . . . . . . . . . . . . . . . . . . . . .5Initialising the Blackbaud Payment Service . . . . . . . . . . . . . . . . . . . . . . . . . . .8Automatically Generate Payments and Recurring Gifts in a Batch . . . . . . . .9Create EFT Transmission Files . . . . . . . . . . . . . . . . . . . . . . . . . . . . . . . . . . . . .9Understand the Create Transmission File Screen for Australia . . . . . . . . . . . . . .10Understand the Create Transmission File Screen for New Zealand . . . . . . . . . .12Direct Debit Transmission Files . . . . . . . . . . . . . . . . . . . . . . . . . . . . . . . . . . . .13Direct Debit File Formats for Australia . . . . . . . . . . . . . . . . . . . . . . . . . . . . . . . .14
Descriptive Record . . . . . . . . . . . . . . . . . . . . . . . . . . . . . . . . . . . . . . . . . . . . .14Detail Record . . . . . . . . . . . . . . . . . . . . . . . . . . . . . . . . . . . . . . . . . . . . . . . . .15File Total Record . . . . . . . . . . . . . . . . . . . . . . . . . . . . . . . . . . . . . . . . . . . . . .16
Direct Debit File Formats for New Zealand . . . . . . . . . . . . . . . . . . . . . . . . . . . .16MTS Header Record . . . . . . . . . . . . . . . . . . . . . . . . . . . . . . . . . . . . . . . . . . . .17Transaction Record . . . . . . . . . . . . . . . . . . . . . . . . . . . . . . . . . . . . . . . . . . . . .17Control Record . . . . . . . . . . . . . . . . . . . . . . . . . . . . . . . . . . . . . . . . . . . . . . . .18
Credit Card Transmission Files . . . . . . . . . . . . . . . . . . . . . . . . . . . . . . . . . . . .19Commit a Batch . . . . . . . . . . . . . . . . . . . . . . . . . . . . . . . . . . . . . . . . . . . . . . . . .19
Procedures
Add a merchant account . . . . . . . . . . . . . . . . . . . . . . . . . . . . . . . . . . . . . . . . . . . .6

CH A PT E R 12
An Overview of EFT ProcessingWhen you receive gifts donated by direct debit or credit card, you can use an electronic funds transfer to process the transactions. Electronic funds transfer is a general banking system by which transactions, such as deposits or bill payments, are made electronically from a donor’s bank account or credit card to your bank account. Perhaps the most valuable donors to your organisation are the ones who donate on a regular basis – your regular supporters. With the optional module Electronic Funds Transfer, you can enable your donors to regularly contribute electronically to your organisation by direct debit from their bank accounts or by credit card. With Electronic Funds Transfer, you benefit from reduced paperwork and postage costs.When you use Electronic Funds Transfer, additional features are available in Batch so you can easily process your gifts with The Raiser’s Edge.• In Batch, with the Automatically Generate Transactions/Payments menu
option, you automatically generate payments and gift records for selected recurring gifts or pledges that require electronic processing through direct debit or credit card. You automatically generate these electronic payments through a gift batch. The program creates a payment entry for each eligible recurring gift transaction or pledge instalment due within the gift batch you use.
• In Batch, with the Create EFT Transmission Files menu option, you create direct debit transmission files to send to your organisation’s bank.
• In Batch, with the Create EFT Transmission Files menu option, you create credit card transmission files to process. To authorise and process credit cards in The Raiser’s Edge, you can use IATS/Ticketmaster or another third-party service provider.
• In Batch, you can track the acceptance or rejection code for transactions in a gift batch.
• In Batch, you can commit the gift batch.Now that you have a general understanding of what Electronic Funds Transfer can do, the rest of this document provides an overview of the electronic processing for credit cards and direct debits.
Prepare for IATS/TicketmasterTo authorise and process credit cards in The Raiser’s Edge, you can use IATS, owned by Ticketmaster. In Batch, you can create credit card transmission files to send to IATS/Ticketmaster for authorisation and processing. To create credit card transmission files in Batch, select Tools, Create EFT Transmission Files from the menu bar of a gift batch.To process your credit card gifts, you do not need to install additional software. You simply set up an account with IATS/Ticketmaster, set a few options in Configuration, and begin to create credit card transmission files in Batch.Before you begin to process credit cards, follow these tips to help you get started with IATS/Ticketmaster.
Internet access is required. The IATS/Ticketmaster website works best with Microsoft Internet Explorer. A modem or Internet access speed of 28.8 baud or better is recommended.

EFT OV E R V I E W 3
To set up an account, contact IATS/Ticketmaster. You can contact them by telephone on 001 604 682 8455 x 3138 or fax on 001 604 684 1715. IATS supplies you with its own merchant account numbers.Sign and return the IATS Merchant Account Programme Agreement by fax to 001 604 684 1715, along with a copy of a voided cheque for deposit information. IATS will send you a confirmation by fax that includes the necessary user code (login ID) and password to begin processing. IATS provides full merchant capability for all major debit and credit cards within 48 hours of receiving your signed agreement.Once you set up your account with IATS/Ticketmaster, on the Business Rules page of Configuration, set up your credit card authorisation service information. For information about how to set up your service information, see “Add a merchant account” on page 6.
Configuration SettingsWhen you have the optional module Electronic Funds Transfer, extra fields appear in Configuration so you can process your transmission files. To process your direct debit and credit card transactions using Electronic Funds Transfer, you must set specific options in The Raiser’s Edge. The next section provides a general description of the options you must set, the overall processing of electronic gifts, and the roles of the third parties involved. For detailed information and procedures regarding Electronic Funds Transfer, see the Electronic Funds Transfer (EFT) Guide.
GeneralOn the General page of Configuration, you can add information about your organisation. To access the General page, click General in Configuration.

CH A PT E R 14
To process credit card transactions in The Raiser’s Edge, you must set up an account with the Blackbaud Payment Service. To help you comply with the Payment Card Industry Data Security Standard (PCI DSS), The Raiser’s Edge uses this web service to securely store sensitive credit card information outside of your database. Under Blackbaud Payment Service Credentials, enter the user ID and password used to connect to your account with the Blackbaud Payment Service.
Financial InstitutionsOn the Financial Institutions page of Configuration, you can add bank information for your organisation and designate which banks or branches are sponsoring banks. On the New Bank/Branch screen, tick Sponsoring Bank to indicate that a bank or branch transfers funds electronically through direct debit. On the Financial Institutions page, you can also add constituent banks. To provide details about where money comes from, you can assign banks defined here to gift records or to constituent records as relationships. Also, new banks added from constituent records appear on the Financial Institutions page. To access the Financial Institutions page, click Financial Institutions in Configuration.
For detailed information about how to add, edit, and delete financial institutions from the Financial Institutions page, see the Financial Institutions section in the Configuration chapter of the Configuration & Security Guide. For information about how to add a bank from a constituent record, see the Constituent Data Entry Guide.

EFT OV E R V I E W 5
Business RulesOn the Business Rules page of Configuration, you set up your credit card authorisation service. From the tree view on the Business Rules page, select Batch options. In the Process credit cards through field, select IATS/Other.
From the tree view on the Business Rules page, select Merchant Accounts. Under Merchant accounts for authorising credit cards and ACH gifts, you can add information about your merchant accounts. You can add multiple accounts in which to designate your credit card payments. Each account you add appears in the Account field drop-down list on the Create Transmission Files screen in

CH A PT E R 16
Batch. Only the account description appears as a choice in the drop-down list, so be sure to add a specific description to identify the type of account. You use the Account field to select the account to which to apply the credit card payments in a specific transmission file. For information about how to add a merchant account to the Business Rules page, see “Add a merchant account” on page 6.
When you add account information in Configuration, all your accounts appear in the grid on the Business Rules page. To open and edit existing account information, select the account in the grid and click Open Account. After you add a merchant account in Configuration, you can begin to create transmission files in Batch. To create a transmission file, select Tools, Create EFT Transmission Files from the menu bar of the gift batch. Using the login ID and password you enter when you add the merchant account, The Raiser’s Edge automatically interfaces with the Blackbaud Payment Service to process the credit card gifts you include in your credit card transmission files through your authorisation service. When you click Create Now on the Create Transmission Files screen, the program automatically connects to the Blackbaud Payment Service.
Add a merchant account
1. On the Business Rules page of Configuration, select Merchant Accounts on the tree view list.

EFT OV E R V I E W 7
2. Under Merchant accounts for authorising credit cards and ACH gifts, click New Account. The Add Merchant Account screen appears.
3. Enter a name and description to help identify the merchant account.4. When your organisation sets up an account with the payment gateway,
you receive a login ID and password for the account. In the Login ID and Password fields, enter the login credentials provided by the payment gateway for the merchant account. Regardless of the characters you enter in the Password field, only asterisks appear.
5. In the Confirm password field, enter the password received from the payment processor again. Regardless of the characters you enter in this field, only asterisks appear.
6. In the Gateway field, select the payment gateway available through the Blackbaud Payment Service to use to process transactions with the merchant account.
7. In the Currency field, select the currency to use with the merchant account and selected gateway.
With the Address Verification Service
(AVS), the gateway issues a transaction to authorise the payment. In response to this transaction, the gateway receives information about the payment, including whether the street address and post code are correct. Depending on the AVS level selected for the merchant account, the gateway uses this information to determine whether to accept the payment.
8. If the selected gateway provides the Address Verification Service (AVS) as fraud protection to verify customer billing addresses submitted through online payment transactions, the AVS level field is enabled. In the AVS Level field, select whether to use AVS with the merchant account and at what level. • To perform no address verification, select “None”.• To accept transactions only when both the street address and post code
match, select “Full”.• To accept transactions when either the street address or post code
match, select “Medium”.• To accept transactions when anything other than the street address or
post code do not match, select “Light”.

CH A PT E R 18
The Card Security Code (CSC) appears
only on the credit card itself, and not on receipts or statements.
9. If the selected gateway provides a Card Security Code (CSC) check as fraud protection to verify the card security code, called the Card Verification Value (CVV2), the CSC level field is enabled. In the CSC Level field, select whether to use CSC checks with the merchant account and at what level. • To perform no CSC check, select “None”.• To accept transactions only when the CSC matches, select “Full”.• To decline transactions only when the CSC does not match, select
“Light”.10. In the Process mode field, select the mode in which to use the merchant
account with the selected gateway. You can select “Live” or “Demo”. If the selected gateway supports a test mode, you can also select “Test”.
11. To set up the merchant account but not make it available for use, tick Inactive.
12. In the card grid, the payment cards the selected gateway supports appears. In the Enable column, tick the checkboxes for the credit cards to use with the merchant account.
13. If the selected gateway requires additional fields, the field grid is enabled. In the grid, enter the information necessary to process transactions through the gateway.
14. Click OK. The Raiser’s Edge sends the merchant account information to the Blackbaud Payment Service for secure storage. You return to the Business Rules page. In the grid, the new merchant account appears.
Initialising the Blackbaud Payment ServiceTo authorise and process credit cards in The Raiser’s Edge, you can use the Blackbaud Payment Service to interface with your merchant accounts. To process your credit card gifts with the Blackbaud Payment Service, you do not need to install additional software. You simply need to set up an account with the Blackbaud Payment Service, set a few options in Configuration, and begin to create credit card transmission files in Batch. Once you create an account with the Blackbaud Payment Service, set up your merchant account, and set specific options in Configuration, you can create credit card transmission files for authorisation and processing through the Blackbaud Payment Service. To create credit card transmission files in Batch, select Tools, Create EFT Transmission Files from the menu bar of the gift batch. When you click Create Now on the Create Transmission Files screen, The Raiser’s Edge automatically interfaces with the Blackbaud Payment Service to process the credit card gifts you include in your credit card transmission files.If the credit card transaction is approved, your authorisation service puts an authorisation code that begins with Y in the Authorisation Code field of the gift batch.Your authorisation service verifies that sufficient funds exist in the account for transfer. If sufficient funds exist, the account is processed, and the funds transfer immediately.
EFT OV E R V I E W 9
If the credit card transaction is rejected, your authorisation service adds N in front of the authorisation code. When The Raiser’s Edge receives the response, the program strips the N from the authorisation code, converts the authorisation code to text, and puts the text into the Rejection Code field of the batch. Examples of rejection codes include your merchant account not supporting the credit card, the credit card being reported stolen or lost, the credit card being expired, an invalid card status, or your merchant account being unable to process the transaction. To authorise a declined credit card, you must first clear its rejected authorisation code from the batch.
Automatically Generate Payments and Recurring Gifts in a BatchWhen you have the optional module Electronic Funds Transfer, you can select Automatically Generate Transactions/Payments from the Tools menu in Batch to automatically generate payment (gift) records for recurring gift transactions and pledges with payments due. For detailed information and procedures about how to automatically generate transactions, see the Electronic Funds Transfer (EFT) Guide.After you generate the payments due, each payment due is added to a row in the gift batch. You can now create transmission files to send to your local bank or merchant account.
Create EFT Transmission FilesTransmission files contain all the necessary information to electronically transfer funds from a constituent’s bank account or credit card to your organisation’s bank account. You can create two types of transmission files – direct debit and credit card. Transmission files are associated with a specific gift batch. For each gift batch in the database, you can create one direct debit transmission file and one credit card transmission file. For information about how to create and send transmission files, see the Electronic Funds Transfer (EFT) Guide.With Electronic Funds Transfer, you can create a transmission file. You send the transmission file to a third party approval company or your sponsoring bank or bureau to be processed. You can also create a transmission file for authorisation and processing with your merchant account. To create a transmission file, select Tools, Create EFT Transmission Files from the menu bar of the Data Entry screen for the gift batch. The Create Transmission Files screen appears, so you can set up your direct debit or credit card transmission file information.

CH A PT E R 110
Understand the Create Transmission File Screen for AustraliaOn the Create Transmission Files screen, you specify which transmission files to create and enter applicable information for each file. The Create Transmission Files screen is divided into three main sections. Under Direct Debit Transmission File, you can tick Create direct debit file and select a financial processing date for the transmission file, a sponsoring bank, and the location of the transmission file.
Under Credit Card Transmission File, you can tick Create credit card file and select the merchant account to process your credit card payments.Under Control Report, select whether to create a control report. If you tick Create control report, you can select to preview or print the report. The following sections further describe the available fields on the Create Transmission Files screen.Financial processing date. In the Financial processing date field, select the
date when the sponsoring bank processes the direct debit transactions in the transmission file. The date must be a normal business day that is not a banking holiday. The financial processing date should be set between one and five days after you generate the transmission file. The specific requirements for the financial processing date vary between financial institutions. For more information about financial processing dates, contact the sponsoring bank.

EFT OV E R V I E W 11
Create direct debit file. To create a direct debit transmission file, tick Create direct debit file. When you tick this checkbox, all fields related to direct debits on the Create Transmission Files screen are enabled.
Sponsoring bank. When you tick Create direct debit file, the Sponsoring bank field is enabled. In the Sponsoring bank field, all sponsoring banks you add from the Financial Institutions page in Configuration appear as a drop-down list. Select the financial institution to process the transactions in the transmission file.
Direct debit file. When you tick Create direct debit file, the Direct debit file field is enabled. Enter the location to save the created transmission file. To map to the location, click the ellipsis and use the Direct Debit Filename screen.
Include a contra entry (self balancing line). To include a corresponding credit for each debit in the transmission file, tick Include a contra entry (self balancing line). When you tick this checkbox, the Lodgement reference field is required.
Lodgement reference. Enter your organisation’s EFT reference number. The Raiser’s Edge uses this information when it creates the Detail Record of the transmission file. When you tick Include a contra entry (self balancing line), this field is required. For information about your organisation’s lodgement reference, consult the sponsoring bank.
Create credit card file. To create a credit card transmission file, tick Create credit card file. When you tick this checkbox, the Account field is enabled.
Account. When you tick Create credit card file, the Account field is enabled. In this field, all merchant accounts you add on the Business Rules page in Configuration appear as a drop-down list. Only the account description you included for the account appears as a choice in the drop-down list. Select the merchant account to use to process all credit card gift payments in the transmission file.
Create control report. Under Control Report, you can create a control report for the transmission file. A control report lists all information you specified when you create the transmission file. To create a control report, tick Create control report. You can select to preview or print the report. To track the settings you selected when you generate transactions and payments, we strongly recommend you view or print a control report.
CH A PT E R 112
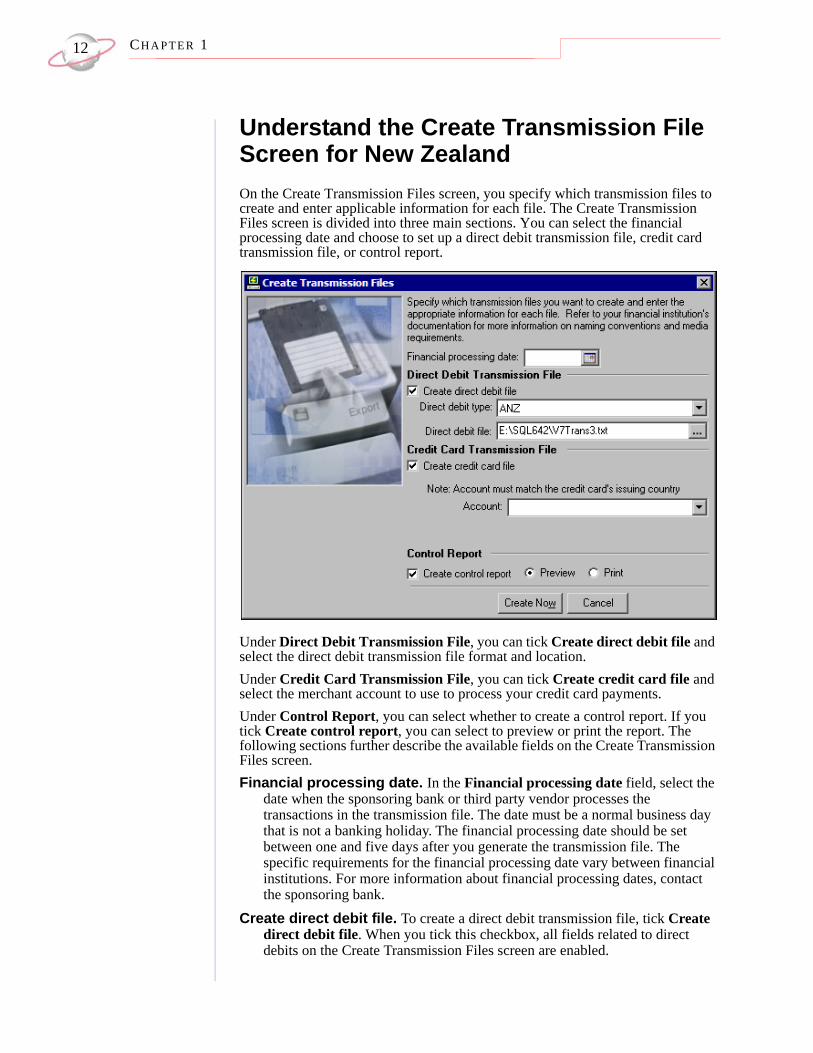
Understand the Create Transmission File Screen for New ZealandOn the Create Transmission Files screen, you specify which transmission files to create and enter applicable information for each file. The Create Transmission Files screen is divided into three main sections. You can select the financial processing date and choose to set up a direct debit transmission file, credit card transmission file, or control report.
Under Direct Debit Transmission File, you can tick Create direct debit file and select the direct debit transmission file format and location. Under Credit Card Transmission File, you can tick Create credit card file and select the merchant account to use to process your credit card payments.Under Control Report, you can select whether to create a control report. If you tick Create control report, you can select to preview or print the report. The following sections further describe the available fields on the Create Transmission Files screen.Financial processing date. In the Financial processing date field, select the
date when the sponsoring bank or third party vendor processes the transactions in the transmission file. The date must be a normal business day that is not a banking holiday. The financial processing date should be set between one and five days after you generate the transmission file. The specific requirements for the financial processing date vary between financial institutions. For more information about financial processing dates, contact the sponsoring bank.
Create direct debit file. To create a direct debit transmission file, tick Create direct debit file. When you tick this checkbox, all fields related to direct debits on the Create Transmission Files screen are enabled.

EFT OV E R V I E W 13
Direct debit file. When you tick Create direct debit file, the Direct debit file fields are enabled. In the top field, select the file format to use to generate the direct debit transmission file you submit to the sponsoring bank for processing. You can select ANZ or BMZ. To create a direct debit transmission file in the Australia and New Zealand Banking Group Limited (ANZ) format, select ANZ. To create a file in the Bank of New Zealand (BMZ) format, select BMZ. For information about the direct debit transmission file and its file formats, see “Direct Debit Transmission Files” on page 13.In the bottom field, enter the location to save the created transmission file. To map to the location, click the ellipsis and use the Direct Debit Filename screen.
Create credit card file. To create a credit card transmission file, tick Create credit card file. When you tick this checkbox, the Account field is enabled.
Account. When you tick Create credit card file, the Account field is enabled. In this field, all merchant accounts you add on the Business Rules page in Configuration appear as a drop-down list. Only the account description you included for the account appears as a choice in the drop-down list. Select the merchant account to use to process all credit card gift payments in the transmission file.
Create control report. Under Control Report, you can create a control report for the transmission file. A control report lists all information you specified when you create the transmission file. To create a control report, tick Create control report. You can select to preview or print the report. To track the settings you selected when you generate transactions and payments, we strongly recommend you view or print a control report.
Direct Debit Transmission FilesThe direct debit transmission file
includes only gifts with EFT? ticked.
When you create a direct debit transmission file from a batch, you can send the transmission file to and from the sponsoring bank via portable media, such as a CD-ROM, or as an email attachment. You and your sponsoring bank should decide the best way to communicate this information.Once the transaction is processed, if the account number for a payment does not exist or is invalid for any reason, the bank declines the request. You can then add the applicable rejection codes for that gift in your batch. If the transaction is successful, the appropriate payment amount is deposited into your organisation’s bank account.To ensure the direct debit transmission file you create can be processed, you must communicate effectively with your organisation’s bank. Coding requirements are strict for direct debit transmission files, and the financial institution can work with you in “test mode” to verify the files you create can be processed. Once the testing process is validated, you can request that your financial institution transfer you to “live mode” to begin to process payments.
CH A PT E R 114
Direct Debit File Formats for AustraliaWhen you work with Electronic Funds Transfer, you must understand what the actual direct debit transmission file represents. For direct debit transmission files, sections of the transmission file contain a specific amount of numbers or letters. These characters represent a text string that contains sections explained in the following direct debit file format tables. For an Australian direct debit transmission file, the text string is referred to as a fixed-length file. Every section in a fixed-length file has a limit. For example, in a fixed-length file transmission file that has 120 characters, character 1 has a designated meaning, and characters 2-8 have another meaning. The following direct debit file format tables explain the information that appears in an Australian direct debit transmission file.
Descriptive RecordOne descriptive record is generated for each user. The Field Name column represents the name of the section that holds specific characters of the text string. The Position column lists the position of the section within the text string. The Contents column provides information about the characters entered in specific parts of the text string. For example, Record Type is located in position 1 of the text string and is always “0”. The Raiser’s Edge always recognises “0” in position 1 as the Record Type of a Descriptive Record.
Field Name Position ContentsRecord Type 1 0 (The Raiser’s Edge automatically enters “0” into
this field. “0” in position 1 always designates the Record Type of a Descriptive Record.)
Filler 2-18 BlankReel Sequence 19-20 01 (The Raiser’s Edge automatically enters “01”
into these fields. “01” in positions 19-20 always designates the Reel Sequence.)
Name of Bank 21-23 An approved abbreviation for the name of the sponsoring bank
Filler 24-30 BlankName of User 57-62 Your organisation’s name, as entered in
ConfigurationUser ID Number 57-62 The user number, as entered in ConfigurationDescription of Entry 63-74 Debit (The Raiser’s Edge automatically enters
“Debit” into these fields. “Debit” in positions 63-74 always designates the Description of Entry.)
Processing Date 75-80 The Financial processing date, as entered on the Create Transmission Files screen, in the DDMMYY format.
Filler 81-120 Blank
EFT OV E R V I E W 15
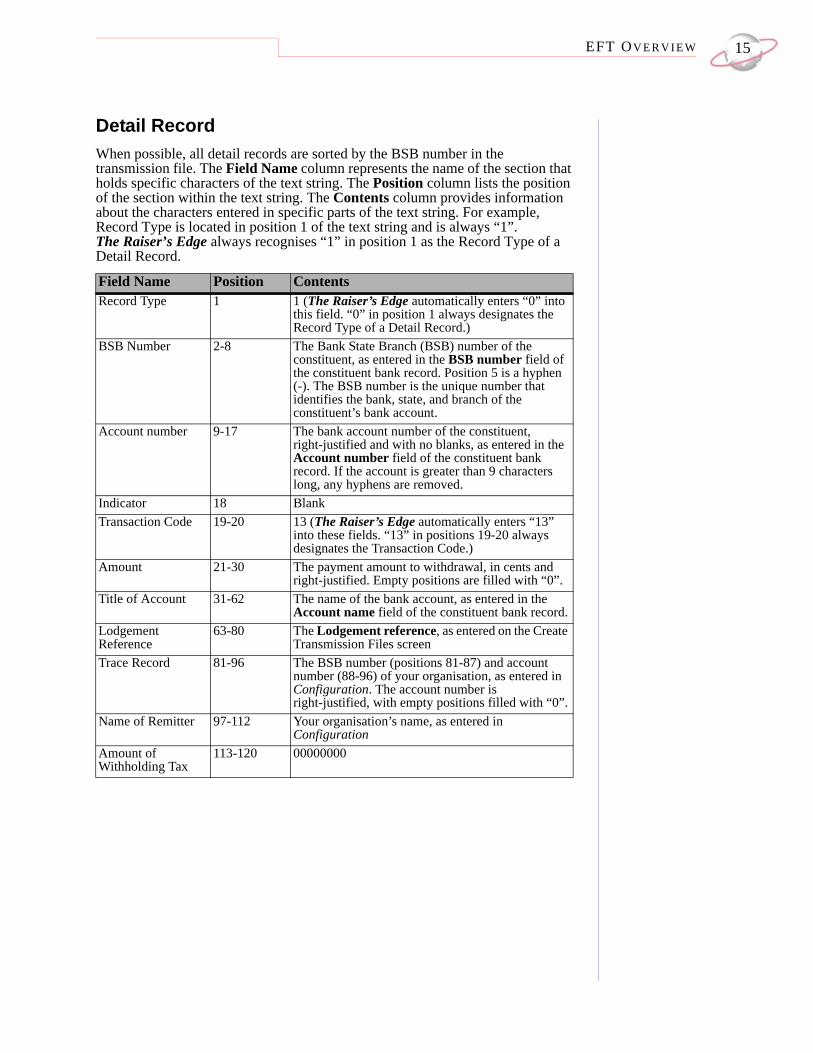
Detail RecordWhen possible, all detail records are sorted by the BSB number in the transmission file. The Field Name column represents the name of the section that holds specific characters of the text string. The Position column lists the position of the section within the text string. The Contents column provides information about the characters entered in specific parts of the text string. For example, Record Type is located in position 1 of the text string and is always “1”. The Raiser’s Edge always recognises “1” in position 1 as the Record Type of a Detail Record.
Field Name Position ContentsRecord Type 1 1 (The Raiser’s Edge automatically enters “0” into
this field. “0” in position 1 always designates the Record Type of a Detail Record.)
BSB Number 2-8 The Bank State Branch (BSB) number of the constituent, as entered in the BSB number field of the constituent bank record. Position 5 is a hyphen (-). The BSB number is the unique number that identifies the bank, state, and branch of the constituent’s bank account.
Account number 9-17 The bank account number of the constituent, right-justified and with no blanks, as entered in the Account number field of the constituent bank record. If the account is greater than 9 characters long, any hyphens are removed.
Indicator 18 BlankTransaction Code 19-20 13 (The Raiser’s Edge automatically enters “13”
into these fields. “13” in positions 19-20 always designates the Transaction Code.)
Amount 21-30 The payment amount to withdrawal, in cents and right-justified. Empty positions are filled with “0”.
Title of Account 31-62 The name of the bank account, as entered in the Account name field of the constituent bank record.
Lodgement Reference
63-80 The Lodgement reference, as entered on the Create Transmission Files screen
Trace Record 81-96 The BSB number (positions 81-87) and account number (88-96) of your organisation, as entered in Configuration. The account number is right-justified, with empty positions filled with “0”.
Name of Remitter 97-112 Your organisation’s name, as entered in Configuration
Amount of Withholding Tax
113-120 00000000

CH A PT E R 116
File Total RecordThe Field Name column represents the name of the section that holds specific characters of the text string. The Position column lists the position of the section within the text string. The Contents column provides information about the characters entered in specific parts of the text string. For example, Record Type is located in position 1 of the text string and is always “7”. The Raiser’s Edge always recognises “7” in position 1 as the Record Type of a File Total Record Format.
Direct Debit File Formats for New ZealandWhen you work with Electronic Funds Transfer, you must understand what the actual direct debit transmission file represents. For direct debit transmission files, sections of the transmission file contain a specific amount of numbers or letters. These characters represent a text string that contains sections that are explained in the following direct debit file format tables. For a New Zealand direct debit transmission file, the text string is referred to as a comma-delimited file. Every section in a comma-delimited file has a maximum character length and is separated by a comma. For example, if one section in the text string contains up to 16 characters, the program must first recognise the comma that separates the sections in the text string before it processes that section. The following direct debit file format tables explain the information that appears in a New Zealand direct debit transmission file.
Field Name Position ContentsRecord Type 1 7 (The Raiser’s Edge automatically enters “0” into
this field. “7” in position 1 always designates the Record Type of a File Total Record Format.)
Institute Total Number
2-8 999-999 (The Raiser’s Edge automatically enters “999-999” into these fields. “999-999” in positions 2-8 always designates the Institute Total Number.)
Filler 9-20 BlankFile Net Total 21-30 Should equal the File Debit Total, right-justified and
without a decimal. Empty positions are filled with “0”.
File Credit Total 31-40 0000000000File Debit Total 41-50 Should equal the File Net Total, right-justified and
without a decimal. Empty positions are filled with “0”.
Filler 51-74 BlankFile Count of Record Type 1
75-80 The total number of Detail Records included in the transmission file
Filler 81-120 Blank
EFT OV E R V I E W 17
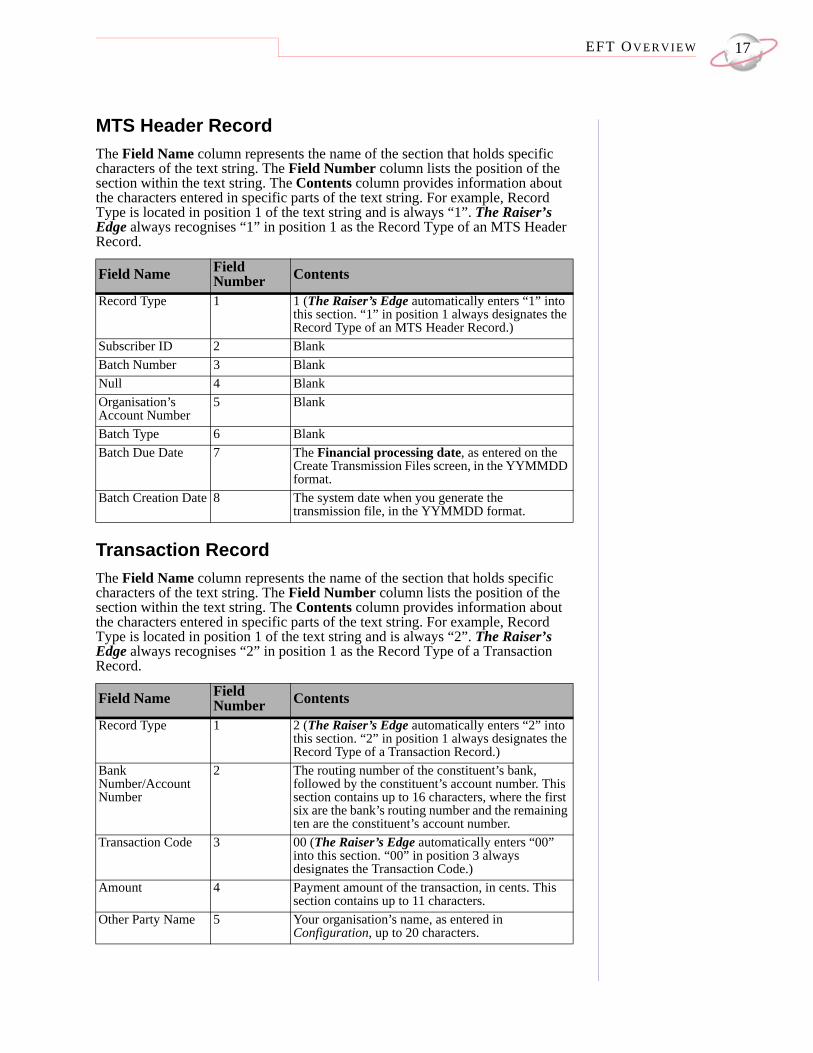
MTS Header RecordThe Field Name column represents the name of the section that holds specific characters of the text string. The Field Number column lists the position of the section within the text string. The Contents column provides information about the characters entered in specific parts of the text string. For example, Record Type is located in position 1 of the text string and is always “1”. The Raiser’s Edge always recognises “1” in position 1 as the Record Type of an MTS Header Record.
Transaction RecordThe Field Name column represents the name of the section that holds specific characters of the text string. The Field Number column lists the position of the section within the text string. The Contents column provides information about the characters entered in specific parts of the text string. For example, Record Type is located in position 1 of the text string and is always “2”. The Raiser’s Edge always recognises “2” in position 1 as the Record Type of a Transaction Record.
Field Name Field Number Contents
Record Type 1 1 (The Raiser’s Edge automatically enters “1” into this section. “1” in position 1 always designates the Record Type of an MTS Header Record.)
Subscriber ID 2 BlankBatch Number 3 BlankNull 4 BlankOrganisation’s Account Number
5 Blank
Batch Type 6 BlankBatch Due Date 7 The Financial processing date, as entered on the
Create Transmission Files screen, in the YYMMDD format.
Batch Creation Date 8 The system date when you generate the transmission file, in the YYMMDD format.
Field Name Field Number Contents
Record Type 1 2 (The Raiser’s Edge automatically enters “2” into this section. “2” in position 1 always designates the Record Type of a Transaction Record.)
Bank Number/Account Number
2 The routing number of the constituent’s bank, followed by the constituent’s account number. This section contains up to 16 characters, where the first six are the bank’s routing number and the remaining ten are the constituent’s account number.
Transaction Code 3 00 (The Raiser’s Edge automatically enters “00” into this section. “00” in position 3 always designates the Transaction Code.)
Amount 4 Payment amount of the transaction, in cents. This section contains up to 11 characters.
Other Party Name 5 Your organisation’s name, as entered in Configuration, up to 20 characters.
CH A PT E R 118
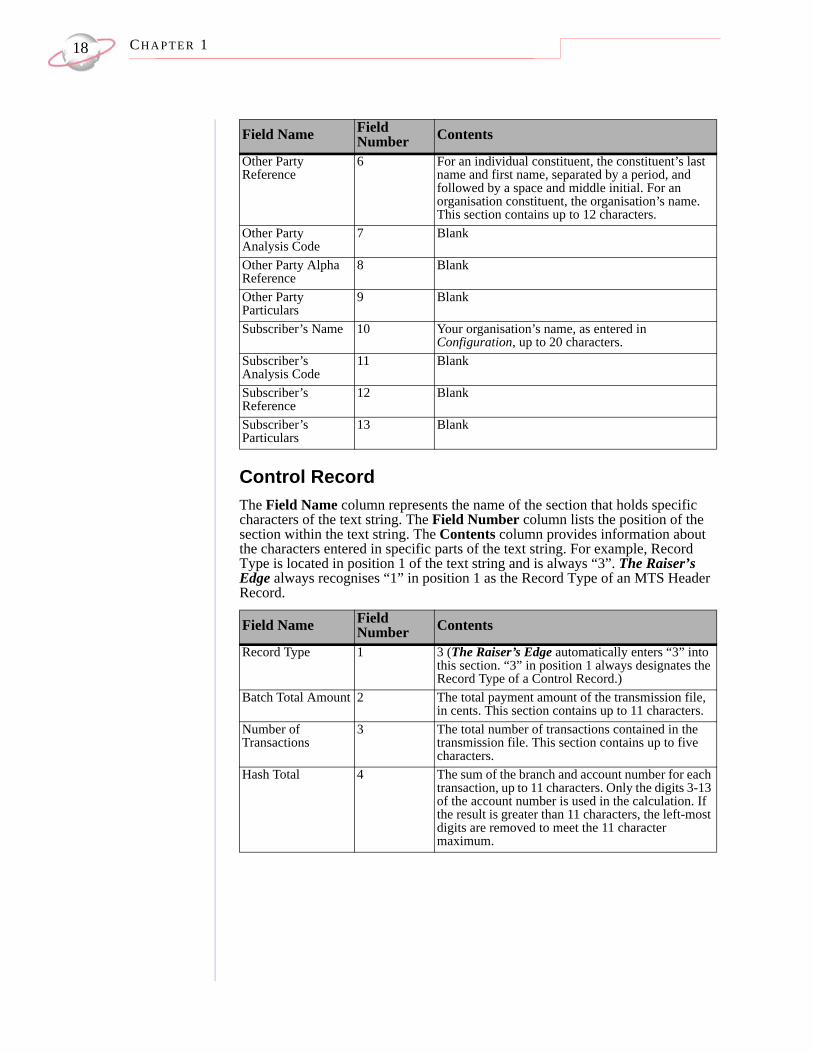
Control RecordThe Field Name column represents the name of the section that holds specific characters of the text string. The Field Number column lists the position of the section within the text string. The Contents column provides information about the characters entered in specific parts of the text string. For example, Record Type is located in position 1 of the text string and is always “3”. The Raiser’s Edge always recognises “1” in position 1 as the Record Type of an MTS Header Record.
Other Party Reference
6 For an individual constituent, the constituent’s last name and first name, separated by a period, and followed by a space and middle initial. For an organisation constituent, the organisation’s name. This section contains up to 12 characters.
Other Party Analysis Code
7 Blank
Other Party Alpha Reference
8 Blank
Other Party Particulars
9 Blank
Subscriber’s Name 10 Your organisation’s name, as entered in Configuration, up to 20 characters.
Subscriber’s Analysis Code
11 Blank
Subscriber’s Reference
12 Blank
Subscriber’s Particulars
13 Blank
Field Name Field Number Contents
Record Type 1 3 (The Raiser’s Edge automatically enters “3” into this section. “3” in position 1 always designates the Record Type of a Control Record.)
Batch Total Amount 2 The total payment amount of the transmission file, in cents. This section contains up to 11 characters.
Number of Transactions
3 The total number of transactions contained in the transmission file. This section contains up to five characters.
Hash Total 4 The sum of the branch and account number for each transaction, up to 11 characters. Only the digits 3-13 of the account number is used in the calculation. If the result is greater than 11 characters, the left-most digits are removed to meet the 11 character maximum.
Field Name Field Number Contents
EFT OV E R V I E W 19
Credit Card Transmission FilesThe credit card transmission file
includes only gifts with EFT? ticked.
To electronically credit a transaction to a donor’s credit card, you must create a credit card transmission file for authorisation and processing with an authorisation service such as IATS/Ticketmaster. To create a credit card transmission file, select Create EFT Transmission Files from the Tools menu in a gift batch. When you click Create Now on the Create Transmission Files screen, The Raiser’s Edge automatically initialises the Blackbaud Payment Service, which begins to interface with the program to process and authorise the credit card transmission file through your merchant account. Credit card transmission files only process if you have an account set up with the Blackbaud Payment Service, a merchant account, and set specific options on the Business Rules page in Configuration. The Raiser’s Edge uses the login IDs and passwords you specify in Configuration to interface with the Blackbaud Payment Service and your merchant account. For information about how to prepare for credit card transmission files, see “Configuration Settings” on page 3.
Commit a BatchOnce your direct debit and credit card payments have been authorised or rejected, you can commit the batch to the database. Upon committal, all authorised payments are applied and the gift records in your database are updated. From the Commit Gift Batch screen, if you have exceptions in your batch, you can select to create a batch with those exceptions so you can work with all rejected payments in your batch. For information about how to commit a batch, see the Batch Guide.

CH A PT E R 120