educational talking robot - migliorprezzo.it · 1 doc is a fun and likeable robot providing a...
TRANSCRIPT

1
DOC is a fun and likeable robot providing a simple and intuitive introduction to the basic concepts of programming. The child gets to train their logical thought processes and develop their spatial intelligence by practising counting and deciding how to move DOC in order to reach the various objectives spread across the puzzle mat. Simply pressing a button on DOC’s head is all that is needed to program him to follow a sequence of actions and move. A fun and practical approach to true IT programming, utilising experimentation in increasingly complex game modes, based on direct experience rather than on theory. An innovative method that sees numbers as a tool to interpret reality and interact concretely with it, rather than as an abstract concept. To learn how to interact with DOC we recommend reading page 9 of the instruction manual.
EDUCATIONAL TALKING ROBOT

22
Children are incredibly creative. If they are asked to imagine a new machine, who knows what they will come up with. In this age, we are surrounded by powerful tools and we can ask a computer to do practically anything for us. However, for this to happen, we need to be able to translate our ideas into a language that is comprehensible to the machine. It is therefore necessary to learn to simplify complex concepts in order to describe them in a clear and ordered manner. The fi rst step in exploring this new world of possibilities requires knowledge of how machines assimilate commands, in other words, learning to program. All the devices around us, from the cell phone to the PC, the vacuum cleaner to the electric toothbrush, have a series of sequencing commands at the basis of their functioning that somebody wrote and sent to the machine in order for it to know how to function once the user presses the button. Knowing how the devices we use function, allows for greater awareness of both the world around us as well as an understanding of the potential of the tools at our disposition. Children who have learnt the basic concepts of programming are able to apply this logic to far more advanced projects such as the creation of animation and even programing their own videogames. The possibilities are infi nite!
Why learn programming?
STEM is an acronym founded in the United States to indicate an inter-disciplinary approach to the practical learning of theoretic concepts in Science (physics and social sciences), Technology, Engineering and Mathematics.

33
The box contains:
• DOC• 9 blue backed cards
these are utilised in GAME mode and illustrate the sequence of objects to be collected, the objectives to reach and their scores.
• 21 red backed cards these tutorial cards, utilised in FREE mode on puzzle mat 1, provide a sequence of brief moves enabling one to depart from START and reach the illustrated objective.
• 12 large puzzle cards by putting these together, puzzle mat 1 (orange background) is composed. Puzzle mat 2 (blue background) is found on the reverse side.
• 16 double-faced directional cards these enable the route to be visualised before inserting the sequence using DOC’s buttons.
Inserting the batteries.The game functions with three AA LR6 1.5V batteries (not included) and must be powered by the above-mentioned battery type only.
• BATTERY INSTALLATION - The batteries are to be inserted by an adult. - Ensure that the game is switched off . - Open the battery compartment at the back of the toy by unscrewing the central screw on DOC’s backpack.
- Insert 3 AA LR6 batteries, respecting the polarities indicated within the battery slot and on the photograph on the following page. Ensure that the ribbon passes behind the lower batteries and above the top battery, exactly

44
The buttonsThe arrows on DOC’s head indicate the direction in which he will move, while the other buttons are used to determine particular actions, the exact nature of which changes according to the various activities:
1. FORWARD ARROW - this moves DOC one block forward.
2. LEFT ARROW - this turns DOC, on the spot, 90 degrees to the left.
3. RIGHT ARROW - this turns DOC, on the spot, 90 degrees to the right.4. BACKWARD ARROW - this moves DOC one block backwards.5. OK BUTTON - this is needed to make DOC undertake the command sequence he
has received. It is also used to confi rm that DOC is placed on the START block in both EDU and GAME mode.
6. CANCEL BUTTON - this is used to cancel the moves selected on the buttons from DOC’s memory in FREE and GAME mode. In EDU mode, on the other hand, it is possible to start with a sequence for the fi rst objective and thereafter request DOC to be repositioned on the START.
7. ACTION BUTTON - this is used for an action inserted into the sequence of movements that are memorisable to DOC: it is used in GAME mode to collect an object from puzzle mat 2, while in FREE and EDU it simply reproduces a fun sound eff ect.
Introduction to the commands 1
4
5
6 7
2 3
as indicated in the following fi gure. In this manner, it will be suff icient simply to pull on the ribbon in order to change the batteries in the future.
- Close the battery compartment and screw in the screw. - Switch on the game by moving the selector to the chosen mode.
1 3 4 52

55
In order to ensure maximum accuracy, please position the robot in the center of the cell if it is not well aligned, WITHOUT changing its orientation after each single sequence of movements. (In case of strong deviations, please refer to the notes at page 8).
Playing modes There are three playing modes, which are selected using the buttons on DOC’s head. To switch DOC on move the selector from OFF to the mode desired. OFF - move the selector into this position to switch DOC off . FREE - this is the recommended playing mode for fi rst time players. Move the selector to FREE. The robot will be free to move around, either on his puzzle mat or on any other clean and smooth surface.
1. FREE mode without the puzzle mat: the aim is to explore DOC’s moving possibilities and to experiment with the programming keyboard. Position the robot on any smooth, fl at surface without dust, give him commands followed by the OK button and have fun watching him move about.
2. FREE mode on puzzle mat 1: the aim is to practise giving the fi rst sequences of commands after choosing a destination on the mat (for example, get DOC to the cow). Position DOC on the START of puzzle mat 1 and follow the tutorial illustrated on the red backed cards, program by pressing the buttons on DOC’s head and then pressing OK. Have you reached your goal?
Remember that you can interrupt the introductory message at any time: simply press the movement programming buttons (the movement and action buttons) on DOC’s head. Once familiar with DOC, the playing possibilities are endless. You can also play on personalised puzzle mats of your own, recreating personalised grids for the robot using your own drawings and scenes that you prefer. We recommend you create a grid with boxes that adapt to DOC’s paces (13cm).
13cm
13cm

66
EDU - is the educational mode, recommended for children 5 and over, and in general, for those who would like to practise before diving into GAME mode. Use puzzle mat 1 and move the selector to EDU. In this mode, the robot will indicate where he wants to go. Position DOC on the START, following the indications on the block, with his eyes facing the top border of the mat. After having pressed OK to confi rm, DOC will ask you to program a series of three objectives. Remember that if correctly positioned on the START, you can interrupt DOC’s introductory message by pressing OK; it will not be possible to interrupt DOC while he is giving instructions on the objectives to reach. Doc recognises his position on the puzzle mat, commenting positively when the goal is reached. The red wall on puzzle mat 1 is a limit perceived by the robot as an insurmountable obstacle. The fi rst sequence to input is that needed to reach the fi rst objective departing from the START, the second is a request to move from the fi rst objective block to that of the second objective and fi nally the last sequence is a departure from the second block and concludes DOC’s movement taking him to the third objective.Once the third objective has been reached, the player will be asked to reposition DOC on the START block for a new sequence.
ATTENTION: the entire sequence of commands must be inserted before pressing OK; the combination sequence should take DOC from the block where he is to the arrival destination. In order to get the right feedback, the robot should be positioned on the START block in the position indicated and should not be moved again manually, but only through programming (the movement and action buttons).

77
GAME - is the playing mode, recommended for children 6 and over and in general for all expert players. Use puzzle mat 2 and move the selector to GAME: DOC will ask to be placed on the START block, in the direction indicated on the block, and once OK has been pressed to confi rm his position, he will ask you to draw a blue card. If already correctly positioned, DOC’s introductory message can be interrupted by pressing OK; once the card has been drawn, DOC’s successive instructions can be interrupted by pressing the programming buttons (movement and action buttons). The cards illustrate the two objectives to be reached: the object that needs to be collected and the place that it needs to be taken to.
ATTENTION: the entire sequence needs to be programmed before pressing the OK button; all the moves inserted must enable DOC to undertake the actions provided on the card in a single programming sequence.
IMPORTANT: DOC can not cross the elements with a red border (hedges and cones), but he can pas over the other objects.
This is how to proceed: a. Insert the moves that enable DOC to reach the block where the object is found
(e.g.: from START to the cinema ticket). b. Press the Action button so that DOC collects the object corresponding to the
particular block (collect cinema ticket). c. Insert the moves that enable DOC to reach the required place and press OK (once
you have a ticket go to the cinema).

88
DOC recognises his position in the game space and reacts according to the movements and actions programmed. Upon reaching the objective, the player wins the card, whereas erring along the route leads to the loss of the card. Once an error is made, DOC asks to be repositioned on the START and tells you to draw another card. The game can be played alone with the aim being to win as many cards as possible or in company, challenging friends.
NB:• DOC is able to memorise a maximum of 25 consecutive moves. It is possible to
understand that too many commands have been given if the sound eff ect on command insertion changes.
• After some seconds without instructions from the player, DOC will remind you that he is switched on and awaiting input, and in EDU mode will repeat the objective to be reached. ATTENTION: In this case, all the moves already inserted will be cancelled from DOC’s memory and DOC will need to be reprogrammed from the START.
• If DOC remains unused for long periods, he will automatically go into standby mode after saying “bye bye”. To reactivate the game, simply press one of the buttons on DOC’s head and the game will recommence with the introductory message for the selected mode. We recommend turning the selector to OFF at the end of play to avoid excessive battery drain.
• To ensure precision in his movements, we recommend placing doc manually on the exact centre of the block in which he is found. Should serious errors occur (such as visibly short steps, or extremely imprecise movements), the batteries are probably running low: try substituting them with new batteries. A new set of Duracell batteries should guarantee continuous play for 5-7 hours.
DOC has been programmed to be as precise as possible, but he is not infallible. We can guarantee his precision in accordance with the parameters in the following table:
Batteries
Speed of movement
Rotation angle left/right
Forward/backward movement
Alkaline 3 x 1,5 V AA
About 115 mm/sec
90° ± 5°
129 mm ± 5 mm
TECHNICAL SPECIFICATIONS

99
MANUAL
To use the toy correctly, we recommend that parents and teachers follow the tutorial. Before inserting an entire sequence of commands, an operation that requires a certain capacity for abstract thought, we recommend that the child uses the directional cards to help them visualise the route fi rst.
Moving DOC in space • After having assembled puzzle mat 1, position DOC on the START making
sure that he is facing the direction indicated on the block. • Select the FREE mode by moving the selector on DOC’s head
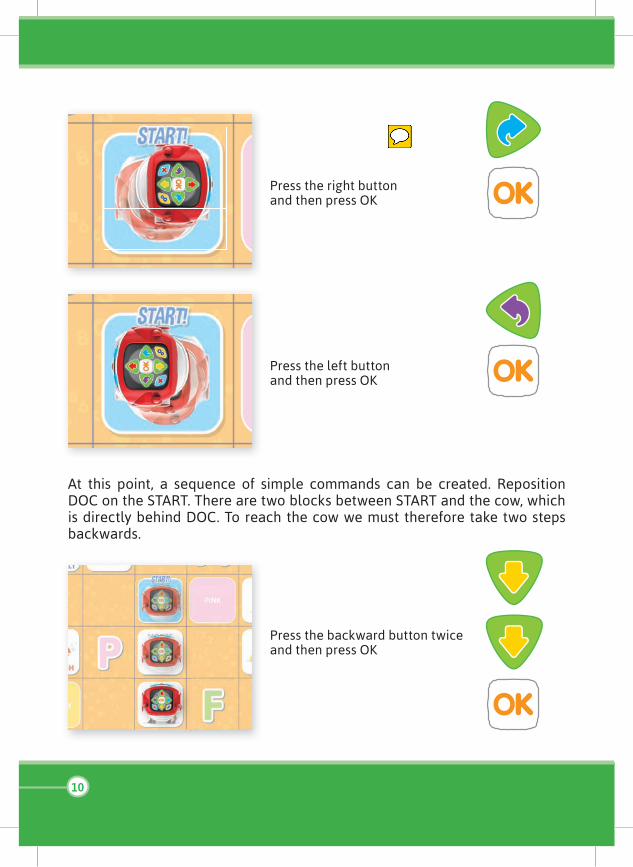
First step: single commands We recommend familiarising oneself with the basic commands before anything else. Move DOC one move at a time using one of the movement buttons (to understand the eff ect that each button has, see the introduction to commands on page 2) followed by the OK button. Continue with the other movement buttons.
Press the forward buttonand then press OK
Press the backward buttonand then press OK
1010
Press the right buttonand then press OK
Press the backward button twice and then press OK
Press the left buttonand then press OK
At this point, a sequence of simple commands can be created. Reposition DOC on the START. There are two blocks between START and the cow, which is directly behind DOC. To reach the cow we must therefore take two steps backwards.

1111
That was a programming sequence. Learning how to move DOC by inserting all the commands necessary to reach an objective in a single sequence is essential for the other activities off ered by the game. Once you have learnt how to move DOC, you can move onto the second step.
Second step: sequences with cards. At this point, you can move onto sequences that are a little more diff icult. Position DOC on the START in the position indicated on the block and draw a red-backed card. Insert the route following the program illustrated on the card from top to bottom. If you make a mistake, we recommend retrying from the START, seeking to understand where you went wrong.
1212
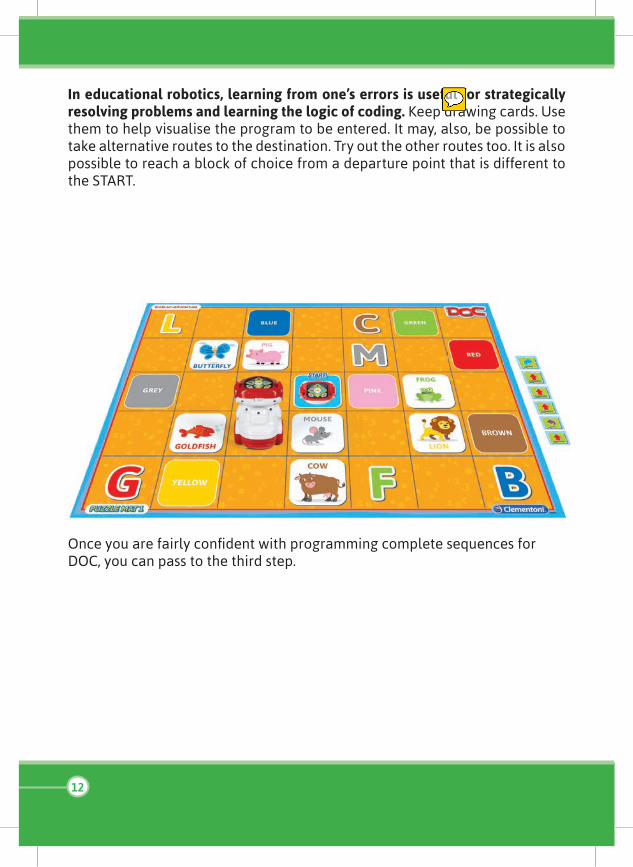
In educational robotics, learning from one’s errors is useful for strategically resolving problems and learning the logic of coding. Keep drawing cards. Use them to help visualise the program to be entered. It may, also, be possible to take alternative routes to the destination. Try out the other routes too. It is also possible to reach a block of choice from a departure point that is diff erent to the START.
Once you are fairly confi dent with programming complete sequences for DOC, you can pass to the third step.
1313
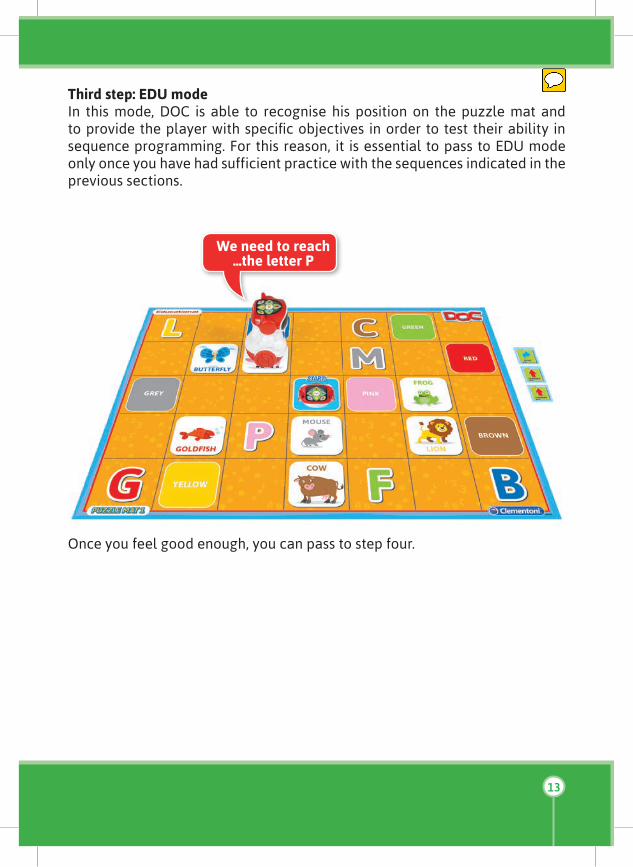
Third step: EDU modeIn this mode, DOC is able to recognise his position on the puzzle mat and to provide the player with specifi c objectives in order to test their ability in sequence programming. For this reason, it is essential to pass to EDU mode only once you have had suff icient practice with the sequences indicated in the previous sections.
Once you feel good enough, you can pass to step four.
We need to reach ...the letter P

1414
ATTENTION: puzzle mat 2 is far more complex than puzzle mat 1 and is therefore recommended for children over the age of 6, or those who are already expert. For younger children, we recommend the assistance of an adult or an older child.
Fourth step: GAME modeIn this mode it is necessary to use puzzle mat 2(the reverse of puzzle mat 1) and the blue cards. This mode is made more diff icult by the presence of obstacles, which are highlighted by a red border and are to be avoided, as well as by the complexity of the required programming. DOC is able to recognise his position on the puzzle mat in in this mode too. One or more players can play. The cards indicate the number of points won for reaching each objective.
Let’s goon this mission!

1515
EN INSTRUCTIONS FOR CORRECT USE OF TOYS/GAMES WITH REPLACEABLE BATTERIESWARNING! • Batteries must be installed by an adult. • The + and - symbols on the batteries must be lined up correctly.
• Old batteries must be removed from the game. • The power terminal block must not be short-circuited. • Never touch the contacts inside the battery case, as this could cause a short circuit. • The rechargeable batteries must be removed prior to being charged. Only recharge under adult supervision. • Never attempt to recharge non-rechargeable batteries. • Diff erent types of batteries or new and used batteries should not be used at the same time.OTHER RECOMMENDATIONS: • Batteries are dangerous if swallowed; keep away from children. • Always remove batteries prior to long-term storage. • Do not try to open the batteries. • Do not throw batteries into a fi re.INSTRUCTIONS FOR BATTERY DISPOSAL
The symbol indicates that dead batteries must be disposed of in accordance with current regulations for waste disposal. Chemical symbols for mercury (Hg), cadmium (Cd) and/or lead (Pb) which appear below the crossed out wheelie bin symbol indicate that there is a signifi cant percentage of the relative substance in the battery. These substances are highly damaging to the environment and human health. The correct disposal of batteries allows
their isolation and the targeted treatment of harmful substances, and allows recycling of precious primary materials, reducing negative eff ects on persons and the environment. The disposal of worn-out batteries in landfi lls or the environment signifi cantly increases the risk of water pollution. Pursuant to European Directive 2013/56/EU, it is prohibited to dispose of batteries and accumulators as urban waste and consumers are obliged to participate in separated waste collection so as to facilitate the treatment and recycling of the same.HOW TO DISPOSE OF BATTERIES: Discharge the batteries completely by leaving on the game until the batteries have fully run out. Remove the batteries from the game before disposal. Dispose of all batteries in accordance with current regulations, by using the appropriate containers at an authorised recycling centre or by returning them to the shop where they were purchased. Returning them is free! Penalties are applied for incorrect disposal.INSTRUCTIONS FOR THE DISPOSAL OF ELECTRICAL AND ELECTRONIC DEVICES SUBJECT TO SEPARATE WASTE DISPOSALIMPORTANT! The crossed out wheelie bin symbol indicates that in European Union member states (Dir. 2012/19/EU) and in those that adopt separated waste collection systems, all components of the product marked by this symbol (or indicated as such in the game instructions) are subject to separated waste collection laws at the end of their life. It is prohibited to dispose of such components as mixed urban waste.HOW TO DISPOSE OF ELECTRICAL AND ELECTRONIC DEVICES: it is mandatory to separately collect those components marked by the symbol (or indicated as such in the relevant documentation) and deliver them to authorised recycling centres for the purposes established, or where possible, to return the product for disposal back to the shop when a similar product is purchased, or for free in the event the external dimensions of the component are less than 25 cm.Users of the product play a critical role in ensuring the correct disposal of electrical and electronic equipment that has reached the end of its life. It is therefore important for each user to be aware of their role and to always dispose of electrical/electronic waste in accordance with current legislation, thereby contributing to the correct management of waste and encouraging its reuse, recycling and/or recovery.
Warning! Components marked by the symbol contain substances that are harmful to the environment and human health. It is therefore prohibited to dispose of them as mixed urban waste or together with other domestic waste. Incorrect disposal may result in damage to the environment and may be punished by the law. These components should not be used improperly. In particular, it is prohibited to remove the electrical and electronic parts from the toy
or use the toy if damaged. These actions could cause health hazards.N.B.: The above information only relates to the parts of the toy marked with the prohibitive symbol (or those parts indicated in the information leafl et as being subject to this restriction).Other game components (cards, accessories, etc.) and their packaging are not subject to the above described indications and must be disposed of according to the methods provided for by current standards. These other components do not need to be delivered to authorised recycling centres for electrical and electronic equipment or returned to the shop when a new product is purchased. Domestic users (non-professional) are invited to contact their local retailer, the public waste disposal authorities or the Customer Service Department of CLEMENTONI S.p.A. (Tel. +39 071 75811; fax +39 071 7581234; e-mail: [email protected]) for further information about the correct way to dispose of the product.
Registered on the electronic and electrical manufacturers’ register: REGISTRATION IN PROGRESS.
ioioioion n n n
ururururcchchc

161616
Manual to be kept
Product code: 61323
V375
47
UK SUBSIDIARY:Clementoni UK Ltd
Olympic way – Wembley - HA9 0NP - United Kingdom
Phone: +44 208 782 [email protected]
MANUFACTURER:Clementoni S.p.A.
Zona Industriale Fontenoce s.n.c.62019 Recanati (MC) - Italy
Tel.: +39 071 75811www.clementoni.com
SUGGESTIONS FOR USEIn the event of a malfunction, check the following:
The game switches off or freezes Reset the game by carrying out one of the following actions: a) Turn the game off, then turn it back on again; b) Remove the batteries for at least 10 seconds before inserting them again.
OR: replace the batteries. In the event of a malfunction due to electrostatic discharge, switch the game off and on to reset the functions. If the problem persists, use the game in a different area.
MAINTENANCE
• Clean the game using a soft, slightly damp cloth. Do not use soaps or detergents. • Do not use chemical solvents. • Never expose the game to direct sunlight or heat sources. • Do not pour liquid on the game or immerse in water. • Never disassemble the game. • Do not drop the game. • Always remove the batteries from the game when not in use for long periods of time.
WARNING: The sticky tape, bags, plastic sheets and labels are not part of the game and must be kept out of reach of small children.