e-marketplace tutorial
TRANSCRIPT
The purpose of this document is to explain how micro-entrepreneurs can sell services, goods and experiences to
untapped markets through emerging web-based marketplaces.
Online marketplaces
In competitive markets access to
customers is often controlled by retail
monopolies. In those situations, small and
micro-businesses recurrently face great
barriers to make their goods and services
visible to potential customers. The control exerted by intermediaries
is often due to customers’ lack of
information about suppliers, or because of
excessive complexity of supply. At its
core, retail monopolies are dependent on
information imbalances, and therefore, such
situations can be addressed with
information-based solutions that improve
info flow between suppliers and their
potential customers. Recently, advances in ICT systems
have created innovations that can moderate
large and complex sets of product offerings
and make them available to customers in
efficient ways. Often, these solutions have
taken the form of web marketplaces where
micro-entrepreneurs can offer their services
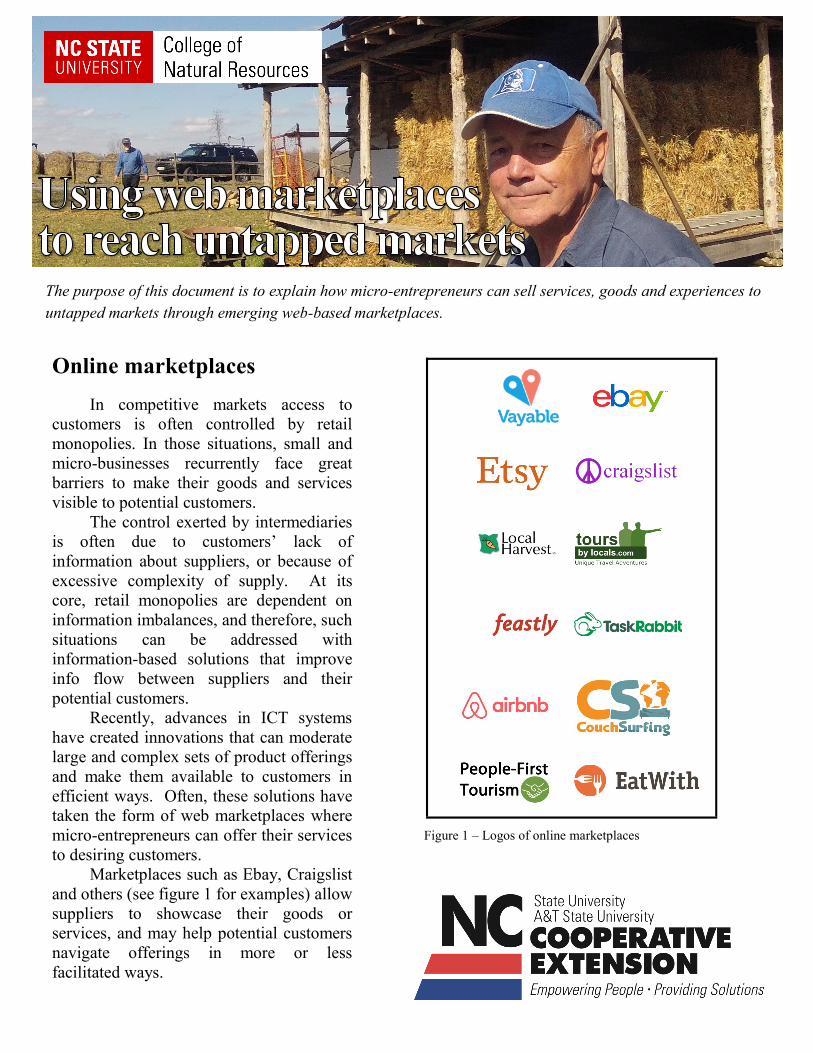
to desiring customers. Marketplaces such as Ebay, Craigslist
and others (see figure 1 for examples) allow
suppliers to showcase their goods or
services, and may help potential customers
navigate offerings in more or less
facilitated ways.
Figure 1 – Logos of online marketplaces
The system provides help and examples throughout
the process.
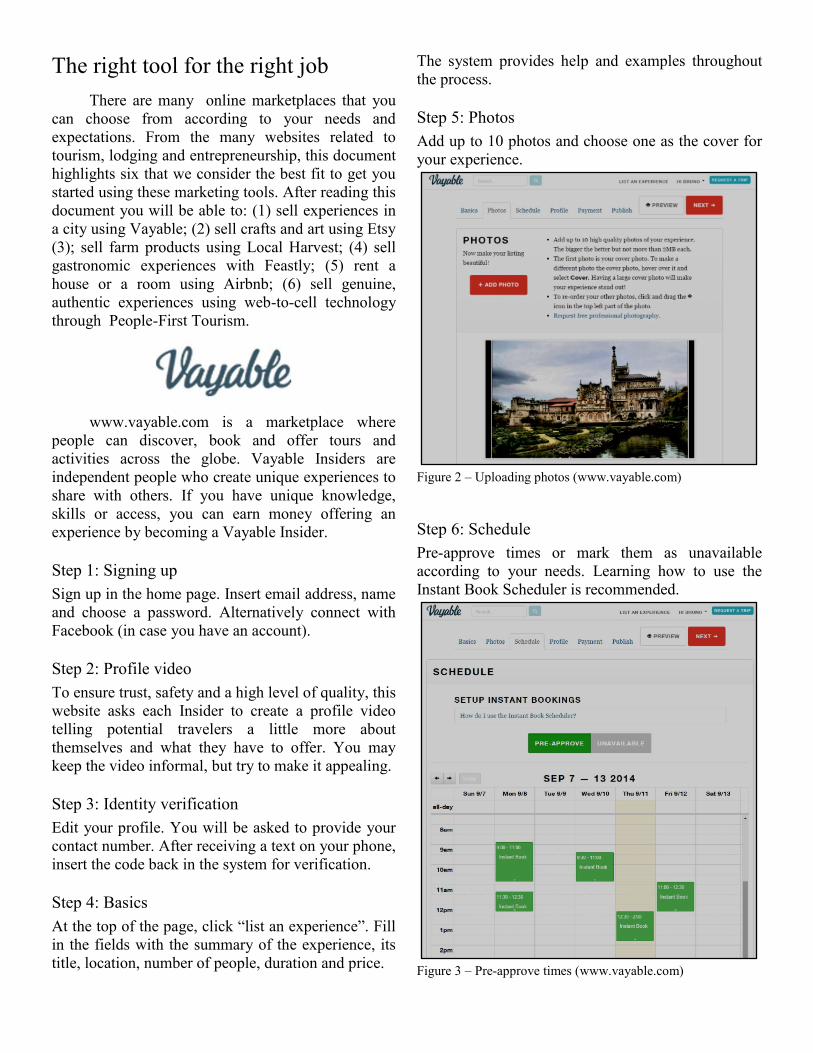
Step 5: Photos
Add up to 10 photos and choose one as the cover for
your experience.
Figure 2 – Uploading photos (www.vayable.com)
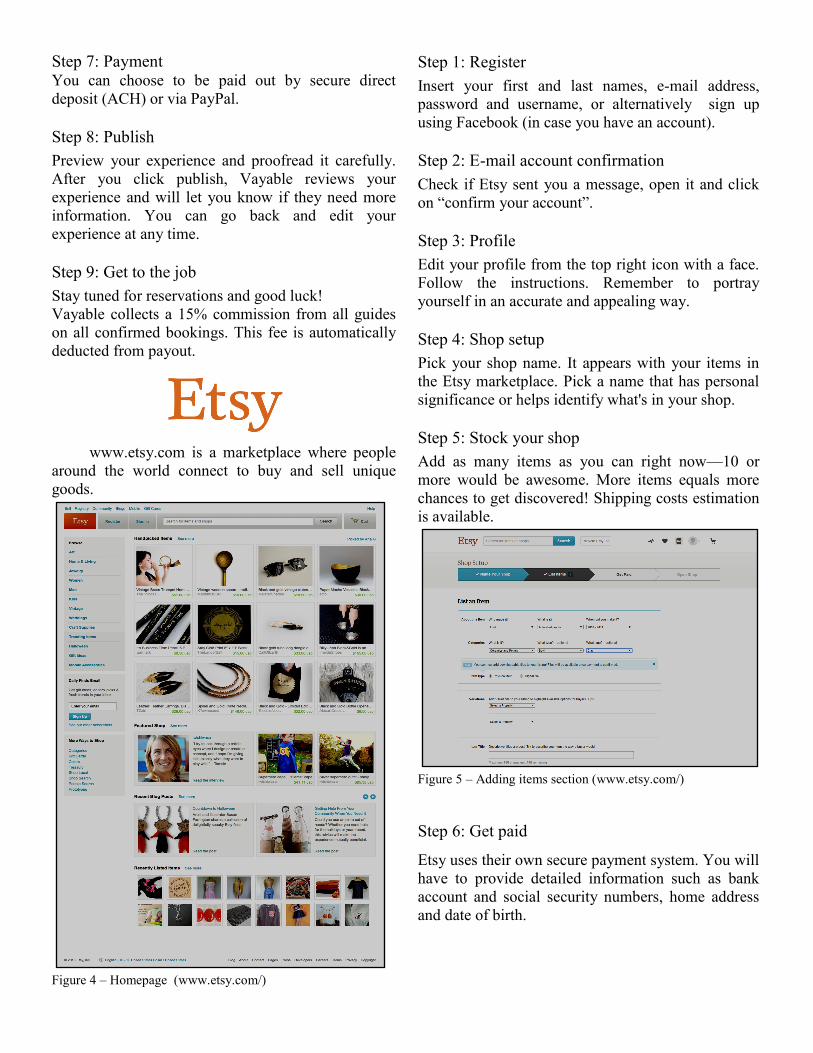
Step 6: Schedule
Pre-approve times or mark them as unavailable
according to your needs. Learning how to use the
Instant Book Scheduler is recommended.
Figure 3 – Pre-approve times (www.vayable.com)
The right tool for the right job
There are many online marketplaces that you
can choose from according to your needs and
expectations. From the many websites related to
tourism, lodging and entrepreneurship, this document
highlights six that we consider the best fit to get you
started using these marketing tools. After reading this
document you will be able to: (1) sell experiences in
a city using Vayable; (2) sell crafts and art using Etsy
(3); sell farm products using Local Harvest; (4) sell
gastronomic experiences with Feastly; (5) rent a
house or a room using Airbnb; (6) sell genuine,
authentic experiences using web-to-cell technology
through People-First Tourism.
www.vayable.com is a marketplace where
people can discover, book and offer tours and
activities across the globe. Vayable Insiders are
independent people who create unique experiences to
share with others. If you have unique knowledge,
skills or access, you can earn money offering an
experience by becoming a Vayable Insider.
Step 1: Signing up
Sign up in the home page. Insert email address, name
and choose a password. Alternatively connect with
Facebook (in case you have an account).
Step 2: Profile video
To ensure trust, safety and a high level of quality, this
website asks each Insider to create a profile video
telling potential travelers a little more about
themselves and what they have to offer. You may
keep the video informal, but try to make it appealing.
Step 3: Identity verification
Edit your profile. You will be asked to provide your
contact number. After receiving a text on your phone,
insert the code back in the system for verification.
Step 4: Basics
At the top of the page, click “list an experience”. Fill
in the fields with the summary of the experience, its
title, location, number of people, duration and price.
Step 1: Register
Insert your first and last names, e-mail address,
password and username, or alternatively sign up
using Facebook (in case you have an account).
Step 2: E-mail account confirmation
Check if Etsy sent you a message, open it and click
on “confirm your account”.
Step 3: Profile
Edit your profile from the top right icon with a face.
Follow the instructions. Remember to portray
yourself in an accurate and appealing way.
Step 4: Shop setup
Pick your shop name. It appears with your items in
the Etsy marketplace. Pick a name that has personal
significance or helps identify what's in your shop.
Step 5: Stock your shop
Add as many items as you can right now—10 or
more would be awesome. More items equals more
chances to get discovered! Shipping costs estimation
is available.
Figure 5 – Adding items section (www.etsy.com/)
Step 6: Get paid
Etsy uses their own secure payment system. You will
have to provide detailed information such as bank
account and social security numbers, home address
and date of birth.
Step 7: Payment You can choose to be paid out by secure direct
deposit (ACH) or via PayPal.
Step 8: Publish
Preview your experience and proofread it carefully.
After you click publish, Vayable reviews your
experience and will let you know if they need more
information. You can go back and edit your
experience at any time.
Step 9: Get to the job
Stay tuned for reservations and good luck!
Vayable collects a 15% commission from all guides
on all confirmed bookings. This fee is automatically
deducted from payout.
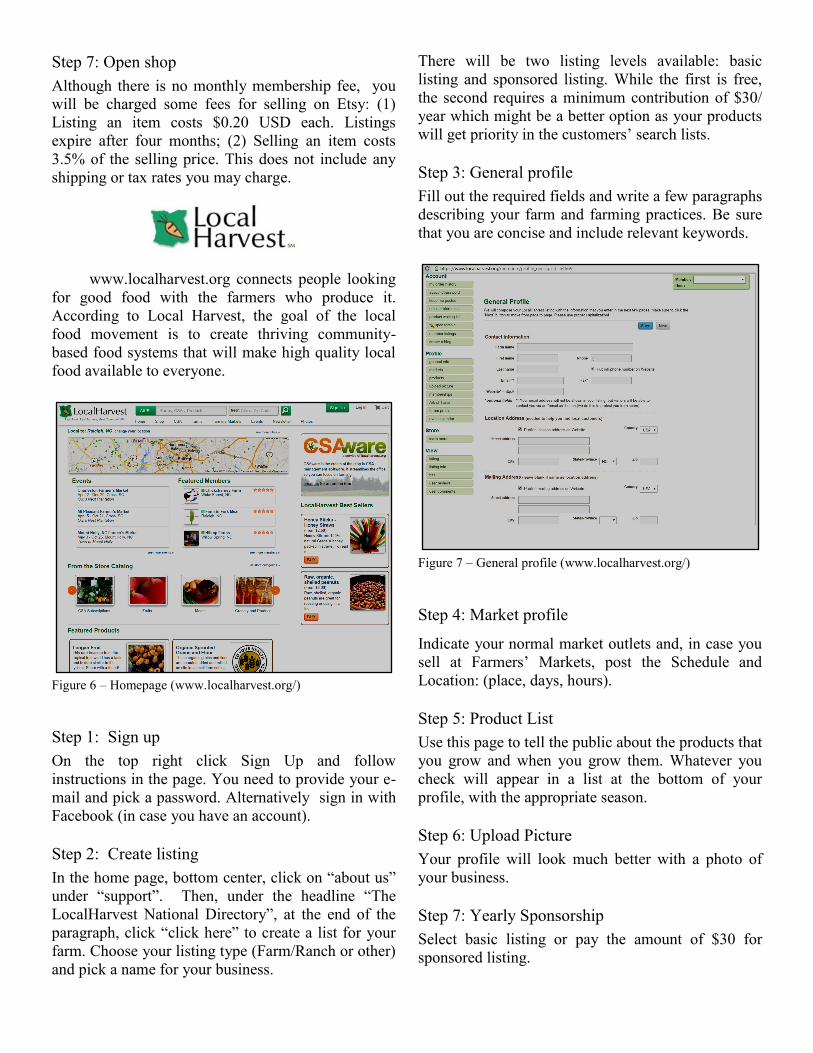
www.etsy.com is a marketplace where people
around the world connect to buy and sell unique
goods.
Figure 4 – Homepage (www.etsy.com/)
Step 7: Open shop
Although there is no monthly membership fee, you
will be charged some fees for selling on Etsy: (1)
Listing an item costs $0.20 USD each. Listings
expire after four months; (2) Selling an item costs
3.5% of the selling price. This does not include any
shipping or tax rates you may charge.
www.localharvest.org connects people looking
for good food with the farmers who produce it.
According to Local Harvest, the goal of the local
food movement is to create thriving community-
based food systems that will make high quality local
food available to everyone.
Figure 6 – Homepage (www.localharvest.org/)
Step 1: Sign up
On the top right click Sign Up and follow
instructions in the page. You need to provide your e-
mail and pick a password. Alternatively sign in with
Facebook (in case you have an account).
Step 2: Create listing
In the home page, bottom center, click on “about us”
under “support”. Then, under the headline “The
LocalHarvest National Directory”, at the end of the
paragraph, click “click here” to create a list for your
farm. Choose your listing type (Farm/Ranch or other)
and pick a name for your business.
There will be two listing levels available: basic
listing and sponsored listing. While the first is free,
the second requires a minimum contribution of $30/
year which might be a better option as your products
will get priority in the customers’ search lists.
Step 3: General profile
Fill out the required fields and write a few paragraphs
describing your farm and farming practices. Be sure
that you are concise and include relevant keywords.
Figure 7 – General profile (www.localharvest.org/)
Step 4: Market profile
Indicate your normal market outlets and, in case you
sell at Farmers’ Markets, post the Schedule and
Location: (place, days, hours).
Step 5: Product List
Use this page to tell the public about the products that
you grow and when you grow them. Whatever you
check will appear in a list at the bottom of your
profile, with the appropriate season.
Step 6: Upload Picture
Your profile will look much better with a photo of
your business.
Step 7: Yearly Sponsorship
Select basic listing or pay the amount of $30 for
sponsored listing.
Step 8: Ark of Taste Product List
Use this page to tell the public of any Slow Food Ark
of Taste products that you grow or manufacture. You
can learn more about this concept in the website.
Step 9: Calendar of Events
If you would like to maintain a calendar of events
with LocalHarvest, you can add them here. Your
events will be shown as part of your listing and will
be available for view by all visitors looking for
information in your area through the LocalHarvest
events calendar.
Step 10: Your Storefront
After you submit, you come to a screen that says
"Thank you. Now LocalHarvest will review your store
to ensure that it complies with their standards, and
approve it for inclusion in the catalog. Please notice
that if you are accepted LocalHarvest will retain a
payment of 15% of each sale as a commission
(before shipping or taxes,) and of 6% over the
shipping fees, to cover their credit card processing
costs. Their commission for CSA subscriptions is
6%. You will be able to create your Localharvest
store after they approve your listing.
www.eatwith.com offers you a fun and easy
way to host an unforgettable experience in your
home. Prepare your favorite dishes, meet interesting
people and share your unique cultural perspective.
And, earn some extra income on the side! EatWith is
growing fast but it is likely that it might not be
currently accepting host applications in your location.
Step 1: Sign up
Sign up on the top right. Provide your first and last
names, email address and a password. Choose your
country. Alternatively sign up with Facebook (in case
you have an account).
Step 2: Become a host
Once you are logged in you’ll be redirected to the
home page. Here, on the top right you’ll be able to
see your name. Click on the drop arrow and then
dashboard. Once in the dashboard, scroll down. Click
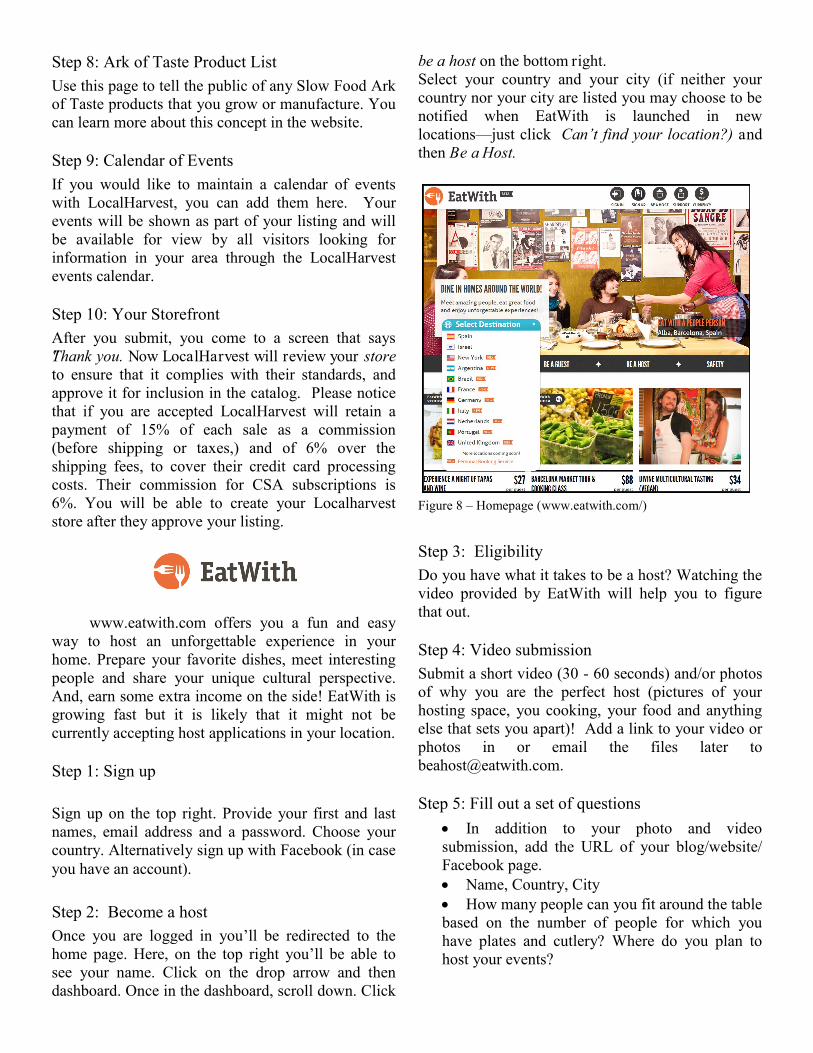
be a host on the bottom right.
Select your country and your city (if neither your
country nor your city are listed you may choose to be
notified when EatWith is launched in new
locations—just click Can’t find your location?) and
then Be a Host.
Figure 8 – Homepage (www.eatwith.com/)
Step 3: Eligibility
Do you have what it takes to be a host? Watching the
video provided by EatWith will help you to figure
that out.
Step 4: Video submission
Submit a short video (30 - 60 seconds) and/or photos
of why you are the perfect host (pictures of your
hosting space, you cooking, your food and anything
else that sets you apart)! Add a link to your video or
photos in or email the files later to
Step 5: Fill out a set of questions
In addition to your photo and video
submission, add the URL of your blog/website/
Facebook page.
Name, Country, City
How many people can you fit around the table
based on the number of people for which you
have plates and cutlery? Where do you plan to
host your events?
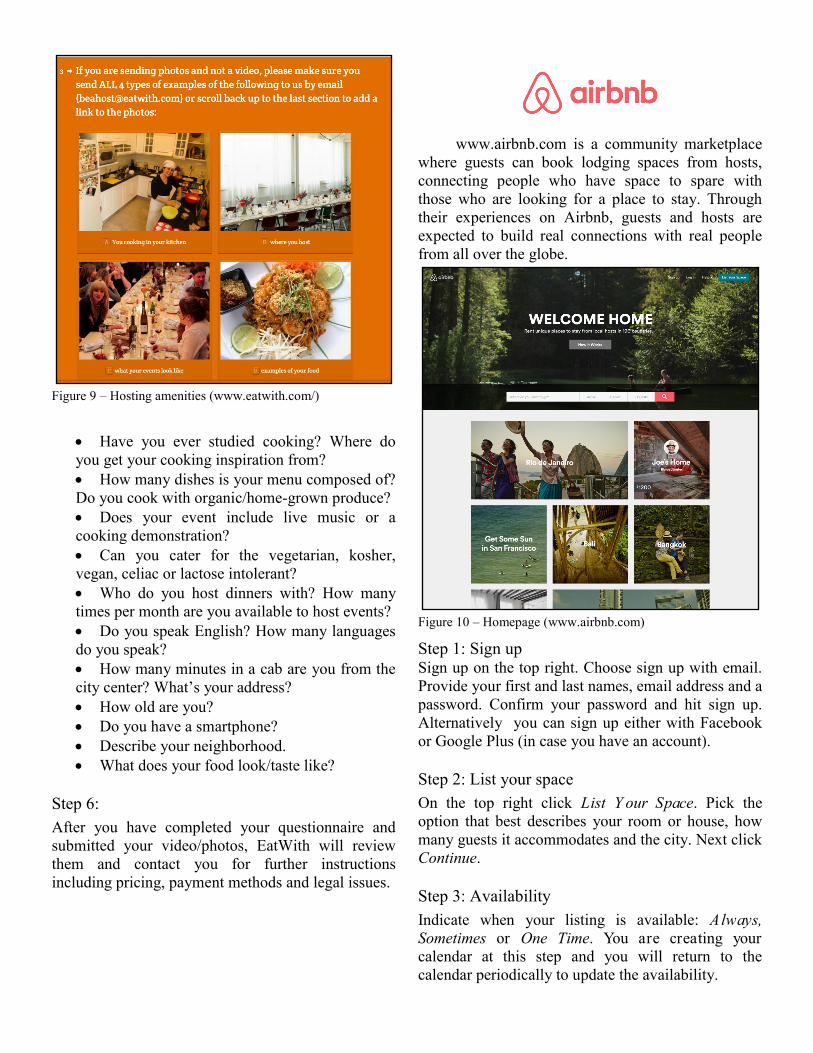
Figure 9 – Hosting amenities (www.eatwith.com/)
Have you ever studied cooking? Where do
you get your cooking inspiration from?
How many dishes is your menu composed of?
Do you cook with organic/home-grown produce?
Does your event include live music or a
cooking demonstration?
Can you cater for the vegetarian, kosher,
vegan, celiac or lactose intolerant?
Who do you host dinners with? How many
times per month are you available to host events?
Do you speak English? How many languages
do you speak?
How many minutes in a cab are you from the
city center? What’s your address?
How old are you?
Do you have a smartphone?
Describe your neighborhood.
What does your food look/taste like?
Step 6:
After you have completed your questionnaire and
submitted your video/photos, EatWith will review
them and contact you for further instructions
including pricing, payment methods and legal issues.
www.airbnb.com is a community marketplace
where guests can book lodging spaces from hosts,
connecting people who have space to spare with
those who are looking for a place to stay. Through
their experiences on Airbnb, guests and hosts are
expected to build real connections with real people
from all over the globe.
Figure 10 – Homepage (www.airbnb.com)
Step 1: Sign up Sign up on the top right. Choose sign up with email.
Provide your first and last names, email address and a
password. Confirm your password and hit sign up.
Alternatively you can sign up either with Facebook
or Google Plus (in case you have an account).
Step 2: List your space
On the top right click List Y our Space. Pick the
option that best describes your room or house, how
many guests it accommodates and the city. Next click
Continue.
Step 3: Availability
Indicate when your listing is available: Always,
Sometimes or One Time. You are creating your
calendar at this step and you will return to the
calendar periodically to update the availability.
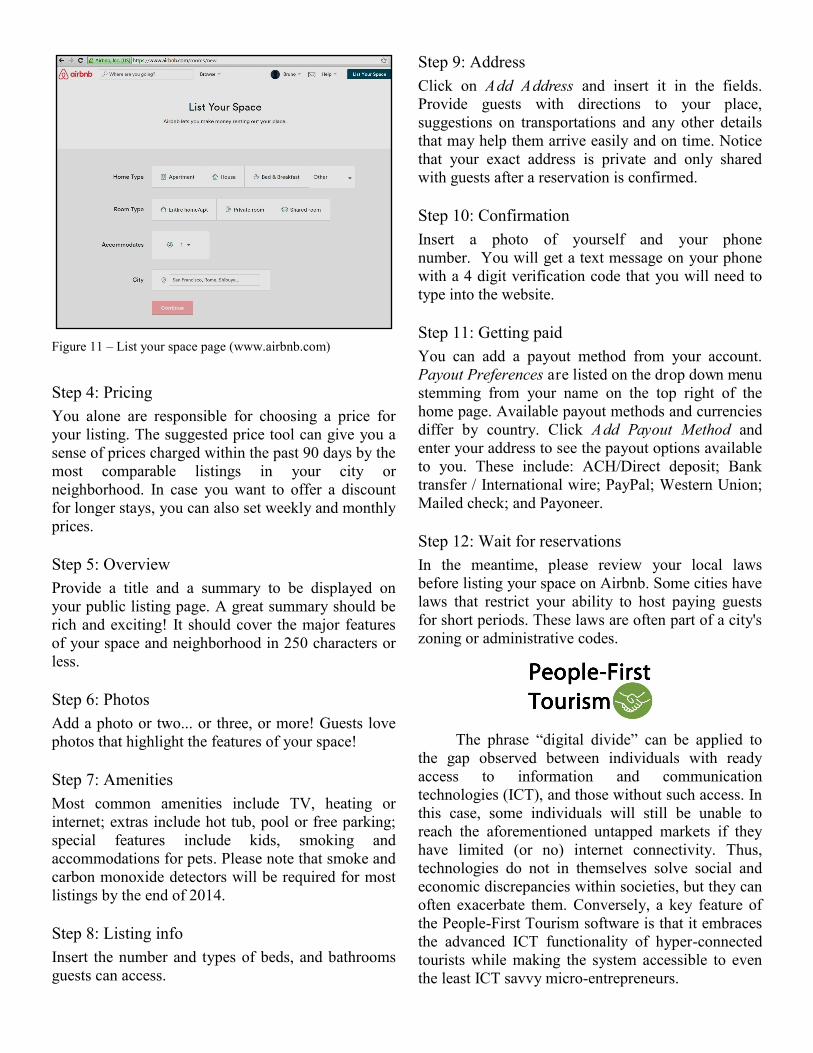
Figure 11 – List your space page (www.airbnb.com)
Step 4: Pricing
You alone are responsible for choosing a price for
your listing. The suggested price tool can give you a
sense of prices charged within the past 90 days by the
most comparable listings in your city or
neighborhood. In case you want to offer a discount
for longer stays, you can also set weekly and monthly
prices.
Step 5: Overview
Provide a title and a summary to be displayed on
your public listing page. A great summary should be
rich and exciting! It should cover the major features
of your space and neighborhood in 250 characters or
less.
Step 6: Photos
Add a photo or two... or three, or more! Guests love
photos that highlight the features of your space!
Step 7: Amenities
Most common amenities include TV, heating or
internet; extras include hot tub, pool or free parking;
special features include kids, smoking and
accommodations for pets. Please note that smoke and
carbon monoxide detectors will be required for most
listings by the end of 2014.
Step 8: Listing info
Insert the number and types of beds, and bathrooms
guests can access.
Step 9: Address
Click on Add Address and insert it in the fields.
Provide guests with directions to your place,
suggestions on transportations and any other details
that may help them arrive easily and on time. Notice
that your exact address is private and only shared
with guests after a reservation is confirmed.
Step 10: Confirmation
Insert a photo of yourself and your phone
number. You will get a text message on your phone
with a 4 digit verification code that you will need to
type into the website.
Step 11: Getting paid
You can add a payout method from your account.
Payout Preferences are listed on the drop down menu
stemming from your name on the top right of the
home page. Available payout methods and currencies
differ by country. Click Add Payout Method and
enter your address to see the payout options available
to you. These include: ACH/Direct deposit; Bank
transfer / International wire; PayPal; Western Union;
Mailed check; and Payoneer.
Step 12: Wait for reservations
In the meantime, please review your local laws
before listing your space on Airbnb. Some cities have
laws that restrict your ability to host paying guests
for short periods. These laws are often part of a city's
zoning or administrative codes.
The phrase “digital divide” can be applied to
the gap observed between individuals with ready
access to information and communication
technologies (ICT), and those without such access. In
this case, some individuals will still be unable to
reach the aforementioned untapped markets if they
have limited (or no) internet connectivity. Thus,
technologies do not in themselves solve social and
economic discrepancies within societies, but they can
often exacerbate them. Conversely, a key feature of
the People-First Tourism software is that it embraces
the advanced ICT functionality of hyper-connected
tourists while making the system accessible to even
the least ICT savvy micro-entrepreneurs.
2
1
3
4
5
6
7
8
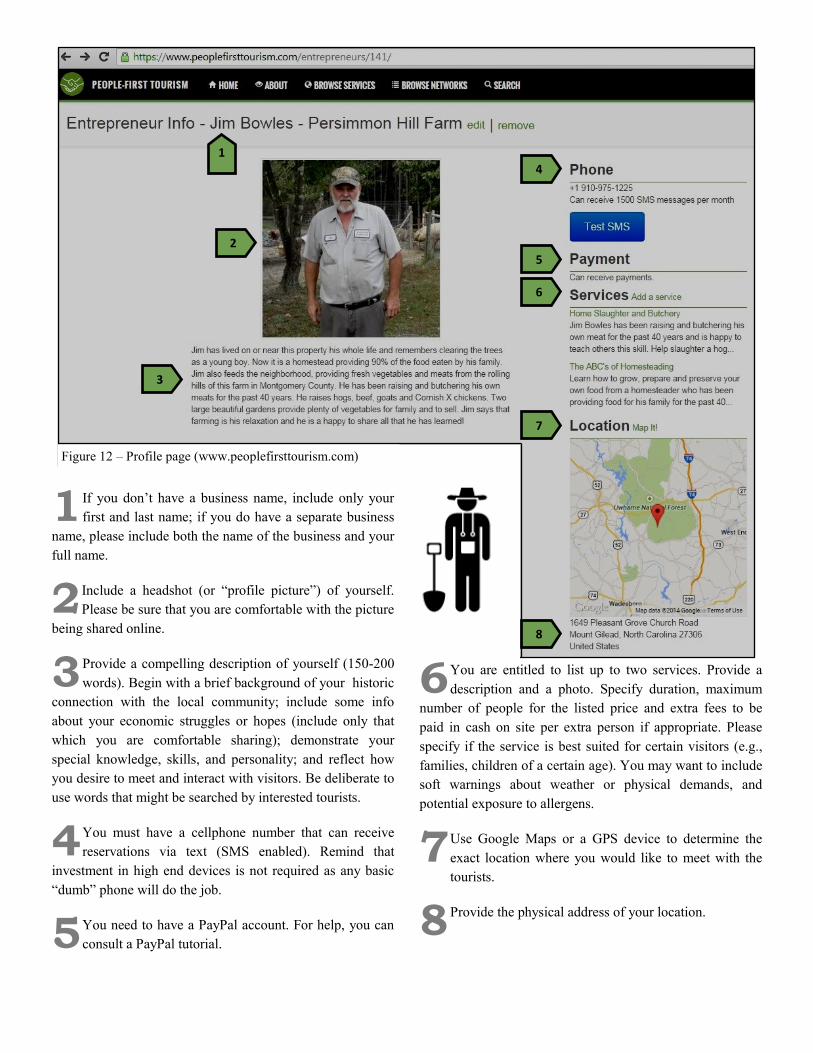
1 If you don’t have a business name, include only your
first and last name; if you do have a separate business
name, please include both the name of the business and your
full name.
2 Include a headshot (or “profile picture”) of yourself.
Please be sure that you are comfortable with the picture
being shared online.
3 Provide a compelling description of yourself (150-200
words). Begin with a brief background of your historic
connection with the local community; include some info
about your economic struggles or hopes (include only that
which you are comfortable sharing); demonstrate your
special knowledge, skills, and personality; and reflect how
you desire to meet and interact with visitors. Be deliberate to
use words that might be searched by interested tourists.
4 You must have a cellphone number that can receive
reservations via text (SMS enabled). Remind that
investment in high end devices is not required as any basic
“dumb” phone will do the job.
5 You need to have a PayPal account. For help, you can
consult a PayPal tutorial.
6 You are entitled to list up to two services. Provide a
description and a photo. Specify duration, maximum
number of people for the listed price and extra fees to be
paid in cash on site per extra person if appropriate. Please
specify if the service is best suited for certain visitors (e.g.,
families, children of a certain age). You may want to include
soft warnings about weather or physical demands, and
potential exposure to allergens.
7 Use Google Maps or a GPS device to determine the
exact location where you would like to meet with the
tourists.
8 Provide the physical address of your location.
Figure 12 – Profile page (www.peoplefirsttourism.com)
P1T at a glance www.peoplefirstourism.com is a marketplace
for buying and selling genuine tourism experiences.
This project links entrepreneurs trying to pursue
dignified and sustainable livelihoods through tourism
with adventurous and conscientious tourists
interested in unique off the beaten path experiences
and in making positive impacts on the communities
they visit.
Figure 13 – NC home page (www.peoplefirsttourism.com/NC)
Travelers interested in supporting local economies
and people, while also having meaningful tourism
experiences, can register on this site and search for
providers based on geographic location or type of
activity. Once a desirable provider or product is
identified, travelers can fill out a reservation inquiry
that is submitted via SMS to the entrepreneur's cell
phone. The travelers will receive an email answer
some time later from the entrepreneur confirming
availability or declining the reservation. Once
travelers receive confirmation of the reservation, they
are prompted to pre-pay for the service through
PayPal.
This reservation process was designed in
consultation with tourism micro-entrepreneurs to
maximize their ability to be involved in selling
tourism services despite their unreliable access to
communications and their complex work schedules.
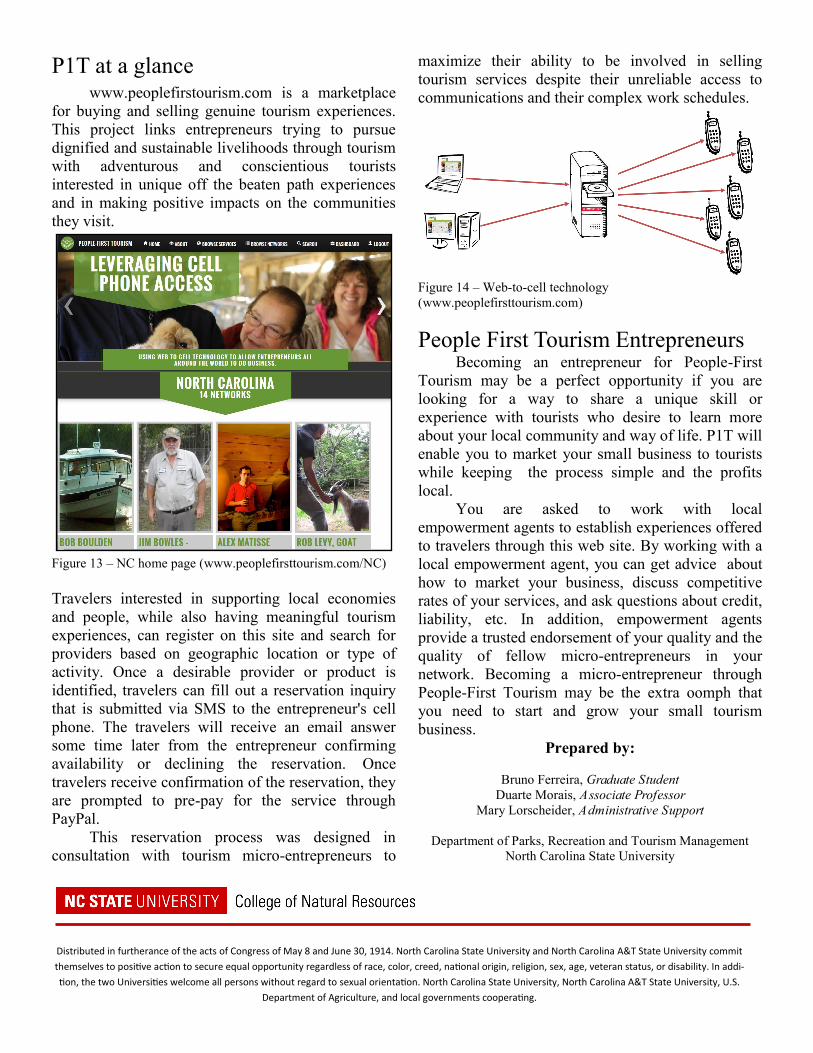
Figure 14 – Web-to-cell technology
(www.peoplefirsttourism.com)
People First Tourism Entrepreneurs Becoming an entrepreneur for People-First
Tourism may be a perfect opportunity if you are
looking for a way to share a unique skill or
experience with tourists who desire to learn more
about your local community and way of life. P1T will
enable you to market your small business to tourists
while keeping the process simple and the profits
local.
You are asked to work with local
empowerment agents to establish experiences offered
to travelers through this web site. By working with a
local empowerment agent, you can get advice about
how to market your business, discuss competitive
rates of your services, and ask questions about credit,
liability, etc. In addition, empowerment agents
provide a trusted endorsement of your quality and the
quality of fellow micro-entrepreneurs in your
network. Becoming a micro-entrepreneur through
People-First Tourism may be the extra oomph that
you need to start and grow your small tourism
business.
Prepared by:
Bruno Ferreira, Graduate Student
Duarte Morais, Associate Professor
Mary Lorscheider, Administrative Support
Department of Parks, Recreation and Tourism Management
North Carolina State University
Distributed in furtherance of the acts of Congress of May 8 and June 30, 1914. North Carolina State University and North Carolina A&T State University commit
themselves to positive action to secure equal opportunity regardless of race, color, creed, national origin, religion, sex, age, veteran status, or disability. In addi-
tion, the two Universities welcome all persons without regard to sexual orientation. North Carolina State University, North Carolina A&T State University, U.S.
Department of Agriculture, and local governments cooperating.