dv8 offroad tcjl-02 2018+ jl tire carrier · 2018+ jl tire carrier (recommend up to a 42x12.50”...
TRANSCRIPT

DV8 Offroad TCJL-02
2018+ JL Tire Carrier (Recommend up to a 42x12.50” tire)
1. Begin by removing factory tire carrier assembly from JL.
a. Be sure to keep all factory components since you will utilize parts from factory carrier.
2. Open your new TCJL-02 and inspect all items prior to installation.
3. Remove both driver side and passenger tail lights from vehicle. Set aside.
a. Access bolt for light remove by popping out access panel on each side of the interior of the Jeep.
4. On the passenger side, remove interior panel that surrounds the rear hatch closing mechanism and wiring.
a. Take care not to break tabs holding enclosure to vehicle.

5. Remove rear panel off rear hatch by prying up a corner and pull straight back. If pulled at an angle, you can
potentially break pins.
6. Locate rear camera wiring and third brake light wiring. Since you have removed the factory carrier assembly,
unplug these two items and feed extensions out the front of the rear gate.

7. Remove the wiring from the rear hatch. Release the zip ties by holding down catch and pulling down on the
plastic zip tie. Once wiring is free from rear door. Carefully remove all tape and protective jacket to expose all
wires.
a. Feed the camera and third brake light plugs and wiring back towards Jeep. Do one at a time and be
careful to not tangle the wires.
8. Pull the third brake light and rear view camera wires through sheathing near hinges and feed into hole above
hinges for rear gate as shown.

9. Once wiring is routed through grommet and out brake light hole, set it aside for now. Begin by removing rear
door from factory hinges. Using torx bit, remove hinges. Using socket remove rear door stopper bolt. Set door
inside Jeep safely.
10. Drill 5/8” hole on bottom side of passenger side light. Feed wiring for camera and third brake light. Feed wires
through. Reinstall light. NOTE: You will not be able to remove light once hinges are installed.

11. Remove factory hinges from vehicle. Using the new DV8 hinges. Install the hinges into the factory position
with factory hardware. Use a small dab of blue lock tight on each bolt. Do not secure yet.
12. Install hatch hinges onto hinges using provided hardware. Tighten down until hinges are secure.

13. Install rear door onto hinges using provided hardware. Once door is secure, close the door and tighten the (6)
hinge bolts with thread lock to 65ft lbs. Ensure the door is aligned on all edges prior to tightening the (6) bolts.
14. Install carrier onto hinges using provided hardware. This is best to do with help. Tighten hardware until carrier
is secure.

15. Once carrier is installed, swing carrier open and close to ensure a tight but unobstructed open and closing
movement. Install the threaded tire post onto the carrier using provided hardware. Next, install tire using
rubber cone, round plate, and “T” handle.
16. Once the tire is installed on carrier, mount driver side catch with spring loaded pins onto carrier as show. You
will use the bracket to mark holes for drilling. NOTE: You must do this with full weight of tire and wheel on
carrier.

17.
18. Close carrier against jeep and mark center of holes. Make sure carrier is level and straight. Begin by drilling a
small pilot hole using the marks from the bracket. Once pilot hole is made, insert backing (support) plate into tail
light hole. Check to make sure holes align.
19. Once hole position is confirmed, drill the (4) holes shown below that bolt the plate to the Jeep using a 7/16”
drill bit. Once holes are drilled, install bracket and support plate using supplied hardware.
a. Drill (2) holes for bumpers with ¼” drill bit. Install rubber bumpers.

20. Close gate and check fitment. Reinstall driver side taillight.
21. From the factory carrier, remove the factory stud plate by undoing the two screws on the factory tire mount.

22. Using a punch, lightly tap out the factory camera mount. NOTE: This is plastic and so be careful and punch out
the two holes in the center equally.
23. Unscrew camera from factory mount and install to new carrier along with camera protective cover using
provided hardware.
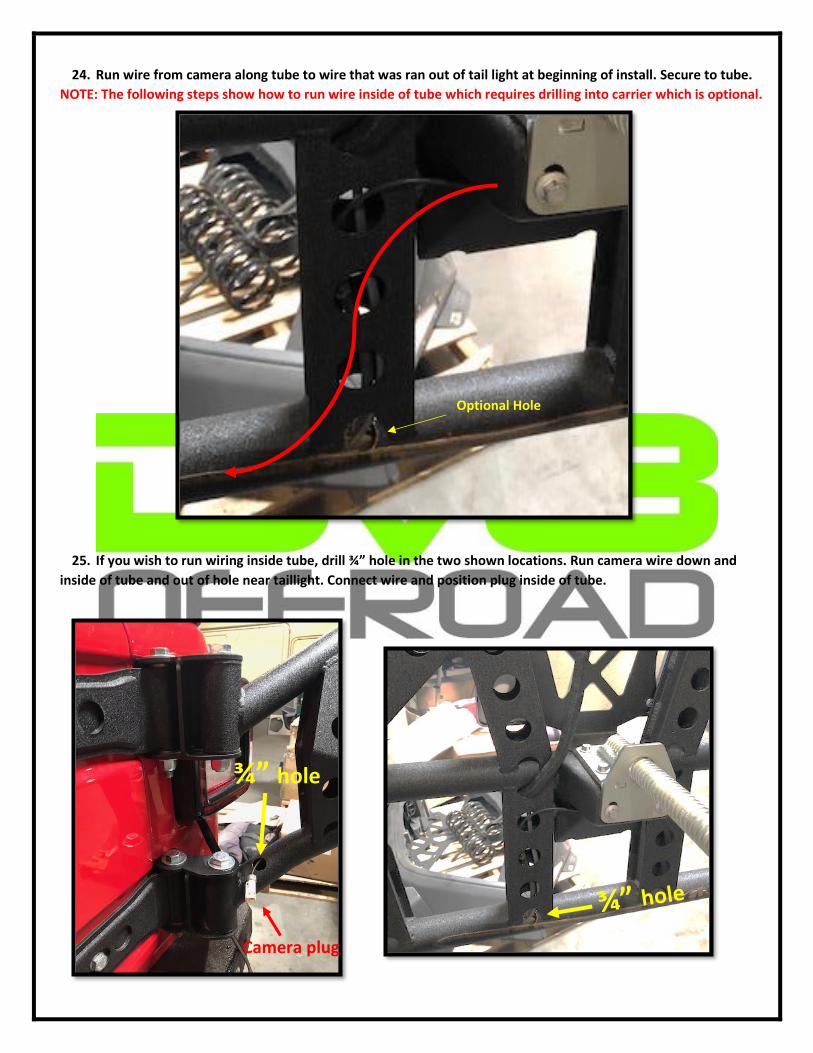
24. Run wire from camera along tube to wire that was ran out of tail light at beginning of install. Secure to tube.
NOTE: The following steps show how to run wire inside of tube which requires drilling into carrier which is optional.
25. If you wish to run wiring inside tube, drill ¾” hole in the two shown locations. Run camera wire down and
inside of tube and out of hole near taillight. Connect wire and position plug inside of tube.
Optional Hole
¾” hole
Camera plug

26. Once wired, leave enough excess from carrier to tail light to allow opening and closing. You can utilize the
factory rubber plug from rear hatch as a grommet. Slice grommet all the way down on one side, allowing you to
wrap it around the wires and place it into the ¾” hole.
27. Check all components to ensure all items are installed properly and replace factory interior panels.
If you have any questions or concerns, please email us at [email protected] or call us
at 951-680-9595.