dutch caps and veils
TRANSCRIPT

Dutch Caps and VeilsBY BRIDGET WALKER
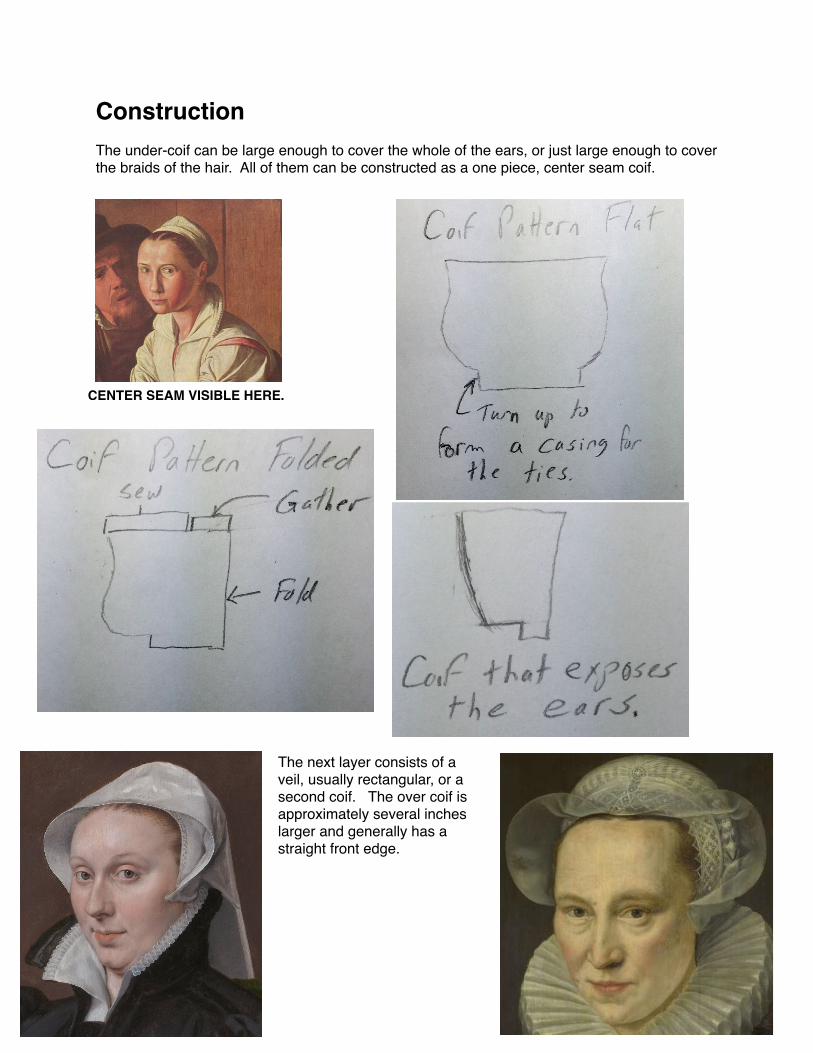
Construction
The under-coif can be large enough to cover the whole of the ears, or just large enough to cover the braids of the hair. All of them can be constructed as a one piece, center seam coif.
The next layer consists of a veil, usually rectangular, or a second coif. The over coif is approximately several inches larger and generally has a straight front edge.
CENTER SEAM VISIBLE HERE.
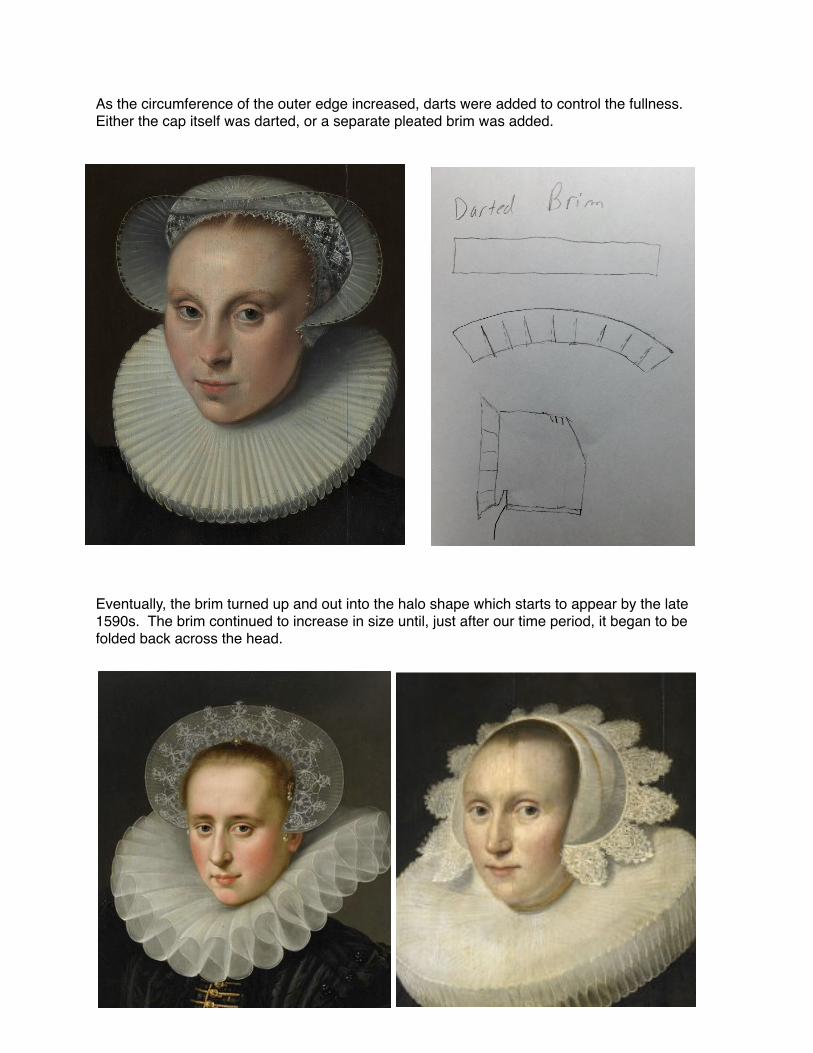
As the circumference of the outer edge increased, darts were added to control the fullness. Either the cap itself was darted, or a separate pleated brim was added.
Eventually, the brim turned up and out into the halo shape which starts to appear by the late 1590s. The brim continued to increase in size until, just after our time period, it began to be folded back across the head.

Giving the Cap Shape
Although the caps and veils are made up very simple pattern pieces, giving them the quintessential "Dutch" shape requires a few more tools:
Ear Irons
The ear iron, or oorijzer, is a metal support for the headdress, worn as shown in the picture on the right. Early versions were bare wire hidden under the coif, but they developed into elaborate, visible jewelry. They are still present in modern Dutch folk costume. For our period, they are essential for any style in which the ears are left uncovered by the under coif, and very useful for the rest.
Starch
1. Acquire starch. Wheat starch is available in Asian markets and on line. Corn starch may already be in your pantry.
2. Dissolve two tablespoons of starch into one cup of cold water. Whisk very well. Any lumps left at this stage will not dissolve as the starch is cooked.
3. Microwave starch in short bursts. Starch will start as a milky liquid. It's done when it becomes translucent and gelatinous.
4. WAIT UNTIL IT COOLS. No, really. Your fingers will thank you.
5. Your cap should be slightly damp. Dry fabric does not take starch as well. Fabric that is too wet will dilute the starch.
6. Work starch into the fibers of your cap. Just dipping it will not work. Squish it in there and squeegee off the extra. If starching a veil, heavily starch the front, and then taper the starch off. If the back has too much starch it is hard to fold.
7. Dry in the sun, on a sweater rack in your dryer, in your dehydrator, or in your oven.
8. When dry, iron the front edge flat with a lot of pressure and a moderate amount of steam.
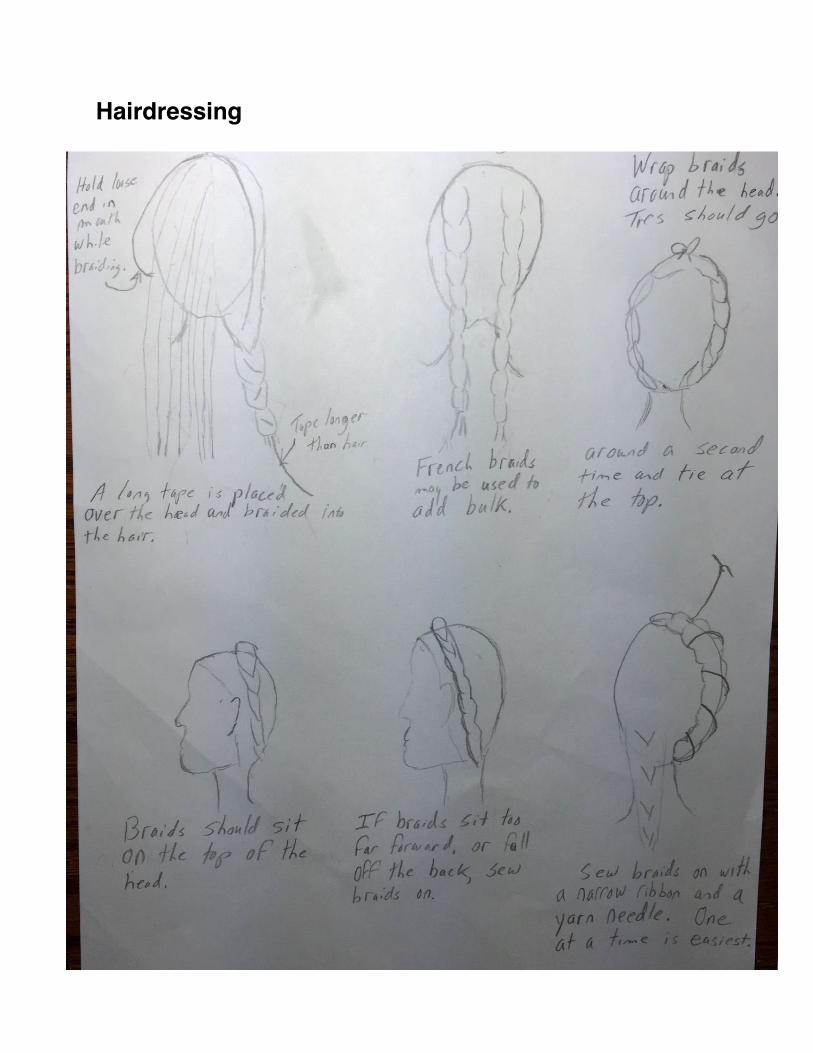
Hairdressing

The goal of this hair style is to create a stable ridge of hair which becomes the anchor point for the ear irons and the under coif. If the hair is short, here are some potential solutions:
If the hair is too short to be added to or put into ponytails, the only solution may be to put chin strap on the under coif. This is actually seen in a number of period portraits. Very short hair will not be able to wear styles that bare the ears, but that style occurs much less often then those that cover the ears entirely. The chin strap will preform the job of the ear iron. It will keep the coif's ear flaps down and provide a stable base for the outer cap or veil.

Finally Putting On Your Hat!
Next, put on your veil or over cap. The front edge is usually worn slightly forward of the under coif. Pin the center point to the under coif. If the under coif covers the ears, pin the cap's front corners to the coif. Anywhere from jaw line to temple can be documented. If the ears are exposed, pin the cap to the ear iron. This can be done either by wrapping the corner around the ball of the ear iron, or by folding the corner out and pining the fold to the ear iron. (The later may be tricky with the style of ear iron we have made. Many period oorijzers have pin holes, which would probably make it easier.) Then, if wearing a cap, tie the strings around your head, making sure that any fullness is behind the string. Alternatively, pin liberally into place. If wearing a veil, pin the lower edges to the under coif near the back of your head. Use your fingers to create the graceful crease shown in both pictures.
Enjoy yur hat!!

A Few Useful Resources
Janet Arnold's Patterns of Fashion 4. Covers coifs, caps, ruffs and shirts.
The book Painting & the Market in Early Modern Antwerp by Elizabeth Honig. An art historian's view of the market genre paintings, especially of Aertsen and Beukelaer.
Noel Gieleghem's excellent tutorial How To Create A Stand-Alone 1570s-Style Linen Ruff at https://attachment.fbsbx.com/file_download.php?id=474415655903760&eid=ASuTRgg7FGF6GIqfuapE8rGwraqZrsPz1_ZlXKk9krk0rQJ-5ny1SGCY6HabAaqdei4&ext=1402134403&hash=ASuZmUeaaH3w2uLW. Useful for it's general information on using starch, and for creating the ruff that your late period "Flemish" hat will eventually demand.
Karinne Taylor's website: Clothing the Low Countries: Researching and Recreating Netherlandish Clothing From the Period 1480-1530 found at http://dutchrenaissanceclothing.wordpress.com/. For anyone interested in the other half of the 1500s.
All the pictures used in this class can be found on their own Pinterest board here: http://pinterest.com/margaretgeorge1/cap-and-veil-class/
If you have any other questions, please feel free to contact me [email protected]