dressmaking grade 9 - depedmbhs.ga
TRANSCRIPT
0
Dressmaking Grade 9 Quarter 1: Module 4:Week 7-8
Republic of the Philippines Department of Education
PUBLIC TECHNICAL - VOCATIONAL

1
SPTVE
Dressmaking Grade 9 Quarter 1: Module 4
Week 7-8
MANIPULATING BASIC PATTERNS
2
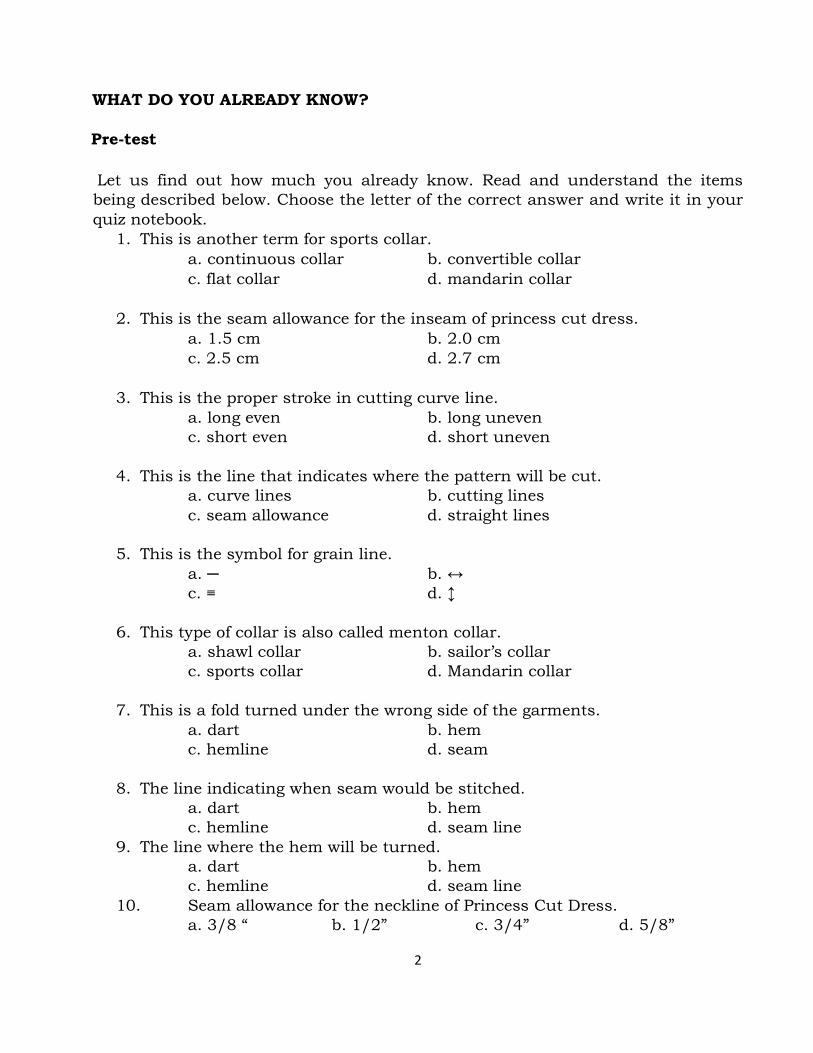
WHAT DO YOU ALREADY KNOW?
Pre-test
Let us find out how much you already know. Read and understand the items
being described below. Choose the letter of the correct answer and write it in your
quiz notebook.
1. This is another term for sports collar.
a. continuous collar b. convertible collar
c. flat collar d. mandarin collar
2. This is the seam allowance for the inseam of princess cut dress.
a. 1.5 cm b. 2.0 cm
c. 2.5 cm d. 2.7 cm
3. This is the proper stroke in cutting curve line.
a. long even b. long uneven
c. short even d. short uneven
4. This is the line that indicates where the pattern will be cut.
a. curve lines b. cutting lines
c. seam allowance d. straight lines
5. This is the symbol for grain line.
a. ─ b. ↔
c. ≡ d. ↕
6. This type of collar is also called menton collar.
a. shawl collar b. sailor’s collar
c. sports collar d. Mandarin collar
7. This is a fold turned under the wrong side of the garments.
a. dart b. hem
c. hemline d. seam
8. The line indicating when seam would be stitched.
a. dart b. hem
c. hemline d. seam line
9. The line where the hem will be turned.
a. dart b. hem
c. hemline d. seam line
10. Seam allowance for the neckline of Princess Cut Dress.
a. 3/8 “ b. 1/2” c. 3/4” d. 5/8”

3
LESSON 4 : MANIPULATING AND CUTTING FINAL PATTERNS
WHAT IS THIS LESSON ABOUT?
The lesson deals on how patterns are laid out in accordance with the
standard procedure how patterns are manipulated in accordance with the
customer’s specifications. The latter includes labelling, filling and securing
final patterns as per standard operating procedure. It also deals with the
cutting of final pattern with seam allowance in accordance with customers’
specifications.
WHAT WILL YOU LEARN?
At the end of the lesson, you should be able to:
1. lay out pattern in accordance with the standard procedure;
2. manipulate basic/block pattern in accordance with the customers’
specifications;
3. label, fill and secure the final patterns as per standard operating
procedure;
4. cut the final patterns with seam allowance in accordance with the
customers specifications; and
5. check the cut final pattern pieces.
LET US STUDY - Words to Study
• Bust point – the focal point for dart manipulation in the bodice front
• Bust-fitting dart – the fold that originates in the underarm seamline
• Dart – a fold of fabric wider at one end coming to a point at an end which gives shape to garment
• Fitting dart – are triangular folds in the cloth that fit the fabric to the curves of the body
• Hem – the fold turned under the wrong side of the garment
• Hemline – the line where the hem will be turned
• Seam allowance – space added between the cut edge and stitching line of the fabric
• Seam line – line indicating when seam would be stitched.
• Sloper – a cardboard copy of the basic pattern that dart areas and seam allowance cut away
• Waist-fitting dart - the fold that originates in the waistline
• Weights – heavy objects placed on top of patterns when tracing for the pattern not to move.
• Cutting line – the line where the pattern is to be cut.

4
Plan for the Construction of a Princess Cut Dress with Collar
Construction garment is just like building construction that needs
planning. In making a project, there must be an accompanying project plan.
This serves as a guide in making any kind of project. It contains the materials
and tools to be used, design, and procedure in making the project.
Project Plan
Date Begun:
Project Plan No.: Date
Finished:
I. Name of the Project: Princess Cut Dress with Collar and Sleeves
II. Objectives: To construct a well-fitted Princess cut dress with puff sleeve
and sports/knotched collar correctly and neatly.
III. Word Study:
Princess Cut Dress is a dress with curve lengthwise line extending
from shoulders or armhole down to the waist, hips, or hemline of a
garment.
Puff Sleeves give one youthful appearance. It produces a feeling of
width at the shoulder and on the level of the bust or just above it.
Sports Collar provides a close fit at the back of the neck whether it
is open or closed.
IV. Tools and Equipment:
• Cutting tools
• Drafting tools
• Sewing tools
• Measuring tools
• Marking tools
• Sewing machine

5
V. Materials and Supplies Needed:
Qty. Unit Description of Materials Unit Total Cost
2
1
4
9
½
TOTAL
yds.
spool
pcs.
pcs.
yds.
Polyester cotton (60 inches width)
Color thread
Pattern paper
Buttons
Pelon
Php45.00
Php10.00
Php3.00
Php5.00
Php20.00
Php90.00
Php10.00
Php12.00
Php45.00
Php10.00
Php167.00
VI. Design Specifications:
Button holes (handworked)
sports/ knotched collar
puff sleeve
Pri ncess cut dress
buttons

6
VII. Procedure:
A. Pre-sewing stage
i. Take body measurements
ii. Draft the basic pattern
1. Front and Back Bodice
2. Front and Back Skirt
3. Sleeve iii. Construct and
manipulate final pattern
1. Princess Cut dress
2. Puff Sleeves
3. Sports/Knot Collar
iv. Draft final pattern
v. Prepare materials or fabric
vi. Lay and pin pattern pieces on the fabric
vii. Cut the fabrics
viii. Transfer construction mark
B. Sewing Stage
i. Prepare sewing machine
ii. Stay-stitching
iii. Baste the interfacing
iv. Overedge edges
v. Join inseam (front and back)
vi. Join shoulder vii. Prepare collar
viii. Attach collar ix.
Join side seams
x. Prepare sleeves
xi. Attach sleeves
xii. Finish hemline
xiii. Mark and work on buttonholes
xiv. Press finish dress
xv. Fit and evaluate

7
VIII. Evaluation:
Evaluation
Weight
Student’s Grade
Teacher’s Grade
Workmanship
Accuracy
General Appearance
Speed
Work Habits
OVERALL
35%
30%
15%
10%
10%
100%
IX. Comments and Recommendations:
FLAT - PATTERN DESIGNING
Flat-Pattern Designing is working out the pattern of a garment either in
the material itself or by cutting a pattern using the foundation pattern as a
basis.
After drafting the basic/block pattern, you are now ready to manipulate the
basic pattern into casual apparel in accordance to the style specification.
Princess Cut Dress
1. Prepare the necessary tools, supplies and materials
• Tape measure
• Transparent ruler (long)
• French curve
• Hip curve
• Pencil
• Pattern paper (2pcs)
• Pins
• Scissor
• Eraser
• Weight
• Sloper

8
2. Lay the basic pattern on the pattern paper with necessary allowances for
style needed.
3. Trace the front and back basic bodice patterns and the front and back
basic skirt patterns.
4. Manipulate the basic pattern to the desired style.
• From the front bodice, get the midpoint of the shoulder and mark.
• Raise the dart point 5/8 inch (1.5 cm) upward and draw a
connecting line towards the center of the shoulder line. (use broken
line)
• For the back bodice, raise dart point by 1 inch (2.5 cm) upward
and draw a connecting line towards the shoulders dart point.
• For the lower part which is the skirt, draw straight lines from the
dart point down to the hemline.

9
5. Cut the pattern following the broken lines (cut the waistline dart and
shoulder dart). Slash a little from the bust point height toward the side
dart and close.
6. Pin all pattern pieces separately (allowing spaces for necessary flaring
and allowance) into another sheet of pattern paper.
shoulder fitting dart
1.5 cm.
waist - fitting dart
2.5 cm bust - fitting
dart
waist - fitting dart

10
7. For flaring the inseam and side
• For the inseam, add 1.5 inches (4 cm) at the hemline and connect
it into the darts
• For the side, add also 1.5 inches (4 cm) at the hemline and connect
at the upper or first hip
8. For seam allowances:
• Neckline – 3/8 inch (1 cm)
• Shoulder –3/4 inch (2 cm)
• Armhole – 5/8 inch (1.5 cm)
• Inseam – 5/8 inch (1.5 cm)
• Side seam- 1 inch (2.5 cm)
• Hemfold – 1.5 inches (4 cm)
• Center front- ¾ inch (2 cm)
Center
Front
Side of
Back Center
Back
Side of
Front
cm. 1
2 cm.
1 .5 cm.
1 .5
cm.
1.5
cm .
1 .5 cm.
1 .5 cm.
1.5 cm
.
1 .5
cm .
1 .5 cm.
2.5 cm.
2.5 cm.
2.5 cm.
2.5 cm.
2.5 cm.
2.5 cm.
2
cm .
4 cm.
4 cm.
4 cm. 4
cm. 4 cm.
4 cm. 4
cm.
4 cm.
4 cm. 4
cm.

11
Cutting of Final Pattern
Tools needed:
1. scissors
2. pin
3. weight
To cut the Princess cut dress:
1. Fold in the seam allowance and pin temporarily around he
neckline area.
2. Cut the neckline curve.
3. Turn out the following allowance of the cut pattern of the front
bodice.
4. From the shoulder and neckline corner, mark this point A,
measure 1 ½ inches (3.8cm). Mark point B.
5. From the point on the pattern on the waist level, measure 2 ½
inches (6.4cm). Mark the point C.
6. From the fold of the pattern on the hemline level, 2 ½ inches
(6.4cm). Mark the point D.
7. Connect point B to C with the slightly concave part of the ruler.
8. Connect point C to D with a straight line.
9. Cut along points B to C to D.
10. Turn the pattern so that the right side is facing up.
11. Pin the folded facing allowance and the main bodice of the
pattern around the neck area and the shoulder together.
12. Cut the outline of the front bodice on seam allowance from the
corner of the neckline to the shoulder line to the inseam to the
armhole line to the side seam and the hemline.
To Cut the Collar
1. Pin the folded part so that it will not move when cut.
2. Cut along the seam allowance.
To Cut the Sleeves
1. Pin the folded part so that it will not move when cut.
2. Turn out and cut along the seam allowance.
12
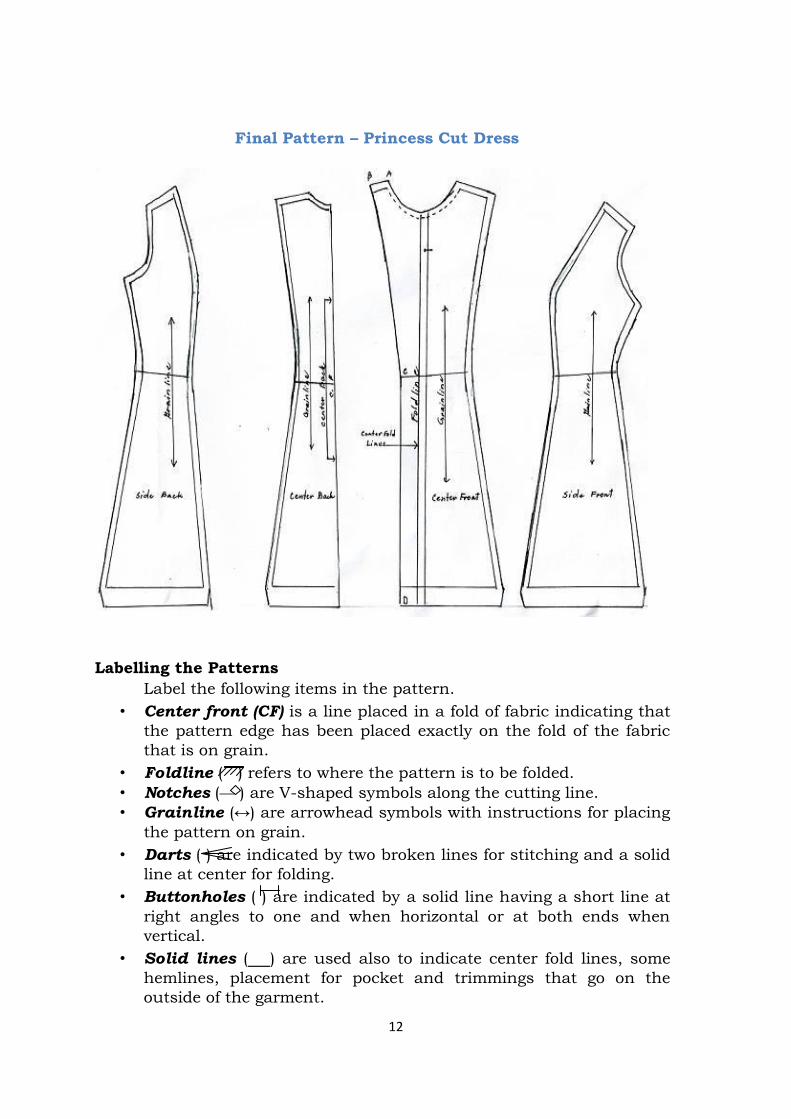
Final Pattern – Princess Cut Dress
Labelling the Patterns
Label the following items in the pattern.
• Center front (CF) is a line placed in a fold of fabric indicating that
the pattern edge has been placed exactly on the fold of the fabric
that is on grain.
• Foldline ( ) refers to where the pattern is to be folded.
• Notches ( ) are V-shaped symbols along the cutting line.
• Grainline (↔) are arrowhead symbols with instructions for placing
the pattern on grain.
• Darts ( ) are indicated by two broken lines for stitching and a solid
line at center for folding.
• Buttonholes ( ) are indicated by a solid line having a short line at
right angles to one and when horizontal or at both ends when
vertical.
• Solid lines ( ) are used also to indicate center fold lines, some
hemlines, placement for pocket and trimmings that go on the
outside of the garment.

13
• Name of pattern piece refers to the parts of pattern
• Name of person refers to the customer/client
Sports Collar or Convertible Collar. This provides a close fit at
the back of the neck whether it is open or closed. It is very practical to
wear under suit jackets and coats.
Steps in Making the Sports or Convertible Collar
1. Lower front bodice neckline by slightly removing some of the
intense curve.
2. Measure neck hole of pattern, and then divide by two.
3. Square out body ways from A.
4. From A to B is 8cm.
5. From B to C is the neckline of the pattern.
6. D is the center of B and C.
7. From C to F is 3/8 inch (1 cm). A to E is equal to B to C.

14
8. From E to E1 is 1 cm. G is the center of line AE.
9. Finish collar by shaping A, G, E1 and B, D and F.
Shawl Collar. This collar is also called menton collar. It is
designed as a variation of the continuous collar. The curve portion of
the back neckline is straightened and squared to accentuate the
hugging effect the collar is supposed to give. This is commonly done on
the surplice bodice, one which has neckline extended on each side from
the shoulder and oftentimes to the opposite side seams with the line
crossing in the center.
Here is the procedure in making the shawl collar.
1. Prepare a full front bodice.
2. Design the V-shaped neckline after establishing the surplice
bodice.
3. Design the shawl collar.
15
4. Mark front bodice center and start the overlap or closing from
this.
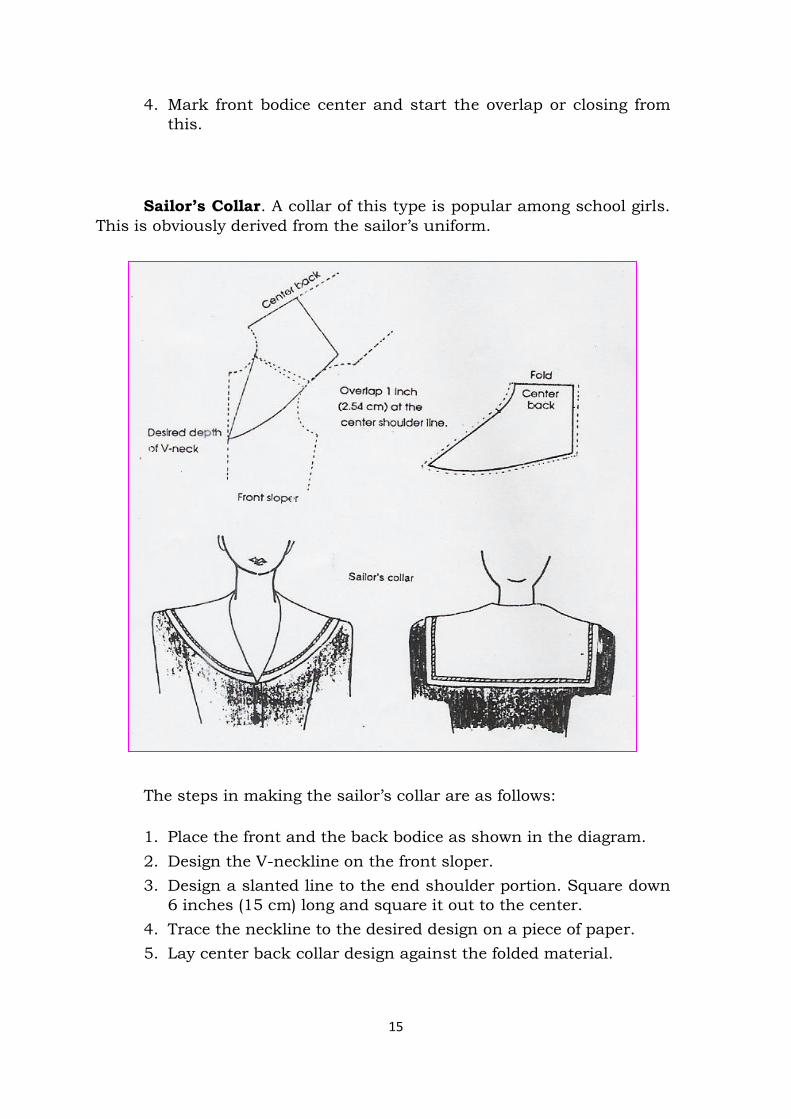
Sailor’s Collar. A collar of this type is popular among school girls.
This is obviously derived from the sailor’s uniform.
The steps in making the sailor’s collar are as follows:
1. Place the front and the back bodice as shown in the diagram.
2. Design the V-neckline on the front sloper.
3. Design a slanted line to the end shoulder portion. Square down
6 inches (15 cm) long and square it out to the center.
4. Trace the neckline to the desired design on a piece of paper.
5. Lay center back collar design against the folded material.

16
Continuous Collar. This collar is part of the bodice. This collar rests
on a V-shaped neckline and gives a good sweeping effect from the front
to the back neck without distortions. It provides a smooth soft roll and
a hanging effect at the back of the neck.
Here is the procedure in making continuous collar.
1. Formulate a V-shaped neckline on the front bodice.
2. Design the desired shape of the collar.
3. Trace collar design of front bodice.
4. Open the flopped paper under and trace printed collar design.
5. Use the highest front neckline as the basis to continue
designing the back pattern.

17
6. Square a line from A to B. the line should equal to the desired
width of the collar.
7. Bind carefully the collar design of front bodice to the center of
back bodice.
Half-Rolled Collar. This collar is very popular. It has a stand at
the back which gradually lessens in width until the collar lies flat at the
base of the throat.
Here is the procedure in making the half-rolled collar.
1. Draw around front and back bodice sloper as shown.
2. Overlap 1 inch (2.54 cm) at the outer shoulder line without
changing the neckline position.
3. Move 1 inch (2.54 cm) away from center point.
4. Shape the collar.
5. Complete the final pattern.

18
Mandarin Collar. This is popularly called Chinese collar, standing
collar, or oriental collar. It fits very snugly around the neck giving one a
prim look.
The following are the steps in making the mandarin collar.
1. Measure the base neck circumference. Then divide by 2.
2. Square out both ways from A.
3. Measure 1.18 inches (3cm) from A to B.
4. Measure one-half of base neck circumference online AE.
Mark D as ½ of line AE.
5. Move up ¾ inch (1.90cm) from E to E1.
6. Measure 1 inch (2.54cm) from C to C1.
7. Bend AE1 through point D with a soft curve. Do the same for
BC1.
8. Finish collar by shaping C1E1.
19
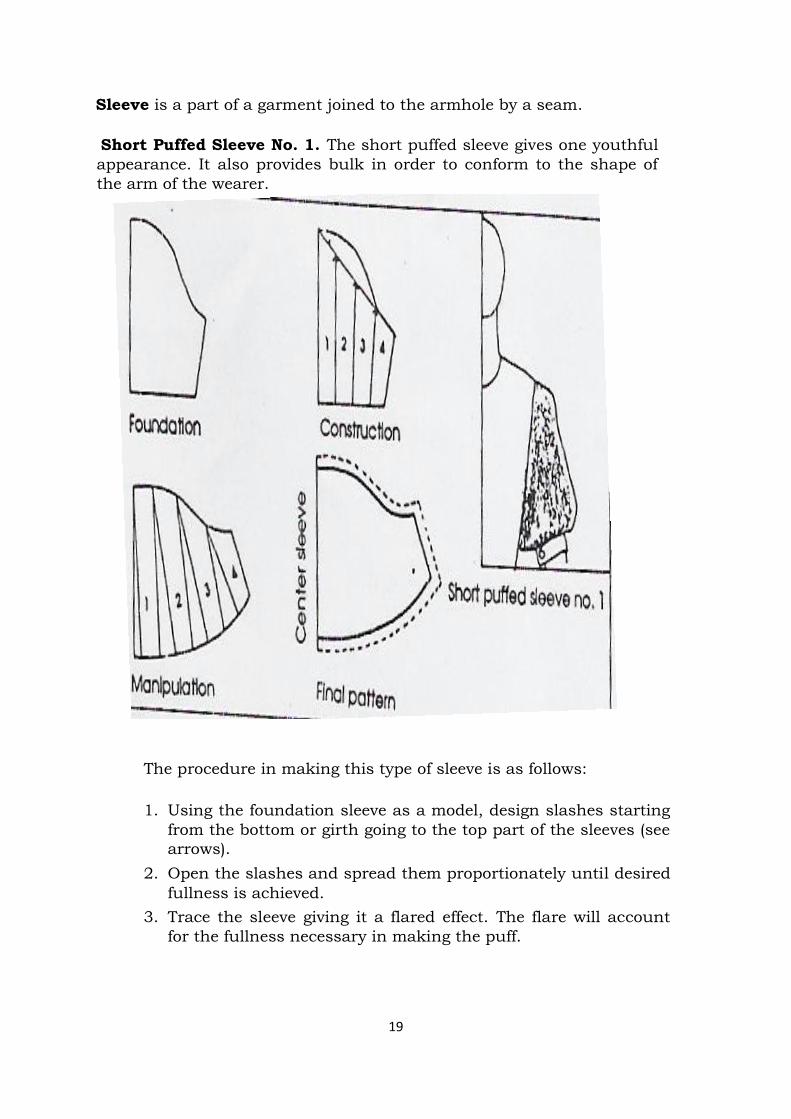
Sleeve is a part of a garment joined to the armhole by a seam.
Short Puffed Sleeve No. 1. The short puffed sleeve gives one youthful
appearance. It also provides bulk in order to conform to the shape of
the arm of the wearer.
The procedure in making this type of sleeve is as follows:
1. Using the foundation sleeve as a model, design slashes starting
from the bottom or girth going to the top part of the sleeves (see
arrows).
2. Open the slashes and spread them proportionately until desired
fullness is achieved.
3. Trace the sleeve giving it a flared effect. The flare will account
for the fullness necessary in making the puff.

20
Short Puffed Sleeve no. 2. This type of sleeve produces a feeling
of width at the shoulder and on the level of the bust or just above it.
Following are the steps in making this sleeve:
1. Prepare the foundation pattern.
2. Design the various slashes for fullness. Slashes are designed
equally on both the top and lower sections of the sleeve.
Preferably, lay this pattern against the center bias fold.
21
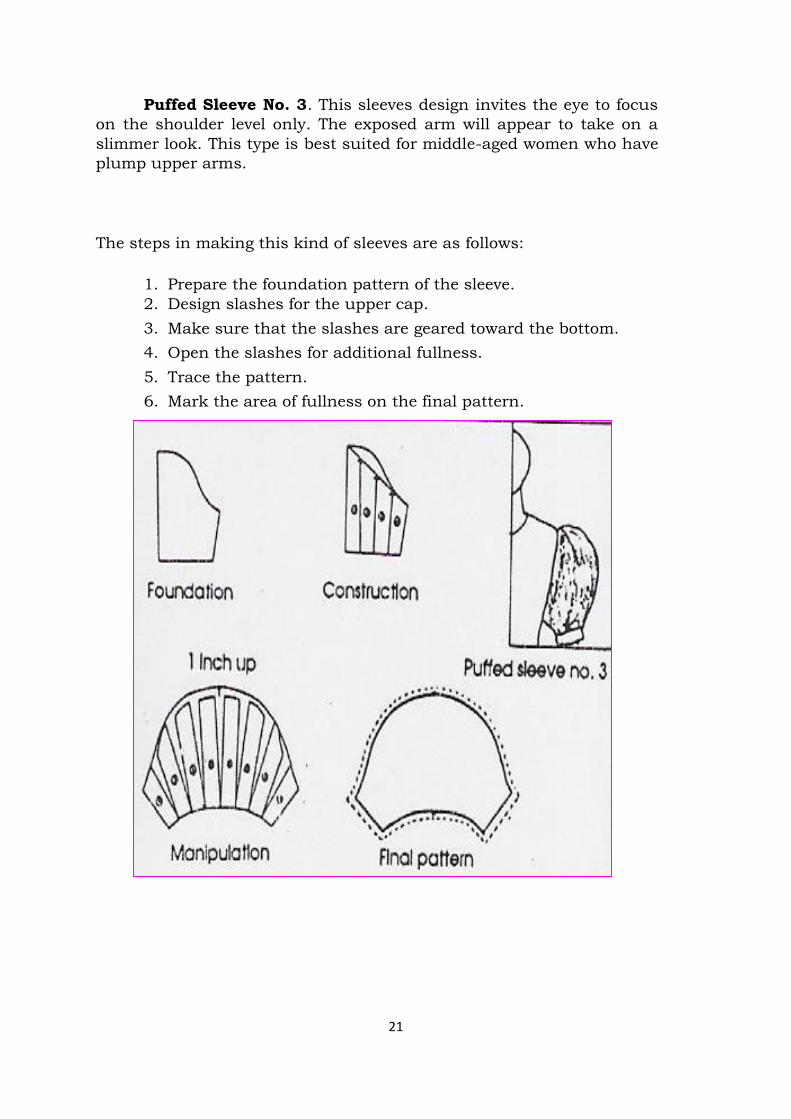
Puffed Sleeve No. 3. This sleeves design invites the eye to focus
on the shoulder level only. The exposed arm will appear to take on a
slimmer look. This type is best suited for middle-aged women who have
plump upper arms.
The steps in making this kind of sleeves are as follows:
1. Prepare the foundation pattern of the sleeve.
2. Design slashes for the upper cap.
3. Make sure that the slashes are geared toward the bottom.
4. Open the slashes for additional fullness.
5. Trace the pattern.
6. Mark the area of fullness on the final pattern.

22
Cap Sleeve. The cap of the shoulder becomes the basis of the
sleeve. When a little extension is desired in order to allow the arm to
pass freely through the armhole, this sleeve will best serve its purpose.
Here is the procedure in making the cap sleeve.
1. Prepare the pattern for front and back bodice.
2. Extend the side line of the bodice up to the top to the level with
the end point of the shoulder.
3. Extend the shoulder and line up to the extended side line.
4. The length from the shoulder edge as illustrated will be the
length on the side armhole from where the side seams start.
This ensures ease in putting the arm through the armhole.

23
Two-darted Sleeve. In making this sleeve, four inches are added
to the foundation sleeve pattern. The extra measurement is for the cap
portion which is to be darted in order to produce a pad to the cap
region.
The steps in making the two-darted sleeves are as follows:
1. Draft the foundation sleeve.
2. Add 2 ½ inches (6.4 cm) to the cap portion.
3. Curve gracefully following the basic curve for the canon.
4. Design the two darts on the cap.
5. The length of the darts should not exceed the measurement
added to the cap. The width of the darts will ensure a squared
effect of the cap.
24
Four-darted Sleeve. The four-darted sleeve is a variation of the
two-darted sleeve. The darts are given out for design purposes only. The
length of the dart is limited to the added amount to the cap region.
Here are the steps in making the four-darted sleeves:
1. Draft the sleeve pattern.
2. Add 2 ½ inches (6.4 cm) to the cap region.
3. Design the four darts on the cap region.
4. Limit the length of the darts on the cap region.
5. Ensure a squared effect on the cap.
LET US REMEMBER
• Knowledge of pattern drafting will help you sew garments correctly.
• Pattern drafting is easy if each step in the process is clearly related to
the final outcome and if the drafter visualizes what he/she is doing.
• Both foundation and style pattern are needed in garment
construction. Some dressmakers cut the fabrics without using any
patterns.
• Cut exactly on the cutting line
• Accuracy in cutting is necessary to construct a garment that duplicates
the design and size of the pattern.

25
HOW MUCH HAVE YOU LEARNED?
1. Differentiate the foundation pattern from a style pattern?
1. Distinguish the two patterns.
2. How is a style pattern made?
3. Why is a style pattern important?
4. What is the difference between seam allowance and seam line?
5. How should you start the cutting of final pattern?
LET US APPLY WHAT YOU HAVE LEARNED
Task I. Evaluate Princess cut dress, sports collar and puff sleeves.
Standards Highest
possible
score
Student Teacher
a. Measurements
• Make use of correct measurement
• Measurements correctly taken
• Allowance correctly added
b. Tools
• Drafting tools: correctly and properly used
• Drafting tools in good condition
8
8
7
8
7

26
c. Procedure
• Step-by step procedure: correctly followed
d. Patterns
• Princess cut dress: correctly and properly
interpreted and drafted
• Sports/Knotched collar: correctly and
properly interpreted and drafted
• Puff sleeve: correctly and properly interpreted and drafted
• Corners properly shaped
• Curved areas prim and smooth
• Cutting lines neatly done
TOTAL
15
10
8
8
7
7
7
100

27
RESOURCES:
Paper/pencil
Cutting tools
Drafting tools
Measuring tools
Measurement chart
Model/Dress Form
Pattern paper
Long table
Weights
Manual/Learning modules
Sloper magazines
Fashion catalogue
Fabrics
Model Project
REFERENCES:
Del Rosario, Constancia et. al. Practical Arts-Clothing and Textiles I
and II, Publisher Philippine Book Company, Printed by Regal,
Manila, Philippines
Francisco, Chic R. Simplified Pattern-Making of Basic ladies, Wear,
Manila, Philippines
Francisco, Chic R. Complete Step-by-Step Guide in Fashion Designing,
Copyright 1992, Golden Ideas Publishing Home Inc.
Hilario, Carmelita B., Clothing Technology Made Easy Publisher National
Book Store Printed by 24k Printing Corp., Valenzuela City
Reader’s Digest, Complete Guide to sewing, The Reader’s Digest
Association, Inc., Pleasantville, New York, Montreal
Rojo, Luz V. et. al. Practical THE, Home Economics III and IV, Philippine,
Adriana Publishing
THE III and IV, Home Technology, Clothing I and II, DECS,
Philippines, Insular Printing Corp.
Knight, Lorna . The Dressmaker’s Technique Bible A Complete Guide to
Sewing. Page One Publishing. Published in Asia 2008
DISCLAIMER
Most of the content of this module is lifted from CBLM in Garments
Second Year, copyright, Department of Education 2008. Graphics were added to
enhance students’ understanding of concepts. Likewise, relevant activities were
added to make the module appropriate for distance modular learning. Barrowed
photos included in this module are owned by their respective copyright owners. The
publisher does not claim ownership over them. The additional activities were
prepared by ____________________________________.

28