dreamweaver for web design - funwithstuff.comfunwithstuff.com/dreamweaver-for-web-design.pdf ·...
TRANSCRIPT
Page 1Iain Anderson
Dreamweaver for Web Design
Dreamweaver for Web Design
Page 2 funwithstuff.com
Dreamweaver for Web Design
Copyright Information
Author: Iain Anderson Contact: [email protected] Last Revised: 22 April 2009
License: Creative Commons · By · Non-commercial · No Derivative Works http://creativecommons.org/licenses/by-nc-nd/2.5/au
This release is primarily to gather feedback. If you’d like to see a more freely-licensed release, tell me. In the meantime, share and enjoy.
Note that a previous version of this manual incorporated content from a third-party training manual. To the best of my knowledge, this content has been removed leaving only my original work. Please contact me if you believe any copyrights have been infringed.

Page 3Iain Anderson
Dreamweaver for Web Design
ContentsIntroduction ...................................................................................................4
HTML Basics .................................................................................................7
Interface ....................................................................................................... 17
Links ............................................................................................................23
Images .........................................................................................................27
CSS for Text Formatting ..............................................................................33
Complex Layouts: Tables ............................................................................. 41
Complex Layouts: CSS ................................................................................45
Viewing a Website ....................................................................................... 51
More HTML ..................................................................................................55
Uploading your site ......................................................................................63
Overall Site Design ......................................................................................67
Templates ....................................................................................................73

Page 4 funwithstuff.com
Dreamweaver for Web Design
Introduction Dreamweaver is the most popular web development program today. However, there’s much more to web development than knowing how to use Dreamweaver. Importantly, sometimes it’s more efficient, or simply necessary to directly edit the raw web code, called HTML. This manual will help you to understand what’s going on underneath the surface of the web and use Dreamweaver to access it easily.
This manual is intended to cover many versions of Dreamweaver, and there are some significant differences in how more advanced web features are accessed in different versions of the program. These differences will be highlighted as they are reached.
However, because we’ll be looking at the code itself, you can use any version of Dreamweaver to create web pages. The more recent your version of Dreamweaver is, the easier it will be to create modern, compliant pages.
Additionally, be aware that screenshots in this manual are taken under various versions of Dreamweaver and on Mac and PC platforms. No matter which platform you work on, always test your site on multiple browsers on multiple platforms. Seemingly innocuous code can sometimes be interpreted quite differently.

Page 5Iain Anderson
Dreamweaver for Web Design
HTML Standards
The language of most of the pages you’ll publish on the web is HTML. This stands for Hyper Text Markup Language and continues to be revised today. The standards organisation that looks after web standards is the World Wide Web Consortium.
http://w3.org/
Over the years, various extensions to the HTML standard of the day have been proposed, and to some extent supported by various web browsers such as Internet Explorer, Safari and Firefox. It’s definitely recommended to code to web standards first rather than focusing support on a particular browser. While browsers change over time, a correctly coded page that states usage of a particular revision of HTML code should always be rendered correctly. Broadly speaking, the flashier the effect you’re trying to achieve, the less compatible it will be and the more testing will be required.

Page 6 funwithstuff.com
Dreamweaver for Web Design

Page 7Iain Anderson
Dreamweaver for Web Design
HTML Basics
Objective
This chapter will introduce the concept of HTML, the simple text-based markup language on which the web is based. After completing this chapter, you should be able to create a simple web page using Dreamweaver as a text editor. It’s useful, and it sounds harder than it is!
HTML Basics
Let’s jump in by using Dreamweaver as a simple text editor.
g Launch Dreamweaver.
g Create a new HTML document by clicking on the “HTML” option in the splash page.

Page 8 funwithstuff.com
Dreamweaver for Web Design
g Switch into Split view by choosing View > Code and Design.
NOTE · In the top pane of the split window is the HTML code that corresponds to the rendered web page view in the lower pane of the window. If you make changes to one pane, these changes will be reflected when you click in the other. They won’t update as you type.
g Look at the text in the top Code pane.
HTML code is based on the principle of “tags” that enclose plain text and tell the browser how to interpret that text. A tag is marked by the < and > symbols and follows a set structure:
<tagname parameter=”value”>
Most tags are used as an opening and a closing pair. The closing tag is simply the name of the tag preceded by a slash, like this:
</tagname>

Page 9Iain Anderson
Dreamweaver for Web Design
Structural Tags
Important tags have been included in the page that Dreamweaver has made for you. They include <html>, to enclose the entire page, <head> to enclose information about the document (such as the title) and <body> to enclose the main part of the page. Like most other tags, all of these tags have closing pairs. This structure is regular and required in every valid web page.
➊
➋
The <title> tag, sitting within the <head> area, provides the title that a visitor to this page would see in the title bar of their web browser. Currently, it’s called “Untitled Page”, which is both uninformative and sloppy coding.
g Edit the source code ➊ to change the title to:<title>My Page</title>.
g Click in the design area ➋ of the window.

Page 10 funwithstuff.com
Dreamweaver for Web Design
You’ll see the title of the page changes in the window title bar and in the title field just below it. This is an example of how Dreamweaver works: everything you change using the interface is reflected (somehow) in the source code and vice versa. It’s important to understand how both work so that you can recover from problems that are difficult to deal with in one of the two modes.
For example, it can be tricky to diagnose certain layout problems simply by looking at the source code, but it can be equally difficult to precisely apply certain styles using the graphical user interface.
NOTE · Don’t worry! You don’t need to be an expert in HTML coding to be good at web design.
Tags
Let’s look at some more tags to gain some familiarity with HTML and how it works.
g Click into the Source pane.
g Type a few lines of text (anything) in the main body area of the document, between the opening and closing body tags.
g Press return a few times to create new lines in the text.
g Click back into the Design pane.
You’ll see that all the text you typed appears lumped together without paragraph returns or multiple neighbouring spaces. This is because HTML is designed to only use tags to provide formatting, ignoring any formatting information provided with the text alone. It’s necessary to specify paragraphs explicitly:

Page 11Iain Anderson
Dreamweaver for Web Design
g Add opening <p> and closing </p> tags around each paragraph.
You’ll see that each chunk of text is now separated from each other.
g Insert some more tags (each with a closing pair) around some text in your document, and see what they do:• <b>• <i>• <strong>• <em>• <blockquote>
Some tags in this list seem to work in the same way as other tags. The <b> and <i> tags have been deprecated, replaced by <strong> and <em>. They’re outdated, and while they still work today, they won’t work in a future web standard. It’s best to avoid deprecated tags when alternatives are available.
NOTE · The reason this is important is that the web is moving towards logical document structure rather than simple appearance. It’s possible, using appearance-focused tags, to change a heading to 24-point Bold Helvetica, for example, but without a logical indication that this should be a “heading”, there’s no structure for computers or other non-visual users to follow. In fact, for headings, special tags exist for different levels of headings. The appearance of each of these can be modified, but don’t worry about that for now.
Heading Tags
g In Source view, type “My New Heading” on a new line.
g Instead of <p> and </p>, insert <h1> and </h1> around this text, like this:

Page 12 funwithstuff.com
Dreamweaver for Web Design
<h1>My New Heading</h1>
You’ve created a heading! This not only looks like a heading in a web browser, it’s logically a heading — important to semantic meaning and to search engines.
g Add more headings, exploring heading tags h2 to h6.
Nesting Tags
It’s important to nest closing tags to complement the order in which the tags were opened. That is, your code should look like this:
<tag1><tag2>Some text.</tag2></tag1>
…not like this:
<tag1><tag2>Some text.</tag1></tag2>
Misplaced tags can cause odd layout issues and Dreamweaver will flag them in yellow for your attention.
Page 13Iain Anderson
Dreamweaver for Web Design
Empty Tags
Some tags don’t need to be closed. Known as empty tags, these tags signify a particular element that stands alone. While they don’t need to be closed, current standards require a closing slash before the end of the tag to make interpreting the code easier. Try these two tags and see what they produce:
• <hr />
• <br />
Saving and Previewing
Before we go too much further we should save this file and start previewing our work in a real web browser. The Design view in Dreamweaver is only an approximation of how a real browser will interpret the page, so for a true representation, open the file in a web browser and flick between it and Dreamweaver while authoring.
g Choose File > Save to save your file now.
g Create a new folder called “HTML”.
g Name the file index.html.
NOTE · The name index.html is important. The file called index.html is the default file a web servers sends when no file name is specified, so when you visit a site just by typing in the site name, you’re actually seeing a file called index.html at the top level of that web site. It’s not necessary to use a folder called HTML, but it’s important to keep all the files that will go up on a website together.

Page 14 funwithstuff.com
Dreamweaver for Web Design
Some web servers use home.html or default.html instead of index.html, and you can use .htm instead of .html if you wish. It’s good to pick one standard and use it throughout a site to avoid problems — we’ll use .html in this text.
File Naming Conventions
It’s important on the web to avoid most punctuation, including (!@#$%^&*:/\|<>”) and spaces in filenames. Avoid uppercase too — it can cause problems when moving a site from one type of webserver to another. Hyphens and underscores are both OK. So, to avoid problems, apply these rules to file and folder names for anything you put on the web:
• No spaces (not “my page.html”)
• No uppercase characters (not “MyPage.html”)
• No punctuation (not “page#1!.html”)
Previewing your page
Now that your file is saved:
g Choose File > Preview in Browser > (any browser) to open in that browser.
g Alternatively, press the “world” button in your document toolbar:

Page 15Iain Anderson
Dreamweaver for Web Design
Firefox and Internet Explorer are common today on Windows systems, while Firefox and Safari are popular on Macs. You can set up additional browsers on your system using File > Preview in Browser > Edit Browser List, and it’s a good idea to test in as many browsers as you can.
You’ll see your page as it should actually appear. Throughout this text, Previewing your page means using this command, also available by pressing F12 and customisable using the Keyboard Shortcut preferences.

Page 16 funwithstuff.com
Dreamweaver for Web Design
Page 17Iain Anderson
Dreamweaver for Web Design
InterfaceSo how does Dreamweaver work its magic? At a basic level, you can simply work in Design view, so that you directly edit and see (roughly) what an end user will see. If you separate paragraphs with a single return character (more than once is unnecessary) the correct tags will automatically be inserted.
• Take a few moments now to select text in the Design view and see exactly what is selected in the matching Code view.
There can be great significance in the selection of one character, so be precise when you select text to change styles. To avoid problems, Dreamweaver provides another way to select entire blocks of code. At the bottom of each page’s window, to the left, is a list of the current open tags where the text insertion point currently is. This alone can be a useful tool to discover just what’s going on in a page.
• Click inside one of your nested list items to see the string of tags.
However, there’s a powerful hidden trick here:
• Click on one of the tags in the string to select that entire code chunk from start to finish.
This can be very useful when trying to select something specific like a table cell (we’ll explore these soon).
Let’s take a look at some more of the interface. The key to much of the power of Dreamweaver is the Properties palette. This floating palette changes depending on what you have selected at the time, so if you have some text selected, you’ll be able to change its style or size. For the moment, don’t use the style menu as it can have unintended consequences.

Page 18 funwithstuff.com
Dreamweaver for Web Design
Use the Properties palette (Preview after each change) now to:
• Create a new bullet list
• Indent some elements in the bullet list
• Change those intended list elements to a numbered list
• Indent one of those elements further
• Use Bold (strong) and Italic (emphasis) styles
• Centre, Right and Left Align different paragraphs
• Assign heading, paragraph and preformatted styles using the Format drop-down menu.
The other main component used to build pages in Dreamweaver is the Insert toolbar, which can be used to insert many different types of objects into a page.
Using these options, you won’t need to remember the tags required to insert a particular element — just drag it from the toolbar. With an object selected, any parameters specific to that type of element will be shown in the Properties palette.
There’s also a Page Properties dialog where page-level settings can be changed.
Page 19Iain Anderson
Dreamweaver for Web Design
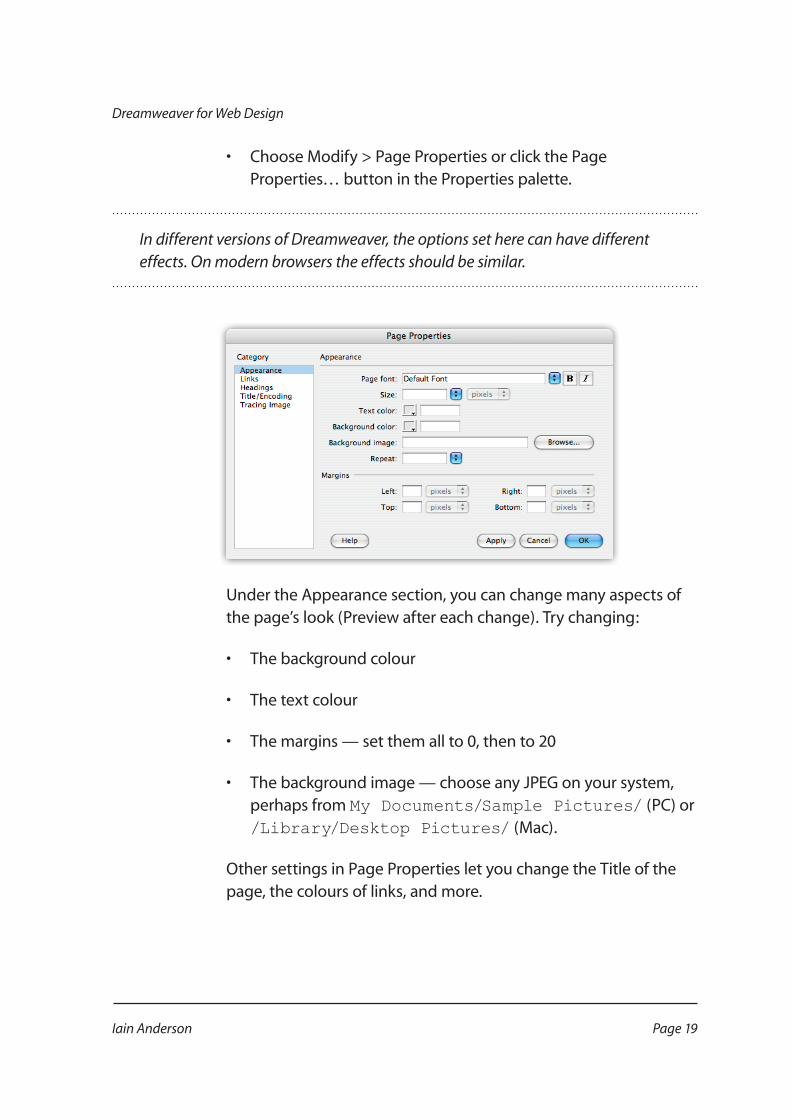
• Choose Modify > Page Properties or click the Page Properties… button in the Properties palette.
In different versions of Dreamweaver, the options set here can have different effects. On modern browsers the effects should be similar.
Under the Appearance section, you can change many aspects of the page’s look (Preview after each change). Try changing:
• The background colour
• The text colour
• The margins — set them all to 0, then to 20
• The background image — choose any JPEG on your system, perhaps from My Documents/Sample Pictures/ (PC) or /Library/Desktop Pictures/ (Mac).
Other settings in Page Properties let you change the Title of the page, the colours of links, and more.
Page 20 funwithstuff.com
Dreamweaver for Web Design
Colour
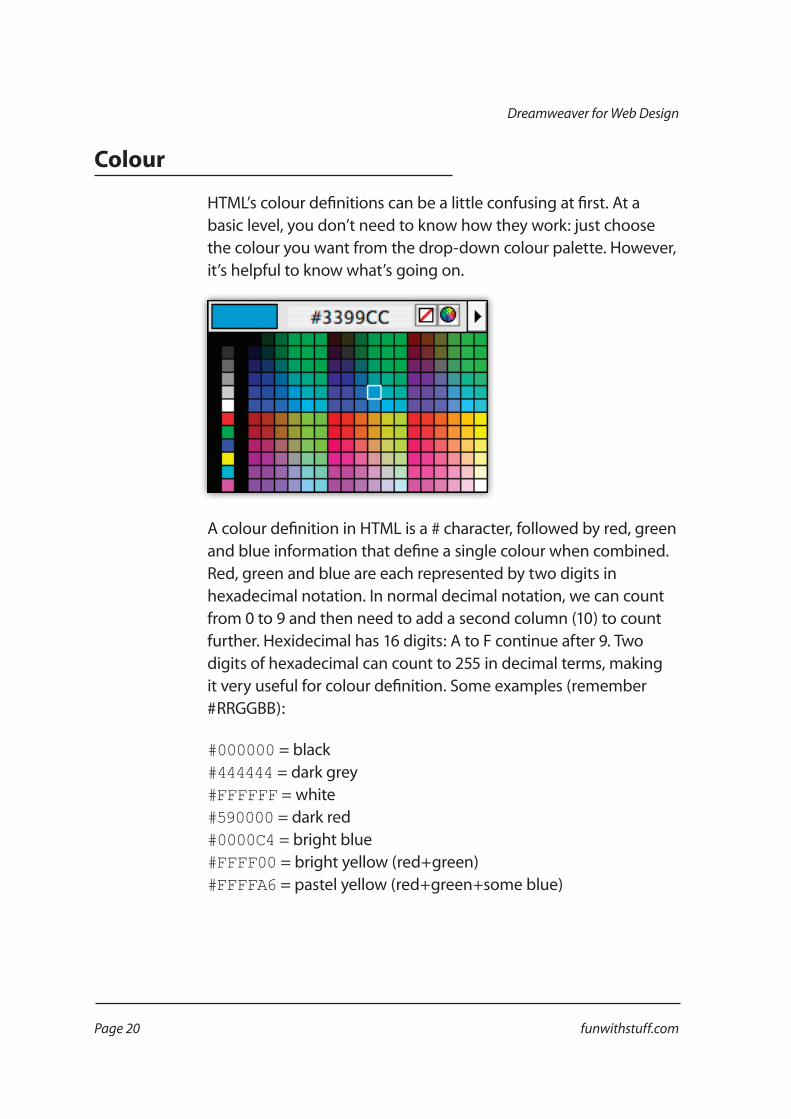
HTML’s colour definitions can be a little confusing at first. At a basic level, you don’t need to know how they work: just choose the colour you want from the drop-down colour palette. However, it’s helpful to know what’s going on.
A colour definition in HTML is a # character, followed by red, green and blue information that define a single colour when combined. Red, green and blue are each represented by two digits in hexadecimal notation. In normal decimal notation, we can count from 0 to 9 and then need to add a second column (10) to count further. Hexidecimal has 16 digits: A to F continue after 9. Two digits of hexadecimal can count to 255 in decimal terms, making it very useful for colour definition. Some examples (remember #RRGGBB):
#000000 = black#444444 = dark grey#FFFFFF = white#590000 = dark red#0000C4 = bright blue#FFFF00 = bright yellow (red+green)#FFFFA6 = pastel yellow (red+green+some blue)

Page 21Iain Anderson
Dreamweaver for Web Design
In times past, “web-safe” colours were important. These 216 colours were common to most platforms and would ensure reliable colour display. These are the colours you see in the Dreamweaver drop-down menu. This standard, however, is mostly irrelevant today. Few monitors today are limited to 256 simultaneous colours as they were some years ago. Worse, 16-bit displays can only show a tiny number of the web-safe colour palette accurately. Therefore, choose any colour you want to, but don’t expect it to look the same to every viewer.
Everyone interprets colour differently, so make sure colour isn’t critical to your site’s design. As with many things on the web, information is paramount and the visual look secondary.
• As an exercise, experiment with changing the background colour, text colour and link colour of your page.
• Create variations of existing colours (darker, lighter, more pastel, more vibrant) to get a handle on HTML colours.

Page 22 funwithstuff.com
Dreamweaver for Web Design

Page 23Iain Anderson
Dreamweaver for Web Design
LinksThe most important feature of HTML is the ability to link to other pages. Hyperlinks are the reason the web exists in the form it does today and it’s important to use them correctly. So we have aome pages to link to, let’s create some new pages quickly.
Duplicating Pages
Site-level consistency is important to page appearance, which is one reason I usually recommend creating a single “template” page and creating other pages as copies of that original. Dreamweaver does, in fact, provide a template system for generating simple pages, but we won’t look at that here.
• Set up one page as you like it.
• Choose File > Save As… and save another version of this page as “page2.html” next to the original page. Change the title of this new page, the text of the main heading on the page and the background colour.
• Repeat this step twice more, creating new pages with different properties.
Creating Links
• Open up your original index.html page.
• Add some text to the bottom of the page: Home - Page 2 - Page 3 to indicate links to each of the pages you crated earlier.
• Select the text that will link to one of these pages.

Page 24 funwithstuff.com
Dreamweaver for Web Design
• In the Properties palette, type the name of the target page in the link field and press return. Because the page is next to the current page, you don’t need to put anything else — this is a valid, local, relative URL (Universal Resource Locator).
• Add links for each of these pieces of text, including the Home link, which should point to the current page. If you don’t want to type, you can also use the folder icon to the right of the Link field to browse for the file you want. Sometimes this can be faster, but you have to be careful not to link to another copy of this same file in a different folder. Be sure that the link is correct and not a long, tortured path to a specific file on your hard drive and not within the site’s folder.
• Preview your new page.
You’ll see that once you click one of these links, the other pages don’t have an easy way to link back. Let’s fix that.
• Copy all the links from the index.html page.
• Paste in each other page in turn.
• On each page, remove the link for that particular page by selecting the link text and deleting it. For example, on page2.html, remove the link to “Page 2”. That link won’t do anything and it should be used as a clue to let the user know where they are.
• The once-linked text should still be selected. Make that text bold on each page.
• Preview one page and explore the links.
Page 25Iain Anderson
Dreamweaver for Web Design
It’s important to make the text that links to another page relevant — don’t use “click here”. Some browser programs provide lists of links in a page, but this feature is made useless by “click here” links. Further, not everybody “clicks” to activate links. Perhaps most importantly, Google indexes the text used to link to another page to provide useful information — if you use “click here” that’s a wasted opportunity for free publicity. For example, instead of “For information about Ju-Jitsu, click here” you could write “More information about Ju-Jitsu is available” which is independently informative.
External links are very similar in execution to local relative links. Instead of using a local URL (simply a page name) you must spell out the full address, including the beginning “http://”. Most URLs are structured in this way:
• http://site name/folder/pagename.html
If you leave out the page name (http://www.google.com) or folder name (http://funwithstuff.com/blog/) then the default page (probably index.html) in the folder in that location will be used.
• Add a couple of external links to your pages.
Sometimes you may wish to direct your visitors to external sites without leaving your own site. A sophisticated user could accomplish this on their own, but to force this effect you’ll need to add another parameter.
The target parameter allows this. By specifying a window name or a specific option (such as _ blank) a link will open in a new window. It’s a good idea to use _ blank if you simply want to open a new window, as subsequent links targeting a named window will open in that same window, whatever happens to be loaded in that window now.
Page 26 funwithstuff.com
Dreamweaver for Web Design
• Add _ blank as the target value to each of your external links and re-preview.
NOTE: In the latest strict web standards, _target is no longer valid. Instad, JavaScript must be used to produce a similar effect.
Page 27Iain Anderson
Dreamweaver for Web Design
ImagesDespite the extensive text controls you’re already familiar with (and the many more there are to come) you’ll want to escape the limitations of text and add graphics to your pages. This is easy to do, but beware: unless you’re careful, using graphics can destroy website usability. Appropriate use of graphics can improve the appearance of your site a great deal, though many modern sites have adopted a more minimalist look and use graphics very sparingly.
It’s good practice (and highly recommended) to create a separate images folder, within your HTML folder, to hold any and all images you’ll be using in your website. On some sites, the number of images is higher than the number of HTML files, so it’s important to keep it clean. Remember to avoid uppercase and spaces in filenames.
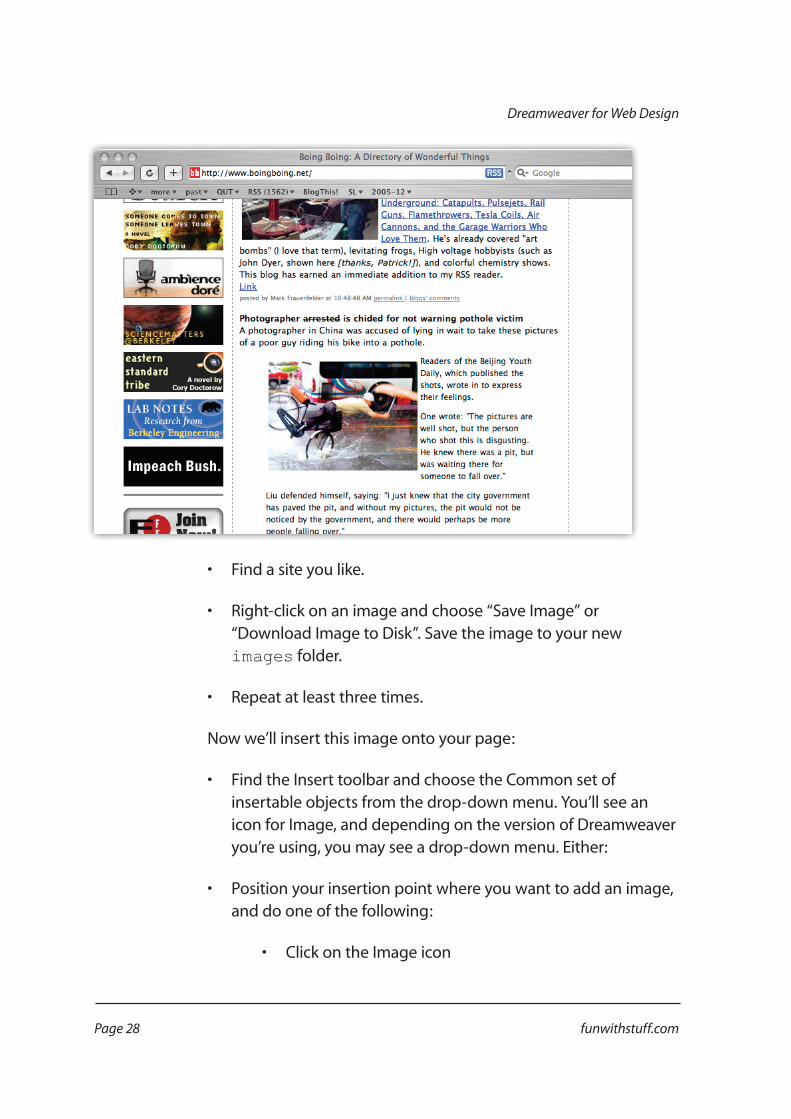
Since we haven’t looked at how to create images yet, let’s download some placeholder images. Remember to observe copyright — this is for educational and fair use only.
Page 28 funwithstuff.com
Dreamweaver for Web Design
• Find a site you like.
• Right-click on an image and choose “Save Image” or “Download Image to Disk”. Save the image to your new images folder.
• Repeat at least three times.
Now we’ll insert this image onto your page:
• Find the Insert toolbar and choose the Common set of insertable objects from the drop-down menu. You’ll see an icon for Image, and depending on the version of Dreamweaver you’re using, you may see a drop-down menu. Either:
• Position your insertion point where you want to add an image, and do one of the following:
• Click on the Image icon
Page 29Iain Anderson
Dreamweaver for Web Design
• Choose Image from the drop-down menu (the icon by the menu will then reflect your most recent choice)
• or… Drag the Image icon to the page where you want the image to be placed
• You’ll then need to locate your image.
It’s important to save your HTML file before you add an image, so don’t try this on brand new files.
Dreamweaver will fill in important fields for you, including width and height. These are provided so that a browser knows how big an image is before it loads, so it can leave space for an image ahead of time. Don’t use these controls to resize images — quality will be poor and you may ask your viewers to download more than they need to.
Still, you’ll have to do a little more work. An important part of any image online is alternative information for those who can’t see the image: blind users, those using alternative access technologies, or simply dial-up users who’ve turned off image loading for speed. The alt parameter of the <img> tag provides this alternative information, but by default it’s blank.
• Find the alt field in the properties palette.
• Describe the image. This is a title or description, not “company logo”. If you couldn’t see the image, what would you like to read instead?
It’s also important to know that an image can host a link as easily as text can.
• Select an image in your page.
• Type in a URL in the Link field of the Properties palette, or press the Browser button and locate a file.

Page 30 funwithstuff.com
Dreamweaver for Web Design
• Preview your page.
By default, Dreamweaver adds the value of 0 to the border property of the image. This property only applies when an image is used as a link. If greater than zero, it describes the width of the border around the image.
Image Positioning
There are three useful options (and several not-so-useful) for alignment of images. Default simply leaves the image where it is, which lets you control the position of the image by changing the paragraph’s alignment.
• Centre an image by changing the enclosing paragraph’s alignment to “center” using the Properties palette.
Two other options are useful too.
• Insert an image within a paragraph of text. If necessary, add more text by repeatedly copying and pasting the existing text.
• Select the image.
• Change the value for the align parameter to “right”.
The image will move to the right and allow text to flow to its left.
• Also try align=”left”.
While these options are useful, it can be difficult to include a margin around the image while still aligning the image to the left or right margin. CSS can be used in this situation, and we’ll explore this later.
Page 31Iain Anderson
Dreamweaver for Web Design
Image Formats
On the web today, two formats are commonly used for basic images, with a third in ascendancy. GIF and JPEG are common, while PNG is capable but support is not as complete as it could be. The two dominant formats have distinct strengths and weaknesses.
GIF uses an indexed colour palette of up to 256 colours (poor) but allows the use of 1-bit transparency (only 0% or 100% visibility) plus limited animation and interlaced loading. GIF uses lossless compression, so once you’ve converted your image to indexed colour, you won’t lose any more data. It’s ideal for logos, text and titles.
JPEG uses lossy compression, meaning that object edges within an image can become fuzzy and blockiness can be visible. When saving a JPEG image, options are available to trade off quality for size (and therefore increase download speed). JPEG supports full 24-bit colour and optional progressive loading, but has no capability to support transparency or animation. It’s ideal for photos and for any large images.
PNG tries to combine the best of both formats, featuring lossless compression but supporting full 24-bit colour and true (graduated) transparency support. It’s likely to replace GIF for transparency use within the next 5 years.
Image Size
The size of an individual image should not be too large. A rule of thumb is that an entire page should download within ten seconds or so. On a dialup modem connection, that means your entire page should be less than 40k.

Page 32 funwithstuff.com
Dreamweaver for Web Design
Use of a program such as Adobe Photoshop is recommended to minimise file sizes. The File > Save for Web command allows you to interactively examine different compression options, and produces very small files. Be careful not to simply use “Save As” because this method often includes icons and previews that are not needed on the web. Including these features in your files will increase download times.

Page 33Iain Anderson
Dreamweaver for Web Design
CSS for Text FormattingThe most common use of Cascading Style Sheets (CSS) is to format text as it offers many advantages over the traditional HTML-based methods of formatting. All recent versions of Dreamweaver use CSS to apply formatting, but a few basic rules will help greatly in understanding how to use CSS effectively.
• Select some text in one of your HTML documents.
• Using the Properties palette, assign a font.
When choosing a font, you’ll normally choose a list of fonts. A web page can only be viewed using fonts installed on the end-user’s computer, so it’s necessary to provide a list of alternatives. If the first font is not present, the second font is used, and so on.
• Assign a size.
When choosing the size of the text, you’ll be able to select from many different units of measurement. Pixels or points are tempting, but instead choose ems. In printing terms, an em is the width of the lowercase m character. On the web, an em is the size of “normal” text, depending on the end user’s preference. Therefore, 1.2em is slightly larger than normal and 2em is double normal size. If you wish, you could use percentages — 100% is normal size and the rest is simple. In some browsers, choosing pixels results in text that cannot be resized, which is inconsiderate

Page 34 funwithstuff.com
Dreamweaver for Web Design
to your visitors. Points can display at different sizes in different browsers and usually displays smaller than you’d expect a particular size to be in a word processing program.
Once you’ve defined these properties, you’ll see that “style1” is now an option from the Style drop-down menu. Dreamweaver has created a new style to match your chosen options, similar to the styles seen in Word or InDesign.
Look in the source code. In the head of the document, you’ll see a new tag, <style>, in the head area. Within this tag is a new style definition, style1, along with a defintion in a new kind of syntax. This is CSS, and though it’s not the same as HTML, it’s straightforward.
Each style definition consists of:
• name { parameter1: value1 unit1; parameter2: value2 unit2}
Clearly, there’s more on offer here than simple font and size controls.
In the CSS Styles palette, you’ll see the styles currently referenced by or contained within your document. At the moment, it simply says <style>. (In versions of Dreamweaver prior to 8, you can see a similar CSS Properties palette.)
• Open the <style> definition and examine the style1 definition within.
• Edit this style using the Edit Style… button at the bottom of the palette. This dialog provides a simple way to edit CSS without manual code work.
Page 35Iain Anderson
Dreamweaver for Web Design
• Experiment with the options in the Type section of the dialog. In many cases it will be necessary to type in a value manually as the drop-down menus only provide units. A helpful attribute here is line-height (increase this for readability).
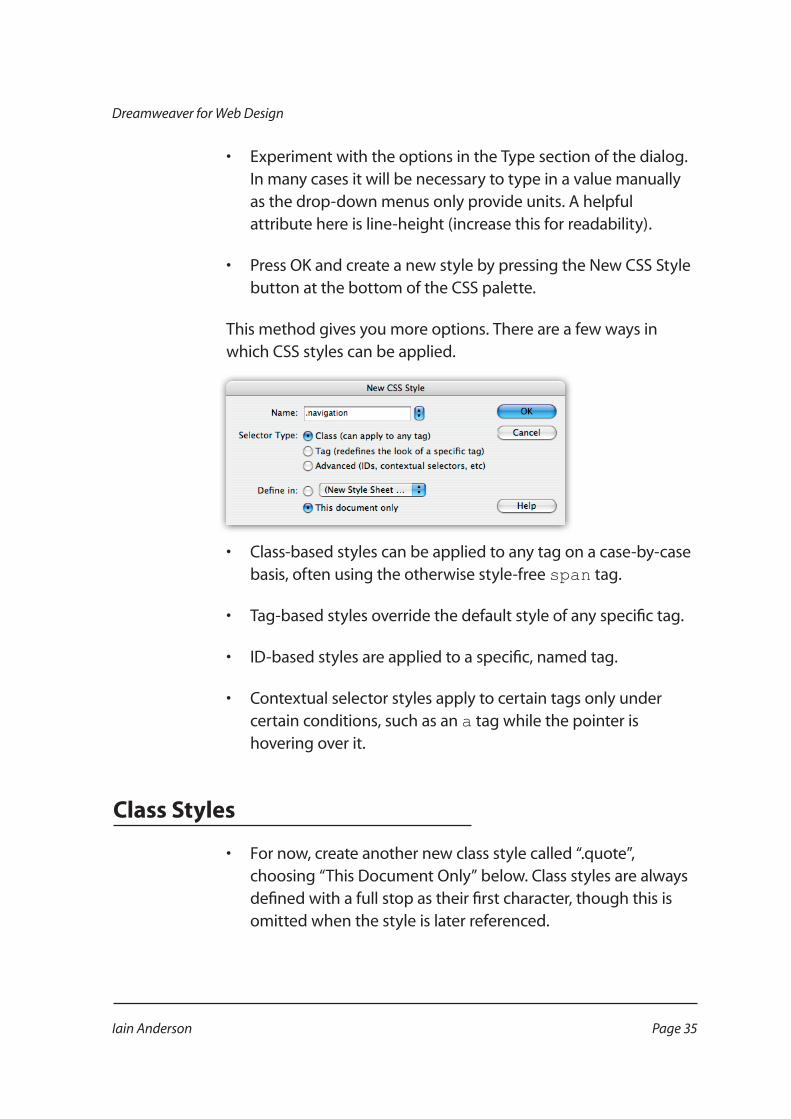
• Press OK and create a new style by pressing the New CSS Style button at the bottom of the CSS palette.
This method gives you more options. There are a few ways in which CSS styles can be applied.
• Class-based styles can be applied to any tag on a case-by-case basis, often using the otherwise style-free span tag.
• Tag-based styles override the default style of any specific tag.
• ID-based styles are applied to a specific, named tag.
• Contextual selector styles apply to certain tags only under certain conditions, such as an a tag while the pointer is hovering over it.
Class Styles
• For now, create another new class style called “.quote”, choosing “This Document Only” below. Class styles are always defined with a full stop as their first character, though this is omitted when the style is later referenced.
Page 36 funwithstuff.com
Dreamweaver for Web Design
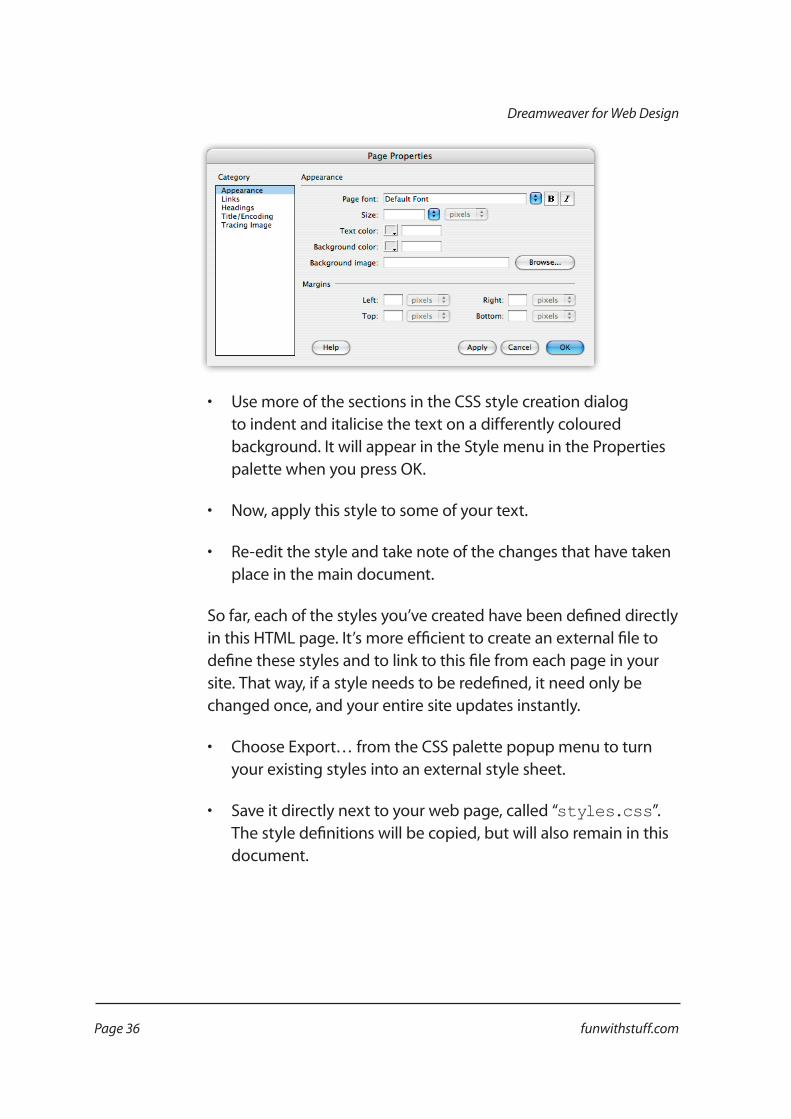
• Use more of the sections in the CSS style creation dialog to indent and italicise the text on a differently coloured background. It will appear in the Style menu in the Properties palette when you press OK.
• Now, apply this style to some of your text.
• Re-edit the style and take note of the changes that have taken place in the main document.
So far, each of the styles you’ve created have been defined directly in this HTML page. It’s more efficient to create an external file to define these styles and to link to this file from each page in your site. That way, if a style needs to be redefined, it need only be changed once, and your entire site updates instantly.
• Choose Export… from the CSS palette popup menu to turn your existing styles into an external style sheet.
• Save it directly next to your web page, called “styles.css”. The style definitions will be copied, but will also remain in this document.

Page 37Iain Anderson
Dreamweaver for Web Design
• Click the Attach Style Sheet button at the bottom of the CSS palette. Locate your new styles.css file. (Link and Import are the two ways you can link style sheets. Link is best supported, but Import can be useful for specific circumstances.)
• Delete your existing style information, the part enclosed within the <style> tag.
• Note that you can skip many of these steps by declaring your initial style into a “new style sheet” rather than “this document only”.
• Create a new HTML page next to this one and link the existing CSS stylesheet to it.
• Add some text in one of the existing styles.
While the Class style concept is powerful, a more basic technique can be even more useful. Because Tag styles allow you to override existing tags, you can use the logical structure they provide to give a personalised look to page without applying any styles at all. Further, tying CSS styles to inbuilt header and list tags encourages you to create a more logically ordered site. This is recommended for accessibility and for different modes of access into the future. Let’s define a Tag style now.
Tag Styles
• Define a new style using the New CSS Style button in the CSS palette.
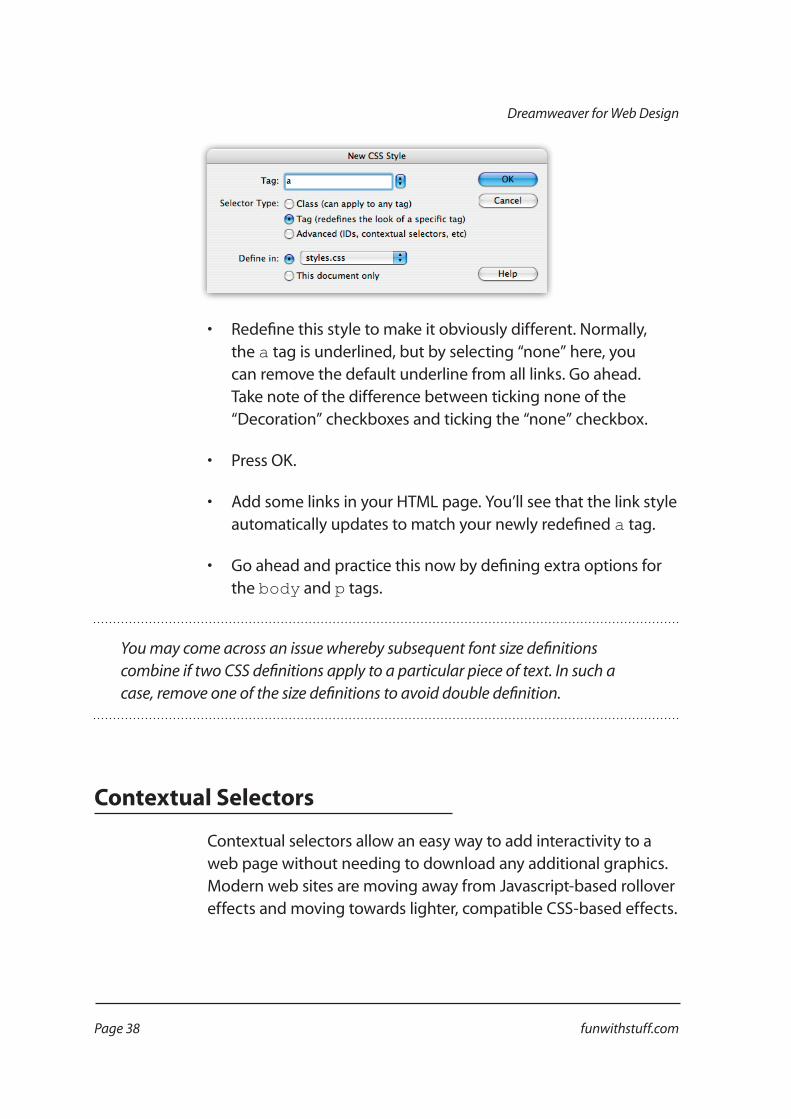
• Choose a Tag style. From the drop-down menu, choose the a tag.
Page 38 funwithstuff.com
Dreamweaver for Web Design
• Redefine this style to make it obviously different. Normally, the a tag is underlined, but by selecting “none” here, you can remove the default underline from all links. Go ahead. Take note of the difference between ticking none of the “Decoration” checkboxes and ticking the “none” checkbox.
• Press OK.
• Add some links in your HTML page. You’ll see that the link style automatically updates to match your newly redefined a tag.
• Go ahead and practice this now by defining extra options for the body and p tags.
You may come across an issue whereby subsequent font size definitions combine if two CSS definitions apply to a particular piece of text. In such a case, remove one of the size definitions to avoid double definition.
Contextual Selectors
Contextual selectors allow an easy way to add interactivity to a web page without needing to download any additional graphics. Modern web sites are moving away from Javascript-based rollover effects and moving towards lighter, compatible CSS-based effects.

Page 39Iain Anderson
Dreamweaver for Web Design
The most compatible selectors are those that function when over a link. When the pointer moves over a link, the alternative style switches in for that element. If a background element is provided or the underline style changed, this can provide a useful contextual clue while retaining easy editability.
• Define a new style, this time choosing Advanced from the radio list.
• Choose a:visited from the Selector drop down menu. (Adding a:link is redundant since we’ve already redefined the a tag.)
The modifications you make to this style apply to links you’ve already visited. Typically this style is used simply to change the colour of visited links, to give visitors a clue to where they have not yet visited.
• Press OK and preview your page again.
• Now add more Advanced styles, one for a:hover and another for a:active. Hover is most important; it allows the look of a link to change while the pointer is over it. Try adding a background colour to this style definition. Active applied only when the mouse is clicking on a link, while the mouse is held down, so it’s likely to be a subtle effect. Creative use of colour and backgrounds here can be effective.
These different styles can all apply simultaneously. For example, if you change the colour of the text of a:visited, add a background colour and an underline to a:hover and an overline to a:active, all of these elements could be shown simultaneously in a compatible browser. If you’re looking to exploit this, be sure to define the styles in the order shown in Dreamweaver so the styles don’t conflict with one another.

Page 40 funwithstuff.com
Dreamweaver for Web Design
It’s worth being aware of the more complex possibilities that CSS offers for formatting. It’s possible, for example, to create styles for pseudo-elements such as “:first-line” or “:first-letter” and for “:before” and “:after” an element. These can create some nice effects, but they’re less compatible and should only be used for optional finishing touches, as you can’t be sure everyone will see them.
There are also complex inheritance options available for governing styles only when contained within another particular style. These generally require manual editing of CSS code but can be ideal in some circumstances.
As an exercise, create a series of CSS styles:
• Redefine the h1 to h3 tags to produce a series of custom headings.
• Create a class style that produces a coloured, dashed-border block that floats to the right of other elements.
• Create a series of alternative bullet list styles, one with a custom image for the bullet.
• Create a class style that features indented text with double-spaced lines.
• Change the default font for your entire site.

Page 41Iain Anderson
Dreamweaver for Web Design
Complex Layouts: TablesRight now, all we’ve looked at so far has been plain, simple layouts. There’s much more that can be accomplished with HTML and with more modern standards such as CSS. Here we’ll look at tables (the traditional solution) initially and then focus on how CSS (how it should be done).
The use of tables grew out of necessity; it’s all that was once available to position text or graphics on a page. Simple table layouts are easy to understand and implement, and generally cause few problems. However, they can quickly get out of hand. In addition, they can be slow to load, difficult for alternative browsers to interpret, encourage bad practices such as the use of placeholder graphics and can be difficult to maintain. That said, because of the familiarity of tables to most word processing users, they are a good place to start. If you’re familiar with Word’s table options, you won’t be confused.
• Start by roughly sketching out a layout on a piece of paper. Focus on the lines that govern where each block of text or graphic should be placed. If you look at a magazine page you’ll see that different areas often line up with one another — use that to try to keep your table as simple as possible. You can merge cells together if needed and cells need not be of equal size.
For this example, we’ll keep it simple: a title across the top of the page spanning both columns, then two columns below, one thin one to the left (for links) and another taking the rest of the width for content.
• Create this table in Dreamweaver using the Insert toolbar’s Table icon or the Insert > Table command.

Page 42 funwithstuff.com
Dreamweaver for Web Design
• Choose 2 rows and 2 columns. In general, try to avoid too many of either.
• Choose a border of 0 to make the table cell edges invisible.
• Leave the cell spacing and padding at 10 pixels each.
Cell spacing and cell padding control the spacing inside cells and between cells respectively. The distinction is especially important if background colours are used in table cells.
• Choose 100% for the width.
Using percentage values here allows a table to adapt to fit different screen sizes rather than forcing a user into a particular size. This is called a “fluid” layout.
• To merge the cells in the top row into one cell, select them both by dragging across both cells, then click the Merge Cells button in the Properties palette.
Page 43Iain Anderson
Dreamweaver for Web Design
To set up a thinner column, you’ll need to select that column. Since there’s only one cell in this example you need to change, that’s simple.
• Click within the left cell in the second row. Click on the <td> in the “tag tree” at the bottom of the window. This will select the cell.
• Set the width of the cell to 20% in the Properties palette. There’s no need to define a width for the rightmost cell — it will simply take up the amount of space remaining.
• Now drag and drop your content from your current page into the various table cells.
• Preview your page.
Now that you’ve got a basic table, experiment with the options available:
• Change the background colour of cells
• Change the border width and colour
• Change the overall width of the table
• Make a much more complex table
• Put one 100% width table within the central cell of another 3x3 table (nesting)
Especially if you’re looking at the code, you’ll see that there are some problems with complex table layouts:
• A table cell will always expand to fit the content if necessary, so a table height definition cannot be used reliably.

Page 44 funwithstuff.com
Dreamweaver for Web Design
• Sometimes, a table cell will render smaller than specified. The only sure way to avoid this is to use 1x1 transparent GIFs, set artificially to the size required. However, this is inefficient and poor practise.
• If no content remains within a cell, many browsers will not render that cell at all. This is worked around (in Dreamweaver) by the use of non-breaking spaces ( ) within otherwise empty cells.
• It can be difficult to select exactly the cell you want in Dreamweaver’s design view.
• The HTML code can be difficult to directly decipher.
For all of these reasons and many more, CSS is the recommended standard for layouts of this type. Standards documents suggest that tables only be used for largely tabular data, or where the table could be linearised (read line by line, following the order of the HTML code) and retain meaning.
However, and it’s a big however, there are many ways to be caught out with CSS too. In general, there are solutions available but you’ll need to have a clearer understanding of how the underlying code works to be able to fix the problems that appear. Only the latest version of Dreamweaver has mature CSS support in Design mode, so you’ll have to dip into the source code more often in other versions.
In Dreamweaver 8 and above, you can use the new CSS panel to change every aspect of a CSS style and use colouring to denote different parts of a CSS layout.
Page 45Iain Anderson
Dreamweaver for Web Design
Complex Layouts: CSSWe looked at CSS in terms of text formatting earlier in the course.Now, we’ll introduce CSS as it relates to positioning of blocks of code, known in Dreamweaver as “AP divs”. An “absolutely positioned div”, previously known as a layer, is part of the page that’s independently movable and resizable. It can sit above or below other layers, and sits above parts of the page not in a div tag.
The great advantage of div-based layouts is that they flexibly separate the content from the visual design. Their great disadvantages are that they can be more difficult to handle than tables and can be interpreted differently by different browsers. Both these problems will disappear in time, as designers, design tools and browsers become more CSS-savvy.
Some types of layout are very easy to accomplish with layers, but these tend to be unsophisticated and static in their design. Let’s create an example now.
• Create a new HTML page.
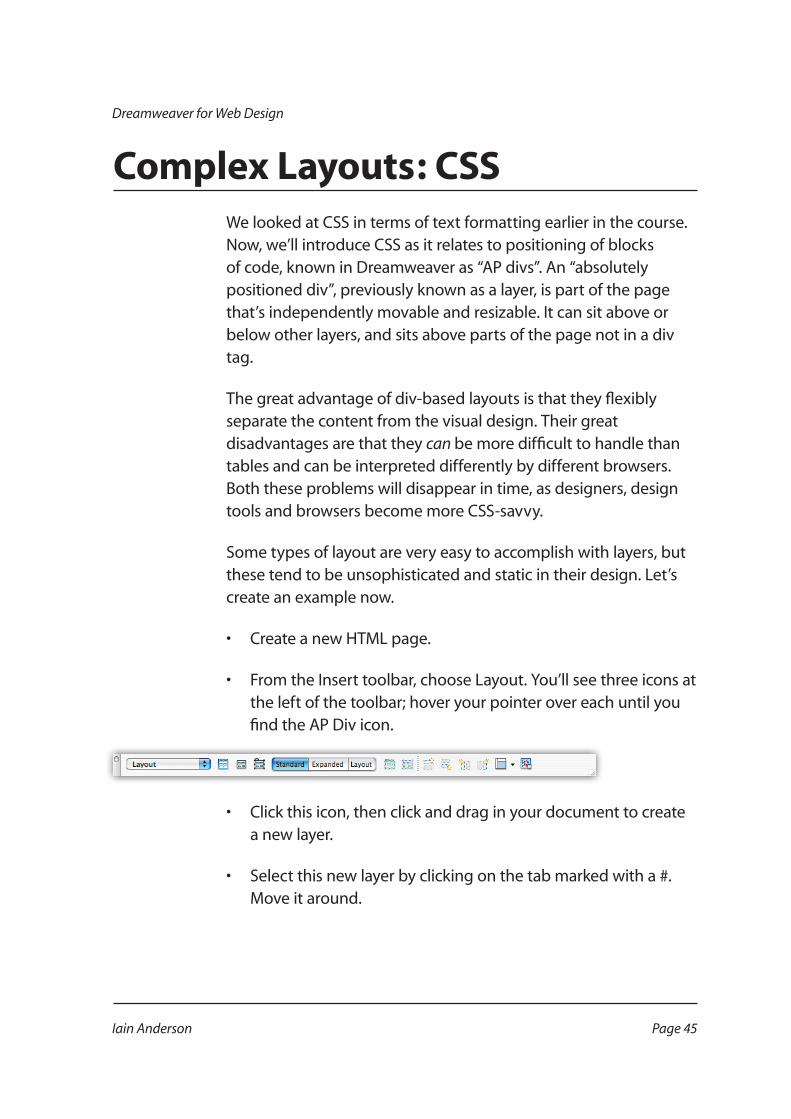
• From the Insert toolbar, choose Layout. You’ll see three icons at the left of the toolbar; hover your pointer over each until you find the AP Div icon.
• Click this icon, then click and drag in your document to create a new layer.
• Select this new layer by clicking on the tab marked with a #. Move it around.

Page 46 funwithstuff.com
Dreamweaver for Web Design
• Change some of this AP Div’s properties using the Properties palette. Experiment with width, height, padding, background colour, left and top.
• Create another AP Div and assign a new background colour. Now move this layer on top of the other one.
• Change the first AP Div’s z-index property to juggle the stacking order of the two layers.
• Add content to each AP Div: type text and drag graphics into to each one.
So far, so good. You’ve been able to position elements freely on a page without caring about tables, rows or columns. But this layout strategy won’t take you very far. Since each AP Div is of a fixed size, none of this content will shrink or grow to fill available space as the window changes size. “Fluid” layouts are fairly easy to produce in table-based layouts and only slightly trickier in CSS. Let’s convert this simple layout into a more practical fluid example.
• Change the properties of the first AP Div to position it at left: 0px and top: 0px.
• Change its width to 20%.
• Change the second AP Div to position left: 20%, top: 0px and width: 80%.
This is a simple fluid layout with two percentage-based widths. Often, though, you want to mix static values with percentage based values. Try this:
• Change the width of the first AP Div to 200px and the left parameter of the second to 200px.

Page 47Iain Anderson
Dreamweaver for Web Design
In a browser, you’ll see that the 80% width is no longer accurate. There’s no guarantee of 80% of width being left over or of it filling the window appropriately. Worse, how do we deal with the height? The answer is to rethink the method by which this layout is accomplished. With CSS, it’s best to take a light-handed approach — defining as little as possible — rather than rigidly forcing everything to fit exactly.
• Use the Tag palette (or the CSS palette in Dreamweaver 8) to remove the width, height, top and left declarations for the second AP Div. Clear them, don’t just make them 0.
By removing these parameters, we’re going to let the second AP Div land naturally with the flow of the page. Since this is the main part of the page, that’s appropriate; other elements can push it out of the way.
• Add 200px as margin-left. This will push this section 200 pixels away from the left side of the window, leaving room for the left AP Div.
• Remove the height declarations for each AP Div and add values for padding in each.
As long as there’s content in each AP Div they will extend vertically. This is unlikely to be a problem in a website full of content, so add some dummy text to make the page fill up. Defining a height for the site isn’t often a good idea, as you can end up with pages longer than they need to be and/or columns that are too short.
The above strategy is just one simple way to look at CSS Positioning. It’s often more useful to be able to position blocks to the right or left of other blocks, or to the internal right-hand side of a text box. Let’s try creating a similar site using another strategy, one which features a floating navigation bar to the left side of the content.
Page 48 funwithstuff.com
Dreamweaver for Web Design
• Create another new HTML page.
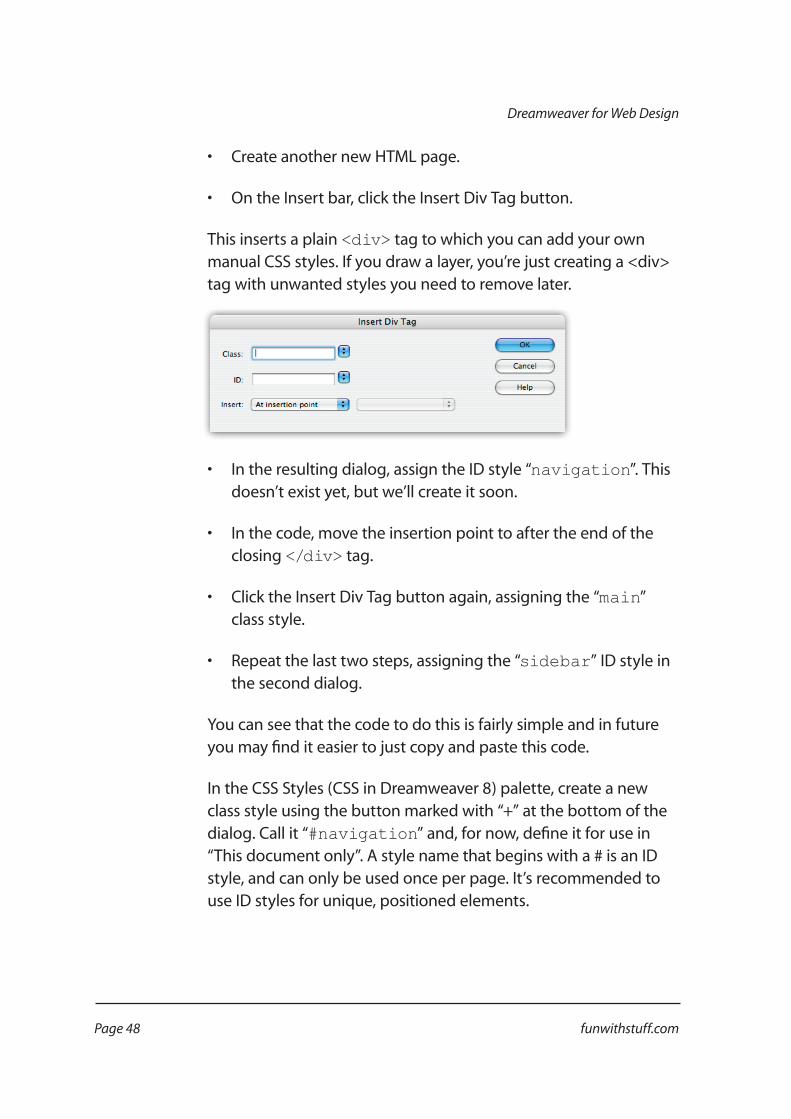
• On the Insert bar, click the Insert Div Tag button.
This inserts a plain <div> tag to which you can add your own manual CSS styles. If you draw a layer, you’re just creating a <div> tag with unwanted styles you need to remove later.
• In the resulting dialog, assign the ID style “navigation”. This doesn’t exist yet, but we’ll create it soon.
• In the code, move the insertion point to after the end of the closing </div> tag.
• Click the Insert Div Tag button again, assigning the “main” class style.
• Repeat the last two steps, assigning the “sidebar” ID style in the second dialog.
You can see that the code to do this is fairly simple and in future you may find it easier to just copy and paste this code.
In the CSS Styles (CSS in Dreamweaver 8) palette, create a new class style using the button marked with “+” at the bottom of the dialog. Call it “#navigation” and, for now, define it for use in “This document only”. A style name that begins with a # is an ID style, and can only be used once per page. It’s recommended to use ID styles for unique, positioned elements.

Page 49Iain Anderson
Dreamweaver for Web Design
This dialog allows CSS styles to be manually created. We’ll look at this interface again later with relation to text styles and external style sheets.
• Add properties to the “#navigation” style. Explore the Border and Box sections of the dialog, and make sure to include padding. Set width to 150px. Press OK when done.
• Create a “#main” ID style and add different properties to it. Don’t define a width, but do define margin-left to 200px.
• Lastly, create a “#sidebar” style and add still different properties. Try setting width to 25%.
• Make sure there’s some content in each of your new <div> tags in the HTML, then preview the file.
You should be able to see the blocks resize appropriately as you change the window size in your browser. If you plan a site to use a structure such as this, not only will it load quickly, it will be easy to modify (using external style sheets) and compatible.
While CSS design can sometimes use non-obvious techniques, there are many sites out there that can help you. For a few nice starting points, look at:
• http://glish.com/css
• http://webdesignfromscratch.com
The use of CSS for page design can be complex, but there is a great deal of help available on the net. The above links are only a starting point, but there’s no need to feel stuck. Many templates are built in to Dreamweaver, and they encompass a wide range of the types of designs you’re likely to want to use.

Page 50 funwithstuff.com
Dreamweaver for Web Design
To get started, just create a new document and choose HTML from the page that appears. You’ll see a range of types of pages, all created using modern CSS styles. Examine the code to see what’s happening and change it as you need to.
If you’re spoiled for choice, start from a template that uses a fixed size (less than 900 pixels) that’s centred on the page. You’ll gain the benefits of a fixed layout but your page won’t be stuck on the left side of the screen. To create boxes within the existing centred area, insert your <div> tags inside the existing “container” elements. Avoid the “Draw AP Div” functionality completely.
Bear in mind that some things you may try to do are difficult to implement across all browsers. For example, fixed positioning can be problematic in some versions of Internet Explorer. If you run into trouble, you’re unlikely to be the first, so search for a solution. The web is a great resource for help on web coding, but do try to find a couple of opinions; outdated information is not always removed promptly.
Page 51Iain Anderson
Dreamweaver for Web Design
Lists for Navigation
Once you’ve got the hang of the different tricks that are possible with CSS-based layouts, it’s worth trying a further trick. Rather than using graphic links or simple text links, use lists for navigation. You should represent navigation menus in lists because they are lists, and because CSS allows you to make them appear as you choose.
For many examples and sample code, visit:
http://css.maxdesign.com.au/listamatic/

Page 52 funwithstuff.com
Dreamweaver for Web Design
Photoshop Layouts
If you’ve got Photoshop, there’s a simple trick that can be used to create a relatively complex table- or CSS-based layout. It’s not going to be fluid but can be handy as a starting point to create an initial layout.
• Open an image in Photoshop.
• Select the Slice tool and draw boxes over areas of the image you’d like to convert into links. Horizontal and vertical lines around these areas will be split too.
• Choose File > Save for Web.
• Choose quality and image format settings for each slice in your image, using the two-up display to compare the original with the compressed data. The same interface can be used to prepare non-sliced images for the web and is recommended.
• Press OK. In the next dialog, be sure to save HTML and Images. Note that the save location is for the HTML page. Any images required will be saved into an images subfolder, which will be created if necessary. By default, this tool creates table-based layouts. To create (static) CSS-based layouts, choose Custom from the Settings drop-down menu and select CSS rather than tables.
• Open this new HTML page in Dreamweaver. You’ll see that a table layout has been created, using the lines you drew to generate the cells.
• Add links to images as desired in Dreamweaver.

Page 53Iain Anderson
Dreamweaver for Web Design
Viewing a WebsiteA crucial difference between designing for the web and for print is that in print, you know the end product. Everything about the page is known, including the colours, the size of the paper, font and images. On the web, none of this is prescribed. A user could be on a 12” laptop screen or on a 30” widescreen monitor. They might be using the full screen area or might have several windows visible at once. Assumptions about your audience are dangerous and can cost your site visitors.
To the right of the “tag tree” at the bottom of each window are two useful readouts: an indicator of the current size of the window and the total downloaded size of the web page. Both are important when planning your pages:
• Will this page fit on everyone’s screen?
• Does that assume their web browser is maximised?
• If not, how many viewers will be alienated?
• How long will this page take to download:
• Over dialup?
• Over broadband?
The size shown is an actual pixel size, but space must be left around the page for scroll bars, menu bars and so on. It’s also very important to remember that not everyone browses at full screen. As screens get larger, reading very long lines on maximised windows can become tiring. Even on small screens, many users flick between multiple windows and applications at once, so a site that demands a user’s full attention is asking to be ignored.
Page 54 funwithstuff.com
Dreamweaver for Web Design
The only way to be sure of maximum compatility for your site(s) is to assume as little as possible. Focus on the content first and the look afterwards. There are many ways to spice up a web page but the overall information and the flow through that information will always be most important.
Browser Tricks
To help you explore how different people might view your site, it’s important to preview your site in a selection of different browsers. Sometimes differences will be obvious and sometimes they’ll be subtle. If differences are unavoidable, your site should at least be viewable and usable in every browser you can find. Don’t overlook platform differences either; the very popular Mac browser Safari is unavailable on the PC and Internet Explorer for PC is very different to (the discontinued, no longer available) Internet Explorer for Mac.
At time of writing, the world’s most popular browser is Internet Explorer for PC. This is because it’s the default browser on Microsoft Windows. However, Firefox is free, gaining popularity, and standards-based. It’s definitely worth developing with Firefox as a primary browser and making sure that it works in IE second. This is a safe strategy going forward, as a site that only works correctly in IE is more likely to fail in the future than one based on standards today.
The most important feature of Firefox (and Safari on the Mac, once activated in Preferences) is tabs. These let you open multiple web pages in a single window, allowing you to open and contain several pages from a single list of links, such as produced by a search engine. Hold control (command on Mac) while clicking a link to open the linked page in a new tab.

Page 55Iain Anderson
Dreamweaver for Web Design
Another very helpful feature in Firefox is extensions. These downloadable add-ons allow expanded functionality over the basic setup, including a variety of new features. The Web Developer extension alone includes many useful tools, including the ability to quickly validate your code, outline tables or outdated code, display paths in links, resize the window and countless other handy functions.
• http://getfirefox.com/
Let’s now dip back into HTML and explore some of the less common features.

Page 56 funwithstuff.com
Dreamweaver for Web Design

Page 57Iain Anderson
Dreamweaver for Web Design
More HTML
Anchors
Anchor links provide a way to link directly to different parts of an HTML page, rather than just the top of the page.
• Open one of your existing HTML pages. Add a lot of text to it to make the page longer.
• Switch the Insert bar to “Common”.
• Drag the anchor icon to near the bottom of the page and give it a name (here we’ll use “anchorname”). The name should be representative of the context at that point and can contain only letters and numbers — no spaces or punctuation.
• Scroll back up to the top of the page. Select some text and add a link to it by typing “#anchorname”, in the URL field.
• Preview the page. When you click on the link, the browser jumps to the anchor near the bottom of the page.
• Open a second HTML page. Add a link to the first page, by typing the name manually or using the browse feature.
• Add #anchorname to the end of the URL, so it reads “yourpage.html#anchorname”.
• Preview this page too. The link jumps directly to the bottom of the other page.

Page 58 funwithstuff.com
Dreamweaver for Web Design
The natural complement to a downward anchor link is one that returns to the top of the page. You may have seen “Return to Top” links before. This is simple to implement:
• Put an anchor named “top” at the top of the page and insert links to “#top”.
Email Links
It’s easy to provide a link to an email address, though it’s not always wise. Type “Email the webmaster” in your HTML document.
Select that text and add “mailto:[email protected]” as the URL.
While this will work for users who have a separate email client set up on their computer, it won’t work for users in internet cafés, for example. Even when the link works, the email message must manually be sent by the user. If this message is not seen immediately, it can be inadvertently closed before being sent.
A further problem is that of spam. Any email address placed on the web is likely to be picked up by a computer program known as a crawler that surfs the web looking for email addresses to add to spam mailing lists. Therefore, it’s a good idea to
• protect email addresses and
• provide alternative email methods.
The first option involves one of these methods:
• Omitting the link entirely and/or obfuscating the text, perhaps by surrounding the @ sign with spaces, or using -at- instead of @.
Page 59Iain Anderson
Dreamweaver for Web Design
• Inserting extra words or characters into the text and/or URL, such as user*REMOVETHIS*[email protected].
• Obfuscating the link text and/or URL using HTML entities.
HTML entities can be an effective way to protect against most crawlers, but not all. As these programs are updated, they will be able to interpret anything your browser can. Therefore, it’s best not to put linked email addresses on the web at all. If you want to use entities, the quick solution is to replace the @ symbol with @ as your browser can understand this but many crawlers cannot.
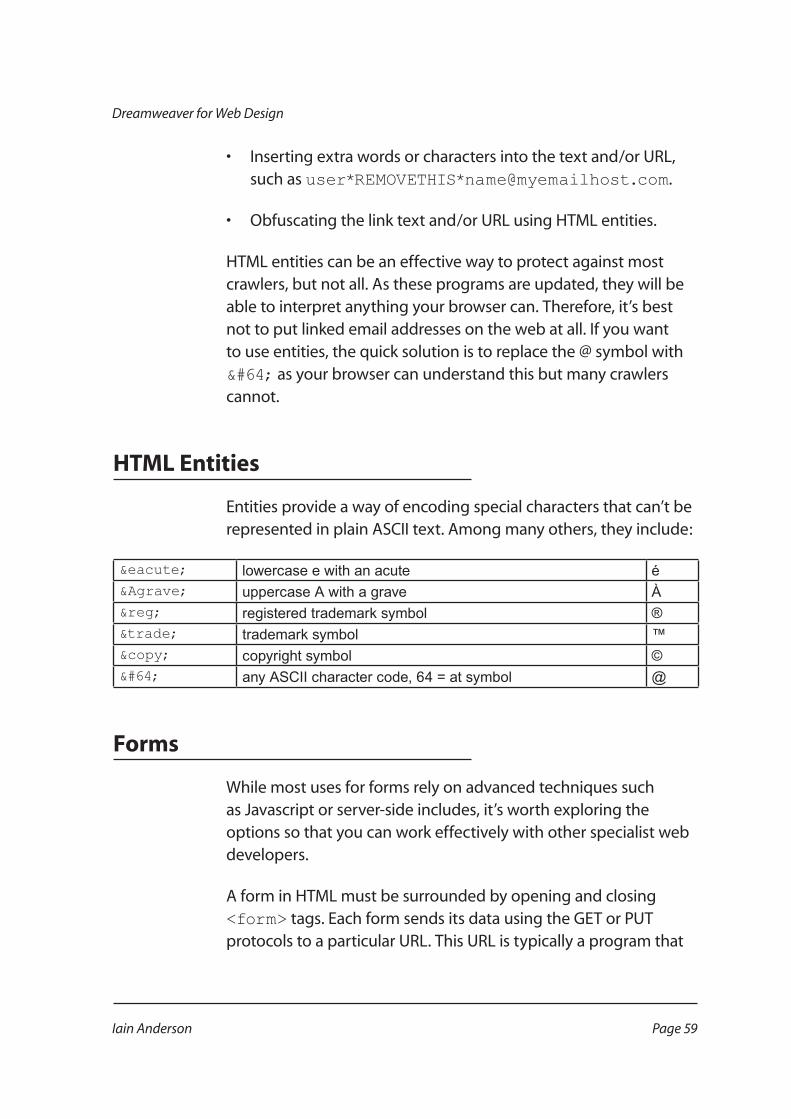
HTML Entities
Entities provide a way of encoding special characters that can’t be represented in plain ASCII text. Among many others, they include:
é lowercase e with an acute éÀ uppercase A with a grave À® registered trademark symbol ®™ trademark symbol ™© copyright symbol ©@ any ASCII character code, 64 = at symbol @
Forms
While most uses for forms rely on advanced techniques such as Javascript or server-side includes, it’s worth exploring the options so that you can work effectively with other specialist web developers.
A form in HTML must be surrounded by opening and closing <form> tags. Each form sends its data using the GET or PUT protocols to a particular URL. This URL is typically a program that

Page 60 funwithstuff.com
Dreamweaver for Web Design
runs on the web server and responds to particular input. It’s also possible to use Javascript alone to process form input, though this is less compatible.
A form can contain any number of form elements, including:
• text fields
• text areas
• checkboxes
• radio buttons
• list menus
• buttons
…though a form should always have a Submit button to activate the form. Each element is named individually to identify its contents in the sent data, and some elements (checkboxes, radio buttons, list menus) also have a pre-defined value, such as yes or no.
• Create a form in an HTML document. Don’t worry about defining an action in this example.
• Create a text field. Change the width and the initial value.
• Add a radio button group. Radio buttons are similar to checkboxes except that only one radio button within a group can be active at any one time. Unlike other form elements, radio buttons share a common name and return different values.
• Continue with this form, preparing a series of fields to accept a name and address for a mailing list application. Provide separate checkbox and radio buttons to assess other options.

Page 61Iain Anderson
Dreamweaver for Web Design
While the completed form won’t be functional, it could be used by a back-end web developer to link in to a database. At a simpler level, it’s possible to download pre-made programs that send email containing form data. These are an ideal way to collect data from end-users without requiring that they have an email program on their own computer. Normally free, these programs are not complex to set up if you have access to that part of the web server. Contact your webmaster or hosting organisation to discuss the addition of a web-email gateway.
Even if you don’t know Javascript or server-side programming, you can still use forms as a navigation tool using built-in Dreamweaver tools. However, as it relies on Javascript, alternative navigation methods should be included. Let’s examine Javascript now.
Javascript and Behaviours
Javascript is a simple client-side scripting (programming) language that is well supported by various browsers. It’s possible to write your own Javascript, to modify provided code, or to use the built-in behaviours — chunks of Javascript customisable through a graphical interface. We’ll use one now.
A common navigation technique today is to use a drop-down menu to jump to different parts of a website. It’s small and often convenient, though less accessible.
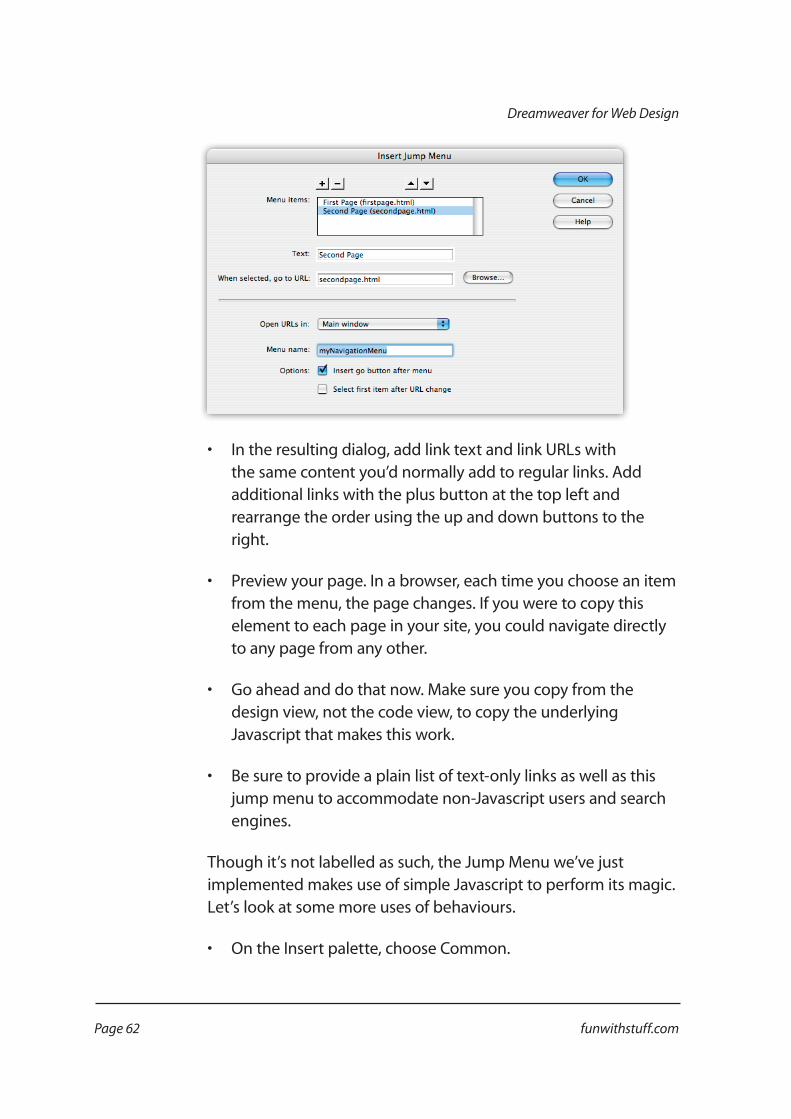
• Drag the Jump Menu icon from the Forms insert palette to a place in your document.
Page 62 funwithstuff.com
Dreamweaver for Web Design
• In the resulting dialog, add link text and link URLs with the same content you’d normally add to regular links. Add additional links with the plus button at the top left and rearrange the order using the up and down buttons to the right.
• Preview your page. In a browser, each time you choose an item from the menu, the page changes. If you were to copy this element to each page in your site, you could navigate directly to any page from any other.
• Go ahead and do that now. Make sure you copy from the design view, not the code view, to copy the underlying Javascript that makes this work.
• Be sure to provide a plain list of text-only links as well as this jump menu to accommodate non-Javascript users and search engines.
Though it’s not labelled as such, the Jump Menu we’ve just implemented makes use of simple Javascript to perform its magic. Let’s look at some more uses of behaviours.
• On the Insert palette, choose Common.

Page 63Iain Anderson
Dreamweaver for Web Design
• From the Image drop-down menu (the small arrow to the right of the Image icon) choose Rollover Image.
• Choose two images from your images folder (preferably the same size) and a URL to be taken to when you click.
• Preview the page.
There’s quite a bit of Javascript to make this work; let’s take a look.
• Open the Behaviors palette and select your rollover image in your page.
You’ll see that two behaviours have been applied, one to each of two trigger conditions: onMouseOver and onMouseOut. Most behaviours are triggered from user input and work from onMouseOver or onMouseUp. Since the most commonly used Javascript functions are provided in the Jump Menu and Rollover Image items, we won’t look at behaviours in more detail here.
Page 64 funwithstuff.com
Dreamweaver for Web Design
Page 65Iain Anderson
Dreamweaver for Web Design
Uploading your siteNormally, it’s a good idea to work on a local copy of your website, not on the live master copy. Be sure to keep multiple backups of various stages of development, so you can revert to a previous version should a change be undesirable. When you’re happy with your changes, it’s time to upload your site.
At a simple level, the uploading process is essentially just copying files to a specific area of a web server. That web server runs software that responds to HTTP (Hyper Text Transfer Protocol) requests from web browsers by sending data from a particular location on its hard drive.
Sometimes, typically on intranets, you may be able to simply copy files from your local working copy to a specific folder or drive on the network. Most commonly, websites are hosted on external web servers, and it’s necessary to use a specific protocol to transfer files. This is FTP, File Transfer Protocol, and many tools (some free) exist to send files in this manner. However, Dreamweaver can send files by FTP directly.
To take advantage of this, it’s a good idea to use Dreamweaver’s Site functionality. This feature allows you to easily manage a site, assess validity of links and keep files together. It’s sensible to create a new “site” before starting work on a website.
• From the Site menu, choose “Manage Sites”.
• Create a new site by clicking on the New… button and choosing Site from the (confusing) pop-up menu that appears.
• Stepping through Basic mode, give your site a name.
• Don’t use a server technology.
Page 66 funwithstuff.com
Dreamweaver for Web Design
• Edit local copies, then upload to server (recommended). Choose a place on your computer to store your files. Note that this folder should be the exact files to be uploaded to the web server, and nothing else. Keep source files in a separate folder.
• Since you probably don’t have access to your web server from our office, you can choose None for “How do you connect to your remote server?”. If you know the details for your FTP site, you can choose FTP and enter them. Once at your own office, if you have Local/Network access, you can choose that.
• It’s important to get the folder on the remote server correct. Often, you’ll have access to more than simply your webspace: you may need to put your files into a subfolder called “htdocs”, “web” or “pubiic _ html”. Be sure to get this information right. You’ll be able to see the web server once you connect using FTP, so you should be able to see the folder name later if you don’t know it now.
Now that you’ve created a site, any new pages you create will automatically default to being saved within it. You can choose to work with a different site by choosing it from the Manage Sites dialog.
• Create some new pages now. Make sure they’re saved within the site’s local root directory.
• Use Windows Explorer (PC) or Finder (Mac) to move some of your existing files into the site’s local root folder.
• Examine the Files palette to see the new pages. If necessary, press the Refresh button at the top of the palette. You might also need to move or copy an images folder into this new local root directory.
• If you’ve got a remote server configured, press the Connect button in the Files palette.

Page 67Iain Anderson
Dreamweaver for Web Design
• Tear off the Files palette and extend it horizontally. Press the Expand/Collapse button at the top of the palette to see both your local and remote files at once. Importantly, the structures of each of these folders should be the same; one should not contain a subfolder into which all content is placed. If this is the case, reconfigure the site (using Manage Sites) to include the subfolder, as discussed previously.
• Select the new files, right-click and choose Synchronise. This is the safest way to upload files to a web site. Dreamweaver will verify the status of the remote files and confirm that these are the correct files to upload. If anyone else uploads files to your webserver, this can avoid overwriting newer files with older ones.

Page 68 funwithstuff.com
Dreamweaver for Web Design
Page 69Iain Anderson
Dreamweaver for Web Design
Overall Site DesignWhen planning a web site, the most important thing to consider is how a user will move through the site. Only a small part of this is the visual appearance of the site; a more important aspect is the way in which information will be presented and consumed. How is the the information arranged? How many links are placed together?
Generally, it’s best to use short, descriptive link titles if possible and group them in sets of no more than about seven links. It’s also a good idea to provide multiple entry points. If you provide links to your pages in navigation bars, consider also linking from within the text of pages on your site.
It’s recommended to provide many ways to move between pages on your site, rather than forcing a user to return to the home page all the time. Another useful strategy is to create a “breadcrumb trail” of links listing the pages which a user has clicked on to get to this point. Let’s look at an example of how a reasonably complex site might be structured:

Page 70 funwithstuff.com
Dreamweaver for Web Design
In the example on the previous page, a “breadcrumb trail” for one of the third-level pages might look like:
Carpagetimefunsite > Engines > Exhausts
As the previous pages are linked in such a structure, it’s easy for a user to move about within a site. Some sites also provide the main links from the home page on every page in the site, usually in a common header or footer. This strategy can work well, but it’s important to plan ahead. Site-wide changes can be difficult or time-consuming to implement.
Visual Design
As in most design, you’ll be influenced by what you’ve consumed yourself, so look at as many websites as you can, with a critical eye. Websites can’t be easily protected from simple copying, though of course it’s illegal to claim others work as your own.
However, many sites encourage you to experiment with layout schemes that they provide. Often, you can legally copy a complex, compatible layout, adapt it for your own needs, and simply add an acknowledgement in the source code. At other times, you just want to find out the trick that’s been used to accomplish a certain effect. Let’s look at how you can decipher another website’s source code.
• Open a page you like in any browser.
• Right-click on the page background and choose View Source. You’ll see what you saw in Code view in Dreamweaver, raw HTML code.
• Save this page to your desktop and open it in Dreamweaver. It won’t look the same and error messages may appear.

Page 71Iain Anderson
Dreamweaver for Web Design
You’ll need to look through the source code for any links to external files in images or in CSS references. Most references in a web page will be local, relative links, which you can decipher the URLs fairly easily. If a URL is simply a file name, it will be located directly next to this file’s location on the web server, so:
• Copy the file name.
• Paste this address (including any subfolders) over the current file name in the address bar.
Sometimes a URL will start with a slash (/). This means that this address starts at the root level of the website, so:
• Copy the address, including the slash.
• Paste over the existing address, starting from the slash that immediately follows the site name.
In either case, if these referenced files are in subfolders, you’ll have to recreate them so that your newly saved files are in the same relative place to the original file. Further, references that start with a slash won’t work when viewing the local copy of your site; you must view a copy from a webserver. It’s easier to change these links to true local links for testing purposes.
Remember, whenever you do this, not to infringe copyright. It can be useful to examine another site as a learning tool, but don’t simply copy large chunks of code. It’s not legal and won’t help you understand what’s happening to your site. Bugs and incompatibilities will be much easier to track down if you only incorporate code you need.

Page 72 funwithstuff.com
Dreamweaver for Web Design
Metadata
For commercial sites, it can be important to set up metadata — keywords and description information — for each page on your site. Some search engines may use the description to describe your site in a search engine listing, though keywords are often ignored today.
• On the Insert bar, choose HTML.
• From the second menu along, choose Description, and type a brief description of the page. This inserts a META tag into the head section of the page.
• From the same menu, choose Keywords and type any relevant keywords, separated by commas. This will be useful for a site-specific search tool, though on the wider internet keywords have been abused and are ignored by major search engines.
If you don’t add a description and keywords to every page, at least add it to the home page. It’s the page most likely to be shown in search engine results and it’s important to present your site well, rather than with random text from part of the page.
Before we close, let’s look at the very top of the source code. You will see a !DOCTYPE declaration, probably over two lines. This piece of metadata defines the HTML standard to which this page is written and can affect how a browser will interpret it. A page might be written to take advantage of the latest standards, and might use a “strict” declaration, or be less carefully coded and use “loose”.
Different versions of Dreamweaver include different declarations here, so if you find yourself drawn into cutting-edge design, don’t overlook the effects that this can have on how your page looks. Crucially, a page matched to an accurate !DOCTYPE declaration

Page 73Iain Anderson
Dreamweaver for Web Design
should be interpreted correctly for years to come. A page missing this declaration may be interpreted in different ways by different browsers.
Further Resources
Many sites on the internet can help with many HTML and CSS problems, including issues from the latest browser and Dreamweaver updates, current standards, techniques and hacks to work around browser incompatibilities.
• http://bluerobot.com/
• http://csszengarden.com/
• http://www.webmonkey.com/
• http://www.basictips.com/
• http://webdesignfromscratch.com/
• http://alistapart.com/
• http://funwithstuff.com/therules/
• http://blog.html.it/layoutgala/
Page 74 funwithstuff.com
Dreamweaver for Web Design
Final Words
I hope you’ve enjoyed this book and gained some knowledge of modern web design — though there’s much more to learn. If you’ve found this book useful, please let me know by emailing [email protected]. Donations are gladly accepted; just ask for details.
If you’re wondering who I am, I do a number of things with design (print and web), video (short film, motion graphics and animation) and teaching (university and college level). More details on what I’m up to can be found at http://funwithstuff.com.
— Iain Anderson