downloading &installing the lync client 2013 -...
TRANSCRIPT

Lync 2013
Downloading
&Installing
the
Lync Client 2013

***Important Information*** – Please read before downloading and installing the
Lync Client 2013
1. Before you download and install the Lync Client 2013 is
extremely important that you make sure you have applied the latest
updates to both your operating system (Windows) and to your MS
Office 2010 or 2013. Failure to do this will result in an unsuccessful
attempt to install the Lync Client 2013.
2. Please make note of the MS Office version you are running. If
you are running the 32bit version of MS Office 2010 or 2013 you will
need to download and install the 32bit version of the Lync Client
2013.
3. As the downloadable files from the AMES site are .ISO images
you will need to burn them to a disc with software/freeware that is
freely available on the internet such as; ISO Opener -
http://www.isoopener.com/ There is a small tutorial on how to
download and install ISO Opener on the Lync 2013 Wiki page
4. We understand that the downloads for Lync Client are rather
large in size and are therefore conscious that this may be an issue
for many due to download limits and slower internet connections.
We have burnt both versions of the Lync Client 2013 files to a disc
which can then be sent to you at your request to make the process a
more efficient and pleasant end user experience for you. If you
would like a disc to be sent to you please contact Ann Hardingham
email: [email protected] with your request . There is a
small tutorial on how to use the DVD on the Lync 2013 Wiki page

Access 2013 Lync software from https://asa.ames.net.au
Select Lync Client download from the drop down menu
Use you username and password as supplied by AMES – your username is your surname then your first name initial. Then log in
Click on Browse Networks
Click on Lync Client

Select the download appropriate to your computer set-up: • Lync 32bit download • Lync 64 bit download
Save the file and click OK to save the file to your computer
Click on Logout to leave the site
You will get logout message

Navigate to your download folder or wherever you chose to your Lync download to – this is a .ISO or disk image file and will need to be opened in a different way.
PLEASE NOTE: You will need software to unpack the .ISO file before you
can install. isoopener is a small freeware piece of software that will
allow you to do this. The next part of the installation instructions will deal with
downloading and installing isoopener then using it to unpack the file for use.
If you already have .iso burning software and know how to use it to unpack the above file please move forward to the
installation of Lync Client 2013 section. OR
If you have a CD with the files on it sent to you by Ann Hardingham or your Lync eMentor then please move
forward to the installation of Lync Client 2013 section.

Unpacking your .iso file with isoopener:
Go to : http://www.isoopener.com/ click on Download
Save the file to your computer
Navigate to your downloads folder or where you downloaded the file to. Double click on the file to install isoopener.
You may receive a message from Windows asking if you allow this program to make changes to your computer – click Allow
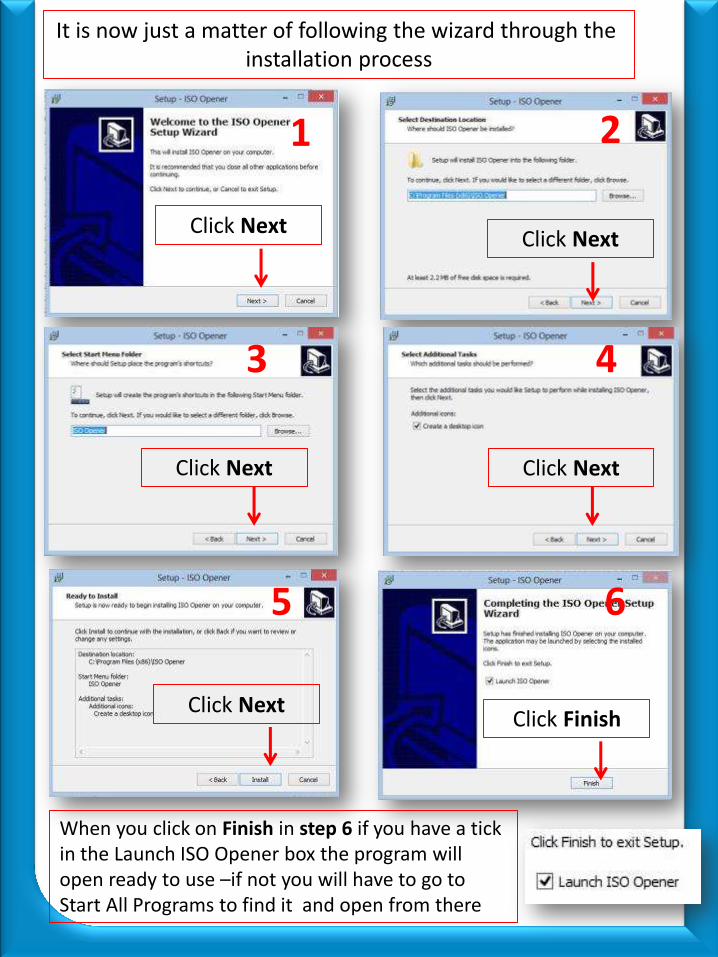
It is now just a matter of following the wizard through the installation process
Click Next
6 5
4 3
2 1
Click Next
Click Next Click Next
Click Next
Click Finish
When you click on Finish in step 6 if you have a tick in the Launch ISO Opener box the program will open ready to use –if not you will have to go to Start All Programs to find it and open from there

Open ISO Opener and click on Open to find your .iso file
Navigate to to the file in the pop up window click on the file then Open
You will notice the file will now populate both the ISO file and Output folder windows
Click on the Select button to choose a different location for the unpacked files if you wish to and choose a different location from the pop up window

Click on the Extract
When extraction is finished you will receive a successful message
Click OK and the destination folder will open for you

Installing the Lync 2013 Client:
Double click the x86 folder in the destination folder to open it
You will see all of the above files – go right to the bottom and double click on Setup to install the Lync Client 2013
Click in the Accept Terms in this Agreement Box then click on Continue

Click on Install Now
Installation may take a few minutes depending on your computer
Lync Client will now start
When finished installing you will get this screen do not click on continue online click on close
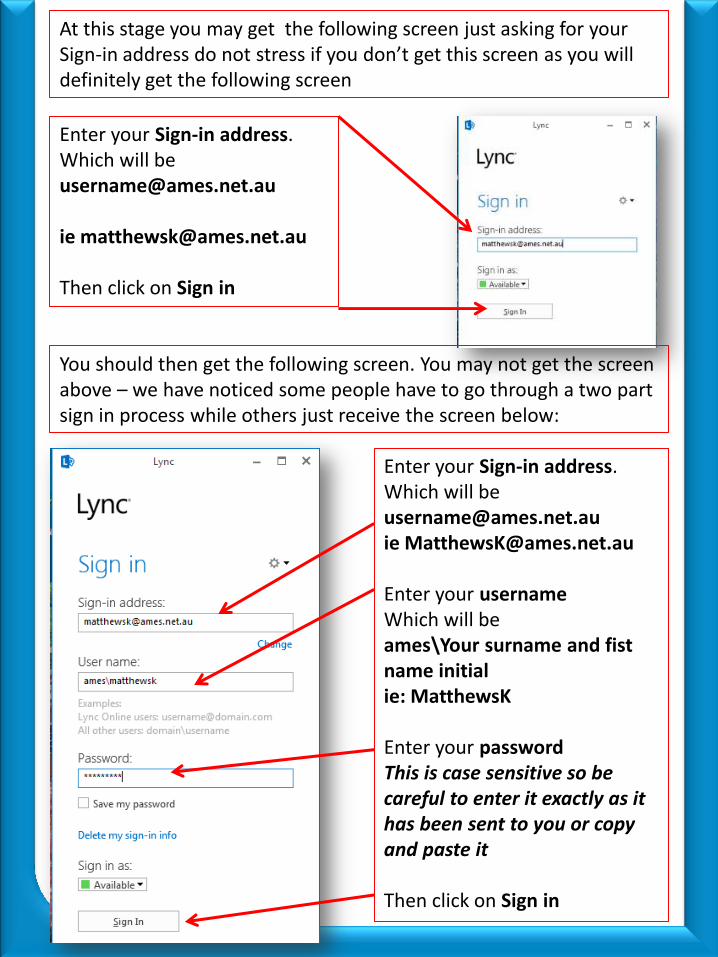
Enter your Sign-in address. Which will be [email protected] ie [email protected] Then click on Sign in
Enter your Sign-in address. Which will be [email protected] ie [email protected] Enter your username Which will be ames\Your surname and fist name initial ie: MatthewsK Enter your password This is case sensitive so be careful to enter it exactly as it has been sent to you or copy and paste it Then click on Sign in
At this stage you may get the following screen just asking for your Sign-in address do not stress if you don’t get this screen as you will definitely get the following screen
You should then get the following screen. You may not get the screen above – we have noticed some people have to go through a two part sign in process while others just receive the screen below:

Once you are signed in you will see a screen like this one except you will not have any contacts yet so your contact area will be empty. You will now be able to start adding contacts and using Lync.
Refer to the part 1 and part 2 guides on the Lync 2013 wiki page to navigate the Lync environment learn how to add contacts,
make calls and use the meeting functions of Lync