
What’s New in Microsoft PowerPoint 2007? Olathe District Schools Instructional Technology
Last Updated ~ July, 2008

New
Fe
atu
res
in
Mic
roso
ft P
ow
erP
oin
t 2
00
7 -
Ola
the
Dis
tric
t S
cho
ols
1
Introduction to MS PowerPoint 2007
You have already been introduced to the overall new features in Microsoft Office 2007, such as the
Microsoft Office Button, Tabs and Ribbons, and Groups and Commands.
This training manual will introduce you to some of the new features available in PowerPoint 2007. By
the end of the training, you should be familiar with how to create a new PowerPoint 2007 presentation
and incorporate many of the new enhanced features included with this version of the application.
NOTE: This is a hands-on tutorial. When you are asked to enter text, select an object or highlight text
throughout this tutorial, the instructions will appear in GREEN text as shown in the first direction below.
The MS PowerPoint 2007 Interface
Open MS PowerPoint 2007
The first thing you’ll notice, when you
open a 2007 PowerPoint application is
that there is no longer a File Menu or
Menu Bar, just as with 2007 Word.
The MS Office Button, Quick Access
Toolbar and the Ribbon replace the
old Menu, Standard and Formatting
Toolbars in PowerPoint 2003.
The Office Button is the access point to Create a New
Presentation, Open or Close an Existing Presentation,
Save a Presentation, Print a Presentation as well as
more commands.
Recent Documents are displayed in the right side of
the Office Button window. These documents can be
“pinned” to this window using the push pin icon as
shown at left.
The PowerPoint Options Button provides a means of
changing options for various commands and windows.

New
Fe
atu
res
in
Mic
roso
ft P
ow
erP
oin
t 2
00
7 -
Ola
the
Dis
tric
t S
cho
ols
2
Converting a Previous PowerPoint Presentation
If you open a presentation created in an earlier version of PowerPoint, the
Office Button will also provide a Convert command as shown at left. The
dialog box below will appear. Choosing this command will convert the ppt
file to a pptx file and all of the new features in PowerPoint 2007 will then be
available for use. The file size will also be reduced. Further, the ppt
document will be “replaced” with the pptx document.
Compatibility Mode
When you open a presentation in PowerPoint 2007 that was created in an earlier version of PowerPoint,
the Title Bar at the top of the window will indicate you are working in Compatibility Mode, as shown
below, if you do not choose to convert it to the new version type.
You will also not be able to use all of the new features in
PowerPoint 2007 unless you convert the file to a PowerPoint
2007 file type. The graphic to the left shows that a command
that is “currently disabled” as the presentation is a ppt file that
has not been converted to a pptx file.

New
Fe
atu
res
in
Mic
roso
ft P
ow
erP
oin
t 2
00
7 -
Ola
the
Dis
tric
t S
cho
ols
3
Compatibility Checker
When you create a new PPT 2007 file, you may
wish to run the Compatibility Checker before
sending it to others. The Run Compatibility
Checker checks to see if a feature used in the
PowerPoint 2007 presentation is compatible
with earlier versions of PowerPoint in case the
presentation needs to be saved in an earlier
format.
A detailed report of any complications will be
displayed. You will then need to decide
whether to save the presentation in a format
that will open in a previous version, using the
Save As command in the Office Button window.
IMPORTANT: Again, the CONVERT command converts an old ppt file to the new pptx format;
whereas, SAVE AS is used to save a new pptx file backwards into the old ppt format.
Key Tips
Key Tips are now available in all MS Office 2007 applications. Click the ALT Key to display the Key Tips.
Press the corresponding letter to activate the Key Tip.
New
Fe
atu
res
in
Mic
roso
ft P
ow
erP
oin
t 2
00
7 -
Ola
the
Dis
tric
t S
cho
ols
4
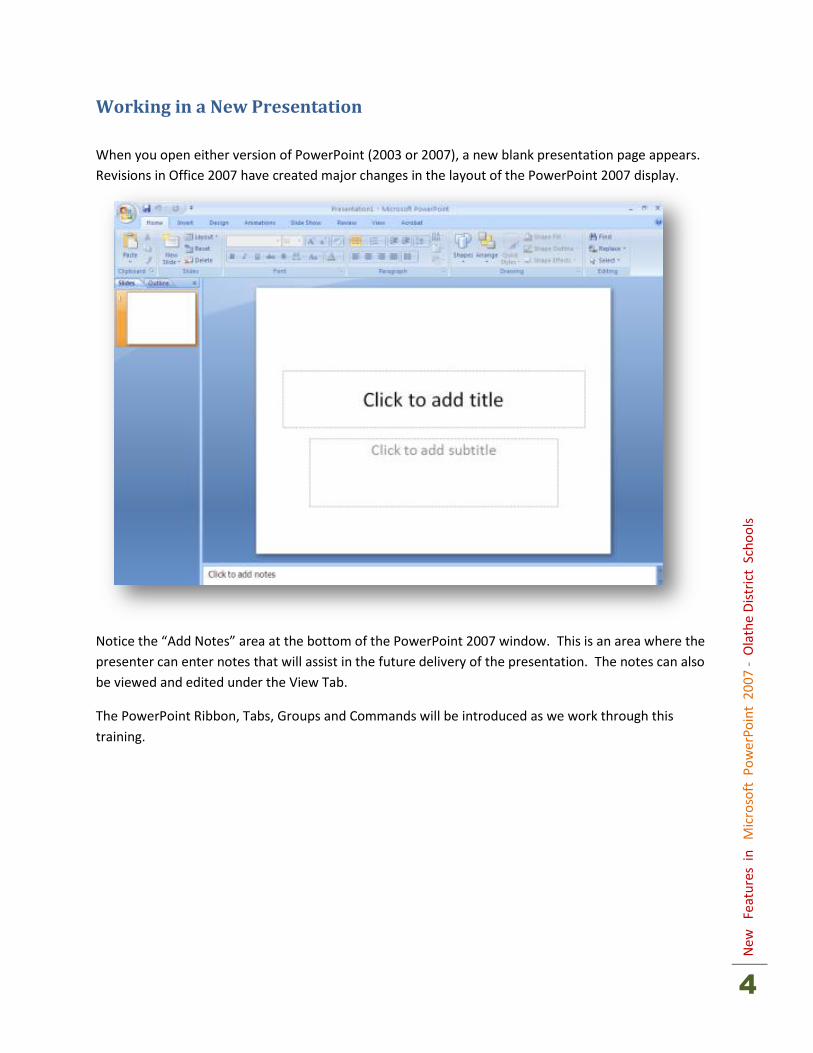
Working in a New Presentation
When you open either version of PowerPoint (2003 or 2007), a new blank presentation page appears.
Revisions in Office 2007 have created major changes in the layout of the PowerPoint 2007 display.
Notice the “Add Notes” area at the bottom of the PowerPoint 2007 window. This is an area where the
presenter can enter notes that will assist in the future delivery of the presentation. The notes can also
be viewed and edited under the View Tab.
The PowerPoint Ribbon, Tabs, Groups and Commands will be introduced as we work through this
training.
New
Fe
atu
res
in
Mic
roso
ft P
ow
erP
oin
t 2
00
7 -
Ola
the
Dis
tric
t S
cho
ols
5
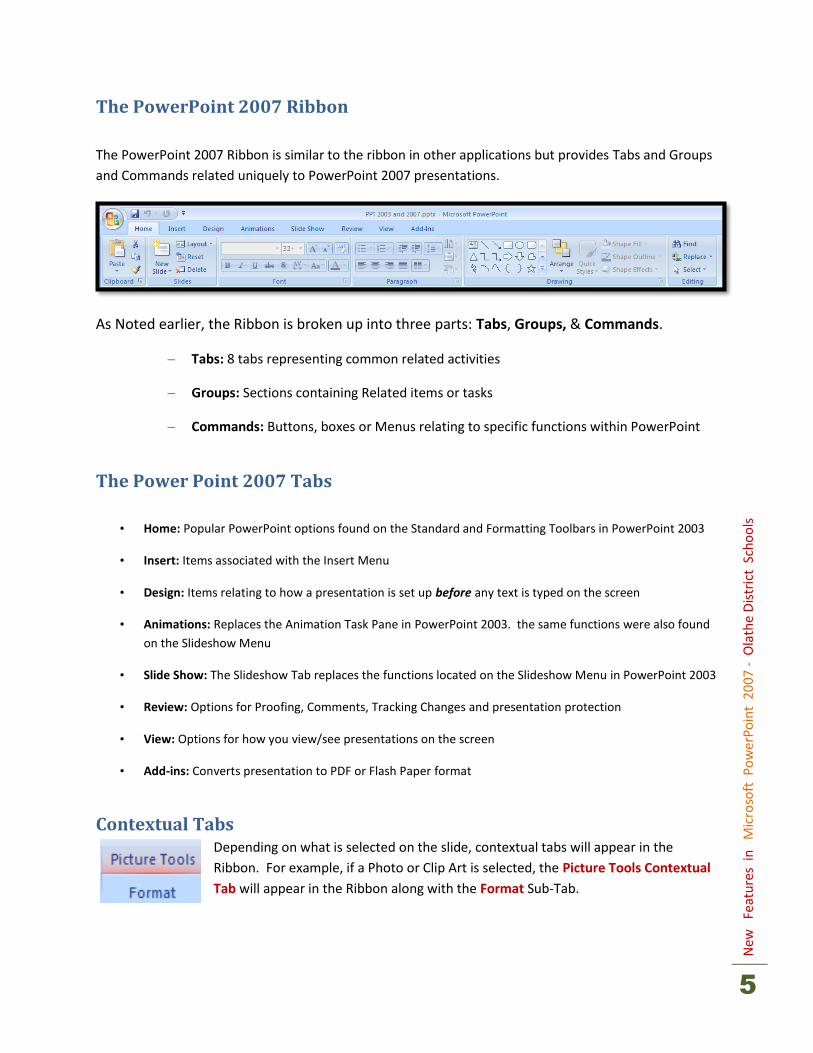
The PowerPoint 2007 Ribbon
The PowerPoint 2007 Ribbon is similar to the ribbon in other applications but provides Tabs and Groups
and Commands related uniquely to PowerPoint 2007 presentations.
As Noted earlier, the Ribbon is broken up into three parts: Tabs, Groups, & Commands.
– Tabs: 8 tabs representing common related activities
– Groups: Sections containing Related items or tasks
– Commands: Buttons, boxes or Menus relating to specific functions within PowerPoint
The Power Point 2007 Tabs
• Home: Popular PowerPoint options found on the Standard and Formatting Toolbars in PowerPoint 2003
• Insert: Items associated with the Insert Menu
• Design: Items relating to how a presentation is set up before any text is typed on the screen
• Animations: Replaces the Animation Task Pane in PowerPoint 2003. the same functions were also found
on the Slideshow Menu
• Slide Show: The Slideshow Tab replaces the functions located on the Slideshow Menu in PowerPoint 2003
• Review: Options for Proofing, Comments, Tracking Changes and presentation protection
• View: Options for how you view/see presentations on the screen
• Add-ins: Converts presentation to PDF or Flash Paper format
Contextual Tabs Depending on what is selected on the slide, contextual tabs will appear in the
Ribbon. For example, if a Photo or Clip Art is selected, the Picture Tools Contextual
Tab will appear in the Ribbon along with the Format Sub-Tab.

New
Fe
atu
res
in
Mic
roso
ft P
ow
erP
oin
t 2
00
7 -
Ola
the
Dis
tric
t S
cho
ols
6
Quick Access Toolbar
As you work with PowerPoint 2007, you may find that it would be handy to have some of your
more frequently-used tools more readily accessible. The PowerPoint 2007 Quick Access
Toolbar can be modified just as with other Office 2007 applications to add these tools.
Example #1: to add the “Insert Picture” button to the toolbar, do the following.
Click the Insert Tab and then RIGHT-click the Insert Picture button.
Click “Add to Quick Access Toolbar”.
The Insert Picture button is added. You can
add any button you choose by repeating this
process or using the process shown below.
Example #2: to add the Crop button to the
toolbar, do the following.
Click the down arrow at the right side of the Quick Access Toolbar.
Choose More Commands.
Click “Choose Commands from”.
Choose Picture Tools from the drop-down list.
Choose the Crop command.
Click Add.
Click OK.
Notice the change in the Quick Access Toolbar at the top of your window.
To remove buttons from the Quick Access Toolbar just RIGHT-click on the button you desire to
remove and choose Remove from Quick Access Toolbar.

New
Fe
atu
res
in
Mic
roso
ft P
ow
erP
oin
t 2
00
7 -
Ola
the
Dis
tric
t S
cho
ols
7
Building a New Presentation
We will now begin to build a short new PowerPoint 2007 presentation incorporating some of
the new PowerPoint 2007 features. We will create a mini-version of the popular “Shift
Happens” educational presentation many of you have seen. You should currently have a new
blank presentation open in PowerPoint 2007.
Slide #1: Title Slide
Click in the Title Text Box in the first slide and enter the text “Shift Happens” as shown below.
Click the border of the subtitle box to select the entire box and press Delete.
Click the Design Tab and click the down arrow at the bottom right-hand corner of the Themes
Group to display More Choices for Themes. Notice you are provided a tip that right-clicking a
theme will provide more options for applying that theme.

New
Fe
atu
res
in
Mic
roso
ft P
ow
erP
oin
t 2
00
7 -
Ola
the
Dis
tric
t S
cho
ols
8
PowerPoint 2007 provides a LIVE PREVIEW of the themes as you hover over them with your
mouse.
Right-click on the Verve Theme to view the options for applying this theme.
Click once on the Verve Theme to apply it. Slide 1 should now be similar to the slide below.
Click inside the Text Box and drag to highlight the text.
Click the Drawing Tools Format Tab.
Click the Word Art Styles More Button to display the available styles.
Choose the Fill-Accent 2, Double Outline – Accent 2 option as shown below.

New
Fe
atu
res
in
Mic
roso
ft P
ow
erP
oin
t 2
00
7 -
Ola
the
Dis
tric
t S
cho
ols
9
Highlight the resulting text.
Use the Control-Key and the Right-Bracket Key (above the Enter Key) to increase the point size
of the text to approximately 80 point, as shown below. (right-click to view the Mini-Toolbar)
Resize and Reposition the Text Box so that it appears as shown below.

New
Fe
atu
res
in
Mic
roso
ft P
ow
erP
oin
t 2
00
7 -
Ola
the
Dis
tric
t S
cho
ols
1
0
Click the Insert Tab and click the Picture command. Insert the graphic titled: pic1.jpg from the
network drive.
Position and resize the graphic as shown below.
Click the picture once to select it.
Click the Picture Tools Format Tab.

New
Fe
atu
res
in
Mic
roso
ft P
ow
erP
oin
t 2
00
7 -
Ola
the
Dis
tric
t S
cho
ols
1
1
Click the Picture Shape Command and choose Flowchart: Multidocument.
The result should be similar to the following.
Click on the Home Tab.
Highlight the text “Shift” and change the Font Color to Black, using the Font Command.
Click the Insert Tab.
Choose the Shapes Command and select the basic RIGHT triangle.

New
Fe
atu
res
in
Mic
roso
ft P
ow
erP
oin
t 2
00
7 -
Ola
the
Dis
tric
t S
cho
ols
1
2
Draw a triangle in the location and using the approximate size as shown below.
Notice that the shape is drawn using one of the “theme colors” by default.
Slide #2: Content – Did You Know?
Click the Home Tab and click the down arrow for the “New Slide” command.
Choose the “Two Content” Slide Format.

New
Fe
atu
res
in
Mic
roso
ft P
ow
erP
oin
t 2
00
7 -
Ola
the
Dis
tric
t S
cho
ols
1
3
Complete the following steps on this slide.
Click the border of the title text box. Delete the Title Text Box.
Click the Bullet Tool in the Home Tab to remove the bullet from the left placeholder box.
Click in the left placeholder box and enter the text as shown below.
Click the Drawing Tools Format Tab and apply the Word Art Style as shown below.
Highlight the text and increase the font size.
Click in the right placeholder box and remove the bullet format.
Enter a Question Mark as shown below.
Increase the font size for the question mark.
Click inside the right text box and then click the Drawing Tools Format Tab.
Use the Shape Styles Group, Shape Fill command to create a background fill effect as shown.

New
Fe
atu
res
in
Mic
roso
ft P
ow
erP
oin
t 2
00
7 -
Ola
the
Dis
tric
t S
cho
ols
1
4
Slide #3: Chart Object
From the Home Tab, insert a New Slide. [Choose Title and Content]
You will create a slide with a Pie Chart similar to the following.
Enter the 2-line Title Text as shown above.
Use the Drawing Tools Format Tab to format the text on both lines.
Highlight the 2nd line of text.
Click the Home Tab.
Use the Character Spacing command in the Font Group to change the character spacing to
“Very Loose.” Notice the effect in the 2nd line of the title.

New
Fe
atu
res
in
Mic
roso
ft P
ow
erP
oin
t 2
00
7 -
Ola
the
Dis
tric
t S
cho
ols
1
5
Click the Insert Chart icon in the 2nd text box.
Choose Pie Chart. Choose Exploded Pie in 3D. Click OK.
An Excel 2007 Window appears with pre-existing data.
Highlight the contents of Row 4 and 5 and press Delete.
Close the Excel Window.
Click to select the resulting title and the data legend in the PowerPoint Chart that appears and
delete them. The result should be similar to the illustration below.
Click once on the red piece of pie. Click once again to select only the darker piece of the pie as
shown above.
New
Fe
atu
res
in
Mic
roso
ft P
ow
erP
oin
t 2
00
7 -
Ola
the
Dis
tric
t S
cho
ols
1
6
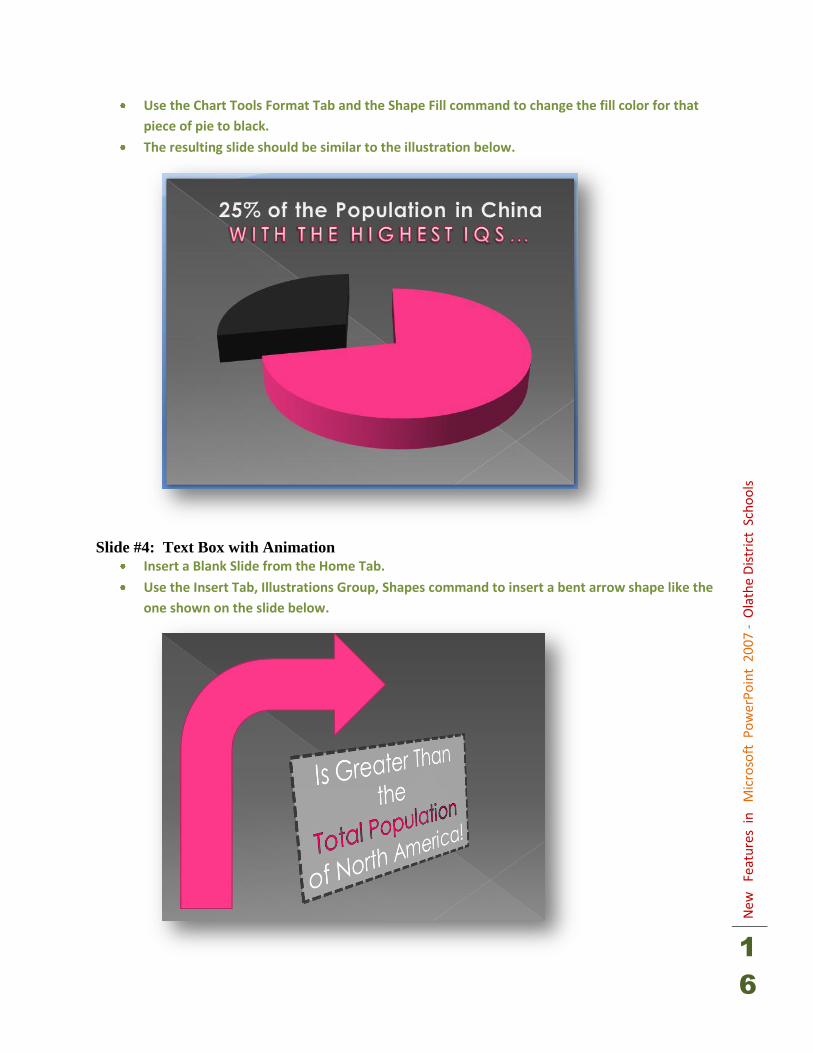
Use the Chart Tools Format Tab and the Shape Fill command to change the fill color for that
piece of pie to black.
The resulting slide should be similar to the illustration below.
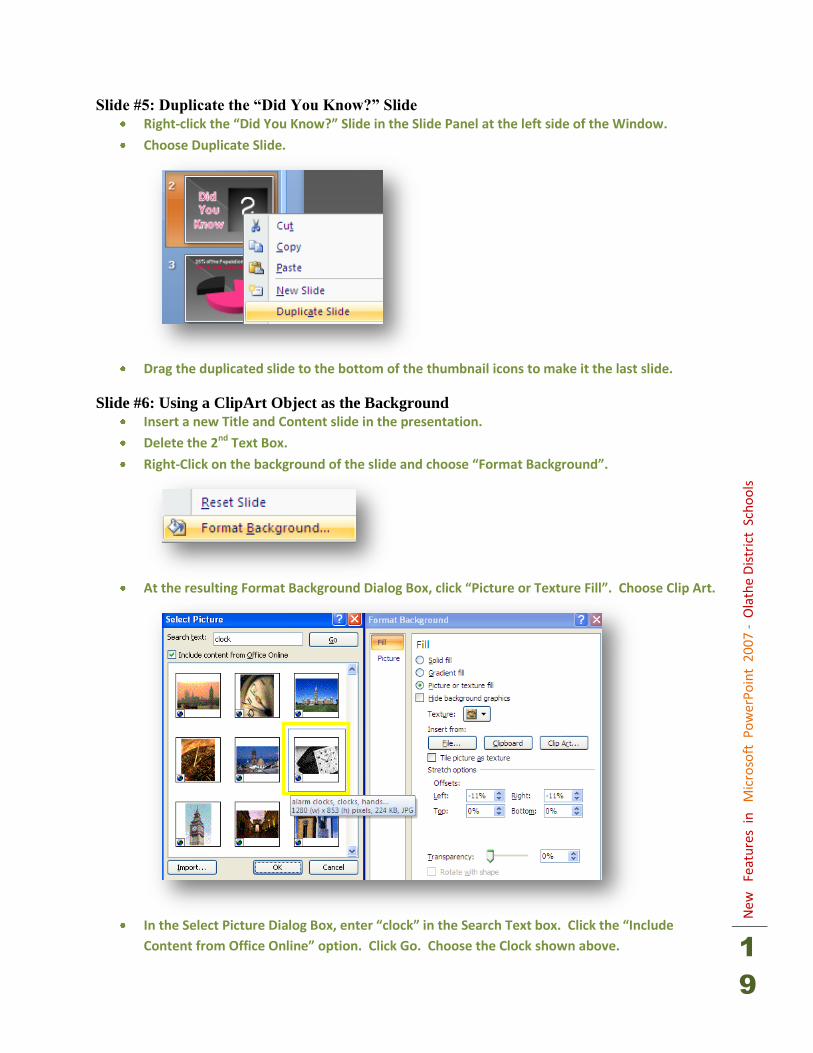
Slide #4: Text Box with Animation
Insert a Blank Slide from the Home Tab.
Use the Insert Tab, Illustrations Group, Shapes command to insert a bent arrow shape like the
one shown on the slide below.

New
Fe
atu
res
in
Mic
roso
ft P
ow
erP
oin
t 2
00
7 -
Ola
the
Dis
tric
t S
cho
ols
1
7
Insert a Simple Text Box for the 2nd object and enter the text as shown.
Click inside the text box.
Use the Drawing Tools Format Tab and the Shape Fill, Shape Outline and Shape Effects
commands to change the Text Box attributes to match those shown.
The “Perspective Contrasting Right” option was chosen for the 3-D Rotation Shape Effect.
Click the Animation Tab.
Click inside the Text Box.
Click the Custom Animation Button in the Animations Group.

New
Fe
atu
res
in
Mic
roso
ft P
ow
erP
oin
t 2
00
7 -
Ola
the
Dis
tric
t S
cho
ols
1
8
Click the Add Effects Button in the Custom Animation Pane that opens on the right side of the
window.
Choose Add Effect…Entrance…More Effects.
Choose Color Typewriter from the Moderate section. Click OK.
Close the Custom Animation pane.
Preview the Presentation
Click the first slide in the presentation.
Click the “Slide Show” icon in the Task Tray at the bottom of the window to preview the
presentation thus far.
Press Escape at any time to end the preview of the presentation.
New
Fe
atu
res
in
Mic
roso
ft P
ow
erP
oin
t 2
00
7 -
Ola
the
Dis
tric
t S
cho
ols
1
9
Slide #5: Duplicate the “Did You Know?” Slide
Right-click the “Did You Know?” Slide in the Slide Panel at the left side of the Window.
Choose Duplicate Slide.
Drag the duplicated slide to the bottom of the thumbnail icons to make it the last slide.
Slide #6: Using a ClipArt Object as the Background
Insert a new Title and Content slide in the presentation.
Delete the 2nd Text Box.
Right-Click on the background of the slide and choose “Format Background”.
At the resulting Format Background Dialog Box, click “Picture or Texture Fill”. Choose Clip Art.
In the Select Picture Dialog Box, enter “clock” in the Search Text box. Click the “Include
Content from Office Online” option. Click Go. Choose the Clock shown above.

New
Fe
atu
res
in
Mic
roso
ft P
ow
erP
oin
t 2
00
7 -
Ola
the
Dis
tric
t S
cho
ols
2
0
Click Close.
Enter the Title Text shown below.
Format and reposition it as shown.
The slide should now be similar to the following.
Slide #7: Inserting a Smart Art Object
Insert a new Title and Content slide in the presentation.
Click the Smart Art object in the 2nd text box.
Choose the Vertical Picture Accent List as shown below.

New
Fe
atu
res
in
Mic
roso
ft P
ow
erP
oin
t 2
00
7 -
Ola
the
Dis
tric
t S
cho
ols
2
1
Click inside the Text Box area at the left side of the Smart Art object.
Enter the text as shown below.
Close the Text box area using the small “x” at the top right corner of this section.
Click on the picture icon inside the top pink circle to select a photo to appear in this area.
Import the corresponding pictures for each baby from the network drive as shown below.
Delete the Title text box.
Insert a new “chevron” shape as shown on the next page.
To duplicate the shape, hold down the Control Key and drag out from the existing shape to
create a duplicate of the shape.
Change the Fill Color for 2 of the shapes.

New
Fe
atu
res
in
Mic
roso
ft P
ow
erP
oin
t 2
00
7 -
Ola
the
Dis
tric
t S
cho
ols
2
2
The resulting slide should appear as shown below.
Apply and modify the animation for each shape as shown below, using the Custom Animation
Pane.

New
Fe
atu
res
in
Mic
roso
ft P
ow
erP
oin
t 2
00
7 -
Ola
the
Dis
tric
t S
cho
ols
2
3
Apply and modify the animation for the Smart Art object as shown below.
Applying Slide Transitions
Click the Animations Tab.
In the Slide Transitions area choose the Comb Horizontal slide transition from the “More
Transitions” down arrow.
Click “Apply to All”.

New
Fe
atu
res
in
Mic
roso
ft P
ow
erP
oin
t 2
00
7 -
Ola
the
Dis
tric
t S
cho
ols
2
4
Apply Sound Transitions
Apply the “Voltage” transition sound on both of the “Did You Know?” slides.
Changing the Theme Color and Theme Font
Click the Design Tab.
In the Themes Group, click the Colors drop-down arrow and change to the “Paper” color
group. Notice that all slides update to this color group, but all slides remain in the same
Theme.
Press Control + Z to undo this change.
Use the Fonts drop-down arrow to change to any other Font Group for this Theme.
Again, press Control + Z to undo this change.

New
Fe
atu
res
in
Mic
roso
ft P
ow
erP
oin
t 2
00
7 -
Ola
the
Dis
tric
t S
cho
ols
2
5
Inserting Tables
Now that you have inserted various objects and modified and formatted the objects in PowerPoint
2007. Try inserting one last blank slide and insert a Table Object and Format it as shown below, without
being provided step-by-step directions.
Tips:
This is a 2 x 3 table.
The 2 cells in the top row are merged together.
The alignment command is used to center the text within the top cell vertically.
The Shape Fill command from the Home Tab is used to insert the 2 pictures shown. The
photos are located on the network drive.
The resizing handles are used to resize the table and the column widths.

New
Fe
atu
res
in
Mic
roso
ft P
ow
erP
oin
t 2
00
7 -
Ola
the
Dis
tric
t S
cho
ols
2
6
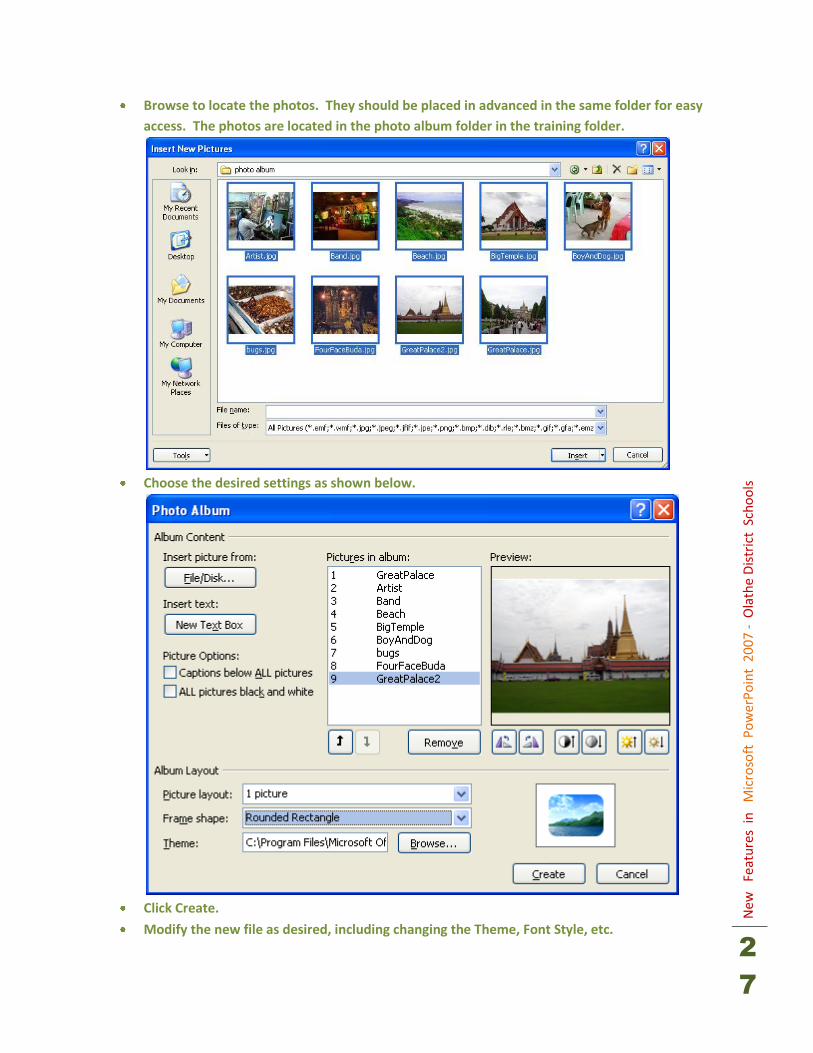
Insert a Photo Album
PowerPoint 2007 includes a wonderful new feature that allows for inserting a group of photos into a
presentation. The command creates a new PowerPoint 2007 file and gives the option for placing each
photo one per page or multiple photos per page, as well as many formatting options.
From the Insert Tab, choose Photo Album.
Choose to Insert Pictures from: “File/Disk…”
New
Fe
atu
res
in
Mic
roso
ft P
ow
erP
oin
t 2
00
7 -
Ola
the
Dis
tric
t S
cho
ols
2
7
Browse to locate the photos. They should be placed in advanced in the same folder for easy
access. The photos are located in the photo album folder in the training folder.
Choose the desired settings as shown below.
Click Create.
Modify the new file as desired, including changing the Theme, Font Style, etc.
New
Fe
atu
res
in
Mic
roso
ft P
ow
erP
oin
t 2
00
7 -
Ola
the
Dis
tric
t S
cho
ols
2
8
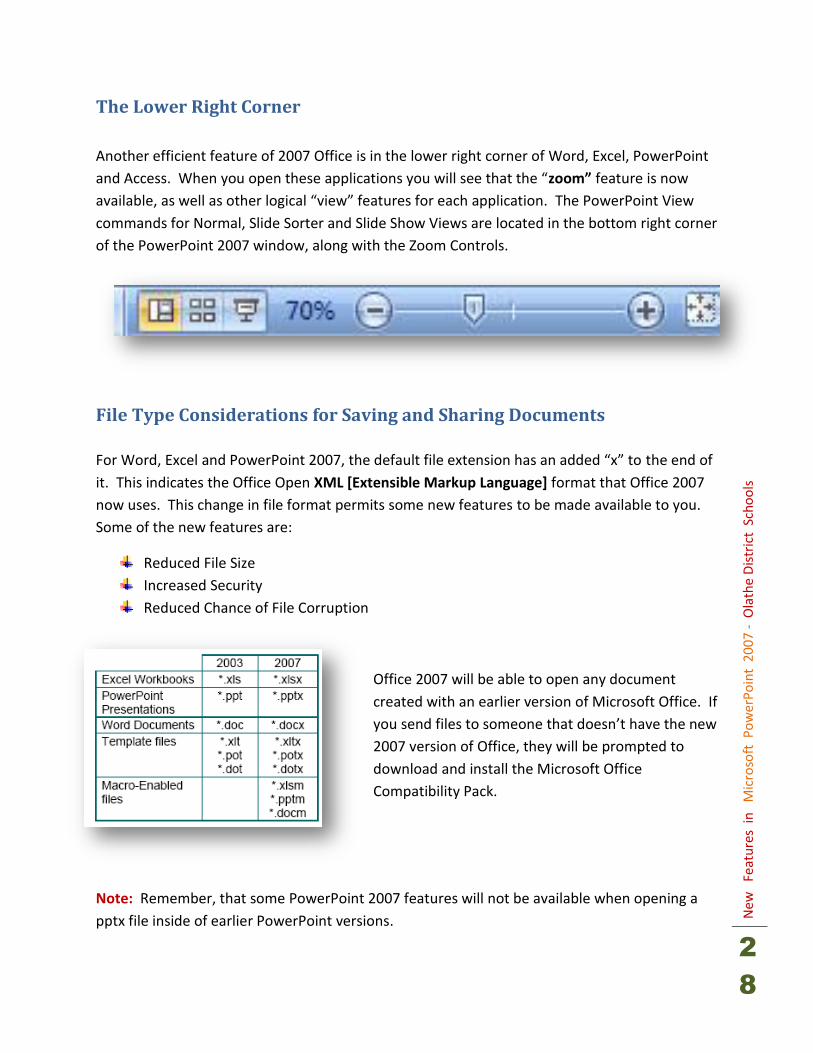
The Lower Right Corner
Another efficient feature of 2007 Office is in the lower right corner of Word, Excel, PowerPoint
and Access. When you open these applications you will see that the “zoom” feature is now
available, as well as other logical “view” features for each application. The PowerPoint View
commands for Normal, Slide Sorter and Slide Show Views are located in the bottom right corner
of the PowerPoint 2007 window, along with the Zoom Controls.
File Type Considerations for Saving and Sharing Documents
For Word, Excel and PowerPoint 2007, the default file extension has an added “x” to the end of
it. This indicates the Office Open XML [Extensible Markup Language] format that Office 2007
now uses. This change in file format permits some new features to be made available to you.
Some of the new features are:
Reduced File Size
Increased Security
Reduced Chance of File Corruption
Office 2007 will be able to open any document
created with an earlier version of Microsoft Office. If
you send files to someone that doesn’t have the new
2007 version of Office, they will be prompted to
download and install the Microsoft Office
Compatibility Pack.
Note: Remember, that some PowerPoint 2007 features will not be available when opening a
pptx file inside of earlier PowerPoint versions.

New
Fe
atu
res
in
Mic
roso
ft P
ow
erP
oin
t 2
00
7 -
Ola
the
Dis
tric
t S
cho
ols
2
9
Microsoft Office Help Button
The Microsoft Office Help Button is located in the top right corner of all Office applications.
You may also press the F1 function key on your keyboard to access Help.


