
Kyocera MFP Quick Guide

QUICKGuide 3051ci / 3551ci 4551ci / 5551ci
ENG
E-Mail operation:::
Preview
:::
Sending ❶ Press the [Home] key.
❷ Press [Send].
❸ Place the originals on the platen or in the document processor.
❹ Enter the destination address.
From the address book: Press [Address Book]. Press the checkbox to select the desired destination from the list. Press [Search (Name)] to find the destination. Enter the name you search for. Confirm with [OK].
You may choose multiple destinations.
Enter an e-mail address: Press [E-mail Addr Entry] and [E-mail Address]. Enter the E-Mail address on the touch screen. After that press [OK].
If you want to send the e-mail to several destinations, go back to step 4.
❺ To send the e-mail press the [Start] key.
Destination Detail Address Book
Folder Path Entry
E-mail Addr Entry
No.
1/100
AAA BBB CCC DDD
FFF GGG HHH III JJJ
00040003 00050001 0002
0006 0007 0008 0009 0010
1/1
i-FAX Addr Entry
FAX No. Entry
WSD Scan /DSM Scan
Destination
EEE
Detail/Edit Delete RecallChainDirectOn Hook
Org./Sending Data Format
Quick Setup Destination Color/ Image Quality
Advanced Setup
Program
Enter Destination.
Address Book
Cancel OK
GroupE-mail
Dest.
Search(Name)
Search(No.)
No. Type Name Detail
Folder
Detail
Address Book SortAddr Book
0001
0002
0005
0004
0003
ABCD [email protected]
TUVW [email protected]
Group1
Group2
Group3
Name
Add/Edit Address Book
1/2
i-FAXFAX
ABC DEF JKL MNO PQRS TUV WXYZGHI 0-9
E-mail Address
Add a new e-mail destination. Press [E-mail Address], then enter the address using the keyboard screen.
E-mail Address Entry
Enter Destination.
Destination
Cancel OKNext Dest.Add to Addr Book
Scan settings ❶ Press the [Home] key.
❷ Press [Send].
❸ Press [Color/Image Quality].
❹ Press [Color Selection].
❺ Choose the Color to be used.
❻ Confirm with [OK].
Destination Detail
ABCD [email protected] Address Book
Folder Path Entry
E-mail Addr Entry
No.
1/100
AAA BBB CCC DDD
FFF GGG HHH III JJJ
00040003 00050001 0002
0006 0007 0008 0009 0010
1/1
i-FAX Addr Entry
FAX No. Entry
WSD Scan /DSM Scan
Destination
TUVW 192.168.188.120
Group1 Group1
EEE
Detail/Edit Delete RecallChainDirectOn Hook
Org./Sending Data Format
Quick Setup Destination Color/ Image Quality
Advanced Setup
Program
Black & WhiteGrayscale
Color Selection
Full Color
Select scanning color. Use [Auto Color] to automatically produce color originals in full color and black & white originals in black & white.
Cancel OKAdd Shortcut
Destination
Auto Color (Color/B & W)
Auto Color (Color/Gray)
100% A4
A4
Preview
Original Zoom Send
Further settings
❶ Press the [Home] key.
❷ Press [Send].
❸ Press [Quick Setup].
Choose an item to be changed. After changing confirm with [OK].
To enter a file name press [Advanced Setup]. Press [File Name Entry] and
change the name. Confirm with [OK].
❹ Press [Destination] to return.
Destination
Destination
1/1
File Format
Density
Normal 0
Scan Resolution
2-sided/Book Original
1-sided
Color Selection
Auto Color (Color/Gray)
ABCD
TUVW
Group1
Shortcut 1
Shortcut 2
Shortcut 3
Shortcut 4
Shortcut 5
Shortcut 6
300x300dpi
Org./Sending Data Format
Quick SetupDestination Color/ Image Quality
Advanced Setup
Program
100% A4
A4
Preview
Original Zoom
Sending Image
Send
Continuous Scan
Off
Printed in China 302N45616002 Rev.1 2013.1

ENG
Fax operation❶ Press the [Status/Job Cancel] key.
❷ Press [Sending Jobs].
❸ Choose the job to be canceled and press [Cancel].
❹ Confirm with [Yes].
Communication is canceled.
Book Address
Search(Name)
Detail
Log
All
Sending a fax ❶ Press the [Home] key.
❷ Press [FAX].
❸ Place the originals on the platen or in the document processor.
❹ Enter the destination address.
Enter the destination: Enter the fax number with the numeric keys. After that press [OK].
From the address book: Press [Address Book]. Press the checkbox to select the desired destination from the list. Press [Search (Name)] to find the destination. Enter the name you search for. Confirm with [OK].
You may choose multiple destinations.
If you want to send the fax to several destinations, go back to step 4.
❺ To send the fax press the [Start] key.
Canceling fax job
Log
0123456789438 14:47
1/1
Detail
InProcess
Status User Name Destination TypeAccepted Time Job No.
Cancel
Job Type All
Status
Status
Scheduled Job
Priority Override
ClosePaper/ Supplies
Device/Communicate
Storing JobsSending JobsPrinting Jobs
Check ❶ Press the [Status/Job Cancel] key. transmission ❷ Press [Sending Jobs]. result ❸ Press [Log].
❹ Under Job Type, select [FAX].
❺ Select a job to be checked.
❻ Press [Detail].
The details are displayed.
For more details refer to the Operation Guide on the co-packed DVD.
ABCD [email protected] FAX No. Entry
No.
1/100
AAA BBB CCC DDD
FFF GGG HHH III JJJ
00040003 00050001 0002
0006 0007 0008 0009 0010
Check Destinations
Destination
Pause Backspace
EEE
Space
Detail Delete Recall ChainDirectOn Hook
Org./Sending Data Format
Quick Setup Destination Image Quality Advanced Setup
Program
Enter Destination.
001/001
Address Book
Cancel OK
Group
Dest.
Search(No.)
No. Type Name Detail
Detail
Address Book SortAddr Book
0001
0002
0005
0004
0003
D OFFICE
E OFFICE
Add/Edit Address Book
1/2
FAX
ABC DEF JKL MNO PQRS TUV WXYZGHI 0-9
1234568790
1234568860
A OFFICE 1234567890
B OFFICE 1234568907
C OFFICE 1234569078
Name
438 14
1/1
InProcess
ResultUser Name DestinationJob No.
Job Type All
Status
Status
Scheduled Job
FAX
i-FAX
Folder
Application
Next
ClosePaper/ Supplies
Device/Communicate
Storing JobsSending JobsPrinting Jobs
Detail Job No.: 000080
Job No.: Result/Destination: Detail
000080 Completed
Job Type: Destination:
Sending Job - E-mail 1
User Name:
User1
Job Name:
doc20070404115151
Accepted Time: End Time:
1/208:08:08 09:09:09
Close

ENG
Print operation❶ Press the [Status/Job Cancel] key.
❷ Press [Printing Jobs].
❸ Choose the job to be canceled and press [Cancel].
❹ Confirm with [Yes].
Job is canceled.
Private printing Note: To activate the private printing from the PC, select the [Job] tab in the printer driver, select [Job storage (e-MPS)] checkbox, and then select [Private print] from [Type] list.
Remove the checkmark from [Prompt for access code], and enter 4 digits number in [Specify access code].
The section [Job name] allows you to type in your name directly.
❶ Press the [Home] key.
❷ Press [Job Box].
❸ Select the creator of the private print job.
❹ Select the document to be printed from the list.
❺ Press [Print]. Type in the access code with the numeric keys.
❻ Press [Start Print] to start printing.
Note: By pressing [Delete] jobs can be canceled.
Close
Private Print/Stored Job
1/2
Open
User Name Files
5
2
1
1
1
User
User
User
User
User
1
2
3
4
5
2/3
Detail
Close
User:
File
File
File
File
File
Print Delete
02/02/2013 09:40
02/02/2013 09:45
02/02/2013 09:50
02/02/2013 09:55
02/02/2013 10:00
File Name Date and Time Size
MB30
MB21
MB21
MB36
MB30
1
2
3
4
5
Color settings ❶ When printing from an application press the [Properties] button.
❷ Choose [Imaging] tab.
❸ Choose [Full color] or [Black].
❹ When [Full color] is selected, use [Color reproduction] to choose object types depending on your original to be printed. Standard selection is [Printer settings]. Options are: [Text and graphics], [Text and photos], [Vivid colors], [Publications], [Line art], [Custom table] or [Advanced].
❺ Confirm with [OK].
Cancel print job
doc20081010091015 InProcess000001
doc20081010091510 Waiting000002
AAAAA
AAAAA
Pause All Print Jobs
Cancel Priority Override
Move Up
Status
Status Log
Job Type All
Job No. Accepted Time Type Job Name User Name Status
1/1
Detail
10/10 09:10
10/10 09:15
000003 10/10 09:20 doc20081010092015 WaitingBBBBB
Printing Jobs ClosePaper/Device/Storing JobsSending Jobs
SuppliesCommunicate

ENG
Copy operationCopy Image
Preview
OriginalZoomPaper
100%---
:::
---
Place original.
:::
Combine
Off
Duplex >>1-sided 1-sided Off
Zoom Selection Paper Density
/Punch Staple
One-touch Image Adjust
Copies
Cancel OKAdd Shortcut
Select desired image quality.Before
OriginalZoomPaper
100%---
:::
---
Of
PortraitPhoto
Vivid
LandscapePhoto (Blue)
LandscapePhoto (Green)
Light Dark
Place original.
AfterMuted
Sharp Smooth
Color Shade
Blue 1
Cancel OKAdd Shortcut
OfCyan
Magenta
Yellow
Black
-5 -1-2-3-4 543210
-5 -1-2-3-4 543210
-5 -1-2-3-4 543210
-5 -1-2-3-4 543210
Preview
:::
Cancel OKAdd Shortcut
Of Background
Lighter Darker
1 2 4 5
Auto
Preview
:::
Preview
OriginalZoomPaper
100%---
:::
---
Place original.
:::
Preparation ❶ Press the [Home] key.
❷ Press [Copy].
❸ Place the originals on the platen or in the document processor.
❹ Choose the color mode.
❺ Choose [Paper Selection], [Duplex] [Zoom], [Combine], [Density] or [Staple/Punch] (optional) in the sub menu from the main screen.
❻ Confirm all settings with [OK].
❼ Enter the number of copies with the numeric keys.
❽ Press the [Start] key.
Optional functions: The color settings can be changed.
❶ Press [Color/Image Quality].
❷ Choose [Color Balance], [Hue Adjustment], [One-touch Image Adjust], [Sharpness], [Background Density Adj.], [Saturation] in the sub menu from the main screen.
❸ Confirm all settings with [OK].
f
Copies
Color/ Image Quality
Org./Paper/ Finishing
Quick Setup Layout/Edit Advanced Setup
Shortcut 1
Shortcut 4
Shortcut 3
Shortcut 2
Shortcut 6
Shortcut 5
Program
100% A4
A4
Preview
Original Zoom Paper
Preview
Normal 0Auto 100%
Color Balance
Copies
f
On
100% A4
A4Original Zoom Paper
Help A [Help] key is provided on this machine’s operation panel. If you are unsure of how to operate the machine, would like more information on its functions or are having problems getting the machine to work properly, press the [Help] key to view a detailed explanation on the touch panel.
For more details refer to the Operation Guide on the co-packed DVD.
Background Density Adj.
Copies
Manual
f
3
100% A4
A4Original Zoom Paper
Saturation
Copies
Cancel OKAdd Shortcut
VividGrayish
0 1 2 3-1-2-3
100% A4
A4
Preview
Original Zoom Paper

Kyocera Print Driver Guide

Quick Print Tab- This screen allows you to do the basic print settings and profiles saved.
From this screen you can select options for your print job.
Examples: 2 Sided Printing
1. Quick Print 2. Select Print on both sides
To Print in color 1. Quick Print 2. Select Color Mode

Basic Tab- This screen allows you to change paper size, paper trays and media. It also allows you to change the color settings, duplex, collate options and orientation of document.
To Select Paper Trays:
1. Source 2. Drop down arrow and select tray.
To Select Media type:
1. Media Type 2. Drop down to Unspecified and select
media. (ex: Cardstock,labels,envelopes)

Layout Tab- This screen allows you to make booklets, scale documents, posters, multiple pages and full bleed.

Finishing Tab- This screen allows you to give a the document a finishing feature such as stapling folding, hole punch and gutters.
Printing with Tri-Fold 1. In the Basic tab, under Destination, select Printer default or Folding tray. 2. In the Finishing tab, click the Tri-Fold icon 3. In Print side, select one of the two options: Inside This selection prints on the inside of the folded document. Outside This selection prints on the outside of the folded document. 4. In Direction of fold, select from the options available. Left to right/Top to bottom Right to left/Bottom to top
Stapling a Print Job 5. In Number of sheets, type 1. In the Finishing tab, click the Staple icon. or select the number of 2. Select the position from available options.The position options vary sheets that will be folded based on settings in Finishing edge, which provides custom staple locations 6. Click OK to return to the in the document. Print dialog box. If a folding unit is installed and Booklet is selected in the Layout tab, 7. Click OK to start printing. Booklet (fold) is automatically selected. The job is printed in booklet format and folded, with two staples placed in the binding. 3. Select the count for stapling: Under Count, select the number of sheets for each stapled set, or select All to staple all sheets. 4. Click OK to return to the Print dialog box. 5. Click OK to start printing.
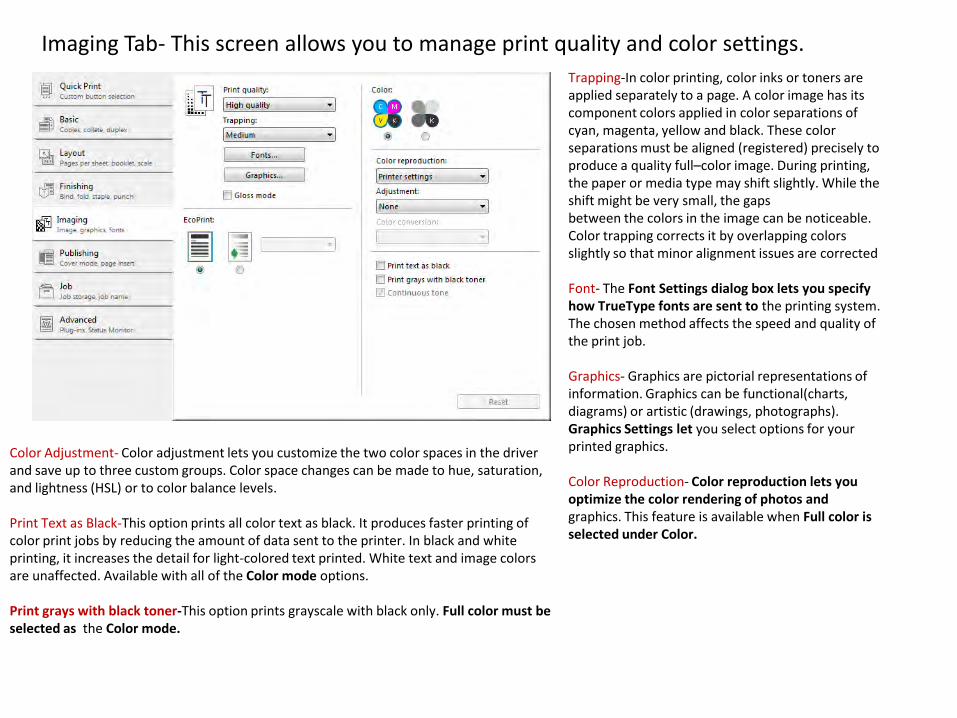
Imaging Tab- This screen allows you to manage print quality and color settings. Trapping-In color printing, color inks or toners are applied separately to a page. A color image has its component colors applied in color separations of cyan, magenta, yellow and black. These color separations must be aligned (registered) precisely to produce a quality full–color image. During printing, the paper or media type may shift slightly. While the shift might be very small, the gaps between the colors in the image can be noticeable. Color trapping corrects it by overlapping colors slightly so that minor alignment issues are corrected
Font- The Font Settings dialog box lets you specify how TrueType fonts are sent to the printing system. The chosen method affects the speed and quality of the print job.
Graphics- Graphics are pictorial representations of information. Graphics can be functional(charts, diagrams) or artistic (drawings, photographs). Graphics Settings let you select options for your printed graphics. Color Adjustment- Color adjustment lets you customize the two color spaces in the driver
and save up to three custom groups. Color space changes can be made to hue, saturation, Color Reproduction- Color reproduction lets you and lightness (HSL) or to color balance levels. optimize the color rendering of photos and graphics. This feature is available when Full color is Print Text as Black-This option prints all color text as black. It produces faster printing of selected under Color. color print jobs by reducing the amount of data sent to the printer. In black and white
printing, it increases the detail for light-colored text printed. White text and image colors are unaffected. Available with all of the Color mode options.
Print grays with black toner-This option prints grayscale with black only. Full color must be selected as the Color mode.

Publishing-In the Publishing tab, you can create covers and inserts for a print job, insert sheets between transparencies, and insert tab divider sheets.

Job-In the Job tab, you can store print jobs in the memory installed in the printing system. Example: Private Prints.
Storing a Private Print Job Private print lets you store a document temporarily in printing system memory without printing, and protect it with an Access code. The job is stored on the storage device until it is printed or manually deleted, or the printing system is turned off. 1 In the Job tab, click the Job storage (e-MPS) icon. 2 In the Type list, select Private print. 3 Select a method for choosing an access code: Clear Prompt for access code, and then type four numbers in the Specify access code box. You do not need to type the access code each time you print. Select Prompt for access code. The Private Print dialog box appears when you print. Type the access code in the dialog box. 4 Click OK to return to the Print dialog box. 5 Click OK to start printing.

Advance-In the Advanced tab, you can choose special features that extend the capabilities of the printing system. Example: Adding watermarks


