
00005 AMG
CL 5CL 6CL 5

� Please read this manual carefully be-fore putting it aside. Then return it to your vehicle where it will be handy for your reference.
� Please follow the recommendations contained in this manual. They are de-signed to acquaint you with the opera-tion of your Mercedes-Benz.
� Please pay attention to the warnings and cautions contained in this manual. They are designed to help improve the safety of the vehicle operator and oc-cupants.
We extend our best wishes for many miles of safe, pleasurable driving.
Mercedes-Benz USA, LLC A DaimlerChrysler Company
Our company and staff congratulate you on the purchase of your new Mercedes-Benz.
Your selection of our product is a demon-stration of your trust in our company name. Furthermore, it exemplifies your de-sire to own an automobile that will be as easy as possible to operate and provide years of service.
Your Mercedes-Benz represents the ef-forts of many skilled engineers and crafts-men. To help assure your driving pleasure, as well as your and your passengers’ safe-ty, we ask you to make a small investment of time:

Contents
IntrodProducOperat
SerImpretaMeMaRoaChaOpout
WhereSymboOperat
ProProbleReport
Rep
Getting started ................................... 29Unlocking ............................................. 30
Unlocking with the SmartKey ......... 30Unlocking with KEYLESS-GO*......... 32
Adjusting .............................................. 34Seats .............................................. 34Steering wheel................................ 37Mirrors............................................ 38
Driving.................................................. 40Fastening the seat belts ................. 40Starting the engine ......................... 42Switching on headlamps................. 46Turn signals and high beam ............ 46Windshield wipers........................... 47Problems while driving.................... 48
Parking and locking .............................. 49Parking brake ................................. 50Switching off headlamps................. 50Turning off engine........................... 51
uction .......................................... 9t information................................ 9or’s Manual ............................... 10vice and Warranty Information.. 10ortant notice for California il buyers and lessees of
rcedes-Benz automobiles .......... 11intenance .................................. 12dside Assistance ...................... 12nge of address or ownership.... 12
erating your vehicle side the USA or Canada............ 13 to find it .................................... 14ls............................................... 15ing safety .................................. 16per use of the vehicle ............... 16ms with your vehicle.................. 17ing safety defects...................... 18orting safety defects ................ 18
At a glance .......................................... 19Cockpit................................................. 20Instrument cluster ................................ 22Multifunction steering wheel ................ 24Center console ..................................... 25
Upper part ...................................... 25Lower part ...................................... 26
Overhead control panel ........................ 27Door control panel................................ 28

Contents
Safety aOccupan
AirbaSeatChildBloc
Panic alaActivDeac
Driving sABSBASESP.
Anti-theImmAnti-Tow-
eats .................................................... 96Lumbar support .............................. 96Easy-entry/exit feature .................. 96Head restraints ............................... 97Multicontour seat*.......................... 99Folding forward front seat backrests..................... 100Seat ventilation* .......................... 102Seat heating................................. 103
emory function ............................... 105Storing positions into memory ..... 106Recalling positions from memory ............................... 106Storing exterior rear view mirror parking position ........ 107
ighting ............................................. 108Exterior lamp switch .................... 108Combination switch ..................... 111Hazard warning flasher ................ 111Interior lighting ............................ 112Courtesy lighting.......................... 113
nd Security ........................... 53t safety................................... 54gs ........................................... 55
belts ....................................... 60ren in the vehicle.................... 63
king of rear window operation . 69rm.......................................... 70ating ....................................... 70tivating ................................... 70afety systems......................... 71................................................ 71................................................ 73................................................ 73ft systems................................ 76obilizer..................................... 76theft alarm system.................. 77away alarm ............................. 78
Controls in detail ............................... 79Locking and unlocking ......................... 80
SmartKey ....................................... 80KEYLESS-GO card* ........................ 83Opening the doors from the inside............................... 87Opening the trunk lid from the inside............................... 88Opening the trunk lid from the outside............................. 89Trunk lid emergency release .......... 89Closing the trunk lid ....................... 90Separately locking the trunk .......... 90Separately unlocking the trunk ...... 91Trunk lid opening/closing system*.............. 91Power closing assist for doors and trunk lid.................... 94Automatic central locking .............. 94Locking and unlocking from the inside............................... 95
S
M
L

Contents
InstrumInsCooTripTacOu
ControMuMuMeStaAUCDTELNADisTripMaSet
Automatic climate control .................. 157Setting the temperature ............... 160Adjusting air distribution .............. 161Adjusting air volume ..................... 162Maximum cooling MAXCOOL........ 162Defrosting..................................... 162Air recirculation mode .................. 163Charcoal filter ............................... 164Rear window defroster.................. 165Deactivating the climate control system.............................. 166Air conditioning ............................ 166Residual heat and ventilation........ 167Ventilated storage compartment under armrest ............................... 167Rear passenger compartment adjustable air vents ...................... 168
ent cluster ............................. 114trument cluster illumination .... 114lant temperature gauge ......... 115 odometer .............................. 115hometer.................................. 115
tside temperature indicator ..... 116l system .................................. 117ltifunction display.................... 117ltifunction steering wheel........ 118nus .......................................... 120ndard display menu ................ 122DIO menu ................................ 122 changer operating mode ........ 123 menu* ................................... 125VI menu................................... 127tronic* menu........................... 128 computer menu..................... 129
lfunction memory menu .......... 130tings menu.............................. 131
Automatic transmission...................... 143One-touch gearshifting ................. 144Gear ranges .................................. 145Gear selector lever position .......... 146Program mode selector switch ..... 147Accelerator position...................... 148Emergency operation (Limp home mode)........................ 148Steering wheel gearshift control (Speedshift) and manual shift program CL 55 AMG ............. 149
Good visibility ..................................... 151Rear view mirror ........................... 151Windshield wipers......................... 154Headlamp cleaning system ........... 154Sun visors ..................................... 155Rear window sunshade ................. 156

Contents
Power wOpenthe wSync
Sliding/OpenslidinSyncslidin
Driving sCruisDistrActivPark(Park
LoadingRoofLoadCarg
Driving off .................................... 227Parking......................................... 227Tires............................................. 228Hydroplaning................................ 229Tire traction ................................. 229Tire speed rating .......................... 229Winter driving instructions ........... 230Standing water............................. 231Passenger compartment.............. 231Driving abroad ............................. 231Control and operation of radio transmitters .................... 232Catalytic converter....................... 232Emission control .......................... 233Coolant temperature.................... 234
t the gas station .............................. 235Check regularly and before a long trip................... 236
indows.................................. 169ing and closing indows ................................. 169
hronizing power windows ..... 172pop-up roof........................... 173ing and closing the g/pop-up roof ..................... 173hronizing the g/pop-up roof ..................... 175ystems ................................. 176e control............................... 176onic*..................................... 179e Body Control (ABC)............ 190tronic system* ing assist)............................. 193.............................................. 197 rack*.................................... 197ing instructions..................... 197o tie-down hooks .................. 198
Useful features .................................. 199Interior storage spaces ................ 199Ashtrays ....................................... 206Cigarette lighter ........................... 207Heated steering wheel* ............... 208Telephone* .................................. 208Tele Aid ........................................ 209Garage door opener ..................... 217Infrared reflecting windshield....... 221
Operation ........................................ 223The first 1000 miles (1500 km) ......... 224Driving instructions............................ 225
Drive sensibly – save fuel............. 225Drinking and driving ..................... 225Pedals .......................................... 225Power assistance ......................... 225Brakes.......................................... 226
A

Contents
EngineHooEngTraActfluiCooBatWinhea
Tires aImpLifeDirCheRot
WinterWinBloSno
Opening/closing in an emergency ..... 301Sliding/pop-up roof ...................... 301
Replacing bulbs .................................. 302Bulbs............................................. 302Replacing bulbs for front lamps .... 304Replacing bulbs for rear lamps ..... 305
Replacing wiper blades ...................... 307Removing...................................... 307Installing ....................................... 307
Flat tire............................................... 308Preparing the vehicle .................... 308Mounting the spare wheel ............ 308
Battery ............................................... 313Disconnecting the battery ............ 314Removing the battery ................... 314Charging and reinstalling the battery .................................... 314 Reconnecting the battery ............. 315
Jump starting...................................... 316Towing the vehicle.............................. 318
Installing towing eye bolt .............. 321
compartment ......................... 237d ............................................ 237ine oil ..................................... 238nsmission fluid level................ 242ive Body Control (ABC) d level...................................... 242lant ........................................ 242
tery ......................................... 243dshield washer system and dlamp cleaning system........... 244nd wheels................................ 246ortant guidelines .................... 246 of tires................................... 247
ection of rotation..................... 247cking tire inflation pressure ... 247ating wheels ........................... 251 driving .................................... 252ter tires .................................. 252ck heater*............................... 253w chains................................. 253
Maintenance....................................... 254Clearing the service indicator ....... 254Service term exceeded ................. 254Calling up the service indicator..... 255Resetting the service indicator ..... 255
Vehicle care........................................ 256Cleaning and care of vehicle ......... 256
Practical hints .................................. 263What to do if …? ................................. 264
Lamps in instrument cluster ......... 264Lamp in center console................. 269Messages in the display................ 270
Where will I find...? ............................. 295First aid kit.................................... 295Vehicle jack, vehicle tool kit, luggage bowl, spare wheel............ 295
Unlocking/locking in an emergency... 297Unlocking the vehicle.................... 297Locking the vehicle ....................... 298Changing batteries........................ 299Fuel filler flap ................................ 300

Contents
Fuses ...FusecomFusecomEme
TechnicSpare paWarrant
LossInfor
IdentificLayout o
CL 5CL 5CL 6
onsumer information....................... 345Uniform tire quality grading ......... 345
echnical terms............................... 347
dex................................................. 353
.............................................. 322 boxes in passenger partment................................ 322 boxes in engine partment................................ 324rgency engine shut-down ...... 324
al data.................................. 325rts service ............................ 326
y coverage............................. 327 of Service and Warranty mation Booklet...................... 327ation labels............................ 328f poly-V-belt drive ................. 32900 ......................................... 3295 AMG................................... 32900 ......................................... 329
Engine................................................ 330Rims and Tires ................................... 331
Same size tires............................. 332Mixed size tires ............................ 333Spare wheel ................................. 333
Electrical system ............................... 334Main Dimensions ............................... 335Weights.............................................. 336Fuels, coolants, lubricants etc. .......... 337
Capacities .................................... 337Engine oils.................................... 339Engine oil additives ...................... 339Air conditioning refrigerant .......... 339Brake fluid.................................... 340Premium unleaded gasoline ......... 340Fuel requirements ........................ 340Gasoline additives ........................ 341Coolants....................................... 342Windshield and headlamp washer system ............................. 344
C
T
In

9
Product information
Introduction
PrPlebe
Weinaacyo
Wethety
Mercedes-Benz original parts as well as conversion parts and accessories ap-proved by us are available at your autho-rized Mercedes-Benz Center where you will receive comprehensive information, in-cluding permissible technical modifica-tions, and where proper installation will be performed.
oductase obst inter
recoml parts
cessoriur vehic
have tir relia
for Mer
informationserve the following in your own est:
mend using Mercedes-Benz orig-as well as conversion parts and es explicitly approved by us for le model.
ested these parts to determine bility, safety and special suitabili-cedes-Benz vehicles.
We are unable to make an assessment for other products and therefore cannot be held responsible for them, even if in indi-vidual cases an official approval or authori-zation by governmental or other agencies should exist. Use of such parts and acces-sories could adversely affect the safety, performance or reliability of your vehicle. Please do not use them.

10
Introduction
Op
OpThisdeareadwith
For of thstrumanageor oure the
YouequTheoptivehithe thorgladdure
ervice and Warranty Information
he Service and Warranty Information ooklet contains detailed information bout the warranties covering your ercedes-Benz, including:
New Car Limited Warranty
Emission System Warranty
Emission Performance Warranty
California, Maine, Massachusetts, and Vermont Emission Control System Warranty (California, Maine, Massachusetts, and Vermont only)
State Warranty Enforcement Laws (Lemon Laws)
erator
erator Operatl of use it care the ve
your owe vehicctions aual. Ign
to the vthers. Vto followMerced
r vehiclipment refore, onal eqcle. If yoperatiized Me to dems.
’s Manual
’s Manualor’s Manual contains a great ful information. We urge you to fully and familiarize yourself hicle before driving.
n safety and longer service life le, we urge you to follow the in-nd warnings contained in this oring them could result in dam-ehicle or personal injury to you ehicle damage caused by fail- instructions is not covered by
es-Benz Limited Warranty.
e may have some or all of the described in this manual. you may find explanations for uipment not installed in your ou have any questions about on of any equipment, your au-rcedes-Benz Center will be onstrate the proper proce-
We continuously strive to improve our product, and ask for your understanding that we reserve the right to make changes in design and equipment. Therefore, infor-mation, illustrations and descriptions in this Operator’s Manual might differ from your vehicle.
Optional equipment is also described in this manual, including operating instruc-tions wherever necessary. Since they are special-order items, the descriptions and illustrations herein may vary slightly from the actual equipment of your vehicle.
If there are any equipment details that are not shown or described in this Operator’s Manual, your authorized Mercedes-Benz Center will be glad to inform you of correct care and operating procedures.
The Operator’s Manual and Service Book-let are important documents and should be kept with the vehicle.
S
TBaM
�
�
�
�
�

11
Introduction
Operator’s Manual
Imporbuyersautom
Under a replaof the Mercedthorizeone orfunctioits expnumberiod ofthe veh18000odomefirst, a temptslessee curs:
(3) the vehicle is out of service by reason of repair of the same or different sub-stantial defects or malfunctions for a cumulative total of more than 30 calender days. Written notification should be sent to us, not a dealer, at Mercedes-Benz USA, LLC, Customer Assistance Center, One Mercedes Drive, Montvale, NJ 07645-0350.
tant notice for California retail and lessees of Mercedes-Benz obiles
California law you may be entitled to cement of your vehicle or a refund purchase price or lease price, if es-Benz USA, LLC and/or its au-
d repair or service facilities fail to fix more substantial defects or mal-ns in the vehicle that are covered by ress warranty after a reasonable r of repair attempts. During the pe- 18 months from original delivery of icle or the accumulation of miles (approx. 29000 km) on the ter of the vehicle, whichever occurs reasonable number of repair at- is presumed for a retail buyer or if one or more of the following oc-
(1) the same substantial defect or mal-function results in a condition that is likely to cause death or serious bodily injury if the vehicle is driven, that de-fect or malfunction has been subject to repair two or more times, and you have directly notified Mercedes-Benz USA, LLC in writing of the need for its repair,
(2) the same substantial defect or mal-function of a less serious nature than category (1) has been subject to repair four or more times and you have direct-ly notified us in writing of the need for its repair, or

12
Introduction
Opera
Mainten
The Servessary mperform
Always hwhen yorized MeThe servvice in t
hange of address or ownership
you change your address, be sure to end in the “Change of Address Notice” und in the Service and Warranty Informa-
on Booklet, or simply call the ercedes-Benz Customer Assistance enter (in the USA) at -800-FOR-MERCedes, or Customer Ser-ice (in Canada) at 1-800-387-0100. It is in our own interest that we can contact you hould the need arise.
you sell your Mercedes, please leave all terature with the vehicle to make it avail-ble to the next operator.
you bought this vehicle used, be sure to end in the “Notice of Purchase of Used ar” found in the Service and Warranty In-rmation Booklet, or call the ercedes-Benz Customer Assistance Cen-r (in the USA) at 1-800-FOR-MERCedes,
r Customer Service (in Canada) at -800-387-0100.
tor’s Manual
ance
ice Booklet describes all the nec-aintenance work which should be
ed at regular intervals.
ave the Service Booklet with you u take the vehicle to your autho-rcedes-Benz Center for service. ice advisor will record each ser-he booklet for you.
Roadside Assistance
The Mercedes-Benz Roadside Assistance Program provides factory trained technical help in the event of a breakdown. Calls to the toll-free Roadside Assistance number
1-800-FOR-MERCedes (in the USA)1-800-387-0100 (in Canada)
will be answered by Mercedes-Benz Cus-tomer Assistance Representatives 24 hours a day, 365 days a year.
For additional information refer to the Mercedes-Benz Roadside Assistance Pro-gram brochure in your glove box.
C
IfsfotiMC1vys
Iflia
IfsCfoMteo1

13
Introduction
Operator’s Manual
Operaor Can
If you peign co
� Serma
� Unlcatablage
� Gaser ocau
ting your vehicle outside the USA ada
lan to operate your vehicle in for-untries, please be aware that:
vice facilities or replacement parts y not be readily available.
eaded gasoline for vehicles with alytic converters may not be avail-e; the use of leaded fuels will dam- the catalysts.
oline may have a considerably low-ctane rating, and improper fuel can se engine damage.
Certain Mercedes-Benz models are avail-able for delivery in Europe under our Euro-pean Delivery Program. For details, consult your authorized Mercedes-Benz Center or write to:
In the USA:
Mercedes-Benz USA, LLCEuropean Delivery DepartmentOne Mercedes DriveMontvale, NJ 07645-0350
In Canada:
Mercedes-Benz Canada, Inc.European Delivery Department849 Eglinton Avenue EastToronto, Ontario M4G 2L5

14
Introduction
Wh
WhThisvidefor yhas info
At a
Hercondriv
Gett
HerneethisMering
Safe
Herfeat
echnical data
ll important technical data for your vehi-le can be found in this section.
dexes
he glossary provides explanations of the ost important technical terms.
he table of contents and the index are de-igned to help you find information quickly nd easily.
he following publications are part of your ehicle documentation:
this Operator’s Manual
the Service Booklet
eparate operating instructions will be rovided as required depending on the quipment options installed in your vehi-le.
ere to
ere to Operat comprou, theits ownrmation
glance
e you wtrols ther’s sea
ing sta
e you wd for yo sectioncedes-Bor borro
ty and
e you wures of
find it
find itor’s Manual is designed to pro-ehensive support information vehicle operator. Each section reference color so you can find quickly.
ill find an overview of all the at can be operated from the t.
rted
ill find all the information you ur first drive. You should read first if this is your first enz vehicle or if you are rent-wing this vehicle.
Security
ill find descriptions of the safety your vehicle.
Controls in detail
Here you will find detailed information about the equipment installed in your vehi-cle. This section expands on the “Getting started” section and also describes techni-cal innovations. If you are already familiar with the basic functions of your vehicle, this section will be of particular interest to you.
Operation
Here you will find all the information you need for the proper operation of your vehi-cle.
Practical hints
This section provides fast assistance for dealing with problems you may encounter.
T
Ac
In
Tm
Tsa
Tv
�
�
Spec

15
Introduction
Symbols
SyThOp
*
� This symbol points to instructions for you to follow.
� A number of these symbols appearing in succession indicates a multiple-step procedure.
� Page This symbol tells you where to look for further information on a topic.
�� This continuation symbol marks an interrupted procedure which will be continued on the next page.
-> In the glossary of technical terms, this symbol is used to cross-reference term defini-tions.
DISPLAY Words appearing in the multi-function display are printed in the type shown here.
mbole followerator’
Opwiteqthethithecle
sing symbols are found in this
s Manual:
tional equipment is identified h an asterisk. Since standard uipment varies between models, descriptions and illustrations in
s manual may differ slightly from actual equipment of your vehi-.
Warning! GWarning notices draw your attention to haz-ards that may endanger your health or life, or the health or life of others.
!Highlights hazards that may result in damage to your vehicle.
iHelpful hints or further information you may find useful.

16
Introduction
Op
Op
W
Wococatioeleande
Eleouhic
Mato an
Otvehthe
Soener
eratin
eratin
arning!
rk imprmponenuse themning comctronic y modifisired eff
ctronic sly impale.
ke sureelectron authoriz
her impricle cou operat
me safegine is ruturn off
g safety
g safetyProper use of the vehicle
Proper use of the vehicle requires that you are familiar with the following information and rules:
� The safety precautions in this manual
� The “Technical data” section in this manual
� Traffic rules and regulations
� Motor vehicle laws and safety stan-dards
Goperly carried out on electronic ts and associated software could to malfunction or cease func-pletely. Because the vehicle’s
components are interconnected, cation made may produce an un-ect on other systems.
system malfunctions could seri-ir the operating safety of your ve-
that any repairs or modifications ic components are carried out by ed Mercedes-Benz Center.
oper work or modifications on the ld also have a negative impact on
ing safety of the vehicle.
ty systems only function while the nning. You should therefore nev-
the engine while driving.

17
Introduction
Problems with your vehicle
PrIf y affect its safe operation, we urge you to im d and corrected if required. If the matter is no r management, or if necessary contact us at
In
CuMeOnMo
In
CuMe84To
oblemou shomediatet handleone of
the USA
stomerrcedese Mercntvale,
Canada
stomerrcedes9 Eglinronto, O
s with your vehicleuld experience a problem with your vehicle, particularly one that you believe mayly contact your authorized Mercedes-Benz Center to have the problem diagnosed to your satisfaction, please discuss the problem with the Mercedes-Benz Cente
the following addresses:
:
Assistance Center-Benz USA, LLCedes Drive NJ 07645-0350
:
Relations Department-Benz Canada, Inc.ton Avenue Eastntario, M4G 2L5

18
Introduction
Rep
RepFor The ral Regulations, Part 575 pursuant to the “Na
Rep
If yo or death, you should immediately inform the s-Benz USA, LLC.
If NH ty defect exists in a group of vehicles, it may dual problems between you, your dealer, or M
To c r 366-0123 in Washington, D.C. area) or writ obtain other information about motor ve-hicle
ortin
ortinthe USA followintional T
orting
u belieNationa
TSA re order aercede
ontact e to: NH safety
g safety defects
g safety defects only:g text is published as required of manufacturers under Title 49, Code of U.S. Fede
raffic and Motor Vehicle Safety Act of 1966.”
safety defects
ve that your vehicle has a defect which could cause a crash or could cause injuryl Highway Traffic Safety Administration (NHTSA) in addition to notifying Mercede
ceives similar complaints, it may open an investigation, and if it finds that a safe recall and remedy campaign. However, NHTSA cannot become involved in indivis-Benz USA, LLC.
NHTSA, you may either call the Auto Safety Hotline toll-free at 1-888-327-4236 (oTSA, U.S. Department of Transportation, Washington, D.C. 20590. You can also
from the Hotline.

At a glance
Cockpit
Instrument cluster
Multifunction steering wheel
Center console
Overhead control panel
Door control panel
19

20
At a glance
Coc
Coc
kpit
kpit

21
At a glance
Cockpit
I
1 C
�
�
�
2 C
�
�
3 I
4 Mw
5 G
Item Page
15 Steering wheel adjustment stalk
37
Heated steering wheel* 208
16 Parking brake pedal 44
17 Hood lock release 237
18 Parking brake release 44
19 Door control panel 28
20 Exterior lamp switch 46,108
21 Headlamp washer button 154
22 Parking assist* (Parktronic) left front area warning indi-cator
195
tem Page
ombination switch
Turn signals 46
Windshield wipers 47
High beam 111
ruise control lever
Cruise control 176
Distronic* 179
nstrument cluster 22,111
ultifunction steering heel
24,118
ear range indicator, clock 22
Item Page
6 Lever for voice control sys-tem* (see separate operat-ing instructions)
7 Parking assist* (Parktronic) right front area warning in-dicator
195
8 Overhead control panel 27
9 Glove box lock 199
10 Glove box lid release 199
11 Glove box 199
12 Center console 25,26
13 Starter switch 31
14 Horn

22
At a glance
Ins
Ins
trume
trume
nt cluster
nt cluster

23
At a glance
Instrument cluster
I
1 Cg
2 F
F
3 L
K
4 S
v
l
1 Vehicfunctiswitchis run
5 T
Item Page
Stored speed for:
Cruise control or 176
Distronic* 179
10 Outside temperature indi-cator
115
11 Left display with:
1 Supplemental restraint system indicator lamp
266
; Brake warning lamp, except Canada
267
3 Brake warning lamp, Canada only
267
? Engine malfunction indicator lamp
268
12 Knob for instrument clus-ter illumination
114
tem Page
oolant temperature auge
115
uel gauge with:
uel reserve warning lamp 268
Left turn signal indicator lamp
Right turn signal indicator lamp
46
46
peedometer with:
Electronic Stability Program (ESP) warning lamp
264
Distance warning lamp1
les without Distronic*: Warning lamp withouton. It illuminates with SmartKey in starter position 2. It should go out when the engine
ning.
265
achometer 115
Item Page
6 Right display with:
- Antilock Brake Sys-tem (ABS) malfunc-tion indicator lamp
265
A High beam head-lamp indicator
111
< Seat belt nonusage warning lamp
266
7 J Reset button 114
8 Display with:
Program mode 147
Gear range indicator 145
Digital clock (see COMAND operating instructions)
9 Multifunction display with:
Trip odometer 117
Main odometer 117

24
At a glance
Mu
Mu
Item Page
4 Menu systems: Press button
è for next system
ÿ for previous system
5 Scrolling within a menu: Press button
j for next display
k for previous display
ltifun
ltifun
ction steering wheel
ction steering wheel
Item Page
1 Multifunction display 117
Operating control system
118
2 Selecting the submenu or setting the volume
ç down/to decrease
æ up/to increase
3 Telephone*: Press button
í to take a callto dial a call
ì to end a callto reject an incoming call

25
At a glance
Center console
CeUp Item Page
8 Electronic Stability Pro-gram (ESP) control switch
75
9 Rear seat head restraints, switch for folding down
97
10 Tow-away alarm switch 78
11 COMAND (see separate operating instructions)
12 Automatic climate control 157
13 Ashtray 206
Lighter 207
nter per pa
consolert Item Page
1 Rear window sunshade 156
2 Parking assist* (Parktronic system) deactivation switch
193
3 Active Body Control (ABC) 190
4 Level control switch 191
5 Central locking switch 95
Anti-theft alarm system in-dicator lamp
77
6 Hazard warning flasher on/off switch
111
7 Central unlocking switch 95

26
At a glance
Center
Lower p
console
art Item Page
1 KEYLESS-GO* start/stop button
33, 43
2 Selector lever for automatic transmission
43,145
3 PASSENGER AIRBAG OFF indicator lamp
65
4 Thumbwheel for setting distance in Distronic*
187
5 Distance warning func-tion* on/off switch
187
6 Program mode selector for automatic transmission
147

27
At a glance
Overhead control panel
Ov
erhe ad control panelItem Page
1 Left reading lamp on/off 112
2 Rear interior lighting on/off
112
3 Right reading lamp on/off 112
4 Interior lighting control 112
5 Sliding/pop-up roof 173
6 Hands-free microphone for Tele Aid (emergency call system), telephone* and voice control system* (see separate operating instruc-tions)
7 Rear view mirror 38,151
8 Garage door opener 217
9 Tele Aid (emergency call system) button
209

28
At a glance
Doo
Doo
Item Page
6 Switches for opening/ closing front door windows
169
7 Rear window override switch
69
8 Switches for opening/ closing rear windows
169
9 Remote trunk lid release switch
88
Trunk lid opening/closing system* switch
91
r con
r con
trol panel
trol panel
Item Page
1 Door handle 87
2 Memory function (for stor-ing seat, mirror and steer-ing wheel settings)
105
3 Seat heating 103
Seat ventilation* 102
4 Seat adjustment 34, 96
5 Exterior mirror adjustment 38,151

Getting started
Unlocking
Adjusting
Driving
Parking and locking
29

30
Getting started
Un
Theovertionshomat
If yofuncdetaformenc
Press unlock button Πon the key.
All turn signal lamps blink once. The locking knobs in the doors move up.
Get in the vehicle and insert the key in the starter switch.
iOpening a door causes the windows on that side of the car to open slightly. They will return to the up position when the door is closed.
lockin
“Gettingview ofs. First-uld payion give
u are ations dil” sectation.
es are a
g
started” section provides an the vehicle’s most basic func-time Mercedes-Benz owners special attention to the infor-n here.
lready familiar with the basic escribed here, the “Controls in ion will help you with further in-The corresponding page refer-t the end of each segment.
UnlockingUnlocking with the SmartKey
Your vehicle comes equipped with two SmartKeys with integrated remote con-trols and removable mechanical key.
The locking tabs for the mechanical key portion of the two keys are a different color to help distinguish each key unit.
SmartKey with remote control
1 ‹ Lock button2 Š Unlock button for trunk lid3 Œ Unlock button4  Panic button (� page 70)
�
�

31
Getting started
Unlocking
Starte
Starter
0 For1 Pow
sum2 Ign
con3 Sta
!If the key is left in starter switch posi-tion 0 for an extended period of time, it can no longer be turned in the starter switch.
� Remove the key from the starter switch and reinsert.
If the key can still not be turned, the battery may not be sufficiently charged.
� Check the battery and charge it if necessary (� page 313).
� Get a jump start (� page 316).
To prevent accelerated battery dis-charge or a completely discharged bat-tery, always remove the key from the starter switch.
r switch positions
switch
removing keyer supply for some electrical con-ers, such as seat adjustment
ition (power supply for all electrical sumers) and driving positionrting position
Warning! GWhen leaving the vehicle, always remove the key from the starter switch, take the KEYLESS-GO* card with you and lock the ve-hicle. Do not leave children unattended in the vehicle, or with access to an unlocked vehicle. Unsupervised use of vehicle equip-ment may cause an accident and/or serious personal injury.
iThe SmartKey can only be removed from the starter switch with the gear selector lever in position P.

32
Getting started
Unlock
Unlocki
Vehiclesthe two and remcle comLESS-GO
The funcKEYLESS
Grasp the door handle.
All turn signal lamps blink once. The locking knobs on the doors move up.
ressing the KEYLESS-GO start/stop but-n on the selector lever corresponds to rning the key to the various starter
witch positions.
Warning! GWhen leaving the vehicle, always take the key and the KEYLESS-GO card with you, and lock the vehicle. Do not leave children unat-tended in the vehicle, or with access to an unlocked vehicle. Unsupervised use of vehi-cle equipment may cause an accident and/or serious personal injury.
ing
ng with KEYLESS-GO*
with KEYLESS-GO*: in addition to SmartKeys with remote controls ovable mechanical key, your vehi-es equipped with two KEY-* cards.
tion of the SmartKey overrules the -GO function.
If you have the KEYLESS-GO function, your vehicle checks whether the KEYLESS-GO card is valid when you grasp the door han-dle. If your KEYLESS-GO card is valid, the doors will unlock, and you can open them.
�
Ptotus
iTo unlock the vehicle, the KEYLESS-GO card must be outside the vehicle, no further than approx. 3 feet (1 meter) away from the door.

33
Getting started
Unlocking
1 KEY
Beforestart/selectromoved
Ignition (or position 2)
� Press the KEYLESS-GO start/stop but-ton twice in immediate succession.
This supplies power to all electrical consumers. All the lights in the instru-ment cluster light up.
More information can be found in the “Controls in detail” section (� page 83). For information on starting the engine us-ing the KEYLESS-GO start/stop button, see “Starting with KEYLESS-GO*” (� page 43).
iIf you now press the KEYLESS-GO start/stop button once, the power sup-ply is again switched off.
LESS-GO start/stop button
you press the KEYLESS-GO top button, the vehicle’s on-board nics have status 0 (as with key re-).
Make sure the gear selector lever is set to P.
Do not depress the brake pedal.
Position 1
� Press the KEYLESS-GO start/stop but-ton once.
This supplies power to some electrical consumers, such as seat adjustment.
iIf you now press the KEYLESS-GO start/stop button twice, the power supply is switched off.

34
Getting started
Adj
Adj
Sea
W
Allreatenthe
W
DoAdthe
Nebaclinslidslidtheriobewepro
Warning! GChildren 12 years old and under must never ride in the front seat, except in a Mercedes-Benz authorized BabySmartTM compatible child seat, which operates with the BabySmartTM system installed in the ve-hicle to deactivate the front passenger air-bag when it is properly installed. Otherwise they will be struck by the airbag when it in-flates in a crash. If this happens, serious or fatal injury will result.
According to accident statistics, children are safer when properly restrained in the rear seating positions than in the front seat-ing positions. Infants and small children must ride in back seats and be seated in an appropriate infant or child restraint system, which is properly secured with the vehicle's seat belt and top tether strap, or secured via lower anchors and top tether strap, fully in accordance with the child seat manufactur-er’s instructions.
ustin
ustin
ts
arning!
seat, her view ming of s vehicle
arning!
not adjujusting t driver t
ver ride ck reclined posie undere under abdomus or fatlts proviarer is inperly po
g
g
Gad restraint, steering wheel, and irror adjustments, as well as fas-
eat belts, must be done before is put into motion.
Gst the driver’s seat while driving.
he seat while driving could cause o lose control of the vehicle.
in a moving vehicle with the seat ed. Sitting in an extremely re-tion can be dangerous. You could the seat belt in a collision. If you it, the belt would apply force at en or neck. That could cause se-al injuries. The seat back and seat de the best restraint when the an upright position and belts are sitioned on the body.
Your seat must be adjusted so that you can correctly fasten your seat belt.
Never place hands under the seat or near any moving parts while a seat is being ad-justed.
Warning! GWhen leaving the vehicle, always remove the key from the starter switch, take the KEY-LESS-GO* card with you, and lock your vehi-cle.
The power seats can also be operated with the driver’s or passenger door open. Do not leave children unattended in the vehicle, or with access to an unlocked vehicle. Unsu-pervised use of vehicle equipment may cause an accident and/or serious personal injury.

35
Getting started
Adjusting
� Turn the key in the starter switch to position 1 or 2.or
� Press the KEYLESS GO* start/stop button once or twice.or
� Open the driver’s or passenger door.
A chilsignifiare nothe chrestra
Seat adjustment
The seat adjustment switches are located in each door.
1 Head restraint height2 Seat height3 Seat cushion tilt4 Seat cushion depth5 Seat fore and aft adjustment6 Seat backrest tilt
d’s risk of serious or fatal injuries is cantly increased if the child restraints t properly secured in the vehicle and ild is not properly secured in the child int.

36
Getting started
Adjust
Head re
� Presrecti
Seat he
� Presrecti
Seat cus
� Presrectiare l
eat backrest tilt
Press the switch forward or backward in the direction of arrow 6 until your arms are slightly angled when holding the steering wheel.
ead restraint tilt
Manually adjust the angle of the head restraint. Push or pull on the lower edge of the head restraint cushion.
Warnin
For youposition
Adjust hthe hea
Do not head reed to hedent.
ing
straint height
s the switch up or down in the di-on of arrow 1.
ight
s the switch up or down in the di-on of arrow 2.
hion tilt
s the switch up or down in the di-on of arrow 3 until your upper legs ightly supported.
Seat cushion depth
� Press the switch forward or backward in the direction of arrow 4 until your legs are supported comfortably.
Seat fore and aft adjustment
� Press the switch forward or backward in the direction of arrow 5.
Adjust to a comfortable seating posi-tion that still allows you to reach the accelerator/brake pedal safely. The position should be as far to the rear as possible, corresponding to the driver’s ability to properly operate the controls.
S
�
H
�
g! Gr protection, drive only with properly ed head restraints.
ead restraint to support the back of d approximately at ear level.
drive the vehicle without the seat straints. Head restraints are intend-lp reduce injuries during an acci-
iWhen moving the seat, be sure that there are no items in the footwell or be-hind the seats. Otherwise you could damage the seats.

37
Getting started
Adjusting
More i“Contr
Steering wheel adjustment
The stalk for steering wheel adjustment is located on the steering column (lower left).
1 Steering column, lengthen or shorten2 Steering column, height
� Turn the key in the starter switch to position 1 or 2.or
� Press the KEYLESS GO* start/stop button once or twice.or
� Open the driver’s or passenger door.
iTheautondnotoutviewme
Whpiereswit
If thforetheretubesthe
nformation can be found in the ols in detail” section (� page 97).
Steering wheel
front passenger seat head restraint omatically lowers after a few sec-s when the front passenger seat is occupied.This improves the driver's ward view as well as the forward from the rear passenger compart-
nt.
en the front passenger seat is occu-d again, the front passenger head traint returns to the last set position hin a few seconds.
e front passenger seat was moved or aft while not being occupied,
front passenger seat head restraint rns to a position that corresponds t with the seat's axial position when seat is occupied again.
Warning! GDo not adjust the steering wheel while driv-ing. Adjusting the steering wheel while driv-ing could cause the driver to lose control of the vehicle.
When leaving the vehicle, always remove the key from the starter switch, and take the KEYLESS-GO* card with you.
The steering wheel adjustment feature can also be operated with the driver’s door open. Do not leave children unattended in the vehicle, or with access to an unlocked vehicle. Unsupervised use of vehicle equip-ment may cause an accident and/or serious personal injury.

38
Getting started
Adjust
Steering
� Movedirecsteeyour
Steering
� Movetion legs displdicatter a
Please rformatio(� page
side rear view mirror
Manually adjust the inside rear view mirror.
xterior rear view mirror
Warning! GExercise care when using the passenger side exterior rear view mirror. The mirror surface is convex (outwardly curved surface for a wider field of view). Objects in mirror are closer than they appear. Check your in-side rear view mirror or glance over your shoulder before changing lanes.
ing
column, lengthen or shorten
stalk forward or backward in the tion of arrow 1 until a comfortable
ring wheel position is reached with arms slightly bent at the elbow.
column, height
the stalk up or down in the direc-of arrow 2. Make sure that your can move freely and that all the ays (including malfunction and in-or lamps) on the instrument clus-re clearly visible.
efer to “Controls in detail” for in-n on the heated steering wheel* 208).
Mirrors
Adjust the inside and exterior rear view mirrors before driving so that you have a good view of the road and traffic condi-tions.
In
�
E
Warning! GIn the case of an accident liquid electrolyte may escape the mirror housing if the mirror glass breaks.
Electrolyte has an irritating effect. Do not al-low the liquid to come into contact with eyes, skin, clothing, or respiratory system. In case it does, immediately flush affected area with water, and seek medical help if necessary.

39
Getting started
Adjusting
The budoor.
1 Dri2 Pas3 Adj
Information on the electrically folding exte-rior rear view mirrors can be found in the “Controls in detail” section (� page 152).
!Elewitcomuidter.
!Information on how to reposition the exterior mirror housing when it was forcibly pushed forward (hit from the rear) or forcibly pushed rearward (hit from the front) can be found in the “Controls in detail” section (� page 153)
iAt low ambient temperatures, the mir-rors will be heated automatically.
ttons are located on the driver’s
ver’s side mirrorsenger side mirrorustment button
� Make sure that the ignition is switched on.
All the lights in the instrument cluster light up.
� Press button 1 for the left mirror or button 2 for the right mirror.
� Push adjustment button 3 up, down, left or right according to the desired setting.
ctrolyte drops coming into contact h the vehicle paint finish can only be
pletely removed while in their liq- state and by applying plenty of wa-

40
Getting started
Dri
Dri
W
Dowethean
Duthedelon
In the same crash, the possibility of injury or death is lessened if you are wearing your seat belt. The airbags can only protect as ex-pected if the occupants are using their seat belts (� page 54).
Warning! GChildren 12 years old and under must never ride in the front seat, except in a Mercedes-Benz authorized BabySmartTM compatible child seat, which operates with the BabySmartTM system installed in the ve-hicle to deactivate the passenger front air-bag when it is properly installed. Otherwise they will be struck by the airbag when it in-flates in a crash. If this happens, serious or fatal injury will result.
ving
ving
arning!
not lay ll. Be ca driver’s
ce for th
ring sud objects
rneath tger brak
Fastening the seat beltsGany objects in the driver’s foot-reful that floor mats or carpets in footwell leave sufficient clear-e pedals.
den driving or braking maneuvers could get caught between or un-
he pedals. You could then no e or accelerate.
Warning! GAlways fasten your seat belt before driving off. Always make sure your passengers are properly restrained, even those sitting in the rear and pregnant women.
Failure to wear and properly fasten and po-sition your seat belt greatly increases your risk of injuries and their likely severity in an accident. You and your passengers should always wear seat belts.
If you are ever in an accident, your injuries can be considerably more severe without your seat belt properly buckled. Without your seat belt buckled, you are much more likely to hit the interior of the vehicle or be ejected from it. You can be seriously injured or killed.

41
Getting started
Driving
1 Release button2 Buckle3 Latch plate
� With a smooth motion, pull the belt out of the seat belt outlet.
� Place the belt over your shoulder.
� Push latch plate 3 into buckle 2 until it clicks.
� If necessary, tighten the lap portion to a snug fit by pulling shoulder portion up.
Accorare sarear sing pomust approwhichseat bloweraccorer's in
A chilsignifiare nothe chrestra
Warn
Neverthan teveryostrain
ding to accident statistics, children fer when properly restrained in the eating positions than in the front seat-sitions. Infants and small children ride in back seats and be seated in an priate infant or child restraint system, is properly secured with the vehicle’s elt and top tether strap, or secured via anchors and top tether strap, fully in dance with the child seat manufactur-structions.
d’s risk of serious or fatal injuries is cantly increased if the child restraints t properly secured in the vehicle and ild is not properly secured in the child int.
ing! G let more people ride in the vehicle here are seat belts available. Be sure ne riding in the vehicle is correctly re-
ed with a separate seat belt.
Warning! GNever ride in a moving vehicle with the seat backrest reclined. Sitting in an extremely re-clined position can be dangerous. You could slide under the seat belt in a collision. If you slide under it, the belt would apply force at the abdomen or neck. That could cause se-rious or even fatal injuries. The seat back-rest and seat belt provide the best restraint when the wearer is in an upright position and the belt is properly positioned on the body.
Warning! GRead and observe the additional warning no-tices printed in the “Safety and Security” section (� page 58).

42
Getting started
Driving
Proper
� Do n
� Adjuportito thnot tarm)
� Positon yoacro
� Placeright
� Nevepers
� Do nson atime
� Checensu
� Ensuted sbulkywhen
tarting the engine
Warning! GInhalation of exhaust gas is hazardous to your health. All exhaust gas contains carbon monoxide, and inhaling it can cause uncon-sciousness and lead to death.
Do not run the engine in confined areas (such as a garage) which are not properly ventilated. If you think that exhaust gas fumes are entering the vehicle while driving, have the cause determined and corrected immediately. If you must drive under these conditions, drive with at least one window fully open.
use of seat belts
ot twist the belt when fastening.
st seat belt so that the shoulder on is located as close as possible e middle of the shoulder (it should ouch the neck or pass under the .
ion the lap belt as low as possible ur hips (over hip joint) and not
ss the abdomen.
the seat backrest in a nearly up- position.
r use a seat belt for more than one on at a time.
ot fasten a seat belt around a per-nd another object at the same
.
k your seat belt during travel to re that it is properly positioned.
re that the seat belt is always fit-nugly. You should avoid wearing clothing, such as winter coats, traveling in the vehicle.
SWarning! GDo not pass belts over sharp edges. They could tear.
Do not allow the belt to get caught in the door or in the seat adjustment mechanism. This could damage the belt.
Never attempt to make modifications to seat belts. This could impair the effective-ness of the belts.
Damaged seat belts or belts that were highly stressed in an accident must be replaced by an authorized Mercedes-Benz Center.

43
Getting started
Driving
Autom
Gearshtransm
P ParR RevN NeuD Dri
� Mais s
1 KEYLESS-GO start/stop button
� Firmly depress the brake pedal during the starting procedure. Do not depress accelerator.
The selector lever lock is released.
� Press KEYLESS-GO start/stop button 1 once.
The engine starts automatically.
For information on turning off the engine with KEYLESS-GO, see “Turning off engine with KEYLESS-GO” (� page 51).
atic transmission
ift pattern for automatic ission
k position with selector lever lockerse geartral
ve position
ke sure that the gear selector lever et to P.
Starting with the SmartKey
� Turn the key in the starter switch to position 3 and hold until the engine starts (� page 31).
� Firmly depress the brake pedal.
The selector lever lock is released.
For information on turning off the engine with the SmartKey, see “Turning off engine with the SmartKey” (� page 51).
Starting with KEYLESS-GO*
You can start your vehicle without a key using the KEYLESS-GO start/stop button on the gear selector lever.
iYou can also use the “touch-start” function. Turn the key to position 3 and release it again immediately. The en-gine then starts automatically.

44
Getting started
Driving
Starting
If the enabove, c
� If yoSmapositdure
� If yoKEYLfor bcardOr:Startsignaterfe
� Repe(� pastart
� Get a
If the enstarting functionfuel sup
Release the parking brake by pulling on handle 2.
The indicator lamp ; (USA only) or 3 (Canada only) in the instrument cluster goes out.
Warning! GWhen leaving the vehicle, always remove the key from the starter switch, take the KEY-LESS-GO* card with you and lock the vehi-cle. Do not leave children unattended in the vehicle, or with access to an unlocked vehi-cle. Children could release the parking brake, which could result in an accident and/or serious injury.
difficulties
gine does not start as described arry out the following steps:
u are starting the engine with the rtKey, turn key in starter switch to ion 0 and repeat starting proce-.
u are starting the engine with ESS-GO: Close all doors to allow
etter detection of the KEYLESS-GO .
the engine with the key as radio ls from another source may be in-ring with the KEYLESS-GO card.
at the starting procedure ge 42). Remember that extended
ing attempts can drain the battery.
jump start (� page 316).
gine does not start after several attempts, there could be a mal- in the engine electronics or in the ply system.
� Notify an authorized Mercedes-Benz Center.
Parking brake
1 Parking brake pedal2 Parking brake release handle
�

45
Getting started
Driving
Drivin
� Firm
� Mo
� Rel
� Carped
Once tic centlocking
iYouinsiare
Youing(�
Warning! GIt is dangerous to shift the selector lever out of P or N if the engine speed is higher than idle speed. If your foot is not firmly on the brake pedal, the vehicle could accelerate quickly forward or in reverse. You could lose control of the vehicle and hit someone or something. Only shift into gear when the en-gine is idling normally and when your right foot is firmly on the brake pedal.
iSimultaneously depressing the acceler-ator pedal and applying the brake re-duces engine performance and causes premature brake and drivetrain wear.
g
ly depress the brake pedal.
ve selector lever in position D or R.
ease the brake pedal.
efully depress the accelerator al.
he vehicle is in motion, the automat-ral locking system engages and the knobs drop down.
After a cold start the automatic transmis-sion engages at a higher engine speed. This allows the catalytic converter to reach its operating temperature faster.
can open a locked door from the de. Open door only when conditions safe to do so.
can deactivate the automatic lock- using the control system page 139).
!If you hear a warning signal when driv-ing off, you have forgotten to release the parking brake.
Release the parking brake.
iWait for the gear selection process to complete before setting the vehicle in motion.

46
Getting started
Driving
Switchi
Exterior
1 Off2 Low
� Turn
igh beam
Push the combination switch forward.
The high beam headlights are switched on.The high beam symbol A in the tachometer lights up.
ore information can be found in the Controls in detail” section (� page 111).
Warnin
On slippin orderresult incle convent thi
iTo signal minor directional changes, e.g. passing or changing lanes, move combination switch to point of resis-tance only and release. The turn signal blinks three times.
ng on headlamps
lamp switch
beam headlamps on
the switch to B.
More information can be found in the “Controls in detail” section (� page 108).
Turn signals and high beam
The combination switch is on the left of the steering column.
Combination switch
1 Turn signals, right2 Turn signals, left
� Press the combination switch up 1 or down 2.
H
�
M“
g! Gery road surfaces, never downshift to obtain braking action. This could drive wheel slip and reduced vehi-
trol. Your vehicle’s ABS will not pre-s type of loss of control.

47
Getting started
Driving
Winds
The costeerin
Combin
1 Sin2 Sw
� Maon.
Single wipe
� Press switch briefly in the direction of arrow 1.
The windshield wipers wipe one time without washer fluid.
Wiping with windshield washer fluid
� Press switch in the direction of arrow 1 past the resistance point.
The windshield wiper operates with washer fluid.
The switch should not be left in inter-mittent setting as the wipers will wipe the windshield once every time the en-gine is started. Dust that accumulates on the windshield might scratch the glass when wiping occurs on a dry windshield.
��
hield wipers
mbination switch is on the left of the g column.
ation switch
gle wipeitching on windshield wipers
ke sure that the ignition is switched
Switching on windshield wipers
� Turn the combination switch to the de-sired position depending on the inten-sity of the rain.
0 Windshield wipers off
I Intermittent wiping
II Normal wiper speed
III Fast wiper speed
iThe intermittent wiping interval is de-pendent on wetness of windshield. Wiping will not occur with a door open.
!Do not leave windshield wipers in inter-mittent setting when vehicle is taken to an automatic car wash or during wind-shield cleaning. Wipers will operate in the presence of water sprayed on the windshield, and wipers may be dam-aged as a result.

48
Getting started
Driving
case of accident
the vehicle is leaking gasoline:
Do not start the engine under any cir-cumstances.
Notify local fire and/or police authori-ties.
the extent of the damage cannot be de-rmined:
Notify an authorized Mercedes-Benz Center.
no damage can be determined on the
major assemblies
fuel system
engine mount
Start the engine in the usual manner.
!If leashiel
� Ffra
� Ta
If winall in
� Sn
� HcM
Problems while driving
The engine runs erratically and misfires
� An ignition cable may be damaged.
� The engine electronics may not be op-erating properly.
� Unburned gasoline may have entered the catalytic converter and damaged it.
� Give very little gas.
� Have the problem repaired by an au-thorized Mercedes-Benz Center as soon as possible.
The coolant temperature is over 248°F (120°C)
The coolant is too hot and is no longer cooling the engine.
� Stop the vehicle as soon as possible and turn off the engine. Allow engine and coolant to cool.
� Check the coolant level and add cool-ant if necessary (� page 242).
In
If
�
�
Ifte
�
If
�
�
�
�
ves, snow, etc. block the wind-d wipers, switch off the wipers.
or safety reasons, withdraw key om starter switch. Remove block-ge.
urn the windshield wipers on gain.
dshield wipers fail to function at switch position I:
et the combination switch to the ext highest wiper speed.
ave the windshield wipers hecked at the nearest authorized ercedes-Benz Center.

49
Getting started
Parking and locking
PaYoYoyo
W
Wmvr
W
Wpsineh
� Turn the key to starter switch position 0 and remove, or press start/stop button (vehicles with KEYLESS-GO*).
� Take the key or the KEYLESS-GO* card and lock vehicle when leaving.
rkingu have u have ur vehic
arning
ait untioving th
ehicle cemoved.
arning
ith the ower asystems. mind thffort is nicle.
and lockingnow completed your first drive. properly stopped and parked le. End your drive as follows:
! Gl the vehicle is stationary before re-e key from the starter switch. The
annot be steered when the key is
! Gengine not running, there is no sistance for the brake and steering In this case, it is important to keep at a considerably higher degree of ecessary to brake or steer the ve-
Warning! GDo not park this vehicle in areas where com-bustible materials such as grass, hay or leaves can come into contact with the hot exhaust system, as these materials could be ignited and cause a vehicle fire.
To reduce the risk of personal injury as a re-sult of inadvertent vehicle movement, be-fore turning off the engine and leaving the vehicle always:
� Keep right foot firmly on brake pedal.
� Firmly depress parking brake pedal.
� Move the selector lever to position P.
� Slowly release brake pedal.
� When parked on an incline, turn front wheels towards the road curb.

50
Getting started
Parkin
Parking
1 Park2 Rele
� Step
Whetor laada obe ill
witching off headlamps
Turn the exterior lamp switch to M (� page 46).
ore information can be found in the Controls in detail” section (� page 108).
Warning! GGetting out of your vehicle with the selector lever not fully engaged in position P is dan-gerous. Also, when parked on an incline, position P alone may not prevent your vehi-cle from moving, possibly hitting people or objects.
Always set the parking brake in addition to shifting to position P (� page 43).
When parked on an incline, turn front wheels towards the road curb.
g and locking
brake
ing brakease handle
firmly on parking brake 1.
n the engine is running, the indica-mp ; (USA only) or 3 (Can-nly) in the instrument cluster will
uminated.
S
�
M“
Warning! GWhen leaving the vehicle, always remove the key from the starter switch, take the KEY-LESS-GO* card with you and lock the vehi-cle. Do not leave children unattended in the vehicle, or with access to an unlocked vehi-cle. Children could release the parking brake and/or move the gear selector lever from position P, either of which could result in an accident and/or serious injury.

51
Getting started
Parking and locking
Turnin
� Plapos
Turnin
� Tur(�it. The
� Pre(�
More information can be found in the “Controls in detail” section (� page 80).
Turning off engine with KEYLESS-GO*
� Place the gear selector lever in P.
� Press the KEYLESS-GO start/stop but-ton until the engine shuts off.
With the driver's door closed, the start-er switch is now in position 1. With the driver’s door opened, the starter switch is set to position 0, same as key re-moved from starter switch. The immo-bilizer is activated (� page 31).
iAlwtion
On tow
iThefromsele
Warning! GWhen leaving the vehicle, always remove the key from the starter switch and lock your ve-hicle. Do not leave children unattended in the vehicle, or with access to an unlocked vehicle. Unsupervised use of vehicle equip-ment may cause an accident and/or serious personal injury.
��
g off engine
ce the gear selector lever in ition P.
g off engine with the SmartKey
n the key in the starter switch page 31) to position 0 and remove
immobilizer is activated.
ss the seat belt release button page 41).
� After exiting the vehicle press the lock button ‹ on the SmartKey (� page 30).
The locking knobs on the doors move down. The turn signal indicators light up briefly.
ays set the parking brake in addi- to shifting to position P.
steep slopes, turn the front wheels ards the curb.
SmartKey can only be removed the starter switch with the gear ctor lever in position P.
!With the SmartKey removed and the driver’s door open, a warning sounds if the vehicle’s exterior lamps are not switched off.
Warning! GTo prevent possible personal injury, always keep hands and fingers away from the door openings when closing the doors. Be espe-cially careful when small children are around.
Before closing doors, make sure that there is no possibility of someone getting caught in a door during closing.

52
Getting started
Parkin
� Pres(� pa
ore information can be found in the Controls in detail” section (� page 80).
!If youther
� fo
� nb
Turnlecto
Warnin
To prevkeep haopeningcially caaround.
Before is no poin a doo
Warning! GWhen leaving the vehicle, always remove the key from the starter switch, take the KEY-LESS-GO* card with you, and lock your vehi-cle. Do not leave children unattended in the vehicle, or with access to an unlocked vehi-cle. Unsupervised use of vehicle equipment may cause an accident and/or serious per-sonal injury.
g and locking
s the seat belt release button ge 41).
1 Lock button on the door handle
� After exiting the vehicle, press lock button 1 on the door handle or on the trunk lid (� page 86).
The locking knobs on the doors move down. The turn signal indicators light up briefly.
M“
hear a warning signal you have ei-
rgotten to turn off the lights, or
ot put the gear selector lever in P efore opening the driver’s door.
off the lights or place the gear se-r lever in P.
g! Gent possible personal injury, always nds and fingers away from the door s when closing the doors. Be espe-reful when small children are
closing doors, make sure that there ssibility of someone getting caught r during closing.
iOpening a door causes the windows on that side of the car to open slightly. They will return to the up position when the door is closed.

Safety and Security
Occupant safety
Panic alarm
Driving safety systems
Anti-theft systems
53

54
Safety and Security
Occ
In thportof th
The
� S
� E
� A
� C
� C
� L(
As ieffeer.
he restraint systems are fully operational the 1 indicator lamp is not lit when e engine is running.
malfunction in the system has been de-cted, if the 1 indicator lamp:
fails to go out after approximately four seconds.
does not come on at all.
comes on after the engine was started or while driving.
or safety reasons, we strongly recom-end that you visit an authorized ercedes-Benz Center immediately to
ave the system checked.
ore information can be found in the Practical hints” section (� page 266).
iFtsd(
upan
is sectant face vehic
restrain
eat be
merge
irbags
hild se
hild se
ower aLATCH
ndepencts wor
or inforavelintraint sren, se
� page
t safety
Occupant safetyion you will learn the most im-ts about the restraint systems le.
t systems are:
lts
ncy tensioning device
ats
at recognition
nchors and tethers for children )
dent systems their protective k in conjunction with each oth-
The 1 indicator lamp in the instrument cluster lights up
� for about four seconds when you turn the key in the starter switch to position 1 or press the KEYLESS-GO* start/stop button once. It then goes out briefly, lights up again and remains lit until you start the engine.
� for about four seconds when you start the engine by turning the key or press-ing the KEYLESS-GO* start/stop but-ton.
Tifth
Ate
�
�
�
FmMh
M“
rmation on infants and children g with you in the vehicle and re-ystems for infants and chil-e “Children in the vehicle” 63).
iThe 1 indicator lamp lights up and remains lit if the key is turned to posi-tion 2 and left there or the KEYLESS-GO* start/stop button is pressed twice. The indicator lamp will go out when you start the engine.

55
Safety and Security
Occupant safety
Warn
In thecator not coeratioommeMercethe synot bedent, injuryunnecry.
Improcludincan letende
In adda riskcausinWork formeCente
Warning! GTo reduce the risk of injury when the front airbags inflate, it is very important for the driver and front passenger to always be in a properly seated position and to wear your seat belts.
For maximum protection in the event of a collision always be in normal seated position with your back against the seat backrest. Fasten your seat belt and ensure that it is properly positioned on your body.
Since the airbag inflates with considerable speed and force, a proper seating and hands on steering wheel position will help to keep you at a safe distance from the airbag. Oc-cupants who are unbelted, out of position or too close to the airbag can be seriously in-jured by an airbag as it inflates with great force in the blink of an eye:
� Sit properly belted in an upright position with your back against the seat back-rest.
Airbagsing! G event that the 1 malfunction indi-lamp lights up during driving or does me on at all, the SRS may not be op-nal. For your safety, we strongly rec-nd that you visit an authorized des-Benz Center immediately to have stem checked; otherwise the SRS may activated when needed in an acci-
which could result in serious or fatal , or it might deploy unexpectedly and essarily which could also result in inju-
per work on the restraint systems, in-g incorrect installation and removal, ad to possible injury through an unin-d activation of the SRS.
ition, through improper work there is of rendering the SRS inoperative or g unintended airbag deployment.
on the SRS must therefore only be per-d by an authorized Mercedes-Benz r.
Warning! GAirbags are designed to reduce the potential of injury and fatality in certain frontal im-pacts (front airbags), side impacts (side im-pact airbags and head protection window curtain airbags) or rollovers (head protec-tion window curtain airbags). However, no system available today can totally eliminate injuries and fatalities.
The activation of the SRS temporarily releas-es a small amount of dust from the airbags. This dust, however, is neither injurious to your health, nor does it indicate a fire in the vehicle. The dust might cause some tempo-rary breathing difficulty for people with asth-ma or other breathing trouble. To avoid this, you may wish to get out of the vehicle as soon as it is safe to do so. If you have any breathing difficulty but cannot get out of the vehicle after the airbag inflates, then get fresh air by opening a window or door.

56
Safety and Security
Occup
� Adjble erafrombonthe10be ationsteelemMe
� Do closboa
� Keewhesidepotwhe
� Adjposwhe
Warning! GAccident research shows that the safest place for children in an automobile is in the rear seat. Should you choose to place a child 12 years old or under in the front passenger seat of your vehicle, you must properly use a BabySmartTM child restraint which will turn off the passenger front airbag. BabySmartTM will not, however, turn off any side impact airbag.
It should be noted that with respect to both front and rear side impact airbags there is a possibility for a side airbag related injury if occupants, especially children, are not prop-erly seated or restrained when next to a side airbag which needs to deploy rapidly in a side impact in order to do its job.
To help avoid the possibility of injury, please follow these guidelines:
(1) Occupants, especially children, should never place their bodies or lean their heads in the area of the door where the side airbag inflates. This could result in
ant safety
ust the driver’s seat as far as possi-rearward, still permitting proper op-tion of vehicle controls. The distance
the center of the driver’s breast-e to the center of the airbag cover on steering wheel must be at least inches (25 cm) or more. You should ble to accomplish this by a combina- of adjustments to the seat and ring wheel. If you have any prob-
s, please see your authorized rcedes-Benz Center.
not lean with your head or chest e to the steering wheel or dash-rd.
p hands on the outside of steering el rim. Placing hands and arms in- the rim can increase the risk and
ential severity of hand/arm injury n driver front airbag inflates.
ust the front passenger seat as far as sible rearward from the dashboard n the seat is occupied.
� Occupants, especially children, should never lean their heads in the area of the door where the side airbag inflates. This could result in serious injuries or death should the airbag be triggered. Always sit upright, properly use the seat belts and appropriate size infant or child re-straint system.
� Children 12 years old and under must never ride in the front seat, except in a Mercedes-Benz authorized BabySmartTM compatible child seat, which operates with the BabySmartTM system installed in the vehicle to deacti-vate the passenger front airbag when it is properly installed. Otherwise they will be struck by the airbag when it inflates in a crash. If this happens, serious or fa-tal injury will result.
Failure to follow these instructions can re-sult in severe injuries to you or other occu-pants.
If you sell your vehicle you are responsible to make the buyer aware of these points. Be sure to give the buyer this Operator’s Manu-al.

57
Safety and Security
Occupant safety
seai
(2) Albefadr
(3) Al
If youtheserear sairbagbe accto do Cente
PleaseMerceAssist(1-800
We caution you not to rely on the pres-ence of the airbags in order to avoid wearing your seat belt.
Your vehicle was originally equipped with airbags that are designed to acti-vate in certain impacts exceeding a preset threshold to reduce the poten-tial and severity of injury. It is important for your safety and the safety of your passengers that you replace deployed airbags and repair any malfunctioning airbags to ensure that the vehicle will continue to provide supplemental crash protection for occupants.
rious injuries or death should the side rbag be activated.
ways sit upright, properly use the seat lts and use an appropriately sized in-nt or child restraint system for all chil-en 12 years old or under.
ways wear seat belts properly.
believe that, even with the use of guidelines, it would be safer for your eat occupants to have both rear side s deactivated, then deactivation can omplished upon your written request
so at your authorized Mercedes-Benz r at an additional cost.
contact your local authorized des-Benz Center or call our Customer ance Center at 1-800-FOR-MERCedes -367-6372) for details.
iAirbags are designed to activate only in certain frontal impacts (front air bags), side impacts (side impact and head protection window curtain airbags) which exceed preset thresholds and in certain rollovers (head protection win-dow curtain airbags). Only during these events will they provide their supple-mental protection.
The driver and passengers should al-ways wear their seat belts. Otherwise it is not possible for airbags to provide their supplemental protection.
In case of other types of impacts and impacts below airbag deployment thresholds, airbags will not be activat-ed. The driver and passenger will then be protected to the extent possible by a properly fastened seat belt. A proper-ly fastened seat belt is also needed to provide the best possible protection in a rollover.

58
Safety and Security
Occup
Safety gemergeairbag
Warnin
� DamhighrepmustalMe
� Airbtionor etha
� An airbag system component within the steering wheel gets hot after the airbag has inflated. Do not touch.
� Improper work on the system, including incorrect installation and removal, can lead to possible injury through an unin-tended activation of the SRS.
� In addition, through improper work there is a risk of rendering the SRS inop-erative or causing unintended airbag de-ployment. Work on the SRS must therefore only be performed by an au-thorized Mercedes-Benz Center.
� For your protection and the protection of others, when scrapping the airbag unit or emergency tensioning device, our safety instructions must be fol-lowed. These instructions are available from your authorized Mercedes-Benz Center.
� Given the considerable deployment speed and the textile structure of the airbags, there is the possibility of abra-sions or other injuries resulting from air-bag deployment.
ant safety
uidelines for the seat belt, ncy tensioning device and
g! Gaged seat belts or belts that were ly stressed in an accident must be
laced and their anchoring points st also be checked. Use only belts in-led or supplied by an authorized rcedes-Benz Center.
ags and ETDs are designed to func- on a one-time-only basis. An airbag mergency tensioning device (ETD)
t was activated must be replaced.
� No modifications of any kind may be made to any components or wiring of the SRS. This includes changing or re-moving any component or part of the SRS, the installation of additional trim material, badges etc. over the steering wheel hub, front passenger airbag cov-er, door trim panels, or door frame trims, and installation of additional elec-trical/electronic equipment on or near SRS components and wiring. Keep area between airbags and occupants free from objects (e.g. packages, purses, umbrellas, etc.).
� Do not pass belts over sharp edges. They could tear.
� Do not make any modification that could change the effectiveness of the belts.
� Do not hang items such as coat hangers from the coat hooks or handles over the door. These items may turn into projec-tiles and cause head and other injuries when curtain airbag is deployed.

59
Safety and Security
Occupant safety
When yurge yoowner alertingthe Op
Front
Driver ployed
� in t
� if imthre
� indbag
The airwhich ment ted by t
Side impact airbags, window curtain airbags
The side impact airbags and window cur-tain airbags are deployed:
� on the impacted side of the vehicle
� in impacts exceeding a preset deploy-ment threshold
� independently of the front airbags
In addition, the window curtain airbags 1 are deployed:
� in certain vehicle rollovers
The side impact airbags 2 and 3 are not deployed in impacts which do not exceed the system’s deployment threshold.
!Do not place objects heavier than 20 lbs (9 kg) on the front passenger seat. This could cause the front or side im-pact airbag on the front passenger side to deploy in a crash which exceeds the system's deployment threshold.
ou sell your vehicle we strongly u to give notice to the subsequent
that it is equipped with an SRS by them to the applicable section in
erator’s Manual.
airbags
and passenger airbags are de-:
he event of a frontal impact
pact exceeds a preset deployment shold
ependently of the side impact air-s
bags will not deploy in impacts do not exceed the system’s deploy-hresholds. You will then be protect-he fastened seat belts.
The front passenger airbag will only be de-ployed if:
� the front passenger seat is occupied.
� the PASSENGER AIRBAG OFF indicator lamp in the center console is not lit (� page 65).
� the impact exceeds a preset deploy-ment threshold
1 Driver’s airbag2 Passenger airbag

60
Safety and Security
Occup
The fronwill onlythe fron
The windbetween
1 Wind2 Fron3 Rear
iFor information on infants and children traveling with you in the vehicle and re-straint systems for infants and chil-dren, see “Children in the vehicle” (� page 63).
ant safety
t passenger side impact airbag 2 deploy if the system senses that t passenger seat is occupied.
ow curtain airbags fill up the area the A and C pillars (see arrows).
ow curtain airbagt side impact airbags side impact airbags
Seat belts
The seat belt nonusage warning lamp < in the instrument cluster lights up and a warning sounds for a short time when you turn the key in the starter switch to position 2 or press the KEYLESS-GO* start/stop button twice and the drivers seat belt is not fastened.
After starting the engine, the seat belt non-usage warning lamp blinks for a brief peri-od to remind the driver and passengers to fasten the seat belts.
The use of seat belts and infant and child restraint systems is required by law in most states, the District of Columbia and all Canadian provinces. Even where this is not the case, all vehicle occupants should have their seat belts fastened at all times when driving or riding in the vehicle.
Information on fastening seat belts is found in the “Getting started” section (� page 40).

61
Safety and Security
Occupant safety
Warn
Alwayoff. Alproperear a
Failursitionrisk oaccidealway
If youcan byour syour slikely ejecteor kill
In thedeathyour sthey aerly w
Warning! GDamaged seat belts or belts that were highly stressed in an accident must be replaced and their anchoring points must also be checked.
Only use seat belts which have been ap-proved by Mercedes-Benz.
Do not make any modifications to the seat belts. This can lead to unintended activation or to failure.
Have all work carried out only by an autho-rized Mercedes-Benz Center.
ing! Gs fasten your seat belt before driving ways make sure your passengers are rly restrained, even those sitting in the nd pregnant women.
e to wear and properly fasten and po- your seat belt greatly increases your f injuries and their likely severity in an nt. You and your passengers should
s wear seat belts.
are ever in an accident, your injuries e considerably more severe without eat belt properly buckled. Without eat belt buckled, you are much more to hit the interior of the vehicle or be d from it. You can be seriously injured
ed.
same crash, the possibility of injury or is lessened if you are properly wearing eat belt. Airbags can only protect as re designed if the occupants are prop-earing their seat belts.
Warning! GNever ride in a moving vehicle with the seat backrest reclined. Sitting in an extremely re-clined position can be dangerous. You could slide under the seat belt in a collision. If you slide under it, the belt would apply force at the abdomen or neck. That could cause se-rious or even fatal injuries. The seat back-rest and seat belt provide the best restraint when the wearer is in an upright position and the belt is properly positioned on the body.
Warning! GNever let more people ride in the vehicle than there are seat belts available. Be sure everyone riding in the vehicle is correctly re-strained with a separate seat belt.

62
Safety and Security
Occup
Warnin
USE SE
� Seaproothtionries
� Eacbeltredseving sysfronbagairbemseasignferecer(sidbagploy
� Never use a seat belt for more than one person at a time. Do not fasten a seat belt around a person and another per-son or other objects.
� Belts should not be worn twisted. In a crash, you wouldn’t have the full width of the belt to manage impact forces. The twisted belt against your body could cause injuries.
� Pregnant women should also use a lap-shoulder belt. The lap belt portion should be positioned as low as possible on the hips to avoid any possible pres-sure on the abdomen.
� Never place your feet on the instrument panel or on the seat. Always keep both feet on the floor in front of the seat.
ant safety
g! GAT BELTS PROPERLY
t belts can only work when used perly. Never wear seat belts in any er way than as described in this sec-, as that could result in serious inju- in case of an accident.
h occupant should wear their seat at all times, because seat belts help uce the likelihood of and potential erity of injuries in accidents, includ-rollovers. The integrated restraint tem includes SRS (driver’s airbag, t passenger airbag, side impact air-s, head protection window curtain ags for side windows), ETD (seat belt
ergency tensioning device), and front t knee bolsters. The system is de-ed to enhance the protection of-d to properly belted occupants in
tain frontal (front airbags) and side e impact and window curtain air-s) impacts which exceed preset de-ment thresholds and in
certain rollovers (window curtain air-bags).
� Never wear the shoulder belt under your arm, against your neck or off your shoul-der. In a crash, your body would move too far forward. That would increase the chance of head and neck injuries. The belt would also apply too much force to the ribs or abdomen, which could se-verely injure internal organs such as your liver or spleen.
� Never wear belts over rigid or breakable objects in or on your clothing, such as eyeglasses, pens, keys etc., as these might cause injuries.
� Position the lap belt as low as possible on your hips and not across the abdo-men. If the belt is positioned across your abdomen, it could cause serious injuries in a crash.

63
Safety and Security
Occupant safety
Emergseat b
The seseats asioning
The ETlowingtened:
� in fing
� in c
� if tanddic
In an imes remway thagainsthe forcupant
Children in the vehicle
If an infant or child is traveling with you in the vehicle:
� Secure the child using an infant or child restraint appropriate to the age and size of the child and recommended for use by Mercedes-Benz.
� Ensure that the infant or child is prop-erly secured at all times while the vehi-cle is in motion.
Infant and child restraint seats and infor-mation on choosing an appropriate re-straint system can be obtained from any Mercedes-Benz Center.
Infant and child restraint systems
Use only a BabySmartTM compatible child restraint for the front passenger seat in this vehicle.
We recommend all infants and children be properly restrained at all times while the vehicle is in motion.
ency tensioning device (ETD), elt force limiter
at belts for the front and rear outer re equipped with emergency ten- devices and belt force limiters.
D is designed to activate in the fol- cases when the seat belts are fas-
rontal or rear-end impacts exceed- a preset severity level
ertain vehicle rollovers
he restraint systems are operational functioning correctly. See 1 in-
ator lamp (� page 54).
pact, emergency tensioning devic-ove slack from the belts in such a at the seat belts fit more snugly t the body. Belt force limiters reduce ce exerted by the seat belts on oc-s during a crash.
Automatic comfort-fit feature seat belt
An automatic comfort-fit feature for front seats reduces the retracting force of the seat belts when they are in normal use.
Warning! GAn emergency tensioning device (ETD) that was activated must be replaced.
When scrapping the emergency tensioning device, our safety instructions must be fol-lowed. These are available at your autho-rized Mercedes-Benz Center.
!Do not place objects heavier than 20 lbs (9 kg) on the front passenger seat. This could cause the front or side im-pact airbag on the front passenger side to deploy in a crash which exceeds the system's deployment threshold.

64
Safety and Security
Occup
All lap-sseat belfor secu
To fastestraint inthe shouretract. eting sothe specThe beltrestraint
To deactlet seat belt canner.
iInforing f(� pa
For iseat
A statement by the child restraint man-ufacturer of compliance with this stan-dard can be found on the instruction label on the restraint and in the instruc-tion manual provided with the restraint.
When using any infant or child restraint system, be sure to carefully read and follow all manufacturer’s instructions for installation and use.
Please read and observe warning labels affixed to inside of vehicle and to infant or child restraints.
ant safety
houlder belts except the driver’s t have special seat belt retractors re fastening of child restraints.
n a child restraint, follow child re-structions for mounting. Then pull lder belt out completely and let it
During seat belt retraction, a ratch-und can be heard to indicate that ial seat belt retractor is activated. is now locked. Push down on child to take up any slack.
ivate, release seat belt buckle and belt retract completely. The seat again be used in the usual man-
mation on child seats with mount-ittings for tether anchorages ge 67).
nformation on “LATCH”-type child mounts (� page 68).
Warning! GNever release the seat belt buckle while the vehicle is in motion, since the special seat belt retractor will be deactivated.
!The use of infant or child restraints is required by law in all 50 states, the Dis-trict of Columbia, the U.S. territories and all Canadian provinces.
Infants and small children should be seated in an appropriate infant or child restraint system properly secured by a lap-shoulder belt or, if so equipped, a child restraint lower anchorage system that complies with U.S. Federal Motor Vehicle Safety Standards 213 and 225 and Canadian Motor Vehicle Safety Standards 213 and 210.2.

65
Safety and Security
Occupant safety
BabySmartTM airbag deactivation system
1 Indicator lamp
BabySmartTM is a trademark of Siemens
Automotive Corp.
Warn
Childrride inMercecompthe Bahicle tbag wthey wflatesfatal i
Accorare sarear sing pomust approwhichseat bloweraccorer’s in
Do not leave children unattended in the ve-hicle; even if the children are secured in a child restraint system. Unsupervised chil-dren in a child restraint system may use ve-hicle equipment and may cause an accident and/or serious personal injury.
ing! Gen 12 years old and under must never the front seat, except in a des-Benz authorized BabySmartTM
atible child seat, which operates with bySmartTM system installed in the ve-o deactivate the passenger front air-hen it is properly installed. Otherwise ill be struck by the airbag when it in-
in a crash. If this happens, serious or njury will result.
ding to accident statistics, children fer when properly restrained in the eating positions than in the front seat-sitions. Infants and small children ride in back seats and be seated in an priate infant or child restraint system, is properly secured with the vehicle’s elt and top tether strap, or secured via anchors and top tether strap, fully in dance with the child seat manufactur-structions.
Infants and small children should never share a seat belt with another occupant. During an accident, they could be crushed between the occupant and seat belt.
Children too big for child restraint systems must ride in back seats using regular seat belts. Position shoulder belt across chest and shoulder, not face or neck. A booster seat may be necessary to achieve proper belt positioning for children from 41 lbs. un-til they reach a height where a lap/shoulder belt fits properly without a booster.
A child’s risk of serious or fatal injuries is significantly increased if the child restraints are not properly secured in the vehicle and the child is not properly secured in the child restraint.
When the child restraint is not in use, re-move it from the vehicle or secure it with the seat belt to prevent the child restraint from becoming a projectile in the event of an ac-cident.

66
Safety and Security
Occup
Special seats, dMercedeany authrequiredbag deachild seafront air
The PASlamp 1 lbe illummoved o
Self-teschild se
After turto positiKEYLESStwice, th
iThe sside tens
cushion. An incorrectly mounted child seat could cause injuries to the child in case of an accident, instead of protecting the child.
Follow the manufacturer’s instructions for installation of special child seats.
Warning! GWhen using a BabySmartTM compatible child seat on the front passenger seat, the passenger front airbag will not deploy only if the PASSENGER AIRBAG OFF indicator lamp remains illuminated.
Please be sure to check the indicator every time you use the special system child seat. Should the light go out while the restraint is installed, please check installation. If the light remains out, do not use the BabySmartTM restraint to transport children on the front passenger seat until the system has been repaired.
ant safety
BabySmartTM compatible child esigned for use with the s-Benz system and available at orized Mercedes-Benz Center are for use with the BabySmartTM air-ctivation system. With the special t properly installed, the passenger
bag will not deploy.
SENGER AIRBAG OFF indicator ocated in the center console will inated, except with the key re-r in the starter switch position 0.
t BabySmartTM without special at installed
ning the key in the starter switch on 1 or 2 or pressing the -GO* start/stop button once or e PASSENGER AIRBAG OFF indi-
cator lamp 1 located in the center console lights up for approx. 6 seconds and then goes out.
If the indicator lamp should not come on or is continuously lit, the system is not func-tioning. You must see an authorized Mercedes-Benz Center before seating any child on the passenger seat.
More information can be found in the “Practical hints” section (� page 269).
ystem does not deactivate the impact airbag and the emergency ioning device.
Warning! GThe BabySmartTM airbag deactivation sys-tem will ONLY work with a special child seat designed to operate with it. It will not work with child seats which are not BabySmartTM compatible.
Never place anything between seat cushion and child seat (e.g. pillow), since it reduces the effectiveness of the deactivation sys-tem. The bottom of the child seat must make full contact with the passenger seat cushion. An incorrectly mounted child seat

67
Safety and Security
Occupant safety
Installsystem
This vechoragthe rea
2 Hook3 Anchorage ring
� Securely fasten hook 2, which is part of the tether strap, to anchorage ring 3.
� Reinstall cover after removing the teth-er strap.
Warn
Do nophonefront vices systemthe PAnot tououslyfuncti
iFor safety, please make sure that the hook has attached to the ring beyond the safety catch, as illustrated.
ation of infant and child restraint s
hicle is equipped with tether an-es for a top tether strap at each of r seating positions.
1 Cover of top anchorage ring
� Remove cover 1 from anchorage ring.
� Store cover 1 in a convenient place (e.g. glove box).
� Guide tether strap between head re-straint and top of seat back.
Head restraint must be positioned such that the top tether strap can pass freely between the head restraint and the top of seat back.
Make sure that the tether strap is not twisted.
ing! Gt place powered-on laptops, cell s and like electronic devices on the
passenger seat. Signals from such de-may interfere with the BabySmartTM
. Such signal interference may cause SSENGER AIRBAG OFF indicator lamp come on during self-test or be contin- lit, indicating that the system is not
oning.

68
Safety and Security
Occup
Child se
This veh(Lower Atype ancseats) fochild seatings.
If you ha“LATCH”ered wit
1 Upho
� Remin th
iThe child seat must be firmly attached in the right and left side anchor fittings.
Non-“LATCH” type child seats may also be used and can be installed using the vehicle’s seat belt system. Install child seat according to the manufacturer’s instructions.
ant safety
at anchors – “LATCH” type
icle is equipped with two LATCH nchors and Tethers for CHildren) hors (at each of the outer rear r the installation of a “LATCH” t with the matching anchor fit-
ve not installed a child seat, the mounting anchor fittings are cov-h an upholstery blend.
lstery blend.
ove upholstery blend 1 and store it e rear center armrest.
2 Indicates the position of the anchors3 Anchors
� Install child seat according to the man-ufacturer’s instructions.

69
Safety and Security
Occupant safety
For more information on power windows, see the “Controls in detail” section (� page 169).
Warn
Childrmust belts.and sseat mbelt ptil thebelt fi
Instaler’s in
The chright a
An incloose in ser
Damachild splaced
Do nohicle, child
iOperation of the rear windows with the switches located in the driver’s door is still possible.
Warning! GActivate the override switch when children are riding in the back seats of the vehicle. The children may otherwise injure them-selves, e.g. by becoming trapped in the win-dow opening.
When leaving the vehicle, always remove the key from the starter switch, take the KEY-LESS-GO* card with you, and lock your vehi-cle. Do not leave children unattended in the vehicle, or with access to an unlocked vehi-cle. Unsupervised use of vehicle equipment can cause an accident and/or serious per-sonal injury.
Blocking of rear window operation
The override switch is located on the driv-er’s door.
1 Override switch
Activating override switch
� Slide override switch 1 to the right.
The functions in the rear are disabled.
Deactivating override switch
� Slide override switch 1 to the left.
The functions in the rear are enabled again.
ing! Gen too big for child restraint systems ride in back seats using regular seat Position shoulder belt across chest houlder, not face or neck. A booster
ay be necessary to achieve proper ositioning for children from 41 lbs. un-y reach a height where a lap/shoulder ts properly without a booster.
l child seat according to manufactur-structions.
ild seat must be firmly attached in the nd left side anchors 3.
orrectly mounted child seat may come during an accident which could result ious injury or death to your child.
ged or impact damaged child seats or eat mounting fittings must be re-.
t leave children unattended in the ve-even if the children are secured in a restraint system.

70
Safety and Security
Pan
PanAn alam2½
1 Â
iFor operation in the USA only: This de-vice complies with Part 15 of the FCC Rules. Operation is subject to the following two conditions:
(1) This device may not cause harmful interference, and
(2) this device must accept any inter-ference received, including interfer-ence that may cause undesired operation.
Any unauthorized modification to this device could void the user’s authority to operate the equipment.
ic ala
ic alaudible
ps will ominute
bu
rm
rmalarm and blinking exterior perate for approximately
s.
tton
Activating
� Press and hold button 1 for at least one second.
Deactivating
� Press button 1 again
or
� Insert key in the starter switch.

71
Safety and Security
Driving safety systems
DrIn the
�
�
�
ABS
The ABS regulates the brake pressure so that the wheels do not lock during braking. This allows you to maintain the ability to steer your vehicle.
The ABS is functional above a speed of ap-proximately 5 mph (8 km/h) independent of road surface conditions.
At the instant one of the wheels is about to lock up, a slight pulsation can be felt in the brake pedal, indicating that the ABS is in the regulating mode. Keep firm and steady pressure on the brake pedal while experi-encing the pulsation.
Warning! GDo not pump the brake pedal. Use firm, steady brake pedal pressure instead. Pump-ing the brake pedal defeats the purpose of the ABS and significantly reduces braking effectiveness.
iving this sec follow
ABS (A
BAS (B
ESP (E
iIn winfectiveonly atires),
safety systemstion you will find information on ing driving safety systems:
ntilock Brake System)
rake Assist System)
lectronic Stability Program)
ter operation, the maximum ef-ness of the ABS and the ESP is
chieved with winter tires (M+S or snow chains as required.
Warning! GThe following factors increase the risk of ac-cidents:
� Excessive speed, especially in turns
� Wet and slippery road surfaces
� Following another vehicle too closely
The ABS, BAS and ESP cannot reduce this risk.
Always adjust your driving style to the pre-vailing road and weather conditions.

72
Safety and Security
Driving
Continuyields thnamely steer the
On slippspond epulsatinof hazartions as driving.
BS control
he - indicator lamp in the instrument luster lights up when you turn the key in e starter switch to position 2 or press e KEYLESS-GO* start/stop button twice.
goes out when the engine is running.
ore information can be found in the Practical hints” section (� page 265).
iTo alroadyourpriat
safety systems
ous steady brake pedal pressure e advantages provided by the ABS, braking power and the ability to vehicle.
ery road surfaces, the ABS will re-ven with light brake pressure. The g brake pedal can be an indication dous road conditions and func-a reminder to take extra care while
A
TcththIt
M“
ert following vehicles to slippery conditions you discover, operate hazard warning flashers as appro-e.
Warning! GThe ABS cannot prevent the natural laws of physics from acting on the vehicle, nor can it increase braking or steering efficiency be-yond that afforded by the condition of the vehicle brakes and tires or the traction. The ABS cannot prevent accidents, including those resulting from excessive speed in turns, following another vehicle too closely, or hydroplaning. Only a safe, attentive, and skillful driver can prevent accidents. The ca-pabilities of an ABS equipped vehicle must never be exploited in a reckless or danger-ous manner which could jeopardize the us-er’s safety or the safety of others.

73
Safety and Security
Driving safety systems
BAS
The Braemergebrakesprovidetially recontinuemergeABS w
When ybrakesis then
ESP
The Electronic Stability Program (ESP) monitors the vehicle's traction (force of adhesive friction between the tires and the road surface) and handling.
The ESP recognizes when a wheel is spin-ning or if the vehicle starts to skid. By ap-plying brakes to the appropriate wheel and by limiting engine output, the ESP works to stabilize the vehicle. The ESP is especially useful while driving off and on wet or slip-pery road surfaces.
The ESP warning lamp v in the instru-ment cluster flashes when the ESP is en-gaged.
The warning lamp v in the instrument cluster lights up when you turn the key in the starter switch to position 2 or press the KEYLESS-GO* start/stop button twice. It goes out when the engine is running.
ke Assist System (BAS) operates in ncy situations. If you apply the
very quickly, the BAS automatically s full brake boost, thereby poten-ducing the braking distance. Apply ous full braking pressure until the ncy braking situation is over. The
ill prevent the wheels from locking.
ou release the brake pedal, the function again as normal. The BAS deactivated.
More information can be found in the “Practical hints” section (� page 273).
Warning! GThe BAS cannot prevent the natural laws of physics from acting on the vehicle, nor can it increase braking efficiency beyond that af-forded by the condition of the vehicle brakes and tires or the traction. The BAS cannot prevent accidents, including those resulting from excessive speed in turns, following an-other vehicle too closely, or hydroplaning. Only a safe, attentive, and skillful driver can prevent accidents. The capabilities of a BAS equipped vehicle must never be exploited in a reckless or dangerous manner which could jeopardize the user’s safety or the safety of others.

74
Safety and Security
Driving
ore information can be found in the Practical hints” section (� page 264).
Warnin
Never sESP wastrumelows:
� Whas p
� Wh
� Adathe
Failure cause t
The ESPfrom ex
!Because of the ESP’s automatic opera-tion, the engine must be shut off (key in starter switch position 0 or 1) when
� the parking brake is being tested on a brake test dynamometer
� the vehicle is being towed with the front/rear axle raised.
Active braking action through the ESP may otherwise seriously damage the brake system.
The ESP will only function properly if you use wheels of the recommended tire size (� page 331).
safety systems
M“
g! Gwitch off the ESP when you see the rning lamp v flashing in the in-nt cluster. In this case proceed as fol-
ile driving off, apply as little throttle ossible
ile driving ease up on the accelerator
pt your speed and driving style to prevailing road conditions
to observe these guidelines could he vehicle to skid.
cannot prevent accidents resulting cessive speed.
Warning! GThe ESP cannot prevent the natural laws of physics from acting on the vehicle, nor can it increase the traction afforded. The ESP cannot prevent accidents, including those resulting from excessive speed in turns, or hydroplaning. Only a safe, attentive, and skillful driver can prevent accidents. The ca-pabilities of an ESP equipped vehicle must never be exploited in a reckless or danger-ous manner which could jeopardize the us-er’s safety or the safety of others.
iDistronic* is switched off when ESP is activated.

75
Safety and Security
Driving safety systems
Switch
To impthe ESPbe advspin angrip su
� stadeecha
� san
Switching on the ESP
� Press the ESP switch 1.
The ESP warning lamp v in the in-strument cluster goes out. You are now again in normal driving mode.
Warn
The Enormastancsystemdard d
iDisESP
!Avoid spinning of a drive wheel for an extended period with the ESP switched off. This may cause serious damage to the drivetrain which is not covered by the Mercedes-Benz Limited Warranty.
Warning! GWhen the ESP warning lamp v is illuminated continuously, the ESP is switched off.
Adapt your speed and driving to the prevail-ing road conditions and to the non-operating status of the ESP.
ing off the ESP
rove the vehicle's traction, turn off in driving situations where it would
antageous to have the drive wheels d thus cut into surfaces for better ch as:
rting out on slippery surfaces and in p snow in conjunction with snow ins
d or gravel
The switch is located on the center con-sole.
1 ESP off/on
� Press the ESP switch 1 until the ESP warning lamp v in the speedometer lights up.
ESP is deactivated.
If one or more wheels are spinning, the ESP warning lamp v in the speedome-ter flashes, regardless of the speed.
Traction control brakes a spinning wheel even when ESP is deactivated.
ESP always operates when you are brak-ing, even when it has been deactivated.
ing! GSP should not be switched off during l driving other than in the circum-
es described below. Disabling of the will reduce vehicle stability in stan-
riving maneuvers.
tronic* cannot be activated when has been deactivated.
76
Safety and Security
Ant
AntImm
Thepers
Act
� Wfi
� Wgsl
iIn case the engine cannot be started (yet the vehicle’s battery is charged), the system is not operational. Contact an authorized Mercedes-Benz Center or call 1-800-FOR-MERCedes (in the USA), or 1-800-387-0100 (in Canada).
i-thef
i-thefobilize
immobons fro
ivating
ith therom thmmobi
ith KEine by tart/stever ac
t systems
t systemsr
ilizer prevents unauthorized m starting your vehicle.
SmartKey: Removing the key e starter switch activates the lizer.
YLESS-GO*: Turning off the en-means of the KEYLESS-GO op button on the gear selector tivates the immobilizer.
Deactivating
� With the SmartKey: Inserting the key in the starter switch deactivates the im-mobilizer.
� With KEYLESS-GO*: Starting the en-gine by means of the KEYLESS-GO start/stop button on the gear selector lever deactivates the immobilizer.

77
Safety and Security
Anti-theft systems
Anti-th
Once tvisual asomeo
� a d
� the
� the
The alawhen
� som
� theica
Disarming the alarm system
The alarm system is disarmed when you unlock your vehicle with the remote con-trol or KEYLESS-GO*. The turn signal lamps blink once to indicate that the alarm system is deactivated.
Canceling the alarm
To cancel the alarm:
With the SmartKey
� Insert the key in the starter switch.
or
� Press the Œ or ‹ button.
With KEYLESS-GO*
� Grasp the outside door handle.
or
� Press the KEYLESS-GO* start/stop button.
iIf th20atetemsubandGPS
eft alarm system
he alarm system has been armed, a nd audible alarm is triggered when
ne opens
oor
trunk
hood
rm system will also be triggered
eone attempts to raise the vehicle
vehicle is opened with the mechan-l key
Arming the alarm system
The alarm system is armed after locking the vehicle with the remote control or KEYLESS-GO*. The turn signal lamps blink three times to indicate that the alarm sys-tem is activated. The indicator lamp in the central locking switch will blink after ap-proximately 10 seconds when the alarm system is completely armed (� page 95).
e alarm stays on for more than seconds, an emergency call is initi-d automatically by the Tele Aid sys- provided Tele Aid service was scribed to and properly activated, that necessary cellular service and coverage are available.
iIf the turn signal lamps do not blink three times one of the following ele-ments may not be properly closed:
� a door
� the trunk lid
� the hood
Close the respective element and lock the vehicle again.

78
Safety and Security
Anti-th
Tow-aw
Once theand audsomeon
Arming
When yoalarm is30 seco
When yotow-awaautomat
Press switch 2.
Indicator lamp 1 in the switch lights up briefly.
Exit vehicle and lock your vehicle with the key or (vehicles with KEY-LESS-GO*) the lock button at each door handle.
he tow-away alarm remains disarmed un-l you lock your vehicle again.
iThe tgereed o
If the20 satedtem subsand tGPS
iYou cannot disarm the tow-away alarm if the ignition is turned on.
eft systems
ay alarm
tow-away alarm is armed, a visual ible alarm will be triggered when e attempts to raise the vehicle.
tow-away alarm
u lock your vehicle, the tow-away automatically armed after about nds.
u unlock your vehicle, the y protection disarms ically.
Disarming tow-away alarm
To prevent triggering the tow-away alarm feature, switch off the tow-away alarm be-fore towing the vehicle, or when parking on a surface subject to movement, such as a ferry or auto train.
1 Indicator lamp2 Tow-away alarm off switch
The switch is located on the center con-sole.
� Turn off the ignition and remove the key.
�
�
Tti
ow-away protection alarm is trig-d, for example, if the vehicle is lift-n one side.
alarm stays on for more than econds, an emergency call is initi- automatically by the Tele Aid sys-provided Tele Aid service was cribed to and properly activated, hat necessary cellular service and coverage are available.

Controls in detail
Locking and unlocking
Seats
Memory function
Lighting
Instrument cluster
Control system
Automatic transmission
Good visibility
Automatic climate control
79
Power windows
Sliding/pop-up roof
Driving systems
Loading
Useful features

80
Controls in detail
Loc
In thfindate cle. basiwill
To qsic f“GeTheen a
martKey with remote controls
1 ‹ Lock button2 Š Unlock button for trunk lid3 Mechanical key locking tab4 Œ Unlock button5 Battery check lamp6  Panic button (� page 70)
iYou can also open and close the power windows (� page 171) and sliding/ pop-up roof using the SmartKey (� page 174).
king
e “Con detailethe equIf you ac functibe of p
uickly functiontting sta correspt the be
and unlocking
trols in detail” section you will d information on how to oper-ipment installed on your vehi-re already familiar with the ons of your vehicle, this section articular interest to you.
amiliarize yourself with the ba-s of the vehicle, refer to the rted” section of this manual. onding page numbers are giv-ginning of each segment.
Locking and unlockingInformation on locking and unlocking can be found in the “Getting started” section on (� page 30) and (� page 49).
SmartKey
Your vehicle comes supplied with two SmartKeys with remote controls and a re-movable mechanical key. The locking tabs for the mechanical key portion of the two SmartKeys are a different color to help dis-tinguish each SmartKey unit.
The SmartKey provides an extended oper-ating range. To prevent theft, however, it is advisable to only unlock the vehicle when you are in close proximity to it.
The SmartKey centrally locks and unlocks:
� the doors
� the trunk
� the fuel filler flap
S

81
Controls in detail
Locking and unlocking
Factor
Global
� Pre
All loc
Theoff.swi
The vewithin locking
� nei
� thesta
� thevat
Global locking
� Press button ‹.
Restoring to factory setting
� Press and hold buttons Œ and ‹ simultaneously for about six seconds until battery check lamp 5 blinks twice.
!To exptrom
Warning! GWhen leaving the vehicle, always remove the key from the starter switch, take the KEYLESS-GO* card with you and lock the ve-hicle. Do not leave children unattended in the vehicle, or with access to an unlocked vehicle. It is possible for children to open a locked door from the inside, which could re-sult in an accident and/or serious injury.
y setting
unlocking
ss button Œ.
turn signal lamps blink once. The king knobs in the doors move up.
anti-theft alarm system is switched If it is dark, the locator lighting tches on.
hicle will lock again automatically approximately 40 seconds of un- if:
ther door nor trunk is opened
SmartKey is not inserted in the rter switch
central locking switch is not acti-ed
Global locking
� Press button ‹.
All turn signal lamps blink three times. The locking knobs in the doors move down.The anti-theft alarm system is activat-ed.
Selective setting
If you frequently travel alone, you may wish to reprogram the key so that pressing Œ only unlocks the driver’s door and the fuel filler flap.
� Press and hold buttons Œ and ‹ simultaneously for about five seconds until battery check lamp 5 blinks twice.
The key will then function as follows:
Unlocking driver’s door and fuel filler flap
� Press button Œ once.
Global unlocking
� Press button Œ twice.
prevent possible malfunction, avoid osing the key to high levels of elec-agnetic radiation.

82
Controls in detail
Lockin
Checkin
� Pres
Batteto inorde
oss of SmartKey or mechanical key
you lose a SmartKey or mechanical key, ou should do the following:
Have the SmartKey deactivated by an authorized Mercedes-Benz Center.
Report the loss of the SmartKey or the mechanical key immediately to your car insurance company.
If necessary, have the mechanical lock replaced.
our authorized Mercedes-Benz Center ill be glad to supply you with a replace-ent.
!If youvehicbattechar
� Cr(�
o
� Uth(�v(�
If theauth
iIf the vehicle was previously centrally locked with the SmartKey, the trunk lid will lock automatically after closing it.
The turn signals will flash three times to confirm locking.
If the trunk was previously separately locked (� page 90), the trunk lid will re-main locked.
g and unlocking
g the batteries
s button ‹ or Œ.
ry check lamp 5 lights up briefly dicate that the key batteries are in r.
Unlocking the trunk lid
You can unlock the trunk separately.
A minimum height clearance of 6.1 ft (1.90 m) is required to open the trunk lid.
� Press and hold button Š until trunk unlocks.
L
Ify
�
�
�
Ywm
can no longer lock or unlock the le with the key, then either the ries in the SmartKey are dis-
ged or the key is malfunctioning.
heck the batteries in the key and eplace them if necessary
page 299).
r
se the mechanical key to unlock e doors (� page 297) and trunk page 298) as required. Lock the
ehicle using the mechanical key page 298).
key is malfunctioning, contact an orized Mercedes-Benz Center.
!If battery check lamp 5 does not light up briefly during check, then the key batteries are discharged.
Replace the batteries (� page 299).
You can obtain the required batteries at any authorized Mercedes-Benz Cen-ter.
!The trunk lid swings open automatical-ly. Always make sure that there is suffi-cient overhead clearance.

83
Controls in detail
Locking and unlocking
KEYLE
SpeciaKEYLESvaliditycheckehandle
If the c
� the
� the
� the
� In order to start the engine with the KEYLESS-GO card:
� The KEYLESS-GO card must be lo-cated in the vehicle.
� All the doors must be closed.
� If you have started the engine with the KEYLESS-GO start/stop button, you can only turn it off again with this but-ton, even if you have put the key in the starter switch in the meantime.
� This does not apply if, after starting, the selector lever is still in position P. The key will then have priority over the card and the vehicle’s electrical system will operate according to the position of the key in the starter switch, even stop-ping the engine.
� If the KEYLESS-GO card is positioned farther away from the vehicle (e.g. in-side clothing or briefcase) and can no longer be recognized by the system, the vehicle cannot be locked or the en-gine started via the KEYLESS-GO sys-tem.
Warn
Whenkey frKEYLEhicle. the vevehiclment perso
SS-GO card*
lly equipped vehicles come with two S-GO cards. On these vehicles, the
of the KEYLESS-GO card is d every time you grasp a door .
ard is valid, your vehicle unlocks
doors
trunk lid
fuel filler flap
Important notes on using KEYLESS-GO
� Always carry the KEYLESS-GO card with you.
� Never store the KEYLESS-GO card to-gether with:
� Electronic items such as a cellular phone or another KEYLESS-GO card
� Metallic objects such as coins or metal foil
Doing so could impair the function of the KEYLESS-GO system.
� Always take an electronic SmartKey with you in case of a malfunction of the KEYLESS-GO system.
� To lock or unlock the vehicle, the card must be located outside the vehicle within approximately 3 ft. (1 m) of a door or the trunk lid.
ing! G leaving the vehicle, always remove the om the starter switch, take the SS-GO card with you and lock the ve-Do not leave children unattended in hicle, or with access to an unlocked e. Unsupervised use of vehicle equip-may cause an accident and/or serious nal injury.
!To prevent possible malfunction, avoid exposing the KEYLESS-GO card to high levels of electromagnetic radiation.

84
Controls in detail
Lockin
� If thefromswitcvehicCHIPpear
Find catiofrontpock
� RemstartcardleavelockiCARDpear
dividual setting
you frequently travel alone, you may wish reprogram the KEYLESS-GO card so that
rasping a door handle only unlocks the river’s door, interior lockable storage ompartments and the fuel filler flap.
1 Programming button2 “Driver’s door” symbol3 “Global unlock” symbol
g and unlocking
KEYLESS-GO card is removed the vehicle while the ignition is hed on (e.g. if passenger exits the le with the card), the message CARD NOT RECOGNIZED! will ap- in the multifunction display.
the card or change its present lo-n immediately (e.g. place it on the passenger seat or insert it in shirt et).
ember that the engine can be ed by anyone with a KEYLESS-GO that is left inside the vehicle. If you the card behind when exiting and ng the vehicle, the message CHIP DETECTED IN VEHICLE! will ap- in the multifunction display.
Factory setting
Global unlocking
� Grasp the door handle.
The vehicle will lock again automatically within approximately 40 seconds of un-locking if neither door nor trunk is opened.
Global locking
� Press lock button at door handle (� page 52) or trunk (� page 86) and (� page 93).
In
Iftogdc
iThe vehicle could inadvertently unlock if the KEYLESS-GO card is within 3 ft. (1 m) of the vehicle and
� the door handle is splashed with water, or
� you attempt to clean the door handle.

85
Controls in detail
Locking and unlocking
� Prebutsym
Thetion
Unl
�
Glo
�
Glo
�
Restor
� Prebutsym
Checking the batteries
� Briefly press the programming button 1.
The KEYLESS-GO card batteries are in order if the indicator lamp for either the “Driver’s door” 2 or “Global unlock” 3 comes on red or green.
!If the symbols 2 or 3 do not light up during the check, then the batteries of the KEYLESS-GO card are discharged.
� Change the batteries (� page 299).
You can obtain the batteries at any au-thorized Mercedes-Benz Center.
ss and hold the programming ton 1 until the “Driver’s door” bol 2 lights up.
KEYLESS-GO card will then func- as follows:
ocking the driver’s door
Grasp the driver’s door handle.
bal unlocking
Grasp the door handle on the pas-senger side.
bal locking
Press lock button at door handle or trunk.
ing to factory setting
ss and hold the programming ton 1 until the “Global unlock” bol 3 lights up.
!If you cannot lock or unlock the vehicle with the KEYLESS-GO card, then either the batteries of the KEYLESS-GO card are discharged or the KEYLESS-GO card is malfunctioning or the vehicle battery is drained.
� Check the batteries of the KEYLESS-GO card (� page 85) and replace them if necessary (� page 299).
or
� Use the mechanical key to unlock the doors (� page 297) and trunk (� page 298) as required. Lock the vehicle using the mechanical key (� page 298).
If your KEYLESS-GO card is malfunc-tioning, contact your authorized Mercedes-Benz Center.

86
Controls in detail
Lockin
Checkin
If you calocked tstatus u
� Brief
The ior “Ggree
Vehi
Red
Gree
iWheanti-the tdarkon (�
Wheti-thethe t
Warning! GWhen closing the windows and the sliding/ pop-up roof, make sure that there is no dan-ger of anyone being harmed by the closing procedure.
If potential danger exists, proceed as fol-lows:
� Release the lock button.
� Pull on the door handle and hold firmly. The side windows and the sliding/pop-up roof will open for as long as the door handle is held but the door not opened.
g and unlocking
g vehicle lock status
nnot remember whether you have he vehicle, you can check the lock sing the KEYLESS-GO card.
ly press programming button 1.
ndicator lamp for “Driver’s door” 2 lobal unlock” 3 lights up in red or
n.
cle lock status:
Vehicle is locked
n Vehicle is unlocked
Locking the vehicle
1 Trunk lock button
� Press the lock button at door (� page 52) or trunk 1.
Closing the side windows and the sliding/pop-up roof
� Press and hold lock button at door (� page 52) until the side windows and the sliding/pop-up roof are closed.
n the vehicle is unlocked and the theft alarm system is switched off, urn signals illuminate briefly. If it is , the locator lighting also switches
page 137).
n the vehicle is locked and the an-ft alarm system is activated, the urn signals flash three times.

87
Controls in detail
Locking and unlocking
Unlock
The trucense
A minim(1.90 m
� Pre
Opening the doors from the inside
You can open a locked door from the in-side. Open door only when conditions are safe to do so.
1 Locking knob2 Inside door handle
� Pull on door handle 2.
If door was locked, locking knob 1 will move up.
!Thely. Acie
iIf thloccallflas
To outly ifin tthe
ing the trunk lid
nk lid lock is located in the rear li-plate recess.
um height clearance of 6.1 ft ) is required to open the trunk lid.
ss trunk lid lock 1 (� page 89)
Loss of the KEYLESS-GO card
If you lose your KEYLESS-GO card, you should do the following:
� Have the KEYLESS-GO card deactivat-ed by an authorized Mercedes-Benz Center.
� Report the loss immediately to your car insurance company.
� Have the mechanical lock replaced if necessary.
Your authorized Mercedes-Benz Center will be glad to supply you with a replace-ment.
trunk lid swings open automatical-lways make sure that there is suffi-
nt overhead clearance.
e vehicle was previously centrally ked, the trunk lid will lock automati-y after closing it. The turn signal will h three times to confirm locking.
prevent a possible inadvertent lock-, the trunk lid will open automatical- a KEYLESS-GO card is recognized he area of the rear shelf or inside trunk.

88
Controls in detail
Lockin
Pull remote trunk lid release switch 2.
The trunk opens. The indicator lamp 1 comes on. It remains lit until you close the trunk again.
he trunk can also be opened from the in-ide in an emergency, see “Trunk lid emer-ency release” (� page 89).
iIf thelockeSmaside tem.
To calowin
� PS
� Ins
iIf youthat ly. Thclose
!The trunk lid swings open automatical-ly. Always make sure that there is suffi-cient overhead clearance.
g and unlocking
Opening the trunk lid from the inside
You can open the trunk from the inside if the vehicle is stationary.
A minimum height clearance of 6.1 ft (1.90 m) is required to open the trunk lid.
The switch is located on the driver’s door.
1 Indicator lamp2 Remote trunk lid release switch
�
Tsg
vehicle has previously been d from the outside with the
rtKey, opening a door from the in-will trigger the anti-theft alarm sys-
ncel the alarm, do one of the fol-g:
ress button Œ or ‹ on the martKey.
sert the SmartKey in the starter witch.
open a door, the side windows on side of the vehicle will lower slight-e windows close again when you the door.

89
Controls in detail
Locking and unlocking
Openin
The trucense
A minim(1.90 m
� Pre
The trusure thance.
� Briefly press the emergency release button.
The trunk unlocks and the trunk lid opens.
iThe
!The emergency release button does not open the trunk lid if the vehicle bat-tery is discharged or disconnected.
iIf the emergency release button is pressed and the vehicle was centrally locked, the exterior lamps will flash and the alarm will sound as the trunk lid opens.
To cancel the alarm, insert the key in the starter switch or press button Œ or ‹ on the key.
g the trunk lid from the outside
nk lid lock is located in the rear li-plate recess.
um height clearance of 6.1 ft ) is required to open the trunk lid.
ss trunk lid lock 1.
nk lid swings open. Always make at there is sufficient overhead clear-
The trunk can also be opened from the in-side of the trunk in an emergency, see “Trunk lid emergency release” (� page 89).
Trunk lid emergency release
The emergency release button is located in the trunk lid.
Illumination of the emergency release but-ton:
� The button will blink for 30 minutes af-ter opening the trunk.
� The button will blink for 60 minutes af-ter closing the trunk.
vehicle must be unlocked.

90
Controls in detail
Lockin
Closing
1 Hand
� Lowehand
� Pushside
The pensuly clo
eparately locking the trunk
1 Locked2 Unlocked
Close the trunk lid.
iTo prevent an inadvertent lockout, do not place the key in the trunk.
Vehicles with KEYLESS-GO*: To pre-vent a possible inadvertent lockout, the trunk lid will open automatically if a KEYLESS-GO card is recognized in the area of the rear shelf or inside the trunk.
��
g and unlocking
the trunk lid
le
r trunk lid by pulling firmly on le 1.
the trunk lid closed from the out-with hands placed flat on trunk lid.
ower closing assist automatically res that the lid is pulled complete-sed (� page 94).
S
�
Warning! GTo prevent possible personal injury, always keep hands and fingers away from the trunk lid opening when closing the trunk. Be espe-cially careful when small children are around.
Warning! GOnly drive with the trunk closed as, among other dangers such as visibility blockage, exhaust fumes may enter the vehicle interi-or.

91
Controls in detail
Locking and unlocking
� PulSm
� Instrun
� Turpos
The truvehicle
Separa
� Turpos
You
If the trunk lid does not open, it is still locked separately (� page 91).
The trunk can also be opened from the in-side in an emergency, see “Trunk lid emer-gency release” (� page 89).
You can stop the opening procedure as fol-lows:
� Press the remote trunk lid switch 2.
The trunk lid stops moving.
iYoulocica
!The trunk lid swings open automatical-ly. Always make sure that there is suffi-cient overhead clearance.
iThe vehicle must be unlocked.
l the mechanical key out of the artKey (� page 297).
ert the mechanical key into the k lid lock.
n the key completely to the right to ition 1.
nk remains locked even when the is centrally unlocked.
tely unlocking the trunk
n the key completely to the left to ition 2.
can now open the trunk.
Trunk lid opening/closing system*
You can open or close the trunk lid from the inside if the vehicle is stationary.
A minimum height clearance of 6.1 ft (1.90 m) is required to open the trunk lid.
Opening from the inside
1 Indicator lamp2 Remote trunk lid switch
� Pull remote trunk lid switch 2.
The trunk opens. The indicator lamp 1 comes on. It remains lit until you close the trunk again.
can only cancel the separate trunk king mode by means of the mechan-l key.

92
Controls in detail
Lockin
Closing
� Presthe iout a
To interr
� Rele
If the truobject wbeen pilsequencstopped
Warnin
Maintaithe dooing procone is i
To interthe doo
Warning! GMonitor the closing procedure carefully to ensure that no one is in danger of being in-jured. To prevent possible personal injury, always keep hands and fingers away from the trunk opening when closing the trunk. Be especially careful when small children are around. To stop the closing procedure, press the remote trunk lid switch (on driv-er's door control panel), the trunk lid closing switch 1 or the Š button on the Smart-Key.
!Do not place the key in the open trunk. You may lock yourself out.
Vehicles with KEYLESS-GO*: To pre-vent a possible inadvertent lockout, the trunk lid will open automatically if a KEYLESS-GO card is recognized in the area of the rear shelf or inside the trunk.
g and unlocking
from the inside
s the remote control switch 2 until ndicator lamp in the switch goes nd the trunk lid is closed.
upt the closing procedure:
ase remote trunk lid switch 2.
nk lid comes into contact with an hile closing (e.g. luggage that has ed too high) in the upper motion e, the closing procedure is and the trunk re-opens slightly.
Closing from the outside
1 Trunk lid closing switch
� Press the trunk lid closing switch 1 briefly.
The trunk lid closes automatically.
If the trunk lid comes into contact with an object while closing (e.g. luggage that has been piled too high) in the upper motion sequence, the closing procedure is stopped and the trunk re-opens slightly.
g! Gn sight of trunk area while operating r mounted switch. Monitor the clos-edure carefully to ensure that no
n danger of being injured.
rupt the closing procedure, release r mounted remote trunk lid switch.

93
Controls in detail
Locking and unlocking
ClosinKEYLE
On vehsystemthe truneousl
1 Tru2 KEY
� Maand
� Pre
Thetheflas
(e.g. presence of an MB sport luggage con-tainer). When activated, the trunk lid opens to approximately the height of the roof edge.
� With the trunk lid closed, press the re-mote trunk lid switch and hold for at least five seconds (� page 91).
Depending on its previous status, the opening height restriction is then switched on or off.
iIf the trunk lid comes into contact with an object while closing (e.g. luggage that has been piled too high), the clos-ing procedure is stopped and the trunk re-opens slightly.
The closing procedure can be stopped at anytime by once again pressing the trunk lid closing switch in the trunk lid or the remote control switch in the driv-er’s door or the Š button on the SmartKey.
g and locking the trunk lid with SS-GO*
icles with trunk lid opening/closing and KEYLESS-GO, you can close nk lid and lock the vehicle simulta-y.
nk lid closing switchLESS-GO switch
ke sure that you have the SmartKey the KEYLESS-GO card with you.
ss switch 2 in the trunk lid.
trunk lid closes automatically and vehicle is locked. The turn signals h three times to confirm locking.
Limiting opening height of trunk lid
The trunk lid opening height can be limited when transporting goods on a roof rack
iTo prevent a possible inadvertent lock-out, the trunk lid will open automatical-ly if a KEYLESS-GO card is recognized in the area of the rear shelf or inside the trunk.
Warning! GMonitor the closing procedure carefully to ensure that no one is in danger of being in-jured. To prevent possible personal injury, always keep hands and fingers away from the trunk opening when closing the trunk. Be especially careful when small children are around. To stop the closing procedure, press the trunk lid closing switch 1 in the trunk lid, the Š button on the SmartKey or the remote trunk lid switch (on driver's door control panel).

94
Controls in detail
Lockin
Power ctrunk li
Power c
� Presenga
The d
Power c
� Pres
The t
It is not trunk lidsisted mlid closethe doorWhen thmechantrunk ca
ou can deactivate the automatic locking sing the control system (� page 139).
iThe doors unlock automatically after an accident if the force of the impact ex-ceeds a preset threshold.
The vehicle automatically locks when the ignition is switched on and the wheels are turning at speeds of approx-imately 9 mph (15 km/h) or more. You could therefore lock yourself out when the vehicle
� is pushed
� is on a test stand
g and unlocking
losing assist for doors and d
losing assist for doors
s the doors gently past the initial ge position into the lock.
oors close automatically.
losing assist for trunk lid
s the trunk lid gently into its lock.
runk closes automatically.
necessary to slam the door or closed. A pneumatic power-as-echanism draws doors and trunk d quietly and automatically once or trunk lid has been latched. e pneumatic power-assist and ism has stopped, doors and/or n be re-opened.
Automatic central locking
The doors and the trunk automatically lock when the ignition is switched on and the wheels are turning at speeds of approxi-mately 9 mph (15 km/h) or more.
You can open a locked door from the in-side. Open door only when conditions are safe to do so.
Yu
Warning! GTo prevent possible personal injury, always keep hands and fingers away from the door or trunk opening when closing a door or the trunk lid. Be especially careful when small children are around.
The pneumatic power closing assist mecha-nism cannot be stopped once it has been engaged.
To prevent personal injury, never activate the closing assist mechanism by tampering with the door or trunk lid latch.

95
Controls in detail
Locking and unlocking
Lockin
You catrunk fswitchyou wato drive
The fuelocked
Warn
Whenkey frKEYLEhicle. the vevehiclment perso
iYou can open a locked door from the inside. Open door only when conditions are safe to do so.
If the vehicle was previously centrally locked with the SmartKey or the KEYLESS-GO* card it will not unlock using the central locking switch.
If the vehicle was previously locked with the central locking switch:
� While in the global remote control mode, the complete vehicle is un-locked when a door is opened from the inside.
� While in the selective remote con-trol mode, only the door opened from inside is unlocked.
g and unlocking from the inside
n lock or unlock the doors and the rom inside using the central locking . This can be useful, for example, if nt to lock the vehicle before starting .
l filler flap cannot be locked or un- with the central locking switch.
The switches are located in the center con-sole.
Central locking/unlocking switches
1 Central locking switch2 Central unlocking switch
Locking
� Press central locking switch 1.
If both doors are closed, the vehicle locks.
Unlocking
� Press central unlocking switch 2.
The vehicle unlocks.
ing! G leaving the vehicle, always remove the om the starter switch, take the SS-GO* card with you and lock the ve-Do not leave children unattended in hicle, or with access to an unlocked e. Unsupervised use of vehicle equip-may cause an accident and/or serious nal injury.

96
Controls in detail
Sea
SeaInfofoun(� p
Lum
Youlum
Thepassthe
1 T
ou can activate the following functions:
Steering column:
Only the steering column is adjusted.
Steering column and seat:
Both the steering column and the seat are adjusted.
he easy-entry/exit feature can be witched on or off in the in the settings enu of the control system (� page 140).
Warning! GYou must make sure that no one can be-come trapped or injured by the moving steering wheel and driver’s seat when the easy-entry/exit feature is activated, the driver’s door is being opened, and the en-gine is turned off or the SmartKey removed from the starter switch. Do not leave chil-dren unattended in the vehicle, or with ac-cess to an unlocked vehicle. Unsupervised use of vehicle equipment may cause an ac-cident and/or serious personal injury.
ts
tsrmationd in theage 34
bar su
can adbar sup
thumbwenger’
seat.
humbw
on seat adjustment can be “Getting started” section
).
pport
just the contour of the seat’s port to best support your back.
heels for the driver’s and front s seat are on the inner side of
heel
� Make sure the ignition is switched on.
All the lamps in the instrument cluster should light up.
� Set the lumbar support between 0 and 5.
Easy-entry/exit feature
With the easy-entry/exit feature activat-ed, the steering wheel tilts upwards and the driver’s seat moves to the rear.
This allows easier entry into and exit from the vehicle when the driver’s door is opened. However, the engine must be turned off.
When the SmartKey is inserted in the start-er switch or you have pressed the KEYLESS-GO* start/stop button once and the driver’s door is closed, the steering wheel and the driver’s seat return to their last set positions.
Y
�
�
Tsm

97
Controls in detail
Seats
Head r
Informcan betion (�
Rear seat head restraints
Folding rear head restraints back
� Make sure the ignition is switched on.
All the lamps in the instrument cluster should light up.
Warn
For yopositi
Adjusthe he
Do nohead ed to dent.
iTilteashea
Warning! GFor safety reasons, always drive with the rear head restraints in the upright position when the rear seats are occupied.
Keep the area around head restraints clear of articles (e.g. clothing) to not obstruct the folding operation of the head restraints.
iYou can adjust the angle manually by pulling or pushing the head restraints by hand.
��
estraints
ation on head restraint adjustment found in the “Getting started” sec-page 36).
Front seat head restraints
Removing front head restraints
� Press switch 1 upwards and hold until the head restraint is fully extended.
� Pull out head restraint.
Installing front head restraints:
� Press switch 1 upwards and hold for about five seconds.
� Push the head restraint down until it engages.
� Adjust head restraint to desired posi-tion (� page 35).
ing! Gur protection, drive only with properly
oned head restraints.
t head restraint to support the back of ad approximately at ear level.
t drive the vehicle without the seat restraints. Head restraints are intend-help reduce injuries during an acci-
the seat backrest to the rear for ier removal and installation of the d restraints.

98
Controls in detail
Seats
� Pres
The rward
Placing
� Pull tit loc
on the rear center console:
� Make sure the ignition is switched on.
All the lamps in the instrument clus-ter should light up
� Push upper half 1 of switch.
The rear head restraints will fold up-right.
� Push lower half 2 of switch.
The rear head restraints will fold down.
!MakegageOthecann
s switch 1.
ear head restraints will fold back-.
rear head restraints upright
he rear head restraint upright until ks into position.
Head restraint tilt
The rear head restraint angle can be ad-justed manually.
Power head restraints, rear*
You can fold the rear head restraints back-ward or upright using the head restraint folding switch. The switch is located:
� on the front center console:
� Make sure the ignition is switched on.
All the lamps in the instrument clus-ter should light up
� Press switch 1 briefly.
The rear head restraints will fold backward.
� Press switch 1 and hold.
The rear head restraints will fold up-right.
�
sure that the head restraints en- when adjusting them manually. rwise, their protective function ot be assured.

99
Controls in detail
Seats
Multic
The mucushiointo thelumbar
The seacushiotinuousright siSmartKpositiostart/
Lumbar region support
� Press k or j on rocker switch 4.
This selects the air cushion you wish to adjust.
� Press æ or ç on rocker switch 4.
The air cushion inflates or deflates.
Side bolsters adjustment
� Adjust the side bolsters so that they provide good lateral support using switch 2.
iWhen the engine is turned off, the last cushion setting is retained in memory, and the cushion is automatically ad-justed to this setting when the engine is restarted.
ontour seat*
lticontour seat has a movable seat n and inflatable air cushions built seat backrest to provide additional and side support.
t cushion movement, seat backrest n height and curvature can be con-ly varied with regulators on the de of the seat after turning the ey in the starter switch to
n 2 or pressing the KEYLESS-GO* stop button twice.
1 Shoulder region support2 Side bolster adjustment3 Massage function (PULSE)4 Lumbar region support
Adjusting the multicontour seat in the or-der listed above is recommended.
� Make sure the ignition is switched on.
All lamps in the instrument cluster light up.
Shoulder region support
� Press æ or ç on switch 1.
The air cushion inflates or deflates.

100
Controls in detail
Seats
Massag
You can trips by function
� Pres
The iup. Tgion
olding seat backrests to the rear
Lift release lever and fold backrest back.
The seat and head restraint return to their previous positions.
o interrupt the procedure, activate the eat adjustment switch (� page 35).
iThe mtomaminu
iWhen moving the seat, be sure that there are no items in the footwell or be-hind the seats. Otherwise you could damage the seats.
Warning! GAlways ensure that no one can become trapped or injured when the seat is moving. In case potential danger exists, the proce-dure can be interrupted by moving the seat adjustment switch (� page 35) in the door control panel.
e function (PULSE)
reduce muscle tension during long periodically using the massage .
s button 3.
ndicator lamp on button 3 lights he air cushions in the lumbar re-inflate and deflate rhythmically.
Folding forward front seat backrests
Folding seat backrests forward
� Lift release lever and fold backrest for-ward.
The seat will automatically slide for-ward and the head restraint will move down.
F
�
Ts
assage function switches off au-tically after approximately eight tes. The indicator lamp goes out.
iThe head restraint is automatically low-ered.

101
Controls in detail
Seats
Warn
The sethe bamust motiobackring mLOCK displathe relock. Ccautiofrom troom rest a
Keep of artifoldin
The was sooboth bwarni
!The automatic seat slide is provided with a safety feature.
The automatic process is interrupted, if the backrest of the sliding seat is pushed against an occupant or object. The seat will slide forward and stop.
Investigate and correct the cause of in-terruption.
Now use memory button (� page 105) or seat adjustment switch (� page 35) to bring seat into desired position.
When folding the backrest forward from a reclined position, and then fold-ing it back, the backrest stops in a more upright position for the safety of any rear-seat passenger. Adjust the backrest until your arms are slightly an-gled when holding the steering wheel (� page 35).
ing! Gat belts provide protection only with ckrest locked in place and, therefore, be locked in place with the vehicle in n. Do not drive the vehicle when the est is not locked in place. If the warn-essage SEAT BACKREST, RIGHT - or SEAT BACKREST, LEFT - LOCK is yed in the multifunction display, then spective backrest is not engaged in its arefully slow down, and drive with
n to an area which is in a safe distance he roadway. Always provide sufficient behind the backrest and fold the back-ll the way back until it locks in place.
the area around head restraints clear cles (e.g. clothing) to not obstruct the g operation of the head restraints.
arning message is no longer displayed n as the backrest is locked in place. If ackrests are locked in place and the
ng message is still displayed, have the
system checked at your authorized Mer-cedes-Benz Center immediately.
When leaving the vehicle, always remove the electronic key from the starter switch, take the KEYLESS-GO* card with you, and lock your vehicle.
The power seats can also be operated with the driver’s or passenger door open. Do not leave children unattended in the vehicle or with access to an unlocked vehicle. Unsu-pervised use of vehicle equipment may cause an accident and/or serious personal injury.
Never place hands under seat or near any moving parts during a seat adjustment pro-cedure.

102
Controls in detail
Seats
Seat ve
The switventilatithe election 1 orture (� plamps olevel sel
witching off seat ventilation
Press switch 1 repeatedly until all indi-cator lamps go out.
Level
3
2
1
off
iThe seat ventilation is automatically set to the highest level if activated via sum-mer opening feature (� page 171).
!If one or all of the lamps blink on the seat ventilation switch, there is insuffi-cient voltage due to too many electrical consumers being switched on. The seat ventilation switches off automatically.
The seat ventilation will switch back on again automatically as soon as suffi-cient voltage is available.
ntilation*
ch is located on the door. Seat on can be activated manually with tronic key in starter switch posi- 2, or by the summer opening fea-age 171). The blue indicator
n the switch show the ventilation ected:
1 Seat ventilation switch
� Make sure the ignition is switched on.
All lamps in the instrument cluster light up.
Switching on seat ventilation
� Press switch 1.
Three blue indicator lamps above the switch light up.
� Continue pressing switch 1 until the desired seat ventilation level is reached.
S
�
Three indicator lamps on
Two indicator lamps on
One indicator lamp on
No indicator lamp on

103
Controls in detail
Seats
Seat h
Vehicl
The sw
1 No2 Rap
� Ma
All ligh
Switching off rapid seat heating mode
� Press switch 2 again.
!If one or both of the lamps on the seat heating switch are blinking, there is in-sufficient voltage due to too many elec-trical consumers being turned on. The seat heating switches off automatical-ly.
The seat heating will switch back on again automatically as soon as suffi-cient voltage is available.
eating
es without seat ventilation*
itch is located on the door.
rmal heatingid heating
ke sure the ignition is switched on.
the lamps in the instrument cluster t up.
Switching on seat heating
� Press switch 1.
A red indicator lamp above the switch lights up.
Switching off seat heating
� Press switch 1 again.
Rapid seat heating mode
� Press switch 2.
Both red indicator lamps above the switch light up.
iThe seat heating will be automatically switched off after approximately 30 minutes.
iThe system switches over to normal heating mode after approximately five minutes. Only the right-hand indicator lamp remains lit.

104
Controls in detail
Seats
Vehicle
The switindicatoheating
1 Seat
� Mak
All thlight
witching off rapid seat heating mode
Press switch position 1 twice.
Level
2
1
off
!If one or both of the lamps on the seat heating switch are blinking, there is in-sufficient voltage due to too many elec-trical consumers are turned on. The seat heating switches off automatical-ly.
The seat heating will switch back on again automatically as soon as suffi-cient voltage is available.
s with seat ventilation*
ch is located on the door. The red r lamps on the switch show the level selected:
heating switch
e sure the ignition is switched on.
e lamps in the instrument cluster up.
Switching on seat heating
� Press switch 1 twice.
A red indicator lamp above the switch lights up.
Switching off seat heating
� Press switch 1 again.
Rapid seat heating
� Press switch 1 once.
Both indicator lamps above the switch light up.
S
�
Two indicator lamps on
One indicator lamp on
No indicator lamp on iThe seat heating will be automatically switched off after approximately 30 minutes.
iThe system switches over to normal heating mode after approximately five minutes. Only the right-hand indicator lamp remains lit.

105
Controls in detail
Memory function
M
1, 2, 3 Stored position button
M Memory button
� Make sure that the ignition is switched on or the relevant door is open and the SmartKey is inserted in the starter switch.
Warning! GDo not activate the memory function while driving. Activating the memory function while driving could cause the driver to lose control of the vehicle.
emory
!Prior ter shoheightseat bsure afort. Tadjust“Airbaseat p
In addensuretion anoutsidjusted
Fastenchildresecurewith UStandaMotorand 21
functionThe memory button and stored position switch are located on the door.
You can store up to three different settings per SmartKey or KEYLESS-GO* card.
The following settings are saved for each stored position:
� Driver’s seat and seat backrest posi-tion
� Settings for multicontour seat*
� Steering wheel position
� Inside rear view mirror position
� Exterior rear view mirror position
� Automatic climate control
These key dependent memory settings can be deactivated if desired (� page 140).
o operating the vehicle, the driv-uld check and adjust the seat , seat position fore and aft, and ackrest angle if necessary, to en-dequate control, reach and com-he head restraint should also be ed for proper height. Also see g” section (� page 55) for proper ositioning.
ition, adjust the steering wheel to adequate control, reach, opera-d comfort. Both the inside and
e rear view mirrors should be ad- for adequate rear vision.
seat belts. Infants and small n should be seated in a properly d restraint system that complies .S. Federal Motor Vehicle Safety rds 213 and 225 and Canadian
Vehicle Safety Standards 213 0.2.

106
Controls in detail
Memo
Storing
� Adjumirro(� pa
� Pres
� Relepositseco
All thed p
Warning! GDo not operate the power seats using the memory button if the seat backrest is in an extremely reclined position. Doing so could cause damage to front or rear seats.
First move seat backrest to an upright posi-tion.
ry function
positions into memory
st the seats, steering wheel and rs to the desired position ge 34).
s memory button M.
ase memory button M and push ion button 1, 2 or 3 within three nds.
e settings are stored at the select-osition.
Recalling positions from memory
� Press and hold position button 1, 2 or 3 until the seat, steering wheel and mirrors have fully moved to the stored positions.
iReleasing the button immediately stops movement to the stored posi-tions.

107
Controls in detail
Memory function
Storining po
For eassengercan seeengage
For infpositioexterio
� Adjust the exterior rear view mirror with button 2 so that you see the rear wheel and the road curb.
� Press memory button M.
� Within three seconds, press bottom of adjustment button 2.
The parking position is stored if the mirror does not move.
iYoupasror
iIf the mirror does move, repeat the above steps. After the setting is stored you can move the mirror again.
g exterior rear view mirror park-sition
ier parking you can adjust the pas- exterior rear view mirror so that you the right rear wheel as soon as you reverse gear R.
ormation on activating the parking n, see “Setting parking position for r rear view mirror” (� page 142).
The buttons are located on the driver’s door.
1 Exterior rear view mirror2 Adjustment buttonM Memory button
� Stop the vehicle.
� Switch ignition on (if not already on).
� Press button 1.
The passenger-side exterior rear view mirror is selected.
can store a parking position for the senger-side exterior rear view mir-for each key or KEYLESS-GO* card.

10
Controls in detail
Lig
LigFor lam“Ge
Exte
Thedash
iIf you remove the key and open the driver’s door while the parking lamps or low beam headlamps are switched on, then
� a warning sounds
� $ appears in the multifunction display
� the message TURN OFF LIGHTS! ap-pears in the multifunction display
iWith the daytime running lamp mode activated and the engine running, the low beam headlamps cannot be switched off manually.
8
hting
htingnotes ops and tting sta
rior la
exterioboard
n how to switch on the head-use the turn signals, see the rted” section (� page 46).
mp switch
r lamp switch is located on the to the left of the steering wheel.
M Off
U Automatic headlamp mode
C Parking lamps (also side marker lamps, tail lamps, license plate lamps, instrument panel lamps)Canada only: When engine is run-ning, the low beams are also switched on.
B Low beam plus parking lamps or high beam headlamps (combination switch pushed forward).
ˆ Standing lamps, right (turn left one stop)
‚ Standing lamps, left (turn left two stops)

109
Controls in detail
Lighting
Manua
The lowlamps exterioswitch
Autom
The paand licautomaof the
� Tur
iWitactnot
iIf you drive in countries where vehicles drive on the other side of the road than the country where the vehicle is regis-tered, you must have the headlamps modified for symmetrical low beams. Relevant information can be obtained at your authorized Mercedes-Benz Cen-ter.
l headlamp mode
beam headlamps and parking can be switched on and off with the r lamp switch. For exterior lamp , see (� page 108).
atic headlamp mode
rking lamps, low beam headlamps ense plate lamps switch on and off tically depending on the brightness
ambient light.
n the exterior lamp switch to U.
h the daytime running lamp mode ivated, the low beam headlamps will switch off automatically.
iFront fog lamps and rear fog lamp can not be switched on manually with exte-rior lamp switch in position U. To activate the fog lamps, turn exterior lamp switch to position B and pull the exterior lamp switch to first or sec-ond stop (� page 110).
Warning! GIn automatic headlamp mode, the head-lamps will not be automatically switched on under foggy conditions. To minimize risk to you and to others, activate headlamps by turning exterior lamp switch to B.
The driver is responsible for the operation of the vehicle’s lights at all times. The automat-ic headlamp feature is only an aid to the driv-er. Switch on the vehicle lights manually when driving or when traffic conditions re-quire you to do so.

110
Controls in detail
Lightin
Daytime
� Turnposit
When thheadlamIn low amlamps w
Canada
When yoposition(with a t
For nighexterior permit alamps.
USA onl
The hightivated wning lamlamp sw
witching on rear fog lamp
Make sure that the low beam head-lamps are switched on.
Pull out exterior lamp switch to second stop.
The yellow indicator lamp † in the lamp switch lights up.
iFog lamps will operate with the parking lamps and/or the low beam head-lamps on. Fog lamps should only be used in conjunction with low beam headlamps. Consult your State or Prov-ince Motor Vehicle Regulations regard-ing permissible lamp operation.
g
running lamp mode
exterior lamp switch to ion M or U.
e engine is running, the low beam ps are automatically switched on. bient light conditions the parking
ill also switch on.
only
u shift from a driving gear to N or P, the low beam switches off hree-minute delay).
ttime driving you should turn the lamp switch to position B to ctivation of the high beam head-
y
beam headlamps can also be ac-hen driving with the daytime run-p mode activated and exterior itch in position M.
To activate the daytime running lamp mode, see “Setting daytime running lamp mode” (� page 136).
Locator lighting and night security illu-mination
Locator lighting and night security illumi-nation are described in the control system section under “Setting locator lighting” (� page 136) and “Setting night security il-lumination” (� page 137).
Switching on front fog lamps
� Make sure that the low beam head-lamps are switched on.
� Pull out exterior lamp switch to first stop.
The green indicator lamp ‡ in the lamp switch lights up.
S
�
�
iSee notes on the exterior lamp switch (� page 108).

111
Controls in detail
Lighting
Combi
The coleft sid
1 Hig2 Hig
Switch
� Turpos
� Pusdire
Thenat
Switching on the hazard warning flasher
� Press the hazard warning flasher switch.
All turn signals will blink.
Switching off the hazard warning flasher
� Press hazard warning flasher switch again.
iWith the hazard warning flasher acti-vated and the combination switch set for either left or right turn, only the re-spective left or right turn signal will op-erate when the key in the starter switch is in position 1 or 2.
iIf the hazard warning flasher was acti-vated automatically, press switch 1 twice.
nation switch
mbination switch is located on the e of the steering column.
h beamh beam flasher
ing on high beams
n exterior lamp switch to ition B (� page 108).
h the combination switch in ction 1.
high beam symbol A is illumi-ed on the instrument cluster.
High beam flasher
� Pull the combination switch briefly in direction 2.
Hazard warning flasher
The hazard warning flasher can be activat-ed with the ignition switched on or off. It is activated automatically when an airbag is deployed.
The switch is located on the center con-sole.
1 Hazard warning flasher switch

112
Controls in detail
Lightin
Interior
The concontrol p
1 Left 2 Rear3 Righ4 Rock
syste
eactivating
Press the ñ symbol on rocker switch 4.
The interior lighting remains switched off in darkness, even when you
� unlock the vehicle
� open a door
� remove the key from the starter switch
g
lighting
trols are located in the overhead anel.
front reading lamp interior lightst front reading lamper switch for automatic control m
Automatic control
Activating
� Press the rocker switch to the center position 4.
Interior lamps are switched on in dark-ness, when
� the vehicle is unlocked
� a door is opened
� the key is removed from the starter switch
The interior lamps are switched off after a set time (� page 138).
D
�
iIf the door remains open, the interior lamps switch off automatically after ap-proximately five minutes.

113
Controls in detail
Lighting
Manua
Switch
� Preswi
The
Switch
� Preswi
Theauton.
Switch
� Pre
Theswi
Courtesy lighting
For better orientation in the dark, courtesy lamps will illuminate the interior of your ve-hicle as follows:
With parking lamps switched on:
� the door entry lamps
� the driver and passenger footwells
With key in starter switch position 1:
� the door entry lamps
� the center console
iIf you turn the key in the starter switch to position 0 and switch off the exterior headlamps, the door entry lamps will remain lit for approximately five min-utes.
l control
ing lamps on
ss the ð symbol on rocker tch 4.
front interior lighting switches on.
ing lamps off
ss the ñ symbol on rocker tch 4.
interior lighting switches off. The omatic control function is switched
ing rear interior lights on
ss switch 2.
rear compartment lighting is tched on.
Switching rear interior lights off
� Press switch 2.
The rear compartment lighting is switched off.
Front reading lamps
Switching on
� Press switch 1 or 3.
The corresponding reading lamp is switched on.
Switching off
� Press switch 1 or 3.
The corresponding reading lamp is switched off.
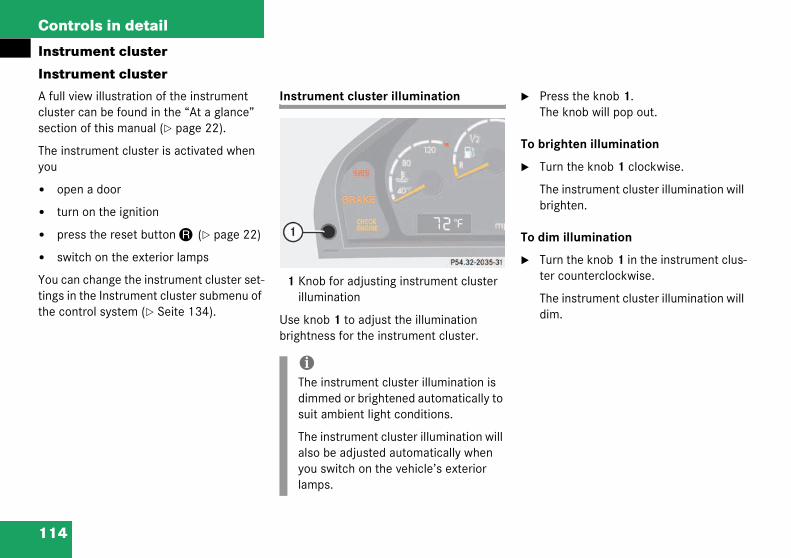
11
Controls in detail
Ins
InsA fuclussect
Theyou
� o
� t
� p
� s
Youtingthe
Press the knob 1.The knob will pop out.
o brighten illumination
Turn the knob 1 clockwise.
The instrument cluster illumination will brighten.
o dim illumination
Turn the knob 1 in the instrument clus-ter counterclockwise.
The instrument cluster illumination will dim.
4
trume
trumell view ter canion of t
instrum
pen a
urn on
ress th
witch o
can chas in thecontrol
nt cluster
nt clusterillustration of the instrument be found in the “At a glance” his manual (� page 22).
ent cluster is activated when
door
the ignition
e reset button J (� page 22)
n the exterior lamps
nge the instrument cluster set- Instrument cluster submenu of system (� Seite 134).
Instrument cluster illumination
1 Knob for adjusting instrument cluster illumination
Use knob 1 to adjust the illumination brightness for the instrument cluster.
�
T
�
T
�
iThe instrument cluster illumination is dimmed or brightened automatically to suit ambient light conditions.
The instrument cluster illumination will also be adjusted automatically when you switch on the vehicle’s exterior lamps.

115
Controls in detail
Instrument cluster
Coolan
Duringstop-anperatui.e. clotemper
Tachometer
The red marking on the tachometer de-notes excessive engine speed.
To help protect the engine, the fuel supply is interrupted if the engine is operated within the red marking.
CL 55 AMG
The tachometer of the CL 55 AMG does not have a red marking denoting excessive engine speed.
To help protect the engine, the fuel supply is interrupted if the engine is operated at an excessive engine speed.
Warn
� Dhempario
� Stcabyfrco
Turn oand dcools
!Avoid driving at excessive engine speeds, as it may result in serious en-gine damage that is not covered by the Mercedes-Benz Limited Warranty.
t temperature gauge
severe operating conditions and d-go city traffic, the coolant tem-
re may rise close to 248° F (120°C), se to the red zone of the coolant ature gauge.
The engine should not be operated with the coolant temperature above 248° F (120°C), i.e. in the red zone of the coolant temperature gauge. Doing so may cause serious engine damage which is not cov-ered by the Mercedes-Benz Limited War-ranty.
Trip odometer
� Make sure you are viewing the trip odometer display.
� Press button è or ÿ on the mul-tifunction steering wheel repeatedly until the trip odometer appears if it is not displayed (� page 117).
� Press and hold the reset button J (� page 22) in the instrument cluster until the trip odometer is reset.
ing! Griving when your engine is badly over-ated can cause some fluids which ay have leaked into the engine com-rtment to catch fire. You could be se-usly burned.
eam from an overheated engine can use serious burns and can occur just opening the engine hood. Stay away
om the engine if you see or hear steam ming from it.
ff the engine, get out of the vehicle o not stand near the vehicle until it down.
iExcessive coolant temperatures trigger a warning in the multifunction display (� page 278).

116
Controls in detail
Instrum
Outside hen moving the vehicle into colder ambi-nt temperatures (e.g. when leaving your arage), you will notice a delay before the wer temperature is displayed.
delay also occurs when ambient temper-tures rise. This prevents inaccurate tem-erature indications caused by heat diated from the engine during idling or
low driving.
Warnin
The outsigned tis there
Indicateing poinface is especia
ent cluster
temperature indicator The temperature sensor is located on the lower left-hand side of the instrument clus-ter (� page 22). Due to its location, the sensor can be affected by road or engine heat during idling or slow driving. There-fore, the accuracy of the displayed temper-ature can only be verified by comparison to a thermometer placed next to the sensor, not by comparison to external displays (e.g. bank signs etc.).
Weglo
Aapras
g! Gside temperature indicator is not de-o serve as an ice-warning device and fore unsuitable for that purpose.
d temperatures just above the freez-t do not guarantee that the road sur-
free of ice. The road may still be icy, lly in wooded areas or on bridges.

117
Controls in detail
Control system
CoThthepoto
�
�
Fotemdumepla
Multifunction display
1 Trip odometer2 Main odometer
ntrole contr key in
sition 1
call up
chang
r examp to fin
e for sessagesy, and
iThe didio, CDregard
systemol system is activated as soon as the starter switch is turned to . The control system enables you
information about your vehicle
e vehicle settings
le, you can use the control sys-d out when your vehicle is next rvice, to set the language for in the instrument cluster dis-much more.
The control system relays information to the multifunction display.
splays for the audio systems (ra- player) will appear in English,
less of the language selected.
Warning! GA driver’s attention to the road and traffic conditions must always be his/her primary focus when driving.
For your safety and the safety of others, se-lecting features through the multifunction steering wheel should only be done by the driver when traffic and road conditions per-mit it to be done safely.
Bear in mind that at a speed of just 30 mph (approximately 50 km/h), your vehicle is covering a distance of 44 feet (approximate-ly 13.5 m) every second.

118
Controls in detail
Contro
Multifun
The dispand the controlletion stee
1 Multifunction display in the speed-ometer
Operating the control system
2 Selecting the submenu or setting the volume
ç down/to decrease
æ up/to increase
3 Telephone*
í to take a call
ì to end a call
4 Menu systems
è for next menu
ÿ for previous menu
5 Moving within a menu
j for next display
k for previous display
l system
ction steering wheel
lays in the multifunction display settings in the control system are d by the buttons on the multifunc-ring wheel.

119
Controls in detail
Control system
Pressinfunctioshown
The inftion discontainmenus
The indwithin erationfunctiotion orvehicle
In the SETTINGS menu, instead of functions you will find a number of submenus for calling up and changing settings. For in-structions on using these submenus, see the “Settings menu” section (� page 131).
The number of menus available in the sys-tem depends on which optional equipment is installed in your vehicle.
The menus are described on the following pages.
g any of the buttons on the multi-n steering wheel will alter what is in the multifunction display.
ormation available in the multifunc-play is arranged in menus, each ing a number of functions or sub-
.
ividual functions are then found the relevant menu (radio or CD op-s under AUDIO, for example). These ns serve to call up relevant informa- to customize the settings for your .
It is helpful to think of the menus, and the functions within each menu, as being ar-ranged in a circular pattern.
� If you press button è or ÿ repeatedly, you will pass through each menu one after the other.
� If you press button k or j repeatedly, you will pass through each function display, one after the other, in the current menu.

120
Controls in detail
Contro
Menus he table on the next page provides an verview of the individual menus.
l system
This is what you will see when you scroll through the menus.
To

121
Controls in detail
Control system
Menus
Me Menu 7 Menu 8
Com
man
ds/
subm
enus
Stapla
ter Malfunction memory
Settings
Ca ption er
Call up malfunc-tion messages
Reset to factory settings
Chsur
ption ce t
Instrument clus-ter submenu
Chlev
e Lighting sub-menu
Digom
Vehicle sub-menu
Convenience submenu
iThearewitsar
, submenus and functions
nu 1 Menu 2 Menu 3 Menu 4 Menu 5 Menu 6
ndard dis-y
AUDIO Telephone NAVI Distronic* Trip compu
ll up FSS Select radio station
Load phone book
Activate route guid-ance
Call up set-tings
Fuel consumstatistics aftstart
eck tire pres-e*
Operate CD player
Search for name in phone book
Fuel consumstatistics sinthe last rese
eck engine oil el
Call up rang
ital speed-eter
headings used in the menus table designed to facilitate navigation hin the system and are not neces-ily identical to those shown in the
control system displays.
The first function displayed in each menu will automatically show you which part of the system you are in.

122
Controls in detail
Contro
Standar
You candard disor j
The follo
Display
� Presedly eter
The cthe m
1 Waveband2 Setting for station selection using
memory3 Station frequency
Press button k or j repeatedly until the desired station is found.
The type of search depends on the set-ting for the station tuning (� page 139):
� Frequency
� Memory
Functio
Call up
Check t
Check e
Call up
l system
d display menu
select the functions in the stan-play menu with button k .
wing functions are available:
digital speedometer
s the j or k button repeat-until you see the digital speedom-appear in the display.
urrent vehicle speed is shown in ultifunction display.
AUDIO menu
The functions in the AUDIO menu operate the audio equipment which you currently have turned on.
If no audio equipment is currently turned on, the message AUDIO OFF is shown in the display.
The following functions are available:
Select radio station
� Turn on the radio. Refer to the separate COMAND operating instructions.
� Press button è or ÿ repeatedly until you see the currently tuned sta-tion in the display.
�
n Page
FSS 255
ire pressure* 248
ngine oil level 238
digital speedometer see below
Function Page
Select radio station 122
Operate CD player 123

123
Controls in detail
Control system
Opera
� Turplaera
� Preuntbei
CD changer operating mode
General notes
Should excessively high temperatures oc-cur while in CD mode, CD TEMP HIGH will appear on the display and muting will take place. The unit will then switch back to the last operating mode used until the temper-ature has decreased to a safe operating level.
Should excessively low temperatures oc-cur while in CD mode, CD TEMP LOW will ap-pear on the display, but the CD will continue to play.
Handle CDs carefully to prevent interfer-ence during playback. Avoid fingerprints and dust on CDs. Do not write on CDs or apply any label or other material to them.
Use only original CDs. Using copied CDs may create problems during playback.
iYoutheRefinst
Youusu
te the CD player
n on the radio and select the CD yer. Refer to separate COMAND op-ting instructions.
ss button è or ÿ repeatedly il the settings for the CD currently ng played are shown in the display.
1 Current CD, for CD changer (� page 123)
2 Current track
� Press button k or j repeatedly until the desired track is selected.
can only store new stations using designated feature on the radio. er to separate COMAND operating ructions.
can also operate the radio in the al manner.
iCD changer: To select a CD from the magazine, press a number on the CO-MAND system key pad located in the center dashboard.

124
Controls in detail
Contro
Clean Cmerciallvents, anused forcase aftdirect su
Only useand thatital audi
Use of Cdard maer. Do noadapter.
For inforrefer to instructi
Slide the CD changer door to the right and press the eject button 3.
The magazine is ejected.
1 CD2 CD changer3 CD tray4 CD magazine
Remove the magazine and completely pull out the CD tray.
Place the CD in the recess of the tray, label side up.
Push the tray into the magazine in the direction shown by the arrow.
l system
Ds from time to time with a com-y available cleaning cloth. No sol-ti-static sprays, etc. should be
cleaning. Replace the CD in its er use. Protect CDs from heat and nlight.
CDs, which bear the label shown conform to the compact disc dig-o standard (IEC 60908).
Ds which do not meet this stan-y cause damage to the CD chang-t play single-CDs (80 mm) with an
mation operating the CD changer the separate COMAND operating ons.
Operational readiness of CD changer
If a CD changer has been installed in the system, it can be operated from the CO-MAND system key pad located in the cen-ter dashboard. A loaded magazine must be installed for CD playing.
Loading/unloading the CD magazine
The CD changer is located behind the cov-er on the left hand side in the trunk.
� Remove the CD changer cover.
�
�
�
�
�
Warning! GThe CD changer is a Class 1 laser product. There is a danger of invisible laser radiation if the cover is opened or damaged.Do not remove the cover. The CD changer does not contain any parts which can be ser-viced by the user. For safety reasons, have any service work which may be necessary performed only by qualified personnel.

125
Controls in detail
Control system
� Pusin tclo
TEL m
� Press button ÿ or è on the steering wheel repeatedly until you see the TEL menu in the display.
Which messages will appear in the display field depends on whether your telephone is switched on or off:
� If the telephone is off, the message in the multifunction display is: TEL OFF.
� If the telephone is on:
The telephone will then search for a network. During this time the display reads NO SERVICE.
As soon as the telephone has found a network, READY is indicated in the dis-play.
The standby message indicates that your telephone is ready for use and you can op-erate it using the control system.
iCDerlypla
Warn
A drivcondifocussafetypull omakinchoospleaseuse thtraffic
h the magazine into the CD changer he direction shown by the arrow and se the CD changer door.
enu*
You can use the functions in the TEL menu to operate your telephone, provided it is connected to a hands-free system and switched on.
� Switch on the telephone and COMAND.
s which have been inserted improp- or are unreadable will not be
yed.
ing! Ger’s attention to the road and traffic tions must always be his/her primary when driving. For your safety and the of others, we recommend that you ver to a safe location and stop before g or taking a telephone call. If you e to use the telephone while driving, use the hands-free device and only e telephone when weather, road and conditions permit.
Some jurisdictions prohibit the driver from using a cellular telephone while driving a ve-hicle.
Bear in mind that at a speed of just 30 mph (approximately 50 km/h), your vehicle is covering a distance of approximately 44 feet (approximately 13.5 m) every sec-ond.
Never operate radio transmitters equipped with a built-in or attached antenna (i.e. with-out being connected to an external antenna) from inside the vehicle while the engine is running. Doing so could lead to a malfunc-tion of the vehicle’s electronic system, pos-sibly resulting in an accident and/or personal injury.

126
Controls in detail
Contro
Answer
When yocalls, yothe disp
� Pres
You play tione
Press button j or k repeatedly until the desired name appears in the display.
The stored names are displayed in in-creasing or decreasing alphabetical or-der.
iIf youpres
iIf you press and hold j or k for longer than one second, the system scrolls rapidly through the list of names until you release the button again.
Cancel the quick search mode by pressing ì.
l system
ing a call
ur telephone is ready to receive u can answer a call at any time. In lay you will then see the message:
s button í .
have answered the call. In the dis-you see the length of the call posi-d above the number.
Ending a call
� Press button ì.
You have ended the call. In the display you will again see the standby mes-sage.
Dialing a number from the phone book
If your telephone is ready to receive calls, you may select and dial a number from the phone book at any time.
� Press button ÿ or è repeatedly until you see the TEL menu in the dis-play.
� Press button j or k .
The control system reads the phone book which is stored in the telephone. This may take up to 30 seconds. In the display you will see the message PLEASE WAIT!.
When the message PLEASE WAIT! dis-appears, the phone book has been loaded.
�
do not wish to accept a call, s button ì.
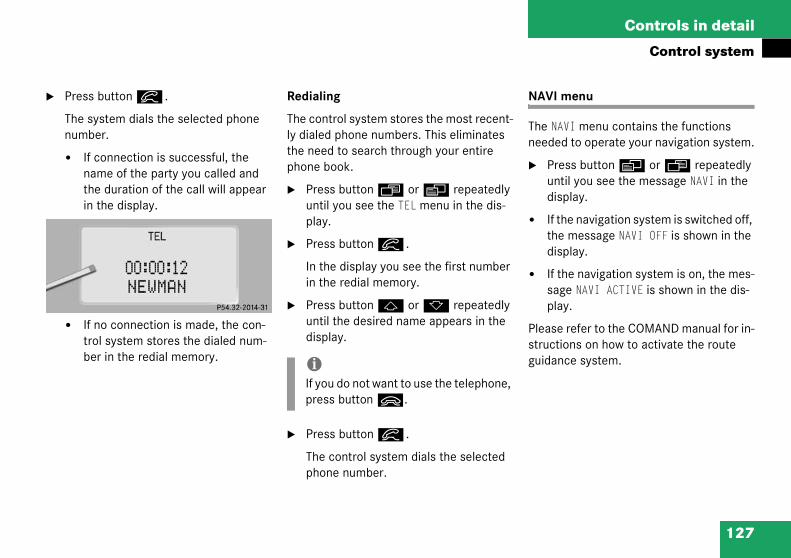
127
Controls in detail
Control system
� Pre
Thenum
�
�
NAVI menu
The NAVI menu contains the functions needed to operate your navigation system.
� Press button è or ÿ repeatedly until you see the message NAVI in the display.
� If the navigation system is switched off, the message NAVI OFF is shown in the display.
� If the navigation system is on, the mes-sage NAVI ACTIVE is shown in the dis-play.
Please refer to the COMAND manual for in-structions on how to activate the route guidance system.
ss button í .
system dials the selected phone ber.
If connection is successful, the name of the party you called and the duration of the call will appear in the display.
If no connection is made, the con-trol system stores the dialed num-ber in the redial memory.
Redialing
The control system stores the most recent-ly dialed phone numbers. This eliminates the need to search through your entire phone book.
� Press button ÿ or è repeatedly until you see the TEL menu in the dis-play.
� Press button í .
In the display you see the first number in the redial memory.
� Press button j or k repeatedly until the desired name appears in the display.
� Press button í .
The control system dials the selected phone number.
iIf you do not want to use the telephone, press button ì.

128
Controls in detail
Contro
Distron
Use the rent settWhat infdependsis active
Please rtion of tstruction
� Presuntilpictu
istronic activated
hen Distronic is activated, DISTRONIC nd the set speed are seen in the display.
1 Distronic activated
l system
ic* menu
Distronic menu to display the cur-ings for your Distronic system. ormation is shown in the display on whether the Distronic system or inactive.
efer to the “Driving systems” sec-his manual (� page 179) for in-s on how to activate Distronic.
s button è or ÿ repeatedly you see one of the following two res in the display.
Distronic deactivated
When Distronic is deactivated you will see the standard display.
1 Vehicle ahead, if detected2 Actual distance to vehicle ahead3 Desired distance to vehicle ahead4 Symbol for activated distance warning
function5 Your vehicle
D
Wa

129
Controls in detail
Control system
Trip co
Use thtisticalinform
Fuel c
� PreuntTrip
� Preuntpla
Fuel consumption since last reset
� Press button ÿ or è repeatedly until you see the first function of the Trip computer menu.
� Press button j or k repeatedly until you see this message in the dis-play: AFTER RESET.
1 Distance driven since last reset2 Time elapsed since last reset3 Average fuel consumption since last re-
set4 Average speed since last reset
Funct
Fuel costart
Fuel csince l
Call up
mputer menu
e trip computer menu to call up sta- data on your vehicle. The following ation is available:
onsumption statistics after start
ss button ÿ or è repeatedly il you see the first function of the computer menu.
ss button j or k repeatedly il you see this message in the dis-y: AFTER START.
1 Distance driven since start2 Time elapsed since start3 Average fuel consumption since start4 Average speed since start
ion Page
nsumption statistics after 129
onsumption statistics ast reset
129
range (distance to empty) 130 iThe AFTER START display will flash until a distance of approximately 1 mile (1.6 km) has been covered or two min-utes have elapsed since the engine was restarted. During this period, you can incorporate the values for the previous journey by pressing button J in the in-strument cluster.
If button J is not pressed, the AFTER START values are set to “0”.

130
Controls in detail
Contro
Resettin
� PresuntilTrip
� Presuntilto re
� Pres(� pauntil
alfunction memory menu
se the malfunction memory menu to scan alfunction and warning messages that ay be stored in the system. The informa-on shown in the display depends on hether malfunctions have actually oc-urred.
Warning! GMalfunction and warning messages are only indicated for certain systems and are inten-tionally not very detailed. The malfunction and warning messages are simply a remind-er with respect to the operation of certain systems and do not replace the owner’s and/or driver’s responsibility to maintain the vehicle’s operating safety by having all required maintenance and safety checks performed on the vehicle and by bringing the vehicle to an authorized Mercedes-Benz Center to address the malfunction and warning messages (� page 270).
l system
g fuel consumption statistics
s button ÿ or è repeatedly you see the first function of the computer menu.
s button j or k repeatedly you see the reading that you want set in the display.
s and hold the reset button J ge 22) in the instrument cluster
the value is reset to 0.
Call up range (distance to empty)
� Press button ÿ or è repeatedly until you see the first function of the Trip computer menu.
� Press button j or k repeatedly until you see this message in the dis-play: RANGE.
In the display you will see the calculat-ed range based on the current fuel tank level.
M
Ummtiwc

131
Controls in detail
Control system
� Preuntme
No ma
If no msage inNO MAL
Malfun
If malfuthe num
1 Num
� Pre
Theplahinwar
Settings menu
In the SETTINGS menu there are two func-tions:
� The function TO RESET: R BUTTON FOR 3 SEC., with which you can reset all the settings to the original factory settings.
� A collection of submenus with which you can make individual settings for your vehicle.
� Press button è or ÿ repeatedly until the SETTINGS menu appears in the display.
ss button è or ÿ repeatedly il you see the malfunction message mory in the display.
lfunction messages
alfunctions have occurred, the mes- the display is: FUNCTION
ctions have occurred
nctions have occurred, you will see ber of malfunctions in the display:
ber of malfunctions
ss button k or j .
stored messages will now be dis-yed in order. See the “Practical ts” section for malfunction and ning messages (� page 270).
Should any malfunctions occur while driv-ing, the number of malfunctions will reap-pear in the display when the key in the starter switch is turned to position 0 or re-moved from the starter switch.
iThe message memory will be cleared when you turn the key in the starter switch to position 1 or 2. You will then only see high priority malfunctions (� page 270).

132
Controls in detail
Contro
Resettin
You canmenus t
� Presin thmate
In thto prconf
� Pres
The frese
esetting the functions of a submenu
or each submenu you can reset all the nctions to the factory settings.
Move to a function in the submenu.
Press the reset button J (� page 22) in the instrument cluster for approxi-mately three seconds.
In the display you will see the request to press the reset button J again to confirm.
Press the reset button J again.
All functions of the submenu will reset to factory settings.i
The sbe reby prond
Due the sall ofVEHI
l system
g all settings
reset all the functions of all sub-o the factory settings.
s the reset button J(� page 22) e instrument cluster for approxi-ly three seconds.
e display you will see the request ess the reset button J again to irm.
s the reset button J again.
unctions of all the submenus will t to factory settings.
Submenus in the Settings menu
� Press button k or j .
In the display you see the collection of the submenus.
� Press button æ or ç .
The selection marker moves to the next submenu.
The submenus are arranged by hierarchy. Scroll down with the ç button, scroll up with the æ button.
Move within the submenus with the k or j button to the individual functions.
The settings themselves are made with button æ or ç.
R
Ffu
�
�
�
ettings you have changed will not set unless you confirm the action essing the reset button J a sec-
time.
to safety reasons, resetting all of ettings while driving will not reset the values in the LIGHTING or the CLE menu.

133
Controls in detail
Control system
The tabbe chatailed isettinges.
INSTR CONVENIENCE
Selectmode
ode (ra- Set key dependency
Selectmode
Activate easy-entry/exit fea-ture
Select Set parking position for exterior rear view mirrors
Set fold-in function for exterior rear view mirrors
le below shows what settings can nged within the various menus. De-nstructions on making individual s can be found on the following pag-
UMENT CLUSTER LIGHTING VEHICLE
temperature display Set daytime running lamp mode (USA only)
Set station selection mdio)
speedometer display Set locator lighting Set automatic locking
language Exterior lamps delayed shut-off
Interior lighting delayed shut-off

134
Controls in detail
Contro
Instrum
Access tthe SETTTER submcluster dfunction
electing speedometer display mode
Move the selection marker with the æ or ç button to the INST. CLUSTER submenu.
Press button j or k repeatedly until you see this message in the dis-play: DISPLAY VALUES IN.
The selection marker is on the current setting.
Press æ or ç to set speedome-ter unit to MILES or KM.
Functio
Select tmode
Select smode
Select l
l system
ent cluster submenu
he INST. CLUSTER submenu via INGS menu. Use the INST. CLUS-enu to change the instrument
isplay settings. The following s are available:
Selecting temperature display mode
� Move the selection marker with the æ or ç button to the INST. CLUSTER submenu.
� Press button j or k repeatedly until you see this message in the dis-play: TEMP. INDICATOR.
The selection marker is on the current setting.
� Press æ or ç to set the temper-ature unit to degrees Celsius (°C) or degrees Fahrenheit (°F).
S
�
�
�
n Page
emperature display 135
peedometer display 134
anguage 135

135
Controls in detail
Control system
Select
� MotheCLU
� Preuntpla
Theset
Lighting submenu
Access the LIGHTING submenu via the SET-TINGS menu. Use the LIGHTING submenu to change the lamp and lighting settings on your vehicle. The following functions are available:
Function Page
Set daytime running lamp mode (USA only)
136
Set locator lighting 136
Exterior lights delayed shut-off 137
Interior lighting delayed shut-off 138
ing language
ve the selection marker with æ or ç button to the INST. STER submenu.
ss button j or k repeatedly il you see this message in the dis-y: TEXT
selection marker is on the current ting.
� Press æ or ç to select the lan-guage to be used for the multifunction display messages.
Available languages:
� German
� English
� Italian
� French
� Spanish

136
Controls in detail
Contro
Setting (USA on
� Movethe æING s
� Presuntilplay:
The ssetti
� Presor damodcounlamp
etting locator lighting
uring darkness, the following lamps will ome on when the exterior lamp switch is position U, the locator lighting fea-re is activated and the vehicle is un-cked by remote control:
Parking lamps
Tail lamps
License plate lamps
Front fog lamps
he locator lighting switches off when the river’s door is opened. It switches off au-matically after a period of approximately
0 seconds.
Move the selection marker with the æ or ç button to the LIGHT-ING submenu.
l system
daytime running lamp mode ly)
the selection marker with or ç button to the LIGHT-
ubmenu.
s button j or k repeatedly you see this message in the dis- LIGHT CIRCUIT HEADLIGHT MODE.
election marker is on the current ng.
s æ or ç to select manual ytime running lamp (constant)
e. This function is not available in tries where daytime running s are mandatory.
With daytime running lamp mode se-lected and the exterior lamp switch at position 0, the following lamps will come on automatically when the en-gine is turned on:
� Parking lamps and low beam head-lamps
� License plate lamps (in low ambient light conditions)
S
Dcintulo
�
�
�
�
Tdto4
�
iIf you turn the exterior lamp switch to another position, the corresponding lamp(s) will switch on.
For safety reasons, resetting the LIGHTING submenu to factory settings (� page 132) will not reset the daytime running lamp mode.
In the display you will then see the mes-sage: LIGHTING – CANNOT BE TOTALLY RESET TO FACTORY SETTINGS WHILE DRIVING!.

137
Controls in detail
Control system
� Preuntpla
Theset
� Presire
Theor o
To select delayed shut-off period:
� Move the selection marker with the æ or ç button to the LIGHT-ING submenu.
� Press button j or k repeatedly until you see this message in the dis-play: HEADLIGHTS DELAYED SHUT-OFF.
The selection marker is on the current setting.
� Press æ or ç to select the de-sired lamp-on period.
You can select:
� 0 S, the delayed shut-off feature is deactivated
� 15 S, 30 S, 45 S, or 60 S, the de-layed shut-off feature is activated
ss button j or k repeatedly il you see this message in the dis-y: LOCATOR LIGHTING.
selection marker is on the current ting.
ss æ or ç to select the de-d setting.
locator lighting will be switched on ff.
Setting night security illumination (Exterior lights delayed shut-off)
Use the HEADLIGHTS DELAYED SHUT-OFF function to set whether and for how long you would like the exterior lamps to illumi-nate during darkness after all doors are closed. When the delayed shut-off feature is activated and the exterior lamp switch is in position U, the following lamps will remain lit after you remove the key from the starter switch:
� Parking lamps
� Tail lamps
� License plate lamps
� Front fog lamps
iYou can reactivate this function within ten minutes by opening a door.
If you do not open a door after remov-ing the key, the lamps will automatical-ly shut off after 60 seconds.

138
Controls in detail
Contro
You canlayed sh
� Befoin th
� Turnposit
The dvatedreins
Vehicles
� Preston o(� pa
Press æ or ç to select the de-sired lamp-on time period. You can se-lect:
� 0 S, the delayed shut-off feature is deactivated.
� 5 S, 10 S, 15 S, or 20 S, the de-layed shut-off feature is activated.
l system
temporarily deactivate the de-ut-off feature:
re leaving the vehicle, turn the key e starter switch to position 0.
the key in the starter switch to ion 2 and back to 0.
elayed shut-off feature is deacti-. It will reactivate as soon as you ert the key in the starter switch.
with KEYLESS-GO*:
s the KEYLESS-GO start/stop but-n the gear selector lever ge 33).
Interior lighting delayed shut-off
Use this function to set whether and for how long you would like the interior light-ing to remain lit during darkness after the key is removed from the starter switch.
� Move the selection marker with the æ or ç button to the LIGHT-ING submenu.
� Press button j or k repeatedly until you see this message in the dis-play: INT. LIGHTING DELAYED SHUT-OFF.
The selection marker is on the current setting.
�

139
Controls in detail
Control system
Vehicl
AccessINGS mmake ging fun
Setting
Use thto selelection
� MotheCLE
� Preuntpla
Theset
� Press button j or k repeatedly until you see this message in the dis-play: AUTOMATIC DOOR LOCK.
The selection marker is on the current setting.
� Press æ or ç to switch AUTOMATIC DOOR LOCK ON or OFF.
Funct
Set sta(radio)
Set au
e submenu
the VEHICLE submenu via the SET-enu. Use the VEHICLE submenu to eneral vehicle settings. The follow-ctions are available:
station selection mode
e STATION SEARCH USING function ct the manual or memory station se- mode for the radio (� page 122).
ve the selection marker with æ or ç button to the VEHI- submenu.
ss button j or k repeatedly il you see this message in the dis-y: STATION SEARCH USING.
selection marker is on the current ting.
� Press æ or ç to select the de-sired station selection mode. You can select:
� FREQUENCY
� MEMORY selects next stored station
Setting automatic locking
Use this function to activate or deactivate the automatic central locking. With the au-tomatic central locking system activated, the vehicle is centrally locked at vehicle speeds of approximately 9 mph (15 km/h).
� Move the selection marker with the æ or ç button to the VEHI-CLE submenu.
ion Page
tion selection mode see below
tomatic locking 139

140
Controls in detail
Contro
Conven
Access tSETTINGmenu toof convefunction
ctivating easy-entry/exit feature
se this function to activate and deacti-ate the easy-entry/exit feature. When e feature is activated, the steering wheel
nd driver’s seat will move back to facili-te exiting when you
remove the key from the starter switch
open the driver’s door.
owever, the engine must be turned off.
Functio
Set key
Activate
Set parkrear vie
Set foldrear vie
l system
ience submenu
he CONVENIENCE submenu via the S menu. Use the CONVENIENCE sub- change the settings for a number nience features. The following s are available:
Setting key dependency
Use this function to set whether the mem-ory settings for the seats, the steering wheel, the mirrors, and the automatic cli-mate control should be stored separately for each key (� page 105).
� Move the selection marker with the æ or ç button to the CONVENIENCE submenu.
� Press button j or k repeatedly until you see this message in the dis-play: SETTINGS KEY-DEPENDENT.
The selection marker is on the current setting.
� Press æ or ç to set key depen-dency to ON or OFF.
A
Uvthata
�
�
H
n Page
dependency 140
easy-entry/exit feature 140
ing position for exterior w mirrors
142
-in function for exterior w mirrors
142

141
Controls in detail
Control system
After ewheel stored
� the
� Press æ or ç to change the easy-entry/exit setting.
The following settings are available for the easy-entry/exit feature:
Warn
You mcomesteerithe eaand thkey isnot leor witperviscauseinjury
Do nohicle, Childrunintefeaturand/
OFF The easy-entry/exit feature is deactivat-ed.
STEER. COL. Only the steering column is moved.
ST. COL + SEAT Both the steering column and the seat are moved.
ntering the vehicle, the steering and seat will move into the position in memory when
driver’s door is closed
� you put the key in the starter switch
� press the appropriate stored position button on the memory switch (� page 105).
� Move the selection marker with the æ or ç button to the CONVENIENCE submenu.
� Press button j or k repeatedly until you see this message in the dis-play: EASY-ENTRY FEATURE ACTIVATE.
The selection marker is on the current setting.
ing! Gust make sure that no one can be-
trapped or injured by the moving ng wheel and the driver’s seat when sy-entry/exit feature is in operation e driver’s door is being opened or the removed from the starter switch. Do ave children unattended in the vehicle, h access to an unlocked vehicle. Unsu-ed use of vehicle equipment may an accident and/or serious personal .
t leave children unattended in the ve-or with access to an unlocked vehicle. en could open the driver’s door and ntionally activate the easy-entry/exit e, which could result in an accident or serious personal injury.
iTo cancel seat/steering wheel move-ment, do one of the following:
� Press seat adjustment switch (� page 35)
� Move the steering column stalk (� page 37)
� Press the memory switch (� page 105)

142
Controls in detail
Contro
Setting view mi
Use the functionside extturned dvers wheditional position(� page
� Movethe Cthe æ
� Presedly WHEN
Press the j or k button repeat-edly until the message FOLD MIRRORS WHEN LOCKING appears in the display.
The selection marker is on the current setting.
Press the æ or ç button to switch the automatic fold-in setting for the mirrors ON or OFF when the vehicle is locked.
l system
parking position for exterior rear rror
MIRROR SETTING WHEN PARKING to select whether the passenger erior rear view mirror should be ownward during parking maneu-n reverse gear is engaged. For ad-
information see “Setting parking for exterior rear view mirror” 142).
the selection marker to ONVENIENCE submenu using
or ç button.
s the j or k button repeat-until the message MIRROR SETTING PARKING appears in the display.
The selection marker is on the current setting.
� Press æ or ç to switch function ON or OFF.
Setting fold-in function for exterior rear view mirrors
Using this function, you can set the exteri-or rear view mirrors to be automatically folded in when you lock your vehicle (� page 152).
� Move the selection marker to the CONVENIENCE submenu using the æ or ç button.
�
�

143
Controls in detail
Automatic transmission
AuInftraed
Yoprocodopedri
If ttomits
When the selector lever is in position D, you can influence transmission shifting by:
� limiting the gear range
� changing gears manually
Warning! GIt is dangerous to shift the selector lever out of P or N if the engine speed is higher than idle speed. If your foot is not firmly on the brake pedal, the vehicle could accelerate quickly forward or reverse. You could lose control of the vehicle and hit someone or something. Only shift into gear when the en-gine is idling normally and when your right foot is firmly on the brake pedal.
tomaormationsmiss” sectio
ur transcess to
ntinuallwn. Therformedving co
he opeatic tr
gear sh
iDuringsion uthe caquickl
tic transmissionn on driving with an automatic ion is found in the “Getting start-n (� page 43).
mission adapts its gear shifting your individual driving style by
y adjusting the shift points up or se shift point adjustments are based on current operating and
nditions.
rating conditions change the au-ansmission reacts by adjusting ift program.
The automatic transmission selects indi-vidual gears automatically, depending on:
� the selector lever position D with gear ranges 4, 3, 2, 1 (� page 145)
� the selected shift program (C/S) (� page 147)
� the position of the accelerator pedal (� page 148)
� the vehicle speed
The current selector lever position and shift program (C/S) appear in the tachom-eter display (� page 22).
the brief warm-up the transmis-pshifting is delayed. This allows talytic converter to heat up more y to operating temperature.

144
Controls in detail
Autom
One-tou
Even witcan chaselector
Downsh
� Briefleft i
The trangear to tmultanetransmis
anceling gear range limit
Press and hold the selector lever in the D+ direction until D reappears in the ta-chometer display.
he transmission will shift from the current ear range directly to gear range D.
hifting into optimal gear range
Press and hold the gear selector lever in the D– direction.
he transmission will automatically select e gear range suited for optimal accelera-
on and deceleration. This will involve hifting down one or more gears.
Warnin
On slippin orderresult incle convent thi
atic transmission
ch gearshifting
h an automatic transmission you nge the gears manually when the lever is in position D.
ifting
ly press the selector lever to the n the D– direction.
smission will shift from the current he next lower gear. This action si-ously limits the gear range of the sion (� page 145).
Upshifting
� Briefly press the selector lever to the right in the D+ direction.
The transmission will shift from the current gear to the next higher gear as permitted by the shift program. This action simulta-neously extends the gear range of the transmission.
C
�
Tg
S
�
Tthtis
g! Gery road surfaces, never downshift to obtain braking action. This could drive wheel slip and reduced vehi-
trol. Your vehicle’s ABS will not pre-s type of loss of control.
iTo avoid overrevving the engine when the selector lever is moved to the D– direction, the transmission will not shift to a lower gear if the engine's max. speed would be exceeded.

145
Controls in detail
Automatic transmission
Gear r
With thcan limpressinverse tlever to
The setachomceleratrpm limyond a
Gear range
Effect
ç The transmission shifts through second gear only.
Allows the use of engine’s braking power when driving
� on steep downgrades
� in mountainous regions
� under extreme operating conditions
æ The transmission operates only in first gear.
For maximum use of engine’s braking effect on very steep or lengthy downgrades.
anges
e selector lever in position D, you it the transmission’s gear range by g the lever to the left (D-), and re-he gear range limit by pressing the the right (D+).
lected gear range will appear in the eter display. If you press on the ac-
or when the engine has reached its it, the transmission will upshift be-
ny gear range limit selected.
Gear range
Effect
é The transmission shifts through fourth gear only.
è The transmission shifts through third gear only.
With this selection you can use the braking effect of the engine.

146
Controls in detail
Autom
Gear se
Ef
P Pa
Seis in stotenthedriingsecu
Ththelevmoin
!Coasting the vehicle, or driving for any other reason with selector lever in N can result in transmission damage that is not covered by the Mercedes-Benz Limited Warranty.
Warning! GGetting out of your vehicle with the selector lever not fully engaged in position P is dan-gerous. Also, position P alone is not intend-ed to or capable of preventing your vehicle from moving, possibly hitting people or ob-jects.
Always set the parking brake in addition to shifting to position P (� page 44).
When parked on an incline, turn the front wheels towards the road curb.
atic transmission
lector lever position
fect
rk position
lector position when the vehicle parked. Only place selector lever position P when vehicle is pped. The park position is not in-ded to serve as a brake when vehicle is parked. Rather, the ver should always set the park- brake in addition to placing the
lector lever in position P to se-re the vehicle.
e key can only be removed from starter switch with the selector er in position P. With the key re-ved the selector lever is locked
position P.
Effect
R Reverse gear
Place selector lever in position R only when vehicle is stopped.
N Neutral
No power is transmitted from the en-gine to the drive axle. When the brakes are released, the vehicle can be moved freely (pushed or towed).
To avoid damage to the transmission, never engage N while driving.
If the ESP is deactivated or malfunc-tioning:Only move selector lever to N if the vehicle is in danger of skidding (e.g. on icy roads).
D Drive
The transmission shifts automatical-ly. All five forward gears are avail-able.

147
Controls in detail
Automatic transmission
� Press the program mode selector switch repeatedly until the letter of the desired shift program appears in the ta-chometer display (� page 22).
Select C for comfort driving:
� The vehicle starts out in second gear (both forward and reverse) for gentler starts. This does not apply if full throttle is applied or gear range 1 is selected.
� Traction and driving stability are im-proved on icy roads.
� Upshifts occur earlier even when you give more gas. The engine then operates at lower rpms and the wheels are less likely to spin.
� The power transmission ratio for se-lector lever position R changes de-pending on the program mode selected (C or S).
Warn
Whenkey frKEYLEhicle. the vevehiclver froaccide
Program mode selector switch
1 Program mode selector switch
S Sport For standard driving
C Comfort For comfort driving
ing! G leaving the vehicle, always remove the om the starter switch, take the SS-GO* card with you and lock the ve-Do not leave children unattended in hicle, or with access to an unlocked e. Children could move the selector le-m position P, which could result in an nt and/or serious personal injury.
!Never change the program mode when the selector lever is out of position P. This could result in a change of driving characteristics for which you may not be prepared.

148
Controls in detail
Autom
Acceler
Your drision’s sh
Less thr
More th
mergency operation (Limp home ode)
vehicle acceleration worsens or the ansmission no longer shifts, the trans-ission is most likely operating in
imp-Home Mode (emergency operation). this mode, only second gear and reverse
ear can be activated.
Stop the vehicle.
Move selector lever to P.
Turn off the engine.
Wait at least ten seconds before re-starting.
Restart the engine.
Move selector lever to position D (for second gear) or R.
Have the transmission checked at an authorized Mercedes-Benz Center as soon as possible.
atic transmission
ator position
ving style influences the transmis-ifting behavior:
ottle Earlier upshifting
rottle Later upshifting
Kickdown
Use kickdown when you want maximum acceleration.
� Press the accelerator past the point of resistance.
The transmission shifts into a lower gear.
� Ease up on the accelerator when you have reached the desired speed.
The transmission shifts up again.
Em
IftrmLIng
�
�
�
�
�
�
�

149
Controls in detail
Automatic transmission
Steeri(SpeedCL 55
The CLautomamodesyou casteerinver.
1 Rig2 Lef
Activating steering wheel gearshift control
� Press the program mode selector switch repeatedly until the M for manual shift program appears in the tachome-ter display.
Automatic gear shifting is activated.
!Never change the program mode when the selector lever is out of position P. It could result in a change of driving char-acteristics for which you may not be prepared.
ng wheel gearshift control shift) and manual shift program AMG
55 AMG can be driven in both the tic and manual shift program
. In the manual shift program mode n change the gears manually on the g wheel or by using the selector le-
ht button: upshiftt button: downshift
To do so, you must first select the manual shift program M on the program mode se-lector switch.
3 Program mode selector switch
S Sport For standard driving
C Comfort For comfort driving
M Manual For manual gear shifting

150
Controls in detail
Autom
Upshifti
� Presside
or
� Briefright
The thighe
Warm upplace fuating teminto revestopped
eactivating steering wheel gearshift ontrol
Press the program mode selector switch repeatedly until the S or C for au-tomatic shift program appears in the tachometer display.
Automatic gear shifting is activated.
!Avoidextenslippous dnot cLimit
iAt each engine start, the transmission will go into the last automatic shift pro-gram mode selected (S or C). Program mode M is not stored and will not be re-called when engine is restarted.
atic transmission
ng
s the button located on the right of the steering wheel.
ly press the selector lever to the in the D+ direction.
ransmission shifts to the next r gear.
the engine smoothly. Do not ll load on the engine until the oper-
perature has been reached. Shift rse gear only when the vehicle is
.
Downshifting
� Press the button located on the left side of the steering wheel.
or
� Briefly press the selector lever to the right in the D- direction.
The transmission shifts to the next low-er gear.
Warm up the engine smoothly. Do not place full load on the engine until the oper-ating temperature has been reached. Shift into reverse gear only when the vehicle is stopped.
Dc
�
spinning of a drive wheel for an ded period when driving off on
ery surface. This may cause seri-amage to the drivetrain which is overed by the Mercedes-Benz ed Warranty.
Warning! GOn slippery road surfaces, never downshift in order to obtain braking action. This could result in drive wheel slip and reduced vehi-cle control. Your vehicle’s ABS will not pre-vent this type of loss of control.

151
Controls in detail
Good visibility
GoInf(�mitin
Re
Au
Threathetom
�
�
Th
�
�
Warning! GExercise care when using the passenger side exterior rear view mirror. The mirror surface is convex (outwardly curved surface for a wider field of view). Objects in mirror are closer than they appear. Check your in-side rear view mirror or glance over your shoulder before changing lanes.
!Electrolyte drops coming into contact with the vehicle paint finish can be completely removed only while in the liquid state by applying plenty of water.
od viormatiopage 4rrors (�g starte
ar view
tomat
e reflecr view insideaticall
the ign
incomthe seror.
e rear v
revers
the int
sibilityn on the windshield wipers 7) and for setting the rear view page 38) is found in the “Get-d” section.
mirror
ic antiglare rear view mirror
tion brightness of the exterior mirror on the driver’s side and rear view mirror will respond au-y to glare when
ition is switched on, and
ing light from headlamps falls on nsor in the inside rear view mir-
iew mirror will not react if
e gear is engaged
erior lighting is turned on
Warning! GThe automatic antiglare function does not react if incoming light is not aimed directly at sensors in the inside rear view mirror.
The inside rear view mirror and the exterior rear view mirror on the driver’s side do not react, for example, if the rear window sun-shade is in raised position.
Glare can endanger you and others.
Warning! GIn the case of an accident liquid electrolyte may escape from the mirror housing if the mirror glass breaks.
Electrolyte has an irritating effect. Do not al-low the liquid to come into contact with eyes, skin, clothing, or respiratory system. In case it does, immediately flush affected area with water, and seek medical help if necessary.

152
Controls in detail
Good v
Activatiparking
The buttdoor.
1 Drive2 Pass
mirro
Follow tparking ger-sideturned d
� Makpositrear
lectrically folding exterior rear view irrors
olding the exterior rear view mirrors in nd out automatically
hen the corresponding function in the ontrol system is activated (� page 142):
The exterior rear view mirrors automat-ically fold in as soon as the vehicle is locked from the outside.
The exterior rear view mirrors automat-ically fold out as soon as the vehicle is unlocked and the driver’s or passenger door are subsequently opened.
isibility
ng exterior rear view mirror position
ons are located on the driver’s
r’s side exterior rear view mirrorenger-side exterior rear view r
hese steps to activate the mirror position so that the passen- exterior rear view mirror will be ownward to the stored position.
e sure you have stored a parking ion for the passenger-side exterior view mirror (� page 107).
� Make sure that the MIRROR SETTING WHEN PARKING function in the CONVENIENCE submenu in the control system, is switched to ON (� page 142).
� Switch on ignition (if not already on).
� Press button 2 for passenger-side ex-terior rear view mirror.
� Place the gear selector lever in reverse gear R.
The passenger-side exterior rear view mirror will be turned downward in the stored position.
The exterior rear view mirror returns to its previously stored driving position:
� 10 seconds after you put the gear se-lector lever out of position R
� immediately once you exceed a vehicle speed of approx. 6 mph (10 km/h)
� immediately when you press button 1 for driver’s side exterior rear view mirror
Em
Fa
Wc
�
�

153
Controls in detail
Good visibility
Foldinand ou
The exthey ar
The budoor.
1 Fol2 Fol
� Ma
All sho
!If an exterior mirror housing is forcibly pushed forward (hit from the rear), re-position it manually by applying firm pressure until it snaps back into place.
If an exterior mirror is forcibly pushed rearward (hit from the front) press button 2 to fold mirrors in, then press button 1 to fold mirrors out. Do not force mirror by hand as it may damage the adjustment mechanism.
The mirror housing is now properly po-sitioned and you can adjust the mirror normally.
g the exterior rear view mirrors in t manually
terior rear view mirrors can vibrate if e not completely folded out.
ttons are located on the driver’s
ds the exterior mirrors outds the exterior mirrors in
ke sure the ignition is switched on.
the lamps in the instrument cluster uld light up.
Folding in
� Briefly press button 2.
The mirrors fold in.
Folding out
� Briefly press button 1.
The mirrors fold out.
!Before you drive the vehicle through an automatic car wash, fold the exterior mirrors in, otherwise they may get damaged.
iIf you are driving at more than 9 mph (15 km/h), you will not be able to fold the exterior mirrors in.

154
Controls in detail
Good v
Windsh
Informatfound in(� page
A rain sewindshiethe wind
� Swit
� Set t(� pa
After thewipes arrain senthe wind
eadlamp cleaning system
he switch is located on the left side of the ashboard.
1 Headlamp washer switch
Switch on ignition.
Press switch 1.
iInterthe vdoor
isibility
ield wipers
ion on the windshield wipers is the “Getting started” section 47).
nsor automatically controls the ld wipers depending on how wet shield is.
ch on ignition.
he wiper switch to position I ge 47).
initial wipe, pauses between e automatically controlled by the sor which monitors the wetness of shield.
H
Td
�
�
mittent wiping is interrupted when ehicle is at a standstill and a front is opened.
!To prevent the windshield wipers from being damaged, do not leave the wiper switch in intermittent setting when the vehicle is taken to an automatic car wash or when cleaning the windshield.
The switch should not be left in inter-mittent setting as the wipers will wipe the windshield once every time the en-gine is started. Dust that accumulates on the windshield might scratch the glass when wiping occurs on a dry windshield.
iIf intermittent wiping is on and you turn the key in the steering lock from posi-tion 1 to position 2 (� page 31) and keep the key in that position longer than 2 seconds, the wipe interval will be set to approx. 5 seconds.

155
Controls in detail
Good visibility
Sun vi
The suwhile d
� Swrien
Document holder
You can use the plastic tab of the docu-ment holder to hold admission tickets, parking passes or similar items in place.
Adjusting the vanity mirror
� Slide the mirror to the left or to the right.
Images in the mirror appear in normal size or larger, depending on the posi-tion of the mirror.
Warn
Do no
Keep while can e
sors
n visors protect you from sun glare riving.
ing sun visors down when you expe-ce glare.
1 Mounting2 Mirror cover3 Mirror lamp4 Document holder
� To use mirror, lift up cover 2.
Mirror lamp 3 lights up.
If sunlight enters through a side window:
� Disengage sun visor from mounting 1.
� Pivot sun visor to the side.
ing! Gt use the vanity mirror while driving.
the mirrors in the sun visors closed vehicle is in motion. Reflected glare ndanger you and others.
iIf you disengage the sun visor from mounting 1, mirror lamp 3 will switch off.

156
Controls in detail
Good v
Rear wi
The swit
� Turn1 or prestwice
� Pressuns
� Presthe s
Always rport aga
Warning! GWhen leaving the vehicle, always remove the SmartKey from starter switch, and lock your vehicle. Do not leave children unattended in the vehicle, or with access to an unlocked vehicle. Unsupervised use of vehicle equip-ment may cause an accident and/or seri-ous personal injury.
isibility
ndow sunshade
ch is located in the center console.
the key to starter switch position 2. Vehicles with KEYLESS-GO*: s the start/stop button once or .
s the switch briefly at 1 to raise the hade.
s the switch briefly at 1 to lower unshade.
aise the sunshade fully for its sup-inst the window frame.
Warning! GWhen operating the rear window sunshade, make sure that there is no danger of anyone being harmed by the raising or lowering pro-cedure.
The raising or lowering procedure can be im-mediately reversed by pressing switch 1.

157
Controls in detail
Automatic climate control
Au
toma tic climate control
158
Controls in detail
Autom
Ite
1 Ce
2 Fix
3 Aive
4 Aiair
5 Aiair
6 Fix
7 Ce
8 Sifix
9 Siab
10 Ai
11 Do
12 Au
iFor draft-free ventilation, move the slid-ers for the center air vents to the mid-dle position.
atic climate control
m
nter air vent, left, adjustable
ed air vent, left
r volume control for left center air nt
r temperature control for center vents
r volume control for right center vent
ed air vent, right
nter air vent, right, adjustable
de defroster vent, left and right, ed
de air vent, left and right, adjust-le
r volume control for side air vents
or air vent, left and right
tomatic climate control panel
Warning! GWhen operating the automatic climate con-trol, the air that enters the passenger com-partment through the air vents in the footwell can be very hot or very cold (de-pending on the set temperature). This may cause burn or frostbite to unprotected skin in the immediate area of the air vents. Al-ways keep sufficient distance between un-protected parts of the body and the footwell air vents. If necessary, change the air flow using the air distribution controls to direct the air away from the footwell air vents (� page 161).

159
Controls in detail
Automatic climate control
Autom
The automatic climate control is operation-al whenever the engine is running. You can operate the climate control system in ei-ther the automatic or manual mode. The system cools or heats the interior depend-ing on the selected interior temperature and the current outside temperature.
Nearly all dust particles, pollutants and odors are filtered out before outside air en-ters the passenger compartment through the air distribution system.
The air conditioning will not engage (no cooling) if the ACOFF mode is selected (� page 166).
Warning! GFollow the recommended settings for heat-ing and cooling given on the following pag-es. Otherwise the windows could fog up, impairing visibility and endangering you and others.
atic climate control panel
Item
1 Windshield defroster
2 Rear window defroster
3 Display
4 Residual engine heat utilization
5 Automatic climate control on/off
6 Air distribution, right
7 AC cooling on/off
8 Temperature control, right
9 Air volume (automatic, manual)
10 Temperature control, left
11 Air recirculation
12 Air distribution, left
13 Activated charcoal filter

160
Controls in detail
Autom
djusting the temperature for center ir vents
hen outside temperatures are low, you an manually raise the air temperature for e center and side air vents. The umbwheel 4 is located between the cen-r air vents (� page 157).
utomatic temperature control
Turn thumbwheel 4 to A.
The indicator lamp above the thumb-wheel lights up. The temperature is au-tomatically adjusted to the set value.
urning on warm air
Turn thumbwheel 4 in the direction of the white marking.
Warm air will enter from the center air vent.
iThe c(ON/tivatfor emovethe vKEYL
If thethe i
Keepwindand a
Do nobjehaus
atic climate control
Setting the temperature
Use temperature controls (� page 159) 10 for the left side or 8 for the right side to separately adjust the air temperature on each side of the passenger compartment. You should raise or lower the temperature setting in small increments, preferably starting at 72°F (22°C).
Increasing/decreasing
� Press button 10 or 8 repeatedly up or down until the display shows the de-sired temperature.
The automatic climate control system will accordingly adjust the interior air temperature.
Aa
Wcththte
A
�
T
�
urrent climate control settings OFF, temperature, air volume, ac-
ed charcoal filter, etc.) are stored ach electronic key before it is re-d from the starter switch or when ehicle is locked using the ESS-GO* card (� page 105).
vehicle interior is hot, ventilate nterior before driving off.
the air intake grille in front of the shield free of snow, leaves, sticks ny other debris.
ot obstruct air volume by placing cts on the air volume-through ex-t slots below the rear window.
iWhen operating the climate control system in automatic mode, you will only rarely need to adjust the tempera-ture, air volume and air distribution.

161
Controls in detail
Automatic climate control
Turnin
� Turthe
Cooven
Adjust
Use th(� pagdistribucompafound o
Windows fogged on the inside
� Press button ACOFF to switch on the air conditioning (� page 159).
The indicator lamp in the button goes out.
� Press button , to switch off the air recirculation (� page 159).
The indicator lamp on the button goes out.
� Adjust left and right air vents 1 and 6 upwards (� page 157).
� Set blower to the maximum speed.
� Increase temperature setting.
� Open the side air vents 9 and direct them onto the side windows (� page 157).
Symb
h
j
V
k
g on cooler air
n thumbwheel 4 in the direction of blue marking.
ler air will enter from the center air t.
ing air distribution
e air distribution controls 12 and 6 e 159) to separately adjust the air tion on each side of the passenger
rtment. The following symbols are n the controls:
Adjusting manually
� Press button U.
The button emerges and the h, V, j and k symbols become visible.
� Turn the marking on the regulator to the desired symbol.
The air will be directed to the vents cor-responding to this symbol.
Adjusting automatically
� Press button U until it clicks in.
The h, V, j and k sym-bols are no longer visible. The air distri-bution is adjusted automatically.
ol Function
Directs air through the cen-ter air vents
Directs air to the windows
Directs air into the entire vehicle interior
Directs air to the footwells

162
Controls in detail
Autom
Windsh
� Swit
� Presclick
The hbols
� Presrecir
The iout.
� Set b
Adjustin
Use air vboth autjustmen
Adjustin
� Pres(� pa
The dume
efrosting
ctivating
Press button P (� page 159).
The indicator lamp on the button lights up.
witch off air recirculation, if selected.
Press button , (� page 159).
The indicator lamp on the button goes out.
Close center air vents.
Adjust side air vents upwards.
eactivating
Press button P (� page 159).
The indicator lamp on the button goes out. Defrosting is turned off.
iThese settings should only be selected for a short time.
atic climate control
ield fogged on the outside
ch the windshield wipers on.
s on both U buttons until they in.
, V, j and k sym-are no longer visible.
s button , to switch off the air culation (� page 159).
ndicator lamp on the button goes
lower to the maximum speed.
g air volume
olume control 9 (� page 159) for omatic and manual air volume ad-t.
g automatically
s A on air volume switch 9 ge 159).
isplay shows “AUTO”. The air vol- is adjusted automatically.
Adjusting manually
Reducing air volume
� Press switch 9 down until the desired air volume is reached.
The display shows the current level.
Increasing air volume
� Press switch 9 up until the desired air volume is reached.
The display shows the current level.
Maximum cooling MAXCOOL
If the left and right air distribution controls as well as the air volume control are set to U and there is a high need for cool-ing, the display “AUTO MAXCOOL” ap-pears.
This provides the fastest possible cooling of the vehicle interior (when windows and sliding/pop-up roof are closed).
D
A
�
S
�
�
�
D
�

163
Controls in detail
Automatic climate control
Air rec
Switchunpleafrom thintake air in t
Activa
� Pre
Theup.
Warn
When41°F modefoggin
iIf ysidroo
iThe air recirculation mode is activated automatically:
� at high outside temperatures
� if the concentration of carbon mon-oxide and nitrogen oxide in the out-side air increases beyond a predetermined level, for example in a tunnel.
Please note that the charcoal filter must be activated (� page 164) for the air recirculation mode to be activated automatically.
If you have turned off the air condition-ing (� page 166) or the outside temperature is below 41°F (5°C), the air recirculation mode will not switch on automatically.
irculation mode
to air recirculation mode to prevent sant odors from entering the vehicle e outside. This setting cuts off the of outside air and recirculates the he passenger compartment.
ting
ss button , (� page 159).
indicator lamp on the button lights
ing! G the outside temperature is below (5°C), only switch to air recirculation for short periods to prevent window g.
ou keep button , pressed, the e windows and the sliding/pop-up f will be closed.
Warning! GNever operate the side windows and the sliding/pop-up roof if there is the possibility of anyone being harmed by the closing pro-cedure.
In the event that the procedure causes po-tential danger, the closing of the side win-dows can be immediately halted by releasing the , button or by pressing the respective window switch. The closing of the sliding/pop-up roof can be immediately halted by releasing the , button or by moving the sliding/pop-up roof switch in the overhead control panel in any direction.

164
Controls in detail
Autom
Deactiv
� Pres
The iout.
The air rautomat
� afterature(5°C
� afteris tur
� afterature(5°C
eactivating
Press button e (� page 159).
The indicator lamp on the button goes out.
iIf youside roof posit
Warning! GNever operate the side windows and the sliding/pop-up roof if there is the possibility of anyone being harmed by the closing pro-cedure.
In the event that the procedure causes po-tential danger, the procedure can be imme-diately halted by releasing the e button or by pressing the respective window switch. The closing of the sliding/pop-up roof can be immediately halted by releasing the e button or by moving the slid-ing/pop-up roof switch in the overhead con-trol panel in any direction.
atic climate control
ating
s button , (� page 159).
ndicator lamp on the button goes
ecirculation mode is deactivated ically:
five minutes if the outside temper- is below approximately 41°F )
five minutes if the air conditioning ned off
30 minutes if the outside temper- is above approximately 41°F )
At outside temperatures above 79°F (26°C) the system will not automatically switch back to outside air. A quantity of outside air is added after approximately 30 minutes.
Charcoal filter
An activated charcoal filter markedly re-duces bad odors and removes pollutants from air entering the passenger compart-ment.
Activating
� Press button e (� page 159).
The indicator lamp on the button lights up.
D
�
keep button , pressed, the windows and the sliding/pop-up will be returned to their previous ion.
iIf you keep button e pressed, the side windows and the sliding/pop-up roof will be closed.

165
Controls in detail
Automatic climate control
The syair recimonoxconcenbeyondin a tun
The aunot funthe out41°F (
The acswitchinside,needs down.
iIf ysidroopos
Warning! GAny accumulation of snow and ice should be removed from the rear window before driv-ing. Visibility could otherwise be impaired, endangering you and others.
!If the rear window defroster switches off too soon and the indicator lamp starts blinking, this means that too many electrical consumers are operat-ing simultaneously and there is insuffi-cient voltage in the battery. The system responds automatically by deactivating the rear window defroster.
As soon as the battery has sufficient voltage, the rear window defroster au-tomatically turns itself back on.
stem switches automatically to the rculation mode if the carbon ide (CO) or nitrogen oxide (NOX) tration of the outside air increases a predetermined level, for example nel.
tomatic air recirculation mode does ction if ACOFF mode is selected or if side temperature has fallen below
5°C).
tivated charcoal filter should be ed off when windows fog up on the or if the passenger compartment to be quickly heated or cooled
Rear window defroster
The rear window defroster uses a large amount of power. To keep battery drain to a minimum, switch off the defroster as soon as the rear window is clear. The de-froster is automatically deactivated after approximately 6 to 17 minutes of opera-tion depending on the outside tempera-ture.
Activating
� Press button F (� page 159).
The indicator lamp on the button lights up.
Deactivating
� Press button F (� page 159) again.
The indicator lamp on the button goes out.
ou keep button e pressed, the e windows and the sliding/pop-up f will be returned to their previous itions.
166
Controls in detail
Autom
Deactivtem
Deactiv
It is posautomat
� Pres
The d
Reactiv
There arautomat
� PresMtrol sswitc
ctivating
oist air can fog up the windows. You can ehumidify the air with the air condition-g.
Press ACOFF again (� page 159).
The indicator lamp on the button ACOFF goes out.
he air conditioning uses the refrigerant 134a. This refrigerant is free of CFCs hich are harmful to the ozone layer.
!If the ACOFF button on the automatic climate control panel starts to blink, this indicates that the air conditioning is losing refrigerant. The compressor has turned itself off. The air condition-ing cannot be turned on again.
Have the air conditioning checked at the nearest authorized Mercedes-Benz Center.
atic climate control
ating the climate control sys-
ating
sible to completely deactivate the ic climate control system.
s button M (� page 159).
isplay shows “0”
ating
e several ways to reactivate the ic climate control system:
s one of the following buttons, , P, U, a temperature con-witch (� page 159) or air volume h 9 on the climate control panel.
Air conditioning
The air conditioning is operational while the engine is running and cools the interior air to the temperature set by the operator.
Deactivating
It is possible to deactivate the air condi-tioning (cooling) function of the automatic climate control system. The air in the vehi-cle will then no longer be cooled or dehu-midified.
� Press button ACOFF (� page 159).
The indicator lamp on the button ACOFF lights up.
A
Mdin
�
TRw
iCondensation may drip out from under-neath the vehicle. This is normal and not an indication of a malfunction.

167
Controls in detail
Automatic climate control
Residu
With thto contfor up use of engine
Activa
� Turposswi
� Pre
Thecom
Ventilated storage compartment under armrest
The storage compartment under the arm-rest (� page 200) can be ventilated when the automatic air conditioning is switched on. The switch is located inside the storage compartment in the front. The air tempera-ture is about the same as that of the center air vents.
The air volume is dependent on the setting of:
� Air distribution control
� Air volume control
� Air vents in the dashboard
The air temperature is about the same as that of the dashboard air vents. It cannot be regulated separately.
al heat and ventilation
e engine switched off, it is possible inue to heat or ventilate the interior to 30 minutes. This feature makes the residual heat produced by the .
ting
n the key in the starter switch to ition 1 or remove it from the starter tch.
ss button T (� page 159).
indicator lamp on button T es on.
Deactivating
� Press button T (� page 159).
The indicator lamp on button T goes off.
The residual heat is automatically turned off:
� when the ignition is switched on
� after about 30 minutes
� if the battery voltage drops
iHow long the system will provide heat-ing depends on the coolant tempera-ture and the temperature set by the operator. The blower will run at speed setting 1 regardless of the air distribu-tion control setting.

168
Controls in detail
Autom
Switchi
� Push
Switchi
� Push
iThe cdue theatmenthe p
!Do nage c
iThe booster blower allows air volume speed to the rear passenger compart-ment to be increased at four different levels.
The temperature at the air vents for rear passenger compartment 1 and 2 is the same as at the dashboard center air vents.
atic climate control
ng ventilation on
upper portion of switch.
ng ventilation off
lower portion of switch.
Rear passenger compartment adjust-able air vents
1 Left center air vent2 Right center air vent3 Thumbwheel for center air vents with
adjustable booster blower
To open center air vents and to adjust the booster blower:
� Turn thumbwheel 3.
ompartment can get very warm o its confined space. When storing sensitive objects in the compart-t, close the air vent while heating assenger compartment.
ot obstruct the air vent in the stor-ompartment.

169
Controls in detail
Power windows
PoOp
Thclosidswonter
1234
If the window encounters an obstruction that blocks its path in a circumstance where you pressed the switch past the resistance point and released it to close the window, the automatic reversal function will stop the window and open it slightly.
If the window encounters an obstruction that blocks its path in a circumstance where you are closing the window by pressing and holding the switch, by pressing and holding button ‹ on the SmartKey, or by press-ing and holding the lock button (vehicles with KEYLESS-GO*) on the door handle, the automatic reversal function will not operate.
When leaving the vehicle, always remove the key from starter switch, take the SmartKey with KEYLESS-GO* with you, and lock your vehicle. Do not leave children unattended in the vehicle, or with access to an unlocked vehicle. Unsupervised use of vehicle equip-ment can cause an accident and/or serious personal injury.
wer wening
e side wsed elee winditches the pas conso
Left frRight fRight rLeft re
indowsand closing the windows
indows can be opened and ctrically. The switches for all the
ows are on the driver’s door. The for the respective windows are senger door and on the rear cen-
le.
ont windowront windowear windowar window
Additional switches for the rear windows are located on the rear center console.
1 Left rear window2 Right rear window
Warning! GWhen closing the windows, make sure that there is no danger of anyone being harmed by the closing procedure.
The closing of the door windows can be im-mediately halted by releasing the switch or, if switch was pressed past the resistance point and released, by pressing the respec-tive switch.

170
Controls in detail
Power
� Turnposit
Opening
� Lightpoin
The wyou r
Closing
� Lightpoin
The wyou r
If youclosimenobstarmsic re
Warning! GDriver's door only:If within five seconds you again press the switch past the resistance point and re-lease, the automatic reversal will not func-tion.
windows
key in the starter switch to ion 1 or 2.
the windows
ly press switch k to resistance t.
indow will move downwards until elease the switch.
the windows
ly press switch j to resistance t.
indow will move upwards until elease the switch.
pull and hold the switch up when ng the window, and upward move-t of the window is blocked by some ruction including but not limited to , hands, fingers etc., the automat-
versal will not operate.
Fully opening the windows
� Press switch k past the resistance point and release.
Fully closing the windows
� Press switch j past the point of re-sistance and release.
!If the upward movement of the window is blocked during the closing proce-dure, the window will stop and open slightly.
Remove the obstruction, press the switch j again past the resistance point and release.
If the window still does not close when there is no obstruction, then hold the switch j down. The side window will then close without the obstruction sensor function.

171
Controls in detail
Power windows
Stoppi
� Pre
Opening (Summer opening feature)
� Press and hold button Œ after un-locking the vehicle.
The windows and sliding/pop-up roof begin to open after approximately one second.
� Release the ‹ button to stop proce-dure.
Closing (Convenience feature)
� Press and hold button ‹ after lock-ing the vehicle.
The windows and sliding/pop-up roof begin to close after approximately one second.
� Release the ‹ button to stop proce-dure.
Make sure that all side windows and the sliding/pop-up roof are properly closed before leaving the vehicle.
iYoudow
�
�
�
ng windows
ss respective switch again.
Opening and closing the windows with the SmartKey
The sliding/pop-up roof will also be opened or closed when you operate the power windows with the key. can also open or close the win-
s using the:
SmartKey, see below
button O in the control panel of the automatic climate control (� page 159).
button e in the control panel of the automatic climate control (� page 159).
Warning! GNever operate the windows or sliding/ pop-up roof if there is the possibility of any-one being harmed by the opening or closing procedure.
In the event that the procedure causes po-tential danger, the procedure can be imme-diately halted by releasing the remote control button. To reverse direction of movement, press Œ for opening or ‹ for closing.

172
Controls in detail
Power
Closingpop-up
� Pres(� pathe s
ynchronizing power windows
he power windows must be resynchro-ized each time after the battery has been isconnected:
Push the power window switches until the side windows are closed and hold the switches for approximately one second.
windows
the side windows and sliding / roof with KEYLESS-GO*
s and hold lock button at door ge 52) until the side windows and liding/pop-up roof are closed.
S
Tnd
�
Warning! GWhen closing the windows and the sliding/ pop-up roof, make sure that there is no dan-ger of anyone being harmed by the closing procedure.
The windows will not automatically re-open if blocked during convenience closing.
If potential danger exists, proceed as fol-lows:
SmartKey
� Release the ‹ button.
� Press and hold the Œ button until the windows and the sliding/pop-up roof open again.
KEYLESS-GO*
� Release the lock button.
� Pull on the door handle and hold firmly. The side windows and the sliding/pop-up roof will open for as long as the door handle is held but the door not opened.

173
Controls in detail
Sliding/pop-up roof
SlOppo
1234
Opening and closing the sliding/ pop-up roof
� Turn the key in the starter switch to position 1 or 2 or press the KEYLESS-GO* start/stop button.
� To open, close, raise or lower the sliding/pop-up roof, move the switch to resistance point in the required di-rection.
Release the switch when the roof has reached the required position.
When leaving the vehicle, always remove the key from starter switch, take the KEYLESS-GO* card with you, and lock your vehicle. Do not leave children unattended in the vehicle, or with access to an unlocked vehicle. Unsupervised use of vehicle equip-ment may cause an accident and/or seri-ous personal injury.
iding/ening p-up ro
Push uPull doPush fPush b
pop-up roofand closing the sliding/ of
p to raise roof at rearwn to lower roof at rearorward to slide roof closedack to slide roof open
With the roof closed or tilted open, a screen can be slid into the roof opening to guard against sun rays. When sliding the roof open, the screen will also retract.
Warning! GWhen closing the sliding/pop-up roof, make sure that there is no danger of anyone being harmed by the closing procedure.
The closing procedure of the sliding/pop-up roof can be immediately halted by releasing the switch or, if the switch was moved past the resistance point and released, by mov-ing the switch in any direction.

174
Controls in detail
Sliding
Openingmatical
� To sepresand reac
The sthe ppastdirec
Closingmatical
� Prespoinlease
The splete
Stoppin
� Move
pening and closing the sliding/ op-up roof with the SmartKey
he power windows will also be opened or losed when you operate the sliding/ op-up roof with the key.
Aim transmitter eye at the front door handle.
Warning! GNever operate the windows or sliding/ pop-up roof if there is the possibility of any-one being harmed by the opening or closing procedure.
In case the procedure causes potential dan-ger, the procedure can be stopped immedi-ately by releasing the remote control button. To reverse direction of movement, press Œ for opening or ‹ for closing
/pop-up roof
the sliding/pop-up roof auto-ly
lect a sunroof opening position, s the switch to the resistance point release it when the sunroof has hed the required position.
liding/pop-up roof now opens to osition set if the switch is pressed
the resistance point in the “open” tion.
the sliding/pop-up roof auto-ly
s the switch past the resistance t in the “close” direction and re-.
liding/pop-up roof closes com-ly.
g the sliding/pop-up roof
the switch in any direction.
If the movement of the sliding/pop-up roof is blocked during the closing pro-cedure, the roof will stop and reopen slightly.
Op
Tcp
�
iYou can also open or close the sliding/ pop-up roof using the:
� SmartKey (� page 171)
� button O in the control panel of the automatic climate control (� page 159)
� button e in the control panel of the automatic climate control (� page 159)
!To avoid damaging the seals, do not transport any objects with sharp edges which can stick out of the sliding/ pop-up roof.
The sliding/pop-up roof can be opened or closed manually should an electrical malfunction occur (� page 301).

175
Controls in detail
Sliding/pop-up roof
Openin
� Preloc
Thebegsec
� Reldur
Closin
� Preing
Thebegsec
� Reldur
Make sslidingbefore
Synchronizing the sliding/pop-up roof
The power sliding/pop-up roof must be re-synchronized each time after:
� the battery has been disconnected
� the sliding/pop-up roof has been closed manually
� the sliding/pop-up roof does not open smoothly
� a malfunction
� Press the switch in direction 1 (� page 173).
� Wait until the sliding/pop-up roof is raised and hold the switch down for approx. one second.
g (Summer opening feature)
ss and hold button Πafter un-king the vehicle.
windows and sliding/pop-up roof in to open after approximately one ond.
ease the ‹ button to stop proce-e.
g (Convenience feature)
ss and hold button ‹ after lock- the vehicle.
windows and sliding/pop-up roof in to close after approximately one ond.
ease the ‹ button to stop proce-e.
ure that all side windows and the /pop-up roof are properly closed leaving the vehicle.
Closing the side windows and sliding/ pop-up roof with KEYLESS-GO* (Convenience feature)
� Press and hold lock button at door (� page 52) until the side windows and the sliding/pop-up roof are closed.
Warning! GWhen closing the windows and the sliding/ pop-up roof, make sure that there is no dan-ger of anyone being harmed by the closing procedure.
If potential danger exists, proceed as fol-lows:
� Release the lock button.
� Pull on the door handle and hold firmly. The side windows and the sliding/pop-up roof will open for as long as the door handle is held but the door not opened.

17
Controls in detail
Dri
DriThescri
� Cws
� Awp
� Pp
Thedesction
Warning! GCruise control is a convenience system de-signed to assist the driver during vehicle op-eration. The driver is and must remain at all times responsible for the vehicle speed and for safe brake operation.
Only use cruise control if the road, traffic and weather conditions make it advisable to travel at a steady speed.
� The use of cruise control can be danger-ous on winding roads or in heavy traffic because conditions do not allow safe driving at a steady speed.
� The use of cruise control can be danger-ous on slippery roads. Rapid changes in tire traction can result in wheel spin and loss of control.
� Deactivate cruise control when driving in fog.
The “Resume” function should only be oper-ated if the driver is fully aware of the previ-ously set speed and wishes to resume this particular preset speed.
6
ving s
ving s drivingbed on
ruise chich thpeed
BC witith whension
arktroarking
BAS, ABribed i
(� pag
ystems
ystems systems of your vehicle are de-the following pages:
ontrol and Distronic*, with e vehicle can maintain a preset
h vehicle level control systems, ich you can change vehicle sus- characteristics.
nic system*, which serves as a assistant.
S and ESP driving systems are n the “Safety and Security” sec-e 71).
Cruise control
Cruise control automatically maintains the speed you set for your vehicle.
Use of cruise control is recommended for driving at a constant speed for extended periods of time. You can set any speed over 20 mph (30 km/h).
The cruise control function is operated by means of the cruise control lever.
The cruise control lever is the uppermost lever found on the left-hand side of the steering column (� page 20).

177
Controls in detail
Driving systems
1 Set2 Set3 Can4 Res
Settin
� Accspe
� Briecon
The
� Remped
Cru
!Moving gear selector lever to position N while driving also cancels cruise control. However, the gear se-lector lever should not be moved to position N while driving except to coast when the vehicle is in danger of skid-ding (e.g. on icy roads).
iThe last stored speed is canceled when you turn off the engine.
current or higher speed current or lower speedcel cruise controlume at previously set speed
g current speed
elerate or decelerate to the desired ed.
fly lift 1 or depress 2 the cruise trol lever.
current speed is set.
ove your foot from the accelerator al.
ise control is activated.
The selected speed appears in the multi-function display for approximately 5 sec-onds, and the corresponding speedometer segments from the selected speed to the vehicle maximum speed are illuminated.
Canceling cruise control
There are several ways to cancel cruise control:
� Step on the brake pedal.
or
� Briefly push the cruise control lever to position 3.
Cruise control will be canceled. The last speed set will be stored for later use.
iOn uphill or downhill grades, cruise control may not be able to maintain the set speed. Once the grade eases, the set speed will be resumed.

178
Controls in detail
Driving
Setting function
� Briefposit
The cset s
� Rempeda
The selefunctiononds, ansegmenvehicle m
ine adjustment in 1 mph anada: 1 km/h) increments
aster
Briefly tip the cruise control lever in the direction of arrow 1.
lower
Briefly tip the cruise control lever in the direction of arrow 2.
Warnin
The speset agamit. Podifferenspeed cous inju
iWhen you use the cruise control lever to decelerate, the transmission will au-tomatically downshift if the engine’s braking power does not slow the vehi-cle sufficiently.
systems
to last stored speed (“Resume” )
ly push the cruise control lever to ion 4.
ruise control will resume the last peed.
ove your foot from the accelerator l.
cted speed appears in the multi- display for approximately 5 sec-d the corresponding speedometer ts from the selected speed to the
aximum speed are illuminated.
Setting a higher speed
� Lift the cruise control lever to position 1 and hold it until the desired speed is reached.
� Release the cruise control lever.
The new speed is set.
Setting a lower speed
� Depress the cruise control lever to position 2 and hold it until the desired speed is reached.
� Release the cruise control lever.
The new speed is set.
F(C
F
�
S
�
g! Ged stored in memory should only be in if prevailing road conditions per-ssible acceleration or deceleration ces arising from returning to preset ould cause an accident and/or seri-ry to you and others.
iDepressing the accelerator pedal does not deactivate cruise control. After brief acceleration (e.g. for passing), cruise control will resume the last speed set.

179
Controls in detail
Driving systems
Distro
When acruise convenduring major
� If tha slyouthadis
� If thyouwa
Warn
Distrostitutenot renize oor theic canvehicl
Warning! GDistronic requires familiarity with its opera-tional characteristics. We strongly recom-mend that you review the following information carefully before operating the system.
iFor operation in the USA only: This de-vice complies with Part 15 of the FCC Rules. Operation is subject to the following two conditions:
� This device may not cause harmful interference, and
� this device must accept any inter-ference received, including interfer-ence that may cause undesired operation.
Any unauthorized modification to this device could void the user’s authority to operate the equipment.
nic*
ctivated, the Distronic adaptive control system increases driving ience afforded by the cruise control travel on expressways and other roads.
e Distronic distance sensor detects ower moving vehicle directly ahead, r vehicle speed will be reduced so t you follow that vehicle at a preset tance.
ere is no vehicle directly ahead of , Distronic will function in the same
y as cruise control (� page 176).
ing! Gnic adaptive cruise control is no sub- for active driving involvement. It does act to stationary objects, nor recog-r predict the curvature and lane layout movement of vehicles ahead. Distron- only apply a maximum of 20% of the e’s braking power.
It is the driver’s responsibility at all times to be attentive to traffic and road conditions and to provide the steering, braking and oth-er driving inputs necessary to retain control of the vehicle.
Warning! GDistronic is a convenience system. Its speed adjustment reduction capability is intended to make cruise control more effective and usable when traffic speeds vary. However, it is not intended to, nor does it, replace the need for extreme care. The responsibility for the vehicle speed and the distance to the ve-hicle ahead, including most importantly brake operation to assure safe stopping dis-tance, always rests with the driver.
Distronic cannot take street and traffic con-ditions into account.

180
Controls in detail
Driving
Warnin
Distronditions the roamake itspeed.
Warnin
Use of pery rocan res
Distrondistancduring csnow o
Distronic is designed and intended only to maintain a set speed and keep a set dis-tance from moving objects in front of it.
Warning! GThe “Resume” function should only be oper-ated if the driver is fully aware of the previ-ously set speed and wishes to resume this particular preset speed.
systems
g! Gic cannot take street and traffic con-into account. Only use Distronic if d, weather and traffic conditions advisable to travel at a steady
g! GDistronic can be dangerous on slip-ads. Rapid changes in tire traction ult in wheel spin and loss of control.
ic does not act upon adverse sight e conditions. Do not use Distronic onditions of fog and heavy rain,
r sleet.
Warning! GClose attention to road and traffic condi-tions is imperative at all times, regardless of whether or not Distronic is activated.
Use of Distronic can be dangerous on wind-ing roads or in heavy traffic because condi-tions do not allow safe driving at a steady speed.
Distronic will not react to stationary objects in the roadway (e.g. a stopped vehicle in a traffic jam or a disabled vehicle). Distronic will also not respond to oncoming vehicles.
Switch off Distronic:
� when changing from the left to the right lane if vehicles are moving more slowly in the left lane
� when entering a turn lane or highway off ramp
� in complex driving situations, such as in highway construction zones
In these situations, Distronic will continue to maintain the set speed unless deactivated.

181
Controls in detail
Driving systems
Distrodial
Set spe
If Distrments
� Immediately brake the vehicle to avoid a collision.
Under no circumstances should the driver await the intermittent warning sound before braking. See warning note on the next page.
The intermittent warning sound ceases and the red distance warning lamp l goes out when the neces-sary distance to the vehicle ahead is again established.
iThespespe
��
nic displays in the speedometer
ed
onic is activated, one or two seg-light up around the set speed.
Segments
If Distronic detects a vehicle directly ahead, the segments from the speed of the vehicle ahead to set speed light up.
If Distronic calculates that there is a dan-ger of collision
� the distance warning lamp l in the instrument cluster lights up red
� an intermittent warning sounds
vehicle speed displayed on the edometer can briefly vary from the ed setting on the Distronic system.

182
Controls in detail
Driving
istronic menu in the control system
the Distronic menu you can read the cur-nt settings for Distronic. What appears in e display depends on whether Distronic
nd the distance warning function are rned on or off.
Press button è or ÿ repeatedly until you see one of the following dis-plays.
Warnin
An intedistancment clsystemvehiclespeed ipable omaintaiwhich c
Immedithe distvehicleintendeintercedavoid anot wainal to inthat wilemergesult in a
Tailgati
systems
D
Inrethatu
�
g! Grmittent warning sounds and the e warning lamp l in the instru-uster is illuminated if the Distronic calculates that the distance to the ahead and your vehicle’s current ndicate that Distronic will not be ca-f slowing the vehicle sufficiently to n the preset following distance, reates a danger of a collision.
ately brake the vehicle to increase ance between your vehicle and the in front of you. The warning sound is d as a final caution that you have not ed with your own braking inputs to
potentially dangerous situation. Do t for the operation of the warning sig-tercede with your own braking, as
l result in potentially dangerous ncy braking which will not always re-n impact being avoided.
ng increases the risk of an accident.
Warning! GDistronic brakes your vehicle with a maxi-mum of 6.5 ft/s2 (2 m/s2). This corre-sponds to about 20% of the maximum deceleration ability of your vehicle.
Distronic brakes the vehicle in an effort to restore the preset distance or to maintain the speed. The brake pedal is automatically applied as this happens which results in the brake pedal moving.
Keep driver’s foot area clear at all times, in-cluding the area under the brake pedal. Ob-jects stored in this area may impair pedal movement which could interfere with the braking ability of the Distronic system.
Do not place your foot under the brake pedal – your foot could become caught.
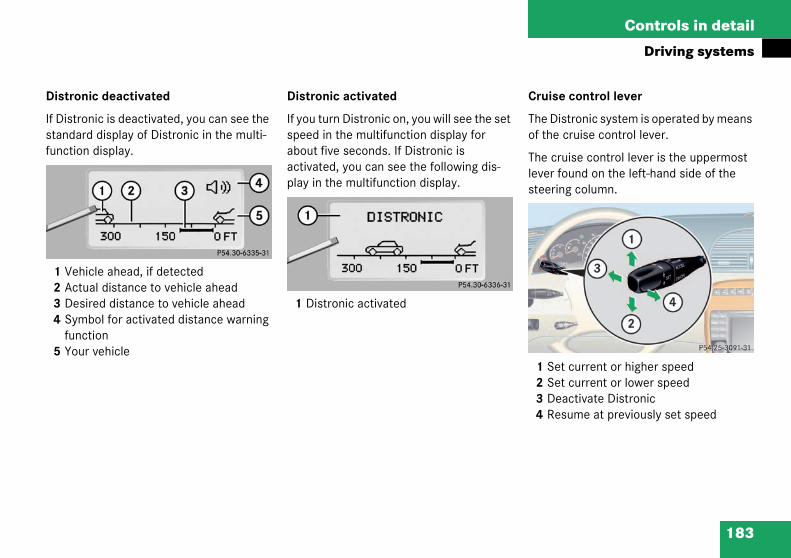
183
Controls in detail
Driving systems
Distro
If Distrstandafunctio
1 Veh2 Act3 Des4 Sym
fun5 You
Cruise control lever
The Distronic system is operated by means of the cruise control lever.
The cruise control lever is the uppermost lever found on the left-hand side of the steering column.
1 Set current or higher speed2 Set current or lower speed3 Deactivate Distronic4 Resume at previously set speed
nic deactivated
onic is deactivated, you can see the rd display of Distronic in the multi-n display.
icle ahead, if detectedual distance to vehicle aheadired distance to vehicle aheadbol for activated distance warning
ctionr vehicle
Distronic activated
If you turn Distronic on, you will see the set speed in the multifunction display for about five seconds. If Distronic is activated, you can see the following dis-play in the multifunction display.
1 Distronic activated

184
Controls in detail
Driving
Activati
You can
� you a(40 k
� the E
If Distropressingsee the display.
In the foDistroni
� up togine
� when
� if you
� if theposit
� if the
etting a higher speed
Briefly tip the cruise control lever in the direction of arrow 1 (� page 183) to in-crease vehicle speed in increments of 5 mph (Canada: 10 km/h).
The new speed is set.
The stored speed is displayed in the multifunction display for approximately five seconds (� page 183), and one or two segments around the stored speed light up on the speedometer (� page 181).
iDepressing the accelerator pedal does not deactivate Distronic. After brief ac-celeration (e.g. for passing), the cruise control will resume the last speed set.
systems
ng Distronic
activate Distronic if
re driving between 25 mph m/h) and 110 mph (180 km/h)
SP is activated (� page 73)
nic has not been activated after the cruise control lever you will message --- in the multifunction
llowing cases you cannot activate c:
two minutes after starting the en-
you brake
have set the parking brake
gear selector lever is in ion P, R or N
ESP is switched off
Setting the current speed
� Accelerate or decelerate to the desired speed.
� Briefly lift or depress the cruise control lever.
Distronic is activated and the current speed is set.
� Remove your foot from the accelerator pedal.
S
�
iIf you do not take your foot off of the accelerator completely, the following message will appear in the multifunc-tion display: DISTRONIC OVERRIDE. Distronic will not work to maintain the distance to slower moving vehicle in front of you. Your vehicle speed will then be determined only by the accel-erator pedal position.

185
Controls in detail
Driving systems
Settin
� Briediredecof 5
The
Themufivetwoligh(�
Setting to last stored speed (“Resume” function)
� Briefly tip the cruise control lever in the direction of arrow 4 (� page 183).
Distronic is set to the last stored speed.
� Remove your foot from the accelerator pedal.
iWhto dtomcel
Warning! GThe speed stored in memory should only be set again if prevailing road conditions per-mit. Possible acceleration or deceleration differences arising from returning to preset speed could cause an accident and/or seri-ous injury to you and others.
g a lower speed
fly tip the cruise control lever in the ction of arrow 2 (� page 183) to rease vehicle speed in increments mph (Canada: 10 km/h).
new speed is set.
stored speed is displayed in the ltifunction display for approximately seconds (� page 183), and one or segments around the stored speed t up on the speedometer page 181).
Fine adjustment in 1 mph (Canada: 1 km/h) increments
Faster
� Briefly tip the cruise control lever in the direction of arrow 4 (� page 183).
en you use the cruise control lever ecelerate, the transmission will au-atically downshift if the rate of de-
eration is too low.

186
Controls in detail
Driving
Deactiv
There arDistroni
� Briefdirec
or
� Step
Distrspee
etting the following distance in istronic
ou can set the specified following dis-nce for Distronic by varying the time set-
ng between 1.0 and 2.0 seconds. Using is time setting and the current speed of
our vehicle, Distronic calculates and sets e required following distance to the vehi-
le ahead. The set distance will be shown the multifunction display field.
he thumbwheel for making the time set-ng is located on the lower section of the enter console.
iThe fthe mmate
The lyou t
Warning! GIt is up to the driver to exercise discretion to select the appropriate setting given road conditions, traffic, driver’s preferred driving style and applicable laws and driving recom-mendations for safe following distance.
systems
ating Distronic
e several ways to deactivate the c system:
ly tip the cruise control lever in the tion of arrow 3 (� page 183).
on the brake pedal.
onic will be deactivated. The last d set will be stored into memory.
Distronic deactivates automatically when:
� You set the parking brake.
� You drive slower than 25 mph (40 km/h).
� The ESP is active (� page 73) or you deactivate the ESP.
� You move the transmission selector le-ver into position N.
A signal will sound. The DISTRONIC OFF message appears in the multifunction display for approximately five seconds.
SD
Ytatithythcin
Tticollowing message will appear in
ultifunction display for approxi-ly five seconds: DISTRONIC OFF.
ast stored speed is deleted when urn off the engine.
Warning! GDistronic switches off and releases the brakes when the vehicle decelerates below the minimum speed of approx. 25 mph (40 km/h) by operation of the system. At that time the driver must apply the brakes in order to reduce vehicle speed further or bring it to a stop.

187
Controls in detail
Driving systems
1 Disswi
2 Thu
Increa
Increastronic tance t
� Tur
When pressing the brake pedal, the warn-ing sound stops. The warning sound also stops when the distance to the vehicle ahead is sufficient again without applying the brake pedal. In this case the distance warning lamp l also extinguishes.
Warning! GIf the distance warning lamp l in the in-strument cluster lights up while driving and/or an intermittent warning sounds, im-mediate attention on the part of the driver is required.
As required by the traffic situation, apply the brakes and navigate around a possible ob-stacle. However, do not drive by relying on the distance warning function, as this will re-sult in an emergency braking application. Especially depending on road surface condi-tions and driver reaction, this will not always enable you to avoid a collision.
tance warning function on/off tchmbwheel for setting distance
sing distance
ing the distance setting tells Dis-to maintain a greater following dis-o the vehicle ahead.
n thumbwheel 2 towards ¯ .
Decreasing distance
Decreasing the distance setting tells Dis-tronic to maintain a shorter following dis-tance to the vehicle ahead.
� Turn thumbwheel 2 towards ® .
Distance warning function
When Distronic is deactivated, this func-tion will continue to warn you when recog-nizing a stationary obstacle or a slower vehicle moving in the vehicle’s path and the danger of a collision exists:
� The distance warning lamp l in the instrument cluster lights up
� An intermittent warning sounds.
If these warnings are issued, you must brake manually to maintain a safe distance and avoid a collision with the vehicle ahead.

188
Controls in detail
Driving
Activati
� Pres
IndicA loumult
Deactiv
� Pres
IndicNo lomult
iComwayscouldtanc
Distronic regulates only the distance be-tween your vehicle and those directly ahead of it, but does not register stationary objects in the road, e.g.:
� a stopped vehicle in a traffic jam
� a disabled vehicle
� an oncoming vehicle
The driver must always be on the alert, ob-serve all traffic and intercede as required by steering or braking the vehicle.
Warning! GDistronic should not be used in snowy or icy road conditions.
systems
ng
s switch 1.
ator lamp on the switch lights up. dspeaker symbol appears in the ifunction display (� page 183).
ating
s switch 1.
ator lamp on the switch goes out. udspeaker symbol appears in the
ifunction display.
Driving with Distronic
This section describes a number of driving situations where special precaution is re-quired on the part of the driver. Be pre-pared to brake in such situations. This will deactivate the Distronic system.
plex driving situations are not al- fully recognized by Distronic. This result in wrong or missing dis-
e warnings.
Warning! GDistronic works to maintain the speed se-lected by the driver unless a moving obsta-cle proceeding directly ahead of it in the same travel direction is detected (e.g. fol-lowing another vehicle ahead of you at a dis-tance set by Distronic). This means that:
� Your vehicle can pass another vehicle after you change lanes.
� While in a sharp turn or if the vehicle in front is in a sharp turn, Distronic could lose sight of a vehicle traveling in front of it, then your vehicle could accelerate to the previously selected speed.

189
Controls in detail
Driving systems
The mosystemthe hooand icetronic DISTROTOR'S display
For clesor, sesensor
Offset driving
A vehicle traveling in your lane but offset from your direct line of travel may not be detected by Distronic. There will be insuffi-cient distance to the vehicle ahead.
st likely cause for a malfunctioning is a dirty sensor (located behind d grill), especially at times of snow or heavy rain. In such a case, Dis-
will switch off, and the message NIC - CLEAN SENSOR! SEE OPERA-MAN. appears in the multifunction .
aning and care of the Distronic sen-e “Cleaning the Distronic system ” (� page 259).
Turns and bends
In turns or bends, Distronic may not detect a moving vehicle in front, or it may detect one too soon. This may cause your vehicle to brake late or unexpectedly.
iIf the message DISTRONIC - CLEAN SENSOR! SEE OPER. MANUAL disappears during driving and the last speed stored flashes for approximately five seconds, the dirt (e.g. slush) has dissolved; Distronic is again operational.

190
Controls in detail
Driving
Lane ch
Distronichangindistance
ctive Body Control (ABC)
he ABC system automatically selects the ptimum suspension tuning and ride eight for your vehicle.
uspension tuning
he suspension tuning is set according to:
your driving style
road surface conditions
the vehicle loading
your choice of suspension style, “sporty” or “regular”, which you select using the ABC switch
The selected suspension style is stored in memory, even after the key is re-moved from the starter switch.
systems
anging
c has not yet detected the vehicle g lanes. There will be insufficient to the lane changing vehicle.
Narrow vehicles
Because of their narrow profiles, the vehi-cles traveling near the outer edges of the lane have not yet been detected by Dis-tronic. There will be insufficient distance to the vehicle ahead.
A
Toh
S
T
�
�
�
�

191
Controls in detail
Driving systems
1 ABC2 Ind
� Sta
Suspe
The sewhen i
� Preregsus
Ind
Select the level 1 and 2 settings only when required by current driving conditions. Otherwise
� fuel consumption may increase
� handling may be impaired
iThese height adjustments are so small that you may not notice any change.
Warning! GTo help avoid personal injury, keep hands and feet away from wheel housing area, and stay away from under the vehicle when low-ering the vehicle chassis.
switchicator lamp
rt the engine.
nsion for sporty driving
tting for sporty driving is selected ndicator lamp 2 is illuminated.
ss ABC switch 1 to change from ular suspension to sporty driving pension.
icator lamp 2 comes on.
Suspension for regular driving
The setting for regular driving is selected when indicator lamp 2 is off.
� Press ABC switch 1 to change from sporty driving suspension to regular suspension.
Indicator lamp 2 goes out.
Vehicle level control
Your vehicle automatically adjusts its ride height to
� reduce fuel consumption
� increase vehicle safety
The vehicle chassis ride height is raised or lowered according to the selected level setting and to the vehicle speed:
� With increasing speed, ride height is re-duced by up to a maximum of 0.95 inches (24 mm).
� With decreasing speed, the ride height is again raised to the selected vehicle level.

192
Controls in detail
Driving
The folloselected
The switcated insole.
Briefly press switch 2 to change from one level setting to the next. When ve-hicle is at raised level 2, pressing the switch will return the vehicle to normal level.
The message:
ACTIVE BODY CONTROLVEHICLE RISING!
appears in the multifunction display. The display switches off when the vehi-cle is raised.
Vehiclestation
ing Indicator lamps (� page 192)
Normal in (11 mm) Both lamps off
Raised in (14 mm) One lamp on
Raised in (24 mm) Both lamps on
1 Depend
systems
wing vehicle level settings can be when the vehicle is stationary:
ch and the indicator lamps are lo- the upper part of the center con-
1 Indicator lamps2 Vehicle level control switch
�
level when ary
Use for Ride height increase over normal
Automatic lower
level Normal operation None Max. approx. 0.4
level 1 Driving with snow chains (� page 253)
Max. 0.55 in (14 mm)1 Max. approx. 0.55
level 2 Very rough road surface conditions
Max. 0.95 in (24 mm)1 Max. approx. 0.95
ent on load

193
Controls in detail
Driving systems
Norma
Speed sis (ap
� bet(65
� bet87gre
Parktronic system* (Parking assist)iPrecesdiasta
Themagin
Warning! GParktronic is a supplemental system. It is not intended to, nor does it replace, the need for extreme care. The responsibility during parking and other critical maneuvers always rests with the driver.
Special attention must be paid to objects with smooth surfaces or low silhouettes (e.g. trailer couplings, painted posts, or road curbs). Such objects may not be detected by the system and can damage the vehicle.
The operational function of the Parktronic can be affected by dirty sensors, especially at times of snow and ice, see “Cleaning the Parktronic system sensors” (� page 259).
Interference caused by other ultrasonic sig-nals (e.g. working jackhammers or the air brakes of trucks) can cause the system to send erratic indications, and should be tak-en into consideration.
l level (see table)
dependent lowering of vehicle chas-proximate values):
ween 0 mph (0 km/h) and 40 mph km/h) – none
ween 40 mph (65 km/h) and mph (140 km/h) – lowered pro-ssively by approx. 0.4 in (11 mm).
Raised level 1 (see table)
Speed dependent lowering of vehicle chas-sis (approximate values)
� between 0 mph (0 km/h) and 38 mph (60 km/h) - raised by approx. 0.55 in (14 mm)
� between 38 mph (60 km/h) and 100 mph (160 km/h) - lowered pro-gressively by approx. 0.55 in (14 mm)
Raised level 2 (see table)
Speed dependent lowering of vehicle chas-sis (approximate values):
� between 0 mph (0 km/h) and 18 mph (30 km/h) - raised by approx. 0.95 in (24 mm)
� between 18 mph (30 km/h) and 38 mph (60 km/h) - lowered progres-sively by approx. 0.4 in (10 mm)
� between 38 mph (60 km/h) and 100 mph (160 km/h) – lowered pro-gressively by additional approx. 0.55 in (14 mm).
ssing the switch twice in quick suc-sion will cause the vehicle to imme-tely raise or lower according to the rting level.
selected vehicle level setting re-ins stored in memory even if the en-e is turned off and restarted.

194
Controls in detail
Driving
The Parkdesigneding mancates thvehicle a
The Parktivated wand reletronic sy11 mph Parktron
ange of the sensors
o function properly, the sensors must be ee of dirt, ice, snow and slush. Clean the ensors regularly, being careful not to cratch or damage the sensors.
Warnin
Make sthe areacould o
systems
tronic system is an electronic aid to assist the driver during park-
euvers. It visually and audibly indi-e relative distance between the nd an obstacle.
tronic system is automatically ac-hen you switch on the ignition
ase the parking brake. The Park-stem deactivates at speeds over (18 km/h). At lower speeds the ic system turns on again.
The Parktronic system monitors the sur-roundings of your vehicle with six sensors in the front bumper and four sensors in the rear bumper.
1 Sensors in the front bumper
R
Tfrss
g! Gure that no persons or animals are in in which you are maneuvering. You
therwise injure them.

195
Controls in detail
Driving systems
Front s
Rear s
2 Right front area warning indicator
Visual signals indicate to the driver the rel-ative distance between the sensors and an obstacle. The warning indicators for the front area are located above the left air vents 1 and center air vents 2 in the dash-board. The warning indicator for the rear area is integrated in the rear trim.
Each warning indicator is divided into six yellow and two red segments for either side of the vehicle. The Parktronic system is ready when the border around the indi-cator is illuminated.
Cente
Corne
Cente
Corne
!Durattebelplatronjecyou
Ultres mePar
ensors
ensors
Minimum distance
If the system detects an obstacle in this range, all the warning lamps light up and you hear a warning signal. If the obstacle is closer than the minimum distance, the ac-tual distance might no longer be indicated by the system.
Warning indicators
1 Left front area warning indicator
r approx. 40 in (100 cm)
rs approx. 24 in (60 cm)
r approx. 48 in (120 cm)
rs approx. 32 in (80 cm)
ing parking maneuvers, pay special ntion to objects located above or
ow the height of the sensors (e.g. nters or trailer hitches). The Park-ic system will not detect such ob-
ts at close range and damage to r vehicle or the object may result.
asonic signals from outside sourc-(e.g. truck air brakes or jackham-rs) may impair the operation of the ktronic system.
Center approx. 8 in (20 cm)
Corners approx. 6 in (15 cm)

196
Controls in detail
Driving
The posterminesactivate
As your or moreon the dthe objeup, you tance.
� FronwarnmenwarnthreesegmThe sselec
he Parktronic switch is located in the up-er section of the center console.
1 Parktronic on/off2 Indicator lamp
witching off the Parktronic system
Press switch 1.
Indicator lamp 2 comes on.
witching on the Parktronic system
Press switch 1 again.
Indicator lamp 2 goes out.
Selectopositio
D
R or N
P
systems
ition of the gear selector lever de- which warning indicators will be
d.
vehicle approaches an object, one segments will light up, depending istance between your vehicle and ct. When the eighth segment lights have reached the minimum dis-
t area: An intermittent acoustic ing will sound as the first red seg-t lights up and a constant acoustic ing, both lasting a maximum of seconds, will sound for the eighth ent, i.e. the second red segment. ignal is canceled when the gear tor lever is placed in position P.
� Rear area: An intermittent acoustic warning will sound as the first red seg-ment lights up and a constant acoustic warning, both lasting a maximum of three seconds, will sound for the eighth segment, i.e. the second red segment. The signal is canceled when the gear selector lever is placed in position D or P.
Switching the Parktronic system on/off
You can switch off the Parktronic system manually.
Tp
S
�
S
�
r lever n
Warning indicator
Front area activated
Rear and front area activated
Neither activated

197
Controls in detail
Loading
LoRo Loading instructions
The total load weight including vehicle oc-cupants and luggage/cargo should not ex-ceed the vehicle capacity weight indicated on the certification tag which can be found on the left door pillar.
W
UMafa
adingof rack
arning
se only ercede
void damcturer’s
* Preparing roof rack installation
� Open trim at the trim strips in the roof.
� Secure the roof rack according to man-ufacturer’s instructions for installation.
! Groof racks approved by s-Benz for your vehicle model to
age to the vehicle. Follow manu- installation instructions.
!Load the roof rack in such a way that the vehicle cannot be damaged while driving.
Make sure that
� you can fully raise the sliding/ pop-up roof
� you can fully open the trunk

198
Controls in detail
Loadin
Warnin
Always ly as po
In an acden maaround jury to are sec
To helpsion or when trgo in thgage orDo not shelf.
Never dcarbon hicle inand dea
g
Cargo tie-down hooks
Six hooks are located in the trunk.
� Carefully secure cargo by applying even load on all hooks with rope of suf-ficient strength to hold down the cargo.
g! Gfasten items being carried as secure-ssible.
cident, during hard braking or sud-neuvers, loose items will be thrown inside the vehicle and can cause in-vehicle occupants unless the items urely fastened in the vehicle.
avoid personal injury during a colli-sudden maneuver, exercise care ansporting cargo. Put luggage or car-e trunk if possible. Do not pile lug- cargo higher than the seat backs. place anything on the rear-window
rive vehicle with trunk open. Deadly monoxide (CO) gases may enter ve-terior resulting in unconsciousness th.

199
Controls in detail
Useful features
UsInt Opening the glove box
� Press button 3.
The glove box lid opens downward.
Closing the glove box
� Push lid up to close.
W
Tswgpb
Lo
Ktaa
iThe glove box can be locked and un-locked with the mechanical key.
eful ferior s
arning
o help aion or suhen stoage or cile luggaacks.
uggage bjects.
eep como prevenbout andn accide
eaturestorage spaces Glove box
1 Unlocked position2 Locked position3 Glove box lid release
! Gvoid personal injury during a colli-dden maneuver, exercise care
wing objects in the vehicle. Put lug-argo in the trunk if possible. Do not ge or cargo higher than the seat
nets cannot secure hard or heavy
partment lids closed. This will help t stored objects from being thrown injuring vehicle occupants during nt.

200
Controls in detail
Useful
Storage
A storagcover ofstore ch
1 Stora
� Lightstora
The l
An AUX Portablehere.
torage compartment below the front rmrest
he buttons are located under the cushion f the armrest.
he storage compartment below the front rmrest is illuminated with the exterior mps switched on.
1 Button to open storage compartment2 Button to open storage tray
features
compartment in the glove box
e compartment is located in the the glove box. It can be used to eck cards, pens, a flashlight, etc.
ge compartment in glove box
ly press the marking on the lid of ge compartment 1.
id opens upward.
socket is located in the glove box. audio devices can be plugged in
Storage compartment in front of arm-rest
Opening
The compartment contains a cup holder (� page 202).
� Lightly touch cover plate 1.
The cover opens automatically.
Closing
� Lightly push the cover plate 1 up until it engages in lock.
Sa
To
Tala

201
Controls in detail
Useful features
Openin
The co
� Pre
Openin
� Pre
Closing
� Slide cover 1 forward.
Storage compartments under the front seats
1 Lid2 Buttons
Opening
� Press the buttons 2 together and fold the lid 1 down.
Closing
� Close the lid 1 until both buttons 2 of lock engage.
iTheed
Thedueheamethe
!Do age
g storage compartment
mpartment contains a coin holder.
ss button 1 and lift the armrest.
g storage tray
ss button 2 and lift up the armrest.
Storage compartment between rear seats
1 Cover
Opening
� Slide cover 1 rearward.
storage compartment can be heat-or cooled.
compartment can get very warm to its confined space. When storing t-sensitive objects in the compart-nt, close the air vent while heating passenger compartment.
not obstruct the air vent in the stor- compartment.
!Do not let bank cards, credit cards or other cards with a magnetic strip come near the storage tray as a magnet built into the tray could erase or change the information on the card.

202
Controls in detail
Useful
Cup hol
Push button 2.
The second cup holder folds out in the direction indicated by the arrow.
Warnin
When nwhile trinto theon opento a heihot liquvers.
features
der in front of seat armrest Folding cup holder out
� Open the storage compartment in front of the armrest (� page 200).
� Push button 1.
The cup holder opens automatically.
�
g! Got in use, keep the cup holder closed aveling. Place only containers that fit cup holder to prevent spills. Use lids containers and do not fill containers ght where the contents, especially ids, could spill during vehicle maneu-

203
Controls in detail
Useful features
Foldin
� Prerec
Cup holder in rear seat armrest
Warning! GWhen not in use, keep the cup holder closed while traveling. Place only containers that fit into the cup holder to prevent spills. Use lids on open containers and do not fill containers to a height where the contents, especially hot liquids, could spill during vehicle maneu-vers.
g cup holder in
ss the second cup holder in the di-tion of arrow 3 until it engages.
� Press release button 4 and fold the cup holder into the storage compartment until it engages.
� Close the storage compartment.

204
Controls in detail
Useful
Opening
� Push
The c
Closing
� Pushit en
2 Insert3 Auxiliary cup holder
Press auxiliary cup holder 3 in the di-rection of the arrow until it snaps in place.
You can now place a larger container in the holder. For even larger containers you can remove insert 2. Make sure that the container does not press against the glove box.
features
cup holder
front of sliding compartment 1.
up holder slides out.
cup holder
sliding compartment 1 back until gages.
Auxiliary cup holder
You can fasten the auxiliary cup holder onto the left front side of the passenger seat.
Inserting the auxiliary cup holder
1 Cover
� Pull up the cover and place it in a storage compartment.
�

205
Controls in detail
Useful features
Parcel net in front passenger footwell
A small convenience parcel net is located in the front passenger footwell. It is for small and light items, such as road maps, mail, etc.
Warn
Whenholdeauxilialids ontainerpecialmane
iWhaux
Whauxin i
Warning! GDo not place heavy or fragile objects, or ob-jects having sharp edges, in the parcel net.
In an accident, during hard braking or sud-den maneuvers, they could be thrown around inside the vehicle and cause injury to vehicle occupants.
Removing the auxiliary cup holder
� Pull the auxiliary cup holder 3 (� page 204) up and out of the recep-tacle and place it in a storage compart-ment.
� Install cover 1 (� page 204) on the opening. Press cover down until it snaps in place.
ing! G not in use, remove the auxiliary cup r. Place only containers that fit into the ry cup holder to prevent spills. Use open containers and do not fill con-
s to a height where the contents, es-ly hot liquids, could spill during vehicle uvers.
en you move the seat forward, the iliary cup holder turns to the side.
en you move the seat back, turn the iliary cup holder back until it stops ts original position.

206
Controls in detail
Useful
Parcel n
You canhooks ahold a lo
� Hangleft a
emoving ashtray insert
Prevent vehicle from moving by setting the parking brake. Move the selector lever to position N.
Now you have more room to remove the insert.
Push sliding button 1 to the right.
The ashtray is disengaged and slides out a short way out.
Remove insert from ashtray frame.
einstalling the ashtray insert
Install insert by pushing back into frame until it engages again.
!The pcientaccid
Warning! GRemove front ashtray only with vehicle standing still. Set the parking brake to se-cure vehicle from movement. Move gear se-lector lever to position N. With gear selector lever in position N, turn off the engine.
features
et in trunk
hang a parcel net in the trunk. The nd the parcel net in the trunk can ad of up to 29.8 lbs (13.5 kg).
the parcel net on hooks 1 on the nd right sides of the trunk.
Ashtrays
Center console ashtray
Opening ashtray
� Briefly touch cover plate.
The ashtray opens automatically.
R
�
�
�
R
�
arcel net cannot protect or suffi-ly secure goods in the event of an ent.

207
Controls in detail
Useful features
Rear s
Openin
� Pul
Remov
� Preser
Reinst
� Ins
� Clo
Warning! GNever touch the heating element or sides of the lighter; they are extremely hot. Hold the knob only.
When leaving the vehicle, always remove the key from the starter switch, take the KEYLESS-GO* card with you and lock the ve-hicle. Do not leave children unattended in the vehicle, or with access to an unlocked vehicle. Unsupervised use of vehicle equip-ment may cause an accident and/or seri-ous personal injury.
iThe lighter socket can be used to ac-commodate electrical accessories up to a maximum 85 W.
eat ashtray
g ashtray
l at top of cover to open ashtray.
ing ashtray insert
ss latch 1 to disengage ashtray in-t and remove it.
alling the ashtray insert
tall ashtray insert.
se the ashtray.
Cigarette lighter
1 Cigarette lighter
� Make sure the ignition is switched on.
All the lamps in the instrument cluster should light up.
� Push in cigarette lighter 1.
The lighter will pop out automatically when hot.

208
Controls in detail
Useful
Heated
The steeleather a
The levethe stee
1 Swit2 Indic3 Swit
elephone*
adio transmitters, such as a portable tele-hone or a citizens band unit, should only e used inside the vehicle if they are con-ected to an antenna that is installed on e outside of the vehicle.
he external antenna must be approved by ercedes-Benz. Please contact an autho-zed Mercedes-Benz Center for informa-on on the installation of an approved xternal antenna. Refer to the radio trans-itter operation instructions regarding use
f an external antenna.
Warning! GNever operate radio transmitters equipped with a built-in or attached antenna (i.e. with-out being connected to an external antenna) from inside the vehicle while the engine is running. Doing so could lead to a malfunc-tion of the vehicle’s electronic system, pos-sibly resulting in an accident and/or serious personal injury.
features
steering wheel*
ring wheel heating warms up the rea of the steering wheel.
r is on the lower left-hand side of ring wheel.
ching onator lampching off
Switching on
� Make sure the ignition is switched on.
All the lamps in the instrument cluster should light up.
� Turn lever in direction of arrow 1.
The steering wheel is heated. Indicator lamp 2 lights up.
Switching off
� Turn the lever in direction of arrow 3.
The steering wheel heating is turned off. Indicator lamp 2 goes out.
T
Rpbnth
TMritiemo
iThe steering wheel heating does not turn off automatically.

209
Controls in detail
Useful features
Tele AidWarn
Pleasesponsattenthis/hyour sommeand stphone
If youdrivinand oweathjurisdcellula
Only oagemand tr
1 Obser
!The initial activation of the Tele Aid sys-tem may only be performed by com-pleting the subscriber agreement and placing an acquaintance call using the SOS button. Failure to complete either of these steps will result in a system that is not activated. If the system is not activated, the indicator lamp in the SOS button stays on after turning key in starter switch to position 2 or press-ing KEYLESS-GO* start/stop button twice to position 2 (� page 33). The message TELE AID – NOT ACTIVATED will be shown in the multifunction dis-play for approx. 10 seconds.
If you have any questions regarding ac-tivation, please call the Response Cen-ter at 1-800-756-9018 (in the USA) or 1-888-923-8367 (in Canada).
You can take and make telephone calls us-ing the í and ì buttons on the steering wheel. To carry out other tele-phone functions, use the control system (� page 117).
See separate operating manual for instruc-tions on how to use the telephone.
ing! G do not forget that your primary re-ibility is to drive the vehicle. A driver’s ion to the road must always be er primary focus when driving. For afety and the safety of others, we rec-nd that you pull over to a safe location op before placing or taking a tele- call.
choose to use the telephone1 while g, please use the hands-free device nly use the telephone when road, er and traffic conditions permit. Some ictions prohibit the driver from using a r telephone while driving a vehicle.
perate the COMAND (Cockpit Man-ent and Data System)1 if road, weather affic conditions permit.
ve all legal requirements.
Bear in mind that at a speed of just 30 mph (approximately 50 km/h), your vehicle is covering a distance of approx. 44 feet (ap-proximately 13.5 m) every second.

210
Controls in detail
Useful
The Tele
(Telemamand)
The Teleof respo
� Auto
� Road
� Infor
The Teleing that properlylular and
The speabe adjusthe multpress bubutton ç
� To acRoadthe Iing o
ystem self-check
itially, after turning the key in starter witch to position 2, malfunctions are de-cted and indicated (the indicator lamps the SOS button, the Roadside Assis-nce button • and the Information
utton ¡ stay on longer than 0 seconds or do not come on). The mes-age TELE AID – VISIT WORKSHOP! ap-ears for approx. 10 seconds in the ultifunction display.
features
Aid system
tic Alarm Identification on De-
Aid system consists of three types nse:
matic and manual emergency
side Assistance and
mation
Aid system is operational provid-the vehicle’s battery is charged, connected, not damaged and cel- GPS coverage is available.
ker volume of a Tele Aid call can ted using the volume control on ifunction steering wheel. To raise, tton æ and to lower, press
.
tivate, press the SOS button, the side Assistance button • or
nformation button ¡, depend-n the type of response required.
Shortly after the completion of your Ac-quaintance Call, you will receive a user ID and password via first call mail. By visiting www.mbusa.com and selecting “Tele Aid” (USA only), you will have access to account information, remote door unlock, profile and more.
S
Insteintab1spm
iThe SOS button is located above the in-terior rear view mirror.
The Roadside Assistance button • and the Information button ¡ are located below the center armrest cov-er.
!The Tele Aid system utilizes the cellular network for communication and the GPS (Global Positioning System) satel-lites for vehicle location. If either of these signals are unavailable, the Tele Aid system may not function and if this occurs, assistance must be sum-moned by other means.

211
Controls in detail
Useful features
tion display. All information relevant to the emergency, such as the location of the ve-hicle (determined by the GPS satellite loca-tion system), vehicle model, identification number and color are generated.
A voice connection between the Response Center and the occupants of the vehicle will be established automatically soon af-ter the emergency call has been initiated. When a voice connection is established the audio system mutes and the message TELE AID – CALL CONNECTED appears in the multifunction display. The Response Center will attempt to determine more pre-cisely the nature of the accident provided they can speak to an occupant of the vehi-cle.
Warn
If the the Rothe Ining thindicared anVISITfunctia maltected
If a mabovepectenearepossib
Emergency calls
An emergency call is initiated automatical-ly:
� following an accident in which the emergency tensioning devices (ETDs) or airbags deploy
� if the anti-theft alarm or the tow-away alarm stays on for more than 20 seconds. See anti-theft alarm sys-tem (� page 76) and tow-away alarm (� page 78)
An emergency call can also be initiated manually by opening the cover next to the inside rear view mirror labeled SOS, then briefly pressing the button located under the cover. See below for instructions on initiating an emergency call manually.
Once the emergency call is in progress, the indicator lamp in the SOS button will begin to flash. The message EMERGENCY CALL – CONNECTING CALL appears in the multifunc-tion display. When the connection is estab-lished, the message EMERGENCY CALL – CALL CONNECTED appears in the multifunc-
ing! Gindicator lamps in the SOS button, in adside Assistance button and/or in
formation button do not come on dur-e system self-check or if any of these tors remain illuminated constantly in d/or the message TELE AID - WORKSHOP! is displayed in the multi-
on display after the system self-check, function in the system has been de-.
alfunction is indicated as outlined , the system may not operate as ex-d. Have the system checked at the st Mercedes-Benz Center as soon as le.

212
Controls in detail
Useful
The Tele
� It haal. Afor mand
� The rand Gthe iter
itiating an emergency call manually
1 SOS button
Briefly press on the cover of the emer-gency call button with the inscription SOS above the inside rear view mirror.
The cover will open.
Press SOS button 1 briefly.
The indicator lamp in SOS button 1 will flash until the emergency call is con-cluded.
Wait for a voice connection to the Re-sponse Center.
iLocaposssignaand pspon
features
Aid system is available if:
s been activated and is operation-ctivation requires a subscription onitoring services, connection
cellular air time
elevant cellular phone network PS signals are available and pass
nformation on to the response cen-
In
�
�
�
tion of the vehicle on a map is only ible if the vehicle is able to receive ls from the GPS satellite network ass the information on to the re-
se center.
Warning! GIf the indicator lamp in the SOS button is il-luminated continuously and there was no voice connection to the Response Center established, then the Tele Aid system could not initiate an emergency call (e.g. the rele-vant cellular phone network is not available). The message EMERGENCY CALL – CALL FAILED appears in the multifunction display for approx. 10 seconds.
Should this occur, assistance must be sum-moned by other means.

213
Controls in detail
Useful features
� Clois c
system mutes and the message TELE AID – ROADSIDE ASSISTANCE CALL CONNECTED appears in the multifunction display.
� Describe the nature of the need for as-sistance.
The Mercedes-Benz Roadside Assistance dispatcher will either dispatch a qualified Mercedes-Benz technician or arrange to tow your vehicle to the nearest Mercedes-Benz Center. For services such as labor and/or towing, charges may ap-ply. Refer to the Roadside Assistance man-ual for more information.
These programs are only available in the USA:
� Sign and Drive services: Services such as jump start, a few gallons of fuel or the replacement of a flat tire with the vehicle spare tire are obtainable.
� Remote Vehicle Diagnostics: This func-tion permits the Mercedes-Benz Road-side Assistance dispatcher to download malfunction codes and real time vehicle data.
Warn
If you vehiclhicle ido nopressleave tion. Tcontavehiclceive makepants
se cover 1 after the emergency call oncluded.
Roadside Assistance button •
Located below the center armrest cover is the Roadside Assistance button •.
� Press and hold the button (for longer than 2 seconds).
A call to a Mercedes-Benz Roadside As-sistance dispatcher will be initiated. The button will flash while the call is in progress. The message ROADSIDE AS-SISTANCE – CONNECTING CALL will ap-pear in the multifunction display.
When the connection is established, the message ROADSIDE ASSISTANCE – CALL CONNECTED appears in the multifunc-tion display. The Tele Aid system will trans-mit data generating the vehicle identification number, model, color and lo-cation (subject to availability of cellular and GPS signals).
A voice connection between the Roadside Assistance dispatcher and the occupants of the vehicle will be established. When a voice connection is established the audio
ing! Gfeel at any way in jeopardy when in the e (e.g. smoke or fire in the vehicle, ve-n a dangerous road location), please t wait for voice contact after you have ed the emergency button. Carefully the vehicle and move to a safe loca-he Response Center will automatically ct local emergency officials with the e’s approximate location if they re-an automatic SOS signal and cannot voice contact with the vehicle occu-.

214
Controls in detail
Useful
voice connection between the Customer ssistance Center representative and the ccupants of the vehicle will be estab-shed. When a voice connection is estab-shed the audio system mutes and the essage TELE AID – INFO CALL ACTIVE
ppears in the multifunction display. Infor-ation regarding the operation of your ve-icle, the nearest Mercedes-Benz Center r Mercedes-Benz USA products and ser-ices is available to you.
or more details concerning the Tele Aid ystem, please visit www.mbusa.com and se your ID and password (sent to you sep-rately) to learn more (USA only).
iThe isistanatedurining tpositton a
See whenup inprox
If theAssiscontconntablicouldtancphonmessCALLtion
iThe indicator lamp in the Information button ¡ remains illuminated in red for approx. 10 seconds during the sys-tem self-check after turning key in the starter switch to position 2 (together with the SOS button and the Roadside Assistance button •).
features
Information button ¡
Located below the center armrest cover is the Information button ¡.
� Press and hold the button (for longer than 2 seconds).
A call to the Customer Assistance Cen-ter will be initiated. The button will flash while the call is in progress. The message INFO – CONNECTING CALL will appear in the multifunction display.
When the connection is established, the message INFO – CALL CONNECTED appears in the multifunction display. The Tele Aid system will transmit data generating the vehicle identification number, model, color and location (subject to availability of cel-lular and GPS signals).
AAolilimamhov
Fsua
ndicator lamp in the Roadside As-nce button • remains illumi-d in red for approx. 10 seconds g the system self-check after turn-
he key in the starter switch to ion 2 (together with the SOS but-nd the Information button ¡).
system self-check (� page 210) the indicator lamp does not light red or stays on longer than ap-imately 10 seconds.
indicator lamp in the Roadside tance button • is illuminated
inuously and there was no voice ection to the Response Center es-shed, then the Tele Aid system not initiate a Roadside Assis-
e call (e.g. the relevant cellular e network is not available). The age ROADSIDE ASSISTANCE – FAILED appears in the multifunc-
display.
Roadside Assistance calls can be ter-minated using the ì button on the multifunction steering wheel.

215
Controls in detail
Useful features
Upgrade Signals
The Tele Aid system processes calls using the following priority:
� Automatic emergency – First priority
� Manual emergency – Second priority
� Roadside Assistance – Third priority
� Information – Fourth priority
Should a higher priority call be initiated while you are connected, an upgrade (al-ternating) tone will be heard, and the ap-propriate indicator lamp will flash. If certain information such as vehicle identi-fication number or customer information is not available, the operator may need to re-transmit.
During this time you will hear a beep and voice contact will be interrupted. Voice contact will resume once the retransmis-sion is completed. Once a call is conclud-ed, a beep will be heard and the appropriate indicator lamp will stop flash-ing. The COMAND system operation will resume.
Seewheup pro
If thbutly aspothetiatvanavaCALtion
Infoingtion
System self-check (� page 210) n the indicator lamp does not light
in red or stays on longer than ap-ximately 10 seconds.
e indicator lamp in the Information ton ¡ is illuminated continuous-nd no voice connection to the Re-nse Center has been established, n the Tele Aid system could not ini-e an Information call (e.g. the rele-t cellular phone network is not ilable). The message INFO – L FAILED appears in the multifunc- display.
rmation calls can be terminated us- the ì button on the multifunc- steering wheel.
!If the indicator lamps do not start flash-ing after pressing one of the buttons or remain illuminated (in red) at any time, the Tele Aid system has detected a fault or the service is not currently ac-tive, and may not initiate a call. Visit your Mercedes-Benz Center and have the system checked or contact the Re-sponse Center at 1-800-756-9018 (in the USA) or 1-888-923-8367 (in Cana-da) as soon as possible.

216
Controls in detail
Useful
emote door unlock
the event that you have locked your ve-icle unintentionally (e.g. key inside vehi-le), and the reserve key is not handy:
Contact the Mercedes-Benz Response Center at 1-800-756-9018 (in the USA) or 1-888-923-8367 (in Canada).
You will be asked to provide your pass-word which you provided when you completed the subscriber agreement.
Then return to your vehicle and press the trunk lock for a minimum of 20 seconds until the SOS button is flashing.
The message EMERGENCY CALL – CALL CONNECTED appears in the multi-function display.
s an alternative, you may unlock the vehi-le via Internet using the ID and password ent to you shortly after the completion of our Acquaintance Call.
!If theor ththe R1-801-88Mercat 1-(1-80tomeCana
iThe iing bcludea RetancRoadcallsprestion
features
R
Inhc
�
�
Acsy
indicator lamp continues to flash e system does not reset, contact esponse Center at 0-756-9018 (in the USA) or 8-923-8367 (in Canada), or edes-Benz Customer Assistance 800-FOR-MERCedes 0-367-6372) in the USA or Cus-r Service at 1-800-387-0100 in da.
ndicator lamp in the correspond-utton flashes until the call is con-d. Calls can only be terminated by
sponse Center or Customer Assis-e Center representative except side Assistance and Information , which can also be terminated by sing button ì on the multifunc-steering wheel.
iWhen a Tele Aid call has been initiated, the audio system or the COMAND sys-tem audio is muted and the selected mode (radio, tape or CD) pauses. The optional cellular phone (if installed) switches off. If it is necessary for you to use this phone, then the vehicle must be at a standstill. Disconnect the coiled cord and place the call. The COMAND navigation system (if engaged) will con-tinue to run. The display in the instru-ment cluster is available for use and spoken commands are only available by pressing the RPT button on the CO-MAND unit. A pop-up window will ap-pear in the COMAND display to indicate that a Tele Aid call is in progress.

217
Controls in detail
Useful features
The Revehiclefeature
Garage door opener
The built-in remote control is capable of operating up to three separately controlled objects.
1 Indicator lamp
2, 3, 4 Signal transmitter key
5 Hand-held remote control trans-mitter (not part of vehicle equip-ment)
iTheavanet
ThesagCALtifuthe
Oncspoto ehic
If thmolocRes15loc
sponse Center will then unlock your with the remote door unlocking .
Stolen vehicle tracking services
In the event your vehicle was stolen:
� Report the incident to the police.
The police will issue a numbered inci-dent report.
� Give this number to the Mercedes-Benz Response Center along with the pass-word which was issued to you when you subscribed to the service.
The Response Center will then attempt to covertly contact the vehicle’s Tele Aid system. Once the vehicle is lo-cated, the Response Center will con-tact the local law enforcement and you. The vehicle’s location will only be pro-vided to law enforcement.
remote door unlocking feature is ilable if the relevant cellular phone work is available.
SOS button will flash and the mes-e EMERGENCY CALL – L CONNECTED will appear in the mul-nction display to indicate receipt of door unlock command.
e the vehicle is unlocked, a Re-nse Center specialist will attempt stablish voice contact with the ve-
le occupants.
e trunk button was pressed for re than 20 seconds before door un-k authorization was received by the ponse Center, you must wait minutes before pressing the trunk k again.

218
Controls in detail
Useful
rogramming or reprogramming the in-egrated remote control
Turn key in the starter switch to position 1 or 2.
Hold the end of the hand-held transmit-ter of the device you wish to train approximately 2 to 5 inches (5 cm to 12 cm) away from the surface of the in-tegrated remote control located on the inside rear view mirror, keeping the in-dicator lamp in view.
Using both hands, simultaneously push the hand-held transmitter button and the desired integrated remote trunk lid switch. Do not release the buttons until completing next step.
Warnin
When pthe doo
When pcontrolanyone
iCertaare iopencultieter, cMercMercCent1-80Serv1-80
features
Pt
�
�
�
g! Grogramming a garage door opener, r moves up or down.
rogramming or operating the remote , make sure there is no possibility of being injured by the moving door.
in types of garage door openers ncompatible with the integrated er. If you should experience diffi-s with programming the transmit-ontact your authorized edes-Benz Center, or call edes-Benz Customer Assistance er (in the USA only) at 0-FOR-MERCedes, or Customer ice (in Canada) at 0-387-0100.
iFor operation in the USA only: This de-vice complies with Part 15 of the FCC Rules. Operation is subject to the following two conditions:
(1) This device may not cause harmful interference.
(2) This device must accept any inter-ference received, including interfer-ence that may cause undesired operation.
Any unauthorized modification to this device could void the user’s authority to operate the equipment.

219
Controls in detail
Useful features
� Theremandlammin
� Whly,
� To rep
You have 30 seconds time to initiate the following step.
� Firmly press and release the pro-grammed integrated remote control transmit button.
� Press and release same button a sec-ond time to complete the training pro-cess.
Some garage door openers may require you to do this procedure a third time to complete the training.
� Confirm the garage door operation by pressing the programmed button on the integrated remote control transmit-ter.
iIf, asucmoof tragwit
indicator lamp on the integrated ote control will flash, first slowly then rapidly. The rapid flashing p indicates successful program-g of the new frequency signal.
en the indicator lamp flashes rapid-release both buttons.
program the remaining two buttons, eat the above steps.
Rolling code programming
To train a garage door opener (or other roll-ing code devices) with the rolling code fea-ture, follow these instructions after completing the “Programming” portion of this text. (A second person may make the following training procedures quicker and easier.)
� Locate training button on the garage door opener motor head unit.
Exact location and color of the button may vary by garage door opener brand. If there is difficulty locating the trans-mitting button, refer to garage door opener operator’s manual.
� Press “training” button on the garage door opener motor head unit.
The “training light” is activated.
fter several attempts, you do not cessfully program the integrated re-te control device to learn the signal he hand-held transmitter, the ga-e door opener could be equipped h the “rolling code feature”.

220
Controls in detail
Useful
Canadia
During ptransmitmitting.
� Contgrateton (the “repehandondsbeen
Uponlampafter
rasing the remote control memory
Turn key in ignition to position 1 or 2.
Simultaneously hold down the left and right side buttons for approximately 20 seconds, or until the indicator lamp blinks rapidly.
The codes of all three channels are erased.
iIf you sell your vehicle, erase the codes of all three channels.
features
n programming
rogramming, your hand-held ter may automatically stop trans-
inue to press and hold the inte-d remote control transmitter but-refer to steps two through four in Programming” portion) while you atedly press (“cycle”) your -held transmitter every two sec- until the frequency signal has learned.
successful training, the indicator will flash slowly and then rapidly several seconds.
Operating the remote control
� Turn key in starter switch to position 1 or 2.
� Select and press the appropriate but-ton to activate the remote controlled device.
The integrated remote control trans-mitter continues to send the signal as long as the button is pressed – up to 20 seconds.
E
�
�

221
Controls in detail
Useful features
Infrare
1 Mocolent
2 Infr(pa
3 31.4 19.5 1.7
d reflecting windshield
unting location for electronic toll lection devices (infrared transpar-)ared transparent area ss-through for electronic signals)5 in (80 cm)0 in (48 cm)5 in (4.5 cm)
Your vehicle is equipped with infrared re-flecting glass which reduces the amount of radiated heat entering the interior through the windows.
The infrared reflecting glass also prevents the transmission of signals through the glass by in-vehicle electronic devices (e.g. electronic toll collection devices).
To allow the use of these devices in the ve-hicle, two infrared transparent areas (1 and 2) are placed in the windshield.

222

Operation
The first 1000 miles (1500 km)
Driving instructions
At the gas station
Engine compartment
Tires and wheels
Winter driving
Maintenance
Vehicle care
223

224
Operation
The
In thtaileing
!Additional instructions for AMG vehi-cles:
� During the first 1000 miles (1500 km) do not exceed a speed of 85 mph (140 km/h).
� During this period, avoid engine speeds above 4500 rpm in each gear.
!All of the above instructions, as may apply to your vehicle type, also apply when driving the first 1000 miles (1500 km) after the engine or the rear differential has been replaced.
iAlways obey applicable speed limits.
first
e “Oped inform
and car
1000 miles (1500 km)
ration” section you will find de-ation on operating, maintain-
ing for your vehicle.
The first 1000 miles (1500 km)The more cautiously you treat your vehicle during the break-in period, the more satis-fied you will be with its performance later on.
� Drive your vehicle during the first 1000 miles (1500 km) at varying but moderate vehicle and engine speeds.
� During this period, avoid heavy loads (full throttle driving) and excessive en-gine speeds (no more than 2⁄3 of maxi-mum rpm in each gear).
� Avoid accelerating by kick-down.
� Do not attempt to slow the vehicle down by shifting to a lower gear using the selector lever.
� Select gear positions 3, 2 or 1 only when driving at moderate speeds (for hill driving).
After 1000 miles (1500 km), you may gradually increase vehicle and engine speeds to the permissible maximum.

225
Operation
Driving instructions
DrDr
Fupedit
To
�
�
�
�
�
�
Fuingon
Pedals
Power assistance
Warning! GKeep driver’s foot area clear at all times. Ob-jects stored in this area may impair pedal movement.
Warning! GWith the engine not running, there is no power assistance for the brake and steering systems. In this case, it is important to keep in mind that a considerably higher degree of effort is necessary to brake and steer the ve-hicle.
iving ive sen
el consnds on ions.
save fu
Keep ttion pr
Remov
Remov
Allow load u
Avoid eration
Have aat reguMerce
el cons in cold short t
instructionssibly – save fuel
umption, to a great extent, de-driving habits and operating con-
el you should:
ires at the recommended infla-essures.
e unnecessary loads.
e roof rack when not in use.
engine to warm up under low se.
frequent acceleration and decel-.
ll maintenance work performed lar intervals by an authorized
des-Benz Center.
umption is also increased by driv- weather, in stop-and-go traffic, rips and in hilly country.
Drinking and driving
Warning! GDrinking and driving and/or taking drugs and driving are very dangerous combina-tions. Even a small amount of alcohol or drugs can affect your reflexes, perceptions and judgement.
The possibility of a serious or even fatal ac-cident is sharply increased when you drink or take drugs and drive.
Please don’t drink or take drugs and drive or allow anyone to drive after drinking or taking drugs.

226
Operation
Driving
Brakes the parking brake is released and the rake warning lamp in the instrument clus-r stays on, the brake fluid level in the res-
rvoir is too low.
rake pad wear or a leak in the system may e the reason for low brake fluid in the res-rvoir.
ave the brake system inspected at an au-orized Mercedes-Benz Center immedi-
tely.
ll checks and service work on the brake ystem should be carried out by an autho-zed Mercedes-Benz Center.
stall only brake pads and brake fluid rec-mmended by Mercedes-Benz.
Warnin
After drwithoutter deethe firstreducedbe necefect. Main front
Restingcause ebrake p
It can atherebytivenesvehicle dent.
instructions
To help prevent brake disk corrosion after driving on wet road surfaces (particularly salted roads), it is advisable to brake the vehicle with considerable force prior to parking. The heat generated serves to dry the brakes.
If your brake system is normally only sub-jected to moderate loads, you should occa-sionally test the effectiveness of the brakes by applying above-normal braking pressure at higher speeds. This will also enhance the grip of the brake pads.
Ifbtee
Bbe
Htha
Asri
Ino
g! Giving in heavy rain for some time applying the brakes or through wa-p enough to wet brake components, braking action may be somewhat and increased pedal pressure may ssary to obtain expected braking ef-intain a safe distance from vehicles
.
your foot on the brake pedal will xcessive and premature wear of the ads.
lso result in the brakes overheating, significantly reducing their effec-s. It may not be possible to stop the in sufficient time to avoid an acci-
!Be very careful not to endanger other road users when you apply the brakes.
Refer to the description of the Brake Assist System (BAS) (� page 73).

227
Operation
Driving instructions
After hon for parkingdown t
ParkingWarn
If otheinstallfluid ivehiclsafe bcould
!Whgraby engvenduc
!Set the parking brake whenever park-ing or leaving the vehicle. In addition, move selector lever to position P.
In addition, when parking on hills, turn front wheel towards the curb.
Warning! GDo not park this vehicle in areas where com-bustible materials such as grass, hay or leaves can come into contact with the hot exhaust system, as these materials could be ignited and cause a vehicle fire.
ard braking, it is advisable to drive some time, rather than immediately , so that the air stream can cool
he brakes faster.
Driving off
Apply the brakes to test them briefly after driving off. Perform this procedure only when the road is clear of other traffic.
Warm up the engine smoothly. Do not place full load on the engine until the oper-ating temperature has been reached.
When starting off on a slippery surface, do not allow one drive wheel to spin for an ex-tended period with the ESP switched off. Doing so may cause serious damage to the drive train which is not covered by the Mercedes-Benz Limited Warranty.
ing! Gr than recommended brake pads are ed, or other than recommended brake s used, the braking properties of the e can be degraded to an extent that raking is substantially impaired. This result in an accident.
en driving down long and steep des, relieve the load on the brakes shifting into a lower gear to use the ine’s braking power. This helps pre-t overheating of the brakes and re-es brake pad wear.
iSimultaneously depressing the acceler-ator pedal and applying the brake re-duces engine performance and causes premature brake and drivetrain wear.

228
Operation
Driving
he tread wear indicator appears as a solid and across the tread.
pecified tire pressures must be main-ined. This applies particularly if the tires
re subject to extreme operating condi-ons (e.g. high speeds, heavy loads, high mbient temperatures).
To redusult of ifore turvehicle
� Kee
� Firm
� Mo
� Slo
� Whwhe
� TurandstarKEY
� Takwith
Warning! GDo not allow your tires to wear down too far. As tread depth approaches 1⁄16 in (1.5 mm), the adhesion properties on a wet road are sharply reduced.
Depending upon the weather and/or road surface (conditions), the tire traction varies widely.
instructions
Tires
Tread wear indicators (TWI) are required by law. These indicators are located in six places on the tread circumference and be-come visible at a tread depth of approxi-mately 1⁄16 in (1.5 mm), at which point the tire is considered worn and should be re-placed.
Tb
Staatia
ce the risk of personal injury as a re-nadvertent vehicle movement, be-ning off the engine and leaving the always:
p right foot firmly on brake pedal.
ly depress parking brake pedal.
ve the selector lever to position P.
wly release brake pedal.
en parked on an incline, turn front el towards the road curb.
n the key to starter switch position 0 remove, or press KEYLESS-GO* t/stop button (vehicles with LESS-GO*).
e the key or the KEYLESS-GO* card you and lock vehicle when leaving.
Warning! GIf you feel a sudden significant vibration or ride disturbance, or you suspect that possi-ble damage to your vehicle has occurred, you should turn on the hazard warning flash-ers, carefully slow down, and drive with cau-tion to an area which is a safe distance from the road.
Inspect the tires and the vehicle underbody for possible damage. If the vehicle or tires appear unsafe, have it towed to the nearest Mercedes-Benz Center or tire dealer for re-pairs.

229
Operation
Driving instructions
Hydro
Depenon the at low vehicleroad anrain.
Tire tr
The saicy roa
Tire speed rating
Regardless of the tire rating, local speed limits should be obeyed. Use prudent driv-ing speeds appropriate to prevailing condi-tions.
CL 500 and CL 600
An electronic speed limiter prevents your vehicle from exceeding a speed of 130 mph (210 km/h).
Warn
Do nothe abmay lodrivinspeedheat b Warning! G
Even when permitted by law, never operate a vehicle at speeds greater than the maxi-mum speed rating of the tires.
Exceeding the maximum speed for which tires are rated can lead to sudden tire fail-ure, causing loss of vehicle control and pos-sibly resulting in an accident and/or personal injury and possible death, for you and for others.
planing
ding on the depth of the water layer road, hydroplaning may occur, even speeds and with new tires. Reduce speed, avoid track grooves in the d apply brakes cautiously in the
action
fe speed on a wet, snow covered or d is always lower than on a dry road.
You should pay particular attention to the condition of the road whenever the outside temperatures are close to the freezing point.
Mercedes-Benz recommends M+S rated radial-ply tires for the winter season for all four wheels to insure normal balanced handling characteristics. On packed snow, they can reduce your stopping distance in comparison to summer tires. Stopping dis-tance, however, is still considerably greater than when the road is not covered with snow or ice. Exercise appropriate cau-tion.
ing! Gt drive with a flat tire. A flat tire affects ility to steer or brake the vehicle. You se control of the vehicle. Continued
g with a flat tire or driving at high with a flat tire will cause excessive uild-up and possibly a fire.
Warning! GIf ice has formed on the road, tire traction will be substantially reduced. Under such weather conditions, drive, steer and brake with extreme caution.

230
Operation
Driving
CL500 (
Your veh“H”-rateof 130 m
CL 600
Your veh“Y”-rateof 188 m
Vehicles
Your veh“Y”-rateof 188 m
CL 55 A
Your veh“Y”-rateof 188 m
An electvehicle f155 mph
Informattires (�
oad salts and chemicals can adversely af-ct braking efficiency. Increased pedal rce may become necessary to produce e normal braking effect.
e therefore recommend depressing the rake pedal periodically when traveling at ngth on salt-strewn roads.
his can bring road salt impaired braking fficiency back to normal. Be very careful at you carry out these braking maneu-
ers without endangering any other road sers.
the vehicle is parked after being driven n salt treated roads, the braking efficien-y should be tested as soon as possible af-r driving is resumed while observing the
afety rules in the previous paragraph.
instructions
without Sport Package*)
icle is factory equipped with d tires, which have a speed rating ph (210 km/h).
(without Sport Package*)
icle is factory equipped with d tires, which have a speed rating ph (300 km/h).
with Sport Package*
icle is factory equipped with d tires, which have a speed rating ph (300 km/h).
MG
icle is factory equipped with d tires, which have a speed rating ph (300 km/h).
ronic speed limiter prevents your rom exceeding a speed of (250 km/h).
ion on tire speed rating for winter page 252)
Winter driving instructions
The most important rule for slippery or icy roads is to drive sensibly and to avoid abrupt acceleration, braking and steering maneuvers. Do not use the cruise control system under such conditions.
When the vehicle is in danger of skidding, move selector lever to position N. Try to keep the vehicle under control by correc-tive steering action.
Rfefoth
Wble
Tethvu
Ifoctes
iInformation on driving with snow chains (� page 253).
Warning! GOn slippery road surfaces, never downshift in order to obtain braking action. This could result in drive wheel slip and reduced vehi-cle control. Your vehicle’s ABS will not pre-vent this type of control loss.

231
Operation
Driving instructions
For mo(� pag
Passenger compartment
Driving abroad
Abroad, there is a widely-spread Mercedes-Benz service network at your disposal. If you plan to drive into areas which are not listed in the index of your Mercedes-Benz Center directory, you should request pertinent information from your authorized Mercedes-Benz Center.
Warn
If the sure tpipe aenginmonoterior death
To assopen hicle n
Warn
The osignedis thedicateing posurfac
Warning! GAlways fasten items being carried as secure-ly as possible.
In an accident, during hard braking or sud-den maneuvers, loose items will be thrown around inside the vehicle, and cause injury to vehicle occupants unless the items are securely fastened in the vehicle.
The trunk is the preferred place to carry ob-jects.
re information on winter driving e 252).
Standing watering! Gvehicle becomes stuck in snow, make hat snow is kept clear of the exhaust nd from around the vehicle with the
e running. Otherwise, deadly carbon xide (CO) gases may enter vehicle in-resulting in unconsciousness and .
ure sufficient fresh air ventilation, a window slightly on the side of the ve-ot facing the wind.
ing! Gutside temperature indicator is not de- to serve as an ice-warning device and
refore unsuitable for that purpose. In-d temperatures just above the freez-int do not guarantee that the road e is free of ice.
!Do not drive through flooded areas or water of unknown depth.
If you must drive through standing wa-ter, drive slowly to prevent water from entering the passenger compartment or the engine compartment. Water in these areas could cause damage to electrical components or wiring of the engine or transmission, or could result in water being ingested by the engine through the air intake causing severe internal engine damage. Any such dam-age is not covered by the Mercedes-Benz Limited Warranty.

232
Operation
Driving
Controlmitters
COMAN
atalytic converter
our Mercedes-Benz is equipped with onolithic type catalytic converters, an portant element in conjunction with the
xygen sensors to achieve substantial con-ol of the pollutants in the exhaust emis-ions. Keep your vehicle in proper perating condition by following our rec-mmended maintenance instructions as utlined in your Service Booklet.
Warnin
Please sponsibOnly opagemenphone1
conditio
Bear in (approxcoverin44 feetond.
1 Observe
!To prevent damage to the catalytic con-verters, use only premium unleaded gasoline in this vehicle.
Any noticeable irregularities in engine operation should be dealt with prompt-ly. Otherwise, excessive unburned fuel may reach the catalytic converter, causing it to overheat and start a fire.
instructions
and operation of radio trans-
D, radio and telephone*
Telephones and two-way radios
Radio transmitters, such as a portable tele-phone or a citizens band unit should only be used inside the vehicle if they are con-nected to an antenna that is installed on the outside of the vehicle.
Refer to the radio transmitter operation in-structions regarding use of an external an-tenna.
C
Ymimotrsooo
g! Gdo not forget that your primary re-ility is to drive the vehicle safely. erate the COMAND (Cockpit Man-t and Data System), radio or tele-
if road, weather and traffic ns permit.
mind that at a speed of just 30 mph imately 50 km/h), your vehicle is g a distance of approximately (approximately 13.5 m) every sec-
all legal requirements.
Warning! GNever operate radio transmitters equipped with a built-in or attached antenna (i.e. with-out being connected to an external antenna) from inside the vehicle while the engine is running. Doing so could lead to a malfunc-tion of the vehicle’s electronic system, pos-sibly resulting in an accident and/or personal injury.

233
Operation
Driving instructions
Warn
As witerate ble mcan cosystemand c
Warning! GInhalation of exhaust gas is hazardous to your health. All exhaust gas contains carbon monoxide, and inhaling it can cause uncon-sciousness and lead to death.
Do not run the engine in confined areas (such as a garage) which are not properly ventilated. If you think that exhaust gas fumes are entering the vehicle while driving, have the cause determined and corrected immediately. If you must drive under these conditions, drive with at least one window fully open at all times.
Emission control
Certain systems of the engine serve to keep the toxic components of the exhaust gases within legal limits.
These systems, of course, will function properly only when maintained strictly ac-cording to factory specifications. Any ad-justments to the engine should therefore be carried out only by qualified Mercedes-Benz Center authorized techni-cians.
Engine adjustments should not be altered in any way. Moreover, the specified service jobs must be carried out regularly accord-ing to Mercedes-Benz servicing require-ments. For details refer to the Service Booklet.
ing! Gh any vehicle, do not idle, park or op-this vehicle in areas where combusti-aterials such as grass, hay or leaves me into contact with the hot exhaust , as these materials could be ignited
ause a vehicle fire.

234
Operation
Driving
Coolant
During sstop-andperature(120°C)
The engthe cool(120°C)gine damMercede
instructions
temperature
evere operating conditions and -go city traffic, the coolant tem- may rise close to approx. 248°F .
ine should not be operated with ant temperature over 248°F . Doing so may cause serious en-age which is not covered by the s-Benz Limited Warranty.
Warning! G� Driving when your engine is badly over-
heated can cause some fluids, which may have leaked into the engine com-partment, to catch fire. You could be se-riously burned.
� Steam from an overheated engine can cause serious burns and can occur just by opening the engine hood. Stay away from the engine if you see or hear steam coming from it.
Turn off the engine, get out of the vehicle and do not stand near the vehicle until it cools down.
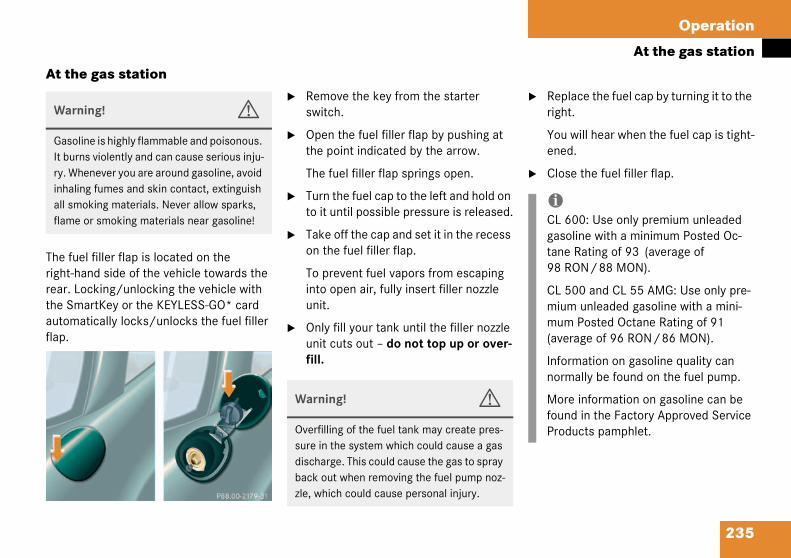
235
Operation
At the gas station
At
Thrigreatheaufla
� Replace the fuel cap by turning it to the right.
You will hear when the fuel cap is tight-ened.
� Close the fuel filler flap.
W
GItrinafl
iCL 600: Use only premium unleaded gasoline with a minimum Posted Oc-tane Rating of 93 (average of 98 RON/88 MON).
CL 500 and CL 55 AMG: Use only pre-mium unleaded gasoline with a mini-mum Posted Octane Rating of 91 (average of 96 RON/86 MON).
Information on gasoline quality can normally be found on the fuel pump.
More information on gasoline can be found in the Factory Approved Service Products pamphlet.
the g
e fuel fiht-handr. Lock Smart
tomaticp.
arning
asoline burns vy. Whenehaling fll smokiame or
as station
ller flap is located on the side of the vehicle towards the ing/unlocking the vehicle with Key or the KEYLESS-GO* card ally locks/unlocks the fuel filler
� Remove the key from the starter switch.
� Open the fuel filler flap by pushing at the point indicated by the arrow.
The fuel filler flap springs open.
� Turn the fuel cap to the left and hold on to it until possible pressure is released.
� Take off the cap and set it in the recess on the fuel filler flap.
To prevent fuel vapors from escaping into open air, fully insert filler nozzle unit.
� Only fill your tank until the filler nozzle unit cuts out – do not top up or over-fill.
! Gis highly flammable and poisonous. iolently and can cause serious inju-ver you are around gasoline, avoid
umes and skin contact, extinguish ng materials. Never allow sparks, smoking materials near gasoline!
Warning! GOverfilling of the fuel tank may create pres-sure in the system which could cause a gas discharge. This could cause the gas to spray back out when removing the fuel pump noz-zle, which could cause personal injury.

236
Operation
At the
ngine oil level
ore information on engine oil page 238).
ehicle lighting
heck function and cleanliness.More infor-ation on replacing light bulbs can be und in the “Practical hints” section on page 302).
ire inflation pressure
ore information on tire inflate pressure page 247).
pening hood (� page 237).
xterior lamp switch (� page 108).
iLeavcap oillum
More“Prac
gas station
Check regularly and before a long trip
1 Windshield washer and headlamp cleaning systemMore information on refilling the reser-voir (� page 244).
2 Brake fluidMore information on brake fluid can be found in the “Technical data” section on (� page 340).
3 Coolant levelMore information on coolant (� page 242).
E
M(�
V
Cmfo(�
T
M(�
O
E
ing the engine running and the fuel pen can cause the ? lamp to
inate.
information can be found in the tical hints” section (� page 268).

237
Operation
Engine compartment
EnHo
Op
Ththeing
1
� Pull handle 2 to its stop out of radiator grill.
� Pull up on the hood (do not pull up on the handle) and then release it.
The hood will be automatically held open at shoulder height.
W
Dcb
Warning! GTo help prevent personal injury, stay clear of moving parts when the hood is open and the engine is running. Make sure the hood is properly closed before driving. When closing the hood, use extreme caution not to catch hands or fingers.
The radiator fan may continue to run for ap-proximately 30 seconds or even restart af-ter the engine has been turned off. Stay clear of fan blades.
��
gine od
ening
e hood driver brake
Hood
arning
o not pule is in me forced
compartment
lock release lever is located in ’s footwell to the left of the park-pedal.
lock release
� Pull lever 1 towards you in the direction of the arrow.
The hood is unlocked and handle 2 will extend out of the radiator grill.
2 Handle for opening the hood
! Gll the release lever while the vehi-otion. Otherwise the hood could open by passing air flow.
!To avoid damage to the windshield wip-ers or hood, never open the hood if the wiper arms are folded forward away from the windshield.

238
Operation
Engine
ngine oil
he amount of oil your engine needs will epend on a number of factors, including riving style. Higher oil consumption can ccur when
the vehicle is new
the vehicle is driven frequently at high-er engine speeds
ngine oil consumption checks should only e made after the vehicle break-in period.
hecking engine oil level
hen checking the oil level the vehicle ust
be parked on level ground
be at normal operating temperature
have been stationary for at least five minutes with the engine turned off
Warnin
If you sengine peraturoverheaaway fruntil thecall the
Warnin
The engignitionit is dannition csocket)
� with
� whi
� if igturn
compartment
Closing
� Let the hood drop from a height of ap-proximately 1 ft (30 cm).
The hood will lock audibly.
� Check to make sure that the hood is fully closed.
If you can raise the hood at a point above the headlamps, then it is not properly closed. Open it again and let it drop with somewhat greater force.
E
Tddo
�
�
Eb
C
Wm
�
�
�
g! Gee flames or smoke coming from the compartment, or if the coolant tem-e gauge indicates that the engine is ted, do not open the hood. Move
om vehicle and do not open the hood engine has cooled. If necessary,
fire department.
g! Gine is equipped with a transistorized system. Because of the high voltage gerous to touch any components (ig-oils, spark plug sockets, diagnostic of the ignition system
the engine running
le starting the engine
nition is “on” and the engine is ed manually
Warning! GBe careful that you do not close the hood on anyone.

239
Operation
Engine compartment
Checkcontro
You camultifu
� Turpos
The staappear
� Prestesagpla
ENGMEAMEAONL
Other display messages
If the key is not turned to position 2 in the starter switch, the following message will appear:FOR ENGINE OIL LEVELSWITCH ON IGNITION!
� Switch on the ignition.
If you see the message:OBSERVE WAITING PERIOD
� Wait five minutes before repeating check procedure.
If you see the message:ENGINE OIL LEVELNOT WHEN ENGINE ON!
� Turn off the engine. If engine is at nor-mal operating temperature, wait five minutes before checking oil. If the en-gine is not yet at normal operating tem-perature, you must wait 30 minutes before checking oil. ��
ing the engine oil level with the l system
n check the engine oil level on the nction display.
n the key in the starter switch to ition 2.
ndard display (� page 122) should in the multifunction display.
ss buttonk or j on the ering wheel until the following mes-e is seen in the multifunction dis-y:
INE OIL LEVELSURING NOWSURE. CORRECTY IF VEH. LEVEL
One of the following messages will sub-sequently appear in the indicator:
� ENGINE OIL LEVELOK
� ADD 1.0 QT. TOREACH MAX. OIL LEVEL!(Canada: 1.0 LITER)
� ADD 1.5 QTS. TOREACH MAX. OIL LEVEL!(Canada: 1.5 LITERS)
� ADD 2.0 QTS. TOREACH MAX. OIL LEVEL!(Canada: 2.0 LITERS)
� If necessary, add engine oil.
For adding oil see (� page 241).

240
Operation
Engine
If there igine at nfollowingENGINE REDUCE
� Have
See “Praengine odisplay w
More inffound in(� page
Open the hood (� page 237).
Pull out oil dipstick 1 (� page 241).
Wipe oil dipstick 1 clean.
Fully insert oil dipstick 1 into the dip-stick guide tube, and remove after ap-proximately three seconds to obtain an accurate reading.
1 Oil dipstick
iIf youdurethe m
compartment
s excessive engine oil with the en-ormal operating temperature, the message will appear:OIL LEVELOIL LEVEL
excess oil siphoned.
ctical hints” (� page 281) if the il level indicator lights up in the hile the engine is running.
ormation on engine oil can be the “Technical data” 339).
Checking the engine oil level with the oil dipstick (CL 500, CL 55 AMG only)
The engine oil level can be checked by ei-ther oil dipstick 1 or via the multifunction display in the instrument cluster (� page 239). The amount of engine oil needed is shown more precisely on the op-erating system display.
1 Oil dipstick
�
�
�
�
want to stop the checking proce-, press the k or j button on
ultifunction steering wheel.

241
Operation
Engine compartment
The oilline beoil dips
For ad
See “Penginedisplay
More ifound i(� pag
� Unscrew the filler neck cap 1 from filler neck.
� Add engine oil as required. Be careful not to overfill with oil.
Be careful not to spill any oil when adding. Avoid environmental damage caused by oil entering the ground or water.
� Screw the filler neck cap 1 back on the filler neck.
More information on engine oil can be found in the “Technical data” (� page 339).
iFill oil ma
!Excessive oil must be siphoned or drained off. It could cause damage to the engine and catalytic converter not covered by the Mercedes-Benz Limited Warranty.
level is acceptable when it leaves a tween the upper and lower marks of tick 1.
ding oil see (� page 241).
ractical hints” (� page 281) if the oil level indicator lights up in the while the engine is running.
nformation on engine oil can be n the “Technical data” e 339).
Adding engine oil
CL 500, CL 55 AMG
1 Filler neck cap
CL 600
1 Filler neck cap
quantity between upper and lower dipstick marking level is approxi-tely 2.1 US qt (2.0 l).

242
Operation
Engine
Transm
The tranto be chfluid loshave an check th
Active B
Regular you notisages inauthorizthe ABC
Warning! GIn order to avoid any possibly serious burns:
� Use extreme caution when opening the hood if there are any signs of steam or coolant leaking from the cooling system, or if the coolant temperature gauge indi-cates that the coolant is overheated.
� Do not remove pressure cap on coolant reservoir if engine temperature is above 194°F (90°C). Allow engine to cool down before removing cap. The coolant reservoir contains hot fluid and is under pressure.
� Using a rag, slowly open the cap approx-imately ½ turn to relieve excess pres-sure. If opened immediately, scalding hot fluid and steam will be blown out un-der pressure.
� Do not spill antifreeze on hot engine parts. Antifreeze contains ethylene gly-col which may burn if it comes into con-tact with hot engine parts.
compartment
ission fluid level
smission fluid level does not need ecked. If you notice transmission s or gear shifting malfunctions, authorized Mercedes-Benz Center e automatic transmission.
ody Control (ABC) fluid level
fluid level check is not required. If ce fluid leaks or malfunction mes- the multifunction display, have an ed Mercedes-Benz Center check system.
Coolant
The engine coolant is a mixture of water and anticorrosion/antifreeze. To check the coolant level, the vehicle must be parked on level ground and the engine must be cool.

243
Operation
Engine compartment
The cothe pasment.
1 Coo
� Usiimalea
� Conrem
Battery
Your vehicle’s battery is located in the trunk under the right hand wheel well cov-er panel (� page 313).
The battery should always be sufficiently charged in order to achieve its rated ser-vice life. Refer to Service Booklet for bat-tery maintenance intervals.
If you use your vehicle mostly for short dis-tance trips, you will need to have the bat-tery charge checked more frequently.
When replacing the battery, always use batteries approved by Mercedes-Benz.
If you do not intend to operate your vehicle for an extended period of time, consult an authorized Mercedes-Benz Center about steps you need to observe.
olant expansion tank is located on senger side of the engine compart-
lant expansion tank
ng a rag, turn the cap slowly approx-tely one half turn to the left to re-
se any excess pressure.
tinue turning the cap to the left and ove it.
The coolant level is correct if the level
� for cold coolant: reaches the black top part of the reservoir
� for warm coolant: is approx. 0.6 in (1.5 cm) higher
� Add coolant as required.
� Replace and tighten cap.
More information on coolant can be found in the “Technical data” section (� page 342).

244
Operation
Engine
indshield washer system and eadlamp cleaning system
luid for the windshield washer system and e headlamp cleaning system is supplied om the windshield washer reservoir. It as a capacity of approx. 7.1 US qt. (6.7 l).
uring all seasons, add MB Windshield asher Concentrate “S” to water. Premix e windshield washer fluid in a suitable
ontainer.
Refill the reservoir with MB Windshield Washer Concentrate and water (or commercially available pre-mixed windshield washer solvent/antifreeze, depending on ambient temperatures).
Always use washer solvent/antifreeze where temperatures may fall below freezing. Failure to do so could result in damage to the washer system/reser-voir.
GADB
ECF
compartment
Batteries contain materials that can harm the environment if disposed of improperly. Recycling of batteries is the preferred method of disposal. Many states require sellers of batteries to accept old batteries for recycling.
Wh
Fthfrh
DWthc
�
Observe all safety instructions and precautions when handling automotive batteries.
Risk of explosion
Keep flames or sparks away from battery. Do not smoke.
Battery acid is caustic. Do not allow it to come into contact with skin, eyes or clothing.
In case it does, immediately flush affected area with clear water and seek medical help if necessary.
Wear eye protection.
Keep children away.
Follow the instructions in this Operator's Manual.

245
Operation
Engine compartment
The wihicle isfor tem(–10°C
1 Wa
More i“Techn
ndshield washer system on this ve- heated, so a fluid mixture produced peratures of approximately 14°F ) should be sufficient.
sher fluid reservoir
nformation can be found in the ical data” section (� page 344).
Warning! GWasher solvent/antifreeze is highly flam-mable. Do not spill washer solvent/antifreeze on hot engine parts, be-cause it may ignite. You could be seriously burned.
!Only use washer fluid which is suitable for plastic lenses. Improper washer flu-id can damage the plastic lenses of the headlamps.

24
Operation
Tire
TireSeeter fmenwintvice
portant guidelines
Use only sets of tires and rims of the same type and make.
Tires must be of the correct size for the rim.
Break in new tires for approximately 60 miles (100 km) at moderate speeds.
Regularly check the tires and rims for damage.
If vehicle is heavily loaded, check tire pressure and correct as required.
Do not allow your tires to wear down too far. Adhesion properties on wet roads are sharply reduced at tread depths under 1/8 in (3 mm).
When replacing individual tires, you should mount new tires on the front wheels first (on vehicles with same-sized wheels all around).
W
RetiooriMetiomo
�
�
6
s and
s and your auor inforded rimer oper concer
arning!
place rimn, manuginal parcedes-n. If incounted:
The whnents c
The cowheelsanteed
wheels
wheelsthorized Mercedes-Benz Cen-mation on tested and recom-s and tires for summer and ation. They can also offer ad-ning tire service and purchase.
Retreaded tires are not tested or recom-mended by Mercedes-Benz, since previous damage cannot always be recognized on retreads. Mercedes-Benz can therefore not assure the operating safety of the vehi-cle when such tires are used.
Im
�
�
�
�
�
�
�
Gs or tires with the same designa-
facturer and type as shown on the rt. See your authorized Benz Center for further informa-rrectly sized rims and tires are
eel brakes or suspension compo-an be damaged
rrect operating clearance of the and the tires are no longer guar-
Warning! GWorn, old tires can cause accidents. If the tire tread is badly worn, or if the tires have sustained damage, replace them.
When replacing rims, use only genuine Mercedes-Benz wheel bolts specified for the particular rim type. Failure to do so can re-sult in the bolts loosening and possibly an accident.

247
Operation
Tires and wheels
Life of
The sevarying
� Dri
� Tire
� Dis
Checking tire inflation pressure
Correct the tire pressure only when tires are cold.
Regularly check your tire pressure at inter-vals of no more than 14 days.
If the tires are warm, you should only cor-rect the tire pressure if it is too low for cur-rent operating conditions.
A table on the fuel filler flap lists the spec-ified tire inflation pressures for warm and cold tires as well as for various operating conditions.
Warn
Tires asix ye
!Keeplaposwit
Warning! GIf the tire pressure repeatedly drops:
� Check the tires for punctures from for-eign objects.
� Check to see whether air is leaking from the valves or from around the rim.
tires
rvice life of a tire is dependent upon factors including but not limited to:
ving style
pressure
tance driven
Direction of rotation
Unidirectional tires offer added advantag-es, such as better hydroplaning perfor-mance. To benefit, however, you must make sure that the tires rotate in the direc-tion specified.
An arrow on the sidewall indicates the in-tended direction of tire rotation.
ing! Gnd spare tire should be replaced after
ars, regardless of the remaining tread.
p unmounted tires in a cool, dry ce with as little exposure to light as sible. Protect tires from contact
h oil, grease and gasoline.

248
Operation
Tires a
Tire pres1.5 psi (temperawhen chtemperatempera
Tire temcrease wdriving s
hecking tire pressure electronically*
he tire inflation pressure monitor only nctions on wheels that are equipped with e proper electronic sensors. It monitors e tire inflation pressure, as selected by e driver, in all four tires. A warning is is-
ued to alert you to a decrease in pressure one or more of the tires.
ire pressure inquiries are made using the ultifunction display (� page 117). The in-
ation pressures are displayed only after a w minutes’ travel time.
ou can select the unit of measure used for e tire inflation pressure by changing the
etting in the control system (� page 117).
iThe pminimcomf
Increheavloadsfavorride somemax.min.
iPossible differences between the read-ings of a tire pressure gauge of an air hose, e.g. gas station equipment, and the vehicle’s control system can occur. The readings issued by the control sys-tem are more precise.
nd wheels
sure changes by approximately 0.1 bar) per 18°F (10°C) of air ture change. Keep this in mind ecking tire pressure where the ture is different from the outside ture.
perature and tire pressure also in-hile driving, depending on the peed and the tire load.
Check the spare tire periodically for condi-tion and inflation pressure. Spare tires will age and become worn over time even if never used, and thus should be inspected and replaced when necessary or after a maximum of six years.
C
Tfuthththsin
Tmflfe
Yths
ressures listed for light loads are um values offering high driving
ort.
ased inflation pressures listed for ier loads may also be used for light . These higher pressures produce able handling characteristics. The of the vehicle, however, will be what harder. Never exceed the
values or inflate tires below the values listed on the fuel filler flap.
Warning! GFollow recommended inflation pressures.
Do not overinflate tires. Overinflated tires can result in sudden deflation (blowout) be-cause they are more likely to become punc-tured or damaged by road debris, potholes etc.
Do not underinflate tires. Underinflated tires wear unevenly, adversely affect handling and fuel economy, and are more likely to fail from being overheated.
Do not overload the tires by exceeding the specified vehicle capacity weight (as indicat-ed by the label on the pillar in the driver’s door opening). Overloading the tires can overheat them, possibly causing a blowout.

249
Operation
Tires and wheels
� Sw
� Pretifuuntpea(�
� Preedlpredis
Warning! GFollow recommended inflation pressures.
Do not overinflate tires. Overinflated tires can result in a sudden deflation (blowout) because they are more likely to become punctured or damaged by road debris, pot-holes etc.
Do not underinflate tires. Underinflated tires wear unevenly, adversely affect handling and fuel economy, and are more likely to fail from being overheated.
Do not overload the tires by exceeding the specified vehicle capacity weight (as indicat-ed by the label on the pillar in the driver’s door opening). Overloading the tires can overheat them, possibly causing a blowout.
iOperating radio transmission equip-ment (e.g. wireless headsets, two-way radios) in or near the vehicle could cause the tire inflation pressure moni-tor to malfunction.
itch on the ignition.
ss button è or ÿ on the mul-nction steering wheel repeatedly il the standard display menu ap-rs in the multifunction display
page 118).
ss the k or j button repeat-y until you see the current inflation ssures for each tire appear in the play.
Warning! GThe tire inflation pressure monitor does not indicate a warning for wrongly selected in-flation pressures. Always adjust tire inflation pressure according to the label affixed on the fuel filler flap.
The tire inflation pressure monitor is not able to issue a warning due to a sudden loss of pressure (e.g. tire puncture caused by a foreign object). In this case bring the vehicle to a halt by carefully applying the brakes and avoiding abrupt steering maneuvers.

250
Operation
Tires a
Activatimonitor
You mussure mo
� If yo
� If you
� If yotires
� Makrectl
� Prestifununtilin th(� pa
Press the reset button J (� page 22).
The following message will appear in the multifunction display: CHECK CURRENT TIRE PRES.?
Press the æ button.
The following message will appear in the multifunction display field:TIRE PRES. MONITOR ACTIVATED
The tire inflation pressure monitor will now monitor the tire inflation pressure values of all four tires.
The following message will appear in the multifunction display field:TIRE PRES. MONITOR PRES. DISPLAY AFTER DRIVING A FEW MINS. REACTIVATE USING R BUTTON
This display appears until the individual inflation pressure values are matched with the tires. The individual values are then displayed.
nd wheels
ng the tire inflation pressure
t activate the tire inflation pres-nitor in the following cases:
u have changed the tire pressure
have replaced the wheels or tires
u have installed new wheels or
e sure that the tire pressure is cor-y set.
s button è or ÿ on the mul-ction steering wheel repeatedly the standard display menu appear e in the multifunction display ge 118).
� Press the k or j button repeat-edly until you see the current inflation pressures for each tire appear in the displayor the following message appears in the displayTIRE PRES. MONITOR PRES. DISPLAY AFTER DRIVING A FEW MINS. REACTIVATE USING R BUTTON
�
�
iIf transporting a deflated road wheel or additional wheel sensors in the vehicle, the tire inflation pressure monitor should not be reactivated until the de-flated wheel or additional wheel sen-sors have been removed from the vehicle. Otherwise, the deflated wheel or additional sensors could cause the tire inflation pressure monitor system to malfunction.

251
Operation
Tires and wheels
If you w
� Pre
If the fmultifuREACTIPRES. orTIRE PCHECK
� Checor
� Reamo
!If your vehicle is equipped with a tire in-flation pressure monitor*, there are electronic components built into the wheel.Do not use mounting tools in the area of the valve as they could damage the electronic components. To prevent damage or incorrect instal-lation, have the tires changed at an au-thorized Mercedes-Benz Center.
Warning! GHave the tightening torque checked after changing a wheel. Wheels could become loose if not tightened with a torque of 110 ft.lb. (150 Nm).
Use only genuine Mercedes-Benz wheel bolts specified for your vehicle's rims.
ish to cancel activation:
ss the ç button.
ollowing message appears in the nction display field:VATE TIRE MONITOR
RES. TIRES!
ck the tire inflation pressures and rect them if necessary.
ctivate the tire inflation pressure nitor.
Rotating wheels
On vehicles with the same wheel size all around, wheels can be rotated every 3000 to 6000 miles (5000 to 10000 km), or sooner if necessary, according to the de-gree of tire wear. The same direction of tire rotation must be retained.
Rotate the wheels before the characteris-tic tire wear pattern becomes visible (shoulder wear on front wheels and tread center wear on rear wheels).
Thoroughly clean the inner side of the wheels after each rotation. Check and en-sure proper tire inflation pressure. It is necessary to activate the tire inflation pressure monitor*.
Warning! GRotate front and rear wheels only if they are of the same size.

25
Operation
Win
WinBefocle wMerclud
� Cc
� Awc“sf(
� BwAtl
� Tet
lways observe the speed rating of the inter tires installed on your vehicle. If the aximum speed for which your tires are ted is below the speed rating of your ve-
icle, you must place a notice to this effect here it will be seen by the driver. Such no-ces are available from your tire dealer or om any authorized Mercedes-Benz enter.
Warning! GIf you use your spare tire when winter tires are fitted on the other wheels, be aware that the difference in tire characteristics may very well impair turning stability and that overall driving stability may be reduced. Adapt your driving style accordingly.
Have the spare tire replaced with a winter tire at the nearest authorized Mercedes-Benz Center.
2
ter d
ter dre the interiz
cedes-Bes:
heck ooncen
dditionater oleaningS” to aolventor tem� page
attery ith de well-c
hat theow amb
ire chad radiahe win
riving
rivingonset of winter have your vehi-ed at an authorized enz Center. This service in-
f anticorrosion and antifreeze tration.
of cleaning concentrate to the f the windshield and headlamp system. Add MB Concentrate pre-mixed windshield washer /antifreeze which is formulated peratures below freezing point 343)
test. Battery capacity drops creasing ambient temperature. harged battery helps to ensure engine can be started even at ient temperatures.
nge. We recommend M+S rat-l-ply tires on all four wheels for
ter season.
Winter tires
Always use winter tires at temperatures below 39°F (4°C) and whenever wintry road conditions prevail. Use of winter tires is the only way to achieve the maximum ef-fectiveness of the ABS and the ESP in win-ter operation.
For safe handling, ensure that all mounted winter tires are of the same make and have the same tread design.
AwmrahwtifrC
Warning! GWinter tires with a tread depth under 0.16 in (4 mm) must be replaced. They are no long-er suitable for winter operation.

253
Operation
Winter driving
Block
(CanadThe ener.
The eleyour au
Please observe the following guidelines when using snow chains:
� Using snow chains is not permissible with all wheel/tire combinations.
� Chains should only be used on the rear wheels. Follow the manufacturer's mounting instructions.
� Use only snow chains that are ap-proved by Mercedes-Benz. Your autho-rized Mercedes-Benz Center will be glad to advise you on this subject.
!Do not use snow chains with tire sizes 245/45 R18 on 8½J x 18 rim and 265/40 R18 in general (� page 331).
Do not use snow chains on tires mount-ed on AMG rims.
heater*
a only)gine is equipped with a block heat-
ctrical cable may be installed at thorized Mercedes-Benz Center.
Snow chains
When using snow chains, the vehicle should only be driven at vehicle height 1 (� page 191).
Snow chains should only be driven on snow-covered roads at speeds not to ex-ceed 30 mph (50 km/h). Remove chains as soon as possible when driving on roads without snow.
iWhen driving with snow chains, you may wish to deactivate the ESP (� page 75) before setting the vehicle in motion. This will improve the vehi-cle‘s traction.

25
Operation
Ma
MaWe youMerthe by t
Failuaccodesithe coveWar
FSSis du
Appservsageplayswit
SERVSERVSERVSERV
learing the service indicator
he service indicator is automatically leared after 30 seconds. You can also lear it yourself.
Press the reset button J (� page 22) in the instrument cluster.
ervice term exceeded
you have exceeded the suggested ser-ice term, you will see the following mes-age in the multifunction display:
ERVICE A EXCEEDED BY XXXX MILES (KM)ERVICE A EXCEEDED BY XXX DAYSERVICE A EXCEEDED BY X DAY
n acoustic signal will also sound.
he Mercedes-Benz Center will reset the ervice indicator following a completed ervice.
4
intena
intenastronglyr vehiclcedes-BServicehe FSS
re to hrdancegnatedFSS mared by
ranty.
will noe.
roximatice is ds will a while ych on t
ICE A ICE A ICE A ICE A
nce
nce recommend that you have
e serviced by your authorized enz Center, in accordance with
Booklet at the times called for (Flexible Service System).
ave the vehicle maintained in with the Service Booklet at the
times/mileage called for by y result in vehicle damage not the Mercedes-Benz Limited
tify you when your next service
ely one month before your next ue, one of the following mes-ppear in the multifunction dis-ou are driving or when you
he ignition (example service A):
IN XXXXX MILES (KM)IN XXX DAYSIN X DAYDUE NOW!
The type of service due is indicated in the multifunction display:
9 Minor service (A)
´ Major service (B)
C
Tcc
�
S
Ifvs
SSS
A
Tss
iThe interval between services depends on your driving habits. A gentle driving style, moderate engine speeds and the avoidance of short distance trips will lengthen the interval between services.

255
Operation
Maintenance
Calling
� Sw
Thetem
� Pretifucat´in t
� To confirm, hold down the reset button until you hear a signal.
The service indicator now displays the reset interval.
iIf thof dthetor.linedayvice
Do wit
iIf the service indicator was inadvertent-ly reset, have a Mercedes-Benz Center correct it.
Only reset if the proper service has been performed. Resetting the system without performing proper service as called for by the FSS will cause the FSS to incorrectly determine the next ser-vice interval which will result in engine damage not covered by the Mercedes-Benz Limited Warranty.
up the service indicator
itch on the ignition.
standard display of the control sys- appears (� page 117).
ss button k or j on the mul-nction steering wheel until FSS indi-or with the service symbol 9 or
and the service deadline appears he multifunction display.
Resetting the service indicator
In the event that the service on your vehi-cle is not carried out by an authorized Mercedes-Benz Center, you can reset the service indicator yourself.
� Switch on the ignition.
The standard display of the control sys-tem appears (� page 117).
� Press button k or j on the mul-tifunction steering wheel until the FSS indicator with the service symbol 9 or ´ and the service deadline ap-pears in the multifunction display.
� Press the reset button J (� page 22) in the instrument cluster for about four seconds.
This message appears in the multifunc-tion display:
SERVICE INTERVAL?RESET WITH R BUTTON
e battery is disconnected, the days isconnection will not be included in count shown by the service indica- To arrive at the true service dead-, you will need to subtract these s from the days shown in the ser- indicator.
not confuse the service indicator h the engine oil level indicator :.

25
Operation
Veh
VehClea
Whivehifluetackund
Suctremalso
� A
� R
� T
doing so, do not neglect the underbody f the vehicle. A prerequisite for a thor-ugh check is a washing of the underbody llowed by a thorough inspection. Dam-
ged areas need to be re-undercoated.
our vehicle has been treated at the facto- with a wax-base rustproofing in the body
avities which will last for the lifetime of e vehicle. Post-production treatment is
either necessary nor recommended by ercedes-Benz because of the possibility
f incompatibility between materials used the production process and others ap-lied later.
e have selected car-care products and ompiled recommendations which are pecially matched to our vehicles and hich always reflect the latest technology. ou can obtain Mercedes-Benz approved ar-care products at your authorized ercedes-Benz Center.
cratches, corrosive deposits, corrosion or amage due to negligent or incorrect care annot always be removed or repaired with
W
MaSoAlwulado
Nesig
6
icle c
icle cning a
le in opecle is snces wh the paerbody
h damae and v by:
ir pollu
oad sa
ar, gra
arning!
ny cleanme are pays foll
r contaiors or w
ver use ned for
are
arend care of vehicle
ration, even while parked, your ubjected to varying external in-ich, if gone unchecked, can at-
intwork as well as the and cause lasting damage.
ge is caused not only by ex-arying climatic conditions, but
tion
lt
vel and stone chipping
To avoid paint damage, you should imme-diately remove:
� Grease and oil
� Fuel
� Coolant
� Brake fluid
� Insects
� Tree resins etc.
Frequent washing reduces and/or elimi-nates the aggressiveness and potency of the above adverse influences.
More frequent washings are necessary to deal with unfavorable conditions:
� Near the ocean
� In industrial areas (smoke, exhaust emissions)
� During winter operation
You should check your vehicle from time to time for stone chipping or other damage. Any damage should be repaired as soon as possible to prevent corrosion.
Inoofoa
YrycthnMoinp
WcswYcM
Sdc
Ging products can be hazardous. oisonous, others are flammable.
ow the instructions on the partic-ner. Always open your vehicle’s indows when cleaning the inside.
fluids or solvents that are not de-cleaning your vehicle.

257
Operation
Vehicle care
the carIn suchauthor
The foland ca“how-tto Meructs.
Additiobookle
Power
When uthe vehturer’s
Paintwork, painted body components
Mercedes-Benz approved Paint Care should be applied when water drops on the paint surface do not “bead up”, normally every 3 to 5 months, depending on climate and washing detergent used.
Mercedes-Benz approved Paint Cleaner should be applied if the paint surface shows signs of embedded dirt (i.e. loss of gloss).
Do not apply any of these products or wax if your vehicle is parked in the sun or if the hood is still hot.
Use the appropriate MB-Touch-Up Stick for quick and provisional repairs of minor paint damage (i.e. chips from stones, vehi-cle doors etc.).
Engine cleaning
Prior to cleaning the engine compartment make sure to protect electrical compo-nents and connectors from contact with water and cleaning agents.
iVehIf awatclo(apadv
-care products recommended here. cases it is best to seek aid at your
ized Mercedes-Benz Center.
lowing topics deal with the cleaning re of your vehicle and give important o” information as well as references cedes-Benz approved car-care prod-
nal information can be found in the t “Vehicle Care Guide“.
washer
sing a power washer for cleaning icle always observe the manufac-
operating instructions.
Tar stains
Quickly remove tar stains before they dry and become more difficult to remove. A tar remover is recommended.
icles with KEYLESS-GO*: door handle is hit by a strong jet of er, and a KEYLESS-GO* card is in
se proximity, i.e. within approx. 3 ft. prox. 1 m), the vehicle could be in-ertently locked or unlocked.
!Never use a round nozzle to power wash tires. The intense jet of water can result in damage to the tire.
Always replace a damaged tire.
Always keep the jet of water moving across the surface. Do not aim directly at electrical parts, electrical connec-tors, seals, or other rubber parts.

258
Operation
Vehicl
Corrosiorosion WcompartBefore aings andpoly-V-btected fr
Vehicle
Do not uin directdetergenproved C
Thorougfused jespray toplenty ochamois
Rinse wiwith a chagents t
rnamental moldings
or regular cleaning and care of very dirty hrome-plated parts, use a chrome clean-r.
eadlamps, tail lamps, turn signal nses
se a mild car wash detergent, such as ercedes-Benz approved Car Shampoo, ith plenty of water.
o prevent scratches, never apply strong rce and use only a soft, non-scratchy
loth when cleaning the lenses. Do not at-mpt to wipe dirty lenses with a dry cloth
r sponge.
e care
n protection, such as MB Anticor-ax should be applied to the engine ment after every engine cleaning. pplying, all control linkage bush- joints should be lubricated. The elt and all pulleys should be pro-om any wax.
washing
se hot water or wash your vehicle sunlight. Use only a mild car wash t, such as Mercedes-Benz ap-ar Shampoo.
hly spray the vehicle with a dif-t of water. Direct only a very weak wards the ventilation intake. Use f water and rinse the sponge and frequently.
th clear water and thoroughly dry amois. Do not allow cleaning
o dry on the finish.
Due to the width of the vehicle, fold in out-side mirrors prior to running the vehicle through an automatic car wash to prevent damage to the mirrors.
In the winter, thoroughly remove all traces of road salt as soon as possible.
When washing the underbody, do not for-get to clean the inner sides of the wheels.
O
Fce
Hle
UMw
Tfocteo
iVehicles with KEYLESS-GO*:If a door handle is hit by a strong jet of water, and a KEYLESS-GO* card is in close proximity, i.e. within approx. 3 ft. (approx. 1 m), the vehicle could be in-advertently locked or unlocked.

259
Operation
Vehicle care
Cleanicover
1 Dis
Use a mMercedwith plcover 1
To prevforce acloth wnot attdry clo
To prevent scratches, never apply strong force and use only a soft, non-scratchy cloth when cleaning the sensor. Do not at-tempt to wipe dirty sensors with a dry cloth or sponge.
Wiper blades
Clean the wiper blade inserts with a clean cloth and detergent solution.
Warning! GFor safety reasons, switch off wipers and re-move key from starter switch before clean-ing the wiper blades, otherwise the wiper motor might suddenly turn on and cause in-jury.
ng the Distronic* system sensor
tronic* system sensor cover
ild car wash detergent, such as es-Benz approved Car Shampoo,
enty of water to clean sensor .
ent scratches, never apply strong nd use only a soft, non-scratchy hen cleaning the sensor cover. Do empt to wipe dirty sensors with a th or sponge.
Cleaning the Parktronic system sensors
1 Parktronic sensors
Use a mild car wash detergent, such as Mercedes-Benz approved Car Shampoo with plenty of water.
When using a steam cleaner or power washer, aim nozzle only briefly from a minimum distance of 4 in (10 cm) at sensors 1.
iRestart the engine after cleaning sen-sor cover 1.

260
Operation
Vehicl
Window
Use a wisurfacesrecomm
strument cluster
se a gentle dishwashing detergent or ild detergent for delicate fabrics as a ashing solution. Wipe with a cloth moist-ned in lukewarm solution. Do not use couring agents.
teering wheel and gear selector lever
ipe with a damp cloth and dry thoroughly r clean with Mercedes-Benz approved eather Care.
up holder
se a gentle dishwashing detergent or ild detergent for delicate fabrics as a ashing solution. Wipe with a cloth moist-ned in lukewarm solution. Do not use couring agents.
ard plastic trim items
our Mercedes-Benz approved Interior are onto soft lint-free cloth and apply ith light pressure.
!Fold fromtion age t
Fold ontokey i
Warnin
For safemove king the motor mjury.
e care
cleaning
ndow cleaning solution on all glass . An automotive glass cleaner is ended.
Light alloy wheels
Mercedes-Benz approved Wheel Care should be used for regular cleaning of the light alloy wheels.
If possible, clean wheels once a week with Mercedes-Benz approved Wheel Care, us-ing a soft bristle brush and a strong spray of water.
Follow instructions on container.
In
Umwes
S
WoL
C
Umwes
H
PCw
the windshield wiper arms away the windshield in a vertical posi-only. They could otherwise dam-he hood (� page 237).
the windshield wiper arms back the windshield before turning the n the starter switch.
g! Gty reasons, switch off wipers and re-
ey from starter switch before clean-windshield, otherwise the wiper ight suddenly turn on and cause in-
!Fold the windshield wiper arms away from the windshield in a vertical posi-tion only. They could otherwise dam-age the hood (� page 237).
Fold the windshield wiper arms back onto the windshield before turning the key in the starter switch.
iUse only acid-free cleaning materials. Acid could lead to corrosion.

261
Operation
Vehicle care
Headli
Clean wdry-shadirt.
Seat b
The wechemiclukewawebbin(80°C)
Plastic and rubber parts
Do not use oil or wax on these parts.
Warn
Do noseverenot be
ner
ith soft bristle brush, or use a mpoo cleaner in case of excessive
elts
bbing must not be treated with al cleaning agents. Use only clear, rm water and soap. Do not dry the g at temperatures above 176°F or in direct sunlight.
Leather upholstery
Using aftermarket seat covers or wearing clothing that have the tendency to give off coloring (e.g. when wet etc.) may cause the upholstery to become permanently dis-colored. By lining the seats with a proper intermediate cover, contact-discoloration will be prevented.
Wipe leather upholstery with a damp cloth and dry thoroughly or clean with Mercedes-Benz approved Leather Care. Exercise particular care when cleaning per-forated leather as its underside should not become wet.
ing! Gt bleach or dye seat belts as this may ly weaken them. In a crash they may able to provide adequate protection.

262

Practical hints
What to do if …?
Where will I find...?
Unlocking/locking in an emergency
Opening/closing in an emergency
Replacing bulbs
Replacing wiper blades
Flat tire
Battery
Jump starting
263
Towing the vehicle
Fuses

26
Practical hints
Wh
WhLam rning the SmartKey in the starter switch
position 2, have it checked and replaced necessary.
Pro uggested solution
v Turn the ESP back on (� page 75).
f the ESP cannot be turned back on, have he system checked at an authorized ercedes-Benz Center as soon as possi-
le.
v When driving off apply as little throttle as possible.
While driving, ease up on the acceler-ator.
Adapt your speed and driving to the prevailing road, weather conditions.
Do not deactivate the ESP. Excep-tions: (� page 75).
ailure to follow these instructions in-reases the risk of an accident.
4
at to
at to ps in i
blem
do if …?
do if …?nstrument cluster General information:
If a bulb in the instrument cluster fails to light up during the bulb self-check when
tutoif
Possible cause S
The yellow ESP warning lamp lights up while driving.
The ESP is deactivated.
Risk of accident!
Adapt your speed and driving to the prevail-ing road, weather and traffic conditions.
�
ItMb
The yellow ESP warning lamp flashes while driving.
The ESP or traction control has come into op-eration because of detected traction loss in at least one tire.
Distronic* is deactivated.
�
�
�
�
Fc

265
Practical hints
What to do if …?
Proble Suggested solution
l � Apply the brakes immediately to in-crease the following distance.
l � Apply the brakes immediately.
� Carefully observe the traffic situation. You may need to brake or maneuver to avoid hitting an obstacle.
- � Continue driving with added caution. Wheels may lock during hard braking, reducing steering capability.
� Have the system checked at an autho-rized Mercedes-Benz Center as soon as possible.
Failure to follow these instructions in-creases the risk of an accident.
� When the voltage is above this value again, the ABS is operational again.
� If necessary, have the generator and battery checked.
m Possible cause
The red distance indicator lamp lights up while driving.
You are too close to the vehicle in front of you to maintain selected speed.
The red distance indicator lamp comes on while driving and you hear a warning sound.
� You are gaining too rapidly on the vehicle ahead of you.
� The distance warning system has recog-nized a stationary obstacle on your prob-able line of travel.
The yellow ABS malfunction indi-cator lamp comes on while driv-ing.
The ABS has detected a malfunction and has switched off. The BAS and the ESP are also switched off (see messages in display).
The brake system is still functioning normally but without the ABS available.
If the ABS control unit control unit is malfunc-tioning, other systems such as Parktronic*, Distronic*, the navigation system and the au-tomatic transmission can also malfunction.
The charging voltage has fallen below 10 volts and the ABS has switched off.

266
Practical hints
What t
< Fasten your seat belt.
1 Drive with added caution to the near-est authorized Mercedes-Benz Cen-ter.
Problem uggested solution
Warnin
In the eindicatenot be stronglyrized Mhave thSRS maan accidfatal injand unnacciden
o do if …?
The red seat belt warning lamp blinks for a brief period after starting the engine.
The warning lamp reminds you to fasten seat belts.
�
The red SRS indicator lamp lights up while driving.
There is a malfunction in the restraint sys-tems. The airbags or emergency tensioning device (ETDs) could deploy unexpectedly or fail to activate in an accident.
�
Possible cause S
g! Gvent that a malfunction of the SRS is d as outlined above, the SRS may
operational. For your safety, we recommend that you visit an autho-
ercedes-Benz Center immediately to e system checked; otherwise the y not be activated when needed in ent, which could result in serious or
ury, or it might deploy unexpectedly ecessarily which could result in an t and/or injury to you or to others.

267
Practical hints
What to do if …?
Proble Suggested solution
Excep;Canad3
� Release the parking brake.
� Risk of accident! Carefully stop the vehicle and notify an authorized Mercedes-Benz Center. Do not add brake fluid! This will not solve the problem.
Warn
Drivinnatedbrakebrakebrakesystem
!If you find that the brake fluid in the brake fluid reservoir has fallen to the minimum mark or below, have the brake system checked for brake pad thickness and leaks.
m Possible cause
t Canada:
a only:
The red brake warning lamp lights up while driving and you hear a warning sound.
You are driving with the parking brake set.
The red brake warning lamp lights up while driving.
There is insufficient brake fluid in the reser-voir.
ing! Gg with the brake warning lamp illumi- can result in an accident. Have your system checked immediately if the warning lamp stays on. Don’t add fluid before checking the brake
.
Overfilling the brake fluid reservoir can re-sult in spilling brake fluid on hot engine parts and the brake fluid catching fire. You can be seriously burned.

268
Practical hints
What t
Problem uggested solution
? Have the vehicle checked as soon as possible by an authorized Mercedes-Benz Center.An on-board diagnostic connector is used by the service station to link the vehicle to the shop diagnostics sys-tem. It allows the accurate identifica-tion of system malfunctions through the readout of diagnostic trouble codes. It is located in the front left area of the footwell next to the park-ing brake pedal.
After refuelling start the engine three or four times in succession.
he Limp-Home Mode is canceled. You o not need to have your vehicle hecked.
Refuel at the next gas station (� page 235).
Check the fuel cap (� page 235).
o do if …?
Possible cause S
The yellow “CHECK ENGINE” malfunction indicator lamp comes on while driving.
There is a malfunction in:
� The fuel management system
� The ignition system
� The emission control system
� Systems which affect emissions
Such malfunctions may result in excessive emissions values and may switch the engine to its Limp-Home Mode (emergency opera-tion).
�
Your gas tank is empty. �
Tdc
The yellow fuel tank reserve warning lamp lights up while driving.
The fuel level has dropped below the reserve mark.
�
The fuel cap not closed tight. �

269
Practical hints
What to do if …?
Lamp
Proble Suggested solution
The PAlamp l
� Have the system checked as soon as possible by an authorized Mercedes-Benz Center.
The PAlamp dchild spassen
� Make sure that there is nothing be-tween seat cushion and child seat and check installation of the child seat.
� If the light remains out, have the sys-tem checked as soon as possible by an authorized Mercedes-Benz Center.
Do not use the BabySmartTM restraint to transport children on the front pas-senger seat until the system has been repaired.
in center console
m Possible cause
SSENGER AIRBAG OFF indicator ights up.
A BabySmartTM child seat is installed on the front passenger seat. Therefore the front passenger airbag is switched off.
The system is malfunctioning if there is no BabySmartTM child seat installed on the front passenger seat.
SSENGER AIRBAG OFF indicator oes not light up with a BabySmartTM eat properly installed on the front ger seat.
The system is malfunctioning.

270
Practical hints
What t
Messag
The conmalfuncdisplay.
Certain es are a
Addressfollow ththis Ope
Selectinthe contboth cle
High-pritifunctio
Certain be clearusing th
Other mes of lesplay colomultifunton J.
n the pages that follow, you will find a ompilation of all the messages that may ppear in the display.
igh priority messages appear on a red ackground.
iTurning the key in the starter switch to position 2, or pressing the KEY-LESS-GO* start/stop button twice to position 2 causes all lamps as well as the multifunction display to come on. Ensure that they are all in working or-der before starting your journey.
o do if …?
es in the display
trol system shows warning and tion messages in the multifunction
warning and malfunction messag-ccompanied by an audible signal.
these messages accordingly and e additional instructions given in rator’s Manual.
g the malfunction memory menu in rol system (� page 130) displays ared and uncleared messages.
ority messages appear in the mul-n display in red color.
messages of high priority cannot ed from the multifunction display e reset button J.
essages of high priority or messag-s immediate priority (regular dis-rs) can be cleared from the
ction display using the reset but-
These are then stored in the malfunction message memory (� page 130).
Oca
Hb
Warning! GAll categories of messages contain impor-tant information which should be taken note of and, where a malfunction is indicated, ad-dressed as soon as possible at an autho-rized Mercedes-Benz Center.
Failure to repair condition noted may cause damage not covered by the Mercedes-Benz Limited Warranty, or result in property dam-age or personal injury.
Warning! GNo messages will be displayed if either the instrument cluster or the multifunction dis-play is inoperative.
Contact your nearest authorized Mercedes-Benz Center.

271
Practical hints
What to do if …?
Displa Possible solution
ABC - � Do not exceed a speed of 50 mph (80 km/h).
� Visit a service center as soon as pos-sible.
� Stop your vehicle as soon as it is safe to do so.
� Press the vehicle level control button to select raised level 2 (� page 192).
� Stop and press the vehicle level con-trol button to select a higher vehicle level (� page 192).
� Do not turn steering wheel too far to avoid damaging the front fenders.
� Listen for scraping noises.
� Do not exceed a speed of 50 mph (80 km/h).
� Visit a service center as soon as pos-sible.
� Visit an authorizedMercedes-Benz Center as soon as possible.
y Possible cause
ACTIVE BODY CONTROLDRIVE CAREFULLY!
The capability of the ABC system is restricted. This can impair the handling.
The vehicle is losing oil.
ACTIVE BODY CONTROLSTOP, CAR TOO LOW!
The vehicle is parked on an extremely un-even surface.
ABC is malfunctioning.
DISPLAY MALFUNCTIONVISIT WORKSHOP!
The display for ABC or the ABC system it-self is malfunctioning.

272
Practical hints
What t
ABC � Do not exceed a speed of 50 mph (80 km/h).
� Visit a service center as soon as pos-sible.
ABS � Continue driving with added caution. Wheels may lock during hard brak-ing, reducing steering capability.
� Have the system checked at an au-thorized Mercedes-Benz Center as soon as possible.
Failure to follow these instructions in-creases the risk of an accident.
� Continue driving with added caution. Wheels may lock during hard brak-ing, reducing steering capability.
� Have the system checked at an au-thorized Mercedes-Benz Center as soon as possible.
Failure to follow these instructions in-creases the risk of an accident.
Display Possible solution
o do if …?
VISIT WORKSHOP! The capability of the ABC system is restrict-ed.
MALFUNCTION!VISIT WORKSHOP!
The ABS has detected a malfunction and has switched off. The ESP and the BAS are also deactivated.
The brake system is still functioning nor-mally but without the ABS available.
DISPLAY MALFUNCTIONVISIT WORKSHOP!
The ABS or the ABS display is malfunction-ing.
Possible cause

273
Practical hints
What to do if …?
Displa Possible solution
AIR FI � Have the air filter checked by an au-thorized Mercedes-Benz Center.
BAS
� Continue driving with added caution.
� Have the system checked at an au-thorized Mercedes-Benz Center as soon as possible.
Failure to follow these instructions in-creases the risk of an accident.
� Continue driving with added caution.
� Have the system checked at an au-thorized Mercedes-Benz Center as soon as possible.
Failure to follow these instructions in-creases the risk of an accident.
y Possible cause
LTER CHANGE CARTRIDGEVISIT WORKSHOP!
The air filter is clogged.
MALFUNCTION!VISIT WORKSHOP!
The BAS has detected a malfunction and switched off.The ESP is switched off, too. The ABS maystill be operational.
DISPLAY MALFUNCTIONVISIT WORKSHOP!
The BAS or the BAS display is malfunction-ing.

274
Practical hints
What t
Display Possible solution
# � Have the battery checked at a ser-vice station.
� Stop immediately and check the poly-V-belt.
If it is broken:
� Do not continue to drive. Otherwise the engine will overheat due to an in-operative water pump which may re-sult in damage to the engine. Notify an authorized Mercedes-Benz Center.
If it is intact:
� Drive immediately to the nearest au-thorized Mercedes-Benz Center. Ad-just driving to be consistent with reduced braking responsiveness.
o do if …?
Possible cause
BATTERY/ALTERNATORVISIT WORKSHOP!
The battery was charged with a battery charger or jump started.
The battery is no longer charging.Possible causes:
� Alternator malfunctioning
� Broken poly-V-belt
Do not forget that the brake system re-quires electrical energy and may be operat-ing with restricted capability. Considerably greater brake pedal force is required and the stopping distance is longer.

275
Practical hints
What to do if …?
Displa Possible solution
2 � Have the brake pads replaced as soon as possible.
Excep;Canad3
- � Risk of accident! Stop the vehicle and notify an authorized Mercedes-Benz Center. Do not add brake fluid! This will not solve the problem.
iBracheintelet.
!If you find that the brake fluid in the brake fluid reservoir has fallen to the minimum mark or below, have the brake system checked for brake pad thickness and leaks.
y Possible cause
BRAKE WEARVISIT WORKSHOP!
The brake pads have reached their wear limit.
t Canada:
a only:
BRAKE FLUIDVISIT WORKSHOP!
There is insufficient brake fluid in the reservoir.
ke pad thickness must be visually cked by a qualified technician at the rvals specified in the Service Book-
Warning! GDriving with this message displayed can re-sult in an accident. Have your brake system checked immediately. Don’t add brake fluid before checking the brake system. Overfill-ing the brake fluid reservoir can result in spilling brake fluid on hot engine parts and the brake fluid catching fire. You can be se-riously burned.

276
Practical hints
What t
Display Possible solution
F � Change the batteries (� page 299).
� Stop the vehicle as soon as it is safe to do so.
� Search for the card.
Otherwise the vehicle cannot be central-ly locked nor can the engine be started again after it has been stopped.
� Change the position of the card in the vehicle.
� Operate the vehicle with the key in the starter switch if necessary.
� Take the card out of the vehicle.
� Visit an authorized Mercedes-Benz Center as soon as possible.
o do if …?
Possible cause
CHIP CARDCHECK BATTERY
KEYLESS-GO*card batteries are dis-charged.
CHIP CARDNOT RECOGNIZED!
KEYLESS-GO*card is not recognized while the engine is running because
� the card is not in the vehicle
� there is strong radio-frequency interfer-ence
KEYLESS-GO*card is momentarily not rec-ognized.
CHIP CARDDETECTED IN VEHICLE
KEYLESS-GO*card left in the vehicle was recognized while locking the vehicle from the outside.
CHIP CARDVISIT WORKSHOP!
The KEYLESS-GO* system is malfunction-ing.

277
Practical hints
What to do if …?
Displa Possible solution
F � Insert key in the starter switch.
� Take the KEYLESS-GO*card with you when leaving the vehicle.
B � Add coolant (� page 242).
� If you have to add coolant frequently, have the cooling system checked by an authorized Mercedes-Benz Cen-ter.
Warn
Do noAntifrmay bengin
y Possible cause
CHIP CARDDO NOT FORGET
This display appears (for a maximum of 60 seconds) if the driver’s door is opened with the engine shut off and no key in the starter switch.Message is only a reminder.
COOLANTCHECK LEVEL!
The coolant level is too low.
ing! Gt spill antifreeze on hot engine parts. eeze contains ethylene glycol which urn if it comes into contact with hot e parts. You can be seriously burned.
!Do not ignore the low engine coolant level warning. Extended driving with the message and symbol displayed may cause serious engine damage not covered by the Mercedes-Benz Limited Warranty.
Do not drive without a sufficient amount of coolant in the cooling sys-tem. The engine will overheat, causing major engine damage.

278
Practical hints
What t
Display Possible solution
Ï � Stop the vehicle and turn off the en-gine.
� Only start the engine again after the message disappears. You could oth-erwise damage the engine.
Warnin
Driving ed can leaked catch fi
Steam fseriousthe engif you s
!The engine should not be operated with the coolant temperature above 248°F (120°C). Doing so may cause serious engine damage which is not covered by the Mercedes-Benz Limited Warranty.
o do if …?
During severe operating conditions and stop-and-go city traffic, the coolant tem-perature may rise close to 248°F (120°C).
Possible cause
COOLANTSTOP, ENGINE OFF!
The coolant is too hot.
g! Gwhen your engine is badly overheat-cause some fluids which may have into the engine compartment to re. You could be seriously burned.
rom an overheated engine can cause burns and can occur just by opening ine hood. Stay away from the engine ee or hear steam coming from it.
Turn off the engine, get out of the vehicle and do not stand near the vehicle until it cools down.

279
Practical hints
What to do if …?
Displa Possible solution
Ï � Stop immediately and check the poly-V-belt.
If it is broken:
� Do not continue to drive. Otherwise the engine will overheat due to an in-operative water pump which may re-sult in damage to the engine. Notify an authorized Mercedes-Benz Center.
If it is intact:
� Do not continue to drive the vehicle with this message displayed. Doing so could result in serious engine damage that is not covered by the Mercedes-Benz Limited Warranty.
Ï � Observe the coolant temperature display.
� Have the fan replaced as soon as possible.
y Possible cause
COOLANTSTOP, ENGINE OFF!
The poly-V-belt could be broken.
COOLANTVISIT WORKSHOP!
The cooling fan for the coolant is malfunc-tioning.

280
Practical hints
What t
Display Possible solution
G � Continue driving with added caution.
� Visit an authorized Mercedes-Benz Center as soon as possible.
DISTRON � Try activating Distronic* again later.
� Clean the Distronic* cover in the ra-diator grille (� page 259).
� Restart the vehicle.
� Visit an authorized Mercedes-Benz Center as soon as possible.
J � Close the doors.
P � Place the selector lever in position P.
? � Visit an authorized Mercedes-Benz Center as soon as possible.
o do if …?
Possible cause
DISPLAY MALFUNCTIONVISIT WORKSHOP!
The instrument cluster display is malfunc-tioning.
IC EXTERNAL INTERFERENCEREACTIVATE!
Distronic* is switched off and is temporari-ly unavailable.
CLEAN SENSOR!SEE OPERATOR'S MAN.
Distronic* is switched off because the Dis-tronic* cover in the radiator grille is dirty.
VISIT WORKSHOP! Distronic* is malfunctioning or the display is malfunctioning.
DOOR OPEN! You are attempting to drive with one or more doors open.
SHIFTTO P
You have turned off the engine with the KEYLESS-GO* start/stop button and opened the driver’s door.
VISIT WORKSHOP! There may be a malfunction in the:
� Fuel injection system
� Ignition system
� Exhaust system
� Fuel system

281
Practical hints
What to do if …?
Displa Possible solution
: - � Carefully bring the vehicle to a halt as soon as possible.
� Turn off the engine.
� Add engine oil.
-
� Have oil siphoned. Observe all legal requirements with respect to its dis-posal.
- � Check the engine oil level (� page 238) and add oil as required.
� If you must add engine oil frequently, have the engine checked for possible leaks.
� Have the oil checked.
y Possible cause
ENGINE OIL LEVELSTOP, ENGINE OFF!
There is no oil in the engine. There is a danger of engine damage.
ENGINE OIL LEVELREDUCE OIL LEVEL
You have added too much engine oil. Thereis a risk of damaging the engine or the catalytic converter.
ENGINE OILVISIT WORKSHOP!
The engine oil has dropped to a critical level.
There is water in the oil.

282
Practical hints
What t
When thEL! mesrunning engine omately t
Display Possible solution
: � Have the measuring system checked by an authorized Mercedes-Benz Center.
� Check the engine oil level (� page 238) and add oil as required.
!The engine oil level warnings should not be ignored. Extended driving with the symbol displayed could result in se-rious engine damage that is not cov-ered by the Mercedes-Benz Limited Warranty.
o do if …?
e ENGINE OIL LEVEL – CHECK LEV-sage appears while the engine is and at operating temperature, the il level has dropped to approxi-he minimum mark on the dipstick.
When this occurs, the warning will first come on intermittently and then stay on if the oil level drops further.
If no oil leaks are noted, continue to drive to the nearest service station where the engine oil should be topped to the “full” mark on the dipstick with an approved oil.
Possible cause
ENGINE OIL LEVELVISIT WORKSHOP!
The measuring system is malfunctioning.
ENGINE OIL LEVELCHECK LEVEL!
The engine oil level is too low.

283
Practical hints
What to do if …?
Displa Possible solution
ESP � Continue driving with added caution.
� Visit an authorized Mercedes-Benz Center as soon as possible.
Failure to follow these instructions in-creases the risk of an accident.
� Continue driving with added caution.
� Visit an authorized Mercedes-Benz Center as soon as possible.
Failure to follow these instructions in-creases the risk of an accident.
-
� With the vehicle stationary and the engine running, turn the steering wheel completely to the left and then to the right to synchronize the ESP.
If the ESP message does not go out:
� Continue driving with added caution.
� Visit an authorized Mercedes-Benz Center as soon as possible.
Failure to follow these instructions in-creases the risk of an accident.
y Possible cause
MALFUNCTION!VISIT WORKSHOP!
The ESP has detected a malfunction and switched off.The ABS may still be operational.
DISPLAY MALFUNCTIONVISIT WORKSHOP!
The ESP or the ESP display is malfunction-ing.
NOT AVAILABLE!SEE OPER. MANUAL
The ESP was deactivated because the power supply has been interrupted. The ABS isstill operational.

284
Practical hints
What t
A � Refuel at the next gas station (� page 235).
Y � Close the hood (� page 238).
I � Remove the key from the starter switch.
� Visit an authorized Mercedes-Benz Center as soon as possible.
� Remove the key from the starter switch.
� Fold back and push the seat backrest until the seat cushion and seat back-rest audibly engage into the driving position.
� Fold back and push the seat backrest until the seat cushion and seat back-rest audibly engage into the driving position.
Display Possible solution
o do if …?
RESERVE FUEL The fuel level has dropped below the re-serve mark.
HOOD OPEN! You are driving with the hood open.
REMOVE KEY! You have forgotten to remove the key.
REPLACE KEY!VISIT WORKSHOP!
There is no additional code available for SmartKey.
AUTOM. LIGHT ONREMOVE KEY!
SEAT BACKREST, RIGHTLOCK!
The driver seat backrest is not engaged.
SEAT BACKREST, LEFTLOCK!
The passenger seat backrest is not en-gaged.
Possible cause

285
Practical hints
What to do if …?
Displa Possible solution
. � In the control system, set lamp oper-ation to manual (� page 136).
� Switch on headlamps using the exte-rior lamp switch.
� Visit an authorized Mercedes-Benz Center as soon as possible.
� Visit an authorized Mercedes-Benz Center as soon as possible.
� Turn off the lights.
-
� Visit an authorized Mercedes-Benz Center as soon as possible.
� Visit an authorized Mercedes-Benz Center as soon as possible.
� Replace the bulb as soon as possible.
y Possible cause
LIGHT SENSORVISIT WORKSHOP!
The lamp sensor is malfunctioning. The headlamps switch on automatically.
BRAKE LIGHTVISIT WORKSHOP!
Brake lamp illumination is delayed or lampis permanently on.
DISPLAY MALFUNCTIONVISIT WORKSHOP!
The display for the lamps or the system is malfunctioning.
TURN OFF LIGHTS! Lamps have been turned on although the key in the starter switch is in position 0.
TURN SIG. MIRROR, LCHECK LIGHT!
The left turn signal in the side mirror is malfunctioning. This message will only appearif all light emitting diodes have stopped working.
TURN SIG. MIRROR, RCHECK LIGHT!
The right turn signal in the side mirror is malfunctioning. This message will only ap-pear if all light emitting diodes have stopped working.
TURN SIG., LFCHECK LIGHT! BACK-UP LIGHT ON!
The left front turn signal lamp is malfunc-tioning. A back-up bulb is being used.

286
Practical hints
What t
. � Replace the bulb as soon as possible.
� Replace the bulb as soon as possible.
� Replace the bulb as soon as possible.
� Replace the bulb as soon as possible.
� Replace the bulb as soon as possible.
� Replace the bulb as soon as possible.
� Replace the bulb as soon as possible.
� Replace the bulb as soon as possible.
Display Possible solution
o do if …?
TURN SIG., RFCHECK LIGHT! BACK-UP LIGHT ON!
The right front turn signal lamp is malfunc-tioning. A back-up bulb is being used.
HIGH BEAM, L CHECK LIGHT!
The left high beam flasher lamp is malfunc-tioning.
HIGH BEAM, R CHECK LIGHT!
The right high beam lamp flasher is mal-functioning.
MARKER LIGHT, FLCHECK LIGHT!
The front left side marker lamp is malfunc-tioning.
MARKER LIGHT, FRCHECK LIGHT!
The front right side marker lamp is mal-functioning.
FR. L. PARK. LAMPCHECK LIGHT! BACK-UP LIGHT ON!
The left parking lamps are malfunctioning. A back-up bulb is being used.
FR. R. PARK. LAMPCHECK LIGHT! BACK-UP LIGHT ON!
The right parking lamps are malfunctioning. A back-up bulb is being used.
STANDING LIGHT, LCHECK LIGHT! BACK-UP LIGHT ON!
The left standing lamp is malfunctioning. A back-up bulb is being used.
Possible cause

287
Practical hints
What to do if …?
. � Replace the bulb as soon as possible.
� Visit an authorized Mercedes-Benz Center as soon as possible.
� Visit an authorized Mercedes-Benz Center as soon as possible.
� Visit an authorized Mercedes-Benz Center as soon as possible.
. � Visit an authorized Mercedes-Benz Center as soon as possible.
� Visit an authorized Mercedes-Benz Center as soon as possible.
� Visit an authorized Mercedes-Benz Center as soon as possible.
� Visit an authorized Mercedes-Benz Center as soon as possible.
� Replace the bulb as soon as possible.
Displa Possible solution
STANDING LIGHT, RCHECK LIGHT! BACK-UP LIGHT ON!
The right standing signal lamp is malfunc-tioning. A back-up bulb is being used.
FRONT FOGLIGHT, LCHECK LIGHT!
The left front fog lamp is malfunctioning.
FRONT FOGLIGHT, RCHECK LIGHT!
The right front fog lamp is malfunctioning.
LOW BEAM, L CHECK LIGHT!
The left low beam lamp is malfunctioning.
LOW BEAM, R CHECK LIGHT!
The right low beam lamp is malfunctioning
3RD BRAKE LIGHTCHECK LIGHT!
The high mounted brake lamp is malfunc-tioning.
BRAKE LIGHT, LCHECK LIGHT! BACK-UP LIGHT ON!
The left brake lamp is malfunctioning. A back-up bulb is being used.
BRAKE LIGHT, RCHECK LIGHT! BACK-UP LIGHT ON!
The right brake lamp is malfunctioning. A back-up bulb is being used.
REVERSE LIGHT, LCHECK LIGHT!
The left backup lamp is malfunctioning.
y Possible cause

288
Practical hints
What t
. � Replace the bulb as soon as possible.
� Replace the bulb as soon as possible.
� Replace the bulb as soon as possible.
� Replace the bulb as soon as possible.
� Replace the bulb as soon as possible.
� Replace the bulb as soon as possible.
� Replace the bulb as soon as possible.
� Replace the bulb as soon as possible.
! � Release the parking brake (� page 44).
Display Possible solution
o do if …?
REVERSE LIGHT, RCHECK LIGHT!
The right backup lamp is malfunctioning.
REAR FOGLIGHTCHECK LIGHT!
The rear fog lamp is malfunctioning.
LICENSE PLATE LIGHT, LCHECK LIGHT!
The left license plate lamp is malfunction-ing.
LICENSE PLATE LIGHT, RCHECK LIGHT!
The right license plate lamp is malfunction-ing.
TAIL LIGHT, LCHECK LIGHT! BACK-UP LIGHT ON!
The left tail lamp is malfunctioning. A back-up bulb is being used.
TAIL LIGHT, RCHECK LIGHT! BACK-UP LIGHT ON!
The right tail lamp is malfunctioning. A back-up bulb is being used.
TURN SIG., LRCHECK LIGHT! BACK-UP LIGHT ON!
The left rear turn signal lamp is malfunc-tioning. A back-up bulb is being used.
TURN SIG., RRCHECK LIGHT! BACK-UP LIGHT ON!
The right rear turn signal lamp is malfunc-tioning. A back-up bulb is being used.
PARK. BRAKE RELEASE BRAKE!
You are driving with the parking brake en-gaged.
Possible cause

289
Practical hints
What to do if …?
< � Visit an authorized Mercedes-Benz Center as soon as possible.
H
� Activate the tire inflation pressure monitor* (� page 248).
Displa Possible solution
Warn
Do nothe ab
SEAT BELT SYSTEMVISIT WORKSHOP!
The seat belt system is malfunctioning.
TIRE PRES. MONITOR PRES. DISPLAY AFTER DRIVING A FEW MINS. RE-ACTIVATE USING R BUTTON
The tire pressure is being checked.
TIRE PRES. MONITORREACTIVATE!
The tire inflation pressure monitor* is de-activated.
y Possible cause
ing! Gt drive with a flat tire. A flat tire affects ility to steer or brake the vehicle.
You may lose control of the vehicle. Contin-ued driving with a flat tire will cause exces-sive heat build-up and possibly a fire.

290
Practical hints
What t
Display Possible solution
H � Check the tire pressure at the next service station.
� Have the tire inflation pressure mon-itor* checked by an authorized Mercedes-Benz Center.
� Change the wheel (� page 308).
� Check and correct tire pressure as required (� page 248).
Warnin
Do not the abil
o do if …?
Possible cause
TIRE PRES. MONITORNOT ACTIVE
The tire inflation pressure monitor* is un-able to monitor the tire pressure due to
� the presence of several wheel sensors in the vehicle.
� excessive wheel sensor temperatures.
� a nearby radio interference source.
� unrecognized wheel sensors mounted.
TIRE PRES. MONITORVISIT WORKSHOP!
The tire inflation pressure monitor* is mal-functioning.
A wheel without proper sensor was in-stalled.
g! Gdrive with a flat tire. A flat tire affects ity to steer or brake the vehicle.
You may lose control of the vehicle. Contin-ued driving with a flat tire will cause exces-sive heat build-up and possibly a fire.

291
Practical hints
What to do if …?
Displa Possible solution
H � Carefully bring the vehicle to a halt, avoiding abrupt steering and braking maneuvers.
� Change the wheel (� page 308).
� Carefully bring the vehicle to a halt, avoiding abrupt steering and braking maneuvers.
� Change the wheel (� page 308).
� Carefully bring the vehicle to a halt, avoiding abrupt steering and braking maneuvers.
� Change the wheel (� page 308).
� Carefully bring the vehicle to a halt.
� Check the tire pressure.
� Change the wheel (� page 308).
Warn
Do nothe ab
y Possible cause
TIRE PRES.CAUTION, TIRE DEFECT!
One or more tires is rapidly deflating.
TIRE PRES.CHECK TIRES!
The tire pressure in one or more tires is al-ready below the minimum value.
The tire pressure in one or more tires is low.
TIRE PRES., RFCAUTION, TIRE DEFECT!
The right front tire is rapidly deflating.
TIRE PRES., RFCHECK TIRES!
The right front tire pressure is low.
ing! Gt drive with a flat tire. A flat tire affects ility to steer or brake the vehicle.
You may lose control of the vehicle. Contin-ued driving with a flat tire will cause exces-sive heat build-up and possibly a fire.

292
Practical hints
What t
Display Possible solution
H � Carefully bring the vehicle to a halt, avoiding abrupt steering and braking maneuvers.
� Change the wheel (� page 308).
� Carefully bring the vehicle to a halt.
� Check the tire pressure.
� Change the wheel (� page 308).
� Carefully bring the vehicle to a halt, avoiding abrupt steering and braking maneuvers.
� Change the wheel (� page 308).
� Carefully bring the vehicle to a halt.
� Check the tire pressure.
� Change the wheel (� page 308).
Warnin
Do not the abil
o do if …?
Possible cause
TIRE PRES., LFCAUTION, TIRE DEFECT!
The left front tire is rapidly deflating.
TIRE PRES., LFCHECK TIRES!
The left front tire pressure is low.
TIRE PRES., RRCAUTION, TIRE DEFECT!
The right rear tire is rapidly deflating.
TIRE PRES., RRCHECK TIRES!
The right rear tire pressure is low.
g! Gdrive with a flat tire. A flat tire affects ity to steer or brake the vehicle.
You may lose control of the vehicle. Contin-ued driving with a flat tire will cause exces-sive heat build-up and possibly a fire.

293
Practical hints
What to do if …?
Displa Possible solution
H � Carefully bring the vehicle to a halt, avoiding abrupt steering and braking maneuvers.
� Change the wheel (� page 308).
� Carefully bring the vehicle to a halt.
� Check the tire pressure.
� Change the wheel (� page 308).
Warn
Do nothe ab
Displa Possible solution
L � Have the Tele Aid system checked by an authorized Mercedes-Benz Cen-ter.
� Have the Tele Aid system checked by an authorized Mercedes-Benz Cen-ter.
y Possible cause
TIRE PRES., LRCAUTION, TIRE DEFECT!
The left rear tire is rapidly deflating.
TIRE PRES., LRCHECK TIRES!
The left rear tire pressure is low.
ing! Gt drive with a flat tire. A flat tire affects ility to steer or brake the vehicle.
You may lose control of the vehicle. Contin-ued driving with a flat tire will cause exces-sive heat build-up and possibly a fire.
y Possible cause
TELE AID MALFUNCTIONVISIT WORKSHOP!
One or more main functions of the Tele Aidsystem are malfunctioning.
TELE AID BATTERYVISIT WORKSHOP!
The emergency power battery for the Tele Aid system is malfunctioning. If the vehiclebattery is also discharged, Tele Aid will notbe operational.

294
Practical hints
What t
ì
Ê � Close the trunk lid.
W � Add washer fluid (� page 244).
Î � Have cruise control or Distronic* checked by an authorized Mercedes-Benz Center.
_ � Wait until the seat, mirrors and steer-ing wheel have moved to their driving positions.The message will disappear.
± � Have the electronic systems checked by an authorized Mercedes-Benz Center.
Display Possible solution
o do if …?
FUNCTIONNOT AVAILABLE!
This display appears if button ì or í on the multifunction steering wheel is pressed and the vehicle is not equipped with a telephone.
TRUNK OPEN! This message will appear whenever the trunk lid is open.
WASHER FLUIDCHECK LEVEL!
The fluid level has dropped to about 1/3 of total reservoir capacity.
CRUISE CONTROLVISIT WORKSHOP!
Cruise control or Distronic* is malfunction-ing.
ENTRY POSITIONDO NOT DRIVE!
Seat, mirrors and steering wheel have not yet moved to their preset driving positions.
DISPLAY MALFUNCTIONVISIT WORKSHOP!
Certain electronic systems are unable to relay information to the control system. The following systems may have failed:
� Coolant temperature display
� Tachometer
� Cruise control display
Possible cause

295
Practical hints
Where will I find...?
WFir
Tharm
�
�
�
�
The vehicle tool kit includes:
� One pair of universal pliers
� Two open-end wrenches
� One hex-socket wrench
� One interchangeable slot/Phillips screwdriver
� One towing eye bolt
� One wheel wrench
� One alignment bolt
� One fuse extractor
� One fuse chart for the main fuse box
� Spare fuses
!To prevent damage, always disengage trunk floor handle from trunk edge and lower trunk floor before closing the trunk lid.
here wst aid
e first arest.
Fold re
Press
Fold li
Remov
iCheckfor comand re
ill I find...?kit
id kit is stored in the rear center
ar arm rest down 1.
handle 1 upwards.
d 2 up.
e first aid kit.
Vehicle jack, vehicle tool kit, luggage bowl, spare wheel
The spare wheel, the vehicle tool kit and the luggage bowl are stored in the com-partment underneath the trunk floor.
1 Vehicle jack2 Vehicle tool kit3 Luggage bowl4 Spare wheel
� Lift up the trunk floor cover and engage trunk floor handle in upper edge of trunk.
You can now remove the tools and ac-cessories.
expiration dates and contents pleteness at least once a year
place missing/expired items.

296
Practical hints
Where
Vehicle
To prep
� Remwhee
� Push
� Turnenga
Storing
� Retrabase
� Push
pare wheel
emoving the spare wheel
Take out vehicle tool kit tray 2.
Turn the luggage bowl 3 counterclock-wise.
Remove the spare wheel 4.
toring the spare wheel
Place spare wheel 4 in wheel well and secure it with luggage bowl 3.
Turn the luggage bowl 3 clockwise to its stop.
Place vehicle tool kit tray 2 in luggage bowl 3.
will I find...?
jack
are the vehicle jack for use
ove the vehicle jack from the spare l well under the trunk floor.
the crank handle up.
the crank handle clockwise until it ges (operational position).
the vehicle jack in the trunk
ct the vehicle jack arm to the of the vehicle jack.
the crank handle up.
� Turn the crank handle counterclock-wise to the end of the stop (storage po-sition).
S
R
�
�
�
S
�
�
�
Warning! GThe jack is designed exclusively for jacking up the vehicle at the jack take-up brackets built into both sides of the vehicle. To help avoid personal injury, use the jack only to lift the vehicle during a wheel change. Never get beneath the vehicle while it is supported by the jack. Keep hands and feet away from the area under the lifted vehicle. Always firmly set parking brake and block wheels before raising vehicle with jack.
Do not disengage parking brake while the vehicle is raised. Be certain that the jack is always vertical (plumb line) when in use, es-pecially on hills. Always try to use the jack on level surface. Make sure that the jack arm is fully seated in the jack take-up brack-et. Always lower the vehicle onto sufficient capacity jackstands before working under the vehicle.

297
Practical hints
locking/locking in an emergency
UnUn
Un
If ydous
12
�
iUnlocking your vehicle with the me-chanical key will trigger the anti-theft alarm system. To cancel the alarm, do one of the following:
� Press button Œ or ‹ on the SmartKey.
� Insert the key in the starter switch.
� If KEYLESS-GO* card present, press the KEYLESS-GO* start/stop button.
lockilockin
lockin
ou areor usining the
MechaMecha
Move row anthe ho
Un
ng/locking in an emergencyg the vehicle
g the driver’s door
unable to unlock the driver’s g the SmartKey, open the door mechanical key.
nical key locking tabnical key
locking tab 1 in direction of ar-d slide the mechanical key out of using.
� Unlock the door with the mechanical key. To do so, push the mechanical key in the lock until it stops and turn it to the left (position 1).

298
Practical hints
Unlock
Unlocki
If you arthe Smachanical
Trunk lo
� Insertrunk
� Turnposit
� Pres
The t
ocking the vehicle
you are unable to lock the vehicle with e SmartKey, lock it with the mechanical
ey as follows:
Close the passenger door and the trunk lid.
Press the central locking switch in the center console (� page 95).
Check to see whether the locking knob on the passenger door is still visible. If necessary push it down manually.
Lock the driver’s door with the me-chanical key.
Lock the trunk lid if necessary with the mechanical key (� page 90).
ing/locking in an emergency
ng the trunk
e unable to unlock the trunk with rtKey, open the trunk with the me- key as follows:
ck
t the mechanical key into the lid lock.
the key counterclockwise to ion 1.
s trunk lid lock 2.
runk lid swings open.
L
Ifthk
�
�
�
�
�
!The trunk lid swings open automatical-ly. Always make sure that there is suffi-cient overhead clearance. A minimum height clearance of 6.1 ft (1.90 m) is re-quired to open the trunk lid.
iUnlocking your vehicle with the me-chanical key will trigger the anti-theft alarm system. To cancel the alarm, do one of the following:
� Press button Œ or ‹ on the SmartKey.
� Insert the key in the starter switch.
� If KEYLESS-GO* card present, press the KEYLESS-GO* start/stop button (� page 33).

299
Practical hints
locking/locking in an emergency
Chang
If the bLESS-Gcan norecommplacedCenter
Batterithe envRecyclmethosellersfor rec
� Insert the mechanical key 1 in side opening and push gray slide 2.
The battery compartment is unlatched.
� Pull the battery compartment out of the key housing in direction of arrow.
� Remove the batteries.
3 Battery4 Contact spring
� Using a lint-free cloth, insert new batteries 3 under the contact spring 4 with the plus (+) side facing up.
� Return battery compartment into hous-ing until it locks into place.
Warn
Keep
If a baimme
Un
ing batteries
atteries in the SmartKey or the KEY-O* card are discharged, the vehicle
longer be locked or unlocked. It is ended to have the batteries re-
at an authorized Mercedes-Benz .
es contain materials that can harm ironment if disposed of improperly.
ing of batteries is the preferred d of disposal. Many states require of batteries to accept old batteries ycling.
SmartKey
1 Mechanical key2 Battery compartment
Replacement batteries: Lithium, type CR 2025 or equivalent.
� Remove mechanical key 1 (� page 297).
ing! Gthe batteries out of reach of children.
ttery is swallowed, seek medical help diately.
iWhen changing batteries, always re-place both batteries.
The required replacement batteries are available at any Mercedes-Benz Center.

300
Practical hints
Unlock
KEYLES
1 Batte
ReplaceCR 2025
� Pry orow
� Rem
� Instathe “LESS
� Repl
Open the trunk with the mechanical key (� page 298).
Remove the battery cover and the trim inside the trunk on the right-hand side.
Pull release knob 1 (arrow) flap.
The fuel filler flap can be opened.
ing/locking in an emergency
S-GO* card
ry cover
ment batteries: Lithium, type or equivalent.
pen cover 1 (e.g. by using a nar-blade screw driver).
ove the batteries.
ll new batteries as indicated by +” and “–” markings in the KEY--GO card.
ace battery cover 1.
Fuel filler flap
In an emergency, the fuel filler flap can only be opened from the trunk. The release knob is located on the right-hand side in the trunk.
1 Release knob
�
�
�

301
Practical hints
pening/closing in an emergency
OpSli
Thbelig
Yorootio
1
�
� Insert crank 2 through hole.
� Turn crank 2 clockwise to:
� slide roof closed
� raise roof at the rear
� Turn crank 2 counterclockwise to:
� slide roof open
� lower roof at the rear
The sliding/pop-up roof must be resyn-chronized after being operated manually (� page 175).
eningding/p
e slidinhind thht.
u can of manu
n occur
Lens
Pry off
O
/closing in an emergencyop-up roof
g/pop-up roof drive is located e lens of the interior overhead
pen or close the sliding/pop-up ally should an electrical malfunc-.
lens 1 using a srewdriver.
� Turn the key in the starter switch to position 1 or 2.
� Remove the crank from the Operator’s Manual pouch.
2 Crank

30
Practical hints
Rep
RepSafeexteforesemtime
Corrimpreadbulbrizedadju
ront lamps
iBw
�
�
�
�
Lamp Type
1 Additional turn sig-nal lamps
LED
2 Turn signal lamp 1156 A
3 High beam flasher H7-55 W
4 Side marker lamp W 5 W
5 Fog lamp HB4-55 W
6 Parking and stand-ing lamps
H 6 W
7 Low beam and high beam
Xenon1 D2S-35 W
Bi-Xenon headlamps: For safety reasons (high volt-age), do not replace the xenon bulb yourself. Seeyour authorized Mercedes-Benz Center.
2
lacin
lacin vehiclrior ligh essentblies ars.
ect heaortant. justed has be Mercestment
ack-uphen th
Turn
Brak
Park
Tail
g bulbs
g bulbse operation depends on proper ting and signaling. It is there-
ial that all bulbs and lamp as-e in good working order at all
dlamp adjustment is extremely Have headlamps checked and at regular intervals and when a en replaced. See your autho-des-Benz Center for headlamp .
Bulbs F
bulbs will be brought into use e following lamps malfunction:
signal lamps
e lamps
ing lamps
lamps
1

303
Practical hints
Replacing bulbs
Rear la � Use only 12 volt bulbs of the same type and with the specified watt rating.
� Switch lights off before changing a bulb to prevent short circuits.
� Always use a clean lint-free cloth when handling bulbs.
� Your hands should be dry and free of oil and grease.
� If the newly installed bulb does not light up, visit an authorized Mercedes-Benz Center.
� Have the LEDs and bulbs for the follow-ing lamps replaced by an authorized Mercedes-Benz Center:
� Additional turn signal lamps in the exterior rear view mirrors
� Bi-Xenon lamps
� Front fog lamps
� High mounted brake lamp
� Brake lamp
� Rear side marker
L
8 Hla
9 B
10 Ts
S
11 B
12 L
13 Rd
14 T
mps Notes on bulb replacement
amp Type
igh mounted brake mp
LED
rake lamp LED
ail, parking and tanding lamp
P 21/4 W
ide marker lamp LED
ackup lamp P 21 W
icense plate lamps C 5 W
ear fog lamp, river’s side
P 21/4 W
urn signal lamp PY 21 W
Warning! GKeep bulbs out of reach of children.
Bulbs and bulb sockets can get very hot. Al-low the lamp to cool down before changing a bulb.
Halogen lamps contain pressurized gas. A bulb can explode if you
� touch or move it when hot
� drop the bulb
� scratch the bulb
Wear eye and hand protection.
Because of high voltage in Bi-Xenon lamps, it is dangerous to replace the bulb or repair the lamp and its components. We recom-mend that you have such work done by a qualified technician.

304
Practical hints
Replac
Replaci
1 Housbulb
Insert the new bulb so that the base lo-cates in the recess on the holder.
From below, press connector 2 with bulb upward onto the reflector.
Align housing cover 1 and click into place.
ront turn signal bulb
Switch off the lights.
Open the hood (� page 237).
Twist bulb socket 4 counterclockwise and pull out.
Push bulb into socket, turn counter-clockwise and remove.
Insert new bulb in socket, push in and twist clockwise.
Reinsert bulb socket in lamp and twist clockwise.
Warnin
Do not headlamlamps, repair tommenqualifiecedes-B
ing bulbs
ng bulbs for front lamps
ing cover for high beam flasher , parking and standing lamp
2 Electrical connector for high beam flasher housing bulb
3 Parking and standing lamp4 Bulb socket for turn signal lamp5 Low beam and high beam (Bi-Xenon)
housing cover
High beam flasher bulb
� Switch off the lights.
� Open the hood (� page 237).
� Press ends of housing cover 1 tab to-gether and remove cover.
� Press connector 2 downward.
� Remove connector 2 with the bulb.
�
�
�
F
�
�
�
�
�
�
g! Gremove the cover for the Bi-Xenon p. Because of high voltage in xenon
it is dangerous to replace the bulb or he lamp and its components. We rec-d that you have such work done by a d technician at an authorized Mer-enz Center.

305
Practical hints
Replacing bulbs
Parkin
� Sw
� Op
� Preget
� Pul
� Pul
� Ins
� Rei
� Aligpla
Replacing bulbs for rear lamps
Tail lamp assemblies
1 Backup lamp (black socket)2 Turn signal lamp (white socket)3 Tail, standing and parking lamp (red
socket)4 Driver’s side: tail, parking and rear fog
lampPassenger’s side: tail and parking lamp (red socket)
g and standing lamp bulb
itch off the lights.
en the hood (� page 237).
ss ends of housing cover 1 tab to-her and remove cover.
l out the bulb socket with the bulb.
l the bulb out of the bulb socket.
ert a new bulb in the socket.
nstall the bulb socket.
n housing cover and click into ce.
Side marker lamp bulb
� Switch off the lights.
� Carefully slide lamp towards rear.
� Remove front end first.
� Twist bulb socket counterclockwise and pull out.
� Pull bulb out of the bulb socket.
� Insert new bulb in socket.
� Reinstall bulb socket, push in and twist clockwise.
� To reinstall lamp, set rear end in bumper and let front end snap into place.

306
Practical hints
Replac
� Swit
� Open
� Turnthe t
� Turnpull o
� Gentpull o
� Inserit clo
� Rein
The b
� Repl
Switch off the lights.
Loosen both screws 1 and remove lamp.
Replace the tubular lamp and reinstall lamp.
Retighten the screws.
ing bulbs
ch off the lights.
trunk.
lock counterclockwise and move rim to the side.
bulb socket counterclockwise and ut.
ly twist bulb counterclockwise and ut of bulb holder.
t new bulb into the holder and turn ckwise.
stall bulb socket.
ulb socket should audibly click.
ace trim and secure with lock.
License plate lamp
1 Screws
�
�
�
�

307
Practical hints
Replacing wiper blades
Re
Re
�
�
�
Installing
� Slide the wiper blade into the cutout on the wiper arm.
� Rotate wiper blade into position paral-lel to wiper arm.
� Fold the wiper arm backward to rest on the windshield.
!Never open the hood when the wiper arm is folded forward.
Do not allow the wiper arms to contact the windshield glass without a wiper blade inserted.
Make certain that the wiper blades are properly installed. Improperly installed wiper blades may cause windshield damage.
For your convenience, we recommend that you have this work carried out by an authorized Mercedes-Benz Center.
placi
movin
Turn k
Turn csetting
With w(see ato pos
!To avoarms swhen
ng wiper blades
g
ey in starter switch to position 1.
ombination switch to wiper II (� page 47).
iper arm in the vertical position bove), turn key in starter switch ition 0.
� Fold the wiper arm forward.
You should hear it snap into place.
� Turn the wiper blade at a right angle to wiper arm (arrow 1).
� Slide the wiper blade sideways out of the retainer in the direction of arrow 2.
id damage to the hood, the wiper hould only be folded forward
in the vertical position.
Warning! GFor safety reasons, remove key from starter switch before replacing a wiper blade, other-wise the motor could suddenly turn on and cause injury.

30
Practical hints
Fla
FlaPre
� Pm
� T
� Esp
� M
� Ha
Mou
Spa
SpaSpo
Thesizecle,
pare wheel CL 55 AMG and port Package*
Warning! GThe dimensions of the spare wheel are dif-ferent from those of the road wheels. As a result, the vehicle handling characteristics change when driving with a mounted spare wheel. Adapt your driving style accordingly.
The spare wheel rim is for temporary use only. Use for over a total of 12000 miles (20000 km) (aggregate of all uses) may cause wheel rim failure leading to an acci-dent and possible injuries.
Never operate the vehicle with more than one spare wheel mounted.
When driving with spare wheel mounted, en-sure proper tire pressure and do not exceed vehicle speed of 50 mph (80 km).
Drive to the nearest Mercedes-Benz-Center as soon as possible to have the spare wheel replaced with a regular road wheel.
8
t tire
t tireparing
ark theoving
urn on
ngagetraightarking
ove th
ave an safe d
nting
re whe
re whert Pack
spare wd tire oand it i
the vehicle
vehicle as far as possible from traffic on a hard surface.
the hazard warning flashers.
the steering wheel lock in the ahead position and set the brake.
e selector lever to P.
y passenger exit the vehicle at istance from the roadway.
the spare wheel
el
el CL 500 and CL 600 (except age*)
heel rim is mounted with a full f the same type as on the vehi-s fully functional.
However, that spare wheel rim is weight optimized and has a limited service life of 12000 miles (20000 km) use before a standard wheel rim must replace it.
More information can be found in the “Technical data” section (� page 333).
SS
Warning! GThe spare wheel rim is for temporary use only. Use for over a total of 12000 miles (20000 km) (aggregate of all uses) may cause wheel rim failure leading to an acci-dent and possible injuries.
Drive to the nearest Mercedes-Benz-Center as soon as possible to have the spare wheel replaced with a regular road wheel.
Never operate the vehicle with more than one spare wheel mounted.

309
Practical hints
Flat tire
More i“Techn
Prepar
� Takjac
� Tak(�
Lifting
� Preby (noobj
When c
� Plahinsite
When c
� Plaof bwo
� On wheel to be changed, loosen but do not yet remove the wheel bolts (ap-proximately one full turn with wrench).
The tube openings are located directly be-hind the front wheel housings and in front of the rear wheel housings. ��
nformation can be found in the ical data” section (� page 333).
ing the vehicle
e vehicle tool kit tray and vehicle k out of trunk.
e the spare wheel out of wheel well page 296).
the vehicle
vent the vehicle from rolling away blocking wheels with wheel chocks t included) or other sizable, heavy ects.
hanging wheel on a level surface:
ce one chock in front of and one be-d the wheel that is diagonally oppo- to the wheel being changed.
hanging wheel on a hill:
ce chocks behind the downhill sides oth wheels of the axle not being
rked on.
� Take the two-piece wheel wrench out of the vehicle tool kit tray. Assemble wheel wrench.
Warning! GThe jack is designed exclusively for jacking up the vehicle at the jack take-up brackets built into both sides of the vehicle. To help avoid personal injury, use the jack only to lift the vehicle during a wheel change. Never get beneath the vehicle while it is supported by the jack. Keep hands and feet away from the area under the lifted vehicle. Always firmly set parking brake and block wheels before raising vehicle with jack.
Do not disengage parking brake while the vehicle is raised. Be certain that the jack is always vertical (plumb line) when in use, es-pecially on hills. Always try to use the jack on level surface. Make sure that the jack arm is fully seated in the jack take-up brack-et. Always lower the vehicle onto sufficient capacity jackstands before working under the vehicle.

310
Practical hints
Flat tir
1 Jack
� Moveat po
� Remdam
Keeping jack in this position, turn crank 3 clockwise until the jack base meets the ground. Make sure the jack is vertical (plumb line).
Continue to turn the crank until the tire is a maximum of 1.2 in (3 cm) from the ground.
Warning! GThe jack is intended only for lifting the vehi-cle briefly for wheel changes. It is not suited for performing maintenance work under the vehicle.
� Never start the engine when the vehicle is raised.
� Never lie down under the raised vehicle.
e
support tube cover
cover 1 toward rear by pressing int indicated by arrow.
ove cover 1 carefully to avoid age to the locking tabs.
1 Jack arm2 Jack support tube hole3 Crank
� Insert jack arm 1 fully into tube hole 2 up to the stop.
�
�
Warning! GInsert the jack arm fully into the jack sup-port tube hole up to the stop. Otherwise the vehicle may fall from the jack and cause per-sonal injury or damage to the vehicle.

311
Practical hints
Flat tire
Remov
1 Alig
� Unsmo
� Repbol
� Rem
� Rem
� Guide the spare wheel onto the align-ment bolt and push it on.
� Insert wheel bolts and tighten them slightly.
� Unscrew the alignment bolt, install last wheel bolt and tighten slightly.
!Do Thiand
Warning! GUse only genuine equipment Mercedes-Benz wheel bolts. They are identi-fied by the Mercedes star. Other wheel bolts may come loose.
Do not tighten the wheel bolts when the ve-hicle is raised. Otherwise the vehicle could tip over.
ing the wheel
nment bolt
crew upper-most wheel bolt and re-ve.
lace this wheel bolt with alignment t 1 supplied in the tool kit.
ove the remaining bolts.
ove the wheel.
Mounting the new wheel
� Clean contact surfaces of wheel and wheel hub.
not place wheel bolts in sand or dirt. s could result in damage to the bolt wheel hub threads.
!To avoid paint damage, place wheel flat against hub and hold it there while in-stalling first wheel bolt.
Warning! GAlways replace wheel bolts that are dam-aged or rusted.
Never apply oil or grease to wheel bolts.
Damaged wheel hub threads should be re-paired immediately. Do not continue to drive under these circumstances! Contact an au-thorized Mercedes-Benz Center or call Roadside Assistance.
Incorrect mounting bolts or improperly tightened mounting bolts can cause the wheel to come off. This could cause an acci-dent. Make sure you are using the correct mounting bolts.

312
Practical hints
Flat tir
Lowerin
� Loweterclly on
� Rem
1 - 5 W
� Tightlowined (1Obse110
eplacing jack support tube cover
Slide tongue of cover under the upper edge of the tube opening.
Applying even pressure, press cover until it snaps into place. Be careful not to damage the locking tabs or clamp the plastic retaining strap.
!You can also screw the faulty wheel down into the spare wheel well in the trunk.
Do not activate the tire inflation pres-sure monitor* until the depressurized tire is no longer in the vehicle.
e
g the vehicle
r vehicle by turning crank coun-ockwise until vehicle is resting ful- its own weight.
ove the jack.
heel bolts
en the five wheel bolts evenly, fol-g the diagonal sequence illustrat- to 5), until all bolts are tight. rve a tightening torque of ft lb (150 Nm).
� Before storing the jack in the trunk, it should be fully collapsed, with handle folded in.
� Place the wheel bolt wrench, alignment bolt and jack back in the vehicle tool kit in the trunk and close the covering lid.
R
�
�
Warning! GHave the tightening torque checked after changing a wheel. The wheels could come loose if they are not tightened to a torque of 110 ft lb (150 Nm).

313
Practical hints
Battery
Ba
W
Fs
Ny
Basflm
Awflims
Warning! GWith a disconnected battery
� you will no longer be able to turn the key in the starter switch and pressing the KEYLESS-GO* start/stop button on the selector lever will have no effect
� the selector lever will remain locked in position P
ttery
arning
ailure toult in se
ever leaou migh
attery flllow thiskin or clush affeedical h
batteryhich is ames orproper
moking
! G follow these instructions can re-vere injury or death.
n over batteries while connecting, t get injured.
uid contains sulfuric acid. Do not fluid to come in contact with eyes, othing. In case it does, immediately cted area with water and seek elp if necessary.
will also produce hydrogen gas, flammable and explosive. Keep sparks away from battery, avoid connection of jumper cables, etc.
!Never loosen or detach battery termi-nal clamps while the engine is running or the key is in the starter switch. Oth-erwise the alternator and other elec-tronic components could be severely damaged.
Have the battery checked regularly by an authorized Mercedes-Benz Center. Refer to Service Booklet for mainte-nance intervals or contact your autho-rized Mercedes-Benz Center for further information.
Warning! GDo not place metal objects on the battery as this could result in a short circuit.
Use leak-proof battery only to avoid the risk of acid burns in the event of an accident.

314
Practical hints
Batter
The battthe right
1 Batte2 Lock
3 Nega4 Cove
emoving the battery
Remove the screw securing the bat-tery.
Remove the battery support and brack-et. Take out the battery.
harging and reinstalling the battery
Charge battery in accordance with the instructions of the battery charger manufacturer.
Reinstall the charged battery. Follow the previously described steps in re-verse order.
Warning! GNever charge a battery while still installed in the vehicle. Gases may escape during charg-ing and cause explosions that may result in paint damage, corrosion or personal injury.
y
ery is located in the trunk under hand wheel well cover panel.
ry cover ing knob
tive terminalr over positive terminal
Disconnecting the battery
� Turn off all electrical consumers.
� Depress the parking brake firmly or move the gear selector lever to posi-tion P.
� Open the trunk lid (� page 88) or (� page 89).
� Turn locking knob 2 and remove bat-tery cover 1.
� Detach negative terminal 3 of the bat-tery with the 10 mm open-end wrench from the vehicle tool kit.
� Remove cover 4 from the positive ter-minal.
� Disconnect the battery positive lead.
R
�
�
C
�
�

315
Practical hints
Battery
Recon
� Tur
� Concov
� Con
Batteries contain materials that can harm the environment if disposed of improperly. Large 12-volt storage batteries contain lead. Recycling of batteries is the preferred method of disposal. Many states require sellers of batteries to accept old batteries for recycling.
!Nev
!Thetubwhe
necting the battery
n off all electrical consumers.
nect the positive lead and fasten its er 4.
nect negative lead 3.
er invert the terminal connections.
battery, its filler caps and the vent e must always be securely installed n the vehicle is in operation.
iThe following procedures must be car-ried out following any interruption of battery power (e.g. due to reconnect-ing):
� Set the clock. Refer to the separate COMAND operating instructions.
� Resynchronize the ESP (� page 283).
� Resynchronize side windows (� page 172).
� Resynchronize sliding/pop-up roof (� page 175).

31
Practical hints
Jum
Jum
W
Fadacainj
Neor
Baalloskiflume
A bwhflaimsm
Attcainj
Re
!Avoid repeated and lengthy starting at-tempts.
Do not attempt to start the engine us-ing a battery quick charge unit.
If engine does not run after several un-successful starting attempts, have it checked at the nearest authorized Mercedes-Benz Center.
Excessive unburned fuel generated by repeated failed starting attempts may damage the catalytic converter and may present a fire risk.
Make sure the jumper cables do not have loose or missing insulation.
Make sure the cable clamps do not touch any other metal part while the other end is still attached to a battery.
6
p sta
p sta
arning!
ilure to fmage ton lead toury or de
ver leanjump sta
ttery fluw this f
n or clotsh affecdical he
attery wich is flames or sproper coking et
emptingn result ury.
ad all in
rting
rtingIf the battery is discharged, the engine can be started with jumper cables and the bat-tery of another vehicle. Observe the follow-ing:
� Jump starting should only be performed when the engine and catalytic convert-er are cold.
� Do not start the engine if the battery is frozen. Let the battery thaw out first.
� Only jump start from batteries with the same voltage rating (12V). Jump start-ing with a more powerful battery could damage the vehicle’s electrical system, which will not be covered by the Mercedes-Benz Limited Warranty.
� Use only jumper cables with sufficient cross-section and insulated terminal clamps.
� Always make sure that the jumper ca-bles are not on or near pulleys, fans or other parts that move when an engine is started or running.
Gollow these directions will cause the electronic components, and a battery explosion and severe ath.
over batteries while connecting rting, you might get injured.
id contains sulfuric acid. Do not luid to come in contact with eyes, hing. In case it does, immediately ted area with water, and seek lp if necessary.
ill also produce hydrogen gas, mmable and very explosive. Keep parks away from battery, avoid onnection of jumper cables, c.
to jump start a frozen battery in it exploding, causing personal
structions before proceeding.

317
Practical hints
Jump starting
The bathe tru(� pag
� Matou
� Tur
� App
� Shi
� Op
� Rem
� ContheCla
� Connect negative terminals 2 and 4 of the batteries with the jumper cable. Clamp cable to charged battery 4 first.
� Start the engine of the disabled vehi-cle.
You can now turn on the electrical con-sumers. Do not turn on the lights under any circumstances.
� Remove the jumper cables first from negative terminals 2 and 4 and then from positive terminals 1 and 3.
You can now turn on the lights.
� Have the battery checked at the near-est authorized Mercedes-Benz Center.
Warn
Keep Do no
Obsertions (� pa
!Do not tow-start the vehicle.
ttery is located on the right side of nk under the battery cover e 313).
ke sure that the two vehicles do not ch.
n off all electrical consumers.
ly parking brake.
ft gear selector lever to position P.
en the trunk lid.
ove battery cover.
nect positive terminals 1 and 3 of batteries with the jumper cable. mp cable to charged battery 3 first.
1 Positive terminal of discharged battery2 Negative terminal of discharged bat-
tery3 Positive terminal of charged battery4 Negative terminal of charged battery
� Start engine of the vehicle with the charged battery and run at idle speed.
ing! Gflames or sparks away from battery. t smoke.
ve all safety instructions and precau-when handling automotive batteries ge 243).
!Never invert the terminal connections.

31
Practical hints
Tow
TowMercle bgroulift/
!Umt
DTbs
D
Tds
S(l
!If the vehicle is towed with the front axle raised, the engine must be shut off (key in starter switch position 0 or 1). Otherwise, the ESP will immediately be engaged and will apply the rear wheel brakes.
When towing the vehicle with all wheels on the ground, the selector lever must be in position N and the key must be in starter switch position 2.
When towing the vehicle with all wheels on the ground or the front axle raised, the vehicle may be towed only for dis-tances up to 30 miles (50 km) and at a speed not to exceed 30 mph (50 km/h).
8
ing t
ing tcedes-Be transnd usindolly eq
se flatent w
o posit
o not owing umpy upport
o not
o prevo not tuspens
witch � pageocking
he vehicle
he vehicleenz recommends that the vehi-ported with all wheels off the g flatbed or appropriate wheel uipment.
When circumstances do not permit the recommended towing methods, the vehi-cle may be towed with all wheels on the ground or front wheels raised only so far as necessary to have the vehicle moved to a safe location where the recommended towing methods can be employed.bed or wheel lift/dolly equip-
ith key in starter switch turned ion 0.
tow with sling-type equipment. with sling-type equipment over roads will damage radiator and s.
tow-start the vehicle.
ent damage during transport, ie down vehicle by its chassis or ion parts.
off the tow-away alarm 78) and the automatic central
(� page 139).

319
Practical hints
Towing the vehicle
!To damwe confor nea
Warning! GWith the engine not running, there is no power assistance for the brake and steering systems. In this case, it is important to keep in mind that a considerably higher degree of effort is necessary to brake and steer the ve-hicle. Adapt your driving accordingly.
be certain to avoid a possibility of age to the transmission, however,
recommend the drive shaft be dis-nected at the rear axle drive flange any towing beyond a short tow to a rby garage.
Warning! GPrior to towing the vehicle with all wheels on the ground, make certain that the key is in starter switch position 2.
If the key is left in starter switch position 0 for an extended period of time, it can no longer be turned in the switch. In this case, the steering is locked. To unlock, remove key from starter switch and reinsert.
If circumstances require towing the vehicle with all wheels on the ground, always tow with a tow bar if:
� the engine will not run
� there is a malfunction in the power sup-ply or in the vehicle’s electrical system
as that will be necessary to adequately con-trol the towed vehicle.

320
Practical hints
Towing
iTo sithe hkey iactivleft omanwill o
Uponard w
iThe selector lever will remain locked in position P and the key will not turn in the starter switch if the battery is dis-connected or discharged. See notes on the battery (� page 313) or on jump starting (� page 316).
the vehicle
gnal turns while being towed with azard warning flasher in use, turn n starter switch to position 2 and ate the combination switch for the r right turn signal in the usual
ner – only the selected turn signal perate.
canceling the turn signal, the haz-arning flasher will operate again.
!When towing the vehicle with all wheels on the ground, please note the follow-ing:
With the automatic central locking acti-vated and the key in starter switch position 2, or KEYLESS-GO* start/stop button in position 2, the vehicle doors lock if the left front wheel as well as the right rear wheel are turning at vehicle speeds of approx. 9 mph (15 km/h) or more.
Switch off the tow-away alarm (� page 78).
To prevent the vehicle door locks from locking, deactivate the automatic cen-tral locking (� page 139).
Towing of the vehicle should only be done using the properly installed tow-ing eye bolt. Never attach tow cable, tow rope or tow rod to the vehicle chas-sis, frame or suspension parts.

321
Practical hints
Towing the vehicle
Install
Front
1 Cov
Remov
� Prerow
� Lifttow
Removing cover
� Pull cover in the direction of the arrow.
� Fold cover down to reveal threaded hole for the towing eye bolt.
The towing eye bolt is supplied with the tool kit (located in the storage compart-ment under the trunk floor).
� Screw towing eye bolt in to its stop and tighten with lug wrench.
Reinstalling cover
� Fit cover and snap into place.
ing towing eye bolt
of vehicle
er on right side of front bumper
ing cover
ss mark on cover in direction of ar-.
cover off to reveal threaded hole for ing eye bolt.
The towing eye bolt is supplied with the tool kit (located in the storage compart-ment under the trunk floor).
� Screw towing eye bolt in to its stop and tighten with lug wrench.
Reinstalling cover
� Fit cover and snap into place.
Rear of vehicle
2 Cover on right side of rear bumper

32
Practical hints
Fus
FusYouin va
� I
� Id
� Ie
� Is
Thethe (� p
� Tf
� S
� S
use boxes in passenger compartment
here are two fuse boxes in the passenger ompartment. One fuse box is located in e dashboard on the front passenger side.
n additional fuse box is located under the ght rear seat.
use box in the dashboard
1 Cover
2
es
esr vehiclrious f
n the d
n the reer the
n the er’s side
n the eenger
followinvehicleage 29
he fuseuses ar
pare fu
pecial
e’s electrical fuses are located use boxes:
ashboard on the passenger side
ar passenger compartment un-right rear seat
ngine compartment on the driv-
ngine compartment on the pas-side
g implements are located in tool kit in the trunk 5):
chart. The amperages of the e also given there.
ses
fuse extractor
F
TcthAri
F
iOnly install fuses that have been tested and approved by Mercedes-Benz and that have the specified amperage rat-ing.
Never attempt to repair or bridge a blown fuse. Have the cause determined and remedied by an authorized Mercedes-Benz Center.

323
Practical hints
Fuses
Openin
� Op
� Usithe
Thefrom
� Insthe
� Looing
� Usirec
Opening
� Pull cover 1 away from fuse box (arrow).
� Remove cover rearward.
Closing
� Press cover back on until it engages.
!Do scrdas
g
en the passenger door.
ng the flat of your hand, press on middle of the cover.
edge of cover 1 lifts up slightly the dashboard.
ert flat, blunt object into the edge of cover as a lever.
sen cover 1 from the dashboard us- lever.
ng your hands, pull cover 1 in the di-tion of the arrow and remove.
Closing
� Press cover 1 back on.
Fuse box in the rear passenger compartment
1 Cover
not use sharp objects such as a ew driver to open the fuse box in the hboard, as this could damage it.

324
Practical hints
Fuses
Fuse bo
There argine comfront pas(dividingment an
1 Fuse2 Slide
mergency engine shut-down
the engine can no longer be stopped us-g the SmartKey or the KEYLESS-GO*
tart/stop button, the engine can be rned off by withdrawing two fuses.
or easy removal of fuses, use the fuse ex-actor (supplied with vehicle tool kit) to ull out the fuses marked on the fuse chart s “ENGINE EMERGENCY STOP”.
he fuse chart is also located in the vehicle ol kit (� page 295).
!The cover must fit properly and the slide must be positioned at the ‹ symbol, as moisture or dirt may impair the functionality of the fuses.
xes in engine compartment
e two fuse boxes located in the en-partment on both the driver’s and senger side in front of the firewall wall between engine compart-d passenger compartment).
box cover, driver’s side
1 Fuse box cover, front passenger side2 Slide
Opening
� Push both slides 2 to the Œ symbol.
� Remove cover 1.
Closing
� Replace cover 1 and press it down by hand.
� Push both slides 2 to the ‹ symbol.
E
Ifinstu
Ftrpa
Tto

Technical data
Spare parts service
Warranty coverage
Identification labels
Layout of poly-V-belt drive
Engine
Rims and Tires
Electrical system
Main Dimensions
Weights
325
Fuels, coolants, lubricants etc.
Consumer information

326
Technical data
Spa
Thenec
!The use of non-genuine parts and ac-cessories not authorized by Mercedes-Benz could damage the vehi-cle, which is not covered by the Mercedes-Benz Limited Warranty, or could compromise the vehicle’s dura-bility or safety.
re pa
“Technessary t
rts service
ical data” section provides the echnical data for your vehicle.
Spare parts serviceAll authorized Mercedes-Benz Centers maintain a stock of original spare parts re-quired for maintenance and repair work. In addition, strategically located parts distri-bution centers provide quick and reliable parts service.
More than 300000 different spare parts for Mercedes-Benz models are available.
Mercedes-Benz original spare parts are subjected to stringent quality inspections. Each part has been specifically developed, manufactured or selected for and adapted to Mercedes-Benz vehicles.
Therefore, Mercedes-Benz original spare parts should be installed.

327
Technical data
Warranty coverage
WYotheWaauchnawi
�
�
�
�
Loss of Service and Warranty Information Booklet
Should you lose your Service and Warranty Information booklet, have your authorized Mercedes-Benz Center arrange for a re-placement. It will be mailed to you.
arranur vehic warrarranty
thorizedange orlly instath the t
New V
Emiss
Emiss
CaliforVermoWarra
ty coveragele is covered under the terms of
nties printed in the Service and Information booklet. Your Mercedes-Benz Center will ex- repair any defective parts origi-lled in the vehicle in accordance erms of the following warranties:
ehicle Limited Warranty
ion System Warranty
ion Performance Warranty
nia, Maine, Massachusetts, and nt Emission Control Systems
nty
Replacement parts and accessories are covered by the Mercedes-Benz Spare Parts and Accessories warranties, copies of which are available at any Mercedes-Benz Center.

32
Technical data
Ide
Ide
1 C(
3 Engine number (engraved on engine)4 VIN, visible (lower edge of windshield)5 Information label, California version
Vacuum line routing for emission con-trol system
6 Emission control label
hen ordering spare parts, please specify ehicle identification and engine numbers.
8
ntific
ntific
ertificaon driv
ation labels
ation labels
tion label er’s B pillar)
2 Vehicle Identification Number (VIN) (below right rear passenger seat)
Wv

329
Technical data
Layout of poly-V-belt drive
LaCL
1234567
CL 600
1 Automatic belt tensioner2 Power steering pump3 Air conditioning compressor4 Crankshaft5 Coolant pump6 Generator (alternator)7 Idler pulley8 Idler pulley9 Idler pulley
yout 500
AutomPowerAir conCrankCoolanGenerIdler p
of poly-V-belt drive
atic belt tensioner steering pumpditioning compressor
shaftt pump
ator (alternator)ulley
CL 55 AMG
The CL 55 AMG has two poly-V-belts (belt one shown in purple/belt two shown in black).
1 Idler pulley2 Automatic belt tensioner3 Power steering pump4 Air conditioning compressor5 Crankshaft6 Coolant pump7 Generator (alternator)8 Idler pulley9 Automatic belt tensioner
10 Super charger

33
Technical data
Eng
Eng
Mo
1 Th ing data of all special bodies and special equipment.
CL 600 (215.376)1
Eng 275
Mo injec- 4-stroke engine, gasoline injec-tion
No. 12
Bor 3.23 in (82.00 mm)
Str 3.43 in (87.00 mm)
Tot 336.4 cu.in. (5513 cm3)
Com 9:1
Ou 493 hp/5000 rpm (368 kW/5000 rpm)
Maacc
m m)
590 ft.lb/1800–3500 rpm (800 Nm/1800–3500 rpm)
Ma 5950 rpm
Firi 1-12-5-8-3-10-6-7-2-11-4-9
Pol mm) mm)
7 ft 8 in (2335 mm)
0
ine
ine
del
e quoted
ine
de of o
of cyli
e
oke
al pisto
press
tput ac
ximum. to SA
ximum
ng ord
y-V-bel
CL 500 (215.375)1
data apply only to the standard vehicle. See an authorized Mercedes-Benz Center for the correspond
CL 55 AMG (215.374)1
113 113
peration 4-stroke engine, gasoline injec-tion
4-stroke engine, gasolinetion
nders 8 8
3.82 in (97.00 mm) 3.82 in (97.00 mm)
3.31 in (84.00 mm) 3.60 in (92.00 mm)
n displacement 303.5 cu.in. (4966 cm3) 331.8 cu.in. (5439 cm3)
ion ratio 10:1 9:1
c. to SAE J 1349 302 hp/5500 rpm (225 kW/5500 rpm)
493 hp/6100 rpm(368 kW/6100 rpm)
torque E J 1349
339 ft.lb/2700 rpm (460 Nm/2700 rpm)
517 ft.lb/2750–4000 rp(700 Nm/2750–4000 rp
engine speed 6000 rpm 6500 rpm
er 1-5-4-2-6-3-7-8 1-5-4-2-6-3-7-8
t 7 ft 10 in (2390 mm) Belt one: 4 ft 3 in (1289 Belt two: 8 ft 1 in (2462

331
Technical data
Rims and Tires
RiUssptesOteff
�
�
�
iFurther information on tires and rims is available at any authorized Mercedes-Benz Center. A tire inflation pressure table is located on the fuel fill-er cap of the vehicle. The tire pressure should be checked regularly and should only be adjusted on cold tires. Follow tire manufacturer’s mainte-nance recommendation included with vehicle.
ms ane only tecificalted an
her tireects, su
poor h
increa
increa
d Tiresires and rims which have been ly developed for your vehicle and d approved by Mercedes-Benz. s and rims can have detrimental ch as
andling characteristics
sed noise
sed fuel consumption
!Moreover, tires and rims not approved by Mercedes-Benz may, under load, ex-hibit dimensional variations and differ-ent tire deformation characteristics that could cause them to come into contact with the vehicle body or axle parts. Damage to the tires or the vehi-cle can be the result.

332
Technical data
Rims a
Same s
ge*)CL 55 AMG
Rims (l
1 For use
8J x18 H2 or 8½J x18 EH22
2 Must no
Wheel 1.73 in (44 mm)
Summe -
All seas -
Winter M+S1 or S1
245/45 R18 100V XL M+S or 245/45 R18 96H M+S
nd Tires
ize tires
CL 500 (except Sport Package*)
CL 600 (except Sport Packa
ight alloy) 7½J x17 H2 8J x18 H21
with snow chains contact an authorized Mercedes-Benz Centert be used with snow chains
offset 1.81 in (46 mm) 1.73 in (44 mm)
r tires (radial-ply tires) - 245/45 R18 96Y1
on tires (radial-ply tires) 225/55 R17 97H M+S AS -
tires (radial-ply tires) 225/55 R17 97H M+S 245/45 R18 100V XL245/45 R18 96H M+
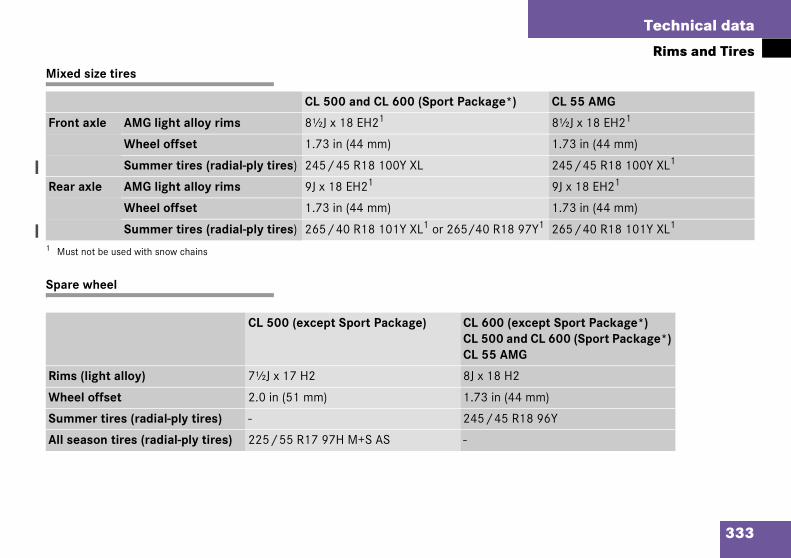
333
Technical data
Rims and TiresMi
Sp
CL 55 AMG
Fr
1 M
8½J x 18 EH21
1.73 in (44 mm)
245/45 R18 100Y XL1
Re 9J x 18 EH21
1.73 in (44 mm)
Y1 265/40 R18 101Y XL1
ept Sport Package*) CL 600 (Sport Package*)
Ri
W mm)
Su 8 96Y
Al
xed siz
are wh
ont ax
ust not
ar axle
ms (lig
heel of
mmer
l seaso
e tires
eel
CL 500 and CL 600 (Sport Package*)
le AMG light alloy rims 8½J x 18 EH21
be used with snow chains
Wheel offset 1.73 in (44 mm)
Summer tires (radial-ply tires) 245/45 R18 100Y XL
AMG light alloy rims 9J x 18 EH21
Wheel offset 1.73 in (44 mm)
Summer tires (radial-ply tires) 265/40 R18 101Y XL1 or 265/40 R18 97
CL 500 (except Sport Package) CL 600 (excCL 500 andCL 55 AMG
ht alloy) 7½J x 17 H2 8J x 18 H2
fset 2.0 in (51 mm) 1.73 in (44
tires (radial-ply tires) - 245/45 R1
n tires (radial-ply tires) 225/55 R17 97H M+S AS -

33
Technical data
Ele
Ele
Mo CL 600
Gen 14 V/180 A
Sta 12 V/1.7 kW
Bat 12 V/95 Ah
Spa NGK NFR 6Q-G
Ele 0.028 in (0.7 mm)
Tig ) 15 – 22 ft.lb (20 – 30 Nm)
4
ctrica
ctrica
del
erator
rter m
tery
rk plu
ctrode
htening
l system
l system
CL 500 CL 55 AMG
(alternator) 14 V/150 A 14 V/180 A
otor 12 V/1.7 kW 12 V/1.8 kW
12 V/95 Ah 12 V/95 Ah
gs Bosch F 8 DPP332NGK PFR 5 R-11
NGK ILFR 6 A
gap 0.039 in (1.0 mm) 0.031 in (0.8 mm)
torque 15 – 22 ft.lb (20 – 30 Nm) 15 – 22 ft.lb (20 – 30 Nm

335
Technical data
Main Dimensions
M
M CL 600
O 196.4 in (4989 mm)
O 73.1 in (1857 mm)
O 55.4 in (1408 mm)
W 113.6 in (2885 mm)
Tr 62.1 in (1577 mm)
Tr 62.1 in (1578 mm))
ain Di
odel
verall v
verall v
verall v
heelba
ack, fr
ack, re
mensions
CL 500 CL 55 AMG
ehicle length 196.4 in (4989 mm) 196.4 in (4989 mm)
ehicle width 73.1 in (1857 mm) 73.1 in (1857 mm)
ehicle height 55.4 in (1408 mm) 55.4 in (1408 mm)
se 113.6 in (2885 mm) 113.6 in (2885 mm)
ont 62.1 in (1577 mm) 62.2 in (1581 mm)
ar 62.1 in (1578 mm) 62.1 in (1578 mm)

33
Technical data
We
We
Roo
Tru
6
ights
ights
f load
nk load
max. 220 lb (100 kg)
max. 220 lb (100 kg)

337
Technical data
Fuels, coolants, lubricants etc.
FuCa Please refer to the Factory Approved Ser-
vice Products pamphlet, or inquire at your Mercedes-Benz Center.
Fuels, coolants, lubricants etc.
En Recommended engine oils
Au MB Automatic Transmission Oil1
1 M
Re Hypoid gear oil SAE 85 W 90
H MB Hydraulic fluid
Po MB Power Steering Fluid (Pentosin CHF 11S)
Fr h High temperature roller bearing grease
Br MB Brake Fluid (DOT 4+)
Co l) l)l)
MB 325.0 Anticorrosion/Antifreeze
els, cpacitie
gine w
tomat
B part n
ar axle
ydrauli
wer st
ont wh
ake sy
oling s
oolants, lubricants etc.s Vehicle components and their respective
lubricants must match. Therefore use only brands tested and recommended by us.
Model Capacity
ith oil filter CL 500CL 55 AMGCL 600
8.5 US qt (8.0 l)7.9 US qt (7.5 l)9.5 US qt (9.0 l)
ic transmission CL 500CL 55 AMGCL 600
9.1 US qt (8.6 l)9.1 US qt (8.6 l)8.1 US qt (7.7 l)
o. 001 989 21 03 10
1.7 US qt (1.6 l)
c system for ABC approx. 4.2 US qt (4.0 l)
eering approx. 1.1 US qt (1.0 l)
eel hubs approx. 2.1 oz (60 g) eac
stem 0.7 US qt (0.7 l)
ystem CL 500CL 55 AMGCL 600
approx. 12.1 US qt (11.5approx. 15.3 US qt (14.5approx. 15.85 US qt (15

338
Technical data
Fuels,
Fuels, coolants, lubricants etc.
Low tem MB 325.0 Anticorrosion/Antifreeze
Fuel taincludi
Premium unleaded gasoline:Posted Octane Rating of min 91 (average of 96 RON/86 MON)
Fuel taincludi
Premium unleaded gasoline:Posted Octane Rating of min 93 (average of 98 RON/88 MON)
Air con R-134a refrigerant and special PAG lubricant oil (never R-12)
Windshheadlam
MB Windshield Washer Concentrate1
1 Use MB er Concentrate “S” and commercially available pre-mixed w page 344).
coolants, lubricants etc.
Model Capacity
perature cooling system CL 600 2.43 US qt (2.3 l)
nkng a reserve of
CL 500CL 55 AMG
23.2 US gal (88.0 l)2.9 US gal (11.0 l)
nkng a reserve of
CL 600 23.2 US gal (88.0 l)2.9 US gal (11.0 l)
ditioning system
ield washer andp cleaning system:
7.1 US qt (6.7 l)
Windshield Washer Concentrate “S” and water for temperatures above freezing or MB Windshield Washindshield washer solvent/antifreeze for temperatures below freezing. Follow suggested mixing ratios (�

339
Technical data
Fuels, coolants, lubricants etc.
Engine
Enginesuitabionly enMercedmendeApprovyour au
Pleasescheducould rby the
Air conditioning refrigerant
R-134a (HFC) refrigerant and special PAG lubricating oil is used in the air condition-ing system.
Never use R-12 (CFC) or mineral-based lu-bricating oil, otherwise damage to the system will occur.
oils
oils are specifically tested for their lity in our engines. Therefore, use gine oils recommended by es-Benz. Information on recom-
d brands is available in the Factory ed Service Products pamphlet, or at thorized Mercedes-Benz Center.
follow FSS recommendations for led oil changes. Failure to do so esult in engine damage not covered Mercedes-Benz Limited Warranty.
Engine oil additives
Do not blend oil additives with engine oil. They may be harmful to the engine opera-tion.
Damage or malfunctions resulting from blending oil additives are not covered by the Mercedes-Benz Limited Warranty.

340
Technical data
Fuels,
Brake fl
During vof the brthrough the atmoous opecontent bles in ttem’s ef
Thereforplaced espring.
Only braMercedethorizedvide you
uel requirements
se only premium unleaded gasoline eeting ASTM standard D 439:
The octane number (posted at the pump) must be min. 91 for CL 500 and CL 55 AMG and min. 93 for CL 600. It is an average of both the Research (R) octane number and the Motor (M) oc-tane number: (R+M)/2). This is also known as the ANTI-KNOCK INDEX.
nleaded gasoline containing oxygenates uch as ethanol, IPA, IBA and TBA can be sed provided the ratio of any one of these xygenates to gasoline does not exceed 0%; MTBE not to exceed 15%.
coolants, lubricants etc.
uid
ehicle operation, the boiling point ake fluid is continuously reduced the absorption of moisture from sphere. Under extremely strenu-
rating conditions, this moisture can lead to the formation of bub-he system, thus reducing the sys-ficiency.
e, the brake fluid must be re-very two years, preferably in the
ke fluid approved by s-Benz is recommended. Your au-
Mercedes-Benz Center will pro- with additional information.
Premium unleaded gasoline F
Um
�
Usuo1
!To maintain the engine’s durability and performance, premium unleaded gaso-line must be used. If premium unleaded is not available and low octane fuel is used, follow these precautions:
� Have the fuel tank only partially filled with unleaded regular and fill up with premium unleaded as soon as possible.
� Avoid full throttle driving and abrupt acceleration.
� Do not exceed an engine speed of 3000 rpm if the vehicle is loaded with a light load such as two per-sons and no luggage.
� Do not exceed 2/3 of maximum ac-celerator pedal position if the vehi-cle is fully loaded or operating in mountainous terrain.

341
Technical data
Fuels, coolants, lubricants etc.
The ratexceed
Using mnot alloethanoused.
These requireknock,
Do not blend any specific fuel additives with fuel. This only results in unnecessary costs and may be harmful to the engine op-eration.
Damage or malfunctions resulting from poor fuel quality or from blending specific fuel additives are not covered by the Mercedes-Benz Limited Warranty.
io of methanol to gasoline must not 3% plus additional cosolvents.
ixtures of ethanol and methanol is wed. Gasohol, which contains 10% l and 90% unleaded gasoline, can be
blends must also meet all other fuel ments, such as resistance to spark boiling range, vapor pressure etc.
Gasoline additives
A major concern among engine manufac-turers is carbon build-up caused by gaso-line. Mercedes-Benz recommends only the use of quality gasoline containing additives that prevent the build up of carbon depos-its.
After an extended period of using fuels without such additives, carbon deposits can build up especially on the intake valves and in the combustion area, leading to en-gine performance problems such as:
� Warm-up hesitation
� Unstable idle
� Knocking/pinging
� Misfire
� Power loss

342
Technical data
Fuels,
Coolant
The engand antivides:
� Corr
� Free
� Boiliboilin
The coolwith a coto approrosion p
If the an–22°F (–coolant is reach(130°C)
The cooround toprotectioprotectievery 15(250000
the coolant level is low, water and B 325.0 anticorrosion/antifreeze
hould be used to bring it up to the proper vel (have cooling system checked for
igns of leakage). Please make sure that e mixture is in accordance with label in-
tructions.
he water in the cooling system must meet inimum requirements, which are usually
atisfied by normal drinking water. If you re not sure about the water quality, con-ult your authorized Mercedes-Benz enter.
coolants, lubricants etc.
s
ine coolant is a mixture of water corrosion/antifreeze, which pro-
osion protection
ze protection
ng protection (by increasing the g point)
ing system was filled at the factory olant providing freeze protection ximately –22°F (–30°C) and cor-rotection.
tifreeze mixture is effective to 30°C), the boiling point of the
in the pressurized cooling system ed at approximately 266°F .
lant solution must be used year provide the necessary corrosion n and increase in the boil-over
on. You should have it replaced years or 150000 miles km), whichever comes first.
Coolant system design and coolant used stipulate the replacement interval. The above replacement interval is only applica-ble if MB 325.0 anticorrosion/antifreeze solution or other Mercedes-Benz approved products of equal specification (see Facto-ry Approved Service Products pamphlet) are used to renew the coolant concentra-tion or bring it back up to the proper level.
To provide important corrosion protection, the solution must be at least 45% anticorrosion/antifreeze [equivalent to freeze protection to approx. –22°F (–30°C)]. If you use a solution that is more than 55% anticorrosion/antifreeze [freeze protection to approx. –49°F (–45°C)], the engine temperature will increase due to the lower heat transfer capability of the so-lution. Therefore, do not use more than this amount of anticorrosion/antifreeze.
IfMslesths
TmsasC

343
Technical data
Fuels, coolants, lubricants etc.
Antico
Your venum panents inecessfreeze specifiminum
Before the start of the winter season (or once a year in hot southern regions), you should have the anticorrosion/antifreeze concentration checked. The coolant is also regularly checked each time you bring your vehicle to your authorized Mercedes-Benz Center for service.
Antico
Mode
CL 50
CL 55
CL 60
rrosion/antifreeze
hicle contains a number of alumi-rts. The use of aluminum compo-
n motor vehicle engines itates that anticorrosion/ anti-coolant used in such engines be cally formulated to protect the alu-
parts. (Failure to use such anticorrosion/ antifreeze coolant will result in a signifi-cantly shortened service life.)
Therefore, the following product is strongly recommended for use in your vehicle: Mercedes-Benz 325.0 Anticorrosion/ An-tifreeze Agent.
rrosion/antifreeze quantity
l Approx. freeze protection
– 35°F (– 37°C) – 49°F (– 45°C)
0 6.1 US qt (5.75 l) 6.7 US qt (6.3 l)
AMG 7.7 US qt (7.25 l) 8.5 US qt (8.0 l)
0 6.3 US qt (6.0 l) 7.0 US qt (6.6 l)

344
Technical data
Fuels,
Windshsystem
Both thesystemswasher
The wasapprox.
indshield and headlamp washer fluid ixing ratio
or temperatures above freezing use B Windshield Washer Concentrate “S”
nd water:
1 part “S” to 100 parts water
0 ml “S” to 1 gallon (4 liters) water].
or temperatures below freezing use B Windshield Washer Concentrate “S”
nd commercially available pre-mixed indshield washer solvent/antifreeze:
1 part “S” to 100 parts solvent
0 ml “S” to 1 gallon (4 liters) solvent].
coolants, lubricants etc.
ield and headlamp washer
windshield and headlamp washer are supplied from the windshield fluid reservoir.
her fluid reservoir has a capacity of 7.1 US qt. (6.7 l).
� Refill the reservoir with MB Windshield Washer Concentrate and water (or con-centrate and commercially available pre-mixed windshield washer solvent/ antifreeze, depending on ambient tem-peratures).
Wm
FMa
�
[4
FMaw
�
[4
Warning GWasher solvent/antifreeze is highly flam-mable. Do not spill washer solvent/ antifreeze on hot engine parts, because it may burn. You can be seriously burned.

345
Technical data
Consumer information
CoThof detioTra19
Un
Qucashex
Allfedthe
Traction
The traction grades, from highest to lowest are AA, A, B, and C. Those grades repre-sent the tire’s ability to stop on wet pave-ment as measured under controlled conditions on specified government test surfaces of asphalt and concrete. A tire marked C may have poor traction perfor-mance.
Tr
20
Warning GThe traction grade assigned to this tire is based on straightedge braking traction tests, and does not include acceleration, cornering, hydroplaning, or peak traction characteristics.
nsume followall manr Title 4ns, Parffic and66.”
iform
ality grble, on oulder aample:
passeneral sase grad
ead we
0
er informationing text is published as required ufacturers of passenger cars un-9, Code of U.S. Federal Regula-
t 575 pursuant to the “National Motor Vehicle Safety Act of
tire quality grading
ades can be found, where appli-the tire sidewall between tread nd maximum section width. For
ger car tires must conform to fety requirements in addition to es.
Tread wear
The tread wear grade is a comparative rat-ing based on the wear rate of the tire when tested under controlled conditions on a specified government test course. For ex-ample, a tire graded 150 would wear one and one-half (1½) times as well on the gov-ernment course as a tire graded 100. The relative performance of tires depends upon the actual conditions of their use, however, and may depart significantly from the norm due to variations in driving habits, service practices and differences in road characteristics and climate.ar Traction Temperature
AA A

346
Technical data
Consu
Temper
The temest), B, atance toability tocontrollelaboratoperatureto degencessive tire failuof perfotires muVehicle Sand A remance othe mini
mer information
ature
perature grades are A (the high-nd C, representing the tire’s resis- the generation of heat and its dissipate heat when tested under d conditions on a specified indoor ry test wheel. Sustained high tem- can cause the material of the tire erate and reduce tire life, and ex-
temperature can lead to sudden re. Grade C corresponds to a level rmance which all passenger car st meet under the Federal Motor afety Standard No. 109. Grades B
present higher levels of perfor-n the laboratory test wheel than mum required by law.
Warning GThe temperature grade for this tire is estab-lished for a tire that is properly inflated and not overloaded. Excessive speed, underin-flation, or excessive loading, either sepa-rately or in combination, can cause excessive heat build-up and possible tire failure.

Technical terms
ABC(AcActthasiovar
ABS(AnPredurcon
Bi-Xenon headlampsHeadlamps which use an electric arc as the light source and produce a more in-tense light than filament headlamps. Bi-Xenon headlamps produce low beam and high beam.
CAC(Customer Assistance Center)Mercedes-Benz customer service cen-ter, which can help you with any ques-tions about your vehicle and provide
347
AlignmMepinto a
assistance in the event of a break-down.
CAN system(Controller Area Network)Data bus network serving to control ve-hicle functions such as door locking or windshield wiping.
CockpitAll instruments, switches, buttons and indicator/warning lamps in the passen-ger compartment needed for vehicle operation and monitoring.
tive Body Control)ive, computer-controlled system t hydraulically adjusts the suspen-n at all four wheels in response to ious driving situations.
tilock Brake System)vents the wheels from locking up ing braking so that the vehicle can tinue to be steered.
ent bolttal pin with thread. The centering is an aid used when changing a tire lign the wheel with the wheel hub.
BabySmartTM airbag deactivation system
This system detects if a special system compatible child restraint seat is in-stalled on the front passenger seat. The system will automatically deactivate the passenger front airbag when such a seat is properly installed (PASSENGER AIRBAG OFF indicator lamp in the cen-ter console lights up). See your autho-rized Mercedes-Benz Center for availability.
BabySmartTM compatible child seatsSpecial restraint system for children. The sensor system for the passenger seat prevents deployment of the pas-senger side airbag if a BabySmartTM compatible child seat is installed.
BAS(Brake Assist System)System for potentially reducing braking distances in emergency braking situa-tions. The system is activated when it senses an emergency based on how fast the brake is applied.

348
Technical terms
COMAN(Coctem)Inforvehicsystegatioequietc.)
ControlThe cvehiccommessdisplthe mnavigjust
Cruise cA drimatiset b
ngine oil viscosityMeasurement for the inner friction (vis-cosity) of the oil at different tempera-tures. The higher the temperature an oil can tolerate without becoming thin, or the lower the temperature it can tol-erate without becoming viscous, the better the viscosity.
SP(Electronic Stability Program)Improves vehicle handling and direc-tional stability.
Dkpit Management and Data Sys-
mation and operating center for le sound and communications ms, including the radio and navi-n, as well as for other optional
pment (CD changer, telephone, .
systemontrol system is used to call up le information and to change
ponent settings. Information and ages appear in the multifunction ay. The driver uses the buttons on ultifunction steering wheel to ate through the system and to ad-
settings.
ontrolving convenience system for auto-cally maintaining the vehicle speed y the driver.
Distronic*A driving convenience cruise control system which helps the driver maintain a pre-selected speed:
� If there is no vehicle directly ahead, the system operates in the same way as conventional ->cruise con-trol.
� If a slower moving vehicle is ahead, Distronic will reduce your vehicle speed to the extent permitted by re-duced throttle and up to 20% brak-ing power to maintain the preset minimum following distance.
Engine numberThe number set by the manufacturer and placed on the cylinder block to uniquely identify each engine pro-duced.
E
E

349
Technical terms
ETD(EmDevandtembel->S
FSS(FleSerdisthedue
Gear rNumtheThecancon
Line of fallThe direct line that an object moves downhill when influenced by the force of gravity alone.
Lock buttonButton on the door which indicates whether the door is locked or un-locked. Pushing the lock button down on an individual door from inside will lock that door.
Memory functionUsed to store three individual seat, steering wheel and mirror positions for each key or, if so equipped, KEY-LESS-GO* feature.
MenuThe control system displays are ar-ranged in menus. Each menu contains a number of commands for particular systems. In the Audio menu, for exam-ple, you will find the commands SELECT RADIO STATION or OPERATE CD player. Using commands you can directly change the settings for your vehicle.
ergency Tensioning Device)ice which deploys in certain frontal rear collisions exceeding the sys-'s threshold to tighten the seat
ts. RS
xible Service System)vice indicator in the multifunction play that informs the driver when next vehicle maintenance service is .
angeber of gears which are available to
automatic transmission for shifting. automatic gear shifting process be adapted to specific operating ditions using the selector lever.
GPS(Global Positioning System)Satellite-based system for relaying geographic location information to and from vehicles equipped with special re-ceivers. Employs CD digital maps for navigation.
Instrument clusterThe displays and indicator/warning lamps in the driver’s field of vision, in-cluding the tachometer, speedometer, engine temperature and fuel gauge.
KEYLESS-GO*System for entering and operating the vehicle without the use of a key.
KickdownDepressing the accelerator past the point of resistance shifts the transmis-sion down to the lowest possible gear. This very quickly accelerates the vehi-cle and should not be used for normal acceleration needs.

350
Technical terms
MON(MotThe Mas deod. Iabilit(knoMON->ROpostTI-KN
MultifunDispto prcont
MultifunSteeing t
OverspeEnginof thgine riouscoveWarr
rogram mode selector switchUsed to switch the automatic transmis-sion between sport operation S and comfort operation C.CL 55 AMG with steering wheel gear-shift control and manual shift program: in addition to S and C (see above), you can use the M for manual operation.
emote Vehicle DiagnosticsTransmission of vehicle data and cur-rent location to the Mercedes-Benz Customer Assistance Center for sub-scribers to Tele Aid service.
EST(Residual engine heat utilization)Feature that uses the engine heat stored in the coolant to heat the vehi-cle interior for a short time after the en-gine has been turned off.
estraint systemsSeat belts, belt tensioners, airbags and child restraint systems. As indepen-dent systems, their protective func-tions complement one another.
or Octane Number)otor Octane Number for gasoline
termined by a standardized meth-t is an indication of a gasoline's y to resist undesired detonation cking). The average of both the (Motor Octane Number) and N (Research Octane Number) is ed at the pump, also known as AN-OCK INDEX.
ction displaylay field in the speedometer used esent information provided by the rol system.
ction steering wheelring wheel with buttons for operat-he control system.
ed rangee speeds within the red marking
e tachometer dial. Avoid this en-speed range, as it may result in se- engine damage that is not red by the Mercedes-Benz Limited anty.
Parktronic*System which uses visual and acoustic signals to assist the driver during park-ing maneuvers.
Poly-V-belt driveDrives engine-components (alternator, AC compressor, etc.) from the engine.
Power trainCollective term designating all compo-nents used to generate and transmit motive power to the drive axles, includ-ing:
� Engine
� Clutch/torque converter
� Transmission
� Transfer case
� Drive shaft
� Differential
� Axle shafts/axles
P
R
R
R

351
Technical terms
RON(ReThelinemelinetiontheandposTI-K
Shift lWhpreverof pbra
SpeedStemashithewh
TelematicsA combination of the terms “telecom-munications” and “informatics”.
Tightening torqueForce times lever arm (e.g. a lug wrench) with which threaded fasteners such as wheel bolts are tightened.
Tire speed ratingPart of tire designation; indicates the speed range for which a tire is ap-proved.
TractionForce exerted by the vehicle on the road via the tires.
VIN(Vehicle Identification Number)The number set by the manufacturer and placed on the body to uniquely identify each vehicle produced.
Voice control system*Voice control system for car phones, portable cell phones and audio sys-tems (radio, CD, etc.).
search Octane Number) Research Octane Number for gaso- as determined by a standardized thod. It is an indication of a gaso-'s ability to resist undesired detona- (knocking). The average of both ->MON (Motor Octane Number) RON (Research Octane Number) is ted at the pump, also known as AN-NOCK INDEX.
ocken the vehicle is parked, this lock vents the transmission selector le- from being inadvertently moved out osition P without key turned and ke pedal depressed.
shiftering wheel gearshift control and nual shift program. In the manual ft program mode you can change gears yourself on the steering eel or by using the selector lever.
SRS(Supplemental Restraint System)Seat belts, emergency tensioning de-vice and airbags. Though independent systems, they are closely interfaced to provide effective occupant protection.
Tele Aid System(Telematic Alarm Identification on De-mand)The Tele Aid system consists of three types of response: automatic and man-ual emergency, roadside assistance and information. Tele Aid is initially ac-tivated by completing a subscriber agreement and placing an acquain-tance call.The Tele Aid system is operational pro-viding that the vehicle’s battery is charged, properly connected, not dam-aged and cellular and GPS coverage is available.

352

Index
AABC
MeSet
ABSABSMaMeWa
Acceletrans
Adjustable air vents, rear passenger compartment 168
Adjusting 34Air distribution 161Air volume 162Backrest tilt 36Exterior rear view mirror 38Folding forward front seat
backrests 100Head restraint height 36Head restraint tilt 36
353
AccideIn c
ActivatAir Air AntCenChaDisDisEasESPExtExt
Inside rear view mirror 38Instrument cluster illumination 114Lumbar support 96Mirrors 38Multicontour seat* 99Seat cushion depth 36, 99Seat cushion tilt 36Seat fore and aft adjustment 36Seat height 36Seat in the lumbar region 99Seat in the shoulder region 99Seats 34Steering column height 38Steering column length 38Steering wheel 37
190, 347ssages in display 271ting vehicle level 19123, 71, 347 control 72
lfunction indicator lamp 265ssages in display 272rning lamp 265rator position, automatic mission 148ntase of 48ingconditioner (cooling) 166recirculation mode 163i-theft alarm system 77tral locking (control system) 139rcoal filter 164
tance warning function* 188tronic* 184y-entry/exit feature 140
75erior headlamps 46erior lamps 109
Exterior rear view mirror parking position 152
Front and rear fog lamp 109Hazard warning flasher 111Headlamps 46High beams 111Ignition 31Ignition with KEYLESS-GO* start/stop
button 33Immobilizer 51, 76Rear window defroster 165Residual heat 167Seat heater 103, 104Seat ventilation* 102Tow-away alarm 78Windshield wipers 47
Activating steering wheel gearshift control 149
Downshifting 150Upshifting 150
AddingCoolant 243Engine oil 241
Additional turn signals 302

354
Index
Air condTurn
Air presspressu
Air recirActivDeac
Air ventsAdju
Air volumAdju
AIRBAG Airbags
Babysy
ChildFronPassSafeSideWind
AlarmAudiCancVisua
t the gas station 235TF (automatic transmission fluid) 242UDIO menu 122
Selecting radio station 122udio system
CD mode 123utomatic antiglare for rear view mirror 151
utomatic central lockingActivating/deactivating (control
system) 139utomatic climate control 157
Air recirculation mode 163Defrosting 162Rear window defroster 165Setting the temperature 160
utomatic headlamp mode 109utomatic lighting control
Activating 112Deactivating 112
utomatic locking when driving 94
itioner (cooling)ing off 166ure see Tire inflation re 247
culation mode 163ating 163tivating 164, rear passenger compartment
stable 168e
sting 162OFF indicator lamp 269
55SmartTM deactivation stem 65, 347ren 56t 59enger 59ty guidelines 58 impact 59ow curtain 59
ble 70, 77eling 77l 77
Alarm systemAnti-theft 77Anti-theft alarm system
indicator lamp 25Alignment bolt 311Alignment bolt (vehicle tool kit) 295, 347Antiglare
Automatic 151Antilock brake system (ABS) 347Antilock Brake System see ABS 23Anti-theft alarm system
Activating 77Canceling alarm 77Deactivating 77
Anti-theft systems 76Anti-theft alarm system 77Anti-theft alarm system indicator
lamp 25Immobilizer 76Tow-away alarm 78
ArmrestStorage compartment in front of 200,
201Storage compartment in front of
armrest 200Ashtray 206
AAA
A
A
A
A
AA
A

355
Index
AutomAccAct
cDea
gEm
MFluGeaGeaGeaKicOnProSelStaSte
(Sg
TraWin
AuxiliaInsRem
Battery, vehicle 243, 313Charging 314Disconnecting 314Reconnecting 315Reinstalling 314Removing 314
Bi-Xenon headlamps 347Block heater* 253Blocking
Rear window operation 69Brake assist system (BAS) 347Brake fluid 236, 340Brake lamp bulbs 303Brake lamp, high mounted 303Brake pads
Message in display 275Brakes 226
Warning lamp 267Break-in period 224
atic transmission 143elerator position 148ivating steering wheel gearshift ontrol 149ctivating steering wheel
earshift control 150ergency operation (Limp Home ode) 148
id level 242r ranges 145r selector lever position 146r shifting malfunctions 148
kdown 148e-touch gearshifting 144gram mode selector switch 147ector lever position 143rting the engine 43ering wheel gearshift control peedshift) and manual shift pro-
ram S 55 AMG 149nsmission fluid 242ter program mode 147, 149
ry cup holder 204erting 204
oving 205
BBabySmartTM
Airbag deactivation system 65, 347Compatible child seats 65, 347Self-test 66
Backrest supportsLumbar region 99Shoulder region 99
Backup lamps 303, 305Bulbs 303
BAS 73, 347Messages in display 273, 283
Batteries, KEYLESS-GO* cardChanging 300Check lamp 85Checking 85
Batteries, SmartKeyChanging 299Check lamp 81Checking 82
Batteries, SmartKey with KEYLESS-GO*Checking 82
Battery dischargedJump starting 316

356
Index
Bulbs, reAddiBackBrakFog FronHighHighLicenLow ParkRearSideStanTail lTurn
CCAC (CuCaliforni
ImpoCalling u
DistrRangServ
CAN sysCargo ti
harcoal filter 164Activating 164Deactivating 164
hargingVehicle battery 314
HECK ENGINE malfunction indicator lamp 268
heckingBatteries (KEYLESS-GO* card) 85Coolant level 242Oil level 236, 238Oil level with the oil dipstick 240Tire inflate pressure 236Vehicle lighting 236Vehicle lock status
(KEYLESS-GO* card) 86hild safety 63
Airbags 56Infant and child restraint systems 60,
63LATCH child seat mounts 68
hild safety switch see Blocking of rear window operation 69
igarette lighter 207
placing 302tional turn signals 302up lamps 303e lamps 303lamps 302t lamps 302 beam 302 mounted brake lamp 303se plate lamps 303, 306
beam 302ing lamps 302, 303, 305 fog lamp 303, 305 marker lamps 302, 305ding lamps 302, 303, 305amp assemblies 303, 305 signal lamps 302, 303
stomer Assistance Center) 347artant notice 11ponic* settings 128e (distance to empty) 130ice indicator 255tem 347e-down hooks 198
Catalytic converter 232CD changer* 123CD mode 123CD player
Operating 123Center console 25
AIRBAG OFF indicator lamp 269Lower part 26Upper part 25
CentigradeSetting temperature units 134
Central lockingAutomatic 94From inside 95Switch 95Switching on/off (control
system) 139Unlocking from inside 95
Central locking switch 95Changing
Batteries (KEYLESS-GO* card) 300Batteries (SmartKey) 299Key setting 140KEYLESS-GO* card setting 84Vehicle level 192
Changing CDs 123
C
C
C
C
C
C
C

357
Index
CleaninCupDisGeaHarHeaHeaInsLeaLigParPlaSeaSteWinWinWip
ClockClosing
CupGloHooSidSidSlid
Distronic* menu 128Functions 119, 121Instrument cluster submenu 134Lighting submenu 135Malfunction memory menu 130Menus 120, 121, 349Multifunction display 117Multifunction steering wheel 118NAVI menu 127Operating
CD player 123Selecting radio system 122Settings menu 131Standard display menu 122Submenus 119, 121TEL* menu 125Trip computer menu 129Vehicle submenu 139
Convenience submenu 140Activating easy-entry/exit
feature 140Setting automatic locking 139Setting fold-in function for exterior rear
view mirrors 142Setting parking position for exterior
rear view mirror 142
g holder 260
tronic* system sensor cover 259r selector lever 260d plastic trim items 260dlamps 154dliner 261
trument cluster 260ther upholstery 261ht alloy wheels 260ktronic* system sensor 259stic and rubber parts 261t belts 261ering wheel 260dows 260dshield 47er blades 25923
holder 204ve box 199d 238
e windows 170e windows with KEYLESS-GO* 86ing/pop-up roof 173, 301With SmartKey 174
Sliding/pop-up roof with KEYLESS-GO* 86, 172, 175
Trunk 90Windows 169Windows with
KEYLESS-GO* 172, 175Windows with SmartKey 171
Closing sliding/pop-up roofIn an emergency 301
Cockpit 20, 347Cockpit management and data system
(COMAND) 348COMAND 348COMAND see separate operating instruc-
tionsCombination switch 111
High beam flasher 46, 111Turn signals 46Windshield wipers 47
Consumer information 345Control and operation of radio
transmitters 232Control system 117, 348
AUDIO menu 122Convenience submenu 140Display digital speedometer 122

358
Index
CoolantAddiChecMessTemTemWarn
Coolant Chec
CourtesCruise c
CancDriviDriviFine LeveSavinSetti
Cruise cCup hold
CleaClosIn froIn reOpen
Custome
Seat ventilation* 102Tow-away alarm 78
eactivating steering wheel gearshift control 150eceleration
With Distronic* 182eep water see Standing water 231efrosting 162elayed switch-off
Interior lighting 138ialing
A number (telephone) 126ifficulties
While driving see Problems while driving 48
With starting 44igital speedometer 122irection of rotation (tires) 247ischarged battery
Jump starting 316isconnecting
Vehicle battery 314
242ng 243king level 242ages in display 277, 278
perature 234perature gauge 115ing lamp 278level 236king 242
y lighting 113ontrol 176, 348eling 177ng downhill 177ng uphill 177adjustment 178r 183g current speed 177
ng speeds 178ontrol lever 176er
ning 260ing 204nt seat armrest 202
ar seat armrest 203ing 204r Assistance Center (CAC) 347
DDaytime running lamp mode 110
Setting 136Deactivating
Air conditioner (cooling) 166Air recirculation mode 164Alarm 77Anti-theft alarm system 77Automatic climate control 166Central locking (control system) 139Cruise control 177Defrost 162Distance warning function* 188Distronic* 186Engine with KEYLESS-GO* 51Engine with the key 51ESP 75Exterior lamps 109Hazard warning flasher 111Headlamps 50Immobilizer 76Interior lighting delayed
switch-off 138Rear window defroster 165Residual heat 167Seat heater 103, 104
D
D
DDD
D
D
DDD
D

359
Index
DisplayDigDisMeSerSho
DistanDecIncSetWa
DistanCal
DistanActDeaDisInteSym
DistronActActCalCleCruDea
DoorsMessage in display 280Opening from inside vehicle 87Opening from outside 81
Downhill drivingCruise control 177
Downshifting 144, 150Drink holder see Cup holder 202Drinking and driving 225Driving
Abroad 231General instructions 40, 225Hydroplaning 229In winter 230Problems 48Safety systems 71Through standing water 231With Distronic* 188
Driving abroad 231Driving instructions 225Driving off 227Driving safety systems
ABS 71BAS 73ESP 73
sital speedometer 122tronic* 181ssages 239, 270vice indicator 254wing malfunctions 131
cereasing in Distronic* 187
reasing in Distronic* 187ting in Distronic* 186rning function 187ce to empty (range)ling up 129ce warning function* 187ivating 188ctivating 188
tronic* warning lamp 187rmittent warning sound 187bol in multifunction display 128ic* 179, 348ivated 183ivating 184ling up settings 128, 182aning system sensor 259ise control lever 183ctivated 183
Deactivating 186Deceleration 182Decreasing distance 187Decreasing time interval 186Displays in the speedometer dial 181Distance warning function 187Driving hints 188Fine adjustment 185Increasing distance 187Increasing time interval 186Intermittent signal tone 181Malfunction indicator lamp 265Menu 182Messages in display 280Resetting stored speed 185Sensor cover 259Setting a higher speed 184Setting a lower speed 185Setting following distance 186Setting the current speed 184Warning and indicator lamps 181Warning lamp 265
Door control panel 19, 28Door handle 28Door unlock
With Tele Aid 216

360
Index
Driving sABCCruisDistrDriviParkVehi
EEasy-ent
ActivElectricaElectricaElectron
73, 34Emergen
InitiaWith
EmergenEmergen
Mode)Emergen
ClosLockOpenRemUnlo
ngine oil 238Adding 241Additives 339Checking level 238Consumption 238Display messages 281Filler neck 241Messages in display 239, 282Viscosity 348
ngine oil level see Oil level 236, 238, 240
ntry positionMessages in display 294
SP 23, 73, 348Switching off 75Switching on 75Warning lamp 264
TD 349Safety guidelines 58
TD (Emergency tensioning device) 63xterior lamp switch 108xterior rear view mirrors
Adjusting 38Folding 152Parking position for 142
ystems 176190
e control 176onic* 179ng safety systems 71tronic* 193cle level control 191
ry/exit feature 96ating 140l fuses 322l system 334ic Stability Program see ESP 23, 8cy callsting an emergency call 212 Tele Aid 211cy engine shut-down 324cy operation (Limp Home
148cy operations
ing sliding/pop-up roof 301ing the vehicle 298ing sliding/pop-up roof 301
ote door unlock 216cking the trunk lid 298
Unlocking the vehicle 297Emergency tensioning device see
ETD 63, 349Emission control 233Ending
A call (telephone) 126Engine 330
Compartment 237Message in display 268Starting 43Starting with KEYLESS-GO* 43Starting with the key 43Turning off with the key 51
Engine cleaning 257Engine compartment 237
Fuse box in 324Hood 237
Engine malfunction indicator lamp 23, 268
Engine number 348
E
E
E
E
E
EEE

361
Index
FFahren
SetFastenFine ad
CruDis
First aiFlat tir
LowMoPre
FlexiblFog lam
RepFog lam
RepFog lam
MeSw
FoldingExt
Front a
Functions (control system) 119, 121Resetting 132
Fuse box 322, 324Fuse chart 295Fuses 322
Fuse box in dashboard 322Fuse box in engine compartment 324Fuse box in passenger
compartment 322Fuse box in the rear passenger
compartment 323Fuse chart 295Fuse extractor 295Spare fuses 295
GGarage door opener 27, 217
Erasing in remote control 220Integrated remote control 218Rolling code programming 219
Gasoline see Fuel 235Gear range 349
Automatic transmission 145Limiting 145Shifting into optimal 144
Gear range limitCanceling 144
heitting temperature units 134ing the seat belts 40justmentise control 178tronic* 185d kit 295e 308ering the vehicle 312
unting the Spare wheel 308paring the vehicle 308, 309e Service System (FSS) 254, 349
p, rear 110, 303lacing bulb 305pslacing bulbs 302ps, front
ssages in display 287itching on 110
erior rear view mirrors 152irbags 59
Front lampsMessages in display 286– 287Replacing bulbs 302, 304Switching on 108
Front seatHead restraints 97Head restraints installing 97Head restraints removing 97
FSS (Flexible Service System) 254, 349Fuel 235
Fuel reserve warning lamp 268Premium unleaded gasoline 235Reserve warning lamp 23
Fuel consumption statisticsAfter start 129Since last reset 129
Fuel filler flap 235Locking 235Opening 300Unlocking 235
Fuel reserve tankMessage in display 284
Fuel tankFiller flap 235
Fuels, coolants, lubricants etc. 337

362
Index
Gear selCleaPosit
Gearshiftransm
GlobalLockUnlo
Global PGlove bo
ClosOpen
Good visGPS 2
HHand-he
Progco
Hands-frHard pla
CleaHazard w
SwitSwit
Head reHeadlam
ydroplaning 229
entification labelsCertification label 328Emission control label 328Engine number 328Information label, California version
Vacuum line routing for emission control system 328
VIN (vehicle identification number) 328
VIN, visible 328nition 31mobilizer 76Activating 76Deactivating 76
dicator lamps see Lamps, indicator and warningfant and child restraint systems 63
Installing 67LATCH child seat mounts 68
formationAbout service and warranty 10Button for Tele Aid 214
ector leverning 260ion 146t pattern for automatic ission 43
ing 81cking 81ositioning System (GPS) 349x 21, 199
ing 199ing 199ibility 15110, 349
ld transmitterramming integrated remote ntrol 218ee microphone 27stic trim itemsning 260
arning flasher 111ching off 111ching on 111straints 97p cleaning system 236
HeadlampsAutomatic control 109Bi-Xenon 347Cleaning 258Cleaning system 154, 244, 344Refilling washer fluid 244Switching off 50Switching on 46
HeadlinerCleaning 261
Heated steering wheel* 208Height adjustment
Head restraints 36Steering wheel 37
Height adjustmentsVehicle level 191
High beam flasher 46, 111High beam headlamps
Messages in display 286Replacing bulbs 302Switching on 111
High mounted brake lamp 303Hood 237
Closing 238Message in display 284Opening 237
H
IId
IgIm
In
In
In

363
Index
Inside AdjAnt
InstalliInfaWip
InstrumCleCooIlluMuOuSel
InstrumIntegra
CanEraHanOpRol
InterioActDeaDelMa
Starting the engine 43Turning off the engine 51Unlocking with 30
KEYLESS-GO start/stop button* 33KEYLESS-GO* 349
Activating ignition with 33Closing side windows 86Closing sliding/pop-up roof 86Closing sliding/pop-up roof
with 172, 175Closing windows with 172, 175Locking the vehicle 86Messages in display 276Starting the engine 43Turning off engine 51Unlocking with 32
rear view mirrorusting 38iglare 151ngnt and child restraint systems 67er blades 307ent cluster 21, 22, 114, 349
aning 260lant temperature gauge 115
mination 114ltifunction display 117tside temperature indicator 116ecting language 135ents and controls see Cockpit 20
ted remote controladian programming 220
sing memory 220d-held transmitter 218
erating 220ling code programming 219r lighting 112ivating automatic control 112ctivating automatic control 112
ayed switch-off 138nual operation 113
Interior storage spaces 199Cup holder 202Glove box 199Parcel net 205Storage compartment in front of
armrest 200, 201
JJump starting 316
KKey positions in starter switch 31Key, KEYLESS-GO* card
Changing the batteries 300Key, mechanical 297Key, SmartKey
Battery check lamp 81Changing the batteries 299Checking the batteries 82Factory setting 81Global locking 81Global unlocking 81Loss of 82Positions in starter switch 31Remote controls 80Restoring to factory setting 81Selective setting 81

364
Index
KEYLESSCentChanChecChecFactLockLossMessReprRestTurnUnloUnlo
Keys 8KickdowKilometeKm/h o
LLamp buLamps,
FronLightMessRear
everFor cruise control 183
icense plate lampsReplacing bulbs 303, 306
ight alloy wheelsCleaning 260
ight sensor 285ighter see Cigarette lighter 207ighting 108
Automatic headlamp mode 109Combination switch 111Daytime running lamp mode 110Exterior lamp switch 108Front fog lamps 110High beam flasher 111High beams 111Instrument cluster illumination 114Interior 112Locator lighting 110Low beam 108Manual headlamp mode 109Night security illumination 110Parking lamps 108Rear fog lamp 110Settings (control system) 135
imiting the gear range 145
-GO* card 83ral locking 84ging the batteries 299king the batteries 82, 85king vehicle lock status 86
ory setting 84ing the vehicle 86 of 87ages in display 276
ogramming 84oring to factory setting 81ing off the engine 51cking 83cking with 320n 148, 349rs/miles in speedometer 134
r mph in speedometer 134
lbs, exterior 302exteriort 302 sensor 285ages in display 287
303
Lamps, indicator and warningABS 265Battery (SmartKey) 81Brakes 267CHECK ENGINE 268Coolant 277Distronic*DTR* 181, 265Engine diagnostics 268ESP 75, 264Fuel reserve 268Instrument cluster 264–268PASSENGER AIRBAG OFF 65, 269Seat belts 266Service indicator 254SRS 55Tow-away alarm 78Turn signals 23
LanguageMultifunction display 135Setting 135
LATCH child seat anchors 68LATCH child seat mounts 68Layout of poly-V-belt drive 329Leather upholstery
Cleaning 261
L
L
L
LLL
L

365
Index
Limp HLine ofLoadin
CarInsRoo
LocatoSet
Lock bDooSmTru
LockinCenFueGloTheTruVeh
Loss oKEYMeSm
Low beMeRep
Menus 119AUDIO 122Control system 349Distronic* 128, 182In control system 120, 121Malfunction memory 130NAVI 127Operating
CD player 123Settings menu 131Standard display 122Submenus 119TEL* 125Trip computer 129
MicrophoneHands-free microphone 27
Miles/kilometers in speedometerSetting 134
ome Mode 148 fall 349g 197go tie-down hooks 198tructions 197f rack 197
r lighting 110ting 136utton 349r handle (KEYLESS-GO*) 52
artKey 30, 80nk 86g 49, 80tral (KEYLESS-GO* card) 84l filler flap 235bal, SmartKey 81 vehicle with KEYLESS-GO* 86nk lid, separately 90icle in an emergency 298
fLESS-GO* card 87
chanical key 82artKey 82am headlampsssages in display 286, 287lacing bulbs 302
LoweringVehicle 312
Lumbar support adjustment 96
MMain Dimensions 335Maintenance 12, 254Malfunction memory 130
Calling up 130Displaying 131
Manual headlamp mode 109Manual operations
Fuel filler flap 300Interior lighting control 113Locking the vehicle 298Sliding/pop-up roof 301Unlocking the driver’s door 297Unlocking the trunk lid 298
Massage function 100MAXCOOL maximum cooling 162Mechanical key 297Memory function 105, 349
Recalling positions from memory 106
Storing exterior rear view mirror park-ing positions 107
Storing key dependent settings 106

366
Index
MirrorsActiv
paAdjuAuto
miExteExte
poExte
poInsidStori
ingMON (MMph or kMulticonMultifun
SeleStan
ultifunction steering wheel 24, 118, 350
Buttons 118
avigation systemOperating 127See separate COMAND* operating in-
structionsight security illumination 110
ccupant safety 54Airbags 55Children and airbags 56Children in the vehicle 63Fastening the seat belt 40Infant and child restraint systems 63LATCH child seat mounts 68Seat belts 40, 58
dometer, main 23dometer, trip 23
ating exterior rear view mirror rking position 152sting 38matic antiglare for rear view rror 151rior rear view mirror 38rior rear view mirror parking sition 142rior rear view mirror parking sitions 142e rear view mirror 38ng exterior rear view mirror park- position 107otor Octane Number) 235, 350m/h in speedometer 134tour seat* 99ction display 24, 117, 350cting language 135dard display 121
Multifunction display messagesABC 271ABS 272BAS 273, 283Brake fluid 275Brake pads 275Check engine 268Coolant 278Coolant level 277Distronic* 280Doors 280Engine 268Engine oil level 282Entry position 294Fuel reserve tank 284Hood 284Key 284KEYLESS-GO* card 276Lamps 287Parking brake 288Selector lever 280Tele Aid 293Telephone* 294Tires 291Trunk 294Washer fluid 294
M
NN
N
OO
OO

367
Index
OilAddCheConFillVis
Oil leveChe
One-toCanDowUps
OpeninAshCupDooFueFueGloHooSidSlid
Sto
PPaintwork 257Panic alarm 70
Panic button on SmartKey 70Parcel net in front passenger
footwell 205Parcel net in trunk 206Parking 49, 227Parking brake 44, 50
Message in display 288Releasing 44
Parking lampsReplacing bulbs 302, 303, 305Switching on 108
Parking positionExterior rear
view mirrors 107, 142, 152Parktronic* 193, 350
Cleaning sensors 259Warning indicators 195
PASSENGER AIRBAG OFFWarning lamp 269
ing 241cking level 238sumption 238
er neck 241cosity 348lcking 236, 238, 240
uch gearshifting 144celing gear range limit 144nshifting 144hifting 144gtray 206 holder 204rs from the inside 87l filler flap 235l filler flap manually 300ve box 199d 237
e windows 170ing/pop-up roof 173, 301In an emergency 301With SmartKey 174rage space in the armrest 201
Storage space in the center console 201
Trunk 89Trunk from the inside 88Windows 169, 170Windows with SmartKey 171
OperatingCD player 123COMAND* see separate operating in-
structionsGarage door opener 220Integrated remote control 220Navigation system 127Radio 122Radio transmitters 232Safety 16Telephone* 125Vehicle outside the USA and
Canada 13Operating safety 16Operator’s Manual 10Ornamental moldings 258Outside temperature indicator 116Overdue service 254Overhead control panel 27Overspeed range 350

368
Index
PassengFuseInsidInterParc
fooPasseng
safetyPedalsPhone b
LoadQuic
Phone nDialiRedi
Plastic aClea
Pliers, uPoly-V-bPosition
RecaPosition
StoriPower aPower c
for do
roblemsWhile driving 48With vehicle 17
roduct information 9rogram mode selector switch 350
Automatic transmission 147ULSE function (Massage function) 100
uick searchPhone book* 126
adioSelecting stations 122Station selection setting 139
adio transmitters, control and operation 232
ange (distance to empty)Calling up 130
eading lamp 27ear fog lamp 303
Bulb 303Switching on 110
ear lamp bulbsReplacing 305
ear lamps see Tail lamps
er compartment 231 box in 322e rear view mirror 38ior lighting 112el net in front passenger twell 205er safety see Occupant
54225
ook*ing 126k search 126umber*ng 126aling 127nd rubber partsning 261niversal (vehicle tool kit) 295elt drive 350s (Memory function)lling from memory 106s (Memory function*)ng into memory 106ssistance 225losing assist ors and trunk lid 94
Power seatAdjusting backrest tilt 36Adjusting head restraint height 36Adjusting head restraint tilt 36Adjusting seat cushion depth 36Adjusting seat cushion tilt 36Adjusting seat height 36Folding forward front seat
backrests 100Front seat head restraints 97Seat fore and aft adjustment 36
Power train 350Power washer 257Power windows 169
Blocking of rear window operation 69Side windows 169Synchronizing 172
Practical hintsFirst aid kit 295Fuses 322Lamp in center console 269Lamps in instrument cluster 264Messages in the display 270Vehicle tool kit 295
P
PP
P
RR
R
R
RR
R
R

369
Index
Rear pAdj
Rear seFolPla
Rear seHea
Rear viRear viRear w
BloRear w
ActDea
Rear wReconn
VehRegulaRegulaReinstaRemot
InteSm
RemotWit
Remot
ResettingAll functions (control system) 132All functions of a submenu 132Fuel consumption 129Service indicator (FSS) 255Stored speed in Distronic* 185Trip odometer 115
Residual heat utilization 167, 350Residual ventilation 167REST (Residual engine heat
utilization) 350Restraint system see Infant and child re-
straint systems 63, 67Rims and Tires 331Roadside Assistance
Tele Aid 213Roadside assistance 12Rolling code programming 219RON (Research Octane
Number) 235, 351Roof rack 197Rotating wheels 251Rubber parts
Cleaning 261
assenger compartmentustable air vents 168at head restraints
ding back with switch 92, 97cing upright 98atsd restraints 97
ew mirror automatic antiglare 151ew mirrors see Mirrorsindowcking operation 69indow defroster 165ivating 165ctivating 165
indow sunshade* 156ectingicle battery 315r checks 236r driving style 191lling vehicle battery 314
e controlsgrated 218artKey 80e door unlockh Tele Aid 216e Vehicle Diagnostics 350
RemovingVehicle battery 314Wheel 311
ReplacingBackup lamp bulbs 305Brake lamp bulbs 305Bulbs 302Front lamp bulbs 304License plate lamp bulbs 306Parking lamp bulbs 305Rear fog lamp bulb 305Rear fog lamp bulbs 305Rear lamp bulbs 303, 305Rear turn signal bulbs 305Side marker lamp bulbs 305Standing lamp bulbs 305Wiper blades 307
ReportingSafety defects 18
Reset button in the instrument cluster 132

370
Index
SSafety
OccuSafety bSafety d
RepoSafety s
DriviSaving cScrewdrSeat belSeat bel
CleaFastePropSafeWarn
Seat cusAdju
Seat heaSwitSwit
Seat venSwitSwit
ervice indicator 254Calling up 255Clearing 254, 255
ervice life (tires) 247ervice System see FSS 254etting
Convenience functions 140Cruise control 177Daytime running lamp mode 136Distronic* time interval 186Exterior rear view mirror parking
position 142Following distance in Distronic* 186Higher speed in cruise control 178Higher speed in Distronic* 184Individual vehicle settings 131Interior lighting delayed
switch-off 138Lamps and lighting (control
system) 135Language, multifunction display 135Locator lighting 136Lower speed in cruise control 178Lower speed in Distronic* 185Miles/kilometers in
speedometer 134
pant 54elts see Seat belts 40efectsrting 18
ystemsng 71urrent speed 177iver (vehicle tool kit) 295t force limiter 63ts 60ning 261ning 40
er use of 42, 62ty guidelines 58ing lamp 266hion depthsting 99ter
ching off 103ching on 103tilation*
ching off 102ching on 102
Seats 96Adjusting 34Adjusting lumbar support 99Adjusting shoulder support 99Easy entry/exit feature 96Heater 103Massage function 100Multicontour seat* 99
Securing cargoCargo tie-down hooks 198
Selector leverMessage in display 280Position 143
Self-testBabySmartTM airbag deactivation
system 66Tele Aid 210
ServiceCalling up the service indicator 255Major service (Service B) 254Minor service (Service A) 254Overdue 254Types 254When due 254
Service (maintenance) 254Service and warranty information 10
S
SSS

371
Index
Parm
SloSpeSpeSpeStaSusTemTemUni
VehSetting
CalConFacLigMeResResSel
Stopping 171Synchronizing power windows 172
Simultaneous wiping and washingWindshield wipers 47
Single wipe 47Sliding/pop-up roof 173
Closing 173, 301Closing with
KEYLESS-GO* 86, 172, 175Closing with SmartKey 174Opening 173, 301Opening with SmartKey 174Stopping 174Synchronizing 175
SmartKeyChanging the batteries 299Global locking and unlocking 81Lock button 30, 80Locking and unlocking 80Opening and closing the slid-
ing/pop-up roof 174Opening and closing windows 171Unlock button 30, 80Unlocking with 30
Snow chains 253Spare fuses 295
king position for exterior rear view irrors 142
wer speed in cruise control 178ed in cruise control 178ed in Distronic* 184edometer display mode 134tion selection mode 139pension tuning 190perature (interior) 160perature indicator 134
tsSpeedometer 134Temperature 134icle level control 191sling up Distronic* 128, 182venience functions 140tory, SmartKey 81hting (control system) 135nus and submenus 119etting all (control system) 132etting in the submenu 132ective 81
Settings menuFunctions in 131Individual vehicle settings 131Submenus 132
Shift lock 351Shifting
Gear selector lever positions 146Into optimal gear range (automatic
transmission) 144Shoulder support
Seat adjustment 99Side impact airbags 59Side marker lamps
Replacing bulbs 302, 303, 305Side windows
Automatic closing 170Automatic opening 170Cleaning 260Closing 169, 170, 171Closing fully 170Closing with KEYLESS-GO* 86, 172,
175Closing with SmartKey 171Opening 169, 170, 171Opening fully 170Opening with SmartKey 171

372
Index
Spare paSpare w
MouSpeed
ReseDis
SavinSpeed s
CruisDistr
SpeedomDispDispSetti
SpeedomSele
Sporty dSRS 6
IndicSRS indiStanding
ReplStanding
Drivi
torage spacesCup holder 204Storage tray 201
toring (Memory function*)Positions into memory 106
ubmenusConvenience 140For settings 119In control system 121Instrument cluster 134Lighting 135Resetting functions in Control
system 132Selecting 132Settings menu 132Vehicle 139
un visors 155upplemental Restraint System (SRS) 351
uspension tuningFor regular driving style 191For sporty driving style 191Setting 190
rts service 326heelnting 308
tting stored speed in tronic* 185g current 177
ettingse control 178onic* 184, 185eter 23
laying gear range 145lays 181ngs units 134
eter display modecting 134riving suspension 1912, 351ator lamp 266cator lamp 54 lamps 108
acing bulbs 302, 303, 305 water
ng instructions 231
Starter switch 21, 31Positions 31Switching on 43
Starting difficulties 44Starting position 31Starting the engine 42Station selection
Setting 139Steering column
Height adjustment 38Length adjustment 38
Steering wheelAdjusting 37Buttons 24Cleaning 260Electrical adjustment 37Heated steering wheel* 208Height adjustment 38
Stolen vehicleTracking services 217
StoppingSliding/pop-up roof 174Windows 171
Storage compartmentsArmrest 200, 201Glove box 199
S
S
S
SS
S

373
Index
SwitchAut
sEngESPHazHea
SwitchAut
sESPFroFroHazHeaHigParReaWin
SymboDis
SynchrPowSlid
Loading phone book* 126Messages in display 294Operating 125Redialing 127
TemperatureDisplay mode 134Setting interior temperature 160Setting units in display 134Tires 248
Tie-down hooks (Trunk) 198Tightening torque 351Tightening torque (Wheel bolts) 312Tire inflation pressure
Checking 236, 247Tire speed rating 229, 351Tire traction 229Tires 246, 345
Direction of rotation 247Driving instructions 228Messages in display 291Retreads 246Service life 247Temperature 248Tread depth 252Wear pattern 251Winter 252
ing offomatic central locking (control ystem) 139ine 51
75ard warning flasher 111dlamps 50
ing onomatic central locking (control ystem) 139
75nt fog lamps 110nt lamps 108ard warning flasher 111dlamps 46
h beams 111king lamps 108r fog lamp 110dshield wipers 47l (Distronic*)tance warning function* 128onizinger windows 172ing/pop-up roof 175
TTachometer 23, 115
Overspeed range 115Tail lamps
Cleaning 258Replacing bulbs 303, 305
Tar stains 257Tele Aid 209
Emergency calls 211Information 214Initiating an emergency call
manually 212Messages in display 293Remote door unlock 216Roadside Assistance 213Stolen vehicle tracking services 217System self-check 210Upgrade signals 215
Tele Aid System 351Telematics* 351Telephone* 24, 208
Answering a call 126Dialing a number from the phone
book 126Ending a call 126Hands-free microphone 27

374
Index
Tools 2Tow-awa
ArmiDisaDisa
Towing eInsta
Towing tTracking
For sTractionTransmi
transmTread deTrip comTrip odo
ReseTrunk
ClosLockLockLockMessOpenOpenParc
nlocking 30, 80Central (KEYLESS-GO* card) 84Driver’s door in an emergency 297Fuel filler flap 235Global 81In an emergency 297Selective settings 81Trunk in an emergency 298Trunk lid 80Trunk lid with SmartKey 82Trunk lid, separately 91Vehicle in an emergency 216With KEYLESS-GO* card 32With the KEYLESS-GO* card 83With the SmartKey 30
nlocking the trunk lid 87pgrade signals
Tele Aid 215phill driving
Cruise control 177pshifting 144, 150
95y alarm 25, 78ng 78rming 78rming for transport 78ye bolt (vehicle tool kit) 295lling 321he vehicle 318 servicestolen vehicle 217
147, 351ssion see Automatic ission 242pth (tires) 252puter 129metertting 115
ing 90 button 86 button, KEYLESS-GO* 86ing separately 90age in display 294ing 89ing from inside vehicle 88
el net 206
Tie-down hooks 198Trunk lid 89Trunk lock 298Unlocking in an emergency 298Unlocking separately 91Unlocking with SmartKey 82
Trunk lid emergency release 89Turn signal lamps
Replacing bulbs 302, 303Turn signals 46
Additional in mirrors 302Cleaning lenses 258Front bulbs 302, 304Indicator lamps 23Rear bulbs 303, 305
Turning offEngine 51
UUnits
Setting speedometer units 134Setting temperature units 134
Unlock buttonSmartKey 30, 80Trunk lid 80
U
UU
U
U

375
Index
UsefulAshCigGarInteTelTel
VVehicle
IndLocLocLowProSerTowUnlUnl
VehicleVehicle
CupDisEngGeaHarHea
Vehicle tool kit 295Alignment bolt 295Fuse chart 295Fuse extractor 295Hex-socket wrench 295Open-end wrench 295Screwdriver 295Spare fuses 295Universal pliers 295Wheel wrench 295
Vehicle washing 258VIN (Vehicle Identification Number) 351Voice control system* 351
Hands-free microphone 27
WWarning indicators
Parktronic* 195Warning lamps see Lamps, indicator and
warningWarning sounds
Distance warning function* 187Distronic* 181Drivers seat belts 60Parking brake 45
Warranty coverage 327Washing the vehicle 256
features 199trays 206arette lighter 207age door opener 217rior storage spaces 199
e Aid 209ephone* 208
ividual settings 131, 133king 25king in an emergency 298ering 312
per use of 16vice battery 313ing 318
ocking 25ocking in an emergency 297 battery 313 care 256 holder 260
tronic* system sensor cover 259ine cleaning 257r selector lever 260d plastic trim items 260dlamps 258
Instrument cluster 260Leather upholstery 261Light alloy wheels 260Ornamental moldings 258Paintwork 257Parktronic* system sensor 259Plastic and rubber parts 261Power washer 257Seat belts 261Steering wheel 260Tail lamps 258Tar stains 257Turn signals 258Vehicle washing 258Window cleaning 260Wiper blades 259
Vehicle level 191Changing 192Setting 192
Automatic 192Manual 192
Vehicle lightingChecking 236
Vehicle lock statusChecking (KEYLESS-GO*) 86

376
Index
Wear paWeightsWheel c
TightWheels
RotaTires
WindowWindowWindshi
RefilReplWash
WindshiWindshi
MessRefilWipi
iper bladesCleaning 259Installing 307Replacing 307
ipingAnd washing simultaneously 47Interval 47With windshield washer fluid 47
rench, hex-socket (vehicle tool kit) 295rench, open-end (vehicle tool kit) 295rench, wheel (vehicle tool kit) 295
enon headlampsBi-Xenon 347
ttern (tires) 251336
hangeening torque 312
ting 251 and wheels 246 curtain airbags 59s see Side windowseldling washer fluid 244acing wiper blades 307er fluid 244, 344
eld washer 236eld washer fluidage in display 294
ling 244, 344ng with 47
Windshield wipers 47, 154Fast wiper speed 47Intermittent wiping 47Replacing wiper blades 307Single wipe 47Switching on 47Wiping with windshield washer
fluid 47Winter driving 252
Block heater* 253Snow chains 253Tires 252Transmission program
mode 147, 149Winter driving instructions 230
Winter tires 252
W
W
WWW
XX


Service and Literature
Your authorized Mercedes-Benz Center has trained technicians and original Mercedes-Benz parts to service your vehicle properly. For expert advice and quality service, see your authorized Mercedes-Benz Center.
If you are interested in obtaining service literature for your vehicle, please contact your authorized Mercedes-Benz Center. We consider this the best way for you to obtain accurate information for your vehicle.
For further information you can find us on the Mercedes-Benz website www.mbusa.com or www.mercedes-benz.ca.
We reserve the right to modify the technical details of the vehicle as given in the data and illustrations of this Operator’s Manual. Reprinting, translation and copying, even of excerpts, is not permitted without our prior authorization in writing.
Title illustration no. P00.01-2397-31
Press time 17/01/03GSP/SIP
Printed in Germany
Warning! GTo help avoid personal injury, be extremely careful when performing any service work or repairs. Improper or incomplete service or the use of incorrect or inappropriate parts or materials may damage the vehicle or its equipment, which may in turn result in personal injury.
If you have any questions about service, maintenance and the carrying out thereof, seek the advice of an authorized Mercedes-Benz Center.


