dow ii map making guide
TRANSCRIPT

Page 1

INDEX1 Introduction 4
2 Fundamentals 52.1 Map Size 52.2 Layout. 62.3 Requisition, Power and Victory points 62.4 Balance 72.5 Cover 72.6 Pathfinding 8
3 Worldbuilder tools 103.1 Heightmap Editor: Basics 103.2 Importing and Exporting 11
4.1 Texture Tile Painting Editor : Basics. 124.2 Layering 13
5.1 Objects Placement: Basics 145.2 Properties. 155.3 Manipulating and damage 155.4 Advanced 16
6.1 Impass Map Editor. 17
7.1 Splat Placement: Basics 177.2 Manipulating. 19
8.1 Camera Mesh Editor. 20
9.1 Grass Editor: Basics 209.2 Layering + Natural effects 21
10.1 Spline Placement 2210.2 Manipulating 2210.3 Textures 2310.4 Objects 2410.5 Height Deform 25
Page 2

11.1 Water Placement 2611.2 Natural Edges. 2611.3 Waterfalls 27
12.1 Lighting: Basics 2812.2 Global 29
13.1 Action Markers: Effects and Sounds 2913.2 Starting and Manipulating Effects 30
14.1 Stamps 30
15.1 Atmospheric and Weather 31
16.1 Terrain Properties 33
17.1 Advanced / Overlays/View 34
18.1 Build Order 34
18.2 Checklist 35
19.1 Testing 3619.2 Packaging 36
20.1 Useful Links 38
Page 3

1 INTRODUCTION
Hi and welcome to my map maker guide. I hope you find the following pages useful and that you have fun.Duncan
If this is your first experience with mapping I would recommend reading through this guide chapter by chapter whilst practising with the world builder. Allow yourself this time to get used to the world builder, seeing how different tools work, what objects are available and what limitations there are etc. Mapping is a fairly simple process but I cannot iterate enough how much practice will improve your mapping.
After this take a more detailed look at relics map (just observe 2 computers) have a look at how all the components combine together to make a finished product. Having spent some time previously with the world builder will greatly help you to understand how these maps were made. Maybe even take a screen shot and try a rough copy a small part of their map. Making a detailed, balanced and enjoyable map takes time, don't rush and enjoy the ride!
I would recommend sketching out ideas for your map using pencil and paper. Decide what kind of map you are trying to make. These can range from tight urban environments to a large expanse of desert. You can also sketch in the world builder – spend 10 minuets making a very rough map. Just use the height map and the objects for home base, requisition, power and victory points. I have found both methods to be useful to get a basic idea of balance and pathing. Whilst sketching is great for initial concepts, the world builder is useful for tweaking before you start finalising your map. If in doubt, ask the community for advice on your map balance.
I would also recommend watching the videos created by GrizzzzzzzzzzzzzzThey are also a very useful guide. http://www.gamereplays.org/communit y/index.php?showtopic=510554
Starting Your First Map
Run WorldBuilder.exe
Open a new file (Ctrl + n)
Choose an appropriate size for the map ( as discussed below) Height is not as important at this time, but 50m is a good place to start.
To Save the Map (File, Save As): Save to <root>/Assets/Maps/PvP/
Make sure it is saving to the <root>/Assets/Maps/PvP folder otherwise they will not be baked to the correct location to test the map.
Save progress often. The editor can crash without warning. (don't turn off the auto reminder!)
At the time of this guides release the editor doesn't work, however Copernicus has created a fix : http://community.dawnofwar2.com/forums/topic/34627Thanks Cope !
Page 4

2 FUNDAMENTALS
2.1 Map Size
Map size is a very important factor to consider when making a map. Decide at the start how big you want your map, its not simple to change it half way thought mapping. The map size will directly effect the balance and pace of the game. Too large and the game will seem like a trek between points with the slower races being at a disadvantage and transports becoming a requirement. Too small and there could be no room to flank without being seen and can create some pathing issues. Think about what type of map you would like and use that as a starting point to select your map.
• You can always make your map larger then you think you will need, and reduce to the size you want using impasse tool (chapter 6.1). This will effect the camera and the fps of your map. However if used correctly can created interesting shaped maps, for example, Calderis Refinery. Just have objects or height changes to show to the player where is inaccessible.
• There should always be a non playable area around the map, this is to hide the map "drop off" and allow you to make a more realistic environment. This should generally be at least 150%- 175% size of the playable area in 1v1, but this percentage decreases as the map gets larger. You do not need a huge non playable area, either enough to get to the maximum fog distance (chapter 15.1) or to allow a realistic height change to hide the drop off. Again make sure it is clear where this non playable area starts by either using objects of having height changes.
The recommend "starting" size for maps is below.
Players Playable Area Non Playable Area 2 256 x 256 448 x 448 4 352 x 352 544 x 5446 448 x 448 608x608
Below is also a list of a couple of official maps along with their sizes. The “M2 playable” area is a rough approximation taking into account large area of the edges which have been made inaccessible Map Playable
(HeighxWidth)Terrain Size(HeighxWidth)
M2 Playable (aprrox)
Req points
Power Nodes
(2p) Siwal Frontier 256x256 384x384 65000 5 4
(2p) Green Tooth Jungle 352x320 512x512 85000 5 4
(2p) High Legis Stratum 320x384 672x768 90000 4 4
(2p) Leviathan Hive 448x256 832x448 85000 4 5
(2p) Green Tooth Gorge 256x288 512x544 70000 6 4
(2p) Outer Reaches 256x256 384x384 65000 5 4
(4p) Golgotha Depths 320x320 576x576 100000 5 5
(4p) Medean Cliff Mines 384x384 512x512 135000 5 5
(4p) Calderis Refinery 448x448 800x800 110000 6 6
(6p) Tiber Outpost 512x512 640x640 200000 6 6
(6p) Argus Desert Gate 320x480 640x800 130000 7 6
(6p) Angel Gate 416x416 544x544 130000 7 6
(6p) Typhon Arena 384x384 544x544 145000 5 5
Page 5

2.2 Layout
Layout and is one of the most important factors when creating a map. You map can be open spaces, narrow corridors, creating flanking heaven or flanking hell . Get it wrong and a stunning looking map can become unplayable. When creating the layout try and think if there is an unfair advantage to any race or unit. For example:A narrow map with a low or no flanking possibilities favours a platform build, where as a map with lots of narrow routes and shot blocking will favour melee units.
Also try and have at least one large open space where the armies can clash late game. A basic rule of thumb is that there should always be three routes to any point on the map or two wide routes.
Height changes can help with the look of the map and create some natural shot blocking, but the extra time going up a ramp or stairs is not a major factor (unless you are using narrow stairs and then you need to consider vehicle pathing). It is the different routes a player can take, where he can fire and how fast he can flank that will effect the gameplay.
2.3 Requisition/Power/Vps
Getting the number of requisition points correct is important, it will effect the pace of the game and how quickly a player can upgrade his base. Don't supply the players with too many or too few points, both will cause issues.
• 3 VP's are a must on all sizes. The game is built around this concept and any deviation can create stalemates or extend out games to boredom levels.
• Power nodes are less restrictive, however due to the nature of teching and the importance of power harassing there are still some restrictions to balanced play. For example: a large number of power points allow multiple variations on where you can place your power, subsequently making your enemy scout for it. Conversely a low number can makes power harassing easier, as if you get pushed off the map the enemy can make a bee-line straight to the power node confident that the power nodes will be there.
Below is how many power nodes I would build to create a balanced map1v1 : 4 - 52v2 : 5 - 6 3v3 : 5 - 6
• The number of requisition points can vary the greatest. Whilst still important it will not effect play as much as Victory or power. Again too few and there will be nothing extra to fight over too many and half the game will be spent capping. They are useful for increasing "zone value" as described in the next chapter.
Again I would recommend.1v1: 4-62v2: 5-63v3: 5-7
Please refer to the previous chart on page 4 to see the number of points on official maps.
The objects for the above three can be found in the object list
ebps > world objects > gameplay > strategic_point_requisition_pvpebps > world objects > gameplay > strategic_point_pvpebps > world objects > gameplay > victory_point_pvp
Page 6

Tip: Zone value: Each victory point, power node or requisition point increases the “value” of an area on the map. The higher this value the more important is it to fight over. Try and spread this value as evenly as you can across the map, this will greatly increase the re playability of a map as you will not be required to fight over the same area over and over.
When placing the points, consider how this effects the zone value. Think of how you would play the map, where would you go first, would you always go that route, and does the layout allow for multiple capping orders.
2.4 Balance
One player or team should not have an unfair advantage over the other,additionally nor should any race. The layout doesn't have to be symmetrical but each player should have a equal distance to available requisition, power and vp's. A useful tool for this is the Ruler Mode tool (please see 2.6) where you can compare pathing distance between two points.
Cover should be evenly available to both sides. When coming up to a node, both sides should have equal green/yellow cover available or the imbalance offset in a different part of the map.
Garrisonable buildings are also important to consider. They cannot have a “commanding view” of a large portion of the map. Make it possible to flank the building, get close with green cover or bypass it completely (Buildings are considered yellow cover, so any green cover available around will negate the bonus). Too many buildings favours ranged races/builds where none make it easier for melee to push off ranged from the map as they have no where else to retreat too.
2.5 Cover
There are four types base properties for objects which effect cover. • No cover : which provide no bonus and are purely decorative. (no box)• Yellow : which gives moderate defence against ranged fire (green box with a yellow
triangle in corner)• Green : which gives good defence against ranged fire (green box with a green
triangle in corner)• Blue : which blocks line of sight. (blue box around object)
Some objects have a combination of the above.
Example of the cover types with “cover and shot blocking”, activated by the icon
Page 7

Tip: Shot blocking can be artificially created anywhere by using the object:
ebps > world objects > gameplay> move_shot_blockers.
This will not show on the map but will block all ranged. It is important to use these when there is a significant change in height as this is not automatically created. Note : it also acts as a move blocker for all units. Yellow cover is a bit more forgiving for where it can be placed , it is the green cover which give the highest bonus and has to be placed more carefully. Along with balance, think about if there is opportunity to flank the cover, and how the cover can make more interesting skirmishes. objects which are shot blockers allow complete protection from ranged fire, and are useful in giving melee more opportunity to flank. A rough example how cover can be used to allow flanking.
Note: Some splats will also give cover, mostly the ones from the crater section
2.6 Pathfinding
Objects also have the five different crusher properties which determine their effect on unit pathing. Each unit in the game has a different crusher type. If the unit reaches or surpasses the objects required crusher value, it will not take it into account with its pathing and just drive/run through it.
Land Only – Most infantry.Light Crusher - Hive tyrant.Jumper – Jump troops when landing.Medium Crusher – Light vehicles (ie wartrucks, falcon, razor back)Heavy Crusher – Walkers, terminators, heavy tanks (looted, predator)
To show these values. Select the ruler tool from the task bar denoted by the icon
Page 8

Select two point, either terrain or objects determined by your start and end points.
Selected the type of crusher required.
Click Regenerate Pathfinding Data
This is also helpful when measuring the distance between two points to help with map balance. Use Object for both the Start and End, click on the two points you are interested in. (ie Home Base and Point Node)
The straight line and pathfinding distance (determined by crusher type selected) will now be shown at the bottom of the side bar
A selection of objects showing their effect on pathing when subjected to different crusher types.
Due to the size and manoeuvrability of infantry they do not normally get pathing issues, be more concerned with vehicles and how there pathing will be effected by your layout and objects. Since the recent patch vehicle pathing is now a lot better, but make sure vehicles have a “relative” easy time getting around the map. Conversely if you want to block an area off from vehicles or leave some routes infantry only, this is a useful tool to make sure that it works.
A map can also take into account walls that can be crushed as a later date to create new routes around the map (see Argus Desert Gate or Quest's Hersey) which can completed change of the map for late game. I wouldn't recommend blocking off VP's completed, as this “drags” out the game and creates too much of an advantage for teleporting or burrowing commanders, who can cap with immunity until later in the game.
Page 9

3 WORLDBUILDER TOOLS
3.1 Heightmap Editor
The height map editor is generally the first tool you should use when starting to create your map. It creates the “foundation” of the layout and can help the map look more authentic, especially in the case of city based maps.
To start click on the Heightmap icon on the toolar (or press F5)
LMB/ RMB Mode: The action of left or right mouse buttons respectively.
Additive : Increases the heigh of the selected areasSubtractive: Decrease the height.Set Value: Change the height of the selected area to a set value as determined by HeightSmoothing: Smooths all the height values in the selected area together.
Brush size – Diameter of brush in meters.
Feather:• 0 all area selected will be immediately
effected 100% • 100% only centre point is 100% effected,
whist the effect is gradually decreased to the edge of the brush
Height: Used to set the value for Set Value HeightStrength – The speed at which heights are changed (no effect to set value)
Smooth Terrain – will smooth the whole of the map (not recommended)
Sample: Will set the height to the same value as where you click. (press Ctrl for this action)
The image to the right shows the effect of feather on height map. From 0 feather to 100.
Set value is useful where you are going to be using stairs or ramps. Have height changes in increments of 5, the basics height of stairs is either 5 for small or 10 for larger. Also most walls have a value rounded to 5. It will make a much neater map. It is most useful in city maps to get the interesting level changes expected in the 40k world. Whilst getting the basic layout with set value, it is easier to then export and import the height map tga file to get crisp edges. (explained later in 3.2)
Page 10

Smoothing is useful for natural landscapes as expected, but also for removing small terrain errors or pathing errors. Remember to smooth height edges very slightly,especially if no feather was used. This will stop any texture errors from showing.
Please see section 10.4 (page 24) on how to use the height Deform spine tool. This is a very useful too when creating a perfect ramp.
Tip: For city maps the 4x4 terrain brush size is your best friend. Where 1x1 is great for tiding corners it tends to take too long on long straight walls, and can leave height errors. It consists 85% of a 3x3 square. The outer boxes are only filled 20-30% so it requires a lot of movement to starting getting rough edges.
3.3 Importing Exporting Heightmaps
You can export a greyscale image of your map heightmap as a tga file. This grayscale image can then be changed in an external program as you see fit. This can be any program, but you can get Paint.net (http://www.getpaint.net/) or Gimp (http://www.gimp.org/) for free
To get the same height value just use the pipette tool, any changes will now be that height when re imported. This is great for creating city maps as you can use the filled square tool for instantly straight edges!
• File > Export Height Map > Name File > Set Height value to your map maximum.
• Edit in external program.
• Save back as .tga file. (or just write over same Heightmap file)
• File > Import Height Map > Select File > Set Height value to your map maximum
Note: This heightmap will include the non playable area. Mark the non playable off roughly with a higher height value, so its easier to see where it is when editing.
You can export and reimport as much as you like sending the .tga back and forth between the two programs until you are happy.
Right is showing how the heightmap will turn out when you import the above tga greyscale example.
Have you saved yet ?…...
Page 11

4.1 Texture Tile Painting Editor
Basics
Textures are one of the main building blocks for the atmosphere of the level. Whether it is a desert tundra, dense jungle or sprawling urban environment, textures help set the scene.
To start using textures, click the Tile toolbar (F7)
Brush Size: Determines the diameter of the brush in meters
Feather: Effects the strength of the tile as it moves further from the centre point
Strength: Determines the initial % coverage of the texture. Note 14% is the lowest value you can paint.
Each part of the map has 100% worth of texture to be painted. This can consist of 100% of one texture, or a mixture of different textures totalling 100% (ie 30, 20,50)This is explained more in the next chapter.
Layers: These are you selected textures of the map. You can have 8 in total. Over writing the texture with a different one will automatically change all of that texture on the map to the new one. Select your textures at the start of mapping to make best use of these 8.
Existing Layers: These are the layers that you can select. To use one, click on a texture, click on a spare (or current) layer box, and click Assign Layer.
To the right is an image showing how feather and strength effect how a texture is place. (Feather/Strength)
As you can see each layer has two textures assigned to it, These are the ground texture and the cliff texture. These can either be identical or in most cases different. This help in differentiating height changes in the map. The more dramatic the change the higher percentage will be the cliff texture.
Below is an image showing have height changes effects how the texture is displayed.
Page 12

4.2 Texture Layering
As stated, textures consist of 100% of either a single texture of a combination of a few. The editor will display the textures you “painted” in the order of which you placed them, overwriting the earliest if you go over 100%.
The chart to the right shows how painting different layers creates a different tile. As you can see where there is enough “texture allocation” left you can see the original cement, otherwise it lost under the grass and dirt.
Examples:
1) Consists of 70% Cement, 15% of Grass and 15% of Dirt
2) 45% Grass and 55% Dirt3) 5% Grass and 95% Dirt
Taking this into account you can create natural textures by layering how ever you need. You can layer as many different textures as you want (well up to 7).To the right is an example of how five different textures can be mixed together to create a natural looking base for your map.
Warning: The creation of your own layers by using the “Assign Ground and Assign Cliff” is not supported in the current version of world builder. Any attempt to make your own layer will create a texture error.
TIP: When you are not sure how much of a layer for a specific texture you need, set the strength to 14%. Every time you click and paint an area will add 14%. You can therefore build up the texture layer in small increments of 14,28,42,56 etc. This is also good for creating natural textures and you can easily have multiple strength layering.
TIP: To "dirty" up a level select a large brush with high feather and set the strength to 14%. Select the dirt texture desires and paint over the majority of the map. All the textures will now have a brown hue. You could also change the global lighting to a slight brown color, which will blend in the objects, and accentuate any brown textures / splats in the design.
Page 13

5.1 Object Placements
Basics
Objects are another primary tool that you will be using in all your maps. Take into account that objects require most of processing power. The larger maps will generally have more objects but they have to be limited carefully. Think about the lower end machines who cannot handle a 516 by 516 map with 5000+ objects. You will generally have more in a 3v3 then a 1v1, but a 1v1 will allow you a greater number of objects per meter squared. However you cannot have an excessive number of many objects in one place, as this still will effect the fps.(the number of entities on the screen at any set time is what effects the fps)
To start click on the object placement icon (or press F2)
Placement: • Adjustable: Ignore, (this will automatically
place the object at 0 height)
• Relative to terrain. This will snap the object to the height of where ever you clicked.
Player assignment: Determines if its either world (default) or assigned to one of players. I would place object first and then change their respective owners, so that this is not left on by mistake. You need a minimum of two bases of different owners to have a playable map.
Use Random Rotation: Will place at a randomly assigned angle (360o)
Snap to grid: As before will snap to selected grid size.
Snap to angle: Will snap to selected angle (up to 45o)
Snap to height: Ignore (will place object at 0 height)
Current (with object selected)• Adjustable: Will allow you to change the height.• Relative to terrain: Stickies the object to the
height of the terrain it rests on..
Note: With some objects you will not be able to change this properties, unless placed in the non playable area.This mostly effects vista objects.
You can also now change owner (world, player1-8)
Autoalign: Will set the objects angle to the angle of the terrain its currently placed.
Edit State: You can change health to make the object look damaged
Object list: This is a expandable list of all the objects in game. For reference the only ones that you can use without SCAR coding are
EBPS > World Objects (majority of objects you will require)VISUALS > World Objects (mostly vista objects which are for the unplayable areas)
You have to select you object from the list to place it. (it will default to tyranid spore)
Page 14

5.2 Properties
With an object selected you will be able to see various boxes surrounding it.
White: This is the volume of the object and the space it occupies. This is useful when stacking objects, when you can just see the bottom of the white box it is placed correctly.
Yellow Box with small triangle in corner(yellow or green)This denotes the cover level of the object. If the object doesn't have this box it will not effect cover.
Red grid: This shows the footprint of the object and how it will effect pathing.
Object impass: covered in 2.6
5.3 Object Manipulation
With the object selected a number of actions can be taken.
• Height: Press and hold down “h” and move mouse up and down to desired height.
• Rotation: Press and hold shift and move mouse in any direction. With the object selected you can change “Snap to Angle” to desired angle and move object to get it to change.
• Copy: You can copy the object by holding down “c” and select the object, or with selected by dragging a new copy out.
• Autoalign: Will change the tilt of the object to the same as the ground it rests on.
• Edit State:
Click “Add” and press ok. (you can only change health)Double click on “Set Health” Enter the percentage as decimal place (ie 0.65 is 65%)Click apply and ok.
The Object will now have new health value. This can be shows as battle damage but not all objects have multiple visuals, a lot will just stay the same until 0% where it will disappear and leave splat. This tool should be mostly used for damaging buildings.For the objects that are effected the bands of damage show as.
1 - 0.67 No damage 0.66 - 0.34 Moderate damage0.33 - .01 Heavy damage0 Destroyed
Example right shows a building is its various states of decay.
Page 15

5.4 Advanced
Objects can be placed at any height, angle or tilt you require. You can hide part of objects inside other objects to create new interested models. You can also hide part of the object in the ground.
Be careful where using hidden objects or ones top of other objects that can be destroyed. If the lower object is destroyed but not the object higher, it will just float in mid air.
TIP: A useful tool when making a map is having a “angle” chart at the side. This can be used to set you object at any angle you require. This can be easily created in the spline deform tool as discussed in 10.4 (page 24)
When turning objects on their side. Have a vertical wall of 40 height of more (lower can be 95o), then place the object half into the wall and click “Autoalign”. This will flip the object 90 degrees in as shown.
Tip: You are only limited by your imagination when manipulating objects !
Page 16

6.1 Impass Editor
This is a simple tool to use but it is important in your map to stop pathing issues, exploitation or just to create interesting map shapes.
Click on the Impass Map Editor icon (or press F6)
Brush Size: Diameter of brush in meters.
Left Click paints on the impass (light orange colour)
Right Click will remove the impass “paint”
Place in areas you want to be inaccessible, or where there is gong to be pathing issues. This can be used to block off areas of the map to create a more interesting shape. (If doing this however have objects/height change to signify that it is non playable) No unit will be able to pass through this impass. If you run the Ruler tool for path finding you can then change to the impass tool while still keeping the overlay. This can then be filled in as required.
Remember to paint impass on top of inaccessible height changes, otherwise units that can teleport can retreat to safety, creating an unfair advantage.
Below is an example of how the impass tool can be used to “fix” a map.
7.1 Splat Placement
Basics
Splats are a great tool for creating a varied and detailed ground layer or to tie objects and textures together. There are hundred of splat to choose from, and with the different colours and sizes this becomes thousands. They can also be easily layered. Again take into account how many splat you are using, it will effect the fps of your map. Do not make splats too large as this will stretch their base texture to a point where it will pixelate.
Tip: Knowing all the splats off by heart take a long time, have a splat pallet at the side of the map or in an area you are not working on. This is one of every splat at its optimum size for your selected environment. This can be a quick reference to the splats available at a glance (you have a preview but it distorts the non square splats too much) and you can also just copy splats as you need then!
Page 17

To start using splats click on the splat icon SPLT (or press F8)
Random RotationAssign Button : Will rotate selected splat to new random rotation
Placement: Automatic random rotation on placing splat
Random Mirror X & YAssign Will flip the selected splat along its x/y axis
On: will automatically flip splat along its x/y axisSnap To
Snap to Grid – Will snap splat to specified grid distance
Snap to Angle – will snap splat to specified angleDefault
Pick: All these buttons will set the value of the corresponding tool to the same as the selected splat.
Rotation: rotational value (ignore)
Scale: Relative size of splat, value scale dependent on splat selected
Mirror X:Will flip selected splat along its X axis
Mirror Y:Will flip selected splat along its Y axis
Colour: Selects the colour of splat
Opacity: selects how see through the splat is.Current
These action will effect the current selected asset effecting it the same way as above.
Optimum size: This will set to the default size of the splat
TexturesAssign: This will replace the current selected splat with the highlighted splat on the list
To start placing splats its a simple case of selecting it from the expandable list and then left clicking on the map.
Right is an image are some examples of how size, opacity and colour will effect a splat.
Page 18

Tip :Splats are highly useful in city maps. They can be placed to create a hard change in the texture, producing an effective city feel. Below is just a few examples of the “floor trims” that are on offer. They are also very useful in creating roads.
7.2 Manipulating
After placing a splat you can still manipulate it however you want.
Rotation: Hold down both Shift and the Left mouse button, now moving the mouse in any direction will change the direction for the splat. As before in objects, you can activate “snap to angle” and the selected splat will automatically change to that angle (one moved slightly)
Size: Hold down both Shift and the Right mouse button and drag the mouse in any direction, this will change the size of the splat. Do not make the spats too large, this will distort the texture.
Copy: You can copy the splat by holding down “c” and select the splat, or with selected by dragging a new copy out. Order: With multiple splats selected page up and page down will change the order in which there are placed. The default will put the last splat placed on top.
Colour: You can change colour from the “current” part of the side bar. You are not just limited to the pallet shown. By clicking on the advanced button you can select your own.
You can place as many splats as you want on top of each other, bear in mind that splats will effect performance.
Two examples of how just splats can be used to create detailed environments.
Page 19
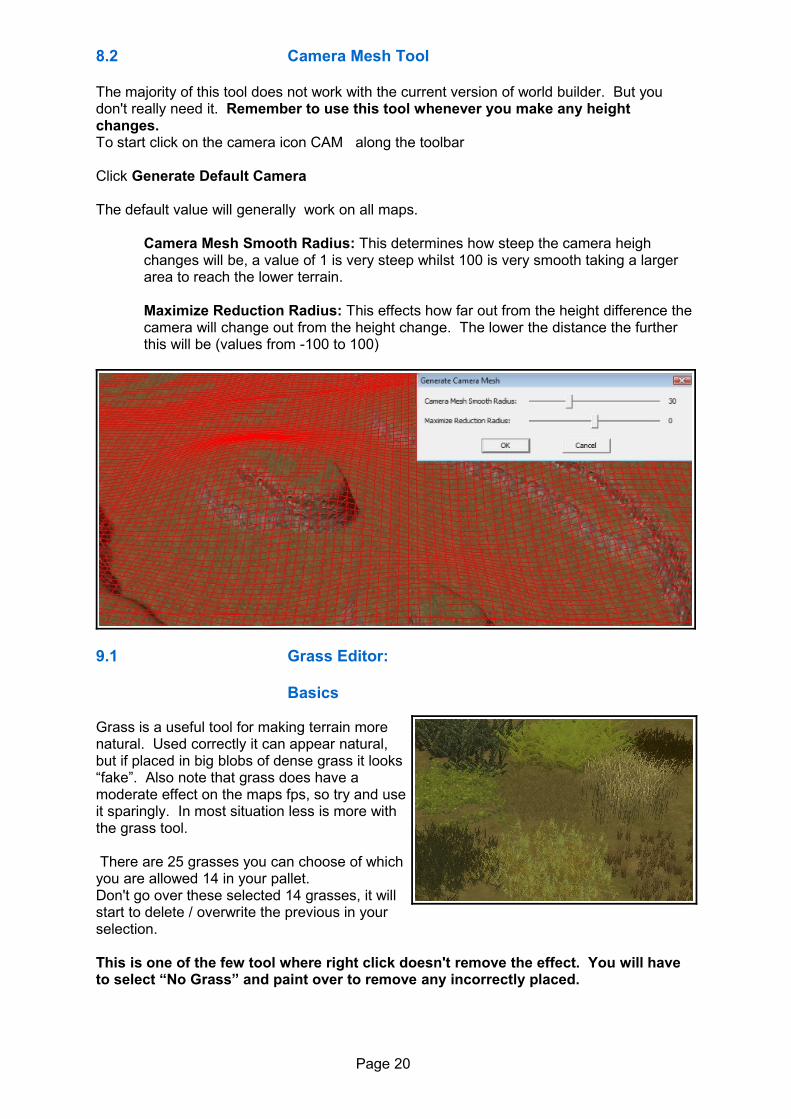
8.2 Camera Mesh Tool
The majority of this tool does not work with the current version of world builder. But you don't really need it. Remember to use this tool whenever you make any height changes. To start click on the camera icon CAM along the toolbar
Click Generate Default Camera
The default value will generally work on all maps.
Camera Mesh Smooth Radius: This determines how steep the camera heigh changes will be, a value of 1 is very steep whilst 100 is very smooth taking a larger area to reach the lower terrain.
Maximize Reduction Radius: This effects how far out from the height difference the camera will change out from the height change. The lower the distance the further this will be (values from -100 to 100)
9.1 Grass Editor:
Basics
Grass is a useful tool for making terrain more natural. Used correctly it can appear natural, but if placed in big blobs of dense grass it looks “fake”. Also note that grass does have a moderate effect on the maps fps, so try and use it sparingly. In most situation less is more with the grass tool.
There are 25 grasses you can choose of which you are allowed 14 in your pallet.Don't go over these selected 14 grasses, it will start to delete / overwrite the previous in your selection.
This is one of the few tool where right click doesn't remove the effect. You will have to select “No Grass” and paint over to remove any incorrectly placed.
Page 20

To start using the grass tool click on the icon
Do not use the height tab, it will not paint and has no effect.
To start “painting” grass selected the grass with left click and left click on map.
Type: This is a list of grasses available for your map.
+ : This will bring up the grasses available. Select one and click ok to add it to the above list. (14 maximum)
- : With the grass selected press this button to remove it from your list.
Brush size: Diameter of brush in meters.
Normal/Crushed/Burnt: This will select the added effect to the grass. Note that crush doesn't work, and burnt works on some grasses turning them black, but will just not display others.
9.2 Layering + Natural Effects
Creating natural looking areas of grass can be difficult. The idea is to break up the grass and not to have dense clumped areas. But there are a few tips to help you
• Place the grass with a size 1 brush• You can use multiple grasses blended together but try and use grasses with a similar
hue. See below for example• Leave gaps between grasses, showing the tile texture. This will also help fps.• Place assets in the grass (ferns, small plants etc) which break it up.• You don't have to use all 14 grass slots.• Try and place grasses in their natural environment. For example; reeds at the waters
edge, ferns below trees and in corners.
Below is an example of four grasses blended together. In this image I have used
Grass_Green_01 Grass_Green_02Grass_Mixed_01Ferns_Small_01
Saved yet ?......(you get the idea)
Page 21

10.1 Spline Placement:
The spine tools can be the hardest tool to use. It combines your knowledge of splats / objects with your knowledge or splines. Splines are basically a designated path determined by your placed control points. Along this path you can place splats, objects or even deform terrain with any combination of their properties.
To start using splines click on the spline icon (or press F9)
The basic of placing spline control points is the same for all three of the tools. The side bar will be the same at the top, with only the lower changing to the selection. Try not to have any sudden turns, it can cause graphics glitches.
Right click to place the control points, if you are not happy press “Esc” to restart. You need a minimum of 4 points to “activate” the spline.
Snap to - Grid : This can be sued to get a straight line. For example snapping to 10 meters, and showing the 10 meter grid (under Overlay in. will make producing a straight line a lot easier.
Ignore Snap to Angle and Snap to Height.
Outline Drag Mode: Once checked the spline objects/splat will stay in place while you move the yellow spline outline, otherwise the will be moved with it.
10.2 Manipulating.
Once placed you can still effect the spine in many ways.
Move: Left click and drag spline to new position.
Rotate: Press shift and left click, and move the mouse in any direction
Width: Press shift and right click, and move the mouse in any direction
Remove: Press delete.
Control points: If you are not happy with the spline control points, press Space bar with the spline selected. Click and drag any of the control points to their new position.You can also remove any with delete.Press Space bar again if you want to exit and return to the whole spline.
Length: Press the add/remove from back/front buttons to add an additional control point to the spline.
Copy: Press and hold “c” now drag out a new copy from the selected spline
Page 22

10.3 Spline Textures (Splats)
Width: Width in meters
Width Preset: Selection of different sizes
Set To Preset Width: With spline selected this will set to the above width
Set To Optimum Width: Sets to the optimum width of the texture assigned
Redefine CV's : Ignore
Control Points – add/remove as before
Fix to Tiling Width – sets to width of spline if you have expanded it (but this generally occurs automatically)
Colourise – can change opacity along the spline, or change it to a different colour of a number of colours(see below)
Tiling – The number of splats that fill up the spline, don't mess around, it will destroy texture.
TextureAssign- Can replace splat with new one, click new desired splat and click this button.
When placing your control points for the spline try and refrain from having tight turns. This will distort the texture to can cause it to glitch. Try and place enough points that you get a nice even curve, generally place more control points then you will need. This will allow you to manipulate the spline easier.
Careful when stretching out your spline without adding more control points with the add to front/back buttons, as it can distort the texture
Example of a spline with too few control points at the top and a better amount at the bottom.
Page 23
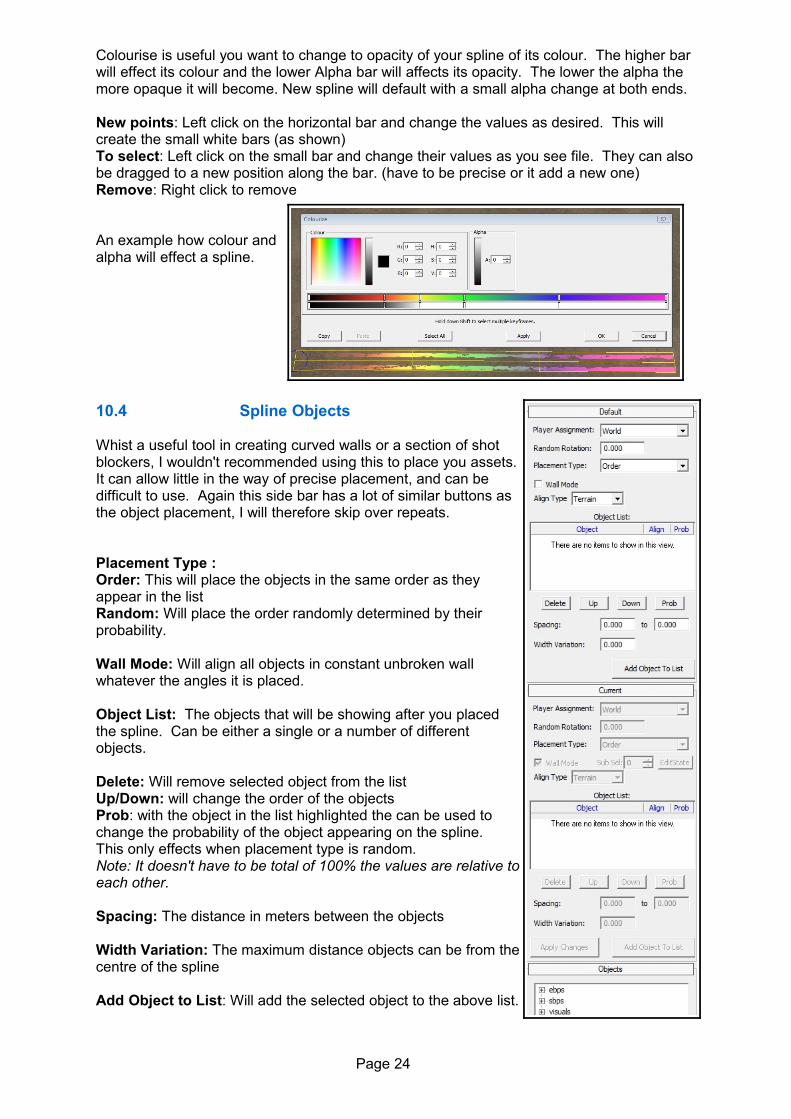
Colourise is useful you want to change to opacity of your spline of its colour. The higher bar will effect its colour and the lower Alpha bar will affects its opacity. The lower the alpha the more opaque it will become. New spline will default with a small alpha change at both ends.
New points: Left click on the horizontal bar and change the values as desired. This will create the small white bars (as shown)To select: Left click on the small bar and change their values as you see file. They can also be dragged to a new position along the bar. (have to be precise or it add a new one)Remove: Right click to remove
An example how colour and alpha will effect a spline.
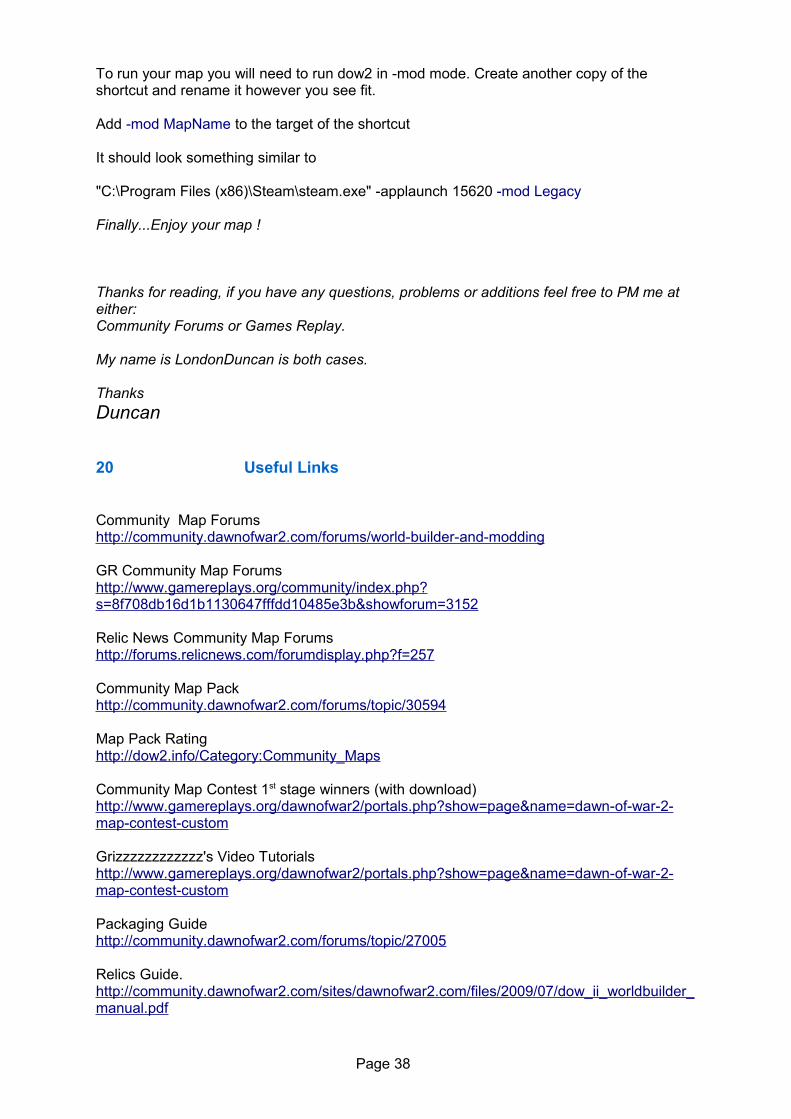
10.4 Spline Objects
Whist a useful tool in creating curved walls or a section of shot blockers, I wouldn't recommended using this to place you assets. It can allow little in the way of precise placement, and can be difficult to use. Again this side bar has a lot of similar buttons as the object placement, I will therefore skip over repeats.
Placement Type : Order: This will place the objects in the same order as they appear in the listRandom: Will place the order randomly determined by their probability.
Wall Mode: Will align all objects in constant unbroken wall whatever the angles it is placed.
Object List: The objects that will be showing after you placed the spline. Can be either a single or a number of different objects.
Delete: Will remove selected object from the listUp/Down: will change the order of the objectsProb: with the object in the list highlighted the can be used to change the probability of the object appearing on the spline.This only effects when placement type is random.Note: It doesn't have to be total of 100% the values are relative to each other.
Spacing: The distance in meters between the objects
Width Variation: The maximum distance objects can be from the centre of the spline
Add Object to List: Will add the selected object to the above list.
Page 24

Some examples showing how spacing and width variation will effect your spline
10.5 Spline Height Deform
Select Deform, and check the tick box underneath.
Width: This will select how wide the height change will be in meters. Some pre-set value have been included but you can manually change the value to what ever you want.
Mode/Height Presets: Both act the same, setting spline to add the specified height.
To create the spline, press Enter.
Again you can manipulate the spline after it has been placed however you like as discussed in the previous chapter. However you cannot change its height.
After you have pressed enter and have created your spline you can click Edit Profile. This will bring up another window, left click will add more points or you can left click and drag existing to new places.
Click Apply to make the changes
An example right show how to create a ramp. Just take the last point and drag it down to the lowest point.A ratio of 1:2 Height to width has been used. (10m Height, 20m width)
Once you are happy with the spline and its position, with the spline selected you can click bake. The spline can be moved around as you like before baking but after, it will be changed into a permanent height change.
Tip: You are not limited to just ramps !
Page 25

11.1 Water Placement
Getting water looking natural can be difficult. It tends to create a noticeable difference between the ground and water making it looking unnatural. However it is a simple tool to use and can create a great mood on your map if used correctly
With the water tool selected.
Update: Various times the water will update, or you can click the update button
Right click: Adds the waters starting point.
Depth: is the waters depth in meters. You can use decimal places. Note that water becomes impassible after 0.5 meters. You can check if you water is impassible using the ruler tool and hiding water by deselecting it under the “view” tab.
Properties of water• The water will not pass any heightmap which is higher then its depth , even if there is
lower terrain on the others side, but will fill the whole map if allowed.• It will stay at its height level from the initial placing, even if the heightmap gets
shallower.• It will stack on top of each others.
Warning: Do not place more then three waters on the map, it takes a lot to process and can dramatically effect your fps.
To change the water effect and colour you will need to change the terrain properties (as covered later in 16.1 page 31). To change the ripples see under wind in Atmosphere Properties (15.1 page 30)
11.2 Natural EdgesA few tips in making the waters edge look as natural as possible.
• Use a water colour that matches you terrain as close as possible.• Smooth the edges of the heightmap and update the water• Add a mud or Dirt tile to the edge• Add grasses around the waters edge and in the water (reed_1, reed_2)• Add splats to extra detail.• Use objects to hide the edge and for variety
Example below of the stages to create a natural waters edge.
Page 26

11.3 Waterfalls.
Waterfalls are a great addition to any map with water, as they create a dramatic feature. If made incorrectly however it can ruin the effect.
The main things to think about are:
• Water Speed (as covered in 16.1 page33). A rough value of about 2 is right, but this is variable depending on waterfalls size and the maps overall wind speed. It needs to match the placed water otherwise it will stick out.
• The heightmap around it, to blend it in and make it look natural. Alternatively assets can be used. You will need to hide the waterfall objects edges otherwise it will look unnatural
• Effects to hide where the waterfall object meets the water tool
Waterfalls objects are mainly found Visuals > World Objects > Jungle Terrain > Waterfalls > Missionb
When the waterfalls top is above view height it is simple enough to just adjust the height map to hide the vertical edges of the waterfall.
If you can see the top of the waterfall it is a bit trickier. You will need to manipulate the terrain so it “holds” in the water on the above level, without being seen though. Place a slither of terrain that is just above the water height. You will also need to hide the top edges of the waterfall, rocks or jungle trees can be useful for this.
There is a good selection of rocks that can be used to hide the edges or to create interesting formations inside the waterfall. There can be found
ebps > Jungle terrain > cliffs.
There are two effects and a sound that you can use to improve your waterfall. These are listed in the stamp pack as Waterfall, splash and sound_local waterfall.
Below is an example of a simple waterfall with added effects where the top is out of game camera view.
Page 27

12.1 Lighting Mode
Basics
Lighting greatly effects the atmosphere of the map. Your map can be set at different types of the day with whatever sun colour you like. Local lighting is useful for highlighting specific areas on the map or just for effect.
The darker your overall global lighting the more you will be able to see the local lighting as it contrasts to the darkness. Be careful not to set the level too low otherwise it will become too difficult to see where you are going ! Along with the light comes the shadows and these can also be used for good effect to increase the atmosphere of the map.
To start click on the lighting mode icon.And expand the sidebar
Lights: Local light objects which will radiate light as specified below.Environmental Probes: Don't seem to have any effect.
Bake Lighting: Will turn on the lighting and show how it effects areas with the pre-placed probes
Quick Bake: Supposed to be used to test small areas and save from a larger map bake, but doesn't work.Use this at the beginning of mapping to remove the harsh shadows.
Light Colour : The colour of the light object selected. Again you can add any colour you want with the advanced tool.
Light Brightness: How bright the light will be.
Scale: Effects the dimensions of the light which will in turn effect the amount of light produced. The larger the flight object the higher the brightness will be.
When placing your lighting objects, they are defaulted to ground height, where they will not show. You will need to raise the light in order for it to work. Take some time to double check the lighting is all in the right place before you bake the lighting. Baking can be a long process/.
Some examples of light probes (not the first on is too low to produce any light.
Page 28

12.2 Global Lighting
Take some time getting your global lighting levels right, its the one effect the player is always going to see. Its simple to adjust, but you will be surprised how the smallest changes can have a massive effect on the look of the map.
You will find global lighting under scenario > atmospheric properties
Sunlight Colour: Colour of light, again can make your own colour
Intensity: Brightness of the light on the level. Scale is 0 (pitch black) to 10 but I wouldn't recommend going below 0.3 or above 5
Shadow Intensity: How dark the shadows will be on the level
Sunrise Direction: Where the sunlight will appear from on the level thus effecting the shadow direction
Time of Day: How hight the sun is in the sky, thus effecting the length of the shadows.
13.1 Action Markers: Effects and Sounds
Effects are not in the editor by default, but I have created a stamp folder that contains copies from the official maps. There is little you can change in the way of properties but there are enough effects and sounds for your requirements.
Thanks to Deionarra for the ones I missed !
Instructions
Download the below folders:
http://www.filefront.com/14857375/DOW2 EFFECTS.zip
Place both folders into.<root>\dawn of war 2\Tools\ToolsData\WorldBuilderData\Stamps
When you open up world build your stamp list will now be populated with the effects.
To Place Effect
Select "Stamp Placement" on toolbar.
Select the effect required from the stamp list
Place on map with right click (it can be moved after)
Either press enter or hit "Create Stamp" button
These effects will not be showing in the worldbuilder yet (but will show in game), to be able to edit effectively see below on starting the effects.
Page 29

To Start and Manipulate Effect
Selected the "Render Marker Prox" icon
Make sure action markers is selected in the sidebar
To start: Select each action marker and press restart or click the Restart All button from the right hand toolbar.
To move: selected either one of the axis, or the bottom yellow "plate" to move freely. You cannot use H to raise you need to select the y axis.
To copy: You can copy with “c” as per usual.
To change effect see the expandable command box. Its size, height and direction can all be effected
• Delay: Delay in effect starting from map start in seconds
• Fx: Effect registered to action marker (cannot be changed)
• Position: no change• Orientation: Rotates effect in 360 angle but
doesn't change direction• Length: Height of the effect along the
vertical Y axis• Scale: Directly effect size• Self Mark: no change
14.1 Stamps
I won't go into too much detail with the stamp tool. It is limited to only being useful for either transferring groups of objects between maps or even the whole map. For the sake of variety you don't want to copy large areas, and any copying that you require can be done with “c”.
To create: Bound box: You can use this to create a selection box and click Create Stamp. Selection: You can either select one item or left click and drag a box selecting multiple items. Then click Create Stamp. This will not select the heightmap though.
Filters: When checked the stamp will pick up that item in its selection
Rotational Gizmo: will place a action marker before placing the stamp allowing you to rotate and move it.Random Rotation: Will place the whole stamp at a random angle.Bound Volume: With rotational gizmo selected this will show the outline of the items in the stamp.Absolute Cords: Will place the stamp at the same coordinates as from its creation.
Stamp List: They created stamp will automatically go into the temporary folder. To place any stamp, select the stamp from the list right click on map and either press enter of Create Stamp
Tip: If you made an error in you map size this can be used to resize you map. Tick all the filter boxes. Use bound box over the whole map. When in new map make sure absolute cords is selected. You map will now have been transferred over. However it seems to lower the whole terrain just under 5 meters.
Page 30

15.1 Atmospheric and Weather
Another way to create great atmosphere in a level is to change its fog and its weather. Again getting these right is important as the player will always see these where ever he is on the map. There are many ways you can use these tools, from creating thick foggy swamp to a city in the middle of a storm.
There are a couple of section in atmosphere properties, however you are only really interested in sunlight, fog, sky, wind and weather . Lighting was cover in the previous section of 12.2 (page 27)
They can be found under Scenario > Atmosphere Properties
Fog
Colour / alpha gradient: This acts the same was as a splines texture chart (10.2 page 23)The colour can be varied along the fogs distance, but I wouldn't recommend it. The alpha is the most important gradient. The darker the colour the less fog is showing. You can also add more point or move existing ones.
Fog start: The distance from the camera the fog will start, this is not on by default. If you do reduce the distance to 0 make sure the fog alpha is only at very low values at the start. Otherwise you will not be able see effectively. Check this by setting the view to “Use Game Camera”
Fog end: The distance the fog will end. Useful for hiding the map edge.
Fog Layer Depth: This effects the horizontal base fog of the level. To remove set it to 0.
Fog Contrast: How opaque he fog will be, the higher the vaue the harder it will be to see.
Sky Blend Height: Changes the height at where the fog meets the sky.
Weather
You can create a number of different weather effects for your map from light rain, sandstorm, tyranid spores to even snow. To get the weather looking natural can take some time as there are a lot of different properties you can adjust.
I have extracted the official map weather effects and have created some other basic ones for you to download. You can simply load these up into your map.
Download the below Atmosphere folder. http://www.filefront.com/14857417/ATMOSPHERE.zip
Replace the original folder located at.<root>\dawn of war 2\Tools\ToolsData\WorldBuilderData\Atmosphere
You will now be able to load these preset atmospheres into your map. Just click the Load Button top of Atmosphere Properties.
Page 31

SkyThis is the backdrop of your level, there are a number of preset background you can choose from. It is simple to active, and will appear as a dome texture around your map
Sky Model: Select the background that you want to use
Height: The height the background will be placed.
Rotation: Will spin the background in any direction, it is a little change on the overall effect.
Rain:Speed: How fast the texture will travel to the ground
Wind Strength: Changes how much the wind speed will effect the direction
Density: How much of the texture you will see
Buoyancy: Determines how light the texture is, and creates a random directional element.
Width/Length: effect the size of the particles you will see
Tile U/Tile V: Effects density by changing the size of the texture tile
Texture: The type of particle you want to see (rain/spores/sand etc)
Splash Density: The amount of rain splashes you will see on the ground
Max Spash Age: The length of time the effect will take to compete.
Lightning cannot be changed in the current version of the worldbuilder.
MiscTerrain wetness Level: This has no real effect I can see
Weather type: Choose from rain, tyranoformation, sand or neutral.
Wind: Direction: Angle the wind will come from
Declination: The angle is the wind comes from from 90o to -90o. Where 90o is straight down
Strength: The relative speed of the wind
Water onlyDirection: This will effect the direction of the ripples on the water
Strength: How fast those ripples will move.
Page 32

16.1 Terrain Properties
This tool can be used to add cloud/city shadows to your map and to change the properties of your water
It can be found under Scenario > Terrain Properties
Horizon: Ignore.
Fog Layer Base Height: acts the same way as Fog Layer Depth in Atmosphere properties and stack on top of each other.
Giant ShadowTexture name: The shadow you want to use
Scrolling Type: select scroll
Movement Strength: The speed at which the texture will move across the map.
Water Objects (effects waterfalls)Scrolling Type: Select scroll
Movement Strength: The speed at which the water flows in the object. Do not set this too high as it will appear unnatural. Around a value of two is a good starting point.
Water Reflection: (This will effect the water placed through the water tool)Normal Map: The type of ripple effect showing
Water Colour: Select the desired water colour
Foam Map: not available
Bumpiness: The apparent height of the water ripples
Wind Factor: Determines how much he wind will effect the speed of the water ripples. (in effect it just effects the speed of the ripples)
Ocean Mode: No visible change
Desired Texel Per meter: Ignore
Some examples of the different water effects
Page 33

17.1 Overlays / Advanced / View
There are many extra overlays, views and useful tools that can be used to help you create your map. Here is a small sample and their uses (all found from the menu bar)
OverlayToggle (Ctrl + F5)
Grid Overlay 5m/10m/32m: This will create a grid on the map, useful for getting dimensions right or straight angles when snapping to grid.
Regenerate Impass: Will recalculate the impass for the map, useful when yo want to see the impass and still use another tool.
AdvancedWireframe (World): Will change the heightmap into a wireframe model, can be useful if you are not sure on the height change.
StatGraph: has useful information, most importantly the fps you are getting at that specific moment. This is dependent on your system, so if you have a high end machine allow a large margin for the lower end machines to be able to cope.
ViewWater: Will toggle the water display. Useful when you need to look at the impass of shallow water.
Use Game Camera: Places the camera to how the game camera will be set. This is sueful for testing the camera mesh and to see any errors that would appear. For example if you can see the map edge.
18.1 Build Order
This is a basic build order which I would recommend for mapping. You can place them in any order, and redo specific areas as you see fit.
• Concept – Size / Basic Layout / Requisition / Bases / Basic Cover• Heightmap• Bases/ victory points/ requisition points/ power nodes• Placing majority of large objects• Check pathfinding and map balance• Rest of objects• Impass tool to correct any errors• Basic Textures• Water (if any)• Splats• Tie all the textures/ together and splats together• Effects• Grass tool• Improving detail• Lighting• Atmosphere and weather• Checking map for errors• Bake and test !
The next page is a checklist to use after you have created your map. This is probably not everything you need to check, but is the majority.I would recommend printing out this next page.
Page 34

18.2 CHECKLIST
Non visible map drop off whilst using the game camera
Balanced for each player and each race.
Layout doesn't favour any specific build / tactics
Balanced garrison buildings
Correct number of requisition and power nodes.
Pathing for different crushers smooth (importantly vehicles)
No exploitable areas
Balanced cover.
Frame per second is acceptable.
No cliff errors
Turrets covering the base correctly.
Assets placed correctly
Texture tile looks appropriate for the map.
Splats placed correctly and are not over sized
Spline textures do not show any errors
Grass looks natural, including waters edge
Water and waterfalls are flowing at the correct speed to look natural
Game camera mesh is set correctly.
Lighting is at the right level, and local spot lighting looks correct.
Weather effects set correctly
Fog distance and alpha at the right level.
Effects and sound placed.
Giant shadows correctly used.
Page 35
19.1 Testing
Testing your map is important to find errors created in game play that you haven't realised whilst making the map. There is so many different combinations of events that is it always difficult to take them all into account. This is why testing is so important. If you do not have anyone to test the map for you having two identical computers fight on the map will help you see any problems or balance issues that may come up. Computer testing is no substitute for humans, they don't deliberately go out their way to test every aspect of the map and you never get any feedback !
After you have created you map you need to bake you map. (File> Save and Bake )
Make sure the map is saved to the <root>/Assets/Maps/PvP folder otherwise they will not be baked to the correct location to test the map.
You now need to run the game in -dev mode. To achieve this create a duplicate shortcut on your desk. You don't need to create a copy but its easier then changing back and forth,also you should rename it. (ie DOW2 Developer Mode)
Right click on the shortcut and click propertiesGo to the Shortcut tabAdd – dev to the end of the target It should read some thing along the lines of "C:\Program Files (x86)\Steam\steam.exe" -applaunch 15620 -dev
When you run in developer mode it will make your baked map available to play.
19.2 Packaging
This can be a difficult process to get right. If you are having difficulty on the below, check of other guides from the forums, or ask for help showing a copy of the relevant text files.
There are three main steps.• Addition and modifying of archive design• Modifying the createarchive.bat tool.• Running the program from command prompt or windows run task
Warning: A map with spaces will not package correctly, for exmaple change My First Map to My_First_Map.
If you are not sure on your root path, go to the dawn of war II main folder and copy it from the navigation bar.
Archive Design
Make sure to make a copy of 4p_SmallDemo before you change anything. Keep this as a original copy in case you make any saved mistakes .
Go to <root>\dawn of war 2\Assets\Archive Design
Copy the 4p_SmallDemo and rename it to your map name.
Open this in notepad or any other text editing program.
Page 36

You now need to make some changes• The archive name to your maps exact file name • Replacing DOW2_WB\Root with root path on your computers• The Map name to the name of your map. (.sga not important)
<Archive Name="4p_SmallDemo" DefaultCompression="Buffer" DefaultRoot="c:\DOW2-WB\Root\GameAssets" ArchiveFile="Mods\4p_SmallDemo.sga">
It should end up something like
<Archive Name="Legacy" DefaultCompression="Buffer" DefaultRoot="C:\Program Files (x86)\Steam\SteamApps\common\dawn of war 2\GameAssets" ArchiveFile="Mods\Legacy">
CreateAchive.bat tool
Go to <root>\dawn of war 2\Tools\Bin
Open CreateAchive.bat ( you might not be able to open this directly, if not go into the text editing program and open it from there)
You will need to make the following changes• Replacing C:\DOW2-WB\ROOT to that of your root path ,• addition of “ “ around the root path.(important)
Archive.exe -c -r ..\..\GAMEASSETS\ -cf ..\..\Assets\ArchiveDesign\%1.sga_design -a C:\DOW2-WB\ROOT\dawn of war 2\GameAssets\Mods\%1.sga -log %1.log
This now should look something like:
Archive.exe -c -r ..\..\GAMEASSETS\ -cf ..\..\Assets\ArchiveDesign\%1.sga_design -a "c:\Program files (X86)\Steam\steamapps\common\dawn of war 2\GameAssets\Mods"\%1.sga -log %1.logCommand Prompt / Run Task
Open up command prompt , or open up windows run task.
Type in"<root>\Tools\Bin\CreateArchive.bat" Map Name
It should end up looking something like
"C:\Program Files (x86)\Steam\SteamApps\common\dawn of war 2\Tools\Bin\CreateArchive.bat" Legacy
The addition of “” is important.
A new file is created in <root>\GameAssets\Mods called Map Name.sga. A log file is also created in <root>\Tools\Bin
Make sure the only items left in <root>\GameAssets\Data\Maps are the ones for the current map you are archiving. Otherwise this program will package every map you have baked.
Page 37
To run your map you will need to run dow2 in -mod mode. Create another copy of the shortcut and rename it however you see fit.
Add -mod MapName to the target of the shortcut
It should look something similar to
"C:\Program Files (x86)\Steam\steam.exe" -applaunch 15620 -mod Legacy
Finally...Enjoy your map !
Thanks for reading, if you have any questions, problems or additions feel free to PM me at either:Community Forums or Games Replay.
My name is LondonDuncan is both cases.
ThanksDuncan
20 Useful Links
Community Map Forumshttp://community.dawnofwar2.com/forums/world-builder-and-modding
GR Community Map Forums http://www.gamereplays.org/community/index.php?s=8f708db16d1b1130647fffdd10485e3b&showforum=3152
Relic News Community Map Forumshttp://forums.relicnews.com/forumdisplay.php?f=257
Community Map Packhttp://community.dawnofwar2.com/forums/topic/30594
Map Pack Ratinghttp://dow2.info/Category:Community_Maps
Community Map Contest 1st stage winners (with download)http://www.gamereplays.org/dawnofwar2/portals.php?show=page&name=dawn-of-war-2-map-contest-custom
Grizzzzzzzzzzzz's Video Tutorialshttp://www.gamereplays.org/dawnofwar2/portals.php?show=page&name=dawn-of-war-2-map-contest-custom
Packaging Guidehttp://community.dawnofwar2.com/forums/topic/27005
Relics Guide.http://community.dawnofwar2.com/sites/dawnofwar2.com/files/2009/07/dow_ii_worldbuilder_manual.pdf
Page 38