do guide do check the box
TRANSCRIPT
DO GUIDE
6. Place the cable holder containing the Lightning to USB cable in the iPanel.
7. Starting from the connector, loosely place the cable in the cable channel and press it into the channel to secure it.
NOTE: The cable must be completely pressed into the channel so that it is flush with the shorter wall of the cable channel.
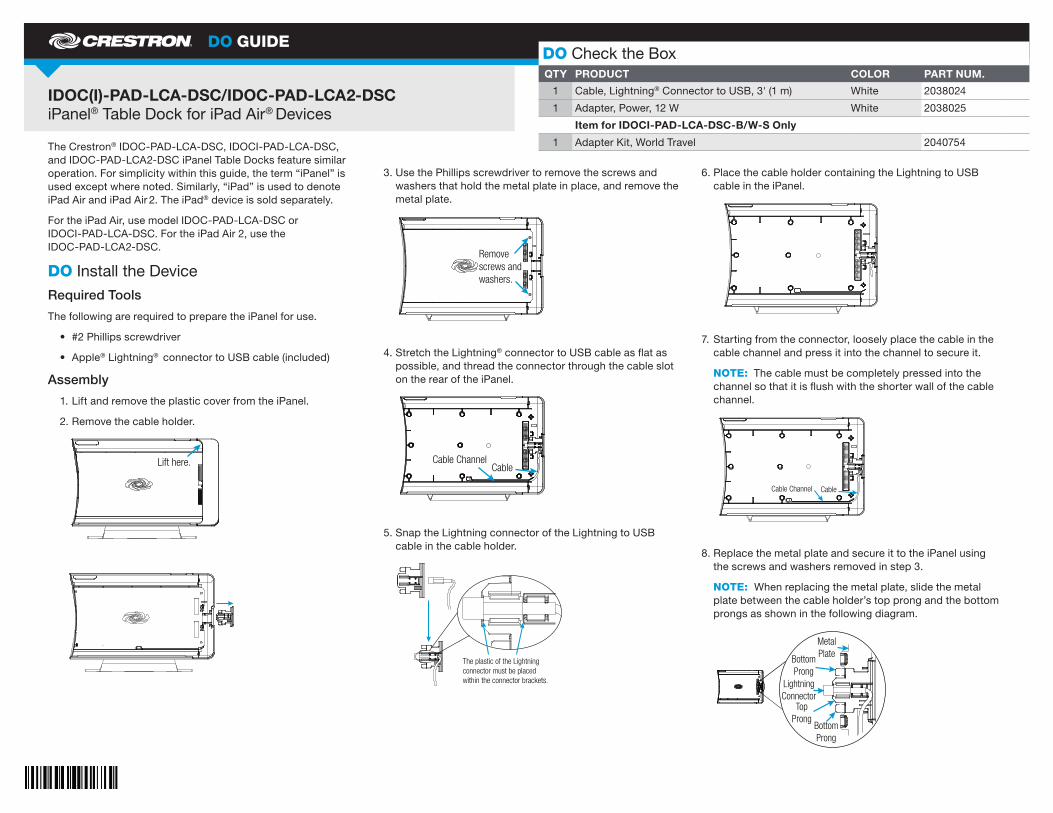
8. Replace the metal plate and secure it to the iPanel using the screws and washers removed in step 3.
NOTE: When replacing the metal plate, slide the metal plate between the cable holder’s top prong and the bottom prongs as shown in the following diagram.
DO Check the BoxQTY PRODUCT COLOR PART NUM.
1 Cable, Lightning® Connector to USB, 3' (1 m) White 2038024
1 Adapter, Power, 12 W White 2038025
Item for IDOCI-PAD-LCA-DSC-B/W-S Only
1 Adapter Kit, World Travel 2040754
3. Use the Phillips screwdriver to remove the screws and washers that hold the metal plate in place, and remove the metal plate.
4. Stretch the Lightning® connector to USB cable as flat as possible, and thread the connector through the cable slot on the rear of the iPanel.
5. Snap the Lightning connector of the Lightning to USB cable in the cable holder.
IDOC(I)-PAD-LCA-DSC/IDOC-PAD-LCA2-DSC iPanel® Table Dock for iPad Air® Devices
The Crestron® IDOC-PAD-LCA-DSC, IDOCI-PAD-LCA-DSC, and IDOC-PAD-LCA2-DSC iPanel Table Docks feature similar operation. For simplicity within this guide, the term “iPanel” is used except where noted. Similarly, “iPad” is used to denote iPad Air and iPad Air 2. The iPad® device is sold separately.
For the iPad Air, use model IDOC-PAD-LCA-DSC or IDOCI-PAD-LCA-DSC. For the iPad Air 2, use the IDOC-PAD-LCA2-DSC.
DO Install the DeviceRequired Tools
The following are required to prepare the iPanel for use.
• #2 Phillips screwdriver
• Apple® Lightning® connector to USB cable (included)
Assembly
1. Lift and remove the plastic cover from the iPanel.
2. Remove the cable holder.
Lift here.
Remove screws and washers.
Cable ChannelCable
The plastic of the Lightning connector must be placed within the connector brackets.
Cable Channel Cable
BottomProng
MetalPlate
BottomProng
TopProng
LightningConnector

DO GUIDE DOC. 7767D (2043461) 04.16Specifications subject to change without notice.
9. Snap the plastic cover that was removed in step 1 into place.
10. Connect the USB connector of the Lightning to USB cable to the included power pack, and
connect the power pack to a wall outlet.
DO Use the DeviceInsert the iPad
1. Hold the iPad horizontally (with the iPad dock connector facing into the dock), and position it so that it rests behind the iPanel’s top and bottom retaining lips.
2. Slide the iPad into the iPanel until the cable holder pops out, as shown in the following diagram.
3. Hold the iPad in place and press the cable holder so that it is flush with the iPanel. The iPad is now connected to the iPanel.
Remove the iPad
To remove the iPad, hold the left side of the iPad and slide it out of the iPanel.
DO Learn MoreVisit the website for additional information and the latest firmware updates. To learn more about this product, use a QR reader application on your mobile device to scan the QR images.
Crestron Electronics 15 Volvo Drive, Rockleigh, NJ 07647 888.CRESTRON | www.crestron.com
As of the date of manufacture, the product has been tested and found to comply with specifications for CE marking.
Federal Communications Commission (FCC) Compliance Statement This device complies with part 15 of the FCC Rules. Operation is subject to the following conditions: (1) This device may not cause harmful interference, and (2) this device must accept any interference received, including interference that may cause undesired operation.
Caution: Changes or modifications not expressly approved by the manufacturer responsible for compliance could void the user’s authority to operate the equipment.
Note: This equipment has been tested and found to comply with the limits for a Class B digital device, pursuant to part 15 of the FCC Rules. These limits are designed to provide reasonable protection against harmful interference in a residential installation. This equipment generates, uses and can radiate radio frequency energy and, if not installed and used in accordance with the instructions, may cause harmful interference to radio communications. However, there is no guarantee that interference will not occur in a particular installation.
If this equipment does cause harmful interference to radio or television reception, which can be determined by turning the equipment off and on, the user is encouraged to try to correct the interference by one or more of the following measures:
• Reorient or relocate the receiving antenna. • Increase the separation between the equipment and receiver. • Connect the equipment into an outlet on a circuit different from that to which the receiver is connected. • Consult the dealer or an experienced radio/TV technician for help.
Industry Canada (IC) Compliance Statement CAN ICES-3(B)/NMB-3(B)
The specific patents that cover Crestron products are listed at patents.crestron.com. The product warranty can be found at www.crestron.com/warranty.
Certain Crestron products contain open source software. For specific information, please visit www.crestron.com/opensource.
Crestron, the Crestron logo, and iPanel are either trademarks or registered trademarks of Crestron Electronics, Inc. in the United States and/or other countries. Apple, iPad, iPad Air, and Lightning are either trademarks or registered trademarks of Apple, Inc. in the United States and/or other countries. Other trademarks, registered trademarks, and trade names may be used in this document to refer to either the entities claiming the marks and names or their products. Crestron disclaims any proprietary interest in the marks and names of others. Crestron is not responsible for errors in typography or photography.
This document was written by the Technical Publications department at Crestron.
©2016 Crestron Electronics, Inc.
IDOC-PAD-LCA2-DSC
IDOC-PAD-LCA-DSC
Cable Holder