directions - hubblesite - out of the ordinary...out of...
TRANSCRIPT
Materials:
model pattern printed onto cardstock/cover-stock
instructions printed on regular paper
white or clear craft glue and/or a gluestick
sharp scissors
1/8˝ (3mm) wooden dowel
medium-weight sandpaper
black construction paper
ruler, preferably with a metal edge
pencil
black marker or paint and paintbrush
silver or gray paint
Optional (but very helpful) materials:
butter knife or flathead screwdriver
flat toothpicks or small paintbrush (for applying glue)
gluestick (make sure it’s not “repositionable”)
sharp craft knife and cutting board
aluminum foil (or some other shiny material)
black, silver, or gray paint
paper towels or moist towelettes to keep your hands clean
aerosol acrylic clear coat or sealant
This model reflects the configuration of the Hubble Space Telescope after servicing mission 3B in 2002.
Overview:
This project takes about 4-8 hours to complete.
This project is recommended for age 12 and up. Crafters under the age of 16 may want an adult’s help for some of the more complex steps.
•
•
•
•
•
•
•
•
•
•
•
•
•
•
•
•
•
•
•
•
•
Construction tips:
Read through all the directions first. Make sure you know where all of your materials are and what you will need to do.
Don’t cut out pieces until you need them, so you can keep track of them. You can also lightly pencil the part numbers to the backs.
Score fold lines before cutting out the pieces. This will make it much easier to fold the flaps later. Draw the edge of a narrow but not sharp object — like a blunt knife or a small flathead screwdriver — along the dotted lines to make an indentation. Use a ruler to make sure your lines are straight.
Fold the pieces and fit them together at least once before applying the glue.
Keep your hands and your workplace clean and clear of scraps to prevent accidents and errors.
Wash your hands right away if they get dirty or get glue on them so you won’t get your model dirty.
When using white or clear craft glue, only use as much glue as is needed to cover the surfaces you’re connecting with a very thin layer. Too much glue may end up on your hands or on the surface of your model. Large flat areas are most easily glued with the gluestick. Press all glued areas together tightly for about 10 seconds to make sure it seals tightly.
Unless otherwise indicated, allow the glue to dry before going on to the next step.
Be careful using sharp scissors and blades. Have a responsible adult nearby to help you if you need assistance.
When using a craft knife, a dull blade is more dangerous than a sharp blade. Replace the blade with a new one as soon as it becomes difficult to cut with.
Take your time and be patient!
•
•
•
•
•
•
•
•
•
•
•
Hubble Space TelescopePaper Model DirectionsDownloads, patterns, and other information at: www.hubblesite.org/go/model
Hubble Space Telescope Paper Model Directions Page �
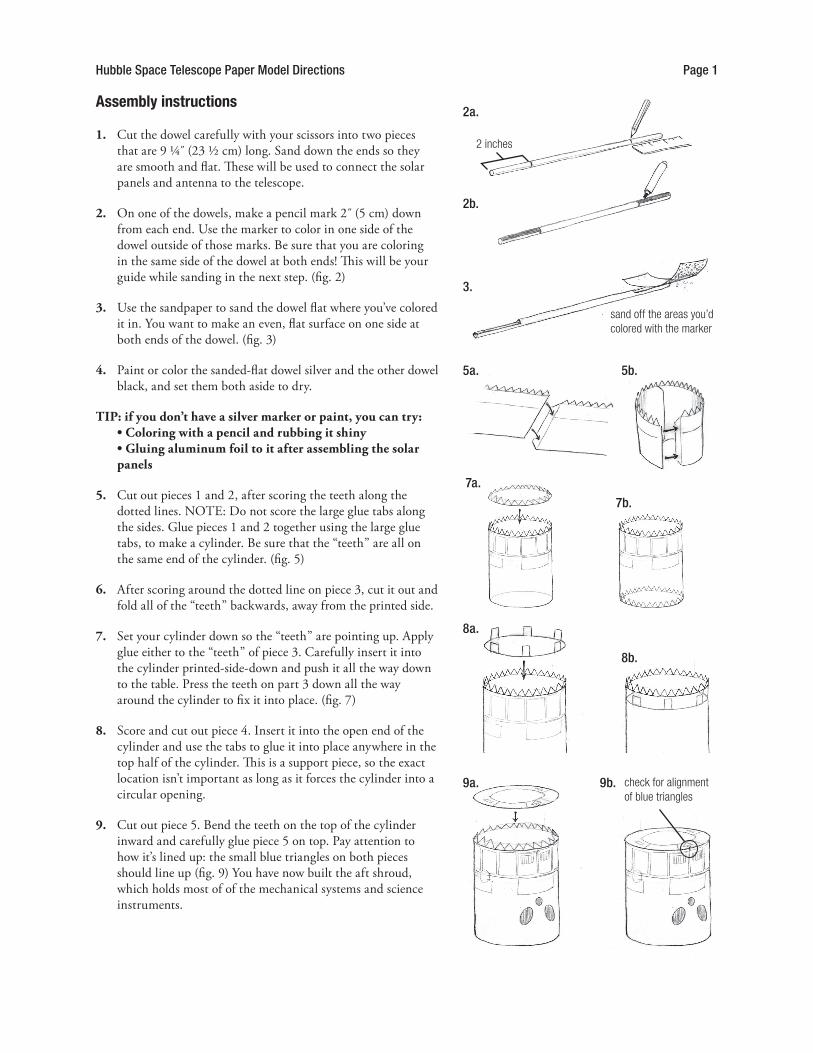
check for alignment of blue triangles
Assembly instructions
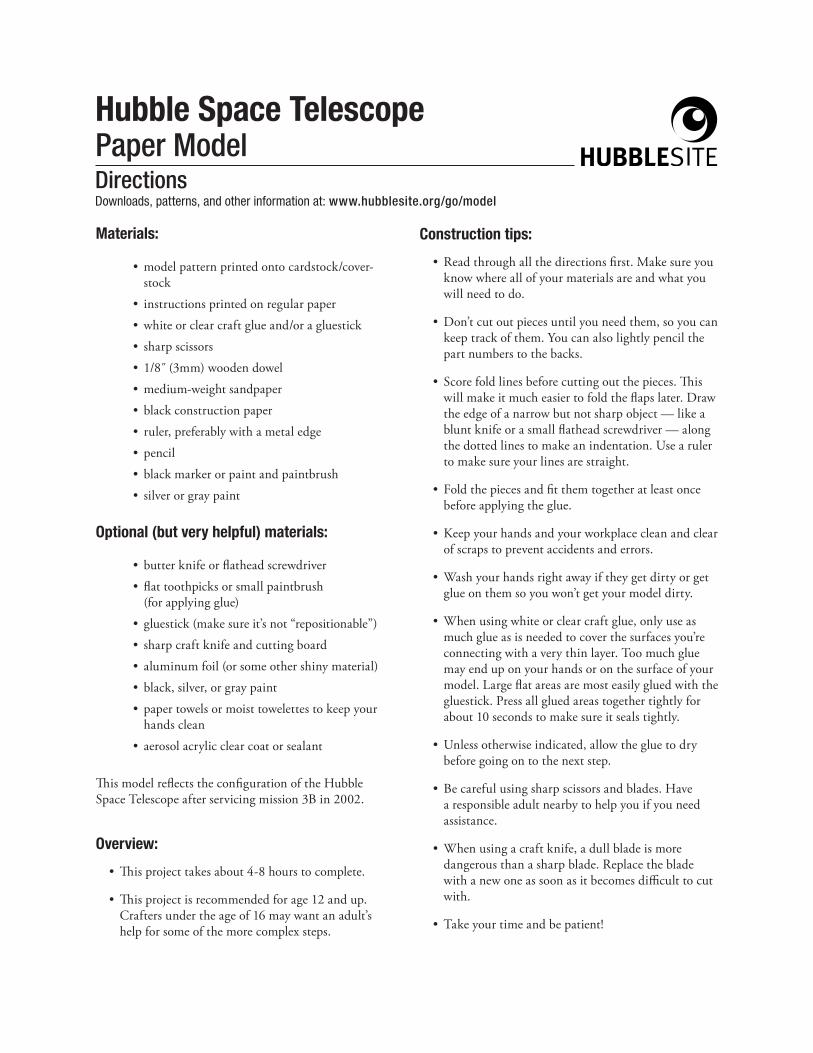
Cut the dowel carefully with your scissors into two pieces that are 9 1/4˝ (23 1/2 cm) long. Sand down the ends so they are smooth and flat. These will be used to connect the solar panels and antenna to the telescope.
On one of the dowels, make a pencil mark 2˝ (5 cm) down from each end. Use the marker to color in one side of the dowel outside of those marks. Be sure that you are coloring in the same side of the dowel at both ends! This will be your guide while sanding in the next step. (fig. 2)
Use the sandpaper to sand the dowel flat where you’ve colored it in. You want to make an even, flat surface on one side at both ends of the dowel. (fig. 3)
Paint or color the sanded-flat dowel silver and the other dowel black, and set them both aside to dry.
TIP: if you don’t have a silver marker or paint, you can try: • Coloring with a pencil and rubbing it shiny • Gluing aluminum foil to it after assembling the solar panels
Cut out pieces 1 and 2, after scoring the teeth along the dotted lines. NOTE: Do not score the large glue tabs along the sides. Glue pieces 1 and 2 together using the large glue tabs, to make a cylinder. Be sure that the “teeth” are all on the same end of the cylinder. (fig. 5)
After scoring around the dotted line on piece 3, cut it out and fold all of the “teeth” backwards, away from the printed side.
Set your cylinder down so the “teeth” are pointing up. Apply glue either to the “teeth” of piece 3. Carefully insert it into the cylinder printed-side-down and push it all the way down to the table. Press the teeth on part 3 down all the way around the cylinder to fix it into place. (fig. 7)
Score and cut out piece 4. Insert it into the open end of the cylinder and use the tabs to glue it into place anywhere in the top half of the cylinder. This is a support piece, so the exact location isn’t important as long as it forces the cylinder into a circular opening.
Cut out piece 5. Bend the teeth on the top of the cylinder inward and carefully glue piece 5 on top. Pay attention to how it’s lined up: the small blue triangles on both pieces should line up (fig. 9) You have now built the aft shroud, which holds most of of the mechanical systems and science instruments.
1.
2.
3.
4.
5.
6.
7.
8.
9.
2a.
5a. 5b.
7a.
8a.
9a.
3.
2b.
7b.
8b.
9b.
sand off the areas you’d colored with the marker
2 inches
Hubble Space Telescope Paper Model Directions Page 2
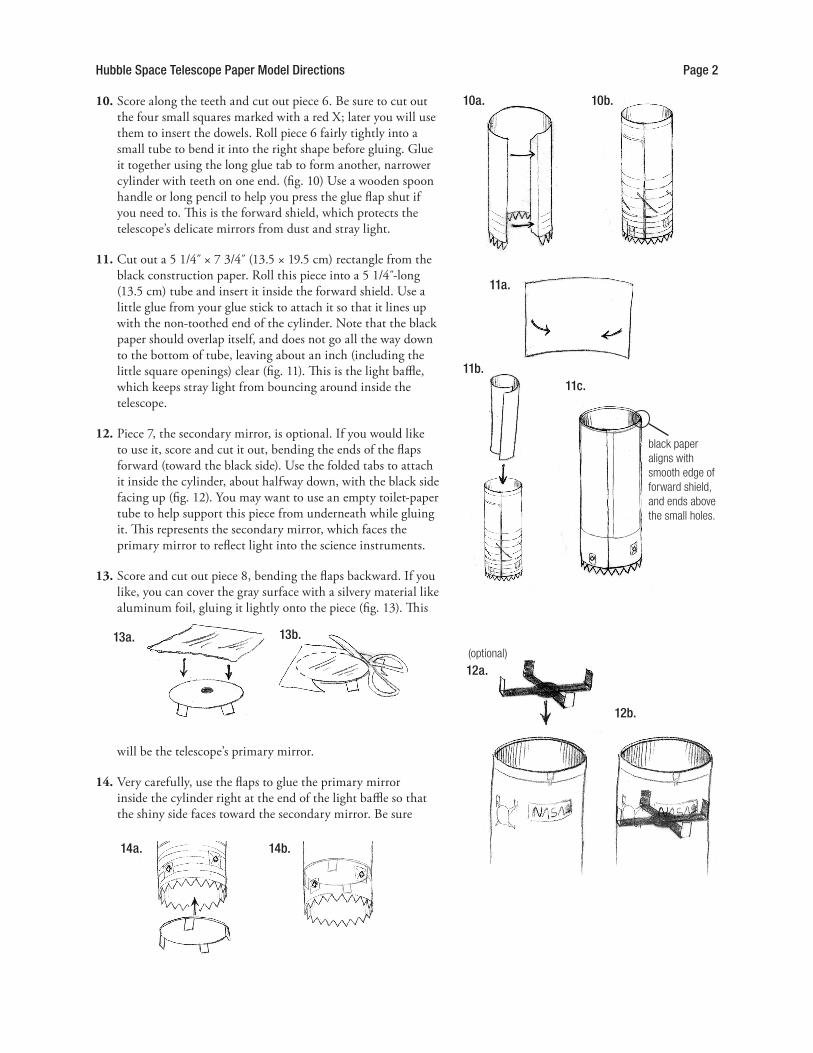
Score along the teeth and cut out piece 6. Be sure to cut out the four small squares marked with a red X; later you will use them to insert the dowels. Roll piece 6 fairly tightly into a small tube to bend it into the right shape before gluing. Glue it together using the long glue tab to form another, narrower cylinder with teeth on one end. (fig. 10) Use a wooden spoon handle or long pencil to help you press the glue flap shut if you need to. This is the forward shield, which protects the telescope’s delicate mirrors from dust and stray light.
Cut out a 5 1/4˝ × 7 3/4˝ (13.5 × 19.5 cm) rectangle from the black construction paper. Roll this piece into a 5 1/4˝-long (13.5 cm) tube and insert it inside the forward shield. Use a little glue from your glue stick to attach it so that it lines up with the non-toothed end of the cylinder. Note that the black paper should overlap itself, and does not go all the way down to the bottom of tube, leaving about an inch (including the little square openings) clear (fig. 11). This is the light baffle, which keeps stray light from bouncing around inside the telescope.
Piece 7, the secondary mirror, is optional. If you would like to use it, score and cut it out, bending the ends of the flaps forward (toward the black side). Use the folded tabs to attach it inside the cylinder, about halfway down, with the black side facing up (fig. 12). You may want to use an empty toilet-paper tube to help support this piece from underneath while gluing it. This represents the secondary mirror, which faces the primary mirror to reflect light into the science instruments.
Score and cut out piece 8, bending the flaps backward. If you like, you can cover the gray surface with a silvery material like aluminum foil, gluing it lightly onto the piece (fig. 13). This
will be the telescope’s primary mirror.
Very carefully, use the flaps to glue the primary mirror inside the cylinder right at the end of the light baffle so that the shiny side faces toward the secondary mirror. Be sure
10.
11.
12.
13.
14.
�0a.
��a.
(optional)�3a.
�4a.
�0b.
�2a.
�2b.
�3b.
�4b.
��b.��c.
black paper aligns with smooth edge of forward shield, and ends above the small holes.
Hubble Space Telescope Paper Model Directions Page 3
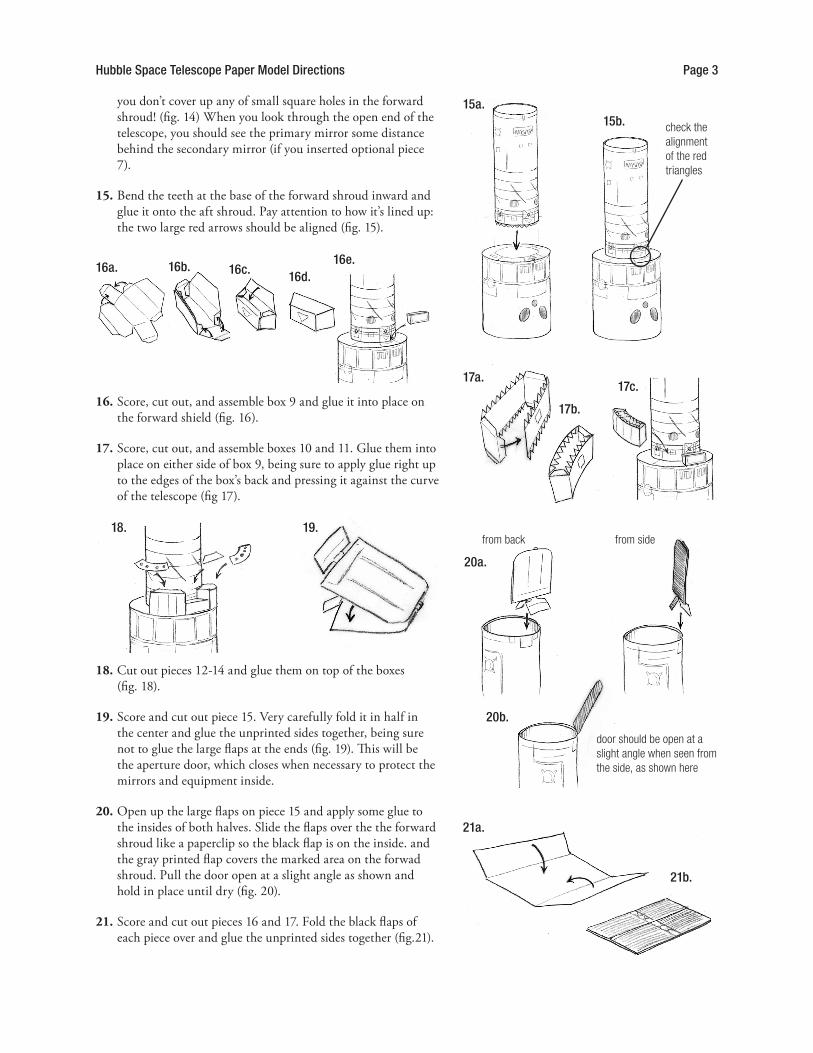
you don’t cover up any of small square holes in the forward shroud! (fig. 14) When you look through the open end of the telescope, you should see the primary mirror some distance behind the secondary mirror (if you inserted optional piece 7).
Bend the teeth at the base of the forward shroud inward and glue it onto the aft shroud. Pay attention to how it’s lined up: the two large red arrows should be aligned (fig. 15).
Score, cut out, and assemble box 9 and glue it into place on the forward shield (fig. 16).
Score, cut out, and assemble boxes 10 and 11. Glue them into place on either side of box 9, being sure to apply glue right up to the edges of the box’s back and pressing it against the curve of the telescope (fig 17).
Cut out pieces 12-14 and glue them on top of the boxes (fig. 18).
Score and cut out piece 15. Very carefully fold it in half in the center and glue the unprinted sides together, being sure not to glue the large flaps at the ends (fig. 19). This will be the aperture door, which closes when necessary to protect the mirrors and equipment inside.
Open up the large flaps on piece 15 and apply some glue to the insides of both halves. Slide the flaps over the the forward shroud like a paperclip so the black flap is on the inside. and the gray printed flap covers the marked area on the forwad shroud. Pull the door open at a slight angle as shown and hold in place until dry (fig. 20).
Score and cut out pieces 16 and 17. Fold the black flaps of each piece over and glue the unprinted sides together (fig.21).
15.
16.
17.
18.
19.
20.
21.
�5a.
�6a. �6b. �6c. �6d.�6e.
�7a.
�7b.
�7c.
�8. �9.
20a.
2�a.
�5b.
from side
20b.
2�b.
from back
check the alignment of the red triangles
door should be open at a slight angle when seen from the side, as shown here
Hubble Space Telescope Paper Model Directions Page 4
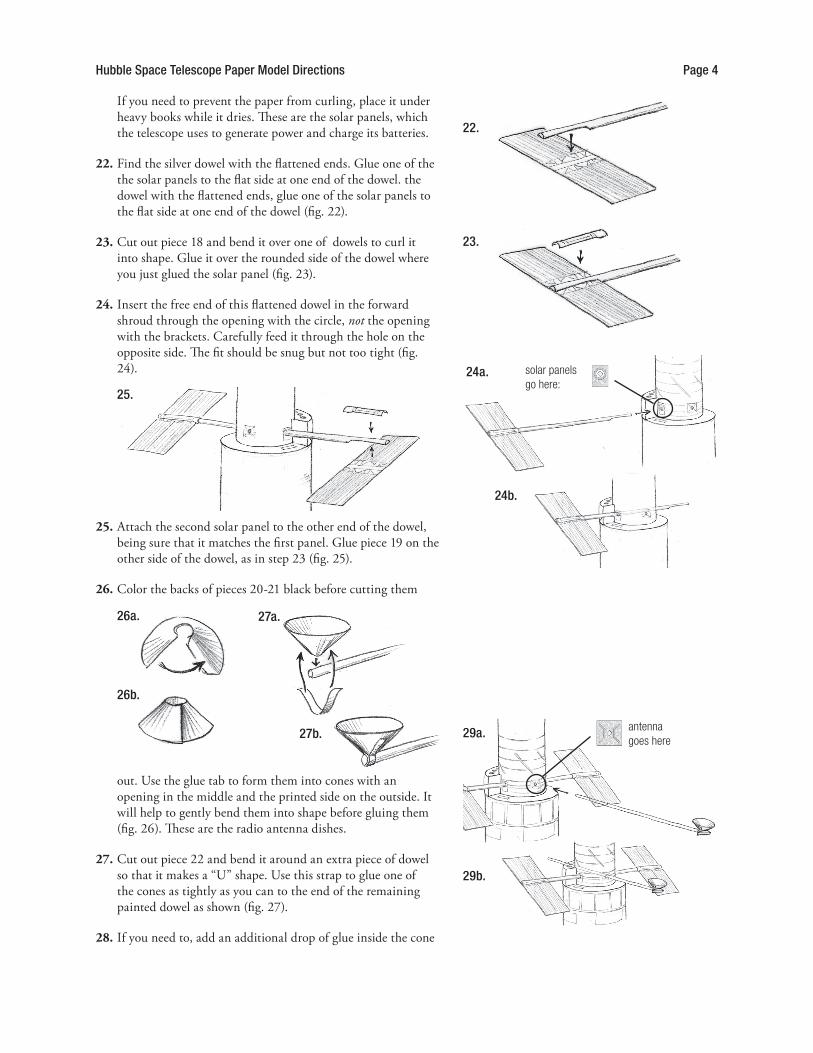
If you need to prevent the paper from curling, place it under heavy books while it dries. These are the solar panels, which the telescope uses to generate power and charge its batteries.
Find the silver dowel with the flattened ends. Glue one of the the solar panels to the flat side at one end of the dowel. the dowel with the flattened ends, glue one of the solar panels to the flat side at one end of the dowel (fig. 22).
Cut out piece 18 and bend it over one of dowels to curl it into shape. Glue it over the rounded side of the dowel where you just glued the solar panel (fig. 23).
Insert the free end of this flattened dowel in the forward shroud through the opening with the circle, not the opening with the brackets. Carefully feed it through the hole on the opposite side. The fit should be snug but not too tight (fig. 24).
Attach the second solar panel to the other end of the dowel, being sure that it matches the first panel. Glue piece 19 on the other side of the dowel, as in step 23 (fig. 25).
Color the backs of pieces 20-21 black before cutting them
out. Use the glue tab to form them into cones with an opening in the middle and the printed side on the outside. It will help to gently bend them into shape before gluing them (fig. 26). These are the radio antenna dishes.
Cut out piece 22 and bend it around an extra piece of dowel so that it makes a “U” shape. Use this strap to glue one of the cones as tightly as you can to the end of the remaining painted dowel as shown (fig. 27).
If you need to, add an additional drop of glue inside the cone
22.
23.
24.
25.
26.
27.
28.
solar panels go here:
22.
23.
24a.
25.
26a. 27a.
26b.
27b.
24b.
29a.
29b.
antenna goes here

Hubble Space Telescope Paper Model Directions Page 5
to help hold it in place.
Insert the free end of this dowel into the remaining openings on the forward shroud immediately above the row of boxes.
Carefully feed it through the hole on the opposite side (fig. 29).
Attach the second cone to the free end of the dowel with piece 23, just as you did in step 27. You may want to have them point in opposite directions (fig. 30). These are the radio antennae that the telescope uses for communication.
Fold piece 24 in half and glue it together, and do the same with piece 25. Glue them onto both ends of the dowel right under the radio dishes, with the grey triangle pointing toward the dish (fig. 31).
Make sure the dowels with the solar panels and radio dishes are centered. Your model is now ready for display!
If you like, you can spray your model with an aerosol acrylic clear coat or sealant, to protect it from fingerprints and dust. If you do so, be sure to follow all of the safety precautions on the can and spray in a well-ventilated area with proper protection for yourself and the sur-roundings.
29.
30.
31.
30. 3�a.
3�b.
3�c.
The finished model