digitization standards library, archives and...
TRANSCRIPT

LIBRARY, ARCHIVES AND DOCUMENTATION SERVICESKathleen Brosseau – Mylène Choquette – Louise RenaudVersion 1.1 – March 2006
Digitization Standardsfor the Canadian Museumof Civilization Corporation

Library and Archives Canada Cataloguing in Publication
Canadian Museum of CivilizationDigitization standards for the Canadian Museum of Civilization Corporation / Kathleen Brosseau, Mylène Choquette, Louise Renaud.
Text in English and French on inverted pages.Title on added t.p.: Normes de numérisation de la Société du musée canadien des civilisations.ISBN 0-662-49507-1Cat. no.: NM24-16/2006
1. Digital preservation—Standards—Canada. 2. Archival materials—Digitization. 3. Photographs—Digitization. 4. Photography of antiquities. 5. Museum conservation methods. I. Renaud, Louise, 1954- II. Brosseau, Kathleen III. Choquette, Mylène IV. Title.V. Title: Normes de numérisation de la Société du musée canadien des civilisations.
Z681.3.D53C36 2006 069’.52 C2006-980226-2E

INTRODUCTION . . . . . . . . . . . . . . . . . . . . . . . . . . . . . . . . . . . . . . . . . . . . . . . . 2
GENERAL GUIDELINES . . . . . . . . . . . . . . . . . . . . . . . . . . . . . . . . . . . . . . . . . . 3
TEXT DOCUMENTS . . . . . . . . . . . . . . . . . . . . . . . . . . . . . . . . . . . . . . . . . . . . . 71. Two-Dimensional Manuscripts or Artifacts 82. Black-and-White Printed Materials 93. Printed Materials with Photographs and/or Annotations 104. Onionskin, Rice Paper, Tracing Paper 115. Newspapers (Ink-Dot Printing) 12
PHOTOGRAPHIC DOCUMENTS . . . . . . . . . . . . . . . . . . . . . . . . . . . . . . . . 131. Photographs 142. Multiple Photographs 153. Black-and-White Negatives 164. Black-and-White Negatives with Multiple Images 175. Glass Negatives 186. Colour Negatives 197. Slides (35mm) 208. Colour Transparencies 219. Lantern Slides 22
ARTIFACT PHOTOGRAPHY . . . . . . . . . . . . . . . . . . . . . . . . . . . . . . . . . . . . . 231. Normal-Sized Artifacts 242. Reflective Artifacts 253. Small Artifacts 264. Round Artifacts 275. Artifacts with a Trademark, Seal, Signature or Hallmark 286. Long Artifacts in Supple Materials 297. Large Artifacts 308. Artifacts — Clothing Samples 319. Artifacts with Multiple Components 32
GLOSSARY . . . . . . . . . . . . . . . . . . . . . . . . . . . . . . . . . . . . . . . . . . . . . . . . . . . . . 33
Table of Contents
1

This document is intended as a working tool aimed at standardizing the digitization process at the Canadian Museum of CivilizationCorporation (CMCC).
It was created to address the Corporation’s requirements, within existingres ources, and uses actual examples illustrating the diversity of the collection. The artifact photographs presented here are used primarily fordocumentary purp oses, and do not represent the types of photographsdisplayed in publications.
The document is neither exhaustive nor final. It is, instead, a collection of basic guidelines, and will likely evolve as technology and knowledgedevelop within this field. The document is also not intended as a course in digitization. There are specialized tools which can provide much more comprehensive information than what is offered in these few pages. When in doubt, always refer to a specialist.
The overall information is based primarily on recommendations found inthe U.S. National Archives and Records Administration (NARA) document,Technical Guidelines for Digitizing Archival Materials for Electronic Access:Creation of Production Master Files — Raster Images, and on current practices at the Gatineau Preservation Centre — Library and ArchivesCanada (LAC).
Introduction
2INTRODUCTION
General Guidelines 1. TO CALCULATE THE NUMBER OF PIXELS PER INCH (PPI) FOR A STANDARD 8 X 10 IMAGE AT 300 PPI, USE THE FOLLOWING FORMULA: 3000 ÷ greatest length (in inches) = number of ppi, and digitize at 100%.Note that it is the original document which measures 8 x 10, not the final digital file.Examples:
• To digitize a document measuring 7 x 8.5 inches:3000 ÷ 8.5 = 352 (round off to 360 ppi).
• To digitize a 2 x 3 negative: 3000 ÷ 3 = 1000 ppi.
2. THE MAIN FILE FORMATS USED AT THE CMCC ARE:a) TIFF — the master file, and the archived final version of the image.b) JPEG — the surrogate file, used for circulation and consultation,
and the current image format attached to the catalogue record.
3. AT THE CMCC, THE DIMENSIONS OF IMAGE FILES IN JPEG FORMAT WILL VARY, DEPENDING ON THE NEEDS OF THE ARCHIVES OR COLLECTION MANAGEMENT SYSTEMS, OR BASED ON WEB REQUIREMENTS. THE USUAL STANDARDS ARE:
a) For text and photographic documents, the image is saved at _____ x 768 pixels
b) For documents with small characters, the image is saved at _____ x 1130 pixels.JPEG files are saved at 72 ppi, with the lower level of compression (level 12).
Note: The empty space, represented by the underlined blank (e.g., _____ x 768 pixels) is left open to accommodate variations in size. The number of pixels — 768 or 1130 — refers to the longest measurement of the document being digitized.
3GENERAL GUIDELINES

KODAK Q-14
4. WHEN BURNING IMAGES ONTO CD FOR DEPOSIT IN THE ARCHIVES: a) Use a good quality CD: CD-R, rather than CD-RW, with a reflective
gold coating (e.g., MAM-A CD-R Gold).b) Burn the CD at a slower speed (4X) to ensure a “deep” impression. c) Check that the information burned into the CD has been
effectively transferred. d) Use water-based ink markers.
5. WHEN CALIBRATING THE WHITE, GREY AND BLACK AREAS, REFER TO THE ADJACENT GRID TO COMPLY WITH THE LEVELS USED AT THE CMCC.Furthermore, to secure RGB variance on Kodak Q-14 colour and grey scales:
a) The reading of white from the Kodak scales must be made within a range of 5 pixels.
b) The data for each of the RGB channels must not vary by more than 3%.
Scales are useful for correcting a poor-quality digital image, or for batch digitization.
Note: When correction is necessary, do not save your changes on the original image. Instead, create a duplicate digital file and work on that version.
4GENERAL GUIDELINES
A VARIANCE OF 3%IS ACCEPTABLE
WHITE NEUTRAL GREY ( M) BLACK
Reference Levels 237-237-237 102-102-102 23-23-23
Recommended Levels 233 to 248 98 to 106 19 to 27
Levels Used for 233 to 248 145 to 155 30 to 40CMCC Collections

MACBETH SCALESAMPLES
KODAK Q-60
6. SCALE SAMPLES USED AT THE CMCC ARE:a) The Kodak Q-14, mainly used alongside the material being
digitized or photographed.b) The Kodak Q-60, used primarily for reference purposes.c) A homemade scale, based on the squares of the Kodak Q-14 scale, is
also used for smaller objects in the CMCC collection. It is important that the squares be identical in size to one another (squares of 1 cm 2 are recommended), and it is useful to include a reference measurement.
d) A small commercial white-grey-black scale, used for macro photography of artifacts.
Notes:a) The use of a detailed colour scale, such as MacBeth digital
colour checkers, may come in handy when working with specific types of media.
b) For reliability purpose, the scale used must be clean — without dust or stains.
7. DURING DIGITIZATION, IT IS IMPORTANT TO CHECK THE HISTOGRAM TO ENSURE THAT THE IMAGE IS NEITHER OVEREXPOSED NOR UNDEREXPOSED:The histogram shows the distribution of colour levels between the twoextremes — pure black (level 0) and pure white (level 255). It is sometimesnecessary, before saving the final digital image, to work with cursors within Photoshop® to optimize quality at both the black and white levels.
Note: It is best to make any corrections to the image on a duplicate digital file.
5GENERAL GUIDELINES
HISTOGRAM INDICATING ABALANCED EXPOSURE
HISTOGRAM INDICATING A POOR EXPOSURE

6GENERAL GUIDELINES
8. IN SOME INSTANCES, BATCH PROCESSING CAN BE CARRIED OUT. IT IS USED MAINLY WHEN:
a) The quality of the original material being digitized is of less importance; b) For consultative and visual reference purposes; andc) To correct a group of images with similar issues or problems.
Note: Should this method be used, it is important to remember that this process cannot provide an optimal digital rendering ofeach individual image.
If you opt for batch digitization, follow the steps below.• Digitize a colour scale before each digitization session. • Balance the RGB channels on the first image, as indicated in
the general guidelines above.• Save this data and apply the same ALV to all subsequent images.
9. WHEN SCANNING OR PHOTOGRAPHING ANY MATERIAL, THE MINIMAL REQUIREMENTS FOR WORKING AREAS ARE:
a) Hardware (scanner, camera, monitor, etc) must be calibrated on a regular basis.
b) Room wall colours should be neutral.c) Room lighting should be kept at the lowest level.d) Monitor should be protected from direct light to avoid reflections.e) Working area kept as dust-free as possible.
10. WHEN PHOTOGRAPHING ARTIFACTS, GENERAL PROCEDURES REQUIRE:
a) Using a regular lens (unless otherwise specified).b) Using a professional studio flash set-up, not the camera flash.
Reference: Technical Guidelines for Digitizing Archival Materials for Electronic Access: Creation of Production Master Files — Raster Images.U.S. National Archives and Records Administration (NARA), by Steven Puglia, Jeffrey Reed, and Erin Rhodes, June 2004. http://www.archives.gov/ preservation/technical/guidelines.pdf

7
1. Two-Dimensional Manuscripts or Artifacts2. Black-and-White Printed Materials3. Printed Materials with Photographs and/or Annotations4. Onionskin, Rice Paper, Tracing Paper5. Newspapers (Ink-Dot Printing)
Text Documents

8TEXT DOCUMENTS
Two-Dimensional Manuscripts or Artifacts
TYPE OF DOCUMENT
• This includes all original documents or artifacts which require faithful reproductionof the colour and/or texture of the materialand the information it contains.
• Examples: older manuscript on which youwant to show signs of aging and/or deterioration; annotated document; map;scale drawing; work on paper; birthdaycard/postcard; other.
REMARKS
• Keep a border around the document toallow reframing as well as later modifications (e.g., removing the scale and document number).
• Batch digitization enhances productivity, but does not offer optimal rendering of individual images.
• For documents larger than the surface of the digital scanner use the instructions fornormal-sized artifact photography.
• For documents with several pages, considerproducing a PDF document from the originals, or from black-and-white copies.
RECOMMENDATIONS
• 300 ppi, with a minimum of 3000 pixels for the longest measurement (8 x 10, or 1:1 for formats larger than 8 x 10).
• Refer to the general guidelines to calculate the number of ppi requiredfor a given dimension. Note that it is the original document whichmeasures 8 x 10, not the final digital file.
• Digitize in reflective mode. • Select 48-bit mode on the scanner to capture the maximum number of
colours. If this option is not available, 24-bit mode is acceptable. • For reference purposes, digitize a colour scale (Kodak Q-14 or Q-60)
before each digitization session.• Use a grey background. • Digitize the document with a grey or colour scale and, depending on
available space, always place it in the same position (ideally lower left). • Colour-balance each image as indicated in the general guidelines.
If there is no greyscale reference, balance the levels of white inthe brightest zone (D-Max), then balance the black in the darkestzone (D-Min).
• Enlarge the frame by one inch at the bottom, and type the documentnumber in black at the lower right (font: Arial, 40 pts.).
• Flatten the image (i.e., flatten layers).• Convert in Adobe RGB 1998 profile, 8 bits per channel (total 24 bits).• Save the image as an uncompressed TIFF, named to standards
established by the Corporation’s Photo Archives. • Produce a JPEG version as described in the general guidelines.
EXAMPLES
1.
CD2004-1610-MU-C-5-1-3

9TEXT DOCUMENTS
Black-and-White Printed Materials
TYPE OF DOCUMENT
• Includes relatively recent documents, blackon white, without annotations, withoutimages, with clear print, with sharp contrastbetween the ink and the paper, and onpaper that is neither yellowed nor stained.
• Examples: book; document printed on a laser or inkjet printer.
REMARKS
• Keep a border around the document toallow reframing as well as later modifications (e.g., removing the scale and document number).
• Batch digitization enhances productivity, but does not offer optimal rendering of individual images.
• For documents larger than the surface of the digital scanner, use the instructions fornormal-sized artifact photography.
• For documents with several pages, considerproducing a PDF document from the originals, or from black-and-white copies.
RECOMMENDATIONS
• 300 ppi, with a minimum of 3000 pixels for the longest measurement (8 x 10, or 1:1 for formats larger than 8 x 10).
• Refer to the general guidelines to calculate the number of ppi requiredfor a given dimension. Note that it is the original document whichmeasures 8 x 10, not the final digital file.
• Digitize in reflective mode.• For reference purposes, digitize a colour scale (Kodak Q-14 or Q-60)
before each digitization session. • Use a grey background.• Digitize the document with a grey or colour scale and, depending on
available space, always place it in the same location (ideally lower left). • Colour-balance each image as indicated in the general guidelines.
If there is no greyscale reference, balance the levels of white in thebrightest zone (D-Max), then balance the black in the darkest zone (D-Min).
• Enlarge the frame by one inch at the bottom, and type the documentnumber in black at the lower right (font: Arial, 40 pts.).
• Flatten the image (i.e., flatten layers).• Convert in greyscale profile “Gray Gamma” 2.2, 8 bits. • Save the image as an uncompressed TIFF, named to standards
established by the Corporation’s Photo Archives. • Produce a JPEG version as described in the general guidelines.
EXAMPLES
2.
CD2005-0935-E2005-01552

10TEXT DOCUMENTS
Printed Material with Photographs and/or Annotations
TYPE OF DOCUMENT
• These documents are similar to thosedescribed previously, but have distinctivemarkings that may be useful to see in colour.
• Examples: book whose aging you want toshow; book with colour or leadpencil annotations.
REMARKS
• For this type of document, digitization canbe combined by alternating use of the greyand colour scales. For example, in a bookhaving text pages with illustrations or photos, digitize the text pages using theguidelines for greyscale, and digitize thepages with illustrations using the guidelines for RGB.
• Keep a border around the document toallow reframing as well as later modifications (e.g., removing the scale and document number).
• Batch digitization enhances productivity, but does not offer optimal rendering ofindividual images.
• For documents larger than the surface ofthe digital scanner use the instructions fornormal-sized artifact photography.
• For documents with several pages, considerproducing a PDF document from theoriginals, or from black-and-white copies.
RECOMMENDATIONS
• 300 ppi, with a minimum of 3000 pixels for the longest dimension (8 x 10, or 1:1 for formats larger than 8 x 10).
• Refer to the general guidelines to calculate the number of ppi requiredfor a given dimension. Note that it is the original document whichmeasures 8 x 10, not the final digital file.
• Digitize in reflective mode. • Select 48-bit mode on the scanner to capture the maximum number of
colours. If this option is not available, 24-bit mode is acceptable. • For reference purposes, digitize a colour scale (Kodak Q-14 or Q-60)
before each digitization session. • Use a grey background. • Digitize the document with a grey or colour scale and, depending on
available space, always place it in the same location (ideally lower left). • Colour-balance each image as indicated in the general guidelines.
If there is no greyscale reference, balance the levels of white in the brightest zone (D-Max), then balance the black in the darkest zone (D-Min).
• Enlarge the frame by one inch at the bottom, and type the documentnumber in black at the lower right (font: Arial, 40 pts.).
• Flatten the image (i.e., flatten layers).• Convert in Adobe RGB 1998 profile, 8 bits per channel (total 24 bits). • Save the image as an uncompressed TIFF, named to standards
established by the Corporation’s Photo Archives. • Produce a JPEG version as described in the general guidelines.
EXAMPLES
3.
CD2005-0957-E2005-02445

11TEXT DOCUMENTS
Onionskin, Rice Paper, Tracing Paper
TYPE OF DOCUMENT
• All documents with notable transparencyand/or a glossy finish.
• Example: duplicate copy of correspondence.
NOTES
• To optimize results, do a test before applyingthese recommendations.
REMARKS
• You can choose to digitize in reflective modealone by applying the guidelines forgreyscale. Since this mode enables betterreproduction of text, it is recommended forall documents that are either difficult to read or have poor contrast.
• Keep a border around the document toallow reframing as well as later modifications (e.g., removing the scale and document number).
• For documents larger than the surface of the digital scanner, use the instructions fornormal-sized artifact photography.
• For documents with several pages, considerproducing a PDF document from the originals, or from black-and-white copies.
RECOMMENDATIONS
• Because of the transparency of the document, and because the greybackground will bleed through, digitize the document twice using awhite background: once in reflective mode, then in transparency modeat 300 ppi, with a minimum of 3000 pixels for the longest dimensions(8 x 10, or 1:1 for formats larger than 8 x 10).
• Refer to the general guidelines to calculate the number of ppi requiredfor a given dimension. Note that it is the original document whichmeasures 8 x 10, not the final digital file.
• Select 48-bit mode on the scanner to capture the maximum number ofcolours. If this option is not available, 24-bit mode is acceptable.
• For reference purposes, digitize a colour scale (Kodak Q-14 or Q-60)before each digitization session, to calibrate the equipment.
• In reflective mode only, digitize the document with a grey or colourscale and, depending on available space, always place the scale in thesame location (ideally lower left).
• Colour-balance each image as indicated in the general guidelines. If there is no greyscale reference, balance the levels of white in thebrightest zone (D-Max), then balance the black in the darkest zone (D-Min).
• Enlarge the frame by one inch at the bottom, and type the documentnumber in black at the lower right (font: Arial, 40 pts.).
• Flatten the image (i.e., flatten layers).• Convert both files in Adobe RGB 1998 profile, 8 bits per channel
(total 24 bits), or if the document is black-and-white, convert in “Gray Gamma” 2.2, 8 bits.
• Save the image as an uncompressed TIFF, named to standards established by the Corporation’s Photo Archives.
• Produce a JPEG version as described in the general guidelines.
EXAMPLES
4.
REFLECTIVE MODE CD2004-0008-B322-17-1
TRANSPARENCY MODE D2006-05007

12TEXT DOCUMENTS
Newspapers (Ink-Dot Printing)
TYPE OF DOCUMENT
• Examples: newspaper; magazine; stamp.
PROCEDURES
• Digitize in de-screening mode. This will helpminimize the moiré pattern which resultsfrom scans of ink-dot printing.
• When it is necessary to cut out an articlefrom the rest of the newspaper, create anoutline of the article in question, invert your selection, then fill the remainingsurface with white or 50% grey.
RECOMMENDATIONS
• 300 ppi, with a minimum of 3000 pixels for the longest dimension (8 x 10, or 1:1 for formats larger than 8 x 10).
• Refer to the general guidelines to calculate the number of ppi requiredfor a given dimension. Note that it is the original document whichmeasures 8 x 10, not the final digital file.
• Digitize in reflective mode.• Select 48-bit mode on the scanner to capture the maximum number of
colours. If this option is not available, 24-bit mode is acceptable. • For reference purposes, digitize a colour scale (Kodak Q-14 or Q-60)
before each digitization session. • Use a grey background. • Digitize the document with a grey or colour scale and, depending on
available space, always place it in the same location (ideally lower left). • Colour-balance each image as indicated in the general guidelines.
If there is no greyscale reference, balance the levels of white in the brightest zone (D-Max), then balance the black in the darkest zone (D-Min).
• Enlarge the frame by one inch at the bottom, and type the documentnumber in black at the lower right (font: Arial, 40 pts.).
• Flatten the image (i.e., flatten layers).• Convert in Adobe RGB 1998 profile, 8 bits per channel (total 24 bits).
If the document is black-and-white, save in “Gray Gamma” 2.2, 8 bits.• Save the image as an uncompressed TIFF, named to standards
established by the Corporation’s Photo Archives. • Produce a JPEG version as described in the general guidelines.
EXAMPLES
5.
CD2005-0855-E2005-00880
CD2005-0957-E2005-02446

13
1. Photographs2. Multiple Photographs3. Black-and-White Negatives4. Black-and-White Negatives with Multiple Images5. Glass Negatives6. Colour Negatives7. Slides (35mm)8. Colour Transparencies9. Lantern Slides
Photographic Documents

14PHOTOGRAPHIC DOCUMENTS
Photographs
TYPE OF DOCUMENT
• Includes all photographic prints: black-and-white, monochromatic, or colour.
• Examples: black-and-white print; colour print; sepia print; ferrotype;ambrotype; daguerreotype; other.
REMARKS
• Keep a border around the document toallow reframing as well as later modifications (e.g., removing the scale and document number).
• Batch digitization enhances productivity, but does not offer optimal rendering of individual images.
• For documents larger than the surface of the digital scanner, use the instructions fornormal-sized artifact photography.
RECOMMENDATIONS
• 300 ppi, with a minimum of 3000 pixels for the longest dimension (8 x 10, or 1:1 for formats larger than 8 x 10).
• Refer to the general guidelines to calculate the number of ppi requiredfor a given dimension. Note that it is the original document whichmeasures 8 x 10, not the final digital file.
• Digitize in reflective mode. • Select 48-bit mode on the scanner to capture the maximum number of
colours. If this option is not available, 24-bit mode is acceptable.• As a point of reference, digitize a colour scale (Kodak Q-14 or Q-60)
before each digitization session. • Use a grey background. • Digitize the document with a grey or colour scale and, depending on
available space, always place it in the same location (ideally lower left). • Colour-balance each image as indicated in the general guidelines.
If there is no greyscale reference, balance the levels of white in the brightest zone (D-Max), then balance the black in the darkest zone (D-Min).
• Enlarge the frame by one inch at the bottom, and type the documentnumber in black at the lower right (font: Arial, 40 pts.).
• Flatten the image (i.e., flatten layers).• Convert in Adobe RGB 1998 profile, 8 bits per channel (total 24 bits),
or if the document is black-and-white, convert in “Gray Gamma” 2.2, 8 bits. • Save the image as an uncompressed TIFF, named to standards
established by the Corporation’s Photo Archives. • Produce a JPEG version as described in the general guidelines.
EXAMPLES
1.
CD2004-1610-MU-VM-88-863
CD2004-1610-MU-VM-88-859

15PHOTOGRAPHIC DOCUMENTS
Multiple Photographs
TYPE OF DOCUMENT
• Prints with more than one image.• Examples: stereograph; photograph
on cardboard (more than one photo).
NOTES
• Digitize at a higher resolution to ensure asufficient number of pixels when viewingeach individual image.
REMARKS
• Keep a border around the document toallow reframing as well as later modifications (e.g., removing the scale and document number).
• Batch digitization enhances productivity, but does not offer optimal rendering of individual images.
RECOMMENDATIONS
• 600 ppi, with a minimum of 6000 pixels for the longest dimension (8 x 10, or 1:1 for formats larger than 8 x 10).
• Refer to the general guidelines to calculate the number of ppi requiredfor a given dimension. Note that it is the original document whichmeasures 8 x 10, not the final digital file.
• Digitize in reflective mode. • Select 48-bit mode on the scanner to capture the maximum number of
colours. If this option is not available, 24-bit mode is acceptable. • As a point of reference, digitize a colour scale (Kodak Q-14 or Q-60)
before each digitization session. • Use a grey background.• Digitize the document with a grey or colour scale and, depending on
available space, always place it in the same location (ideally lower left). • Colour-balance each image as indicated in the general guidelines.
If there is no greyscale reference, balance the levels of white in the brightest zone (D-Max), then balance the black in the darkest zone (D-Min).
• Enlarge the frame by one inch at the bottom, and type the documentnumber in black at the lower right (font: Arial, 40 pts.).
• Flatten the image (i.e., flatten layers).• Convert in Adobe RGB 1998 profile, 8 bits per channel (total 24 bits).• Save the image as an uncompressed TIFF, named to standards
established by the Corporation’s Photo Archives. • Produce a JPEG version as described in the general guidelines.
EXAMPLES
2.
CD2004-1765-B569-5-2

16PHOTOGRAPHIC DOCUMENTS
Black-and-White Negatives
NOTES
• Placement of a negative’s emulsion sidevaries from one scanner to another. Toensure that the emulsion is against the proper face of the optical reader, follow individual scanner guidelines.
• Do test scans whenever possible.Dep end ing on the quality of the negative,it is sometimes preferable to digitize as a posi tive, and then invert the imageusing image-processing software (e.g., Photoshop® ).
• Concentric ring patterns (dark and brightbands) may appear while scanning negatives. These patterns are called“Newton’s Rings”, and are caused by theinteraction of light waves reflecting on twoglossy surfaces — one convex and one flat— and the air pockets between them.
• Possible ways to avoid them: a) use a mount to raise the negative, thus avoidingcontact with the scanner glass. b) insert ananti-Newton’s ring sheet between the negative and the scanner glass.
REMARKS
• Keep a border around the document toallow reframing as well as later modifications.
• The technician must verify the final image by comparing the original negative with thedigitized version.
RECOMMENDATIONS
• 300 ppi, with a minimum of 3000 pixels for the longest measurement (8 x 10, or 1:1 for formats larger than 8 x 10).
• Refer to the general guidelines to calculate the number of ppi requiredfor a given dimension. Note that it is the original document whichmeasures 8 x 10, not the final digital file.
• Digitize in transparency mode. • As a point of reference, digitize a transparent greyscale (on film) before
each digitization session, to calibrate the equipment. • Digitize as a positive, and then invert the image with image-processing
software (e.g., Photoshop® ).• If the negative allows, reframe the image in a way which preserves the
border and any notations found there. • Balance the levels of white in the brightest zone (D-Max), then balance
the black in the darkest zone (D-Min). • Convert in greyscale profile “Gray Gamma” 2.2, 8 bits. • Save the image as an uncompressed TIFF, named to standards
established by the Corporation’s Photo Archives. • Produce a JPEG version as described in the general guidelines.
EXAMPLES
3.
ORIGINAL CD2002-129-031
REVERSED AND REFRAMED CD2002-129-031

17PHOTOGRAPHIC DOCUMENTS
Black-and-White Negatives with Multiple Images
NOTES
• Placement of a negative’s emulsion sidevaries from one scanner to another. Toensure that the emulsion is against the proper face of the optical reader, followindividual scanner guidelines.
• Digitize at a higher resolution to ensure asufficient number of pixels when viewingeach individual image.
• Do test scans if possible. Depending on thequality of the negative, it is sometimespreferable to digitize as a positive, and theninvert the image with image-processing software (e.g., Photoshop® ).
• Concentric ring patterns (dark and brightbands) may appear while scanning negatives. These patterns are called“Newton’s Rings”, and are caused by theinteraction of light waves reflecting on twoglossy surfaces — one convex and one flat— and the air pockets between them.
• Possible ways to avoid them: a) use amount to raise the negative, thus avoidingcontact with the scanner glass. b) insert ananti-Newton’s ring sheet between thenegative and the scanner glass.
REMARKS
• Keep a border around the document toallow reframing as well as later modifications.
• The technician must verify the final image by comparing the original negative with thedigitized version.
RECOMMENDATIONS
• 600 ppi, with a minimum of 6000 pixels for the longest measurement (8 x 10 or 1:1 for formats larger than 8 x 10).
• Refer to general guidelines to calculate the number of ppi necessary forthe dimension of the document being digitized. Note that it is the original document which measures 8 x 10, not the final digital file.
• Digitize in transparency mode. • As a point of reference, digitize a transparent greyscale (on film) before
each digitization session. • Digitize as a positive, and then invert the image with image-processing
software (e.g., Photoshop® ). • If the negative allows, reframe the image in a way which preserves the
border and any notations found there. • Balance the white levels in the lightest zone (D-Max) and then balance
the black in the darkest zone (D-Min). • Convert in greyscale profile “Gray Gamma” 2.2, 8 bits. • Save the image as an uncompressed TIFF, named to standards
established by the Corporation’s Photo Archives. • Produce a JPEG version as described in the general guidelines.
EXAMPLES
4.
ORIGINAL CD2002-1122-62100-5
REVERSED AND NOT REFRAMED, TOPRESERVE INFORMATION IN THE MARGINS
CD2002-1122-62100-5
18PHOTOGRAPHIC DOCUMENTS
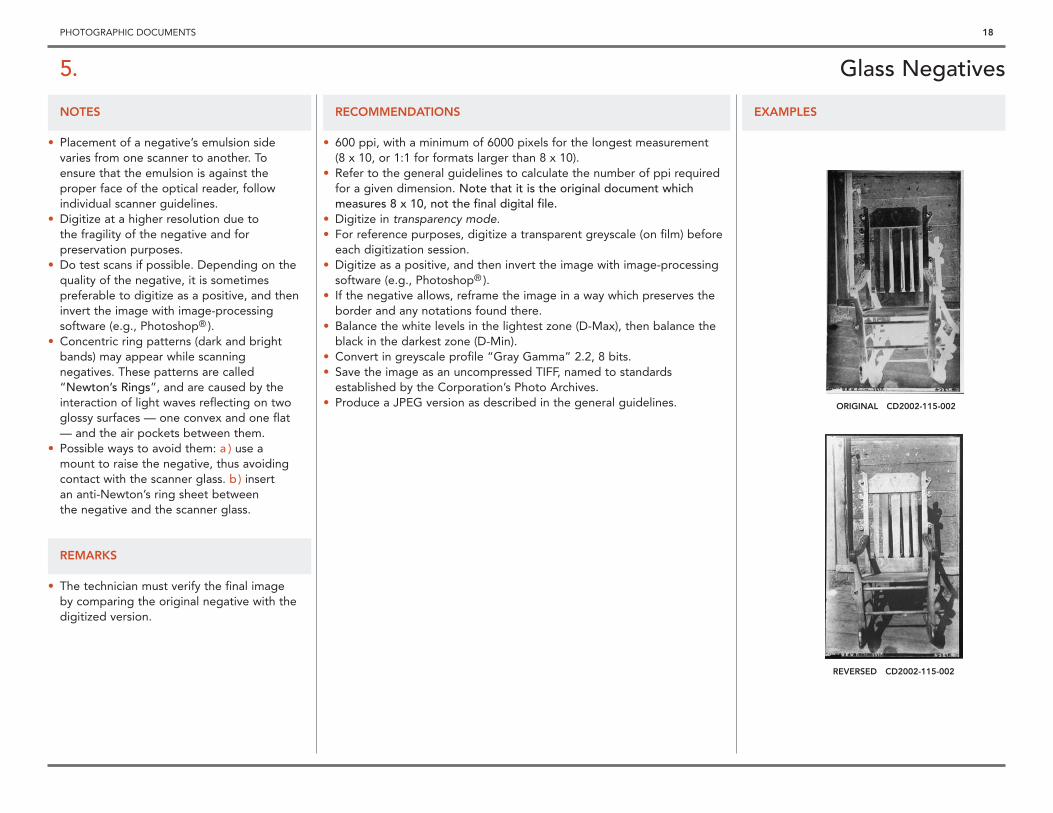
Glass Negatives
NOTES
• Placement of a negative’s emulsion sidevaries from one scanner to another. Toensure that the emulsion is against the proper face of the optical reader, followindividual scanner guidelines.
• Digitize at a higher resolution due to the fragility of the negative and for preservation purposes.
• Do test scans if possible. Depending on thequality of the negative, it is sometimespreferable to digitize as a positive, and theninvert the image with image-processing software (e.g., Photoshop® ).
• Concentric ring patterns (dark and brightbands) may appear while scanning negatives. These patterns are called“Newton’s Rings”, and are caused by theinteraction of light waves reflecting on twoglossy surfaces — one convex and one flat— and the air pockets between them.
• Possible ways to avoid them: a ) use a mount to raise the negative, thus avoidingcontact with the scanner glass. b) insert an anti-Newton’s ring sheet between the negative and the scanner glass.
REMARKS
• The technician must verify the final image by comparing the original negative with thedigitized version.
RECOMMENDATIONS
• 600 ppi, with a minimum of 6000 pixels for the longest measurement (8 x 10, or 1:1 for formats larger than 8 x 10).
• Refer to the general guidelines to calculate the number of ppi requiredfor a given dimension. Note that it is the original document whichmeasures 8 x 10, not the final digital file.
• Digitize in transparency mode. • For reference purposes, digitize a transparent greyscale (on film) before
each digitization session. • Digitize as a positive, and then invert the image with image-processing
software (e.g., Photoshop® ). • If the negative allows, reframe the image in a way which preserves the
border and any notations found there. • Balance the white levels in the lightest zone (D-Max), then balance the
black in the darkest zone (D-Min). • Convert in greyscale profile “Gray Gamma” 2.2, 8 bits. • Save the image as an uncompressed TIFF, named to standards
established by the Corporation’s Photo Archives. • Produce a JPEG version as described in the general guidelines.
EXAMPLES
5.
ORIGINAL CD2002-115-002
REVERSED CD2002-115-002

19PHOTOGRAPHIC DOCUMENTS
Colour Negatives
NOTES
• Placement of a negative’s emulsion sidevaries from one scanner to another. Toensure that the emulsion is against the proper face of the optical reader, followindividual scanner guidelines.
• Do test scans if possible. Depending on thequality of the negative, it is sometimespreferable to digitize as a positive, and theninvert the image with image-processing software (e.g., Photoshop® ).
• Concentric ring patterns (dark and brightbands) may appear while scanning negatives. These patterns are called“Newton’s Rings”, and are caused by theinteraction of light waves reflecting on twoglossy surfaces — one convex and one flat— and the air pockets between them.
• Possible ways to avoid them: a ) use a mount to raise the negative, thus avoidingcontact with the scanner glass. b) insert ananti-Newton’s ring sheet between the negative and the scanner glass.
REMARKS
• The technician must verify the final image by comparing the original negative with thedigitized version.
RECOMMENDATIONS
• 300 ppi, with a minimum of 3000 pixels for the longest measurement (8 x 10, or 1:1 for formats larger than 8 x 10).
• Refer to the general guidelines to calculate the number of ppi requiredfor a given dimension. Note that it is the original document whichmeasures 8 x 10, not the final digital file.
• Digitize in transparency mode. • For reference purposes, digitize a transparent colour scale (on film)
before each digitization session. • Digitize as a positive, and then invert the image with image-processing
software (e.g., Photoshop® ). • If the negative allows, reframe the image to preserve the border and
any notations found there. • Balance the white levels in the whitest zone (D-Max), then balance the
black in the blackest zone (D-Min). • Convert in Adobe RGB 1998 profile, 8 bits per channel (total 24 bits). • Save the image as an uncompressed TIFF, named to standards
established by the Corporation’s Photo Archives. • Produce a JPEG version as described in the general guidelines.
PROCEDURES
• Verify the film type. If the scanner offers this option, select the appropriate film profile and apply it to the digitization session.
• Ideally, the colour scale used should be identical to the film type (e.g., Fuji film digitized using a Fuji scale).
• If the type of film is unknown, do test scans to optimize the digital rendering of the image.
EXAMPLES
6.
ORIGINAL CD98-11-045
REVERSED CD98-11-045

20PHOTOGRAPHIC DOCUMENTS
Slides (35mm)
NOTES
• Placement of the emulsion side varies fromone scanner to another. To ensure that it isagainst the proper face of the optical reader,follow individual scanner guidelines.
REMARKS
• The technician must verify the final image by comparing the original slide with the digitized version.
• Batch digitization enhances productivity, but does not offer optimal rendering ofindividual images.
RECOMMENDATIONS
• 300 ppi, with a minimum of 3000 pixels for the longest measurement (8 x 10, or 1:1 for formats larger than 8 x 10).
• Refer to the general guidelines to calculate the number of ppi requiredfor a given dimension. Note that it is the original document whichmeasures 8 x 10, not the final digital file.
• Digitize in transparency mode. • For reference purposes, digitize a transparent colour scale (on film)
before each digitization session.• If the slide allows, reframe the image in a way which preserves the
border and any notations found there. • Balance the white levels in the whitest zone (D-Max), then balance the
black in the blackest zone (D-Min). • Convert in Adobe RGB 1998 profile, 8 bits per channel (total 24 bits). • Save the image as an uncompressed TIFF, named to standards
established by the Corporation’s Photo Archives. • Produce a JPEG version as described in the general guidelines.
PROCEDURES
• Verify the film type. If the scanner offers this option, select the appropriate film profile and apply it to the digitization session.
• Ideally, the colour scale used should be identical to the film type(e.g., Fuji film digitized using a Fuji scale).
• If the type of film is unknown, do test scans to optimize the digitalrendering of the image.
• Do not scan the slide mount. However, if valuable information isinscribed on it, follow the Lantern Slide procedures and remarks.
EXAMPLES
7.
CD2003-0606-S2001-5973

21PHOTOGRAPHIC DOCUMENTS
Colour Transparencies
TYPE OF DOCUMENT
• Slides larger than 35 mm; e.g., 120 mm, 4 x 5, 8 x 10, etc.
NOTES
• Placement of the emulsion side varies fromone scanner to another. To ensure that it isagainst the proper face of the optical reader,follow individual scanner guidelines.
• Concentric ring patterns (dark and brightbands) may appear while scanning transparencies. These patterns are called“Newton’s Rings”, and are caused by theinteraction of light waves reflecting on twoglossy surfaces — one convex and one flat— and the air pockets between them.
• Possible ways to avoid them: a ) use a mount to raise the negative, thus avoidingcontact with the scanner glass. b) insert an anti-Newton’s ring sheet between the negative and the scanner glass.
REMARKS
• The technician must verify the final image by comparing the original transparencywith the digitized version.
• Batch digitization enhances productivity, but does not offer optimal rendering ofindividual images.
RECOMMENDATIONS
• 300 ppi, with a minimum of 3000 pixels for the longest measurement (8 x 10, or 1:1 for formats larger than 8 x 10).
• Refer to the general guidelines to calculate the number of ppi requiredfor a given dimension. Note that it is the original document whichmeasures 8 x 10, not the final digital file.
• Digitize in transparency mode. • For reference purposes, digitize a transparent colour scale (on film)
before each digitization session.• If the transparency allows, reframe the image in a way which preserves
the border and any notations found there. • Balance the white levels in the whitest zone (D-Max), then balance the
black in the blackest zone (D-Min). • Convert in Adobe RGB 1998 profile, 8 bits per channel (total 24 bits). • Save the image as an uncompressed TIFF, named to standards
established by the Corporation’s Photo Archives. • Produce a JPEG version as described in the general guidelines.
PROCEDURES
• Verify the film type. If the scanner offers this option, select the appropriate film profile and apply it to the digitization session.
• Ideally, the colour scale used should be identical to the film type (e.g., Fuji film digitized using a Fuji scale).
• If the type of film is unknown, do test scans to optimize the digitalrendering of the image.
EXAMPLES
8.
CD94-685-006

22PHOTOGRAPHIC DOCUMENTS
Lantern Slides
NOTES
• Digitize at high resolution due to the fragility of lantern slides, and for preservation purposes.
• Concentric ring patterns (dark and brightbands) may appear while scanninglantern slides. These patterns are called “Newton’s Rings”, and are caused by theinteraction of light waves reflecting on twoglossy surfaces — one convex and one flat— and the air pockets between them.
• Possible ways to avoid them: a ) use a mount to raise the negative, thus avoidingcontact with the scanner glass. b) insert an anti-Newton’s ring sheet between the negative and the scanner glass.
REMARKS
• The technician must verify the final image by comparing the original lantern slide withthe digitized version.
• Batch digitization enhances productivity, but does not offer optimal rendering ofindividual images.
• If digitization is meant to emphasize theinformation on the slide’s frame, it is recommended that a second digitization ofthe slide be done, this time in reflective mode.The frame is thus considered a document,with digitization carried out according toinstructions for two-dimensional manuscriptsor artifacts.
RECOMMENDATIONS
• 600 ppi, with a minimum of 6000 pixels for the longest measurement (8 x 10, or 1:1 for formats larger than 8 x 10).
• Refer to the general guidelines to calculate the number of ppi requiredfor a given dimension. Note that it is the original document whichmeasures 8 x 10, not the final digital file.
• Digitize in transparency mode. • For reference purposes, digitize a transparent colour scale (on film)
before each digitization session.• If the slide allows, reframe the image in a way which preserves the
border and any notations found there. • If it is a black-and-white lantern slide, apply the same procedures as
for glass negatives.• Balance the white levels in the whitest zone (D-Max), then balance
the black in the blackest zone (D-Min). • Convert in Adobe RGB 1998 profile, 8 bits per channel (total 24 bits). • Save the image as an uncompressed TIFF, named to standards
established by the Corporation’s Photo Archives. • Produce a JPEG version as described in the general guidelines.
PROCEDURES
• Include the frame of the slide to capture all the information inscribedon it during digitization.
• By playing with the levels in Photoshop® , it is possible to highlighteither the image or the notations on the frame.
EXAMPLES
9.
LANTERN SLIDE WITHEMPHASIS ON THE IMAGE
CD2003-0523-51166 LS
SAME LANTERN SLIDE WITH DIFFERENTSATURATION LEVELS AND EMPHASISON THE FRAME AND ITS NOTATIONS
CD2003-0523-51166 LS
23
1. Normal-Sized Artifacts2. Reflective Artifacts3. Small Artifacts4. Round Artifacts5. Artifacts with a Trademark, Seal, Signature or Hallmark6. Long Artifacts in Supple Materials7. Large Artifacts8. Artifacts — Clothing Samples9. Artifacts with Multiple Components
Artifact Photography
24ARTIFACT PHOTOGRAPHY
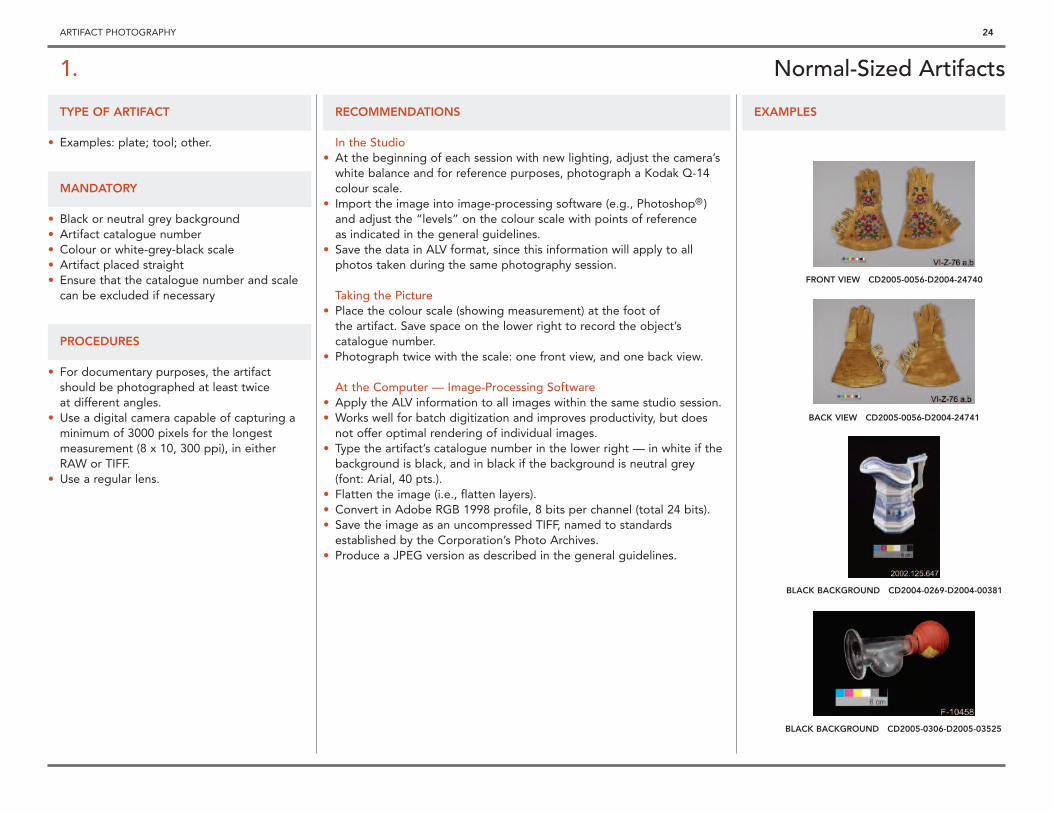
Normal-Sized Artifacts
TYPE OF ARTIFACT
• Examples: plate; tool; other.
MANDATORY
• Black or neutral grey background• Artifact catalogue number• Colour or white-grey-black scale• Artifact placed straight • Ensure that the catalogue number and scale
can be excluded if necessary
PROCEDURES
• For documentary purposes, the artifactshould be photographed at least twiceat different angles.
• Use a digital camera capable of capturing aminimum of 3000 pixels for the longestmeasurement (8 x 10, 300 ppi), in eitherRAW or TIFF.
• Use a regular lens.
RECOMMENDATIONS
In the Studio• At the beginning of each session with new lighting, adjust the camera’s
white balance and for reference purposes, photograph a Kodak Q-14colour scale.
• Import the image into image-processing software (e.g., Photoshop®)and adjust the “levels” on the colour scale with points of reference as indicated in the general guidelines.
• Save the data in ALV format, since this information will apply to all photos taken during the same photography session.
Taking the Picture• Place the colour scale (showing measurement) at the foot of
the artifact. Save space on the lower right to record the object’s catalogue number.
• Photograph twice with the scale: one front view, and one back view.
At the Computer — Image-Processing Software• Apply the ALV information to all images within the same studio session. • Works well for batch digitization and improves productivity, but does
not offer optimal rendering of individual images. • Type the artifact’s catalogue number in the lower right — in white if the
background is black, and in black if the background is neutral grey(font: Arial, 40 pts.).
• Flatten the image (i.e., flatten layers).• Convert in Adobe RGB 1998 profile, 8 bits per channel (total 24 bits). • Save the image as an uncompressed TIFF, named to standards
established by the Corporation’s Photo Archives. • Produce a JPEG version as described in the general guidelines.
EXAMPLES
1.
FRONT VIEW CD2005-0056-D2004-24740
BACK VIEW CD2005-0056-D2004-24741
BLACK BACKGROUND CD2004-0269-D2004-00381
BLACK BACKGROUND CD2005-0306-D2005-03525

25ARTIFACT PHOTOGRAPHY
Reflective Artifacts
TYPE OF ARTIFACT
• Examples: glass object; mirror; ceramic; silver; other.
NOTES
• Reduce surface reflections on the artifact as much as possible.
MANDATORY
• Black or neutral grey background• Artifact catalogue number• Colour or white-grey-black scale• Artifact placed straight • Ensure that the catalogue number and scale
can be excluded if necessary
PROCEDURES
• The artifact must be photographed under awhite dome which filters the light uniformly.
• Care should be taken to avoid seeing thephotographer’s reflection on the artifact.
• Take a first image with a colour scale and asecond without a scale * so that it doesn’treflect on the artifact.
• Use a digital camera capable of capturing aminimum of 3000 pixels for the longestmeasurement (8 x 10, 300 ppi), in eitherRAW or TIFF.
• Use a regular lens.
RECOMMENDATIONS
In the Studio• At the beginning of each session with new lighting, adjust the camera’s
white balance and for reference purposes, photograph a Kodak Q-14colour scale.
• Import the image into image-processing software (e.g., Photoshop® )and adjust the “levels” on the colour scale with points of reference asindicated in the general guidelines.
• Save the data in ALV format, since this information will apply to all photos taken during the same photography session.
Taking the Picture• Place the colour scale (showing measurement) at the foot of the artifact.
Save space on the lower right to record the object’s catalogue number. • Photograph the object twice: once with the scale, and once without.
At the Computer — Image-Processing Software• Apply the ALV information to all images within the same studio session. • Works well for batch digitization and improves productivity, but does
not offer optimal rendering of individual images. • Type the artifact’s catalogue number in the lower right — in white if
the background is black, and in black if the background is neutral grey(font: Arial, 40 pts.).
• Flatten the image (i.e., flatten layers).• Convert in Adobe RGB 1998 profile, 8 bits per channel (total 24 bits). • Save the image as an uncompressed TIFF, named to standards
established by the Corporation’s Photo Archives. • Produce a JPEG version as described in the general guidelines.
EXAMPLES
2.
* To be determined by the photographer.The best view should be the one without a scale.
CD2004-00269-D2004-00376
CD2004-00269-D2004-00375

26ARTIFACT PHOTOGRAPHY
Small Artifacts
TYPE OF ARTIFACT
• Examples: artifact from archaeological digs;glass bead; coin; other.
MANDATORY
• Black or neutral grey background• Artifact catalogue number• Colour or white-grey-black scale• Artifact placed straight • Ensure that the catalogue number and scale
can be excluded if necessary
PROCEDURES
• For tiny objects, a macro lens is required, in order to enlarge the object as much aspossible and capture details.
• The artifact must fill the frame as much as possible.
• Use a digital camera capable of capturing aminimum of 3000 pixels for the longestmeasurement (8 x 10, 300 ppi), in eitherRAW or TIFF.
OPTIONAL
• To eliminate shadows:Raise the artifact by placing it on a showcaseraised approximately 20 cm above thegrey background. This will eliminate shadows. Place a lamp/flash on each side of the showcase, each facing the artifact at a 45˚ angle to the bottom.
RECOMMENDATIONS
In the Studio• At the beginning of each session with new lighting, adjust the camera’s
white balance and for reference purposes, photograph a Kodak Q-14colour scale.
• Import the image into image-processing software (e.g., Photoshop® )and adjust the “levels” on the colour scale with the points of referenceas indicated in the general guidelines.
• Save the data in ALV format, since this information will apply to all photos taken during the same photography session.
Taking the Picture• Photograph the artifact with a small white-grey-black scale measuring
1 cm, 2 cm or 3 cm. Save space on the bottom right to record theobject’s catalogue number.
• Photograph the object twice with the scale: one front view and oneback view.
At the Computer — Image-Processing Software• Apply the ALV information to all images within the same studio session. • Works well for batch digitization and improves productivity, but does
not offer optimal rendering of individual images. • Type the artifact’s catalogue number in the lower right — in white if
the background is black, and in black if the background is neutral grey(font: Arial, 40 pts.).
• Flatten the image (i.e., flatten layers). • Convert in Adobe RGB 1998 profile, 8 bits per channel (total 24 bits). • Save the image as an uncompressed TIFF, named to standards
established by the Corporation’s Photo Archives. • Produce a JPEG version as described in the general guidelines.
EXAMPLES
3.
CD2005-0683-D2005-14171
CD2005-0683-D2005-14172
CD2006-0054-D2005-22759

27ARTIFACT PHOTOGRAPHY
Round Artifacts
TYPE OF ARTIFACT
• Examples: vase; goblet; marble; other.
MANDATORY
• Black or neutral grey background• Artifact catalogue number• Colour or white-grey-black scale• Artifact placed straight • Ensure that the catalogue number and scale
can be excluded if necessary
PROCEDURES
• If there is no variation in pattern, a singleside is photographed with the colour orwhite-grey-black scale.
• Use a digital camera capable of capturing aminimum of 3000 pixels for the longestmeasurement (8 x 10, 300 ppi), in eitherRAW or TIFF.
• Use a regular lens.
RECOMMENDATIONS
In the Studio• At the beginning of each session with new lighting, adjust the camera’s
white balance and for reference purposes, photograph a Kodak Q-14colour scale.
• Import the image into image-processing software (e.g., Photoshop® )and adjust the “levels” on the colour scale with the points of referenceindicated in the general guidelines.
• Save the data in ALV format, since this information will apply to all photos taken during the same photography session.
Taking the Picture• Place the colour or white-grey-black scale (showing measurements) at
the foot of the artifact. Save space on the lower right to record theobject’s catalogue number.
• Photograph the object a single time, with an appropriate scale.
At the Computer — Image-Processing Software• Apply the ALV information to all images within the same studio session. • Works well for batch digitization and improves productivity, but does
not offer optimal rendering of individual images. • Type the artifact’s catalogue number in the lower right — in white if
the background is black, and in black if the background is neutral grey(font: Arial, 40 pts.).
• Flatten the image (i.e., flatten layers).• Convert in Adobe RGB 1998 profile, 8 bits per channel (total 24 bits). • Save the image as an uncompressed TIFF, named to standards
established by the Corporation’s Photo Archives. • Produce a JPEG version as described in the general guidelines.
EXAMPLES
4.
CD2005-0816-D2005-18149
CD2004-0904-D2004-05555

28ARTIFACT PHOTOGRAPHY
Artifacts with a Trademark, Seal, Signature or Hallmark
TYPE OF ARTIFACT
• Examples: bottle; plate; other.
MANDATORY
• Black or neutral grey background• Artifact catalogue number• Colour or white-grey-black scale• Artifact placed straight • Ensure that the catalogue number and scale
can be excluded if necessary
PROCEDURES
• Document the artifact as a whole.• Document the trademark (or signature, seal
or hallmark) on the artifact. For this type ofshot, and exceptionally, the artifact can betipped over if necessary.
• Use a digital camera capable of capturing aminimum of 3000 pixels for the longestmeasurement (8 x 10, 300 ppi), in eitherRAW or TIFF.
• Use a regular lens.
RECOMMENDATIONS
In the Studio• At the beginning of each session with new lighting, adjust the camera’s
white balance and for reference purposes, photograph a Kodak Q-14colour scale.
• Import the image into image-processing software (e.g., Photoshop® )and adjust the “levels” on the colour scale with the points of referenceas indicated in the general guidelines.
• Save the data in ALV format, since this information will apply to allphotos taken during the same photography session.
Taking the Picture• Place the colour scale (showing measurement) at the foot of the artifact.
Save space on the lower right to inscribe the object’s catalogue number. • Photograph the object two or three times: one or two views
documenting the artifact as a whole, and one view of the seal, removing the scale if it would encroach on the detail being recorded.
At the Computer — Image-Processing Software• Apply the ALV information to all images within the same studio session. • Works well for batch digitization and improves productivity, but does
not offer optimal rendering of individual images. • Type the artifact’s catalogue number in the lower right — in white if
the background is black, and in black if the background is neutral grey(font: Arial, 40 pts.).
• Flatten the image (i.e., flatten layers).• Convert in Adobe RGB 1998 profile, 8 bits per channel (total 24 bits). • Save the image as an uncompressed TIFF, named to standards
established by the Corporation’s Photo Archives. • Produce a JPEG version as described in the general guidelines.
EXAMPLES
5.
CD2005-0742-D2005-16705
CD2005-0742-D2005-16706
CD2006-0215-D2006-02400
CD2006-0215-D2006-02402

29ARTIFACT PHOTOGRAPHY
Long Artifacts in Supple Materials
TYPE OF ARTIFACT
• Examples: carpet; cloth; other.
MANDATORY
• Black or neutral grey background• Artifact catalogue number• Colour or white-grey-black scale• Artifact placed straight • Ensure that the catalogue number and scale
can be excluded if necessary
PROCEDURES
• Shoot the object from above, stabilizing the camera on a solid structure, such as scaffolding.
• To avoid distortion of the object, the back of the digital camera must be level and precisely parallel (180˚ angle) to the artifact.
• If the pattern is uniform, it is acceptable tofold the material in order to show a section.
• A back view is also required, unless the twosides are identical. In such case, a single view will suffice.
• Use a digital camera capable of capturing aminimum of 3000 pixels for the longestmeasurement (8 x 10, 300 ppi), in eitherRAW or TIFF.
• Use a regular lens.
RECOMMENDATIONS
In the Studio• At the beginning of each session with new lighting, adjust the camera’s
white balance and for reference purposes, photograph a Kodak Q-14colour scale.
• Import the image into image-processing software (e.g., Photoshop® )and adjust the “levels” on the colour scale with the points of referenceas indicated in the general guidelines.
• Save the data in ALV format, since this information will apply to all photos taken during the same photography session.
Taking the Picture• Place the colour scale (showing measurements) at the foot of the artifact.
Save space on the lower right to record the object’s catalogue number.• Photograph the object twice with the scale: one front view and one
back view.
At the Computer — Image-Processing Software• Apply the ALV information to all images within the same studio session. • Works well for batch digitization and improves productivity, but does
not offer optimal rendering of individual images. • Type the artifact’s catalogue number in the lower right — in white if
the background is black, and in black if the background is neutral grey(font: Arial, 40 pts.).
• Flatten the image (i.e., flatten layers).• Convert in Adobe RGB 1998 profile, 8 bits per channel (total 24 bits). • Save the image as an uncompressed TIFF, named to standards
established by the Corporation’s Photo Archives. • Produce a JPEG version as described in the general guidelines.
EXAMPLES
6.
CD2006-0247-D2006-02044
CD2006-0247-D2006-02045
CD2005-0039-D2004-26683
30ARTIFACT PHOTOGRAPHY
Large Artifacts
TYPE OF ARTIFACT
• Examples: painting; poster; furniture; other.
MANDATORY
• Black or neutral grey background• Artifact catalogue number• Colour or white-grey-black scale• Artifact placed straight • Ensure that the catalogue number and scale
can be excluded if necessary• Ensure uniform lighting and background
PROCEDURES
• Shoot the object from above, stabilizing the camera on a solid structure, such as scaffolding or tripod.
• To avoid distortion of the object, the back of the digital camera must be level and precisely parallel (180˚ angle) to the artifact.
• A painting or piece of furniture can also beplaced so that the corners are 90˚ to thecamera’s viewfinder.
• Additional views are acceptable. For views of details, since framing of the image isrestricted, inclusion of a colour scale is not required.
• Use a digital camera capable of capturing aminimum of 3000 pixels for the longestmeasurement (8 x 10, 300 ppi), in eitherRAW or TIFF.
• Use a regular lens.
RECOMMENDATIONS
In the Studio• At the beginning of each session with new lighting, adjust the camera’s
white balance and for reference purposes, photograph a Kodak Q-14colour scale.
• Import the image into image-processing software (e.g., Photoshop® )and adjust the “levels” on the colour scale with the points of referenceas indicated in the general guidelines.
• Save the data in ALV format, since this information will apply to all photos taken during the same photography session.
Taking the Picture• Place the colour scale (showing measurements) at the foot of the artifact.
Save space on the lower right to record the artifact’s catalogue number. • Photograph twice with the scale: one front view and one back view and,
if necessary, one or two views of details.
At the Computer — Image-Processing Software• Apply the ALV information to all images within the same studio session. • Works well for batch digitization and improves productivity, but does not
offer optimal rendering of individual images. • With the help of the image-processing software, rework the photo by
copying and expanding the black or neutral grey background to fill the canvas evenly.
• Type the artifact’s catalogue number in the lower right — in white if the background is black, and in black if the background is neutral grey(font: Arial, 40 pts.).
• Flatten the image (i.e., flatten layers).• Convert in Adobe RGB 1998 profile, 8 bits per channel (total 24 bits). • Save the image as an uncompressed TIFF, named to standards
established by the Corporation’s Photo Archives. • Produce a JPEG version as described in the general guidelines.
EXAMPLES
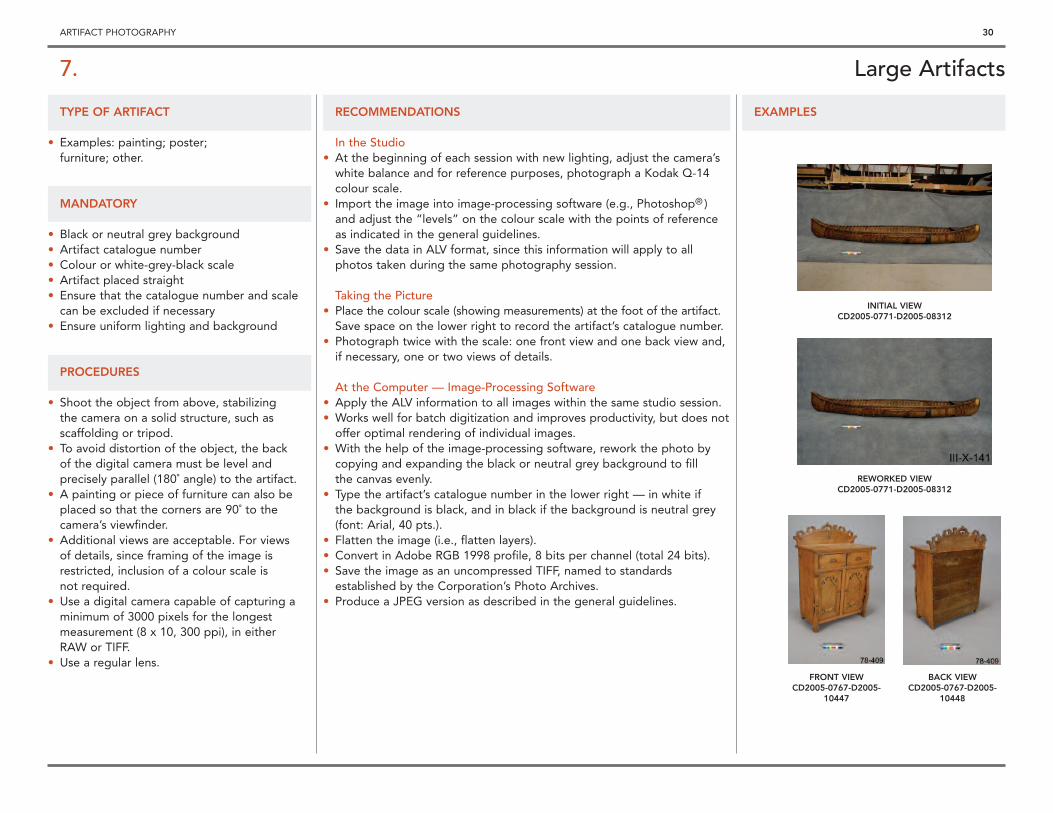
7.
INITIAL VIEWCD2005-0771-D2005-08312
REWORKED VIEWCD2005-0771-D2005-08312
FRONT VIEWCD2005-0767-D2005-
10447
BACK VIEWCD2005-0767-D2005-
10448
31ARTIFACT PHOTOGRAPHY
Artifacts — Clothing Samples
TYPE OF ARTIFACT
• Examples: costume; clothing; other.
MANDATORY
• Black or neutral grey background• Artifact catalogue number• Colour or white-grey-black scale• Artifact placed straight • Ensure that the catalogue number and scale
can be excluded if necessary
PROCEDURES
Item Laid Flat• Shoot the object from above, stabilizing
the camera on a solid structure, such as scaffolding or tripod.
• To avoid distortion of the object, the back of the digital camera must be level and precisely parallel (180˚ angle) to the artifact.
• A back view is required.
Item on Mannequin• Place the artifact on a mannequin. To avoid
distortion of the object, the back of the camera must be level and precisely parallel(180˚ angle) to the artifact.
• For views of clothing details, since framing of the image is restricted, inclusion of acolour scale is not required.
• Use a digital camera capable of capturing aminimum of 3000 pixels for the longestmeasurement (8 x 10, 300 ppi), in eitherRAW or TIFF.
• Use a regular lens.
RECOMMENDATIONS
In the Studio• At the beginning of each session with new lighting, adjust the camera’s
white balance and for reference purposes, photograph a Kodak Q-14colour scale.
• Import the image into image-processing software (e.g., Photoshop® )and adjust the “levels” on the colour scale with the points of referenceas indicated in the general guidelines.
• Save the data in ALV format, since this information will apply to all photos taken during the same photography session.
Taking the Picture• Place the colour scale (showing measurements) at the foot of the artifact.
Save space on the lower right to record the artifact’s catalogue number. • Photograph twice with the scale: one front view and one back view and,
if necessary, once or twice for details.
At the Computer — Image-Processing Software• Apply the ALV information to all images within the same studio session. • Works well for batch digitization and improves productivity, but does not
offer optimal rendering of individual images. • Type the artifact’s catalogue number in the lower right — in white if
the background is black, and in black if the background is neutral grey(font: Arial, 40 pts.).
• Flatten the image (i.e., flatten layers).• Convert in Adobe RGB 1998 profile, 8 bits per channel (total 24 bits). • Save the image as an uncompressed TIFF, named to standards
established by the Corporation’s Photo Archives. • Produce a JPEG version as described in the general guidelines.
EXAMPLES
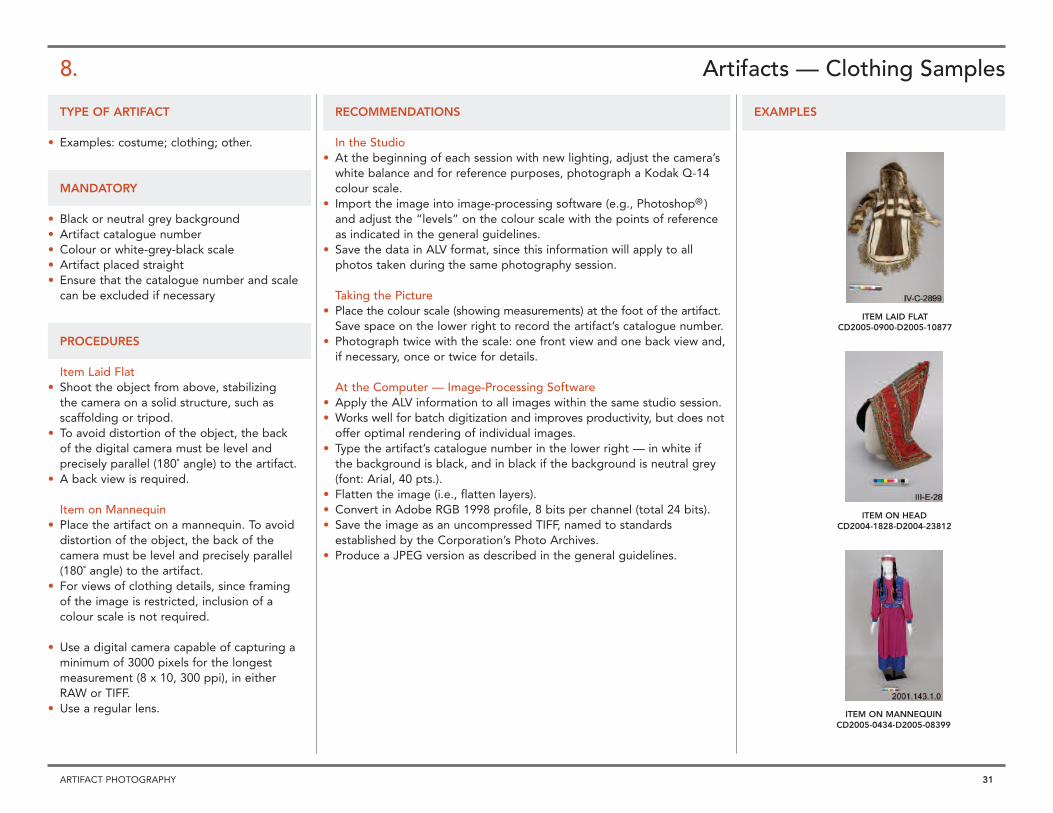
8.
ITEM LAID FLATCD2005-0900-D2005-10877
ITEM ON HEADCD2004-1828-D2004-23812
ITEM ON MANNEQUINCD2005-0434-D2005-08399

32ARTIFACT PHOTOGRAPHY
Artifacts with Multiple Components
TYPE OF ARTIFACT
• Examples: toy; board game; other.
MANDATORY
• Black or neutral grey background• Artifact catalogue number• Colour or white-grey-black scale• Artifact placed straight • Ensure that the catalogue number and scale
can be excluded if necessary
PROCEDURES
• For documentary purposes, the artifactshould be photographed multiple times(especially if the artifact has several components or moving parts).
• Use a digital camera capable of capturing aminimum of 3000 pixels for the longestmeasurement (8 x 10, 300 ppi), in eitherRAW or TIFF.
• Use a regular lens.
RECOMMENDATIONS
In the Studio• At the beginning of each session with new lighting, adjust the camera’s
white balance and for reference purposes photograph a Kodak Q-14colour scale.
• Import the image into image-processing software (e.g., Photoshop® )and adjust the “levels” on the colour scale with the points of referenceas indicated in the general guidelines.
• Save the data in ALV format, since this information will apply to all photos taken during the same photography session.
Taking the Picture• Place the colour scale (showing measurements) at the foot of the artifact.
Save space on the lower right to record the artifact’s catalogue number. • Photograph twice with the scale: one front view and one back view, as
well as multiple views of components and/or moving parts.
At the Computer — Image-Processing Software• Apply the ALV information to all images within the same studio session. • Works well for batch digitization and improves productivity, but does not
offer optimal rendering of individual images. • Type the artifact’s catalogue number in the lower right — in white if
the background is black, and in black if the background is neutral grey(font: Arial, 40 pts.).
• Flatten the image (i.e., flatten layers).• Convert in Adobe RGB 1998 profile, 8 bits per channel (total 24 bits). • Save the image as an uncompressed TIFF, named to standards
established by the Corporation’s Photo Archives. • Produce a JPEG version as described in the general guidelines.
EXAMPLES
9.
CD2005-0266-D2005-02677
CD2005-0266-D2005-02678
CD2005-0266-D2005-02679
CD2005-0266-D2005-02680

33
Glossary

ALV File format used for saving levels and curves in histograms in Adobe Photoshop®.
JPEG: JOINT PHOTOGRAPHIC EXPERTS GROUP A lossy compressiontechnique used for saving images and photographs. This compressionmethod reduces the file size of an image but reduces also its quality.
NEWTON’S RINGS Concentric ring patterns (dark and bright bands) mayappear while scanning negatives, glass negatives, transparencies andlantern slides. These rings are caused by the interaction of light wavesreflecting on two glossy surfaces — one convex and one flat — and the air pockets between them.
PPI: PIXELS PER INCH A unit of measurement used for spatial resolutionof a digital image. Resolution is often referred to as dots per inch or DPI.This term is appropriate when describing printer resolution. In commonusage, the terms PPI and DPI are used interchangeably; however, sinceimage files are composed of pixels, PPI is a more accurate term for digitalimages and has been used in this document.
RAW: INITIAL IMAGE FILE Contains minimal processed data from a digital camera or a scanner. Before any manipulation can be done, theRAW file must be converted into another format.
RGB: RED, GREEN, BLUE The main colours in photography.
TIFF: TAGGED INFORMATION FILE FORMAT A lossless image formatdeveloped for the purpose of storing high-resolution bit-mapped,greyscale, and colour images.
34GLOSSARY
For additional definitions, such as reflective mode, transparency mode,de-screening mode, etc., refer to the Photoshop® user’s manual.
___________________________________________________________________________________________________________
___________________________________________________________________________________________________________
___________________________________________________________________________________________________________
___________________________________________________________________________________________________________
___________________________________________________________________________________________________________
___________________________________________________________________________________________________________
___________________________________________________________________________________________________________
___________________________________________________________________________________________________________
___________________________________________________________________________________________________________
___________________________________________________________________________________________________________
___________________________________________________________________________________________________________
___________________________________________________________________________________________________________
___________________________________________________________________________________________________________
___________________________________________________________________________________________________________
___________________________________________________________________________________________________________
___________________________________________________________________________________________________________
___________________________________________________________________________________________________________
___________________________________________________________________________________________________________
___________________________________________________________________________________________________________
___________________________________________________________________________________________________________
___________________________________________________________________________________________________________
___________________________________________________________________________________________________________
Notes
35

Canadian Museum of Civilization100 Laurier StreetGatineau, Quebec K1A 0M8E-mail: [email protected]: www.civilization.ca
Canadian War Museum1 Vimy PlaceOttawa, Ontario K1A 0M8E-mail: [email protected]: www.warmuseum.ca
© 2006. All rights reserved. No part of this book may be reproduced or transmitted in any form or by any means electronic or mechanical, including photocopying, recording, or any retrieval system, without the prior written permission of the publisher.