digital tv recorder hdr5010kb - superfi user guide final.… · thank you for choosing this toshiba...
TRANSCRIPT

Digital TV recorder
HDR5010KBOWNER’S MANUAL
© 2010 Toshiba Corporation
HDR5010 User Guide.indb 1 8/6/10 09:08:10

Introduction
2
Important Safety Information
Thank you for choosing this Toshiba Digital TV recorder.
Before using the Digital TV recorder, please take a minute to read the following important safety information.
Although this appliance has been •carefully manufactured and rigorously checked prior to leaving the factory, as with all electrical appliances it is possible for problems to develop. If you notice smoke, an excessive build-up of heat or any other unexpected phenomena, you should disconnect the plug from the mains power socket immediately.
Ensure that the unit is sufficiently •ventilated! Never place next to or underneath curtains!
Only use the supplied AC mains adaptor.•
This AC mains adaptor should only be •connected to an AC 240V/50Hz mains power supply - do not attempt to connect it to any other type of supply.
The socket-outlet must be installed near •the equipment and easily accessible.
Do noT• cut off the supplied AC mains adaptor’s plug.
Keep away from rodents. Rodents (and •also cockatiels) enjoy biting into electric flexes.
The animal can cause a short cut (fire •hazard!) and receive a fatal electric shock.
Always hold plug when pulling out plug •from power mains supply system. Do noT pull on flex. The flex can become overloaded and cause a short cut.
Set up unit so that no one is able to trip •over the flex.
This unit is recommended to be installed •on shock-free benches in order to avoid any danger from falling.
Take note that toddlers can pull the •unit down from the table or cupboard by means of its flex. Children can hurt themselves when doing this.
Do noT• use the unit near heat sources. The casing and flex could be damaged by the impact of heat.
Any repairs must be carried out by •qualified service personnel only.
Do noT• open this unit. A non-expert attempting to repair the unit could be dangerous and potentially cause a fire hazard.
Avoid placing the unit on any surfaces •that may be subject to vibrations or shocks.
Leave a space of at least 10cm around •the unit to allow for adequate ventilation.
Place the unit on a stable surface.•
Do noT• place any magnetic objects (including speakers) on or near the unit.
Do noT• place any objects on the unit.
Do noT• obstruct the ventilation on the underside of the unit.
Do noT• expose the unit to shocks or vibrations as this could cause disk failure.
To protect the unit during a thunder •storm unplug the AC power cord and disconnect the aerial.
HDR5010 User Guide.indb 2 8/6/10 09:08:10

Introduction
3
Important Safety Information
CAUTIon: • Do noT touch the aerial connector.
When you leave your home for a long •period of time, unplug the AC mains adaptor for safety reasons.
The unit becomes warm when in •operation. Do noT place any covers or blankets on the unit in order to prevent overheating. The ventilation holes are not to be blocked. Do noT set up near radiators. Do noT place in direct sunshine.
Do noT• allow the unit to get wet.
Do noT• use the unit in hot, humid or excessively dusty places.
Do noT• expose the unit to rain or moisture.
The apparatus shall not be exposed to •dripping or splashing and that no objects filled with liquids, such as vases, shall be placed on the apparatus.
Liquids spilled into the unit can cause •serious damage. Switch the set oFF and disconnect the mains power supply, then consult a qualified service person before attempting to use the unit again.
Moisture condensation occurs, for •example, when you pour a cold drink into a glass on a warm day. Drops of water form on the outside of the glass. In the same way, moisture may condense inside this unit.
Moisture condensation occurs during the following cases.
- When you bring the unit directly from a cold place to a warm place.
- When you use the unit in a room where you just turned on the heater, or a place where the cold wind from the air conditioner directly hits the unit.
- In summer, when you use the unit in a hot and humid place just after you move the unit from an air conditioned room.
- When you use the unit in a humid place.
Do noT use the unit when moisture condensation may occur.
If you use the unit in such a situation, it may damage Hard disk drive and internal parts. Leave the unit for two or three hours. After two or three hours, the unit will have warmed up and evaporated any moisture.
To clean the unit, use a lightly dampened, •soft cloth. Do noT use any kind of abrasive cloth, sponge or cleaner.
To help prevent Screen burn on Plasma •or LCD screens and CRT displays. Never leave static pictures on the screen for long periods of time.
Never place hot objects of open flame •sources, such as lighted candles or nightlights, on or close to the unit.
High temperatures can melt plastic and •lead to fires.
Do noT• stand the unit vertically. Use the unit in a horizontal (flat) position only.
HDR5010 User Guide.indb 3 8/6/10 09:08:10

Introduction
4
General Information
Toshiba is not liable for any damage or loss caused directly or indirectly by the malfunction of this unit, including, without limitation, any one of the following:
Failure to record contents intended to be recorded by the consumer.•Failure to edit contents as intended by the consumer.•
HDD HandlingHDD is a precision apparatus that is susceptible to vibration, strong impact or dirt. Depending on the installation environment or handling, the unit may become partially damaged or in the worst case, recording or replaying may not be available. Especially while the HDD is in motion, do not subject it to vibration or strong impact or pull out the power plug. And if a power failure occurs, the content of the recording / replaying programme may be lost.
HDD rotates at high speed when in operation. Be sure that rotation has stopped and then move the unit without subjecting it to strong impact or vibration.
About HDDHDD is a special device which has high recording density and is suited for long-time recording or high-speed cueing but by contrast, has many factors which can cause breakage.
When an HDD fails, recovery of recorded content (data) may be impossible.•HDD is not a permanent storage location of the recorded contents.•
About the remaining capacity of HDD recording time:In recording to HDD, the Remaining Capacity Display may differ from the actual recordable time as this unit adopts Variable Bit Rate encoding, which varies the recording (storage) amount of data in conformity with the amount of information in the video signal. Before recording to the HDD, ensure there is sufficient space on the HDD by deleting unnecessary titles in advance.
notes on Copyright
About CopyrightUnauthorised copying, broadcasting, public performance and lending of discs are prohibited. This product incorporates copyright protection technology that is protected by U.S. patents and other intellectual property rights. Use of this copyright protection technology must be authorised by Rovi Corporation, and is intended for home and other limited viewing uses only unless otherwise authorised by Rovi Corporation. Reverse engineering or disassembly is prohibited.
HDR5010 User Guide.indb 4 8/6/10 09:08:10

Introduction
5
notes on Copyright
Copyright protection systemTo play back the digital video images of a DVD via an HDMI connection, it is necessary that both the player and the display device (or an AV amplifier) support a copyright protection system called HDCP (high-bandwidth digital content protection system).
HDCP is copy protection technology that comprises data encryption and authentication •of the connected AV device.This unit supports HDCP.•Please read the operating instructions of your display device (or AV amplifier) for more •information.Because HDMI is an evolving technology, it is possible that some devices with an HDMI •input may not operate properly with this unit.When using an HDCP-incompatible display device, the image will not be viewed properly.•When the power failure occurs, or when you unplug the unit, some problems in the HDMI •setting might occur.
Please check and set the HDMI setting again.
* HDMI: High Definition Multimedia Interface
Environmental Information
Following information is only for EU-member states:
The use of the symbol indicates that this product may not be treated as household waste. By ensuring this product is disposed of correctly, you will help prevent potential negative consequences for the environment and human health, which could otherwise be caused by inappropriate waste handling of this product. For more detailed information about recycling of this product, please contact your local city office, your household waste disposal service or the shop where you purchased the product.
Disposal of batteries and/or accumulators
The crossed out wheeled dust bin symbol indicates that batteries and/or accumulators must be collected and disposed of separately from household waste.
If the battery or accumulator contains more than the specified values of lead (Pb), mercury (Hg), and/or cadmium (Cd) defined in the Battery Directive (2006/66/EC), then the chemical symbols for lead (Pb), mercury (Hg) and/or cadmium (Cd) will appear below the crossed out wheeled dust bin symbol.
By participating in separate collection of batteries, you will help to assure the proper disposal of products and batteries and thus help to prevent potential negative consequences for the environment and human health.
For more detailed information about the collection and recycling programmes available in your country, please contact your local city office or the shop where you purchased the product.
In conformity with the EEE Regulation.
HDR5010 User Guide.indb 5 8/6/10 09:08:10

Introduction
6
End User Licence
This product includes software code developed by third parties, including software code subject to the GNU General Public License (‘GPL’) or GNU Lesser General Public License (‘LGPL’). As applicable, the terms of the GPL and LGPL, and information on obtaining access to the GPL Code and LGPL used in this product, are available to you - please contact the manufacturer.
The GPL Code and LGPL Code used in this product is distributed WITHOUT ANY WARRANTY and is subject to the copyrights of one or more authors. For details, see the GPL Code and LGPL Code for this product and the terms of the GPL and LGPL.
Trademark Acknowledgements
Manufactured under license from Dolby Laboratories. Dolby and the double-D symbol are •registered trademarks of Dolby Laboratories.
DVB is a registered trademark of the DVB Project. This logo indicates that the product is •compliant with European Digital Broadcasting.
HDMI, the HDMI logo and High-Definition Multimedia Interface are trademarks or •registered trademarks of HDMI Licensing LLC.
HDR5010 User Guide.indb 6 8/6/10 09:08:10

Table of Contents
Introduction Important Safety Information ........................................................................................................2
General Information ......................................................................................................................4
Notes on Copyright .......................................................................................................................4
Environmental Information ............................................................................................................5
End User Licence .........................................................................................................................6
Trademark Acknowledgements.....................................................................................................6
Getting StartedPackage Contents ........................................................................................................................8
Overview of the Digital TV Recorder ............................................................................................9
Overview of the Remote Control ................................................................................................10
Inserting the Batteries into the Remote Control .........................................................................12
Connecting your Digital TV Recorder .........................................................................................13
Switching your Digital TV Recorder On ......................................................................................14
Automatically Tuning ...................................................................................................................15
Using your Digital TV RecorderEveryday Use .............................................................................................................................16
Common Symbols ......................................................................................................................17
The Electronic Programme Guide (EPG) ...................................................................................18
The Channel List ........................................................................................................................19
The Info Display ..........................................................................................................................20
Picture In Picture (PIP) ...............................................................................................................21
Recording Programmes ..............................................................................................................22
Timeshifting ................................................................................................................................25
The Timers Screen .....................................................................................................................26
Modifying Timers ........................................................................................................................27
The Library Screen .....................................................................................................................29
The Photo Viewer .......................................................................................................................31
The Main Menu ...........................................................................................................................33
Main Menu Structure ..................................................................................................................33
Main Menu Options ....................................................................................................................34
Additional InformationProgramming the Remote Control ..............................................................................................40
Manually Programming the Remote Control ..............................................................................41
Finding the Remote Control’s Current Codes .............................................................................41
Troubleshooting ..........................................................................................................................42
Specifications .............................................................................................................................44
Remote Control Brand Codes ....................................................................................................46
Introduction
7
HDR5010 User Guide.indb 7 8/6/10 09:08:10

Package Contents
© 2010 Toshiba Corporation
q Digital TV recorder w Remote control u Help leaflet
e Batteries (2x AAA/R03) r AC mains adaptor*
t Owner’s manual y Quick start guide
* For use exclusively with this Digital TV recorder. Never use this AC mains adaptor with any other device, as it may cause fire and/or product damage.
q
w
e r
t
y
u
Getting Started
8
HDR5010 User Guide.indb 8 8/6/10 09:08:12

overview of the Digital TV Recorder
Front Panel
q Power switch/LED w Front panel display e USB socket
Rear Panel
q Aerial input socket w Aerial (loop through) output socket
e Ethernet socket
r HDMI output socket t HDMI input sockets 1/2 y USB socket
u SPDIF output (Standard TOS link connector)
i Power socket o SCART output socket
q w
q
e
w e r t y i o
u
Getting S
tarted
9
HDR5010 User Guide.indb 9 8/6/10 09:08:13

overview of the Remote Control
3$
3!
2(2*
3#
2&
3@
3)
2^
2$
2%
q
r
t
u
y
1)
1#
1%
o
1*
e
1&
i
w
1@
1$
1!
1^
2#2@
1(2)2!
Getting Started
10
HDR5010 User Guide.indb 10 8/6/10 09:08:14

q TV - Switches the TV on/into Standby*.
w DTT - Switches the viewing mode to DTT.
e HDMI 1 - Switches the viewing mode to HDMI 1.
r 0-9 - Selects channels, enter PIN.
t AD - Switches Audio Description on or off. Refer to page 16 for more information.
y SUB - Displays subtitles (if available).
u +/− - Adjusts the TV’s volume*.
i PIP - Enters Picture In Picture mode. Refer to page 21 for more information.
o CLoCK - Displays the clock.
1) GUIDE - Switches the Electronic Programme Guide (EPG) on/off. Refer to page 18 for more information.
1! BACK - Returns to the previous level in the menu. Exits EPG, Info and menu (first level).
1@ LIB - Displays the Library of recorded programmes. Refer to page 29 for more information.
1# MEnU - Displays/exits the menu.
1$ - Pauses and resumes live TV. Refer to page 25 for more information. Plays and pauses recordings in the Library.
1% - Stops playback when viewing recordings.
1^ - Skips back 30 seconds when viewing a recording or watching live TV. Press and hold to skip to the start when viewing a recording or skip to the start of the pause buffer when watching live TV.
1& - Rewinds live TV and recordings. Press repeatedly to increase the rewind speed.
1* Coloured buttons - Selects options in digital text/EPG/Channel List/menu.
1( - Fast forwards recordings. Press repeatedly to increase the fast forward speed. When pausing live TV or recordings, press to watch in slow motion.
2) - Skips forward 30 seconds when viewing a recording. Press and hold to skip to the end when viewing a recording.
2! - Records live TV. Sets highlighted programmes to timer record in the EPG.
2@ TV InPUT - Switches between the available TV input modes (eg DTT, HDMI or AV).*
2# TIMER - Displays the Timers screen. Refer to page 26 for more information.
2$ TEXT - Displays digital text (if available).
2% oK/ / / / - Displays the Channel List/confirms a selection (oK button). Navigate the EPG/menu/Channel List/Info menu ( / / / buttons).
2^ InFo - Displays programme and recording information. Refer to page 20 for more information.
2& SAVER - Displays the screen saver.
2* TV/RAD - Switches between Digital TV channels and Digital Radio channels.
2( - Turns the TV’s sound on/off*.
3) Ch. +/ − - Selects the next/previous channel.
3! - Returns to the previous channel watched. Switches between 4 and 24 hours advance in EPG.
3@ HDMI 2 - Switches the viewing mode to HDMI 2.
3# USB - Switches the viewing mode to USB.
3$ STB - Switches the Digital TV recorder on/into Standby.
*The remote control must first be programmed to operate your equipment. Refer to page 40.
Getting S
tarted
11
HDR5010 User Guide.indb 11 8/6/10 09:08:14

Inserting the Batteries into the Remote Control
Lift open the battery compartment cover (as shown).1. Install 2 “AAA/R03” batteries (included); the correct polarity is shown inside the battery 2. compartment. Always check the positive/negative symbols on the batteries to ensure they are inserted correctly.Replace the battery compartment cover and push down until it clicks shut.3.
note:Always dispose of old batteries safely. Check with your local council for how you should get rid of batteries. •Never put batteries on a fire or in the bin with normal household waste.
A label with support information is located on the back of the remote control. •
Getting Started
12
HDR5010 User Guide.indb 12 8/6/10 09:08:15

Connecting your Digital TV Recorder
q Plug your aerial lead into the RF In socket of the recorder.
w Plug an Ethernet cable between the Ethernet socket and a modem or router. Refer to page 37 for more details. Cable not supplied.
e If required, plug a SCART cable between the SCART oUTPUT socket of the recorder and your TV, Video or DVD recorder. Cable not supplied.
r Plug a RF cable between the RF oUT socket of the recorder and your TV, Video or DVD recorder. Cable not supplied.
t Plug a HDMI cable between the HDMI oUT socket of the recorder and your TV. Cable not supplied.
y If required, plug a HDMI cable between your DVD player, DVD recorder, Set-top box, Games console and the HDMI In 1/2 socket of the recorder. Cable not supplied.
u Plug a USB Flash drive or a cable from a Digital still camera or Card reader in to the Photo socket. Refer to page 31 for more details.
i If required, plug an Optical cable (TOS link) between the SPDIF output socket of the recorder and your Hi-Fi or Surround Sound System. Cable not supplied.
o Plug the supplied AC mains adaptor between the power socket of the recorder and a standard wall socket. only switch on the wall socket when all cables have been attached. (Do not cut off the supplied AC mains adaptor’s plug.)
Refer to page 16 for more information on how to change the input mode to HDMI 1/2 and USB.A HDMI cable is recommended as it gives higher quality picture and sound and is required for High Definition viewing.
note:Socket names vary according to make and model of your equipment. •
Photo Viewer socket does not support all USB devices or cameras.•
TV aerial
t iur o
ew
y
q
Getting S
tarted
13
HDR5010 User Guide.indb 13 8/6/10 09:08:16

Switching your Digital TV Recorder on
To Turn on Power to the Unit:Switch On power at the wall socket, if required.1. Within a few seconds the front panel will display “Starting” and the Power ring LED will 2. light.After start up is complete, an image is displayed on your TV screen and the Power ring 3. LED will change to Blue.
To Turn off Power to the Unit:1. Press the [ ] button on the remote control or the Standby button on the front of the unit q.
The Power Ring changes to Red.2. Press the switch on the wall socket to completely turn Off the power to the unit.
Standby ModeWhen the Red Power LED is on the unit is in Standby mode. You can go In/Out of Standby mode by pressing the [ ] button on the remote control or the Standby button on the front of the unit q.
note:
It is recommended that the unit be left in Standby mode rather than switching Off completely, in order to allow •important updates to be received via your aerial.
Whenever the unit receives a signal from the remote control, the Power LED blinks Red.•
After turning On, it takes some time before the unit starts up. Please note that buttons on the remote control and •the unit do not work during this period of time.
Do not switch the power On/Off repeatedly within a short period of time. It could cause a malfunction.•
If a power cut occurs when using the unit, unplug the AC mains adaptor to avoid sudden surges of electricity •when the power comes back on.
Front Panel Display
This will give you information about the DTT/Radio channel that is currently being watched or listened to. It also displays symbols such when using the Digital TV recorder functions. When using the Photo Viewer function “Photo” is displayed.
q
Getting Started
14
HDR5010 User Guide.indb 14 8/6/10 09:08:17

Automatically Tuning
Once the unit has powered up, the following menu is displayed. Press the 1. [oK] button to continue.
The Digital TV recorder will now scan and store all available channels. Depending on 2. the quality of your reception, this may take several minutes. Please be patient and do not press any buttons.
If no channels are found, a message is displayed asking you to check your aerial. Confirm that your aerial is connected correctly and press the [oK] button to restart automatically tuning.
Once the automatic tuning is complete, a summary screen is displayed.3.
Press the 4. [oK] button to exit the automatic tuning process.
Congratulations ! The Digital TV recorder is now ready to use.
Getting S
tarted
15
HDR5010 User Guide.indb 15 8/6/10 09:08:17

Everyday Use
Changing channelsType in the channel number using the [0]-[9] buttons. Alternatively, press the [Ch+] and [Ch-] buttons to select the next/previous channel.
Channel hoppingPress the [ ] button to return to the previous channel watched. Hop between the current and previous channel watched
Adjusting the volume*Press the [ +] and [ -] buttons to increase/decrease the volume.
Muting the sound*Press the [ ] button to mute the sound. Press again to restore.
Displaying Digital TextPress the [TEXT] button to display digital text (if available). Press again to exit digital text.
Displaying subtitlesPress the [SUB] button to display subtitles (if available). Press again to switch off the subtitles.
Audio DescriptionAudio Description is a spoken explanation that describes all important information on a programme, such as body language, facial expressions, scenery, action, costumes or anything that helps to describe the plot of the story, event or image.
Press the [AD] button to switch on the Audio Description. Press again to switch off the Audio Description.
Switching between TV and Radio channelsThe Digital TV recorder stores all the Digital TV channels together and all the Digital Radio channels together. Press the [TV/RAD] button to quickly switch between Digital TV and Digital Radio channels.
When you are listening to a radio channel, the screen saver will automatically start if you do not press any button for a few minutes. Alternatively, press the [SAVER] button to display the screen saver right away. To remove the screen saver, press any button on the remote control.
Switching between DTT, HDMI 1-2 or USBWhile watching Digital TV programmes you can use the [DTT], [HDMI 1], [HDMI 2] or [USB] buttons to switch the viewing mode.
note:
HDMI pass through is only available when the unit is powered out of Standby mode and using HDMI output •from this unit..
*The remote control must first be programmed to operate your equipment. Refer to page 40.
Using your Digital TV recorder
16
HDR5010 User Guide.indb 16 8/6/10 09:08:17

Everyday Use
Using StandbyWhen you’re not watching TV, you should set the Digital TV recorder to Standby. Press the [ ] button to switch between On (Blue Power ring LED on the front panel) and Standby (Red power LED on the front panel). This unit has a low power feature which means that when left in Standby for a long period, it may take longer than normal to power up.
It is safe to put the Digital TV recorder into Standby mode when you have set programmes to record. The Digital TV recorder will automatically wake up from Standby mode to make the recording. If you plan to leave the Digital TV recorder unattended for a long period and have not set any programmes to record, put the Digital TV recorder into Standby and wait for 20 seconds before switching it off at the mains.
Automatic StandbyTo help reduce the amount of electricity it uses, the Digital TV recorder will automatically switch to Standby mode at 3am every day, if there has been a period of inactivity. If you are still watching TV at this time, a screen will be displayed allowing you to stop the Digital TV recorder entering Standby mode. If no button is pressed while this screen is displayed, the Digital TV recorder will enter Standby mode after a few seconds. It is possible to deactivate this automatic Standby mode by setting the Auto Standby option in the General Settings menu to Off. Refer to page 35.
Common Symbols
The following symbols may be visible in the Electronic Programme Guide, Channel List, Info display, Timers screen and Library menu.
Locked channel. Multiple audio languages available.
Encrypted/scrambled channel. Teletext available.
Radio Channel. Timer has been set.
Channel selected for moving. [S] Subtitles available.
Recording has been viewed. Selected channel is hidden.
Timer is set to “Series Record”. Playback of recording has been locked.Recording has been protected from deletion.
Play.
Pause. Record.
Slow motion. Fast Forward.
Rewind. Fast Forward (x16).
Fast Rewind (x16). Fast Forward (x128).
Fast Rewind (x128). HD High Definition.
AD Audio Description available.
Using your D
igital TV
recorder
17
HDR5010 User Guide.indb 17 8/6/10 09:08:18

The Electronic Programme Guide (EPG)
The EPG displays programme information for the next 8 days (when transmitted by broadcasters). You can also set programmes to be recorded from the EPG.
To PressAccess the EPG... [GUIDE] button.
Move around the EPG... [ / / / ] buttons or [0]-[9] buttons to directly enter the channel number.
Display the previous nine channels in the list... [RED] button.
Display the next nine channels in the list... [GREEn] button.
Move forward 4 or 24 hours... [BLUE] button.(Press to switch between 4 and 24 hours)
Move back 4 or 24 hours... [YELLoW] button.(Press to switch between 4 and 24 hours)
View information for the highlighted programme...
[InFo] button. Press again to return to the EPG.
Set a highlighted programme to record... [ ] button. Refer to page 23 for Recording options.
Preview a current programme (in the background)... [oK] button.
Exit the EPG and switch to a previewed programme... [oK] button.
Exit the EPG... [GUIDE] or [BACK] button.
If you accidentally set a wrong programme to record, press the [ ] button again to cancel.
Current channel
Date of currently
displayed programmes
List of channels
Today’s date and current time
Time of currently displayed programmes
Programme information
Using your Digital TV recorder
18
HDR5010 User Guide.indb 18 8/6/10 09:08:19

The Channel List
The Channel List displays all the available channels.
To PressAccess the Channel List... [oK] button while watching TV.
Select channels... [ / ] buttons.
Display the previous nine channels in the list...
[RED] button.
Display the next nine channels in the list... [GREEn] button.
Switch to the selected channel... [oK] button.
Exit the Channel List... [BACK] button.
List of channels
Highlighted channel
Using your D
igital TV
recorder
19
HDR5010 User Guide.indb 19 8/6/10 09:08:20

The Info Display
When watching TV, the Info display gives brief information on the current and future programmes (when the programme information is transmitted by broadcasters). You can also set programmes to be recorded from the Info display. When watching a recording, the Info display gives brief information on the recorded programme.
To PressAccess Info for the current programme/recording...
[InFo] button.
View information for future programmes on the current channel...
[RIGHT] button.
View information for programmes on other channels...
[ / ] buttons.
Change the Audio setting (if available)... [RED] button.
Change the Subtitle setting (if available)... [GREEn] button.
Switch to another channel (when viewing that channel’s information)...
[oK] button.
Set a future programme to record... [ ] button (whilst viewing that programme’s information). Refer to page 22 for more information.
Exit Info... [InFo] or [BACK] button.
Selected programme’s
details
Today’s date and current time
Selected programme’s start and end time
Programme name
Channel
Using your Digital TV recorder
20
HDR5010 User Guide.indb 20 8/6/10 09:08:21
Picture In Picture (PIP)
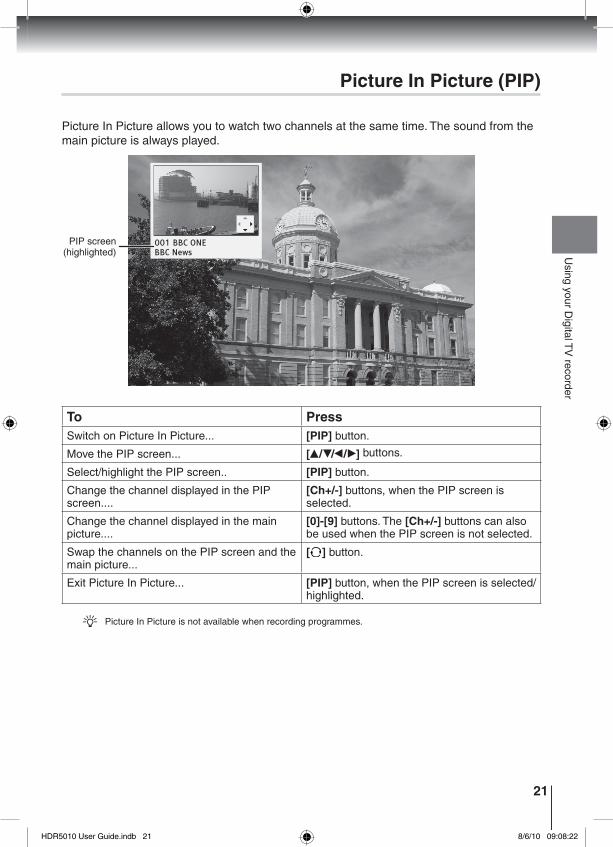
Picture In Picture allows you to watch two channels at the same time. The sound from the main picture is always played.
To PressSwitch on Picture In Picture... [PIP] button.
Move the PIP screen... [ / / / ] buttons.
Select/highlight the PIP screen.. [PIP] button.
Change the channel displayed in the PIP screen....
[Ch+/-] buttons, when the PIP screen is selected.
Change the channel displayed in the main picture....
[0]-[9] buttons. The [Ch+/-] buttons can also be used when the PIP screen is not selected.
Swap the channels on the PIP screen and the main picture...
[ ] button.
Exit Picture In Picture... [PIP] button, when the PIP screen is selected/highlighted.
Picture In Picture is not available when recording programmes.
PIP screen (highlighted) U
sing your Digital T
V recorder
21
HDR5010 User Guide.indb 21 8/6/10 09:08:22

Recording Programmes
This Digital TV recorder has twin tuners, making it possible to record two programmes at the same time.
When recording two programmes at the same time you can also:- watch either of the programmes you are recording.- start to playback one of the recordings, even though it’s still recording !- playback a previously recorded programme - watch either of the programmes being
recorded.
When recording two programmes at the same time you can not:- timeshift/pause live TV.- use Picture In Picture.- watch a third TV channel.
Recording TV Programmes
There are 4 different ways to record programmes:
1. Instant recordingWhile watching a programme, press • [ ] to start recording.Press • [ ] to stop recording.
2. Recording from the Electronic Programme Guide (EPG)With the required programme highlighted in the EPG, press the • [ ] button to set the recording.
For full details on the EPG, refer to page 18.
3. Recording from the Info displayWith the required programme highlighted in the Info display, press the • [ ] button to set the recording.
For full details on the Info display, refer to page 20.
4. Manually recordingYou can manually set a recording from the Timers screen.
With the Timers screen displayed, press the • [YELLoW] button to manually set a recording.
For full details on the Timers menu, refer to page 26.
Using your Digital TV recorder
22
HDR5010 User Guide.indb 22 8/6/10 09:08:22

Recording Programmes
Recording options
Below is the bottom part of an on screen menu that may appear when you make a recoring. The number of options available may vary.
If you do not wish to use any of these options press the [oK] button or simply wait until the menu disappears.
There are 3 options that you may see in this menu:
1. HD alternativeWhen setting a Standard Definition (SD) programme to record, the HD Alternative option will appear if there is a HD version of this programme available. Press the [RED] button and HD alternative will be recorded instead.
2. Recommendations (Try this)This allows you to record a selected list of related programmes. If, for example, you set a recording for Panorama, the recommendations would contain similar programmes such as Horizon. Press the [YELLoW] button if you would like these programmes to be recorded.
To ensure that the series and recommendations are also for HD, choose the HD option before selecting Series or Recommendation options.
note
The broadcaster controls the content of the recommendations and these may be the same as the recordings for •the Series.
3. Series recordThis allows you to record an entire series at the push of a button (when supported by broadcasters). If the programme you are setting is part of a series, press the [BLUE] button to record the entire series. Programmes set to record as part of a series are identified in the “Timers” menu with a symbol.
Trailer bookingWhen there is a trailer for a TV programme (e.g. just before or after Eastenders) a symbol may be displayed on screen (when supported by broadcasters). To use this feature press the [GREEn] button and select the programme(s) you wish to record.
Go to the Timers screen to check the recorded program, and the timer can be modified (Refer to page 26/27 for more information).
Using your D
igital TV
recorder
23
HDR5010 User Guide.indb 23 8/6/10 09:08:22
Recording Programmes
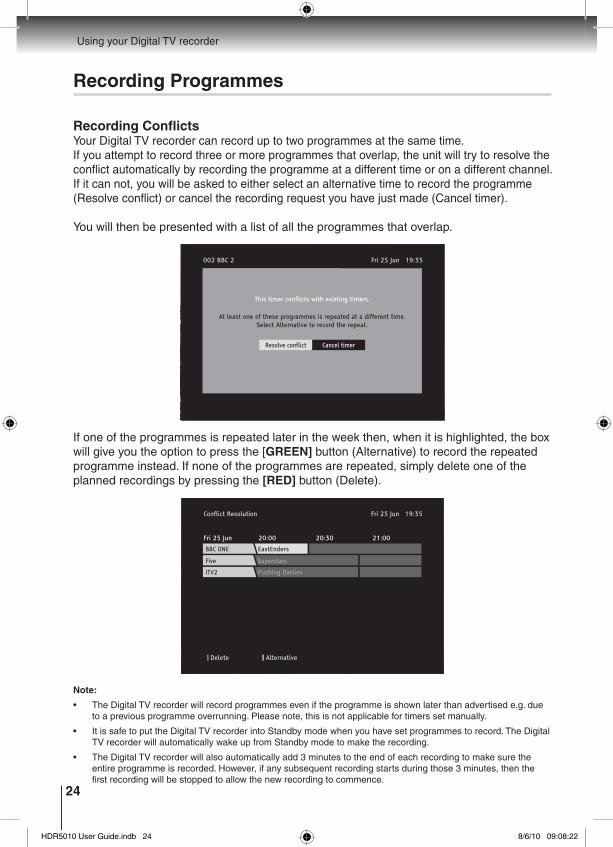
Recording ConflictsYour Digital TV recorder can record up to two programmes at the same time.If you attempt to record three or more programmes that overlap, the unit will try to resolve the conflict automatically by recording the programme at a different time or on a different channel. If it can not, you will be asked to either select an alternative time to record the programme (Resolve conflict) or cancel the recording request you have just made (Cancel timer).
You will then be presented with a list of all the programmes that overlap.
If one of the programmes is repeated later in the week then, when it is highlighted, the box will give you the option to press the [GREEn] button (Alternative) to record the repeated programme instead. If none of the programmes are repeated, simply delete one of the planned recordings by pressing the [RED] button (Delete).
note:
The Digital TV recorder will record programmes even if the programme is shown later than advertised e.g. due •to a previous programme overrunning. Please note, this is not applicable for timers set manually.
It is safe to put the Digital TV recorder into Standby mode when you have set programmes to record. The Digital •TV recorder will automatically wake up from Standby mode to make the recording.
The Digital TV recorder will also automatically add 3 minutes to the end of each recording to make sure the •entire programme is recorded. However, if any subsequent recording starts during those 3 minutes, then the first recording will be stopped to allow the new recording to commence.
Using your Digital TV recorder
24
HDR5010 User Guide.indb 24 8/6/10 09:08:22

Timeshifting
Timeshifting, also known as Pause live TV, lets you pause a broadcast programme and continue watching it later. The maximum length of time you can pause is 4 hours.
Pausing Live TVPress • to pause live TV. Press to resume.
When live TV is paused, the timeshifting banner is displayed indicating how long the programme has been paused.
The length of time you can pause a programme can be adjusted in the menu. See ‘Pause Buffer Size’ on page 35.
Rewinding Live and Timeshifted TVPress • to rewind live TV. Press to resume.
You can press a further 3 times to rewind faster.
Fast Forwarding Timeshifted TVPress • to fast forward timeshifted TV. Press to resume.
You can press a further 3 times to fast forward faster.
Watching in Slow MotionPress • to pause live TV or a recording.Press • to watch in slow motion. Press to return to normal.
Stopping TimeshiftingPress • .
Timeshift banner
Using your D
igital TV
recorder
25
HDR5010 User Guide.indb 25 8/6/10 09:08:24

The Timers Screen
The Timers screen displays all the programmes that are currently set to record. You can also set a manual timer and modify or cancel an existing timer from the Timers screen.
To PressAccess the Timers menu... [TIMER] button.
Select a timer event... [ / ] buttons.
View additional pages of timer events (if available)...
[ / ] buttons.
Delete the selected timer event... [RED] button. If the timer selected is for a series you will be asked whether to delete all timers in the series or just this instance.
Modify the selected timer event... [GREEn] button (see following page for more details).
Manually set a timer... [YELLoW] button (see following page for more details).
Show all timers currently set (including all ‘Series Record’ programmes) ...
[BLUE] button. Press again to display a summary of all timers currently set.
Exit the Timers menu... [TIMER] or [BACK] button.
note:
The number of hours displayed as • Free and for the Library and Timers are approximate only. These are based on recording Standard Definition TV programmes. If recording High Definition TV programmes then the number of hours will change.
List of timers
Today’s date and current time
Size of current
recordings
Size of current timers
symbolindicates
that Series Record
is set
Available recording space
symbol indicates that the timer is protected from deletion
Using your Digital TV recorder
26
HDR5010 User Guide.indb 26 8/6/10 09:08:25

Modifying Timers
Modifying a TimerYou can edit a current timer to change the Type, Channel, Start and End time/date.
With the required timer highlighted, press the 1. [GREEn] button. If the timer is protected, use the [0]-[9] buttons to enter the PIN.
Press 2. [ ] or [ ] to highlight the required setting. Use the [ / / / ] and [0]-[9] buttons to make changes.Press the 3. [GREEn] button to save the changes.
The following settings are available:
Type:
‘Series’ This is displayed if you have set a series record (see page 23 for details). Only the Change/Delete or Playback settings can be changed.
‘Programme’ This is displayed if you set a programme to record that is not part of a series. Only the Type, Change/Delete & Playback settings can be changed.
If the timer Type is changed to manual, then Programme will be changed to Channel. The TV channel you originally set to record (eg. 1 BBC ONE) will be displayed. All of the settings can then be changed.
‘Manual’ This is displayed if you manually set a timer (see next page). The Channel, Start time, End time, Change/Delete & Playback can all be changed.
Using your D
igital TV
recorder
27
HDR5010 User Guide.indb 27 8/6/10 09:08:26

Change/Delete:
‘Allowed’ The timer can be changed or deleted.
‘Disallowed’ The PIN must be entered correctly before the timer can be changed/deleted.
A symbol will be added to recordings that have been protected from change or deletion.
Playback:
‘Allowed’ The recording can be viewed (even if it was recorded from a locked channel).
‘Disallowed’ The recording can not be viewed. The PIN must be entered correctly before the recording can be viewed.
A symbol will be added to recordings that have been protected from playback.
‘Use parental settings’
If the recording is made from a locked channel, the PIN must be entered correctly before the recording can be viewed (see Parental Control on page 38).
Manually Setting a TimerWith the ‘Timers’ menu displayed, press the 1. [YELLoW] button.Press 2. [ ] or [ ] to highlight the required setting. Use the [ / / / ] and [0]-[9] buttons to make changes. All settings apart from Type can be changed.Press the 3. [GREEn] button to save the changes.
Modifying Timers
Using your Digital TV recorder
28
HDR5010 User Guide.indb 28 8/6/10 09:08:26

The Library Screen
The Library menu displays all the recordings currently stored on the hard disk. You can also browse and manage your recordings from the Library menu. The Library menu will take longer to load if you have lots of recordings stored on the hard disk.
To PressAccess the Library menu... [LIB] button.
Select a recording... [ / ] buttons.
View additional pages of recordings (if available)...
[ / ] buttons.
Play the selected recording from the last played position...
[ ] button.
Play the selected recording from a specific position...
[oK] button (see following page for more details).
Delete the selected recording... [RED] button.
Edit the selected recording (to set protection and playback options)...
[GREEn] button (see following page for more details).
Add the selected recording to the playlist... [YELLoW] button (see following page for more details).
Sort the recordings... [BLUE] button. Press the corresponding colour button to select the required sort option.
Exit the Library menu... [LIB] or [BACK] button.
List of recordings
symbol indicates that the recording
has been watched
Available recording space (approx)
Size of current recordings (approx)
Size of current timers
(approx)
Length of recording in minutes (approx)
symbol indicates that the recording is protected from deletion
symbol indicates that the recording is protected from playback
Using your D
igital TV
recorder
29
HDR5010 User Guide.indb 29 8/6/10 09:08:27

The Library Screen
Playing a Recording from a Specific PositionYou can play a recording from the start, the end, the last played position or from any point within the recording.
With the required recording highlighted, press the 1. [oK] button.Press 2. [ / / / ] to highlight the required option. (For ‘Start playback from’, use the [0]-[9] buttons to enter the required time.) Press the [oK] button to play the recording.
A symbol will be added to recordings that have been played.
Setting Protection and Playback optionsYou can prevent a recording from being deleted or played unless the PIN is entered correctly. This can be used to stop accidental deletion or prevent children watching inappropriate recordings.
With the required recording highlighted, press the 3. [GREEn] button.Press 4. [ ] or [ ] to highlight the required setting. Use the [ ] and [ ] buttons to make changes. Press the [GREEn] button to save any changes.
A symbol will be added to recordings that have been protected from deletion.A symbol will be added to recordings that have been protected from playback.
Using the PlaylistYou can set multiple recordings to be played one after another. This can be useful when saving multiple recordings to a Video tape/DVD or just to watch several recordings in one go.
With the required recording highlighted, press the 5. [YELLoW] button. A ‘q’ is added by the recording’s name. Repeat to add further recordings to the playlist.
To remove a recording from the playlist, highlight the recording and press the [YELLoW] button.
With one of the recordings in the playlist highlighted, press the 6. [oK] button. Press [ ] or [ ] to highlight ‘Start playlist’. Press the [oK] button to play the playlist. If you are saving recordings to a Video tape/DVD, don’t forget to start recording on your Video or DVD recorder.
While the playlist is playing, press and hold to skip to the next programme in the playlist. Press and hold to return to the start of the current programme.
Using your Digital TV recorder
30
HDR5010 User Guide.indb 30 8/6/10 09:08:27

The Photo Viewer
The Photo viewer function, allows you to view photos from devices, such as, Digital still cameras (DSC), USB Card readers and USB Flash drives.
operating the Photo InputPrepare the Photo input equipment as follows:1.
Digital Still Camera:Set up according to the instructions for “connecting to PC” in the camera’s User’s manual.
USB Card Reader:Insert only one memory card.
USB Flash Drive:No preparation required.
Connect the USB cable or USB Flash drive to the USB socket 2. q. Alternatively you can use the USB socket on the back panel.Select the USB viewing mode (see page 16). If connecting a camera, turn it On, as 3. instructed in the camera’s User’s manual.Refer to the following page for operation of the viewer / slide show.4. To prevent possible loss of data, switch to a different input mode and switch off the 5. USB device before removing it.
note:
Do not connect any apparatus other than a DSC, USB Card reader or USB Flash drive to the Photo input •socket. It may cause a malfunction.
Do not connect a DSC, USB Card reader or USB Flash drive using a USB Hub. Pictures may not be displayed •correctly, or it may cause a malfunction.
Certain types of USB device may not work with this Photo Viewer function.•
q
Using your D
igital TV
recorder
31
HDR5010 User Guide.indb 31 8/6/10 09:08:28
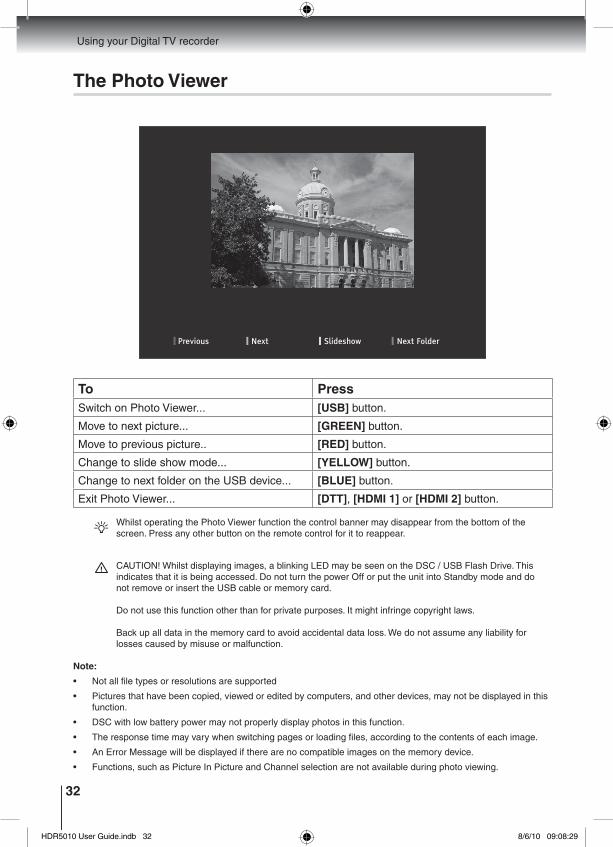
The Photo Viewer
To PressSwitch on Photo Viewer... [USB] button.
Move to next picture... [GREEn] button.
Move to previous picture.. [RED] button.
Change to slide show mode... [YELLoW] button.
Change to next folder on the USB device... [BLUE] button.
Exit Photo Viewer... [DTT], [HDMI 1] or [HDMI 2] button.
Whilst operating the Photo Viewer function the control banner may disappear from the bottom of the screen. Press any other button on the remote control for it to reappear.
CAUTION! Whilst displaying images, a blinking LED may be seen on the DSC / USB Flash Drive. This indicates that it is being accessed. Do not turn the power Off or put the unit into Standby mode and do not remove or insert the USB cable or memory card.
Do not use this function other than for private purposes. It might infringe copyright laws.
Back up all data in the memory card to avoid accidental data loss. We do not assume any liability for losses caused by misuse or malfunction.
note:
Not all file types or resolutions are supported •
Pictures that have been copied, viewed or edited by computers, and other devices, may not be displayed in this •function.
DSC with low battery power may not properly display photos in this function.•
The response time may vary when switching pages or loading files, according to the contents of each image.•
An Error Message will be displayed if there are no compatible images on the memory device.•
Functions, such as Picture In Picture and Channel selection are not available during photo viewing.•
Using your Digital TV recorder
32
HDR5010 User Guide.indb 32 8/6/10 09:08:29

Main Menu
Edit Channel List
Hide Channels
Sort Channels
Tuning
Automatic SearchGuidance Lock
Manual Search
Parental Control
Enter PIN XXXX Enter PIN XXXX
Lock Channels
Set PIN
Settings
General Settings
AccessibilitySettings
DTR Settings
Dolby Settings
Network settings
Service
ManufacturersDetails
Signal Strength
Over Air SoftwareUpgrade
USB SoftwareUpgrade
Reset STB
The Main Menu
To PressAccess the Main Menu... [MEnU] button.
Highlight an option... [ / ] buttons.
Select an option... [oK] button.
Adjust an option’s settings... [ / ] buttons.
Go back a step... [BACK] button.
Exit the Main Menu... [MEnU] button.
Main Menu Structure
Using your D
igital TV
recorder
33
HDR5010 User Guide.indb 33 8/6/10 09:08:29

Main Menu options
Edit Channel List Menu
•Hide Channels Allows you to hide unwanted channels. Press the [oK] button to select a channel to hide.
•Sort Channels Allows you to rearrange the channel order. Press the [oK] button to select the channel
you wish to move. Press [ ] or [ ] to select the new position, then press the [oK] button.
Settings Menu
•General Settings
AudioAllows you to set your preferred audio setting (if available).
HDMI outputAllows you to change the HDMI output resolution. Default setting is Auto. This selects the best possible resolution supported by your TV. If preferred the resolution can be changed. Refer to page 45 for more information.
TV outAllows you to switch the SCART output between RGB and CVBS. The default setting is RGB which gives you the best picture quality. If your TV is not compatible with RGB or you are having problems with the picture, switch to CVBS.
Picture ModeAllows you to switch between widescreen, 4:3 normal and 4:3 letterbox picture.
WidescreenThis is the default setting and is best if you have a widescreen TV.
4:3 normalChoose this option if you do not want to have a black bar at the top and bottom of the screen. Programmes broadcast in widescreen will fill the whole screen but you will lose the left and right edges of the picture.
4:3 letterboxWe recommend you choose this option if you have an older 4:3-format TV. Any programmes broadcast in widescreen will fit onto the screen, but will have a black bar at the top and bottom.
Using your Digital TV recorder
34
HDR5010 User Guide.indb 34 8/6/10 09:08:29
DisplayAllows you to change how the front panel display functions.
The following options are available:
normal <default>.1. The front panel display will show information about the DTT/Radio channel currently
being watched or listened to. It also displays symbols such when using the Digital TV recorder functions. The clock will be displayed when in Standby.
Clock.2. The front panel display will show the time when the Digital TV recorder is on and
nothing when in Standby.
off.3. The front panel display will be off all the time.
Auto StandbyAllows you to select whether the Digital TV recorder automatically switches to Standby mode at 3am, every day. Default setting is On.
Update ChannelsAllows you to update the Channel List automatically or manually. Default setting is Off.
•Accessibility
SubtitleAllows you to set your preferred subtitles setting (if available). Choose between Normal or Hard of Hearing. Hard of hearing adds more description of the sounds to the text (when available).
Audio DescriptionAllows you to set your preferred language for Audio Description (if available).
Audio Description LevelAllows you to set the volume of Audio Description relative to the main sound volume (when AD is available).
•DTR Settings
Pause Buffer Size Allows you to set the length of time the Digital TV recorder will pause a programme. This
setting also determines how far back you can rewind live TV. Choose between 2, 4 hours or disable the setting so that Pause live TV will not operate.
Main Menu options
Using your D
igital TV
recorder
35
HDR5010 User Guide.indb 35 8/6/10 09:08:29

Main Menu options
Auto DeleteYou can set the Digital TV recorder to automatically delete recorded programmes based on their size or if they have been watched. Programmes will only be deleted when there is not enough hard disk space available for new recordings. Default setting is Never.
Format DiskAllows you to delete all recorded programmes.
CAUTION ! Formatting the hard disk will delete all the recorded programmes stored on the hard disk. This may take around 10 minutes.
•Dolby Settings
Downmix Allows you to select the output audio type. Select the setting that best suites your
equipment.
The following options are available:
Automatic <default>.1. This is the best option to select if connecting to an audio device using a HDMI
cable.
- Your audio device will be interrogated over the HDMI cable to find the best quality sound supported by your TV/Amplifier. If Dolby Digital 5.1 is supported, then this will be sent over HDMI, otherwise 2-channel PCM Stereo (with Dolby Surround) will be sent.
- The optical output (SPDIF) will carry 2-channel PCM Stereo (with Dolby Surround).
- The SCART will carry Stereo (with Dolby Surround).
Dolby Digital.2. Select this option if connecting to a Dolby Digital compatible TV/Amplifier, using a
digital optical lead (SPDIF).
- The optical output (SPDIF) will send Dolby Digital 5.1 (if supported).
- The HDMI will carry Dolby Digital 5.1 if supported, otherwise it will carry 2-channel PCM Stereo (with Dolby Surround).
- The SCART will carry Stereo (with Dolby Surround).
Using your Digital TV recorder
36
HDR5010 User Guide.indb 36 8/6/10 09:08:29

Main Menu options
Dolby Surround.3. Select this option if connecting to a TV/Amplifier that supports Dolby Surround Pro
Logic, Dolby Pro Logic II, Dolby Pro Logic IIx or Dolby Pro Logic IIz decode.
- All outputs will carry Stereo (with Dolby Surround).
Stereo.4. Select this mode if connecting to a Stereo audio device.
- All outputs will carry Stereo (without Dolby Surround).
Audio Delay Allows you to delay the audio timing so that it synchronises with the TV picture. This
allows for delays that may be introduced by some TVs.
Dynamic Range Control
The following options are available:
off mode <default>.1. The sound output is as is intended by the programme being watched.
TV mode.2. Default values of Cut and Boost are selected to both reduce high volume and
increase low volume sound, relative to the main sound volume through your TV.
on mode.3. Allows Cut and Boost values to be changed.
Cut: Allows you to reduce high volume sounds such as explosions, relative to the main sound volume. The maximum reduction is 100.
Boost: Allows you to increase low volume sounds such as speech or background sounds, relative to the main sound volume. The maximum increase is 100.
note:
These settings are only effective if supported by the broadcaster.•
•network Settings
The following options are available:
Auto <default>.1. This is the default option. All settings (IP address, DNS server, MAC address etc)
are automatically selected (DHCP). The settings cannot be changed.
Using your D
igital TV
recorder
37
HDR5010 User Guide.indb 37 8/6/10 09:08:29

Manual.2. Allows you to manually change your IP settings (for advanced users only). Use the
[ / / / ] buttons to navigate through the table and enter your own numbers using the [0] - [9] buttons.
note:If you choose invalid IP settings the Digital TV recorder may not operate correctly.•
Parental Control Menu
•Guidance Lock Allows you to automatically lock playback of recorded programmes that are parentally
advised.
•Lock Channels Allows you to select the channels you would like to lock. Locked channels can only be
viewed once the correct PIN is entered. The default PIN is 0000.
•Set PIn Allows you to set your PIN.
Tuning MenuAllows you to automatically or manually tune channels. You will be asked to enter your PIN. The default PIN is 0000.
Service Menu
•Manufacturer’s Details Allows you to check the software and hardware versions and serial number of your
Digital TV recorder.
•Signal Strength Allows you to check the DTT signal strength, quality and transmitter name.
•over Air Software Upgrade Allows you to search for software updates through your aerial (when available).
•USB Software Upgrade Allows you to upgrade your Digital TV recorder using a USB Flash drive connected to
the USB socket.
Main Menu options
Using your Digital TV recorder
38
HDR5010 User Guide.indb 38 8/6/10 09:08:29

To upgrade, follow these instructions;
Download the upgrade file from the www.toshiba.co.uk/tv-dvd-support website. 1. Transfer the file to the root directory of your USB Flash drive.2. Plug your USB Flash drive into the USB socket.3. Select 4. USB Software Upgrade from the Service menu.When prompted, select 5. Yes to upgrade the unit.After a few minutes the unit will reset. When it starts again, use as normal. 6. (You can check the new version in manufacturer’s details)
•Reset Set Top Box Allows you to reset the Digital TV recorder to its default state.
CAUTION ! Resetting the Digital TV recorder will clear all settings and all channel information. After resetting, the Digital TV recorder will need to retune all channels. Only recorded programmes stored on the hard disk will be kept.
Main Menu options
Using your D
igital TV
recorder
39
HDR5010 User Guide.indb 39 8/6/10 09:08:29

Programming the Remote Control
The Digital TV recorder’s remote control can be programmed to operate certain TVs. Follow the procedure below to programme the remote control.
Find the 3 digit code for your brand of TV from the brand codes, starting on page 46.1.
If your brand is not included in the list or the codes for your brand do not operate your equipment, refer to the following page for an automatic method of programming the remote control.
Press and hold the 2. [ ] button and the [AD] button for 3 seconds, then the [ TV] button flashes twice and lights ON.Use the 3. [0]-[9] buttons to enter the 3 digit code for your brand. The [ TV] button flashes when each digit of the code is entered.If a valid code has been entered, the 4. [ TV] button will flash twice, slowly and then goes off.Check that the remote control operates your equipment by pressing the 5. [ TV] button. If not, repeat the above procedure and try another code for your brand.
The codes you enter may be lost if weak batteries are not replaced immediately. Even if your TV brand is listed in the code table, in some instances it may not be possible to operate all of the available functions.
TV standby button
AD button
GUIDE button
button
0-9 buttons
Additional Information
40
HDR5010 User Guide.indb 40 8/6/10 09:08:30

Manually Programming the Remote Control
If your TV brand is not included in the code list, or the brand codes in the list do not operate your equipment, it may still be possible to programme the remote control to operate your equipment.
Press and hold the 1. [ ] button and the [AD] button for 3 seconds, then the [ TV] button flashes twice and lights ON.Aim the remote at the target TV, press the 2. [Ch+] or [Ch–] button to enter Manual Search Mode, the [ TV] button starts to flash. Press the [Ch+] button to search forward or [Ch–] to search backward through the brand codes. Continuously press the [Ch+] or [Ch–] button until the target TV set is switched off, then press the [oK] button to save the codeset and the [ TV] button goes off.Check the other buttons, 3. [ +/–], [ ], [TV Input] work or not. If they don’t, go back to steps (2) and (3).
Finding the Remote Control’s Current Codes
If you have used the procedure above to programme the remote control to operate your TV, it may be useful to know the correct code for your equipment.
Knowing the codes that operate your equipment will allow you to re-programme the remote control quickly using the procedure on the previous page, should the need arise. Make a note of your code and keep it in a safe place.
Press and Hold the 1. [ ] button and [GUIDE] button at the same time for 3 seconds, then the [ TV] button flashes twice and switches OFF.Press the 2. [1] button and count the number of times the [ TV] button flashes. The number of flashes is the first number of the code. No flashes indicates a zero.Press the 3. [2] button and count the number of times the [ TV] button flashes. The number of flashes is the second number of the code. No flashes indicates a zero.Press the 4. [3] button and count the number of times the [ TV] button flashes. The number of flashes is the third number of the code. No flashes indicates a zero.
Additional Inform
ation
41
HDR5010 User Guide.indb 41 8/6/10 09:08:30

Troubleshooting
Should you experience a problem with your Digital TV recorder which can’t be resolved using the table below, put the unit into Standby mode, then unplug completely from the mains. Leave the unit unplugged for at least one minute before connecting again to the mains.
Picture
Problem Possible cause/remedy
No picture/distorted picture
Check the Digital TV recorder is switched On.•Check the aerial is correctly connected to the unit.•Check all connections between the unit and TV.•Check the TV is displaying the correct AV input (refer to •the instruction manual supplied with your TV for details).Check the signal strength (refer to Service menu on •page 38).Power your TV Off and then On at the mains. •
Banner is displayed saying “ Your box is too Hot. Please check that it is properly ventilated”
Unit ventilation is blocked or unit is not positioned correctly. •Reposition unit such that all ventilation holes top/bottom are open and there is nothing blocking them. Also consider moving the unit to a more suitable position (i.e not on top/under other equipment).
Sound
Problem Possible cause/remedy
No sound TV is muted.•Check the aerial is correctly connected to the unit.•Check all connections between the unit and TV/Hi-Fi or •Surround Sound System.Check the signal strength for the channel you are •watching. If the signal is weak then you may have picture but no sound (refer to Service menu on page 38).Power your TV Off and then On at the mains. •
Power
Problem Possible cause/remedy
No power Check the AC mains adaptor is correctly connected and the unit is switched on.
Digital TV recorder takes a long time to switch on
The hard disk is nearly full. Delete some recordings.
Additional Information
42
HDR5010 User Guide.indb 42 8/6/10 09:08:30

Remote Control
Problem Possible cause/remedy
Remote control does not work
If the remote control does not operate your TV, •re-programme the remote control (refer to page 40).Replace the batteries.•
Recording
Problem Possible cause/remedy
Digital TV recorder does not record
Use the Library menu to check if there is any free space •on the hard disk. If there is little or no space, delete some recordings.Put the Digital TV recorder into Standby mode, then •unplug completely from the mains. Leave the unit unplugged for at least one minute before connecting again to the mains.Use the Reset Set Top Box option in the Service menu •(refer to page 39). Please note this resets the box - your recordings will be preserved, but you will lose all other settings and timers. You will also need to retune the box after carrying out this option. Reformat the hard disk (refer to page 36). Please note that •this should only be done as a last resort as formatting the hard disk will permanently delete all recordings.
Toshiba Helpline:Toshiba Website:
0844 856 0730 (calls charged at national rate)www.toshiba.co.uk/tv-dvd-support
Troubleshooting
Additional Inform
ation
43
HDR5010 User Guide.indb 43 8/6/10 09:08:30

Specifications
Physical SpecificationSize (W) 360mm x (H) 60mm x (D) 270mm
Weight 1.9 kg
Power RequirementsInput voltage 12V DC 2.5A (with supplied AC mains adaptor)
DC jack connector 6mm (2.1mm Pin) DC Jack
Power consumption (On) < 30W Max
Power consumption (STBY) < 1W
Operating temperature +5˚C to +40˚C
Storage temperature -20˚C to +60˚C
Twin TunersRF input / output connectors 1x IEC 75R (female) / 1x IEC 75R (male)
Channel coverage UHF 474~850MHz (B21~B68)
DemodulatorModulation Standard Definition
OFDM/QPSK, 16QAM, 64QAMFFT: 2k, 8KCode Rate: 1/2, 2/3, 3/4, 5/6, 7/8Guard Interval: 1/32, 1/16, 1/8, 1/4
High Definition OFDM/QPSK, 16QAM,64QAM, 256QAMFFT: 1K, 2K, 4K, 8K, 8Kext, 16K, 16Kext,32K, 32KextCode Rate: 1/2, 3/5, 2/3, 3/4, 4/5, 5/8Guard Interval: 1/4, 1/8, 1/16, 1/32, 1/128, 19/128, 19/256
Video DecoderVideo decoding Standard Definition – MPEG2 Main level / Main profile
High Definition – MPEG-4 AVC
Video formats 16:9 / 4:3 Letterbox / 4:3
Audio DecoderAudio decoding Standard Definition – MPEG-2 layer 1 and 2
High Definition – Dolby E-AC3 / MPEG-4 HE-AAC
Audio mode Mono / Stereo / Dual
AV ConnectorsHDMI input ports 2 x HDMI type A (19-pin) - selectable
HDMI output port 1 x HDMI type A (19-pin)
Additional Information
44
HDR5010 User Guide.indb 44 8/6/10 09:08:30

Video output 21-pin SCART connector - Composite video (1.0 V pk to pk 75 ohm)RGB (0.7V pk to pk 75 ohm)
Audio output 21-pin SCART connector - Left & Right audio (2V rms 10K ohm)
Audio line out Digital optical (SPDIF) – TOS link connector
Data ConnectorsFront of unit
USB port USB-A female connector / 500mA
Rear of unit
USB port USB-A female connector / 500mA
Ethernet port RJ45 connector Ethernet (10 Base-T / 100 Base-Tx) / HP Auto MDI/MDI-X
Media Storage DeviceSATA HDD (Hard Disk Drive) 500GB, 3.5” platter
Photo ViewerSupported formats JPG, .BMP, .PNG
Supplied AccessoriesRemote controlBatteries (2x AAA/R03)Owner’s manual
Quick start guideHelp leafletAC mains adaptor
Design and specifications are subject to change without notice. All information correct at time of going to press.
HDMI v1.3a Inputs – Supported Resolutions (pass-through)
HDMI output (not from HDMI pass-through)
no. Signal name no. Signal name
1 480i/480p 1 1080p
2 576i/576p 2 1080i
3 720p 3 720p
4 1080i 4 576p
5 1080p 5 576i
8 HDCP (pass-through)
9 CEC (pass-through)
Specifications
Additional Inform
ation
45
HDR5010 User Guide.indb 45 8/6/10 09:08:31

Remote Control Brand Codes
Use the brand codes in the following list when programming the remote control to operate your TV (refer to page 40).
TV Brand ListBrand Code(s) Brand Code(s) Brand Code(s)
Aiwa: 035, 112, 114, 163 JVC: 004, 008, 012, 029, 055, 060, 075, 091, 105, 106, 111
Pye: 011, 056, 059, 083, 164
Alba: 001, 004, 010, 029, 031, 034, 046, 048, 055, 060, 065, 072, 087, 109, 116, 136
LG: 007, 015, 022, 083, 103, 116, 117, 153
Samsung: 001, 003, 004, 006, 007, 009, 012, 022, 026, 030, 035, 039, 054, 055, 070, 083, 088, 096, 103, 110, 118, 128
Baird: 009, 010, 016, 026 Loewe: 011, 040, 076, 101, 107
Sanyo: 002, 004, 006, 009, 014, 015, 017, 020, 026, 035, 045, 054, 059, 075, 082, 113, 158, 169
Beko: 166, 167, 168 Logik: 001, 002, 007, 009, 055, 133
Sharp: 001, 004, 012, 017, 073, 105, 109, 129, 141, 143, 170, 173
Bush: 001, 004, 026, 029, 031, 035, 037, 043, 048, 055, 056, 072, 083, 087, 108, 109, 116, 136, 160
Matsui: 001, 002, 003, 004, 009, 021, 024, 026, 031, 043, 046, 048, 055, 063, 065, 068, 072, 083, 086, 099, 116, 136
Sony: 002, 004, 012, 013, 017, 020, 047, 105, 130, 149, 155
Ferguson: 010, 016, 024, 038, 043, 065, 084, 098, 136
Mitsubishi: 002, 004, 011, 012, 015, 022, 024, 076, 079, 083, 136
Teac: 001, 020, 022, 035, 037, 059, 060, 068, 076, 109, 115, 116, 124, 136, 146, 158
Fidelity: 035, 055, 059, 062, 076, 078
Orion: 002, 021, 022, 031, 035, 042, 048, 059, 065, 078, 083, 107, 116, 133, 161, 163
Tevion: 083, 104, 109, 116, 127, 136, 138
Goodmans: 002, 003, 004, 009, 029, 031, 035, 043, 055, 056, 072, 074, 083, 084, 086, 088, 100, 102, 108, 109, 116, 127, 133, 136, 141, 160, 162, 172
Panasonic: 003, 009, 015, 026, 030, 053, 062, 075, 105, 131, 154, 174
Thomson: 016, 038, 043, 084, 098
Grundig: 001, 004, 008, 024, 065, 072, 079, 083, 088, 100, 111, 115
Philips: 000, 001, 006, 011, 015, 022, 056, 062, 076, 083, 126, 147, 159, 164
Thorn: 003, 004, 009, 010, 014, 016, 035, 043, 074, 076, 079
Additional Information
46
HDR5010 User Guide.indb 46 8/6/10 09:08:31

Remote Control Brand Codes
Hitachi: 001, 003, 004, 005, 009, 013, 015, 016, 017, 022, 023, 037, 069, 074, 075, 085, 099, 102, 119, 120, 121, 134, 136, 137, 138, 142, 144, 148, 152, 169, 172
Pioneer: 002, 016, 019, 020, 038, 062, 071, 076, 125
Toshiba: 001, 002, 003, 004, 006, 007, 008, 012, 013, 016, 019, 024, 035, 059, 062, 075, 096, 103, 105, 116, 118, 141, 150, 156
Additional Inform
ation
47
HDR5010 User Guide.indb 47 8/6/10 09:08:31

U-MAN-002-08 71-800-044-10
HDR5010 User Guide.indb 48 8/6/10 09:08:31