device enrollment guide - adrian stoian enrollment guide ... 7 iunie 2016 version 0.3 created by:...
TRANSCRIPT

TechReady Are you ready to implement IT solutions?
Device Enrollment Guide
Mobile Device Management with Enterprise Mobility Suite
Created for:
TechReady
7 iunie 2016
Version 0.3
Created by:
Adrian Stoian
IT Consultant
MVP Enterprise Mobility

Page 2 MDM_TRDY_DeviceEnrollmentGuide_v03.doc Version 0.3 Rev. 25 June 7, 2016
Change Records
Date Author Version Change description
Oct 09, 2014 Adrian Stoian 0.1 Initial document for review/discussion
Dec 24, 2014 Adrian Stoian 0.2 Minor changes
June 07, 2016 Adrian Stoian 0.3 Added new screenshots
© 2014-2016 TechReady. All rights reserved.
TechReady and TechReady.TV are registered trademarks of TECHREADY S.R.L. in Romania and
European Community.
Distribution Adrian Stoian TechReady [email protected]
Document published as volunteer contribution for the community. The document is provided AS IS, without any warranties. Use at your own risk. TechReady and Adrian Stoian do not assume any liability regarding the information contained in this document.

Page 3 MDM_TRDY_DeviceEnrollmentGuide_v03.doc Version 0.3 Rev. 25 June 7, 2016
Contents Change Records ...................................................................................................................................... 2
Configuration Procedures ....................................................................................................................... 4
To set the Mobile Device Management Authority ............................................................................. 4
To enroll Windows Phone 8.1 devices ................................................................................................ 6
To enroll Android devices ................................................................................................................. 16
To configure Intune auto-enrollment for Windows 10 devices ........................................................ 25

Page 4 MDM_TRDY_DeviceEnrollmentGuide_v03.doc Version 0.3 Rev. 25 June 7, 2016
Configuration Procedures
To set the Mobile Device Management Authority This procedure describes the steps to configure the Mobile Device Management Authority to Microsoft Intune. This setting can be set to:
Microsoft Intune – you configure this setting via the Microsoft Intune Admin portal.
System Center Configuration Manager - you can configure this setting when enabling the Microsoft Intune Connector in System Center Configuration Manager.
In this procedure we will set the Mobile Device Management Authority to Microsoft Intune.
1. On the Intune Admin portal, select the Admin section, in the navigation pane select Mobile Device Management.
2. At the Mobile Device Management section, click Set Mobile Device Management
Authority.

Page 5 MDM_TRDY_DeviceEnrollmentGuide_v03.doc Version 0.3 Rev. 25 June 7, 2016
3. On the Manage Mobile Devices dialog, select Use Microsoft Intune to manage my mobile devices, then click OK.
4. In the Mobile Device Management section, observe the list of supported platforms
Note: Windows, Windows Phone 8.1 and later versions and Android do not require additional configuration, and can be enrolled by default. iOS and Mac OS X require the installation of an Apple Push Notification (APN) certificate.

Page 6 MDM_TRDY_DeviceEnrollmentGuide_v03.doc Version 0.3 Rev. 25 June 7, 2016
To enroll Windows Phone 8.1 devices This procedure describes the enrollment of a Windows Phone 8.1 device (Nokia Lumia). The steps may be different on other models, depending on the manufacturer and OS version. Windows Phone 8.1 does not require the Company Portal .xap file to be published, as it was the case for Windows Phone 8. Instead, users should install the Microsoft Intune Company Portal app from the Windows Phone store.
1. On Windows Phone 8.1, navigate to Settings, Workplace.
2. At Workplace, click Add account.

Page 7 MDM_TRDY_DeviceEnrollmentGuide_v03.doc Version 0.3 Rev. 25 June 7, 2016
3. At Workplace, enter an e-mail address of a user able to enroll devices, then click Sign In.
4. You will be redirected to the sign-in page. Enter the password and click Sign in.

Page 8 MDM_TRDY_DeviceEnrollmentGuide_v03.doc Version 0.3 Rev. 25 June 7, 2016
5. On the Account Added page, click Done.
6. On the Workplace page, you can see that the device is enrolled. Click the name of the company.

Page 9 MDM_TRDY_DeviceEnrollmentGuide_v03.doc Version 0.3 Rev. 25 June 7, 2016
7. You can see also the enrollment details, and you can trigger a sync manually.
Note: The device is enrolled and is receiving policies. To be able to publish applications and information to the device, it is also recommended that you install the Intune Company Portal application. 8. On the phone, navigate to Windows Phone Store and search for “intune company portal”.
Click the application entry in the result of the search.

Page 10 MDM_TRDY_DeviceEnrollmentGuide_v03.doc Version 0.3 Rev. 25 June 7, 2016
9. On the Company Portal page, click Install.
10. If you have not configured previously a Microsoft account (Live ID) on the device, you will be required to sign-in. On the Microsoft account required page, click Sign in.

Page 11 MDM_TRDY_DeviceEnrollmentGuide_v03.doc Version 0.3 Rev. 25 June 7, 2016
11. On the Keep your life in sync page, click Sign in.
12. On the Sign in page, enter a Microsoft account and password, then click Next.

Page 12 MDM_TRDY_DeviceEnrollmentGuide_v03.doc Version 0.3 Rev. 25 June 7, 2016
13. On the Back up page, click Not now.
14. On the Company Portal page, click Install.

Page 13 MDM_TRDY_DeviceEnrollmentGuide_v03.doc Version 0.3 Rev. 25 June 7, 2016
15. After installation, on the Company Portal page, click View.
16. You can also find the Company Portal application in the list of installed applications.

Page 14 MDM_TRDY_DeviceEnrollmentGuide_v03.doc Version 0.3 Rev. 25 June 7, 2016
17. You can sign using the e-mail address and password from Azure Active Directory.
18. Here the user can find the applications that are published by administrator.

Page 15 MDM_TRDY_DeviceEnrollmentGuide_v03.doc Version 0.3 Rev. 25 June 7, 2016
19. You can also see the devices enrolled by the user in the My Devices list.
20. For each device, you can see details and compliance status.

Page 16 MDM_TRDY_DeviceEnrollmentGuide_v03.doc Version 0.3 Rev. 25 June 7, 2016
To enroll Android devices This procedure describes the enrollment of an Android tablet. The steps may be different on other
models, depending on the manufacturer and OS version.
1. On the tablet, access the Google Play store and search for “Intune”. Select the Intune Company Portal.
2. In the Intune Company Portal page click Install.

Page 17 MDM_TRDY_DeviceEnrollmentGuide_v03.doc Version 0.3 Rev. 25 June 7, 2016
3. Accept the application request for device information.
4. After the installation, click Open.

Page 18 MDM_TRDY_DeviceEnrollmentGuide_v03.doc Version 0.3 Rev. 25 June 7, 2016
5. In the Company Portal page, click Sign in to enroll your device.
6. In the logon page, enter an e-mail address of a user able to enroll devices, enter the account
password, then click Sign In.

Page 19 MDM_TRDY_DeviceEnrollmentGuide_v03.doc Version 0.3 Rev. 25 June 7, 2016
7. In the Company Access Setup page, click Begin.
8. In the Why enroll your device? page, click Continue.

Page 20 MDM_TRDY_DeviceEnrollmentGuide_v03.doc Version 0.3 Rev. 25 June 7, 2016
9. In the We care about your privacy page, click Continue.
10. In the What comes next? page, click Enroll.
Page 21 MDM_TRDY_DeviceEnrollmentGuide_v03.doc Version 0.3 Rev. 25 June 7, 2016
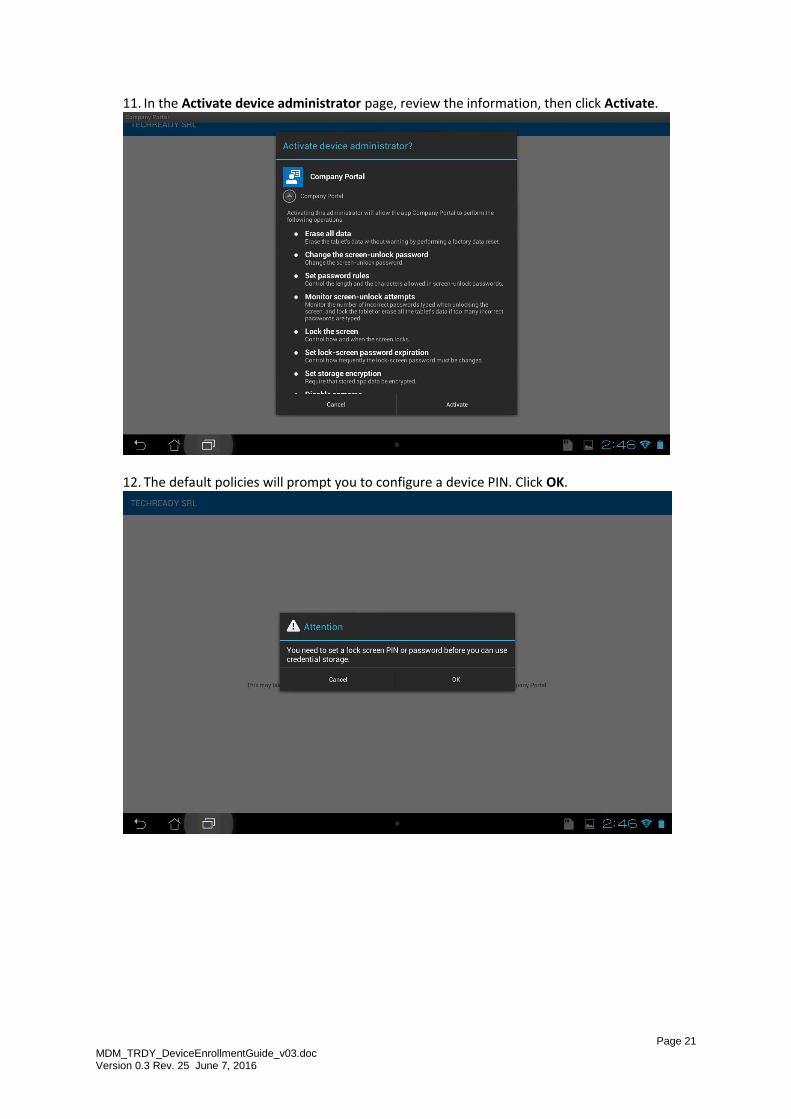
11. In the Activate device administrator page, review the information, then click Activate.
12. The default policies will prompt you to configure a device PIN. Click OK.

Page 22 MDM_TRDY_DeviceEnrollmentGuide_v03.doc Version 0.3 Rev. 25 June 7, 2016
13. In the Unlock selection page, click PIN.
14. Enter the PIN twice, and click Continue.

Page 23 MDM_TRDY_DeviceEnrollmentGuide_v03.doc Version 0.3 Rev. 25 June 7, 2016
15. If prompted, accept the certificate, by clicking OK.
16. In the Company Access Setup page, verify that Device Enrollment and Device Compliance
show green checks, then click Continue.

Page 24 MDM_TRDY_DeviceEnrollmentGuide_v03.doc Version 0.3 Rev. 25 June 7, 2016
17. In the Company Access Setup complete page, click Done.
18. In the Company Portal application, you can see the applications published to the device.

Page 25 MDM_TRDY_DeviceEnrollmentGuide_v03.doc Version 0.3 Rev. 25 June 7, 2016
To configure Intune auto-enrollment for Windows 10 devices This procedure describes the steps to configure Intune Auto-enrollment for Windows 10 devices that are joined to Azure Active Directory. To enable auto-enrollment you need first to add your Azure Active Directory instance to be managed in the Azure Portal, and enable users for Azure Active Directory Premium. If you already performed this configuration, skip to step 20.
1. Open Internet Explorer and navigate to http://azure.microsoft.com/. Click the Portal link
at the top right of the page.
2. In the Microsoft Azure login page, enter your Microsoft ID (formerly Live ID) associated with
the Microsoft Azure subscription, and then click Sign in.

Page 26 MDM_TRDY_DeviceEnrollmentGuide_v03.doc Version 0.3 Rev. 25 June 7, 2016
3. On the new Microsoft Azure portal, click Browse, then select Active Directory.
4. You will be redirected to the old Microsoft Azure portal. Azure Active Directory is still
managed in the old portal. Sign-in again, if necessary.

Page 27 MDM_TRDY_DeviceEnrollmentGuide_v03.doc Version 0.3 Rev. 25 June 7, 2016
5. On the Microsoft Azure page, on the left pane click Active Directory, to view the Azure
Active Directory instances managed with your Microsoft Azure subscription.
6. On the Microsoft Azure page, click New, Directory, Custom Create.

Page 28 MDM_TRDY_DeviceEnrollmentGuide_v03.doc Version 0.3 Rev. 25 June 7, 2016
7. On the Add directory dialog, under Directory select Use existing directory, select I am ready
to be signed out now, and then click the check button.
8. On the Microsoft Azure login page, select Use another account.

Page 29 MDM_TRDY_DeviceEnrollmentGuide_v03.doc Version 0.3 Rev. 25 June 7, 2016
9. Sign in with the administrator account for your Office 365/EMS subscription.
10. On the Use the ‘TECHREADY SRL’ directory with Microsoft Azure page, click Continue.

Page 30 MDM_TRDY_DeviceEnrollmentGuide_v03.doc Version 0.3 Rev. 25 June 7, 2016
11. On the Use the ‘TECHREADY SRL’ directory with Microsoft Azure page, click Sign out now.
12. On the Microsoft Azure login page, select your Microsoft ID (formerly Live ID).

Page 31 MDM_TRDY_DeviceEnrollmentGuide_v03.doc Version 0.3 Rev. 25 June 7, 2016
13. Sign in with the Microsoft ID used by your Microsoft Azure subscription.
14. On the Microsoft Azure page, on the left pane click Active Directory, to view the new Azure
Active Directory instance added in the list. Click the new instance to access its properties.

Page 32 MDM_TRDY_DeviceEnrollmentGuide_v03.doc Version 0.3 Rev. 25 June 7, 2016
15. On the Get Started page, under step 3 - Get Azure AD Premium, you can see that Azure
Active Directory Premium was already enabled when you created the EMS trial.
16. To enable users for Azure Active Directory Premium, click the Licenses tab, then click on
Enterprise Mobility Suite.

Page 33 MDM_TRDY_DeviceEnrollmentGuide_v03.doc Version 0.3 Rev. 25 June 7, 2016
17. On the Enterprise Mobility Suite page, click Assign users.
18. Next to Show, select All Users, then click the check sign. Select a user from the list, then click
Assign.

Page 34 MDM_TRDY_DeviceEnrollmentGuide_v03.doc Version 0.3 Rev. 25 June 7, 2016
19. The selected users will show a status of Enabled.
20. Click left arrow, to go back to your Azure Active Directory instance and select the Applications tab. In the list, click Microsoft Intune.

Page 35 MDM_TRDY_DeviceEnrollmentGuide_v03.doc Version 0.3 Rev. 25 June 7, 2016
21. On the Microsoft Intune page, click Configure.
22. On the Configure page, scroll down the page.

Page 36 MDM_TRDY_DeviceEnrollmentGuide_v03.doc Version 0.3 Rev. 25 June 7, 2016
23. At Manage devices for these users, Apply to, select ALL, then click Save.
24. Click left arrow, to go back to your Azure Active Directory instance, then click the Configure tab.

Page 37 MDM_TRDY_DeviceEnrollmentGuide_v03.doc Version 0.3 Rev. 25 June 7, 2016
25. On the Configure page, scroll down the page.
26. At the Devices section, verify that the option Users may join devices to Azure AD is set to ALL.
Next we have to join a Windows 10 device to Azure AD. It will also be automatically enrolled in Microsoft Intune.

Page 38 MDM_TRDY_DeviceEnrollmentGuide_v03.doc Version 0.3 Rev. 25 June 7, 2016
27. Log in on the device with a local Administrator account. In the Start menu, click Settings.
28. In the Settings window, click Accounts.

Page 39 MDM_TRDY_DeviceEnrollmentGuide_v03.doc Version 0.3 Rev. 25 June 7, 2016
29. In the Accounts window, click Work access, then click Join or leave Azure AD.
30. In the System window, click Join Azure AD.

Page 40 MDM_TRDY_DeviceEnrollmentGuide_v03.doc Version 0.3 Rev. 25 June 7, 2016
31. In the What happens next window, click Next.
32. In the Let’s get you signed in window, enter an Azure Active Directory account and
password, then click Sign in.

Page 41 MDM_TRDY_DeviceEnrollmentGuide_v03.doc Version 0.3 Rev. 25 June 7, 2016
33. In the Make sure this is your organization window, verify the details, then click Join.
34. In the All finished window, click Finish.

Page 42 MDM_TRDY_DeviceEnrollmentGuide_v03.doc Version 0.3 Rev. 25 June 7, 2016
35. In the System window, you can see that the device is joined to the Azure AD organization.
36. In the Accounts window, you can see the account used to join Azure AD.