developer’s guide - embarcadero...
TRANSCRIPT

Developer’s Guide
V E R S I O N 7 . 5
Borland Software Corporation100 Enterprise Way, Scotts Valley, CA 95066-3249www.borland.com
Borland®
InterBase®

Borland Software Corporation may have patents and/or pending patent applications covering subject matter in this document. The furnishing of this document does not give you any license to these patents.
COPYRIGHT © 2004 Borland Software Corporation. All rights reserved. All Borland brand and product names are trademarks or registered trademarks of Borland Software Corporation in the United States and other countries. Other product names are trademarks or registered trademarks of their respective holders.
Part no: INT0070WW21001 8E1R0503
0203040506 9 8 7 6 5 4 3 2 1

iii
Tables ix
Figures xi
Chapter 1Using the InterBase Developer’s GuideTopics covered in this book . . . . . . . . . . . . 1-1
Chapter 2Client/Server ConceptsDefinition of a client . . . . . . . . . . . . . . . . 2-1The InterBase client library . . . . . . . . . . . . 2-2Definition of a server . . . . . . . . . . . . . . . 2-3Application development . . . . . . . . . . . . . 2-4
Borland client tools applications . . . . . . . 2-4Embedded applications . . . . . . . . . . . . 2-6API applications . . . . . . . . . . . . . . . . 2-7Multi-database applications. . . . . . . . . . 2-8
Chapter 3Programming Applications with Delphi or C++ Builder
Optimizing the InterBase SQL Links driver . . 3-1Setting the driver flags. . . . . . . . . . . . . 3-2Setting the SQL pass-through mode . . . . . 3-2Setting the SQL query mode . . . . . . . . . 3-2
Working with TQuery . . . . . . . . . . . . . . . 3-3Why not to use TTable . . . . . . . . . . . . . 3-3Setting TQuery properties and methods. . . 3-3
Using generators . . . . . . . . . . . . . . . . . . 3-4
Chapter 4Programming with JDBCInstalling InterClient classes into JBuilder . . . 4-1
Database application basics . . . . . . . . . . 4-1Using JDBC URLs . . . . . . . . . . . . . . . 4-3
Programming with InterClient . . . . . . . . . . 4-4InterClient architecture . . . . . . . . . . . . 4-4InterClient communication . . . . . . . . . . 4-5
Developing InterClient programs . . . . . . . . 4-6Using the JDBC interfaces . . . . . . . . . . . 4-6About InterClient drivers . . . . . . . . . . . 4-8Accessing InterClient extensions to the JDBC. .
4-10Opening a database connection. . . . . . . . 4-11
Executing SQL statements . . . . . . . . . . 4-13Executing stored procedures . . . . . . . . . 4-18
Troubleshooting InterClient programs . . . . . 4-19Handling installation problems . . . . . . . 4-20Debugging your application . . . . . . . . . 4-20
Deploying InterClient programs . . . . . . . . 4-21Deploying InterClient programs as applets 4-21Deploying InterClient programs as applications
4-23InterClient/JDBC compliance specifications. . 4-23
InterClient extensions to the JDBC API . . . 4-24JDBC features not implemented in InterClient. .
4-24InterClient implementation of JDBC features . .
4-26InterBase features not available through
InterClient or JDBC . . . . . . . . . . . . . 4-26Java SQL datatype support. . . . . . . . . . 4-27SQL-to-Java type conversions . . . . . . . . 4-28Java-to-SQL type conversion . . . . . . . . . 4-28InterClient class references . . . . . . . . . . 4-29
Chapter 5Programming Applications with ODBCOverview of ODBC . . . . . . . . . . . . . . . . . 5-1
Configuring an ODBC driver . . . . . . . . . 5-2Configuring and using ODBC data sources . . . 5-2
Configuring data sources . . . . . . . . . . . . 5-2Connecting from Delphi using the ODBC data
source . . . . . . . . . . . . . . . . . . . . . . 5-3
Chapter 6Working with UDFs and Blob FiltersUDF overview. . . . . . . . . . . . . . . . . . . . 6-2Writing a function module . . . . . . . . . . . . . 6-2
Writing a UDF . . . . . . . . . . . . . . . . . . 6-2Thread-safe UDFs . . . . . . . . . . . . . . . . 6-4
Compiling and linking a function module . . . . 6-5Creating a UDF library . . . . . . . . . . . . . 6-6Modifying a UDF library . . . . . . . . . . . . 6-7
Declaring a UDF to a database . . . . . . . . . . 6-7Declaring UDFs with FREE_IT. . . . . . . . . 6-8UDF library placement . . . . . . . . . . . . . 6-9
Calling a UDF . . . . . . . . . . . . . . . . . . . 6-10Calling a UDF with SELECT . . . . . . . . . 6-10Calling a UDF with INSERT . . . . . . . . . 6-11
Contents

iv
Calling a UDF with UPDATE . . . . . . . . . 6-11Calling a UDF with DELETE . . . . . . . . . 6-11
Writing a Blob UDF . . . . . . . . . . . . . . . . 6-11Creating a Blob control structure . . . . . . . 6-12Declaring a Blob UDF . . . . . . . . . . . . . 6-13A Blob UDF example. . . . . . . . . . . . . . 6-13
The InterBase UDF library . . . . . . . . . . . . 6-14abs . . . . . . . . . . . . . . . . . . . . . . . . 6-16acos . . . . . . . . . . . . . . . . . . . . . . . 6-16ascii_char . . . . . . . . . . . . . . . . . . . . 6-17ascii_val . . . . . . . . . . . . . . . . . . . . . 6-17asin . . . . . . . . . . . . . . . . . . . . . . . . 6-17atan. . . . . . . . . . . . . . . . . . . . . . . . 6-17atan2 . . . . . . . . . . . . . . . . . . . . . . . 6-17bin_and . . . . . . . . . . . . . . . . . . . . . 6-17bin_or . . . . . . . . . . . . . . . . . . . . . .6-18bin_xor. . . . . . . . . . . . . . . . . . . . . . 6-18ceiling . . . . . . . . . . . . . . . . . . . . . . 6-18cos . . . . . . . . . . . . . . . . . . . . . . . . 6-18cosh . . . . . . . . . . . . . . . . . . . . . . . 6-18cot . . . . . . . . . . . . . . . . . . . . . . . . 6-19div . . . . . . . . . . . . . . . . . . . . . . . . 6-19floor . . . . . . . . . . . . . . . . . . . . . . . 6-19ln . . . . . . . . . . . . . . . . . . . . . . . . . 6-19log . . . . . . . . . . . . . . . . . . . . . . . . 6-19log10 . . . . . . . . . . . . . . . . . . . . . . . 6-20lower . . . . . . . . . . . . . . . . . . . . . . . 6-20ltrim . . . . . . . . . . . . . . . . . . . . . . . 6-20mod . . . . . . . . . . . . . . . . . . . . . . . 6-20pi . . . . . . . . . . . . . . . . . . . . . . . . . 6-20rand . . . . . . . . . . . . . . . . . . . . . . . 6-21rtrim . . . . . . . . . . . . . . . . . . . . . . . 6-21sign. . . . . . . . . . . . . . . . . . . . . . . . 6-21sin . . . . . . . . . . . . . . . . . . . . . . . . 6-21sinh. . . . . . . . . . . . . . . . . . . . . . . . 6-22sqrt . . . . . . . . . . . . . . . . . . . . . . . . 6-22strlen . . . . . . . . . . . . . . . . . . . . . . . 6-22substr . . . . . . . . . . . . . . . . . . . . . .6-22tan . . . . . . . . . . . . . . . . . . . . . . . . 6-22tanh . . . . . . . . . . . . . . . . . . . . . . . 6-23
Declaring Blob filters . . . . . . . . . . . . . . . 6-23
Chapter 7Designing Database ApplicationsUsing InterBase databases . . . . . . . . . . . . 7-1
Local databases . . . . . . . . . . . . . . . . . 7-2Remote database servers . . . . . . . . . . . 7-2Database security. . . . . . . . . . . . . . . . 7-2Transactions . . . . . . . . . . . . . . . . . . . 7-3
The Data Dictionary. . . . . . . . . . . . . . . 7-3Referential integrity, stored procedures, and
triggers . . . . . . . . . . . . . . . . . . . . . 7-5Database architecture. . . . . . . . . . . . . . . . 7-5
Planning for scalability . . . . . . . . . . . . . 7-6Single-tiered database applications . . . . . . 7-7Two-tiered database applications . . . . . . . 7-8Multi-tiered database applications . . . . . . 7-8
Designing the user interface . . . . . . . . . . . 7-10Displaying a single record . . . . . . . . . . 7-10Displaying multiple records . . . . . . . . . 7-11Analyzing data . . . . . . . . . . . . . . . . 7-11Selecting what data to show . . . . . . . . . 7-12
Chapter 8Building Multi-tiered ApplicationsUnderstanding databases and datasets. . . . . . 8-1
Using transactions. . . . . . . . . . . . . . . . 8-2Caching updates. . . . . . . . . . . . . . . . . 8-4Creating and restructuring database tables. . 8-4Using the briefcase model . . . . . . . . . . . 8-5
Scaling up to a three-tiered application . . . . . 8-6Creating multi-tiered applications . . . . . . . . 8-6
Chapter 9Introduction to IBXThe IBX components . . . . . . . . . . . . . . . . 9-1The InterBase tab . . . . . . . . . . . . . . . . . . 9-2
TIBTable . . . . . . . . . . . . . . . . . . . . . . 9-2TIBQuery . . . . . . . . . . . . . . . . . . . . . 9-2TIBStoredProc. . . . . . . . . . . . . . . . . . . 9-3TIBDatabase. . . . . . . . . . . . . . . . . . . . 9-3TIBTransaction . . . . . . . . . . . . . . . . . . 9-3TIBUpdateSQL . . . . . . . . . . . . . . . . . . 9-3TIBDataSet . . . . . . . . . . . . . . . . . . . . 9-3TIBSQL . . . . . . . . . . . . . . . . . . . . . . 9-4TIBDatabaseInfo . . . . . . . . . . . . . . . . . 9-4TIBSQLMonitor . . . . . . . . . . . . . . . . . 9-4TIBEvents . . . . . . . . . . . . . . . . . . . . . 9-4
The InterBase Admin tab. . . . . . . . . . . . . . 9-4TIBConfigService . . . . . . . . . . . . . . . . 9-5TIBBackupService . . . . . . . . . . . . . . . . 9-5TIBRestoreService . . . . . . . . . . . . . . . . 9-5TIBValidationService . . . . . . . . . . . . . . 9-5TIBStatisticalService. . . . . . . . . . . . . . . 9-6TIBLogService . . . . . . . . . . . . . . . . . . 9-6TIBSecurityService . . . . . . . . . . . . . . . 9-6TIBLicensingService. . . . . . . . . . . . . . . 9-6TIBServerProperties . . . . . . . . . . . . . . . 9-6

v
TIBInstall . . . . . . . . . . . . . . . . . . . . 9-7TIBUnInstall . . . . . . . . . . . . . . . . . . 9-7
Chapter 10Connecting to DatabasesPersistent and temporary database components . .
10-1Using temporary database components . . . 10-2Creating database components at design time .
10-2Controlling connections . . . . . . . . . . . . . . 10-2
Controlling server login . . . . . . . . . . . . 10-2Connecting to a database server . . . . . . . 10-3Working with network protocols . . . . . . . 10-4Using ODBC . . . . . . . . . . . . . . . . . . 10-4Disconnecting from a database server . . . . 10-4Iterating through a database component’s
datasets . . . . . . . . . . . . . . . . . . . . 10-5Requesting information about an attachment . 10-5
Database characteristics . . . . . . . . . . . . 10-5Environmental characteristics. . . . . . . . . 10-6Performance statistics . . . . . . . . . . . . . 10-7Database operation counts . . . . . . . . . . 10-7Requesting database information. . . . . . . 10-8
Chapter 11Importing and Exporting DataExporting and importing raw data . . . . . . . 11-1
Exporting raw data. . . . . . . . . . . . . . . 11-2Importing raw data . . . . . . . . . . . . . . 11-2
Exporting and importing delimited data . . . . 11-3Exporting delimited data . . . . . . . . . . . 11-3Importing delimited data . . . . . . . . . . . 11-4
Chapter 12Working with InterBase ServicesOverview of the InterBase service components 12-1
About the services manager. . . . . . . . . . 12-1Service component hierarchy . . . . . . . . .12-2Attaching to a service manager . . . . . . . . 12-3Detaching from a service manager . . . . . .12-3
Setting database properties . . . . . . . . . . . . 12-3Bringing a database online . . . . . . . . . . 12-4Shutting down a database . . . . . . . . . . . 12-4Setting the sweep interval . . . . . . . . . . . 12-5Setting the async mode . . . . . . . . . . . . 12-5Setting the page buffers . . . . . . . . . . . . 12-5Setting the access mode . . . . . . . . . . . . 12-6Setting the database reserve space . . . . . .12-6
Activating the database shadow. . . . . . . 12-6Backing up and restoring databases . . . . . . 12-7
Setting common backup and restore properties .12-7
Backing up databases . . . . . . . . . . . . . 12-7Restoring databases . . . . . . . . . . . . . 12-10
Performing database maintenance . . . . . . 12-14Validating a database . . . . . . . . . . . . 12-14Displaying limbo transaction information 12-15Resolving limbo transactions . . . . . . . 12-16
Requesting database and server status reports12-16Requesting database statistics . . . . . . . 12-16
Using the log service . . . . . . . . . . . . . . 12-18Configuring users . . . . . . . . . . . . . . . . 12-18
Adding a user to the security database . . 12-19Listing users in the security database . . . 12-20Removing a user from the security database . . .
12-20Modifying a user in the security database 12-21
Administering software activation certificates 12-21Listing software activation certificates . . 12-21Adding a software activation certificate . 12-21Removing a software activation certificate 12-22
Displaying server properties. . . . . . . . . . 12-23Displaying the database information . . . 12-23Displaying license information . . . . . . 12-23Displaying license mask information . . . 12-24Displaying InterBase configuration parameters .
12-24Displaying the server version . . . . . . . 12-25
Chapter 13Programming with Database EventsSetting up event alerts . . . . . . . . . . . . . . 13-2
Writing an event handler . . . . . . . . . . . 13-2
Chapter 14Working with Cached UpdatesDeciding when to use cached updates . . . . . 14-1Using cached updates . . . . . . . . . . . . . . 14-2
Enabling and disabling cached updates . . 14-3Fetching records . . . . . . . . . . . . . . . . 14-4Applying cached updates . . . . . . . . . . 14-4Canceling pending cached updates . . . . . 14-7Undeleting cached records . . . . . . . . . . 14-8Specifying visible records in the cache . . . 14-9Checking update status . . . . . . . . . . . 14-10
Using update objects to update a dataset . . .14-11

vi
Specifying the UpdateObject property for a dataset . . . . . . . . . . . . . . . . . . . . 14-12
Creating SQL statements for update components . . . . . . . . . . . . . . . . . 14-13
Executing update statements . . . . . . . . 14-19Using dataset components to update a dataset .
14-21Updating a read-only result set . . . . . . . . 14-22Controlling the update process. . . . . . . . . 14-23
Determining if you need to control the updating process . . . . . . . . . . . . . . . . . . . . 14-23
Creating an OnUpdateRecord event handler . . 14-23
Handling cached update errors . . . . . . . . 14-25Referencing the dataset to which to apply
updates . . . . . . . . . . . . . . . . . . . 14-25Indicating the type of update that generated an
error . . . . . . . . . . . . . . . . . . . . . 14-25Specifying the action to take . . . . . . . . 14-26
Chapter 15Understanding DatasetsWhat is TDataSet? . . . . . . . . . . . . . . . . . 15-2Opening and closing datasets . . . . . . . . . . 15-2Determining and setting dataset states . . . . . 15-3
Deactivating a dataset . . . . . . . . . . . . . 15-5Browsing a dataset . . . . . . . . . . . . . . . 15-6Enabling dataset editing . . . . . . . . . . . . 15-6Enabling insertion of new records . . . . . .15-7Calculating fields . . . . . . . . . . . . . . . .15-8Updating records . . . . . . . . . . . . . . . .15-8
Navigating datasets . . . . . . . . . . . . . . . . 15-8Searching datasets . . . . . . . . . . . . . . . . . 15-8Modifying data. . . . . . . . . . . . . . . . . . . 15-9Using dataset events. . . . . . . . . . . . . . . .15-9
Aborting a method . . . . . . . . . . . . . . . 15-9Using OnCalcFields . . . . . . . . . . . . . 15-10
Using cached updates . . . . . . . . . . . . . . 15-10
Chapter 16Working with TablesUsing table components. . . . . . . . . . . . . . 16-1Setting up a table component. . . . . . . . . . . 16-1
Specifying a table name . . . . . . . . . . . . 16-2Opening and closing a table. . . . . . . . . . 16-3
Controlling read/write access to a table. . . . . 16-4Searching for records . . . . . . . . . . . . . . . 16-4Sorting records . . . . . . . . . . . . . . . . . . . 16-4
Retrieving a list of available indexes with GetIndexNames . . . . . . . . . . . . . . . 16-5
Specifying an alternative index with IndexName16-5
Specifying sort order for SQL tables. . . . . 16-5Specifying fields with IndexFieldNames . . . . 16-5
Examining the field list for an index . . . . 16-6Working with a subset of data . . . . . . . . . . 16-6Deleting all records in a table . . . . . . . . . . 16-6Deleting a table . . . . . . . . . . . . . . . . . . 16-7Renaming a table . . . . . . . . . . . . . . . . . 16-7Creating a table . . . . . . . . . . . . . . . . . . 16-7Synchronizing tables linked to the same database
table. . . . . . . . . . . . . . . . . . . . . . . . 16-9Creating master/detail forms . . . . . . . . . . 16-9
Building an example master/detail form. 16-10
Chapter 17Working with QueriesQueries for desktop developers . . . . . . . . . 17-1Queries for server developers . . . . . . . . . . 17-2When to use TIBDataSet, TIBQuery, and TIBSQL . .
17-3Using a query component: an overview . . . . 17-3Specifying the SQL statement to execute . . . . 17-4
Specifying the SQL property at design time 17-5Specifying a SQL statement at runtime . . . 17-6
Setting parameters . . . . . . . . . . . . . . . . 17-7Supplying parameters at design time . . . . 17-8Supplying parameters at runtime . . . . . . 17-9Using a data source to bind parameters . 17-10
Executing a query . . . . . . . . . . . . . . . . 17-12Executing a query at design time . . . . . 17-12Executing a query at runtime . . . . . . . 17-12
Preparing a query . . . . . . . . . . . . . . . 17-13Unpreparing a query to release resources . . 17-14Improving query performance . . . . . . . . 17-14
Disabling bi-directional cursors . . . . . . 17-14Working with result sets . . . . . . . . . . . . 17-15
Updating a read-only result set . . . . . . 17-15
Chapter 18Working with Stored ProceduresWhen should you use stored procedures? . . . 18-2Using a stored procedure . . . . . . . . . . . . 18-3
Creating a stored procedure component . . 18-3Creating a stored procedure . . . . . . . . . 18-4Preparing and executing a stored procedure 18-5

vii
Using stored procedures that return result sets . 18-6
Using stored procedures that return data using parameters. . . . . . . . . . . . . . . . . . . 18-6
Using stored procedures that perform actions on data. . . . . . . . . . . . . . . . . . . . . . . 18-8
Understanding stored procedure parameters. 18-10Using input parameters . . . . . . . . . . . 18-11Using output parameters . . . . . . . . . . 18-11Using input/output parameters . . . . . . 18-12Using the result parameter . . . . . . . . . 18-12Accessing parameters at design time. . . . 18-13Setting parameter information at design time .
18-13Creating parameters at runtime . . . . . . 18-14
Viewing parameter information at design time . . .18-15
Chapter 19Debugging with SQL MonitorBuilding a simple monitoring application . . . 19-1
Chapter 20Writing Installation WizardsInstalling . . . . . . . . . . . . . . . . . . . . . . 20-1
Defining the installation component . . . . 20-1Defining the uninstall component . . . . . . . 20-4
Index I-1

viii

ix
1.1 Chapters in the Developer’s Guide. . . . . . 1-14.1 Pros and cons of applet development . . 4-224.2 InterClient extensions to JDBC . . . . . . 4-244.3 Unsupported JDBC features . . . . . . . . 4-254.4 InterClient implementation of JDBC features
4-264.5 InterBase features not supported by
InterClient . . . . . . . . . . . . . . . . . . 4-264.6 Java SQL datatype support . . . . . . . . 4-274.7 SQL to Java type conversions . . . . . . . 4-284.8 Java-to-SQL type conversions . . . . . . . 4-286.1 Microsoft C compiler options . . . . . . . 6-66.2 Arguments to DECLARE EXTERNAL
FUNCTION . . . . . . . . . . . . . . . . . . 6-86.3 Fields in the Blob struct . . . . . . . . . . 6-126.4 Function declarations for the InterBase UDF
library . . . . . . . . . . . . . . . . . . . . 6-157.1 Data Dictionary interface . . . . . . . . . 7-410.1 TIBDatabaseInfo database characteristic
properties . . . . . . . . . . . . . . . . . . 10-610.2 TIBDatabaseInfo environmental
characteristic properties . . . . . . . . . . 10-6
10.3 TIBDataBaseInfo performance properties10-710.4 TIBDatabaseInfo database operation count
properties . . . . . . . . . . . . . . . . . . 10-812.1 Database shutdown modes . . . . . . . . 12-412.2 Common backup and restore properties 12-712.3 TIBBackupService options . . . . . . . . . 12-812.4 TIBRestoreService options . . . . . . . . .12-1112.5 TIBValidationService options . . . . . . 12-1412.6 TIBValidationService actions . . . . . . . 12-1612.7 TIBStatisticalService options . . . . . . 12-1712.8 TIBSecurityService properties . . . . . . 12-1914.1 TIBUpdateRecordType values . . . . . . 14-914.2 Return values for UpdateStatus . . . . 14-1014.3 UpdateKind values . . . . . . . . . . . 14-2614.4 UpdateAction values . . . . . . . . . . 14-2715.1 Values for the dataset State property. . . 15-315.2 Dataset events . . . . . . . . . . . . . . . 15-915.3 Properties, events, and methods for cached
updates . . . . . . . . . . . . . . . . . . .15-1120.1 TIBInstall properties . . . . . . . . . . . . 20-120.2 TIBInstall options . . . . . . . . . . . . . 20-2
Tables

x

xi
2.1 Basic client/server relationship . . . . . . 2-22.2 Role of the InterBase client library . . . . . 2-34.1 Connection dialog . . . . . . . . . . . . . . 4-24.2 InterClient architecture . . . . . . . . . . . 4-54.3 JDBC interfaces . . . . . . . . . . . . . . . 4-74.4 Using applets to access InterBase . . . . . 4-214.5 Using standalone Java applications to access
InterBase . . . . . . . . . . . . . . . . . . . 4-237.1 User-interface to dataset connections in all
database applications . . . . . . . . . . . . 7-77.2 Single-tiered database application
architecture . . . . . . . . . . . . . . . . . . 7-87.3 Two-tiered database application architecture.
7-8
7.4 Multi-tiered database architectures . . . . . 7-99.1 The InterBase tab . . . . . . . . . . . . . . . 9-29.2 InterBase Admin tab . . . . . . . . . . . . . 9-412.1 InterBase service component hierarchy . 12-215.1 InterBase database component dataset
hierarchy. . . . . . . . . . . . . . . . . . . 15-115.2 Relationship of Inactive and Browse states . .
15-515.3 Relationship of Browse to other dataset states
15-617.1 Sample master/detail query form and data
module at design time . . . . . . . . . . .17-11
Figures

xii

C h a p t e r 1 U s i n g t h e I n t e r B a s e D e v e l o p e r ’ s G u i d e 1-1
C h a p t e r
Chapter 1Using the InterBaseDeveloper’s Guide
[@@Add info on TIBExtract and TIBClientDataSet. See files in _IB8Other\Topics\IBX.]
The InterBase Developer’s Guide focuses on the needs of developers who use the Borland development tools: Delphi, C++ Builder, and JBuilder. It assumes a general familiarity with SQL, data definition, data manipulation, and programming practice.
Topics covered in this bookThe following table lists the chapters in the Developer’s Guide and provides a brief description of each one:
Table 1.1 Chapters in the Developer’s Guide.
Chapter Description
Chapter 1, “Using the InterBase Developer’s Guide”
Intended audience and coverage
Chapter 2, “Client/Server Concepts” Architecture of client/server systems using InterBase, including the definition of client and server, and options for application development
Chapter 3, “Programming Applications with Delphi or C++ Builder”
Programming InterBase applications using the Borland Database Engine (BDE) with Delphi and C++ Builder

1-2 D e v e l o p e r ’ s G u i d e
T o p i c s c o v e r e d i n t h i s b o o k
Chapter 4, “Programming with JDBC” Building InterBase applications using InterClient, InterServer, and JBuilder
Chapter 5: “Programming Applications with ODBC”
Programming InterBase applications with ODBC and OLE DB; programming with the ODBC driver and configuring and using ODBC data sources
Chapter 6, “Working with UDFs and Blob Filters”
Working with UDFs: UDF libraries, declaring the functions to the database, calling the functions; working with Blob filters
Chapter 7: “Designing Database Applications”
Designing a database application, including the decisions involved in designing a user interface, how to use databases, and database architecture
Chapter 8: “Building Multi-tiered Applications”
Understanding the elements of a database application, including datasets and transactions
Chapter 9: “Introduction to IBX” Using InterBase Express (IBX) data access components
Chapter 10: “Connecting to Databases” Database components and how to manipulate database connections
Chapter 11: “Importing and Exporting Data” Using IBX components to migrate data to and from a database
Chapter 12: “Working with InterBase Services”
Building InterBase services into your applications
Chapter 13: “Programming with Database Events”
Using an IBX TIBEvents component to manage InterBase server events
Chapter 14: “Working with Cached Updates”
Working with cached updates, and using the TIBUpdateSQL component to update datasets
Chapter 15: “Understanding Datasets” Working with datasets and TDataSet
Chapter 16: “Working with Tables” Working with tables and TIBTable
Chapter 17: “Working with Queries” Building queries with TIBDataSet and TIBQuery
Chapter 18: “Working with Stored Procedures”
Using InterBase stored procedures in your database applications
Chapter 19: “Debugging with SQL Monitor” Using TIBSQLMonitor to monitor the dynamic SQL passing through the InterBase server
Chapter 20: “Writing Installation Wizards” Using TIBSetup, TIBInstall, and TIBUninstall to build an InterBase installation program
Table 1.1 Chapters in the Developer’s Guide.
Chapter Description

C h a p t e r 1 U s i n g t h e I n t e r B a s e D e v e l o p e r ’ s G u i d e 1-3
T o p i c s c o v e r e d i n t h i s b o o k

1-4 D e v e l o p e r ’ s G u i d e
T o p i c s c o v e r e d i n t h i s b o o k

C h a p t e r 2 C l i e n t / S e r v e r C o n c e p t s 2-1
C h a p t e r e
Chapter 2Client/Server ConceptsThis chapter describes the architecture of client/server systems using InterBase. The chapter covers topics including the definition of and InterBase client and server, and options for application development.
Definition of a clientAn InterBase client is an application, typically written in C, C++, Delphi or Java, that accesses data in an InterBase database.
In the more general case, an InterBase client is any application process that uses the InterBase client library, directly or via a middleware interface, to establish a communication channel to an InterBase server. The connection can be local if the application executes on the same node as the InterBase server, or remote if the application must use a network to connect to the InterBase server.

2-2 D e v e l o p e r ’ s G u i d e
T h e I n t e r B a s e c l i e n t l i b r a r y
Figure 2.1 Basic client/server relationship
InterBase is designed to allow clients to access an InterBase server on a platform and operating system different from the client’s platform and operating system.
The InterBase client libraryThe InterBase client library provides functions that developers of client applications use to initiate connections to a server and to programmatically perform database operations. The library uses the operating system’s client network interface to communicate with one or more InterBase servers, and implements a special InterBase client/server application protocol on top of a network protocol (see “Network protocols” in the Operations Guide).
The client library provides a set of high-level functions in the form of an Application Programmer’s Interface (API) for communication with an InterBase server. All client applications or middleware must use this API to access InterBase databases. The API Guide provides reference documentation and guidelines for using the API to develop high-performance applications.
ibserverApplication
Client node Server node
.ib
Network

C h a p t e r 2 C l i e n t / S e r v e r C o n c e p t s 2-3
D e f i n i t i o n o f a s e r v e r
Figure 2.2 Role of the InterBase client library
Definition of a serverThe InterBase server is a software process that executes on the node that hosts the storage space for databases. The server process is the only process on any node that can perform direct I/O to the database files.
Clients send to the server process requests to perform actions on the database, including:
• Search the database based on criteria
• Collate, sort and tabulate data
• Return sets of data
• Modify data values
• Insert new data into the database
• Remove data from the database
• Create new databases or data structures
• Execute procedural code on the server
• Send messages to other clients currently connected
The server process is fully network-enabled; it services connection requests that originate on another node. The server process implements the same InterBase application protocol that the client uses.
Many clients can remain connected to the multithreaded server process simultaneously. The server regulates access to individual data records within the database, and enforces exclusive access to records when clients request to modify the data in the records.
ibserver
Application
Client node Server nodeNetwork
DBX
GDS32.DLL
.gdb
.ib

2-4 D e v e l o p e r ’ s G u i d e
A p p l i c a t i o n d e v e l o p m e n t
Application developmentOnce you create and populate a database, you can access the information through an application. If you use one of Borland’s client tools, you can access information through your existing application. You can also design and implement a new application by embedding SQL statements or API calls in an application written in a programming language such as C or C++.
Borland client tools applicationsEnterprise versions of Borland client tools such as Delphi, Borland C++, and Kylix can access InterBase databases using Borland Database Express (DBX). Server query reporting is built into the client tool providing Windows application support. This enables you to build sophisticated, user-friendly database applications with minimal programming effort.
InterBase Express (IBX) for Delphi and C++ BuilderIBX is a library of components that allows Delphi, C++ Builder, and Kylix programmers to access InterBase features without having to go through the Borland Database Engine (BDE).The version of IBX that ships with Delphi and C++ Builder does not access the latest InterBase features. An enhanced version of IBX ships with InterBase.
dbExpress (DBX)dbExpress is a set of database drivers that provide fast access to a variety of SQL database servers. For each supported type of database, dbExpress provides a driver that adapts the server-specific software to a set of uniform dbExpress interfaces. When you deploy a database application that uses dbExpress, you need only include a dll (the server-specific driver) with the application files you build.
dbExpress lets you access databases using unidirectional datasets, which are designed for quick lightweight access to database information, with minimal overhead. Unidirectional datasets can only retrieve a unidirectional cursor. They do not buffer data in memory, which makes them faster and less resource-intensive than other types of dataset. However, because there are no buffered records, unidirectional datasets are also less flexible than other datasets. For example, the only supported navigation methods are the First and Next methods. Most others raise exceptions. Some, such as the methods involved in bookmark support, simply do nothing.
There is no built-in support for editing because editing requires a buffer to hold the edits. The CanModify property is always False, so attempts to put the dataset into edit mode always fail. You can, however, use unidirectional datasets to update data using an SQL UPDATE command or provide conventional editing support by using a dbExpress-enabled client dataset or connecting the dataset to a client dataset.

C h a p t e r 2 C l i e n t / S e r v e r C o n c e p t s 2-5
A p p l i c a t i o n d e v e l o p m e n t
There is no support for filters, because filters work with multiple records, which requires buffering. If you try to filter a unidirectional dataset, it raises an exception. Instead, all limits on what data appears must be imposed using the SQL command that defines the data for the dataset.
There is no support for lookup fields, which require buffering to hold multiple records containing lookup values. If you define a lookup field on a unidirectional dataset, it does not work properly.
Despite these limitations, unidirectional datasets are a powerful way to access data. They are the fastest data access mechanism, and very simple to use and deploy.
The Borland Database EngineMost Borland application development tools use middleware technology based on the Borland Database Engine (BDE). The BDE is a library that provides a unified API for applications to interface programmatically with the database client library of any database vendor for which there is a SQL Links driver available. For instance, a C++ application programmer uses the BDE functions to access data from a BDE alias. The programmer configures the BDE alias to use the InterBase driver for SQL Links, and this configuration causes BDE to dynamically load the appropriate library that implements BDE functions with equivalent functions in the InterBase API.
The most important advantage is that application engineers can write code that is independent from a given proprietary database product API, and thereby reduce porting expense if project requirements call for the engineer to change database server technology. For instance, porting an application from using Paradox tables to an InterBase database can be accomplished in large part simply by reconfiguring the BDE alias to use the InterBase SQL Links driver, and specifying the path of the InterBase server and database.
• The interaction between BDE’s caching and InterBase’s own caching can be confusing. Client-side caching gives a lot of benefit with little associated cost when the database resides on the same machine as the client, and the volume of data is low. Applying client-side caching in a client/server system with datasets that are greater in size by orders of magnitude can result in poor network performance as the client refreshes its cache over a network. See “Configuring the Superserver cache” in the Operations Guide for more information.
• The differences between the BDE’s Local SQL interpreter and InterBase’s server-side SQL interpreter are subtle. For consistency’s sake, you should configure applications to pass SQL statements through the BDE and on to the server’s SQL interpreter.

2-6 D e v e l o p e r ’ s G u i d e
A p p l i c a t i o n d e v e l o p m e n t
Embedded applicationsYou can write your own application using C or C++, or another programming language, and embed SQL statements in the code. You then preprocess the application using gpre, the InterBase application development preprocessor. gpre takes SQL embedded in a host language such as C or C++, and generates a file that a host-language compiler can compile.
The gpre preprocessor matches high-level SQL statements to the equivalent code that calls functions in InterBase’s client API library. Therefore, using embedded SQL affords the advantages of using a high-level language, and the runtime performance and features of the InterBase client API.
For more information about compiling embedded SQL applications, see the Embedded SQL Guide.
Predefined database queriesSome applications are designed with a specific set of requests or tasks in mind. These applications can specify exact SQL statements in the code for preprocessing. gpre translates statements at compile time into an internal representation. These statements have a slight speed advantage over dynamic SQL, because they do not need to incur the overhead of parsing and interpreting the SQL syntax at runtime.
Dynamic applicationsSome applications must handle ad hoc SQL statements entered by users at run time; for example, allowing a user to select a record by specifying criteria to a query. This requires that the program construct the query based on user input.
InterBase uses Dynamic SQL (DSQL) for generating dynamic queries. At run time, your application passes DSQL statements to the InterBase server in the form of a character string. The server parses the statement and executes it.
BDE provides methods for applications to send DSQL statements to the server and retrieve results. ODBC applications rely on DSQL statements almost exclusively, even if the application interface provides a way to visually build these statements. For example, Query By Example (QBE) or Microsoft Query provide convenient dialogs for selecting, restricting and sorting data drawn from a BDE or ODBC data source, respectively.
You can also build templates in advance for queries, omitting certain elements such as values for searching criteria. At run time, supply the missing entries in the form of parameters and a buffer for passing data back and forth.
For more information about DSQL, see the Embedded SQL Guide.

C h a p t e r 2 C l i e n t / S e r v e r C o n c e p t s 2-7
A p p l i c a t i o n d e v e l o p m e n t
API applicationsThe InterBase API is a set of functions that enables applications to construct and send SQL statements to the InterBase engine and receive results back. All database work can be performed through calls to the API.
Advantages of using the InterBase APIWhile programming with the API requires an application developer to allocate and populate underlying structures commonly hidden at the SQL level, the API is ultimately more powerful and flexible. Applications built using API calls offer the following advantages over applications written with embedded SQL:
• Control over memory allocation
• Simplification of compiling procedure—no precompiler
• Access to error messages
• Access to transaction handles and options
API function categoriesAPI functions can be divided into seven categories, according to the object on which they operate:
• Database attach and detach
• Transaction start, prepare, commit, and rollback
• Blob calls
• Array calls
• Database security
• Informational calls
• Date and integer conversions
The API Guide has complete documentation for developing high-performance applications using the InterBase API.
The Install API and the Licensing APIThe Install API provides a library of functions that enable you to install InterBase programmatically. You have the option of creating a silent install that is transparent to the end user. The functions in the Licensing API permit you to install license certificates and keys as well.

2-8 D e v e l o p e r ’ s G u i d e
A p p l i c a t i o n d e v e l o p m e n t
Multi-database applicationsUnlike many relational databases, InterBase applications can use multiple databases at the same time. Most applications access only one database at a time, but others need to use several databases that could have the same or different structures.
For example, each project in a department might have a database to keep track of its progress, and the department could need to produce a report of all the active projects. Another example where more than one database would be used is where sensitive data is combined with generally available data. One database could be created for the sensitive data with access to it limited to a few users, while the other database could be open to a larger group of users.
With InterBase you can open and access any number of databases at the same time. You cannot join tables from separate databases, but you can use cursors to combine information. See the Embedded SQL Guide for information about multi-database applications programming.

C h a p t e r 3 P r o g r a m m i n g A p p l i c a t i o n s w i t h D e l p h i o r C + + B u i l d e r 3-1
C h a p t e r
Chapter 3Programming Applications withDelphi or C++ Builder
This chapter discusses programming InterBase applications using the Borland Database Engine (BDE) with Delphi or C++ Builder. Both Delphi and C++ Builder ship with extensive online documentation on programming database applications; you should use that documentation as your main source of information. This chapter describes how to best use these programs with InterBase, including:
• Optimizing the InterBase SQL Links driver
• Working with TQuery
• Using generators
Note With the introduction of InterBase Express (IBX), it is now possible to create InterBase applications without the overhead of the BDE. Part II of this book describes how to use the IBX components. For more information, see “Introduction to IBX” on page 9-1.
Optimizing the InterBase SQL Links driverUse the BDE Administrator to configure the InterBase SQL Links driver. To start the BDE Administrator, select it from the Borland Delphi or C++ in the Programs menu. To view the InterBase driver definition, click on the Configuration tab, and then expand Drivers and Native from the Configuration tree. Click on INTRBASE to display the InterBase driver settings.
To optimize the InterBase driver, you can change the following options:
• DRIVER FLAGS
• SQLPASSTHRU MODE

3-2 D e v e l o p e r ’ s G u i d e
O p t i m i z i n g t h e I n t e r B a s e S Q L L i n k s d r i v e r
• SQLQUERY MODE
These are discussed in the following sections.
Setting the driver flagsDepending on your database needs, you should set the DRIVER FLAGS option to either 512 or 4608 to optimize InterBase. The recommended value for DRIVER FLAGS is 4608.
• If you set DRIVER FLAGS to 512, you specify that the default transaction mode should be repeatable read transactions using hard commits. This reduces the overhead that automatic transaction control incurs.
• If you set DRIVER FLAGS to 4608, you specify that the default transaction mode should be repeatable read transactions using soft commits. Soft commits are an InterBase feature that lets the driver retain the cursor while committing changes. Soft commits improve performance on updates to large sets of data.
When using hard commits, the BDE must re-fetch all records in a dataset, even for a single record change. This is less expensive when using a desktop database, because the data is transferred in core memory. For a client/server database such as InterBase, refreshing a dataset consumes the network bandwidth and degrades performance radically. With soft commit, the cursor is retained and a re-fetch is not performed.
Note Soft commits are never used in explicit transactions started by BDE client applications. This means that if you use the StartTransaction and Commit methods to explicitly start and commit a transaction, then the driver flag for soft commit is ignored.
Setting the SQL pass-through modeThe SQLPASSTHRU MODE option specifies whether the BDE and passthrough SQL statements can share the same database connections. By default SQLPASSTHRU MODE is set to SHARED AUTOCOMMIT. To reduce the overhead that automatic transaction control incurs, set this option to SHARED NOAUTOCOMMIT.
If, however, you want to pass transaction control to your server, set this option to NOT SHARED. Depending on the quantity of data, this can increase InterBase performance by a factor of ten.
The recommended setting for this option is SHARED NOAUTOCOMMIT.
Setting the SQL query modeSet the SQLQRYMODE to SERVER to allow InterBase, instead of the BDE, to interpret and execute SQL statements.

C h a p t e r 3 P r o g r a m m i n g A p p l i c a t i o n s w i t h D e l p h i o r C + + B u i l d e r 3-3
W o r k i n g w i t h T Q u e r y
Working with TQueryUse TQuery rather than TTable; the latter should never be used with InterBase.
Why not to use TTableAlthough TTable is very convenient for its RAD methods and its abstract data-aware model, it is not designed to be used with client/server applications; it is designed for use on relatively small tables in a local database, accessed in core memory.
TTable gathers information about the metadata of a table, and tries to maintain a cache of the dataset in memory. It refreshes its client-side copy of the data when you issue the Post method or the TDatabase.Rollback method. This incurs a huge network overhead for most client/server databases, which have much larger datasets and are accessed over a network. In a client/server architecture, you should use TQuery instead.
Setting TQuery properties and methodsSet the following TQuery properties and methods as indicated to optimize InterBase performance:
• CachedUpdates property: set this property to False to allow the server to handle updates, deletes, and conflicts.
• RequestLive property: set this property to False to prevent the VCL from keeping a client-side copy of rows; this has a benefit to performance because less data must be sent over the network
In a client/server configuration, a “fetch-all” severely affects database performance, because it forces a refresh of an entire dataset over the network. Here are some instances in which cause a TQuery to perform a fetch-all:
• Locate method: you should only use Locate on local datasets
• RecordCount property: although it is nice to get the information on how many records are in a dataset, calculating the RecordCount itself forces a fetch-all.
• Constraints property: let the server enforce the constraint.
• Filter property: let the server do the filtering before sending the dataset over the network.
• Commit method: forces a fetch-all when the BDE DRIVER FLAGS option is not set to 4096 (see “Setting the driver flags” on page 3-2), or when you are using explicit transaction control.

3-4 D e v e l o p e r ’ s G u i d e
U s i n g g e n e r a t o r s
Using generatorsUsing an InterBase trigger to change the value of a primary key on a table can cause the BDE to produce a record or key deleted error message. This can be overcome by adding a generator to your trigger.
For example, when your client sends a record to the server, the primary key is NULL. Using a trigger, InterBase inserts a value into the primary key and posts the record. When the BDE tries to verify the existence of the just-inserted record, it searches for a record with a NULL primary key, which it will be unable to find. The BDE then generates a record or key deleted error message.
To get around this, do the following:
1 Create a trigger similar to the following. The “if” clause checks to see whether the primary key being inserted in NULL. If so, a value is produced by the generator; if not, nothing is done to it.
Create Trigger COUNTRY_INSERT for COUNTRYactive before Insert position 0asbegin
if (new.Pkey is NULL) thennew.Pkey = gen_id(COUNTRY_GEN,1);
end
2 Create a stored procedure that returns the value from the generator:
Create Procedure COUNTRY_Pkey_Gen returns (avalue INTEGER)asbegin avalue = gen_id(COUNTRY_GEN,10);end
3 Add a TStoredProc component to your Delphi or C++ Builder application and associate it with the COUNTRY_Pkey_Gen stored procedure.
4 Add a TQuery component to your application and add the following code to the BeforePost event:
If(TQuery.state = dsinsert) thenbegin StoredProc1.ExecProc;
TQuery.FieldByName('Pkey').AsInteger := StoredProc1.ParamByName('avalue').AsInteger;
end;
This solution allows the client to retrieve the generated value from the server using a TStoredProc component and an InterBase stored procedure. This assures that the Delphi or C++ Builder client will know the primary key value when a record is posted.
C h a p t e r 4 P r o g r a m m i n g w i t h J D B C 4-1
C h a p t e r
Chapter 4Programming with JDBCThis chapter covers building InterBase database applications with InterClient and JBuilder, including:
• Installing InterClient classes into JBuilder
• Programming with InterClient
• Troubleshooting InterClient programs
• Deploying InterClient programs
• InterClient/JDBC compliance specifications
Installing InterClient classes into JBuilderInterClient is an all-Java JDBC driver specifically designed to access InterBase databases.
Database application basicsIf you want your JBuilder application or applet to connect to a database, use a Database component to establish the connection, a DataSet component (such as a TableDataSet or QueryDataSet component) to provide the data, and a data-aware control (such as a GridControl) to display the results. Follow these steps for any JDBC driver. What distinguishes InterClient from other JDBC drivers is the values you specify for the connection parameters of the Database component.
When you edit the connection properties of a Database component, JBuilder displays the Connection dialog.

4-2 D e v e l o p e r ’ s G u i d e
I n s t a l l i n g I n t e r C l i e n t c l a s s e s i n t o J B u i l d e r
Figure 4.1 Connection dialog
To connect to an InterBase database with your Java application/applet, you need to specify the following connection parameters: the name of a JDBC driver class, a username, a password, and a connection URL. The name of the InterClient JDBC driver class is always the same:
interbase.interclient.Driver
Spelling and capitalization are important. If you spell the driver class incorrectly, you may get a ClassNotFoundException, and consequently, a “No suitable driver” error when the connection is attempted. The username and password parameters are the same that you would use when connecting to a database with IBConsole or any other tool. For the sake of simplicity, these examples use sysdba (the InterBase root user) and masterkey for username and password, respectively.
There are other useful features of this dialog, as well. Once you fill in your URL, you can press the Test connection button to ensure that the connection parameters are correct. The Prompt user password check box forces the user to enter a proper username and password before establishing a connection. The Use extended properties check box and property page is not used by InterClient.

C h a p t e r 4 P r o g r a m m i n g w i t h J D B C 4-3
I n s t a l l i n g I n t e r C l i e n t c l a s s e s i n t o J B u i l d e r
Using JDBC URLsThe JDBC URL is the parameter used to locate the actual database to which you want to connect. A JDBC URL can be broken down into three parts, all separated by colons: the keyword jdbc, the subprotocol name, and the datasource name or location. The jdbc keyword is needed to distinguish JDBC URLs from other URLs, such as those for HTTP or FTP. The subprotocol name is used to select the proper JDBC driver for the connection. Every JDBC driver has its own subprotocol name to which it responds. InterClient URLs always have a subprotocol of interbase. Other JDBC drivers have their own unique subprotocol names, for example, the JDBC-ODBC Bridge answers JDBC URLs with the subprotocol of odbc.
The third part of an InterClient URL holds the name of the server that is running InterBase and the location of the database to which you want to connect.In the following syntax, “absolute” and “relative” are always with respect to the server, not the client:
On Unix:
jdbc:interbase://servername//absolutePathToDatabase.ib
jdbc:interbase://servername/relativePathToDatabase.ib
On Microsoft Windows:
jdbc:interbase://servername//DriveLetter:/absolutePathToDatabase.ib
jdbc:interbase://servername/relativePathToDatabase.ib
Here are a few possible configuration options and their corresponding JDBC URLs.
For the atlas database on a Unix machine named sunbox you might use something like this (the path on the Unix machine is /usr/databases/atlas.ib):
jdbc:interbase://sunbox//usr/databases/atlas.ib
To access database test in directory /inetpub on a Unix machine named localhost:
jdbc:interbase://localhost//inetpub/test.ib
To access database test in subdirectory inetpub on a Unix machine named localhost:
jdbc:interbase://localhost/inetpub/test.ib
To access the jupiter database on an NT machine named mrbill, you might use something like this (notice the drive letter):
jdbc:interbase://mrbill/c:/interbas/examples/jupiter.ib
If the client and the server are on the same machine and you wanted to make a local connection, use loopback as the server name. For example, on Microsoft Windows:
jdbc:interbase://loopback/c:/interbas/examples/jupiter.ib

4-4 D e v e l o p e r ’ s G u i d e
P r o g r a m m i n g w i t h I n t e r C l i e n t
Other than these connection-specific issues, InterClient can be used like any other JDBC driver with JBuilder. With Local InterBase, JBuilder Professional and Client/Server versions, it makes it easy to develop and test powerful database applications in Java.
Programming with InterClientAs an all-Java JDBC driver, InterClient enables platform-independent, client/server development for the Internet and corporate intranets. The advantage of an all-Java driver versus a native-code driver is that you can deploy InterClient-based applets without having to manually load platform-specific JDBC drivers on each client system. Web servers automatically download the InterClient classes along with the applets. Therefore, there is no need to manage local native database libraries, which simplifies administration and maintenance of customer applications. As part of a Java applet, InterClient can be dynamically updated, further reducing the cost of application deployment and maintenance.
InterClient allows Java applets and applications to:
• Open and maintain a high-performance, direct connection to an InterBase database server
• Bypass resource-intensive, stateless Web server access methods
• Allow higher throughput speeds and reduced Web server traffic
InterBase developers who are writing new Java-based client programs can use InterClient to access their existing InterBase databases. Because InterClient is an all-Java driver, it can also be used on the Sun NC (Network Computer), a desktop machine that runs applets. The NC has no hard drive or CD ROM; users access all of their applications and data via applets downloaded from servers.
InterClient architectureThe InterClient product consists of a client-side Java package called InterClient, which contains a library of Java classes that implement most of the JDBC API and a set of extensions to the JDBC API. This package interacts with the JDBC Driver Manager to allow client-side Java applications and applets to interact with InterBase databases.

C h a p t e r 4 P r o g r a m m i n g w i t h J D B C 4-5
P r o g r a m m i n g w i t h I n t e r C l i e n t
Figure 4.2 InterClient architecture
Developers can deploy InterClient-based clients in two ways:
• As Java applets, which are Java programs that can be included in an HTML page with the <APPLET> tag, served via a web server, and viewed and used on a client system using a Java-enabled web browser. This deployment method doesn't require manual installation of the InterClient package on the client system. It does require a Java-enabled browser and the JDBC Driver Manager to be installed on the client system.
• As Java applications, which are stand-alone Java programs for execution on a client system. This deployment method requires the InterClient package, the JDBC Driver Manager, and the Java Runtime Environment (JRE), which is part of the Java Developer's Kit (JDK) installed on the client system.
InterClient communicationInterClient is a driver for managing interactions between a Java applet or application and an InterBase database server. On a client system, InterClient works with the JDBC Driver Manager to handle client requests through the JDBC API. To access an InterBase database, InterClient communicates via a TCP/IP connection to the InterBase server and passes back the results to the InterClient process on the client machine.

4-6 D e v e l o p e r ’ s G u i d e
D e v e l o p i n g I n t e r C l i e n t p r o g r a m s
Developing InterClient programsThis section provides a detailed description of how to use InterClient to develop Java applications, including:
• Using the JDBC interfaces
• Using InterClient drivers
• Accessing InterClient extensions
• Opening a database connection
• Executing SQL statements
Using the JDBC interfacesThe JDBC API is a set of Java interfaces that allow database applications to open connections to a database, execute SQL statements, and process the results. These include:
java.sql.DriverManager Loads the specific drivers and supports creating new database connections
java.sql.Connection Represents a connection to a specific database
java.sql.Statement Allows the application to execute a SQL statement
java.sql.PreparedStatement Represents a pre-compiled SQL statement
java.sql.CallableStatement Represents a call to a stored procedure in the database
java.sql.ResultSet Controls access to the rows resulting from a statement execution

C h a p t e r 4 P r o g r a m m i n g w i t h J D B C 4-7
D e v e l o p i n g I n t e r C l i e n t p r o g r a m s
Figure 4.3 JDBC interfaces
Importing the InterClient classesThe InterClient classes provide the code that actually implements the JDBC API. The java.sql package defines the standard JDBC API interfaces. Importing this package allows you to reference all of the classes in the java.sql interface without first typing the “java.sql” prefix. For clarity's sake, this document prefixes all class names with “java.sql,” but it isn't necessary if you import the package. You can import this package with the following line:
import java.sql.*;
The DriverManager classThe DriverManager class is part of the java.sql package. The JDBC framework supports multiple database drivers. The DriverManager manages all JDBC drivers that are loaded on a system; it tries to load as many drivers as it can find. For each connection request, it locates a driver to connect to the target database URL. The DriverManager also enforces security measures defined by the JDBC specification.
The Driver classEach database driver must provide a Driver class that implements the java.sql.Driver interface. The interbase.interclient.Driver class is an all-Java implementation of a JDBC driver that is specific to InterBase. The interbase.interclient package supports most of the JDBC classes and methods plus some added extensions that are not part of the JDBC API.
To access an InterBase database, the InterClient driver communicates via a TCP/IP connection with the InterBase server. InterBase processes the SQL statements and passes the results back to the InterClient driver.

4-8 D e v e l o p e r ’ s G u i d e
D e v e l o p i n g I n t e r C l i e n t p r o g r a m s
MultithreadingAny JDBC driver must comply with the JDBC standard for multithreading, which requires that all operations on Java objects be able to handle concurrent execution.
For a given connection, several threads must be able to safely call the same object simultaneously. The InterClient driver is thread safe. For example, your application can execute two or more statements over the same connection concurrently, and process both result sets concurrently, without generating errors or ambiguous results.
The Connection classAfter instantiating a Driver object, you can open a connection to the database when DriverManager gives you a Connection object. A database driver can manage many connection objects.
The Connection object establishes and manages the connection to your particular database. Within a given connection, you can execute SQL statements and receive the result sets.
The java.sql.Connection interface represents a connection to a particular database. The JDBC specification allows a single application to support multiple connections to one or more databases, using one or more database drivers. When you establish your connection using this class, the DriverManager selects an appropriate driver from those loaded based on the subprotocol specified in the URL, which is passed as a connection parameter.
About InterClient driversThis section describes how to load the InterClient driver and how to explicitly create the InterClient driver.
Loading the InterClient driverThe InterClient driver must be loaded before your application can attempt to connect to an InterBase database. To explicitly load the InterClient driver with the DriverManager, include the following line in your program before using the driver to establish a database connection:
Class.forName("interbase.interclient.Driver");
The first time the Java interpreter sees a reference to interbase.interclient.Driver, it loads the InterClient driver. When the driver is loaded it automatically creates an instance of itself, but there is no handle for it that lets you access that driver directly by name. This driver is anonymous; you do not need to reference it explicitly to make a database connection. You can make a database connection simply by using the java.sql.DriverManager class.

C h a p t e r 4 P r o g r a m m i n g w i t h J D B C 4-9
D e v e l o p i n g I n t e r C l i e n t p r o g r a m s
It's the responsibility of each newly loaded driver to register itself with the DriverManager; the programmer is not required to register the driver explicitly. After the driver is registered, the DriverManager can use it to make database connections.
Explicitly creating the InterClient driverWhen writing a client program, you can interact either with the DriverManager class or with a database driver object directly. To reference an InterClient driver directly, you must use the java.sql.Driver class to explicitly create an instance of the driver. This instance is in addition to the anonymous one that's created automatically when the InterClient driver is loaded:
java.sql.Driver driver = new interbase.interclient.Driver();
Now you can reference the driver classes and methods with driver.XXX(). If all you need to do is connect to the database and execute SQL statements, you do not need to create a driver object explicitly; the DriverManager handles everything for you. However, there are a few cases when you need to reference the driver by name. These include:
• Getting information about the driver itself, such as a version number.
• Tailoring a driver for debugging purposes. For more information, see “Debugging your application” on page 4-20.
The DriverManager sees a driver as only one of many standard JDBC drivers that can be loaded. If you need to create a connection to another type of database in the future, you need only to load the new driver with forName() or declare another driver explicitly with
java.sql.Driver driver = new XXX.Driver
Using java.sql.driver methodsThe java.sql.Driver class has different methods than java.sql.DriverManager. If you want to use any of the java.sql.Driver methods, you need to create an explicit driver object. The following are a few of the driver methods:
• getMajorVersion() gets the driver's major version number
• getMinorVersion() gets the driver's minor version number
The example below shows how to interact with the database by referencing the driver directly:
//create the InterClient driver object as a JDBC driverjava.sql.Driver driver = new interbase.interclient.Driver();
//get the connection objectjava.sql.Connection connection = driver.connect(dbURL, properties);
//reference driver to get the driver version number java.sql.String version = driver.getMajorVersion() + driver.getMinorVersion();System.out.print("You're using driver", + version");

4-10 D e v e l o p e r ’ s G u i d e
D e v e l o p i n g I n t e r C l i e n t p r o g r a m s
Important If your application ever needs to access non-InterBase databases, do not define a driver object as a type interbase.interclient.Driver as follows:
interbase.interclient.Driver driver = new interbase.interclient.Driver();
This method creates a driver object that is an instance of the interbase.interclient.Driver class, not a generic instance of the java.sql.Driver class. It is not appropriate for a database-independent client program because it hard-codes the InterClient driver into your source code, together with all of the classes and methods that are specific to the InterClient driver. Such applications could access only InterBase databases.
Accessing InterClient extensions to the JDBCTo access InterClient-specific classes and methods such as Driver, Connection, and Statement, you must cast your JDBC objects before applying the interbase.interclient method. However, you do not need to declare the original objects this way. Always create the object with a generic JDBC class, and then cast the object to the extended class; for example:
interbase.interclient.Driverinterbase.interclient.Connectioninterbase.interclient.Statement
The following code fragment shows how to cast the JDBC driver object, icDriver in order to access a hypothetical InterClient-specific driver method isBuzzwordCompliant():
//create the InterClient driver object as a generic JDBC driverjava.sql.Driver driver = new interbase.interclient.Driver();
//Cast driver as type interbase.interclient.Driver and call the methodif ((interbase.interclient.Driver)driver.isBuzzwordCompliant())System.out.println("It's Buzzword compliant too!");
Suppose you've used the DriverManager to get the connection, but you want to access an InterClient-specific Connection method, called “foobar”. Here's an example of casting the connection object (instead of the driver object) to interbase.interclient.Connection:
//create the InterClient driver object as a generic JDBC driverjava.sql.Driver driver = new interbase.interclient.Driver();
//Create the connection object as a generic JDBC connectionjava.sql.Connection connection = java.sql.DriverManager.getConnection(url, properties);
//Call foobar by casting connection to type interbase.interclient.Connection (interbase.interclient.Connection)connection.foobar();
Tip By using explicit casts whenever you need to access InterClient-specific extensions, you can find these InterClient-specific operations easily if you ever need to port your program to another driver.

C h a p t e r 4 P r o g r a m m i n g w i t h J D B C 4-11
D e v e l o p i n g I n t e r C l i e n t p r o g r a m s
Opening a database connectionAfter loading the driver, or explicitly creating one, you can open a connection to the database. There are two ways to do this: with the DriverManager's getConnection() method or the driver object's connect() method.
Using the DriverManager to get a connectionWhen you want to access a database, you can get a java.sql.Connection object from the JDBC management layer's java.sql.DriverManager.getConnection() method. The getConnection() method takes a URL string and a java.util.Properties object as arguments. For each connection request, the DriverManager uses the URL to locate a driver that can connect to the database represented by the URL. If the connection is successful, a java.sql.Connection object is returned. The following example shows the syntax for establishing a database connection:
java.sql.Connection connection = java.sql.DriverManager.getConnection(url,properties);
The Connection object in turn provides access to all of the InterClient classes and methods that allow you to execute SQL statements and get back the results.
Using InterClient driver object to get a connectionIf you are using the driver object to get a connection, use the connect() method. This method does the same thing and takes the same arguments as getConnection().
For example:
//Create the InterClient driver object explicitlyjava.sql.Driver driver = new interbase.interclient.Driver();
//Open a database connection using the driver's connect method of the java.sql.Connection connection = driver.connect(url, properties);
Choosing between the Driver and DriverManager methodsSuppose that you have created an explicit driver object. Even though you could use the driver's connect() method, you should always use the generic JDBC methods and classes unless there is some specific reason not to, such as the ones discussed previously. For example, suppose you declared an explicit driver object so you could get driver version numbers, but now you need to create a connection to the database. You should still use the DriverManager.getConnection() method to create a connection object instead of the driver.connect() method.
Note This is not the case when you are using the InterClient Monitor extension to trace a connection. See “Debugging your application” on page 4-20 for a detailed explanation.
Defining connection parametersThe database URL and connection properties arguments to connect() or getConnection() must be defined before trying to create the connection.

4-12 D e v e l o p e r ’ s G u i d e
D e v e l o p i n g I n t e r C l i e n t p r o g r a m s
Syntax for specifying database URLsInterClient follows the JDBC standard for specifying databases using URLs. The JDBC URL standard provides a framework so that different drivers can use different naming systems that are appropriate for their own needs. Each driver only needs to understand its own URL naming syntax; it can reject any other URLs that it encounters. A JDBC URL is structured as follows:
jdbc:subprotocol:subname
The subprotocol names a particular kind of database connection, which is in turn supported by one or more database drivers. The DriverManager decides which driver to use based on which subprotocol is registered for each driver. The contents and syntax of subname in turn depend upon the subprotocol. If the network address is included in the subname, the naming convention for the subname is:
//hostname:/subsubname
subsubname can have any arbitrary syntax.
Defining an InterClient URLInterClient URLs have the following format:
jdbc:interbase://server/full_db_path
“interbase” is the subprotocol, and server is the hostname of the InterBase server. full_db_path (that is, “subsubname”) is the full pathname of a database file, including the initial slash (/). If the InterBase server is a Windows system, you must include the drive name as well. InterClient doesn't support passing any attributes in the URL. For local connections, use:
server = "localhost"
Note The “/” between the server and full_db_path is a delimiter. When specifying the path for a Unix-based database, you must include the initial “/” for the root directory in addition to the “/” for the delimiter.
In a Unix-based database, the following URL refers to the database orders.ib in the directory /dbs on the Unix server accounts.
dbURL = "jdbc:interbase://accounts//dbs/orders.ib"
In a Windows server, the following URL refers to the database customer.ib in the directory /dbs on drive C of the server support.
dbURL = "jdbc:interbase://support/C:/dbs/customer.ib"
Defining the connection propertiesConnection properties must also be defined before trying to open a database connection. To do this, pass in a java.util.Properties object, which maps between tag strings and value strings. Two typical properties are “user” and “password.” First, create the Properties object:
java.util.Properties properties = new java.util.Properties();
C h a p t e r 4 P r o g r a m m i n g w i t h J D B C 4-13
D e v e l o p i n g I n t e r C l i e n t p r o g r a m s
Now create the connection arguments. user and password are either literal strings or string variables. They must be the username and password on the InterBase database to which you are connecting:
properties.put (“user”, "sysdba");properties.put (“password”, "masterkey");
Now create the connection with the URL and connection properties parameters:
java.sql.Connection connection = java.sql.DriverManager.getConnection(url, properties);
SecurityClient applications use standard database user name and password verification to access an InterBase database. InterClient encrypts the user name and password for transmission over the network.
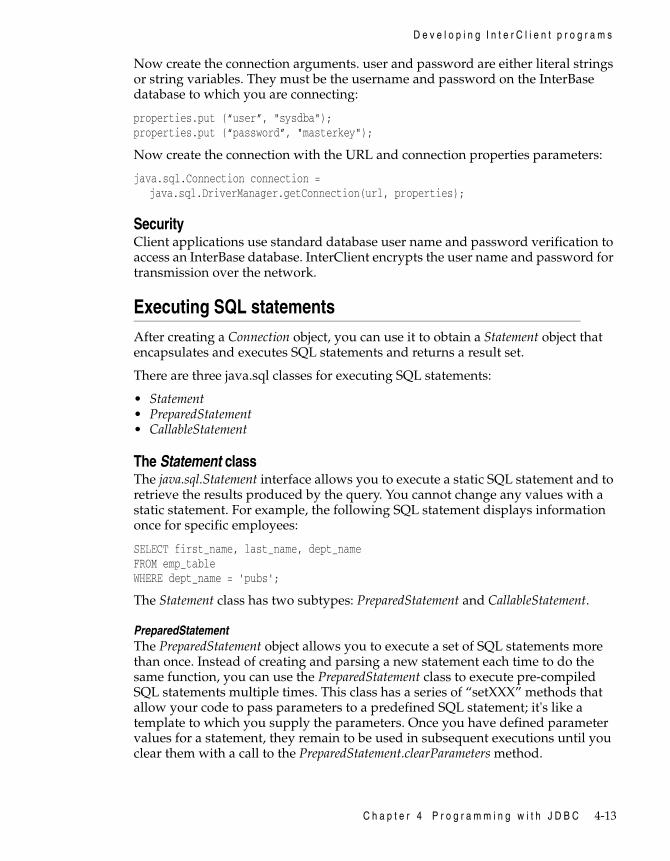
Executing SQL statementsAfter creating a Connection object, you can use it to obtain a Statement object that encapsulates and executes SQL statements and returns a result set.
There are three java.sql classes for executing SQL statements:
• Statement • PreparedStatement • CallableStatement
The Statement classThe java.sql.Statement interface allows you to execute a static SQL statement and to retrieve the results produced by the query. You cannot change any values with a static statement. For example, the following SQL statement displays information once for specific employees:
SELECT first_name, last_name, dept_nameFROM emp_tableWHERE dept_name = 'pubs';
The Statement class has two subtypes: PreparedStatement and CallableStatement.
PreparedStatementThe PreparedStatement object allows you to execute a set of SQL statements more than once. Instead of creating and parsing a new statement each time to do the same function, you can use the PreparedStatement class to execute pre-compiled SQL statements multiple times. This class has a series of “setXXX” methods that allow your code to pass parameters to a predefined SQL statement; it's like a template to which you supply the parameters. Once you have defined parameter values for a statement, they remain to be used in subsequent executions until you clear them with a call to the PreparedStatement.clearParameters method.

4-14 D e v e l o p e r ’ s G u i d e
D e v e l o p i n g I n t e r C l i e n t p r o g r a m s
For example, suppose you want to be able to print a list of all new employees hired on any given day. The operator types in the date, which is then passed in to the PreparedStatement object. Only those employees or rows in “emp_table” where “hire_date” matches the input date are returned in the result set.
SELECT first_name, last_name,emp_no FROM emp_table WHERE hire_date = ?;
See “Selecting data with PreparedStatement” on page 4-15 for more on how this construct works.
CallableStatementThe CallableStatement class is used for executing stored procedures with OUT parameters. Since InterBase does not support the use of OUT parameters, there's no need to use CallableStatement with InterClient.
Note You can still use a CallableStatement object if you do not use the OUT parameter methods.
Creating a Statement objectCreating a Statement object allows you to execute a SQL query, assuming that you have already created the connection object. The example below shows how to use the createStatement method to create a Statement object:
java.sql.Statement statement = connection.createStatement();
Querying dataAfter creating a Connection and a Statement or PreparedStatement object, you can use the executeQuery method to query the database with SQL SELECT statements.
Selecting data with the Statement classThe executeQuery method returns a single result set. The argument is a string parameter that is typically a static SQL statement. The ResultSet object provides a set of “get” methods that let you access the columns of the current row. For example, ResultSet.next lets you move to the next row of the ResultSet, and the getString method retrieves a string.
This example shows the sequence for executing SELECT statements, assuming that you have defined the getConnection arguments:
//Create a Connection object:java.sql.Connection connection = java.sql.DriverManager.getConnection(url,properties);
//Create a Statement objectjava.sql.Statement statement = connection.createStatement();
//Execute a SELECT statement and store results in resultSet:java.sql.ResultSet resultSet = statement.executeQuery("SELECT first_name, last_name, emp_noFROM emp_table WHERE dept_name = 'pubs'");

C h a p t e r 4 P r o g r a m m i n g w i t h J D B C 4-15
D e v e l o p i n g I n t e r C l i e n t p r o g r a m s
//Step through the result rowsSystem.out.println("Got results:");while (resultSet.next ()){
//get the values for the current rowString fname = resultSet.getString(1);String lname = resultSet.getString(2);String empno = resultSet.getString(3);
//print a list of all employees in the pubs deptSystem.out.print(" first name=" + fname);System.out.print(" last name=" + lname);System.out.print(" employee number=" + empno);System.out.print("\n");}
Selecting data with PreparedStatement The following example shows how to use PreparedStatement to execute a query:
//Define a PreparedStatement object typejava.sql.PreparedStatement preparedStatement;
//Create the PreparedStatement objectpreparedStatement = connection.prepareStatement("SELECT first_name, last_name, emp_no FROM emp_table WHERE hire_date = ?");
//Input yr, month, dayjava.sql.String yr;java.sql.String month;java.sql.String day;System.in.readln("Enter the year: " + yr);System.in.readln("Enter the month: " + month);System.in.readln("Enter the day: " + day);
//Create a date objectjava.sql.Date date = new java.sql.Date(yr,month,day);
//Pass in the date to preparedStatement's ? parameterpreparedStatement.setDate(1,date);
//execute the query. Returns records for all employees hired on dateresultSet = preparedStatement.executeQuery();
Finalizing objectsApplications and applets should explicitly close the various JDBC objects (Connection, Statement, and ResultSet) when they are done with them. The Java “garbage collector” may periodically close connections, but there's no guarantee when, where, or even if this will happen. It's better to immediately release a connection's database and JDBC resources rather than waiting for the garbage collector to release them automatically. The following close statements should appear at the end of the previous executeQuery() example.

4-16 D e v e l o p e r ’ s G u i d e
D e v e l o p i n g I n t e r C l i e n t p r o g r a m s
resultSet.close();statement.close();connection.close();
Modifying dataThe executeUpdate() method of the Statement or PreparedStatement class can be used for any type of database modification. This method takes a string parameter (a SQL INSERT, UPDATE, or DELETE statement), and returns a count of the number of rows that were updated.
Inserting dataAn executeUpdate statement with an INSERT statement string parameter adds one or more rows to a table. It returns either the row count or 0 for SQL statements that return nothing:
int rowCount= statement.executeUpdate("INSERT INTO table_name VALUES (val1, val2,…)";
If you do not know the default order of the columns, the syntax is:
int rowCount= statement.executeUpdate("INSERT INTO table_name (col1, col2,…) VALUES (val1, val2,…)";
The following example adds a single employee to “emp_table”:
//Create a connection objectjava.sql.Connection connection = java.sql.DriverManager.getConnection(url, properties);
//Create a statement objectjava.sql.Statement statement = connection.createStatement();
//input the employee dataJava.lang.String fname;Java.lang.String lname;Java.lang.String empno;System.in.readln("Enter first name: ", + fname);System.in.readln("Enter last name: ", + lname);System.in.readln("Enter employee number: ", + empno);
//insert the new employee into the tableint rowCount = statement.executeUpdate ("INSERT INTO emp_table (first_name, last_name, emp_no)VALUES (fname, lname, empno)");
Updating data with the Statement classThe executeUpdate statement with a SQL UPDATE string parameter enables you to modify existing rows based on a condition using the following syntax:
int rowCount= statement.executeUpdate("UPDATE table_name SET col1 = val1, col2 = val2,WHERE condition");

C h a p t e r 4 P r o g r a m m i n g w i t h J D B C 4-17
D e v e l o p i n g I n t e r C l i e n t p r o g r a m s
For example, suppose an employee, Sara Jones, gets married wants you to change her last name in the “last_name” column of the EMPLOYEE table:
//Create a connection objectjava.sql.Connection connection = java.sql.DriverManager.getConnection(dbURL,properties);
//Create a statement objectjava.sql.Statement statement = connection.createStatement();
//insert the new last name into the tableint rowCount = statement.executeUpdate ("UPDATE emp_table SET last_name = 'Zabrinski' WHERE emp_no = 13314");
Updating data with PreparedStatement The following code fragment shows an example of how to use PreparedStatement if you want to execute the update more than once:
//Define a PreparedStatement object typejava.sql.PreparedStatement preparedStatement;
//Create the Prepared_Statement objectpreparedStatement = connection.prepareStatement("UPDATE emp_table SET last_name = ? WHERE emp_no = ?");
//input the last name and employee numberString lname;String empno;System.in.readln("Enter last name: ", + lname);System.in.readln("Enter employee number: ", + empno);int empNumber = Integer.parseInt(empno);
//pass in the last name and employee id to preparedStatement's ? //parameters
//where '1' is the 1st parameter, '2' is the 2nd, etc.preparedStatement.setString(1,lname);preparedStatement.setInt(2,empNumber);
//now update the tableint rowCount = preparedStatement.executeUpdate();
Deleting dataThe executeUpdate() statement with a SQL DELETE string parameter deletes an existing row using the following syntax:
DELETE FROM table_name WHERE condition;
The following example deletes the entire “Sara Zabrinski” row from the EMPLOYEE table:
int rowCount = statement.executeUpdate ("DELETE FROM emp_table WHERE emp_no = 13314");

4-18 D e v e l o p e r ’ s G u i d e
D e v e l o p i n g I n t e r C l i e n t p r o g r a m s
Executing stored proceduresA stored procedure is a self-contained set of extended SQL statements that are stored in a database as part of its metadata. Stored procedures can pass parameters to and receive return values from applications. From the application, you can invoke a stored procedure directly to perform a task, or you can substitute the stored procedure for a table or view in a SELECT statement. There are two types of stored procedures:
• Select procedures are used in place of a table or view in a SELECT statement. A selectable procedure generally has no IN parameters. See note below.
• Executable procedures can be called directly from an application with the EXECUTE PROCEDURE statement; they may or may not return values to the calling program.
Use the Statement class to call select or executable procedures that have no SQL input (IN) parameters. Use the PreparedStatement class to call select or executable stored procedures that have IN parameters.
Note Although it is not commonly done, it is possible to use IN parameters in a SELECT statement. For example:
create procedure with_in_params(in_var integer)returns (out_data varchar(10))asbegin
for select a_field1 from a_tablewhere a_field2 = :in_varinto :out_datado suspend;
end
To return one row:
execute procedure with_in_params(1)
To return more than one row:
select * from with_in_params(1)
Statement exampleAn InterClient application can call a select procedure in place of a table or view inside a SELECT statement. For example, the stored procedure multiplyby10 multiplies all the rows in the NUMBERS table (visible only to the stored procedure) by 10, and returns the values in the result set. The following example uses the Statement.executeQuery() method to call the multiplyby10 stored procedure, assuming that you have already created the Connection and Statement objects:
//multiplyby10 multiplies the values in the resultOne, resultTwo, //resultThree columns of each row of the NUMBERS table by 10
//create a string object

C h a p t e r 4 P r o g r a m m i n g w i t h J D B C 4-19
T r o u b l e s h o o t i n g I n t e r C l i e n t p r o g r a m s
String sql= new String ("SELECT resultone, resulttwo, resultthree FROM multiplyby10");
//Execute a SELECT statement and store results in resultSet:java.sql.ResultSet resultSet = statement.executeQuery(sql);
//Step through the result rowsSystem.out.println("Got results:");while (resultSet.next ()){
//get the values for the current rowint result1 = resultSet.getInt(1);int result2 = resultSet.getInt(2);int result3 = resultSet.getInt(3);
//print the valuesSystem.out.print(" result one =" + result1);System.out.print(" result two =" + result2);System.out.print(" result three =" + result3);System.out.print("\n");}
PreparedStatement exampleIn the example below, the multiply stored procedure is not selectable. Therefore, you have to call the procedure with the PreparedStatement class. The procedure arguments are the scale factor and the value of KEYCOL that uniquely identifies the row to be multiplied in the NUMBERS table.
//Define a PreparedStatement object typejava.sql.PreparedStatement preparedStatement;
//Create a new string objectjava.sql.String sql = new String ("EXECUTE PROCEDURE multiply 10, 1");
//Create the PreparedStatement objectpreparedStatement = connection.prepareStatement(sql);
//execute the stored procedure with preparedStatementjava.sql.ResultSet resultSet = preparedStatement.executeQuery(sql);
//step through the result set and print out as in Statement example
Troubleshooting InterClient programsThis section covers troubleshooting InterClient installation and debugging applications.

4-20 D e v e l o p e r ’ s G u i d e
T r o u b l e s h o o t i n g I n t e r C l i e n t p r o g r a m s
Handling installation problemsCall interbase.interclient.InstallTest to test an InterClient installation. InstallTest provides two static methods for testing the installation. A static main is provided as a command line test that prints to System.out. main() uses the other public static methods that test specific features of the installation. These methods can be used by a GUI application as they return strings, rather than writing the diagnostics to System.out as main() does. InstallTest allows you to:
• determine InterClient driver version information • determine installed packages • check basic network configuration • test making a connection directly without the DriverManager with
driver.connect()• test making a connection with DriverManager.getConnection() • get SQL Exception error messages
Debugging your applicationYou can tailor your own driver instances by using a class called interbase.interclient.Monitor. This is a public InterClient extension to JDBC. The Monitor class contains user-configurable switches that enable you to call a method and trace what happens on a per-driver basis. Types of switches that you can enable include: enableDriverTrace, enableConnectionTrace, enableStatementTrace, and so forth.
Every driver instance has one and only one monitor instance associated with it. The initial monitor for the default driver instance that is implicitly registered with the DriverManager has no logging/tracing enabled. Enabling tracing for the default driver is not recommended. However, if you create your own driver instance, you can tailor the tracing and logging for your driver without affecting the default driver registered with the DriverManager.
Note If you want to use the Monitor to trace connections and statements, you must create the original objects using the connect() method of the tailored driver. You cannot create a connection with DriverManager.getConnection() method and then try to trace that connection. Since tracing is disabled for the default driver, there will be no data.
The following example shows calls to getMonitor() trace methods:
//Open the driver manager's log streamDriverManager.setLogStream(System.out);
//Create the driver objectjava.sql.Driver icDriver = new interbase.interclient.Driver();
//Trace method invocations by printing messages to this monitor's//trace stream((interbase.interclient.Driver)icDriver).getMonitor().setTraceStream

C h a p t e r 4 P r o g r a m m i n g w i t h J D B C 4-21
D e p l o y i n g I n t e r C l i e n t p r o g r a m s
(System.out);((interbase.interclient.Driver)icDriver).getMonitor().enableAllTraces (true);
After running the program and executing some SQL statements, you can print out the trace messages associated with the driver, connection, and statement methods. The tracing output distinguishes between implicit calls, such as the garbage collector or InterClient driver calling close() versus user-explicit calls. This can be used to test application code, since it would show if result sets or statements aren't being cleaned up when they should.
Deploying InterClient programsOnce you have developed your InterClient programs, there are two ways to deploy them: as Java applets embedded on an HTML page, or as stand-alone all-Java applications running on a client system.
Deploying InterClient programs as appletsInterClient programs can be implemented as Java applets that are downloaded over the Internet as part of an HTML web page.
Figure 4.4 Using applets to access InterBase
An InterClient applet uses JDBC to provide access to a remote InterBase server in the following manner:
1 A user accesses the HTML page on which the InterClient applet resides.
2 The applet bytecode is downloaded to the client machine from the Web server.
gds implementation

4-22 D e v e l o p e r ’ s G u i d e
D e p l o y i n g I n t e r C l i e n t p r o g r a m s
3 The applet code executes on the client machine, downloading the InterClient package (that is, the InterClient classes and the InterClient driver) from the Web server.
4 The InterClient driver communicates with the InterBase server, which executes SQL statements and returns the results to the user running the InterClient applet.
5 When the applet is finished executing, the applet itself and the InterClient driver and classes disappear from the client machine.
Required software for appletsIn order to run InterClient applets, the client and server machines must have the following software loaded:
Pros and cons of applet deploymentThe following table displays some of the pros and cons of applet deployment.
Client side Server side
• Java-enabled browser • InterBase server process
• JDBC Driver Manager, which is part of the Java Developer’s Kit (JDK)
• Web server process
• program applets
• InterClient classes
Table 4.1 Pros and cons of applet development
Pros Cons
• The applet is platform-independent; the program is available to everyone
• An applet cannot open network connections to arbitrary hosts; it can only communicate with the server from which it was deployed (the Web server). Therefore, you could not use an applet if your program needs to access data from more than one server
• All code resides on the server, so if code changes, it needs to be updated only in one place
• Applets cannot access local files, so you could not, for example, use applet code to read or write from your local file system
• Response time for database applets on the Internet will be slower than for database applications on a LAN

C h a p t e r 4 P r o g r a m m i n g w i t h J D B C 4-23
I n t e r C l i e n t / J D B C c o m p l i a n c e s p e c i f i c a t i o n s
Deploying InterClient programs as applicationsInterClient programs can also be deployed as stand-alone Java applications. These applications both reside on and execute from the client machine; they're not downloaded from a server. The most common use for these types of Java applications is within a company or corporate intranet, where the application can access corporate database servers on a local or wide area network. However, you can also use Java applications to access databases via the Internet.
Figure 4.5 Using standalone Java applications to access InterBase
Note If your program needs to access data from more than one server/machine, you must develop a stand-alone InterClient application, since you cannot use an applet to do this.
Required software for applicationsIn order to run InterClient applications, the client and server machines must have the following software loaded:
InterClient/JDBC compliance specificationsThe following section includes information on:
• InterClient extensions to the JDBC API
• JDBC features not implemented in InterClient
• InterClient implementation of JDBC features
Client side Server side
• Java programs (compiled bytecode) • InterBase server process
• InterClient package, including the driver and all of the classes
• JDBC Driver Manager, which is part of the Java Developer’s Kit (JDK)

4-24 D e v e l o p e r ’ s G u i d e
I n t e r C l i e n t / J D B C c o m p l i a n c e s p e c i f i c a t i o n s
• InterBase features not available through InterClient or JDBC
• Java SQL datatype support
• SQL-to-Java type conversions
• Java-to-SQL type conversion
• InterClient class references
InterClient extensions to the JDBC APIThe following table lists the extensions provided by InterClient that are not part of the JDBC API:
JDBC features not implemented in InterClientAlthough all JDBC classes and methods must be implemented in order to create a JDBC-compliant driver, some features are not actually supported.
Note Unsupported features throw a SQLException error message.
Table 4.2 InterClient extensions to JDBC
InterClientSubclass Feature Description
ErrorCodes A class defining all error codes returned by InterClient in SQLWarnings and SQLExceptions
PreparedStatement getParameterMetaData() Returns a ParameterMetaData object, which provides information about the parameters to a PreparedStatement.
ParameterMetaData A ParameterMetaData object provides information about the parameters to a PreparedStatement
ResultSet isNull() Returns a Boolean value indicating whether the column contains a NULL value. Unlike wasNull(), isNull() does not require the application to read the value first.
SQL Escape processing: Outer join syntax
InterClient allows you to associate a label with a table name.

C h a p t e r 4 P r o g r a m m i n g w i t h J D B C 4-25
I n t e r C l i e n t / J D B C c o m p l i a n c e s p e c i f i c a t i o n s
The following table lists the JDBC classes, methods, and features not supported by this version of InterClient.
Table 4.3 Unsupported JDBC features
java.sql Subclass Feature Description
CallableStatement OUT parameters InterBase does not support OUT parameters in stored procedures.
Escape processing for storedprocedures: {? = call procedure_name[]}
InterClient does not support escape syntax with a result parameter.
Statement,PreparedStatement,CallableStatement
Escape processing:Scalar functions
InterClient does not support.Keywords fn user(), fn now(), fn curdate() are supported. All other scalar functions are not supported unless they are user-defined.
Statement,PreparedStatement,CallableStatement
Escape processing:time literals: {t 'hh:mm:ss}
time escape clause notsupported
Connection getCatalog() InterBase does not support catalogs.
TRANSACTION_READ_UNCOMMITTED Not supported. Borland recommends using the TRANSACTION_SERIALIZABLE transaction isolation level.
getLoginTimeout() setLoginTimeout()
Login timeouts are not supported in this release.
setQueryTimeout() setQueryTimeout() cancel()
Asynchronous cancels are not supported in this release.
Types BITTINYINTBIGINT
InterBase does not support these datatypes.
DatabaseMetaData getCatalogs() getCatalogSeparator() getCatalogTerm() getMaxCatalogNameLength() getMaxSchemaNameLength() getSchemas() getSchemaTerm() isCatalogAtStart()
InterBase does not support catalogs or schemas.
PreparedStatement setUnicodeStream() InterClient does not support Unicode.
ResultSetMetaData getCatalogName() getSchemaName()
InterBase does not support catalogs or schemas.

4-26 D e v e l o p e r ’ s G u i d e
I n t e r C l i e n t / J D B C c o m p l i a n c e s p e c i f i c a t i o n s
InterClient implementation of JDBC features The following lists unique aspects of InterClient's implementation of the JDBC API.
InterBase features not available through InterClient or JDBC The following table lists InterBase features that are currently unavailable to InterClient developers.
Table 4.4 InterClient implementation of JDBC features
java.sql Subclass Feature Description
Driver connect() Requires two Properties values: “user” and “password”, specifying the database user login and password.
DriverManager getConnection() Requires two Properties values: “user” and “password”, specifying the database user login and password.
Table 4.5 InterBase features not supported by InterClient
Unsupported InterBase Feature Description
Arrays InterClient does not support arrays.
Events and Triggers InterClient does not support InterBase events and triggers. A trigger or stored procedure posts an event to signal a database change (for example: inserts, updates, deletes).
Generators Used to produce unique values to insert into a column as a primary key. InterClient doesn't allow setting of generator values.
Multiple transactions InterClient does not allow more than one transaction on a single connection.
BLOB filters A Blob is used to store large amounts of data of various types. A Blob filter is a routine that translates Blob data from one user-defined subtype to another.

C h a p t e r 4 P r o g r a m m i n g w i t h J D B C 4-27
I n t e r C l i e n t / J D B C c o m p l i a n c e s p e c i f i c a t i o n s
Java SQL datatype supportThe following table lists the supported and unsupported Java SQL datatypes.
Query plan InterBase uses a query optimizer to determine the most efficient plan for retrieving data. InterClient doesn't allow you to view a query plan.
International character sets InterClient doesn't support multiple international character sets. *JDBC does support some.
Transaction locking InterClient doesn't support some transaction options, such as two-lock resolution modes, and explicit table-level locks.
Table 4.6 Java SQL datatype support
Supported Java SQL datatypes Unsupported Java SQL datatypes
VARCHAR, LONGVARCHAR TINYINT
VARBINARY, LONGVARBINARY BIGINT
NUMERIC
SMALLINT
INTEGER
FLOAT
DOUBLE
DATE
TIME
TIMESTAMP
BIT
Table 4.5 InterBase features not supported by InterClient
Unsupported InterBase Feature Description

4-28 D e v e l o p e r ’ s G u i d e
I n t e r C l i e n t / J D B C c o m p l i a n c e s p e c i f i c a t i o n s
SQL-to-Java type conversionsThe following table shows the SQL-to-Java type conversion mapping.
Java-to-SQL type conversionThe following table shows the Java-to-SQL type conversion mapping.
Table 4.7 SQL to Java type conversions
DBC SQL Type Maps to Java Type Or maps to Java objects returned/used by get/setObject methods
CHAR java.lang.String
VARCHAR java.lang.String
LONGVARCHAR java.lang.String
NUMERIC java.lang.Bignum
DECIMAL java.lang.Bignum
SMALLINT short java.lang.Integer
INTEGER int java.lang.Integer
REAL float java.lang.Float
FLOAT double java.lang.Double
DOUBLE double java.lang.Double
BINARY byte[]
VARBINARY byte[]
LONGVARBINARY byte[]
DATE java.sql.Date
TIME java.sql.Time
TIMESTAMP java.sql.Timestamp
Table 4.8 Java-to-SQL type conversions
Java Type maps to getObject/setObject JDBC SQL Type
java.lang.String VARCHAR, LONGVARCHAR
java.lang.Bignum NUMERIC
short java.lang.Integer SMALLINT

C h a p t e r 4 P r o g r a m m i n g w i t h J D B C 4-29
I n t e r C l i e n t / J D B C c o m p l i a n c e s p e c i f i c a t i o n s
InterClient class referencesThe reference information for the InterClient classes is included in the documentation set provided to each client.
int java.lang.Integer INTEGER
float java.lang.Float REAL
double java.lang.Double DOUBLE
byte[] VARBINARY, LONGVARBINARY
java.sql.Date DATE
c.sql.Time TIME
java.sql.Timestamp TIMESTAMP
Table 4.8 Java-to-SQL type conversions
Java Type maps to getObject/setObject JDBC SQL Type

4-30 D e v e l o p e r ’ s G u i d e
I n t e r C l i e n t / J D B C c o m p l i a n c e s p e c i f i c a t i o n s

C h a p t e r 5 P r o g r a m m i n g A p p l i c a t i o n s w i t h O D B C 5-1
C h a p t e r
Chapter 5Programming Applicationswith ODBC
This chapter discusses how to program InterBase applications with ODBC, including:
• ODBC and OLE DB
• Programming with the ODBC driver
• Configuring and using ODBC data sources
Overview of ODBCMicrosoft’s standard, similar in intent to the BDE, is called Open Database Connectivity (ODBC). One standard API provides a unified interface for applications to access data from any data source for which an ODBC driver is available. The InterBase client for Windows platforms includes a 32-bit client library for developing and executing applications that access data via ODBC. The driver is in the file iscdrv32.dll. The ODBC driver follows the ODBC 3.5 specification, which includes the 2.0 and 3.0 specifications.
You configure a data source using the ODBC Administrator tool, much as you do in BDE. If you need to access InterBase databases from third party products that do not have InterBase drivers, you need to install this ODBC driver. The install program then asks you if you want to configure any ODBC data sources. “Configuring” means providing the complete path to any databases that you know you will need to access from non-InterBase-aware products, along with the name of the ODBC driver for InterBase.

5-2 D e v e l o p e r ’ s G u i d e
C o n f i g u r i n g a n d u s i n g O D B C d a t a s o u r c e s
ODBC is the common language of data-driven client software. Some software products make use of databases, but do not yet have specific support for InterBase. In such cases, they issue data queries that conform to a current SQL standard. This guarantees that these requests can be understood by any compliant database. The ODBC driver then translates these generic requests into InterBase-specific code. Other ODBC drivers access other vendors’ databases.
Microsoft Office, for example, does not have the technology to access InterBase databases directly, but it can use the ODBC driver that is on the InterBase CDROM.
You do not need to install an ODBC driver if you plan to access your InterBase databases only from InterBase itself or from products such as Delphi, C++Builder, and JBuilder that use either native InterBase programming components or Borland SQL-Links components to query InterBase data.
JDBC and InterClient are covered in Chapter 4, “Programming with JDBC.”
Configuring an ODBC driverTo access the ODBC Administrator on Windows machines, display the Control Panel and choose ODBC. (In some cases, it appears as “32-Bit ODBC Administrator”.)
Configuring and using ODBC data sourcesUse the ODBC Administrator to configure data sources. To access the ODBC Administrator on Windows platforms, display the Control Panel and choose ODBC (in some cases, it appears as “32-bit ODBC Administrator” or “ODBC Data Source Administrator” or “ODBC Data Sources”).
Note A user data source is a data source visible to the user, whereas a system data source is visible to the system.
Configuring data sourcesBelow are the steps for configuring a data source:
1 Select Start | Settings | Control Panel and double-click the ODBC entry. (If you have the ODBC SDK installed, you can run the “32bit ODBC Administrator” utility instead). The “ODBC Data Source Administrator” window opens.
2 On the User DSN tab, click Add. The “Create New Data Source” window opens.
3 Select the InterBase ODBC driver and click Finish. The “InterBase ODBC Configuration” window opens.

C h a p t e r 5 P r o g r a m m i n g A p p l i c a t i o n s w i t h O D B C 5-3
C o n f i g u r i n g a n d u s i n g O D B C d a t a s o u r c e s
4 Enter the following information:
5 Optionally, click Advanced and fill in CharacterSet and Roles information.
6 Click OK to return to the “ODBC Data Source Administrator” window. You should see the data source you just added, listed under User Data Sources.
Connecting from Delphi using the ODBC data sourceODBC connection from Delphi is very similar to connecting using BDE from Delphi.
The following example shows connecting using the TQuery component, and also displaying the results of a SQL statement.
1 Drop a TQuery, a TDatasource, and a TDBGrid component on a Delphi form.
2 Set the following properties for the TQuery component:
3 Set the following property for the TDatasource component:
Data Source Name Make up a name for your data source
Description A description of the data course (not required)
Network Protocol Choose the protocol from the drop-down list
Database Full physical path to the database, including the database name
Server Server name; if you choose the protocol “local,” this will default to the local server
Username Your database user name, or SYSDBA
Password The database password corresponding to the Username
DatabaseName Pick from the list the data source name created using ODBC Administrator
SQL enter the SQL statement to be executed; for example, “SELECT * FROM Table1”
Active Set to True to connect; supply user name and password on connection
Data Set Set to the name of the TQuery component, or “query1” in this case

5-4 D e v e l o p e r ’ s G u i d e
C o n f i g u r i n g a n d u s i n g O D B C d a t a s o u r c e s
4 Set the following property for the TDBGrid component:
5 Inspect the returned results from the SELECT statement, in the DBGrid area.
Data Set Set to the name of the TDatasource component, or “datasource1” in this case

C h a p t e r 6 W o r k i n g w i t h U D F s a n d B l o b F i l t e r s 6-1
C h a p t e r
Chapter 6Working with UDFs and Blob FiltersThis chapter describes how to create and use UDFs to perform data manipulation tasks that are not directly supported by InterBase. Topics include:
• UDF overview
• Writing a function module
• Compiling and linking a function module
• Declaring a UDF to a database
• Calling a UDF
• Writing a Blob UDF
• The InterBase UDF library
• Declaring Blob filters

6-2 D e v e l o p e r ’ s G u i d e
U D F o v e r v i e w
UDF overviewJust as InterBase has built-in SQL functions such as MIN(), MAX(), and CAST(), it also supports libraries of user-defined functions (UDFs). User-defined functions (UDFs) are host-language programs for performing customized, often-used tasks in applications. UDFs enable the programmer to modularize an application by separating it into more reusable and manageable units. Possibilities include statistical, string, and date functions. UDFs are extensions to the InterBase server and execute as part of the server process.
InterBase provides a library of UDFs, documented in the “The InterBase UDF library” section of this chapter on page 6-14.
You can access UDFs and Blob filters through isql or a host-language program. You can also access UDFs in stored procedures and trigger bodies.
UDFs can be used in a database application anywhere that a built-in SQL function can be used. This chapter describes how to create UDFs and how to use them in an application.
Creating a UDF is a three-step process:
1 Write the function in any programming language that can create a shared library. Functions written in Java are not supported.
2 Compile the function and link it to a dynamically linked or shared library.
3 Use DECLARE EXTERNAL FUNCTION to declare each individual UDF to each database in which you need to use it.
Writing a function moduleTo create a user-defined function (UDF), you code the UDF in a host language, then build a shared function library that contains the UDF. You must then use DECLARE EXTERNAL FUNCTION to declare each individual UDF to each database where you need to it. Each UDF needs to be declared to each database only once.
Writing a UDFIn the C language, a UDF is written like any standard function. The UDF can require up to ten input parameters, and can return only a single C data value. A source code module can define one or more functions and can use typedefs defined in the InterBase ibase.h header file. You must then include ibase.h when you compile.

C h a p t e r 6 W o r k i n g w i t h U D F s a n d B l o b F i l t e r s 6-3
W r i t i n g a f u n c t i o n m o d u l e
Specifying parametersA UDF can accept up to ten parameters corresponding to any InterBase datatype. Array elements cannot be passed as parameters. If a UDF returns a Blob, the number of input parameters is restricted to nine. All parameters are passed to the UDF by reference.
Programming language datatypes specified as parameters must be capable of handling corresponding InterBase datatypes. For example, the C function declaration for FN_ABS() accepts one parameter of type double. The expectation is that when FN_ABS() is called, it will be passed a datatype of DOUBLE PRECISION by InterBase.
UDFs that accept Blob parameters require special data structure for processing. A Blob is passed by reference to a Blob UDF structure. For more information about the Blob UDF structure, see “Writing a Blob UDF” on page 6-11.
Specifying a return valueA UDF can return values that can be translated into any InterBase datatype, including a Blob, but it cannot return arrays of datatypes. For example, the C function declaration for FN_ABS() returns a value of type double, which corresponds to the InterBase DOUBLE PRECISION datatype.
By default, return values are passed by reference. Numeric values can be returned by reference or by value. To return a numeric parameter by value, include the optional BY VALUE keyword after the return value when declaring a UDF to a database.
A UDF that returns a Blob does not actually define a return value. Instead, a pointer to a structure describing the Blob to return must be passed as the last input parameter to the UDF. See “Declaring a Blob UDF” on page 6-13.
Character datatypesUDFs are written in a host language and therefore take host-language datatypes for both their parameters and their return values. However, when a UDF is declared, InterBase must translate them to SQL datatypes or to a CSTRING type of a specified maximum byte length. CSTRING is used to translate parameters of CHAR and VARCHAR datatypes into a null-terminated C string for processing, and to return a variable-length, null-terminated C string to InterBase for automatic conversion to CHAR or VARCHAR.
When you declare a UDF that returns a C string, CHAR or VARCHAR, you must include the FREE_IT keyword in the declaration in order to free the memory used by the return value.

6-4 D e v e l o p e r ’ s G u i d e
W r i t i n g a f u n c t i o n m o d u l e
Calling conventionsThe calling convention determines how a function is called and how the parameters are passed. The called function must match the caller function's calling convention. InterBase uses the CDECL calling convention, so all UDFs must use the same calling convention.
Note that the situation is different for calls to APIs. On UNIX, InterBase uses CDECL for all API calls. On Windows platforms InterBase uses STDCALL for all functions that have a fixed number of arguments and CDECL for functions that have a variable number of arguments. See “Programming with the InterBase API” in the API Guide for a list of these functions.
Thread-safe UDFsIn SuperServer implementations of InterBase, the server runs as a single multi-threaded process. This means that you must take some care in the way you allocate and release memory when coding UDFs and in the way you declare UDFs. This section describes how to write UDFs that handle memory correctly in the new single-process environment.
There are several issues to consider when handling memory in the single-process, multi-thread architecture:
• UDFs must avoid static variables in order to be thread safe. You can use static variables only if you can guarantee that only one user at a time will be accessing UDFs, since users running UDFs concurrently will conflict in their use of the same static memory space. If you do return a pointer to static data, you must not use FREE_IT.
• UDFs must allocate memory using ib_util_malloc() rather than static arrays in order to be thread-safe.
• Memory allocated dynamically is not automatically released, since the process does not end. You must use the FREE_IT keyword when you declare the UDF to the database (DECLARE EXTERNAL FUNCTION).
In the following example for user-defined function FN_LOWER(), the array must be global to avoid going out of context:
Multi-process version (not thread-safe: do not use for SuperServer)char buffer[256];char *fn_lower(char *ups){. . . return (buffer); }
In the following version, the InterBase engine will free the buffer if the UDF is declared using the FREE_IT keyword:

C h a p t e r 6 W o r k i n g w i t h U D F s a n d B l o b F i l t e r s 6-5
C o m p i l i n g a n d l i n k i n g a f u n c t i o n m o d u l e
Thread-safe versionNotice that this example uses InterBase’s ib_util_malloc() function to allocate memory.
char *fn_lower(char *ups){
char *buffer = (char *) ib_util_malloc(256);...return (buffer);
}
The procedure for allocating and freeing memory for return values in a fashion that is both thread safe and compiler independent is as follows:
1 In the UDF code, use InterBase’s ib_util_malloc() function to allocate memory for return values. This function is located as follows:
2 Use the FREE_IT keyword in the RETURNS clause when declaring a function that returns dynamically allocated objects. For example:
DECLARE EXTERNAL FUNCTION lowers VARCHAR(256)RETURNS CSTRING(256) FREE_IT ENTRY POINT 'fn_lower' MODULE_NAME 'ib_udf'
InterBase’s FREE_IT keyword allows InterBase users to write thread-safe UDF functions without memory leaks. Note that it is not necessary to provide the extension of the module name.
3 Memory must be released by the same runtime library that allocated it.
Compiling and linking a function moduleAfter a UDF module is complete, you can compile it in a normal fashion into object or library format. You then declare the UDFs in the resulting object or library module to the database using the DECLARE EXTERNAL FUNCTION statement. Once declared to the database, the library containing all the UDFs is automatically loaded at run time from a shared library or dynamic link library.
• Include ibase.h in the source code if you use typedefs defined in the InterBase ibase.h header file. All “include” (*.h) libraries are in the <interbase_home>/SDK/include directory.
• Link to gds32.dll if you use calls to InterBase library functions.
• Linking and compiling:
Windows <interbase_home>/bin/ib_util.dll
Linux /usr/lib/ib_util.so
Solaris <interbase_home>/lib/ib_util.so

6-6 D e v e l o p e r ’ s G u i d e
C o m p i l i n g a n d l i n k i n g a f u n c t i o n m o d u l e
Microsoft Visual C/C++ Link with <interbase_home>/SDK /lib_ms/ib_util_ms.lib and include <interbase_home>/SDK/include/ib_util.h
Use the following options when compiling applications with Microsoft C++:
Borland C++ Link with <interbase_home>/SDK/lib/ib_util.lib and include <interbase_home>/SDK/include/ib_util.h
Delphi Use <interbase_home>/SDK/include/ib_util.pas.
Examples The following commands use the Microsoft compiler to build a DLL that uses InterBase:
cl -c -Zi -DWIN32 -D_MT -LD udf.c lib -out:udf.dll -def:funclib.def -machine:i586 -subsystem:console link -DLL -out:funclib.dll -DEBUG:full,mapped -DEBUGTYPE:CV -machine:i586 -entry:_DllMainCRTStartup@12 -subsystem:console -verbose udf.obj udf.exp gds32_ms.lib ib_util_ms.lib crtdll.lib
This command builds an InterBase executable using the Microsoft compiler:
cl -Zi -DWIN32 -D_MT -MD udftest.c udf.lib gds32_ms.lib ib_util_ms.lib crtdll.lib
See the makefiles (makefile.bc and makefile.msc on Windows platforms, makefile on UNIX) in the InterBase examples subdirectory for details on how to compile a UDF library.
Examples For examples of how to write thread-safe UDFs, see <interbase_home>/examples/UDF/udflib.c.
Creating a UDF libraryUDF libraries are standard shared libraries that are dynamically loaded by the database at runtime. You can create UDF libraries on any platform—except NetWare—that is supported by InterBase. To use the same set of UDFs with databases running on different platforms, create separate libraries on each platform where the databases reside. UDFs run on the server where the database resides.
Table 6.1 Microsoft C compiler options
Option Action
c Compile without linking (DLLs only)
Zi Generate complete debugging information
DWIN32 Defines “WIN32”
D_MT Use a multi-thread, statically-linked library

C h a p t e r 6 W o r k i n g w i t h U D F s a n d B l o b F i l t e r s 6-7
D e c l a r i n g a U D F t o a d a t a b a s e
Note A library, in this context, is a shared object that typically has a dll extension on Windows platforms, and an so extension on Solaris and Linux.
The InterBase examples directory contains sample makefiles (makefile.bc and makefile.msc on Windows platforms, makefile on UNIX) that build a UDF function library from udflib.c.
Modifying a UDF libraryTo add a UDF to an existing UDF library on a platform:
• Compile the UDF according to the instructions for the platform.
• Include all object files previously included in the library and the newly-created object file in the command line when creating the function library.
Note On some platforms, object files can be added directly to existing libraries. For more information, consult the platform-specific compiler and linker documentation.
To delete a UDF from a library, follow the linker’s instructions for removing an object from a library. Deleting a UDF from a library does not eliminate references to it in the database.
Declaring a UDF to a databaseOnce a UDF has been written and compiled into a library, you must use the DECLARE EXTERNAL FUNCTION statement to declare each function to each database where you want to use it. Each function in a library must be declared separately, but needs to be declared only once to each database.
Declaring a UDF to a database informs the database about its location and properties:
• The UDF name as it will be used in embedded SQL statements
• The number and datatypes of its arguments
• The return datatype
• The name of the function as it exists in the UDF module or library
• The name of the library that contains the UDF
You can use isql, IBConsole, or a script to declare your UDFs.
DECLARE EXTERNAL FUNCTION name [datatype |CSTRING (int) [, datatype | CSTRING (int) ...]]
RETURNS {datatype [BY VALUE] | CSTRING (int) | PARAMETER n} [FREE_IT]ENTRY_POINT 'entryname'MODULE_NAME 'modulename';

6-8 D e v e l o p e r ’ s G u i d e
D e c l a r i n g a U D F t o a d a t a b a s e
Declaring UDFs with FREE_ITInterBase’s FREE_IT keyword allows InterBase users to write thread-safe UDF functions without memory leaks.
Whenever a UDF returns a value by reference to dynamically allocated memory, you must declare it using the FREE_IT keyword in order to free the allocated memory.
Table 6.2 Arguments to DECLARE EXTERNAL FUNCTION
Argument Description
name Name of the UDF to use in SQL statements; can be different from the name of the function specified after the ENTRY_POINT keyword
datatype Datatype of an input or return parameter• All input parameters are passed to a UDF by reference• Return parameters can be passed by value• Cannot be an array element
CSTRING (int) Specifies a UDF that returns a null-terminated string int bytes in length
RETURNS Specifies the return value of a function
BY VALUE Specifies that a return value should be passed by value rather than by reference
PARAMETER n • Specifies that the nth input parameter is to be returned.• Used when the return datatype is BLOB
FREE_IT Frees memory of the return value after the UDF finishes running • Use only if the memory is allocated dynamically in the UDF • See also the UDF chapter in the Developer’s Guide
'entryname' Quoted string specifying the name of the UDF in the source code and as stored in the UDF library
'modulename' Quoted specification identifying the library that contains the UDF• The library must reside on the same machine as the InterBase
server• On any platform, the module can be referenced with no path
name if it is in <interbase_home>/UDF or <interbase_home>/intl• If the library is in a directory other than <interbase_home>/UDF
or <interbase_home>/intl, you must specify its location in InterBase’s configuration file (ibconfig) using the EXTERNAL_FUNCTION_DIRECTORY parameter
• It is not necessary to supply the extension to the module name

C h a p t e r 6 W o r k i n g w i t h U D F s a n d B l o b F i l t e r s 6-9
D e c l a r i n g a U D F t o a d a t a b a s e
Note You must not use FREE_IT with UDFs that return a pointer to static data, as in the “multi-process version” example on page 6-4.
The following code shows how to use this keyword:
DECLARE EXTERNAL FUNCTION lowers VARCHAR(256)RETURNS CSTRING(256) FREE_IT ENTRY POINT 'fn_lower' MODULE_NAME 'ib_udf'
UDF library placementEarlier versions of InterBase had few requirements about the placement of UDF libraries. For security reasons, current versions of InterBase have the following requirements for the placement of UDF libraries:
• On any platform, the module can be referenced with no path name if it is in <interbase_home>/UDF or <interbase_home>/intl.
• If the library in a directory other than <interbase_home>/UDF or <interbase_home>/intl, you must specify its location in InterBase’s configuration file (ibconfig) using the EXTERNAL_FUNCTION_DIRECTORY parameter. Give the complete pathname to the library, including a drive letter in the case of a Windows server.
When either of the above conditions is met, InterBase finds the library. You do not need to specify a path in the declaration.
Note The library must reside on the same machine as the InterBase server.
To specify a location for UDF libraries in ibconfig, enter a line such as the following:
Windows:
EXTERNAL_FUNCTION_DIRECTORY "C:\<interbase_home>\Mylibraries"
Unix:
EXTERNAL_FUNCTION_DIRECTORY "/usr/interbase/Mylibraries"
Note that it is no longer sufficient to include a complete path name for the module in the DECLARE EXTERNAL FUNCTION statement. You must list the path in the EXTERNAL_FUNCTION_DIRECTORY parameter of the InterBase configuration file if the library is not located in <interbase_home>/UDF or <interbase_home>/intl.
Important For security reasons, InterBase strongly recommends that you place your compiled libraries in directories that are dedicated to InterBase libraries. Placing InterBase libraries in directories such as C:\WINNT\system32 or /usr/lib permits access to all libraries in those directories and is a serious security hole.
Example The following statement declares the TOPS() UDF to a database:
DECLARE EXTERNAL FUNCTION TOPS CHAR(256), INTEGER, BLOB

6-10 D e v e l o p e r ’ s G u i d e
C a l l i n g a U D F
RETURNS INTEGER BY VALUEENTRY_POINT 'TE1' MODULE_NAME 'TM1';
This example does not need the FREE_IT keyword because only cstrings, CHAR, and VARCHAR return types require memory allocation. The module must be in InterBase’s UDF directory or in a directory that is named in the configuration file.
Example The following isql script declares three UDFs, ABS(), DATEDIFF(), and TRIM(), to the employee.gdb database:
CONNECT 'employee.gdb';DECLARE EXTERNAL FUNCTION ABS
DOUBLE PRECISIONRETURNS DOUBLE PRECISION BY VALUEENTRY_POINT 'fn_abs' MODULE_NAME 'ib_udf';
DECLARE EXTERNAL FUNCTION DATEDIFFDATE, DATERETURNS INTEGERENTRY_POINT 'fn_datediff' MODULE_NAME 'ib_udf';
DECLARE EXTERNAL FUNCTION TRIMSMALLINT, CSTRING(256), SMALLINTRETURNS CSTRING(256) FREE_ITENTRY_POINT 'fn_trim' MODULE_NAME 'ib_udf';
COMMIT;
Note that no extension is supplied for the module name. This creates a portable module. Windows machines add a dll extension automatically.
Calling a UDFAfter a UDF is created and declared to a database, it can be used in SQL statements wherever a built-in function is permitted. To use a UDF, insert its name in a SQL statement at an appropriate location, and enclose its input arguments in parentheses.
For example, the following DELETE statement calls the ABS() UDF as part of a search condition that restricts which rows are deleted:
DELETE FROM CITIESWHERE ABS (POPULATION - 100000) > 50000;
UDFs can also be called in stored procedures and triggers. For more information, see “Working with Stored Procedures” and “Working with Triggers” in the Data Definition Guide.
Calling a UDF with SELECT
In SELECT statements, a UDF can be used in a select list to specify data retrieval, or in the WHERE clause search condition.

C h a p t e r 6 W o r k i n g w i t h U D F s a n d B l o b F i l t e r s 6-11
W r i t i n g a B l o b U D F
The following statement uses ABS() to guarantee that a returned column value is positive:
SELECT ABS (JOB_GRADE) FROM PROJECTS;The next statement uses DATEDIFF() in a search condition to restrict rows retrieved:
SELECT START_DATE FROM PROJECTSWHERE DATEDIFF (:today, START_DATE) > 10;
Calling a UDF with INSERT
In INSERT statements, a UDF can be used in the comma-delimited list in the VALUES clause.
The following statement uses TRIM() to remove leading blanks from firstname and trailing blanks from lastname before inserting the values of these host variables into the EMPLOYEE table:
INSERT INTO EMPLOYEE(FIRST_NAME, LAST_NAME, EMP_NO, DEPT_NO, SALARY)VALUES (TRIM (0, ' ',:firstname), TRIM (1, ' ', :lastname),
:empno, :deptno, greater(30000, :est_salary));
Calling a UDF with UPDATE
In UPDATE statements, a UDF can be used in the SET clause as part of the expression assigning column values. For example, the following statement uses TRIM() to ensure that update values do not contain leading or trailing blanks:
UPDATE COUNTRIESSET COUNTRY = TRIM (2, ' ', COUNTRY);
Calling a UDF with DELETE
In DELETE statements, a UDF can be used in a WHERE clause search condition:
DELETE FROM COUNTRIESWHERE ABS (POPULATION - 100000) < 50000;
Writing a Blob UDFA Blob UDF differs from other UDFs, because pointers to Blob control structures are passed to the UDF instead of references to actual data. A Blob UDF cannot open or close a Blob, but instead invokes functions to perform Blob access.

6-12 D e v e l o p e r ’ s G u i d e
W r i t i n g a B l o b U D F
Creating a Blob control structureA Blob control structure is a C struct, declared within a UDF module as atypedef. Programmers must provide the control structure definition, which should be defined as follows:
typedef struct blob {void (*blob_get_segment) ();isc_blob_handle blob_handle;long number_segments;long max_seglen;long total_size;void (*blob_put_segment) ();
} *Blob;
Table 6.3 Fields in the Blob struct
Field Description
blob_get_segment Points to a function that is called to read a segment from a Blob if one is passed; the function takes four arguments: a Blob handle, the address of a buffer into which to place Blob a segment of data that is read, the size of that buffer, and the address of the variable that stores the size of the segment that is read. If Blob data is not read by the UDF, set blob_get_segment to NULL.
blob_handle • Required Uniquely identifies a Blob passed to a UDF or returned by it.
number_segments Specifies the total number of segments in the Blob. Set this value to NULL if Blob data is not passed to a UDF.
max_seglen Specifies the size, in bytes, of the largest single segment passed. Set this value to NULL if Blob data is not passed to a UDF.
total_size Specifies the actual size, in bytes, of the Blob as a single unit. Set this value to NULL if Blob data is not passed to a UDF.
blob_put_segment Points to a function that writes a segment to a Blob if one is being returned by the UDF. The function takes three arguments: a Blob handle, the address of a buffer containing the data to write into the Blob, and the size, in bytes, of the data to write. If Blob data is not read by the UDF, set blob_put_segment to NULL.

C h a p t e r 6 W o r k i n g w i t h U D F s a n d B l o b F i l t e r s 6-13
W r i t i n g a B l o b U D F
Declaring a Blob UDFTo specify that a UDF should return a Blob, use the RETURNS PARAMETER n statement to specify which input Blob is to be returned. For example, if the Blob to be returned is the third input parameter, specify RETURNS PARAMETER 3. In the following example, the Blob_PLUS_Blob UDF concatenates two Blobs and returns the concatenation in a third Blob. The following statement declares this UDF to a database, specifying that the third input parameter is the one that should be returned:
DECLARE EXTERNAL FUNCTION Blob_PLUS_BlobBlob,Blob,BlobRETURNS PARAMETER 3ENTRY_POINT 'blob_concatenate' MODULE_NAME 'ib_udf';
COMMIT;
The blob_concatenate() function shown as the entry point above is defined in the following Blob UDF example. The blob_concatenate() function concatenates two blobs into a third blob.
A Blob UDF exampleThe following code creates a UDF, blob_concatenate(), that appends data from one Blob to the end of another Blob to return a third Blob consisting of concatenated Blob data. Notice that it is okay to use malloc() rather than ib_util_malloc() when you free the memory in the same function where you allocate it.
/* Blob control structure */typedef struct blob {
void (*blob_get_segment) ();int *blob_handle;long number_segments;long max_seglen;long total_size;void (*blob_put_segment) ();
} *Blob;
extern char *isc_$alloc();#define MAX(a, b) (a > b) ? a : b#define DELIMITER "-----------------------------"
void blob_concatenate(Blob from1, Blob from2, Blob to)/* Note Blob to, as final input parameter, is actually for output! */{
char *buffer;long length, b_length;

6-14 D e v e l o p e r ’ s G u i d e
T h e I n t e r B a s e U D F l i b r a r y
b_length = MAX(from1->max_seglen, from2->max_seglen);buffer = malloc(b_length);
/* write the from1 Blob into the return Blob, to */while ((*from1->blob_get_segment) (from1->blob_handle, buffer,
b_length, &length))(*to->blob_put_segment) (to->blob_handle, buffer, length);
/* now write a delimiter as a dividing line in the blob */(*to->blob_put_segment) (to->blob_handle, DELIMITER,
sizeof(DELIMITER) - 1);
/* finally write the from2 Blob into the return Blob, to */while ((*from2->blob_get_segment) (from2->blob_handle, buffer,
b_length, &length))(*to->blob_put_segment) (to->blob_handle, buffer, length);
/* free the memory allocated to the buffer */free(buffer);
}
The InterBase UDF libraryInterBase provides a number of frequently needed functions in the form of a UDF library, named ib_udf.dll on Windows platforms and ib_udf on UNIX platforms. This UDF library is located in <interbase_home>/UDF and its functions are all implemented using the standard C library. This section describes each UDF and provides its declaration.
Important notes• Do not move the UDF library file from its installed location unless you also
move the utility file that is located in the same directory (ib_util.dll on Windows, ib_util.so on Solaris and Linux). The UDF library file requires the utility file to function correctly.
• There is a script, ib_udf.sql, in the <interbase_home>/examples/udf directory that declares all of the functions listed below. If you want to declare only a subset of these, copy and edit the script file.
• Several of these UDFs must be called using the new FREE_IT keyword if—and only if—they are written in thread-safe form, using malloc to allocate dynamic memory.
• When trigonometric functions are passed inputs that are out of bounds, they return zero rather than NaN.
Below is a list of the functions supplied in the InterBase UDF library. The description and code for each function follows the table.

C h a p t e r 6 W o r k i n g w i t h U D F s a n d B l o b F i l t e r s 6-15
T h e I n t e r B a s e U D F l i b r a r y
Table 6.4 Function declarations for the InterBase UDF library
Functionname Description Inputs Outputs
abs( ) Absolute value Double precision Double precision
acos( ) Arc cosine Double precision Double precision
ascii_char( ) Return character based on ASCII code
Integer Char(1)
io( ) Return ASCII code for given character
Char(1) Integer
asin( ) Arc sine Double precision Double precision
atan( ) Arc tangent Double precision Double precision
atan2( ) Arc tangent divided by second argument
Double precision, Double precision
Double precision
bin_and( ) Bitwise AND operation Integer Integer
bin_or( ) Bitwise OR operation Integer Integer
bin_xor( ) Bitwise XOR operation Integer Integer
ceiling( ) Round up to nearest whole value
Double precision Double precision
cos( ) Cosine Double precision Double precision
cosh( ) Hyperbolic cosine Double precision Double precision
cot( ) Cotangent Double precision Double precision
div( ) Integer division Integer Integer
floor( ) Round down to nearest whole value
Double precision Double precision
LN( ) Natural logarithm Double precision Double precision
LOG( ) Logarithm of the first argument, by the base of the second argument
Double precision, Double precision
Double precision
LOG10( ) Logarithm base 10 Double precision Double precision
LOWER( ) Reduce all upper-case characters to lower-case
Cstring(80) Cstring(80)
LTRIM( ) Strip preceding blanks Cstring(80) Cstring(80)
MOD( ) Modulus operation between the two arguments
Integer, Integer Integer

6-16 D e v e l o p e r ’ s G u i d e
T h e I n t e r B a s e U D F l i b r a r y
absReturns the absolute value of a number.
DECLARE EXTERNAL FUNCTION ABS DOUBLE PRECISIONRETURNS DOUBLE PRECISION BY VALUEENTRY_POINT 'IB_UDF_abs' MODULE_NAME 'ib_udf';
acosReturns the arccosine of a number between −1 and 1; if the number is out of bounds it returns zero.
DECLARE EXTERNAL FUNCTION ACOS DOUBLE PRECISIONRETURNS DOUBLE PRECISION BY VALUEENTRY_POINT 'IB_UDF_acos' MODULE_NAME 'ib_udf';
PI( ) Return the value of π — Double precision
RAND( ) Return a random value — Double precision
RTRIM( ) Strip trailing blanks Cstring(80) Cstring(80)
SIGN( ) Return -1, 0, or 1 Double precision Integer
SIN( ) Sine Double precision Double precision
SINH( ) Hyperbolic sine Double precision Double precision
SQRT( ) Square root Double precision Double precision
STRLEN( ) Length of string Cstring(32767) Integer
SUBSTR( ) The substring of s starting at position m and ending at position n
Cstring(80), Smallint, Smallint
Cstring(80)
TAN( ) Tangent Double precision Double precision
TANH( ) Hyperbolic tangent Double precision Double precision
Table 6.4 Function declarations for the InterBase UDF library (continued)
Functionname Description Inputs Outputs

C h a p t e r 6 W o r k i n g w i t h U D F s a n d B l o b F i l t e r s 6-17
T h e I n t e r B a s e U D F l i b r a r y
ascii_charReturns the ASCII character corresponding to the value passed in.
DECLARE EXTERNAL FUNCTION ascii_charINTEGERRETURNS CSTRING(1) FREE_ITENTRY_POINT 'IB_UDF_ascii_char' MODULE_NAME 'ib_udf';
ascii_valReturns the ASCII value of the character passed in.
DECLARE EXTERNAL FUNCTION ASCII_VALCHAR(1)RETURNS INTEGER BY VALUEENTRY_POINT 'IB_UDF_ascii_val' MODULE_NAME 'ib_udf';
asinReturns the arcsin of a number between −1 and 1; returns zero if the number is out of range.
DECLARE EXTERNAL FUNCTION ASIN DOUBLE PRECISIONRETURNS DOUBLE PRECISION BY VALUEENTRY_POINT 'IB_UDF_asin' MODULE_NAME 'ib_udf';
atanReturns the arctangent of the input value.
DECLARE EXTERNAL FUNCTION ATAN DOUBLE PRECISIONRETURNS DOUBLE PRECISION BY VALUEENTRY_POINT 'IB_UDF_atan' MODULE_NAME 'ib_udf';
atan2Returns the arctangent of the first parameter divided by the second parameter.
DECLARE EXTERNAL FUNCTION ATAN2 DOUBLE PRECISION, DOUBLE PRECISIONRETURNS DOUBLE PRECISION BY VALUEENTRY_POINT 'IB_UDF_atan2' MODULE_NAME 'ib_udf';
bin_andReturns the result of a binary AND operation performed on the two input values.

6-18 D e v e l o p e r ’ s G u i d e
T h e I n t e r B a s e U D F l i b r a r y
DECLARE EXTERNAL FUNCTION BIN_AND INTEGER, INTEGERRETURNS INTEGER BY VALUEENTRY_POINT 'IB_UDF_bin_and' MODULE_NAME 'ib_udf';
bin_orReturns the result of a binary OR operation performed on the two input values.
DECLARE EXTERNAL FUNCTION BIN_OR INTEGER, INTEGERRETURNS INTEGER BY VALUEENTRY_POINT 'IB_UDF_bin_or' MODULE_NAME 'ib_udf';
bin_xorReturns the result of a binary XOR operation performed on the two input values.
DECLARE EXTERNAL FUNCTION BIN_XOR INTEGER, INTEGERRETURNS INTEGER BY VALUEENTRY_POINT 'IB_UDF_bin_xor' MODULE_NAME 'ib_udf';
ceilingReturns a double value representing the smallest integer that is greater than or equal to the input value.
DECLARE EXTERNAL FUNCTION CEILING DOUBLE PRECISIONRETURNS DOUBLE PRECISION BY VALUEENTRY_POINT 'IB_UDF_ceiling' MODULE_NAME 'ib_udf';
cosReturns the cosine of x. If x is greater than or equal to 263, or less than or equal to −263, there is a loss of significance in the result of the call, and the function generates a _TLOSS error and returns a zero.
DECLARE EXTERNAL FUNCTION COS DOUBLE PRECISIONRETURNS DOUBLE PRECISION BY VALUEENTRY_POINT 'IB_UDF_cos' MODULE_NAME 'ib_udf';
coshReturns the hyperbolic cosine of x. If x is greater than or equal to 263, or less than or equal to −263, there is a loss of significance in the result of the call, and the function generates a _TLOSS error and returns a zero.

C h a p t e r 6 W o r k i n g w i t h U D F s a n d B l o b F i l t e r s 6-19
T h e I n t e r B a s e U D F l i b r a r y
DECLARE EXTERNAL FUNCTION COSH DOUBLE PRECISIONRETURNS DOUBLE PRECISION BY VALUEENTRY_POINT 'IB_UDF_cosh' MODULE_NAME 'ib_udf';
cotReturns 1 over the tangent of the input value.
DECLARE EXTERNAL FUNCTION COT DOUBLE PRECISIONRETURNS DOUBLE PRECISION BY VALUEENTRY_POINT 'IB_UDF_cot' MODULE_NAME 'ib_udf';
divDivides the two inputs and returns the quotient.
DECLARE EXTERNAL FUNCTION DIV INTEGER, INTEGERRETURNS DOUBLE PRECISION BY VALUEENTRY_POINT 'IB_UDF_div' MODULE_NAME 'ib_udf';
floorReturns a floating-point value representing the largest integer that is less than or equal to x.
DECLARE EXTERNAL FUNCTION FLOOR DOUBLE PRECISIONRETURNS DOUBLE PRECISION BY VALUEENTRY_POINT 'IB_UDF_floor' MODULE_NAME 'ib_udf';
lnReturns the natural log of a number.
DECLARE EXTERNAL FUNCTION LN DOUBLE PRECISIONRETURNS DOUBLE PRECISION BY VALUEENTRY_POINT 'IB_UDF_ln' MODULE_NAME 'ib_udf';
logLOG(x,y) returns the logarithm base x of y.
DECLARE EXTERNAL FUNCTION LOG DOUBLE PRECISION, DOUBLE PRECISIONRETURNS DOUBLE PRECISION BY VALUE

6-20 D e v e l o p e r ’ s G u i d e
T h e I n t e r B a s e U D F l i b r a r y
ENTRY_POINT 'IB_UDF_log' MODULE_NAME 'ib_udf';
log10Returns the logarithm base 10 of the input value.
DECLARE EXTERNAL FUNCTION LOG10 DOUBLE PRECISIONRETURNS DOUBLE PRECISION BY VALUEENTRY_POINT 'IB_UDF_log10' MODULE_NAME 'ib_udf';
lowerReturns the input string as lowercase characters. This function works only with ASCII characters.
Note This function can receive and return up to 32,767 characters, the limit on an InterBase character string.
DECLARE EXTERNAL FUNCTION lower CSTRING(80)RETURNS CSTRING(80) FREE_ITENTRY_POINT 'IB_UDF_lower' MODULE_NAME 'ib_udf';
ltrimRemoves leading spaces from the input string.
Note This function can receive and return up to 32,767 characters, the limit on an InterBase character string.
DECLARE EXTERNAL FUNCTION LTRIM CSTRING(80)RETURNS CSTRING(80) FREE_ITENTRY_POINT 'IB_UDF_ltrim' MODULE_NAME 'ib_udf';
modDivides the two input parameters and returns the remainder.
DECLARE EXTERNAL FUNCTION MOD INTEGER, INTEGERRETURNS DOUBLE PRECISION BY VALUEENTRY_POINT 'IB_UDF_mod' MODULE_NAME 'ib_udf';
piReturns the value of pi = 3.14159...
DECLARE EXTERNAL FUNCTION PI

C h a p t e r 6 W o r k i n g w i t h U D F s a n d B l o b F i l t e r s 6-21
T h e I n t e r B a s e U D F l i b r a r y
RETURNS DOUBLE PRECISION BY VALUEENTRY_POINT 'IB_UDF_pi' MODULE_NAME 'ib_udf';
randReturns a random number between 0 and 1. The current time is used to seed the random number generator.
DECLARE EXTERNAL FUNCTION rand RETURNS DOUBLE PRECISION BY VALUEENTRY_POINT 'IB_UDF_rand' MODULE_NAME 'ib_udf';
rtrimRemoves trailing spaces from the input string.
Note This function can receive and return up to 32,767 characters, the limit on an InterBase character string.
DECLARE EXTERNAL FUNCTION RTRIM CSTRING(80)RETURNS CSTRING(80) FREE_ITENTRY_POINT 'IB_UDF_rtrim' MODULE_NAME 'ib_udf';
signReturns 1, 0, or −1 depending on whether the input value is positive, zero or negative, respectively.
DECLARE EXTERNAL FUNCTION SIGN DOUBLE PRECISIONRETURNS INTEGER BY VALUEENTRY_POINT 'IB_UDF_sign' MODULE_NAME 'ib_udf';
sinReturns the sine of x. If x is greater than or equal to 263, or less than or equal to −263, there is a loss of significance in the result of the call, and the function generates a _TLOSS error and returns a zero.
DECLARE EXTERNAL FUNCTION SIN DOUBLE PRECISIONRETURNS DOUBLE PRECISION BY VALUEENTRY_POINT 'IB_UDF_sin' MODULE_NAME 'ib_udf';

6-22 D e v e l o p e r ’ s G u i d e
T h e I n t e r B a s e U D F l i b r a r y
sinhReturns the hyperbolic sine of x. If x is greater than or equal to 263, or less than or equal to −263, there is a loss of significance in the result of the call, and the function generates a _TLOSS error and returns a zero.
DECLARE EXTERNAL FUNCTION SINH DOUBLE PRECISIONRETURNS DOUBLE PRECISION BY VALUEENTRY_POINT 'IB_UDF_sinh' MODULE_NAME 'ib_udf';
sqrtReturns the square root of a number.
DECLARE EXTERNAL FUNCTION SQRT DOUBLE PRECISIONRETURNS DOUBLE PRECISION BY VALUEENTRY_POINT 'IB_UDF_sqrt' MODULE_NAME 'ib_udf';
strlenReturns the length of a the input string.
DECLARE EXTERNAL FUNCTION STRLEN CSTRING(32767)RETURNS INTEGER BY VALUEENTRY_POINT 'IB_UDF_strlen' MODULE_NAME 'ib_udf';
substrsubstr(s,m,n) returns the substring of s starting at position m and ending at position n.
Note This function can receive and return up to 32,767 characters, the limit on an InterBase character string.
DECLARE EXTERNAL FUNCTION SUBSTR CSTRING(80), SMALLINT, SMALLINTRETURNS CSTRING(80) FREE_ITENTRY_POINT 'IB_UDF_substr' MODULE_NAME 'ib_udf';
tanReturns the tangent of x. If x is greater than or equal to 263, or less than or equal to −263, there is a loss of significance in the result of the call, and the function generates a _TLOSS error and returns a zero.
DECLARE EXTERNAL FUNCTION TAN DOUBLE PRECISION

C h a p t e r 6 W o r k i n g w i t h U D F s a n d B l o b F i l t e r s 6-23
D e c l a r i n g B l o b f i l t e r s
RETURNS DOUBLE PRECISION BY VALUEENTRY_POINT 'IB_UDF_tan' MODULE_NAME 'ib_udf';
tanhReturns the hyperbolic tangent of x. If x is greater than or equal to 263, or less than or equal to −263, there is a loss of significance in the result of the call, and the function generates a _TLOSS error and returns a zero.
DECLARE EXTERNAL FUNCTION TANH DOUBLE PRECISIONRETURNS DOUBLE PRECISION BY VALUEENTRY_POINT 'IB_UDF_tanh' MODULE_NAME 'ib_udf';
Declaring Blob filtersYou can use BLOB filters to convert data from one BLOB subtype to another. You can access BLOB filters from any program that contains SQL statements.
BLOB filters are user-written utility programs that convert data in BLOB columns from one subtype to another. The subtype can be either an InterBase subtype or a user-defined one. Declare the filter to the database with the DECLARE FILTER statement. For example:
DECLARE FILTER BLOB_FORMATINPUT_TYPE 1 OUTPUT_TYPE -99ENTRY_POINT 'Text_filter' MODULE_NAME 'Filter_99';
InterBase invokes BLOB filters in either of the following ways:
• SQL statements in an application
• interactively through isql.
isql automatically uses a built-in ASCII BLOB filter for a BLOB defined without a subtype, when asked to display the BLOB. It also automatically filters BLOB data defined with subtypes to text, if the appropriate filters have been defined.
To use BLOB filters, follow these steps:
1 Write the filters and compile them into object code.
2 Create a shared filter library.
3 Make the filter library available to InterBase at run time.
4 Define the filters to the database using DECLARE FILTER.
5 Write an application that requests filtering.
You can use BLOB subtypes and BLOB filters to do a large variety of processing. For example, you can define one BLOB subtype to hold:

6-24 D e v e l o p e r ’ s G u i d e
D e c l a r i n g B l o b f i l t e r s
• Compressed data and another to hold decompressed data. Then you can write BLOB filters for expanding and compressing BLOB data.
• Generic code and other BLOB subtypes to hold system-specific code. Then you can write BLOB filters that add the necessary system-specific variations to the generic code.
• Word processor input and another to hold word processor output. Then you can write a BLOB filter that invokes the word processor.
For more information about creating and using BLOB filters, see the Embedded SQL Guide. For the complete syntax of DECLARE FILTER, see the Language Reference.

C h a p t e r 7 D e s i g n i n g D a t a b a s e A p p l i c a t i o n s 7-1
C h a p t e r
Chapter 7Designing Database ApplicationsDatabase applications allow users to interact with information that is stored in databases. Databases provide structure for the information, and allow it to be shared among different applications.
The InterBase Express (IBX) components provide support for relational database applications. Relational databases organize information into tables, which contain rows (records) and columns (fields). These tables can be manipulated by simple operations known as relational calculus.
When designing a database application, you must understand how the data is structured. Based on that structure, you can then design a user interface to display data to the user and allow the user to enter new information or modify existing data.
This chapter introduces some common considerations for designing a database application and the decisions involved in designing a user interface.
The following topics introduce topics to be considered when designing a database application:
• Using InterBase databases
• Database architecture
• Designing the user interface
Using InterBase databasesThe components on the InterBase page of the Component palette allow your application to read from and write to databases. These components access database information which they make available to the data-aware controls in your user interface.

7-2 D e v e l o p e r ’ s G u i d e
U s i n g I n t e r B a s e d a t a b a s e s
Local databasesLocal databases reside on your local drive or on a local area network. They use the InterBase proprietary APIs for accessing the data. Often, they are dedicated to a single system. When they are shared by several users, they use file-based locking mechanisms. Because of this, they are sometimes called file-based databases.
Local databases can be faster than remote database servers because they often reside on the same system as the database application.
Because they are file-based, local databases are more limited than remote database servers in the amount of data they can store. Therefore, in deciding whether to use a local database, you must consider how much data the tables are expected to hold.
Applications that use local databases are called single-tiered applications because the application and the database share a single file system.
Remote database serversRemote database servers usually reside on a remote machine. They use Structured Query Language (SQL) to enable clients to access the data. Because of this, they are sometimes called SQL servers. (Another name is Remote Database Management system, or RDBMS.)
Remote database servers are designed for access by several users at the same time. Instead of a file-based locking system such as those employed by local databases, they provide more sophisticated multi-user support, based on transactions.
Remote database servers hold more data than local databases. Sometimes, the data from a remote database server does not even reside on a single machine, but is distributed over several servers.
Applications that use remote database servers are called two-tiered applications or multi-tiered applications because the application and the database operate on independent systems (or tiers).
Database securityDatabases often contain sensitive information. When users try to access protected tables, they are required to provide a password. Once users have been authenticated, they can see only those fields (columns) for which they have permission.
For access to InterBase databases on a server, a valid user name and password is required. Once the user has logged in to the database, that username and password (and sometimes, role) determine which tables can be used. For information on providing passwords to InterBase servers, see “Controlling server login” on page 10-2. There is also a chapter on database security in the Operations Guide.

C h a p t e r 7 D e s i g n i n g D a t a b a s e A p p l i c a t i o n s 7-3
U s i n g I n t e r B a s e d a t a b a s e s
If you are requiring your user to supply a password, you must consider when the password is required. If you are using a local database but intend to scale up to a larger SQL server later, you may want to prompt for the password before you access the table, even though it is not required until then.
If your application requires multiple passwords because you must log in to several protected systems or databases, you can have your users provide a single master password which is used to access a table of passwords required by the protected systems. The application then supplies passwords programmatically, without requiring the user to provide multiple passwords.
In multi-tiered applications, you may want to use a different security model altogether. You can use CORBA or MTS to control access to middle tiers, and let the middle tiers handle all details of logging into database servers.
TransactionsA transaction is a group of actions that must all be carried out successfully on one or more tables in a database before they are committed (made permanent). If any of the actions in the group fails, then all actions are rolled back (undone).
Client applications can start multiple simultaneous transactions. InterBase provides full and explicit transaction control for starting, committing, and rolling back transactions. The statements and functions that control starting a transaction also control transaction behavior.
InterBase transactions can be isolated from changes made by other concurrent transactions. For the life of these transactions, the database appears to be unchanged except for the changes made by the transaction. Records deleted by another transaction exist, newly stored records do not appear to exist, and updated records remain in the original state.
For details on using transactions in database applications, see “Using transactions” on page 8-2. For details on using transactions in multi-tiered applications, see “Creating multi-tiered applications” in the Delphi Developer’s Guide.
The Data DictionaryNo matter what type of database you use, your application has access to the Data Dictionary. The Data Dictionary provides a customizable storage area, independent of your applications, where you can create extended field attribute sets that describe the content and appearance of data.
For example, if you frequently develop financial applications, you may create a number of specialized field attribute sets describing different display formats for currency. When you create datasets for your application at design time, rather than using the Object Inspector to set the currency fields in each dataset by hand, you

7-4 D e v e l o p e r ’ s G u i d e
U s i n g I n t e r B a s e d a t a b a s e s
can associate those fields with an extended field attribute set in the data dictionary. Using the data dictionary ensures a consistent data appearance within and across the applications you create.
In a Client/Server environment, the Data Dictionary can reside on a remote server for additional sharing of information.
To learn how to create extended field attribute sets from the Fields editor at design time, and how to associate them with fields throughout the datasets in your application, see “Creating attribute sets for field components” in the Delphi Developer’s Guide. To learn more about creating a data dictionary and extended field attributes with the SQL and Database Explorers, see their respective online help files.
A programming interface to the Data Dictionary is available in the drintf unit (located in the lib directory). This interface supplies the following methods:
Table 7.1 Data Dictionary interface
Routine Use
DictionaryActive Indicates if the data dictionary is active
DictionaryDeactivate Deactivates the data dictionary
IsNullID Indicates whether a given ID is a null ID
FindDatabaseID Returns the ID for a database given its alias
FindTableID Returns the ID for a table in a specified database
FindFieldID Returns the ID for a field in a specified table
FindAttrID Returns the ID for a named attribute set
GetAttrName Returns the name an attribute set given its ID
GetAttrNames Executes a callback for each attribute set in the dictionary
GetAttrID Returns the ID of the attribute set for a specified field
NewAttr Creates a new attribute set from a field component
UpdateAttr Updates an attribute set to match the properties of a field
CreateField Creates a field component based on stored attributes
UpdateField Changes the properties of a field to match a specified attribute set
AssociateAttr Associates an attribute set with a given field ID
UnassociateAttr Removes an attribute set association for a field ID

C h a p t e r 7 D e s i g n i n g D a t a b a s e A p p l i c a t i o n s 7-5
D a t a b a s e a r c h i t e c t u r e
Referential integrity, stored procedures, and triggersAll relational databases have certain features in common that allow applications to store and manipulate data. InterBase also provides other database-specific, features that can prove useful for ensuring consistent relationships between the tables in a database. These include:
• Referential integrity. Referential integrity provides a mechanism to prevent master/detail relationships between tables from being broken. When the user attempts to delete a field in a master table which would result in orphaned detail records, referential integrity rules prevent the deletion or automatically delete the orphaned detail records.
• Stored procedures. Stored procedures are sets of SQL statements that are named and stored on a SQL server. Stored procedures usually perform common database-related tasks on the server, and return sets of records (datasets).
• Triggers. Triggers are sets of SQL statements that are automatically executed in response to a particular command.
Database architectureDatabase applications are built from user interface elements, components that manage the database or databases, and components that represent the data contained by the tables in those databases (datasets). How you organize these pieces is the architecture of your database application.
By isolating database access components in data modules, you can develop forms in your database applications that provide a consistent user interface. By storing links to well-designed forms and data modules in the Object Repository, you and
GetControlClass Returns the control classs for a specified attribute ID
QualifyTableName Returns a fully qualified table name (qualified by user name)
QualifyTableNameByName Returns a fully qualified table name (qualified by user name)
HasConstraints Indicates whether the dataset has constraints in the dictionary
UpdateConstraints Updates the imported constraints of a dataset
UpdateDataset Updates a dataset to the current settings and constraints in the dictionary
Table 7.1 Data Dictionary interface
Routine Use

7-6 D e v e l o p e r ’ s G u i d e
D a t a b a s e a r c h i t e c t u r e
other developers can build on existing foundations rather than starting over from scratch for each new project. Sharing forms and modules also makes it possible for you to develop corporate standards for database access and application interfaces.
Many aspects of the architecture of your database application depend on the number of users who will be sharing the database information and the type of information you are working with.
When writing applications that use information that is not shared among several users, you may want to use a local database in a single-tiered application. This approach can have the advantage of speed (because data is stored locally), and does not require the purchase of a separate database server and expensive site licences. However, it is limited in how much data the tables can hold and the number of users your application can support.
Writing a two-tiered application provides more multi-user support and lets you use large remote databases that can store far more information.
Note Support for two-tiered applications requires SQL Links.
When the database information includes complicated relationships between several tables, or when the number of clients grows, you may want to use a multi-tiered application. Multi-tiered applications include middle tiers that centralize the logic that governs database interactions so that there is centralized control over data relationships. This allows different client applications to use the same data while ensuring that the data logic is consistent. They also allow for smaller client applications because much of the processing is off-loaded onto middle tiers. These smaller client applications are easier to install, configure, and maintain because they do not include the database connectivity software. Multi-tiered applications can also improve performance by spreading the data-processing tasks over several systems.
Planning for scalabilityThe development process can get more involved and expensive as the number of tiers increases. Because of this, you may wish to start developing your application as a single-tiered application. As the amount of data, the number of users, and the number of different applications accessing the data grows, you may later need to scale up to a multi-tiered architecture. By planning for scalability, you can protect your development investment when writing a single- or two-tiered application so that the code can be reused as your application grows.
The VCL data-aware components make it easy to write scalable applications by abstracting the behavior of the database and the data stored by the database. Whether you are writing a single-tiered, two-tiered, or multi-tiered application, you can isolate your user interface from the data access layer as illustrated in Figure 7.1.

C h a p t e r 7 D e s i g n i n g D a t a b a s e A p p l i c a t i o n s 7-7
D a t a b a s e a r c h i t e c t u r e
Figure 7.1 User-interface to dataset connections in all database applications
A form represents the user interface, and contains data controls and other user interface elements. The data controls in the user interface connect to datasets which represent information from the tables in the database. A data source links the data controls to these datasets. By isolating the data source and datasets in a data module, the form can remain unchanged as you scale your application up. Only the datasets must change.
A flat-file database application is easily scaled to the client in a multi-tiered application because both architectures use the same client dataset component. In fact, you can write an application that acts as both a flat-file application and a multi-tiered client (see “Using the briefcase model” on page 8-5).
If you plan to scale your application up to a three-tiered architecture eventually, you can write your one- or two-tiered application with that goal in mind. In addition to isolating the user interface, isolate all logic that will eventually reside on the middle tier so that it is easy to replace at a later time. You can even connect your user interface elements to client datasets (used in multi-tiered applications), and connect them to local versions of the datasets in a separate data module that will eventually move to the middle tier. If you do not want to introduce this artifice of an extra dataset layer in your one- and two-tiered applications, it is still easy to scale up to a three-tiered application at a later date. See “Scaling up to a three-tiered application” on page 8-6 for more information.
Single-tiered database applicationsIn single-tiered database applications, the application and the database share a single file system. They use local databases or files that store database information in a flat-file format.
A single application comprises the user interface and incorporates the data access mechanism. The type of dataset component used to represent database tables is in a flat file. Figure 7.2 illustrates this:
userinterfaceelements
data source
Form Data Module
datasetcomponent database
Client Application

7-8 D e v e l o p e r ’ s G u i d e
D a t a b a s e a r c h i t e c t u r e
Figure 7.2 Single-tiered database application architecture
For more information on building single-tiered database applications, see Chapter 8, “Building Multi-tiered Applications.”
Two-tiered database applicationsIn two-tiered database applications, a client application provides a user interface to data, and interacts directly with a remote database server. Figure 7.3 illustrates this relationship.
Figure 7.3 Two-tiered database application architecture
In this model, all applications are database clients. A client requests information from and sends information to a database server. A server can process requests from many clients simultaneously, coordinating access to and updating of data.
Multi-tiered database applicationsIn multi-tiered database applications, an application is partitioned into pieces that reside on different machines. A client application provides a user interface to data. It passes all data requests and updates through an application server (also called a “remote data broker”). The application server, in turn, communicates directly with a remote database server or some other custom dataset. Usually, in this model, the client application, the application server, and the remote database server are on separate machines. Figure 7.4 illustrates these relationships for multi-tiered applications.
userinterfaceelements
data source
Form Data Module
datasetcomponent local
database
userinterfaceelements
data source
Form Data Module
datasetcomponent remote
database
Client Application

C h a p t e r 7 D e s i g n i n g D a t a b a s e A p p l i c a t i o n s 7-9
D a t a b a s e a r c h i t e c t u r e
Figure 7.4 Multi-tiered database architectures
You can use Delphi to create both client applications and application servers. The client application uses standard data-aware controls connected through a data source to one or more client dataset components in order to display data for viewing and editing. Each client dataset communicates with an application server through an IProvider interface that is part of the application server’s remote data module. The client application can use a variety of protocols (TCP/IP, DCOM, MTS, or CORBA) to establish this communication. The protocol depends on the type of connection component used in the client application and the type of remote data module used in the server application.
The application server creates the IProvider interfaces in one of two ways. If the application server includes any provider objects, then these objects are used to create the IProvider interface. This is the method illustrated in the previous figure. Using a provider component gives an application more control over the interface. All data is passed between the client application and the application server through the interface. The interface receives data from and sends updates to conventional datasets, and these components communicate with a database server.
Usually, several client applications communicate with a single application server in the multi-tiered model. The application server provides a gateway to your databases for all your client applications, and it lets you provide enterprise-wide
remotedatabase
userinterfaceelements
user
elementsinterface
data source
data source
connectioncomponent
connectioncomponent
clientdataset
clientdataset
datasetcomponent
provider
provider
customdataset
Form Data Module Remote data module
Remote data moduleForm Data Module
Client Application Application Server
Client Application Application Server

7-10 D e v e l o p e r ’ s G u i d e
D e s i g n i n g t h e u s e r i n t e r f a c e
database tasks in a central location, accessible to all your clients. For more information about creating and using a multi-tiered database application, see “Creating multi-tiered applications” in the in the Delphi Developer’s Guide.
Designing the user interfaceThe Data Controls page of the Component palette provides a set of data-aware controls that represent data from fields in a database record, and can permit users to edit that data and post changes back to the database. Using data-aware controls, you can build your database application’s user interface (UI) so that information is visible and accessible to users. For more information on data-aware controls see “Using Data Controls” in the Delphi Developer’s Guide.
Data-aware controls get data from and send data to a data source component, TDataSource. A data source component acts as a conduit between the user interface and a dataset component which represents a set of information from the tables in a database. Several data-aware controls on a form can share a single data source, in which case the display in each control is synchronized so that as the user scrolls through records, the corresponding value in the fields for the current record is displayed in each control. An application’s data source components usually reside in a data module, separate from the data-aware controls on forms.
The data-aware controls you add to your user interface depend on what type of data you are displaying (plain text, formatted text, graphics, multimedia elements, and so on). In addition, your choice of controls is determined by how you want to organize the information and how (or if) you want to let users navigate through the records of datasets and add or edit data.
The following sections introduce the components you can use for various types of user interface:
• Displaying a single record
• Displaying multiple records
• Analyzing data
• Selecting what data to show
Displaying a single recordIn many applications, you may only want to provide information about a single record of data at a time. For example, an order-entry application may display the information about a single order without indicating what other orders are currently logged. This information probably comes from a single record in an orders dataset.

C h a p t e r 7 D e s i g n i n g D a t a b a s e A p p l i c a t i o n s 7-11
D e s i g n i n g t h e u s e r i n t e r f a c e
Applications that display a single record are usually easy to read and understand, because all database information is about the same thing (in the previous case, the same order). The data-aware controls in these user interfaces represent a single field from a database record. The Data Controls page of the Component palette provides a wide selection of controls to represent different kinds of fields. For more information about specific data-aware controls, see “Controls that represent a single field” in the “Using data controls” chapter of the Delphi Developer’s Guide.
Displaying multiple recordsSometimes you want to display many records in the same form. For example, an invoicing application might show all the orders made by a single customer on the same form.
To display multiple records, use a grid control. Grid controls provide a multi-field, multi-record view of data that can make your application’s user interface more compelling and effective. They are discussed in “Viewing and editing data with TDBGrid” and “Creating a grid that contains other data-aware controls” in the “Using data controls” chapter of the Delphi Developer’s Guide.
You may want to design a user interface that displays both fields from a single record and grids that represent multiple records. There are two models that combine these two approaches:
• Master-detail forms: You can represent information from both a master table and a detail table by including both controls that display a single field and grid controls. For example, you could display information about a single customer with a detail grid that displays the orders for that customer. For information about linking the underlying tables in a master-detail form, see “Creating master/detail forms” on page 16-9.
• Drill-down forms: In a form that displays multiple records, you can include single field controls that display detailed information from the current record only. This approach is particularly useful when the records include long memos or graphic information. As the user scrolls through the records of the grid, the memo or graphic updates to represent the value of the current record. Setting this up is very easy. The synchronization between the two displays is automatic if the grid and the memo or image control share a common data source.
Note It is generally not a good idea to combine these two approaches on a single form. While the result can sometimes be effective, it is usually confusing for users to understand the data relationships.
Analyzing dataSome database applications do not present database information directly to the user. Instead, they analyze and summarize information from databases so that users can draw conclusions from the data.

7-12 D e v e l o p e r ’ s G u i d e
D e s i g n i n g t h e u s e r i n t e r f a c e
The TDBChart component on the Data Controls page of the Component palette lets you present database information in a graphical format that enables users to quickly grasp the import of database information.
In addition, some versions of Delphi include a Decision Cube page on the Component palette. It contains six components that let you perform data analysis and cross-tabulations on data when building decision support applications. For more information about using the Decision Cube components, see “Using decision support components” in the Delphi Developer’s Guide.
If you want to build your own components that display data summaries based on various grouping criteria, you can use maintained aggregates with a client dataset. For more information about using maintained aggregates, see “Using maintained aggregates” in the “Creating and using a client dataset” chapter of the Delphi Developer’s Guide.
Selecting what data to showOften, the data you want to surface in your database application does not correspond exactly to the data in a single database table. You may want to use only a subset of the fields or a subset of the records in a table. You may want to combine the information from more than one table into a single joined view.
The data available to your database application is controlled by your choice of dataset component. Datasets abstract the properties and methods of a database table, so that you do not need to make major alterations depending on whether the data is stored in a database table or derived from one or more tables in the database. For more information on the common properties and methods of datasets, see Chapter 15, “Understanding Datasets.”
Your application can contain more than one dataset. Each dataset represents a logical table. By using datasets, your application logic is buffered from restructuring of the physical tables in your databases. You might need to alter the type of dataset component, or the way it specifies the data it contains, but the rest of your user interface can continue to work without alteration.
You can use any of the following types of dataset:
• Table components: Tables (TIBTable) correspond directly to the underlying tables in the database. You can adjust which fields appear (including adding lookup fields and calculated fields) by using persistent field components. You can limit the records that appear using ranges or filters. Tables are described in more detail in Chapter 16, “Working with Tables.” Persistent fields are described in “Persistent field components” in the Delphi Developer’s Guide. Ranges and filters are described in “Working with a subset of data” on page 16-6.

C h a p t e r 7 D e s i g n i n g D a t a b a s e A p p l i c a t i o n s 7-13
D e s i g n i n g t h e u s e r i n t e r f a c e
• Query components: Queries (TIBQuery, TIBDataSet, and TIBSQL) provide the most general mechanism for specifying what appears in a dataset. You can combine the data from multiple tables using joins, and limit the fields and records that appear based on any criteria you can express in SQL. For more information on queries, see Chapter 17, “Working with Queries.”
• Stored procedures: Stored procedures (TIBStoredProc) are sets of SQL statements that are named and stored on a SQL server. If your database server defines a remote procedure that returns the dataset you want, you can use a stored procedure component. For more information on stored procedures, see Chapter 18, “Working with Stored Procedures.”
• Client datasets: Client datasets cache the records of the logical dataset in memory. Because of that, they can only hold a limited number of records. Client datasets are populated with data in one of two ways: from an application server or from flat-file data stored on disk. When using a client dataset to represent flat-file data, you must create the underlying table programmatically. For more information about client datasets, see “Creating and using a client dataset” in the Delphi Developer’s Guide.
• Custom datasets: You can create your own custom descendants of TDataSet to represent a body of data that you create or access in code you write. Writing custom datasets allows you the flexibility of managing the data using any method you choose, while still letting you use the VCL data controls to build your user interface. For more information about creating custom components, see “Overview of component creation” in the Delphi Developer’s Guide.

7-14 D e v e l o p e r ’ s G u i d e
D e s i g n i n g t h e u s e r i n t e r f a c e
C h a p t e r 8 B u i l d i n g M u l t i - t i e r e d A p p l i c a t i o n s 8-1
C h a p t e r
Chapter 8Building Multi-tiered ApplicationsOne- and two-tiered applications include the logic that manipulates database information in the same application that implements the user interface. Because the data manipulation logic is not isolated in a separate tier, these types of applications are most appropriate when there are no other applications sharing the same database information. Even when other applications share the database information, these types of applications are appropriate if the database is very simple, and there are no data semantics that must duplicated by all applications that use the data.
You may want to start by writing a one- or two-tiered application, even when you intend to eventually scale up to a multi-tiered model as your needs increase. This approach lets you avoid having to develop data manipulation logic up front so that the application server can be available while you are writing the user interface. It also allows you to develop a simpler, cheaper prototype before investing in a large, multi-system development project. If you intend to eventually scale up to a multi-tiered application, you can isolate the data manipulation logic so that it is easy to move it to a middle tier at a later date.
Understanding databases and datasetsDatabases contain information stored in tables. They may also include tables of information about what is contained in the database, objects such as indexes that are used by tables, and SQL objects such as stored procedures. See Chapter 10, “Connecting to Databases” for more information about databases.
The InterBase page of the Component palette contains various dataset components that represent the tables contained in a database or logical tables constructed out of data stored in those database tables. See “Selecting what data to show” on page 7-12 for more information about these dataset components. You must include a dataset component in your application to work with database information.

8-2 D e v e l o p e r ’ s G u i d e
U n d e r s t a n d i n g d a t a b a s e s a n d d a t a s e t s
Each dataset component on the InterBase page has a published Database property that specifies the database which contains the table or tables that hold the information in that dataset. When setting up your application, you must use this property to specify the database before you can bind the dataset to specific information contained in that database. What value you specify depends on whether or not you are using explicit database components. Database components (TIBDatabase) represent a database in your application. If you do not add a database component explicitly, a temporary one is created for you automatically, based on the value of the Database property. If you are using explicit database components, Database is the value of the Database property of the database component. See “Persistent and temporary database components” on page 10-1 for more information about using database components.
Using transactionsA transaction is a group of actions that must all be carried out successfully on one or more tables in a database before they are committed (made permanent). If one of the actions in the group fails, then all actions are rolled back (undone). By using transactions, you ensure that the database is not left in an inconsistent state when a problem occurs completing one of the actions that make up the transaction.
For example, in a banking application, transferring funds from one account to another is an operation you would want to protect with a transaction. If, after decrementing the balance in one account, an error occurred incrementing the balance in the other, you want to roll back the transaction so that the database still reflects the correct total balance.
By default, implicit transaction control is provided for your applications. When an application is under implicit transaction control, a separate transaction is used for each record in a dataset that is written to the underlying database. Implicit transactions guarantee both a minimum of record update conflicts and a consistent view of the database. On the other hand, because each row of data written to a database takes place in its own transaction, implicit transaction control can lead to excessive network traffic and slower application performance. Also, implicit transaction control will not protect logical operations that span more than one record, such as the transfer of funds described previously.
If you explicitly control transactions, you can choose the most effective times to start, commit, and roll back your transactions. When you develop applications in a multi-user environment, particularly when your applications run against a remote SQL server, you should control transactions explicitly.
Note InterBase does not support nested transactions.
Note You can also minimize the number of transactions you need by caching updates. For more information about cached updates, see Chapter 14, “Working with Cached Updates.”

C h a p t e r 8 B u i l d i n g M u l t i - t i e r e d A p p l i c a t i o n s 8-3
U n d e r s t a n d i n g d a t a b a s e s a n d d a t a s e t s
Using a transaction componentWhen you start a transaction, all subsequent statements that read from and write to the database occur in the context of that transaction. Each statement is considered part of a group. Changes must be successfully committed to the database, or every change made in the group must be undone.
Ideally, a transaction should only last as long as necessary. The longer a transaction is active, the more simultaneous users that access the database, and the more concurrent, simultaneous transactions that start and end during the lifetime of your transaction, the greater the likelihood that your transaction will conflict with another when you attempt to commit your changes.
When using a transaction component, you code a single transaction as follows:
1 Start the transaction by calling the transaction’s StartTransaction method:
IBTransaction.StartTransaction;
2 Once the transaction is started, all subsequent database actions are considered part of the transaction until the transaction is explicitly terminated. You can determine whether a transaction is in process by checking the transaction component’s InTransaction property.
3 When the actions that make up the transaction have all succeeded, you can make the database changes permanent by using the transaction component’s Commit method:
IBTransaction.Commit;
Alternately, you can commit the transaction while retaining the current transaction context using the CommitRetaining method:
IBTransaction.CommitRetaining;
Commit is usually attempted in a try...except statement. That way, if a transaction cannot commit successfully, you can use the except block to handle the error and retry the operation or to roll back the transaction.
If an error occurs when making the changes that are part of the transaction, or when trying to commit the transaction, you will want to discard all changes that make up the transaction. To discard these changes, use the database component’s Rollback method:
IBTransaction.Rollback;
You can also rollback the transaction while retaining the current transaction context using the RollbackRetaining method:
IBTransaction.RollbackRetaining;
Rollback usually occurs in
• Exception handling code when you cannot recover from a database error.
• Button or menu event code, such as when a user clicks a Cancel button.

8-4 D e v e l o p e r ’ s G u i d e
U n d e r s t a n d i n g d a t a b a s e s a n d d a t a s e t s
Caching updatesInterBase Express (IBX) provides support for caching updates. When you cache updates, your application retrieves data from a database, makes all changes to a local, cached copy of the data, and applies the cached changes to the dataset as a unit. Cached updates are applied to the database in a single transaction.
Caching updates can minimize transaction times and reduce network traffic. However, cached data is local to your application and is not under transaction control. This means that while you are working on your local, in-memory, copy of the data, other applications can be changing the data in the underlying database table. They also cannot see any changes you make until you apply the cached updates. Because of this, cached updates may not be appropriate for applications that work with volatile data, as you may create or encounter too many conflicts when trying to merge your changes into the database.
You can tell datasets to cache updates using the CachedUpdates property. When the changes are complete, they can be applied by the dataset component, by the database component, or by a special update object. When changes cannot be applied to the database without additional processing (for example, when working with a joined query), you must use the OnUpdateRecord event to write changes to each table that makes up the joined view.
For more information on caching updates, see Chapter 14, “Working with Cached Updates.”
Note If you are caching updates, you may want to consider moving to a multi-tiered model to have greater control over the application of updates. For more information about the multi-tiered model, see “Creating multi-tiered applications” in the Delphi Developer’s Guide.
Creating and restructuring database tablesYou can use the TIBTable component to create new database tables and to add indexes to existing tables.
You can create tables either at design time, in the Forms Designer, or at runtime. To create a table, you must specify the fields in the table using the FieldDefs property, add any indexes using the IndexDefs property, and call the CreateTable method (or select the Create Table command from the table’s context menu). For more detailed instructions on creating tables, see “Creating a table” on page 16-7.
You can add indexes to an existing table using the AddIndex method of TIBTable.
Note To create and restructure tables on remote servers at design time, use the SQL Explorer and restructure the table using SQL.

C h a p t e r 8 B u i l d i n g M u l t i - t i e r e d A p p l i c a t i o n s 8-5
U n d e r s t a n d i n g d a t a b a s e s a n d d a t a s e t s
Using the briefcase modelMost of this chapter has described creating and using a client dataset in a one-tiered application. The one-tiered model can be combined with a multi-tiered model to create what is called the briefcase model. In this model, a user starts a client application on one machine and connects over a network to an application server on a remote machine. The client requests data from the application server, and sends updates to it. The updates are applied by the application server to a database that is presumably shared with other clients throughout an organization.
Note The briefcase model is sometimes called the disconnected model, or mobile computing.
Suppose, however, that your on-site company database contains valuable customer contact data that your sales representatives can use and update in the field. In this case, it would be useful if your sales reps could download some or all of the data from the company database, work with it on their laptops as they fly across the country, and even update records at existing or new customer sites. When the sales reps return on-site, they could upload their data changes to the company database for everyone to use. The ability to work with data off-line and then apply updates online at a later date is known as the “briefcase” model.
By using the briefcase model, you can take advantage of the client dataset component’s ability to read and write data to flat files to create client applications that can be used both online with an application server, and off-line, as temporary one-tiered applications.
To implement the briefcase model, you must
1 Create a multi-tiered server application as described in “Creating multi-tiered applications” in the Delphi Developer’s Guide.
2 Create a flat-file database application as your client application. Add a connection component and set the RemoteServer property of your client datasets to specify this connection component. This allows them to talk to the application server created in step 1. For more information about connection components, see “Connecting to the application server” in the Delphi Developer’s Guide.
3 In the client application, try on start-up to connect to the application server. If the connection fails, prompt the user for a file and read in the local copy of the data.
4 In the client application, add code to apply updates to the application server. For more information on sending updates from a client application to an application server, see “Updating records” in the Delphi Developer’s Guide.

8-6 D e v e l o p e r ’ s G u i d e
S c a l i n g u p t o a t h r e e - t i e r e d a p p l i c a t i o n
Scaling up to a three-tiered applicationIn a two-tiered client/server application, the application is a client that talks directly to a database server. Even so, the application can be thought of as having two parts: a database connection and a user interface. To make a two-tiered client/server application into a multi-tiered application you must:
• Split your existing application into an application server that handles the database connection, and into a client application that contains the user interface.
• Add an interface between the client and the application server.
There are a number of ways to proceed, but the following sequential steps may best keep your translation work to a minimum:
1 Create a new project for the application server, duplicate the relevant database connection portions of your former two-tiered application, and for each dataset, add a provider component that will act as a data conduit between the application server and the client. For more information on using a provider component, see “Creating a data provider for the application server” in the Delphi Developer’s Guide.
2 Copy your existing two-tiered project, remove its direct database connections, add an appropriate connection component to it. For more information about creating and using connection components, see “Connecting to the application server” in the Delphi Developer’s Guide.
3 Substitute a client dataset for each dataset component in the original project. For general information about using a client dataset component, see “Creating and using a client dataset” in the Delphi Developer’s Guide.
4 In the client application, add code to apply updates to the application server. For more information on sending updates from a client application to an application server, see “Updating records” in the Delphi Developer’s Guide.
5 Move the dataset components to the application server’s data modules. Set the DataSet property of each provider to specify the corresponding datasets. For more information about linking a dataset to a provider component, see “Creating a data provider for the application server” in the Delphi Developer’s Guide.
Creating multi-tiered applicationsA multi-tiered client/server application is partitioned into logical units which run in conjunction on separate machines. Multi-tiered applications share data and communicate with one another over a local-area network or even over the

C h a p t e r 8 B u i l d i n g M u l t i - t i e r e d A p p l i c a t i o n s 8-7
C r e a t i n g m u l t i - t i e r e d a p p l i c a t i o n s
Internet. They provide many benefits, such as centralized business logic and thin client applications. For information on how to build multi-tiered applications, refer to “Creating multi-tiered applications” in the Delphi Developer’s Guide.

8-8 D e v e l o p e r ’ s G u i d e
C r e a t i n g m u l t i - t i e r e d a p p l i c a t i o n s

C h a p t e r 9 I n t r o d u c t i o n t o I B X 9-1
C h a p t e r
Chapter 9Introduction to IBXThis chapter covers the following topics:
• The IBX components
• The InterBase tab
• The InterBase Admin tab
The IBX componentsInterBase Express (IBX) is a set of data access components that provide a means of building applications with Borland Delphi and C++ Builder that can access, administer, monitor, and run the InterBase Services on InterBase databases. Borland Delphi and C++ Builder users can use the IBX components to build InterBase database applications without the overhead of using the Borland Database Engine (BDE). IBX accesses the InterBase API directly, allowing increased speed and control within InterBase applications.
Though many IBX components are similar to the Delphi data access components in name, they do not use the Borland Database Engine (BDE). For each IBX component with a BDE counterpart, the differences are described below.
There is no simple migration from BDE to IBX applications. Generally, you must replace the BDE components with the comparable IBX components, and then recompile your applications. However, the speed you gain, along with the access you get to the powerful InterBase features make migration well worth your time.
This chapter assumes you are familiar with the Delphi development environment and know how to use the Standard, Data Access, and Data Control components.

9-2 D e v e l o p e r ’ s G u i d e
T h e I n t e r B a s e t a b
The InterBase tabThe InterBase tab in Borland Delphi contains the IBX equivalents of the Delphi components on the Data Access tab, along with additional monitoring and events components.
Figure 9.1 The InterBase tab
The InterBase tab contains the following components, from left to right:
• TIBTable• TIBQuery• TIBStoredProc• TIBDatabase• TIBTransaction• TIBUpdateSQL• TIBDataSet• TIBSQL• TIBDatabaseInfo• TIBSQLMonitor• TIBEvents• TIBExtract• TIBClientDataSetThese components are discussed in the following sections.
TIBTableUse a TIBTable component to set up a live dataset on a table or a view without having to enter any SQL statements.
The TIBTable component is discussed more fully in Chapter 16, “Working with Tables.”
TIBQueryUse a TIBQuery component to execute any InterBase dynamic SQL statement, restrict the result set to particular columns and rows, use aggregate functions, and join multiple tables.
The TIBQuery component is discussed more fully in Chapter 17, “Working with Queries.”
TIBTableComponent
TIBQueryComponent

C h a p t e r 9 I n t r o d u c t i o n t o I B X 9-3
T h e I n t e r B a s e t a b
TIBStoredProcUse a TIBStoredProc component for InterBase executable procedures; procedures that return, at most, one row of information. For stored procedures that return more than one row of data, or for SELECT procedures, use either TIBQuery or TIBDataset components.
The TIBStoredProc component is discussed more fully in Chapter 18, “Working with Stored Procedures.”
TIBDatabaseUse a TIBDatabase component to establish connections to databases, which can involve one or more concurrent transactions. Unlike the BDE, IBX has a separate transaction component, which allows you to separate transactions and database connections.
The TIBDatabase component is discussed more fully in Chapter 10, “Connecting to Databases.”
TIBTransactionUse a TIBTransaction component to handle transaction contexts, which might involve one or more database connections. In most cases, a simple one database/one transaction model will do. Having a separate transaction component allows you to take advantage of the InterBase two-phase commit functionality (transactions that span multiple connections) and multiple concurrent transactions using the same connection
The TIBTransaction component is discussed more fully in “Using transactions” on page 8-2.
TIBUpdateSQLUse a TIBUpdateSQL component to update read-only datasets or TIBQuery output.
The TIBUpdateSQL component is discussed more fully in “Updating a read-only result set” on page 17-15
TIBDataSetUse a TIBDataSet component to execute any InterBase dynamic SQL statement, restrict the result set to particular columns and rows, use aggregate functions, and join multiple tables. TIBDataSet components are similar to TIBQuery components, except that they support live datasets without a TIBUpdateSQL component.
The TIBDataSet component is discussed more fully in Chapter 17, “Working with Queries.”
TIBStoredProcComponent
TIBDatabaseComponent
TIBTransaction Component
TIBUpdateSQL Component
TIBDataSetComponent

9-4 D e v e l o p e r ’ s G u i d e
T h e I n t e r B a s e A d m i n t a b
TIBSQLUse a TIBSQL component for data operations that need to be fast and lightweight. Operations such as data definition and pumping data from one database to another are suitable for TIBSQL components.
The TIBSQL component is discussed more fully in Chapter 17, “Working with Queries.”
TIBDatabaseInfoUse a TIBDatabaseInfo component to retrieve information about a particular database, such as the sweep interval, ODS version, and the user names of those currently attached to the database.
The TIBDatabaseInfo component is discussed more fully in “Requesting information about an attachment” on page 10-5.
TIBSQLMonitorUse a TIBSQLMonitor component to develop diagnostic tools to monitor the communication between your application and the InterBase server. With the TraceFlags property of a TIBDatabase component turned on, active TIBSQLMonitor components can keep track of the connection’s activity and send the output to a file or control.
The TIBSQLMonitor component is discussed more fully in Chapter 19, “Debugging with SQL Monitor.”
TIBEventsUse a TIBEvents component to register interest in, and asynchronously handle, events posted by an InterBase server.
The TIBEvents component is discussed more fully in Chapter 13, “Programming with Database Events.”
The InterBase Admin tabThe InterBase Admin tab in Delphi contains the IBX services components, along with the install and uninstall components.
Figure 9.2 InterBase Admin tab
The InterBase Admin tab contains the following components, from left to right:
TIBSQLComponent
TIBDatabaseInfo Component
TIBSQLMonitor Component
TIBEventsComponent

C h a p t e r 9 I n t r o d u c t i o n t o I B X 9-5
T h e I n t e r B a s e A d m i n t a b
• TIBConfigService• TIBBackupService• TIBRestoreService• TIBValidationService• TIBStatisticalService• TIBLogService• TIBSecurityService• TIBLicensingService• TIBServerProperties• TIBInstall• TIBUnInstallThese components are discussed in the following sections.
TIBConfigServiceUse a TIBConfigService component to configure database parameters, including page buffers, access mode, and sweep interval.
The TIBConfigService component is discussed more fully in “Setting database properties” on page 12-3.
TIBBackupServiceUse the TIBBackService component to back up databases. With a TIBBackupService component in your application, you can set such parameters as the blocking factor, backup file name, and database backup options.
The TIBBackupService component is discussed more fully in “Backing up and restoring databases” on page 12-7.
TIBRestoreServiceUse the TIBRestoreService component to restore a database. With a TIBRestoreService component in your application, you can set such parameters as page buffers, page size, and database restore options.
The TIBRestoreService component is discussed more fully in “Backing up and restoring databases” on page 12-7.
TIBValidationServiceUse the TIBValidationService component to validate your database and reconcile your database transactions. With the TIBValidationService, you can set the default transaction action, return limbo transaction information, and set other database validation options.
ConfigServiceComponent
BackupServiceComponent
RestoreService Component
Validation
Service
Component

9-6 D e v e l o p e r ’ s G u i d e
T h e I n t e r B a s e A d m i n t a b
The TIBValidationService component is discussed more fully in “Performing database maintenance” on page 12-14.
TIBStatisticalServiceUse the TIBStatisticalService component to view database statistics such as data pages, database log, header pages, index pages, and system relations.
The TIBStatisticalService component is discussed more fully in “Requesting database and server status reports” on page 12-16.
TIBLogServiceUse the TIBLogService component to create an InterBase log file for your application.
The TIBLogService component is discussed more fully in “Using the log service” on page 12-18.
TIBSecurityServiceUse the TIBSecurityService component to manage user access to the InterBase server. With a TIBSecurityService component in your application, you can create, delete, and modify user accounts, display user information, and set up work groups using SQL roles.
The TIBSecurityService component is discussed more fully in “Configuring users” on page 12-18.
TIBLicensingServiceUse the TIBLicensingService component to add, view, or remove InterBase software activation certificates.
The TIBLicensingService component is discussed more fully in “Administering software activation certificates” on page 12-21.
TIBServerPropertiesUse the TIBServerProperties component to return database server information, including configuration parameters, and version and license information.
The TIBServerProperties component is discussed more fully in “Displaying server properties” on page 12-23.
tatisticalService
Component
LogServiceComponent
SecurityService Component
LicensingService Component
ServerProperties Component

C h a p t e r 9 I n t r o d u c t i o n t o I B X 9-7
T h e I n t e r B a s e A d m i n t a b
TIBInstallUse the TIBInstall component to set up an InterBase installation component, including the installation source and destination directories, and the components to be installed.
The TIBInstall component is discussed more fully in Chapter 20, “Writing Installation Wizards.”
TIBUnInstallUse the TIBUnInstall component to set up an InterBase uninstall component.
The TIBUnInstall component is discussed more fully in Chapter 20, “Writing Installation Wizards.”
InstallComponent
UnInstallComponent

9-8 D e v e l o p e r ’ s G u i d e
T h e I n t e r B a s e A d m i n t a b

C h a p t e r 1 0 C o n n e c t i n g t o D a t a b a s e s 10-1
C h a p t e r
Chapter 10Connecting to DatabasesWhen an InterBase Express (IBX) application connects to a database, that connection is encapsulated by a TIBDatabase component. A database component encapsulates the connection to a single database in an application. This chapter describes database components and how to manipulate database connections.
Another use for database components is applying cached updates for related tables. For more information about using a database component to apply cached updates, see “Applying cached updates with a database component method” on page 14-5.
Persistent and temporary database componentsEach database connection in an application is encapsulated by a database component whether you explicitly provide a database component at design time or create it dynamically at runtime. When an application attempts to connect to a database, it either uses an explicitly instantiated, or persistent, database component, or it generates a temporary database component that exists only for the lifetime of the connection.
Temporary database components are created as necessary for any datasets in a data module or form for which you do not create yourself. Temporary database components provide broad support for many typical desktop database applications without requiring you to handle the details of the database connection. For most client/server applications, however, you should create your own database components instead of relying on temporary ones. You gain greater control over your databases, including the ability to
• Create persistent database connections
• Customize database server logins
• Control transactions and specify transaction isolation levels
10-2 D e v e l o p e r ’ s G u i d e
C o n t r o l l i n g c o n n e c t i o n s
• Create event notifiers to track when a connection is made or broken
Using temporary database componentsTemporary database components are automatically generated as needed. For example, if you place a TIBTable component on a form, set its properties, and open the table without first placing and setting up a TIBDatabase component and associating the table component with it, Delphi creates a temporary database component for you behind the scenes.
The default properties created for temporary database components provide reasonable, general behaviors meant to cover a wide variety of situations. For complex, mission-critical client/server applications with many users and different requirements for database connections, however, you should create your own database components to tune each database connection to your application’s needs.
Creating database components at design timeThe InterBase page of the Component palette contains a database component you can place in a data module or form. The main advantages to creating a database component at design time are that you can set its initial properties and write OnLogin events for it. OnLogin offers you a chance to customize the handling of security on a database server when a database component first connects to the server. For more information about managing connection properties, see “Connecting to a database server” on page 10-3. For more information about server security, see “Controlling server login” on page 10-2.
Controlling connectionsWhether you create a database component at design time or runtime, you can use the properties, events, and methods of TIBDatabase to control and change its behavior in your applications. The following sections describe how to manipulate database components. For details about all TIBDatabase properties, events, and methods, see TIBDatabase in the online InterBase Express Reference.
Controlling server loginInterBase servers include security features to prohibit unauthorized access. The server requires a user name and password login before permitting database access.
At design time, a standard Login dialog box prompts for a user name and password when you first attempt to connect to the database.
At runtime, there are three ways you can handle a server’s request for a login:

C h a p t e r 1 0 C o n n e c t i n g t o D a t a b a s e s 10-3
C o n t r o l l i n g c o n n e c t i o n s
• Set the LoginPrompt property of a database component to True (the default). Your application displays the standard Login dialog box when the server requests a user name and password.
• Set the LoginPrompt to False, and include hard-coded USER_NAME and PASSWORD parameters in the Params property for the database component. For example:
USER_NAME=SYSDBAPASSWORD=masterkey
Important Note that because the Params property is easy to view, this method compromises server security, so it is not recommended.
• Write an OnLogin event for the database component, and use it to set login parameters at runtime. OnLogin gets a copy of the database component’s Params property, which you can modify. The name of the copy in OnLogin is LoginParams. Use the Values property to set or change login parameters as follows:
LoginParams.Values['USER_NAME'] := UserName;LoginParams.Values['PASSWORD'] := PasswordSearch(UserName);
On exit, OnLogin passes its LoginParams values back to Params, which is used to establish a connection.
Connecting to a database serverThere are two ways to connect to a database server using a database component:
• Call the Open method.
• Set the Connected property to True.
Setting Connected to True executes the Open method. Open verifies that the database specified by the Database or Directory properties exists, and if an OnLogin event exists for the database component, it is executed. Otherwise, the default Login dialog box appears.
Note When a database component is not connected to a server and an application attempts to open a dataset associated with the database component, the database component’s Open method is first called to establish the connection. If the dataset is not associated with an existing database component, a temporary database component is created and used to establish the connection.
Once a database connection is established the connection is maintained as long as there is at least one active dataset. If a dataset is later opened which uses the database, the connection must be reestablished and initialized. An event notifier procedure can be constructed to indicate whenever a connection to the database is made or broken.

10-4 D e v e l o p e r ’ s G u i d e
C o n t r o l l i n g c o n n e c t i o n s
Working with network protocolsAs part of configuring the appropriate DBExpress or ODBC driver, you might need to specify the network protocol for the server, such as TCP/IP, depending on the driver’s configuration options. In most cases, network protocol configuration is handled using a server’s client setup software. For ODBC it might also be necessary to check the driver setup using the Microsoft ODBC Administrator. See Chapter 5, “Programming Applications with ODBC” for more information.
Establishing an initial connection between client and server can be problematic. The following troubleshooting checklist should be helpful if you encounter difficulties:
• Is your server’s client-side connection properly configured?
• If you are using TCP/IP:
• Is your TCP/IP communications software installed? Is the proper WINSOCK.DLL installed?
• Is the server’s IP address registered in the client’s HOSTS file?
• Is the Domain Name Service (DNS) properly configured?
• Can you ping the server?
• Are the DLLs for your connection and database drivers in the search path?
Using ODBCAn application can use ODBC data sources (for example, Btrieve). An ODBC driver connection requires:
• A vendor-supplied ODBC driver
• The Microsoft ODBC Driver Manager
Disconnecting from a database serverThere are two ways to disconnect a server from a database component:
• Set the Connected property to False
• Call the Close method
Setting Connected to False calls Close. Close closes all open datasets and disconnects from the server. For example, the following code closes all active datasets for a database component and drops its connections:
IBDatabase1.Connected := False;

C h a p t e r 1 0 C o n n e c t i n g t o D a t a b a s e s 10-5
R e q u e s t i n g i n f o r m a t i o n a b o u t a n a t t a c h m e n t
Iterating through a database component’s datasetsA database component provides two properties that enable an application to iterate through all the datasets associated with the component: DataSets and DataSetCount.
DataSets is an indexed array of all active datasets (TIBDataSet, TIBSQL, TIBTable, TIBQuery, and TIBStoredProc) for a database component. An active dataset is one that is currently open. DataSetCount is a read-only integer value specifying the number of currently active datasets.
You can use DataSets with DataSetCount to cycle through all currently active datasets in code. For example, the following code cycles through all active datasets to set the CachedUpdates property for each dataset of type TIBTable to True:
varI: Integer;
beginfor I := 0 to DataSetCount - 1 do
if DataSets[I] is TIBTable thenDataSets[I].CachedUpdates := True;
end;
Requesting information about an attachmentUse a TIBDatabaseInfo component in your application to query InterBase for attachment information, such as the version of the on-disk structure (ODS) used by the attachment, the number of database cache buffers allocated, the number of database pages read from or written to, or write ahead log information.
After attaching to a database, you can use the TIBDatabaseInfo properties to return information on:
• Database characteristics
• Environmental characteristics
• Performance statistics
• Database operation counts
Database characteristicsSeveral properties are available for determining database characteristics, such as size and major and minor ODS numbers. The following table lists the properties that can be passed, and the information returned in the result buffer for each property type:
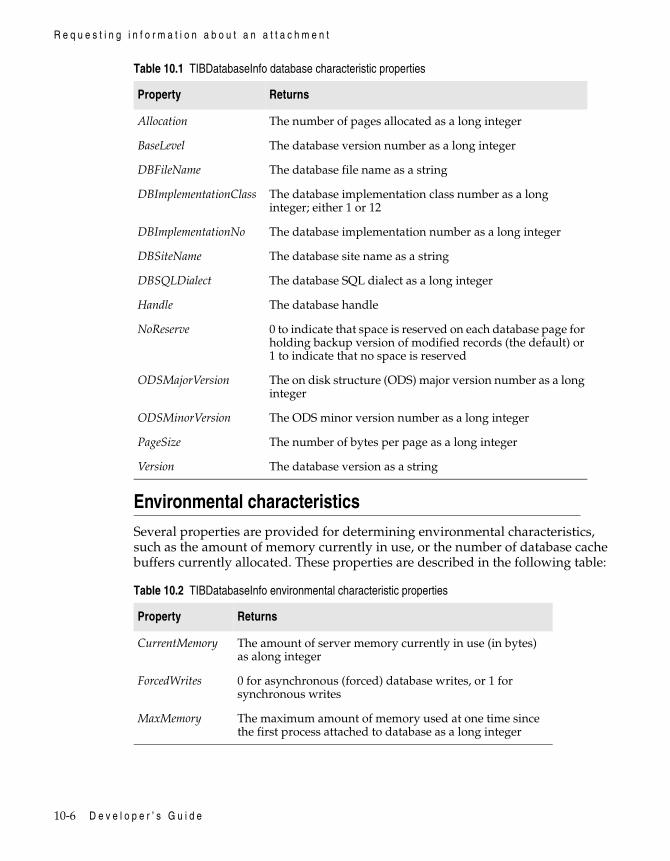
10-6 D e v e l o p e r ’ s G u i d e
R e q u e s t i n g i n f o r m a t i o n a b o u t a n a t t a c h m e n t
Environmental characteristicsSeveral properties are provided for determining environmental characteristics, such as the amount of memory currently in use, or the number of database cache buffers currently allocated. These properties are described in the following table:
Table 10.1 TIBDatabaseInfo database characteristic properties
Property Returns
Allocation The number of pages allocated as a long integer
BaseLevel The database version number as a long integer
DBFileName The database file name as a string
DBImplementationClass The database implementation class number as a long integer; either 1 or 12
DBImplementationNo The database implementation number as a long integer
DBSiteName The database site name as a string
DBSQLDialect The database SQL dialect as a long integer
Handle The database handle
NoReserve 0 to indicate that space is reserved on each database page for holding backup version of modified records (the default) or 1 to indicate that no space is reserved
ODSMajorVersion The on disk structure (ODS) major version number as a long integer
ODSMinorVersion The ODS minor version number as a long integer
PageSize The number of bytes per page as a long integer
Version The database version as a string
Table 10.2 TIBDatabaseInfo environmental characteristic properties
Property Returns
CurrentMemory The amount of server memory currently in use (in bytes) as along integer
ForcedWrites 0 for asynchronous (forced) database writes, or 1 for synchronous writes
MaxMemory The maximum amount of memory used at one time since the first process attached to database as a long integer

C h a p t e r 1 0 C o n n e c t i n g t o D a t a b a s e s 10-7
R e q u e s t i n g i n f o r m a t i o n a b o u t a n a t t a c h m e n t
Performance statisticsThere are four properties that request performance statistics for a database. The statistics accumulate for a database from the moment it is first attached by any process until the last remaining process detaches from the database. For example, the value returned for the Reads property is the number of reads since the current database was first attached, that is, an aggregate of all reads done by all attached processes, rather than the number of reads done for the calling program since it attached to the database:
Database operation countsSeveral information properties are provided for determining the number of various database operations performed by the currently attached calling program. These values are calculated on a per-table basis.
The following table describes the properties which return count values for operations on the database:
NumBuffers The number of memory buffers currently allocated as a long integer
SweepInterval The number of transactions that are committed between sweeps as a long integer
UserNames The names of all users currently attached to the database as a TStringList
Table 10.3 TIBDataBaseInfo performance properties
Property Returns
Fetches The number of reads from the memory buffer cache as a long integer
Marks The number of writes to the memory buffer cache as a long integer
Reads The number of pages reads from the database since the current database was first attached; returned as a long integer
Writes The number of page writes to the current database since it was first attached by any process; returned as long integer
Table 10.2 TIBDatabaseInfo environmental characteristic properties
Property Returns

10-8 D e v e l o p e r ’ s G u i d e
R e q u e s t i n g i n f o r m a t i o n a b o u t a n a t t a c h m e n t
Requesting database informationThis section gives an example on how to use the TIBDatabaseInfo component.
To set up a simple TIBDatabaseInfo component:
1 Drop a TIBDatabase component and a TIBDatabaseInfo component on a Delphi form.
2 Using either the Object Inspector or the Database Component Editor, set up the database connection. For more information, see “Connecting to a database server” on page 10-3.
3 Set the TIBDatabaseInfo component’s Database property to the name of the TIBDatabase component.
4 Connect the TIBDatabase component to the database by setting the Connected property to True.
5 Drop a Button component and a Memo component on the form.
6 Double-click the Button component to bring up the code editor, and set any of the TIBDatabaseInfo properties described above. For example:
procedure TForm1.Button1Click(Sender: TObject);var
I: Integer;begin
Table 10.4 TIBDatabaseInfo database operation count properties
Property Returns
BackoutCount The number of removals of a version of a record as a long integer
DeleteCount The number of database deletes since the database was last attached; returned as long integer
ExpungeCount The number of removals of a record and all of its ancestors as a long integer
InsertCount The number of inserts into the database since the database was last attached; returned as a long integer
PurgeCount The number of removals of fully mature records from the database; returned as a long integer
ReadIdxCount The number of sequential database reads done via an index since the database was last attached; returned as a long integer
ReadSeqCount The number of sequential database reads done on each table since the database was last attached; returned as a long integer
UpdateCount The number of updates since the database was last attached; returned as a long integer

C h a p t e r 1 0 C o n n e c t i n g t o D a t a b a s e s 10-9
R e q u e s t i n g i n f o r m a t i o n a b o u t a n a t t a c h m e n t
with IBDatabaseInfo1 do begin for I := 0 to UserNames.Count - 1 do Memo1.Lines.Add(UserNames[i]); Memo1.Lines.Add(DBFileName); Memo1.Lines.Add(IntToStr(Fetches)); Memo1.Lines.Add(IntToStr(CurrentMemory)); end;
end;

10-10 D e v e l o p e r ’ s G u i d e
R e q u e s t i n g i n f o r m a t i o n a b o u t a n a t t a c h m e n t

C h a p t e r 1 1 I m p o r t i n g a n d E x p o r t i n g D a t a 11-1
C h a p t e r
Chapter 11Importing and Exporting DataInterBase Express (IBX) provides a convenient means to migrate data to and from the database. The TIBSQL component, along with the TIBBatchInput and TIBBatchOutput objects make it possible to import and export data to and from databases in virtually any format.
Descendents of this class can specify a file name (for input or output), and a TIBXSQLDA object representing a record or parameters. The ReadyFile method is called right before performing the batch input or output.
Note For information on exporting InterBase tables to XML using special API calls, see Chapter 14, “Exporting XML” in the API Guide.
Exporting and importing raw dataUse the TIBSQL component, along with the TIBOutputRawFile and TIBInputRawFile objects to perform batch imports and exports of raw data. A raw file is the equivalent of InterBase external file output. Raw files are not limited to straight character format, so whatever structure is defined by your query is what goes in the file.
Use a SQL SELECT statement to export the data to the raw file, and an INSERT statement to import the raw data into another database.
Raw files are probably the fastest way, aside from external tables, to get data in and out of an InterBase database, although dealing with fixed-width files requires considerable attention to detail.

11-2 D e v e l o p e r ’ s G u i d e
E x p o r t i n g a n d i m p o r t i n g r a w d a t a
Exporting raw dataTo export raw data, you will need TIBSQL, TIBDatabase, and TIBTransaction components. Associate the components with each other, select a source database, and set the connections to active.
Tip Use the Database Editor to set up the database component. To start the Database Editor, right click the database component with the mouse and select Database Editor from the drop-down menu.
The following code snippet outputs selected data with a SQL SELECT statement from the SOURCE table to the file source_raw.
procedure TForm1.Button1Click(Sender: TObject);var RawOutput : TIBOutputRawFile;begin IBSQL1.SQL.Text := 'Select name, number, hired from Source'; RawOutput := TIBOutputRawFile.Create; try RawOutput.Filename := 'source_raw'; IBSQL1.BatchOutput(RawOutput); finally
RawOutput.Free; end;end;
Importing raw dataTo import raw data, you will need TIBSQL, TIBDatabase, and TIBTransaction components. Associate the components with each other, select a destination database, and set the connections to active.
Tip Use the Database Editor to set up the database component. To start the Database Editor, right click the database component with the mouse and select Database Editor from the drop-down menu.
It is important to note that you must import data into a table with the same column definitions and datatypes, and in the same order; otherwise, all sorts of unpredictable and undesirable results may occur.
The following code snippet inputs selected data with a SQL INSERT statement from the source_raw file created in the last example into the DESTINATION table.
procedure TForm1.Button2Click(Sender: TObject);var RawInput : TIBInputRawFile;begin IBSQL2.SQL.Text := 'Insert into Destination values(:name, :number, :hired)'; RawInput := TIBInputRawFile.Create; try
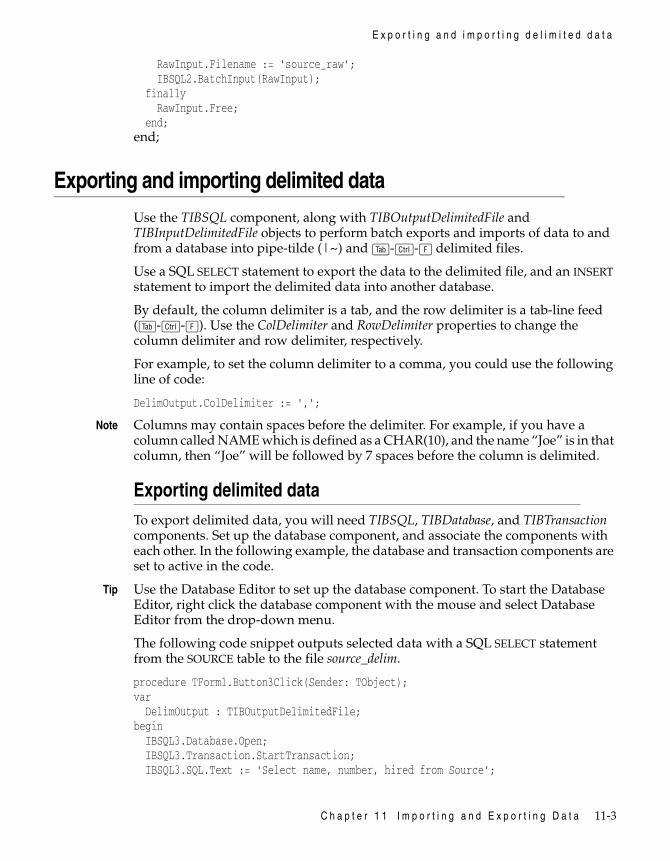
C h a p t e r 1 1 I m p o r t i n g a n d E x p o r t i n g D a t a 11-3
E x p o r t i n g a n d i m p o r t i n g d e l i m i t e d d a t a
RawInput.Filename := 'source_raw'; IBSQL2.BatchInput(RawInput); finally RawInput.Free; end;end;
Exporting and importing delimited dataUse the TIBSQL component, along with TIBOutputDelimitedFile and TIBInputDelimitedFile objects to perform batch exports and imports of data to and from a database into pipe-tilde (|~) and z-w-F delimited files.
Use a SQL SELECT statement to export the data to the delimited file, and an INSERT statement to import the delimited data into another database.
By default, the column delimiter is a tab, and the row delimiter is a tab-line feed (z-w-F). Use the ColDelimiter and RowDelimiter properties to change the column delimiter and row delimiter, respectively.
For example, to set the column delimiter to a comma, you could use the following line of code:
DelimOutput.ColDelimiter := ',';
Note Columns may contain spaces before the delimiter. For example, if you have a column called NAME which is defined as a CHAR(10), and the name “Joe” is in that column, then “Joe” will be followed by 7 spaces before the column is delimited.
Exporting delimited dataTo export delimited data, you will need TIBSQL, TIBDatabase, and TIBTransaction components. Set up the database component, and associate the components with each other. In the following example, the database and transaction components are set to active in the code.
Tip Use the Database Editor to set up the database component. To start the Database Editor, right click the database component with the mouse and select Database Editor from the drop-down menu.
The following code snippet outputs selected data with a SQL SELECT statement from the SOURCE table to the file source_delim.
procedure TForm1.Button3Click(Sender: TObject);var DelimOutput : TIBOutputDelimitedFile;begin IBSQL3.Database.Open; IBSQL3.Transaction.StartTransaction; IBSQL3.SQL.Text := 'Select name, number, hired from Source';

11-4 D e v e l o p e r ’ s G u i d e
E x p o r t i n g a n d i m p o r t i n g d e l i m i t e d d a t a
DelimOutput := TIBOutputDelimitedFile.Create; try DelimOutput.Filename := 'source_delim'; IBSQL3.BatchOutput(DelimOutput); finally DelimOutput.Free; IBSQL3.Transaction.Commit; end;end;
Importing delimited dataTo import delimited data, you will need TIBSQL, TIBDatabase, and TIBTransaction components.et up the database component, and associate the components with each other. In the following example, the database and transaction components are set to active in the code.
Tip Use the Database Editor to set up the database component. To start the Database Editor, right click the database component with the mouse and select Database Editor from the drop-down menu
It is important to note that you must import data into a table with the same column definitions and datatypes, and in the same order; otherwise, all sorts of unpredictable and undesirable results may occur.
The following code snippet inputs selected data with a SQL INSERT statement from the source_delim file created in the last example into the DESTINATION table.
procedure TForm1.Button4Click(Sender: TObject);var DelimInput : TIBInputDelimitedFile;begin IBSQL4.Database.Open; IBSQL4.Transaction.StartTransaction; IBSQL4.SQL.Text := 'Insert into Destination values(:name, :number, :hired)'; DelimInput := TIBInputDelimitedFile.Create; try DelimInput.Filename := 'source_delim'; IBSQL4.BatchInput(DelimInput); finally DelimInput.Free; IBSQL4.Transaction.Commit; end;end;

C h a p t e r 1 2 W o r k i n g w i t h I n t e r B a s e S e r v i c e s 12-1
C h a p t e r
Chapter 12Working with InterBase ServicesInterBase Express (IBX) comes with a set of service components, located on the InterBase Admin page of the Component palette. They allow you to build InterBase database and server administration tools directly into your application.
This chapter shows you how to build the following InterBase database services into your applications, including:
• Configuration
• Backup and Restore
• Licensing
• Security
• Validation
• Statistics
• Log
• Server properties
Overview of the InterBase service componentsThis section describes the general concepts of the InterBase service components and methods for attaching and detaching from a services manager.
About the services managerAll InterBase servers include a facility called the services manager. The InterBase service components enable client applications to submit requests to the services manager of an InterBase server, and the service manager performs the tasks. the

12-2 D e v e l o p e r ’ s G u i d e
O v e r v i e w o f t h e I n t e r B a s e s e r v i c e c o m p o n e n t s
server can be local (on the same host as your application), or remote (on another host on the network). The services components offer the same features when connected to either local or remote InterBase servers.
Service component hierarchyThe root object of the InterBase service components is TIBCustomService, from which descend TIBControlService and TIBServerProperties. TIBServerProperties contains properties and methods specific to server configuration, while TIBControlService is the ancestor object from which all the database configuration and administration components descend.
Figure 12.1 InterBase service component hierarchy
The following three components descend directly from TIBControlService:
• TIBControlAndQueryService contains all the database administration elements, such as monitoring, maintenance, and backup and restore, as well as all of the user validation and security elements.
• TIBConfigService contains all the methods and properties for database configuration.
• TIBLicensingService contains all the properties and methods to add and remove database licenses.
TIBValidationService
TIBSecurityService
TIBControlAndQueryService TIBConfigService TIBLicensingService
TIBLogService
TIBStatisticalService
TIBBackupRestoreService
TIBBackupService
TIBRestoreService
TIBControlService TIBServerProperties
TIBCustomService

C h a p t e r 1 2 W o r k i n g w i t h I n t e r B a s e S e r v i c e s 12-3
S e t t i n g d a t a b a s e p r o p e r t i e s
Attaching to a service managerTo initiate a connection from your application to an InterBase service manager:
1 Place a service component on a form.
2 Set the ServerName property for that component to the name of the server on which the services are to be run.
3 Use the Protocol property to set the network protocol with which to connect to the server.
4 Set the Active property to True. A login dialog is displayed. If you do not wish to display the login dialog, set the user name and password in the Params string editor, and set LoginPrompt to False.
To start the service, use the ServiceStart method.
Note TIBLicensingService and TIBSecurityService do not require that you start the service using the ServiceStart method. For example, to add a license you could use:
Action := LicenseAdd;ServiceStart;
or you could use:
AddLicense;
Detaching from a service managerAfter you finish your tasks with the services components, you should end the connection with the service manager by setting the Active property to False. This calls the Detach method which detaches the service component from the service manager.
Setting database propertiesThe configuration service component, TIBConfigService allows the SYSDBA user to attach to an InterBase database server and configure its behavior, including:
• Bringing a database online• Shutting down a database• Setting the sweep interval• Setting the async mode• Setting the page buffers• Setting the access mode• Setting the database reserve space• Activating the database shadow

12-4 D e v e l o p e r ’ s G u i d e
S e t t i n g d a t a b a s e p r o p e r t i e s
Bringing a database onlineUse the BringDatabaseOnline method of the TIBConfigService component to bring a database back online.
For example, you could associate the BringDatabaseOnline method to a menu item:
procedure TForm1.BringDatabaseOnline1Click(Sender: TObject);beginwith IBConfigService1 dobegin
BringDatabaseOnline;end;
end;
For more information, refer to “Restarting a database” in the Operations Guide.
Shutting down a databaseUse the ShutdownDatabase method of the TIBConfigService component to shut down the database (or perform an action of type TShutdownMode and shut down the database) after a specified number of seconds.
The database shutdown options are:
For example, you could use radio buttons to select the shut down mode and an Edit component to specify the number of seconds before shutting down a database:
if RadioButton1.Checked thenShutdownDatabase(Forced, (StrToInt(Edit4.Text)));
if RadioButton2.Checked thenShutdownDatabase(DenyTransaction,(StrToInt(Edit4.Text)));
if RadioButton3.Checked thenShutdownDatabase(DenyAttachment,(StrToInt(Edit4.Text)));
Table 12.1 Database shutdown modes
Shutdown Mode Meaning
Forced Shut down the database after the specified number of seconds; to shut down the database immediately, set the shutdown interval to 0
DenyTransaction Deny new transactions and shut down the database after the specified number of seconds; if transactions are active after the shutdown interval has expired, the shutdown will fail; to shut down the database immediately, set the shutdown interval to 0
DenyAttachment Deny new attachments and shut down the database after the specified number of seconds; if attachments are active after the shutdown interval has expired, the shutdown will fail; to shut down the database immediately, set the shutdown interval to 0

C h a p t e r 1 2 W o r k i n g w i t h I n t e r B a s e S e r v i c e s 12-5
S e t t i n g d a t a b a s e p r o p e r t i e s
For more information, refer to “Database shutdown and restart” in the Operations Guide.
Setting the sweep intervalUse the SetSweepInterval method of the TIBConfigService component to set the database sweep interval. The sweep interval refers to the number of transactions between database sweeps. To turn off database sweeps, set the sweep interval to 0.
For example, you could set up an application that allows a user to set the sweep interval in an Edit component:
procedure TDBConfigForm.Button1Click(Sender: TObject);begin
with IBConfigService1 dobegin
SetSweepInterval(StrtoInt(Edit1.Text));end;
end;
For more information, refer to “Sweep interval and automated housekeeping” in the Operations Guide.
Setting the async modeInterBase allows you to write to databases in both synchronous and asynchronous modes. In synchronous mode, the database writes are forced. In asynchronous mode, the database writes are buffered.
Set the SetAsyncMode method of the IBConfigService component to True to set the database write mode to asynchronous.
procedure TDBConfigForm.CheckBox2Click(Sender: TObject);begin
with IBConfigService1 dobegin
SetAsyncMode(True);end;
end;
For more information, refer to “Forced writes vs. buffered writes” in the Operations Guide.
Setting the page buffersThe SetPageBuffers method of the IBConfigService component lets you set the number of database page buffers. For example, you could set up an application that allows a user to set the number of page buffers in an Edit component:
procedure TDBConfigForm.Button1Click(Sender: TObject);

12-6 D e v e l o p e r ’ s G u i d e
S e t t i n g d a t a b a s e p r o p e r t i e s
beginwith IBConfigService1 dobegin
SetPageBuffers(StrtoInt(Edit2.Text));end;
end;
For more information on page buffers, refer to “Default cache size per database” in the Operations Guide.
Setting the access modeSet the SetReadOnly method of the IBConfigService component to True to set the database access mode to read-only.
procedure TDBConfigForm.CheckBox1Click(Sender: TObject);begin
with IBConfigService1 dobegin
SetReadOnly(True);end;
end;
Note Once you set the database to read-only, you will be unable to change any of the other database options until you set SetReadOnly method to False again.
For more information on access mode, refer to “Read-only databases” in the Operations Guide.
Setting the database reserve spaceUse the SetReserveSpace method of the IBConfigService component to reserve space on the data page for versioning.
procedure TDBConfigForm.CheckBox3Click(Sender: TObject);begin
with IBConfigService1 dobegin
SetReserveSpace(True);end;
end;
Activating the database shadowThe ActivateShadow method of the IBConfigService component lets you activate a shadow file for database use.
For example, you could associate the ActivateShadow method to a button:

C h a p t e r 1 2 W o r k i n g w i t h I n t e r B a s e S e r v i c e s 12-7
B a c k i n g u p a n d r e s t o r i n g d a t a b a s e s
procedure TDBConfigForm.Button2Click(Sender: TObject);begin
with IBConfigService1 dobegin
ActivateShadow;end;
end;
For more information, see “Shadowing” in the Operations Guide.
Backing up and restoring databasesIBX comes with both Backup and Restore services: TIBBackupService and TIBRestoreService, respectively. These are discussed in “Backing up databases” and “Restoring databases.”
For more information on backup and restore, refer to “Database backup and restore” in the Operations Guide.
Setting common backup and restore propertiesTIBBackupService and TIBRestoreService descend from a common ancestor, which contains the following properties:
Backing up databasesTIBBackupService contains many properties and methods to allow you to build a backup component into your application. Only the SYSDBA user or the database owner will be able to perform backup operations on a database.
Table 12.2 Common backup and restore properties
Property Meaning
BackupFile The path of the backup file name
BackupFileLength The length in pages of the restored database file; must exceed 2 gigabytes; you must supply a length for each database file except the last
DatabaseName Path of the primary file of the database from the server’s point of view; you can specify multiple database files
Verbose If set to True, displays backup or restore information in verbose mode
BufferSize The number of default cache buffers to configure for attachments to the restored database

12-8 D e v e l o p e r ’ s G u i d e
B a c k i n g u p a n d r e s t o r i n g d a t a b a s e s
When backing up a database under normal circumstances, the backup file will always be on the local server since the backup service cannot open a file over a network connection. However, TIBBackupService can create a remote file in one of the following is true:
• The server is running on Windows, the path to the backup file is specified as an UNC name, and the destination for the file is another Windows machine (or a machine which can be connected to via UNC naming conventions).
• The destination drive is mounted via NFS (or some equivalent) on the machine running the InterBase server.
Setting the backup optionsThe Options property allows you to build backup options of type TBackupOption into your application. The backup options are:
Displaying backup outputSet the Verbose property to True to display the backup output to a data control, such as a Memo component.
Setting up a backup componentTo set up a simple backup component:
1 Drop a TIBBackupService component on a Delphi form.
2 Drop Button and Memo components on the form.
3 Enter the name and path of the database to be backed up in the DatabaseName field and the name and path of the database backup file in the BackupFile string field of the Object Inspector, or double click on the button and set the properties in code:
procedure TForm1.Button1Click(Sender: TObject);
Table 12.3 TIBBackupService options
Option Meaning
IgnoreChecksums Ignore checksums during backup
IgnoreLimbo Ignored limbo transactions during backup
MetadataOnly Output backup file for metadata only with empty tables
NoGarbageCollect Suppress normal garbage collection during backup; improves performance on some databases
OldMetadataDesc Output metadata in pre-4.0 format
NonTransportable Output backup file with non-XDR data format; improves space and performance by a negligible amount
ConvertExtTables Convert external table data to internal tables

C h a p t e r 1 2 W o r k i n g w i t h I n t e r B a s e S e r v i c e s 12-9
B a c k i n g u p a n d r e s t o r i n g d a t a b a s e s
beginwith IBBackupService1 do
beginDatabaseName := 'd:\temp\examples\database\employee.gdb';
BackupFile.Add('d:\temp\employee1.gbk'); end;end;
4 Attach to the service manager as described in “Attaching to a service manager” on page 12-3, or set the properties in code:
with IBBackupService1 do begin
ServerName := 'Poulet';LoginPrompt := False;Params.Add('user_name=sysdba');Params.Add('password=masterkey');Active := True;
end;
5 Set any other options in the Object inspector (or set them in code), and then start the service with the ServiceStart method.
The final code for a backup application that displays verbose backup output in a Memo component might look like this:
procedure TForm1.Button1Click(Sender: TObject);begin with IBBackupService1 do begin ServerName := 'Poulet'; LoginPrompt := False; Params.Add('user_name=sysdba'); Params.Add('password=masterkey'); Active := True; try verbose := True; Options := [NonTransportable, IgnoreLimbo]; DatabaseName := 'd:\interbase\examples\database\employee.gdb'; BackupFile.Add('d:\temp\employee1.gbk'); ServiceStart; While not Eof do Memo1.Lines.Add(GetNextLine); finally Active := False; end; end;end;

12-10 D e v e l o p e r ’ s G u i d e
B a c k i n g u p a n d r e s t o r i n g d a t a b a s e s
Backing up a database to multiple filesInterBase allows you to back up a database to multiple files. To do this, you must specify the size of each backup file except for the last, which will hold the remaining information.
procedure TForm1.Button2Click(Sender: TObject);begin with IBBackupService1 do begin ServerName := 'Poulet'; LoginPrompt := False; Params.Add('user_name=sysdba'); Params.Add('password=masterkey'); Active := True; try Verbose := True; Options := [MetadataOnly, NoGarbageCollection]; DatabaseName := 'c:\interbase\examples\database\employee.gdb';
BackupFile.Add('c:\temp\e1.gbk = 2048'); BackupFile.Add('c:\temp\e2.gbk' = 4096); BackupFile.Add('c:\temp\e3.gbk'); ServiceStart; While not Eof do Memo1.Lines.Add(GetNextLine); finally Active := False; end; end;end;
Restoring databasesTIBRestoreService contains many properties and methods to allow you to build a restore component into your application. Only the SYSDBA user or the database owner may use the TIBRestoreService to overwrite an existing database.
The username and password used to connect to the TIBRestoreService will be used to connect to the database for restore.
Setting the database cache sizeUse the PageBuffers property to set the cache size for the restored database. The default is 2048 buffer pages in the database cache. To change the database cache size, set it in the Object Inspector or in code:
PageBuffers := 3000
Setting the page sizeInterBase supports database page sizes of 1024, 2048, 4096, and 8192 bytes. By default, the database will be restored with the page size with which it was created. To change the page size, you can set it in the Object Inspector or in code:

C h a p t e r 1 2 W o r k i n g w i t h I n t e r B a s e S e r v i c e s 12-11
B a c k i n g u p a n d r e s t o r i n g d a t a b a s e s
PageSize := 4096;
Changing the page size can improve database performance, depending on the datatype size, row length, and so forth. For a discussion of how page size affects performance, see “Page size” in the Operations Guide.
Setting the restore optionsThe Options property allows you to build restore options of type TRestoreOption into your application. The restore options are:
Displaying restore outputSet the Verbose property to True to display the restore output to a data control, such as a Memo component.
Setting up a restore componentTo set up a simple restore component:
1 Drop a TIBRestoreService component on a Delphi form.
2 Drop Button and Memo components on the form.
3 Enter the name and path of the database to be restored in the DatabaseName field and the name and path of the database backup file in the BackupFile string field of the Object Inspector, or double click on the button and set the properties in code:
procedure TForm1.Button1Click(Sender: TObject);beginwith IBRestoreService1 do
beginDatabaseName.Add('c:\interbase\examples\database\employee.gdb');BackupFile.Add('c:\temp\employee1.gbk');
Table 12.4 TIBRestoreService options
Option Meaning
DeactivateIndex Do not build indexes during restore
NoShadow Do not recreate shadow files during restore
NoValidity Do not enforce validity conditions (for example, NOT NULL) during restore
OneRelationATime Commit after completing a restore of each table
Replace Replace database if one exists
Create Restore but do not overwrite an existing database
UseAllSpace Do not reserve 20% of each datapage for future record versions; useful for read-only databases

12-12 D e v e l o p e r ’ s G u i d e
B a c k i n g u p a n d r e s t o r i n g d a t a b a s e s
end;4 Attach to the service manager as described in “Attaching to a service manager” on
page 12-3, or set the properties in code:
begin with IBRestoreService1 do begin
ServerName := 'Poulet';LoginPrompt := False;Params.Add('user_name=sysdba');Params.Add('password=masterkey');Active := True;
end;
5 Set any other options in the Object inspector (or set them in code), and then start the restore service with the ServiceStart method.
The final code for a restore application that displays verbose restore output in a Memo component might look like this:
procedure TForm1.Button1Click(Sender: TObject);begin with IBRestoreService1 do begin ServerName := 'Poulet'; LoginPrompt := False; Params.Add('user_name=sysdba'); Params.Add('password=masterkey'); Active := True; try Verbose := True; Options := [Replace, UseAllSpace]; PageBuffers := 3000; PageSize := 4096; DatabaseName.Add('c:\interbase6\tutorial\tutorial.gdb');
BackupFile.Add('c:\interbase6\tutorial\backups\tutor5.gbk');ServiceStart;
While not Eof do Memo1.Lines.Add(GetNextLine); finally Active := False; end; end;end;
Restoring a database from multiple backup filesInterBase allows you to restore a database from multiple files. The following code example shows how to do this.
procedure TForm1.Button3Click(Sender: TObject);begin

C h a p t e r 1 2 W o r k i n g w i t h I n t e r B a s e S e r v i c e s 12-13
B a c k i n g u p a n d r e s t o r i n g d a t a b a s e s
with IBRestoreService1 do begin ServerName := 'Poulet'; LoginPrompt := False; Params.Add('user_name=sysdba'); Params.Add('password=masterkey'); Active := True; try Verbose := True; Options := [Replace, UseAllSpace]; PageBuffers := 3000; PageSize := 4096; BackupFile.Add('c:\temp\employee1.gbk'); BackupFile.Add('c:\temp\employee2.gbk'); BackupFile.Add('c:\temp\employee3.gbk'); DatabaseName.Add('c:\interbase\examples\database\employee.gdb'); ServiceStart; While not Eof do Memo1.Lines.Add(GetNextLine); finally Active := False; end; end;end;
Restoring a database to multiple filesYou might want to restore a database to multiple files to distribute it among different disks, which provides more flexibility in allocating system resources. The following code example shows how to do this.
procedure TForm1.Button2Click(Sender: TObject);begin with IBRestoreService1 do begin ServerName := 'Poulet'; LoginPrompt := False; Params.Add('user_name=sysdba'); Params.Add('password=masterkey'); Active := True; try Verbose := True; Options := [Replace, UseAllSpace]; PageBuffers := 3000; PageSize := 4096; BackupFile.Add('c:\temp\employee1.gbk'); DatabaseName.Add('c:\temp\employee2.gdb = 2048'); DatabaseName.Add('c:\temp\employee3.gdb = 2048'); DatabaseName.Add('c:\temp\employee4.gdb'); ServiceStart;

12-14 D e v e l o p e r ’ s G u i d e
P e r f o r m i n g d a t a b a s e m a i n t e n a n c e
While not Eof do Memo1.Lines.Add(GetNextLine); finally Active := False; end; end;end;
Performing database maintenanceTIBValidationService contains many properties and methods to allow you to perform database validation and resolve limbo transactions. These are discussed in the following sections. For more information, refer to “Database Configuration and Maintenance” in the Operations Guide.
Validating a databaseUse the Options property of TIBValidationService component to invoke a database validation. Set any of the following options of type TValidateOption to True to perform the appropriate validation:
Table 12.5 TIBValidationService options
Option Meaning
LimboTransactions Returns limbo transaction information, including:• Transaction ID• Host site• Remote site• Remote database path• Transaction state• Suggested transaction action• Transaction action• Multiple database information
CheckDB Request a read-only validation of the database without correcting any problems
IgnoreChecksum Ignore all checksum errors when validating or sweeping
KillShadows Remove references to unavailable shadow files
MendDB Mark corrupted records as unavailable so that subsequent operations skip them

C h a p t e r 1 2 W o r k i n g w i t h I n t e r B a s e S e r v i c e s 12-15
P e r f o r m i n g d a t a b a s e m a i n t e n a n c e
To set these options in code, use the Options property:
Options := [CheckDB, IgnoreChecksum, KillShadows];
Note Not all combinations of validation options work together. For example, you could not simultaneously mend and validate the database at the same time. Conversely, some options are intended to be used with other options, such as IgnoreChecksum with SweepDB or ValidateDB, or ValidateFull with ValidateDB.
To use the LimboTransactions option, see the following section.
Displaying limbo transaction informationUse the FetchLimboTransaction method along with theLimboTransactions option to retrieve a record of all current limbo transactions. The following code snippet will display the contents of the TLimboTransactionInfo record, provided that there are any limbo transactions to display.
try Options := [LimboTransactions]; FetchLimboTransactionInfo; for I := 0 to LimboTransactionInfoCount - 1 do begin with LimboTransactionInfo[i] do begin Memo1.Lines.Add('Transaction ID: ' + IntToStr(ID)); Memo1.Lines.Add('Host Site: ' + HostSite); Memo1.Lines.Add('Remote Site: ' + RemoteSite); Memo1.Lines.Add('Remote Database Path: ' + RemoteDatabasePath); //Memo1.Lines.Add('Transaction State: ' + TransactionState); Memo1.Lines.Add('-----------------------------------'); end; end; finally
SweepDB Request database sweep to mark outdated records as free space
ValidateDB Locate and release pages that are allocated but unassigned to any data structures
ValidateFull Check record and page structures, releasing unassigned record fragments; use with ValidateDB
Table 12.5 TIBValidationService options
Option Meaning

12-16 D e v e l o p e r ’ s G u i d e
R e q u e s t i n g d a t a b a s e a n d s e r v e r s t a t u s r e p o r t s
Resolving limbo transactionsYou can correct transactions in a limbo state using the GlobalAction property of the TIBValidationService to perform one of the following actions of type TTransactionGlobalAction on the database specified by the DatabaseName property:
For example, to set the global action using radio buttons:
with IBValidationService1 dotry
if RadioButton1.Checked then GlobalAction := (CommitGlobal);if RadioButton2.Checked then GlobalAction := (RollbackGlobal);if RadioButton3.Checked then GlobalAction := (RecoverTwoPhaseGlobal);if RadioButton4.Checked then GlobalAction := (NoGlobalAction);
Requesting database and server status reportsTIBStatisticalService contains many properties and methods to allow you to build a statistical component into your application. Only the SYSDBA user or owner of the database will be able to run this service.
Requesting database statisticsUse the Options property of TIBStatisticalService to request database statistics. These options are incremental; that is, setting DbLog to True also returns HeaderPages statistics, setting IndexPages to True returns also returns DbLog and HeaderPages statistics, and so forth. Set any of the following options of type TStatOption to True to retrieve the appropriate information:
Table 12.6 TIBValidationService actions
Action Meaning
CommitGlobal Commits the limbo transaction specified by ID or commits all limbo transactions
RollbackGlobal Rolls back the limbo transaction specified by ID or rolls back all limbo transactions
RecoverTwoPhaseGlobal Performs automated two-phase recovery, either for a limbo transaction specified by ID or for all limbo transactions
NoGlobalAction Takes no action

C h a p t e r 1 2 W o r k i n g w i t h I n t e r B a s e S e r v i c e s 12-17
R e q u e s t i n g d a t a b a s e a n d s e r v e r s t a t u s r e p o r t s
To use the statistical service:
1 Drop an IBStatisticalServices component on a Delphi form.
2 Attach to the service manager as described in “Attaching to a service manager” on page 12-3.
3 Set the DatabaseName property to the path of the database for which you would like statistics.
4 Set the options for which statistics you would like to receive, either by setting them to True in the Object Inspector, or in code using the Options property.
5 Start the statistical service using the ServiceStart method.
The following example displays the statistics for a database. With a button click, HeaderPages and DBLog statistics are returned until the end of the file is reached.
procedure TForm1.Button1Click(Sender: TObject);beginwith IBStatisticalService1 do begin ServerName := 'Poulet'; DatabaseName := 'C:\interbase6\tutorial\tutorial.gdb'; LoginPrompt := False; Params.Add('user_name=sysdba'); Params.Add('password=masterkey'); Active := True; ServiceStart; try Options := [DataPages, DBLog]; While not Eof do Memo1.Lines.Add(GetNextLine); finally Active := False; end; end;
Table 12.7 TIBStatisticalService options
Option Meaning
HeaderPages Stop reporting statistics after reporting the information on the header page
DbLog Stop reporting statistics after reporting information on the log pages
IndexPages Request statistics for the user indexes in the database
DataPages Request statistics for data tables in the database
SystemRelations Request statistics for system tables and indexes in addition to user tables and indexes

12-18 D e v e l o p e r ’ s G u i d e
U s i n g t h e l o g s e r v i c e
end;
Using the log serviceUse the TIBLogService to retrieve the interbase.log file, if it exists, from the server. If the log file does not exist, an error is returned.
To use the log service:
1 Drop a TIBLogService component on a Delphi application.
2 Drop Button and Memo components on the same application.
3 Attach to the service manager as described in “Attaching to a service manager” on page 12-3.
4 Start the log service using the ServiceStart method.
The following example displays the contents of the interbase.log file. With a click of the button, the log file is displayed until the end of the file is reached.
procedure TForm1.Button1Click(Sender: TObject);beginwith IBLogService1 do begin ServerName := 'Poulet'; LoginPrompt := False; Params.Add('user_name=sysdba'); Params.Add('password=masterkey'); Active := True; ServiceStart; try While not Eof do Memo1.Lines.Add(GetNextLine); finally Active := False; end; end;end;
Configuring usersSecurity for InterBase relies on a central database for each server host. This database contains legitimate users who have permission to connect to databases and InterBase services on that host. The database also contains an encrypted password for the user. This user and password applies to any database on that server host.

C h a p t e r 1 2 W o r k i n g w i t h I n t e r B a s e S e r v i c e s 12-19
C o n f i g u r i n g u s e r s
You can use the TIBSecurityService component to list, add, delete, and modify users. These are discussed in the following sections.
For more information on InterBase database security, refer to “DataBase Security” in the Operations Guide.
Adding a user to the security databaseUse the AddUser method along with the following properties to add a user to the InterBase security database (admin.ib by default).
The following code snippet allows you to set user information in Edit components, and then adds the user with the AddUser method.
tryUserName := Edit1.Text;FirstName := Edit2.Text;MiddleName := Edit3.Text;LastName := Edit4.Text;UserID := StrToInt(Edit5.Text);GroupID := StrToInt(Edit6.Text);Password := Edit7.Text;AddUser;
finally
Table 12.8 TIBSecurityService properties
Property Purpose
UserName User name to create; maximum 31 characters
Password Password for the user; maximum 31 characters, only first 8 characters are significant
FirstName Optional first name of person using this user name
MiddleName Optional middle name of person using this user name
LastName Optional last name of person using this user name
UserID Optional user ID number, defined in /etc/passwd, to assign to the user
GroupID Optional groupID number, defined in /etc/group, to assign to the user
SQLRole Optional role to use when attaching to the security database; for more information on roles in InterBase, refer to “ANSI SQL 3 roles” in the Operations Guide

12-20 D e v e l o p e r ’ s G u i d e
C o n f i g u r i n g u s e r s
Listing users in the security databaseUse the DisplayUser and DisplayUsers methods to display information for a single user or all users respectively in the InterBase security database (admin.ib by default).
Displaying information for a single userTo view the information for a single user, use the DisplayUser method. The following code snippet displays all the information contained in the TUserInfoArray, keyed on the UserName field.
try UserName := Edit1.Text; DisplayUser(UserName); Edit2.Text := UserInfo[0].FirstName; Edit3.Text := UserInfo[0].MiddleName; Edit4.Text := UserInfo[0].LastName; Edit5.Text := IntToStr(UserInfo[0].UserID); Edit6.Text := IntToStr(UserInfo[0].GroupID);finally
Displaying information for all usersTo view all users, use the DisplayUsers method. DisplayUsers displays the user information contained in the TUserInfo array. The following code snippet displays all users in a memo window.
tryDisplayUsers;for I := 0 to UserInfoCount - 1 do
beginwith UserInfo[i] do
beginMemo1.Lines.Add('User Name : ' + UserName);Memo1.Lines.Add('Name: ' + FirstName + ' ' + MiddleName + '
' + LastName);Memo1.Lines.Add('UID: ' + IntToStr(UserId));Memo1.Lines.Add('GID: ' + IntToStr(GroupId));Memo1.Lines.Add('-----------------------------------');
end;end;
finally
Removing a user from the security databaseUse the DeleteUser method to remove a user from the InterBase security database (admin.ib by default).
The following code snippet calls the DeleteUser method to delete the user indicated by the UserName property:

C h a p t e r 1 2 W o r k i n g w i t h I n t e r B a s e S e r v i c e s 12-21
A d m i n i s t e r i n g s o f t w a r e a c t i v a t i o n c e r t i f i c a t e s
try UserName := Edit1.Text; DeleteUser;finally Edit1.Clear; Active := False;end;
If you remove a user entry from the InterBase security database (admin.ib by default), no one can log into any database on that server using that name. You must create a new entry for that name using the AddUser method.
Modifying a user in the security databaseUse the ModifyUser method along with the properties listed in Table 12.8 to modify user information in the InterBase security database. You cannot change the UserName property, only the properties associated with that user name.
To modify user information you could display the user information using the example in “Displaying information for a single user” on page 12-20. The TUserInfo record is displayed in the Edit boxes. Use the ModifyUser code in the same way as the AddUser code.
Administering software activation certificatesYou can use the TIBLicensingService component to install or remove software activation certificates.
Listing software activation certificatesYou cannot use the TIBLicensingService component to view license information. You must use the License option in TIBStatisticalService. For more information, see “Displaying license information” on page 12-23.
Adding a software activation certificateUse the AddLicense method along with the Key and ID properties to add a software activation certificate.
For example, the following code attaches to a server, and adds a license with the click of a button after the Key and ID are entered into Edit components.
procedure TForm1.Button1Click(Sender: TObject);begin with IBLicensingService1 do begin ServerName := 'Poulet'; LoginPrompt := False;

12-22 D e v e l o p e r ’ s G u i d e
A d m i n i s t e r i n g s o f t w a r e a c t i v a t i o n c e r t i f i c a t e s
Protocol := Local; Params.Add('user_name=SYSDBA'); Params.Add('password=masterkey'); Active := True; try Key := Edit1.Text; ID := Edit2.Text; AddLicense; ServiceStart; finally if Active then Active := False; end; end;end;
Using the Action propertyInstead of using the AddLicense or RemoveLicense methods, you could use the Action property:
Action := LicenseAdd;
or
Action := LicenseRemove;
Removing a software activation certificateUse the RemoveLicense method along with the Key property to remove a software activation certificate:
procedure TForm1.Button2Click(Sender: TObject);begin with IBLicensingService1 do begin ServerName := 'Poulet'; LoginPrompt := False; Params.Add('user_name=SYSDBA'); Params.Add('password=masterkey'); Active := True; try Key := Edit3.Text; finally RemoveLicense; Active := False; end; end;end;

C h a p t e r 1 2 W o r k i n g w i t h I n t e r B a s e S e r v i c e s 12-23
D i s p l a y i n g s e r v e r p r o p e r t i e s
Displaying server propertiesUse the Options property of TIBServerProperties to return server configuration information, including the version of the database and server, license and license mask information, and InterBase configuration parameters. These options are discussed in the following sections.
Displaying the database informationUse the Database option to display the TDatabaseInfo record, which consists of the number of databases attached to the server, the number of databases on the server, and the names and paths of the database files.
You can set the Database option to True in the Object Inspector, or set it in code.
The following code displays the elements of the TDatabaseInfo record. NoOfAttachements and NoOfDatabases are strings displayed in Label components, while DbName is an array of type string, and displayed in a Memo component.
Options := [Database]; FetchDatabaseInfo; Label1.Caption := 'Number of Attachments = ' + IntToStr(DatabaseInfo.NoOfAttachments); Label2.Caption := 'Number of Databases = ' + IntToStr(DatabaseInfo.NoOfDatabases); for I:= 0 to High(DatabaseInfo.DbName) do Memo1.Lines.Add(DatabaseInfo.DbName[i])
Displaying license informationUse the License option to display all software activation certificate IDs and keys currently enabled on the server. The license information is stored as a record, which consists of the Key, ID, and description, all of which are arrays of type string. The number of licensed users on the system is displayed as an integer. You can set License to True in the Object Inspector, or you can set it in code.
The following code displays the number of licensed users in a Label component, and displays the Key, ID, and Desc arrays in a Memo component.
Options := [License]; FetchLicenseInfo; Label1.Caption := 'Licensed Users = ' +
IntToStr(LicenseInfo.LicensedUsers); for I:= 0 to High(LicenseInfo.Key) do Memo1.Lines.Add(LicenseInfo.Key[i] + ':' + LicenseInfo.ID[i]
+ ':' + LicenseInfo.Desc[i]);

12-24 D e v e l o p e r ’ s G u i d e
D i s p l a y i n g s e r v e r p r o p e r t i e s
Displaying license mask informationUse the LicenseMask option to display the license and capability masks on the server. A license mask is a bitmask representing the software activation certificate options currently enabled on the server. A capability mask is a bitmask representing the capabilities currently enabled on the server. You can set LicenseMask to True in the Object Inspector, or you can set it in code.
The following code displays the LicenseMask and CapabilityMask elements of the TLicenseMaskInfo record as Label components on a form.
Options := [LicenseMask]; FetchLicenseMaskInfo; Label1.Caption := 'License Mask = ' + IntToStr(LicenseMaskInfo.LicenseMask); Label2.Caption := 'Capability Mask = ' + IntToStr(LicenseMaskInfo.CapabilityMask);
Displaying InterBase configuration parametersUse the ConfigParams option along with the FetchConfigParams or Fetch method to display the parameters and values in the ibconfig file on the server. ConfigParams displays the location of the InterBase executable, the lock file, the message file, and the security database. It also displays the configuration file parameters. You can set ConfigParams to True in the Object Inspector, or you can set it in code.
The following code snippet shows how you could display configuration parameters as label captions.
Options := [ConfigParameters];FetchConfigParams;Label1.Caption := 'Base File = ' + ConfigParams.BaseLocation;Label2.Caption := 'Lock File = ' + ConfigParams.LockFileLocation;Label3.Caption := 'Message File = ' + ConfigParams.MessageFileLocation;Label4.Caption := 'Security Database = ' + ConfigParams.SecurityDatabaseLocation;
You could also set the ConfigFileData array to display server key values in a Memo component.
var I: Integer; st1: string;...for I:= 0 to High(ConfigParams.ConfigFileData.ConfigFileValue) do begin case ConfigParams.ConfigFileData.ConfigFileKey[i] of ISCCFG_IPCMAP_KEY: st1 := 'IPCMAP_KEY'; ISCCFG_LOCKMEM_KEY: st1 := 'LOCKMEM_KEY';
. .

C h a p t e r 1 2 W o r k i n g w i t h I n t e r B a s e S e r v i c e s 12-25
D i s p l a y i n g s e r v e r p r o p e r t i e s
. ISCCFG_DUMMY_INTRVL_KEY: st1 := 'DUMMY_INTRVL_KEY'; end; Memo1.Lines.Add(st1 + ' = ' + IntTostr(ConfigParams.ConfigFileData.ConfigFileValue[i]));
Displaying the server versionUse the Version option to display the server version information. The TVersionInfo record contains the server version, the implementation version, and the service version.
You can set the Version option to True in the Object Inspector, or set the Options property in code.
The following code displays server properties in Label components when a button is clicked:
Options := [Version];FetchVersionInfo;
Label1.Caption := 'Server Version = ' + VersionInfo.ServerVersion; Label2.Caption := 'Server Implementation = ' +
VersionInfo.ServerImplementation; Label3.Caption := 'Service Version = ' +
IntToStr(VersionInfo.ServiceVersion);end;

12-26 D e v e l o p e r ’ s G u i d e
D i s p l a y i n g s e r v e r p r o p e r t i e s

C h a p t e r 1 3 P r o g r a m m i n g w i t h D a t a b a s e E v e n t s 13-1
C h a p t e r
Chapter 13Programming withDatabase Events
Use the TIBEvents component in your IBX-based application to register interest in and asynchronously handle InterBase server events. The InterBase event mechanism enables applications to respond to action and database changes made by other, concurrently running applications without the need for those applications to communicate directly with each other, and without incurring the expense of CPU time required for period polling to determine if an event has occurred.
Use the TIBEvents component in your application to register an event (or a list of events) with the event manager. The event manager maintains a list of events posted to it by triggers and stored procedures. It also maintains a list of applications that have registered an interest in events. Each time a new event is posted to it, the event manager notifies interested applications that the event has occurred.
To use TIBEvents in your application:
1 Create a trigger or stored procedure on the InterBase server which will post an event.
2 Add a TIBDatabase and a TIBEvents component to your form.
3 Add the events to the Events list and register them with the event manager.
4 Write an OnEventAlert event handler for each event.
Events are passed by triggers or stored procedures only when the transaction under which they occur is posted. In addition, InterBase consolidates events before posting them. For example, if an InterBase trigger posts 20 x STOCK_LOW events within a transaction, when the transaction is committed these will be consolidated into a single STOCK_LOW event, and the client will only receive one event notification.

13-2 D e v e l o p e r ’ s G u i d e
S e t t i n g u p e v e n t a l e r t s
For more information on events, refer to “Working with Events” in the Embedded SQL Guide.
Setting up event alertsDouble click on the ellipsis button (...) of the Events property add an event to the Events list. Each TIBEvents component can handle up to 15 events. If you need to respond to more that 15 events use more that one TIBEvents component. If you attempt to add too many events at runtime, an exception will be raised.
To add an event to the Events list use the following code
TIBEvents.Events.Add( 'STOCK_LOW')
Writing an event handlerOnEventAlert is called every time an InterBase event is received by an IBEvents component. The EventName variable contains the name of the event that has just been received. The EventCount variable contains the number of EventName events that have been received since OnEventAlert was last called.
OnEventAlert runs as a separate thread to allow for true asynchronous event processing, however, the IBEvents component provides synchronization code to ensure that only one OnEventAlert event handler executes at any one time.

C h a p t e r 1 4 W o r k i n g w i t h C a c h e d U p d a t e s 14-1
C h a p t e r
Chapter 14Working with Cached UpdatesCached updates enable you to retrieve data from a database, cache and edit it locally, and then apply the cached updates to the database as a unit. When cached updates are enabled, updates to a dataset (such as posting changes or deleting records) are stored in an internal cache instead of being written directly to the dataset’s underlying table. When changes are complete, your application calls a method that writes the cached changes to the database and clears the cache.
This chapter describes when and how to use cached updates. It also describes the TIBUpdateSQL component that can be used in conjunction with cached updates to update virtually any dataset, particularly datasets that are not normally updatable.
Deciding when to use cached updatesCached updates are primarily intended to reduce data access contention on remote database servers by:
• Minimizing transaction times.
• Minimizing network traffic.
While cached updates can minimize transaction times and drastically reduce network traffic, they may not be appropriate for all database client applications that work with remote servers. There are three areas of consideration when deciding to use cached updates:
• Cached data is local to your application, and is not under transaction control. In a busy client/server environment this has two implications for your application:
• Other applications can access and change the actual data on the server while your users edit their local copies of the data.

14-2 D e v e l o p e r ’ s G u i d e
U s i n g c a c h e d u p d a t e s
• Other applications cannot see any data changes made by your application until it applies all its changes.
• In master/detail relationships managing the order of applying cached updates can be tricky. This is particularly true when there are nested master/detail relationships where one detail table is the master table for yet another detail table and so on.
• Applying cached updates to read-only, query-based datasets requires use of update objects.
The InterBase Express components provide cached update methods and transaction control methods you can use in your application code to handle these situations, but you must take care that you cover all possible scenarios your application is likely to encounter in your working environment.
Using cached updatesThis section provides a basic overview of how cached updates work in an application. If you have not used cached updates before, this process description serves as a guideline for implementing cached updates in your applications.
To use cached updates, the following order of processes must occur in an application:
1 Enable cached updates. Enabling cached updates causes a read-only transaction that fetches as much data from the server as is necessary for display purposes and then terminates. Local copies of the data are stored in memory for display and editing. For more information about enabling and disabling cached updates, see “Enabling and disabling cached updates” on page 14-3.
2 Display and edit the local copies of records, permit insertion of new records, and support deletions of existing records. Both the original copy of each record and any edits to it are stored in memory. For more information about displaying and editing when cached updates are enabled, see “Applying cached updates” on page 14-4.
3 Fetch additional records as necessary. As a user scrolls through records, additional records are fetched as needed. Each fetch occurs within the context of another short duration, read-only transaction. (An application can optionally fetch all records at once instead of fetching many small batches of records.) For more information about fetching all records, see “Fetching records” on page 14-4.
4 Continue to display and edit local copies of records until all desired changes are complete.
5 Apply the locally cached records to the database or cancel the updates. For each record written to the database, an OnUpdateRecord event is triggered. If an error occurs when writing an individual record to the database, an OnUpdateError event is triggered which enables the application to correct the error, if possible,

C h a p t e r 1 4 W o r k i n g w i t h C a c h e d U p d a t e s 14-3
U s i n g c a c h e d u p d a t e s
and continue updating. When updates are complete, all successfully applied updates are cleared from the local cache. For more information about applying updates to the database, see “Applying cached updates” on page 14-4.
If instead of applying updates, an application cancels updates, the locally cached copy of the records and all changes to them are freed without writing the changes to the database. For more information about canceling updates, see “Canceling pending cached updates” on page 14-7.
Enabling and disabling cached updatesCached updates are enabled and disabled through the CachedUpdates properties of TIBDataSet, TIBTable, TIBQuery, and TStoredProc. CachedUpdates is False by default, meaning that cached updates are not enabled for a dataset.
Note Client datasets always cache updates. They have no CachedUpdates property because you cannot disable cached updates on a client dataset.
To use cached updates, set CachedUpdates to True, either at design time (through the Object Inspector), or at runtime. When you set CachedUpdates to True, the dataset’s OnUpdateRecord event is triggered if you provide it. For more information about the OnUpdateRecord event, see “Creating an OnUpdateRecord event handler” on page 14-23.
For example, the following code enables cached updates for a dataset at runtime:
CustomersTable.CachedUpdates := True;
When you enable cached updates, a copy of all records necessary for display and editing purposes is cached in local memory. Users view and edit this local copy of data. Changes, insertions, and deletions are also cached in memory. They accumulate in memory until the current cache of local changes is applied to the database. If changed records are successfully applied to the database, the record of those changes are freed in the cache.
Note Applying cached updates does not disable further cached updates; it only writes the current set of changes to the database and clears them from memory.
To disable cached updates for a dataset, set CachedUpdates to False. If you disable cached updates when there are pending changes that you have not yet applied, those changes are discarded without notification. Your application can test the UpdatesPending property for this condition before disabling cached updates. For example, the following code prompts for confirmation before disabling cached updates for a dataset:
if (CustomersTable.UpdatesPending)if (Application.MessageBox(“Discard pending updates?”,
“Unposted changes”, MB_YES + MB_NO) = IDYES) then
CustomersTable.CachedUpdates = False;

14-4 D e v e l o p e r ’ s G u i d e
U s i n g c a c h e d u p d a t e s
Fetching recordsBy default, when you enable cached updates, datasets automatically handle fetching of data from the database when necessary. Datasets fetch enough records for display. During the course of processing, many such record fetches may occur. If your application has specific needs, it can fetch all records at one time. You can fetch all records by calling the dataset’s FetchAll method. FetchAll creates an in-memory, local copy of all records from the dataset. If a dataset contains many records or records with large Blob fields, you may not want to use FetchAll.
Client datasets use the PacketRecords property to indicate the number of records that should be fetched at any time. If you set the FetchOnDemand property to True, the client dataset automatically handles fetching of data when necessary. Otherwise, you can use the GetNextPacket method to fetch records from the data server. For more information about fetching records using a client dataset, see “Requesting data from an application server” in the “Creating and using a client dataset” chapter of the Delphi Developer’s Guide.
Applying cached updatesWhen a dataset is in cached update mode, changes to data are not actually written to the database until your application explicitly calls methods that apply those changes. Normally an application applies updates in response to user input, such as through a button or menu item.
Important To apply updates to a set of records retrieved by a SQL query that does not return a live result set, you must use a TIBUpdateSQL object to specify how to perform the updates. For updates to joins (queries involving two or more tables), you must provide one TIBUpdateSQL object for each table involved, and you must use the OnUpdateRecord event handler to invoke these objects to perform the updates. For more information, see “Updating a read-only result set” on page 14-22. For more information about creating and using an OnUpdateRecord event handler, see “Creating an OnUpdateRecord event handler” on page 14-23.
Applying updates is a two-phase process that should occur in the context of a transaction component to enable your application to recover gracefully from errors.
When applying updates under transaction control, the following events take place:
1 A database transaction starts.
2 Cached updates are written to the database (phase 1). If you provide it, an OnUpdateRecord event is triggered once for each record written to the database. If an error occurs when a record is applied to the database, the OnUpdateError event is triggered if you provide one.
If the database write is unsuccessful:
• Database changes are rolled back, ending the database transaction.

C h a p t e r 1 4 W o r k i n g w i t h C a c h e d U p d a t e s 14-5
U s i n g c a c h e d u p d a t e s
• Cached updates are not committed, leaving them intact in the internal cache buffer.
If the database write is successful:
• Database changes are committed, ending the database transaction.
• Cached updates are committed, clearing the internal cache buffer (phase 2).
The two-phased approach to applying cached updates allows for effective error recovery, especially when updating multiple datasets (for example, the datasets associated with a master/detail form). For more information about handling update errors that occur when applying cached updates, see “Handling cached update errors” on page 14-25.
There are actually two ways to apply updates. To apply updates for a specified set of datasets associated with a database component, call the database component’s ApplyUpdates method. To apply updates for a single dataset, call the dataset’s ApplyUpdates and Commit methods. These choices, and their strengths, are described in the following sections.
Applying cached updates with a database component methodOrdinarily, applications cache updates at the dataset level. However, there are times when it is important to apply the updates to multiple interrelated datasets in the context of a single transaction. For example, when working with master/detail forms, you will likely want to commit changes to master and detail tables together.
To apply cached updates to one or more datasets in the context of a database connection, call the database component’s ApplyUpdates method. The following code applies updates to the CustomersQuery dataset in response to a button click event:
procedure TForm1.ApplyButtonClick(Sender: TObject);begin
IBDatabase1.ApplyUpdates([CustomersQuery]);end;
The above sequence starts a transaction, and writes cached updates to the database. If successful, it also commits the transaction, and then commits the cached updates. If unsuccessful, this method rolls back the transaction, and does not change the status of the cached updates. In this latter case, your application should handle cached update errors through a dataset’s OnUpdateError event. For more information about handling update errors, see “Handling cached update errors” on page 14-25.
The main advantage to calling a database component’s ApplyUpdates method is that you can update any number of dataset components that are associated with the database. The parameter for the ApplyUpdates method for a database is an array of TIBCustomDataSet. For example, the following code applies updates for two queries used in a master/detail form:
IBDatabase1.ApplyUpdates([CustomerQuery, OrdersQuery]);

14-6 D e v e l o p e r ’ s G u i d e
U s i n g c a c h e d u p d a t e s
For more information about updating master/detail tables, see “Applying updates for master/detail tables” on page 14-6.
Applying cached updates with a dataset component methodsYou can apply updates for individual datasets directly using the dataset’s ApplyUpdates method. Applying updates at the dataset level gives you control over the order in which updates are applied to individual datasets. Order of update application is especially critical for handling master/detail relationships. To ensure the correct ordering of updates for master/detail tables, you should always apply updates at the dataset level. For more information see “Applying updates for master/detail tables” on page 14-6.
The following code illustrates how you apply updates within a transaction for the CustomerQuery dataset previously used to illustrate updates through a database method:
procedure TForm1.ApplyButtonClick(Sender: TObject)begin
IBTransaction1.StartTransaction;CustomerQuery.ApplyUpdates; {try to write the updates to the database }IBTransaction1.Commit; { on success, commit the changes }except
IBTransaction1.Rollback; { on failure, undo any changes }end;
If an exception is raised during the ApplyUpdates call, the database transaction is rolled back. Rolling back the transaction ensures that the underlying database table is not changed. The raise statement inside the try...except block re-raises the exception, thereby preventing the call to CommitUpdates. Because CommitUpdates is not called, the internal cache of updates is not cleared so that you can handle error conditions and possibly retry the update.
Applying updates for master/detail tablesWhen you apply updates for master/detail tables, the order in which you list datasets to update is significant. Generally you should always update master tables before detail tables, except when handling deleted records. In complex master/detail relationships where the detail table for one relationship is the master table for another detail table, the same rule applies.
You can update master/detail tables at the database or dataset component levels. For purposes of control (and of creating explicitly self-documented code), you should apply updates at the dataset level. The following example illustrates how you should code cached updates to two tables, Master and Detail, involved in a master/detail relationship:
IBTransaction1.StartTransaction;try
Master.ApplyUpdates;Detail.ApplyUpdates;Database1.Commit;

C h a p t e r 1 4 W o r k i n g w i t h C a c h e d U p d a t e s 14-7
U s i n g c a c h e d u p d a t e s
exceptIBTransaction1.Rollback;raise;
end;Master.CommitUpdates;Detail.CommitUpdates;
If an error occurs during the application of updates, this code also leaves both the cache and the underlying data in the database tables in the same state they were in before the calls to ApplyUpdates.
If an exception is raised during the call to Master.ApplyUpdates, it is handled like the single dataset case previously described. Suppose, however, that the call to Master.ApplyUpdates succeeds, and the subsequent call to Detail.ApplyUpdates fails. In this case, the changes are already applied to the master table. Because all data is updated inside a database transaction, however, even the changes to the master table are rolled back when IBTransaction1.Rollback is called in the except block. Furthermore, UpdatesMaster.CommitUpdates is not called because the exception which is re-raised causes that code to be skipped, so the cache is also left in the state it was before the attempt to update.
To appreciate the value of the two-phase update process, assume for a moment that ApplyUpdates is a single-phase process which updates the data and the cache. If this were the case, and if there were an error while applying the updates to the Detail table, then there would be no way to restore both the data and the cache to their original states. Even though the call to IBTransaction1.Rollback would restore the database, there would be no way to restore the cache.
Canceling pending cached updatesPending cached updates are updated records that are posted to the cache but not yet applied to the database. There are three ways to cancel pending cached updates:
• To cancel all pending updates and disable further cached updates, set the CachedUpdates property to False.
• To discard all pending updates without disabling further cached updates, call the CancelUpdates method.
• To cancel updates made to the current record call RevertRecord.
The following sections discuss these options in more detail.
Cancelling pending updates and disabling further cached updatesTo cancel further caching of updates and delete all pending cached updates without applying them, set the CachedUpdates property to False. When CachedUpdates is set to False, the CancelUpdates method is automatically invoked.
From the update cache, deleted records are undeleted, modified records revert to original values, and newly inserted record simply disappear.

14-8 D e v e l o p e r ’ s G u i d e
U s i n g c a c h e d u p d a t e s
Note This option is not available for client datasets.
Canceling pending cached updatesCancelUpdates clears the cache of all pending updates, and restores the dataset to the state it was in when the table was opened, cached updates were last enabled, or updates were last successfully applied. For example, the following statement cancels updates for the CustomersTable:
CustomersTable.CancelUpdates;
From the update cache, deleted records are undeleted, modified records revert to original values, and newly inserted records simply disappear.
Note Calling CancelUpdates does not disable cached updating. It only cancels currently pending updates. To disable further cached updates, set the CachedUpdates property to False.
Canceling updates to the current record RevertRecord restores the current record in the dataset to the state it was in when the table was opened, cached updates were last enabled, or updates were last successfully applied. It is most frequently used in an OnUpdateError event handler to correct error situations. For example,
CustomersTable.RevertRecord;
Undoing cached changes to one record does not affect any other records. If only one record is in the cache of updates and the change is undone using RevertRecord, the UpdatesPending property for the dataset component is automatically changed from True to False.
If the record is not modified, this call has no effect. For more information about creating an OnUpdateError handler, see “Creating an OnUpdateRecord event handler” on page 14-23.
Undeleting cached recordsTo undelete a cached record requires some coding because once the deleted record is posted to the cache, it is no longer the current record and no longer even appears in the dataset. In some instances, however, you may want to undelete such records. The process involves using the UpdateRecordTypes property to make the deleted records “visible,” and then calling RevertRecord. Here is a code example that undeletes all deleted records in a table:
procedure TForm1.UndeleteAll(DataSet: TDataSet)begin
DataSet.UpdateRecordTypes := [cusDeleted];{ show only deleted records }
tryDataSet.First;{ go to the first previously deleted record }

C h a p t e r 1 4 W o r k i n g w i t h C a c h e d U p d a t e s 14-9
U s i n g c a c h e d u p d a t e s
while not (DataSet.Eof)DataSet.RevertRecord;{ undelete until we reach the last record ]
except{ restore updates types to recognize only modified, inserted, and
unchanged }DataSet.UpdateRecordTypes := [cusModified, cusInserted, cusUnmodified];raise;
end;DataSet.UpdateRecordTypes := [cusModified, cusInserted, cusUnmodified];
end;
Specifying visible records in the cacheThe UpdateRecordTypes property controls what type of records are visible in the cache when cached updates are enabled. UpdateRecordTypes works on cached records in much the same way as filters work on tables. UpdateRecordTypes is a set, so it can contain any combination of the following values:
The default value for UpdateRecordTypes includes only cusModified, cusInserted, cusUnmodified, and cusUninserted with deleted records (cusDeleted) not displayed.
The UpdateRecordTypes property is primarily useful in an OnUpdateError event handler for accessing deleted records so they can be undeleted through a call to RevertRecord. This property is also useful if you wanted to provide a way in your application for users to view only a subset of cached records, for example, all newly inserted (cusInserted) records.
For example, you could have a set of four radio buttons (RadioButton1 through RadioButton4) with the captions All, Modified, Inserted, and Deleted. With all four radio buttons assigned to the same OnClick event handler, you could conditionally display all records (except deleted, the default), only modified records, only newly inserted records, or only deleted records by appropriately setting the UpdateRecordTypes property.
procedure TForm1.UpdateFilterRadioButtonsClick(Sender: TObject);begin
Table 14.1 TIBUpdateRecordType values
Value Meaning
cusModified Modified records
cusInserted Inserted records
cusDeleted Deleted records
cusUninserted Uninserted records
cusUnmodified Unmodified records

14-10 D e v e l o p e r ’ s G u i d e
U s i n g c a c h e d u p d a t e s
if RadioButton1.Checked thenCustomerQuery.UpdateRecordTypes := [cusUnmodified, cusModified, cusInserted]
else if RadioButton2.Checked thenCustomerQuery.UpdateRecordTypes := [cusModified]
else if RadioButton3.Checked thenCustomerQuery.UpdateRecordTypes := [cusInserted]
elseCustomerQuery.UpdateRecordTypes := [cusDeleted];
end;
For more information about creating an OnUpdateError handler, see “Creating an OnUpdateRecord event handler” on page 14-23.
Checking update statusWhen cached updates are enabled for your application, you can keep track of each pending update record in the cache by examining the UpdateStatus property for the record. Checking update status is most frequently used in OnUpdateRecord and OnUpdateError event handlers. For more information about creating and using an OnUpdateRecord event, see “Creating an OnUpdateRecord event handler” on page 14-23. For more information about creating and using an OnUpdateError event, see “Handling cached update errors” on page 14-25.
As you iterate through a set of pending changes, UpdateStatus changes to reflect the update status of the current record. UpdateStatus returns one of the following values for the current record:
When a dataset is first opened all records will have an update status of usUnmodified. As records are inserted, deleted, and so on, the status values change. Here is an example of UpdateStatus property used in a handler for a dataset’s OnScroll event. The event handler displays the update status of each record in a status bar.
procedure TForm1.CustomerQueryAfterScroll(DataSet: TDataSet);begin
with CustomerQuery do begincase UpdateStatus of
usUnmodified: StatusBar1.Panels[0].Text := 'Unmodified';usModified: StatusBar1.Panels[0].Text := 'Modified';
Table 14.2 Return values for UpdateStatus
Value Meaning
usUnmodified Record is unchanged
usModified Record is changed
usInserted Record is a new record
usDeleted Record is deleted

C h a p t e r 1 4 W o r k i n g w i t h C a c h e d U p d a t e s 14-11
U s i n g u p d a t e o b j e c t s t o u p d a t e a d a t a s e t
usInserted: StatusBar1.Panels[0].Text := 'Inserted';usDeleted: StatusBar1.Panels[0].Text := 'Deleted';else StatusBar1.Panels[0].Text := 'Undetermined status';
end;end;
end;
Note If a record’s UpdateStatus is usModified, you can examine the OldValue property for each field in the dataset to determine its previous value. OldValue is meaningless for records with UpdateStatus values other than usModified. For more information about examining and using OldValue, see “Accessing a field’s OldValue, NewValue, and CurValue properties” in the Delphi Developer’s Guide.
Using update objects to update a datasetTIBUpdateSQL is an update component that uses SQL statements to update a dataset. You must provide one TIBUpdateSQL component for each underlying table accessed by the original query that you want to update.
Note If you use more than one update component to perform an update operation, you must create an OnUpdateRecord event to execute each update component.
An update component actually encapsulates four TIBQuery components. Each of these query components perform a single update task. One query component provides a SQL UPDATE statement for modifying existing records; a second query component provides an INSERT statement to add new records to a table; a third component provides a DELETE statement to remove records from a table, and a forth component provides a SELECT statement to refresh the records in a table.
When you place an update component in a data module, you do not see the query components it encapsulates. They are created by the update component at runtime based on four update properties for which you supply SQL statements:
• ModifySQL specifies the UPDATE statement.
• InsertSQL specifies the INSERT statement.
• DeleteSQL specifies the DELETE statement.
• RefreshSQL specifies the SELECT statement
At runtime, when the update component is used to apply updates, it:
1 Selects a SQL statement to execute based on the UpdateKind parameter automatically generated on a record update event. UpdateKind specifies whether the current record is modified, inserted, or deleted.
2 Provides parameter values to the SQL statement.
3 Prepares and executes the SQL statement to perform the specified update.

14-12 D e v e l o p e r ’ s G u i d e
U s i n g u p d a t e o b j e c t s t o u p d a t e a d a t a s e t
Specifying the UpdateObject property for a datasetOne or more update objects can be associated with a dataset to be updated. Associate update objects with the update dataset either by setting the dataset component’s UpdateObject property to the update object or by setting the update object’s DataSet property to the update dataset. Which method is used depends on whether only one base table in the update dataset is to be updated or multiple tables.
You must use one of these two means of associating update datasets with update objects. Without proper association, the dynamic filling of parameters in the update object’s SQL statements cannot occur. Use one association method or the other, but never both.
How an update object is associated with a dataset also determines how the update object is executed. An update object might be executed automatically, without explicit intervention by the application, or it might need to be explicitly executed. If the association is made using the dataset component’s UpdateObject property, the update object will automatically be executed. If the association is made with the update object’s DataSet property, you must programmatically execute the update object.
The sections that follow explain the process of associating update objects with update dataset components in greater detail, along with suggestions about when each method should be used and effects on update execution.
Using a single update objectWhen only one of the base tables referenced in the update dataset needs to be updated, associate an update object with the dataset by setting the dataset component’s UpdateObject property to the name of the update object.
IBQuery1.UpdateObject := UpdateSQL1;
The update SQL statements in the update object are automatically executed when the update dataset’s ApplyUpdates method is called. The update object is invoked for each record that requires updating. Do not call the update object’s ExecSQL method in a handler for the OnUpdateRecord event as this will result in a second attempt to apply each record’s update.
If you supply a handler for the dataset’s OnUpdateRecord event, the minimum action that you need to take in that handler is setting the event handler’s UpdateAction parameter to uaApplied. You may optionally perform data validation, data modification, or other operations like setting parameter values.
Using multiple update objectsWhen more than one base table referenced in the update dataset needs to be updated, you need to use multiple update objects: one for each base table updated. Because the dataset component’s UpdateObject only allows one update object to be associated with the dataset, you must associate each update object with the dataset

C h a p t e r 1 4 W o r k i n g w i t h C a c h e d U p d a t e s 14-13
U s i n g u p d a t e o b j e c t s t o u p d a t e a d a t a s e t
by setting its DataSet property to the name of the dataset. The DataSet property for update objects is not available at design time in the Object Inspector. You can only set this property at runtime.
IBUpdateSQL1.DataSet := IBQuery1;
The update SQL statements in the update object are not automatically executed when the update dataset’s ApplyUpdates method is called. To update records, you must supply a handler for the dataset component’s OnUpdateRecord event and call the update object’s ExecSQL or Apply method. This invokes the update object for each record that requires updating.
In the handler for the dataset’s OnUpdateRecord event, the minimum actions that you need to take in that handler are:
• Calling the update object’s SetParams method (if you later call ExecSQL).
• Executing the update object for the current record with ExecSQL or Apply.
• Setting the event handler’s UpdateAction parameter to uaApplied.
You may optionally perform data validation, data modification, or other operations that depend on each record’s update.
Note It is also possible to have one update object associated with the dataset using the dataset component’s UpdateObject property, and the second and subsequent update objects associated using their DataSet properties. The first update object is executed automatically on calling the dataset component’s ApplyUpdates method. The rest need to be manually executed.
Creating SQL statements for update componentsTo update a record in an associated dataset, an update object uses one of three SQL statements. The four SQL statements delete, insert, refresh, and modify records cached for update. The statements are contained in the update object’s string list properties DeleteSQL, InsertSQL, RefreshSQL, and ModifySQL. As each update object is used to update a single table, the object’s update statements each reference the same base table.
As the update for each record is applied, one of the four SQL statements is executed against the base table updated. Which SQL statement is executed depends on the UpdateKind parameter automatically generated for each record’s update.
Creating the SQL statements for update objects can be done at design time or at runtime. The sections that follow describe the process of creating update SQL statements in greater detail.
Creating SQL statements at design timeTo create the SQL statements for an update component,
1 Select the TIBUpdateSQL component.

14-14 D e v e l o p e r ’ s G u i d e
U s i n g u p d a t e o b j e c t s t o u p d a t e a d a t a s e t
2 Select the name of the update component from the drop-down list for the dataset component’s UpdateObject property in the Object Inspector. This step ensures that the Update SQL editor you invoke in the next step can determine suitable default values to use for SQL generation options.
3 Right-click the update component and select UpdateSQL Editor from the context menu to invoke the Update SQL editor. The editor creates SQL statements for the update component’s ModifySQL, RefreshSQL, InsertSQL, and DeleteSQL properties based on the underlying data set and on the values you supply to it.
The Update SQL editor has two pages. The Options page is visible when you first invoke the editor. Use the Table Name combo box to select the table to update. When you specify a table name, the Key Fields and Update Fields list boxes are populated with available columns.
The Update Fields list box indicates which columns should be updated. When you first specify a table, all columns in the Update Fields list box are selected for inclusion. You can multi-select fields as desired.
The Key Fields list box is used to specify the columns to use as keys during the update. Instead of setting Key Fields you can click the Primary Keys button to choose key fields for the update based on the table’s primary index. Click Dataset Defaults to return the selection lists to the original state: all fields selected as keys and all selected for update.
Check the Quote Field Names check box if your server requires quotation marks around field names.
After you specify a table, select key columns, and select update columns, click Generate SQL to generate the preliminary SQL statements to associate with the update component’s ModifySQL, InsertSQL, RefreshSQL, and DeleteSQL properties. In most cases you may want or need to fine tune the automatically generated SQL statements.
To view and modify the generated SQL statements, select the SQL page. If you have generated SQL statements, then when you select this page, the statement for the ModifySQL property is already displayed in the SQL Text memo box. You can edit the statement in the box as desired.
Important Keep in mind that generated SQL statements are starting points for creating update statements. You may need to modify these statements to make them execute correctly. For example, when working with data that contains NULL values, you need to modify the WHERE clause to read
WHERE field IS NULL
rather then using the generated field variable. Test each of the statements directly yourself before accepting them.
Use the Statement Type radio buttons to switch among generated SQL statements and edit them as desired.

C h a p t e r 1 4 W o r k i n g w i t h C a c h e d U p d a t e s 14-15
U s i n g u p d a t e o b j e c t s t o u p d a t e a d a t a s e t
To accept the statements and associate them with the update component’s SQL properties, click OK.
Understanding parameter substitution in update SQL statementsUpdate SQL statements use a special form of parameter substitution that enables you to substitute old or new field values in record updates. When the Update SQL editor generates its statements, it determines which field values to use. When you write the update SQL, you specify the field values to use.
When the parameter name matches a column name in the table, the new value in the field in the cached update for the record is automatically used as the value for the parameter. When the parameter name matches a column name prefixed by the string “OLD_”, then the old value for the field will be used. For example, in the update SQL statement below, the parameter :LastName is automatically filled with the new field value in the cached update for the inserted record.
INSERT INTO Names(LastName, FirstName, Address, City, State, Zip)VALUES (:LastName, :FirstName, :Address, :City, :State, :Zip)
New field values are typically used in the InsertSQL and ModifySQL statements. In an update for a modified record, the new field value from the update cache is used by the UPDATE statement to replace the old field value in the base table updated.
In the case of a deleted record, there are no new values, so the DeleteSQL property uses the “:OLD_FieldName” syntax. Old field values are also normally used in the WHERE clause of the SQL statement for a modified or deletion update to determine which record to update or delete.
In the WHERE clause of an UPDATE or DELETE update SQL statement, supply at least the minimal number of parameters to uniquely identify the record in the base table that is updated with the cached data. For instance, in a list of customers, using just a customer’s last name may not be sufficient to uniquely identify the correct record in the base table; there may be a number of records with “Smith” as the last name. But by using parameters for last name, first name, and phone number could be a distinctive enough combination. Even better would be a unique field value like a customer number.
For more information about old and new value parameter substitution, see “Accessing a field’s OldValue, NewValue, and CurValue properties” in the Delphi Developer’s Guide.
Composing update SQL statementsThe TIBUpdateSQL component has four properties for updating SQL statements: DeleteSQL, InsertSQL, RefreshSQL, and ModifySQL. As the names of the properties imply, these SQL statements delete, insert, refresh, and modify records in the base table.

14-16 D e v e l o p e r ’ s G u i d e
U s i n g u p d a t e o b j e c t s t o u p d a t e a d a t a s e t
The DeleteSQL property should contain only a SQL statement with the DELETE command. The base table to be updated must be named in the FROM clause. So that the SQL statement only deletes the record in the base table that corresponds to the record deleted in the update cache, use a WHERE clause. In the WHERE clause, use a parameter for one or more fields to uniquely identify the record in the base table that corresponds to the cached update record. If the parameters are named the same as the field and prefixed with “OLD_”, the parameters are automatically given the values from the corresponding field from the cached update record. If the parameter are named in any other manner, you must supply the parameter values.
DELETE FROM Inventory IWHERE (I.ItemNo = :OLD_ItemNo)
Some tables types might not be able to find the record in the base table when fields used to identify the record contain NULL values. In these cases, the delete update fails for those records. To accommodate this, add a condition for those fields that might contain NULLs using the IS NULL predicate (in addition to a condition for a non-NULL value). For example, when a FirstName field may contain a NULL value:
DELETE FROM NamesWHERE (LastName = :OLD_LastName) AND
((FirstName = :OLD_FirstName) OR (FirstName IS NULL))
The InsertSQL statement should contain only a SQL statement with the INSERT command. The base table to be updated must be named in the INTO clause. In the VALUES clause, supply a comma-separated list of parameters. If the parameters are named the same as the field, the parameters are automatically given the value from the cached update record. If the parameter are named in any other manner, you must supply the parameter values. The list of parameters supplies the values for fields in the newly inserted record. There must be as many value parameters as there are fields listed in the statement.
INSERT INTO Inventory(ItemNo, Amount)VALUES (:ItemNo, 0)
The RefreshSQL statement should contain only a SQL statement with the SELECT command. The base table to be updated must be named in the FROM clause. If the parameters are named the same as the field, the parameters are automatically given the value from the cached update record. If the parameter are named in any other manner, you must supply the parameter values.
SELECT COUNTRY, CURRENCYFROM Country WHERE COUNTRY = :COUNTRY and CURRENCY = :CURRENCY

C h a p t e r 1 4 W o r k i n g w i t h C a c h e d U p d a t e s 14-17
U s i n g u p d a t e o b j e c t s t o u p d a t e a d a t a s e t
The ModifySQL statement should contain only a SQL statement with the UPDATE command. The base table to be updated must be named in the FROM clause. Include one or more value assignments in the SET clause. If values in the SET clause assignments are parameters named the same as fields, the parameters are automatically given values from the fields of the same name in the updated record in the cache. You can assign additional field values using other parameters, as long as the parameters are not named the same as any fields and you manually supply the values. As with the DeleteSQL statement, supply a WHERE clause to uniquely identify the record in the base table to be updated using parameters named the same as the fields and prefixed with “OLD_”. In the update statement below, the parameter :ItemNo is automatically given a value and :Price is not.
UPDATE Inventory ISET I.ItemNo = :ItemNo, Amount = :PriceWHERE (I.ItemNo = :OLD_ItemNo)
Considering the above update SQL, take an example case where the application end-user modifies an existing record. The original value for the ItemNo field is 999. In a grid connected to the cached dataset, the end-user changes the ItemNo field value to 123 and Amount to 20. When the ApplyUpdates method is invoked, this SQL statement affects all records in the base table where the ItemNo field is 999, using the old field value in the parameter :OLD_ItemNo. In those records, it changes the ItemNo field value to 123 (using the parameter :ItemNo, the value coming from the grid) and Amount to 20.
Using an update component’s Query propertyUse the Query property of an update component to access one of the update SQL properties DeleteSQL, InsertSQL, RefreshSQL, or ModifySQL, such as to set or alter the SQL statement. Use UpdateKind constant values as an index into the array of query components. The Query property is only accessible at runtime.
The statement below uses the UpdateKind constant ukDelete with the Query property to access the DeleteSQL property.
with IBUpdateSQL1.Query[ukDelete] do beginClear;Add(‘DELETE FROM Inventory I’);Add(‘WHERE (I.ItemNo = :OLD_ItemNo)’);
end;
Normally, the properties indexed by the Query property are set at design time using the Update SQL editor. You might, however, need to access these values at runtime if you are generating a unique update SQL statement for each record and not using parameter binding. The following example generates a unique Query property value for each row updated:
procedure TForm1.EmpAuditUpdateRecord(DataSet: TDataSet;UpdateKind: TUpdateKind; var UpdateAction: TUpdateAction);
beginwith IBUpdateSQL1 do begin

14-18 D e v e l o p e r ’ s G u i d e
U s i n g u p d a t e o b j e c t s t o u p d a t e a d a t a s e t
case UpdateKind ofukModified:
beginQuery[UpdateKind].Text := Format('update emptab set Salary = %d where
EmpNo = %d',[EmpAuditSalary.NewValue, EmpAuditEmpNo.OldValue]);
ExecSQL(UpdateKind);end;
ukInserted:{...}
ukDeleted:{...}
end;end;UpdateAction := uaApplied;
end;
Note Query returns a value of type TIBDataSetUpdateObject. To treat this return value as a TIBUpdateSQL component, to use properties and methods specific to TIBUpdateSQL, typecast the UpdateObject property. For example:
with (DataSet.UpdateObject as IBUpdateSQL).Query[UpdateKind] do begin{ perform operations on the statement in DeleteSQL }
end;
For an example of using this property, see “Calling the SetParams method” on page 14-20.
Using the DeleteSQL, InsertSQL, ModifySQL, and RefreshSQL propertiesUse the DeleteSQL, InsertSQL, ModifySQL, and RefreshSQL properties to set the update SQL statements for each. These properties are all string list containers. Use the methods of string lists to enter SQL statement lines as items in these properties. Use an integer value as an index to reference a specific line within the property. The DeleteSQL, InsertSQL, ModifySQL, and RefreshSQL properties are accessible both at design time and at runtime.
with UpdateSQL1.DeleteSQL do beginClear;Add(‘DELETE FROM Inventory I’);Add(‘WHERE (I.ItemNo = :OLD_ItemNo)’);
end;
Below, the third line of a SQL statement is altered using an index of 2 with the ModifySQL property.
UpdateSQL1.ModifySQL[2] := ‘WHERE ItemNo = :ItemNo’;

C h a p t e r 1 4 W o r k i n g w i t h C a c h e d U p d a t e s 14-19
U s i n g u p d a t e o b j e c t s t o u p d a t e a d a t a s e t
Executing update statementsThere are a number of methods involved in executing the update SQL for an individual record update. These method calls are typically used within a handler for the OnUpdateRecord event of the update object to execute the update SQL to apply the current cached update record. The various methods are applicable under different circumstances. The sections that follow discuss each of the methods in detail.
Calling the Apply methodThe Apply method for an update component manually applies updates for the current record. There are two steps involved in this process:
1 Values for the record are bound to the parameters in the appropriate update SQL statement.
2 The SQL statement is executed.
Call the Apply method to apply the update for the current record in the update cache. Only use Apply when the update object is not associated with the dataset using the dataset component’s UpdateObject property, in which case the update object is not automatically executed. Apply automatically calls the SetParams method to bind old and new field values to specially named parameters in the update SQL statement. Do not call SetParams yourself when using Apply. The Apply method is most often called from within a handler for the dataset’s OnUpdateRecord event.
If you use the dataset component’s UpdateObject property to associate dataset and update object, this method is called automatically. Do not call Apply in a handler for the dataset component’s OnUpdateRecord event as this will result in a second attempt to apply the current record’s update.
In a handler for the OnUpdateRecord event, the UpdateKind parameter is used to determine which update SQL statement to use. If invoked by the associated dataset, the UpdateKind is set automatically. If you invoke the method in an OnUpdateRecord event, pass an UpdateKind constant as the parameter of Apply.
procedure TForm1.EmpAuditUpdateRecord(DataSet: TDataSet;UpdateKind: TUpdateKind; var UpdateAction: TUpdateAction);
beginIBUpdateSQL1.Apply(UpdateKind);UpdateAction := uaApplied;
end;
If an exception is raised during the execution of the update program, execution continues in the OnUpdateError event, if it is defined.
Note The operations performed by Apply are analogous to the SetParams and ExecSQL methods described in the following sections.

14-20 D e v e l o p e r ’ s G u i d e
U s i n g u p d a t e o b j e c t s t o u p d a t e a d a t a s e t
Calling the SetParams methodThe SetParams method for an update component uses special parameter substitution rules to substitute old and new field values into the update SQL statement. Ordinarily, SetParams is called automatically by the update component’s Apply method. If you call Apply directly in an OnUpdateRecord event, do not call SetParams yourself. If you execute an update object using its ExecSQL method, call SetParams to bind values to the update statement’s parameters.
SetParams sets the parameters of the SQL statement indicated by the UpdateKind parameter. Only those parameters that use a special naming convention automatically have a value assigned. If the parameter has the same name as a field or the same name as a field prefixed with “OLD_” the parameter is automatically a value. Parameters named in other ways must be manually assigned values. For more information see the section “Understanding parameter substitution in update SQL statements” on page 14-15.
The following example illustrates one such use of SetParams:
procedure TForm1.EmpAuditUpdateRecord(DataSet: TDataSet;UpdateKind: TUpdateKind; var UpdateAction: TUpdateAction);
beginwith DataSet.UpdateObject as TIBUpdateSQL do begin
SetParams(UpdateKind);if UpdateKind = ukModified then
IBQuery[UpdateKind].ParamByName('DateChanged').Value := Now;ExecSQL(UpdateKind);
end;UpdateAction := uaApplied;
end;
This example assumes that the ModifySQL property for the update component is as follows:
UPDATE EmpAuditSET EmpNo = :EmpNo, Salary = :Salary, Changed = :DateChangedWHERE EmpNo = :OLD_EmpNo
In this example, the call to SetParams supplies values to the EmpNo and Salary parameters. The DateChanged parameter is not set because the name does not match the name of a field in the dataset, so the next line of code sets this value explicitly.
Calling the ExecSQL methodThe ExecSQL method for an update component manually applies updates for the current record. There are two steps involved in this process:
1 Values for the record are bound to the parameters in the appropriate update SQL statement.
2 The SQL statement is executed.

C h a p t e r 1 4 W o r k i n g w i t h C a c h e d U p d a t e s 14-21
U s i n g u p d a t e o b j e c t s t o u p d a t e a d a t a s e t
Call the ExecSQL method to apply the update for the current record in the update cache. Only use ExecSQL when the update object is not associated with the dataset using the dataset component’s UpdateObject property, in which case the update object is not automatically executed. ExecSQL does not automatically call the SetParams method to bind update SQL statement parameter values; call SetParams yourself before invoking ExecSQL. The ExecSQL method is most often called from within a handler for the dataset’s OnUpdateRecord event.
If you use the dataset component’s UpdateObject property to associate dataset and update object, this method is called automatically. Do not call ExecSQL in a handler for the dataset component’s OnUpdateRecord event as this will result in a second attempt to apply the current record’s update.
In a handler for the OnUpdateRecord event, the UpdateKind parameter is used to determine which update SQL statement to use. If invoked by the associated dataset, the UpdateKind is set automatically. If you invoke the method in an OnUpdateRecord event, pass an UpdateKind constant as the parameter of ExecSQL.
procedure TForm1.EmpAuditUpdateRecord(DataSet: TDataSet;UpdateKind: TUpdateKind; var UpdateAction: TUpdateAction);
beginwith (DataSet.UpdateObject as TIBUpdateSQL) do begin
SetParams(UpdateKind);ExecSQL(UpdateKind);
end;UpdateAction := uaApplied;
end;
If an exception is raised during the execution of the update program, execution continues in the OnUpdateError event, if it is defined.
Note The operations performed by ExecSQL and SetParams are analogous to the Apply method described previously.
Using dataset components to update a datasetApplying cached updates usually involves use of one or more update objects. The update SQL statements for these objects apply the data changes to the base table. Using update components is the easiest way to update a dataset, but it is not a requirement. You can alternately use dataset components like TIBTable and TIBQuery to apply the cached updates.
In a handler for the dataset component’s OnUpdateRecord event, use the properties and methods of another dataset component to apply the cached updates for each record.
For example, the following code uses a table component to perform updates:
procedure TForm1.EmpAuditUpdateRecord(DataSet: TDataSet;UpdateKind: TUpdateKind; var UpdateAction: TUpdateAction);
begin

14-22 D e v e l o p e r ’ s G u i d e
U p d a t i n g a r e a d - o n l y r e s u l t s e t
if UpdateKind = ukInsert thenUpdateTable.AppendRecord([DataSet.Fields[0].NewValue,
DataSet.Fields[1].NewValue])else
if UpdateTable.Locate('KeyField', VarToStr(DataSet.Fields[1].OldValue), []) then
case UpdateKind ofukModify:
beginEdit;UpdateTable.Fields[1].AsString :=
VarToStr(DataSet.Fields[1].NewValue);Post;
end;ukInsert:
beginInsert;UpdateTable.Fields[1].AsString :=
VarToStr(DataSet.Fields[1].NewValue);Post;
end;ukModify: DeleteRecord;
end;UpdateAction := uaApplied;
end;
Updating a read-only result setTo manually update a read-only dataset:
1 Add a TIBUpdateSQL component to the data module in your application.
2 Set the dataset component’s UpdateObject property to the name of the TIBUpdateSQL component in the data module.
3 Enter the SQL update statement for the result set to the update component’s ModifySQL, InsertSQL, DeleteSQL, or RefreshSQL properties, or use the Update SQL editor.
4 Close the dataset.
5 Set the dataset component’s CachedUpdates property to True.
6 Reopen the dataset.
In many circumstances, you may also want to write an OnUpdateRecord event handler for the dataset.
C h a p t e r 1 4 W o r k i n g w i t h C a c h e d U p d a t e s 14-23
C o n t r o l l i n g t h e u p d a t e p r o c e s s
Controlling the update processWhen a dataset component’s ApplyUpdates method is called, an attempt is made to apply the updates for all records in the update cache to the corresponding records in the base table. As the update for each changed, deleted, or newly inserted record is about to be applied, the dataset component’s OnUpdateRecord event fires.
Providing a handler for the OnUpdateRecord event allows you to perform actions just before the current record’s update is actually applied. Such actions can include special data validation, updating other tables, or executing multiple update objects. A handler for the OnUpdateRecord event affords you greater control over the update process.
The sections that follow describe when you might need to provide a handler for the OnUpdateRecord event and how to create a handler for this event.
Determining if you need to control the updating processSome of the time when you use cached updates, all you need to do is call ApplyUpdates to apply cached changes to the base tables in the database. In most other cases, however, you either might want to or must provide additional processing to ensure that updates can be properly applied. Use a handler for the updated dataset component’s OnUpdateRecord event to provide this additional processing.
For example, you might want to use the OnUpdateRecord event to provide validation routines that adjust data before it is applied to the table, or you might want to use the OnUpdateRecord event to provide additional processing for records in master and detail tables before writing them to the base tables.
In many cases you must provide additional processing. For example, if you access multiple tables using a joined query, then you must provide one TIBUpdateSQL object for each table in the query, and you must use the OnUpdateRecord event to make sure each update object is executed to write changes to the tables.
The following sections describe how to create and use an TIBUpdateSQL object and how to create and use an OnUpdateRecord event.
Creating an OnUpdateRecord event handlerThe OnUpdateRecord event handles cases where a single update component cannot be used to perform the required updates, or when your application needs more control over special parameter substitution. The OnUpdateRecord event fires once for the attempt to apply the changes for each modified record in the update cache.
To create an OnUpdateRecord event handler for a dataset:
1 Select the dataset component.
2 Choose the Events page in the Object Inspector.

14-24 D e v e l o p e r ’ s G u i d e
C o n t r o l l i n g t h e u p d a t e p r o c e s s
3 Double-click the OnUpdateRecord property value to invoke the code editor.
Here is the skeleton code for an OnUpdateRecord event handler:
procedure TForm1.DataSetUpdateRecord(DataSet: TDataSet; UpdateKind: TUpdateKind; var UpdateAction: TUpdateAction);begin
{ perform updates here... }end;
The DataSet parameter specifies the cached dataset with updates.
The UpdateKind parameter indicates the type of update to perform. Values for UpdateKind are ukModify, ukInsert, and ukDelete. When using an update component, you need to pass this parameter to its execution and parameter binding methods. For example using ukModify with the Apply method executes the update object’s ModifySQL statement. You may also need to inspect this parameter if your handler performs any special processing based on the kind of update to perform.
The UpdateAction parameter indicates if you applied an update or not. Values for UpdateAction are uaFail (the default), uaAbort, uaSkip, uaRetry, uaApplied. Unless you encounter a problem during updating, your event handler should set this parameter to uaApplied before exiting. If you decide not to update a particular record, set the value to uaSkip to preserve unapplied changes in the cache.
If you do not change the value for UpdateAction, the entire update operation for the dataset is aborted. For more information about UpdateAction, see “Specifying the action to take” on page 14-26.
In addition to these parameters, you will typically want to make use of the OldValue and NewValue properties for the field component associated with the current record. For more information about OldValue and NewValue see “Accessing a field’s OldValue, NewValue, and CurValue properties” in the Delphi Developer’s Guide.
Important The OnUpdateRecord event, like the OnUpdateError and OnCalcFields event handlers, should never call any methods that change which record in a dataset is the current record.
Here is an OnUpdateRecord event handler that executes two update components using their Apply methods. The UpdateKind parameter is passed to the Apply method to determine which update SQL statement in each update object to execute.
procedure TForm1.EmpAuditUpdateRecord(DataSet: TDataSet;UpdateKind: TUpdateKind; var UpdateAction: TUpdateAction);
beginEmployeeUpdateSQL.Apply(UpdateKind);JobUpdateSQL.Apply(UpdateKind);UpdateAction := uaApplied;
end;

C h a p t e r 1 4 W o r k i n g w i t h C a c h e d U p d a t e s 14-25
H a n d l i n g c a c h e d u p d a t e e r r o r s
In this example the DataSet parameter is not used. This is because the update components are not associated with the dataset component using its UpdateObject property.
Handling cached update errorsBecause there is a delay between the time a record is first cached and the time cached updates are applied, there is a possibility that another application may change the record in a database before your application applies its updates. Even if there is no conflict between user updates, errors can occur when a record’s update is applied.
A dataset component’s OnUpdateError event enables you to catch and respond to errors. You should create a handler for this event if you use cached updates. If you do not, and an error occurs, the entire update operation fails.
Important Do not call any dataset methods that change the current record (such as Next and Prior) in an OnUpdateError event handler. Doing so causes the event handler to enter an endless loop.
Here is the skeleton code for an OnUpdateError event handler:
procedure TForm1.DataSetUpdateError(DataSet: TDataSet; E: EDatabaseError;UpdateKind: TUpdateKind; var UpdateAction: TUpdateAction);
begin{ ... perform update error handling here ... }
end;
The following sections describe specific aspects of error handling using an OnUpdateError handler, and how the event’s parameters are used.
Referencing the dataset to which to apply updatesDataSet references the dataset to which updates are applied. To process new and old record values during error handling you must supply this reference.
Indicating the type of update that generated an errorThe OnUpdateRecord event receives the parameter UpdateKind, which is of type TUpdateKind. It describes the type of update that generated the error. Unless your error handler takes special actions based on the type of update being carried out, your code probably will not make use of this parameter.
The following table lists possible values for UpdateKind:

14-26 D e v e l o p e r ’ s G u i d e
H a n d l i n g c a c h e d u p d a t e e r r o r s
The example below shows the decision construct to perform different operations based on the value of the UpdateKind parameter.
procedure TForm1.DataSetUpdateError(DataSet: TDataSet; E: EDatabaseError;UpdateKind: TUpdateKind; var UpdateAction: TUpdateAction);
begincase UpdateKind of
ukModify:begin
{ handle error due to applying record modification update }end;
ukInsert:begin
{ handle error due to applying record insertion update }end;
ukDelete:begin
{ handle error due to applying record deletion update }end;
end;end;
Specifying the action to takeUpdateAction is a parameter of type TUpdateAction. When your update error handler is first called, the value for this parameter is always set to uaFail. Based on the error condition for the record that caused the error and what you do to correct it, you typically set UpdateAction to a different value before exiting the handler. UpdateAction can be set to one of the following values:
Table 14.3 UpdateKind values
Value Meaning
ukModify Editing an existing record caused an error
ukInsert Inserting a new record caused an error
ukDelete Deleting an existing record caused an error

C h a p t e r 1 4 W o r k i n g w i t h C a c h e d U p d a t e s 14-27
H a n d l i n g c a c h e d u p d a t e e r r o r s
If your error handler can correct the error condition that caused the handler to be invoked, set UpdateAction to the appropriate action to take on exit. For error conditions you correct, set UpdateAction to uaRetry to apply the update for the record again.
When set to uaSkip, the update for the row that caused the error is skipped, and the update for the record remains in the cache after all other updates are completed.
Both uaFail and uaAbort cause the entire update operation to end. uaFail raises an exception, and displays an error message. uaAbort raises a silent exception (does not display an error message).
Note If an error occurs during the application of cached updates, an exception is raised and an error message displayed. Unless the ApplyUpdates is called from within a try...except construct, an error message to the user displayed from inside your OnUpdateError event handler may cause your application to display the same error message twice. To prevent error message duplication, set UpdateAction to uaAbort to turn off the system-generated error message display.
The uaApplied value should only be used inside an OnUpdateRecord event. Do not set this value in an update error handler. For more information about update record events, see “Creating an OnUpdateRecord event handler” on page 14-23.
Table 14.4 UpdateAction values
Value Meaning
uaAbort Aborts the update operation without displaying an error message
uaFail Aborts the update operation, and displays an error message; this is the default value for UpdateAction when you enter an update error handler
uaSkip Skips updating the row, but leaves the update for the record in the cache
uaRetry Repeats the update operation; correct the error condition before setting UpdateAction to this value
uaApplied Not used in error handling routines

14-28 D e v e l o p e r ’ s G u i d e
H a n d l i n g c a c h e d u p d a t e e r r o r s

C h a p t e r 1 5 U n d e r s t a n d i n g D a t a s e t s 15-1
C h a p t e r
Chapter 15Understanding DatasetsIn Delphi, the fundamental unit for accessing data is the dataset family of objects. Your application uses datasets for all database access. Generally, a dataset object represents a specific table belonging to a database, or it represents a query or stored procedure that accesses a database.
All dataset objects that you will use in your database applications descend from the virtualized dataset object, TDataSet, and they inherit data fields, properties, events, and methods from TDataSet. This chapter describes the functionality of TDataSet that is inherited by the dataset objects you will use in your database applications. You need to understand this shared functionality to use any dataset object.
Figure 15.1 illustrates the hierarchical relationship of all the dataset components:
Figure 15.1 InterBase database component dataset hierarchy
TDataSet
TClientDataSet TIBCustomDataSetTIBQuery
TIBStoredProc
TIBTable
TIBDataSet

15-2 D e v e l o p e r ’ s G u i d e
W h a t i s T D a t a S e t ?
What is TDataSet?TDataSet is the ancestor for all the dataset objects that you use in your applications. It defines a set of data fields, properties, events, and methods that are shared by all dataset objects. TDataSet is a virtualized dataset, meaning that many of its properties and methods are virtual or abstract. A virtual method is a function or procedure declaration where the implementation of that method can be (and usually is) overridden in descendant objects. An abstract method is a function or procedure declaration without an actual implementation. The declaration is a prototype that describes the method (and its parameters and return type, if any) that must be implemented in all descendant dataset objects, but that might be implemented differently by each of them.
Because TDataSet contains abstract methods, you cannot use it directly in an application without generating a runtime error. Instead, you either create instances of TDataSet’s descendants, such as TIBCustomDataSet, TIBDataSet, TIBTable, TIBQuery, TIBStoredProc, and TClientDataSet, and use them in your application, or you derive your own dataset object from TDataSet or its descendants and write implementations for all its abstract methods.
Nevertheless, TDataSet defines much that is common to all dataset objects. For example, TDataSet defines the basic structure of all datasets: an array of TField components that correspond to actual columns in one or more database tables, lookup fields provided by your application, or calculated fields provided by your application. For more information about TField components, see “Working with field components” in the Delphi Developer’s Guide.
The following topics are discussed in this chapter:
• Opening and closing datasets • Determining and setting dataset states • Navigating datasets • Searching datasets • Modifying data • Using dataset events
Opening and closing datasetsTo read or write data in a table or through a query, an application must first open a dataset. You can open a dataset in two ways:
• Set the Active property of the dataset to True, either at design time in the Object Inspector, or in code at runtime:
IBTable.Active := True;
• Call the Open method for the dataset at runtime:

C h a p t e r 1 5 U n d e r s t a n d i n g D a t a s e t s 15-3
D e t e r m i n i n g a n d s e t t i n g d a t a s e t s t a t e s
IBQuery.Open;
You can close a dataset in two ways:
• Set the Active property of the dataset to False, either at design time in the Object Inspector, or in code at runtime:
IBQuery.Active := False;
• Call the Close method for the dataset at runtime:
IBTable.Close;
You may need to close a dataset when you want to change certain of its properties, such as TableName on a TIBTable component. At runtime, you may also want to close a dataset for other reasons specific to your application.
Determining and setting dataset statesThe state (or mode) of a dataset determines what can be done to its data. For example, when a dataset is closed, its state is dsInactive, meaning that nothing can be done to its data. At runtime, you can examine a dataset’s read-only State property to determine its current state. The following table summarizes possible values for the State property and what they mean:
Table 15.1 Values for the dataset State property
Value State Meaning
dsInactive Inactive DataSet closed; its data is unavailable
dsBrowse Browse DataSet open; its data can be viewed, but not changed
dsEdit Edit DataSet open; the current row can be modified
dsInsert Insert DataSet open; a new row is inserted or appended
dsCalcFields CalcFields DataSet open; indicates that an OnCalcFields event is under way and prevents changes to fields that are not calculated
dsCurValue CurValue Internal use only
dsNewValue NewValue Internal use only
dsOldValue OldValue Internal use only
dsFilter Filter DataSet open; indicates that a filter operation is under way: a restricted set of data can be viewed, and no data can be changed

15-4 D e v e l o p e r ’ s G u i d e
D e t e r m i n i n g a n d s e t t i n g d a t a s e t s t a t e s
When an application opens a dataset, it appears by default in dsBrowse mode. The state of a dataset changes as an application processes data. An open dataset changes from one state to another based on either the code in your application, or the built-in behavior of data-related components.
To put a dataset into dsBrowse, dsEdit, or dsInsert states, call the method corresponding to the name of the state. For example, the following code puts IBTable into dsInsert state, accepts user input for a new record, and writes the new record to the database:
IBTable.Insert; { Your application explicitly sets dataset state to Insert }AddressPromptDialog.ShowModal;if AddressPromptDialog.ModalResult := mrOK then
IBTable.Post; { Delphi sets dataset state to Browse on successful completion }else
IBTable.Cancel; {Delphi sets dataset state to Browse on cancel }
This example also illustrates that the state of a dataset automatically changes to dsBrowse when
• The Post method successfully writes a record to the database. (If Post fails, the dataset state remains unchanged.)
• The Cancel method is called.
Some states cannot be set directly. For example, to put a dataset into dsInactive state, set its Active property to False, or call the Close method for the dataset. The following statements are equivalent:
IBTable.Active := False;IBTable.Close;
The remaining states (dsCalcFields, dsCurValue, dsNewValue, dsOldValue, and dsFilter) cannot be set by your application. Instead, the state of the dataset changes automatically to these values as necessary. For example, dsCalcFields is set when a dataset’s OnCalcFields event is called. When the OnCalcFields event finishes, the dataset is restored to its previous state.
Whenever a dataset’s state changes, the OnStateChange event is called for any data source components associated with the dataset. For more information about data source components and OnStateChange, see “Using data sources” in the “Using data controls” chapter of the Delphi Developer’s Guide.
The following sections provide overviews of each state, how and when states are set, how states relate to one another, and where to go for related information, if applicable.

C h a p t e r 1 5 U n d e r s t a n d i n g D a t a s e t s 15-5
D e t e r m i n i n g a n d s e t t i n g d a t a s e t s t a t e s
Deactivating a datasetA dataset is inactive when it is closed. You cannot access records in a closed dataset. At design time, a dataset is closed until you set its Active property to True. At runtime, a dataset is initially closed until an application opens it by calling the Open method, or by setting the Active property to True.
When you open an inactive dataset, its state automatically changes to the dsBrowse state. Figure 15.2 illustrates the relationship between these states and the methods that set them.
Figure 15.2 Relationship of Inactive and Browse states
To make a dataset inactive, call its Close method. You can write BeforeClose and AfterClose event handlers that respond to the Close method for a dataset. For example, if a dataset is in dsEdit or dsInsert modes when an application calls Close, you should prompt the user to post pending changes or cancel them before closing the dataset. The following code illustrates such a handler:
procedure IBTable.VerifyBeforeClose(DataSet: TIBCustomDataSet)begin
if (IBTable.State = dsEdit) or (IBTable.State = dsInsert) thenbegin
if MessageDlg('Post changes before closing?', mtConfirmation, mbYesNo, 0) = mrYes then
IBTable.Post;else
IBTable.Cancel;end;
end;
To associate a procedure with the BeforeClose event for a dataset at design time:
1 Select the table in the data module (or form).
2 Click the Events page in the Object Inspector.
3 Enter the name of the procedure for the BeforeClose event (or choose it from the drop-down list).
Inactive BrowseOpen
Close

15-6 D e v e l o p e r ’ s G u i d e
D e t e r m i n i n g a n d s e t t i n g d a t a s e t s t a t e s
Browsing a datasetWhen an application opens a dataset, the dataset automatically enters dsBrowse state. Browsing enables you to view records in a dataset, but you cannot edit records or insert new records. You mainly use dsBrowse to scroll from record to record in a dataset. For more information about scrolling from record to record, see “Navigating datasets” on page 15-8.
From dsBrowse all other dataset states can be set. For example, calling the Insert or Append methods for a dataset changes its state from dsBrowse to dsInsert (note that other factors and dataset properties, such as CanModify, may prevent this change). For more information about inserting and appending records in a dataset, see “Modifying data” on page 15-9.
Two methods associated with all datasets can return a dataset to dsBrowse state. Cancel ends the current edit, insert, or search task, and always returns a dataset to dsBrowse state. Post attempts to write changes to the database, and if successful, also returns a dataset to dsBrowse state. If Post fails, the current state remains unchanged.
Figure 15.3 illustrates the relationship of dsBrowse both to the other dataset modes you can set in your applications, and the methods that set those modes.
Figure 15.3 Relationship of Browse to other dataset states
Enabling dataset editingA dataset must be in dsEdit mode before an application can modify records. In your code you can use the Edit method to put a dataset into dsEdit mode if the read-only CanModify property for the dataset is True. CanModify is True if the database underlying a dataset permits read and write privileges.
On forms in your application, some data-aware controls can automatically put a dataset into dsEdit state if:
dsBrowse
Open Close
dsInactive
dsEditdsInsert
InsertAppend Edit
Post (success)CancelDelete
Post (success)CancelDelete
Post(unsuccessful)
Post(unsuccessfu

C h a p t e r 1 5 U n d e r s t a n d i n g D a t a s e t s 15-7
D e t e r m i n i n g a n d s e t t i n g d a t a s e t s t a t e s
• The control’s ReadOnly property is False (the default),
• The AutoEdit property of the data source for the control is True, and
• CanModify is True for the dataset.
Important For TIBTable components, if the ReadOnly property is True, CanModify is False, preventing editing of records.
Note Even if a dataset is in dsEdit state, editing records will not succeed for InterBase databases if your application user does not have proper SQL access privileges.
You can return a dataset from dsEdit state to dsBrowse state in code by calling the Cancel, Post, or Delete methods. Cancel discards edits to the current field or record. Post attempts to write a modified record to the dataset, and if it succeeds, returns the dataset to dsBrowse. If Post cannot write changes, the dataset remains in dsEdit state. Delete attempts to remove the current record from the dataset, and if it succeeds, returns the dataset to dsBrowse state. If Delete fails, the dataset remains in dsEdit state.
Data-aware controls for which editing is enabled automatically call Post when a user executes any action that changes the current record (such as moving to a different record in a grid) or that causes the control to lose focus (such as moving to a different control on the form).
For a complete discussion of editing fields and records in a dataset, see “Modifying data” on page 15-9.
Enabling insertion of new recordsA dataset must be in dsInsert mode before an application can add new records. In your code you can use the Insert or Append methods to put a dataset into dsInsert mode if the read-only CanModify property for the dataset is True. CanModify is True if the database underlying a dataset permits read and write privileges.
On forms in your application, the data-aware grid and navigator controls can put a dataset into dsInsert state if
• The control’s ReadOnly property is False (the default),
• The AutoEdit property of the data source for the control is True, and
• CanModify is True for the dataset.
Important For TIBTable components, if the ReadOnly property is True, CanModify is False, preventing editing of records.
Note Even if a dataset is in dsInsert state, inserting records will not succeed for InterBase databases if your application user does not have proper SQL access privileges.

15-8 D e v e l o p e r ’ s G u i d e
N a v i g a t i n g d a t a s e t s
You can return a dataset from dsInsert state to dsBrowse state in code by calling the Cancel, Post, or Delete methods. Delete and Cancel discard the new record. Post attempts to write the new record to the dataset, and if it succeeds, returns the dataset to dsBrowse. If Post cannot write the record, the dataset remains in dsInsert state.
Data-aware controls for which inserting is enabled automatically call Post when a user executes any action that changes the current record (such as moving to a different record in a grid).
For more discussion of inserting and appending records in a dataset, see “Modifying data” on page 15-9.
Calculating fieldsDelphi puts a dataset into dsCalcFields mode whenever an application calls the dataset’s OnCalcFields event handler. This state prevents modifications or additions to the records in a dataset except for the calculated fields the handler is designed to modify. The reason all other modifications are prevented is because OnCalcFields uses the values in other fields to derive values for calculated fields. Changes to those other fields might otherwise invalidate the values assigned to calculated fields.
When the OnCalcFields handler finishes, the dataset is returned to dsBrowse state.
For more information about creating calculated fields and OnCalcFields event handlers, see “Using OnCalcFields” on page 15-10.
Updating recordsWhen performing cached update operations, Delphi may put the dataset into dsNewValue, dsOldValue, or dsCurValue states temporarily. These states indicate that the corresponding properties of a field component (NewValue, OldValue, and CurValue, respectively) are being accessed, usually in an OnUpdateError event handler. Your applications cannot see or set these states. For more information about using cached updates, see Chapter 14, “Working with Cached Updates.”
Navigating datasetsFor information on navigating datasets, refer to “Navigating datasets” in the Delphi Developer’s Guide.
Searching datasetsFor information on searching datasets, refer to “Searching datasets” in the Delphi Developer’s Guide.

C h a p t e r 1 5 U n d e r s t a n d i n g D a t a s e t s 15-9
M o d i f y i n g d a t a
Modifying dataFor information on modifying data, refer to “Modifying data” in the Delphi Developer’s Guide.
Using dataset eventsDatasets have a number of events that enable an application to perform validation, compute totals, and perform other tasks. The events are listed in the following table:
For more information about events for the TIBCustomDataSet component, see the online VCL Reference.
Aborting a methodTo abort a method such as an Open or Insert, call the Abort procedure in any of the Before event handlers (BeforeOpen, BeforeInsert, and so on). For example, the following code requests a user to confirm a delete operation or else it aborts the call to Delete:
procedure TForm1.TableBeforeDelete (Dataset: TDataset)begin
if MessageDlg('Delete This Record?', mtConfirmation, mbYesNoCancel, 0) <> mrYes then
Abort;end;
Table 15.2 Dataset events
Event Description
BeforeOpen, AfterOpen Called before/after a dataset is opened.
BeforeClose, AfterClose Called before/after a dataset is closed.
BeforeInsert, AfterInsert Called before/after a dataset enters Insert state.
BeforeEdit, AfterEdit Called before/after a dataset enters Edit state.
BeforePost, AfterPost Called before/after changes to a table are posted.
BeforeCancel, AfterCancel Called before/after the previous state is canceled.
BeforeDelete, AfterDelete Called before/after a record is deleted.
OnNewRecord Called when a new record is created; used to set default values.
OnCalcFields Called when calculated fields are calculated.

15-10 D e v e l o p e r ’ s G u i d e
U s i n g c a c h e d u p d a t e s
Using OnCalcFieldsThe OnCalcFields event is used to set the values of calculated fields. The AutoCalcFields property determines when OnCalcFields is called. If AutoCalcFields is True, then OnCalcFields is called when
• A dataset is opened.
• Focus moves from one visual component to another, or from one column to another in a data-aware grid control and the current record has been modified.
• A record is retrieved from the database.
OnCalcFields is always called whenever a value in a non-calculated field changes, regardless of the setting of AutoCalcFields.
Important OnCalcFields is called frequently, so the code you write for it should be kept short. Also, if AutoCalcFields is True, OnCalcFields should not perform any actions that modify the dataset (or the linked dataset if it is part of a master-detail relationship), because this can lead to recursion. For example, if OnCalcFields performs a Post, and AutoCalcFields is True, then OnCalcFields is called again, leading to another Post, and so on.
If AutoCalcFields is False, then OnCalcFields is not called when individual fields within a single record are modified.
When OnCalcFields executes, a dataset is in dsCalcFields mode, so you cannot set the values of any fields other than calculated fields. After OnCalcFields is completed, the dataset returns to dsBrowse state.
Using cached updatesCached updates enable you to retrieve data from a database, cache and edit it locally, and then apply the cached updates to the database as a unit. When cached updates are enabled, updates to a dataset (such as posting changes or deleting records) are stored in an internal cache instead of being written directly to the dataset’s underlying table. When changes are complete, your application calls a method that writes the cached changes to the database and clears the cache.
Implementation of cached updating occurs in TIBCustomDataSet. The following table lists the properties, events, and methods for cached updating:
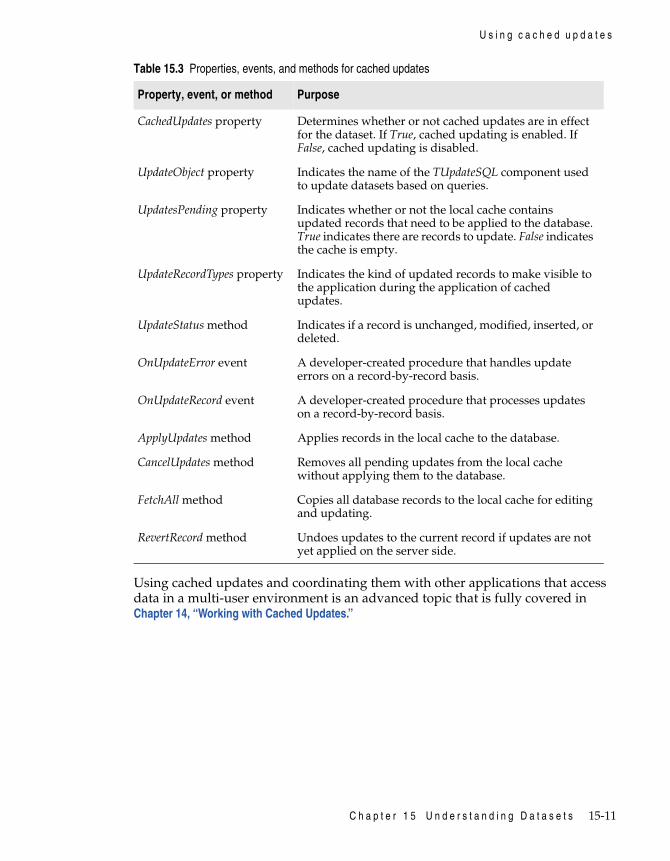
C h a p t e r 1 5 U n d e r s t a n d i n g D a t a s e t s 15-11
U s i n g c a c h e d u p d a t e s
Using cached updates and coordinating them with other applications that access data in a multi-user environment is an advanced topic that is fully covered in Chapter 14, “Working with Cached Updates.”
Table 15.3 Properties, events, and methods for cached updates
Property, event, or method Purpose
CachedUpdates property Determines whether or not cached updates are in effect for the dataset. If True, cached updating is enabled. If False, cached updating is disabled.
UpdateObject property Indicates the name of the TUpdateSQL component used to update datasets based on queries.
UpdatesPending property Indicates whether or not the local cache contains updated records that need to be applied to the database. True indicates there are records to update. False indicates the cache is empty.
UpdateRecordTypes property Indicates the kind of updated records to make visible to the application during the application of cached updates.
UpdateStatus method Indicates if a record is unchanged, modified, inserted, or deleted.
OnUpdateError event A developer-created procedure that handles update errors on a record-by-record basis.
OnUpdateRecord event A developer-created procedure that processes updates on a record-by-record basis.
ApplyUpdates method Applies records in the local cache to the database.
CancelUpdates method Removes all pending updates from the local cache without applying them to the database.
FetchAll method Copies all database records to the local cache for editing and updating.
RevertRecord method Undoes updates to the current record if updates are not yet applied on the server side.

15-12 D e v e l o p e r ’ s G u i d e
U s i n g c a c h e d u p d a t e s

C h a p t e r 1 6 W o r k i n g w i t h T a b l e s 16-1
C h a p t e r
Chapter 16Working with TablesThis chapter describes how to use the TIBTable dataset component in your database applications. A table component encapsulates the full structure of and data in an underlying database table. A table component inherits many of its fundamental properties and methods from TDataSet and TIBCustomDataSet. Therefore, you should be familiar with the general discussion of datasets in Chapter 15, “Understanding Datasets” and before reading about the unique properties and methods of table components discussed here.
Using table componentsA table component gives you access to every row and column in an underlying database table. You can view and edit data in every column and row of a table. You can work with a range of rows in a table, and you can filter records to retrieve a subset of all records in a table based on filter criteria you specify. You can search for records, copy, rename, or delete entire tables, and create master/detail relationships between tables.
Note A table component always references a single database table. If you need to access multiple tables with a single component, or if you are only interested in a subset of rows and columns in one or more tables, you should use a TIBQuery or TIBDataSet component instead of a TIBTable component. For more information about TIBQuery and TIBDataSet components, see Chapter 17, “Working with Queries.”
Setting up a table componentThe following steps are general instructions for setting up a table component at design time. There may be additional steps you need to tailor a table’s properties to the requirements of your application.

16-2 D e v e l o p e r ’ s G u i d e
S e t t i n g u p a t a b l e c o m p o n e n t
To create a table component1 Place a table component from the InterBase page of the Component palette in a
data module or on a form, and set its Name property to a unique value appropriate to your application.
2 Set the Database property to the name of the database component to access.
3 Set the Transaction property to the name of the transaction component.
4 Set the DatabaseName property in the Database component to the name of a the database containing the table.
5 Set the TableName property to the name of the table in the database. You can select tables from the drop-down list if the Database and Transaction properties are already specified, and if the Database and Transaction components are connected to the server.
6 Place a data source component in the data module or on the form, and set its DataSet property to the name of the table component. The data source component is used to pass a result set from the table to data-aware components for display.
To access the data encapsulated by a table component1 Place a data source component from the Data Access page of the Component
palette in the data module or form, and set its DataSet property to the name of the table component.
2 Place a data-aware control, such as TDBGrid, on a form, and set the control’s DataSource property to the name of the data source component placed in the previous step.
3 Set the Active property of the table component to True.
Tip For more information about database components, see Chapter 10, “Connecting to Databases.”
Specifying a table nameThe TableName property specifies the table in a database to access with the table component. To specify a table, follow these steps:
1 Set the table’s Active property to False, if necessary.
2 Set the DatabaseName property of the database component to a directory path.
Note You can use the Database Editor to set the database location, login name, password, SQL role, and switch the login prompt on and off. To access the Database Component Editor, right click on the database component and choose Database Editor from the drop-down menu.

C h a p t e r 1 6 W o r k i n g w i t h T a b l e s 16-3
S e t t i n g u p a t a b l e c o m p o n e n t
3 Set the TableName property to the table to access. You are prompted to log in to the database. At design time you can choose from valid table names in the drop-down list for the TableName property in the Object Inspector. At runtime, you must specify a valid name in code.
Once you specify a valid table name, you can set the table component’s Active property to True to connect to the database, open the table, and display and edit data.
At runtime, you can set or change the table associated with a table component by:
• Setting Active to False.
• Assigning a valid table name to the TableName property.
For example, the following code changes the table name for the OrderOrCustTable table component based on its current table name:
with OrderOrCustTable dobegin
Active := False; {Close the table}if TableName = 'CUSTOMER.DB' then
TableName := 'ORDERS.DB'else
TableName := 'CUSTOMER.DB';Active := True; {Reopen with a new table}
end;
Opening and closing a tableTo view and edit a table’s data in a data-aware control such as TDBGrid, open the table. There are two ways to open a table. You can set its Active property to True, or you can call its Open method. Opening a table puts it into dsBrowse state and displays data in any active controls associated with the table’s data source.
To end display and editing of data, or to change the values for a table component’s fundamental properties (for example: Database, TableName, and TableType), first post or discard any pending changes. If cached updates are enabled, call the ApplyUpdates method to write the posted changes to the database. Finally, close the table.
There are two ways to close a table. You can set its Active property to False, or you can call its Close method. Closing a table puts the table into dsInactive state. Active controls associated with the table’s data source are cleared.

16-4 D e v e l o p e r ’ s G u i d e
C o n t r o l l i n g r e a d / w r i t e a c c e s s t o a t a b l e
Controlling read/write access to a tableBy default when a table is opened, it requests read and write access for the underlying database table. Depending on the characteristics of the underlying database table, the requested write privilege may not be granted (for example, when you request write access to a SQL table on a remote server and the server restricts the table’s access to read only).
The ReadOnly property for table components is the only property that can affect an application’s read and write access to a table.
ReadOnly determines whether or not a user can both view and edit data. When ReadOnly is False (the default), a user can both view and edit data. To restrict a user to viewing data, set ReadOnly to True before opening a table.
Searching for recordsYou can search for specific records in a table in various ways. The most flexible and preferred way to search for a record is to use the generic search methods Locate and Lookup. These methods enable you to search on any type of fields in any table, whether or not they are indexed or keyed.
• Locate finds the first row matching a specified set of criteria and moves the cursor to that row.
• Lookup returns values from the first row that matches a specified set of criteria, but does not move the cursor to that row.
You can use Locate and Lookup with any kind of dataset, not just TIBTable. For a complete discussion of Locate and Lookup, see Chapter 15, “Understanding Datasets.”
Table components also support the Goto and Find methods. While these methods are documented here to allow you to work with legacy applications, you should always use Lookup and Locate in your new applications. You may see performance gains in existing applications if you convert them to use the new methods.
Sorting recordsAn index determines the display order of records in a table. In general, records appear in ascending order based on a primary index. This default behavior does not require application intervention. If you want a different sort order, however, you must specify either
• An alternate index.
• A list of columns on which to sort.
Specifying a different sort order requires the following steps:

C h a p t e r 1 6 W o r k i n g w i t h T a b l e s 16-5
S p e c i f y i n g f i e l d s w i t h I n d e x F i e l d N a m e s
1 Determining available indexes.
2 Specifying the alternate index or column list to use.
Retrieving a list of available indexes with GetIndexNamesAt runtime, your application can call the GetIndexNames method to retrieve a list of available indexes for a table. GetIndexNames returns a string list containing valid index names. For example, the following code determines the list of indexes available for the CustomersTable dataset:
varIndexList: TList;
{...}CustomersTable.GetIndexNames(IndexList);
Specifying an alternative index with IndexNameTo specify that a table should be sorted using an alternative index, specify the index name in the table component’s IndexName property. At design time you can specify this name in the Object Inspector, and at runtime you can access the property in your code. For example, the following code sets the index for CustomersTable to CustDescending:
CustomersTable.IndexName := 'CustDescending';
Specifying sort order for SQL tablesIn SQL, sort order of rows is determined by the ORDER BY clause. You can specify the index used by this clause either with the
• IndexName property, to specify an existing index, or
• IndexFieldNames property, to create a pseudo-index based on a subset of columns in the table.
IndexName and IndexFieldNames are mutually exclusive. Setting one property clears values set for the other.
Specifying fields with IndexFieldNamesIndexFieldNames is a string list property. To specify a sort order, list each column name to use in the order it should be used, and delimit the names with semicolons. Sorting is by ascending order only.
The following code sets the sort order for PhoneTable based on LastName, then FirstName:
PhoneTable.IndexFieldNames := 'LastName;FirstName';

16-6 D e v e l o p e r ’ s G u i d e
W o r k i n g w i t h a s u b s e t o f d a t a
Examining the field list for an indexWhen your application uses an index at runtime, it can examine the
• IndexFieldCount property, to determine the number of columns in the index.
• IndexFields property, to examine a list of column names that comprise the index.
IndexFields is a string list containing the column names for the index. The following code fragment illustrates how you might use IndexFieldCount and IndexFields to iterate through a list of column names in an application:
varI: Integer;ListOfIndexFields: array[0 to 20} of string;
beginwith CustomersTable do
beginfor I := 0 to IndexFieldCount - 1 do
ListOfIndexFields[I] := IndexFields[I];end;
end;
Note IndexFieldCount is not valid for a base table opened on an expression index.
Working with a subset of dataProduction tables can be huge, so applications often need to limit the number of rows with which they work. For table components use filters to limit records used by an application. Filters can be used with any kind of dataset, including TIBDataSet, TIBTable, TIBQuery, and TIBStoredProc components. Because they apply to all datasets, you can find a full discussion of using filters in Chapter 15, “Understanding Datasets.”
Deleting all records in a tableTo delete all rows of data in a table, call a table component’s EmptyTable method at runtime. For SQL tables, this method only succeeds if you have DELETE privileges for the table. For example, the following statement deletes all records in a dataset:
PhoneTable.EmptyTable;
Important Data you delete with EmptyTable is gone forever.

C h a p t e r 1 6 W o r k i n g w i t h T a b l e s 16-7
D e l e t i n g a t a b l e
Deleting a tableAt design time, to delete a table from a database, right-click the table component and select Delete Table from the context menu. The Delete Table menu pick will only be present if the table component represents an existing database table (the Database and TableName properties specify an existing table).
To delete a table at runtime, call the table component’s DeleteTable method. For example, the following statement removes the table underlying a dataset:
CustomersTable.DeleteTable;
Important When you delete a table with DeleteTable, the table and all its data are gone forever.
Renaming a tableYou can rename a table by typing over the name of an existing table next to the TableName property in the Object Inspector. When you change the TableName property, a dialog appears asking you if you want to rename the table. At this point, you can either choose to rename the table, or you can cancel the operation, changing the TableName property (for example, to create a new table) without changing the name of the table represented by the old value of TableName.
Creating a tableYou can create new database tables at design time or at runtime. The Create Table command (at design time) or the CreateTable method (at runtime) provides a way to create tables without requiring SQL knowledge. They do, however, require you to be intimately familiar with the properties, events, and methods common to dataset components, TIBTable in particular. This is so that you can first define the table you want to create by doing the following:
• Set the Database property to the database that will contain the new table.
• Set the TableName property to the name of the new table.
• Add field definitions to describe the fields in the new table. At design time, you can add the field definitions by double-clicking the FieldDefs property in the Object Inspector to bring up the collection editor. Use the collection editor to add, remove, or change the properties of the field definitions. At runtime, clear any existing field definitions and then use the AddFieldDef method to add each new field definition. For each new field definition, set the properties of the TFieldDef object to specify the desired attributes of the field.
• Optionally, add index definitions that describe the desired indexes of the new table. At design time, you can add index definitions by double-clicking the IndexDefs property in the Object Inspector to bring up the collection editor. Use

16-8 D e v e l o p e r ’ s G u i d e
C r e a t i n g a t a b l e
the collection editor to add, remove, or change the properties of the index definitions. At runtime, clear any existing index definitions, and then use the AddIndexDef method to add each new index definition. For each new index definition, set the properties of the TIndexDef object to specify the desired attributes of the index.
Note At design time, you can preload the field definitions and index definitions of an existing table into the FieldDefs and IndexDefs properties, respectively. Set the Database and TableName properties to specify the existing table. Right click the table component and choose Update Table Definition. This automatically sets the values of the FieldDefs and IndexDefs properties to describe the fields and indexes of the existing table. Next, reset the Database and TableName to specify the table you want to create, cancelling any prompts to rename the existing table. If you want to store these definitions with the table component (for example, if your application will be using them to create tables on user’s systems), set the StoreDefs property to True.
Once the table is fully described, you are ready to create it. At design time, right-click the table component and choose Create Table. At runtime, call the CreateTable method to generate the specified table.
Important If you create a table that duplicates the name of an existing table, the existing table and all its data are overwritten by the newly created table. The old table and its data cannot be recovered.
The following code creates a new table at runtime and associates it with the employee.gdb database. Before it creates the new table, it verifies that the table name provided does not match the name of an existing table:
varNewTable: TIBTable;NewIndexOptions: TIndexOptions;TableFound: Boolean;
beginNewTable := TIBTable.Create;NewIndexOptions := [ixPrimary, ixUnique];with NewTable dobegin
Active := False;Database := 'C:\Interbase\Examples\Database\employee.gdb';TableName := Edit1.Text;TableType := ttDefault;FieldDefs.Clear;FieldDefs.Add(Edit2.Text, ftInteger, 0, False);FieldDefs.Add(Edit3.Text, ftInteger, 0, False);IndexDefs.Clear;IndexDefs.Add('PrimaryIndex’, Edit2.Text, NewIndexOptions);
end;{Now check for prior existence of this table}TableFound := FindTable(Edit1.Text); {code for FindTable not shown}if TableFound = True then
C h a p t e r 1 6 W o r k i n g w i t h T a b l e s 16-9
S y n c h r o n i z i n g t a b l e s l i n k e d t o t h e s a m e d a t a b a s e t a b l e
if MessageDlg('Overwrite existing table ' + Edit1.Text + '?', mtConfirmation,mbYesNo, 0) = mrYes then
TableFound := False;if not TableFound then
CreateTable; { create the table}end;
end;
Synchronizing tables linked to the same database tableIf more than one table component is linked to the same database table through their Database and TableName properties and the tables do not share a data source component, then each table has its own view on the data and its own current record. As users access records through each table component, the components’ current records will differ.
You can force the current record for each of these table components to be the same with the GotoCurrent method. GotoCurrent sets its own table’s current record to the current record of another table component. For example, the following code sets the current record of CustomerTableOne to be the same as the current record of CustomerTableTwo:
CustomerTableOne.GotoCurrent(CustomerTableTwo);
Tip If your application needs to synchronize table components in this manner, put the components in a data module and include the header for the data module in each unit that accesses the tables.
If you must synchronize table components on separate forms, you must include one form’s header file in the source unit of the other form, and you must qualify at least one of the table names with its form name.
For example:
CustomerTableOne.GotoCurrent(Form2.CustomerTableTwo);
Creating master/detail formsA table component’s MasterSource and MasterFields properties can be used to establish one-to-many relationships between two tables.
The MasterSource property is used to specify a data source from which the table will get data for the master table. For instance, if you link two tables in a master/detail relationship, then the detail table can track the events occurring in the master table by specifying the master table’s data source component in this property.

16-10 D e v e l o p e r ’ s G u i d e
C r e a t i n g m a s t e r / d e t a i l f o r m s
The MasterFields property specifies the column(s) common to both tables used to establish the link. To link tables based on multiple column names, use a semicolon delimited list:
Table1.MasterFields := 'OrderNo;ItemNo';
To help create meaningful links between two tables, you can use the Field Link designer. For more information about the Field Link designer, see the online Delphi User’s Guide.
Building an example master/detail formThe following steps create a simple form in which a user can scroll through customer records and display all orders for the current customer. The master table is the CustomersTable table, and the detail table is SalesTable.
1 Place two TIBTable, TIBDatabase, TIBTransaction, and TDataSource components in a data module.
2 Set the properties of the first TIBDatabase component as follows:
• Name: CustDatabase
• DefaultTransaction: CustTransaction
3 Using the Database Component Editor, set the Database Name to C:\Program Files\Borland\InterBase\examples\Database\employee.gdb, set the User Name to SYSDBA, set the Password to “masterkey”, and uncheck the Login Prompt box.
4 Set the properties of the first TIBTransaction component as follows:
• DefaultDatabase: CustDatabase
• Name: CustTransaction
5 Set the properties of the first TIBTable component as follows:
• Database: CustDatabase
• Transaction: CustTransaction
• TableName: CUSTOMER
• Name: CustomersTable
6 Set the properties of the second TIBDatabase component as follows:
• Name: SalesDatabase
• DefaultTransaction: SalesTransaction
7 Using the Database Component Editor, set the Database Name to C:\Program Files\Borland\InterBase\examples\Database\employee.gdb, set the User Name to SYSDBA, set the Password to “masterkey”, and uncheck the Login Prompt box.

C h a p t e r 1 6 W o r k i n g w i t h T a b l e s 16-11
C r e a t i n g m a s t e r / d e t a i l f o r m s
8 Set the properties of the second TIBTransaction component as follows:
• DefaultDatabase: SalesDatabase
• Name: SalesTransaction
9 Set the properties of the second TIBTable component as follows:
• Database: SalesDatabase
• Transaction: SalesTransaction
• TableName: SALES
• Name: SalesTable
10 Set the properties of the first TDataSource component as follows:
• Name: CustSource
• DataSet: CustomersTable
11 Set the properties of the second TDataSource component as follows:
• Name: SalesSource
• DataSet: SalesTable
12 Place two TDBGrid components on a form.
13 Choose File | Use Unit to specify that the form should use the data module.
14 Set the DataSource property of the first grid component to “DataModule2.CustSource”, and set the DataSource property of the second grid to “DataModule2.SalesSource”.
15 Set the MasterSource property of SalesTable to “CustSource”. This links the CUSTOMER table (the master table) to the ORDERS table (the detail table).
16 Double-click the MasterFields property value box in the Object Inspector to invoke the Field Link Designer to set the following properties:
• Choose CustNo from the IndexFieldNames property’s drop-down list to link the two tables by the CustNo field.
• Select CustNo in both the Detail Fields and Master Fields field lists.
• Click the Add button to add this join condition. In the Joined Fields list,“CustNo -> CustNo” appears.
• Choose OK to commit your selections and exit the Field Link Designer.
• Set the Active properties of CustomersTable and SalesTable to True to display data in the grids on the form.
• Compile and run the application.
16-12 D e v e l o p e r ’ s G u i d e
C r e a t i n g m a s t e r / d e t a i l f o r m s
If you run the application now, you will see that the tables are linked together, and that when you move to a new record in the CUSTOMER table, you see only those records in the SALES table that belong to the current customer.

C h a p t e r 1 7 W o r k i n g w i t h Q u e r i e s 17-1
C h a p t e r
Chapter 17Working with QueriesThis chapter describes the TIBDataSet and TIBQuery dataset components which enable you to use SQL statements to access data. It assumes you are familiar with the general discussion of datasets and data sources in Chapter 15, “Understanding Datasets.”
A query component encapsulates a SQL statement that is used in a client application to retrieve, insert, update, and delete data from one or more database tables. Query components can be used with remote database servers (Client/Server Suite and Enterprise edition only) and with ODBC-compliant databases.
Queries for desktop developersAs a desktop developer you are already familiar with the basic table, record, and field paradigm used by Delphi and InterBase Express. You feel very comfortable using a TIBTable component to gain access to every field in every data record in a dataset. You know that when you set a table’s TableName property, you specify the database table to access.
Chances are you have also used a TIBTable’s range methods and filter property to limit the number of records available at any given time in your applications. Applying a range temporarily limits data access to a block of contiguously indexed records that fall within prescribed boundary conditions, such as returning all records for employees whose last names are greater than or equal to “Jones” and less than or equal to “Smith.” Setting a filter temporarily restricts data access to a set of records that is usually non-contiguous and that meets filter criteria, such as returning only those customer records that have a California mailing address.

17-2 D e v e l o p e r ’ s G u i d e
Q u e r i e s f o r s e r v e r d e v e l o p e r s
A query behaves in many ways very much like a table filter, except that you use the query component’s SQL property (and sometimes the Params property) to identify the records in a dataset to retrieve, insert, delete, or update. In some ways a query is even more powerful than a filter because it lets you access:
• More than one table at a time (called a “join” in SQL).
• A specified subset of rows and columns in its underlying table(s), rather than always returning all rows and columns. This improves both performance and security. Memory is not wasted on unnecessary data, and you can prevent access to fields a user should not view or modify.
Queries can be verbatim, or they can contain replaceable parameters. Queries that use parameters are called parameterized queries. When you use parameterized queries, the actual values assigned to the parameters are inserted into the query before you execute, or run, the query. Using parameterized queries is very flexible, because you can change a user’s view of and access to data on the fly at runtime without having to alter the SQL statement.
Most often you use queries to select the data that a user should see in your application, just as you do when you use a table component. Queries, however, can also perform update, insert, and delete operations as well as retrieving records for display. When you use a query to perform insert, update, and delete operations, the query ordinarily does not return records for viewing.
To learn more about using the SQL property to write a SQL statement, see “Specifying the SQL statement to execute” on page 17-4. To learn more about using parameters in your SQL statements, see “Setting parameters” on page 17-7. To learn about executing a query, see “Executing a query” on page 17-12 of the InterBase Language Reference.
Queries for server developersAs a server developer you are already familiar with SQL and with the capabilities of your database server. To you a query is the SQL statement you use to access data. You know how to use and manipulate this statement and how to use optional parameters with it.
The SQL statement and its parameters are the most important parts of a query component. The query component’s SQL property is used to provide the SQL statement to use for data access, and the component’s Params property is an optional array of parameters to bind into the query. However, a query component is much more than a SQL statement and its parameters. A query component is also the interface between your client application and the server.

C h a p t e r 1 7 W o r k i n g w i t h Q u e r i e s 17-3
W h e n t o u s e T I B D a t a S e t , T I B Q u e r y , a n d T I B S Q L
A client application uses the properties and methods of a query component to manipulate a SQL statement and its parameters, to specify the database to query, to prepare and unprepare queries with parameters, and to execute the query. A query component’s methods communicates with the database server, usually through a SQL Links driver for Delphi Client/Server and Delphi Enterprise.
To learn more about using the SQL property to write a SQL statement, see “Specifying the SQL statement to execute” on page 17-4. To learn more about using parameters in your SQL statements, see “Setting parameters” on page 17-7. To learn about preparing a query, see “Preparing a query” on page 17-13, and to learn more about executing a query, see “Executing a query” on page 17-12.
When to use TIBDataSet, TIBQuery, and TIBSQLBoth TIBDataSet, TIBQuery, and TIBSQL can execute any valid dynamic SQL statement. However, when you use TIBSQL to execute SELECT statements, its results are unbuffered and therefore unidirectional. TIBDataSet and TIBQuery, on the other hand, are intended primarily for use with SELECT statements. They buffer the result set, so that it is completely scrollable.
Use TIBDataSet or TIBQuery when you require use of data-aware components or a scrollable result set. In any other case, it is probably best to use TIBSQL, which requires much less overhead.
Using a query component: an overviewTo use a query component in an application, follow these steps at design time:
1 Place a query component from the InterBase tab of the Component palette in a data module, and set its Name property appropriately for your application.
2 Set the Database property of the component to the name of the TIBDatabase component to query.
3 Set the Transaction property of the component to the name of the TIBTransaction component to query.
4 Specify a SQL statement in the SQL property of the component, and optionally specify any parameters for the statement in the Params property. For more information, see “Specifying the SQL property at design time” on page 17-5.
5 If the query data is to be used with visual data controls, place a data source component from the Data Access tab of the Component palette in the data module, and set its DataSet property to the name of the query component. The data source component is used to return the results of the query (called a result set) from the query to data-aware components for display. Connect data-aware components to the data source using their DataSource and DataField properties.

17-4 D e v e l o p e r ’ s G u i d e
S p e c i f y i n g t h e S Q L s t a t e m e n t t o e x e c u t e
6 Activate the query component. For queries that return a result set, use the Active property or the Open method. For queries that only perform an action on a table and return no result set, use the ExecSQL method.
Executing the queryTo execute a query for the first time at runtime, follow these steps:
1 Close the query component.
2 Provide a SQL statement in the SQL property if you did not set the SQL property at design time, or if you want to change the SQL statement already provided. To use the design-time statement as is, skip this step. For more information about setting the SQL property, see “Specifying the SQL statement to execute” on page 17-4.
3 Set parameters and parameter values in the Params property either directly or by using the ParamByName method. If a query does not contain parameters, or the parameters set at design time are unchanged, skip this step. For more information about setting parameters, see “Setting parameters” on page 17-7.
4 Call Prepare to bind parameter values into the query. Calling Prepare is optional, though highly recommended. For more information about preparing a query, see “Preparing a query” on page 17-13.
5 Call Open for queries that return a result set, or call ExecSQL for queries that do not return a result set. For more information about opening and executing a query see “Executing a query” on page 17-12.
After you execute a query for the first time, then as long as you do not modify the SQL statement, an application can repeatedly close and reopen or re-execute a query without preparing it again. For more information about reusing a query, see “Executing a query” on page 17-12.
Specifying the SQL statement to executeUse the SQL property to specify the SQL query statement to execute. At design time a query is prepared and executed automatically when you set the query component’s Active property to True. At runtime, a query is prepared with a call to Prepare, and executed when the application calls the component’s Open or ExecSQL methods.
The SQL property is a TStrings object, which is an array of text strings and a set of properties, events, and methods that manipulate them. The strings in SQL are automatically concatenated to produce the SQL statement to execute. You can provide a statement in as few or as many separate strings as you desire. One advantage to using a series of strings is that you can divide the SQL statement into logical units (for example, putting the WHERE clause for a SELECT statement into its own string), so that it is easier to modify and debug a query.

C h a p t e r 1 7 W o r k i n g w i t h Q u e r i e s 17-5
S p e c i f y i n g t h e S Q L s t a t e m e n t t o e x e c u t e
The SQL statement can be a query that contains hard-coded field names and values, or it can be a parameterized query that contains replaceable parameters that represent field values that must be bound into the statement before it is executed. For example, this statement is hard-coded:
SELECT * FROM Customer WHERE CustNo = 1231
Hard-coded statements are useful when applications execute exact, known queries each time they run. At design time or runtime you can easily replace one hard-code query with another hard-coded or parameterized query as needed. Whenever the SQL property is changed the query is automatically closed and unprepared.
Note In queries using local SQL, when column names in a query contain spaces or special characters, the column name must be enclosed in quotes and must be preceded by a table reference and a period. For example, BIOLIFE.”Species Name”.
A parameterized query contains one or more placeholder parameters, application variables that stand in for comparison values such as those found in the WHERE clause of a SELECT statement. Using parameterized queries enables you to change the value without rewriting the application. Parameter values must be bound into the SQL statement before it is executed for the first time. Query components do this automatically for you even if you do not explicitly call the Prepare method before executing a query.
This statement is a parameterized query:
SELECT * FROM Customer WHERE CustNo = :Number
The variable Number, indicated by the leading colon, is a parameter that fills in for a comparison value that must be provided at runtime and that may vary each time the statement is executed. The actual value for Number is provided in the query component’s Params property.
Tip It is a good programming practice to provide variable names for parameters that correspond to the actual name of the column with which it is associated. For example, if a column name is “Number,” then its corresponding parameter would be “:Number”. Using matching names ensures that if a query uses its DataSource property to provide values for parameters, it can match the variable name to valid field names.
Specifying the SQL property at design timeYou can specify the SQL property at design time using the String List editor. To invoke the String List editor for the SQL property:
• Double-click on the SQL property value column, or
• Click its ellipsis button.

17-6 D e v e l o p e r ’ s G u i d e
S p e c i f y i n g t h e S Q L s t a t e m e n t t o e x e c u t e
You can enter a SQL statement in as many or as few lines as you want. Entering a statement on multiple lines, however, makes it easier to read, change, and debug. Choose OK to assign the text you enter to the SQL property.
Normally, the SQL property can contain only one complete SQL statement at a time, although these statements can be as complex as necessary (for example, a SELECT statement with a WHERE clause that uses several nested logical operators such as AND and OR). InterBase supports “batch” syntax so you can enter multiple statements in the SQL property.
Note With the Client/Server Suite or Enterprise edition, you can also use the SQL Builder to construct a query based on a visible representation of tables and fields in a database. To use the SQL Builder, select a query component, right-click it to invoke the context menu, and choose Graphical Query Editor. To learn how to use the SQL Builder, open it and use its online help.
Specifying a SQL statement at runtimeThere are three ways to set the SQL property at runtime. An application can set the SQL property directly, it can call the SQL property’s LoadFromFile method to read a SQL statement from a file, or a SQL statement in a string list object can be assigned to the SQL property.
Setting the SQL property directlyTo directly set the SQL property at runtime,
1 Call Close to deactivate the query. Even though an attempt to modify the SQL property automatically deactivates the query, it is a good safety measure to do so explicitly.
2 If you are replacing the whole SQL statement, call the Clear method for the SQL property to delete its current SQL statement.
3 If you are building the whole SQL statement from nothing or adding a line to an existing statement, call the Add method for the SQL property to insert and append one or more strings to the SQL property to create a new SQL statement. If you are modifying an existing line use the SQL property with an index to indicate the line affected, and assign the new value.
4 Call Open or ExecSQL to execute the query.
The following code illustrates building an entire SQL statement from nothing.
with CustomerQuery do beginClose; { close the query if it’s active }with SQL do begin
Clear; { delete the current SQL statement, if any }Add(‘SELECT * FROM Customer’); { add first line of SQL... }Add(‘WHERE Company = “Sight Diver”’); { ... and second line }
end;Open; { activate the query }

C h a p t e r 1 7 W o r k i n g w i t h Q u e r i e s 17-7
S e t t i n g p a r a m e t e r s
end;
The code below demonstrates modifying only a single line in an existing SQL statement. In this case, the WHERE clause already exists on the second line of the statement. It is referenced via the SQL property using an index of 1.
CustomerQuery.SQL[1] := ‘WHERE Company = “Kauai Dive Shoppe“’;
Note If a query uses parameters, you should also set their initial values and call the Prepare method before opening or executing a query. Explicitly calling Prepare is most useful if the same SQL statement is used repeatedly; otherwise it is called automatically by the query component.
Loading the SQL property from a fileYou can also use the LoadFromFile method to assign a SQL statement in a text file to the SQL property. The LoadFromFile method automatically clears the current contents of the SQL property before loading the new statement from file. For example:
CustomerQuery.Close;CustomerQuery.SQL.LoadFromFile(‘c:\orders.txt’);CustomerQuery.Open;
Note If the SQL statement contained in the file is a parameterized query, set the initial values for the parameters and call Prepare before opening or executing the query. Explicitly calling Prepare is most useful if the same SQL statement is used repeatedly; otherwise it is called automatically by the query component.
Loading the SQL property from string list objectYou can also use the Assign method of the SQL property to copy the contents of a string list object into the SQL property. The Assign method automatically clears the current contents of the SQL property before copying the new statement. For example, copying a SQL statement from a TMemo component:
CustomerQuery.Close;CustomerQuery.SQL.Assign(Memo1.Lines);CustomerQuery.Open;
Note If the SQL statement is a parameterized query, set the initial values for the parameters and call Prepare before opening or executing the query. Explicitly calling Prepare is most useful if the same SQL statement is used repeatedly; otherwise it is called automatically by the query component.
Setting parametersA parameterized SQL statement contains parameters, or variables, the values of which can be varied at design time or runtime. Parameters can replace data values, such as those used in a WHERE clause for comparisons, that appear in a SQL

17-8 D e v e l o p e r ’ s G u i d e
S e t t i n g p a r a m e t e r s
statement. Ordinarily, parameters stand in for data values passed to the statement. For example, in the following INSERT statement, values to insert are passed as parameters:
INSERT INTO Country (Name, Capital, Population)VALUES (:Name, :Capital, :Population)
In this SQL statement, :name, :capital, and :population are placeholders for actual values supplied to the statement at runtime by your application. Before a parameterized query is executed for the first time, your application should call the Prepare method to bind the current values for the parameters to the SQL statement. Binding means that the server allocates resources for the statement and its parameters that improve the execution speed of the query.
with IBQuery1 do beginClose;Unprepare;ParamByName(‘Name’).AsString := ‘Belize’;ParamByName(‘Capital’).AsString := ‘Belmopan’;ParamByName(‘Population’).AsInteger := ‘240000’;Prepare;Open;
end;
Supplying parameters at design timeAt design time, parameters in the SQL statement appear in the parameter collection editor. To access the TParam objects for the parameters, invoke the parameter collection editor, select a parameter, and access the TParam properties in the Object Inspector. If the SQL statement does not contain any parameters, no TParam objects are listed in the collection editor. You can only add parameters by writing them in the SQL statement.
To access parameters:
1 Select the query component.
2 Click on the ellipsis button for the Params property in Object Inspector.
3 In the parameter collection editor, select a parameter.
4 The TParam object for the selected parameter appears in the Object Inspector.
5 Inspect and modify the properties for the TParam in the Object Inspector.
For queries that do not already contain parameters (the SQL property is empty or the existing SQL statement has no parameters), the list of parameters in the collection editor dialog is empty. If parameters are already defined for a query, then the parameter editor lists all existing parameters.

C h a p t e r 1 7 W o r k i n g w i t h Q u e r i e s 17-9
S e t t i n g p a r a m e t e r s
Note The TIBQuery component shares the TParam object and its collection editor with a number of different components. While the right-click context menu of the collection editor always contains the Add and Delete options, they are never enabled for TIBQuery parameters. The only way to add or delete TIBQuery parameters is in the SQL statement itself.
As each parameter in the collection editor is selected, the Object Inspector displays the properties and events for that parameter. Set the values for parameter properties and methods in the Object Inspector.
The DataType property lists the data type for the parameter selected in the editing dialog. Initially the type will be ftUnknown. You must set a data type for each parameter.
The ParamType property lists the type of parameter selected in the editing dialog. Initially the type will be ptUnknown. You must set a type for each parameter.
Use the Value property to specify a value for the selected parameter at design time. This is not mandatory when parameter values are supplied at runtime. In these cases, leave Value blank.
Supplying parameters at runtimeTo create parameters at runtime, you can use the:
• ParamByName method to assign values to a parameter based on its name.
• Params property to assign values to a parameter based on the parameter’s ordinal position within the SQL statement.
• Params.ParamValues property to assign values to one or more parameters in a single command line, based on the name of each parameter set. This method uses variants and avoids the need to cast values.
Note In dialect 3, parameter names passed to functions are case-sensitive.
For all of the examples below, assume the SQL property contains the SQL statement below. All three parameters used are of data type ftString.
INSERT INTO "COUNTRY.DB"(Name, Capital, Continent)VALUES (:Name, :Capital, :Continent)
The following code uses ParamByName to assign the text of an edit box to the Capital parameter:
IBQuery1.ParamByName(‘Capital’).AsString := Edit1.Text;
The same code can be rewritten using the Params property, using an index of 1 (the Capital parameter is the second parameter in the SQL statement):
IBQuery1.Params[1].AsString := Edit1.Text;

17-10 D e v e l o p e r ’ s G u i d e
S e t t i n g p a r a m e t e r s
The command line below sets all three parameters at once, using the Params.ParamValues property:
IBQuery1.Params.ParamValues[‘Country;Capital;Continent’] :=VarArrayOf([Edit1.Text, Edit2.Text, Edit3.Text]);
Using a data source to bind parametersIf parameter values for a parameterized query are not bound at design time or specified at runtime, the query component attempts to supply values for them based on its DataSource property. DataSource specifies a different table or query component that the query component can search for field names that match the names of unbound parameters. This search dataset must be created and populated before you create the query component that uses it. If matches are found in the search dataset, the query component binds the parameter values to the values of the fields in the current record pointed to by the data source.
You can create a simple application to understand how to use the DataSource property to link a query in a master-detail form. Suppose the data module for this application is called LinkModule, and that it contains a query component called SalesQuery that has the following SQL property:
SELECT Cust_No, Po_Number, Order_DateFROM SalesWHERE Cust_No = :Cust_No
The LinkModule data module also contains:
• A TIBDatabase component named SalesDatabase linked to the employee.gdb database, SalesQuery and SalesTransaction.
• A TIBTransaction component named SalesTransaction linked to SalesQuery and SalesDatabase.
• A TIBTable dataset component named CustomersTable linked to the CUSTOMER table, CustomersDatabase and CustomersTransaction.
• A TIBDatabase component named CustomersDatabase linked to the employee.gdb database, CustomersTable and CustomersTransaction.
• A TIBTransaction component named CustomersTransaction linked to CustomersTable and CustomersDatabase.
• A TDataSource component named SalesSource. The DataSet property of SalesSource points to SalesQuery.
• A TDataSource named CustomersSource linked to CustomersTable. The DataSource property of the OrdersQuery component is also set to CustomersSource. This is the setting that makes OrdersQuery a linked query.
Suppose, too, that this application has a form, named LinkedQuery that contains two data grids, a Customers Table grid linked to CustomersSource, and an SalesQuery grid linked to SalesSource.

C h a p t e r 1 7 W o r k i n g w i t h Q u e r i e s 17-11
S e t t i n g p a r a m e t e r s
Figure 17.1 illustrates how this application appears at design time.
Figure 17.1 Sample master/detail query form and data module at design time
Note If you build this application, create the table component and its data source before creating the query component.
If you compile this application, at runtime the :Cust_No parameter in the SQL statement for SalesQuery is not assigned a value, so SalesQuery tries to match the parameter by name against a column in the table pointed to by CustomersSource. CustomersSource gets its data from CustomersTable, which, in turn, derives its data from the CUSTOMER table. Because CUSTOMER contains a column called “Cust_No,” the value from the Cust_No field in the current record of the CustomersTable dataset is assigned to the :Cust_No parameter for the SalesQuery SQL statement. The grids are linked in a master-detail relationship. At runtime, each time you select a different record in the Customers Table grid, the SalesQuery SELECT statement executes to retrieve all orders based on the current customer number.

17-12 D e v e l o p e r ’ s G u i d e
E x e c u t i n g a q u e r y
Executing a queryAfter you specify a SQL statement in the SQL property and set any parameters for the query, you can execute the query. When a query is executed, the server receives and processes SQL statements from your application. If the query is against local tables, the SQL engine processes the SQL statement and, for a SELECT query, returns data to the application.
Note Before you execute a query for the first time, you may want to call the Prepare method to improve query performance. Prepare initializes the database server, each of which allocates system resources for the query. For more information about preparing a query, see “Preparing a query” on page 17-13.
The following sections describe executing both static and dynamic SQL statements at design time and at runtime.
Executing a query at design timeTo execute a query at design time, set its Active property to True in the Object Inspector.
The results of the query, if any, are displayed in any data-aware controls associated with the query component.
Note The Active property can be used only with queries that returns a result set, such as by the SELECT statement.
Executing a query at runtimeTo execute a query at runtime, use one of the following methods:
• Open executes a query that returns a result set, such as with the SELECT statement.
• ExecSQL executes a query that does not return a result set, such as with the INSERT, UPDATE, or DELETE statements.
Note If you do not know at design time whether a query will return a result set at runtime, code both types of query execution statements in a try...except block. Put a call to the Open method in the try clause. This allows you to suppress the error message that would occur due to using an activate method not applicable to the type of SQL statement used. Check the type of exception that occurs. If it is other than an ENoResult exception, the exception occurred for another reason and must be processed. This works because an action query will be executed when the query is activated with the Open method, but an exception occurs in addition to that.
tryIBQuery2.Open;
excepton E: Exception do

C h a p t e r 1 7 W o r k i n g w i t h Q u e r i e s 17-13
P r e p a r i n g a q u e r y
if not (E is ENoResultSet) thenraise;
end;
Executing a query that returns a result setTo execute a query that returns a result set (a query that uses a SELECT statement), follow these steps:
1 Call Close to ensure that the query is not already open. If a query is already open you cannot open it again without first closing it. Closing a query and reopening it fetches a new version of data from the server.
2 Call Open to execute the query.
For example:
IBQuery.Close;IBQuery.Open;{ query returns a result set }
For information on navigating within a result set, see “Disabling bi-directional cursors” on page 17-14. For information on editing and updating a result set, see “Working with result sets” on page 17-15.
Executing a query without a result setTo execute a query that does not return a result set (a query that has a SQL statement such as INSERT, UPDATE, or DELETE), call ExecSQL to execute the query.
For example:
IBQuery.ExecSQL; { query does not return a result set }
Preparing a query Preparing a query is an optional step that precedes query execution. Preparing a query submits the SQL statement and its parameters, if any, for parsing, resource allocation, and optimization. The server, too, may allocate resources for the query. These operations improve query performance, making your application faster, especially when working with updatable queries.
An application can prepare a query by calling the Prepare method. If you do not prepare a query before executing it, then Delphi automatically prepares it for you each time you call Open or ExecSQL. Even though Delphi prepares queries for you, it is better programming practice to prepare a query explicitly. That way your code is self-documenting, and your intentions are clear. For example:
CustomerQuery.Close;if not (CustomerQuery.Prepared) then
CustomerQuery.Prepare;CustomerQuery.Open;

17-14 D e v e l o p e r ’ s G u i d e
U n p r e p a r i n g a q u e r y t o r e l e a s e r e s o u r c e s
This example checks the query component’s Prepared property to determine if a query is already prepared. Prepared is a Boolean value that is True if a query is already prepared. If the query is not already prepared, the example calls the Prepare method before calling Open.
Unpreparing a query to release resourcesThe UnPrepare method sets the Prepared property to False. UnPrepare
• Ensures that the SQL property is prepared prior to executing it again.
• Notifies the server to release any resources it has allocated for the statement.
To unprepare a query, call
CustomerQuery.UnPrepare;
When you change the text of the SQL property for a query, the query component automatically closes and unprepares the query.
Improving query performanceFollowing are steps you can take to improve query execution speed:
• Set the TIBQuery component’s UniDirectional property to True if you do not need to navigate backward through a result set (SQL-92 does not, itself, permit backward navigation through a result set).
• Prepare the query before execution. This is especially helpful when you plan to execute a single query several times. You need only prepare the query once, before its first use. For more information about query preparation, see “Preparing a query” on page 17-13.
Disabling bi-directional cursorsThe UniDirectional property determines whether or not bi-directional cursors are enabled for a TIBQuery component. When a query returns a result set, it also receives a cursor, or pointer to the first record in that result set. The record pointed to by the cursor is the currently active record. The current record is the one whose field values are displayed in data-aware components associated with the result set’s data source.
UniDirectional is False by default, meaning that the cursor for a result set can navigate both forward and backward through its records. Bi-directional cursor support requires some additional processing overhead, and can slow some queries. To improve query performance, you may be able to set UniDirectional to True, restricting a cursor to forward movement through a result set.

C h a p t e r 1 7 W o r k i n g w i t h Q u e r i e s 17-15
W o r k i n g w i t h r e s u l t s e t s
If you do not need to be able to navigate backward through a result set, you can set UniDirectional to True for a query. Set UniDirectional before preparing and executing a query. The following code illustrates setting UniDirectional prior to preparing and executing a query:
if not (CustomerQuery.Prepared) then beginCustomerQuery.UniDirectional := True;CustomerQuery.Prepare;
end;CustomerQuery.Open; { returns a result set with a one-way cursor }
Working with result setsBy default, the result set returned by a query is read-only. Your application can display field values from the result set in data-aware controls, but users cannot edit those values. To enable editing of a result set, your application must use a TIBUpdateSQL component.
Updating a read-only result setApplications can update data returned in a read-only result set if they are using cached updates. To update a read-only result set associated with a query component:
1 Add a TIBUpdateSQL component to the data module in your application to essentially give you the ability to post updates to a read-only dataset.
2 Enter the SQL update statement for the result set to the update component’s ModifySQL, InsertSQL, or DeleteSQL properties. To do this more easily, right click on the TIBUpdateSQL component to access the UpdateSQL Editor.

17-16 D e v e l o p e r ’ s G u i d e
W o r k i n g w i t h r e s u l t s e t s
C h a p t e r 1 8 W o r k i n g w i t h S t o r e d P r o c e d u r e s 18-1
C h a p t e r
Chapter 18Working with Stored ProceduresThis chapter describes how to use stored procedures in your database applications. A stored procedure is a self-contained program written in the procedure and trigger language specific to the database system used. There are two fundamental types of stored procedures. The first type retrieves data (like with a SELECT query). The retrieved data can be in the form of a dataset consisting of one or more rows of data, divided into one or more columns. Or the retrieved data can be in the form of individual pieces of information. The second type does not return data, but performs an action on data stored in the database (like with a DELETE statement).
InterBase servers return all data (datasets and individual pieces of information) exclusively with output parameters.
In InterBase Express applications, access to stored procedures is provided by the TIBStoredProc and TIBQuery components. The choice of which to use for the access is predicated on how the stored procedure is coded, how data is returned (if any), and the database system used. The TIBStoredProc and TIBQuery components are both descendants of TIBCustomDataSet, and inherit behaviors from TIBCustomDataSet. For more information about TIBCusomDataSet, see Chapter 15, “Understanding Datasets.”
A stored procedure component is used to execute stored procedures that do not return any data, to retrieve individual pieces of information in the form of output parameters, and to relay a returned dataset to an associated data source component. The stored procedure component allows values to be passed to and return from the stored procedure through parameters, each parameter defined in the Params property. The stored procedure component is the preferred means for using stored procedures that either do not return any data or only return data through output parameters.

18-2 D e v e l o p e r ’ s G u i d e
W h e n s h o u l d y o u u s e s t o r e d p r o c e d u r e s ?
A query component is primarily used to run InterBase stored procedures that only return datasets via output parameters. The query component can also be used to execute a stored procedure that does not return a dataset or output parameter values.
Use parameters to pass distinct values to or return values from a stored procedure. Input parameter values are used in such places as the WHERE clause of a SELECT statement in a stored procedure. An output parameter allows a stored procedure to pass a single value to the calling application. Some stored procedures return a result parameter. See “Input parameters” and “Output parameters” in the “Procedures and Triggers” chapter of the Language Reference and the working “Working with Stored Procedures”chapter in the Data Definition Guide for more information.
When should you use stored procedures?If your server defines stored procedures, you should use them if they apply to the needs of your application. A database server developer creates stored procedures to handle frequently-repeated database-related tasks. Often, operations that act upon large numbers of rows in database tables—or that use aggregate or mathematical functions—are candidates for stored procedures. If stored procedures exist on the remote database server your application uses, you should take advantage of them in your application. Chances are you need some of the functionality they provide, and you stand to improve the performance of your database application by:
• Taking advantage of the server’s usually greater processing power and speed.
• Reducing the amount of network traffic since the processing takes place on the server where the data resides.
For example, consider an application that needs to compute a single value: the standard deviation of values over a large number of records. To perform this function in your application, all the values used in the computation must be fetched from the server, resulting in increased network traffic. Then your application must perform the computation. Because all you want in your application is the end result—a single value representing the standard deviation—it would be far more efficient for a stored procedure on the server to read the data stored there, perform the calculation, and pass your application the single value it requires.
See “Working with Stored Procedures” in the Data Definition Guide for more information.

C h a p t e r 1 8 W o r k i n g w i t h S t o r e d P r o c e d u r e s 18-3
U s i n g a s t o r e d p r o c e d u r e
Using a stored procedureHow a stored procedure is used in a Delphi application depends on how the stored procedure was coded, whether and how it returns data, the specific database server used, or a combination of these factors.
In general terms, to access a stored procedure on a server, an application must:
1 Instantiate a TIBStoredProc component and optionally associate it with a stored procedure on the server. Or instantiate a TIBQuery component and compose the contents of its SQL property to perform either a SELECT query against the stored procedure or an EXECUTE command, depending on whether the stored procedure returns a result set. For more information about creating a TIBStoredProc, see “Creating a stored procedure component” on page 18-3. For more information about creating a TIBQuery component, see Chapter 17, “Working with Queries”.
2 Provide input parameter values to the stored procedure component, if necessary. When a stored procedure component is not associated with stored procedure on a server, you must provide additional input parameter information, such as parameter names and data types. For more information about providing input parameter information, see “Setting parameter information at design time” on page 18-13.
3 Execute the stored procedure.
4 Process any result and output parameters. As with any other dataset component, you can also examine the result dataset returned from the server. For more information about output and result parameters, see “Using output parameters” on page 18-11 and “Using the result parameter” on page 18-12. For information about viewing records in a dataset, see “Using stored procedures that return result sets” on page 18-6.
Creating a stored procedure componentTo create a stored procedure component for a stored procedure on a database server:
1 Place stored procedure, database, and transaction components from the InterBase page of the Component palette in a data module.
2 Set the Database and Transaction properties of the stored procedure component to the names of the database and transaction components.
3 Set the DatabaseName property in the Database component.
Normally you should specify the DatabaseName property, but if the server database against which your application runs is currently unavailable, you can still create and set up a stored procedure component by omitting the DatabaseName and supplying a stored procedure name and input, output, and result parameters at design time. For more information about input parameters,

18-4 D e v e l o p e r ’ s G u i d e
U s i n g a s t o r e d p r o c e d u r e
see “Using input parameters” on page 18-11. For more information about output parameters, see “Using output parameters” on page 18-11. For more information about result parameters, see “Using the result parameter” on page 18-12
4 Optionally set the StoredProcName property to the name of the stored procedure to use. If you provided a value for the Database property, and the Database component is connected to the database, then you can select a stored procedure name from the drop-down list for the property. A single TIBStoredProc component can be used to execute any number of stored procedures by setting the StoredProcName property to a valid name in the application. It may not always be desirable to set the StoredProcName at design time.
5 Double-click the Params property value box to invoke the StoredProc Parameters editor to examine input and output parameters for the stored procedure. If you did not specify a name for the stored procedure in Step 4, or you specified a name for the stored procedure that does not exist on the server specified in the DatabaseName property in Step 3, then when you invoke the parameters editor, it is empty.
See the “Working with Stored Procedures”chapter in the Data Definition Guide for more information.
Note If you do not specify the Database property in Step 2, then you must use the StoredProc Parameters editor to set up parameters at design time. For information about setting parameters at design time, see “Setting parameter information at design time” on page 18-13.
Creating a stored procedureOrdinarily, stored procedures are created when the application and its database is created, using tools supplied by InterBase. However, it is possible to create stored procedures at runtime. For more information, see “Creating procedures” in the InterBase Data Definition Guide.
A stored procedure can be created by an application at runtime using a SQL statement issued from a TIBQuery component, typically with a CREATE PROCEDURE statement. If parameters are used in the stored procedure, set the ParamCheck property of the TIBQuery to False. This prevents the TIBQuery from mistaking the parameter in the new stored procedure from a parameter for the TIBQuery itself.
Note You can also use the SQL Explorer to examine, edit, and create stored procedures on the server.
After the SQL property has been populated with the statement to create the stored procedure, execute it by invoking the ExecSQL method.
with IBQuery1 do beginParamCheck := False;with SQL do begin
Clear;

C h a p t e r 1 8 W o r k i n g w i t h S t o r e d P r o c e d u r e s 18-5
U s i n g a s t o r e d p r o c e d u r e
Add(‘CREATE PROCEDURE GET_MAX_EMP_NAME’);Add(‘RETURNS (Max_Name CHAR(15))’);Add(‘AS’);Add(‘BEGIN’);Add(‘ SELECT MAX(LAST_NAME)’);Add(‘ FROM EMPLOYEE’);Add(‘ INTO :Max_Name;’);Add(‘ SUSPEND;’);Add(‘END’);
end;ExecSQL;
end;
Preparing and executing a stored procedureTo use a stored procedure, you can optionally prepare it, and then execute it.
You can prepare a stored procedure at:
• Design time, by choosing OK in the Parameters editor.
• Runtime, by calling the Prepare method of the stored procedure component.
For example, the following code prepares a stored procedure for execution:
IBStoredProc1.Prepare;
Note If your application changes parameter information at runtime, you should prepare the procedure again.
To execute a prepared stored procedure, call the ExecProc method for the stored procedure component. The following code illustrates code that prepares and executes a stored procedure:
IBStoredProc1.Params[0].AsString := Edit1.Text;IBStoredProc1.Prepare;IBStoredProc1.ExecProc;
Note If you attempt to execute a stored procedure before preparing it, the stored procedure component automatically prepares it for you, and then unprepares it after it executes. If you plan to execute a stored procedure a number of times, it is more efficient to call Prepare yourself, and then only call UnPrepare once, when you no longer need to execute the procedure.
When you execute a stored procedure, it can return all or some of these items:
• A dataset consisting of one or more records that can be viewed in data-aware controls associated with the stored procedure through a data source component.
• Output parameters.
• A result parameter that contains status information about the stored procedure’s execution.

18-6 D e v e l o p e r ’ s G u i d e
U s i n g a s t o r e d p r o c e d u r e
Using stored procedures that return result setsStored procedures that return data in datasets, rows and columns of data, should most often be used with a query component. However, a stored procedure component can also serve this purpose.
Retrieving a result set with a TIBQueryTo retrieve a dataset from a stored procedure using a TIBQuery component:
1 Instantiate a query component.
2 In the TIBQuery.SQL property, write a SELECT query that uses the name of the stored procedure instead of a table name.
3 If the stored procedure requires input parameters, express the parameter values as a comma-separated list, enclosed in parentheses, following the procedure name.
4 Set the Active property to True or invoke the Open method.
For example, the InterBase stored procedure GET_EMP_PROJ, below, accepts a value using the input parameter EMP_NO and returns a dataset through the output parameter PROJ_ID.
CREATE PROCEDURE GET_EMP_PROJ (EMP_NO SMALLINT)RETURNS (PROJ_ID CHAR(5))ASBEGIN
FOR SELECT PROJ_IDFROM EMPLOYEE_PROJECTWHERE EMP_NO = :EMP_NOINTO :PROJ_IDDO
SUSPEND;END
The SQL statement issued from a TIBQuery to use this stored procedure would be:
SELECT *FROM GET_EMP_PROJ(52)
Using stored procedures that return data using parametersStored procedures can be composed to retrieve individual pieces of information, as opposed to whole rows of data, through parameters. For instance, a stored procedure might retrieve the maximum value for a column, add one to that value, and then return that value to the application. Such stored procedures can be used and the values inspected using either a TIBQuery or a TIBStoredProc component. The preferred method for retrieving parameter values is with a TIBStoredProc.

C h a p t e r 1 8 W o r k i n g w i t h S t o r e d P r o c e d u r e s 18-7
U s i n g a s t o r e d p r o c e d u r e
Retrieving individual values with a TIBQueryParameter values retrieved via a TIBQuery component take the form of a single-row dataset, even if only one parameter is returned by the stored procedure. To retrieve individual values from stored procedure parameters using a TIBQuery component:
1 Instantiate a query component.
2 In the TIBQuery.SQL property, write a SELECT query that uses the name of the stored procedure instead of a table name. The SELECT clause of this query can specify the parameter by its name, as if it were a column in a table, or it can simply use the * operator to retrieve all parameter values.
3 If the stored procedure requires input parameters, express the parameter values as a comma-separated list, enclosed in parentheses, following the procedure name.
4 Set the Active property to True or invoke the Open method.
For example, the InterBase stored procedure GET_HIGH_EMP_NAME, below, retrieves the alphabetically last value in the LAST_NAME column of a table named EMPLOYEE. The stored procedure returns this value in the output parameter High_Last_Name.
CREATE PROCEDURE GET_HIGH_EMP_NAMERETURNS (High_Last_Name CHAR(15))ASBEGIN
SELECT MAX(LAST_NAME)FROM EMPLOYEEINTO :High_Last_Name;SUSPEND;
END
The SQL statement issued from a TIBQuery to use this stored procedure would be:
SELECT High_Last_NameFROM GET_HIGH_EMP_NAME
Retrieving individual values with a TIBStoredProcTo retrieve individual values from stored procedure output parameters using a TIBStoredProc component:
1 Instantiate a stored procedure component.
2 In the StoredProcName property, specify the name of the stored procedure.
3 If the stored procedure requires input parameters, supply values for the parameters using the Params property or ParamByName method.
4 Invoke the ExecProc method.

18-8 D e v e l o p e r ’ s G u i d e
U s i n g a s t o r e d p r o c e d u r e
5 Inspect the values of individual output parameters using the Params property or ParamByName method.
For example, the InterBase stored procedure GET_HIGH_EMP_NAME, below, retrieves the alphabetically last value in the LAST_NAME column of a table named EMPLOYEE. The stored procedure returns this value in the output parameter High_Last_Name.
CREATE PROCEDURE GET_HIGH_EMP_NAMERETURNS (High_Last_Name CHAR(15))ASBEGIN
SELECT MAX(LAST_NAME)FROM EMPLOYEEINTO :High_Last_Name;SUSPEND;
END
The Delphi code to get the value in the High_Last_Name output parameter and store it to the Text property of a TEdit component is:
with StoredProc1 do beginStoredProcName := 'GET_HIGH_EMP_NAME';ExecProc;Edit1.Text := ParamByName('High_Last_Name').AsString;
end;
Using stored procedures that perform actions on dataStored procedures can be coded such that they do not return any data at all, and only perform some action in the database. SQL operations involving the INSERT and DELETE statements are good examples of this type of stored procedure. For instance, instead of allowing a user to delete a row directly, a stored procedure might be used to do so. This would allow the stored procedure to control what is deleted and also to handle any referential integrity aspects, such as a cascading delete of rows in dependent tables.
Executing an action stored procedure with a TIBQueryTo execute an action stored procedure using a TIBQuery component:
1 Instantiate a query component.
2 In the TIBQuery.SQL property, include the command necessary to execute the stored procedure and the stored procedure name. (The command to execute a stored procedure can vary from one database system to another. In InterBase, the command is EXECUTE PROCEDURE.)
3 If the stored procedure requires input parameters, express the parameter values as a comma-separated list, enclosed in parentheses, following the procedure name.

C h a p t e r 1 8 W o r k i n g w i t h S t o r e d P r o c e d u r e s 18-9
U s i n g a s t o r e d p r o c e d u r e
4 Invoke the TIBQuery.ExecSQL method.
For example, the InterBase stored procedure ADD_EMP_PROJ, below, adds a new row to the table EMPLOYEE_PROJECT. No dataset is returned and no individual values are returned in output parameters.
CREATE PROCEDURE ADD_EMP_PROJ (EMP_NO SMALLINT, PROJ_ID CHAR(5))ASBEGIN
BEGININSERT INTO EMPLOYEE_PROJECT (EMP_NO, PROJ_ID) VALUES (:EMP_NO, :PROJ_ID);WHEN SQLCODE -530 DO
EXCEPTION UNKNOWN_EMP_ID;ENDSUSPEND;
END
The SQL statement issued from a TIBQuery to execute this stored procedure would be:
EXECUTE PROCEDURE ADD_EMP_PROJ(20, “GUIDE”)
Executing an action stored procedure with a TIBStoredProcTo retrieve individual values from stored procedure output parameters using a TIBStoredProc component:
1 Instantiate a stored procedure component.
2 In the StoredProcName property, specify the name of the stored procedure.
3 If the stored procedure requires input parameters, supply values for the parameters using the Params property or ParamByName method.
4 Invoke the ExecProc method.
For example, the InterBase stored procedure ADD_EMP_PROJ, below, adds a new row to the table EMPLOYEE_PROJECT. No dataset is returned and no individual values are returned in output parameters.
CREATE PROCEDURE ADD_EMP_PROJ (EMP_NO SMALLINT, PROJ_ID CHAR(5))ASBEGIN
BEGININSERT INTO EMPLOYEE_PROJECT (EMP_NO, PROJ_ID) VALUES (:EMP_NO, :PROJ_ID);WHEN SQLCODE -530 DO
EXCEPTION UNKNOWN_EMP_ID;ENDSUSPEND;
END
The Delphi code to execute the ADD_EMP_PROJ stored procedure is:

18-10 D e v e l o p e r ’ s G u i d e
U n d e r s t a n d i n g s t o r e d p r o c e d u r e p a r a m e t e r s
with StoredProc1 do beginStoredProcName := ‘ADD_EMP_PROJ’;ExecProc;
end;
Understanding stored procedure parametersThere are four types of parameters that can be associated with stored procedures:
• Input parameters, used to pass values to a stored procedure for processing.
• Output parameters, used by a stored procedure to pass return values to an application.
• Input/output parameters, used to pass values to a stored procedure for processing, and used by the stored procedure to pass return values to the application.
• A result parameter, used to return an error or status value to an application. A stored procedure can only return one result parameter.
Whether a stored procedure uses a particular type of parameter depends both on the general language implementation of stored procedures on your database server and on a specific instance of a stored procedure. For example, individual stored procedures on any server may either be implemented using input parameters, or may not be. On the other hand, some uses of parameters are server-specific. For example, the InterBase implementation of a stored procedure never returns a result parameter.
Access to stored procedure parameters is provided by TParam objects in the TIBStoredProc.Params property. If the name of the stored procedure is specified at design time in the StoredProcName property, a TParam object is automatically created for each parameter and added to the Params property. If the stored procedure name is not specified until runtime, the TParam objects need to be programmatically created at that time. Not specifying the stored procedure and manually creating the TParam objects allows a single TIBStoredProc component to be used with any number of available stored procedures.
Note Some stored procedures return a dataset in addition to output and result parameters. Applications can display dataset records in data-aware controls, but must separately process output and result parameters. For more information about displaying records in data-aware controls, see “Using stored procedures that return result sets” on page 18-6.

C h a p t e r 1 8 W o r k i n g w i t h S t o r e d P r o c e d u r e s 18-11
U n d e r s t a n d i n g s t o r e d p r o c e d u r e p a r a m e t e r s
Using input parametersApplication use input parameters to pass singleton data values to a stored procedure. Such values are then used in SQL statements within the stored procedure, such as a comparison value for a WHERE clause. If a stored procedure requires an input parameter, assign a value to the parameter prior to executing the stored procedure.
If a stored procedure returns a dataset and is used through a SELECT query in a TIBQuery component, supply input parameter values as a comma-separated list, enclosed in parentheses, following the stored procedure name. For example, the SQL statement below retrieves data from a stored procedure named GET_EMP_PROJ and supplies an input parameter value of 52.
SELECT PROJ_IDFROM GET_EMP_PROJ(52)
If a stored procedure is executed with a TIBStoredProc component, use the Params property or the ParamByName method access to set each input parameter. Use the TParam property appropriate for the data type of the parameter, such as the TParam.AsString property for a CHAR type parameter. Set input parameter values prior to executing or activating the TIBStoredProc component. In the example below, the EMP_NO parameter (type SMALLINT) for the stored procedure GET_EMP_PROJ is assigned the value 52.
with IBStoredProc1 do beginParamByName(‘EMP_NO’).AsSmallInt := 52;ExecProc;
end;
Using output parametersStored procedures use output parameters to pass singleton data values to an application that calls the stored procedure. Output parameters are not assigned values except by the stored procedure and then only after the stored procedure has been executed. Inspect output parameters from an application to retrieve its value after invoking the TIBStoredProc.ExecProc method.
Use the TIBStoredProc.Params property or TIBStoredProc.ParamByName method to reference the TParam object that represents a parameter and inspect its value. For example, to retrieve the value of a parameter and store it into the Text property of a TEdit component:
with IBStoredProc1 do beginExecProc;Edit1.Text := Params[0].AsString;
end;
Most stored procedures return one or more output parameters. Output parameters may represent the sole return values for a stored procedure that does not also return a dataset, they may represent one set of values returned by a procedure that

18-12 D e v e l o p e r ’ s G u i d e
U n d e r s t a n d i n g s t o r e d p r o c e d u r e p a r a m e t e r s
also returns a dataset, or they may represent values that have no direct correspondence to an individual record in the dataset returned by the stored procedure. Each server’s implementation of stored procedures differs in this regard.
Using input/output parametersInput/output parameters serve both function that input and output parameters serve individually. Applications use an input/output parameter to pass a singleton data value to a stored procedure, which in turn reuses the input/output parameter to pass a singleton data value to the calling application. As with input parameters, the input value for an input/output parameter must be set before the using stored procedure or query component is activated. Likewise, the output value in an input/output parameter will not be available until after the stored procedure has been executed.
In the example Oracle stored procedure below, the parameter IN_OUTVAR is an input/output parameter.
CREATE OR REPLACE PROCEDURE UPDATE_THE_TABLE (IN_OUTVAR IN OUT INTEGER)ASBEGIN
UPDATE ALLTYPETABLESET NUMBER82FLD = IN_OUTVARWHERE KEYFIELD = 0;IN_OUTVAR:=1;
END UPDATE_THE_TABLE;
In the Delphi program code below, IN_OUTVAR is assigned an input value, the stored procedure executed, and then the output value in IN_OUTVAR is inspected and stored to a memory variable.
with StoredProc1 do beginParamByName(‘IN_OUTVAR’).AsInteger := 103;ExecProc;IntegerVar := ParamByName(‘IN_OUTVAR’).AsInteger;
end;
Using the result parameterIn addition to returning output parameters and a dataset, some stored procedures also return a single result parameter. The result parameter is usually used to indicate an error status or the number of records processed base on stored procedure execution. See your database server’s documentation to determine if and how your server supports the result parameter. Result parameters are not assigned values except by the stored procedure and then only after the stored procedure has been executed. Inspect a result parameter from an application to retrieve its value after invoking the TIBStoredProc.ExecProc method.

C h a p t e r 1 8 W o r k i n g w i t h S t o r e d P r o c e d u r e s 18-13
U n d e r s t a n d i n g s t o r e d p r o c e d u r e p a r a m e t e r s
Use the TIBStoredProc.Params property or TIBStoredProc.ParamByName method to reference the TParam object that represents the result parameter and inspect its value.
DateVar := StoredProc1.ParamByName('MyOutputParam').AsDate;
Accessing parameters at design timeIf you connect to a remote database server by setting the Database and StoredProcName properties at design time, then you can use the StoredProc Parameters editor to view the names and data types of each input parameter, and you can set the values for the input parameters to pass to the server when you execute the stored procedure.
Important Do not change the names or data types for input parameters reported by the server, or when you execute the stored procedure an exception is raised.
Some servers do not report parameter names or data types. In these cases, use the SQL Explorer or IBConsole to look at the source code of the stored procedure on the server to determine input parameters and data types. See the SQL Explorer online help for more information.
At design time, if you do not receive a parameter list from a stored procedure on a remote server (for example because you are not connected to a server), then you must invoke the StoredProc Parameters editor, list each required input parameter, and assign each a data type and a value. For more information about using the StoredProc Parameters editor to create parameters, see “Setting parameter information at design time” on page 18-13.
Setting parameter information at design timeYou can invoke the StoredProc parameter collection editor at design time to set up parameters and their values.
The parameter collection editor allows you to set up stored procedure parameters. If you set the Database and StoredProcName properties of the TIBStoredProc component at design time, all existing parameters are listed in the collection editor. If you do not set both of these properties, no parameters are listed and you must add them manually. Additionally, some database types do not return all parameter information, like types. For these database systems, use the SQL Explorer utility to inspect the stored procedures, determine types, and then configure parameters through the collection editor and the Object Inspector. The steps to set up stored procedure parameters at design time are:
1 Optionally set the Database and StoredProcName properties.
2 In the Object Inspector, invoke the parameter collection editor by clicking on the ellipsis button in the Params field.

18-14 D e v e l o p e r ’ s G u i d e
U n d e r s t a n d i n g s t o r e d p r o c e d u r e p a r a m e t e r s
3 If the Database and StoredProcName properties are not set, no parameters appear in the collection editor. Manually add parameter definitions by right-clicking within the collection editor and selecting Add from the context menu.
4 Select parameters individually in the collection editor to display their properties in the Object Inspector.
5 If a type is not automatically specified for the ParamType property, select a parameter type (Input, Output, Input/Output, or Result) from the property’s drop-down list.
6 If a data type is not automatically specified for the DataType property, select a data type from the property’s drop-down list.
7 Use the Value property to optionally specify a starting value for an input or input/output parameter.
Right-clicking in the parameter collection editor invokes a context menu for operating on parameter definitions. Depending on whether any parameters are listed or selected, enabled options include: adding new parameters, deleting existing parameters, moving parameters up and down in the list, and selecting all listed parameters.
You can edit the definition for any TParam you add, but the attributes of the TParam objects you add must match the attributes of the parameters for the stored procedure on the server. To edit the TParam for a parameter, select it in the parameter collection editor and edit its property values in the Object Inspector.
Note You can never set values for output and result parameters. These types of parameters have values set by the execution of the stored procedure.
Creating parameters at runtimeIf the name of the stored procedure is not specified in StoredProcName until runtime, no TParam objects will be automatically created for parameters and they must be created programmatically. This can be done using the TParam.Create method or the TParams.AddParam method.
For example, the InterBase stored procedure GET_EMP_PROJ, below, requires one input parameter (EMP_NO) and one output parameter (PROJ_ID).
CREATE PROCEDURE GET_EMP_PROJ (EMP_NO SMALLINT)RETURNS (PROJ_ID CHAR(5))ASBEGIN
FOR SELECT PROJ_IDFROM EMPLOYEE_PROJECTWHERE EMP_NO = :EMP_NOINTO :PROJ_IDDO
SUSPEND;END

C h a p t e r 1 8 W o r k i n g w i t h S t o r e d P r o c e d u r e s 18-15
V i e w i n g p a r a m e t e r i n f o r m a t i o n a t d e s i g n t i m e
The Delphi code to associate this stored procedure with a TIBStoredProc named StoredProc1 and create TParam objects for the two parameters using the TParam.Create method is:
varP1, P2: TParam;
begin{...}with StoredProc1 do begin
StoredProcName := 'GET_EMP_PROJ';Params.Clear;P1 := TParam.Create(Params, ptInput);P2 := TParam.Create(Params, ptOutput);try
Params[0].Name := ‘EMP_NO’;Params[1].Name := ‘PROJ_ID’;ParamByname(‘EMP_NO’).AsSmallInt := 52;ExecProc;Edit1.Text := ParamByname(‘PROJ_ID’).AsString;
finallyP1.Free;P2.Free;
end;end;{...}
end;
Viewing parameter information at design timeIf you have access to a database server at design time, there are two ways to view information about the parameters used by a stored procedure:
• Invoke the SQL Explorer to view the source code for a stored procedure on a remote server. The source code includes parameter declarations that identify the data types and names for each parameter.
• Use the Object Inspector to view the property settings for individual TParam objects.
You can use the SQL Explorer to examine stored procedures on your database servers. If you are using ODBC drivers you cannot examine stored procedures with the SQL Explorer. While using the SQL Explorer is not always an option, it can sometimes provide more information than the Object Inspector viewing TParam objects. The amount of information returned about a stored procedure in the Object Inspector depends on your database server.
To view individual parameter definitions in the Object Inspector:
1 Select the stored procedure component.
18-16 D e v e l o p e r ’ s G u i d e
V i e w i n g p a r a m e t e r i n f o r m a t i o n a t d e s i g n t i m e
2 Set the Database property of a stored procedure component to the Database property of a TIBDatabase.
3 Set the StoredProcName property to the name of the stored procedure.
4 Click the ellipsis button in for the TIBStoredProc.Params property in the Object Inspector.
5 Select individual parameters in the collection editor to view their property settings in the Object Inspector.
For some servers some or all parameter information may not be accessible.
In the Object Inspector, when viewing individual TParam objects, the ParamType property indicates whether the selected parameter is an input, output, input/output, or result parameter. The DataType property indicates the data type of the value the parameter contains, such as string, integer, or date. The Value edit box enables you to enter a value for a selected input parameter.
For more about setting parameter values, see “Setting parameter information at design time” on page 18-13.
Note You can never set values for output and result parameters. These types of parameters have values set by the execution of the stored procedure.

C h a p t e r 1 9 D e b u g g i n g w i t h S Q L M o n i t o r 19-1
C h a p t e r
Chapter 19Debugging with SQL MonitorUse the TIBSQLMonitor component to monitor the dynamic SQL that passes through the InterBase server. You can write an application that can view only its own SQL statements, or you can write a generic SQL monitor application that monitors the dynamic SQL of all applications built with InterBase Express (IBX).
Use the TIBSQLMonitor component to watch dynamic SQL taking place in all InterBase data access applications both before and after they have been compiled.
SQL monitoring involves a bit of overhead, so you should be aware of the following:
• If no SQL monitors are loaded, there is little to no overhead
• SQL monitoring can be switched off globally by an application to ensure that it does not get bogged down during debugging
• Disabling monitoring in an application that does not require it further reduces the overhead
Building a simple monitoring applicationTo build a simple SQL monitoring application, follow these steps:
1 Open a new form in Delphi.
2 Add a Memo component to the form and clear the Lines property.
3 Add a TIBSQLMonitor component to the form
4 Double-click the OnSQL event and add the following line of code:
Memo1.Lines.Add(EventText);
5 Compile the application.

19-2 D e v e l o p e r ’ s G u i d e
B u i l d i n g a s i m p l e m o n i t o r i n g a p p l i c a t i o n
You can now start another IBX application and monitor the code.

C h a p t e r 2 0 W r i t i n g I n s t a l l a t i o n W i z a r d s 20-1
C h a p t e r
Chapter 20Writing Installation WizardsThis chapter discusses the install and uninstall components.
Installing TIBInstall and its ancestor, TIBSetup provide properties to allow you to build an InterBase install component into your application. TIBInstall allows you to set the installation source and destination, display your own installation messages, and set the individual InterBase components to be installed.
The following sections describe how to set up an installation application, select the installation options, set the source and destination installation directories, and track the installation progress. Once the installation component is set up, you execute it using the InstallExecute method.
Defining the installation componentTIBInstall provides the following properties for defining an installation component:
Table 20.1 TIBInstall properties
Property Purpose
DestinationDirectory Sets or returns the installation target path; if not set, defaults to what is in the Windows registry
InstallOptions Sets which InterBase components are to be installed; see below
MsgFilePath Sets or returns the directory path where the ibinstall.msg file can be found

20-2 D e v e l o p e r ’ s G u i d e
I n s t a l l i n g
Setting the installation optionsThe InstallOptions property allows you to set which InterBase components are to be installed. Set any of the following options to True to install it. For more information on each option, refer to the online help for TInstallOptions.
TIBInstall keeps track of the installed options in the uninstall file.
The following code snippet shows how you could set up a series of check boxes to allow a user to select the InterBase main components:
procedure TSampleform.ExecuteClick(Sender: TObject);var MComps : TMainOptions;begin Execute.Visible := False; Cancel.Visible := True; MComps := [];
if ServerCheck.Checked then Include(MComps, moServer);
if ClientCheck.Checked then Include(MComps, moClient);
Progress Returns an integer from 0 to 100 indicating the percentage of installation completed; if unset, no progress is displayed
RebootToComplete If set to True, returns a message instructing the user to reboot after installation is complete
SourceDirectory Sets or returns the path of the installation source files; in most cases, this will be a path on the InterBase CD
UnInstallFile Returns the name and path of the uninstall file, which contains information on the installed options
Table 20.2 TIBInstall options
Option Installs:
CmdLineTools the InterBase command line tools, including isql, gbak, and gsec
ConnectivityClients the InterBase connectivity clients, including ODBC, OLE DB, and JDBC
Examples the InterBase database and API examples
MainComponents the main InterBase components, including the client, server, documentation, GUI tools, and development tools.
Table 20.1 TIBInstall properties
Property Purpose

C h a p t e r 2 0 W r i t i n g I n s t a l l a t i o n W i z a r d s 20-3
I n s t a l l i n g
if ConServerCheck.Checked then Include(MComps, moConServer);
if GuiToolsCheck.Checked then Include(MComps, moGuiTools);
if DevCheck.Checked then Include(MComps, moDevelopment);
if DocCheck.Checked then Include(MComps, moDocumentation);
IBInstall1.InstallOptions.MainComponents := MComps;
Setting up the source and destination directoriesUse the SourceDirectory, DestinationDirectory and SuggestedDestination properties along with the InstallCheck method to set up the source and destination directories for your installation component. The following code snippet uses two TDirectoryListBox components, SrcDir and DestDir, to allow the user to change the source and destination directories. The InstallCheck method checks to see if everything is prepared for the installation.
try IBInstall1.SourceDirectory := SrcDir.Directory; IBInstall1.DestinationDirectory := DestDir.Directory; IBInstall1.InstallCheck; except on E:EIBInstallError do begin Label1.Caption := ''; Cancel.Visible := False; Execute.Visible := True; ProgressBar1.Visible := False; Exit; end; end;
Setting up the installation progress componentsUse the Progress property, along with a ProgressBar component track the installation status.
function TSampleform.IBInstall1StatusChange( Sender: TObject; StatusComment : String): TStatusResult;begin Result := srContinue; ProgressBar1.Position := IBInstall1.Progress; Label1.Caption := StatusComment;
if Cancelling then begin if Application.MessageBox(PChar('UserAbort'),

20-4 D e v e l o p e r ’ s G u i d e
D e f i n i n g t h e u n i n s t a l l c o m p o n e n t
PChar('Do you want to exit'), MB_YESNO ) = IDYES then Result := srAbort; end else // Update billboards and other stuff as necessary Application.ProcessMessages;end;
Defining the uninstall componentUse the TIBUnInstall component to define which components are removed and what messages are displayed when the user uninstalls InterBase. The following code snippet shows a simple uninstall component.
procedure TUninstall.bUninstallClick(Sender: TObject);begin IBUninstall1.UnInstallFile := 'C:\Program Files\InterBase Corp\InterBase\ibuninst.000'; bUninstall.Visible := False; ProgressBar1.Visible := True;
try IBUninstall1.UnInstallCheck; except on E:EIBInstallError do begin Application.MessageBox(PChar(E.Message), PChar('Precheck Error'), MB_OK); Label1.Caption := ''; bUninstall.Visible := True; ProgressBar1.Visible := False; Exit; end; end;
try IBUninstall1.UnInstallExecute; except on E:EIBInstallError do begin Application.MessageBox(PChar(E.Message), PChar( 'Install Error'), MB_OK ); Label1.Caption := ''; bUninstall.Visible := True; ProgressBar1.Visible := False; Exit; end; end; Label1.Caption := 'Uninstall Completed'; ProgressBar1.Visible := False; bCancel.Visible := False;

C h a p t e r 2 0 W r i t i n g I n s t a l l a t i o n W i z a r d s 20-5
D e f i n i n g t h e u n i n s t a l l c o m p o n e n t
bExit.Visible := True;end;

20-6 D e v e l o p e r ’ s G u i d e
D e f i n i n g t h e u n i n s t a l l c o m p o n e n t

I n d e x I-1
AAbort method 15-9access mode, databases 12-6access privileges See securityaccess rights 16-4Action property 12-16ActivateShadow method 12-6Active property
datasets 15-2, 15-5queries 17-12tables 16-3
active recordcanceling cached updates 14-8synchronizing 16-9
Add method, queries 17-6adding
See also insertingAddLicense method 12-21AddUser method 12-19admin.ib 12-20administering users 12-18, 12-21AfterClose event 15-5Allocation property 10-6alternative indexes 16-5API
advantages 2-7functions 2-7Install and Licensing 2-7
Append method 15-7application development
API applications 2-7Borland tools 2-4embedded SQL applications 2-6InterBase Express 2-4overview 2-4
applicationsdatabase 7-1network protocols 2-2, 10-4optimizing searches 16-4preprocessing See gpresynchronizing tables 16-9
Apply method, update objects 14-19ApplyUpdates method
cached updates 14-5TIBCustomDataSet 15-11
architecture, database applications 7-5arithmetic functions See aggregate functionsarrays
See also error status arrayin UDFs 6-3
asynchronous mode, setting 12-5AutoCalcFields property 15-10
Bbacking up and restoring databases 12-7 to 12-11
remote server 12-8BackoutCount property 10-8BackupFile property 12-7BackupFileLength property 12-7BaseLevel property 10-6BeforeClose event 15-5bi-directional cursors 17-14Blob fields, updating 14-4Blob filters, declaring 6-23Blob UDFs 6-3, 6-11 to 6-14
control structures 6-12blob_get_segment 6-12blob_handle 6-12blob_put_segment 6-12briefcase model 8-5BufferSize property 12-7
CC language
writing function modules 6-2cached updates 14-1, 15-11
and queries 14-23applying 14-4canceling 14-7 to 14-8checking status 14-10 to 14-11client datasets and 14-3defined 15-10enabling/disabling 14-3error handling 14-25 to 14-27
caution 14-25fetching records 14-4InterBase support 8-4overview 14-1 to 14-3pending 14-3queries and 17-15record type constants 14-9transactions and 14-4undeleting records 14-8 to 14-10
CachedUpdates property 3-3, 14-3, 15-11calculated fields 15-8, 15-10CallableStatement class 4-14calling UDFs 6-10 to 6-11Cancel method 15-6, 15-7canceling cached updates 14-7 to 14-8CancelUpdates method 14-7, 14-8, 15-11
Index

I n d e x I-2
CanModify propertydatasets 15-6
characters, queries and special 17-5CheckDB, TValidateOption 12-14ClassNotFoundException 4-2Clear method 17-6client application
definition 2-1client applications
cached updates and 14-1network protocols 10-4retrieving data 17-1, 17-3
client datasetscached updates and 14-3defined 7-13
clients See SQL client applications; Windows clients
client-side caching 2-5Close method
datasets 15-5queries 17-6tables 16-3
Commit method 3-3CommitGlobal, TTransactionGlobalAction 12-16commits
hard 3-2soft 3-2
communication protocols, networks 10-4compiling
UDFs 6-5Component palette
creating databases 10-2Data Controls page 7-10InterBase Admin page 12-1InterBase page 7-1
conditions, testingSee also search conditions
ConfigParameters, TPropertyOption 12-24Connected property 10-3connections
database 10-2 to 10-5database servers 10-3, 10-4disconnecting 10-4network protocols 10-4remote applications, unauthorized access 10-2setting parameters 10-3
constraintsSee also integrity constraints
Constraints property 3-3ConvertExtTables, TBackupOption 12-8Create, TRestoreOption 12-11
CreateTable method 16-7creating
UDFs 6-2current record
canceling cached updates 14-8synchronizing 16-9
CurrentMemory property 10-6cursor
bi-directional 17-14queries and 17-14
cusDeleted constant 14-9cusInserted constant 14-9cusModified constant 14-9custom datasets 7-13cusUninserted constant 14-9cusUnmodified constant 14-9
Ddata
access components 7-1analyzing 7-11changing 15-9graphing 7-12grids 7-11links 16-10synchronizing 16-9
Data Controls page (Component palette) 7-10Data Dictionary 7-3data filters
datasets 16-6queries vs. 17-1
data source, configuring 5-2data sources
binding to queries 17-10remote servers 10-4TDataSource 7-10
data state constants 15-3data structures
Blob 6-12data-aware controls 7-10
displaying data 17-15editing 15-7grids 7-11
databaseevents 13-1
database applications 7-1architecture 7-5flat-file 8-5scaling 7-6, 8-6
database architecture 7-5

I n d e x I-3
database components 10-1 to 10-2creating 10-2temporary 10-2
database drivers 4-7database modification 4-16Database property 8-2database servers 10-3, 17-2DatabaseName property 12-7, 12-16databases 7-1 to 7-13
access mode 12-6adding tables 16-7and datasets 8-1applying cached updates 14-5asynchronous mode, setting 12-5backing up 12-7 to 12-11backing up on remote server 12-8bringing online 12-4changing data 15-9characteristics 10-5deleting tables 16-7disconnecting 10-4environmental characteristics 10-6getting information 10-5limiting data retrieval 16-6local 7-2logging into 10-2maintenance 12-14 to 12-16Open method 10-3operation counts 10-7page buffers 12-5performance statistics 10-7properties, setting 12-3relational 7-1remote 7-2renaming tables 16-7resorting fields 16-5restoring 12-7 to 12-11retrieving data 14-1services 12-1 to 12-25shadowing 12-6shutting down 12-4statistics 12-16sweep interval, setting 12-5tables 7-12transactions 7-3, 8-3unauthorized access 10-2validation 12-14 to 12-16versioning 12-6
DataPages, TStatOption 12-17DataSet component 15-2DataSetCount property 10-5
datasetsActive property 15-2, 15-5adding records 15-7and databases 8-1applying cached updates 14-5, 14-6as logical tables 7-12browsing 15-6CanModify property 15-6changing data 15-9Close method 15-5closing 10-4, 15-3, 15-5custom 7-13default state 15-4editing 15-6event handling 15-9getting active 10-5getting previous values 14-11modes 15-3moving through 15-8Open method 15-2opening 15-2referencing 14-25searching 15-8states 15-3TDataSet 15-2updating 14-11, 14-21, 14-25updating multiple 14-5
DataSets property 10-5DataSource property, queries 17-10datatypes
for UDF parameters 6-3UDFs 6-3
DBChart component 7-12DBFileName property 10-6DBImplementationClass property 10-6DBInmplementationNo property 10-6DbLog, TStatOption 12-17DBSiteName property 10-6DBSQLDialect property 10-6DeactivateIndex, TRestoreOption 12-11Decision Cube page (Component palette) 7-12decision support 7-11declaring Blob filters 6-23DELETE
calling UDFs 6-11Delete method 15-7DELETE statements 14-11, 17-12, 17-13DeleteCount property 10-8DeleteSQL property 14-11DeleteTable method 16-7DeleteUser method 12-20

I n d e x I-4
deleting See droppingDenyAttachment, database shutdown mode 12-4DenyTransaction, database shutdown mode 12-4detaching from databases 10-4detail forms, cached updates and 14-6detail, datasets 16-9 to 16-12disabling cached updates 14-3disconnected model 8-5displaying
server properties 12-23DisplayUser method 12-20DLLs
UDFs and 6-6 to 6-7drill-down forms 7-11driver flags 3-2DriverManager and Driver methods 4-11
EEdit method 15-6editing data 15-6EmptyTable method 16-6enabling cached updates 14-3environmental characteristics 10-6errors
user-defined See exceptionserrors, cached updates 14-25 to 14-27
caution 14-25event alerts, setting up 13-2event handler, writing 13-2event manager 13-1events
See also triggersdatasets 15-9update objects 14-23 to 14-25
events, database 13-1ExecProc method 18-5ExecSQL method
executing a query at runtime 17-12preparing a query 17-13update objects 14-20
executable procedures 4-18executeQuery method 4-14executing queries 17-12 to 17-13
from text files 17-7update objects 14-20
executing stored procedures 18-5expression-based columns See computed columnsExpungeCount property 10-8
FFetchAll method 14-4, 15-11Fetches property 10-7fetching records 14-4FetchLimboTransaction method 12-15fields
attributes 7-3definitions 16-8getting previous values 14-11lists 16-6resorting 16-5
Filter property 3-3filters
data 16-6queries vs. 17-1
Find method, caution for using 16-4flat-file applications 8-5Forced database shutdown mode 12-4ForcedWrites property 10-6forms
drill down 7-11master/detail tables 7-11, 16-9 to 16-12synchronizing data 16-9
FREE_IT 6-5functions
user-defined See UDFs
Ggenerator
added to triggers 3-4GetIndexNames method 16-5GoTo method, caution for using 16-4GotoCurrent method 16-9gpre
preprocessor 2-6grids, data-aware 7-11
HHandle property 10-6hard commits 3-2HeaderPages, TStatOption 12-17
II/O See input, outputIgnoreChecksum, TValidateOption 12-14IgnoreChecksums, TBackupOption 12-8IgnoreLimbo, TBackupOption 12-8implicit transactions 8-2

I n d e x I-5
index definitions 16-8indexes 16-4 to 16-6
alternative 16-5getting 16-5
IndexFieldCount property 16-6IndexFieldNames property 16-5
IndexName vs. 16-5IndexFields property 16-6IndexName property 16-5
IndexFieldNames vs. 16-5IndexPages, TStatOption 12-17input parameters 18-10INSERT
calling UDFs 6-11Insert method 15-7INSERT statements 14-11, 17-12, 17-13InsertCount property 10-8inserting
See also addingInsertSQL property 14-11integrity constraints
See also specific typeInteractive SQL See isqlInterBase Admin page (component palette) 12-1InterBase page (Component palette) 7-1InterBase UDF library 6-14interbase.log file, viewing 12-18InterClient
and JDBC driver manager 4-5and the JDBC API 4-26applets 4-22applications 4-23classes 4-7drivers 4-7, 4-8JDBC extensions 4-10program deployment 4-21URLs 4-12use 4-6
internal caches 14-1InTransaction property 8-3IProvider interface, creating 7-9
JJBuilder
and JDBC drivers 4-1JDBC
API 4-6closing connections 4-15driver class 4-2drivers 4-20
InterClient 4-4URL standards 4-12URLs 4-3
joins, cached updates and 14-23
Kkey constraints See FOREIGN KEY constraints;
PRIMARY KEY constraintskeywords, and JDBC use 4-3KillShadows, TValidateOption 12-14
Llibrary, UDF 6-14 to 6-23License, TPropertyOption 12-23limbo transactions
resolving 12-16retrieving 12-15
LimboTransactions, TValidateOption 12-14links 16-10listing, software activation certificates 12-21live result sets 17-15
updating 14-22LoadFromFile method 17-7local connection 2-1local databases 7-2Locate method 3-3, 16-4logging errors 12-18login dialog box 10-3login scripts 10-2LoginPrompt property 10-3Lookup method 16-4loops See repetitive statements
Mmaintained aggregates 7-12Marks property 10-7master/detail forms 7-11, 16-9 to 16-12
cached updates and 14-6master/detail relationships 7-11MasterFields property 16-9MasterSource property 16-9max_seglen 6-12MaxMemory property 10-6memory, allocating for UDFs 6-4MendDB, TValidateOption 12-14MetadataOnly, TBackupOption 12-8methods, terminating 15-9mobile computing 8-5modifying See altering;updating

I n d e x I-6
ModifySQL property 14-11ModifyUser method 12-21monitoring dynamic SQL 19-1multi-tiered applications 7-2, 7-6, 7-8
Nnaming, variables 17-5navigating datasets 15-8networks
accessing data 14-1connecting to 10-4
NoGarbageCollect, TBackupOption 12-8NoGlobalAction, TTransactionGlobalAction 12-16NonTransportable, TBackupOption 12-8NoReserve property 10-6NoShadow, TRestoreOption 12-11NoValidity, TRestoreOption 12-11number_segments 6-12NumBuffers property 10-7numeric values See values
OODBC drivers 10-4ODSMajorVersion property 10-6ODSMinorVersion property 10-6OldMetadataDesc, TBackupOption 12-8OldValue property 14-11OnCalcFields event 15-8, 15-10OneRelationATime, TRestoreOption 12-11one-to-many relationships 16-9OnEventAlert event handler 13-1OnLogin event 10-2, 10-3OnStateChange event 15-4OnUpdateError event 14-25
TIBCustomDataset 15-11UpdateRecordTypes property 14-9
OnUpdateRecord eventcached updates 14-23example code 14-25TIBCustomDataSet 15-11update objects 14-11, 14-19, 14-21, 14-23UpdateAction 14-27
Open methoddatabases 10-3datasets 15-2queries 17-12, 17-13tables 16-3
Options propertyTIBBackupService 12-8TIBRestoreService 12-11
TIBServerProperties 12-23TIBStatisticalService 12-16TIBValidationService 12-14
ORDER BY clause 16-5output parameters 18-10
Ppage buffers, setting 12-5PageSize property 10-6ParamByName method 17-9parameter substitution (SQL) 14-15, 14-20parameterized queries 17-5
creating 17-7 to 17-11at runtime 17-9
defined 17-2running from text files 17-7
parametersUDFs 6-3
Params propertyqueries 17-9setting user name and password 10-3
performance statistics 10-7persistent database components 10-1Post method 15-6, 15-7Prepare method
queries 17-7, 17-13stored procedures 18-5
PreparedStatement object 4-13, 4-18, 4-19preparing queries 17-14preprocessor See gpreprimary key 3-4privileges 16-4privileges See securityprocedures
executable 4-18select 4-18stored 4-18
procedures See stored proceduresprotocols, network connections 10-4PurgeCount property 10-8
Qqueries 7-13
cached updates and 14-23creating 17-3, 17-5
at runtime 17-6DataSource property 17-10defining statements 17-4 to 17-7ExecSQL method 17-13optimizing 17-12, 17-14 to 17-15

I n d e x I-7
overview 17-3 to 17-4parameter substitution 14-15, 14-20preparing 17-13, 17-14result sets 17-13, 17-15
cursors and 17-14getting at runtime 17-12updating 14-22, 17-15
running 14-20, 17-12 to 17-13from text files 17-7
setting parameters 17-7 to 17-11at runtime 17-9
special characters and 17-5submitting statements 17-13update objects and 14-11, 14-13whitespace characters and 17-5
Query Builder 17-6query components 7-13
adding 17-3Query Parameters editor 17-8Query property, update objects 14-17
Rranges 16-6RDBMS 7-2ReadIdxCount property 10-8read-only
database access 12-6records 15-7result sets 17-15
updating 14-22tables 16-4
ReadOnly property, tables 16-4Reads property 10-7ReadSeqCount property 10-8RecordCount property 3-3records
adding 15-7cached updates and 14-3deleting 16-6
caution 16-6fetching 14-4finding 15-8, 16-4getting subsets 16-6moving through 15-8read-only 15-7sorting 16-4 to 16-6
with alternative indexes 16-5synchronizing current 16-9undeleting 14-8 to 14-10updating
multiple datasets 14-5queries and 17-15
RecoverGlobal, TTransactionGlobalAction 12-16RecoverTwoPhaseGlobal,
TTransactionGlobalAction 12-16referential integrity See integrity constraintsRefreshSQL property 14-11relational databases 7-1remote applications
cached updates and 14-1retrieving data 17-2
remote connections 2-1remote connections, unauthorized access 10-2remote database management systems 7-2remote database servers See remote serversremote servers
accessing data 14-1backing up databases 12-8overview 7-2unauthorized access 10-2
RemoveLicense method 12-22Replace, TRestoreOption 12-11RequestLive property 3-3reserved words See keywordsresolving limbo transactions 12-16resorting fields 16-5restoring deleted records 14-8Result parameter 18-10result sets 17-13, 17-15
cursors and 17-14getting at runtime 17-12read-only 14-22updating 14-22, 17-15
retrievingdata 17-2, 17-13limbo transaction data 12-15
return valuesUDFs 6-3
RevertRecord method 14-8, 14-9, 15-11Rollback method 8-3rolling back transactions 8-3running queries 17-12 to 17-13
from text files 17-7update objects 14-20
running stored procedures 18-5
Sscalability 7-6, 8-6security 10-2security database

I n d e x I-8
adding users 12-19listing users 12-20name 12-20
SELECTcalling UDFs 6-10
select procedures 4-18SELECT statements 17-13server activation certificates
adding 12-21, 12-22listing 12-21
server applicationsretrieving data 17-2
server properties, displaying 12-23servers
processes 2-3services 12-1 to 12-25
service managerattaching to 12-3detaching from 12-3overview 12-1
servicesbackup 12-7database 12-1 to 12-25hierarchy 12-2licensing 12-21 to 12-22log 12-18manager 12-1restore 12-7security 12-18, 12-21server 12-1 to 12-25statistical 12-16validation 12-14
SetAsyncMode method 12-5SetPageBuffers method 12-5SetParams method 14-20SetReadOnly method 12-6SetReserveSpace method 12-6SetSweepInterval method 12-5shadow, activating database 12-6shutdown option
DenyAttachment 12-4DenyTransaction 12-4
shutdown optionsdatabase 12-4forced 12-4
ShutdownDatabase method 12-4single-tiered applications 7-6, 7-7
flat-file 8-5soft commits 3-2software activation certificates,
administering 12-21 to 12-22
sort order, setting 16-4, 16-5sorting data 16-4 to 16-6
with alternative indexes 16-5SQL
and stored procedure statements 4-18CallableStatement class 4-14DELETE string parameter 4-17executeQuery method 4-14pass-through mode 3-2PreparedStatement object 4-13, 4-18, 4-19SELECT statements 4-14statement format 4-13UPDATE string parameter 4-16
SQL applicationsdeleting records 16-6editing data 15-7inserting records 15-7monitoring 19-1sorting data 16-5
SQL Builder 17-6SQL Explorer 18-15SQL Links 2-5
advantages 2-5SQL property
changing 17-14loading from file 17-7setting at runtime 17-6specifying 17-4
SQL queriescreating 17-3, 17-5
at runtime 17-6defining statements 17-4 to 17-7optimizing 17-12, 17-14 to 17-15overview 17-3 to 17-4parameter substitution 14-15, 14-20preparing 17-13, 17-14result sets 17-13, 17-15
cursors and 17-14getting at runtime 17-12updating 14-22, 17-15
running 14-20, 17-12 to 17-13from text files 17-7
setting parameters 17-7 to 17-11at runtime 17-9
special characters and 17-5submitting statements 17-13update objects and 14-11, 14-13whitespace characters and 17-5
SQL servers 7-2StartTransaction method 8-3statements

I n d e x I-9
See also DSQL statements; SQL statementsstatistics, databases 12-16status array See error status arraystatus constants, cached updates 14-10stored procedures 4-18, 7-13
adding 18-3creating 18-4parameters 18-10Prepare method 18-5preparing 18-5running 18-5
StoreDefs property 16-8StoredProc Parameters editor 18-4
activating 18-15setting parameters 18-13viewing parameters 18-13
StoredProcName property 18-4String List editor 17-5strings See character stringssweep interval, setting 12-5SweepDB, TValidateOption 12-15SweepInterval property 10-7synchronizing data 16-9SystemRelations, TStatOption 12-17
Ttable components 7-12, 16-1TableName property 16-2tables 16-1
access rights 16-4Active property 16-3adding 16-1 to 16-3Close method 16-3closing 16-3creating 16-1, 16-7deleting 16-7emptying 16-6field and index definitions 16-8master/detail relationships 16-9 to 16-12naming 16-2Open method 16-3opening 16-3read-only 16-4removing records 16-6
caution 16-6renaming 16-7retrieving data 16-6searching 16-4sorting data 16-4 to 16-6
with alternative indexes 16-5
synchronizing 16-9TIBTable 7-12updating data with 14-21
TBackupOption 12-8TDataSet 15-2TDataSource 7-10TDBChart 7-12temporary database components 10-1terminating connections 10-4text files, running queries from 17-7TIBBackupService 12-7TIBCustomDataSet 15-10TIBDatabase 10-1
temporary instances 10-2TIBDatabaseInfo 10-5TIBDataSet 7-13
queries 17-1vs TIBQuery 17-3
TIBEvents 13-1TIBLicensingService 12-21 to 12-22TIBLogService 12-18TIBQuery 7-13, 17-1
adding 17-3vs. TIBDataSet 17-3
TIBRestoreService 12-10TIBSecurityService 12-18, 12-19, 12-21TIBServerProperties 12-23TIBSQL 7-13TIBStatisticalService 12-16TIBStoredProc 7-13, 18-3TIBTable 7-12, 16-1TIBUpdateSQL 14-11, 17-15
events 14-23 to 14-25TIBValidationService 12-14 to 12-16total_size 6-12TQuery 3-3, 3-4transactions
cached updates and 14-1, 14-4database 8-2 to 8-3duration 8-3implicit 8-2overview 7-3resolving limbo 12-16Rollback method 8-3rolling back 8-3starting 8-3StartTransaction method 8-3using databases 8-3
TRestoreOption 12-11triggers 3-4TStatOption 12-16
I n d e x I-10
TTable 3-3TTransactionGlobalAction 12-16TUpdateAction type 14-26TUpdateKind type 14-25TValidateOption 12-14two-tiered applications 7-2, 7-6, 7-8
UUDF library 6-14 to 6-23UDFs 6-14 to 6-23
allocating memory 6-4Blob 6-3, 6-11 to 6-14calling 6-10 to 6-11calling with INSERT 6-11calling with SELECT 6-10calling with UPDATE 6-11compiling and linking 6-5creating 6-2, 6-3declaring 6-7 to 6-10libraries 6-6 to 6-7modifying libraries 6-7parameters 6-3return values 6-3the InterBase library 6-14
undeleting cached records 14-8 to 14-10UniDirectional property 17-14UnPrepare method 17-14unpreparing queries 17-14UPDATE
calling UDFs 6-11update objects 14-11
applying 14-19event handling 14-23 to 14-25executing statements 14-20preparing SQL statements 14-13
Update SQL editor 14-14UPDATE statements 14-11, 17-12, 17-13UpdateCount property 10-8UpdateObject property 14-12, 15-11
typecasting 14-18UpdateRecordTypes property 14-8, 14-9, 15-11
OnUpdateError event 14-9UpdatesPending property 14-3, 15-11UpdateStatus method 14-10, 15-11updating records
multiple datasets 14-5queries and 17-15
usDeleted constant 14-10UseAllSpace, TRestoreOption 12-11user interfaces 7-10 to 7-13
multi-record 7-11single record 7-10
user-defined errors See exceptionsuser-defined functions See UDFsUserNames property 10-7users
adding 12-19administering 12-18, 12-21listing 12-20modifying 12-21removing 12-20
usInserted constant 14-10usModified constant 14-10usUnmodified constant 14-10
VValidateDB, TValidateOption 12-15ValidateFull, TValidateOption 12-15validating databases 12-14 to 12-16values
See also NULL valuesvariables, naming 17-5Verbose property 12-7, 12-8, 12-11Version property 10-6versioning, databases 12-6viewing
InterBase log file 12-18security database 12-20
Wwarnings
See also errorsWHERE clause See SELECTwhitespace characters, running queries on 17-5Writes property 10-7