developed to assist commercial fishermen in conducting
TRANSCRIPT

LOAM COPY ONLY TAMU-H-06-001 C3
Drill Guide Manual
F/V
\M\Sea Grant This guide has been developed to assist commercial fishermen in conducting the monthlyTexas emergency drills required by 46 CFR 28.270 (c).
r
LOAN COPY ONLYp
P
Drill Guide Manual
Developed to assist commercial fishermen in conducting monthlyemergency drills required by 46 CFR 28.270 (c)
r
TflMU-SG-06-501
February 2006
f
f
^K|. Publication supported in part by Institutional Grant NA 16RG 1078 toTexasA&M IIniversity h\ the National Sea Grant oilier.^jPr National Oceanic and Atmospheric Administration, I S. 1Jcpartmeni of (iommerce.
1
Acknowledgments
This Drill Guide Manual was developed by John McMillan of McMillan Offshore Survival Training in cooperation
with the Texas Sea Grant College Program's Marine Advisory Service (MAS) and Dewayne Hollin, MAS Marine BusinessManagement Specialist. Special recognition is given to the Alaska Marine Safety Education Association and the UnitedStates Coast Guard, Marine Safety Branch,for their contribution of the safety and survival information used in this manual.Funds for printing the manual were provided by the Texas Sea Grant College Program.
TAMU-SG-06-501
February 2006500 A/F-l
NA16RG1078
Distribution restricted to attendees at safety training course. Forfurther information, contact:
Dewayne Hollin
Texas Sea Grant College Program
(979)845-3857
e-mail [email protected]
FOR€WORD
Welcome!
This manual is directed toward the individual who may travel on or over water as part ofhis or her
work assignment or for pleasure. It is difficult to believe that the information and skills you receive
today may one day prove to be the deciding factor in a life-threatening emergency.
The lack ofcurrent survival training may have contributed to many needless fatalities. It is with this
thought in mind that this training manual and program have been prepared. The survival techniques
learned today are internationally recognized procedures. However, they are not the only methods to
accomplish a certain survival task. Hopefully, you will never need this training, but, if the occasion
ever arises, you can be assured that you have prepared yourself and prepared well.
Many of the skills learned in the program can be taught to your family. By doing this, you can
continue to practice these skills learned today. Most drowning occurs within 10 feet of a place of
safety (dock, boat, etc.), indicating a need to develop self-help skills.
A little preparation, sound judgment and some knowledge can improve your chances of surviving
an emergency. It is the trained person who will have the distinct advantage over the untrained
individual.
REMEMBER: Knowledge is one of the most important elements in any emergency.
Take the time to prepare!!!

Introduction
Commercial fishing is a hazardous occupation, according to recent U.S. Coast Guard fishing vesselcasualty statistics, and the industry trend shows no signs of improvement. Based on an analysis of theannual death rate per 100,000 fishermen, the U.S. commercial fishing industry has an annual deathrate seven times greater than the national average for all types of U.S. industry groups. Statistically, itis the most dangerous industry based on this data.
Faced with economic and competitive pressures, fishermen are prone to take calculated risk. Inview of the liabilities that confront the vessel operator today, however, careful risk management iscrucial for business success, not to mention survival.
Analyses of casualty investigations indicate HUMAN ERROR as the major contributing factor inmost fishing vessel accidents.The human element most commonly attributed to these casualties is alack of technical knowledge in vessel operations not related to actually catching fish.
Poor watchkeeping practices, navigational errors, rules of the road violations and lack ofunderstanding of vessel stability are common causes of vessel accidents. Another cause is material
failure resulting in vessel fire or explosion. A greater awareness of the importance of maintaining avessel and its equipment may have averted some of these casualties.
It is not possible to remove all dangers of fishing, and human error cannot be entirely eliminated,but we can reduce the chances of accidents by altering the behavior of the captain and crew towardgreater safety awareness.While each member of the crew is responsible for his own safety, the captainis ultimately responsible for the safe operation of the vessel and its equipment and for the safety ofeveryone on board.The vessel is only as safe as the people who own and operate it.
In the wake ofa casualty, the words"if only" are often heard.While it isn't possible to change thingsafter the fact, it is possible to prevent most accidents if safety principles are constantly observed.Safety is everyone's responsibility.
Good seamanship is simply thinking ahead. No one is ever 100 percent ready,but it is the captain'sresponsibility to ensure that the vessel and crew are as prepared as possible for the ever-presentpossibility of an accident or emergency. Selection of the crew is very important. Once you havechosen the crew, each member must be given the necessary training and supervision to enable himto do his job safely.
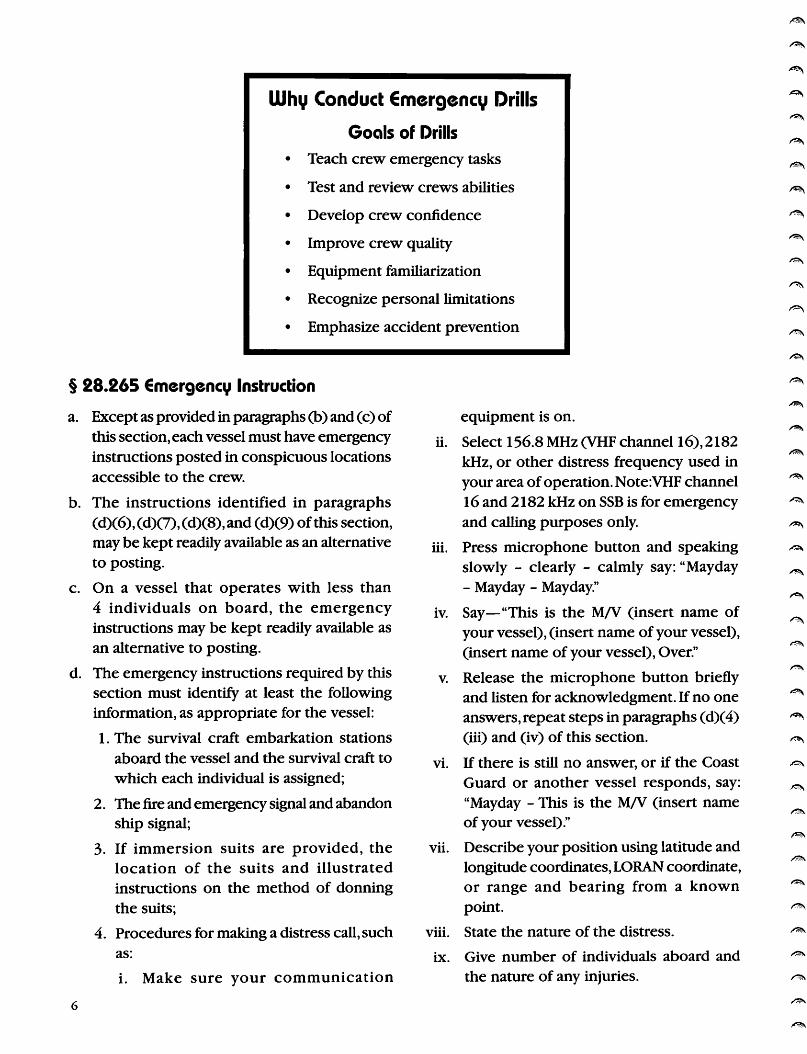
Why Conduct emergency Drills
Goals of Drills
Teach crew emergency tasks
Test and review crews abilities
Develop crew confidence
Improve crew quality
Equipment familiarization
Recognize personal limitations
Emphasize accident prevention
§ 28.265 emergency Instruction
a. Except as provided in paragraphs (b) and (c) ofthis section, each vessel must have emergencyinstructions posted in conspicuous locationsaccessible to the crew.
b. The instructions identified in paragraphs
(d)(6), (d)(7), (d)(8), and (d)(9) of this section,may be kept readily available as an alternative
to posting.
c. On a vessel that operates with less than4 individuals on board, the emergencyinstructions may be kept readily available as
an alternative to posting.
d. The emergency instructions required by thissection must identify at least the followinginformation, as appropriate for the vessel:
1. The survival craft embarkation stations
aboard the vessel and the survival craft to
which each individual is assigned;
2. The fire and emergency signal and abandonship signal;
3. If immersion suits are provided, thelocation of the suits and illustrated
instructions on the method of donning
the suits;
4. Procedures for making a distress call, such
as:
i. Make sure your communication
equipment is on.
ii. Select 156.8 MHz (VHF channel 16), 2182kHz, or other distress frequency used inyour area ofoperation. Note:VHF channel16 and 2182 kHz on SSB is for emergencyand calling purposes only.
iii. Press microphone button and speakingslowly - clearly - calmly say: "Mayday- Mayday - Mayday."
iv. Say—"This is the M/V (insert name ofyour vessel), (insert name of your vessel),(insert name of your vessel), Over."
v. Release the microphone button brieflyand listen for acknowledgment. If no one
answers, repeat steps in paragraphs (d)(4)(iii) and (iv) of this section.
vi. If there is still no answer, or if the Coast
Guard or another vessel responds, say:
"Mayday - This is the M/V (insert nameof your vessel)."
vii. Describe your position using latitude andlongitude coordinates, LORAN coordinate,or range and bearing from a known
point.
viii. State the nature of the distress.
ix. Give number of individuals aboard and
the nature of any injuries.
x. Estimate the present seaworthiness ofyour vessel.
Describe your vessel: (insert length, color,hull type, trim, masts, power and anyadditional distinguishing features).
Say:"I will be listening on Channel 16/2182(or other channel monitored)."
End message by saying: "This is (insertvessel's name and call sign)."
If your situation permits, stand by the radioto await further communication with
the Coast Guard or another vessel. If no
answer, repeat, then try another channel.
Essential action that must be taken in an
emergency, such as:
i. Making a distress call.
ii. Closing of hatches, airports, watertightdoors, vents, scuppers and valves for intake
and discharge lines that penetrate the hull,stopping of fans and ventilation systemsand operation of all safety equipment.
Preparing and launching of survival craft
and rescue boats.
Fighting a fire.
Mustering of personnel including —
a. Seeing that they are properly dressedand have put on their lifejackets orimmersion suits; and
b. Assembling personnel and directingthem to their appointed stations.
Manning of fire parties assigned to dealwith fires.
Special duties required for the operationof fire fighting equipment.
The procedures for rough weather atsea, crossing hazardous bars, flooding andanchoring of the vessel, such as:
i. Close all watertight and weather-tightdoors, hatches and airports to preventtaking water aboard or further floodingin the vessel.
ii. Keep bilges dry to prevent loss of stability
XI
Xll
Xlll
XIV.
111.
iv.
iv.
VI
Vll
111
iv.
VI
11
in
iv.
VI
11
111
due to water in bilges. Use power drivenbilge pump, hand pump and buckets todewater.
Align fire pumps to use as bilge pumps, ifpossible.
Check all intake and discharge lines,whichpenetrate the hull for leakage.
Personnel should remain stationary andevenly distributed.
Personnel should don lifejackets andimmersion suites if the going becomes
very rough, the vessel is about to crossa hazardous bar, or when otherwise
instructed by the master or individual incharge of the vessel.
The procedures for anchoring the vessel.
The procedures to be used in the event anindividual falls overboard, such as:
i. Throw a ring life buoy as close to the
individual as possible.
Post a lookout to keep the individual inthe water in sight.
Launch the rescue boat and maneuver it
to pick up the individual in the water.
Have a crewmember put on a lifejacketor immersion suit, attach a safety lineto the crewmember, and have the
crewmember standby to jump into thewater if necessary.
If the individual overboard is not
immediately located, notify the CoastGuard and other vessels in the vicinity.
Continue searching until released by theCoast Guard.
Procedures for fighting a fire such as:
i. Shut off air supply to the fire — closehatches, ports, doors, ventilators andsimilar openings.
Deenergize the electrical systemssupplying the affected space, if possible.
Immediately use a portable fire

extinguisher or use water for fires in
ordinary combustible materials. Do notuse water on electrical fires.
iv. If the fire is in a machinery space, shut offthe fuel supply and ventilation system andactivate the fixed extinguishing system, ifinstalled.
v. Maneuver the vessel to minimize the effect
of wind on the fire.
vi. If unable to control the fire immediately,notify the Coast Guard and other vesselsin the vicinity.
vii. Move personnel away from the fire, havethem put on lifejackets, and if necessary,prepare to abandon the vessel.
§28.270 Instruction, drills and safetyorientation.
a. Drillsand instructionThe masteror individual
in charge ofeach vessel must ensure that drills
are conducted and instruction is given to eachindividual on board at least once each month.
Instruction may be provided in conjunctionwith drills or at other times and placesprovided it ensures that each individual is
familiar with their duties and their responsesto at least the following contingencies:
1. Abandoning the vessel,
2. Fighting a fire in different locations onboard a vessel,
3. Recovering an individual from the water,
4. Minimizing the affects of unintentionalflooding,
5. Launching survival craft and recoveringlifeboats and rescue boats,
6. Donning immersion suits and otherwearable personal flotation devices,
7. Donning a fireman's outfit and a self-
contained breathing apparatus, if thevessel is equipped,
8. Making a voice radio distress call and usingvisual distress signals,
9. Activating the general alarm, and
10. Reporting inoperative alarm systems andfire detection systems.
. Participation in drills. Drills must be
conducted on board the vessel as if there
were an actual emergency and must includeparticipation by all individuals on board.Break out emergency equipment, test allalarm and detection systems, don protectiveclothing and don immersion suits, if the vessel
is so equipped.
Training. No individual may conduct thedrills or provide the instructions requiredby this section unless that individual hasbeen trained in the proper procedures forconducting the activity.
The viewing ofvideotapes concerning at leastthe contingencies listed in paragraph (a) ofthissection, whether on board the vessel or not,
followed by a discussion led by an individualfamiliar with these contingencies,will satisfythe requirement for instruction but not the
requirement for drills in paragraph (b) ofthis section or for the safety orientation in
paragraph (c) of this section.
Safety orientation. The master or individualin charge of the vessel must ensure that asafety orientation is given to each individualon board that has not received the instruction
and has not participated in the drills requiredby paragraph (a) of this section before thevessel may be operated.
The safety orientation must explain the
emergency instructions required by §28.265and cover the specific evolutions listed inparagraph (a) of this section.
NOTE: The individual conducting the drills andinstruction need not be the master, individual in charge
of the vessel, or a member of the crew.

S€V€N ST€PS TO SURVIVAL
In a survival situation, the decisions you make will bemore important than the equipment you carry!!
Make the decision to live.
RECOGNITION:Admit that your life is in danger.Act!
INVENTORY: Decide what can help and hurt. Do first aid.
SHELTER: Preserve body heat with insulating materials.
SIGNALS: Help rescuers find you.
WATER: Find a safe source of water and drink six pints a day.
FOOD: After you are safe and warm, food will help longwaits.
PLAY: Stay busy and keep a positive mental attitude.
Caution and creativity are your best friends. USE THEM!

Vessel Orientation
New crewmen are usually hired and assigned to avessel knowing very little about the captain, thecrew's duties, safety procedures or benefits.The crewman is just told to board the boat at a specific timeand place. Unfortunately there are no industry-wide standards for orientation of new personnel.
Fishing operations often have difficulty offering safety orientation and training. Crew turnoverand lack of training, fishing experience and vessel familiarity are major factors contributing toaccidents.
Your safety orientation should begin before you go to sea.You should have a tour of the boat andan explanation of the use of safety equipment aboard.Thecaptain should demonstrate the equipmentwhenever possible. He should also tell you about the common safety hazards aboard the vessel.
New crewmen should be given a thorough orientation, particularly in the areas of safety andspecific duties and responsibilities.
Topics to be covered in an orientation should include:
• Where and how to join the vessel.
• How long the fishing trip will last and the kind of working conditions you can expect.
• Sleeping and eating arrangements.
• What to bring, including clothing and equipment.
• The chain of command and tips on how to get along with other crew members.
• Safety precautions to follow.
• Specific duties and responsibilities.
• Payment procedures.
• How to contact family/friends in the event of emergency.
• Emergency procedures and communications.
• Location of safety equipment.
• Safety hazards aboard that specific vessel.
• Any other information that the captain wants the crew to know.
The orientation is to be given to new crew members when they join the vessel and when a newpiece of equipment is added to the vessel. It is to be given only once.
10
ABSTA
EPIRB
FEX
FL
ISUIT
O
PFD
RADIO
RAFT
emergency equipment oncl Abandon Ship Station
F/V
Abandon Ship Station
Emergency position-indicating radio beacon
Fire Extinguisher
Flares
Immersion Suits
Life Rings
Personal Flotation Device
Radio
Life raft
11
Welcome Onboard F/V Ms. Katherine
Welcome onboard the F/V Ms. Katherine.We hope that you have a pleasant and productive trip.The following information is provided to assure that you have a safe and profitable trip.
Safety
Providing for your safety is our primary concern. Please read carefully the attached "SafetyInstructions." We also ask that you follow these guidelines when working about the deck or in variouslocations on the boat.
• Always wear a PFD when existing sea conditions are unfavorable.
• Personalprotective equipment (hard hats,gloves,safety harness) is provided for your safety.Pleaseuse them.
• Follow the directions of the winch operator. He is responsible for your safety.
• Promptly report injuries, accidents or defects to the captain.
• Alcohol and illegal drugs are not allowed. If you are on prescribed medications, inform the captain.Keep medications in proper containers.
• Help maintain vessel cleanliness. Do not throw garbage or cigarette butts on the floor.
• Smoking is allowed only in designated areas.
Your cooperation is appreciated.
Vessel Facilities
The F/V Ms. Katherine offers a range of facilities for your use. These include a laundry room,television area and galley.We only ask that you remember that everyone shares these areas and yourhelp in maintaining them in clean and comfortable order is appreciated.
Safety Instructions
PLEASE READ CAREFULLY. THESE INSTRUCTIONS ARE IMPORTANT FOR YOUR
SAFETY WHILE ONBOARD THE MS. KATHERINE.
In the living quarters is a notice marked"EmergencyAlarms" that gives you information concerning
fire, man overboard and abandon vessel procedures. It is of great importance that you familiarizeyourself with this as soon as possible.
Muster Station
In the event of an alarm the muster station for crew members is at . Please
come appropriately dressed. Bring your lifejacket from your cabin.
€scope Routes
In the living quarters and galley there is a diagram of the F/V Ms. Katherine pointing the way toexits. Follow these to find your way to the nearest way onto the deck. Please locate and becomefamiliar with the exits nearest your quarters.
12

Fire Detection
If you detect a fire, report it immediately to the captain or the nearest crewmember.There arealarms throughout the vessel as well as fire extinguishers and axes.
Man Overboard
If you see someone fall overboard notify the captain immediately. Throw the nearest flotationdevice and keep the person in sight.
emergency Duties
In the living quarters and galley you will find a "Station Bill." This document provides specificduties for specific people to perform for specific emergencies. It also provides information on thelocation of emergency equipment and necessary alarms.
The "Station Bill" will include the following emergency duties:
Location of lifesaving and emergency equipment.
How to operate assigned equipment.
How to make a distress call.
What to do in the event of a person overboard.
What to do in the event of a fire.
What to do in the event of flooding.
What to do in the event of abandon ship order.
We will conduct regular drills. Please review your duties.
Fishing Vessel Drill
Pretend that you are in charge of the safe evacuation of the crew from a vessel that is on fire.Thefire has gotten out of control and there is no other alternative but to abandon ship.
Briefly describe some important considerations that should be addressed prior to vesseldeparture.
13

F/V Safety Orientation
F/V
The following information is provided for your safety and the safety of the crew while on boardthis vessel. Please take a moment to review these safety guidelines that are provided. If you have /»questions or comments, bring it to the attention of the captain.
Safety Checklist
•/ Location of survival craft embarkation station and the survival craft to which each individual is /msassigned. "*
• The fire and emergency signal and abandon ship signal.
•/ Location of immersion suits and illustrated instructions on the method of donning the suits.
1/ Procedures for making a distress call.
*/ Essential actions that must be taken in an emergency by each individual, such as:
• Making a distress call.
• Closing of hatches, airports, watertight doors, vents and valves for intake and discharge linesthat penetrate the hull and operating all lifesaving equipment.
• Preparing and launching of survival craft.
• Fighting a fire.
• Mustering of personnel ensuring they are properly dressed and have put on their lifejacketsor immersion suits.
• Assembling personnel and directing them to their appointed stations.
•" Flooding procedures and reviewing the damage control kit.
• Man-overboard procedures and survival techniques if in the water.
*/ Proper treatment for hypothermia and basic first aid procedures.
• Inspection/testing of the EPIRB.
• Drug, alcohol and smoking policy while on board.
14
Types of emergenciesDrowning
Injuries
Man Overboard
Explosions
Capsizing & Sinking
Collisions
Groundings
Attitude
15
Donning Immersion Suits and Personal Flotation Devices
Personal Flotation Devices (PFDs)
No other piece of lifesaving equipment has saved more lives at sea than the personal flotationdevice, your lifejacket.They are designed to keep you floating face up and should do two thingsfor the survivor: KEEP YOUR MOUTH AND NOSE ABOVE THE SURFACE AND MAKE YOU CLEARLY
VISIBLETO RESCUERS.Without flotation in extremely cold water, your ability to tread water or swimis measured in minutes. If you are unconscious or injured, survival time is even less.
There are five types of PFDs that are approved by the U.S. Coast Guard. Selecting a PFD for certainwaters has been made easier by classifying them into five different types.
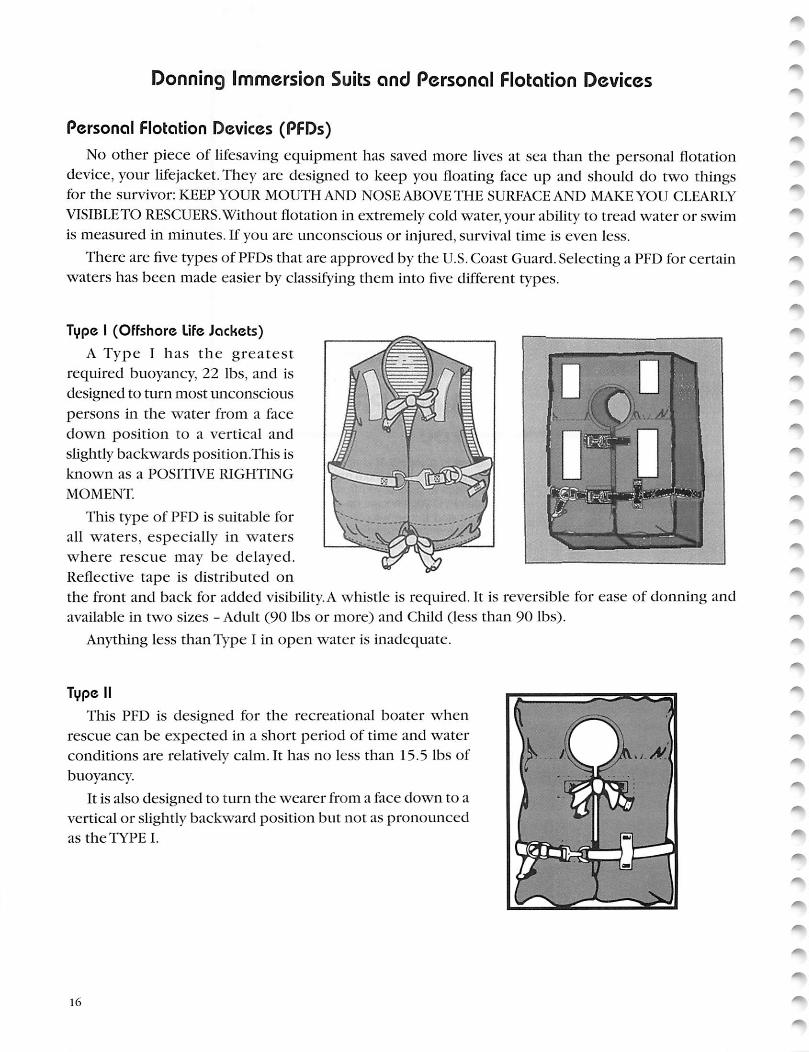
Type I (Offshore Life Jackets)
A Type I has the greatest
required buoyancy, 22 lbs, and is
designed to turn most unconscious
persons in the water from a face
down position to a vertical and
slightly backwards position.This is
known as a POSITIVE RIGHTING
MOMENT.
This type of PFD is suitable for
all waters, especially in waters
where rescue may be delayed.
Reflective tape is distributed onthe front and back for added visibility.A whistle is required. It is reversible for ease of donning andavailable in two sizes - Adult (90 lbs or more) and Child (less than 90 lbs).
Anything less than Type I in open water is inadequate.
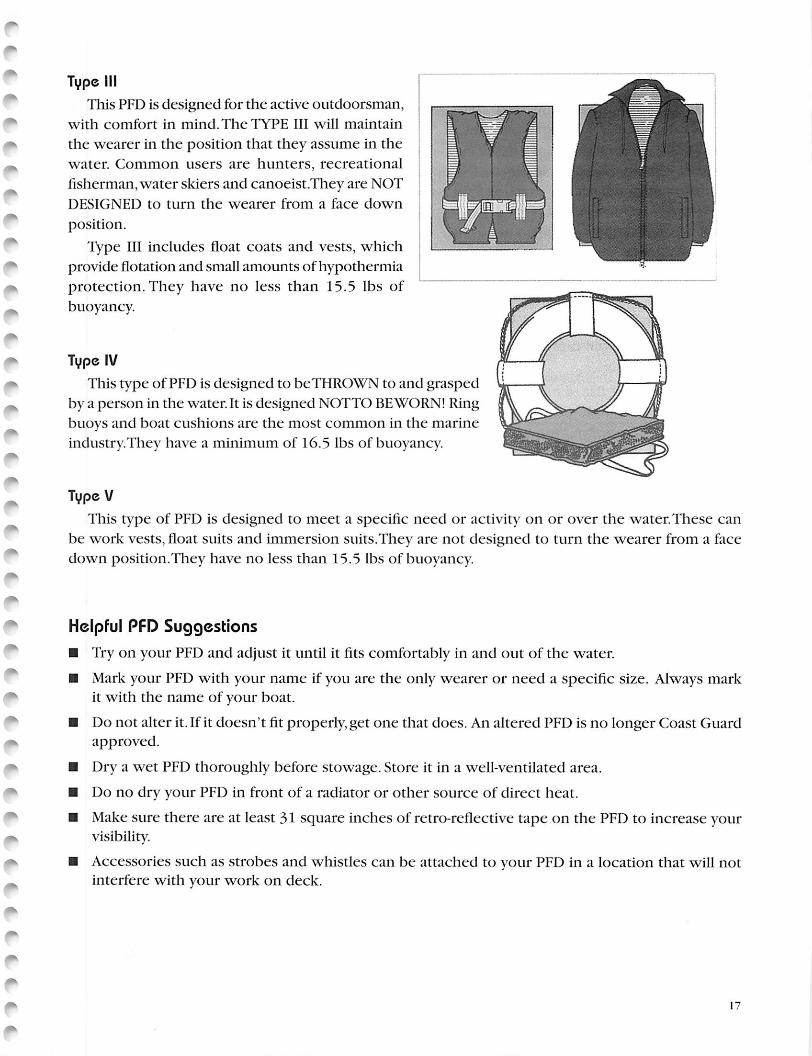
Type II
This PFD is designed for the recreational boater when
rescue can be expected in a short period of time and waterconditions are relatively calm. It has no less than 15.5 lbs of
buoyancy.
It is also designed to turn the wearer from a face down to avertical or slightly backward position but not as pronounced
as the TYPE I.
16
*
~
~
i
i
~
~
~
~
*
~
~
~
~
~
~
~
~
Type III
This PFD is designed for the active outdoorsman,
with comfort in mind. The TYPE III will maintain
the wearer in the position that they assume in thewater. Common users are hunters, recreational
fisherman, water skiers and canoeist.They are NOT
DESIGNED to turn the wearer from a face down
position.
Type III includes float coats and vests, which
provide flotation and small amounts of hypothermiaprotection. They have no less than 15.5 lbs ofbuoyancy.
c~->—
J!
']
H|
1 I ;__.^2B:/ \ /
Type IV
This type of PFD is designed to beTHROWN to and grasped
by a person in the water. It is designed NOTTO BEWORN! Ringbuoys and boat cushions are the most common in the marineindustry.They have a minimum of 16.5 lbs of buoyancy.
Type V
This type of PFD is designed to meet a specific need or activity on or over the water. These can
be work vests, float suits and immersion suits.They are not designed to turn the wearer from a facedown position.They have no less than 15.5 lbs of buoyancy.
Helpful PFD Suggestions
• Try on your PFD and adjust it until it fits comfortably in and out of the water.
• Mark your PFD with your name if you are the only wearer or need a specific size. Always markit with the name of your boat.
• Do not alter it. If it doesn't fit properly, get one that does. An altered PFD is no longer Coast Guardapproved.
• Dry a wet PFD thoroughly before stowage. Store it in a well-ventilated area.
• Do no dry your PFD in front of a radiator or other source of direct heat.
• Make sure there are at least 31 square inches of retro-reflective tape on the PFD to increase yourvisibility.
• Accessories such as strobes and whistles can be attached to your PFD in a location that will notinterfere with your work on deck.
|-
Immersion Suits
Coast Guard approved immersion suits are required for each crew on vessels operating on all U.S.coastal waters above 32 degrees N latitude.
There are many different varieties ofimmersion suits on the market. Some suits are just big overalls;others have boots, detachable gloves, leg zippers and other features. An immersion suit should beequipped with a whistle; an attached light is required on oceangoing vessels of any size.
It should have an inflatable pillow to keep your head and neck out of the water for better thermalprotection and to help eliminate the strain of holding your head up.
Make sure the suit fits you properly; there have been cases of people drowning in suits that weretoo large for them.The suit should form a tight seal around your face. Mark the suit with your nameand the vessel's name with a waterproof marker.
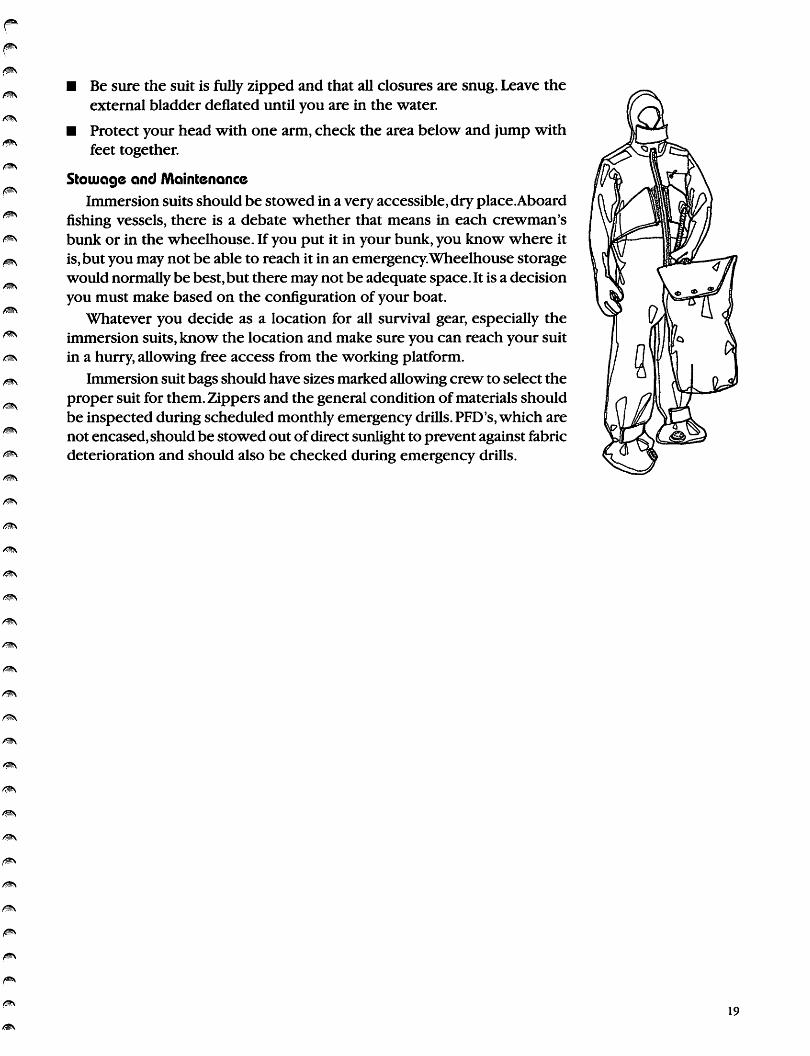
Quick and Safe Donning Procedures
• A sharp jerk on the carrying casewill eject the suit.
• Lay the suit out flat to make sureno parts are folded.
• Remove your boots, but leaveplenty ofwarm clothes on.
• Step into legs of suit while in astable position; if need be, do thisin a sitting position or leaningagainst a support. Put one foot inat a time. With both feet in, pullthe suit up to the waist and adjust feet securely.
• Put one arm in at a time and pull the suit up over the shoulders. Squat down a bit to assist yourselfin getting the head gear on.
• To avoid problems in zipping the suit, arch your back to remove wrinkles in the fabric. If you havea beard, turn your head to one side, so that facial hair is not caught.
• Secure face flap to reduce incoming water.
Once the suit is completely on, squat down and release some of the air trapped in the suit by liftinga piece of the suit off the face with one hand. Secure the Velcro straps around the feet to make thesuit a bit more tailored. Once this is complete, the suit is ready for water entry.
entering the Water
• Enter the water, protecting your head withone arm and step out to the side.
• Avoid facing the water and jumping forward.A slip is more likely to cause a head injury.
• If possible, avoid submerging your head bygently entering the water to prevent seawaterfrom entering the suit through the faceopening.
Huddle
IMMERSION SUITS
Help position
18
• Be sure the suit is fully zipped and that all closures are snug. Leave theexternal bladder deflated until you are in the water.
• Protect your head with one arm, check the area below and jump withfeet together.
Stowage and Maintenance
Immersion suits should be stowed in a very accessible, dry place.Aboardfishing vessels, there is a debate whether that means in each crewman'sbunk or in the wheelhouse. If you put it in your bunk, you know where itis, but you may not be able to reach it in an emergency.Wheelhouse storagewould normally be best, but there may not be adequate space. It is a decisionyou must make based on the configuration of your boat.
Whatever you decide as a location for all survival gear, especially theimmersion suits, know the location and make sure you can reach your suitin a hurry, allowing free access from the working platform.
Immersion suit bags should have sizes marked allowing crew to select theproper suit for them. Zippers and the general condition of materials shouldbe inspected during scheduled monthly emergency drills. PFD's, which arenot encased, should be stowed out ofdirect sunlight to prevent against fabricdeterioration and should also be checked during emergency drills.
19
Hypothermia oncl Cold Water Survival
Hypothermia occurs when the body's CORE temperature drops. Submersion in cold water is amajor cause of hypothermia because water conducts heat away from the body 25 times faster thanair of the same temperature. Hypothermia can also result from a combination of wind and cool orcold temperatures, wet clothing or clothing that is not suitable for the weather.
Although hypothermia can easily occur when air temperatures are above freezing, it can beprevented by using good judgment, wearing layered clothing to stay warm but not sweaty, puttingon rain gear before getting wet, and avoiding being immersed in cold water. It helps to rememberthat 50 percent of your body's heat is lost through your HEAD and NECK.Other high heat loss areasare yourARMPITS, CHEST and GROIN.
Signs and Symptoms
• Uncontrolled shivering • Slurred / slow speech
• Confusion • Poor judgment
• Poor coordination • Drowsiness
• Weak or irregular pulse • Slow / shallow breathing
• Dilated (big) pupils • Unconsciousness
It is sometimes difficult to detect hypothermia because the affected person may not know ormay deny that he is having a problem. In addition, signs and symptoms may be confused with orcomplicated by alcohol.
If you suspect that someone has hypothermia, check the person's pulse for 1 to 2 minutes whendoing your primary survey. Treat the person GENTLY. If he is breathing and has a pulse, carefullyremove his wet clothing and cover him with dry coverings.
To treat for hypothermia, remove the person from the cold environment and remove any wetclothing. Encase the individual in a sleeping bag and provide skin-to-skin contact with a warmperson.
Give warm fluids only after uncontrolled shivering stops, when the person is alert enough to geta cup of hot drink to his mouth by himself without spilling it and can swallow without choking.
Check for and treat other injuries.
20
Preventing Drowning on InitialImmersion
Protective Clothing
Flotation
Slow Entry for Slow Response
Climatize
BodyType (Fat vs. Muscle)
Survival Techniques (Wave Spray Protection andSurvival Swimming)
Stay Out ofWater
21
Abandoning the Vessel
Decision to Abandon
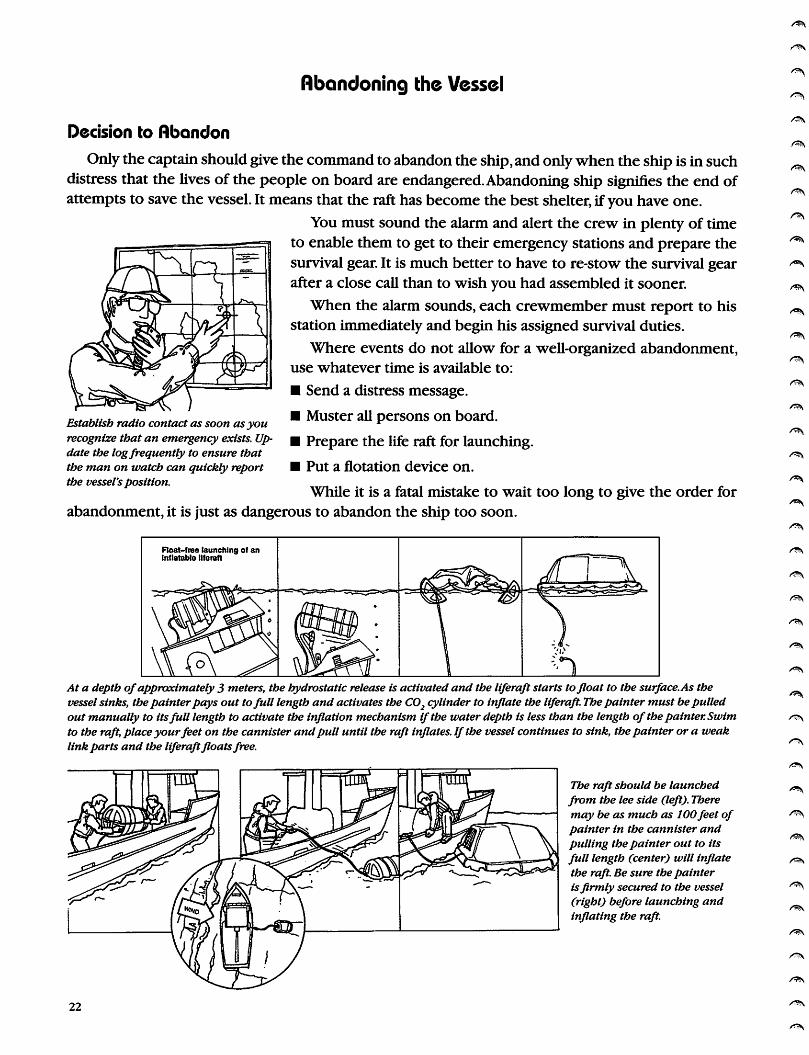
Only the captainshould give the command to abandonthe ship,and only when the ship is in suchdistress that the lives of the people on board are endangered.Abandoning ship signifies the end ofattempts to save the vessel. It means that the raft has become the best shelter, if you have one.
You must sound the alarm and alert the crew in plenty of timeto enable them to get to their emergency stations and prepare thesurvival gear. It is much better to have to re-stow the survival gearafter a close call than to wish you had assembled it sooner.
When the alarm sounds, each crewmember must report to hisstation immediately and begin his assigned survival duties.
Where events do not allow for a well-organized abandonment,use whatever time is available to:
• Send a distress message.
_, .,.. .. . , • Muster all persons on board.Establish radio contact as soon asyou ^
recognize that an emergency exists, up- B Prepare the life raft for launching.date the logfrequently to ensure thattheman on watch can quickly report • Put a flotation device On.the vessel'sposition.
While it is a fatal mistake to wait too long to give the order for
abandonment, it is just as dangerous to abandon the ship too soon.
At a depth ofapproximately 3 meters, the hydrostatic release is activated and the liferaft starts tofloat to the surface. As thevesselsinks, thepainterpays out tofull length and activates the C02cylinder to inflate the liferaft. Thepainter must bepulledout manually to itsfull length to activate the inflation mechanism ifthe water depth is less than the length of the painter. Swimto the raft,placeyourfeet on the cannister andpull until the raft inflates. If the vessel continues to sink, the painter or a weaklink parts and the liferaftfloatsfree.
22
The raft should be launchedfrom the lee side (left). Theremay be as much as 100feet ofpainter in the cannister andpulling the painter out to itsfull length (center) will inflatethe raft. Be sure the painteris firmly secured to the vessel(right) before launching andinflating the raft.
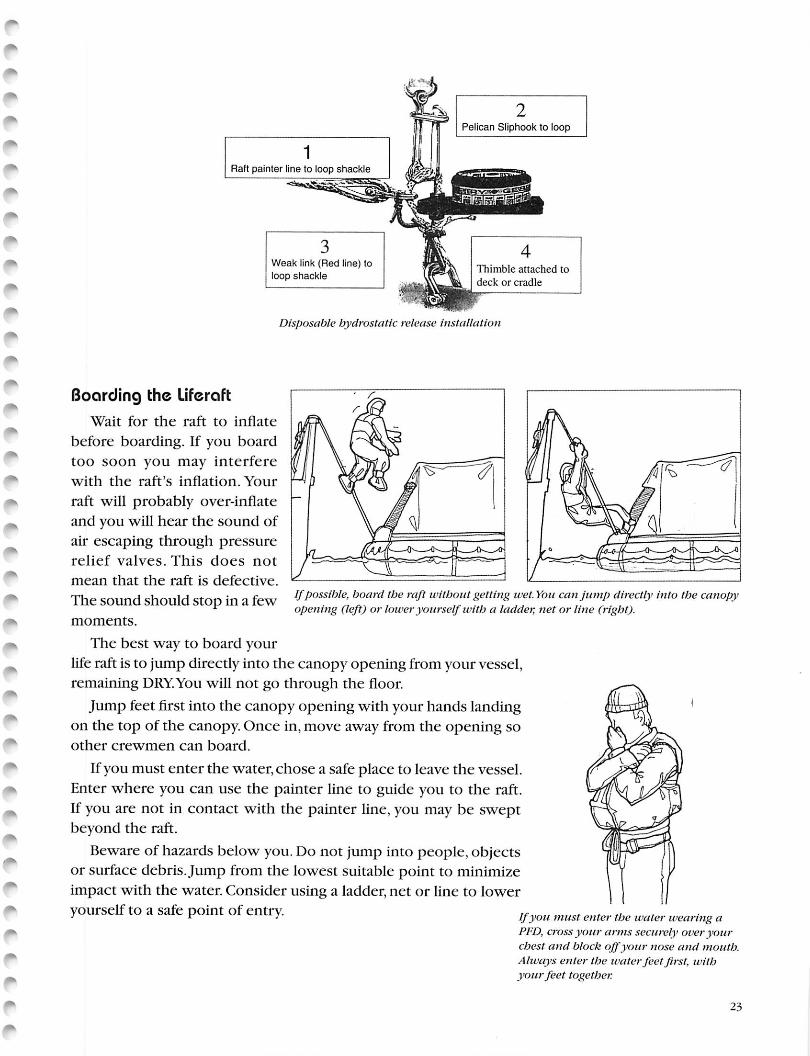
Raft painter line to loop shackle
Weak link (Red line) toloop shackle
Pelican Sliphook to loop
Thimble attached to
deck or cradle
Disposable hydrostatic release installation
Boarding the Liferaft
Wait for the raft to inflate
before boarding. If you board
too soon you may interfere
with the raft's inflation. Your
raft will probably over-inflate
and you will hear the sound of
air escaping through pressure
relief valves. This does not
mean that the raft is defective.
The sound should stop in a few
moments.
The best way to board your
life raft is to jump directly into the canopy opening from your vessel,remaining DRY.You will not go through the floor.
Jump feet first into the canopy opening with your hands landingon the top of the canopy. Once in, move away from the opening soother crewmen can board.
If you must enter the water, chose a safe place to leave the vessel.Enter where you can use the painter line to guide you to the raft.If you are not in contact with the painter line, you may be sweptbeyond the raft.
Beware of hazards below you. Do not jump into people, objectsor surface debris. Jump from the lowest suitable point to minimizeimpact with the water. Consider using a ladder, net or line to loweryourself to a safe point of entry.
all \xr:r:::::fTS '
\s ° /2tf_i-jA_—-o--_<t^-
/ ^—i^_
Ifpossible, board the raft without getting wet. You can jump directly into the canopyopening (left) or loweryourself with a ladder, net or line (right).
Ifyou must enter the water wearing aPFD, cross your arms securely oner yourchest and block offyour nose and mouth.Ahvays enter the waterfeet first, withyourfeet together.
23
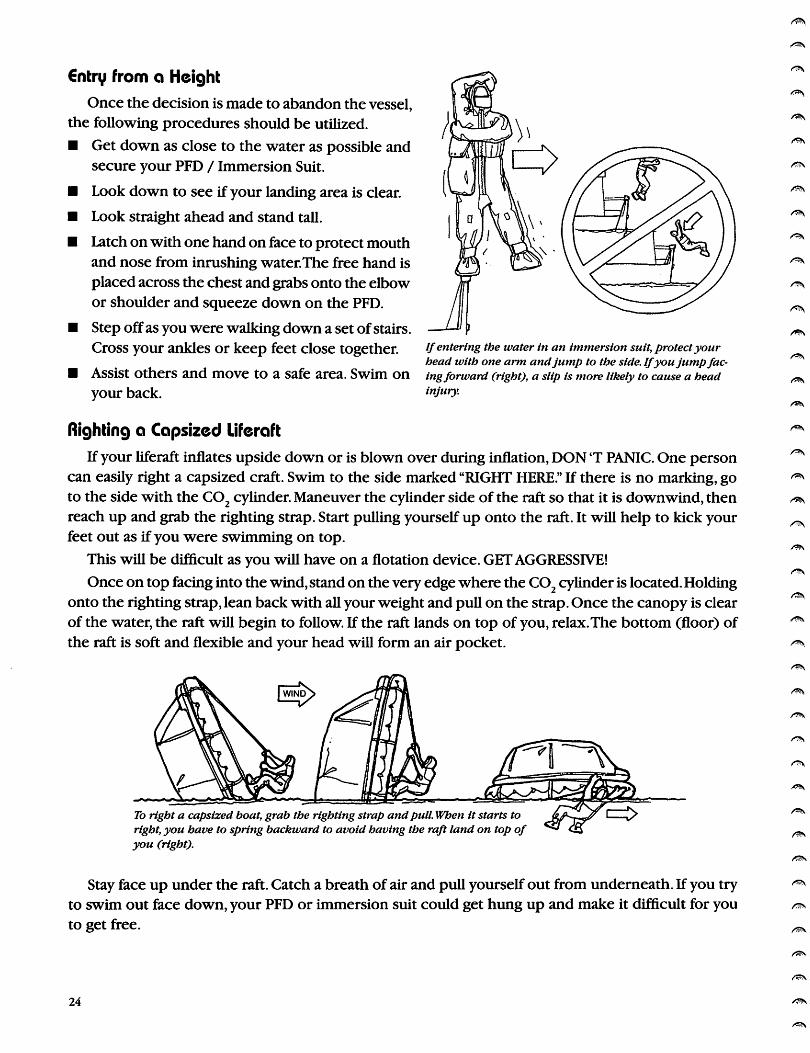
€ntru from a Height
Once the decision is made to abandon the vessel,the following procedures should be utilized.
• Get down as close to the water as possible andsecure your PFD / Immersion Suit.
• Look down to see if your landing area is clear.
• Look straight ahead and stand tall.
• Latch on with one hand on face to protect mouthand nose from inrushing water.The free hand isplaced across the chest and grabs onto the elbowor shoulder and squeeze down on the PFD.
• Step offas you were walking down a set ofstairs.Cross your ankles or keep feet close together.
• Assist others and move to a safe area. Swim on
your back.
Ifentering the water in an immersion suit, protectyourhead with one arm andjump to the side. Ifyoujumpfacingforward (right), a slip is more likely to cause a headinjury.
Righting a Capsized Liferaft
If your liferaft inflates upside down or is blown over during inflation, DON 'T PANIC. One personcan easily right a capsized craft. Swim to the side marked "RIGHT HERE." If there is no marking, goto the side with the C02 cylinder.Maneuver the cylinder side of the raft so that it is downwind, thenreach up and grab the righting strap. Start pulling yourself up onto the raft. It will help to kick yourfeet out as if you were swimming on top.
This will be difficult as you will have on a flotation device. GET AGGRESSIVE!
Once on top facinginto the wind,stand on the very edge where the C02cylinder is located.Holdingonto the righting strap, lean back with all your weight and pull on the strap. Once the canopy is clearof the water, the raft will begin to follow. If the raft lands on top of you, relax.The bottom (floor) ofthe raft is soft and flexible and your head will form an air pocket.
To right a capsized boat, grab the righting strap andpull. When it starts toright, you have to spring backward to avoid having the raft land on top ofyou (right).
Stay face up under the raft. Catch a breath of air and pull yourself out from underneath. If you tryto swim out face down, your PFD or immersion suit could get hung up and make it difficult for youto get free.
24
Survival Once On Board
• Deploy the sea anchor (drogue). Some may automatically deploy. Make sure it is out and functioningproperly.When the raft is on the wave crest, the sea anchor should be in the trough.
• Bail out the raft using bailing bucket and sponge provided. Hands, shoes and caps are alsouseful.
• Close down the entrance to protect the crew from exposure.
• Maintain your raft. Inflate the floor and repair any leaks. It may be necessary to re-distribute your
weight to better stabilize your new home.
• Tend to the injured with the first aid kit contained in the emergency pack. If you have not attendeda first aid class before or lack confidence in your medical skills, it would be advisable to sign up fora course. Remember, ma-in-law may choke on yourT-bone and the skills learned may be useful.
• Locate your survival manual and read instructions aloud for all to hear.
• Assess the scene and make a calm estimate ofyour situation and plan your course ofaction. Assignduties to all uninjured.
• Inventory your emergency pack contents and don't leave items lying around on the floor. Distributeseasick tablets to all even if they have never been seasick.They have never been in a life raft inthe open sea.
• Post a look-out team.Activate your EPIRB and review the proper use of visual distress signals.
• Check the condition of everyone. Use the buddy system to assist each other. Maintain morale andconsistent leadership. Use your sense of humor; it is a powerful tool.
• Distribute food and water but be careful not to waste it. Drink NO seawater even if diluted. Eat
NO fish, turtles or birds that may come near the raft.The fishing kit is for morale, not to eat thefish even if you can cook them with your flare.
• PLAN TO STAY ALIVE AND RETURN HOME TO THE FAMILY!!
25
26
Actions Prior to Abandonment
Alarm Recognition
Muster Location
Personal Shelter Management (Dress for Survival)
Recognize Specific Emergency Duties
Equipment Familiarization
SpecializedTeam Development
Communications
Hazards Complicating Evacuation
Night-Time Evacuation
Injuries
Missing Person
Faulty or No Equipment
PoorWeather Conditions
Panic and Fear
Lack of Leadership
Inexperienced Crew
Initial Hazards Once in the UJater
• Injuries During the Fall
• Cold Water
• Oil & Fire
• Surface Debris
• Dangerous Marine Life
• Missing and Injured Crew
• Crew Separation
• Lack of Preparation

Making a Voice Radio Distress Call and Using Visual Distress Signals
Location Rids for the Mariner
The key to being rescued quickly is to let people know where you can be found. Byusing the fourdetection factors: light, color, sound and movement, you will gain attention.
Yourmost powerful distress tool is your radio. In the event ofan emergency, it is extremely importantto establish radio communication immediately with the Coast Guard or another vessel.
DO NOT WAIT UNTIL THE SITUATION IS OUT OF CONTROL. At that point, there may be nopower to the radio or it may be too late for rescue units to respond.
Having and using marine radios is an integral part of fishing and a valuable aid in an emergency.It is also a privilege granted by the agency that issues the licenses — the Federal CommunicationsCommission (FCC). Emergency marine radio calls are made on VHF channel 16 (156.8 mHz) or SSB2182 kHz.
emergency Calls
There are three internationally recognized radio signals used for marine emergencies. MAYDAY,PAN-PAN, and SECURITY. All three have priority over other radio traffic.
MAYDAY calls also have priority over all other emergency signals.They are to be used only whena vessel or life is threatened by grave and imminent danger and a request is made for immediateassistance.
If you hear a MAYDAY call and it is not answered, you must answer it and log the details of the call.When you can be reasonably sure you will not interfere with other distress-related communications,advise the vessel in distress what assistance you can offer.
MAYDAY RELAY:A11 vessels that are required to have radios are required to relay Maydays that areheard but go unanswered.
To relay an unanswered Mayday, make sure your radio is on and you transmit on channel 16 VHF.
Then state:
1. Mayday relay, Mayday relay, Mayday relay.
2. YOUR vessel's name and call sign.
3. Name and call sign of vessel in distress.
4. Location of vessel in distress.
5. Nature of problem with vessel in distress.
6. Degree of assistance needed.
7. Listen for acknowledgement.
8. Transmit additional requested information.
PAN-PAN (pronounced pahn-pahn) calls are for very urgent messages concerning the safety ofa boat or persons. Examples include urgent storm warnings by an authorized station and/or loss of
steering or power in a shipping lane.To transmit a PAN-PAN message, make sure your radio is on and
you transmit on channel 16 VHF. Then state:
1. PAN-PAN, PAN-PAN, PAN-PAN all stations.
2. Your vessel name and call sign three times.
27
3. Nature of urgent message.
4. Position (latitude and longitude and LORAN are preferred).
5. Total number of people on board.
6. Vessel description (length, color, type, etc.).
SECURITY (pronounced say-cure-i-tay) calls are the lowest priority emergency calls and are usedto alert vessel operators to turn to another station to receive a safety message. SECURITY warnsnearby vessels of a possible hazard.
emergency Position-indicating Radio Beacons (€PIRBs)Vesselsthat areoperatingbeyond the "three-mile line"and aregreaterthan 36' in length arerequired
to have an FCCtype Coast Guard accepted Category 1 406 MHz EPIRB (float free).Vessels less than36'in length beyond the "three mile line" are required to have a Category 2 406 MHz EPRIB.
Drills are to include demonstration of proper use including arming. If you have an EPIRB, turn iton as soon as possible and leave it on. A continuous transmission provides the best hope for rescue.The lanyard attached to the unit should be fastened to the raft or to an individual in the water. MostEPIRB's operate best when floating with the ANTENNAVERTICAL.
Visual Distress Signals
A visual distress signal is anything that makes you BIGGER, BRIGHTEROR DIFFERENT. By yourself,you are a small target; anything you do to make yourself more visible will help rescuers find you.
Visual distress signals are included in the emergency equipment pack aboard your life raft.Theyinclude both pyrotechnics and devices such as flashlights, portable strobe lights, mirrors and distressflags. All have advantages and disadvantages and all are of value only if they are used effectively.
READTHE INSTRUCTIONS — Whatever the signals, always carefully read and follow the affixedinstructions.The signals are very powerful and can cause injury and even worse if not treated withrespect.
Types of and Use of Visual Distress Signals
Parachute Flare
Contained in a plastic canister, the parachute flare produces a bright red flare suspended by aparachute.This flare is activated when you have reason to believe that a rescue craft is in your area.To activate:
• Hold flare vertically, rocket end up.
• Remove the top and bottom caps, holding flare firmly.
• Remove the safety pin from bottom.This allows the firing trigger to be lowered into the ready-tolaunch position.
• Aim slightly downwind and squeeze the trigger up into the canister. BE READY FOR A KICK, ASTHE ROCKETWILL GOTO 1000'.
• The flare will burn for 30-60 seconds. Under ideal conditions the flare is visible up to 30 miles.
28
Pistol Launch Flares
To use this type offlare, load the cartridge into the barrel of the pistoLAim downwind and pull thetrigger.This will activate the signal. It will reach an altitude of 30-50 feet and burn for 8-12 seconds.
Hand-Held Flares
The hand-held flare is designed to produce a bright red distress signal when activated.There aretwo types.
One type has an arrow on the handle and an arrow on the metal flare.To activate:
• Pull the handle down and rotate until the two arrows line up.
• Apply upward force to the handle to activate.
• DO NOT hold onto the flare itself as it becomes very hot.
• If it does not activate after the initial striking, attempt another strike. If it still does not activate,throw it in the water.
• Activate downwind.
The other style of hand held flare requires:
• Lift up on the tape that goes the length of the flare. By doing this, the top side (striker) isexposed.
• To remove the cap, twist it. Hold it out and away from the raft.
• Strike the topside of the cap on the flare end.
• Be careful of the "slag" that will drip, it is extremely hot and dangerous to human skin contact.
Strobe Light
The strobe light is a compact, high-intensity light that is capable of operating continuously for 12hours. It is activated by a "push-on / push-off" button located at the base of the unit.
Signaling Mirror
The signal mirror is one of the best daytime signals available. Aim the mirror into the sun locatingthe beam on your hand or a nearby surface. Look through the aiming hole in the center of the mirrorat the beam. A bright dot should appear. Place the dot toward the rescue craft. Survivors shouldpractice with mirrors constantly since the reflected light signal could possibly be seen by rescuecraft out of the victim's sight or hearing range.
Sea Due
Sea dye marker consists ofa chemical which,when immersed in water,produces a bright greenish-yellow color that is highly visible.To use the dye marker, open the container and swirl it around in thewater. Drift about 20 yards and lower the dye back into the water and create another slick. Continueto do this and you will create a trail for rescue craft to follow. The duration of the sea dye will varyfrom 20 minutes in rough seas to 2 hours in calm sea. Keep the container outside of your survivalcraft, as the dye will spill inside the raft creating a mess.
Floating Smoke Signal
Best seen during the day,the floating orange smoke signal is contained in a waterproof canister.To operate:
• Remove plastic cover.
• Locate activating cord and pull firmly.
29

Throw it into the water immediately.
Within 3-4 seconds, a popping sound will occur and the smoke will be visible.The activation timeis 3 minutes.
Activate downwind, as the smoke will be very pungent.
PtSTOLLAUNCHEO FLARES
Stowage and Maintenance
Store pyrotechnics in a cool, dry, readily accessible place. Each crewmember on board should knowwhere visual distress signals are stowed. One crewmember should be assigned to bring the signalsin an emergency. It is advisable to store a pair of gloves along with pyrotechnics.
Pyrotechnics have an expiration date and need replacement once expired to ensure properfunctioning.
Never aim pyrotechnics directly at rescue craft.This does not encourage good relations with therescue team members.
30
Points to Remember
Hold flare downwind.
Read instructions PRIOR to rescue arriving on scene.
Use them wisely — They are limited in quantity.
Many flares are packed in plastic bags for waterproofing.
/38\
/^\
/^\

Distress Communications Form
Instructions: Complete this form now (except for items 7-10) and post near your radio orradiotelephone.
Speak SLOWLY - CLEARLY - CALMLY
1. Make sure your radio or radiotelephone is on.
2. Select 156.8 MHz (channel 16VHF) or 2182 KHz.
3. Press microphone button and say "MAYDAY, MAYDAY, MAYDAY!!"
4. Say:"THIS IS (your boat name) , (your boat name) , (your call sign).OVER"
5. Release this microphone button briefly and listen for acknowledgement. If no one answers,repeat steps 3 & 4. If there is acknowledgement, or if the Coast Guard or another vesselresponds:
6. Say:"MAYDAY" .(your boat name).
7. DESCRIBE YOUR POSITION in lat/long coordinates, LORAN-C coordinates or range andbearing from a known point.
8. STATE THE NATURE OFYOUR DISTRESS.
9. GIVE NUMBER OF PERSONS ABOARD AND THE NATURE OF ANY INJURIES.
10. ESTIMATE THE PRESENT SEAWORTHINESS OFYOUR BOAT.
11. BRIEFLY DESCRIBEYOUR BOAT, length, masts , power , any additional distinguishing features
., color ., hull type .,trim
12. Say: "I WILL BE LISTENING ON CHANNEL 16 / 2182" (cross out channel that does notapply).
13.End message by saying "THIS ISOVER."
.(your boat name and call sign).
I4.1f your situation permits, stand by the radio to await further communication with the CoastGuard or another vessel.
31
Fire Prevention and Fire Fighting
Fire is even more dreaded at sea than it is ashore. Fishermen faced with a fire at sea can neither
call forprofessionalhelp nor run awayfrom the danger. Shortofabandoning ship in favor ofa tiny liferaft,they must stay onboard and fight the fire themselves whether or not they have any training.
I hope this training program encourages further fire-fighting training,as the time spent today isminimal. I would encourage all participants to contact your local fire department and ask to attend/participate in their portable fire extinguisher training.
Coast Guard statistics reveal that most fires aboard fishing vessels occur in UNATTENDEDMACHINERY SPACES.Typical causes include broken fuel or lube oil lines that spray fuel on hot engineparts, faulty electrical systems, uninsulated exhaust in contact with flammable materials, rags or othercombustibles in the vicinity of hot engines, and spontaneous combustion of oil soaked rags. Otherpotentially high fire danger areas are accommodation spaces and galleys.
Prevention
• Constant awareness of the danger of fire is the responsibility of each and every crewman.Carelessness is a chief cause of fire aboard vessels.
• Each crewman should be:
• Alerted to common fire hazards and taught how to eliminate them.
• Advised of his duties in the event of fire.
• Aware of all means of escape from interior spaces.
• Restrict the use of combustible materials when building, repairing and/or maintaining thevessel.
• Ensure the proper installation of fuel, lube and hydraulic oil lines.
• Exhaust systems are to be properly wrapped and engine rooms, cargo spaces and fuel tanksadequately vented.
• Unattended spaces should be equipped with fire and smoke detectors and alarm systems.
• Vessels must have adequate fixed fire extinguishing systems and/or portable fire extinguishers.
Causes
Spontaneous Ignition
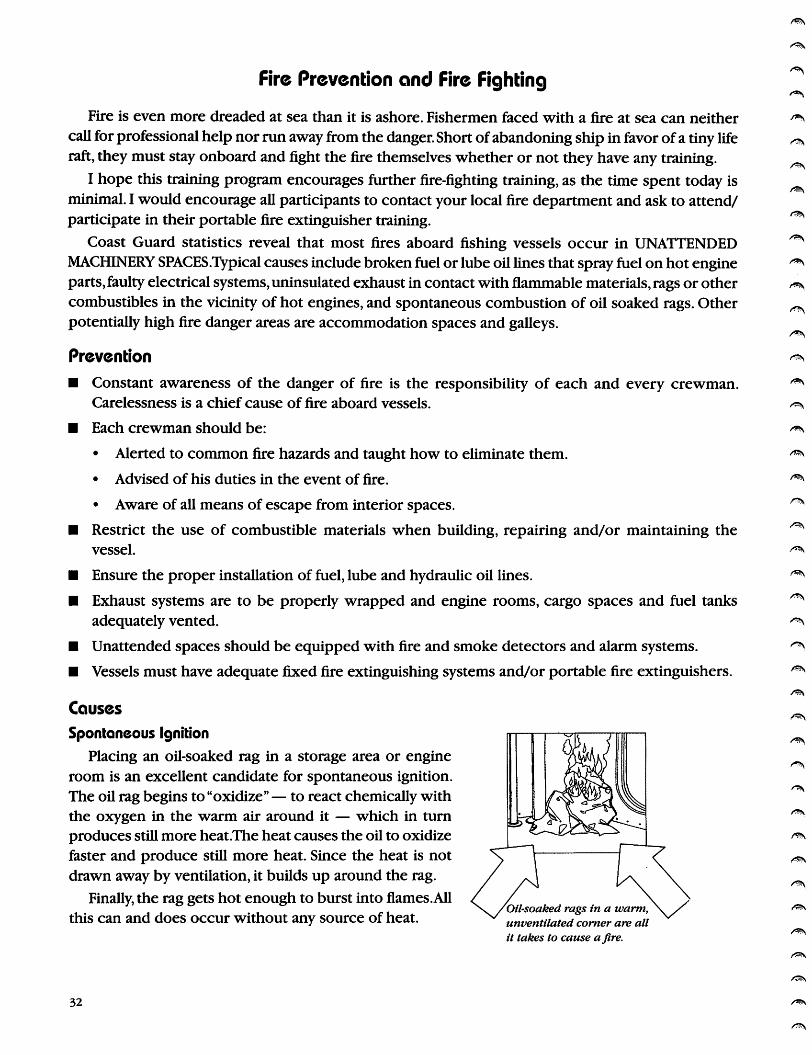
Placing an oil-soaked rag in a storage area or engine
room is an excellent candidate for spontaneous ignition.The oil rag begins to "oxidize" — to react chemically withthe oxygen in the warm air around it — which in turnproduces still more heat.The heat causes the oil to oxidizefaster and produce still more heat. Since the heat is notdrawn away by ventilation, it builds up around the rag.
Finally, the rag gets hot enough to burst into flames.All, \. /Oil-soaked rags in a warm,
this can and does occur without any source of heat. ^ unventiiated comer are ailit takes to cause afire.
32
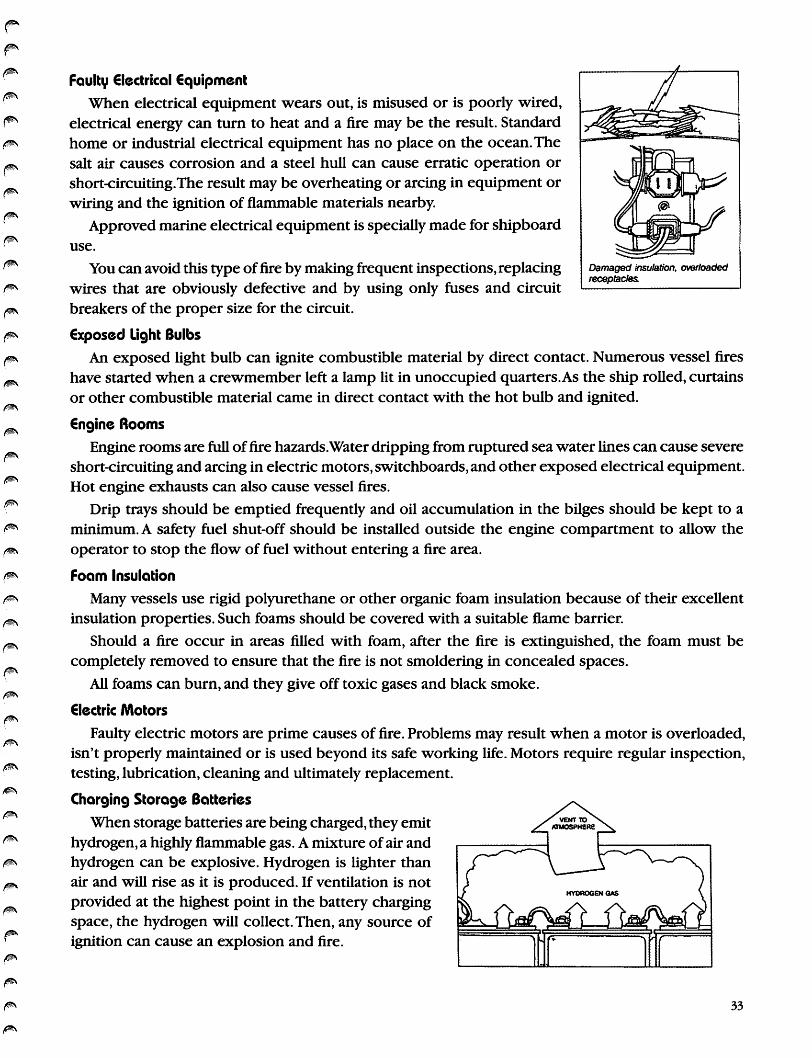
Faulty €lectrical equipment
When electrical equipment wears out, is misused or is poorly wired,electrical energy can turn to heat and a fire may be the result. Standardhome or industrial electrical equipment has no place on the ocean.Thesalt air causes corrosion and a steel hull can cause erratic operation or
short-circuiting.The result may be overheating or arcing in equipment orwiring and the ignition of flammable materials nearby.
Approved marine electrical equipment is specially made for shipboarduse.
You can avoid this type offire by making frequent inspections, replacingwires that are obviously defective and by using only fuses and circuitbreakers of the proper size for the circuit.
Exposed Light Bulbs
An exposed light bulb can ignite combustible material by direct contact. Numerous vessel fireshave started when a crewmember left a lamp lit in unoccupied quarters.As the ship rolled, curtainsor other combustible material came in direct contact with the hot bulb and ignited.
€ngine Rooms
Engine rooms are full offire hazards.Water dripping from ruptured sea water lines can cause severeshort-circuiting and arcing in electric motors, switchboards, and other exposed electrical equipment.
Hot engine exhausts can also cause vessel fires.
Drip trays should be emptied frequently and oil accumulation in the bilges should be kept to aminimum. A safety fuel shut-off should be installed outside the engine compartment to allow theoperator to stop the flow of fuel without entering a fire area.
Foam Insulation
Many vessels use rigid polyurethane or other organic foam insulation because of their excellentinsulation properties. Such foams should be covered with a suitable flame barrier.
Should a fire occur in areas filled with foam, after the fire is extinguished, the foam must be
completely removed to ensure that the fire is not smoldering in concealed spaces.
All foams can burn, and they give off toxic gases and black smoke.
electric Motors
Faulty electric motors are prime causes of fire. Problems may result when a motor is overloaded,isn't properly maintained or is used beyond its safe working life. Motors require regular inspection,testing, lubrication, cleaning and ultimately replacement.
Charging Storage Batteries
When storage batteries are being charged, they emithydrogen, a highly flammable gas. A mixture of air andhydrogen can be explosive. Hydrogen is lighter thanair and will rise as it is produced. If ventilation is notprovided at the highest point in the battery chargingspace, the hydrogen will collect.Then, any source ofignition can cause an explosion and fire.
33

Galley Operation
A ship's galley is a busy, potentially dangerous place.The intense activity, the many people, thelong hours of operation and the basic hazards — open flames, fuel lines,rubbish, and grease or sootbuild up and general poor housekeeping — all add to the danger of a fire.
When liquid fuels are used for cooking, extreme care should be taken to avoid damage to fuellines.You should be constantly alert to leaks in fuel lines and fittings. Everyone who uses the galleyshould know where the fuel line shut-off valves are and the valves must be easy to get at.
Good housekeeping and cleanliness is a must and it doesn't mean just cleaningthe stovetop.
Smoking
Careless smoking is a key fire hazard.Cigarettes and matches must be properlydisposed ofin noncombustible receptacles. Ashtrays should be emptied into metalcontainers with lids, not cardboard boxes used as trash containers. In hazardous
areas,no smoking warnings should be posted and observed. Smoking in bed shouldbe prohibited.
The Fire Triangle
A fire must have HEAT, FUEL and OXYGEN in order to burn.
Remove any leg of this "triangle" and fire cannot occur.
The fuel for a fire can be in the form of flammable solids, liquidsor gases. Liquid fuels burn more intensely than solids becausethey are more easily vaporized.The vapor from a liquid fuel is alsoheavier than air.It is extremely dangerous because it will seek lowplaces, dissipate slowly and travel to distant sources of ignition.
Air contains the oxygen necessary for burning and ignition heatis present in many forms aboard vessels, including flames, spark, friction and spontaneous or internalcombustion.
Removing the Fuel
Theoretically, you could put out a fire by physically dragging the fuel away from the source ofheat,like someone pulling a log out of a campfire.While this may be rarely practical, it is often possible tomove nearby sources of fuel so the fire cannot expand beyond what is already being consumed.
In fire fueled by liquids or gases, it may be possible to extinguish the fire by cutting off the fuelsupply.When a fire is being fed by a leaky hydraulic or diesel line, for example, it can be put out byclosing the proper valve. If a pump is supplying liquid fuel to a fire in the engine room, the pumpcan be shut down. Either way, the source of the fuel is removed and the fire is extinguished.
Removing the Oxygen
A fire can be put out by removing its oxygen, or by lowering the oxygen level in the air to less than16 percent. In open areas,smothering a fire is difficult but not impossible. In smaller open areas, i.e.,fire in a galley trashcan, it may be snuffed out simply by placing a cover tightly over the can blockingthe flow of air to the fire.
To put out a fire in a enclosed compartment, engine room or cargo hold, the space can be starvedofoxygen by completely closing all air-tight hatches, doors, etc.The fire will consume all the availableoxygen as long as no air can continue to enter.
A boat is full offuel sourcesforfire.
34
Removing the Heat
The most common method ofputting out fire is to remove the heat by attacking the fire base withwater. An excellent heat absorber, water destroys the ability of a fire to sustain itself by cooling thefuel, by absorbing the fuel and by absorbing radiant heat from flames.
Stability Hazard
The use of large quantities of water to fight fires may jeopardize the stability of the vessel.Dewatering techniques must be commenced immediately when large quantities of water are used.
WARNING: The use ofwater on electrical fires is not recommended. On electrical fires, water
creates a shock hazard. On oil fires, a solid stream will splash the oil, possibly spreading thefire. Water fog may be used on oil fires.
Spread of Fire
If a fire is attacked quickly and effectively, it can usually be contained and extinguished. If it isallowed to burn freely, however, it will generate great amounts of heat that can spread throughoutthe vessel and ignite new fires wherever fuel and oxygen are present.
Additionally, the heat flame, smoke and gases associated with fire pose many health hazards.Crewmen fighting a fire should use all available protective clothing and respiratory equipment andshould stay low and retreat to fresh air before they are overcome.
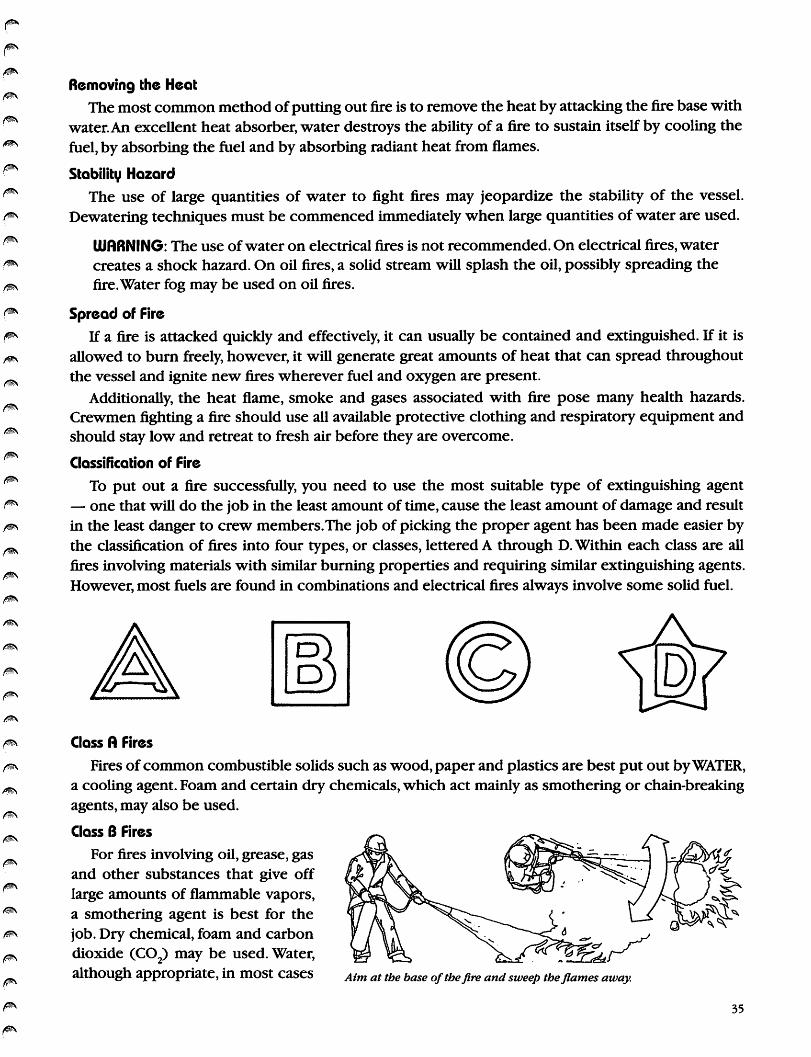
Classification of Fire
To put out a fire successfully, you need to use the most suitable type of extinguishing agent— one that will do the job in the least amount of time, cause the least amount of damage and resultin the least danger to crew members.The job of picking the proper agent has been made easier bythe classification of fires into four types, or classes, lettered A through D. Within each class are allfires involving materials with similar burning properties and requiring similar extinguishing agents.However, most fuels are found in combinations and electrical fires always involve some solid fuel.
Class A Fires
Fires of common combustible solids such as wood, paper and plastics are best put out byWATER,a cooling agent. Foam and certain dry chemicals, which act mainly as smothering or chain-breaking
agents, may also be used.
Class B Fires
For fires involving oil, grease, gas
and other substances that give off
large amounts of flammable vapors,a smothering agent is best for thejob. Dry chemical, foam and carbondioxide (C02) may be used. Water,although appropriate, in most cases Aim at tbe base Qfthefire and sweep theflames away.
35

with inexperienced personnel will only make the fire worse. If the fire is being supplied with fuelby an open valve or a broken pipe, a valve on the supply side must be shut down to stop the fuelsupply.This may put the fire out itself or at least make it easier to put out and allow the use of muchless extinguishing agent.
Class C Fires
For fires involving energized electrical equipment, conductors or appliances, non-conductingextinguishing agents (C02, Halon, dry chemical) must be used, although dry chemical will ruinelectronic equipment.An external generator and main engine shutdown switch should be availableto shut off electrical sources. Always try to de-energize the circuit to remove the chances of shockand the source of ignition.
Class D Fires
These fires may involve combustible metals such as potassium, sodium and their alloys, andmagnesium, zinc, titanium and powdered aluminum.Water should not be used on Class D fires. Itmay add to the intensity or cause the molten metal to splatter.
Hand-held Portable Fire €xtinguishers
Portable extinguishers can be carried to the fire area for a fast attack, butthey contain a limited supply of extinguishing agent.The agent is quicklyused up and continuous application can exhaust the extinguisher in as littleas 8 seconds. For this reason, it is important to back up the lead extinguisherwith additional extinguishers or a hose line. If the first extinguisher fails ordoes not have enough agent to put out the fire completely, the additionalextinguishers can be used to finish the job.
Firefighting Procedures
The first step in fighting a fire is to sound the alarm and alert the captainand crew so the fire can be fought as a team.Vessels have been lost because someone tried to fight a
fire by himselfwithout sounding the alarm. By the time the rest ofthe crew knew what was happeningthe fire was out of control.
The crewmember that discovers a fire or the indications of fire must sound the alarm immediately.When you sound the alarm, be sure to give the exact location of the fire, including the compartmentand deck level.This is important as it confirms the location for the vessel's fire party and gives theminformation regarding the type of fire to expect.The exact location may indicate the need to shutdown certain fuel, electrical and ventilation systems and it indicates what doors and hatches must
be closed to isolate the fire.
size up
Size-up is the evaluation of the fire situation.The fire team leader should determine:
• The class of fire (What combustible materials are burning?).
• The appropriate extinguishing agent.
• The appropriate method of attack.
• How to keep the fire from spreading.
• The required manpower and fire fighting assignments.
Sound the alarm.
36
The first crew to arrive might extinguish a small fire. Larger fires require a coordinated attack andefficient use of manpower and equipment. During size-up, communication and a staging area shouldbe set up.
Communications
Communications with the captain shouldbe established by intercom ora messenger.Communicationswith fire fighting teams must be established and maintained.
Staging Area
The staging area should be established in a smoke-free area, as near as possible to the fire. Anopen-deck location, windward of the fire is ideal. If the fire is below deck deep within the vessel,the staging area should be a location below deck. A location near an intercom, if feasible, would be
helpful in maintaining communications. However, the staging area should not be located where itwill be endangered by fire. All supplies needed to support the firefighting effort should be broughtto the staging area.
Attack the Fire
The attack should be started as soon as possible to gain immediate control of the fire and to preventor minimize its spread.The attack will either be DIRECT or INDIRECT, depending on the fire situation,the equipment available and training level of the crewmen. Direct and indirect attacks differ widelyin how they achieve extinguishments; both are effective when properly employed.
Direct Attack
In a direct attack, fire fighters advance to the immediate fire area and apply the extinguishing agentdirectly into the seat of the fire. An indirect attack should be considered if the heat and smoke makeit impossible to locate or reach the seat of the fire.
Indirect Attack
An indirect attack is employed when it is impossible for fire fighters to reach the seat of the fireor they are not properly prepared as trained firefighters. Generally this is the case when the fireis in the lower portions of the vessel. The success of an indirect attack depends on the completecontainment of the fire.
One technique involves making a small opening low into the fire space, inserting a fire hose nozzleand injecting a water spray. Heat converts the water to steam, which acts as a smothering agent.
Preventing Fire Spread
If a fire can be prevented from spreadingbeyond the space in which it originated,it can usuallybecontrolledandextinguished without extensive damage.To do this,the fire must be virtuallysurroundedon all sides: fire fighters with the hose lines or portable extinguishers must be positioned to coverthe flanks and the spaces above and below the fire.The possibility of the fire traveling through theventing system must also be considered. Many times in a fire at sea, the life rafts, life rings and PFD'sare burned up before it occurs to anyone that the burning vessel might have to be abandoned.
Provisions should be made to safeguard and prepare life saving equipment during fire drills andactual fires.
37
/"^^
Overhaul
Overhaul is begun after the main body of the fire is out. It is actually a combination of twoprocedures: EXAMINATION and CLEANUP The purpose of the examination is to find and extinguishhidden fire and hot embers and to determine if the fire has spread to other parts of the vessel. Atthe same time, debris should be cleaned up and free water removed. Any unsafe conditions shouldbe corrected. ^
When the Fire Is Out
Before a fire can be considered out, the crew must ensure that certain essential steps have beentaken.These include:
• A thorough examination of the fire area to ensure that potential paths of fire spread have beenexamined. /*N
• All smoke and combustion gases have been removed by ventilation. ^
• A reflash watch has been established. Crewmembers must be assigned to do nothing but check ^for re-ignition and to sound the alarm if it occurs. "*
• An examination has been made to see if the fire has damaged the vessel. High temperature can ^cause decks, bulkheads and other structural members to warp or become structurally unsound. ^\
• Any necessary dewatering procedures have been started. /**
• A muster has been conducted to account for all personnel. /ms
/a\
/51\
/Sv
38
/%$\
/$$s

Tactical Considerations
Alarm
Organize and Stage
Restrict and Confine
Attack and Extinguish
Protect Survival Gear
Overhaul and Restore
Portable €xtinguisher Operation
P ullThe Pin
A im Low at Base of Fire
S queeze the Handle
S weep from Side to Side
Fire Size-Up
Where is the Fire?
AreThere People in the Space?
What is Burning? What Class?
What is the Best Agent?
What is the Required Manpower?
Can We Stop It from Spreading?
When the Fire Is Out
Examine the Area Completely
Ventilate Smoke and Gases
Have ReflashWatch
Damage Check to Vessel
Dewatering Procedures
Nose-Count of Personnel
39

Recovering on Individual from the UJater
Man in the UJater
Rule #1 - Don't be the man in the water!!
No one ever plans on falling overboard. A person who unexpectedly finds himself in the wateris a person with fear ... even if they are good swimmers.The fall itself is bound to invite a certainamount of shock and panic.
Upon initial entry into the water, the respiratory system (breathing) will experience a gaspingresponse (short, shallow and irregular breath rate).Another life-threatening reaction that may occurwithin seconds of entering the water is heart attack.This is of particular importance for out-of-shapepeople who fear the water. More often than not, these victims are not wearing a PFD.
Injuries during the fall could render even good swimmers helpless.A successful man-overboardrescue is highly dependent on how well the potential rescuers respond and upon how well the victimcan assist.The following are guidelines in the event you are aVICTIM or RESCUER.
Man Overboard
The success of recovering a person overboard depends on a few factors:
• Ability of victim to alert someone of the fall.
• Ability of rescuer to return to victim.
• Available rescue equipment.
• Drills and procedures practiced prior to incident.
• Temperature of water and time of incident (day vs. night).
If Vou Are the Victim
Things to Consider:
• Am I wearing a PFD?
• Can I swim back to where I fell?
• Did someone see me fall?
• How can I attract attention?
• Will I be able to assist during rescue?
Ring buoysprovideflotationandpermit the victim tobe hauled aboard by handor with a hoisting tackle.A bowline or lifesling canbe used if the person is toolarge to use a ring buoyeffectively.Any debris orfloatable trash thrown nearthe victim will help mark hispositionfor pick up. Strobelights, "day-glow" markersor smokepots attached toa ring buoy will mark thevictim's position.
40

Actions to Take:
• While the fall is taking place, scream to alert others. (Choice of words left to your discretion.)"Help!", "Man overboard!" or a crew member's name is useful.
• Once in the water, surface and assess your situation (Where am I?Who saw or heard me fall?AmI wearing a PFD?)
• Get control of your breathing.
• Remain as calm as possible; realize the chances of survival are in your favor and remember yourcrew likes you....hopefully.
• Begin to draw attention to your location using sound or movement:
- Waving your arms.
- Blowing a whistle.
- Kicking your feet, creating a splash.
- Splashing water with your hands.
• Do not swim if nothing is in sight.
• Utilize your survival skills learned in training (warm water vs. cold water).
• Once spotted, notify rescuer of any injuries or other people in the water.
If Vou Arc the Rescuer
• Sound alarm "MAN OVERBOARD" and give location, i.e. port side, 10 o'clock, NW
• Mark the location where the person fell in by throwing some type of flotation and mark/fixposition on plotter.
• Maintain 100 percent visibility on the victim.
• Communicate with other crew members and captain.
• Once alongside, throw the victim a ring buoy, rope or line.
• Use available equipment to bring victim back on board.
• If water entry/rescue swimmer is required:
- Wear a PFD/Immersion suit and take one for the victim.
- Attach a safety line to the crewmember.
- Toss the PFD to the victim while swimmer stays out of arm's reach.
- Once victim has settled down, tow to safety.Talk to the victim to reassure them.
Recovery
In recent years a lot has been written about the problems of recovering fishermen who have eitherfallen or been washed overboard.There is a variety of man overboard systems that are adoptable formost vessels and circumstances.
For fishing vessels without a dedicated rescue system the following options should beconsidered:
• A technique of circling a person in the water while towing a lifebuoy on a line is an effective wayof making contact, particularly in heavy weather.
41

• A conscious person in the water can be recovered using a rigid ladder, scrambling net or anydevice that can be climbed.
• A lifting strap passed around the back and under the arms of a person in the water, attached to asuitable recovery rope, can prove valuable. Using a mechanicallifting device can assist recoveryon board.
• An inflatable dingy or life raft provides another option for recovery.Your life raft can be inflatedto get people out of oil/gas saturated water and heavy seas.
• A PARBUCKLE can be improvised using ropes or a net in order to recover a person from thewater.
• REMEMBER — arescuer should only enter the water asa last resort. Don't compromise your ownsafety.
Safety Tip
This safety tip concerns swimming fully clothed in cold water. Most people who accidentallyfind themselves in the water are fully clothed or without a lifejacket and suddenly recognize certaindiscomforts.Manygood swimmers have not survived short distance swims due to improper techniquesused when swimming fully clothed.
The key to swimming fully clothed is to use UNDERWATER MOVEMENTS with your hands andfeet. Personal judgment is required concerning the removal of shoes or boots. Some boots will fillwith water or become water soaked and restrict movement. Others may assist in your situation byproviding environmental protection and floatation. Just remember swimming fully clothed requiresstrokes without lifting your arms out of the water.
The swimmer should use a BREAST STROKE, MODIFIED SIDESTROKE or an ELEMENTARYBACKSTROKE.You are not trying out for the Olympic team, just trying to get back to where youfell.
Man-overboard Recovery Methods
There are a number of man-overboard recovery methods.The most commonly used are:
1. One-turn orAnderson', fastest but requires the most skillful shiphandling.
2. Williamson turn for night or low visibility: turns you around and sends you down your previoustrack.
3. Racetrack: for the fastest recovery when you are proceeding at high speed in clear weather.
4. Y-backing: for ships with large turning circles and lots of backing power, proceeding at slowspeeds.
Large ships often use a small boat to recover a man from the water. Smaller vessels will use theboat-recovery method as well when the sea is very rough or there is little chance of getting the manclose alongside. Swimmers with PFDs or immersion suits and tending lines should be ready to gointo the water.
No matter which recovery method is used, the same basic principles and methods apply. Swingthe stern away from the person with full rudder. If possible, stop the shaft before the person reachesthe screw.Always assign someone to do nothing but keep the man in the water in sight.
The folllowing are step-by-step explanations of the four most common recovery methods.
42

Explanation:1) Put the rudder over full
in the same direction as the
man (this swings the sternaway from him). For example,if a person fell over the starboard side, put the rudderover full to starboard. Stopthe engine.
WILLIAMSON TURN
2) When clear of the man,go ahead with the engine.Continue using full rudder.
3) When the heading is 60degrees beyond the originalcourse, shift the rudder to fullover in the opposite directionwithout having steadied on acourse. 60 degrees is proper
PRIMARY USE ANALYSIS
Advantages Disadvantages
Used in reduced Simplicity Slow
visibility becauseit makes good the Makes good the Takes the boat a
original track. original track relatively greatdistance from
Used when it is the man. whichbelieved that a man fell may result inoverboard some time losing sight of himpreviously but he is notin sight.
Explanation:1) Put the rudder over full
in the same direction as theman (this swings the sternaway from him). For example, if a person fell over thestarboard side, put the rudder over full to starboard.Stop the engine.
ANDERSON OR ONETURN
2) When clear of theman. go ahead full. Continue using full rudder.
3) When about two-thirdsof the way around, back theengine two-thirds or full. Stopthe engines when the man iswithin about 15 degrees ofthe bow, then ease the rud-
PRIMARY USE ANALYSIS
Advantages Disadvantages
Used by vesselswhich have consider
able power availableand a tight turningcircle.
Fastest recoverymethod.
Requires veryskillful ship-handling becauseof the lack of astraight approachto the man.
for many vessels, but theexact amount must be determined through trial and error.
4) Come to the reciprocalof the original course, usingfull rudder. For example, ifyour original course was 090degrees, you should besteady on 270 degrees after
der and back the enginesas required to attain theproper final position (sameas that for the Williamsonmethod).
4) Many variations of thismethod are used. They differ primarily in the use ofone or both engines on twin
turning.5) Use the engines and
rudder to get into properfinal position: vessel upwindof the man and dead in the
water with the man alongside, well forward of thepropellers.
screw vessels, and the mo-merit at which they arestopped and backed toreturn to the man andtighten the turn. The variation used should reflect individual vessel characteristics, sea conditions, personal preferences, etc.
43

44
Explanation:1) A variation of the one-
turn method which providesa desirable straight final approach to the man.
2) Put the rudder over fullin the same direction as the
man (this swings the sternaway from him). For exam-
RACETRACK TURN
pie, if a person fell over thestarboard side, put the rudder over full to starboard.Stop the engine.
3) When clear of theman, go ahead full andcontinue using full rudderuntil you come to thereciprocal of the original
PRIMARY USE ANALYSIS
Advantages Disadvantages
Used in good visibilitywhen a straight finalapproach leg is desired.
Straight finalapproach legmakes it easier
to attain the proper final position.
Ship will return tothe man if he islost from sight.
Reasonably fast.
Effective whenwind was from
beam on originalcourse.
Slower thanone-turn method.
Explanation:1. Put the rudder over full
in the same direction as theman (this swings the sternaway from him). For exam-
Y-BACKING
pie, if a person fell over thestarboard side, put the rudder over full to starboard.Stop the engine.
2. When clear of the
PRIMARY USE ANALYSIS
Advantages Disadvantages
Used by vessels with The vessel Backing intolow height of eye. remains compar the wind and seaThe vessel remains atively close to may result incomparatively close to the man. poor control ofthe man, making it the vessel.easier to keep him insight.
course For example, if youroriginal course was 090degrees, steady up on 270degrees after turning.
4) Hold the reciprocalcourse long enough so youcan make a straight finalapproach to the man on theoriginal course.
man, back the engine withfull power, using oppositerudder.
3. Go ahead, using theengines and rudder to at
5) Use full rudder to turnto the man.
6) Use the engine andrudder to get in the properfinal position (the same asfor other recovery methods).
tain the proper final position(same as for the otherrecovery methods).
/3y
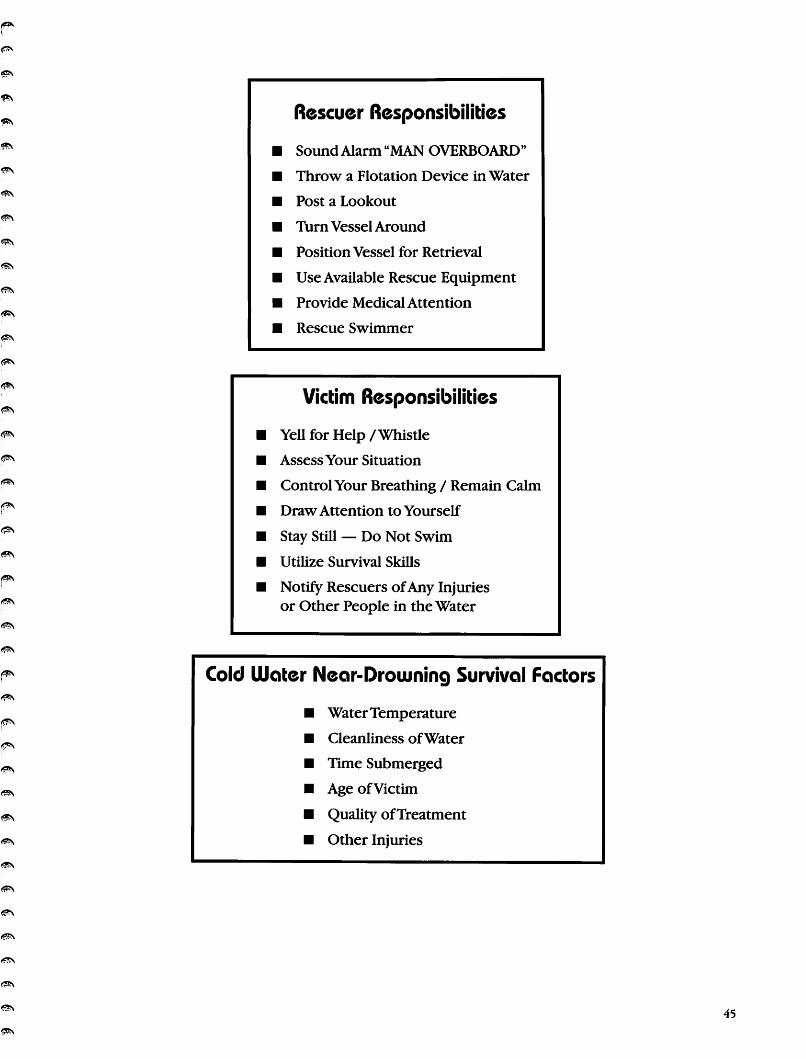
Rescuer Responsibilities
Sound Alarm "MAN OVERBOARD"
Throw a Flotation Device in Water
Post a Lookout
TXirn Vessel Around
PositionVessel for Retrieval
Use Available Rescue Equipment
Provide Medical Attention
Rescue Swimmer
Victim Responsibilities
Yell for Help/Whistle
AssessYour Situation
ControlYour Breathing / Remain Calm
Draw Attention toYourself
Stay Still — Do Not Swim
Utilize Survival Skills
Notify Rescuers ofAny Injuriesor Other People in the Water
Cold UJater Near-Drowning Survival Factors
• WaterTemperature
• Cleanliness ofWater
• Time Submerged
• Age ofVictim
• Quality ofTreatment
• Other Injuries
45
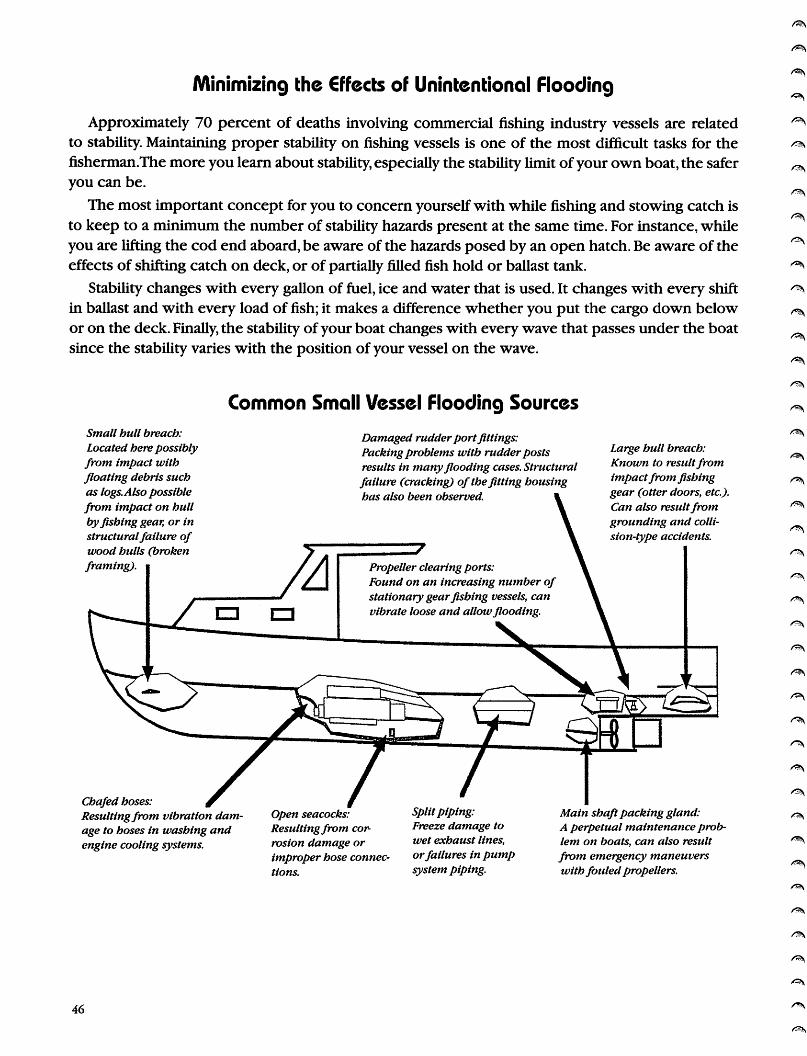
Minimizing the €ffects of Unintentional Flooding
Approximately 70 percent of deaths involving commercial fishing industry vessels are relatedto stability. Maintaining proper stability on fishing vessels is one of the most difficult tasks for thensherman.The more you learn about stability, especially the stability limit of your own boat, the saferyou can be.
The most important concept for you to concern yourself with while fishing and stowing catch isto keep to a minimum the number of stability hazards present at the same time. For instance, whileyou are lifting the cod end aboard, be aware of the hazards posed by an open hatch. Be aware of theeffects of shifting catch on deck, or of partially filled fish hold or ballast tank.
Stability changes with every gallon of fuel, ice and water that is used. It changes with every shiftin ballast and with every load of fish; it makes a difference whether you put the cargo down belowor on the deck. Finally, the stability ofyour boat changes with every wave that passes under the boatsince the stability varies with the position of your vessel on the wave.
Small hull breach:
Located here possiblyfrom impact withfloating debris suchas logs. Also possiblefrom impact on hullbyjishing gear, or instructuralfailure ofwood hulls (broken
framing).
Chafed hoses:Resultingfrom vibration damage to hoses in washing andengine cooling systems.
46
Common Small Vessel Flooding Sources
Damaged rudderportfittings:Packing problems with rudderpostsresults in manyflooding cases. Structuralfailure (cracking) of the fitting housinghas also been observed.
ttPropeller clearing ports:Found on an increasing number ofstationary gearfishing vessels, canvibrate loose and allowflooding.
Large hull breach:Known to resultfromimpactfrom fishinggear (otter doors, etc.).Can also resultfromgrounding and collision-type accidents.
Open seacocks:Resultingfrom corrosion damage orimproper hose connections.
Splitpiping:Freeze damage towet exhaust lines,
orfailures in pumpsystem piping.
Main shaftpacking gland:A perpetual maintenanceproblem on boats, can also result
from emergency maneuverswithfouledpropellers.

Some Suggestions for Preserving Adequate Stability
The United States Coast Guard, in conjunction with the Commercial Fishing IndustryVessel AdvisoryCommittee, recommends the following measures.You should consider this as preliminary guidance onmatters influencing the safety of fishing vessels as specifically related to preserving vessel stability.
• All doorways and other openings through which water can enter the hull or deckhouses shouldbe closed in adverse weather and when not in use.
• All closure devices should be maintained on board in good working condition.
• Hatch covers and flush deck scuttles should be kept securely closed when not in use duringfishing.
• All deadlights should be maintained in good condition and securely closed in bad weather.
• All fishing gear and other large weights should be stowed, prevented from shifting and placed aslow as possible.
• Care should be taken to maintain pull from fishing gear in line with the vessel's longitudinalcenterline and to avoid maneuvering with trawls offthe quarters or beams. (Trawls offthe quartersor beam generate tremendous overturning forces that can easily capsize a vessel).
• The point of action of the weight is at the hoist block of the frame or point of suspension. (Haulback pull points should be shifted to lower points during trawl operations.) This lessens themagnitude of potential overturning forces generated when the trawl moves off the longitudinalcenterline of the vessel.
• The gear to release the deck load on fishing vessels that carry catch such as herring on deckshould be kept in good working order for immediate use when necessary.
• Freeing ports in bulwarks should always be open while underway
• When the weather deck is prepared for the carriage of deck loads by division with pound boards,there should be slots between them for adequate size to allow an easy flow ofwater to the freeingports, i.e., good drainage.
• Never carry fish in bulk without first being sure that the portable divisions in the fish hold areproperly installed.THE CARGO MUST NOT SHIFT!!
• Minimize the number of partially filled tanks. Free surface can severely impair your vessel'sstability.
• Observe any instructions given regardingthe filling ofwater ballasttanks. Remember that partiallyfilled tanks can be dangerous.They generate free surface.
• Closing devices provided for vents to fuel tanks should be secured in bad weather.
• Be alert to the danger of following or quartering seas. These may cause heavy rolling and/ordifficult steering. If excessive heeling or yawing occurs reduce speed, alter course or both.
• Do not overload. Overloading increases draft and decreases reserve buoyancy, which decreasesstability.
• Avoid icing conditions. Standing wire rigging will ice up to a greater extent than struts or yards.If icing cannot be controlled, leave the area.
• Maintain at least 1 foot of freeboard at all times.
41

Preserving UJater Integrity
1. Allwatertight compartments should have a meansof being pumped. In one-compartment typevessels,there should be at least two bilge suctions with one at the deepest part of the bilge andone at the stern.
2. All valves and pumping systems should be marked as to function.
3. Bilge water lever alarms should be installed in all watertight compartments. Alarms are to beaudible and visible.
Damage Control / emergency Repair
1. Prior to vessel departure, inspect condition and proper working order of all engines, auxiliarymotors, impellers, hoses and valves, which make up the pumping system.
2. All bilge suction lines shall be provided with screens.
3. Bilge is to be kept free of debris to ensure proper discharge of bilge water.
4. Spare partsand engine repairkits should be stowed aboard in the event that a pump system needsrepair.
5. Materials such as steel plate patches, repair clamps, wooden plugs or any material that can beused to stop water from entering the vessel and the tools needed to fasten or hold the materialin place, shall be stowed aboard.
48
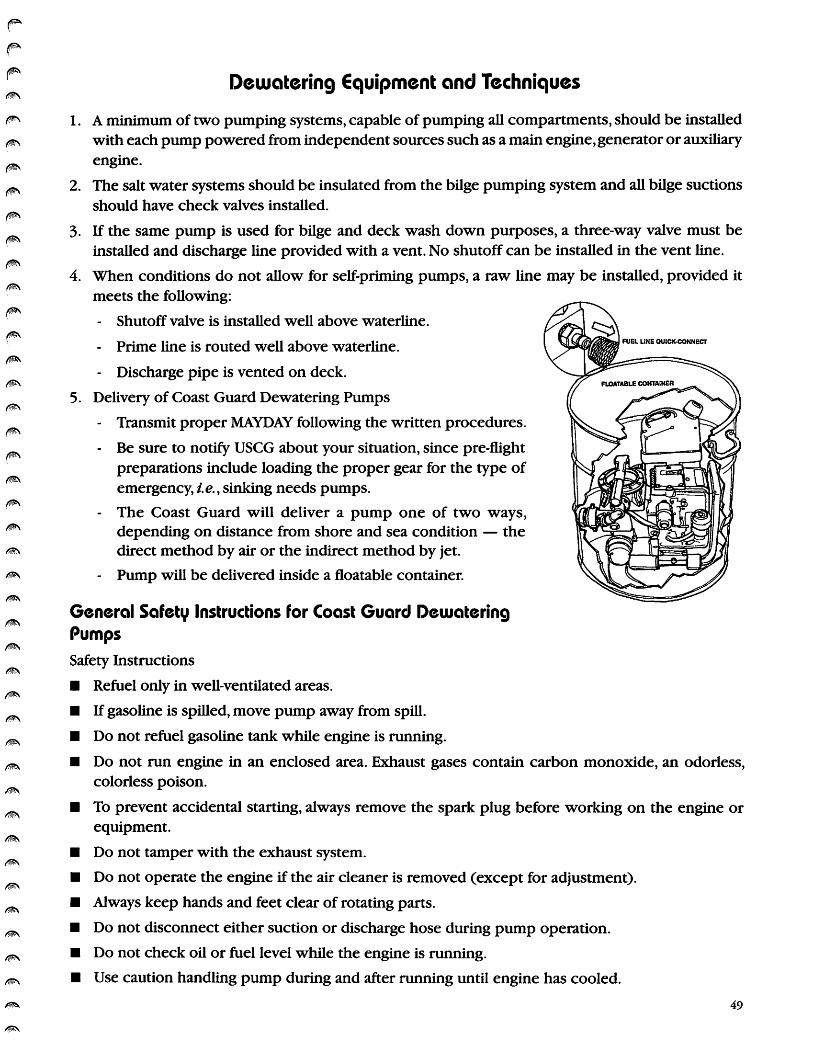
Deuiatering equipment and Techniques
1. A niinimum of two pumping systems, capable of pumping all compartments, should be installedwith each pump powered from independent sources such as a main engine, generator or auxiliaryengine.
2. The salt water systems should be insulated from the bilge pumping system and all bilge suctionsshould have check valves installed.
3. If the same pump is used for bilge and deck wash down purposes, a three-way valve must beinstalled and discharge line provided with a vent. No shutoff can be installed in the vent line.
4. When conditions do not allow for self-priming pumps, a raw line may be installed, provided itmeets the following:
- Shutoff valve is installed well above waterline.
- Prime line is routed well above waterline.
- Discharge pipe is vented on deck.
5. Delivery of Coast Guard Dewatering Pumps
- Transmit proper MAYDAY following the written procedures.
- Be sure to notify USCG about your situation, since pre-flightpreparations include loading the proper gear for the type ofemergency, i.e., sinking needs pumps.
- The Coast Guard will deliver a pump one of two ways,depending on distance from shore and sea condition — thedirect method by air or the indirect method by jet.
- Pump will be delivered inside a floatable container.
General Safety Instructions for Coast Guard DewateringPumps
Safety Instructions
• Refuel only in well-ventilated areas.
• If gasoline is spilled, move pump away from spill.
• Do not refuel gasoline tank while engine is running.
• Do not run engine in an enclosed area. Exhaust gases contain carbon monoxide, an odorless,colorless poison.
• To prevent accidental starting, always remove the spark plug before working on the engine orequipment.
• Do not tamper with the exhaust system.
• Do not operate the engine if the air cleaner is removed (except for adjustment).
• Always keep hands and feet clear of rotating parts.
• Do not disconnect either suction or discharge hose during pump operation.
• Do not check oil or fuel level while the engine is running.
• Use caution handling pump during and after running until engine has cooled.
49
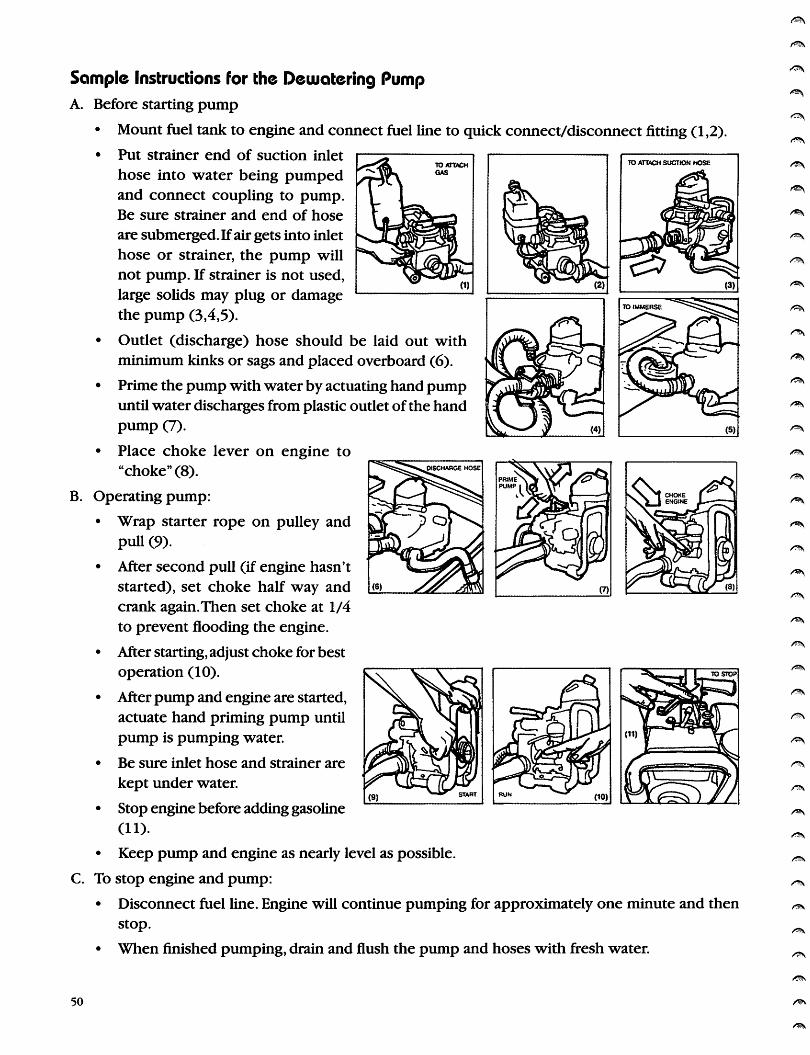
Sample Instructions for the Dewcitering PumpA. Before starting pump
• Mount fuel tank to engine and connect fuel line to quick connect/disconnect fitting (1,2).
• Put strainer end of suction inlet
hose into water being pumpedand connect coupling to pump.Be sure strainer and end of hose
are submerged. If air gets into inlet
hose or strainer, the pump willnot pump. If strainer is not used,
large solids may plug or damagethe pump (3,4,5).
• Outlet (discharge) hose should be laid out withminimum kinks or sags and placed overboard (6).
• Prime the pump with water by actuating hand pumpuntil water discharges from plastic outlet of the handpump (7).
• Place choke lever on engine to"choke" (8).
B. Operating pump:
• Wrap starter rope on pulley and
pull (9).
• After second pull (if engine hasn'tstarted), set choke half way andcrank again.Then set choke at 1/4to prevent flooding the engine.
• After starting, adjust choke for bestoperation (10).
• After pump and engine are started,actuate hand priming pump untilpump is pumping water.
• Be sure inlet hose and strainer are
kept under water.
• Stop engine before adding gasoline
(11).
• Keep pump and engine as nearly level as possible.
C. To stop engine and pump:
• Disconnect fuel line. Engine will continue pumping for approximately one minute and thenstop.
• When finished pumping, drain and flush the pump and hoses with fresh water.
50
TO ATTACH SUCTION HOSE

Guidelines for Hoisting to CG Helos
Initial Communications
• Position (latitude / longitude)
• Any Injuries
• State ofVessel
• Signaling Devices Onboard
• Open Areas to Hoist to (usually port quarter)
Preparation for Hoisting
• If Underway: Bow Facing 30-45 right of wind line
• If DIW: Bow Facing 0-90 right of wind line
• Clear Hoisting Area: snag hazards, antennae, booms
• Life Jackets
• Somebody on Radio if Possible
During Hoisting
• Ground the Device
• Tending Trail Line
• Disconnecting Device
(Don't hook cable to
boat)
• Any Problems: Adviseimmediately over radio
Helicopterstatic electricity
\ /
WARNING
A helicopter inflight builds up astatic charge that must be removedprior to contact between anyportion ofthe helicopter and an individual on the surface.Allow the hoist equipment toground itselfon the boat or contactthe waterprior to touching.
51
Somple Briefing to Pass to Vessels Prior to Hoisting
"A Coast Guard helicopter is proceeding to your position and should arrive at approximatelyMaintain a radio watch on MHz / kHz Channel VHF / FM; the helicopter
will attempt to contact you. Provide a clear area for hoisting, preferably on the port stern. Lower allmasts and booms that can be lowered. Secure all loose gear. Keep all unnecessary personnel clear ofthe hoist area.When the helicopter arrives, change course to place the wind 30 degrees on the portbow and maintain a steady course and steerageway.As the helicopter approaches, gale force windsmay be produced by the rotors, making it difficult to steer.The helicopter will provide all of theequipment for the hoist.A line will probably be trailed from the helicopter for your crew to guidethe rescue device as it is lowered to the deck. Before handling the rescue device, allow it to touchyour vessel.This will discharge static electricity. If you have to move the rescue device from the hoistarea to load the patient, unhook the cable from the rescue device and lay the loose hook on thedeck so the helicopter can retrieve it. Do not attach the loose hook or the cable to your vessel.Thehelicopter may move to the side while the patient is being loaded. Have the patient wear a lifejacketand attach any important records, along with a record of medications that have been administered.If possible, brief the patient on the instructions pictured on the rescue device. When the patientis securely loaded, signal the helicopter to move into position and lower the hook. After allowingthe hook to ground on the vessel, re-attach it to the rescue device. Signal the hoist operator with a"thumbs up" when you are ready for the hoist to begin.As the rescue device is being retrieved, tendthe trail line to prevent the device from swinging.When you reach the end of the trail line, gentlytoss it over the side."
Actions Prior to Rescue
• Follow Instruction from Crew
• Tend to Injured / They Go First
• Transfer Organization
• Prepare Safety Line for Transfer
• Wear Flotation DuringTransfer
• Stay in Raft ifTransfer is Unsafe
• Take yourTime.You're AlmostThere.
52

emergency Instructions
F/V.
General Instructions
1. All crew members and passengers are responsible for knowing their assigned emergency dutiesand stations.
2. All crew members are responsible for knowing the location of the ship's lifesaving and emergencyequipment.
3. All crew members and passengers shall participate in all emergency drills and training sessions.
4. Newly reported personnel should report to for safetyemergency or orientation.
5. If you are in doubt as to any of your responsibilities as specified in this bill, ASK THE CAPTAINfor clarification.
€mergency Signals
Fire and €mergencu Signal ( )
The Fire and Emergency Signal shall be a continuous blast on the ships whistle with the samesignal sounded simultaneously on the General Alarm for a period of not less than 10 seconds.
Man Overboard Signal ( )
The Man Overboard Signal shall be 3 Long Blasts of the ship's whistle with the same signal soundedsimultaneously on the General Alarm, with the signal to be sounded a minimum of four times.
Abandon Ship Signal (******* )
The Abandon Ship Signal shall be at least seven (7) short blasts followed by one (1) long blast onthe ships whistle, with the same signal sounded simultaneously on the General Alarm.
53

Planning emergency Drills
The objective of an emergency drill is to train the crew and maintain and measure their capabilityto respond properly and in a timely way when faced with an emergency condition. Drills shouldinvolve the entire crew and be conducted as if a real emergency exists.
Every drill should be planned in advance to be effective and efficient.
(1) emphasize a Specific Aspect:
Emphasize a single aspect of responding to an emergency, although every drill should contain allthe steps necessary in a real emergency. Do not attempt to teach the crew everything at once. Focusingon a single aspect simplifies the drill, increases the chances of that aspect being remembered duringan emergency, and keeps the time required for a drill within an acceptable limit.
(2) Select a Suitable Location:
The location for the drill should be appropriate for the aspect being emphasized. For example, adrill that focuses on life raft deployment should be held at the life raft station.
(3) Write a Scenario:
All drills should be realistic; therefore the emergency should be describable. Preparing a writtenscenario is recommended to allow the person in charge to follow through the drill withoutinadvertently changing the condition of the drill.
(4) Vary the Schedule:
The day and time of drills should be varied to ensure that all crew members get instruction andpractice in the jobs they will be required to do in an emergency.Varying the schedule with little orno notice will allow the supervisors to access the crew's readiness to respond to emergencies. Drillsshould not be held on the same day of the week at the same hour.
(5) Avoid Undue Risk:
Drills should avoid exposing the crew or vessel to situations that may place them in jeopardy.However, avoiding all risk should not be a basis for failure to test some of the equipment. For example,launching lifeboats in a mild sea can entail some risk; this risk can be reduced to a negligible level withproper maintenance and training.The benefits of operating this equipment to increase the chanceof successful deployment in a real emergency are high and therefore worthwhile.
54

How to Conduct effective Drills
Be Realistic
• Scenarios should be as realistic as possible.
• Crews should feel some pressure; pressure is normal. Each crew member should understand hisor her personal responsibility to be safe.
Be Spontaneous
• Don't always announce drills ahead of time; but always announce a drill as a drill.
• Don't always conduct drills at the same time or places.Try them at night, in rain — be creative.
Do Hands-on Drills
• Retention for hands-on learning is 90 percent.
• Crew members should touch equipment as much as practical.
• Familiarity with equipment during both night and day should be stressed.
Moke Drills Progressive
• Start with a simple walk-through and build skills and speed, but never include running.
• Progress to more complicated scenarios.
• Throw in "curves" to make scenarios more interesting.
Build Teamwork
• Build on the team that you already have.Teamwork will increase efficiency and save lives.
• Crew members should cross-train to cover each other's responsibilities in the event of injury toothers. All hands should participate in drills.
Be Positive
• Drills should not have a punitive cost and should never be used to harass, intimidate or frustrate.Drills can be fun ... a chance to feel good about those you must count on in an emergency.
Debrief All Drills
• A drill is not complete until it is debriefed.
• Each member should talk about what was learned and how it could be done better.
55
Drill Topic: Fire on Board
%
SCENARIO: Fire is caused by a faulty stove, clothing placed too close to an electrical heater, frayedinsulation on electrical wiring against a bulkhead, an oversized light bulb in a bunk light or otherappropriate cause.
SETTING UPTHE DRILL: This drill is best run while underway,at the beginning of a trip and withno gear in the water. Strobe lights or a red rag can simulate fire.Tape can be used to block offpassages due to "smoke." This drill can easily evolve into an abandon ship drill.
INITIATING THE DRILL: Tell the crew member that there is smoke and/or flames coming out of thestove / state room / bulkhead.When the crew member is clear on how to correctly report the fire,the drill begins. Keep the drill moving by telling the crew how effectively they are controlling thefire as the drill proceeds.The fire can spread or be extinguished, depending on their efforts.
CRITICAL POINTS TO LOOK FOR DURING THE DRILL:
Does the person discovering the fire immediately sound the alarm?
Does the person on watch alert all crew members? How?
Are Coast Guard and other vessels made aware of the problems?
Does entire crew recognize the Fire Signal?
How soon is entire crew aware of the emergency?
Are any crew members unaware of the emergency due to an inoperative signal or lack ofcommunication?
Does crew report information such as source and size of fire, and number of personsinvolved? ^
Is communication to the wheelhouse sufficient to allow operator to maneuver vessel to
minimize the effect of wind on the fires?
Does crew communicate with each other?
Is simulated distress signal called off once fire is under control?
Does crew provide good backup for lead firefighter?
~
~
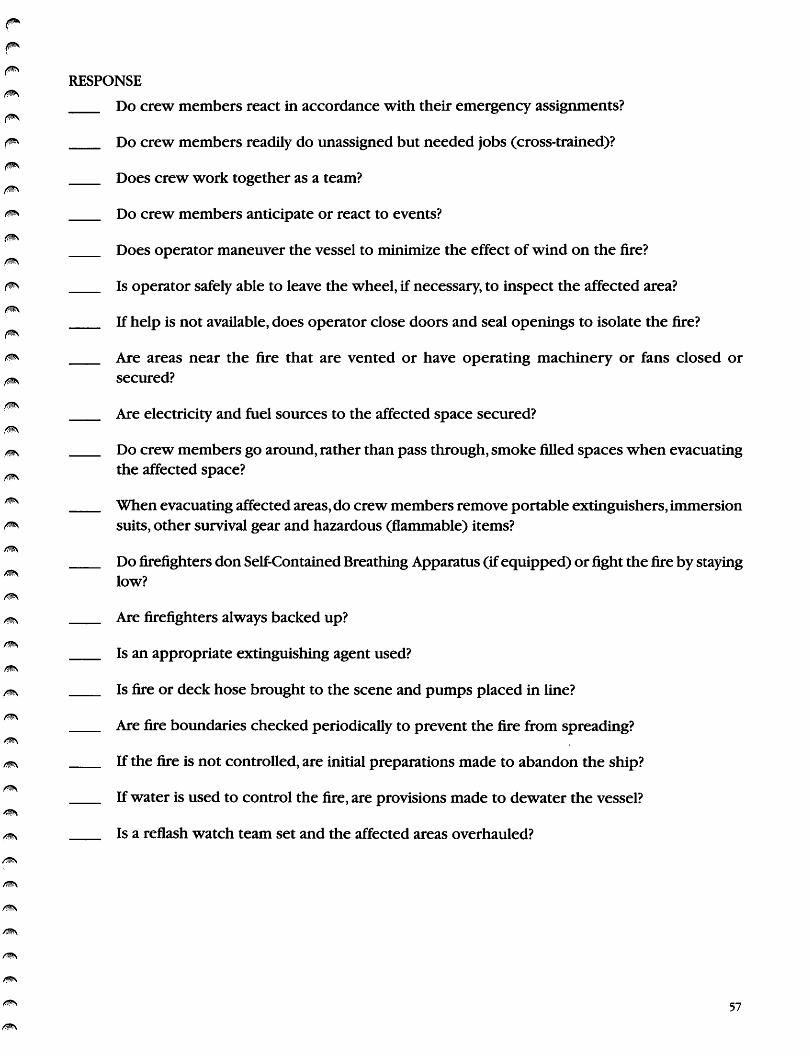
RESPONSE
Do crew members react in accordance with their emergency assignments?
Do crew members readily do unassigned but needed jobs (cross-trained)?
Does crew work together as a team?
Do crew members anticipate or react to events?
Does operator maneuver the vessel to minimize the effect of wind on the fire?
Is operator safely able to leave the wheel, if necessary, to inspect the affected area?
If help is not available, does operator close doors and seal openings to isolate the fire?
Are areas near the fire that are vented or have operating machinery or fans closed or
secured?
Are electricity and fuel sources to the affected space secured?
Do crew members go around, rather than pass through, smoke filled spaces when evacuatingthe affected space?
When evacuating affected areas, do crew members remove portable extinguishers, immersionsuits, other survival gear and hazardous (flammable) items?
Do firefighters don Self-Contained Breathing Apparatus (if equipped) or fight the fire by stayinglow?
Are firefighters always backed up?
Is an appropriate extinguishing agent used?
Is fire or deck hose brought to the scene and pumps placed in line?
Are fire boundaries checked periodically to prevent the fire from spreading?
If the fire is not controlled, are initial preparations made to abandon the ship?
If water is used to control the fire, are provisions made to dewater the vessel?
Is a reflash watch team set and the affected areas overhauled?
57

58
Fire
Notify wheelhouse immediately to sound alarm and call MAYDAY.
Shut off air supply to the fire, close hatches,ports, doors,ventilatorsand similar openings.
Deenergize the electrical systems supplying the effected space, if possible.
Assemble portable fire extinguishers / water hoses to fight the fire. Do not use water onelectrical fires.
If the fire is in the machinery space, shut off the fuel supply and ventilation systems andactivate the fixed extinguisher system, if installed.
Maneuver the vessel to rninimize the effect of wind on the fire.
Check adjoining spaces to prevent spread of fire. Move survival equipment that could bedamaged by the fire.
Once extinguished, make sure to clean up debris so a reflash does not occur.
If unable to control the fire, immediately notify the Coast Guard and other vessels in thevicinity.
_ Move personnel away from the fire, have them put on lifejackets, and if necessary, prepare toabandon the vessel.
*When reporting the fire, did the crewmember see an open flame or smoke? Smoke can traveland mislead the fire team about the exact location.Well-marked safety signs should be placed byevery exit so a crewmember does not become disoriented in a smoke-filled compartment.
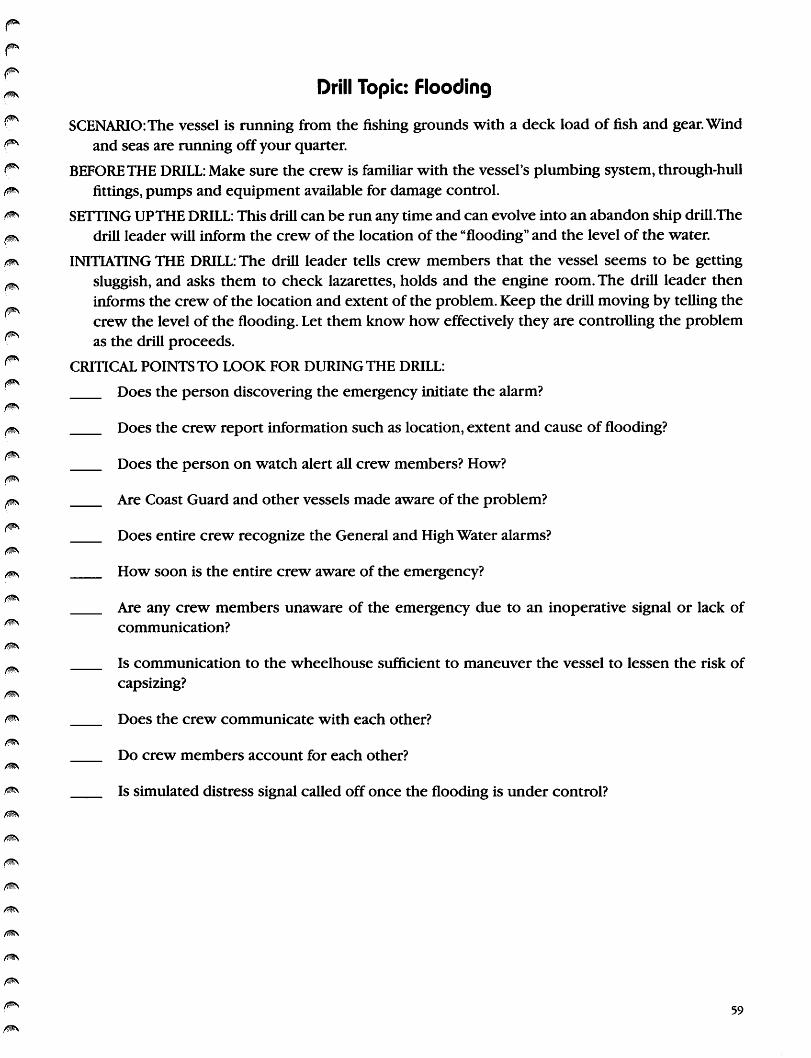
Drill Topic: Flooding
SCENARIO:The vessel is running from the fishing grounds with a deck load of fish and gear.Windand seas are running off your quarter.
BEFORETHE DRILL:Make sure the crew is familiar with the vessel's plumbing system, through-hullfittings, pumps and equipment available for damage control.
SETTING UPTHE DRILL: This drill can be run any time and can evolve into an abandon ship drill.Thedrill leader will inform the crew of the location of the "flooding" and the level of the water.
INITIATING THE DRILL: The drill leader tells crew members that the vessel seems to be getting
sluggish, and asks them to check lazarettes, holds and the engine room. The drill leader theninforms the crew of the location and extent of the problem. Keep the drill moving by telling thecrew the level of the flooding. Let them know how effectively they are controlling the problemas the drill proceeds.
CRITICAL POINTS TO LOOK FOR DURING THE DRILL:
Does the person discovering the emergency initiate the alarm?
Does the crew report information such as location, extent and cause of flooding?
Does the person on watch alert all crew members? How?
Are Coast Guard and other vessels made aware of the problem?
Does entire crew recognize the General and High Water alarms?
How soon is the entire crew aware of the emergency?
Are any crew members unaware of the emergency due to an inoperative signal or lack ofcommunication?
Is communication to the wheelhouse sufficient to maneuver the vessel to lessen the risk of
capsizing?
Does the crew communicate with each other?
Do crew members account for each other?
Is simulated distress signal called off once the flooding is under control?
59
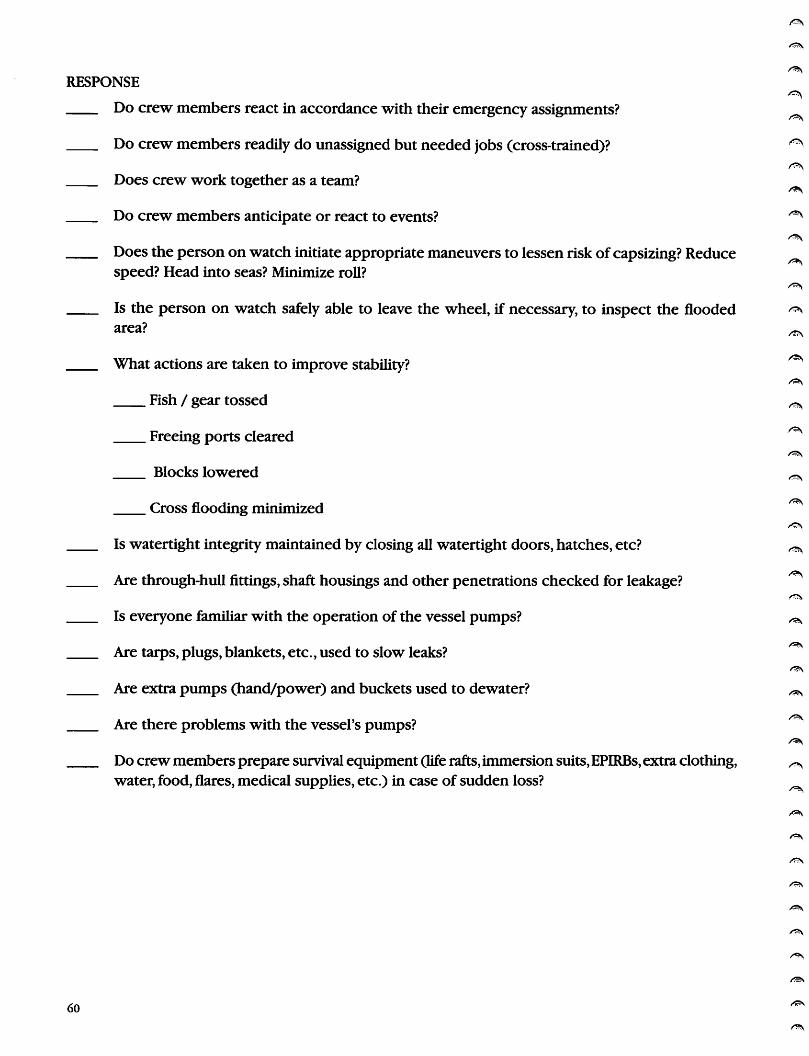
RESPONSE
Do crew members react in accordance with their emergency assignments?
Do crew members readily do unassigned but needed jobs (cross-trained)?
Does crew work together as a team?
Do crew members anticipate or react to events?
Does the person on watch initiate appropriate maneuvers to lessen risk ofcapsizing? Reducespeed? Head into seas? Minimize roll?
Is the person on watch safely able to leave the wheel, if necessary, to inspect the floodedarea?
What actions are taken to improve stability?
Fish / gear tossed
Freeing ports cleared
Blocks lowered
Cross flooding minimized
Is watertight integrity maintained by closing all watertight doors, hatches, etc?
Are through-hull fittings, shaft housings and other penetrations checked for leakage?
Is everyone familiar with the operation of the vessel pumps?
Are tarps, plugs, blankets, etc., used to slow leaks?
Are extra pumps (hand/power) and buckets used to dewater?
Are there problems with the vessel's pumps?
Do crew members prepare survival equipment (life rafts, immersion suits, EPIRBs,extra clothing,water, food, flares, medical supplies, etc.) in case of sudden loss?
60
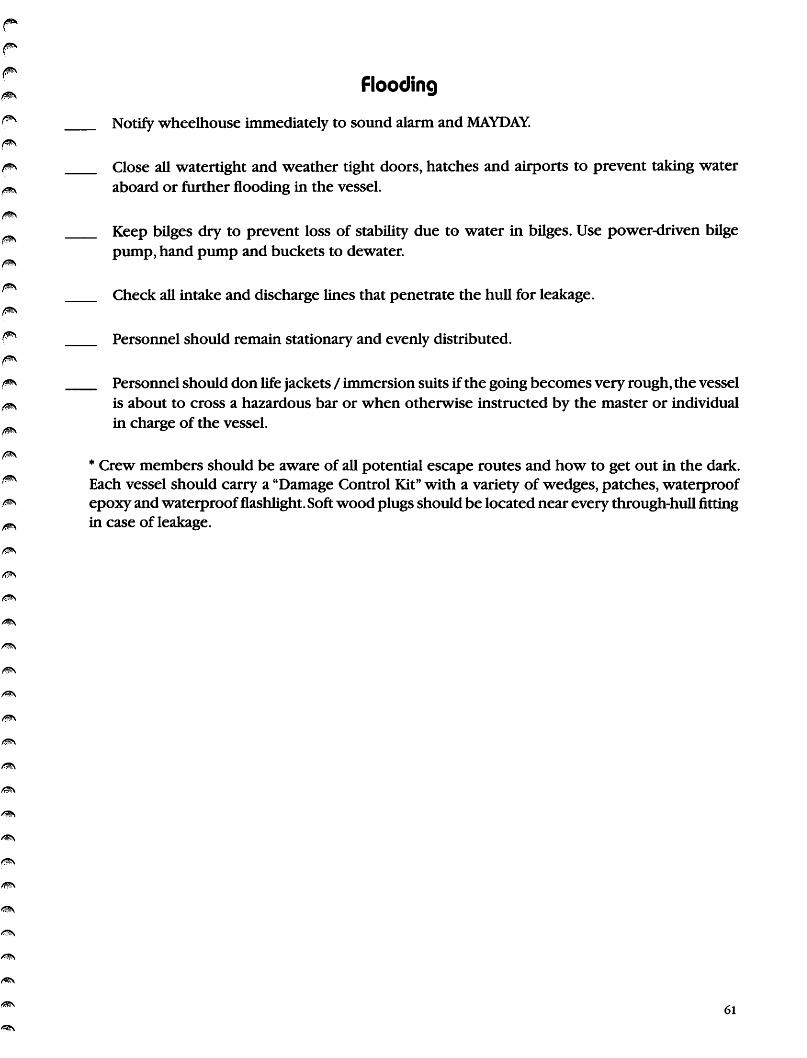
Flooding
_ Notify wheelhouse immediately to sound alarm and MAYDAY.
_ Close all watertight and weather tight doors, hatches and airports to prevent taking wateraboard or further flooding in the vessel.
_ Keep bilges dry to prevent loss of stability due to water in bilges. Use power-driven bilgepump, hand pump and buckets to dewater.
_ Check all intake and discharge lines that penetrate the hull for leakage.
_ Personnel should remain stationary and evenly distributed.
_ Personnel should don life jackets / immersion suits if the going becomes very rough, the vesselis about to cross a hazardous bar or when otherwise instructed by the master or individualin charge of the vessel.
* Crew members should be aware of all potential escape routes and how to get out in the dark.Each vessel should carry a "Damage Control Kit" with a variety of wedges, patches, waterproofepoxy and waterproof flashlight. Soft wood plugs should be located near every through-hull fittingin case of leakage.
61
Drill Topic: Abandon Ship
SCENARIO: Despite the crew's best efforts to control the fire or the flooding, the situationgets outof control and the drill leader gives the order to abandon ship.
SETTING UPTHE DRILL:This drill can be added to the end of a fire or flooding drill to save time andmake the drills more challenging.To prevent the fire or flooding drill from being cut short, thedrill leader should tell the crew not to abandon ship until the order is given.The crew will onlysimulate launching life rafts,activating EPIRBs and abandoning the vessel. However, immersion suitsshould be donned and appropriate survivalequipment brought to the abandon ship station.
INITIATINGTHE DRILL:When the fire or flooding drill has been concluded, the abandon ship signalwill be sounded over the ship's alarm system.
CRITICAL POINTS TO LOOK FOR DURINGTHE DRILL:
Does the person on watch alert all the crew members? How?
Are Coast Guard and other vessels made aware of the problem?
Does entire crew recognize the Abandon Ship Signal?
62
Are any crewmembers unaware of the emergency due to an inoperative signal or lack ofcommunication?
Does the crew communicate with each other?
Are all crew members accounted for?
Are signals used before abandoning ship to attract nearby assistance?
Are all crewmember's able to make adequate MAYDAY call and find the vessel's position?

RESPONSE
Do crew members react in accordance with their emergency assignments?
Do crew members readily do unassigned but needed jobs (cross-trained)?
Does crew work together as a team?
Do crew members anticipate or react to events?
Do crew members know their abandon ship station?
Do obstructions block escape routes or access to survival equipment?
Is life raft painter always secured (simulated) once life raft is released?
Do all hands have an immersion suit of a size that fits appropriately even with deck clothingon?
Do all crew members completely don their immersion suits in 60 seconds?
Does the crew use a buddy system in donning suits and launching rafts?
Does the crew simulate tossing throwable devices overboard?
Does the crew gather an EPIRB, extra clothing, water, food, flares, log and any other survivalequipment and are these items protected from washing overboard?
Are watertight doors and hatches closed, if there is time, before abandoning the vessel?
Do crew members simulate entering the water properly wearing immersion suits?
Can all crew members describe how and when to launch a life raft and entry procedures?
Is crew aware of initial procedures once on board the life raft?
Can all crew members describe how to operate and test EPIRBs?
Is the EPIRB tested and logged at the end of the drill?
If flares are lit, is the Coast Guard notified?
63

Abandon Ship
Prior to abandoning yourvessel,the following actions shouldbe completed,astime and circumstancesallow:
Sound the alarm and send your MAYDAY.
All crew members don extra clothing and immersion suits / PFDs.
Prepare to launch liferaft or other survival craft.Release and take your EPIRB.
64
_ Gather extra supplies that may be useful for your survival (clothing, food, water, flares, cellphones, etc.).Throw buoyant objects over the side if possible to increase visibility.
_ Close all watertight and weather tight doors.
_ Report to the pre-established muster station and prepare to abandon ship as a group.
_ If possible, jump directly into your inflatable life raft to remain dry. If not possible, jump intothe water close to the painter line and pull yourself to the raft.
_ Assist others to the raft, i.e.,non-swimmers / injured.Use your whistle on your PFD/ Immersionsuit to let others in the water know of your location.
_ Once all crew are accounted for,perform initial actions ofcutting the painter, paddle out ofthedanger area, deploy the sea anchor, close entrances if necessary, bail out and repair leaks.
* Most abandonments occur at night. Drills should be conducted at this time to reduce thepossibility of crew panic. Drills should also include how to deal with an injured crewmember.Once the decision is made to leave the vessel, take everything you may need, as you may not beable to ever return to the vessel.
Drill Topic: Person Overboard
SCENARIO:While hauling gear during sloppy weather, a deck hand is washed overboard by a largewave or falls overboard while clippinga 5 gallonbucket over the side.The crew member is wearinga floatation device equipped with a light and whistle. Other boats are visible in the area.
BEFORE THE DRILL: Be sure the crew is familiar with the vessel's person overboard recovery plan,including:
- How the skipper plans to pull a person back on board.
- What equipment is required.
- Skipper's requirements for wearing flotation while on deck.
- Rules for being on deck in rough weather or at night.
This drill is best run while underway with no gear in the water, and with the person overboardrepresented by a FLOTATION DEVICE with a personal marker light attached.
INITIATING THE DRILL: The drill leader chooses a "victim" and informs the crew members about
the overboard incident.The drill leader then throws the flotation device overboard and advises
another crew member of the person overboard. The "victim" does not participate in the drilldirectly, but observes the crew's reaction to the scenario and helps keep track of the followingcritical points.
CRITICAL POINTS TO LOOK FOR DURING THE DRILL:
Does the person discovering the emergency initiate the alarm?
Does the person discovering the emergency tell the wheelhouse which side of the vessel thevictim fell off?
Does the person on watch alert all crew members? How?
Are Coast Guard and other vessels made aware of the problem?
Does the entire crew recognize the Man Overboard signal?
How soon is the entire crew aware of the emergency?
Is communication to the wheelhouse sufficient to bring the vessel to the victim?
Does the crew communicate with each other?
Is the simulated distress signal called off after the victim is rescued?
65

RESPONSE
Do crew members react in accordance with their emergency assignments?
Do crew members readily do unassigned but needed jobs (cross-trained)?
Does the crew work together as a team?
Does the person discovering the emergency throw a marker?
Does the person discovering the emergency continually keep the victim in sight and point?
Does the person on watch use electronic position fixing devices to mark the position of theperson overboard?
Does the person on watch initiate a proper maneuver?
How long does it take to rig the recovery device?
Is the crew in place, including a rescue swimmer in an immersion suit with a safety line, bythe time the vessel is back alongside the victim?
Is the recovery device and vessel's hauling equipment used effectively?
Do any crew members endanger themselves by leaning perilously over the side to recoverthe victim?
Does the crew recognize hypothermia and know appropriate treatment for the victim?
Is medical help sought for treatment of hypothermia or other injuries, if needed?
66

Person Overboard
Throw a ring life buoy (or anything that will float) as close to the individual as possible.
Post a lookout to keep the individual in the water in sight and communicate with others theposition of the victim.
Launch the rescue boat or other apparatus and maneuver it to pick up the individual in thewater.
Have a crewmember put on a lifejacket or immersion suit, attach a safety line to the crewmember and have the crewman standby to jump into the water to assist in recovering theindividual in the water, if necessary.The crew member should take a flotation device with him
to give the victim.
Prepare medical equipment to provide medical care, if necessary.
If the individual overboard is not immediately located, notify the Coast Guard and other vesselsin the vicinity.
Continue searching until released by the Coast Guard.
*Remember the current affects a man in the water.The addition ofa whistle on each ring buoy willassist in locating the person more quickly, reduce victim fatigue and develop victim confidence.
67

68
Seaman's Prayer
Heavenly Father, as I sail theseseas I know You createdthem. You placed inthem all the sea creatures, both large and small. Then showing Your masteryof it all, you walked on the water. Lord, You make the sea to be calm and You
make it rage infury.This sea, Lord, can bless and it can destroy. For me Father,itprovides my living;itfeeds and shelters myfamily.It takes mefrom themforlongperiods oftime. In these times I depend upon Youfor Devine protection. Ipray,Master, for Your guiding hand upon the helm, keep mefrom danger andharm. Guide my vesseluntil I am safe in harboragain.May myprayersand
thoughts be blessed by You.. .Amen.