determination of cement or lime content … of cement or lime content in treated aggregate by the...
TRANSCRIPT

- 1 -
California Test 338STATE OF CALIFORNIA— BUSINESS, TRANSPORTATION AND HOUSING AGENCY March 2000
DEPARTMENT OF TRANSPORTATIONENGINEERING SERVICE CENTERTransportation Laboratory5900 Folsom Blvd.Sacramento, California 95819-4612
DETERMINATION OF CEMENT OR LIME CONTENT INTREATED AGGREGATE BY THE TITRATION METHOD
CAUTION: Prior to handling test materials, performing equipment setups, and/or conducting this method, testers arerequired to read “SAFETY AND HEALTH” in Part 6, Section G of this method. It is the responsibility ofthe user of this method to consult and use departmental safety and health practices and determine theapplicability of regulatory limitations before any testing is performed.
A. SUMMARY
This method contains the procedures for determiningthe percentage of portland cement or lime in freshlymixed treated aggregate. The determinations are basedupon chemical-titration methods that relate the cementor lime contents of field-treated samples to knowncontents in laboratory samples.
Two procedures for determining cement content areincluded in this test method. The acid-base method ispreferred but, because the acid will attack certainminerals such as calcite and dolomite that are present insome aggregates, the constant-neutralization method isprovided as an alternate when needed. A procedure fordetermining the appropriate titration method to be usedis also included.
This test method is divided into the following parts:
1. Field Sampling of Cement or Lime-TreatedMaterials.
2. Preparation of Test Samples.
3. Determination of Appropriate Titration Method.
4. Acid-Base Method for Determining CementContent.
5. Constant-Neutralization Method for DeterminingCement Content.
6. Constant-Neutralization Method for DeterminingLime Content.
B. APPARATUS
A complete list of necessary equipment is included ineach part of this test procedure. Detailed descriptionsof some of these items are included below:
1. Sieves: U.S. Standard Sieves conforming toAASHTO Designation M92 and of convenient sizeand dimensions for separating the material into therequired fractions. Sieves in 305 mm diameterframes are satisfactory, but other sizes may beused.
2. Titrating burettes: 100 mL automatic zeroing typewith stopcock and necessary stand, clamp, etc.Burettes for use with screw-cap bottles to provideself-contained units are preferred, but stand-mounted units with side tubes for filling areacceptable.
3. Pipet: 100 mL pipet with hand-operated bulb filler.
4. Carboy: Plastic, 19 L with neoprene or tygontubing, clamps, and fittings necessary to transfersmall quantities of the solution to the burette or themeasuring flask. Do not substitute glasscontainers for the plastic carboys.
5. Fluorescent light (optional), 915 mm long: Aportable light which can be placed directly behindthe samples during titration testing may be of helpin detecting color changes of the solution.
6. Emergency washing facility: An ample water supplywhich is immediately available in the event acids oracid solutions are splashed or spilled on the skinand/or in the eyes.

California Test 338March 2000
- 2 -
C. MATERIALS
The materials required to perform the different tests arelisted in the individual parts of this test procedure.Instructions for preparing and handling these materialsare given below:
1. Hydrochloric acid (approximately 3 N) prepared asfollows:
a. Pour approximately 11 L of water into a 19 Lplastic carboy.
b. Pour the contents of two full standard 2.7 kgbottles of concentrated reagent-gradehydrochloric acid into the carboy.
c. Stir or mix the solution vigorously for about 1-min.
d. Add water as necessary to bring the totalvolume of water and acid to 19 L; then stir ormix the solution vigorously for another minute.
e. Allow the acid solution to stand overnight;then remix it once again prior to using.
f. Remix the acid solution once a week duringuse and before using after storage for morethan a week.
2. Sodium hydroxide (approximately 1 N) prepared asfollows:
a. Pour approximately 3.8 L of tap water at atemperature of approximately 43°C into a 19 Lplastic carboy. (This temperature is about ashot as can be tolerated on a person's hand).
b. Add 800 g of sodium hydroxide reagent-gradepellets to the water, stopper the carboy, andshake it vigorously for about 1- min.
c. Add tap water in approximately 3.8 Lincrements until 19 L of solution are attained.Stopper and vigorously shake the carboy aftereach addition. Successively reduce thetemperature of each subsequent increment ofwater until the last portion is added at thetemperature of the cold tap.
d. After the solution has cooled to roomtemperature, examine the solution forsuspended matter by looking down throughthe neck of the carboy while shining a strong
light through the sides near the bottom. Thepresence of suspended matter is an indicationof incompletely dissolved sodium hydroxidedue to insufficient heat or insufficient agitationduring the initial mixing. Since reheating isnormally required to dissolve the suspendedmaterial, it is usually more practical to discardthe solution and mix a new batch.
3. Phenolphthalein indicator solution, 1 %.
a. If the 1 % solution is not available, it can beprepared by dissolving 5 g of phenolphthaleinpowder U.S.P. in 250 mL of ethanol and thendiluting this solution with 250 mL of deonizedwater.
4. Prepare Separan NP-10 solution as follows:
a. Mix 0.5 g of NP-10 powder with 1000 mL ofwater in a glass beaker.
b. Stir at frequent intervals until no suspendedmaterial is visible; normally about an hour.
c. Pour the solution into a container suitable forstorage and dispensing.
d. Prepare a fresh solution weekly.
5. Water.
a. Tap water is satisfactory for performing thetitration test and preparing solutions.
b. Calibration-curve samples must be preparedusing the same source of water being used inthe field.
D. CONTROLS
1. Standard Curing Time.
Hydration of cement and lime begins with theintroduction of water. Because the hydration timeprior to starting the titration test can affect the testresults, it is important that the field samples andcalibration curve samples be cured for equalperiods of time. A standard curing time should beestablished for control of titration testing on eachproject based on the following criteria:
a. The curing time is the time lapse between theintroduction of mixing water and beginning thetest.
California Test 338March 2000
- 3 -
b. The standard curing time shall be establishedon the basis of time elapsed between initialmixing and preparation of the field testspecimens.
c. The curing time for individual field samplesshall be within ± 15 min of the standard curingtime.
d. If it becomes necessary for the curing time ofthe field samples to deviate from the standardcuring time, a calibration curve shall beestablished using a corresponding curing time.
2. Calibration Curves.
a. The calibration curve must be established bythe same technician who will be testing thefield samples. Testing technique and ability tosee changes in color may affect the quantitiesof solutions used; however, since the testresults are relative, accuracy will bemaintained as long as the technician isconsistent.
b. A calibration curve shall be established eachday that cement/lime content tests areperformed.
c. The average amount of acid (or sodiumhydroxide) required to neutralize either pair ofduplicate samples in the current calibrationcurve should not differ by more than ± 2 mLfrom the average amount required in thepreceding calibration-curve test. When thistolerance is exceeded, the calibration-curvetesting shall be repeated. If the retestconfirms the curve in question, use these twocurves to establish the new curve. If the retestcorresponds with the previous curve, discardthe curve in question, and use the retest.
d. When it is determined, on the basis of 5 ormore tests, that the calibration curves areconsistent, it is permissible to reduce thefrequency of calibration curves to not less thanone per 7 calendar days, or one for each 10control tests. At any time a calibration curvedoes not meet the tolerances for consistency,the frequency of calibration curves shall beincreased to not less than one per day untilconsistency is reestablished.
e. Changes in the acid solution or in the sourceof aggregate, cement, or water, may affect thetest results. Any time the source of any ofthese items is changed, or a new reagentsolution is mixed, it will be necessary toestablish a new calibration curve.
3. Operator Qualifications.
It is imperative that the technician performing thetitration test establish a consistent technique forstirring the test samples and adding the titratingsolutions. The purpose of stirring the test sampleis to break up all agglomerations and expose allportions of the cement to the solution. It is ofutmost importance in the constant-neutralizationtest that the addition of acid be carefully controlled.An excess of acid will attack reactive aggregatesand will also alter the cement, thus causinginconsistencies in test results.
PART 1. FIELD SAMPLING OF CEMENT ORLIME-TREATED MATERIALS
A. SCOPE
Since the methods of adding and mixing cement or limemay vary from one project to another, it is important thatproper consideration be given to the sampling programto ensure meaningful test results. This Part describesacceptable sampling procedures for use under normalconstruction conditions. Other sampling schemes maybe employed as necessary to accomplish the desiredobjectives.
B. EQUIPMENT
1. Shovel
2. Hand scoop
3. Covered containers with a minimum capacity of3000 g.
C. CONTROL
1. Field samples should always be taken in sets offour or more. When the acid-base method is beingused, up to eight samples can be testedsimultaneously.
2. Field samples should normally be taken from thein-place mixture as soon as possible after mixingand spreading, and before initial compaction.

California Test 338March 2000
- 4 -
3. Samples of in-place material must berepresentative of the full depth of the layer. Thiscan be accomplished best by digging a straight-sided hole through the layer and then removingmaterial from the side of the hole until a properlysized sample is obtained.
4. Each field sample should weigh approximately3000 g.
5. Retain field samples in individual coveredcontainers until ready to prepare test samples.
6. The time differential between mixing the aggregate,cement/lime, and water of any two samples of a setshall not exceed 30 min.
D. PROCEDURE
1. Sampling to Determine the Efficiency of Batch orContinuous-Mix Plants.
a. Samples shall be taken from random locationsafter the mixed material has been spread onthe roadbed.
b. All of the samples shall be taken from a singlebatch or truckload of material.
2. Sampling to Determine the Efficiency of Road-Mixing Equipment.
a. Samples shall be taken at equal intervalsacross the material mixed by a single pass ofthe mixer.
b. If the normal mixing operation requiresremixing the materials, sampling shall be doneafter the final mixing.
c. When lime-treated materials are being mixedand placed in layers greater than .15 msamples shall be taken from the top andbottom halves of the layer at each samplinglocation.
3. Sampling to Determine Conformance to OverallQuantity Requirements.
a. Samples may be taken from random locationswithin the test area or at predeterminedintervals across the roadbed.
b. The random selection of sampling locationsshould be done only after the efficiency of the
mixing equipment has been determined to besatisfactory.
PART 2. PREPARATION OF TEST SAMPLES
A. SCOPE
Properly prepared, representative test samples arecritical to the accuracy of the titration tests. This Partdescribes procedures to be followed in preparing testsamples from material placed in the field and laboratory-mixed samples for use in establishing calibration curves.
It is also important that the moisture content of the testsamples be considered. This can be done either bypreparing the calibration samples at the same moisturecontent as the field samples (Alternate 1) or bypreparing the calibration samples on a dry-weight basisand applying a correction factor (Alternate 2). Bothalternatives are described.
B. EQUIPMENT
1. 9.5-mm sieve
2. 37.5-mm sieve
3. Balance or scale with a minimum capacity of 5 kg,graduated to 1 g.
4. Balance or scale with a capacity of 1 kg, graduatedto 0.1 g.
5. 1.9 L wide-mouth polyethylene containers withcovers (one required for each test sample).
6. Stainless steel stirring rods (one for each sample).
7. Timer
8. Drying ovens, 110 ± 5°C and 38 ± 2°C
C. PROCEDURE
1. Preparation of samples for determining appropriatetitration method.
a. Follow the procedures for preparingcalibration-curve samples, except that nocement will be added, and the dry mass of theaggregate shall be 300 g.
b. Prepare two 300 g aggregate samples.

California Test 338March 2000
- 5 -
c. Prepare two additional samples weighing300 g each from dry Ottawa sand. Glassbeads may be substituted for the Ottawasand.
2. Preparation of calibration-curve samples(Alternate 1).
This procedure provides for adjustment in batchmasses to correlate with the assumed moisturecontent of field samples. No correction of titrationresults will be required.
a. Obtain a representative sample of theaggregate and cement/lime being used on theproject.
b. Dry the aggregate to constant mass at110 ± 5°C. Drying may be waived providedthe moisture content is determined and thebatch masses are adjusted to provide thespecified dry-aggregate masses. Whentesting reclaimed aggregates containing tracesof asphalt or asphalt concrete, the dryingtemperature shall not exceed 38°C.
c. Separate the aggregate on the 37.5 and9.5 mm sieves. Discard any aggregateretained on the 37.5-mm sieve.
d. Using the project records, determine themoisture content representative of thecompleted mixture being placed or anticipatedon the project.
e. Prepare four 300 g test samples conforming tothe grading and moisture content of the fieldsamples. Two samples shall contain 1 %more cement/lime than specified for theproject, and two samples shall contain 1 %less than specified. The appropriate mass ofaggregate, water, and cement/lime can bedetermined from Table 1 when wholepercentages are required.
(1) Place the dry aggregate in apolyethylene container, then thoroughlyblend in the cement/lime using astainless steel stirring rod.
(2) Add the appropriate amount of water,and thoroughly mix again.
(3) Cover the container and allow thesample to cure for a period of time
conforming to the requirements in thetesting procedures.
3. Preparation of calibration-curve samples (Alternate2).
This procedure does not require adjustments tobatch masses because of field moisture contents.A correction factor is applied to the test results ofthe field samples based on their actual moisturecontents.
a. Obtain a representative sample of theaggregate and cement/lime being used on theproject.
b. Dry the aggregate to constant mass at110 ± 5°C. Drying may be waived providedthe moisture content is determined and thebatch masses are adjusted to provide thespecified dry aggregate masses.
c. Separate the aggregate on the 37.5 and9.5-mm sieves. Discard any aggregateretained on the 37.5-mm sieve.
d. Prepare four 300 g test samples conforming tothe grading of the field samples. Twosamples shall contain 1 % more cement/limethan specified for the project, and two samplesshall contain 1 % less than specified. Theappropriate masses of aggregate andcement/lime can be determined from Table 2.
(1) Place the aggregate in a polyethylenecontainer; then thoroughly blend in thecement/lime using a stainless steelstirring rod.
(2) Add water to provide a moisture contentapproximately equal to that being usedin the field.
(3) Cover the container, and allow thesample to cure for a period of timeconforming to the requirements in thetesting procedures.
e. Proceed with testing as described in theappropriate section.
4. Preparation of Field Samples.
a. Obtain 3000 g field samples according to theinstructions in Part 1.

California Test 338March 2000
- 6 -
b. Keep the material in covered containers untilready to prepare the test specimens.
c. Separate the material on the 37.5 and 9.5-mmsieves. Sieving is to be done while thematerial is in a moist condition. It is notintended that all of the fines coating thecoarse aggregate be removed. Separating thematerial into coarse and fine fractions in thismanner makes it possible to obtainrepresentative test samples without drying andsplitting.
TABLE 2
Batch Masses for Calibration-Curve Specimens
(Alternate 2)
Mass g% Cement/
LimeDry
AggregateCement/
Lime
1 . . . . . . . . . . . . . . 297 3.01.5 . . . . . . . . . . . . . . 296 4.42 . . . . . . . . . . .. . . . 294 5.92.5 . . . . . . . . . . .. . . . 293 7.33 . . . . . . . . . . .. . . . 291 8.73.5 . . . . . . . . . . .. . . . 290 10.24 . . . . . . . . . . .. . . . 288 11.54.5 . . . . . . . . . . .. . . . 287 12.95 . . . . . . . . . . .. . . . 286 14.35.5 . . . . . . . . . . .. . . . 284 15.66 . . . . . . . . . . .. . . . 283 17.06.5 . . . . . . . . . . .. . . . 282 18.37 . . . . . . . . . . .. . . . 280 19.67.5 . . . . . . . . . . .. . . . 279 20.98 . . . . . . . . . . .. . . . 278 22.28.5 . . . . . . . . . . .. . . . 276 23.59 . . . . . . . . . . .. . . . 275 24.89.5 . . . . . . . . . . .. . . . 274 26.010 . . . . . . . . . . .. . . . 273 27.3
d. Determine the amount of material retained onthe 37.5 and 9.5-mm sieves and the amountpassing the 9.5-mm sieve. Calculate thepercentage of each fraction based on the totalmass of the sample.
e. Discard the material retained on the 37.5 mmsieve.
f. Reconstitute a 300 g test sample using theoriginal proportions of retained and passing9.5-mm sieve material. 37.5 by 9.5-mmmaterial shall be used in place of thediscarded plus 37.5-mm material.
g. Place the test sample in a polyethylenecontainer, cover it, and allow it to stand for theperiod of time conforming to the standardcuring time for the project.
h. If the calibration-curve samples are preparedaccording to the instructions of Alternate 2, itwill be necessary to prepare a secondspecimen from each field sample for moisturecontent determination.
(1) Place the second sample in a containersuitable for drying; then determine themoisture content in accordance withCalifornia Test 226.
(2) It is permissible to use an accelerateddrying method provided the resultingmoisture content is within ± 1 % of thatdetermined by California Test 226.
PART 3. DETERMINATION OFAPPROPRIATE TITRATIONMETHOD
A. SCOPE
The hydrochloric acid, which is used to digest thecement in the acid-base method, also will attack certainminerals present in some aggregates. This part of thetest procedure is used to detect the presence of theseminerals and thus indicate when the acid-base methodshould not be used.
B. APPARATUS
See Part 4.
C. MATERIALS
See Part 4.
D. PROCEDURES
1. Prepare two 300 g aggregate samples and two 300 gOttawa sand samples following the instructions inPart 2, Section C of this method.
2. Perform the acid-base test on each test samplefollowing the instructions in Part 4 of this testmethod.
3. Determine the difference between the amounts ofsodium hydroxide required to achieve the end point
California Test 338March 2000
- 7 -
for each aggregate sample and the averagerequired for the Ottawa sand samples.
4. If the difference is less than 5 mL, the acid-basemethod should be used.
5. If the difference is 6 mL or more for eitheraggregate sample, the aggregate is reactive to acidand the constant-neutralization method must beused.
PART 4. ACID-BASE METHOD FORDETERMINING CEMENT CONTENT
A. SCOPE
This part describes a procedure for cement-contentdetermination based upon the neutralization of thecement with an excess of hydrochloric acid. Theresidual excess acid, as measured by back titration withan alkali, is inversely proportional to the cement contentof the treated base sample. This test procedure cannotbe used if the aggregate is reactive to acid asdetermined by Part 3 of this test method.
B. APPARATUS
1. 100 mL titrating burette
2. 100 mL pipet with filler
3. Volumetric flask or graduated cylinder suitable foraccurately measuring 200 mL.
4. Volumetric flask or graduated cylinder suitable foraccurately measuring 400 mL.
5. 250 mL Erlenmeyer flask – one for each testsample.
6. Plastic beakers with a capacity of approximately500 mL – one for each test sample.
7. Medicine dropper
8. 1.9 L, wide-mouth polyethylene containers withcovers – one for each test sample.
9. Stainless steel stirring rods – one for each testsample.
10. Two 19 L plastic carboys. A third carboy may berequired if tap water is not available.
C. MATERIALS
1. Hydrochloric acid (approximately 3 N).
2. Sodium hydroxide (approximately 1 N).
3. Phenolphthalein indicator solution, 1 %.
D. PROCEDURE
1. Prepare test specimens according to theinstructions in Part 2, “Preparation of TestSamples”. Up to eight samples can be testedsimultaneously by this procedure; therefore, acalibration set and four field samples can be testedat one time if desired.
2. Allow the prepared test samples to stand in thecovered containers to complete the curing timeestablished as a standard for the project.
3. Accurately measure 200 mL of 3 N HCL for eachtest sample. Pour the acid into the Erlenmeyerflasks and set one flask behind each sample.
4. Accurately measure 400 mL of water for each testsample. Pour the water into beakers, and set onebeaker behind each sample.
5. When the standard curing time has elapsed, startthe timer, and pour the pre-measured acid into thetest samples.
a. Add the acid to one sample at a time at 45 sintervals.
b. Immediately after adding acid, use thestainless steel rod to stir the sample for theremainder of the 45 s period. Use acombination of circular and zigzag motionswith the stirring rod across the bottom of thecontainer to break up all agglomerations ofmaterial and expose all portions of the cementto the acid.
6. At 6 min after adding the acid, stir each sample insequence for 45 s.
7. At 12 min after adding the acid, stir each sample insequence for 45 s.
8. At 18 min after adding the acid, pour the pre-measured water into the test samples.

California Test 338March 2000
- 8 -
a. Add the water to one sample at a time at 45 sintervals.
b. Immediately after adding water, stir thesample for the remainder of the 45 s period.
9. Rinse out the Erlenmeyer flasks.
10. Allow the samples to stand undisturbed until a totalof 30 min has elapsed from the time the acid wasadded; then use the pipet to draw off a 100 mLportion of the residual acid solution from eachspecimen, and deposit it in clean Erlenmeyerflasks.
11. Add two full droppers (approximately 40 drops) ofphenolphthalein solution to the solution in eachErlenmeyer flask.
12. Titrate the solution in each flask by adding onenormal sodium hydroxide from the burette until thesolution becomes a deep red color which does notfade when the flask is shaken for 1-min.
13. Read, and record to the nearest 0.5 mL, theamount of sodium hydroxide added to each flask.
14. Use the titration values to establish a calibrationcurve or to determine the cement content of fieldsamples by the procedures in Sections E or Fbelow.
E. ESTABLISH THE CALIBRATION CURVE
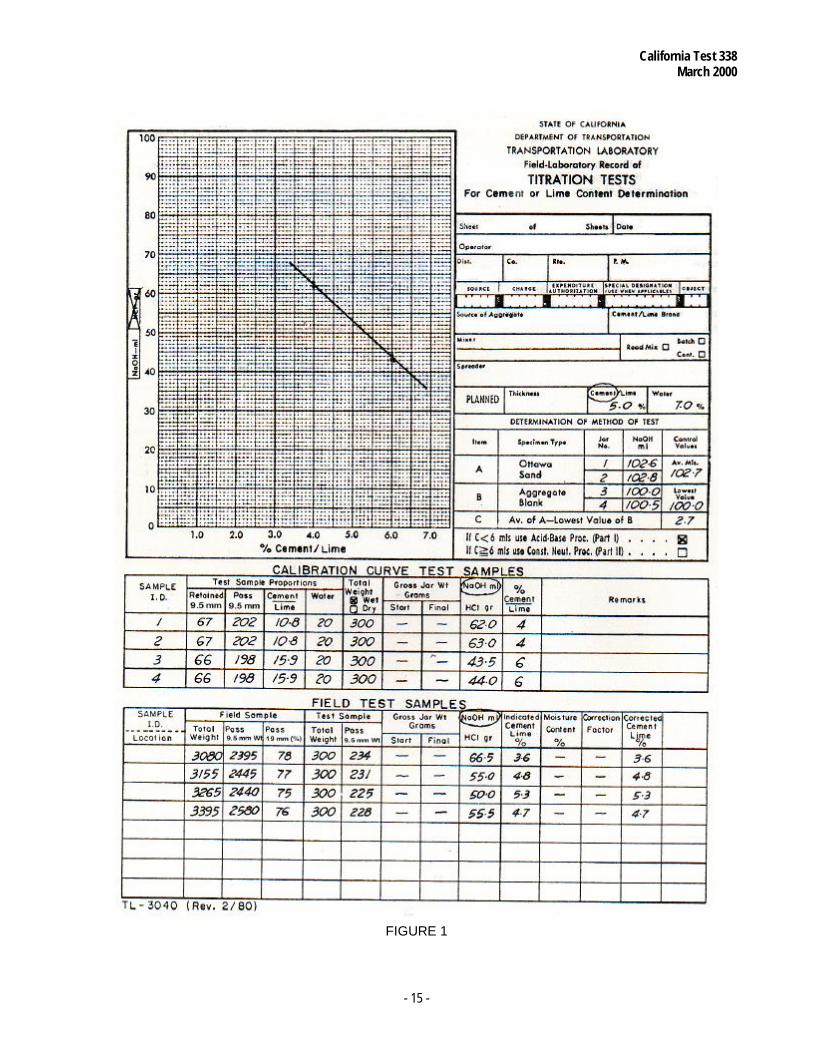
1. Plot the amount of sodium hydroxide, determinedin Section D, above against the known cementcontent of each sample as illustrated in Figure 1.
2. Draw a straight line between the average amountsof sodium hydroxide added to duplicate testsamples.
3. This is the calibration curve for determining thecement content of field samples.
F. DETERMINING CEMENT CONTENT OFFIELD SAMPLES
1. Locate the amount of sodium hydroxide added tothe test sample on the ordinate of the curve plottedfor calibration samples.
2. Extend a horizontal line from this point to itsintersection with the calibration curve.
3. From this point extend a vertical line until itintersects the abscissa of the curve plotted forcalibration samples.
4. This intersection indicates the amount of cement inthe sample.
5. If the calibration samples were prepared accordingto Alternate 1 of the preparation procedures inPart 2, the cement content indicated in paragraph 4above is correct and requires no adjustment.
6. If the calibration samples were prepared accordingto Alternate 2 of the preparation procedures inPart 2, the cement content indicated in paragraph 4above must be corrected. To determine the actualcement content, multiply the indicated cementcontent by the correction factor in Table 3 whichcorresponds to the moisture content of the fieldsample.
TABLE 3
Correction Factor for Moisture Content
MoistureContent
(%)
CorrectionFactor
MoistureContent
(%)
CorrectionFactor
MoistureContent
(%)
CorrectionFactor
1 1.01 11 1.11 21 1.212 1.02 12 1.12 22 1.223 1.03 13 1.13 23 1.234 1.04 14 1.14 24 1.245 1.05 15 1.15 25 1.256 1.06 16 1.16 26 1.267 1.07 17 1.17 27 1.278 1.08 18 1.18 28 1.289 1.09 19 1.19 29 1.29
10 1.10 20 1.20 30 1.30
PART 5. CONSTANT-NEUTRALIZATIONMETHOD FOR DETERMININGCEMENT CONTENT
A. SCOPE
This part is an alternate to the acid-base test procedure,Part 4, and is used for determining cement contentwhen the aggregate is found to react with acid. Thedeterminations are based upon the continuousneutralization of an aqueous solution of the cement-treated aggregate sample for a specified time. This isaccomplished by adding small amounts of acid toneutralize the OH ion as it is liberated during thehydration of the cement. The amount of acid used isdirectly proportional to the cement content of thetreated-base sample.

California Test 338March 2000
- 9 -
B. APPARATUS
1. 100 mL titrating burettes – one for each sample.
2. Volumetric flask or graduated cylinder suitable foraccurately measuring 1000 mL.
3. Medicine dropper.
4. 1.9 L, wide-mouth polyethylene containers withcovers – one for each test sample.
5. Stainless steel stirring rods – one for each testsample.
6. 19 L plastic carboy. A second carboy may berequired if tap water is not available.
7. Timer
8. Fluorescent light (optional)
C. MATERIALS
1. Hydrochloric acid (approximately 3 N).
2. Phenolphthalein indicator solution, 1 %.
D. PROCEDURE
1. Prepare test samples according to the instructionsin Part 2, “Preparation of Test Samples.”
2. Allow the prepared test samples to stand in thecovered containers to complete the curing timeestablished as a standard for the project.
3. Fill the titrating burettes with 3 N hydrochloric acid.
4. At the end of the curing period, add 1000 mL of tapwater to each test sample.
a. Add the water to one sample at a time at 2-min intervals.
b. Immediately after adding the water, use thestainless steel stirring rod to stir the samplethoroughly.
5. Start the timer when the water is added.
6. Add two full droppers (approximately 40 drops) ofphenolphthalein solution to each sample. Thewater will turn red due to the presence of cement.
7. Place one test sample in front of each titratingburette.
8. At 10 min after adding the water, begin stirring thefirst test sample and adding acid from the burette.
a. Stir the sample using a combination of circularand zigzag motions with the stirring rod acrossthe bottom of the container. The objective ofstirring the test specimen is to break up allagglomerations of cement and aggregate, andto expose the cement to water so that the OHion will be released.
b. Add the acid carefully and slowly. Theobjective of adding the acid is to neutralize theOH ions as they are released into the solution.When all of the free OH ions in the solutionhave been neutralized, the red color willdisappear. Any excess acid (beyond theamount required to eliminate the red color) willattack the cement, as well as any acid-reactive aggregates, and can affect the testresults.
c. It is imperative that the tester establishes aconsistent technique for stirring the testsamples and adding acid. Variations in thestirring effort, and particularly differences inthe rate of introducing the acid, can affect thetest results.
d. The instructions above apply to eachsubsequent step that requires stirring oradding acid.
9. During the first minute of stirring and adding acid,stir the test sample continuously, and add acid onlyas necessary to cause the color to disappear.
10. During the second, fourth, sixth, and eighthminutes and for the remainder of the testing periodthereafter, add acid only as necessary to eliminateany red color. The sample shall be stirred as acidis added and for a minimum of 5 s of each minuteof the testing period.
11. During the third, fifth, and seventh minutes do notstir or add acid to the samples already in progress.This time will be devoted to the first minute stirringof subsequent samples in a series.
12. Continue stirring and adding acid to each samplefor a period of 50 min. One hour will have elapsedfrom the time the testing water was added.

California Test 338March 2000
- 10 -
13. Read and record to the nearest 0.5 mL the amountof acid added to each test sample.
a. Determine the amount of acid used by directreading of the graduated burette.
b. If individual burettes are not available for eachtest sample, the acid for all of the samples canbe added through a single burette, and theamount added to individual samples can bedetermined by weighing the samples at thestart and completion of the test. When usingthis method, care must be exercised to avoidnon-uniform mass losses due to evaporation.Mass determinations can be simplified, withless chance of weighing error, if the total massincluding sample, water, container, and stirringrod is used.
14. Use the titration values to establish a calibrationcurve or to determine the cement content of fieldsamples by the procedures in Sections E or Fbelow.
E. ESTABLISHING THE CALIBRATIONCURVE
1. Plot the amount of acid, determined in Section Dabove, against the known cement content of eachcalibration-curve sample as illustrated in Figure 2.
2. Draw a straight line between the average amountsof acid added to duplicate test samples.
3. This is the calibration curve for determining thecement content of field samples.
F. DETERMINING CEMENT CONTENT OFFIELD SAMPLES
1. Locate the amount of acid added to the test sampleon the ordinate of the plotted calibration curve.
2. Extend a horizontal line from this point to itsintersection with the calibration curve.
3. From this point, extend a vertical line until itintersects the abscissa of the curve plotted forcalibration samples.
4. This intersection indicates the amount of cement inthe sample.
5. If the calibration samples were prepared accordingto Alternate 1 of the preparation procedures inPart 2, the cement content indicated in paragraph 4above is correct and requires no adjustment.
6. If the calibration samples were prepared accordingto Alternate 2 of the preparation procedures inPart 2, the cement content indicated in paragraph 4above must be corrected. To determine the actualcement content, multiply the indicated cementcontent by the correction factor in Table 3 whichcorresponds to the moisture content of the fieldsample.
PART 6. CONSTANT-NEUTRALIZATIONMETHOD FOR DETERMINING LIMECONTENT
A. SCOPE
This part describes a procedure for determining thepercentage of lime in soils or aggregates which havebeen treated with lime. The test is based upon thecontinuous neutralization of an aqueous solution of thelime-treated sample for a specified time. This isaccomplished by adding small amounts of acid toneutralize the OH ion as it is liberated during thehydration of the lime. The amount of acid used isproportional to the lime content of the treated sample.
B. APPARATUS
1. 100 mL titrating burette – one for each sample.
2. Volumetric flask or graduated cylinder suitable foraccurately measuring 1000 mL.
3. Volumetric flask or graduated cylinder suitable foraccurately measuring 50 mL.
4. Medicine dropper
5. 1.9 L, wide-mouth, polyethylene containers withcovers – one for each test sample.
6. Stainless steel stirring rods – one for each testsample.
7. 19 L plastic carboy. A second carboy may berequired if tap water is not available.
8. Timer

California Test 338March 2000
- 11 -
C. MATERIALS
1. Hydrochloric acid (approximately 3 N).
2. Phenolphthalein indicator solution, 1 %.
3. Separan NP-10 solution.
D. PROCEDURE
1. Prepare test samples according to the instructionsin Part 2, “Preparation of Test Samples.”
2. Allow the prepared test samples to stand in thecovered containers to complete the curing timeestablished as a standard for the project.
3. Fill the titrating burettes with 3 N hydrochloric acid.
4. At the end of the curing period add 1000 mL of tapwater and 50 mL of Separan NP-10 to each testsample.
a. Add the water and NP-10 to one sample at atime at 2 min intervals. The water and NP-10may be pre-measured and stored in individualcontainers prior to starting the test if desired.
b. Immediately after adding the water use thestainless steel stirring rod to stir the samplethoroughly.
5. Start the timer when the water is added.
6. Add two full droppers (approximately 40 drops) ofphenolphthalein solution to each sample. Thewater will turn red due to the presence of lime.
7. Place one test sample in front of each titratingburette.
8. At 10 min after adding the water and NP-10, beginstirring the test sample and adding acid from theburette.
a. Stir the sample using a combination of circularand zigzag motions with the stirring rod acrossthe bottom of the container. The objective ofstirring the test specimen is to break up allagglomerations of lime and aggregate or soil,and to expose the lime to water so that theOH ions will be released.
b. Add the acid carefully and slowly. Theobjective of adding the acid is to neutralize the
OH ions as they are released into solution.When all of the free OH ions in the solutionare neutralized, the red color will disappear.Any excess acid (beyond the amount requiredto eliminate the red color) will attack the limeas well as any acid-reactive aggregates andcan effect the test results.
c. It is imperative that the tester establishes aconsistent technique for stirring the testsamples and adding acid. Variations in thestirring effort, and particularly differences inthe rate of introducing the acid, can affect thetest results.
d. The instructions above apply to eachsubsequent step that requires stirring oradding acid.
9. During the first minute of stirring and adding acid,stir the test sample continuously, and add acid onlyas necessary to cause the color to disappear.
10. During the second, fourth, sixth and eighth minute,and for the remainder of the testing periodthereafter, add acid only as necessary to eliminateany red color. The sample shall be stirred as acidis added and for a minimum of 5 s of each minuteof the testing period.
11. During the third, fifth, and seventh minute, do notstir or add acid to the samples already in progress.This time will be devoted to the first minute stirringof subsequent samples in a series.
12. At 25 min after adding the initial water and NP-10,stir the sample vigorously for 30 s, and then add anadditional 50 mL of NP-10.
13. Continue stirring and adding acid to each sampleuntil a total of 50 min has elapsed after adding theinitial water and NP-10.
14. Read and record, to the nearest 0.5 mL, theamount of acid added to each test sample.
a. Determine the amount of acid used by directreading of the graduated burette.
b. If individual burettes are not available for eachtest sample, the acid for all of the samples canbe added through a single burette, and theamount added to individual samples can bedetermined by weighing the samples at thestart and completion of the test. The mass of

California Test 338March 2000
- 12 -
the second addition of NP-10 must bedetermined also and a correction applied.When using this method, care must beexercised to avoid non-uniform mass lossesdue to evaporation. Mass determinations canbe simplified, with less chance of weighingerror, if the total mass, including sample,water, container, and stirring rod is used.
15. Use the titration values to establish a calibrationcurve or to determine the lime content of fieldsamples by the procedures in Sections E and Fbelow.
E. ESTABLISHING THE CALIBRATIONCURVE
1. Plot the amount of acid determined in Section Dabove against the known lime content of eachcalibration-curve sample as illustrated in Figure 3.
2. Draw a straight line between the average amountsof acid added to duplicate test samples.
3. This is the calibration curve for determining thelime content of field samples that have been curedfor the same period of time.
F. DETERMINING LIME CONTENT OF FIELDSAMPLES
1. Locate the amount of acid added to the test sampleon the ordinate of the plotted calibration curve.
2. Extend a horizontal line from this point to itsintersection with the calibration curve.
3. From this point, extend a vertical line until itintersects the abscissa of the curve plotted forcalibration samples.
4. This intersection indicates the amount of lime in thesample.
5. If the calibration samples were prepared accordingto Alternate 1 of the preparation procedures inPart 2, the lime content indicated in paragraph 4above is correct and requires no adjustment.
6. If the calibration samples were prepared accordingto Alternate 2 of the preparation procedures inPart 2, the lime content indicated in paragraph 4above must be corrected. To determine the actuallime content, multiply the indicated lime content by
the correction factor in Table 3 which correspondsto the moisture content of the field sample.
G. SAFETY AND HEALTH
Aggregates may contain bacteria and/or organisms thatcan be harmful to one's health. The wearing of dustmasks and protective gloves when handling materials isadvised.
Hydrochloric acid, and the fumes therefrom, areextremely damaging to the human body. Even in dilutedform, hydrochloric acid can cause severe burns,especially of the more sensitive areas such as the eyes.Perform testing in a well-ventilated area.
The sodium hydroxide pellets used to make up the 1 Nsolution are poisonous and can cause severe burns.Violent splatter may occur when the pellets are pouredinto the water.
Chemical-protective gloves, goggles, boots, gauntletsand an apron shall be worn when preparing thehydrochloric acid and sodium hydroxide solutions, andat any time open containers of concentrated acid arebeing handled.
Care must be taken to avoid breathing the acid fumes.Prepare the hydrochloric acid (approximately 3 N) in awell-ventilated area. Use of an approved respirator isrecommended. If the acid or sodium hydroxide solutionis splashed on the skin or in the eyes, the affected areashould be rinsed immediately with a heavy flow ofwater. If the eyes are involved, continue rinsing withwater while a physician is contacted for furtherinstructions.
Glass carboys are not to be substituted for the plasticcarboys for mixing or storing the hydrochloric acidsolution. Glass containers having a maximum capacityof 1-gallon may be used as reservoirs with automaticburettes. All containers of hydrochloric acid or sodiumhydroxide solutions shall be clearly labeled and stored inseparate areas.
Store the hydrochloric acid in closed containers in acool, dry, well-ventilated area away from sources ofignition, strong oxidizers, strong bases, out of directsunlight and away from incompatible chemicals.Storage areas should have acid resistant floors andapproved drainage facilities.
Store sodium hydroxide pellets in a tightly sealed non-metallic container, at a temperature below 60°C, in awell-ventilated area away from water, acids, metals,

California Test 338March 2000
- 13 -
flammable liquids and organic halogens. Storage areashould be equipped with trapped floor drains, curbs orgutters.
Do not use compressed air to agitate the solutions in thecarboys. Do not use pressure to transfer the solutionbetween containers if failure of the system would resultin uncontrolled flow. Exposed spigots, valves, or otherdischarge points should be installed below eye level andbe pointed downward.
Phenolphthalein can cause allergic symptoms and has apowerful laxative effect. It can be toxic. Do not ingest.
Prior to handling, testing or disposing of any wastematerials, testers are required to read: Part A (Section5.0), Part B (Sections: 5.0, 6.0 and 10.0) and Part C(Section 1.0) of Caltrans Laboratory Safety Manual.Users of this method do so at their own risk.
REFERENCESAASHTO Designation: M 92
California Test 226
End of Text (California Test 338 contains 17 pages)

California Test 338March 2000
- 14 -
TABLE 1
California Test 338March 2000
- 15 -
FIGURE 1

California Test 338March 2000
- 16 -
FIGURE 2

California Test 338March 2000
- 17 -
FIGURE 3