designed and produced by argus global, sydney, … this user manual 7 ... er 1 this chapter seeks...
TRANSCRIPT

version 1.0.50
designed and produced by Argus Global, Sydney, Australia

71 Epping Road, Maquarie Park NSW
2113 Australia
phone +61 2 9963 7300
fax +61 2 9963 7399
© Copyright 2009 Argus Global Pty Ltd.
(ABN 42 138 440 230).
Argus Global may have patents or pending
patent applications, trademarks copyrights
or other intellectual property rights covering
subject matter in this document. The
furnishing of this document does not give
you any license to these patents,
trademarks, copyrights or other intellectual
property rights.
All Rights Reserved
The following (where mentioned) are
trademarks:
Cornerstone, True Identity and True Identity
Manager are registered trademarks of
Argus Global Pty Ltd
KWAS and PID are Trademarks of Iridian
Technologies.
Microsoft Office and Microsoft SQL Server
are trademarks of Microsoft Corporation
Incorporated.
Key-Pro and Key-Pro Software are
trademarks of Morse Watchmans
Incorporated
This document is classified Commercial in
Confidence. It is subject to a confidentiality
agreement between Argus Global Pty Ltd
and its customers and partners. Its contents
must not be divulged to third parties.
pages 116
version 1.0.50
1.1 This User Manual 7
1.1.1 Overview 7
1.1.2 Common Elements/Features 7
1.2 The KeyPro Plus KeyWatcher Management System 8
1.2.1 Overview 8
1.2.2 Requirements 8
1.2.3 Typical Deployment Overview 9
2.1 Installing KeyPro Plus Server 10
2.1.1 Installation Steps 10
2.2 Installing KeyPro Plus Client 15
2.2.1 Installation Steps 15
3.1 Running KeyPro Plus Server for the first time 19
3.2 KeyPro Plus Server License 20
3.2.1 Requesting a KPP Server License 20
3.2.2 Installing a KPP Server License File 21
4.1 KeyPro Plus Client Configuration 22
4.2 Running KeyPro Plus Client for the first time 23
4.3 KeyPro Plus Client License 24
4.3.1 Requesting a KPP Client License 24
4.3.2 Installing a KPP Client License File 24
5.1 Navigation Overview 26
5.1.1 Navigation Bar 26
5.1.2 Overlays 27
5.2 First Time System Setup – 10 Essential Steps 29
6.1 Overview 31
6.1.1 Main Screen Overview 32
7.1 KeyWatchers 33
7.1.1 Main Screen Overview 33
7.1.2 Add/Edit a KeyWatcher 34
7.1.3 Release Key 37
7.1.4 Release Slot 38
7.1.5 Return Key 39
7.1.6 Archive 39
7.1.7 Reactivate 40
7.1.8 Sync Key 40
7.1.9 Rebuild 41
7.1.10 Manual Offline On/Off 41
7.1.11 Request Live Key Status Updates 41
7.1.12 Resync Times 42
7.2 Key Access Times 42
7.2.1 Main Screen Overview 42
7.2.2 Add/Edit a Key Access Time 43
7.3 Smart Keys 44
7.3.1 Main Screen Overview 44
7.3.2 Edit a Smart Key 45
7.4 Physical Keys 46
7.4.1 Main Screen Overview 47
7.4.2 Add/Edit a Physical Key 47
7.5 Key Groups 49
7.5.1 Main Screen Overview 49
7.5.2 Add/Edit a Key Group 50
7.6 Departments 51
7.6.1 Main Screen Overview 52
7.6.2 Add/Edit a Department 52
7.7 User Groups 53
7.7.1 Main Screen Overview 53
7.7.2 Add/Edit a User Group 54
8.1 Main Screen Overview 58
8.2 Add/Edit a User 59

8.2.1 Details 59
8.2.2 KeyWatchers 61
8.2.3 Key Groups 63
8.2.4 Smart Keys Access 63
9.1 Live Monitor 65
9.1.1 Main Screen Overview 65
9.2 Historic Monitor 66
9.2.1 Main Screen Overview 66
10.1 Unresolved Alarms 67
10.1.1 Main Screen Overview 67
10.2 Historic Alarms 68
10.2.1 Main Screen Overview 68
11.1 Overview 69
11.1.1 Main Screen Overview 70
11.1.2 Report Screen Overview 70
11.2 Activity Reports 71
11.2.1 All Activity Report 71
11.2.1 KeyWatcher Events Report 72
11.2.2 KeyWatcher Key Activity Report 73
11.2.3 Inconsistent Key Activity Report 74
11.2.4 User Activity Report 75
11.2.5 User Group Activity Report 76
11.3 Status Reports 77
11.3.1 Alarm History Report 77
11.3.1 KeyWatcher Keys Status Report 78
11.4 Audit Reports 79
11.4.1 All Events Report 79
11.4.2 User Audit Report 81
11.4.3 Audit Report 82
11.5 Access Reports 83
11.5.1 KeyWatcher Access Report 83
11.5.2 KeyWatcher Key Access Report 84
11.5.3 Remote Key Access Report 85
11.5.4 Physical Key Access Report 86
11.5.5 User Group Key Access Report 87
11.6 Configuration Reports 88
11.6.1 KeyWatcher Configuration Report 88
11.6.2 Physical Key Report 89
11.6.3 Users In User Group Report 90
11.6.4 Keys In Key Group Report 91
11.6.5 Key Access Times Usage Report 92
12.1 Operator Groups 93
12.1.1 Main Screen Overview 93
12.1.2 Add/Edit an Operator Group 94
12.2 Operators 95
12.2.1 Main Screen Overview 96
12.2.2 Add/Edit an Operator 96
12.3 Notification Recipients 97
12.3.1 Main Screen Overview 97
12.3.2 Add/Edit a Notification Recipient 98
12.4 Scheduled Reports 100
12.4.1 Main Screen Overview 101
12.4.2 Add/Edit a Scheduled Report 101
12.5 System Configuration 108
12.5.1 Main Screen Overview 108
12.5.2 Editing in System Configuration 108
12.6 Integration 109
12.6.1 Main Screen Overview 110
12.6.2 File Importation 110
12.6.3 OnGuard Integration 112

Introduction
1.1 This User Manual
1.1.1 Overview
This Manual is a guide to carrying out the installation and use of all the applications
involved in the KeyPro Plus application suite as well as providing first time users with
information on how to begin using the software. It is advised that this manual is read
before attempting to operate the KeyPro Plus application suite.
1.1.2 Common Elements/Features
This manual has been designed in a manner that should allow the user to quickly learn
basic interactions with the KeyPro Plus Application Suite as well as providing detailed
information, hints and advice on factors to consider about more advanced topics.
Some common elements used in the manual that should
be noted are:
Image box elements often frame images to point
out information, steps or warnings related to
content.
chapte
r
1
This chapter seeks to introduce the user to both the KeyPro
Plus User Manual document and the KeyPro Plus KeyWatcher
Management system
Information
1. Step One
2. Step Two
Warning

Introduction
Full Box elements are used to enforce information given within the manual, they
are placed near to what they refer to. Each example element here will describe its
context.
1.2 The KeyPro Plus KeyWatcher Management System
KeyPro Plus is a software management tool designed to Administer, Control and Maintain
Morse Watchman KeyWatchers.
1.2.1 Overview
KeyPro Plus introduces a single point of control, monitoring and management of;
KeyWatcher activities, user access and configuration of KeyWatchers through a rich
graphical user interface. KeyPro Plus will act as the central source of truth of historical
data and administered KeyWatchers internal settings.
1.2.2 Requirements
Make sure the following hardware and software requirements are met before installing the
KeyPro Plus application suite.
1. The computer must be at least a Pentium 4 or compatible. This computer must be
running Windows XP Professional or higher.
2. PC must have at least 1 Gigabytes of RAM
3. Microsoft .Net Framework 3.1 SP1
4. SQL Express 2005 (or higher) OR SQL Server 2005 (or higher)
The KeyPro Plus Application suite comprises of three core components:
Warnings will indicate factors within the
application that users should be aware of.
Notes are used to help reinforce
information given in this guide.
Tips are useful facts about the application
that are not necessary to know but could
help streamline use.
Introduction
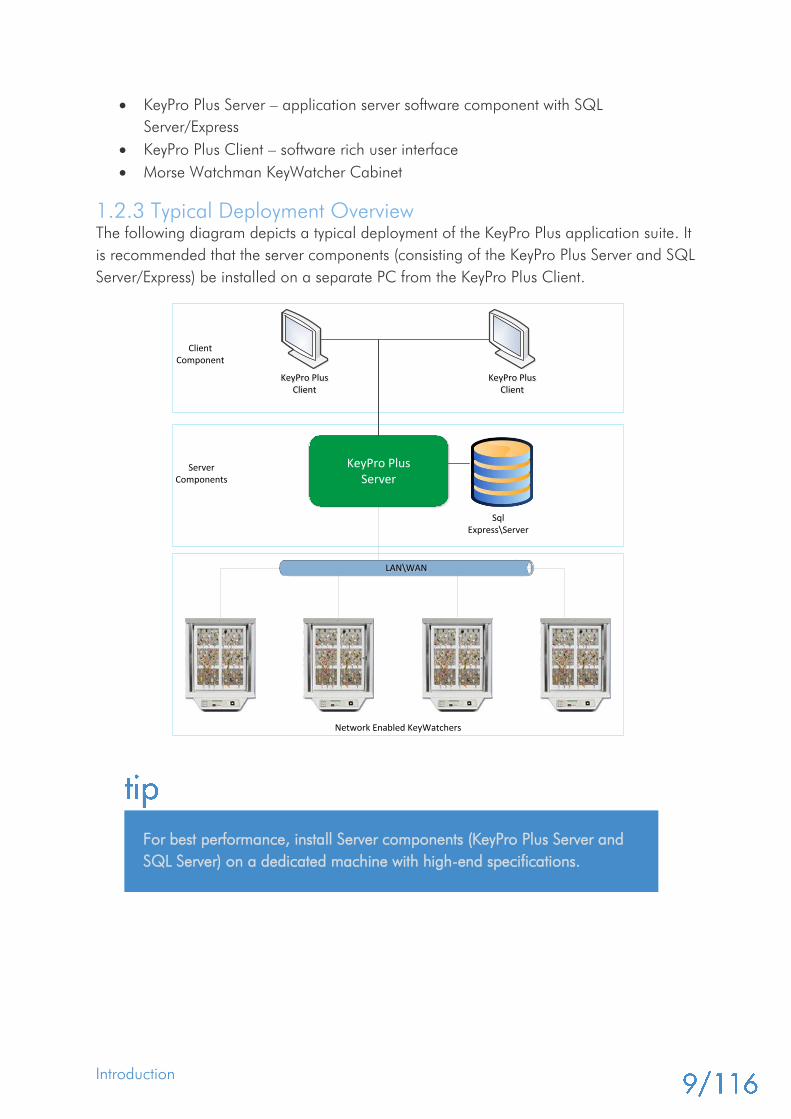
KeyPro Plus Server – application server software component with SQL
Server/Express
KeyPro Plus Client – software rich user interface
Morse Watchman KeyWatcher Cabinet
1.2.3 Typical Deployment Overview
The following diagram depicts a typical deployment of the KeyPro Plus application suite. It
is recommended that the server components (consisting of the KeyPro Plus Server and SQL
Server/Express) be installed on a separate PC from the KeyPro Plus Client.
KeyPro PlusServer
Sql Express\Server
LAN\WANLAN\WAN
KeyPro PlusClient
KeyPro PlusClient
KeyPro PlusClient
KeyPro PlusClient
ClientComponent
ServerComponents
Network Enabled KeyWatchers
For best performance, install Server components (KeyPro Plus Server and
SQL Server) on a dedicated machine with high-end specifications.
Getting Started - Installations
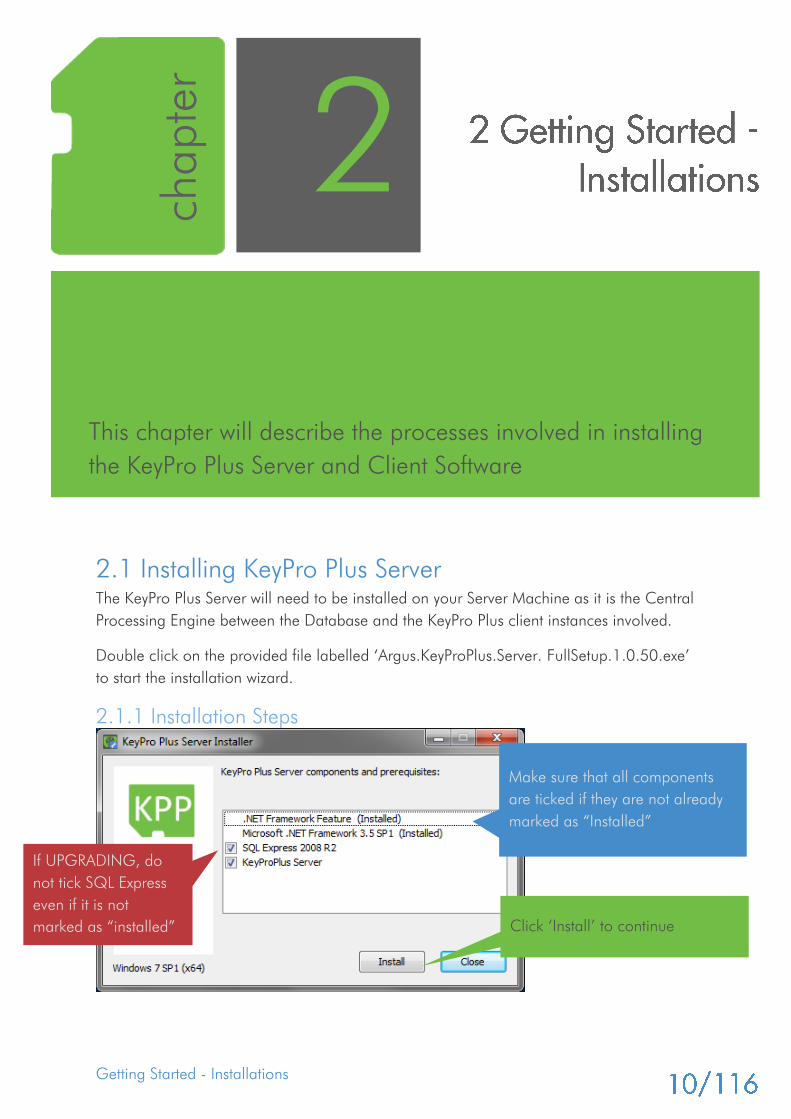
2.1 Installing KeyPro Plus Server
The KeyPro Plus Server will need to be installed on your Server Machine as it is the Central
Processing Engine between the Database and the KeyPro Plus client instances involved.
Double click on the provided file labelled ‘Argus.KeyProPlus.Server. FullSetup.1.0.50.exe’
to start the installation wizard.
2.1.1 Installation Steps
chapte
r
2
This chapter will describe the processes involved in installing
the KeyPro Plus Server and Client Software
Click ‘Install’ to continue
Make sure that all components
are ticked if they are not already
marked as “Installed”
If UPGRADING, do
not tick SQL Express
even if it is not
marked as “installed”
Getting Started - Installations
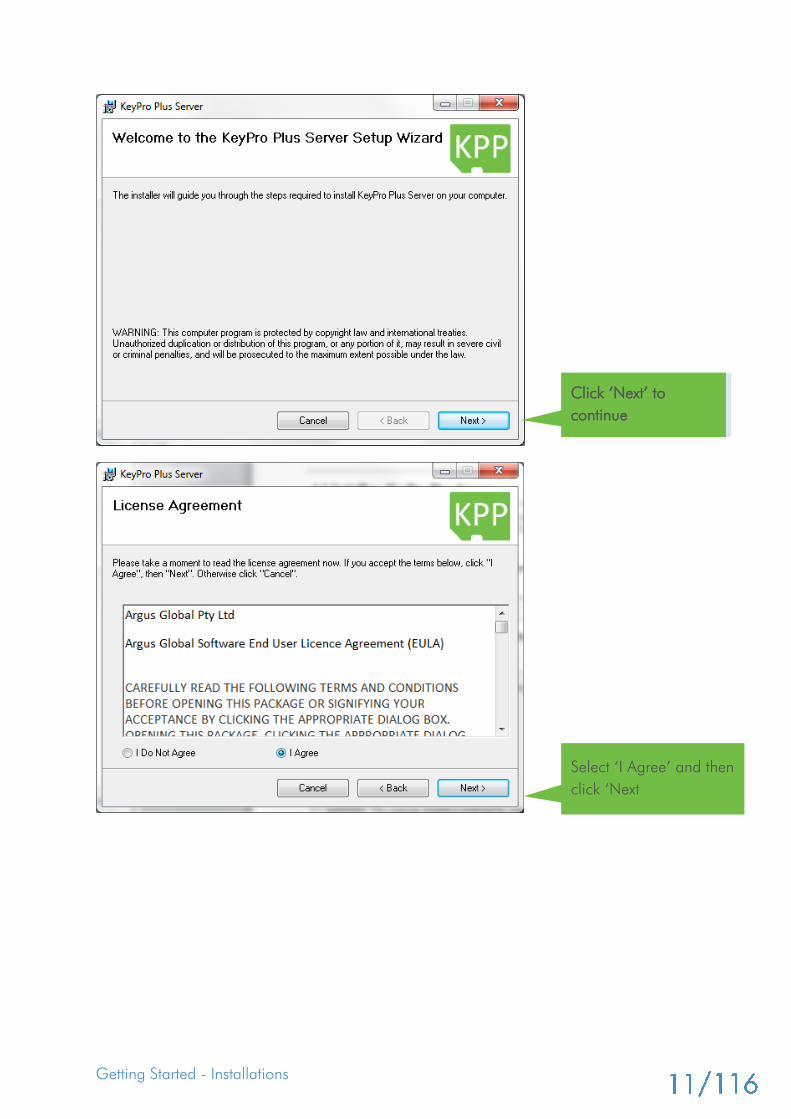
Click ‘Next’ to
continue
Select ‘I Agree’ and then
click ‘Next
Getting Started - Installations
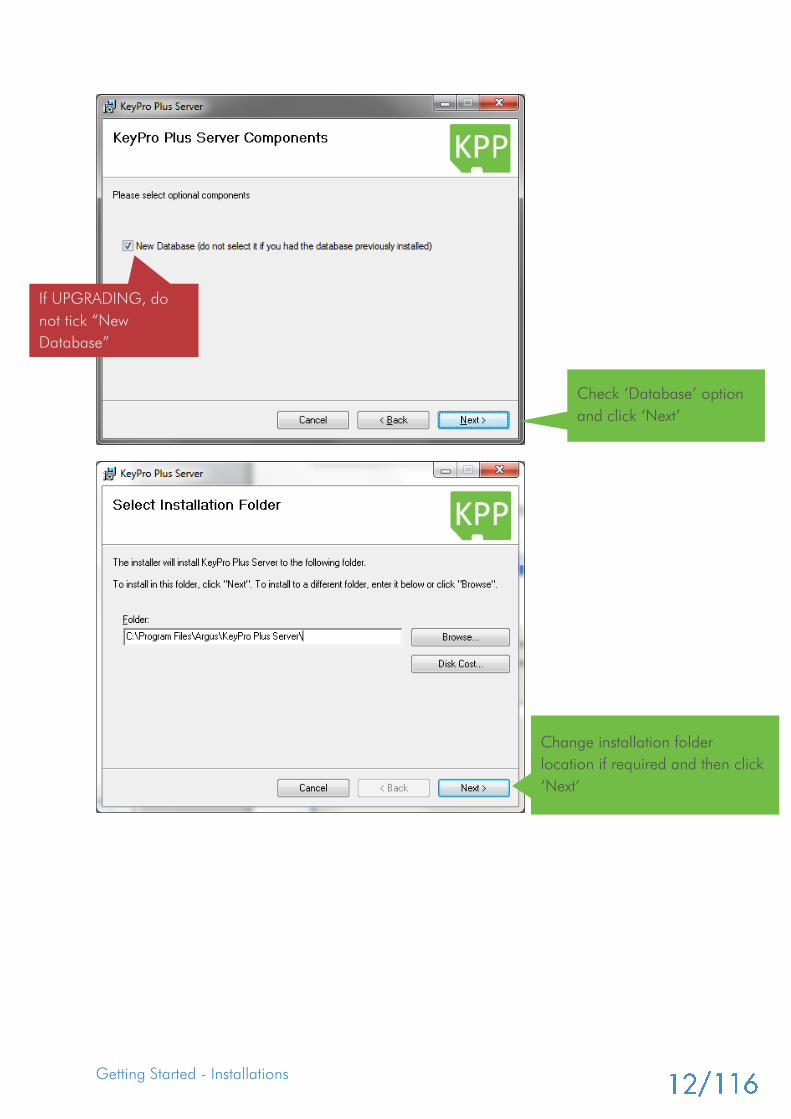
Check ‘Database’ option
and click ‘Next’
Change installation folder
location if required and then click
‘Next’
If UPGRADING, do
not tick “New
Database”

Getting Started - Installations
Files are being installed, upon
completion the Sql Server
Connection dialog will appear.
Click ‘Next’ to continue
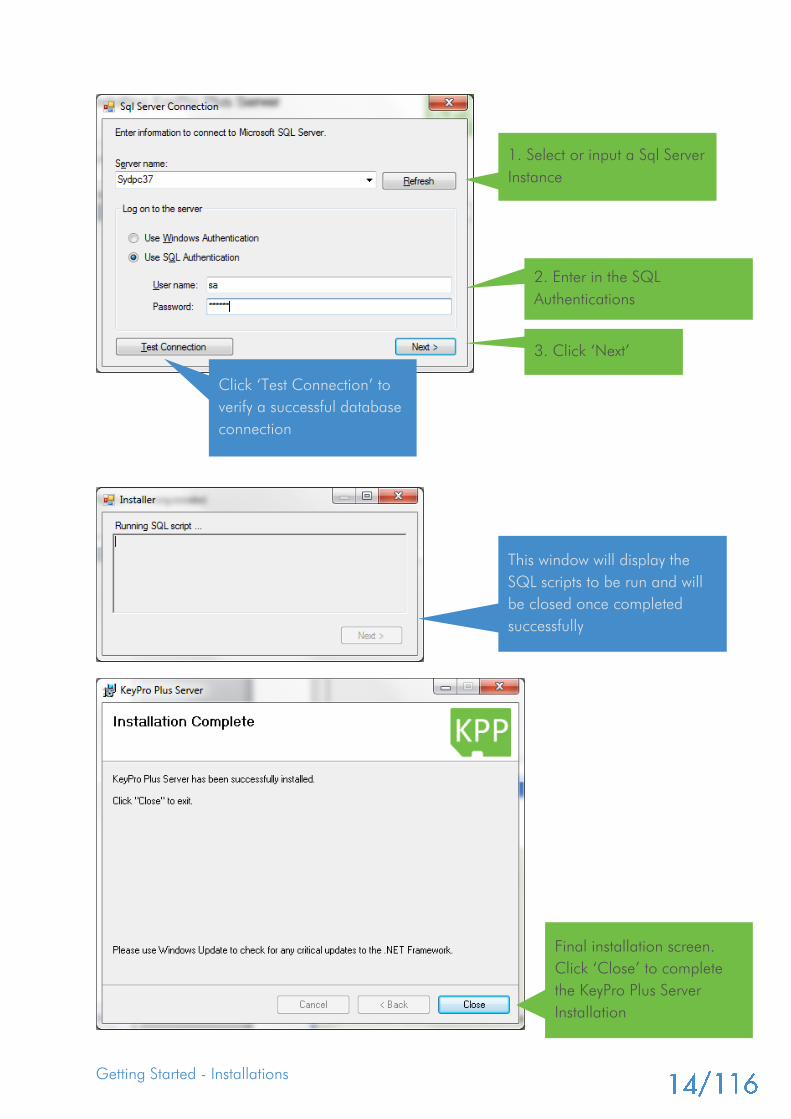
Getting Started - Installations
1. Select or input a Sql Server
Instance
Click ‘Test Connection’ to
verify a successful database
connection
Final installation screen.
Click ‘Close’ to complete
the KeyPro Plus Server
Installation
This window will display the
SQL scripts to be run and will
be closed once completed
successfully
3. Click ‘Next’
2. Enter in the SQL
Authentications
Getting Started - Installations
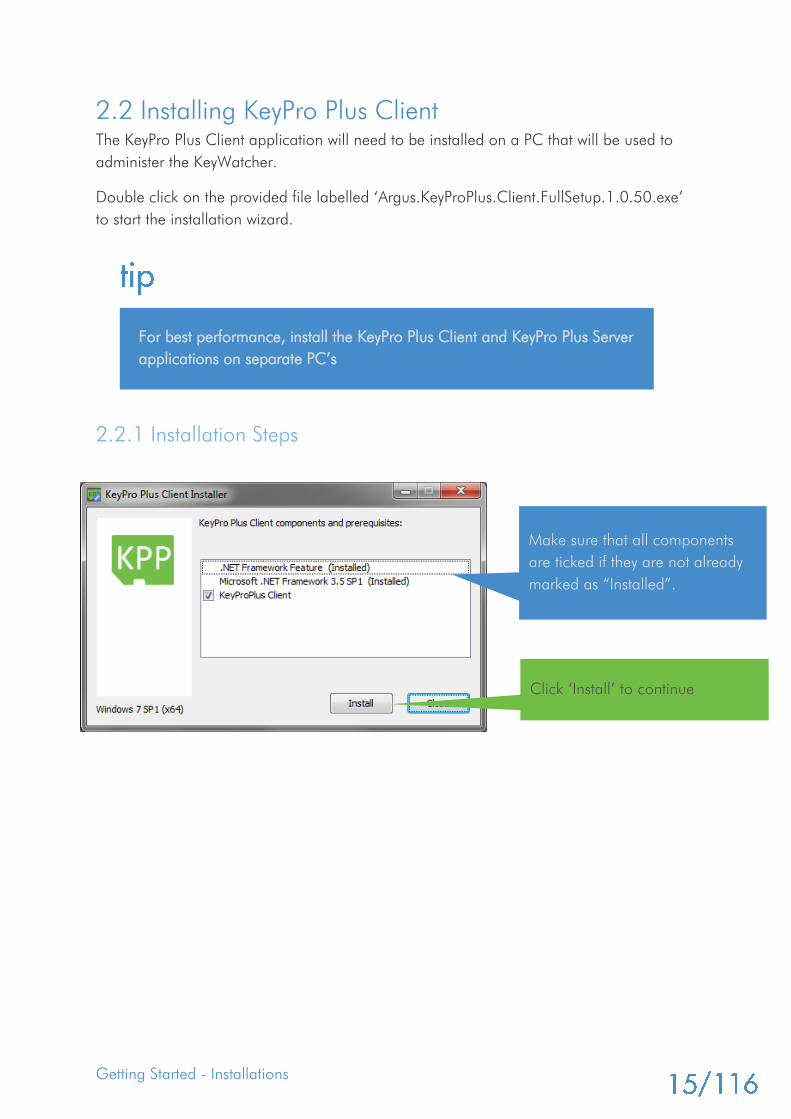
2.2 Installing KeyPro Plus Client
The KeyPro Plus Client application will need to be installed on a PC that will be used to
administer the KeyWatcher.
Double click on the provided file labelled ‘Argus.KeyProPlus.Client.FullSetup.1.0.50.exe’
to start the installation wizard.
2.2.1 Installation Steps
For best performance, install the KeyPro Plus Client and KeyPro Plus Server
applications on separate PC’s
Click ‘Install’ to continue
Make sure that all components
are ticked if they are not already
marked as “Installed”.
Getting Started - Installations
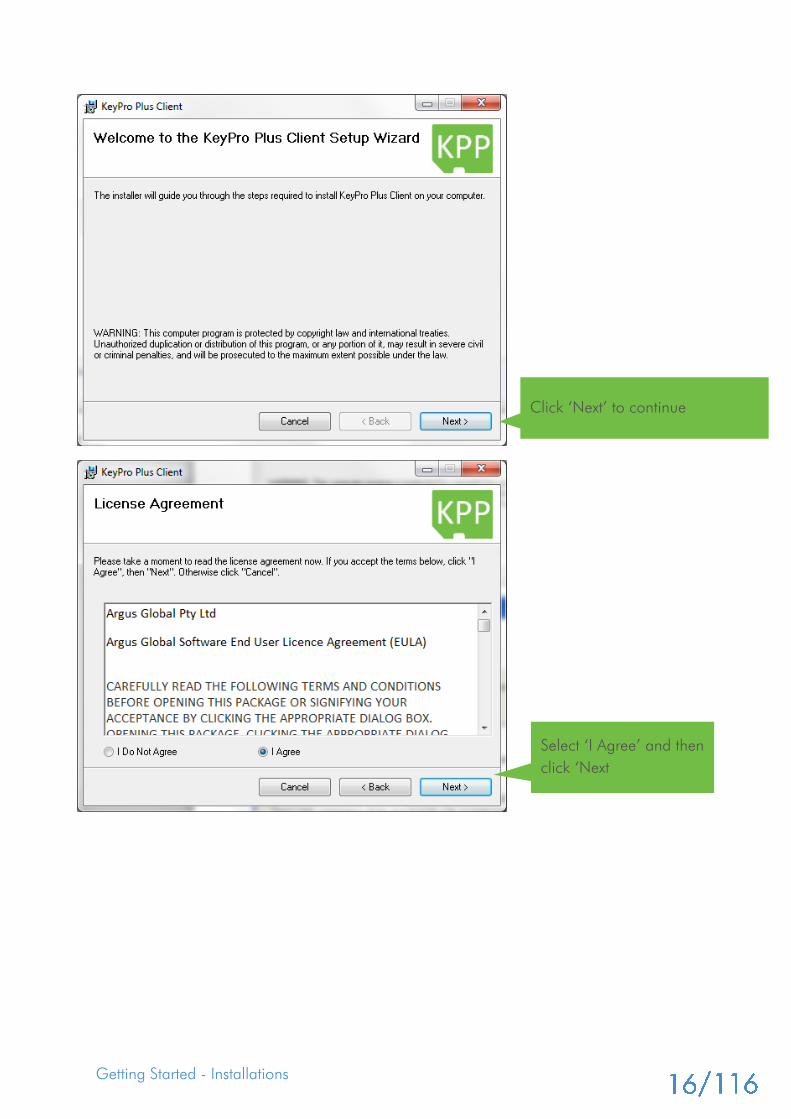
Click ‘Next’ to continue
Select ‘I Agree’ and then
click ‘Next
Getting Started - Installations
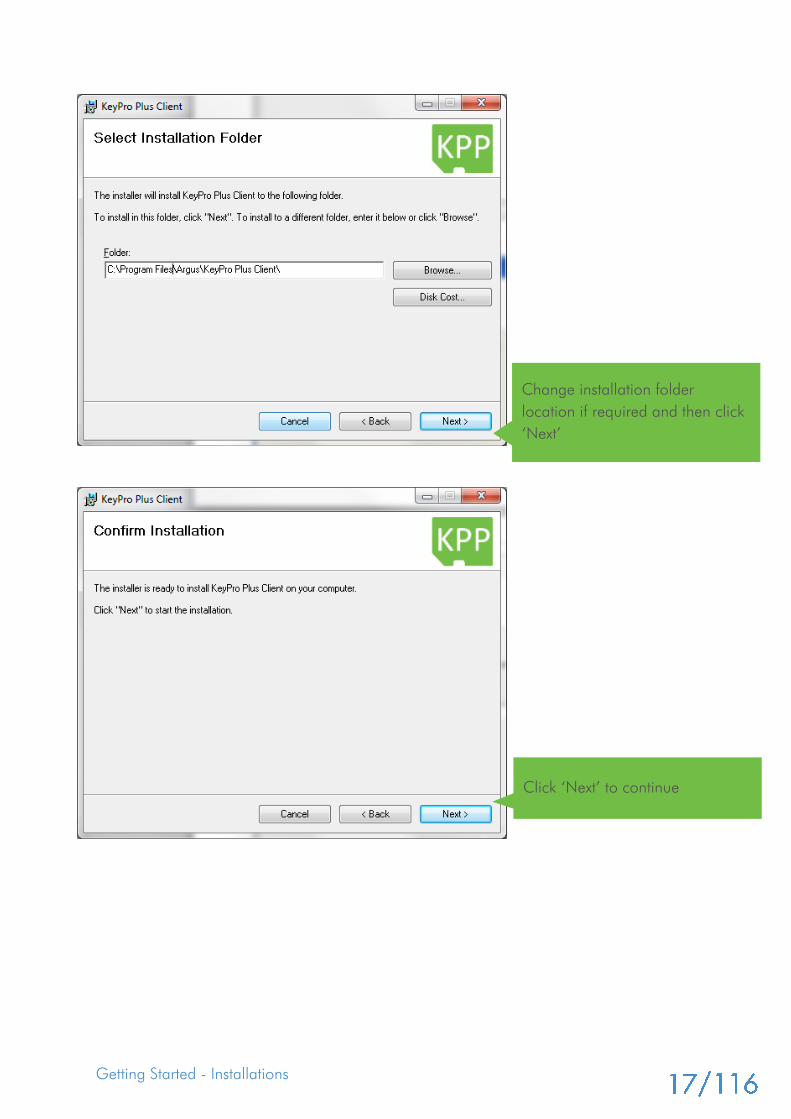
Change installation folder
location if required and then click
‘Next’
Click ‘Next’ to continue
Getting Started - Installations
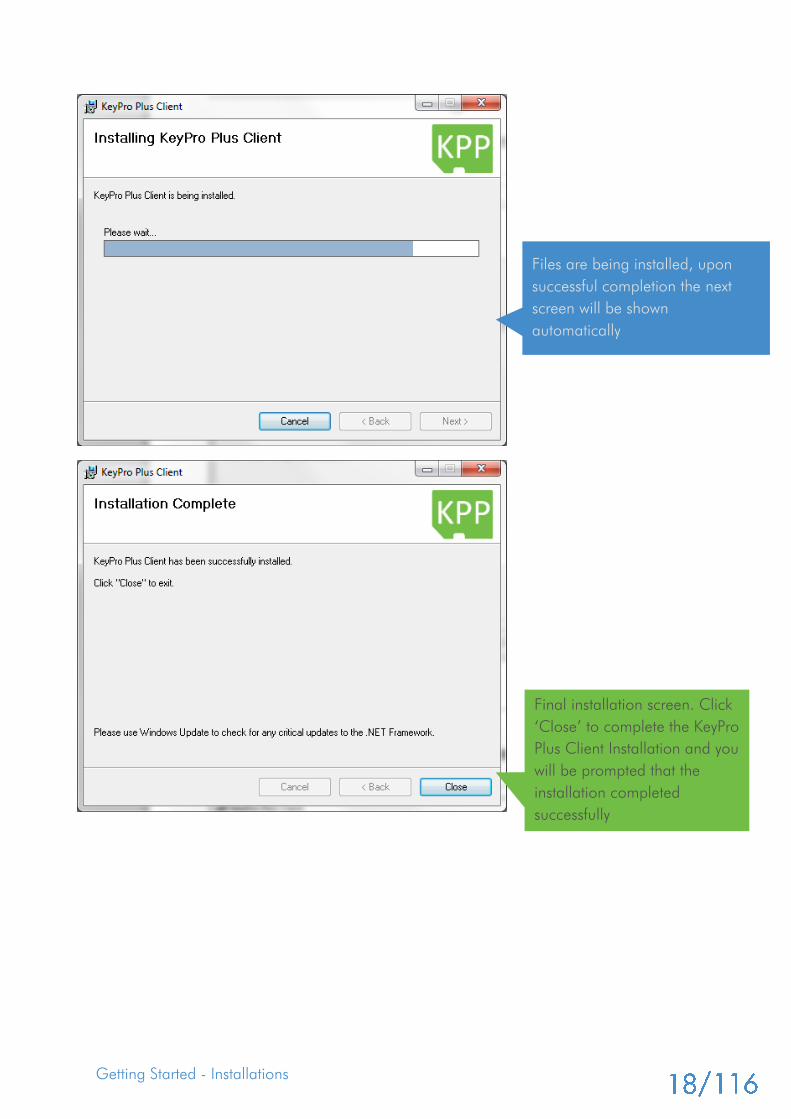
Files are being installed, upon
successful completion the next
screen will be shown
automatically
Final installation screen. Click
‘Close’ to complete the KeyPro
Plus Client Installation and you
will be prompted that the
installation completed
successfully
Getting Started - Server Application
Once installation of the KeyPro Plus Server application is completed successfully it will now
be possible to run the application and license it for use.
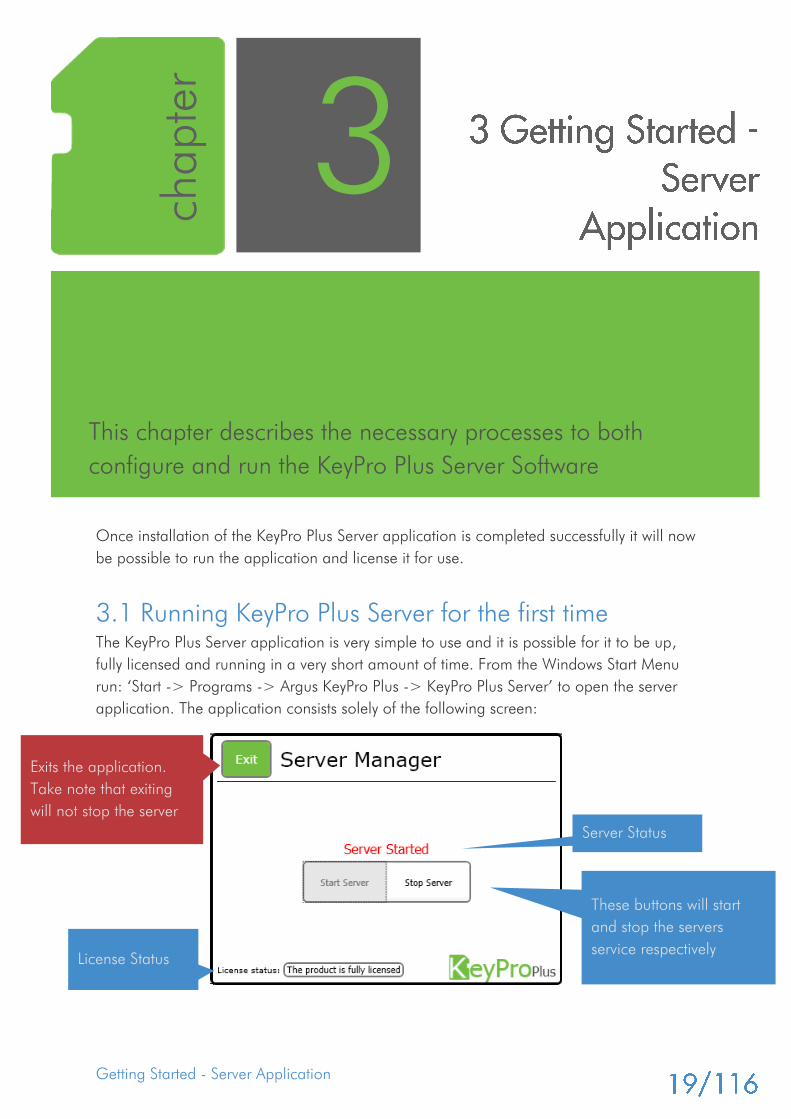
3.1 Running KeyPro Plus Server for the first time
The KeyPro Plus Server application is very simple to use and it is possible for it to be up,
fully licensed and running in a very short amount of time. From the Windows Start Menu
run: ‘Start -> Programs -> Argus KeyPro Plus -> KeyPro Plus Server’ to open the server
application. The application consists solely of the following screen:
chapte
r
3
This chapter describes the necessary processes to both
configure and run the KeyPro Plus Server Software
These buttons will start
and stop the servers
service respectively
Server Status
License Status
Exits the application.
Take note that exiting
will not stop the server
Getting Started - Server Application
The screen above will be displayed upon running the application. If the status does not
report ‘Started’, click on the ‘Start Server’ button. You should note that the ‘License status’
will show ‘Evaluation license’, this evaluation license is only valid for 30 days. You are
now able to close the server application and it will be running as a Windows Service
Process under the Service Name: ‘Argus.KeyProPlus.Server’.
3.2 KeyPro Plus Server License
A valid KeyPro Plus Server License will allow the KeyPro Plus Server application to run
without interruption. Without a valid license the KeyPro Plus Server application will run in
an evaluation period for thirty (30) days before requiring license validation to run.
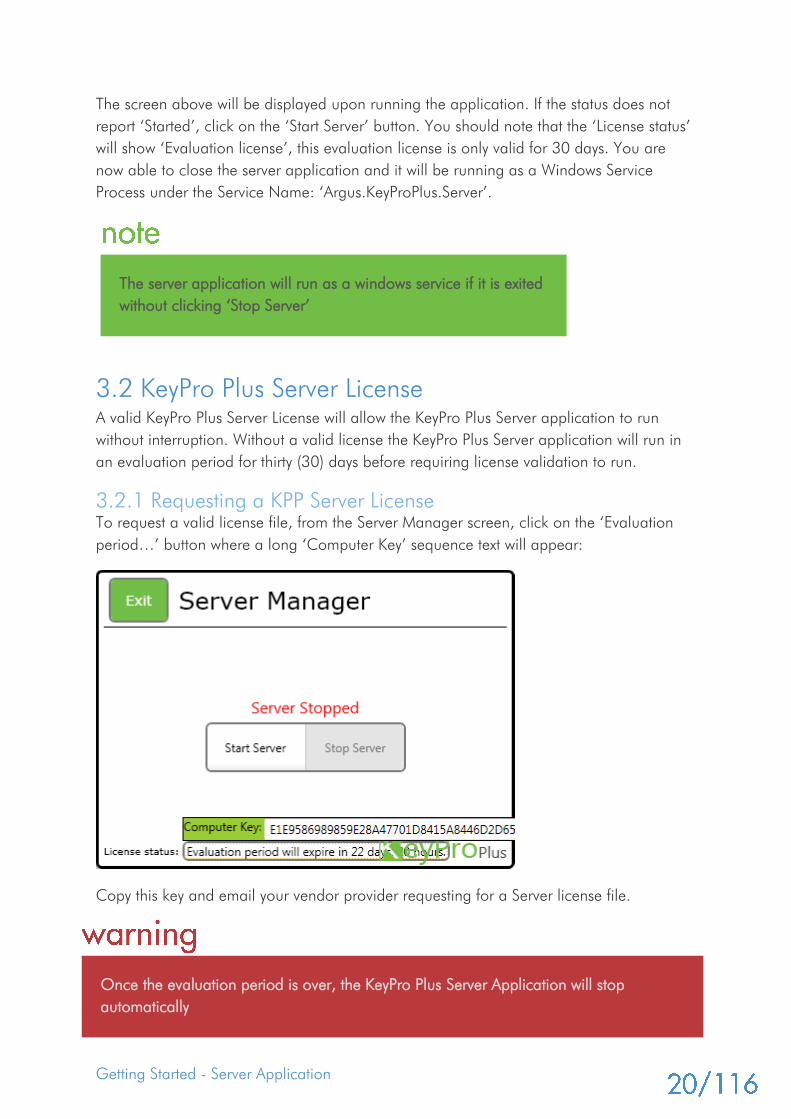
3.2.1 Requesting a KPP Server License
To request a valid license file, from the Server Manager screen, click on the ‘Evaluation
period…’ button where a long ‘Computer Key’ sequence text will appear:
Copy this key and email your vendor provider requesting for a Server license file.
The server application will run as a windows service if it is exited
without clicking ‘Stop Server’
Once the evaluation period is over, the KeyPro Plus Server Application will stop
automatically
Getting Started - Server Application
3.2.2 Installing a KPP Server License File
Once a valid license file is received from your vendor, you will need to copy this
‘license.lic’ file to the location where the KeyPro Plus Server application is installed.
The steps are as follows:
1. Open the KeyPro Plus Server Manager application, stop the Server if status reads
‘Started’ and close off ‘Server Manager’ screen by clicking ‘Exit’.
2. Open ‘Windows Explorer’ and paste the ‘license.lic’ file in the location where the
server is installed. It will by default be installed on the ‘C:\Program
Files\Argus\KeyPro Plus Server’ unless manually altered during installation.
3. Run the KeyPro Plus Server Manager application again and click ‘Start Server’. The
‘License status’ on the Server Manager screen will now read ‘License Valid’
4. Exit Server Manager if you wish. The KeyPro Plus Server application is now fully
licensed and running.
If your version of Windows is 64 bit then your default installation folder would be
“C:\Program Files (x86)\Argus\KeyPro Plus Server”
The KeyPro Plus Server Application license file will not work for the KeyPro Plus Client
Application nor will it work for any computer but the one the key was retrieved from
Getting Started - Client Application
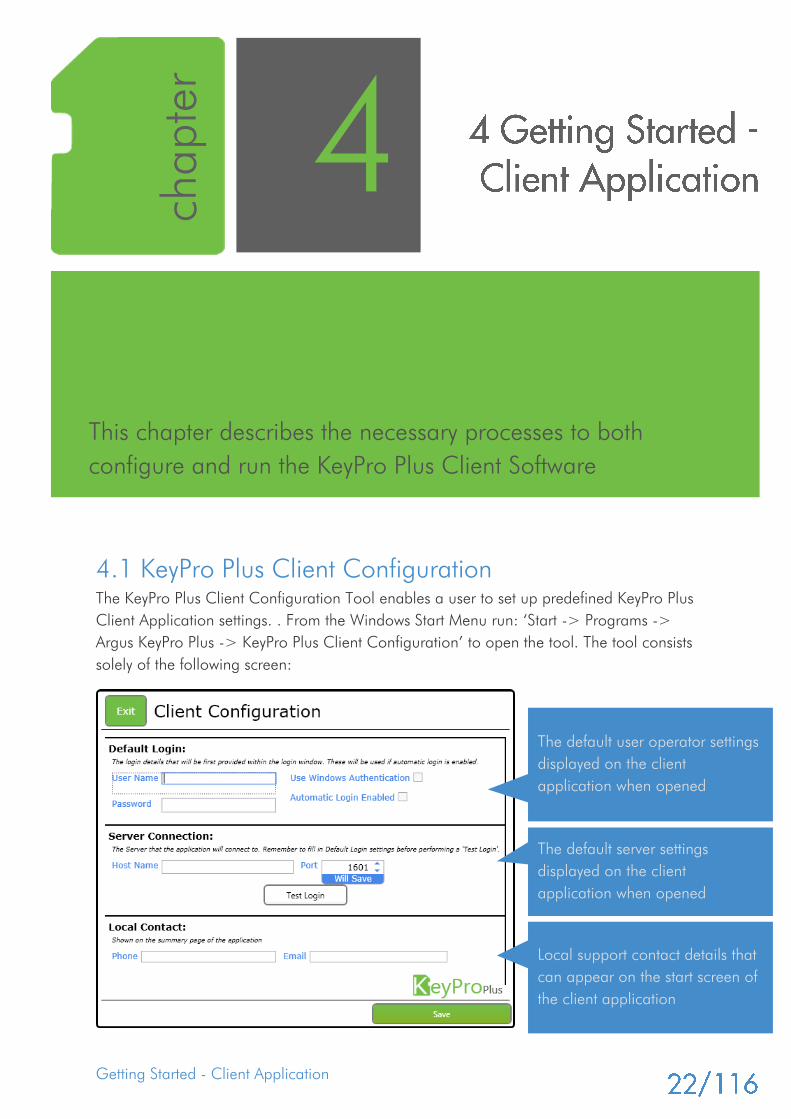
4.1 KeyPro Plus Client Configuration
The KeyPro Plus Client Configuration Tool enables a user to set up predefined KeyPro Plus
Client Application settings. . From the Windows Start Menu run: ‘Start -> Programs ->
Argus KeyPro Plus -> KeyPro Plus Client Configuration’ to open the tool. The tool consists
solely of the following screen:
chapte
r
4
This chapter describes the necessary processes to both
configure and run the KeyPro Plus Client Software
The default user operator settings
displayed on the client
application when opened
The default server settings
displayed on the client
application when opened
Local support contact details that
can appear on the start screen of
the client application
Getting Started - Client Application
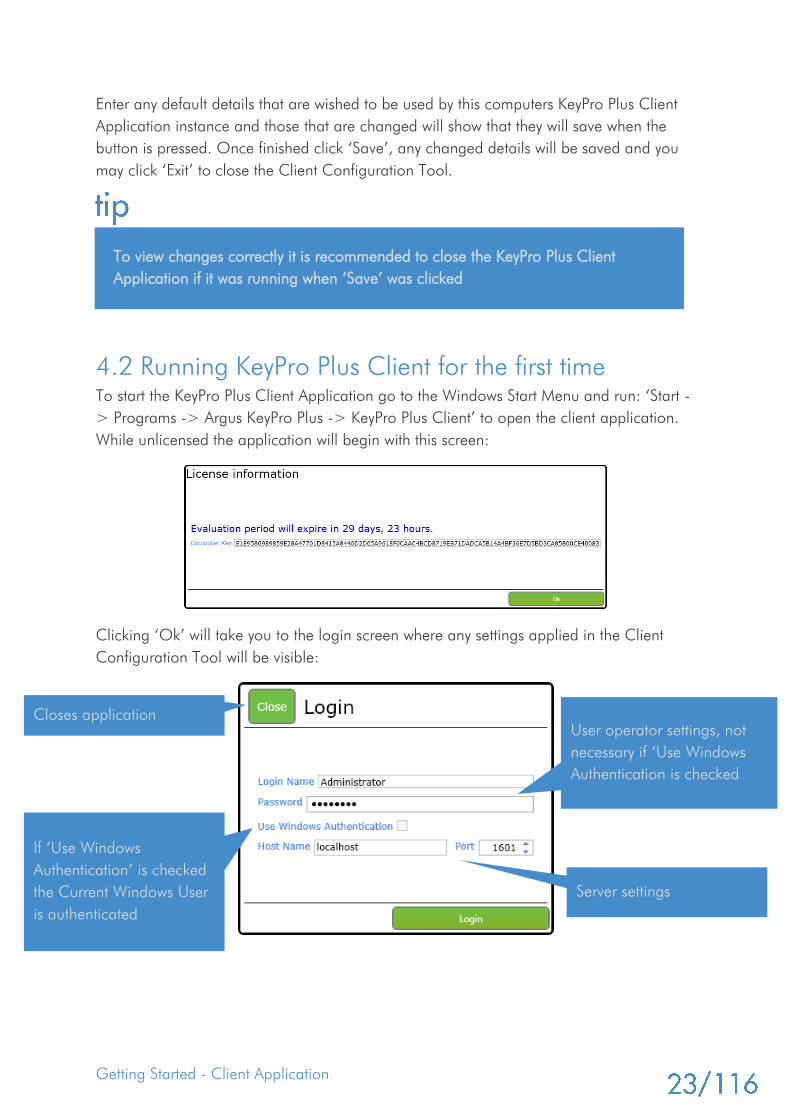
Enter any default details that are wished to be used by this computers KeyPro Plus Client
Application instance and those that are changed will show that they will save when the
button is pressed. Once finished click ‘Save’, any changed details will be saved and you
may click ‘Exit’ to close the Client Configuration Tool.
4.2 Running KeyPro Plus Client for the first time
To start the KeyPro Plus Client Application go to the Windows Start Menu and run: ‘Start -
> Programs -> Argus KeyPro Plus -> KeyPro Plus Client’ to open the client application.
While unlicensed the application will begin with this screen:
Clicking ‘Ok’ will take you to the login screen where any settings applied in the Client
Configuration Tool will be visible:
To view changes correctly it is recommended to close the KeyPro Plus Client
Application if it was running when ‘Save’ was clicked
User operator settings, not
necessary if ‘Use Windows
Authentication is checked
Server settings
If ‘Use Windows
Authentication’ is checked
the Current Windows User
is authenticated
Closes application
Getting Started - Client Application
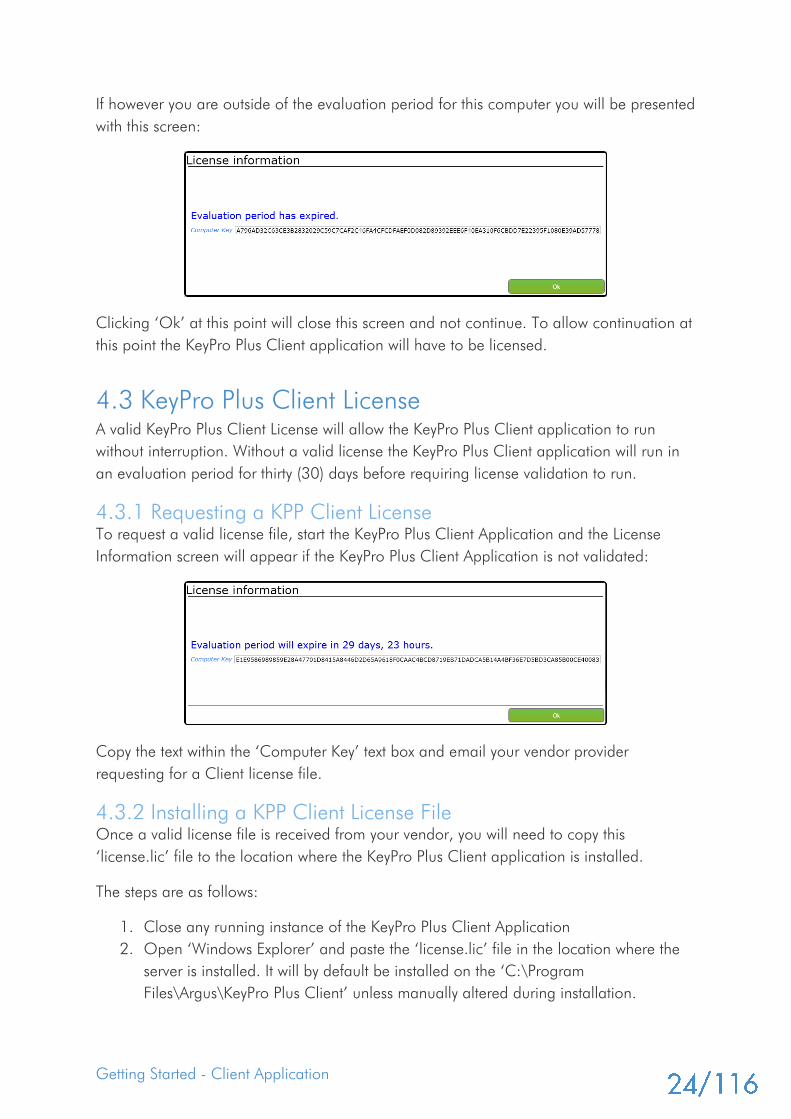
If however you are outside of the evaluation period for this computer you will be presented
with this screen:
Clicking ‘Ok’ at this point will close this screen and not continue. To allow continuation at
this point the KeyPro Plus Client application will have to be licensed.
4.3 KeyPro Plus Client License
A valid KeyPro Plus Client License will allow the KeyPro Plus Client application to run
without interruption. Without a valid license the KeyPro Plus Client application will run in
an evaluation period for thirty (30) days before requiring license validation to run.
4.3.1 Requesting a KPP Client License
To request a valid license file, start the KeyPro Plus Client Application and the License
Information screen will appear if the KeyPro Plus Client Application is not validated:
Copy the text within the ‘Computer Key’ text box and email your vendor provider
requesting for a Client license file.
4.3.2 Installing a KPP Client License File
Once a valid license file is received from your vendor, you will need to copy this
‘license.lic’ file to the location where the KeyPro Plus Client application is installed.
The steps are as follows:
1. Close any running instance of the KeyPro Plus Client Application
2. Open ‘Windows Explorer’ and paste the ‘license.lic’ file in the location where the
server is installed. It will by default be installed on the ‘C:\Program
Files\Argus\KeyPro Plus Client’ unless manually altered during installation.

Getting Started - Client Application
3. The KeyPro Plus Client Application is now fully licensed. Upon running the KeyPro
Plus Client Application the License Information dialog should no longer appear.
If your version of Windows is 64 bit then your default installation folder would be
“C:\Program Files (x86)\Argus\KeyPro Plus Client”
The KeyPro Plus Client Application license file will not work for the KeyPro Plus Server
Application nor will it work for any computer but the one the key was retrieved from

The First Steps - Client Application
5.1 Navigation Overview
5.1.1 Navigation Bar
The KeyPro Plus Client Software uses a tab style menu bar for quick and simple
navigation. Before the overview of this menu bar navigation system two KeyPro Plus Client
application elements will be defined.
Module – A Module consists of a number of related features that are grouped
together by one or more interconnected screens.
e.g. Within KeyPro Plus there is a screen where it is possible to view, add, edit or
delete KeyWatchers. This is defined as the KeyWatchers Module.
Module Category – Modules may perform functions that relate to other Modules
and when this is true they will commonly be located within one Module Category.
e.g. Within KeyPro Plus the Unresolved Alarms Module and the Historical Alarms
Module both relate to KeyPro Plus Alarms thus they are both located in the Alarms
Module Category.
The following image is what the KeyPro Plus Client application navigation menu looks
like.
chapte
r
5
This chapter can be used as a first use tutorial as well as a
system setup checklist for the KeyPro Plus Client Software
Module
Categories
Modules
The First Steps - Client Application
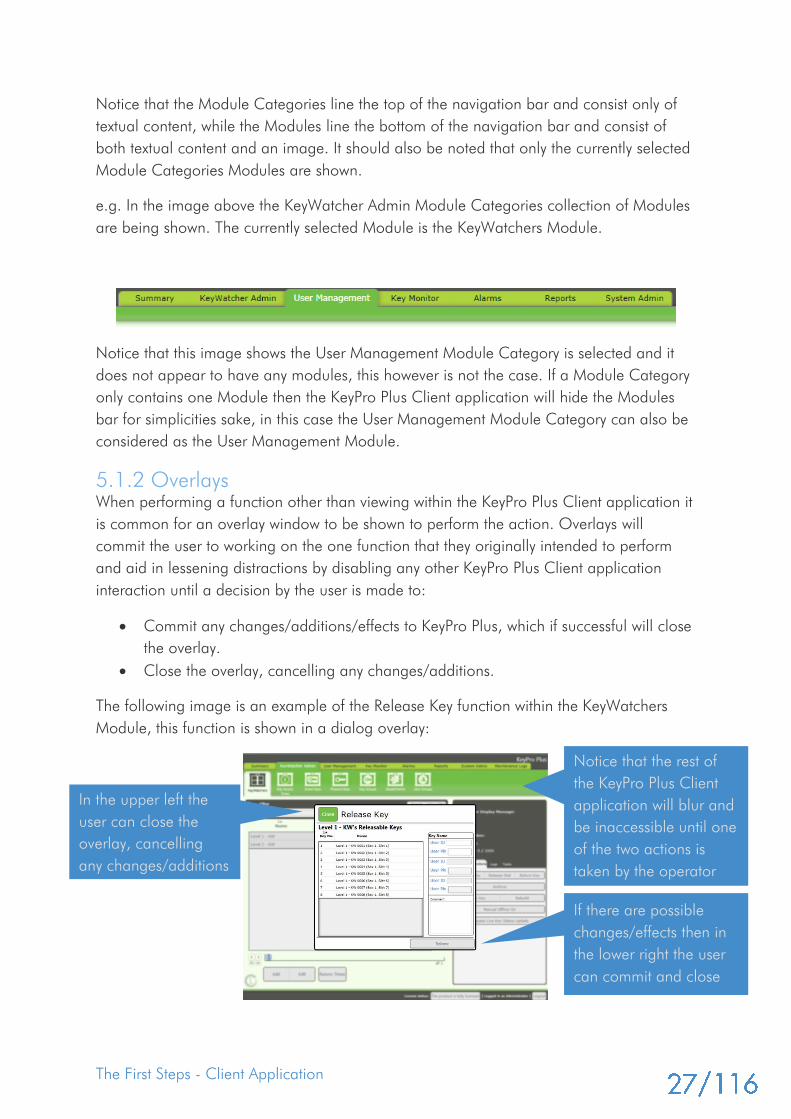
Notice that the Module Categories line the top of the navigation bar and consist only of
textual content, while the Modules line the bottom of the navigation bar and consist of
both textual content and an image. It should also be noted that only the currently selected
Module Categories Modules are shown.
e.g. In the image above the KeyWatcher Admin Module Categories collection of Modules
are being shown. The currently selected Module is the KeyWatchers Module.
Notice that this image shows the User Management Module Category is selected and it
does not appear to have any modules, this however is not the case. If a Module Category
only contains one Module then the KeyPro Plus Client application will hide the Modules
bar for simplicities sake, in this case the User Management Module Category can also be
considered as the User Management Module.
5.1.2 Overlays
When performing a function other than viewing within the KeyPro Plus Client application it
is common for an overlay window to be shown to perform the action. Overlays will
commit the user to working on the one function that they originally intended to perform
and aid in lessening distractions by disabling any other KeyPro Plus Client application
interaction until a decision by the user is made to:
Commit any changes/additions/effects to KeyPro Plus, which if successful will close
the overlay.
Close the overlay, cancelling any changes/additions.
The following image is an example of the Release Key function within the KeyWatchers
Module, this function is shown in a dialog overlay:
If there are possible
changes/effects then in
the lower right the user
can commit and close
In the upper left the
user can close the
overlay, cancelling
any changes/additions
Notice that the rest of
the KeyPro Plus Client
application will blur and
be inaccessible until one
of the two actions is
taken by the operator
The First Steps - Client Application
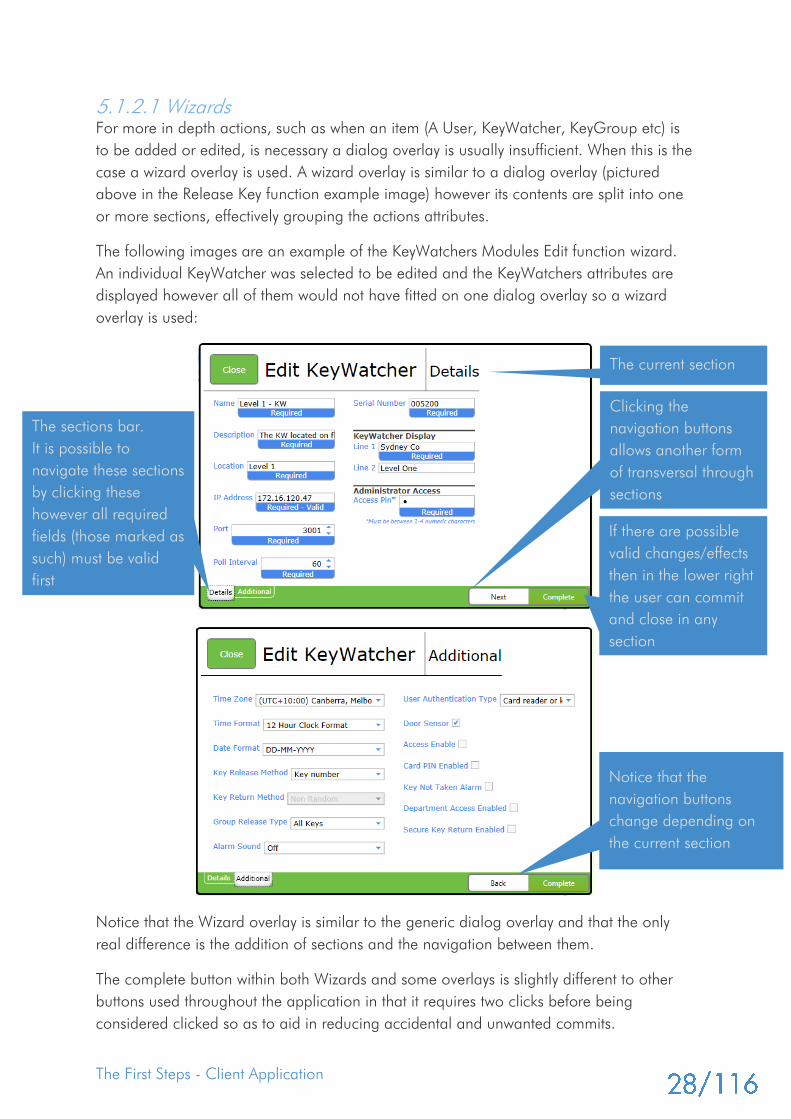
5.1.2.1 Wizards
For more in depth actions, such as when an item (A User, KeyWatcher, KeyGroup etc) is
to be added or edited, is necessary a dialog overlay is usually insufficient. When this is the
case a wizard overlay is used. A wizard overlay is similar to a dialog overlay (pictured
above in the Release Key function example image) however its contents are split into one
or more sections, effectively grouping the actions attributes.
The following images are an example of the KeyWatchers Modules Edit function wizard.
An individual KeyWatcher was selected to be edited and the KeyWatchers attributes are
displayed however all of them would not have fitted on one dialog overlay so a wizard
overlay is used:
Notice that the Wizard overlay is similar to the generic dialog overlay and that the only
real difference is the addition of sections and the navigation between them.
The complete button within both Wizards and some overlays is slightly different to other
buttons used throughout the application in that it requires two clicks before being
considered clicked so as to aid in reducing accidental and unwanted commits.
If there are possible
valid changes/effects
then in the lower right
the user can commit
and close in any
section
Notice that the
navigation buttons
change depending on
the current section
Clicking the
navigation buttons
allows another form
of transversal through
sections
The current section
The sections bar.
It is possible to
navigate these sections
by clicking these
however all required
fields (those marked as
such) must be valid
first
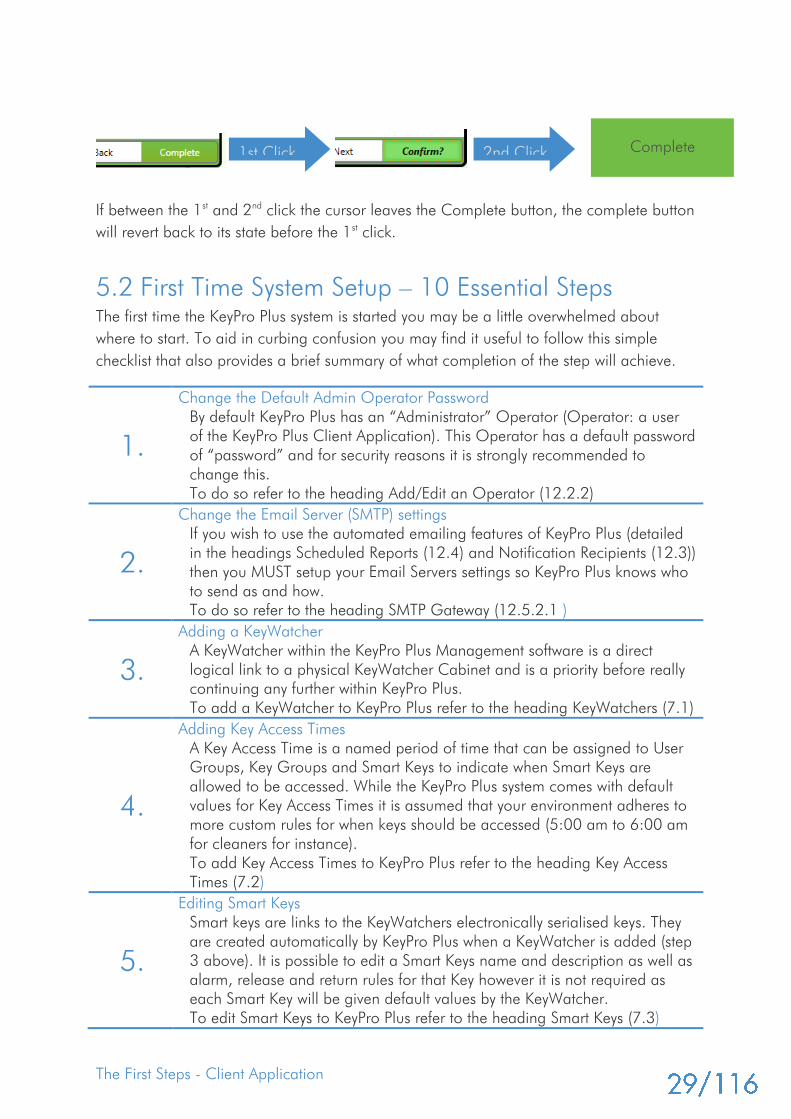
The First Steps - Client Application
If between the 1st
and 2nd
click the cursor leaves the Complete button, the complete button
will revert back to its state before the 1st
click.
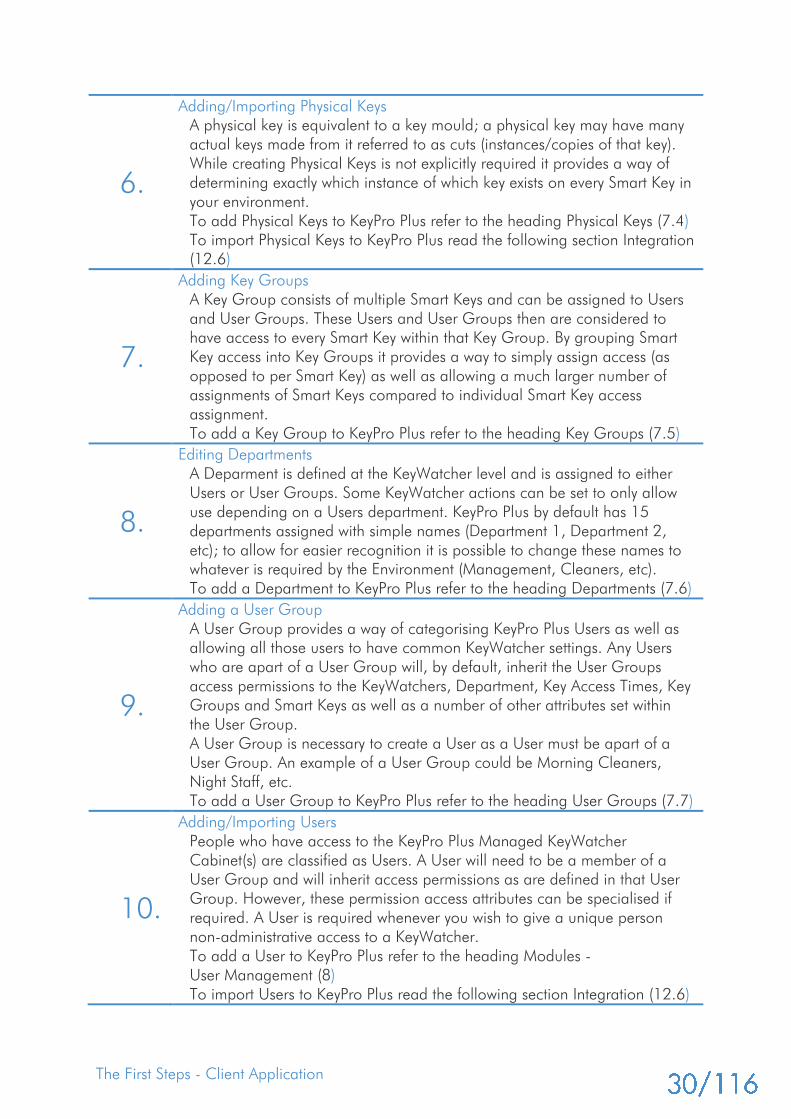
5.2 First Time System Setup – 10 Essential Steps
The first time the KeyPro Plus system is started you may be a little overwhelmed about
where to start. To aid in curbing confusion you may find it useful to follow this simple
checklist that also provides a brief summary of what completion of the step will achieve.
1. 1
Change the Default Admin Operator Password
By default KeyPro Plus has an “Administrator” Operator (Operator: a user
of the KeyPro Plus Client Application). This Operator has a default password
of “password” and for security reasons it is strongly recommended to
change this.
To do so refer to the heading Add/Edit an Operator (12.2.2)
2.
Change the Email Server (SMTP) settings
If you wish to use the automated emailing features of KeyPro Plus (detailed
in the headings Scheduled Reports (12.4) and Notification Recipients (12.3))
then you MUST setup your Email Servers settings so KeyPro Plus knows who
to send as and how.
To do so refer to the heading SMTP Gateway (12.5.2.1 )
3.
Adding a KeyWatcher
A KeyWatcher within the KeyPro Plus Management software is a direct
logical link to a physical KeyWatcher Cabinet and is a priority before really
continuing any further within KeyPro Plus.
To add a KeyWatcher to KeyPro Plus refer to the heading KeyWatchers (7.1)
4. 2
Adding Key Access Times
A Key Access Time is a named period of time that can be assigned to User
Groups, Key Groups and Smart Keys to indicate when Smart Keys are
allowed to be accessed. While the KeyPro Plus system comes with default
values for Key Access Times it is assumed that your environment adheres to
more custom rules for when keys should be accessed (5:00 am to 6:00 am
for cleaners for instance).
To add Key Access Times to KeyPro Plus refer to the heading Key Access
Times (7.2)
5. 1
Editing Smart Keys
Smart keys are links to the KeyWatchers electronically serialised keys. They
are created automatically by KeyPro Plus when a KeyWatcher is added (step
3 above). It is possible to edit a Smart Keys name and description as well as
alarm, release and return rules for that Key however it is not required as
each Smart Key will be given default values by the KeyWatcher.
To edit Smart Keys to KeyPro Plus refer to the heading Smart Keys (7.3)
1st Click 2nd Click Complete
The First Steps - Client Application
6. 1
Adding/Importing Physical Keys
A physical key is equivalent to a key mould; a physical key may have many
actual keys made from it referred to as cuts (instances/copies of that key).
While creating Physical Keys is not explicitly required it provides a way of
determining exactly which instance of which key exists on every Smart Key in
your environment.
To add Physical Keys to KeyPro Plus refer to the heading Physical Keys (7.4)
To import Physical Keys to KeyPro Plus read the following section Integration
(12.6)
7. 1
Adding Key Groups
A Key Group consists of multiple Smart Keys and can be assigned to Users
and User Groups. These Users and User Groups then are considered to
have access to every Smart Key within that Key Group. By grouping Smart
Key access into Key Groups it provides a way to simply assign access (as
opposed to per Smart Key) as well as allowing a much larger number of
assignments of Smart Keys compared to individual Smart Key access
assignment.
To add a Key Group to KeyPro Plus refer to the heading Key Groups (7.5)
8. 1
Editing Departments
A Deparment is defined at the KeyWatcher level and is assigned to either
Users or User Groups. Some KeyWatcher actions can be set to only allow
use depending on a Users department. KeyPro Plus by default has 15
departments assigned with simple names (Department 1, Department 2,
etc); to allow for easier recognition it is possible to change these names to
whatever is required by the Environment (Management, Cleaners, etc).
To add a Department to KeyPro Plus refer to the heading Departments (7.6)
9. 1
Adding a User Group
A User Group provides a way of categorising KeyPro Plus Users as well as
allowing all those users to have common KeyWatcher settings. Any Users
who are apart of a User Group will, by default, inherit the User Groups
access permissions to the KeyWatchers, Department, Key Access Times, Key
Groups and Smart Keys as well as a number of other attributes set within
the User Group.
A User Group is necessary to create a User as a User must be apart of a
User Group. An example of a User Group could be Morning Cleaners,
Night Staff, etc.
To add a User Group to KeyPro Plus refer to the heading User Groups (7.7)
10. 1
Adding/Importing Users
People who have access to the KeyPro Plus Managed KeyWatcher
Cabinet(s) are classified as Users. A User will need to be a member of a
User Group and will inherit access permissions as are defined in that User
Group. However, these permission access attributes can be specialised if
required. A User is required whenever you wish to give a unique person
non-administrative access to a KeyWatcher.
To add a User to KeyPro Plus refer to the heading Modules -
User Management (8)
To import Users to KeyPro Plus read the following section Integration (12.6)

Modules - Summary
6.1 Overview
The system summary module is the start screen for the KeyPro Plus Client Application. It
provides a basic live overview of the KeyPro Plus Management System as well as
functioning as a home page for an operator with even the lowest levels of access within
the application.
chapte
r
6
This chapter describes the Summary Module - The start page
for the KeyPro Plus Client Software that shows a live feed of
important system information
Even valid operators with no access to any other modules within the
KeyPro Plus Client Application will be able to view the Summary Module,
this functionality could be useful on a basic system monitoring station

Modules - Summary
6.1.1 Main Screen Overview
Contact information
shown here by
default. If local
contact information
is filled out in the
client configuration
tool it will appear
here also
The System
Summary shows the
current count of a
range of different
values within the
KeyPro Plus
Management
System

Modules - KeyWatcher Admin
7.1 KeyWatchers
A KeyWatcher within the KeyPro Plus Management software is a direct logical link to a
physical KeyWatcher Cabinet. The KeyWatcher cabinet will be synced with all of the
settings applied to its logical KeyPro Plus equivalent, generated and cancelled alarms and
the actions performed by users at this KeyWatcher cabinet will be sent to KeyPro Plus.
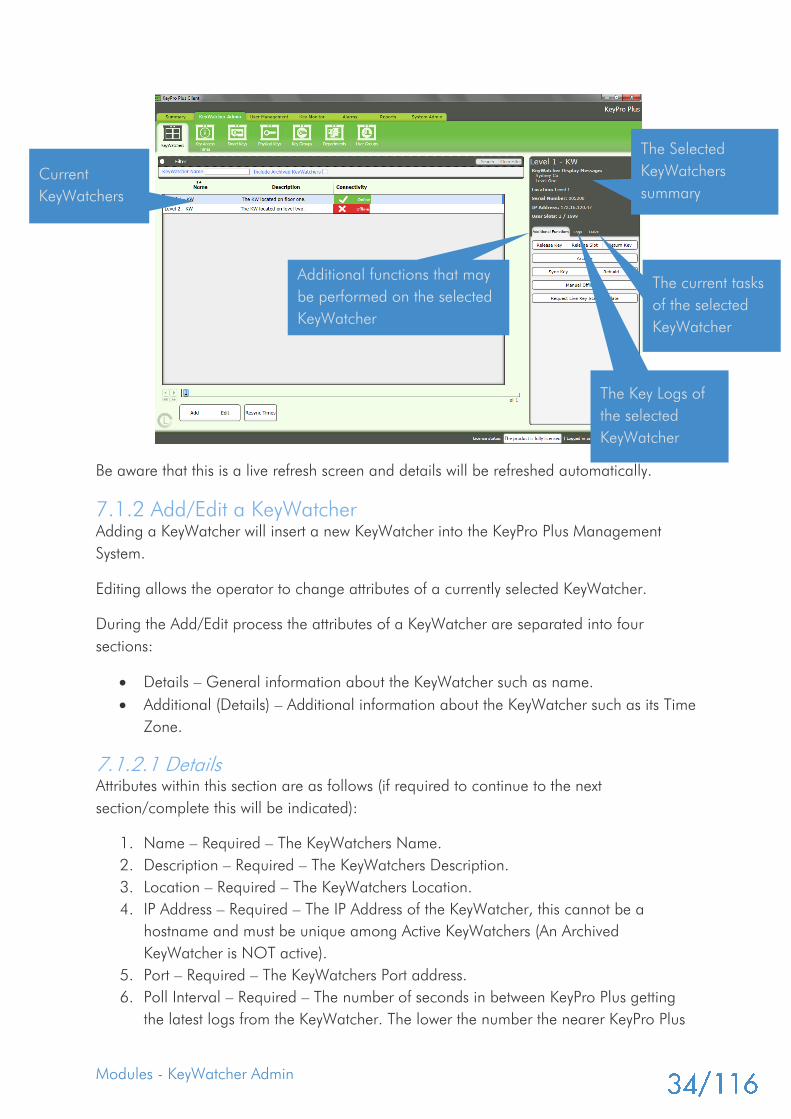
7.1.1 Main Screen Overview
Go to the ‘KeyWatcher Admin -> KeyWatcher’ module item to manage the KeyPro Plus
KeyWatchers.
chapte
r
7
This chapter describes the KeyWatcher Admin Module - This
module groups together all of the tasks required to setup
every KeyWatcher within the KeyWatcher Management
System
Modules - KeyWatcher Admin
Be aware that this is a live refresh screen and details will be refreshed automatically.
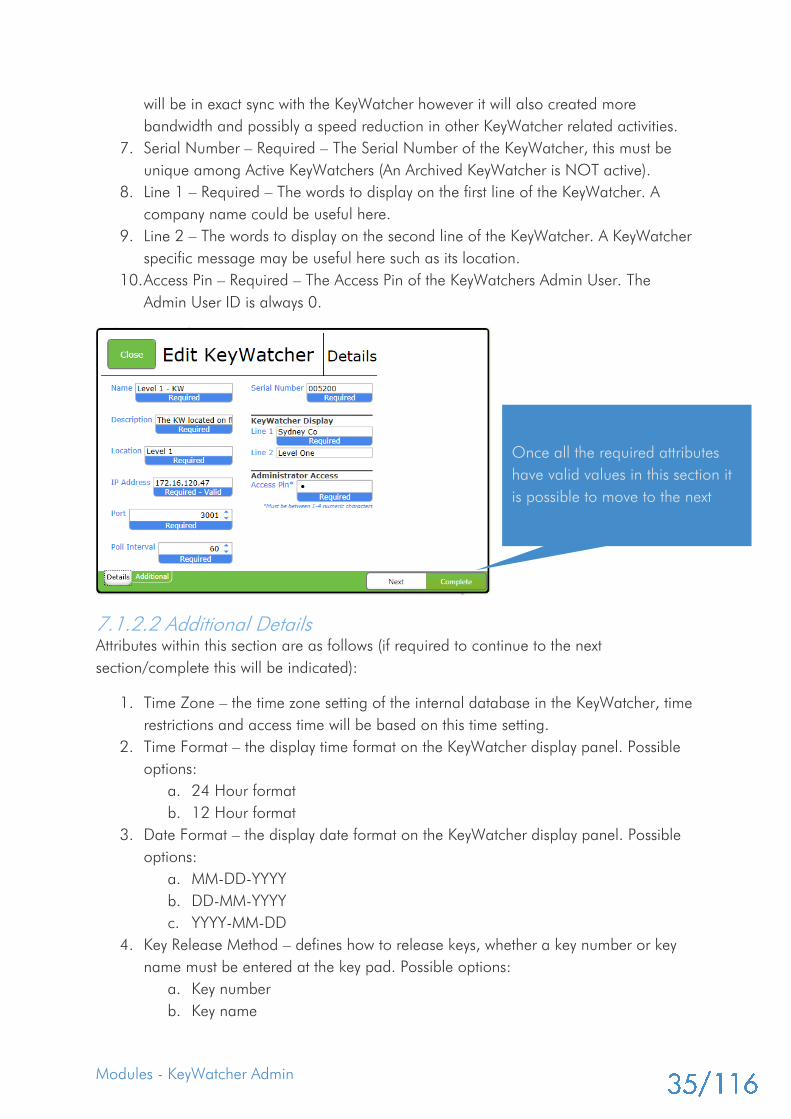
7.1.2 Add/Edit a KeyWatcher
Adding a KeyWatcher will insert a new KeyWatcher into the KeyPro Plus Management
System.
Editing allows the operator to change attributes of a currently selected KeyWatcher.
During the Add/Edit process the attributes of a KeyWatcher are separated into four
sections:
Details – General information about the KeyWatcher such as name.
Additional (Details) – Additional information about the KeyWatcher such as its Time
Zone.
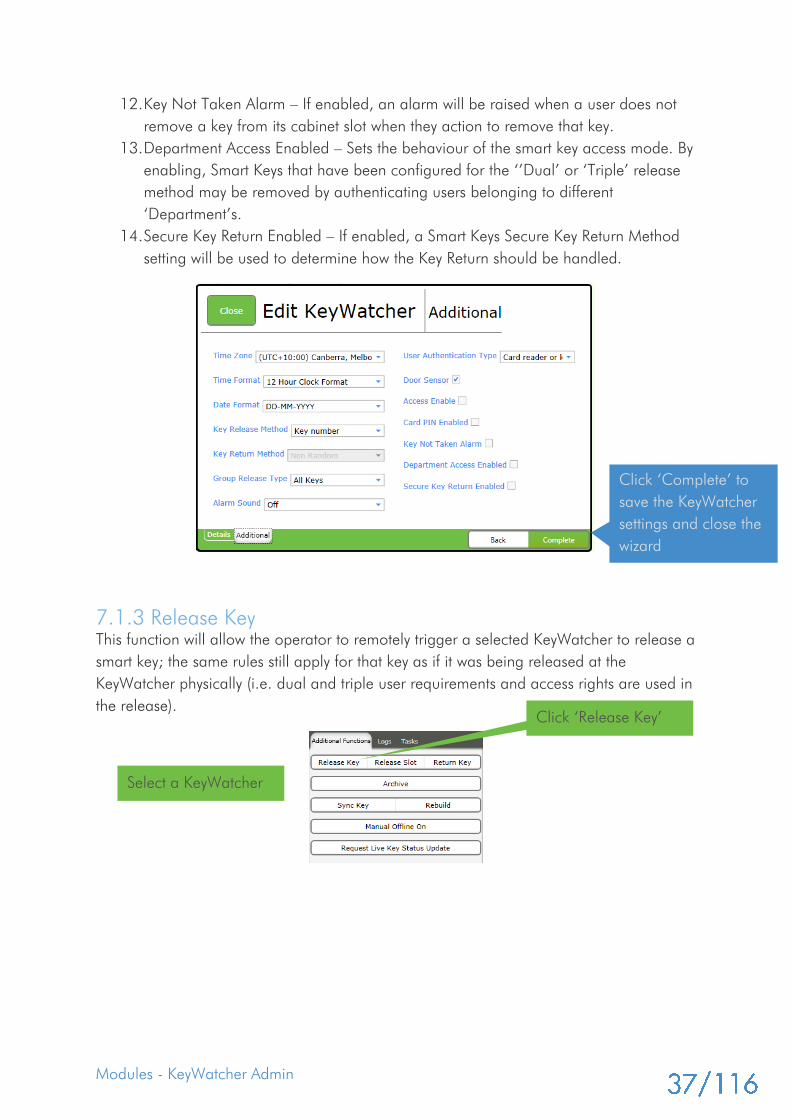
7.1.2.1 Details
Attributes within this section are as follows (if required to continue to the next
section/complete this will be indicated):
1. Name – Required – The KeyWatchers Name.
2. Description – Required – The KeyWatchers Description.
3. Location – Required – The KeyWatchers Location.
4. IP Address – Required – The IP Address of the KeyWatcher, this cannot be a
hostname and must be unique among Active KeyWatchers (An Archived
KeyWatcher is NOT active).
5. Port – Required – The KeyWatchers Port address.
6. Poll Interval – Required – The number of seconds in between KeyPro Plus getting
the latest logs from the KeyWatcher. The lower the number the nearer KeyPro Plus
Current
KeyWatchers
The Selected
KeyWatchers
summary
Additional functions that may
be performed on the selected
KeyWatcher
The Key Logs of
the selected
KeyWatcher
The current tasks
of the selected
KeyWatcher
Modules - KeyWatcher Admin
will be in exact sync with the KeyWatcher however it will also created more
bandwidth and possibly a speed reduction in other KeyWatcher related activities.
7. Serial Number – Required – The Serial Number of the KeyWatcher, this must be
unique among Active KeyWatchers (An Archived KeyWatcher is NOT active).
8. Line 1 – Required – The words to display on the first line of the KeyWatcher. A
company name could be useful here.
9. Line 2 – The words to display on the second line of the KeyWatcher. A KeyWatcher
specific message may be useful here such as its location.
10. Access Pin – Required – The Access Pin of the KeyWatchers Admin User. The
Admin User ID is always 0.
7.1.2.2 Additional Details
Attributes within this section are as follows (if required to continue to the next
section/complete this will be indicated):
1. Time Zone – the time zone setting of the internal database in the KeyWatcher, time
restrictions and access time will be based on this time setting.
2. Time Format – the display time format on the KeyWatcher display panel. Possible
options:
a. 24 Hour format
b. 12 Hour format
3. Date Format – the display date format on the KeyWatcher display panel. Possible
options:
a. MM-DD-YYYY
b. DD-MM-YYYY
c. YYYY-MM-DD
4. Key Release Method – defines how to release keys, whether a key number or key
name must be entered at the key pad. Possible options:
a. Key number
b. Key name
Once all the required attributes
have valid values in this section it
is possible to move to the next

Modules - KeyWatcher Admin
5. Key Return Mode – determines the behaviour when returning a key. Possible
options:
a. Auto – KeyWatcher will automatically select one of its boxes for a key to be
returned.
b. Manual – User must select the KeyWatcher box where the key is to be
returned (this option will only take affect if the Random firmware has been
installed)
c. Non Random – KeyWatcher will select the box and highlight the slot of the
original position of the key to be returned but only if the slot is not already
taken (this option will only take affect if the Non Random firmware has been
installed).
6. Group Release Type – defines the behaviour when releasing Key Groups. Note
that an override of behaviour can be set for individual Key Groups. Possible
options:
a. All Keys – will release all keys belonging to key group
b. First Available – will release any available key belonging to key group
7. Alarm Sound – sound behaviour when an alarm at the KeyWatcher occurs.
Possible options:
a. Off – alarm sound will not beep
b. On – alarm sound will beep when alarm is generated
c. Five Minutes – alarm sound will beep after five minutes of alarm occurrence
8. User Authentication Type – determines how the User will access the KeyWatcher. If
a card reader is installed, there is a few ways to set up the authentication. Possible
options:
a. Keypad – requires user to enter four digit ID and four digit PIN.
b. Card reader or keypad – use option if Card Reader is installed. For this
option you will need to decide how you want to the set the ‘Card PIN
Enabled’ check option. If the Card PIN option is checked the User
authentication will be a prox-card swipe and a valid user PIN.
c. Relay input or keypad – if you have a Card Reader wired to the Relay Input
of the KeyWatcher, this option must be selected. This effectively means that
access to the keypad will not be granted for the User to enter both their ID
and PIN code until a valid prox-card is swiped and the Card Reader informs
the Relay Input (Refer to your KeyWatcher Manual for more information).
9. Door Sensor – if checked, an alarm is produced if the KeyWatcher door is opened
without a valid user code being entered OR if the door is left open. E.g. the door is
manually opened with the KeyWatchers panel key, an alarm will now be raised.
10. Access Enable – if checked, when any User enters their four digit ID and PIN, or
Swipes their Card and enters the PIN incorrectly three times consecutively, the
KeyWatcher will lock up access for EVERYBODY for three minutes.
11. Card PIN Enabled – only available if the ‘User Authentication Type’ is ‘Card reader
or keypad’ – If enabled, when a valid prox-card is swiped its Card PIN is required
to be entered on the keypad before proceeding.
Modules - KeyWatcher Admin
12. Key Not Taken Alarm – If enabled, an alarm will be raised when a user does not
remove a key from its cabinet slot when they action to remove that key.
13. Department Access Enabled – Sets the behaviour of the smart key access mode. By
enabling, Smart Keys that have been configured for the ‘’Dual’ or ‘Triple’ release
method may be removed by authenticating users belonging to different
‘Department’s.
14. Secure Key Return Enabled – If enabled, a Smart Keys Secure Key Return Method
setting will be used to determine how the Key Return should be handled.
7.1.3 Release Key
This function will allow the operator to remotely trigger a selected KeyWatcher to release a
smart key; the same rules still apply for that key as if it was being released at the
KeyWatcher physically (i.e. dual and triple user requirements and access rights are used in
the release).
Click ‘Complete’ to
save the KeyWatcher
settings and close the
wizard
Click ‘Release Key’
Select a KeyWatcher
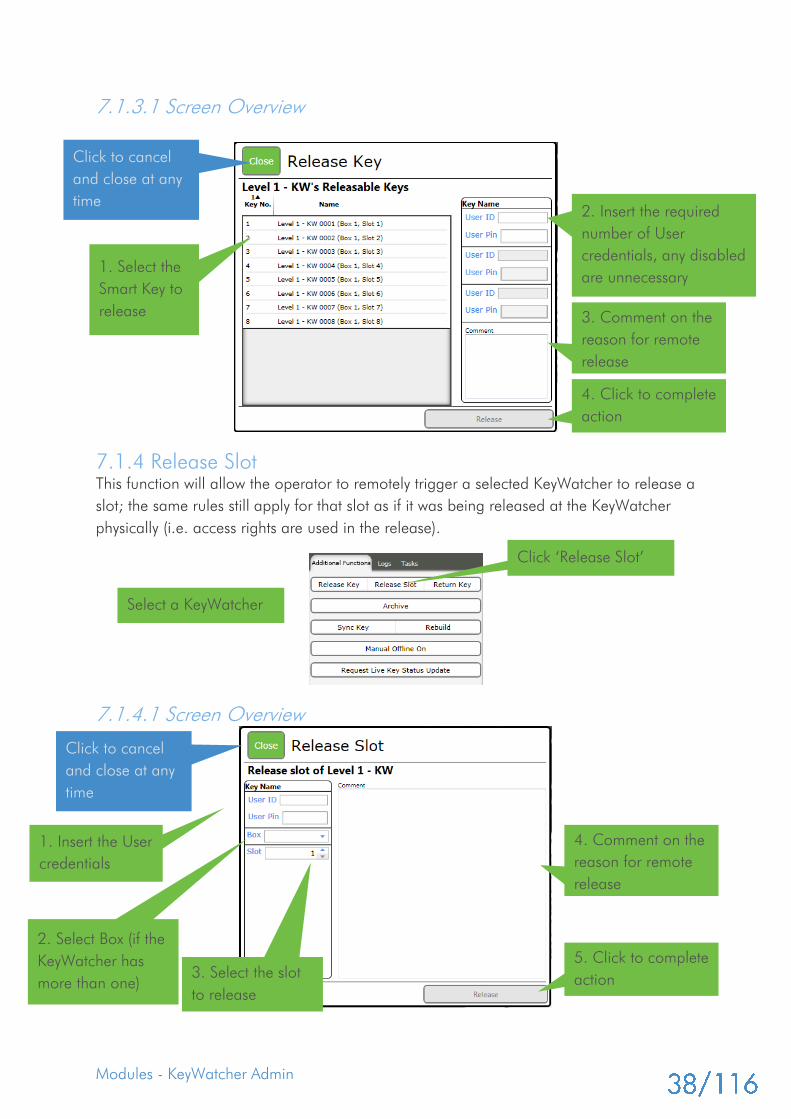
Modules - KeyWatcher Admin
7.1.3.1 Screen Overview
7.1.4 Release Slot
This function will allow the operator to remotely trigger a selected KeyWatcher to release a
slot; the same rules still apply for that slot as if it was being released at the KeyWatcher
physically (i.e. access rights are used in the release).
7.1.4.1 Screen Overview
Click ‘Release Slot’
Select a KeyWatcher
1. Select the
Smart Key to
release
2. Insert the required
number of User
credentials, any disabled
are unnecessary
3. Comment on the
reason for remote
release
4. Click to complete
action
Click to cancel
and close at any
time
3. Select the slot
to release
4. Comment on the
reason for remote
release
5. Click to complete
action
Click to cancel
and close at any
time
2. Select Box (if the
KeyWatcher has
more than one)
1. Insert the User
credentials
Modules - KeyWatcher Admin
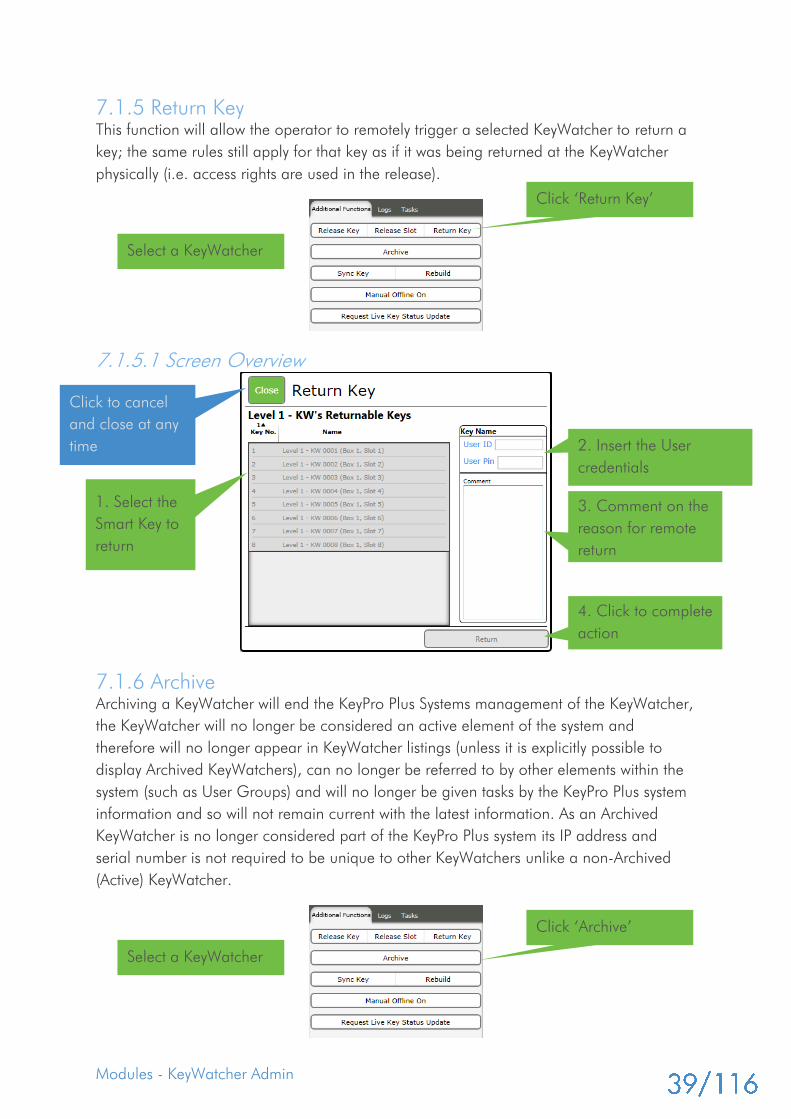
7.1.5 Return Key
This function will allow the operator to remotely trigger a selected KeyWatcher to return a
key; the same rules still apply for that key as if it was being returned at the KeyWatcher
physically (i.e. access rights are used in the release).
7.1.5.1 Screen Overview
7.1.6 Archive
Archiving a KeyWatcher will end the KeyPro Plus Systems management of the KeyWatcher,
the KeyWatcher will no longer be considered an active element of the system and
therefore will no longer appear in KeyWatcher listings (unless it is explicitly possible to
display Archived KeyWatchers), can no longer be referred to by other elements within the
system (such as User Groups) and will no longer be given tasks by the KeyPro Plus system
information and so will not remain current with the latest information. As an Archived
KeyWatcher is no longer considered part of the KeyPro Plus system its IP address and
serial number is not required to be unique to other KeyWatchers unlike a non-Archived
(Active) KeyWatcher.
Click ‘Archive’
Select a KeyWatcher
Click ‘Return Key’
Select a KeyWatcher
1. Select the
Smart Key to
return
2. Insert the User
credentials
3. Comment on the
reason for remote
return
4. Click to complete
action
Click to cancel
and close at any
time

Modules - KeyWatcher Admin
7.1.6.1 Screen Overview
A standard Yes/No dialog will appear prompting the user for confirmation of the Archive
function being performed on the selected KeyWatcher.
7.1.7 Reactivate
When a KeyWatcher is Archived one of the only places it may be viewed is within the
KeyWatcher module item. To reactivate an Archived KeyWatcher (and thus remove its
Archived status) the reactive function may be run on it. To view the Archived KeyWatchers,
check the “Include Archived KeyWatchers” check box, all Archived KeyWatchers will be
highlighted in red and the only additional function that is able to run on them is
Reactivate.
7.1.7.1 Screen Overview
The Reactivate function will present the KeyWatcher Edit wizard (Refer to 7.1.2) for the
selected KeyWatcher; changes can be made as in the normal KeyWatcher Edit wizard and
upon successful completion the KeyWatcher will no longer be Archived.
7.1.8 Sync Key
The Sync Key function will force a full merge of all key information between KeyPro Plus
and the KeyWatcher; no effect if the systems have not become unsynchronized.
1. Check ‘Include
Archived
KeyWatchers’
2. Select an
Archived
KeyWatcher
3. Click ‘Reactivate’
Click ‘Sync Key’
Select a KeyWatcher
Modules - KeyWatcher Admin
7.1.8.1 Screen Overview
A standard Yes/No dialog will appear prompting the user for confirmation of the Archive
function being performed on the selected KeyWatcher.
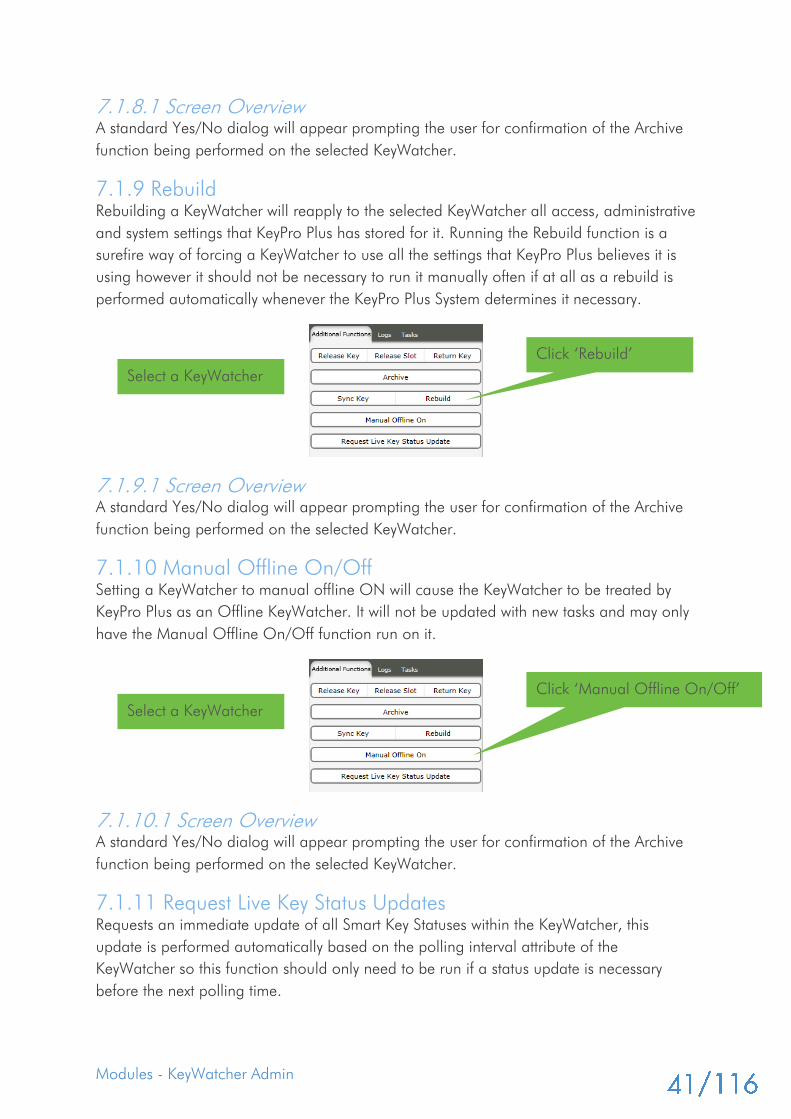
7.1.9 Rebuild
Rebuilding a KeyWatcher will reapply to the selected KeyWatcher all access, administrative
and system settings that KeyPro Plus has stored for it. Running the Rebuild function is a
surefire way of forcing a KeyWatcher to use all the settings that KeyPro Plus believes it is
using however it should not be necessary to run it manually often if at all as a rebuild is
performed automatically whenever the KeyPro Plus System determines it necessary.
7.1.9.1 Screen Overview
A standard Yes/No dialog will appear prompting the user for confirmation of the Archive
function being performed on the selected KeyWatcher.
7.1.10 Manual Offline On/Off
Setting a KeyWatcher to manual offline ON will cause the KeyWatcher to be treated by
KeyPro Plus as an Offline KeyWatcher. It will not be updated with new tasks and may only
have the Manual Offline On/Off function run on it.
7.1.10.1 Screen Overview
A standard Yes/No dialog will appear prompting the user for confirmation of the Archive
function being performed on the selected KeyWatcher.
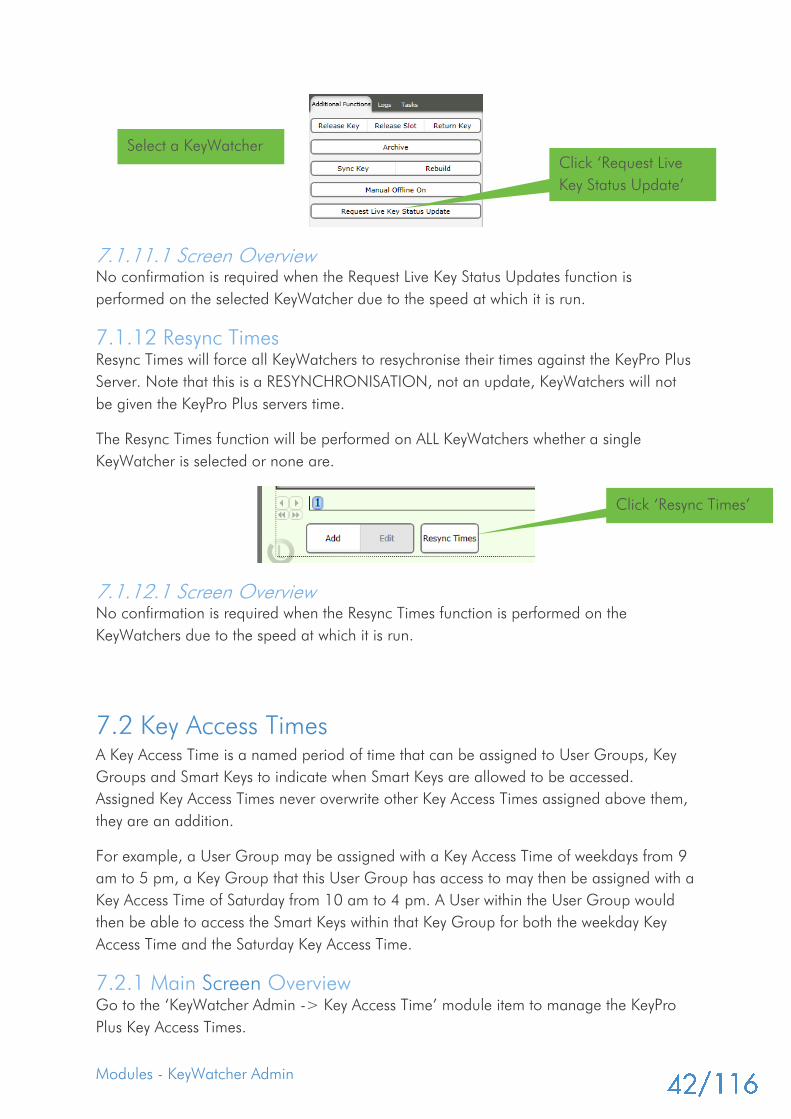
7.1.11 Request Live Key Status Updates
Requests an immediate update of all Smart Key Statuses within the KeyWatcher, this
update is performed automatically based on the polling interval attribute of the
KeyWatcher so this function should only need to be run if a status update is necessary
before the next polling time.
Click ‘Rebuild’
Select a KeyWatcher
Click ‘Manual Offline On/Off’
Select a KeyWatcher
Modules - KeyWatcher Admin
7.1.11.1 Screen Overview
No confirmation is required when the Request Live Key Status Updates function is
performed on the selected KeyWatcher due to the speed at which it is run.
7.1.12 Resync Times
Resync Times will force all KeyWatchers to resychronise their times against the KeyPro Plus
Server. Note that this is a RESYNCHRONISATION, not an update, KeyWatchers will not
be given the KeyPro Plus servers time.
The Resync Times function will be performed on ALL KeyWatchers whether a single
KeyWatcher is selected or none are.
7.1.12.1 Screen Overview
No confirmation is required when the Resync Times function is performed on the
KeyWatchers due to the speed at which it is run.
7.2 Key Access Times
A Key Access Time is a named period of time that can be assigned to User Groups, Key
Groups and Smart Keys to indicate when Smart Keys are allowed to be accessed.
Assigned Key Access Times never overwrite other Key Access Times assigned above them,
they are an addition.
For example, a User Group may be assigned with a Key Access Time of weekdays from 9
am to 5 pm, a Key Group that this User Group has access to may then be assigned with a
Key Access Time of Saturday from 10 am to 4 pm. A User within the User Group would
then be able to access the Smart Keys within that Key Group for both the weekday Key
Access Time and the Saturday Key Access Time.
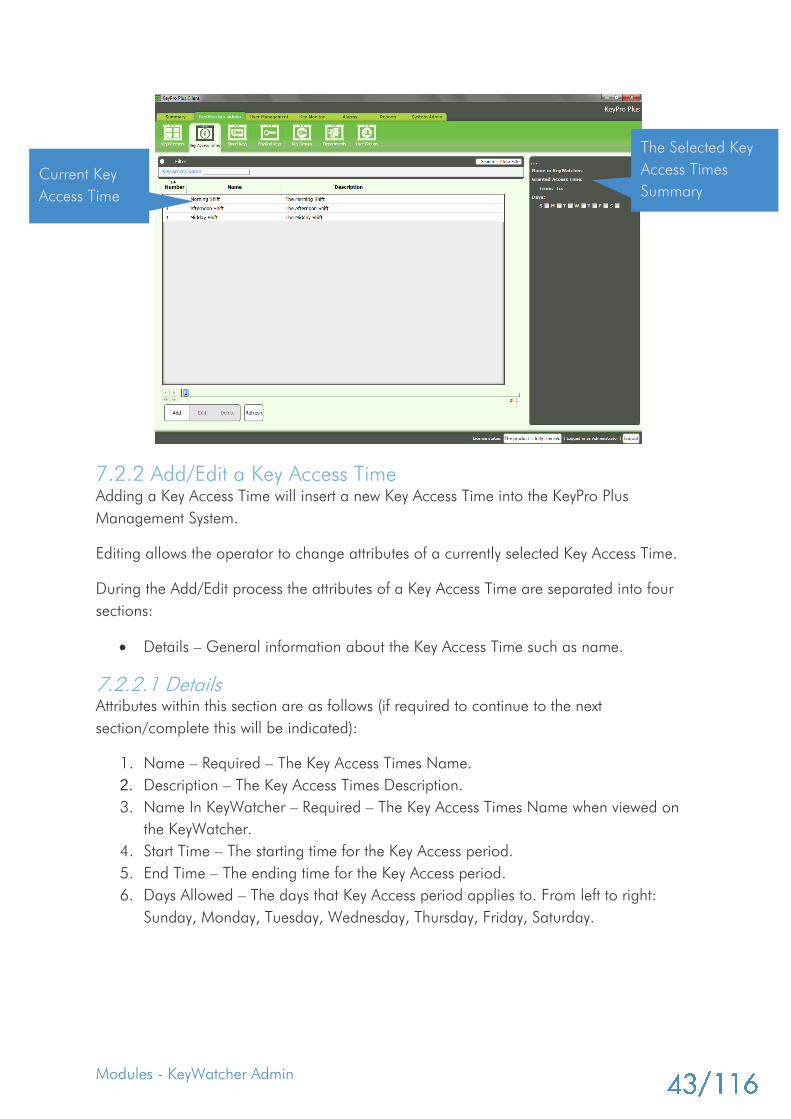
7.2.1 Main Screen Overview
Go to the ‘KeyWatcher Admin -> Key Access Time’ module item to manage the KeyPro
Plus Key Access Times.
Click ‘Request Live
Key Status Update’
Select a KeyWatcher
Click ‘Resync Times’
Modules - KeyWatcher Admin
7.2.2 Add/Edit a Key Access Time
Adding a Key Access Time will insert a new Key Access Time into the KeyPro Plus
Management System.
Editing allows the operator to change attributes of a currently selected Key Access Time.
During the Add/Edit process the attributes of a Key Access Time are separated into four
sections:
Details – General information about the Key Access Time such as name.
7.2.2.1 Details
Attributes within this section are as follows (if required to continue to the next
section/complete this will be indicated):
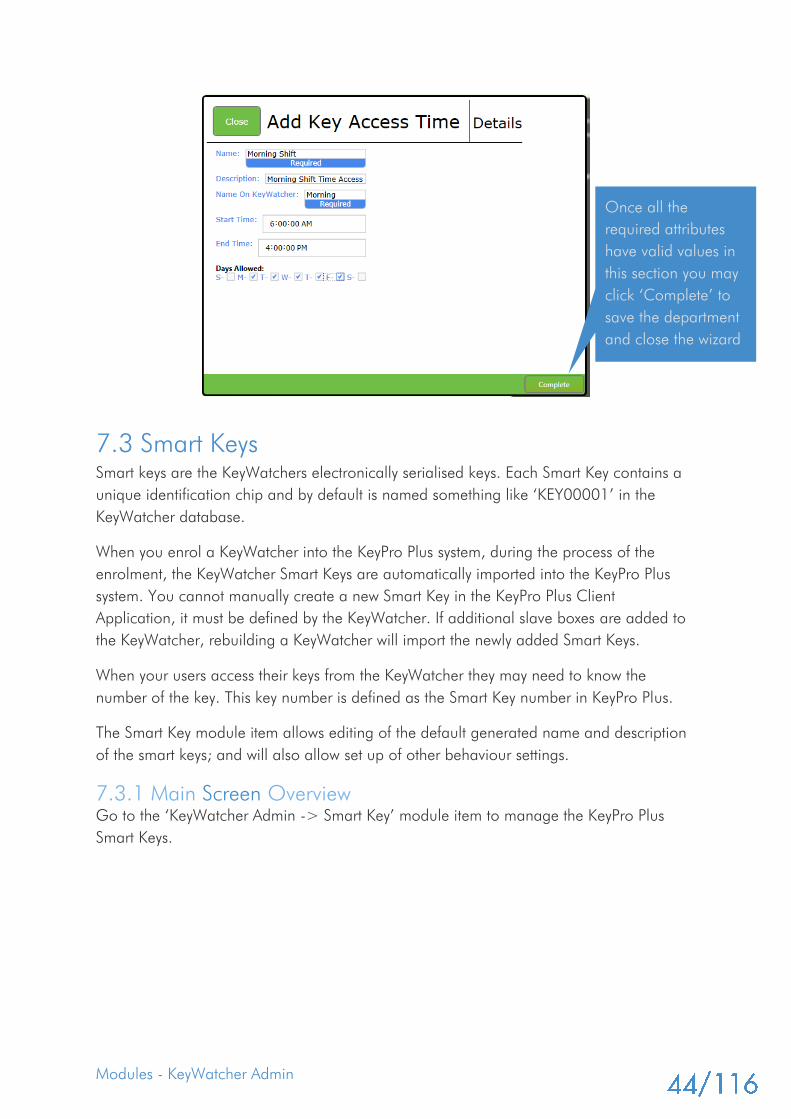
1. Name – Required – The Key Access Times Name.
2. Description – The Key Access Times Description.
3. Name In KeyWatcher – Required – The Key Access Times Name when viewed on
the KeyWatcher.
4. Start Time – The starting time for the Key Access period.
5. End Time – The ending time for the Key Access period.
6. Days Allowed – The days that Key Access period applies to. From left to right:
Sunday, Monday, Tuesday, Wednesday, Thursday, Friday, Saturday.
Current Key
Access Time
The Selected Key
Access Times
Summary
Modules - KeyWatcher Admin
7.3 Smart Keys
Smart keys are the KeyWatchers electronically serialised keys. Each Smart Key contains a
unique identification chip and by default is named something like ‘KEY00001’ in the
KeyWatcher database.
When you enrol a KeyWatcher into the KeyPro Plus system, during the process of the
enrolment, the KeyWatcher Smart Keys are automatically imported into the KeyPro Plus
system. You cannot manually create a new Smart Key in the KeyPro Plus Client
Application, it must be defined by the KeyWatcher. If additional slave boxes are added to
the KeyWatcher, rebuilding a KeyWatcher will import the newly added Smart Keys.
When your users access their keys from the KeyWatcher they may need to know the
number of the key. This key number is defined as the Smart Key number in KeyPro Plus.
The Smart Key module item allows editing of the default generated name and description
of the smart keys; and will also allow set up of other behaviour settings.
7.3.1 Main Screen Overview
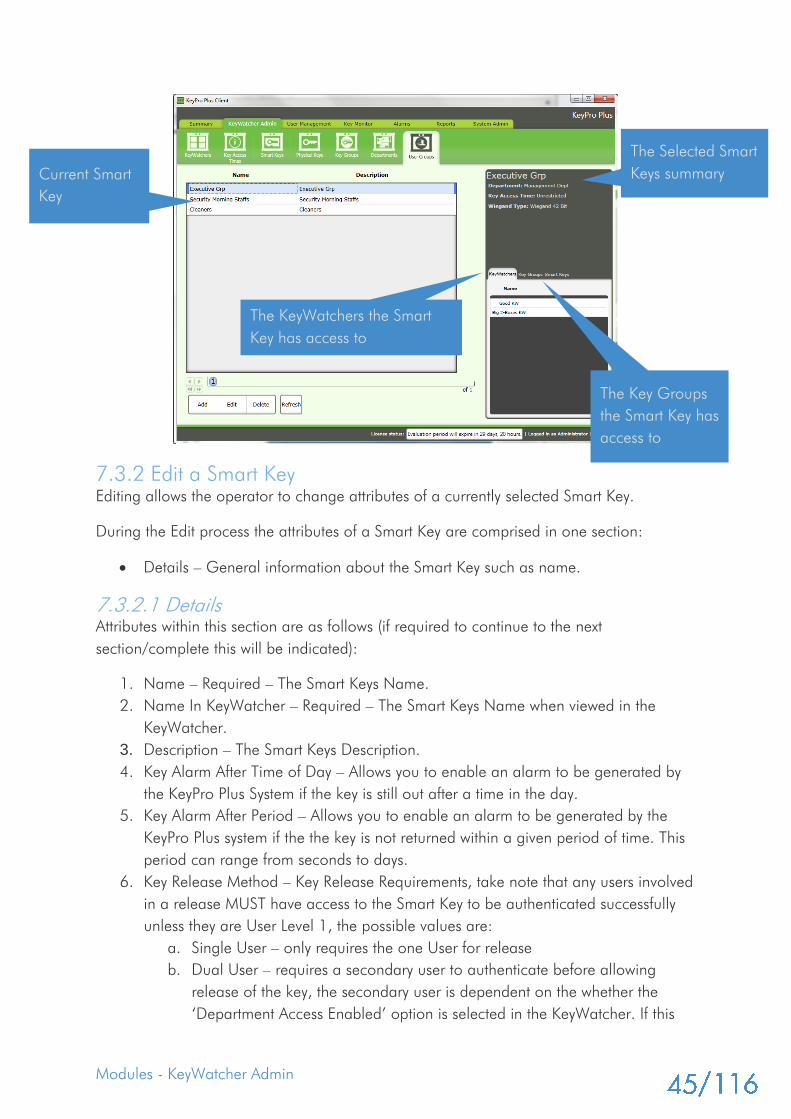
Go to the ‘KeyWatcher Admin -> Smart Key’ module item to manage the KeyPro Plus
Smart Keys.
Once all the
required attributes
have valid values in
this section you may
click ‘Complete’ to
save the department
and close the wizard
Modules - KeyWatcher Admin
7.3.2 Edit a Smart Key
Editing allows the operator to change attributes of a currently selected Smart Key.
During the Edit process the attributes of a Smart Key are comprised in one section:
Details – General information about the Smart Key such as name.
7.3.2.1 Details
Attributes within this section are as follows (if required to continue to the next
section/complete this will be indicated):
1. Name – Required – The Smart Keys Name.
2. Name In KeyWatcher – Required – The Smart Keys Name when viewed in the
KeyWatcher.
3. Description – The Smart Keys Description.
4. Key Alarm After Time of Day – Allows you to enable an alarm to be generated by
the KeyPro Plus System if the key is still out after a time in the day.
5. Key Alarm After Period – Allows you to enable an alarm to be generated by the
KeyPro Plus system if the the key is not returned within a given period of time. This
period can range from seconds to days.
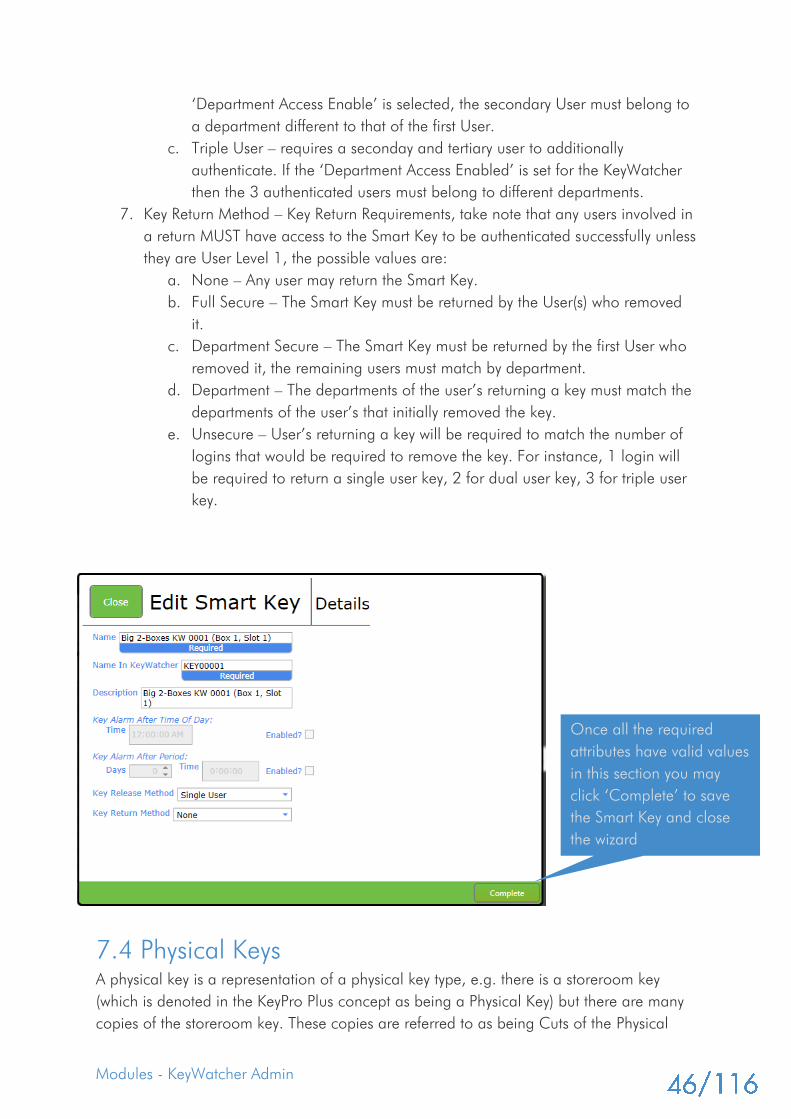
6. Key Release Method – Key Release Requirements, take note that any users involved
in a release MUST have access to the Smart Key to be authenticated successfully
unless they are User Level 1, the possible values are:
a. Single User – only requires the one User for release
b. Dual User – requires a secondary user to authenticate before allowing
release of the key, the secondary user is dependent on the whether the
‘Department Access Enabled’ option is selected in the KeyWatcher. If this
Current Smart
Key
The Selected Smart
Keys summary
The KeyWatchers the Smart
Key has access to
The Key Groups
the Smart Key has
access to
Modules - KeyWatcher Admin
‘Department Access Enable’ is selected, the secondary User must belong to
a department different to that of the first User.
c. Triple User – requires a seconday and tertiary user to additionally
authenticate. If the ‘Department Access Enabled’ is set for the KeyWatcher
then the 3 authenticated users must belong to different departments.
7. Key Return Method – Key Return Requirements, take note that any users involved in
a return MUST have access to the Smart Key to be authenticated successfully unless
they are User Level 1, the possible values are:
a. None – Any user may return the Smart Key.
b. Full Secure – The Smart Key must be returned by the User(s) who removed
it.
c. Department Secure – The Smart Key must be returned by the first User who
removed it, the remaining users must match by department.
d. Department – The departments of the user’s returning a key must match the
departments of the user’s that initially removed the key.
e. Unsecure – User’s returning a key will be required to match the number of
logins that would be required to remove the key. For instance, 1 login will
be required to return a single user key, 2 for dual user key, 3 for triple user
key.
7.4 Physical Keys
A physical key is a representation of a physical key type, e.g. there is a storeroom key
(which is denoted in the KeyPro Plus concept as being a Physical Key) but there are many
copies of the storeroom key. These copies are referred to as being Cuts of the Physical
Once all the required
attributes have valid values
in this section you may
click ‘Complete’ to save
the Smart Key and close
the wizard

Modules - KeyWatcher Admin
Key. Therefore, a Physical Key Cut is an actual key that is potentially attached to the
KeyWatcher Smart Key while the Physical Key could be seen as the key mould for all the
Cut Copies
When setting up a Physical Key consider using a naming convention for the physical key
cuts. Here is an example of a key for the cash volt at a casino:
Cash Safe Key (Physical Key name)
o CashSafe Cut#001 – (a cut instance)
o CashSafe Cut #002 – (a cut instance)
o CashSafe Cut #003 – (a cut instance)
7.4.1 Main Screen Overview
Go to the ‘KeyWatcher Admin -> Physical Keys’ module item to manage the KeyPro Plus
Physical Keys.
7.4.2 Add/Edit a Physical Key
Adding a Physical Key will insert a new Physical Key into the KeyPro Plus Management
System.
Editing allows the operator to change attributes of a currently selected Physical Key.
During the Add/Edit process the attributes of a Physical Key are separated into two
sections:
Details –General information about the Physical Key such as name.
Cuts – The cuts for this Physical Key as well as the details assigned to each cut.
Current
Physical Keys
Physical Keys
Filter
Modules - KeyWatcher Admin
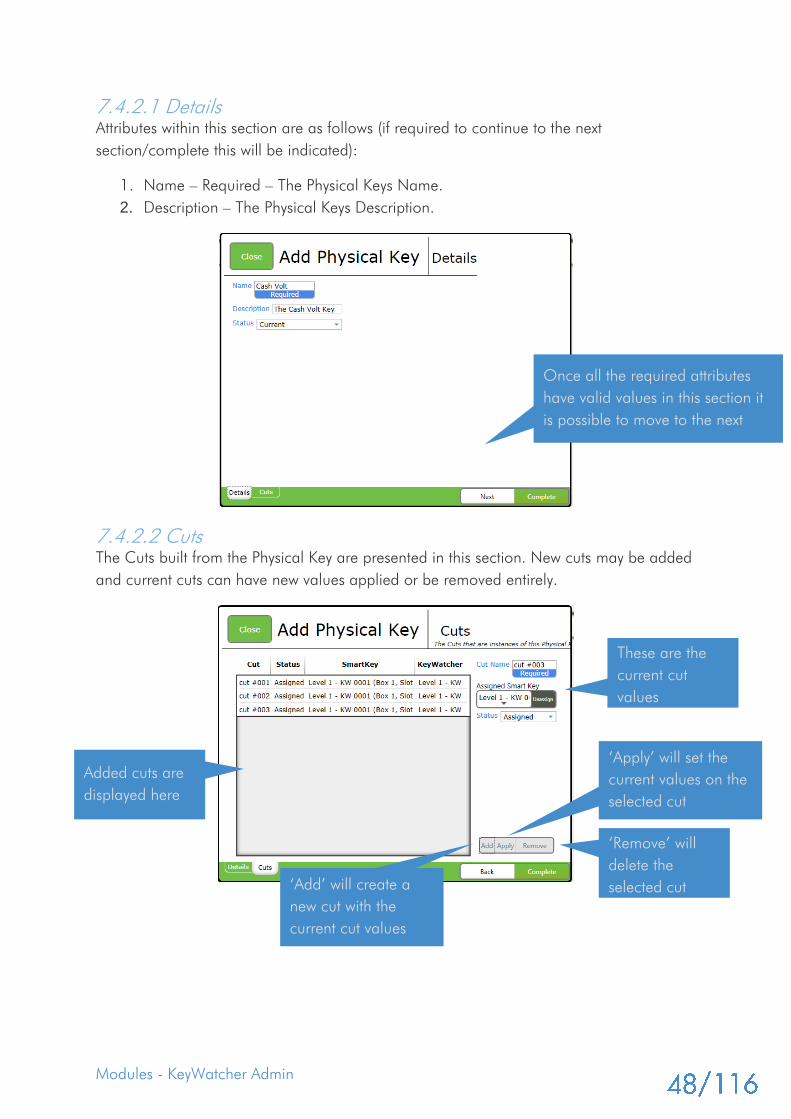
7.4.2.1 Details
Attributes within this section are as follows (if required to continue to the next
section/complete this will be indicated):
1. Name – Required – The Physical Keys Name.
2. Description – The Physical Keys Description.
7.4.2.2 Cuts
The Cuts built from the Physical Key are presented in this section. New cuts may be added
and current cuts can have new values applied or be removed entirely.
Once all the required attributes
have valid values in this section it
is possible to move to the next
Added cuts are
displayed here
‘Remove’ will
delete the
selected cut
‘Apply’ will set the
current values on the
selected cut
‘Add’ will create a
new cut with the
current cut values
These are the
current cut
values

Modules - KeyWatcher Admin
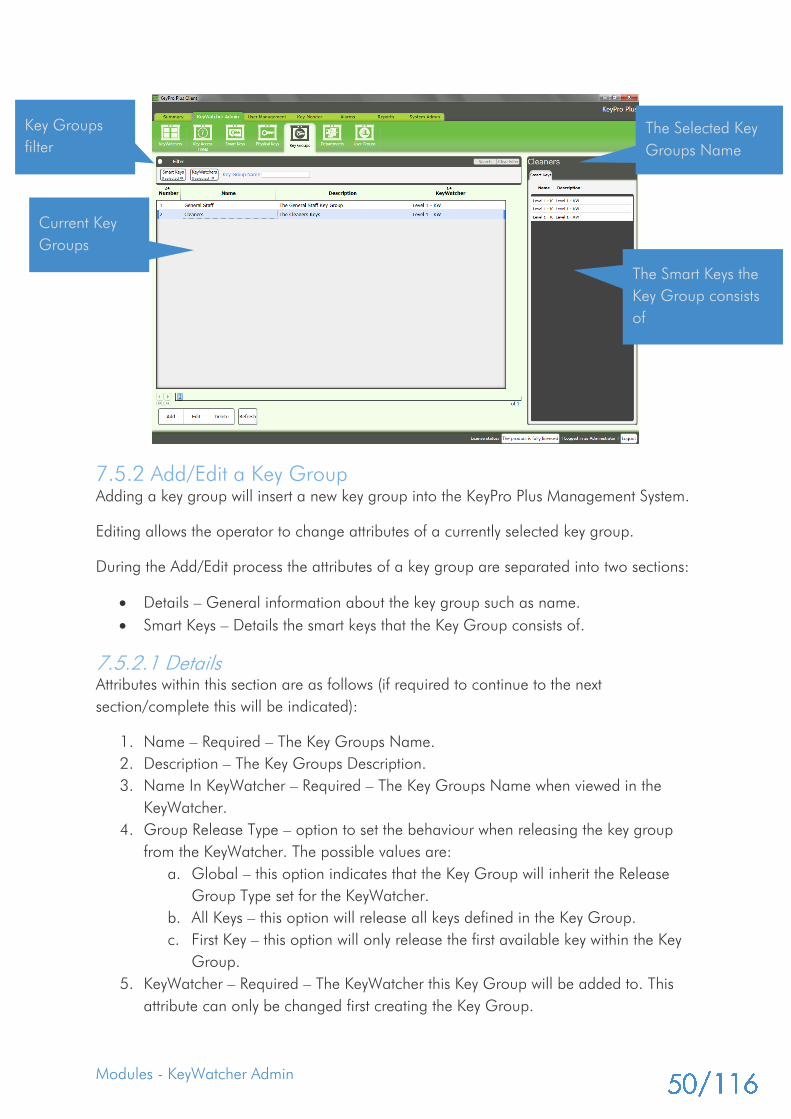
7.5 Key Groups
A Key Group consists of multiple Smart Keys and can be assigned to Users and User
Groups. Each KeyWatcher is capable of storing 250 Key Groups. And each Key Group
may contain up to 100 keys. A Smart Key can be assigned to more than one Key Group.
A Key Group is assigned to only one KeyWatcher.
7.5.1 Main Screen Overview
Go to the ‘KeyWatcher Admin -> Key Groups’ module item to manage the KeyPro Plus
Key Groups.
Choosing an Assigned
Smart Key for the current
cut value presents a
KeyWatcher filtered view for
Smart Key selection
1. Select the
KeyWatcher
that the
Smart Key
resides in
2. Now select the
Smart Key to be used
for assignment, the
popup will close
automatically
3. Click ‘Complete’ once all attributes are set and the Physical Key will be
saved and the wizard closed
Modules - KeyWatcher Admin
7.5.2 Add/Edit a Key Group
Adding a key group will insert a new key group into the KeyPro Plus Management System.
Editing allows the operator to change attributes of a currently selected key group.
During the Add/Edit process the attributes of a key group are separated into two sections:
Details – General information about the key group such as name.
Smart Keys – Details the smart keys that the Key Group consists of.
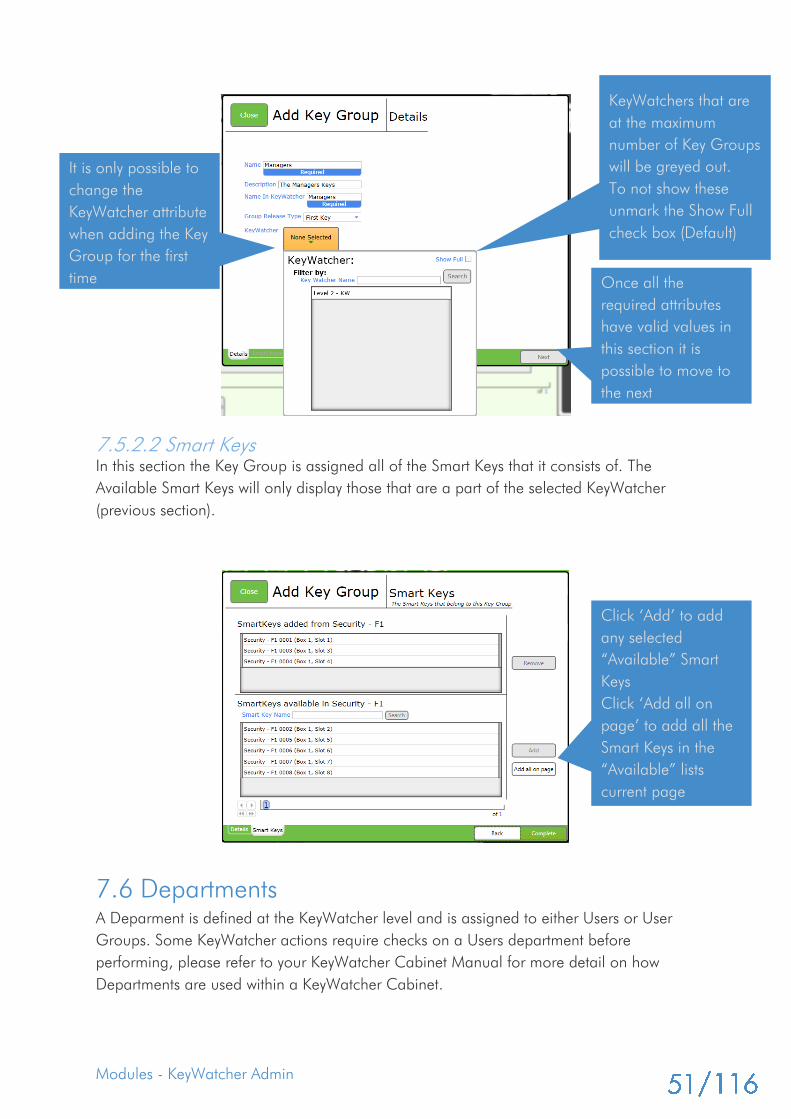
7.5.2.1 Details
Attributes within this section are as follows (if required to continue to the next
section/complete this will be indicated):
1. Name – Required – The Key Groups Name.
2. Description – The Key Groups Description.
3. Name In KeyWatcher – Required – The Key Groups Name when viewed in the
KeyWatcher.
4. Group Release Type – option to set the behaviour when releasing the key group
from the KeyWatcher. The possible values are:
a. Global – this option indicates that the Key Group will inherit the Release
Group Type set for the KeyWatcher.
b. All Keys – this option will release all keys defined in the Key Group.
c. First Key – this option will only release the first available key within the Key
Group.
5. KeyWatcher – Required – The KeyWatcher this Key Group will be added to. This
attribute can only be changed first creating the Key Group.
Current Key
Groups
The Selected Key
Groups Name
The Smart Keys the
Key Group consists
of
Key Groups
filter
Modules - KeyWatcher Admin
7.5.2.2 Smart Keys
In this section the Key Group is assigned all of the Smart Keys that it consists of. The
Available Smart Keys will only display those that are a part of the selected KeyWatcher
(previous section).
7.6 Departments
A Deparment is defined at the KeyWatcher level and is assigned to either Users or User
Groups. Some KeyWatcher actions require checks on a Users department before
performing, please refer to your KeyWatcher Cabinet Manual for more detail on how
Departments are used within a KeyWatcher Cabinet.
Once all the
required attributes
have valid values in
this section it is
possible to move to
the next
KeyWatchers that are
at the maximum
number of Key Groups
will be greyed out.
To not show these
unmark the Show Full
check box (Default)
It is only possible to
change the
KeyWatcher attribute
when adding the Key
Group for the first
time
Click ‘Add’ to add
any selected
“Available” Smart
Keys
Click ‘Add all on
page’ to add all the
Smart Keys in the
“Available” lists
current page
Modules - KeyWatcher Admin
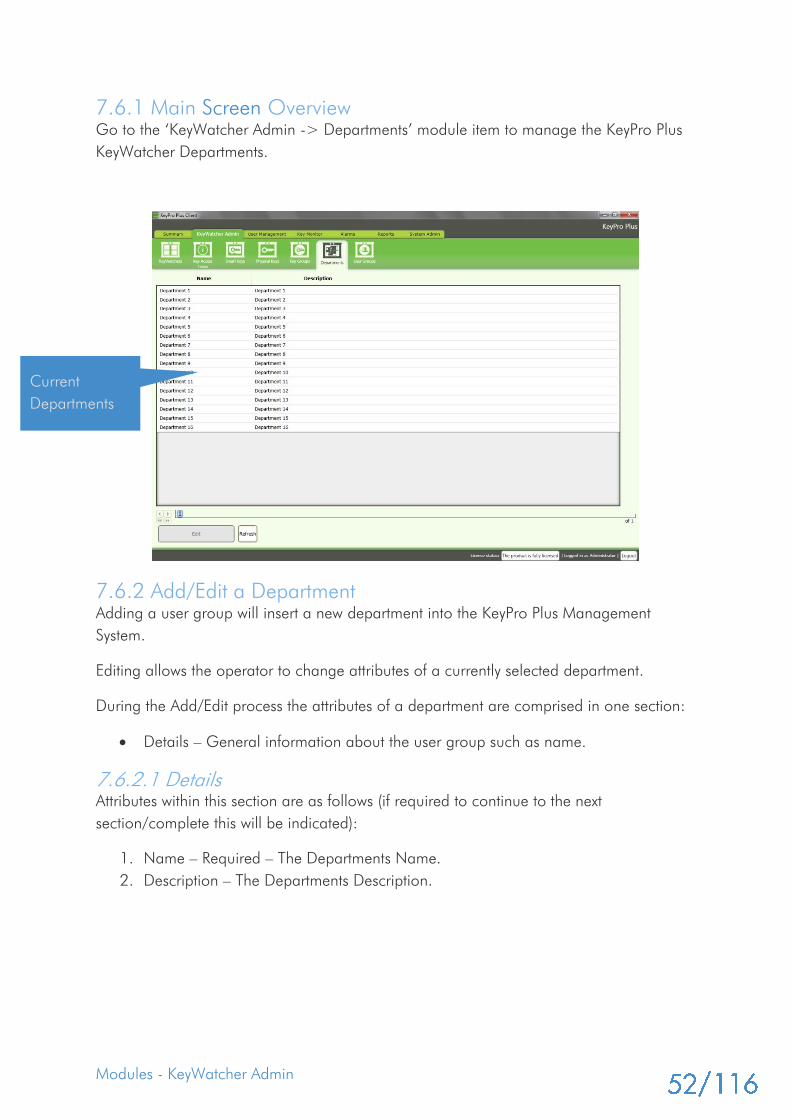
7.6.1 Main Screen Overview
Go to the ‘KeyWatcher Admin -> Departments’ module item to manage the KeyPro Plus
KeyWatcher Departments.
7.6.2 Add/Edit a Department
Adding a user group will insert a new department into the KeyPro Plus Management
System.
Editing allows the operator to change attributes of a currently selected department.
During the Add/Edit process the attributes of a department are comprised in one section:
Details – General information about the user group such as name.
7.6.2.1 Details
Attributes within this section are as follows (if required to continue to the next
section/complete this will be indicated):
1. Name – Required – The Departments Name.
2. Description – The Departments Description.
Current
Departments
Modules - KeyWatcher Admin
7.7 User Groups
A User Group provides a way of categorising KeyPro Plus Users as well as allowing all
those users to have common KeyWatcher settings. Any Users who are apart of a User
Group will, by default, inherit the User Groups access permissions to the KeyWatchers,
Department, Key Access Times, Key Groups and Smart Keys as well as a number of other
attributes set within the User Group.
7.7.1 Main Screen Overview
Go to the ‘KeyWatcher Admin -> User Groups’ module item to manage the KeyPro Plus
User Groups.
Current User
Groups
The Selected User
Groups summary
The KeyWatchers the User
Group has access to
The Key Groups
the User Group
has access to
The Smart Keys the
User Group has
access to (does not
include Inferred
Smart Keys see end
of User Group)
Once all the required
attributes have valid values in
this section you may click
‘Complete’ to save the
department and close the
wizard
Modules - KeyWatcher Admin
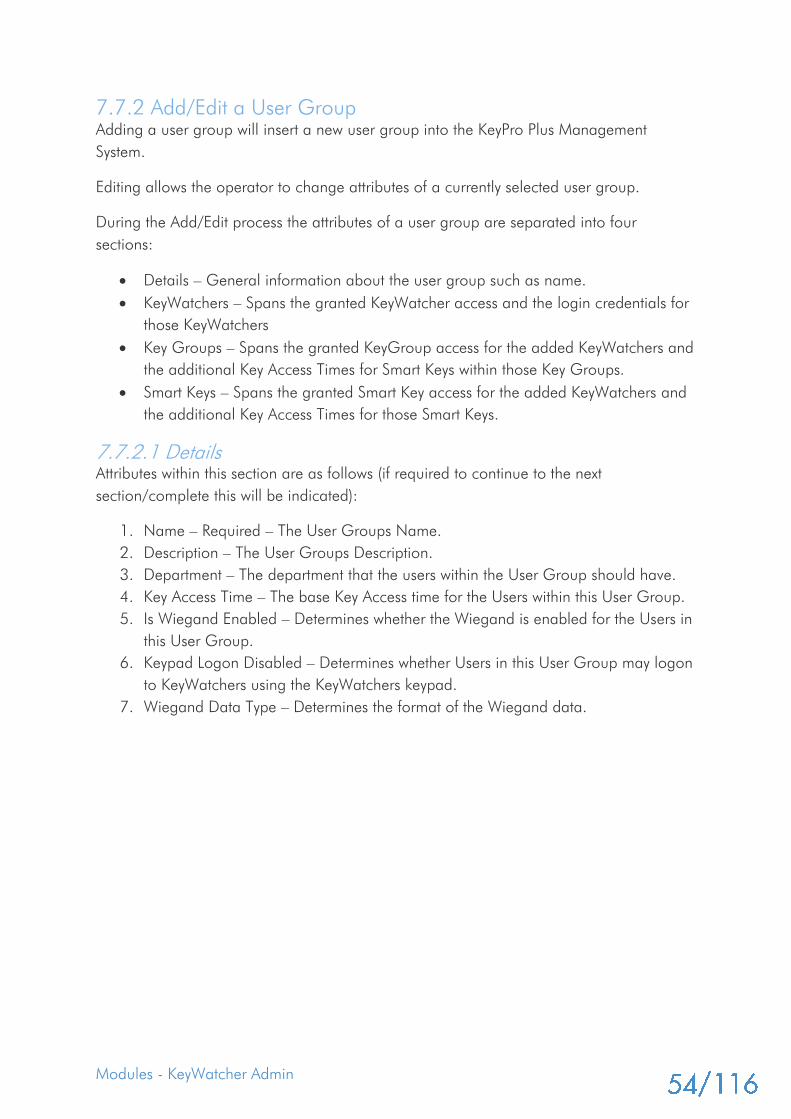
7.7.2 Add/Edit a User Group
Adding a user group will insert a new user group into the KeyPro Plus Management
System.
Editing allows the operator to change attributes of a currently selected user group.
During the Add/Edit process the attributes of a user group are separated into four
sections:
Details – General information about the user group such as name.
KeyWatchers – Spans the granted KeyWatcher access and the login credentials for
those KeyWatchers
Key Groups – Spans the granted KeyGroup access for the added KeyWatchers and
the additional Key Access Times for Smart Keys within those Key Groups.
Smart Keys – Spans the granted Smart Key access for the added KeyWatchers and
the additional Key Access Times for those Smart Keys.
7.7.2.1 Details
Attributes within this section are as follows (if required to continue to the next
section/complete this will be indicated):
1. Name – Required – The User Groups Name.
2. Description – The User Groups Description.
3. Department – The department that the users within the User Group should have.
4. Key Access Time – The base Key Access time for the Users within this User Group.
5. Is Wiegand Enabled – Determines whether the Wiegand is enabled for the Users in
this User Group.
6. Keypad Logon Disabled – Determines whether Users in this User Group may logon
to KeyWatchers using the KeyWatchers keypad.
7. Wiegand Data Type – Determines the format of the Wiegand data.
Modules - KeyWatcher Admin
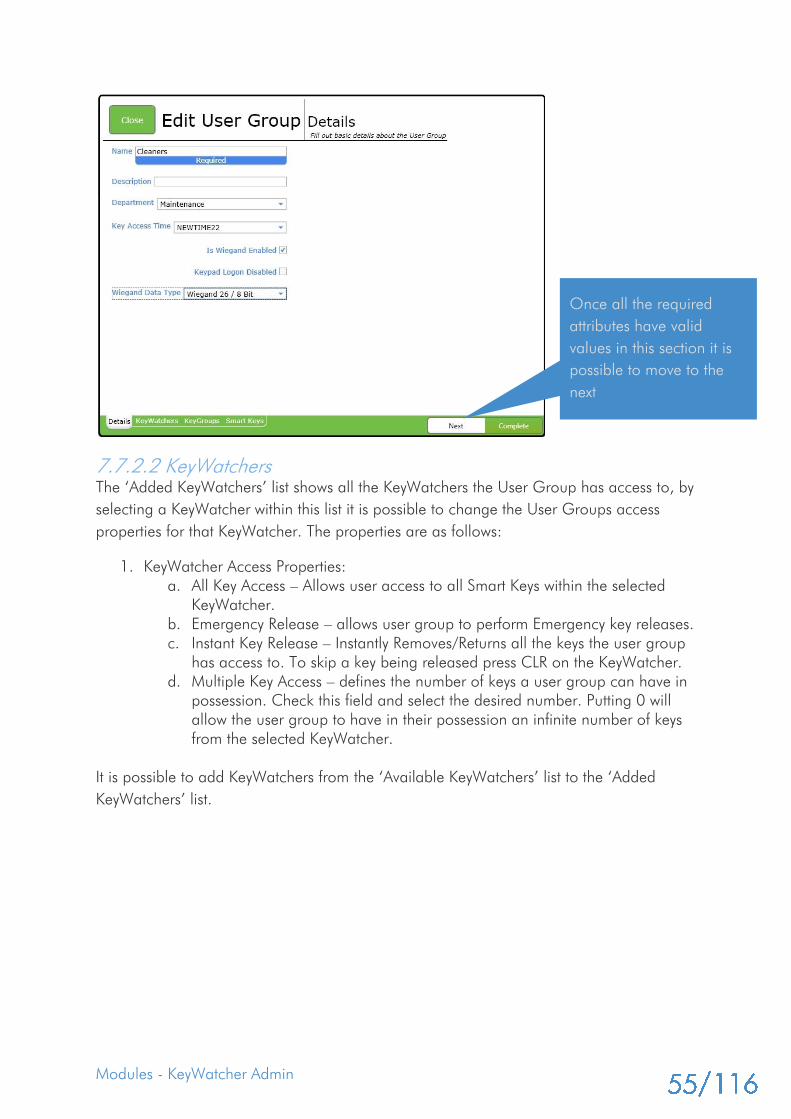
7.7.2.2 KeyWatchers
The ‘Added KeyWatchers’ list shows all the KeyWatchers the User Group has access to, by
selecting a KeyWatcher within this list it is possible to change the User Groups access
properties for that KeyWatcher. The properties are as follows:
1. KeyWatcher Access Properties:
a. All Key Access – Allows user access to all Smart Keys within the selected
KeyWatcher.
b. Emergency Release – allows user group to perform Emergency key releases.
c. Instant Key Release – Instantly Removes/Returns all the keys the user group
has access to. To skip a key being released press CLR on the KeyWatcher.
d. Multiple Key Access – defines the number of keys a user group can have in
possession. Check this field and select the desired number. Putting 0 will
allow the user group to have in their possession an infinite number of keys
from the selected KeyWatcher.
It is possible to add KeyWatchers from the ‘Available KeyWatchers’ list to the ‘Added
KeyWatchers’ list.
Once all the required
attributes have valid
values in this section it is
possible to move to the
next
Modules - KeyWatcher Admin
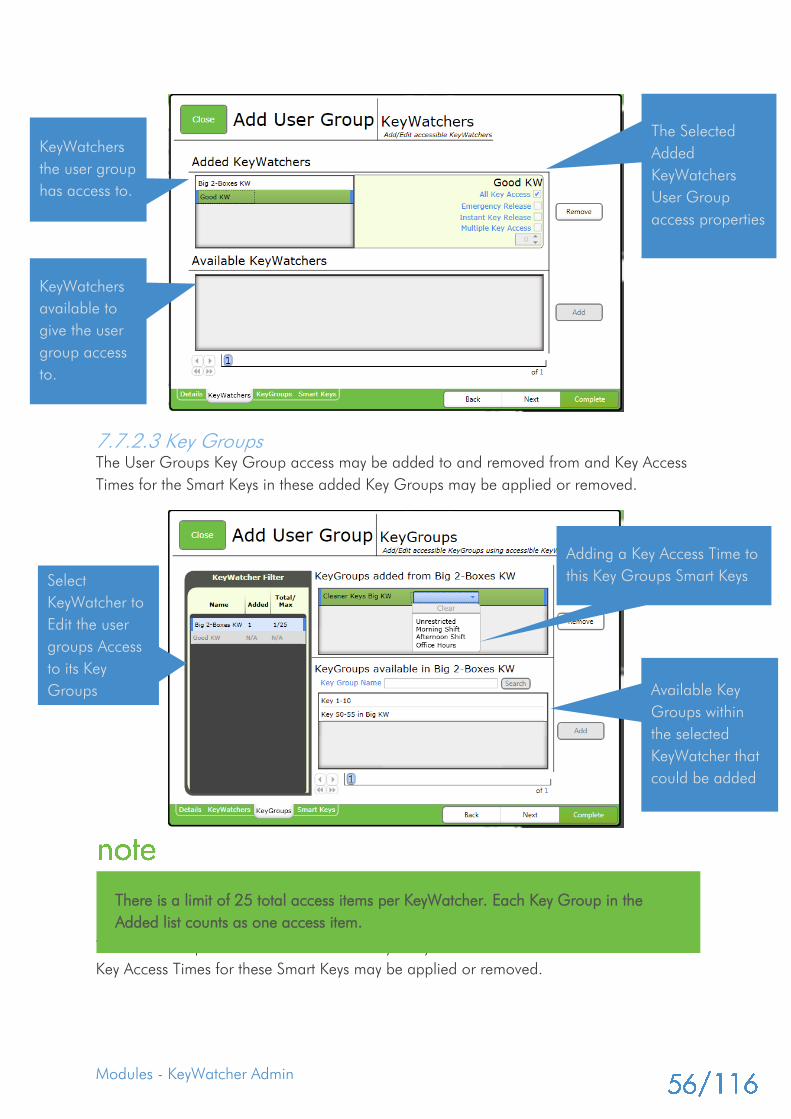
7.7.2.3 Key Groups
The User Groups Key Group access may be added to and removed from and Key Access
Times for the Smart Keys in these added Key Groups may be applied or removed.
7.7.2.4 Smart Keys Access
The User Groups list of accessible Smart Keys may be added to and removed from and
Key Access Times for these Smart Keys may be applied or removed.
KeyWatchers
the user group
has access to.
KeyWatchers
available to
give the user
group access
to.
The Selected
Added
KeyWatchers
User Group
access properties
Select
KeyWatcher to
Edit the user
groups Access
to its Key
Groups
Adding a Key Access Time to
this Key Groups Smart Keys
Available Key
Groups within
the selected
KeyWatcher that
could be added
There is a limit of 25 total access items per KeyWatcher. Each Key Group in the
Added list counts as one access item.
Modules - KeyWatcher Admin
Smart Keys that belong to already added Key Groups in the ‘Key Groups’ section will be
greyed out and cannot be removed however these Smart Keys do not count towards the
“25 Total Access Limit” unless they are given their own additional access time.
If a Smart Key is greyed out it means that this Smart Key is part of a Key Group that
was added to this user group in the previous section (“Key Groups”) and is referred
to as an “Inferred Smart Key”.
There is a limit of 25 total access items per KeyWatcher.
Non Inferred Smart Keys are considered access items.
Inferred Smart Keys are ONLY considered access items if they have been given a Key
Access Time.
There is a limit of 25 total access items per KeyWatcher for the User Group.
An access item may be an:
Added Key Group
Added Non Inferred Smart Key
Inferred Smart Key with a Key Access Time
Select
KeyWatcher to
Edit the user
groups Access
to its Smart
Keys
Available Smart
Keys within the
selected
KeyWatcher that
could be added
Click ‘Complete’
to save the user
group settings
and close the
wizard
Click dropdown to add a Key
Access Time to a Smart Key

Modules - User Management
People who have access to the KeyPro Plus Managed KeyWatcher Cabinet(s) are classified
as Users. A User will need to be a member of a User Group and will inherit access
permissions to the KeyWatchers, Department, Key Access Times, Key Groups and Smart
Keys as are defined in that User Group. However, these permission access attributes can
be specialised if required.
8.1 Main Screen Overview
Go to the ‘User Management’ module item to manage the KeyPro Plus User access rights.
chapte
r
8
This chapter describes the User Management Module - This
module solely focuses on the task of viewing and
administering KeyWatcher Users and editing those users
access to KeyWatchers

Modules - User Management
8.2 Add/Edit a User
Adding a user will insert a new user into the KeyPro Plus Management System.
Editing allows the operator to change attributes of a currently selected user.
During the Add/Edit process the attributes of a user are separated into four sections
however only two of these sections are necessary if the user’s access is not required to be
different from its User Group:
Details – General information about the user such as name.
KeyWatchers – Spans the granted KeyWatcher access and the login credentials for
those KeyWatchers
Key Groups – Spans the granted KeyGroup access for the added KeyWatchers and
the additional Key Access Times for Smart Keys within those Key Groups.
Smart Keys – Spans the granted Smart Key access for the added KeyWatchers and
the additional Key Access Times for those Smart Keys.
8.2.1 Details
Attributes within this section are as follows (if required to continue to the next
section/complete this will be indicated):
1. First Name – Required – The Users First Name
2. Middle Name – The Users Middle Name
3. Last Name – Required – The Users Last Name
4. Preferred Name – The name the operator/user prefers for the user
5. Unique Identifier – This field is usually used if your organisation contains users that
may have the same name and a unique number is used to further distinguish them.
Current
Users
Additional Selected
User summary
Last 20 KeyWatcher actions
performed by User
This tab displays
keys currently in
the Selected
User’s possession
The ‘Task’ tab
displays current
system tasks at
KeyWatcher(s) for
the selected User
User Filter
parameters

Modules - User Management
Its primary intention is to store the user’s unique card number if the KeyPro Plus is
integrated to an Entry Access Control System.
6. User Group – Required – The current User Groups will appear in the options. If a
selected User Group is chosen that had a Card Card option set, the Wiegand
Data section will appear.
7. Department / Department Override – by default, the user will inherit the selected
User Group’s department, however you can opt to specialise this user’s
department by checking the ‘Department Override’ checkbox and then choosing
the specialised Department.
8. Key Access Time / Key Access Time Override – by default, the user will inherit the
selected User Group’s ‘Key Access Time’ restriction, however you can opt to
specialise this user’s Key Access Time settings by checking the ‘Key Access Time
Override’ checkbox and then choosing the specialised Key Access Time option.
9. Keypad Logon Disabled / Keypad Logon Disabled Override – Determines whether
Users in this User Group may logon to KeyWatchers using the KeyWatchers
keypad, by default the User will inherit the User Groups "Keypad Logon Disabled"
setting unless the Users "Keypad Logon Disabled Override" setting is set to true.
10. User Level – A KeyWatcher defined field that ranges from 1 – 5. These levels will
allow the user access to different functions on the KeyWatcher Cabinet, level 1
giving access to all the functions and level 5 giving access to the fewest, refer to
your KeyWatcher Cabinet manual for further details.
11. The Wiegand fields will present themselves if a User Group is Wiegand Enabled.
The Combination of these fields should be unique per user.
For example a user with “Site Code: 1, Issue Number: 1, User Code: 2” may exist
but another user with this exact same combination of values may not however a
user with “Site Code: 1, Issue Number: 2, User Code: 2” could exist as not all the
values are the same as the first user.

Modules - User Management
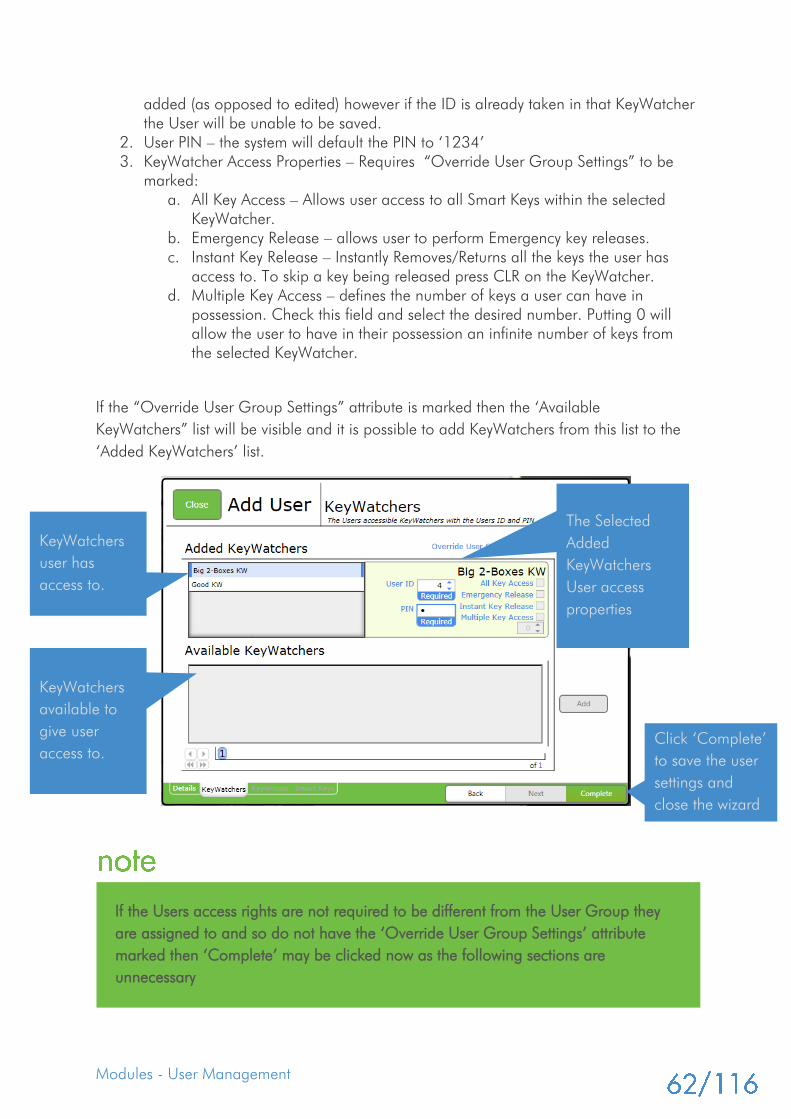
8.2.2 KeyWatchers
By default, the KeyWatcher(s) that the user will have access to will be pre-determined by
the system depending on the User Group membership. The User will have a unique ‘User
ID’ and ‘PIN for each KeyWatcher that has been granted.
Within the KeyWatcher Access section it is possible to mark the users User Group access
settings as overridden. When a user is marked with the “Override User Group Settings”
attribute it is possible to customise their KeyWatcher, Key Group and Smart Key access
settings however they will no longer inherit any of the User Groups access settings for
these fields. Unmarking the users “Override User Group Settings” attribute will revert the
KeyWatcher, Key Group and Smart Key access settings to the User Groups.
The ‘Added KeyWatchers’ list shows all the KeyWatchers the User has access to, by
selecting a KeyWatcher within this list it is possible to change the Users access properties
for that KeyWatcher. Some of these properties are only available if the users “Override
User Group Settings” attribute is marked. The properties are as follows:
1. User ID – automatically assigned ID for KeyWatcher, the value can be changed if
the KeyWatcher is newly added to the ‘Added KeyWatchers’ list or the user is being
Once all the required attributes
have valid values in this section it
is possible to move to the next
Modules - User Management
added (as opposed to edited) however if the ID is already taken in that KeyWatcher
the User will be unable to be saved.
2. User PIN – the system will default the PIN to ‘1234’
3. KeyWatcher Access Properties – Requires “Override User Group Settings” to be
marked:
a. All Key Access – Allows user access to all Smart Keys within the selected
KeyWatcher.
b. Emergency Release – allows user to perform Emergency key releases.
c. Instant Key Release – Instantly Removes/Returns all the keys the user has
access to. To skip a key being released press CLR on the KeyWatcher.
d. Multiple Key Access – defines the number of keys a user can have in
possession. Check this field and select the desired number. Putting 0 will
allow the user to have in their possession an infinite number of keys from
the selected KeyWatcher.
If the “Override User Group Settings” attribute is marked then the ‘Available
KeyWatchers” list will be visible and it is possible to add KeyWatchers from this list to the
‘Added KeyWatchers’ list.
KeyWatchers
user has
access to.
KeyWatchers
available to
give user
access to.
The Selected
Added
KeyWatchers
User access
properties
If the Users access rights are not required to be different from the User Group they
are assigned to and so do not have the ‘Override User Group Settings’ attribute
marked then ‘Complete’ may be clicked now as the following sections are
unnecessary
Click ‘Complete’
to save the user
settings and
close the wizard

Modules - User Management
8.2.3 Key Groups
By default if this user is new (being added), the Key Groups that the user will have access
to will be pre-determined by the system depending on the User Group membership.
However as the ‘Override User Group Settings’ attribute is marked this users list of
accessible Key Groups may be added to and removed from and Key Access Times for the
Smart Keys in these added Key Groups may be applied or removed.
8.2.4 Smart Keys Access
This section is only visible if the KeyWatchers section ‘Override User Group Settings’
attribute is marked
This section is only visible if the KeyWatchers section ‘Override User Group Settings’
attribute is marked
Select
KeyWatcher to
Edit the users
Access to its
Key Groups
Adding a Key Access Time to
this Key Groups Smart Keys
Available Key
Groups within
the selected
KeyWatcher that
could be added
There is a limit of 25 total access items per KeyWatcher. Each Key Group in the
Added list counts as one access item.

Modules - User Management
By default if this user is new (being added), the Smart Keys that the user will have access to
will be pre-determined by the system depending on the User Group membership. However
as the ‘Override User Group Settings’ attribute is marked this users list of accessible Smart
Keys may be added to and removed from and Key Access Times for these Smart Keys may
be applied or removed.
Smart Keys that belong to already added Key Groups in the ‘Key Groups’ section will be
greyed out and cannot be removed however these Smart Keys do not count towards the
“25 Total Access Limit” unless they are given their own additional access time.
If a Smart Key is greyed out it means that this Smart Key is part of a Key Group that
was added to this user in the previous section (“Key Groups”) and is referred to as an
“Inferred Smart Key”.
There is a limit of 25 total access items per KeyWatcher.
Non Inferred Smart Keys are considered access items.
Inferred Smart Keys are ONLY considered access items if they have been given a Key
Access Time.
Select
KeyWatcher to
Edit the users
Access to its
Smart Keys Available Smart
Keys within the
selected
KeyWatcher that
could be added
Click ‘Complete’
to save the user
settings and
close the wizard
Adding a Key Access Time to
this Smart Key

Modules - Key Monitor
The Key Monitor module of the system displays near real time live transaction of Smart Key
actions. It also allows the system operators the ability to view historic key actions.
9.1 Live Monitor
The Live Monitor module item displays the current status of a selected KeyWatchers Smart
Keys, including the position of the keys that are currently back in the cabinet. This module
item is a live screen and will refresh automatically.
9.1.1 Main Screen Overview
To view the Live Monitor module item, navigate to ‘Key Monitor -> Live Monitor'.
chapte
r
9
This chapter describes the Key Monitor Module - This module
provides tasks for both an historical view of actions taken on
smart keys and a live feed of current smart key status
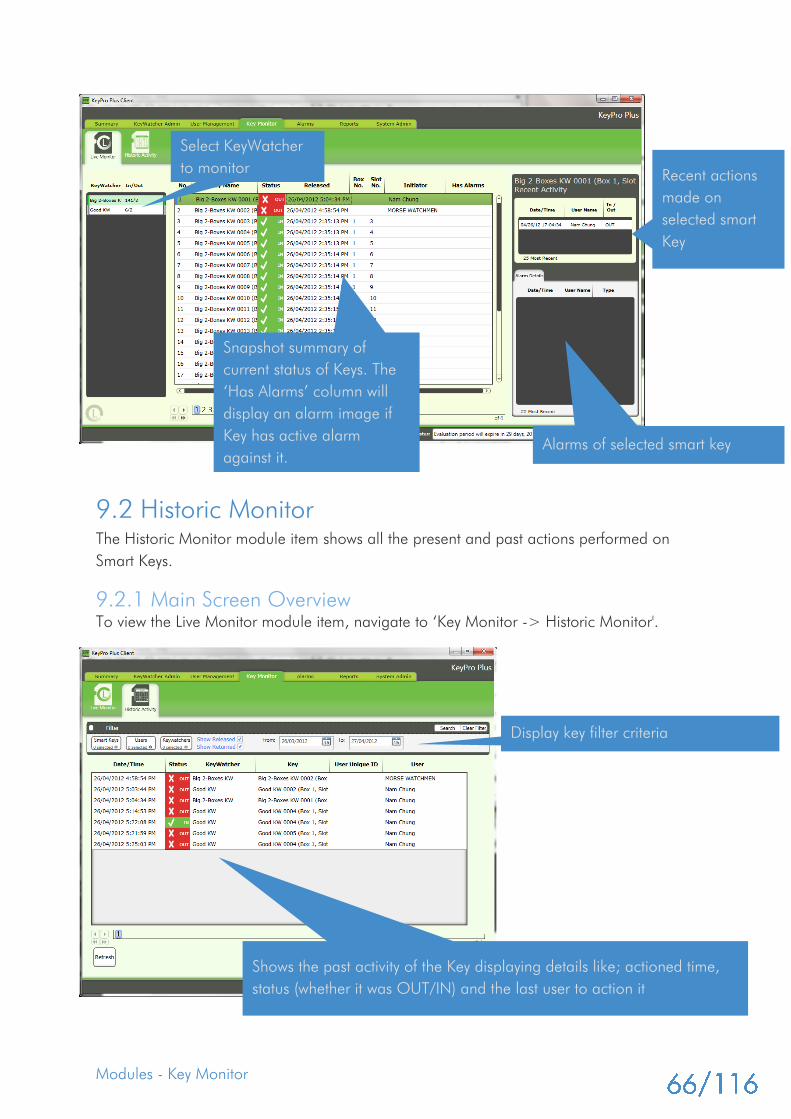
Modules - Key Monitor
9.2 Historic Monitor
The Historic Monitor module item shows all the present and past actions performed on
Smart Keys.
9.2.1 Main Screen Overview
To view the Live Monitor module item, navigate to ‘Key Monitor -> Historic Monitor'.
Shows the past activity of the Key displaying details like; actioned time,
status (whether it was OUT/IN) and the last user to action it
Display key filter criteria
Select KeyWatcher
to monitor
Snapshot summary of
current status of Keys. The
‘Has Alarms’ column will
display an alarm image if
Key has active alarm
against it.
Alarms of selected smart key
Recent actions
made on
selected smart
Key

Modules - Alarms
The Alarms module allows viewing all the alarms raised by the KeyWatcher cabinets and
those generated by the KeyPro Plus System for overdue keys.
10.1 Unresolved Alarms
The Unresolved Alarms module item shows all the currently unresolved alarms. This
module item is a live screen and will refresh automatically.
10.1.1 Main Screen Overview
To view the unresolved alarms module item, navigate to ‘Alarms -> Unresolved Alarms'.
chapte
r
10
This chapter describes the Alarm Module - This module
provides tasks for both an historical view of alarms and a live
feed of current unresolved alarms

Modules - Alarms
10.2 Historic Alarms
The Historic Alarms module item shows all the present and past, resolved and unresolved
alarms.
10.2.1 Main Screen Overview
To view the Historic Alarms module item, navigate to ‘Alarms -> Historic Alarms’.
Filtering results will show straight
away as this screen is Live
Unresolved alarms will remain here
until manually fixed or being
acknowledged by the system
Present and past alarm items.
This will show Resolved and Unresolved
alarms

Modules - Reports
11.1 Overview
The reports module allows operators to generate both transactional reports and system
auditing reports based on collected KeyPro Plus Management data. The reports available
are quite varied in the data that they visualize so to aid in the act of simplifying the search
process reports have been grouped into basic functional categories both within this
manual and within KeyPro Plus Client Application itself.
chapte
r
11
This chapter describes the Reports Module - This module
provides tasks to generate reports on practically every aspect
of the KeyPro Plus KeyWatcher Management System

Modules - Reports
11.1.1 Main Screen Overview
11.1.2 Report Screen Overview
'Generate Report'
will generate a
selected report
The reports list
categorises all
the available
reports by their
basic
functionality, to
collapse a
group click the
group name
'Close' will
exit the report
screen
The buttons on this bar will allow you
to navigate pages, export the report in
different formats and even print it

Modules - Reports
11.2 Activity Reports
The available reports in this section span general activity details.
11.2.1 All Activity Report
This report will display all Key activities known by the KeyPro Plus Management System
filtered by time and selected KeyWatcher(s).
Click ‘Generate Report’
to produce report
The resultant report will display data like this.
This report requires three
criteria fields:
From Date/Time
To Date/Time
Keywatchers

Modules - Reports
11.2.1 KeyWatcher Events Report
This report will display all Key activities (and optionally Alarms) known by the KeyPro Plus
Management System filtered by time and selected KeyWatcher(s).
Choose From and To Date
and Time and whether to
include the Selected
KeyWatchers Alarms
Select KeyWatchers to filter by. Even
archived KeyWatcher entries are available
for reporting
‘Select all on current page’ – will select
all items displayed on the current page
‘Select all’ – will select every item on
every page. Take note that if the item is
filtered (ie by name) then only those
items adhering to the filter will be
selected
The resultant data will be grouped by the selected KeyWatcher(s).
Click ‘Generate Report’
to produce report
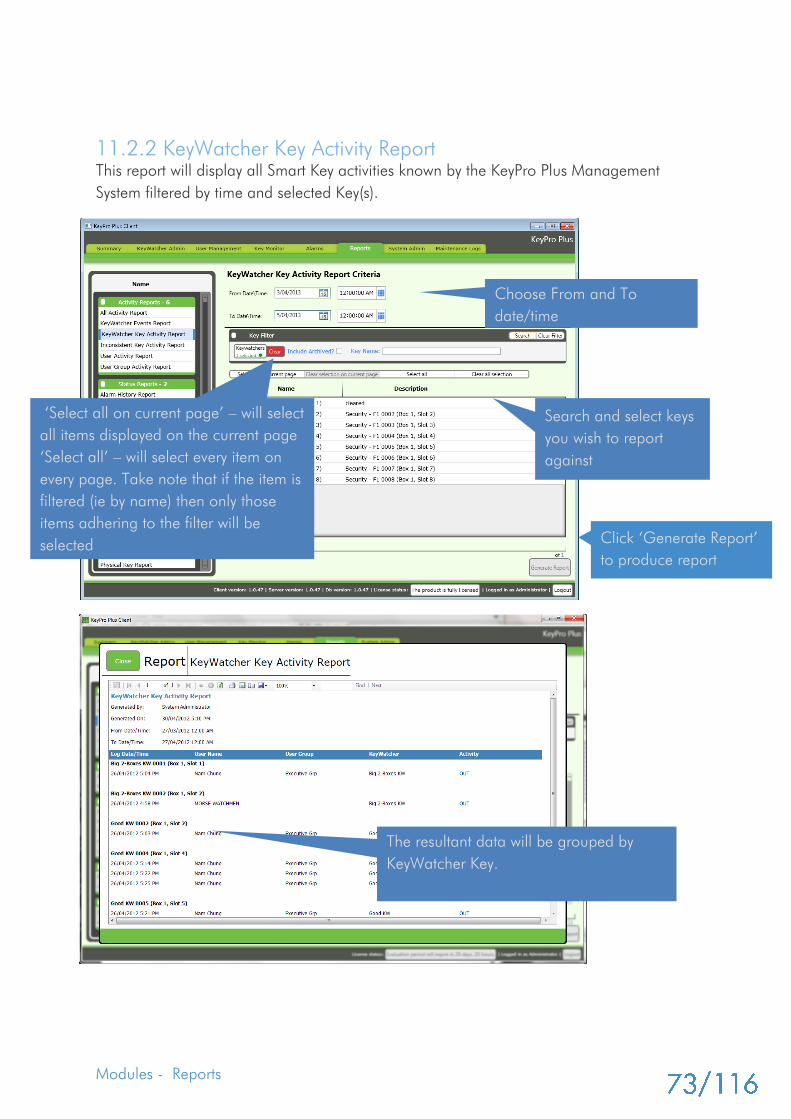
Modules - Reports
11.2.2 KeyWatcher Key Activity Report
This report will display all Smart Key activities known by the KeyPro Plus Management
System filtered by time and selected Key(s).
Choose From and To
date/time
Search and select keys
you wish to report
against
The resultant data will be grouped by
KeyWatcher Key.
Click ‘Generate Report’
to produce report
‘Select all on current page’ – will select
all items displayed on the current page
‘Select all’ – will select every item on
every page. Take note that if the item is
filtered (ie by name) then only those
items adhering to the filter will be
selected

Modules - Reports
11.2.3 Inconsistent Key Activity Report
This report will display Key taken and return events that were alternatively actioned by a
different individual known by the KeyPro Plus Management System filtered by time and
selected Key(s).
Choose From and To date/time
Search and select keys
you wish to report against
Displays keys that were taken by a user
and returned by a different user
Click ‘Generate Report’
to produce report
‘Select all on current page’ – will select
all items displayed on the current page
‘Select all’ – will select every item on
every page. Take note that if the item is
filtered (ie by name) then only those
items adhering to the filter will be
selected
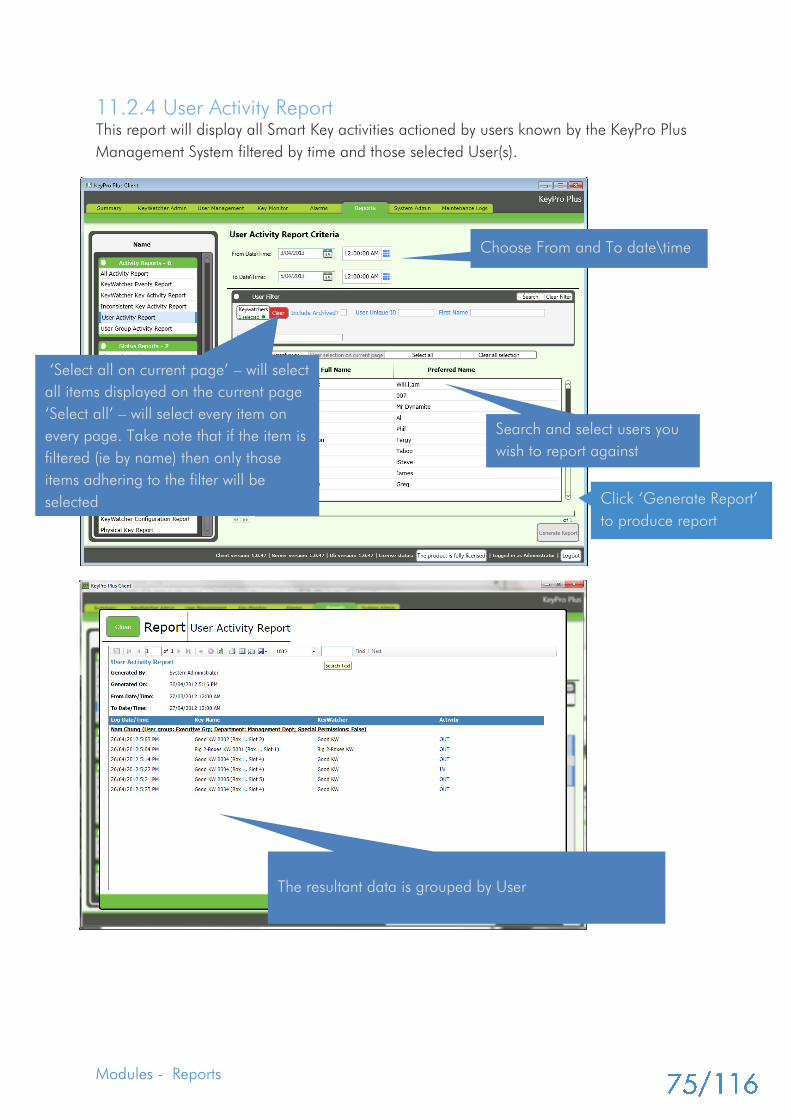
Modules - Reports
11.2.4 User Activity Report
This report will display all Smart Key activities actioned by users known by the KeyPro Plus
Management System filtered by time and those selected User(s).
Choose From and To date\time
Search and select users you
wish to report against
The resultant data is grouped by User
Click ‘Generate Report’
to produce report
‘Select all on current page’ – will select
all items displayed on the current page
‘Select all’ – will select every item on
every page. Take note that if the item is
filtered (ie by name) then only those
items adhering to the filter will be
selected
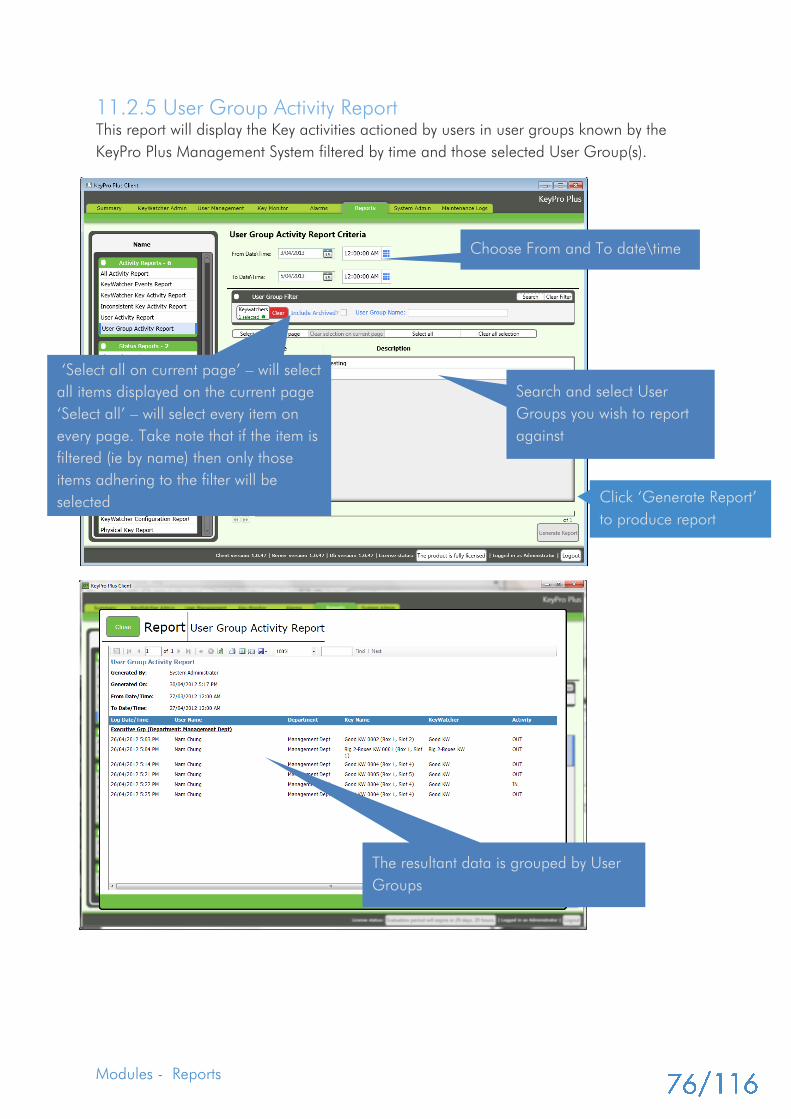
Modules - Reports
11.2.5 User Group Activity Report
This report will display the Key activities actioned by users in user groups known by the
KeyPro Plus Management System filtered by time and those selected User Group(s).
Choose From and To date\time
Search and select User
Groups you wish to report
against
The resultant data is grouped by User
Groups
Click ‘Generate Report’
to produce report
‘Select all on current page’ – will select
all items displayed on the current page
‘Select all’ – will select every item on
every page. Take note that if the item is
filtered (ie by name) then only those
items adhering to the filter will be
selected
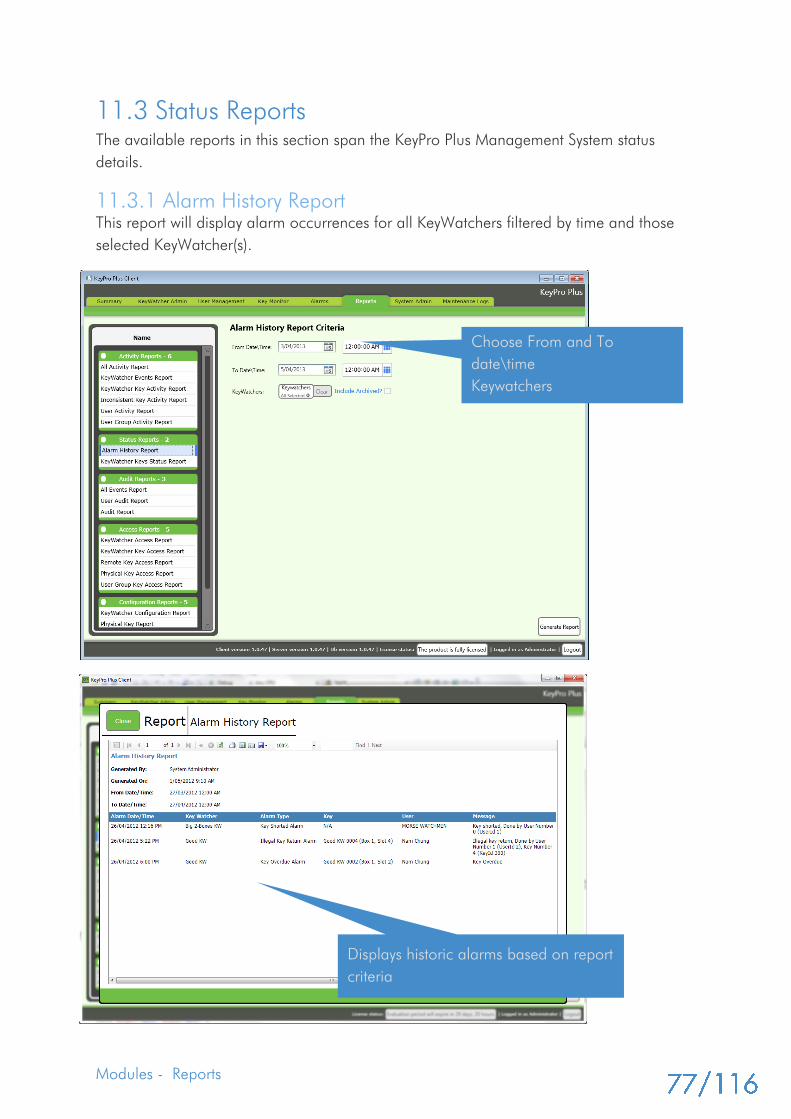
Modules - Reports
11.3 Status Reports
The available reports in this section span the KeyPro Plus Management System status
details.
11.3.1 Alarm History Report
This report will display alarm occurrences for all KeyWatchers filtered by time and those
selected KeyWatcher(s).
Choose From and To
date\time
Keywatchers
Displays historic alarms based on report
criteria

Modules - Reports
11.3.1 KeyWatcher Keys Status Report
This report will display the current Smart Key statuses (Such as the box and slot the
number) of the selected KeyWatchers. Filtered by those selected KeyWatcher(s).
Search and select
KeyWatchers you want to see
the status of.
Shows near real-time key statuses
of all keys for selected KeyWatcher.
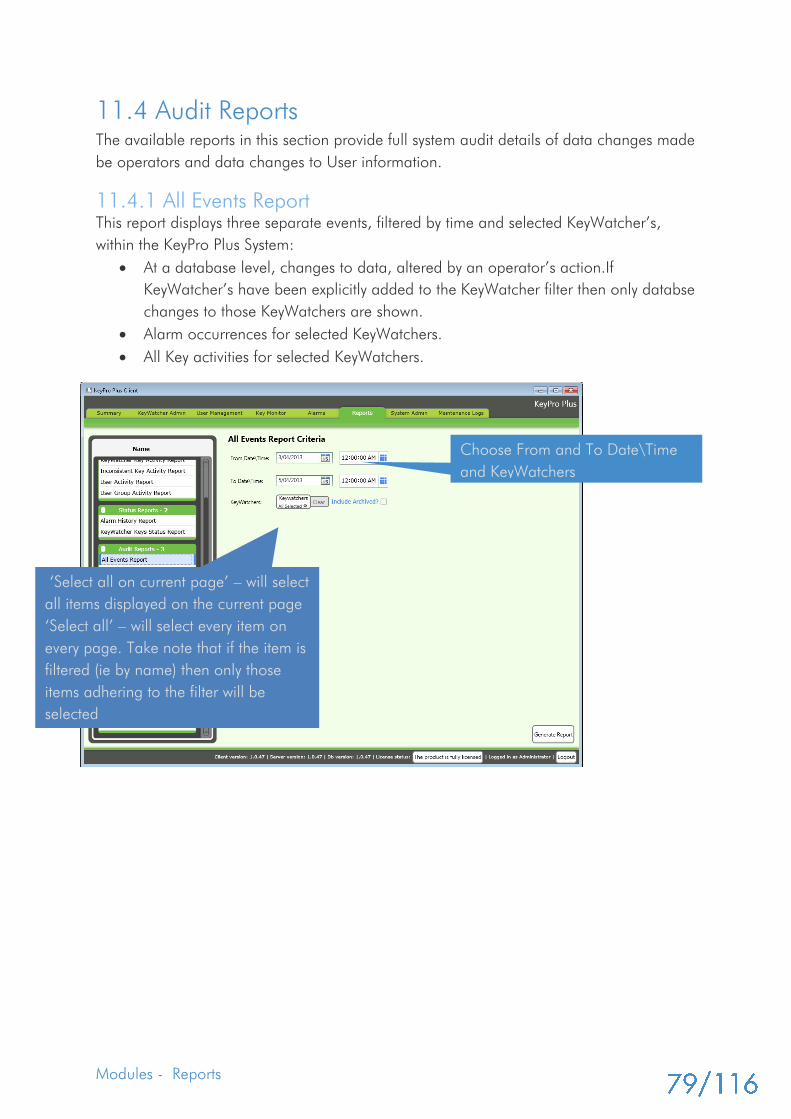
Modules - Reports
11.4 Audit Reports
The available reports in this section provide full system audit details of data changes made
be operators and data changes to User information.
11.4.1 All Events Report
This report displays three separate events, filtered by time and selected KeyWatcher’s,
within the KeyPro Plus System:
At a database level, changes to data, altered by an operator’s action.If
KeyWatcher’s have been explicitly added to the KeyWatcher filter then only databse
changes to those KeyWatchers are shown.
Alarm occurrences for selected KeyWatchers.
All Key activities for selected KeyWatchers.
Choose From and To Date\Time
and KeyWatchers
‘Select all on current page’ – will select
all items displayed on the current page
‘Select all’ – will select every item on
every page. Take note that if the item is
filtered (ie by name) then only those
items adhering to the filter will be
selected
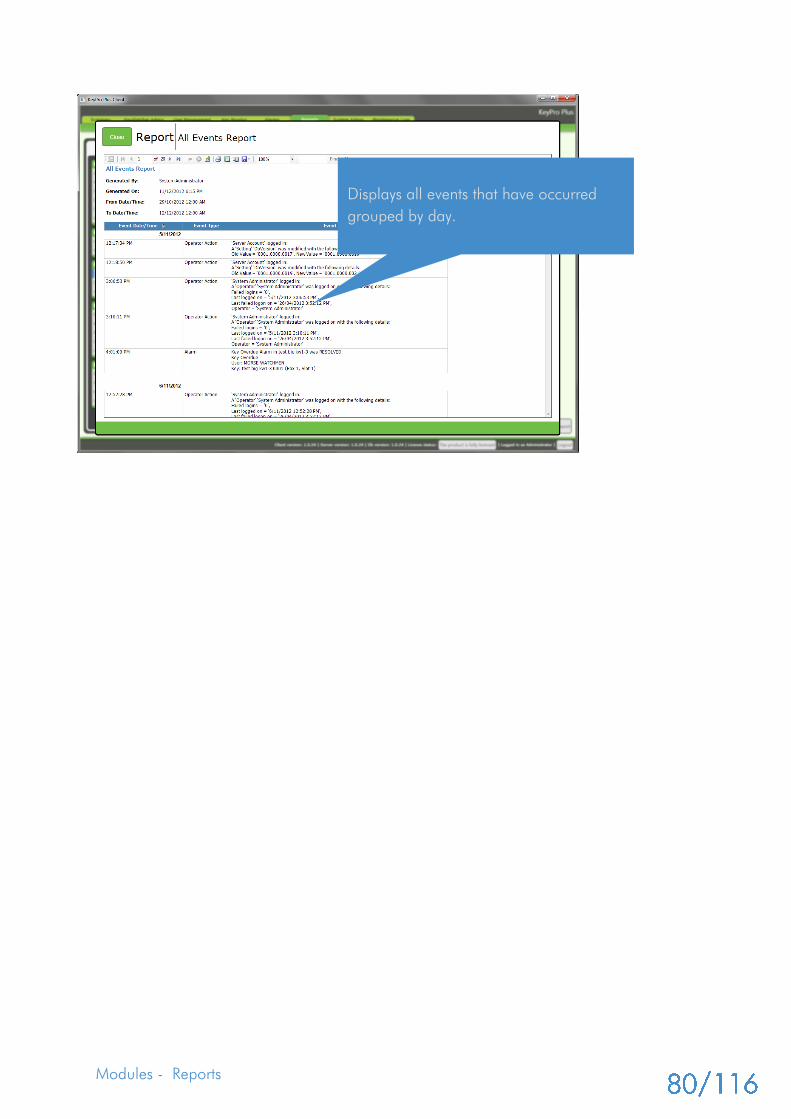
Modules - Reports
Displays all events that have occurred
grouped by day.
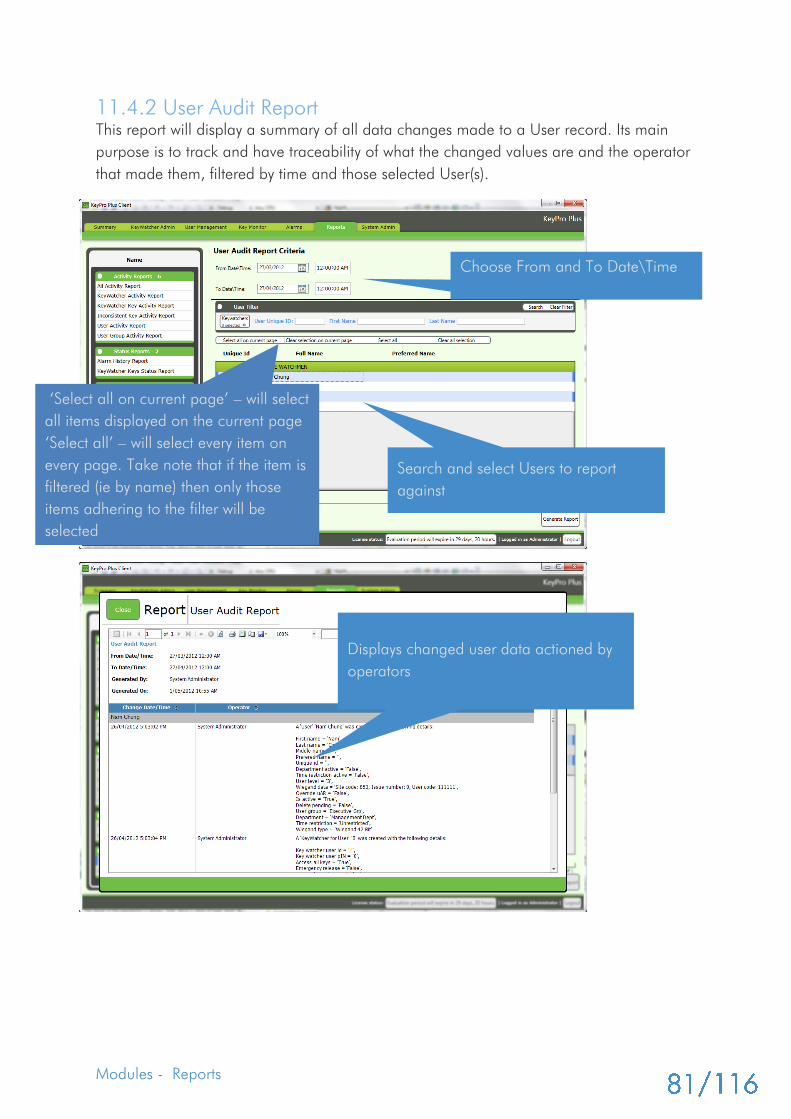
Modules - Reports
11.4.2 User Audit Report
This report will display a summary of all data changes made to a User record. Its main
purpose is to track and have traceability of what the changed values are and the operator
that made them, filtered by time and those selected User(s).
Choose From and To Date\Time
Search and select Users to report
against
Displays changed user data actioned by
operators
‘Select all on current page’ – will select
all items displayed on the current page
‘Select all’ – will select every item on
every page. Take note that if the item is
filtered (ie by name) then only those
items adhering to the filter will be
selected
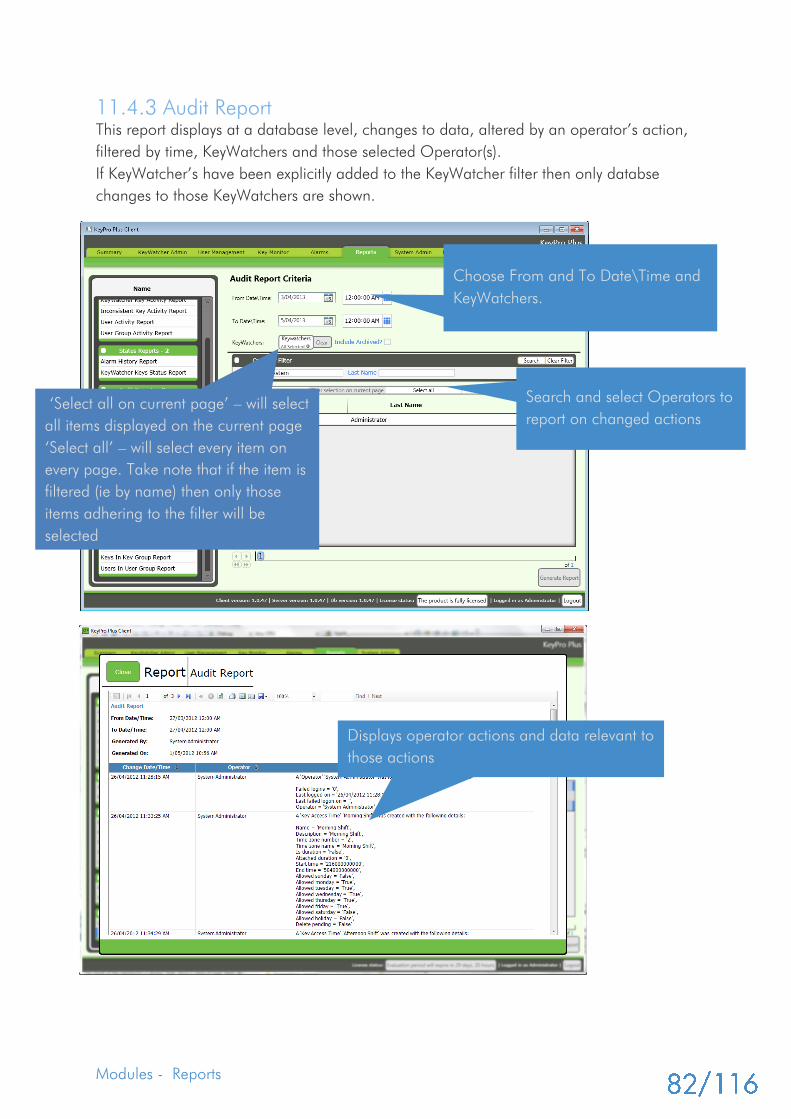
Modules - Reports
11.4.3 Audit Report
This report displays at a database level, changes to data, altered by an operator’s action,
filtered by time, KeyWatchers and those selected Operator(s).
If KeyWatcher’s have been explicitly added to the KeyWatcher filter then only databse
changes to those KeyWatchers are shown.
Choose From and To Date\Time and
KeyWatchers.
Search and select Operators to
report on changed actions
Displays operator actions and data relevant to
those actions
‘Select all on current page’ – will select
all items displayed on the current page
‘Select all’ – will select every item on
every page. Take note that if the item is
filtered (ie by name) then only those
items adhering to the filter will be
selected
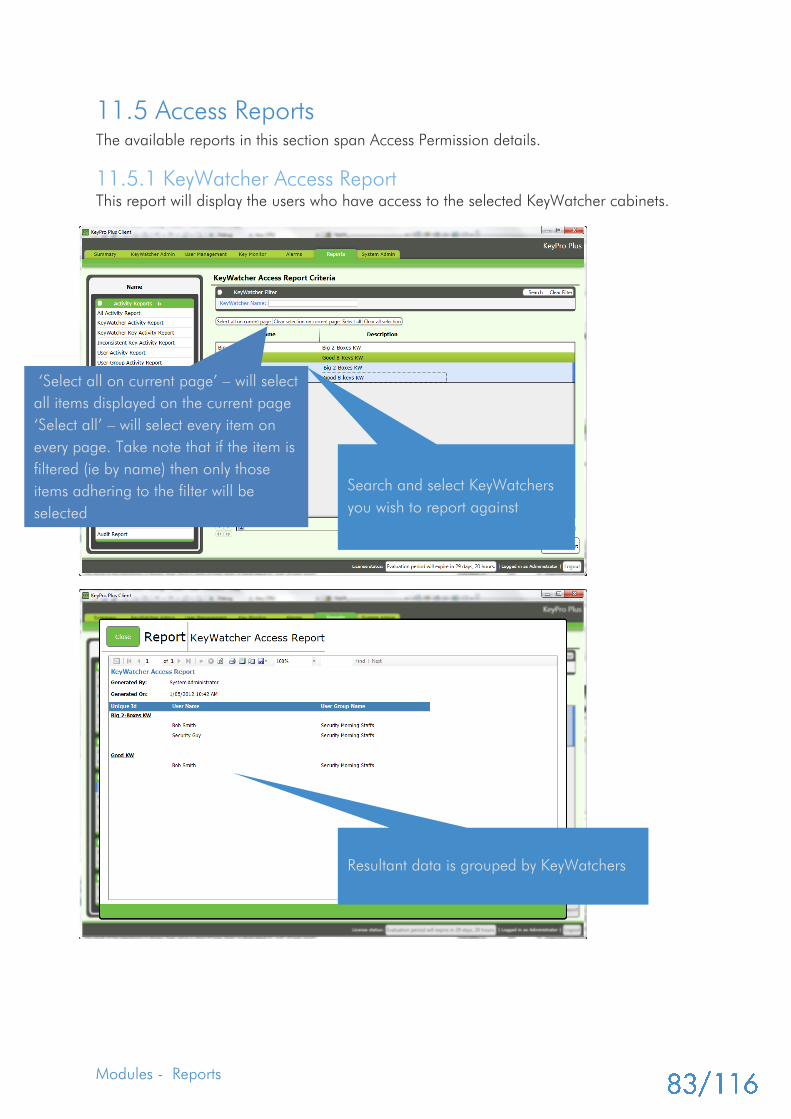
Modules - Reports
11.5 Access Reports
The available reports in this section span Access Permission details.
11.5.1 KeyWatcher Access Report
This report will display the users who have access to the selected KeyWatcher cabinets.
Search and select KeyWatchers
you wish to report against
Resultant data is grouped by KeyWatchers
‘Select all on current page’ – will select
all items displayed on the current page
‘Select all’ – will select every item on
every page. Take note that if the item is
filtered (ie by name) then only those
items adhering to the filter will be
selected
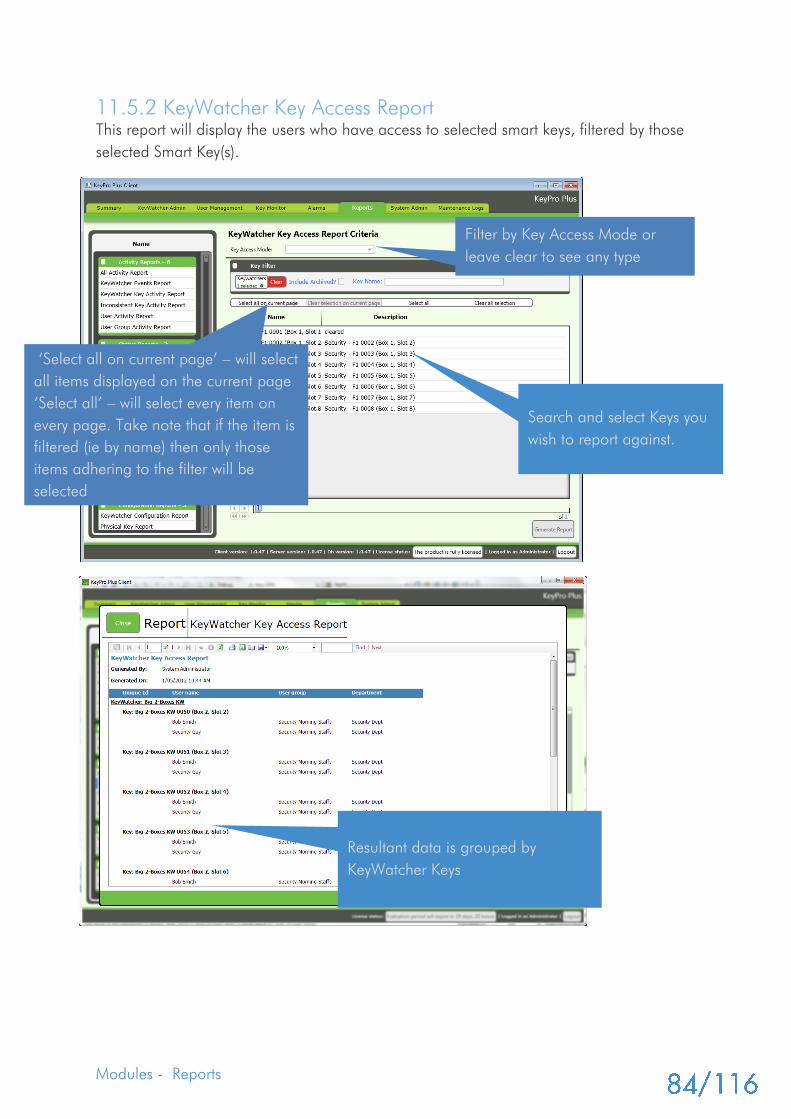
Modules - Reports
11.5.2 KeyWatcher Key Access Report
This report will display the users who have access to selected smart keys, filtered by those
selected Smart Key(s).
Search and select Keys you
wish to report against.
Resultant data is grouped by
KeyWatcher Keys
‘Select all on current page’ – will select
all items displayed on the current page
‘Select all’ – will select every item on
every page. Take note that if the item is
filtered (ie by name) then only those
items adhering to the filter will be
selected
Filter by Key Access Mode or
leave clear to see any type
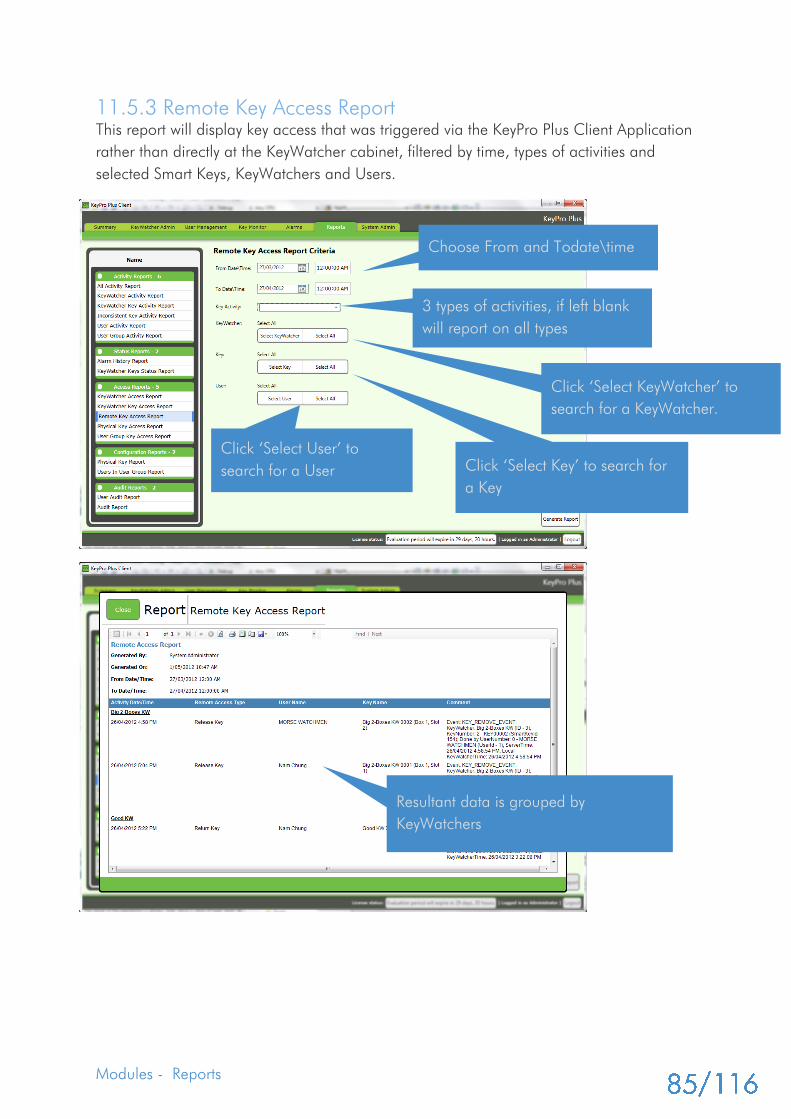
Modules - Reports
11.5.3 Remote Key Access Report
This report will display key access that was triggered via the KeyPro Plus Client Application
rather than directly at the KeyWatcher cabinet, filtered by time, types of activities and
selected Smart Keys, KeyWatchers and Users.
Choose From and Todate\time
3 types of activities, if left blank
will report on all types
Click ‘Select KeyWatcher’ to
search for a KeyWatcher.
Click ‘Select Key’ to search for
a Key
Click ‘Select User’ to
search for a User
Resultant data is grouped by
KeyWatchers
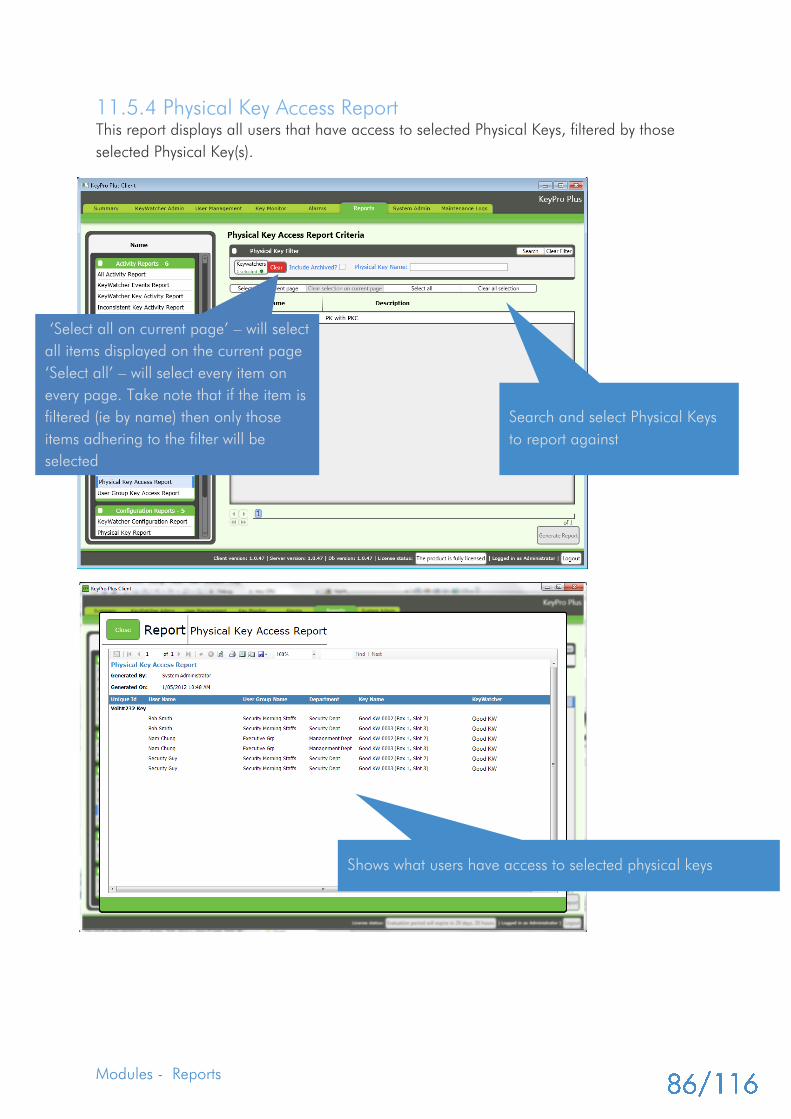
Modules - Reports
11.5.4 Physical Key Access Report
This report displays all users that have access to selected Physical Keys, filtered by those
selected Physical Key(s).
Search and select Physical Keys
to report against
Shows what users have access to selected physical keys
‘Select all on current page’ – will select
all items displayed on the current page
‘Select all’ – will select every item on
every page. Take note that if the item is
filtered (ie by name) then only those
items adhering to the filter will be
selected
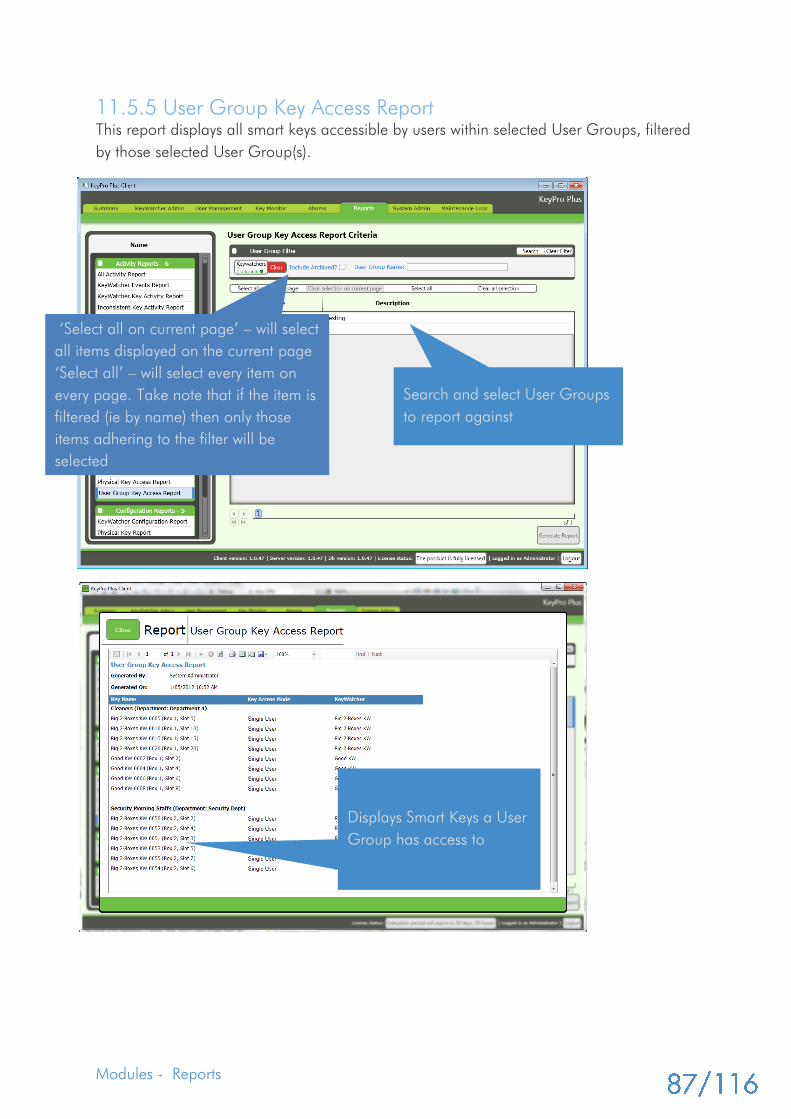
Modules - Reports
11.5.5 User Group Key Access Report
This report displays all smart keys accessible by users within selected User Groups, filtered
by those selected User Group(s).
Search and select User Groups
to report against
Displays Smart Keys a User
Group has access to
‘Select all on current page’ – will select
all items displayed on the current page
‘Select all’ – will select every item on
every page. Take note that if the item is
filtered (ie by name) then only those
items adhering to the filter will be
selected
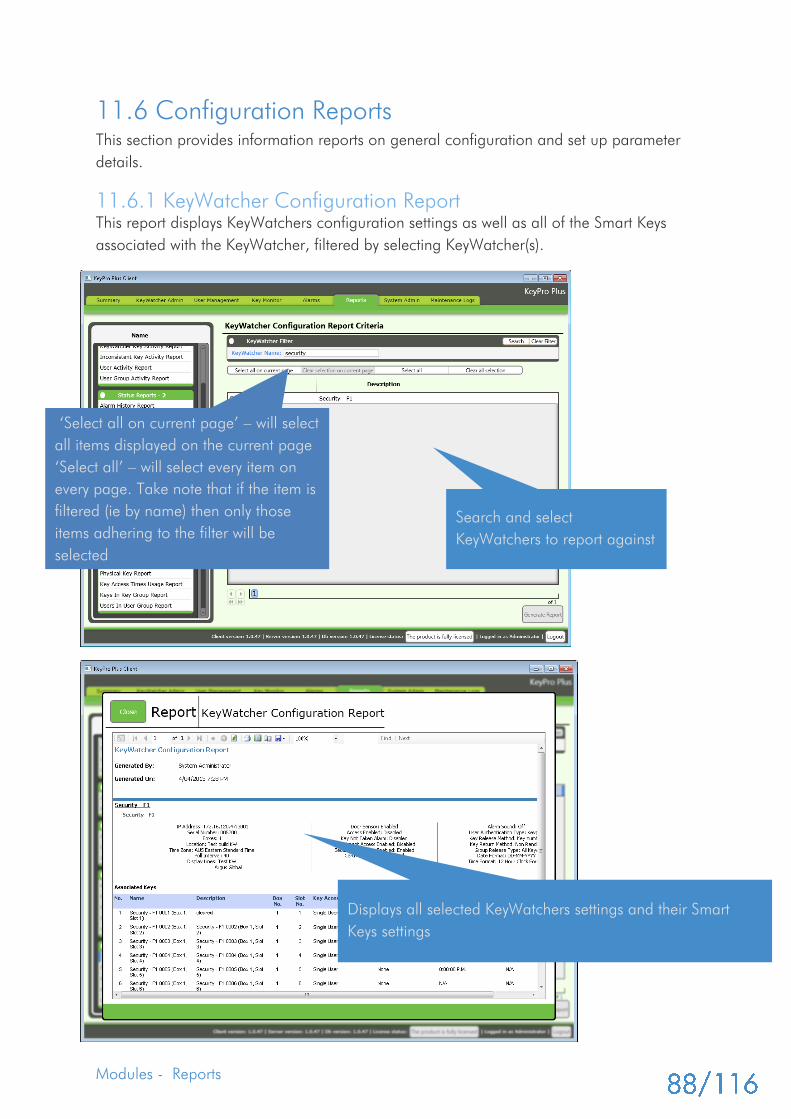
Modules - Reports
11.6 Configuration Reports
This section provides information reports on general configuration and set up parameter
details.
11.6.1 KeyWatcher Configuration Report
This report displays KeyWatchers configuration settings as well as all of the Smart Keys
associated with the KeyWatcher, filtered by selecting KeyWatcher(s).
Search and select
KeyWatchers to report against
Displays all selected KeyWatchers settings and their Smart
Keys settings
‘Select all on current page’ – will select
all items displayed on the current page
‘Select all’ – will select every item on
every page. Take note that if the item is
filtered (ie by name) then only those
items adhering to the filter will be
selected
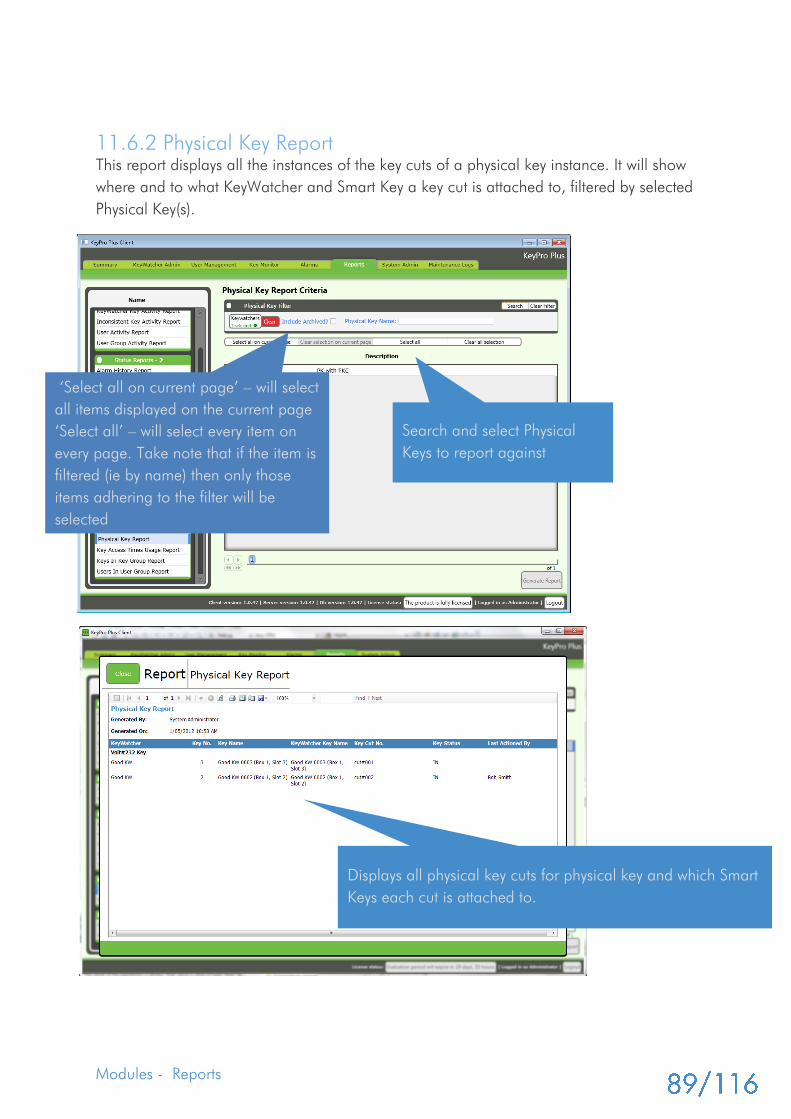
Modules - Reports
11.6.2 Physical Key Report
This report displays all the instances of the key cuts of a physical key instance. It will show
where and to what KeyWatcher and Smart Key a key cut is attached to, filtered by selected
Physical Key(s).
Search and select Physical
Keys to report against
Displays all physical key cuts for physical key and which Smart
Keys each cut is attached to.
‘Select all on current page’ – will select
all items displayed on the current page
‘Select all’ – will select every item on
every page. Take note that if the item is
filtered (ie by name) then only those
items adhering to the filter will be
selected

Modules - Reports
11.6.3 Users In User Group Report
This report will display information on the membership of Users for a User Group, filtered
by those selected User Group(s).
Search and select User Groups
to report against
Displays the Users within the selected User Groups
‘Select all on current page’ – will select
all items displayed on the current page
‘Select all’ – will select every item on
every page. Take note that if the item is
filtered (ie by name) then only those
items adhering to the filter will be
selected
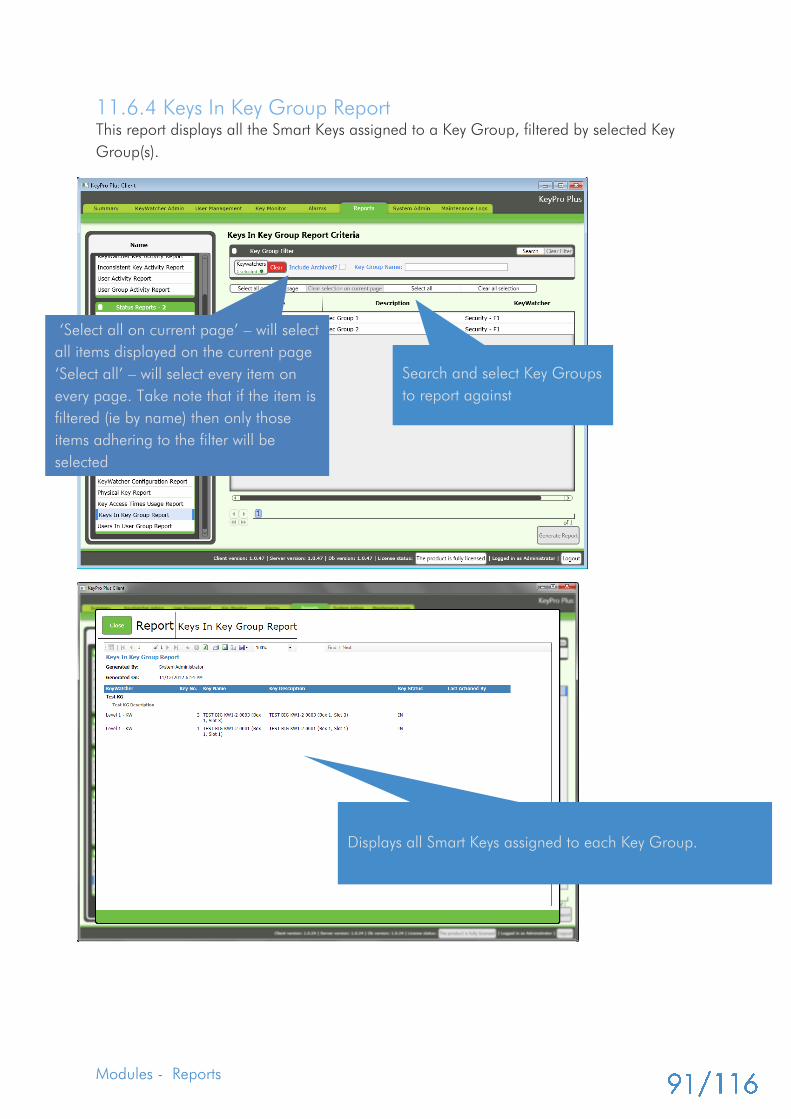
Modules - Reports
11.6.4 Keys In Key Group Report
This report displays all the Smart Keys assigned to a Key Group, filtered by selected Key
Group(s).
Search and select Key Groups
to report against
Displays all Smart Keys assigned to each Key Group.
‘Select all on current page’ – will select
all items displayed on the current page
‘Select all’ – will select every item on
every page. Take note that if the item is
filtered (ie by name) then only those
items adhering to the filter will be
selected
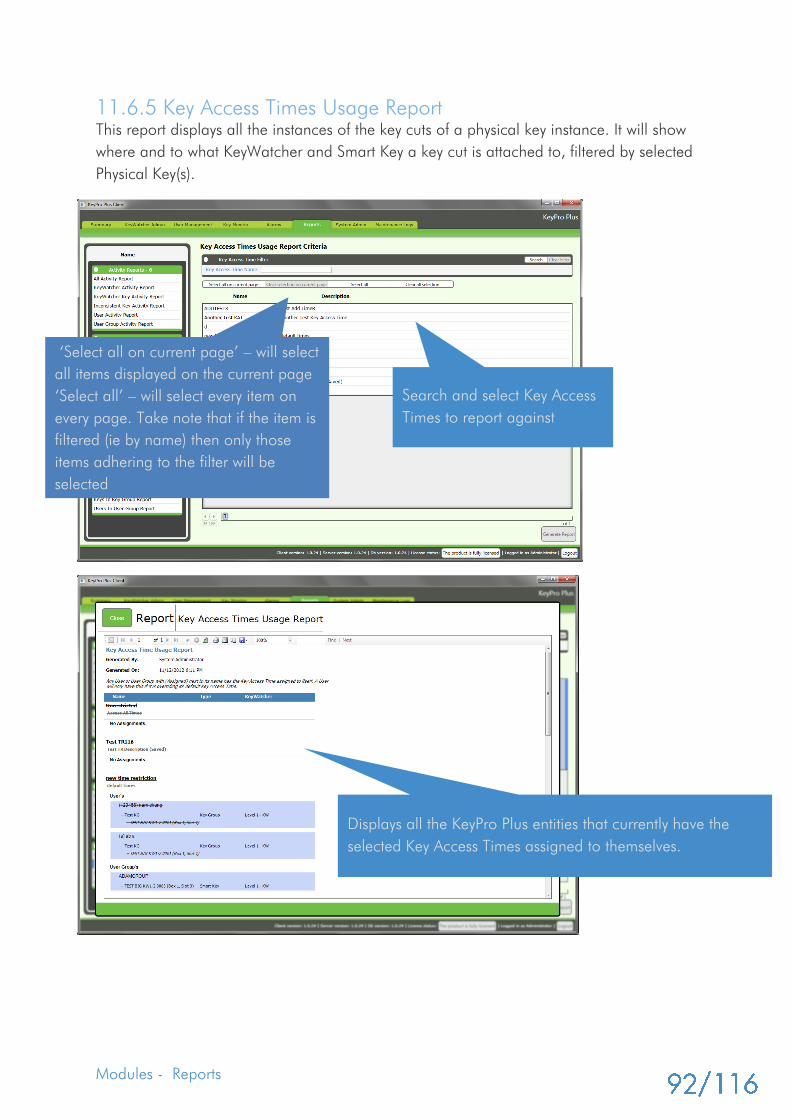
Modules - Reports
11.6.5 Key Access Times Usage Report
This report displays all the instances of the key cuts of a physical key instance. It will show
where and to what KeyWatcher and Smart Key a key cut is attached to, filtered by selected
Physical Key(s).
Search and select Key Access
Times to report against
Displays all the KeyPro Plus entities that currently have the
selected Key Access Times assigned to themselves.
‘Select all on current page’ – will select
all items displayed on the current page
‘Select all’ – will select every item on
every page. Take note that if the item is
filtered (ie by name) then only those
items adhering to the filter will be
selected

Modules - System Admin
12.1 Operator Groups
Operators of the KeyPro Plus system are classified into roles using Operator Groups. An
Operator Group defines authorization to system access rights like, create, update, delete
and read. An Operator assigned to an Operator Group has the access rights of that
group. By default the system comes preloaded with an ‘Administrators’ group that has full
functional access, this ‘Administrators’ Operator Group cannot be deleted.
12.1.1 Main Screen Overview
Go to the ‘System Admin -> Operator Groups’ module item to manage the KeyPro Plus
Operator Groups.
chapte
r
12
This chapter describes the System Admin Module - This
module provides tasks for administering the KeyPro Plus
System itself such as Operator Permissions, Notification
Recipients, Integration Systems, SMTP Settings and Scheduled
Reports.
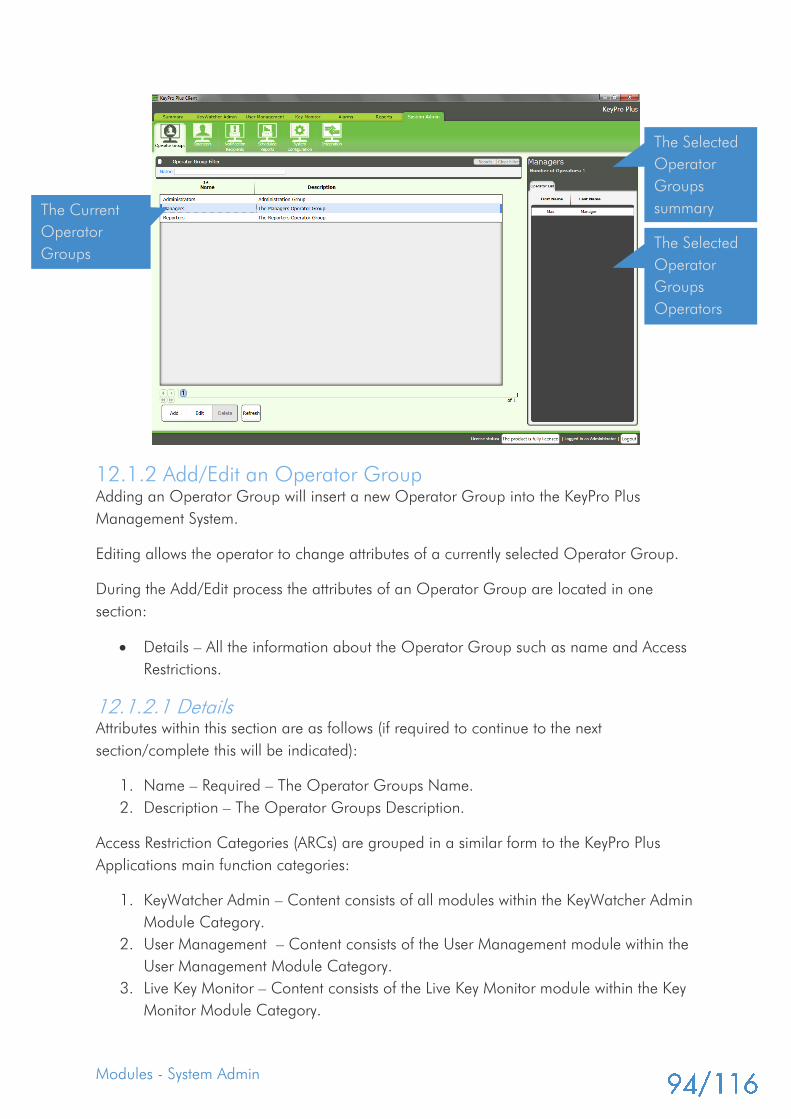
Modules - System Admin
12.1.2 Add/Edit an Operator Group
Adding an Operator Group will insert a new Operator Group into the KeyPro Plus
Management System.
Editing allows the operator to change attributes of a currently selected Operator Group.
During the Add/Edit process the attributes of an Operator Group are located in one
section:
Details – All the information about the Operator Group such as name and Access
Restrictions.
12.1.2.1 Details
Attributes within this section are as follows (if required to continue to the next
section/complete this will be indicated):
1. Name – Required – The Operator Groups Name.
2. Description – The Operator Groups Description.
Access Restriction Categories (ARCs) are grouped in a similar form to the KeyPro Plus
Applications main function categories:
1. KeyWatcher Admin – Content consists of all modules within the KeyWatcher Admin
Module Category.
2. User Management – Content consists of the User Management module within the
User Management Module Category.
3. Live Key Monitor – Content consists of the Live Key Monitor module within the Key
Monitor Module Category.
The Selected
Operator
Groups
summary
The Selected
Operator
Groups
Operators
The Current
Operator
Groups
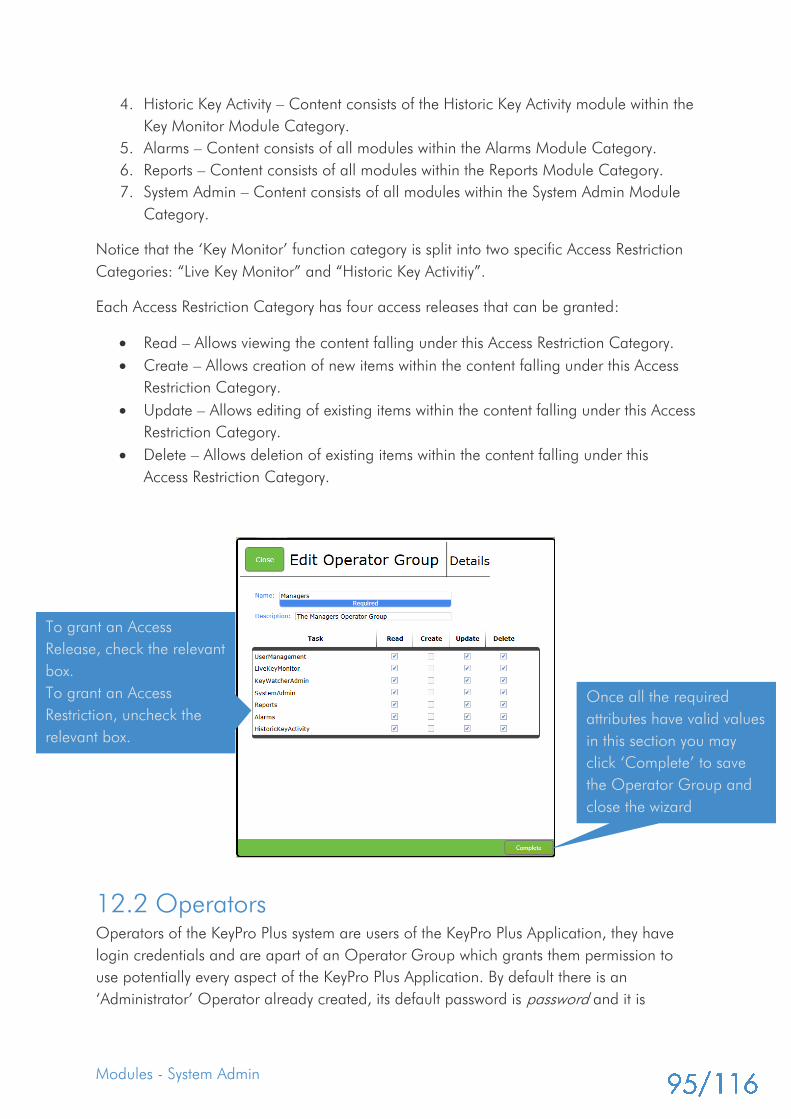
Modules - System Admin
4. Historic Key Activity – Content consists of the Historic Key Activity module within the
Key Monitor Module Category.
5. Alarms – Content consists of all modules within the Alarms Module Category.
6. Reports – Content consists of all modules within the Reports Module Category.
7. System Admin – Content consists of all modules within the System Admin Module
Category.
Notice that the ‘Key Monitor’ function category is split into two specific Access Restriction
Categories: “Live Key Monitor” and “Historic Key Activitiy”.
Each Access Restriction Category has four access releases that can be granted:
Read – Allows viewing the content falling under this Access Restriction Category.
Create – Allows creation of new items within the content falling under this Access
Restriction Category.
Update – Allows editing of existing items within the content falling under this Access
Restriction Category.
Delete – Allows deletion of existing items within the content falling under this
Access Restriction Category.
12.2 Operators
Operators of the KeyPro Plus system are users of the KeyPro Plus Application, they have
login credentials and are apart of an Operator Group which grants them permission to
use potentially every aspect of the KeyPro Plus Application. By default there is an
‘Administrator’ Operator already created, its default password is password and it is
Once all the required
attributes have valid values
in this section you may
click ‘Complete’ to save
the Operator Group and
close the wizard
To grant an Access
Release, check the relevant
box.
To grant an Access
Restriction, uncheck the
relevant box.
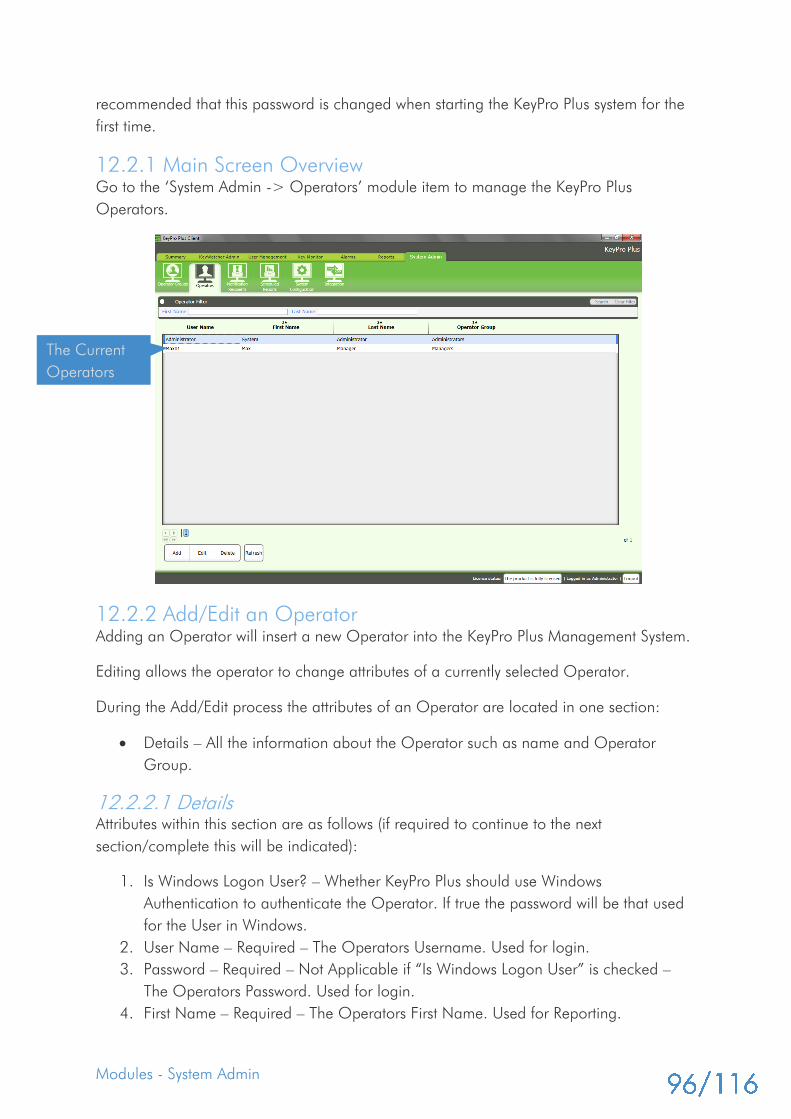
Modules - System Admin
recommended that this password is changed when starting the KeyPro Plus system for the
first time.
12.2.1 Main Screen Overview
Go to the ‘System Admin -> Operators’ module item to manage the KeyPro Plus
Operators.
12.2.2 Add/Edit an Operator
Adding an Operator will insert a new Operator into the KeyPro Plus Management System.
Editing allows the operator to change attributes of a currently selected Operator.
During the Add/Edit process the attributes of an Operator are located in one section:
Details – All the information about the Operator such as name and Operator
Group.
12.2.2.1 Details
Attributes within this section are as follows (if required to continue to the next
section/complete this will be indicated):
1. Is Windows Logon User? – Whether KeyPro Plus should use Windows
Authentication to authenticate the Operator. If true the password will be that used
for the User in Windows.
2. User Name – Required – The Operators Username. Used for login.
3. Password – Required – Not Applicable if “Is Windows Logon User” is checked –
The Operators Password. Used for login.
4. First Name – Required – The Operators First Name. Used for Reporting.
The Current
Operators
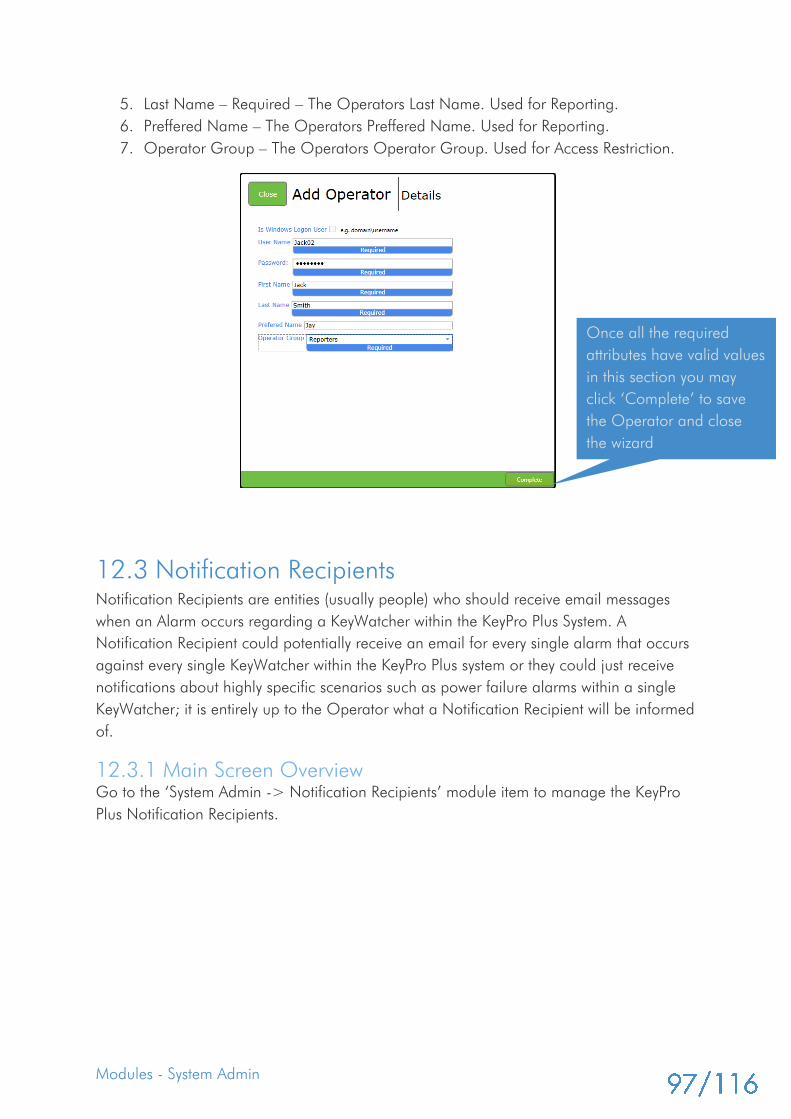
Modules - System Admin
5. Last Name – Required – The Operators Last Name. Used for Reporting.
6. Preffered Name – The Operators Preffered Name. Used for Reporting.
7. Operator Group – The Operators Operator Group. Used for Access Restriction.
12.3 Notification Recipients
Notification Recipients are entities (usually people) who should receive email messages
when an Alarm occurs regarding a KeyWatcher within the KeyPro Plus System. A
Notification Recipient could potentially receive an email for every single alarm that occurs
against every single KeyWatcher within the KeyPro Plus system or they could just receive
notifications about highly specific scenarios such as power failure alarms within a single
KeyWatcher; it is entirely up to the Operator what a Notification Recipient will be informed
of.
12.3.1 Main Screen Overview
Go to the ‘System Admin -> Notification Recipients’ module item to manage the KeyPro
Plus Notification Recipients.
Once all the required
attributes have valid values
in this section you may
click ‘Complete’ to save
the Operator and close
the wizard
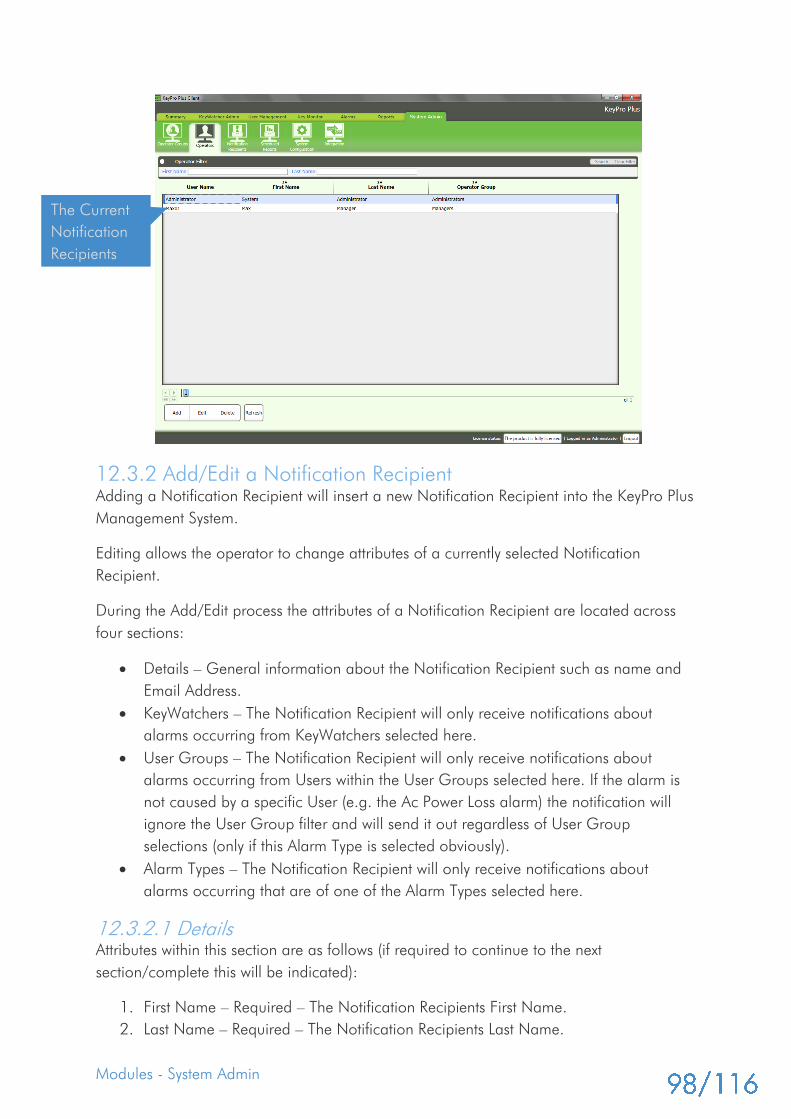
Modules - System Admin
12.3.2 Add/Edit a Notification Recipient
Adding a Notification Recipient will insert a new Notification Recipient into the KeyPro Plus
Management System.
Editing allows the operator to change attributes of a currently selected Notification
Recipient.
During the Add/Edit process the attributes of a Notification Recipient are located across
four sections:
Details – General information about the Notification Recipient such as name and
Email Address.
KeyWatchers – The Notification Recipient will only receive notifications about
alarms occurring from KeyWatchers selected here.
User Groups – The Notification Recipient will only receive notifications about
alarms occurring from Users within the User Groups selected here. If the alarm is
not caused by a specific User (e.g. the Ac Power Loss alarm) the notification will
ignore the User Group filter and will send it out regardless of User Group
selections (only if this Alarm Type is selected obviously).
Alarm Types – The Notification Recipient will only receive notifications about
alarms occurring that are of one of the Alarm Types selected here.
12.3.2.1 Details
Attributes within this section are as follows (if required to continue to the next
section/complete this will be indicated):
1. First Name – Required – The Notification Recipients First Name.
2. Last Name – Required – The Notification Recipients Last Name.
The Current
Notification
Recipients
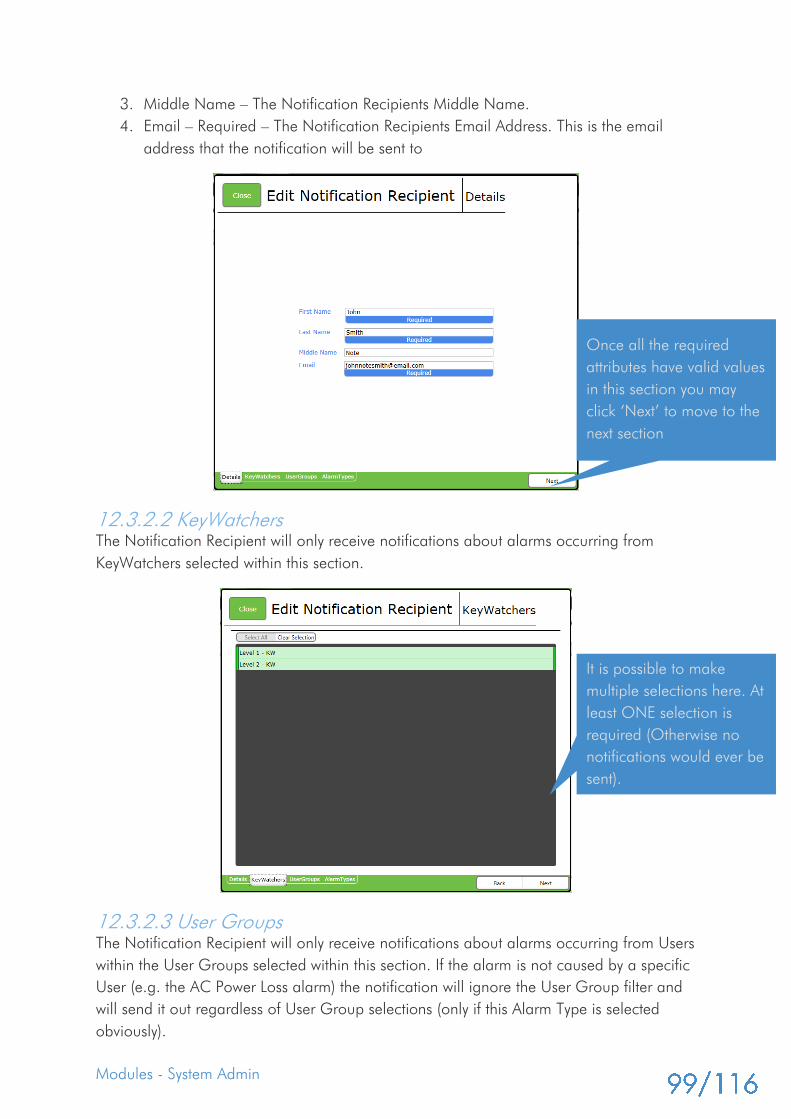
Modules - System Admin
3. Middle Name – The Notification Recipients Middle Name.
4. Email – Required – The Notification Recipients Email Address. This is the email
address that the notification will be sent to
12.3.2.2 KeyWatchers
The Notification Recipient will only receive notifications about alarms occurring from
KeyWatchers selected within this section.
12.3.2.3 User Groups
The Notification Recipient will only receive notifications about alarms occurring from Users
within the User Groups selected within this section. If the alarm is not caused by a specific
User (e.g. the AC Power Loss alarm) the notification will ignore the User Group filter and
will send it out regardless of User Group selections (only if this Alarm Type is selected
obviously).
Once all the required
attributes have valid values
in this section you may
click ‘Next’ to move to the
next section
It is possible to make
multiple selections here. At
least ONE selection is
required (Otherwise no
notifications would ever be
sent).
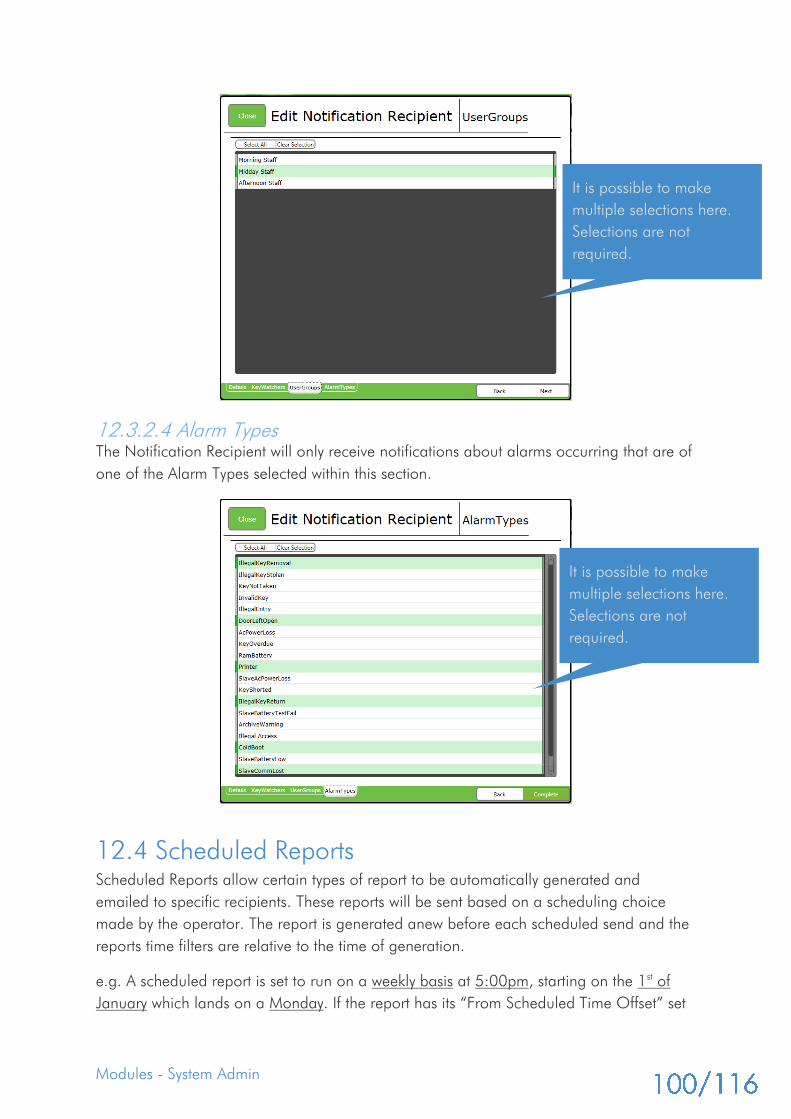
Modules - System Admin
12.3.2.4 Alarm Types
The Notification Recipient will only receive notifications about alarms occurring that are of
one of the Alarm Types selected within this section.
12.4 Scheduled Reports
Scheduled Reports allow certain types of report to be automatically generated and
emailed to specific recipients. These reports will be sent based on a scheduling choice
made by the operator. The report is generated anew before each scheduled send and the
reports time filters are relative to the time of generation.
e.g. A scheduled report is set to run on a weekly basis at 5:00pm, starting on the 1st
of
January which lands on a Monday. If the report has its “From Scheduled Time Offset” set
It is possible to make
multiple selections here.
Selections are not
required.
It is possible to make
multiple selections here.
Selections are not
required.

Modules - System Admin
to 3 days then every Monday from the start date a report will be sent to recipients with
information generated from 3 days prior to the present sending.
1st
of January – Uses information starting from the 29th
of December
8th
of January – Uses information starting from the 5th
of January
12.4.1 Main Screen Overview
Go to the ‘System Admin -> Scheduled Reports’ module item to manage the KeyPro Plus
Scheduled Reports.
12.4.2 Add/Edit a Scheduled Report
Adding a Scheduled Report will insert a new Scheduled Report into the KeyPro Plus
Management System.
Editing allows the operator to change attributes of a currently selected Scheduled Report.
During the Add/Edit process the attributes of a Scheduled Report are located across four
sections:
Details – General information about the Scheduled Report such as name and
Schedule times.
Report Criteria – The report generation rules are defined here; simply put the type
and filters of the required report.
Email Settings – The recipients that the report should be sent to and the emails
subject and body are detailed here.
Test Run – Allows the Operator to explicitly invoke the actual report generation and
sending by the system.
The Current
Scheduled
Reports
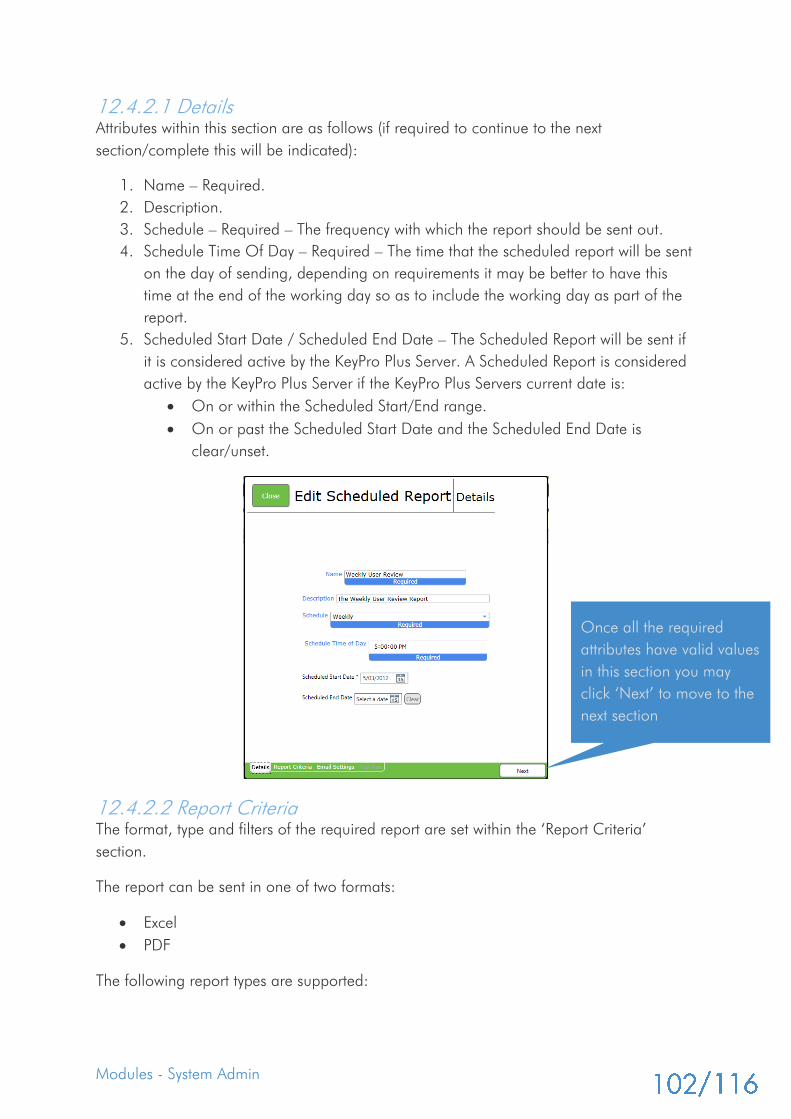
Modules - System Admin
12.4.2.1 Details
Attributes within this section are as follows (if required to continue to the next
section/complete this will be indicated):
1. Name – Required.
2. Description.
3. Schedule – Required – The frequency with which the report should be sent out.
4. Schedule Time Of Day – Required – The time that the scheduled report will be sent
on the day of sending, depending on requirements it may be better to have this
time at the end of the working day so as to include the working day as part of the
report.
5. Scheduled Start Date / Scheduled End Date – The Scheduled Report will be sent if
it is considered active by the KeyPro Plus Server. A Scheduled Report is considered
active by the KeyPro Plus Server if the KeyPro Plus Servers current date is:
On or within the Scheduled Start/End range.
On or past the Scheduled Start Date and the Scheduled End Date is
clear/unset.
12.4.2.2 Report Criteria
The format, type and filters of the required report are set within the ‘Report Criteria’
section.
The report can be sent in one of two formats:
Excel
The following report types are supported:
Once all the required
attributes have valid values
in this section you may
click ‘Next’ to move to the
next section

Modules - System Admin
All Activity Report – This report will display all Key activities known by the KeyPro
Plus Management System filtered by:
o From/To Time offset
User Activity Report – This report will display all Smart Key activities actioned by
users known by the KeyPro Plus Management System filtered by:
o From/To Time offset
o One or more selected User(s).
User Group Activity Report – This report will display the Key activities actioned by
users in user groups known by the KeyPro Plus Management System filtered by:
o From/To Time offset
o One or more selected User Group(s).
KeyWatcher Activity Report – This report will display all Key activities known by the
KeyPro Plus Management System filtered by:
o From/To Time offset
o One or more selected KeyWatcher(s).
Audit Report – This report displays at a database level, changes to data, altered by
an operator’s action, filtered by:
o From/To Time offset
o One or more selected KeyPro Plus Operator(s).
Alarm History Report – This report will display alarm occurrences for all
KeyWatchers filtered by:
o From/To Time offset
Key Activity Report – This report will display all Smart Key activities known by the
KeyPro Plus Management System filtered by:
o From/To Time offset
o One or more selected Smart Key(s).
It should be noted that as can be seen from the report type descriptions above, the Report
Criteria for every report type is at most really only made up of two forms of criteria.
A From/To Time offset – Indicates a date range relative to the send date for
determining which data to include.
A selection of one or more items from a list
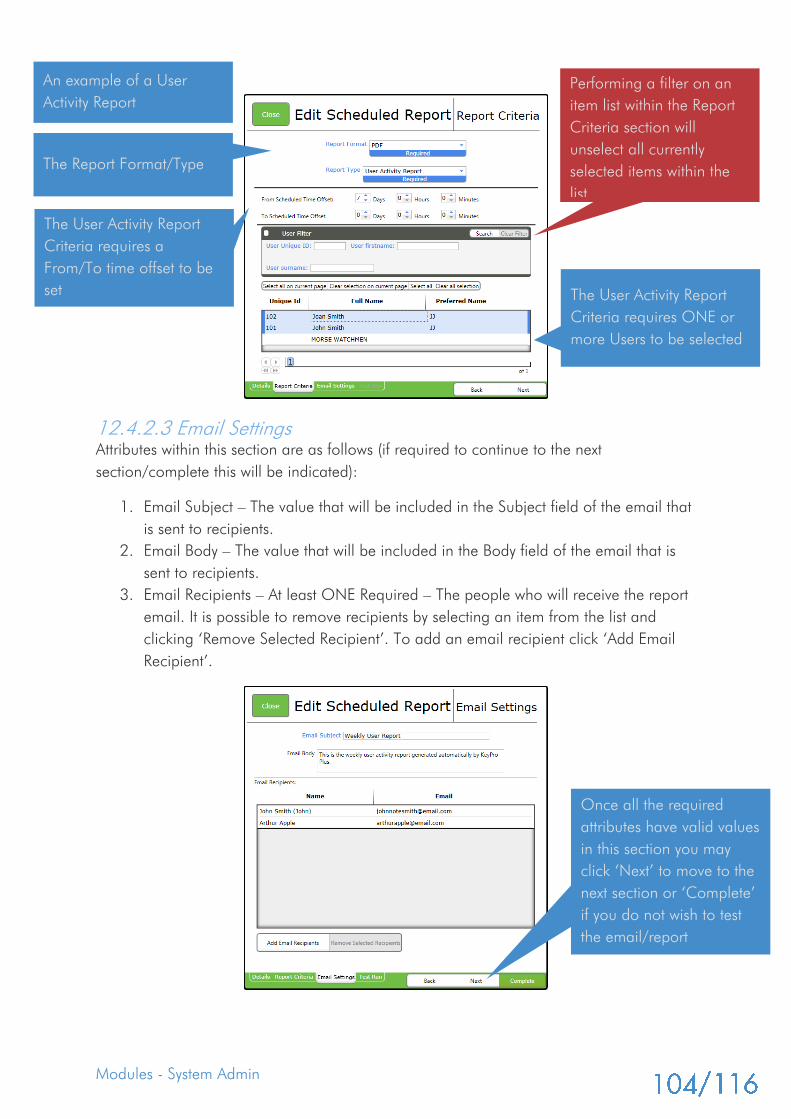
Modules - System Admin
12.4.2.3 Email Settings
Attributes within this section are as follows (if required to continue to the next
section/complete this will be indicated):
1. Email Subject – The value that will be included in the Subject field of the email that
is sent to recipients.
2. Email Body – The value that will be included in the Body field of the email that is
sent to recipients.
3. Email Recipients – At least ONE Required – The people who will receive the report
email. It is possible to remove recipients by selecting an item from the list and
clicking ‘Remove Selected Recipient’. To add an email recipient click ‘Add Email
Recipient’.
The User Activity Report
Criteria requires ONE or
more Users to be selected
An example of a User
Activity Report
Performing a filter on an
item list within the Report
Criteria section will
unselect all currently
selected items within the
list
The User Activity Report
Criteria requires a
From/To time offset to be
set
The Report Format/Type
Once all the required
attributes have valid values
in this section you may
click ‘Next’ to move to the
next section or ‘Complete’
if you do not wish to test
the email/report

Modules - System Admin
12.4.2.3.1 Email Recipients Overlay
Upon clicking ‘Add Email Recipient’ within the ‘Email Settings’ section the following
overlay will appear:
12.4.2.3.2 Email Recipients Overlay - Adding to the Email Address List
Follow these steps to add an Email Recipient to the ‘Email Address’ list of the Email
Recipients Overlay.
12.4.2.3.3 Email Recipients Overlay - Editing in the Email Address List
Follow these steps to edit an Email Recipient in the ‘Email Address’ list of the Email
Recipients Overlay.
The Mode Header will indicate the current Mode:
‘Add’ Mode will read – “Add New Recipient”
‘Edit’ Mode will read – “Edit Recipient”
1. First click ‘Reset’ to
assure that the overlay is in
‘Add’ mode
Recipient Details displays:
In ‘Add’ Mode – A new recipients details
In ‘Edit’ Mode – The last selected recipients details
In ‘Add’ Mode – Add – Adds new recipient using current
Recipient Details
In ‘Edit’ Mode – Update – Applies current Recipient Details
to the last selected recipient
Adds the selected
recipient to the
Scheduled Recipients list
(Closes Overlay)
Clears selection
and puts
overlay into
‘Add’ Mode
Removes the currently selected recipient
2. Fill in Recipient
Details.
Fields marked with
‘Required’ must have
values to continue
3. Click ‘Add’ and the
Recipient will appear in the
Email Address List
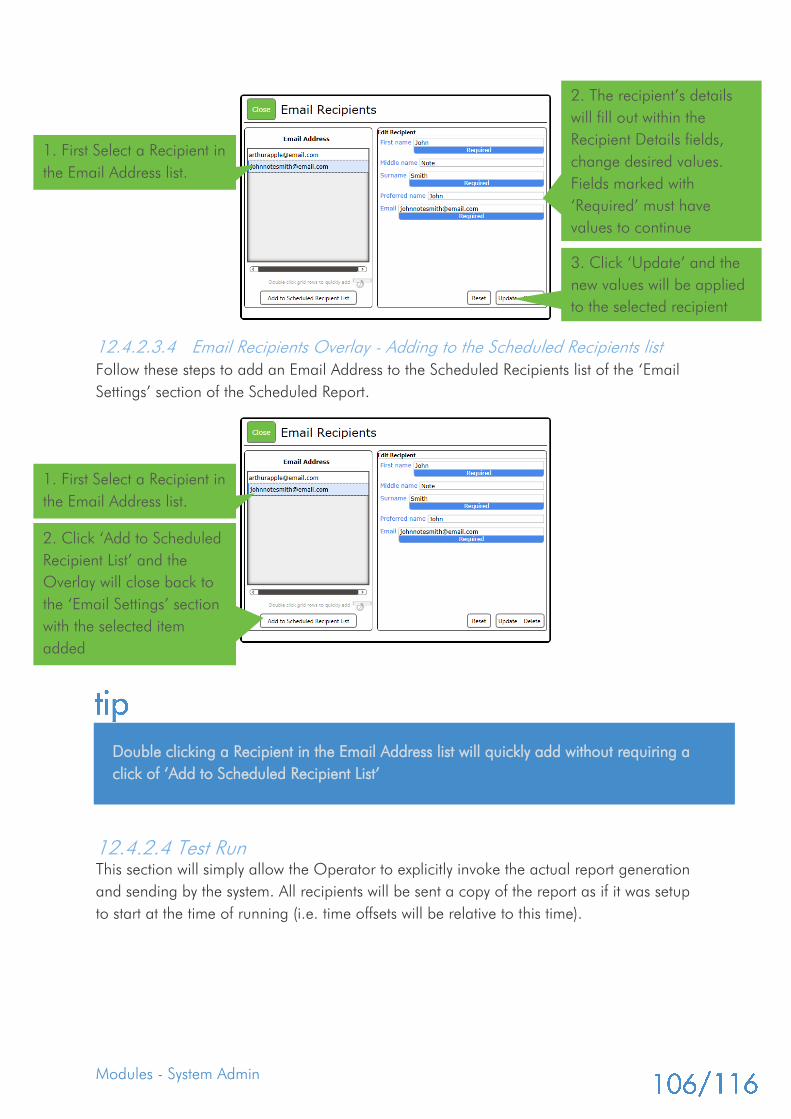
Modules - System Admin
12.4.2.3.4 Email Recipients Overlay - Adding to the Scheduled Recipients list
Follow these steps to add an Email Address to the Scheduled Recipients list of the ‘Email
Settings’ section of the Scheduled Report.
12.4.2.4 Test Run
This section will simply allow the Operator to explicitly invoke the actual report generation
and sending by the system. All recipients will be sent a copy of the report as if it was setup
to start at the time of running (i.e. time offsets will be relative to this time).
1. First Select a Recipient in
the Email Address list.
2. The recipient’s details
will fill out within the
Recipient Details fields,
change desired values.
Fields marked with
‘Required’ must have
values to continue
3. Click ‘Update’ and the
new values will be applied
to the selected recipient
1. First Select a Recipient in
the Email Address list.
2. Click ‘Add to Scheduled
Recipient List’ and the
Overlay will close back to
the ‘Email Settings’ section
with the selected item
added
Double clicking a Recipient in the Email Address list will quickly add without requiring a
click of ‘Add to Scheduled Recipient List’
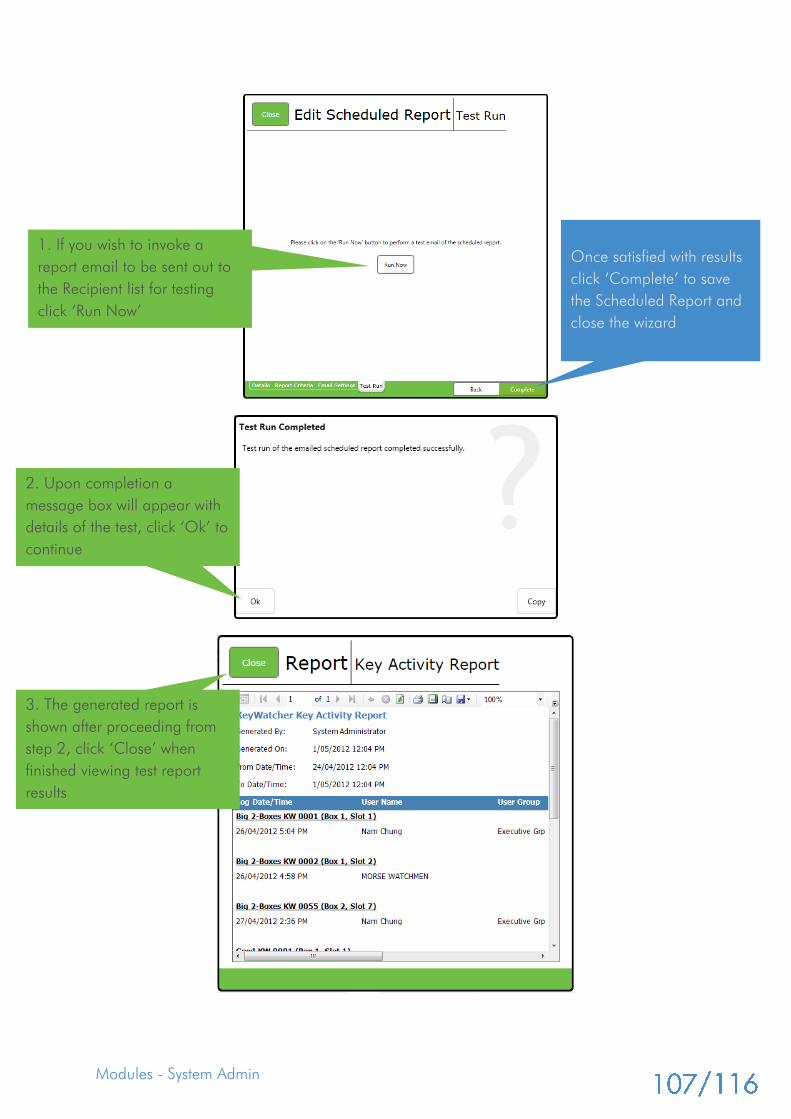
Modules - System Admin
Once satisfied with results
click ‘Complete’ to save
the Scheduled Report and
close the wizard
1. If you wish to invoke a
report email to be sent out to
the Recipient list for testing
click ‘Run Now’
2. Upon completion a
message box will appear with
details of the test, click ‘Ok’ to
continue
3. The generated report is
shown after proceeding from
step 2, click ‘Close’ when
finished viewing test report
results
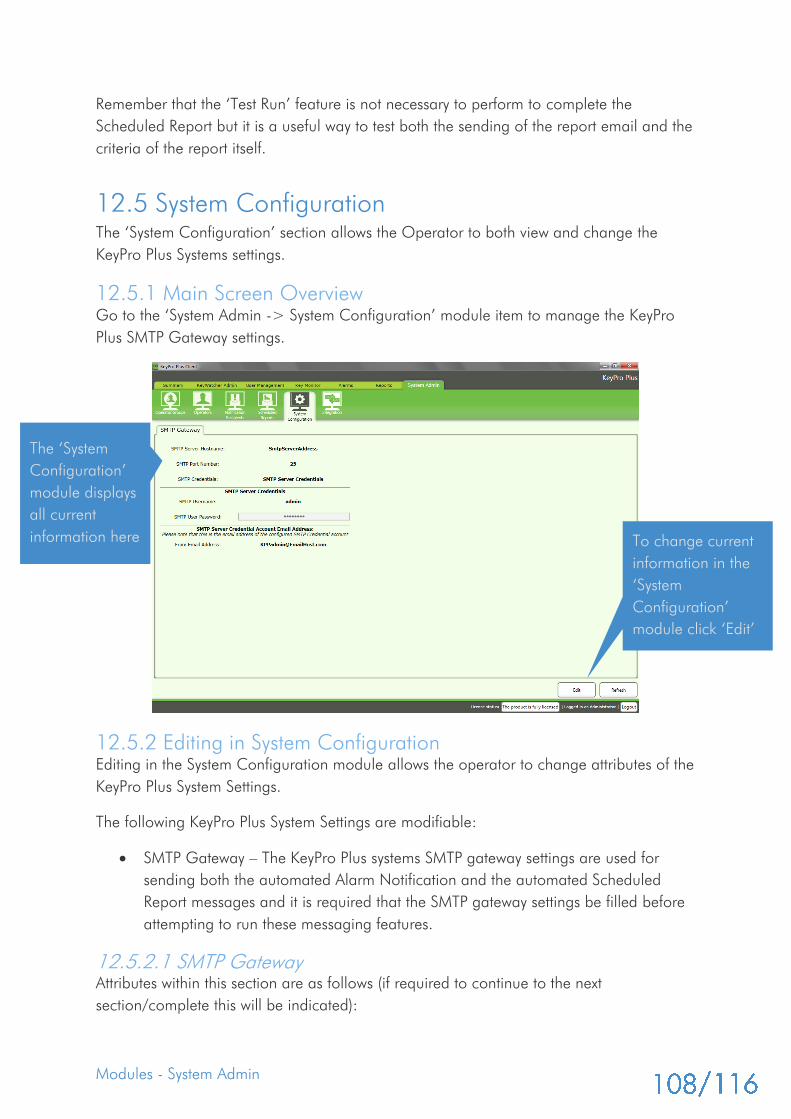
Modules - System Admin
Remember that the ‘Test Run’ feature is not necessary to perform to complete the
Scheduled Report but it is a useful way to test both the sending of the report email and the
criteria of the report itself.
12.5 System Configuration
The ‘System Configuration’ section allows the Operator to both view and change the
KeyPro Plus Systems settings.
12.5.1 Main Screen Overview
Go to the ‘System Admin -> System Configuration’ module item to manage the KeyPro
Plus SMTP Gateway settings.
12.5.2 Editing in System Configuration
Editing in the System Configuration module allows the operator to change attributes of the
KeyPro Plus System Settings.
The following KeyPro Plus System Settings are modifiable:
SMTP Gateway – The KeyPro Plus systems SMTP gateway settings are used for
sending both the automated Alarm Notification and the automated Scheduled
Report messages and it is required that the SMTP gateway settings be filled before
attempting to run these messaging features.
12.5.2.1 SMTP Gateway
Attributes within this section are as follows (if required to continue to the next
section/complete this will be indicated):
The ‘System
Configuration’
module displays
all current
information here To change current
information in the
‘System
Configuration’
module click ‘Edit’
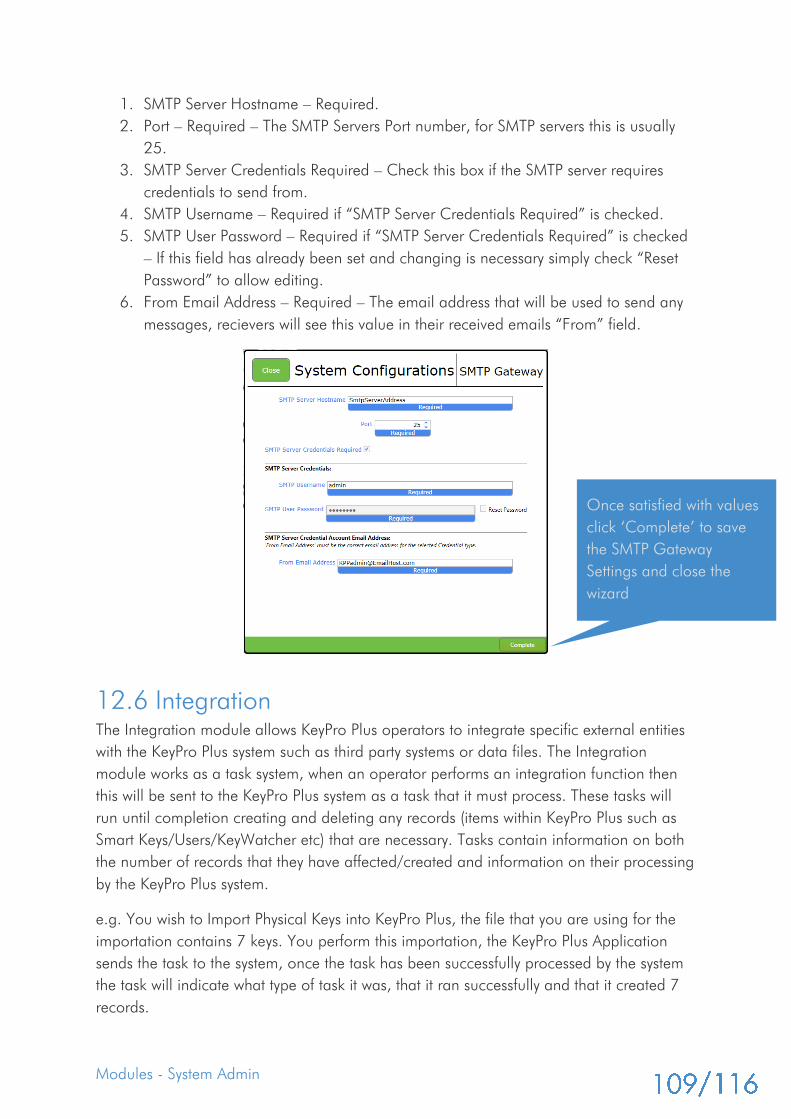
Modules - System Admin
1. SMTP Server Hostname – Required.
2. Port – Required – The SMTP Servers Port number, for SMTP servers this is usually
25.
3. SMTP Server Credentials Required – Check this box if the SMTP server requires
credentials to send from.
4. SMTP Username – Required if “SMTP Server Credentials Required” is checked.
5. SMTP User Password – Required if “SMTP Server Credentials Required” is checked
– If this field has already been set and changing is necessary simply check “Reset
Password” to allow editing.
6. From Email Address – Required – The email address that will be used to send any
messages, recievers will see this value in their received emails “From” field.
12.6 Integration
The Integration module allows KeyPro Plus operators to integrate specific external entities
with the KeyPro Plus system such as third party systems or data files. The Integration
module works as a task system, when an operator performs an integration function then
this will be sent to the KeyPro Plus system as a task that it must process. These tasks will
run until completion creating and deleting any records (items within KeyPro Plus such as
Smart Keys/Users/KeyWatcher etc) that are necessary. Tasks contain information on both
the number of records that they have affected/created and information on their processing
by the KeyPro Plus system.
e.g. You wish to Import Physical Keys into KeyPro Plus, the file that you are using for the
importation contains 7 keys. You perform this importation, the KeyPro Plus Application
sends the task to the system, once the task has been successfully processed by the system
the task will indicate what type of task it was, that it ran successfully and that it created 7
records.
Once satisfied with values
click ‘Complete’ to save
the SMTP Gateway
Settings and close the
wizard
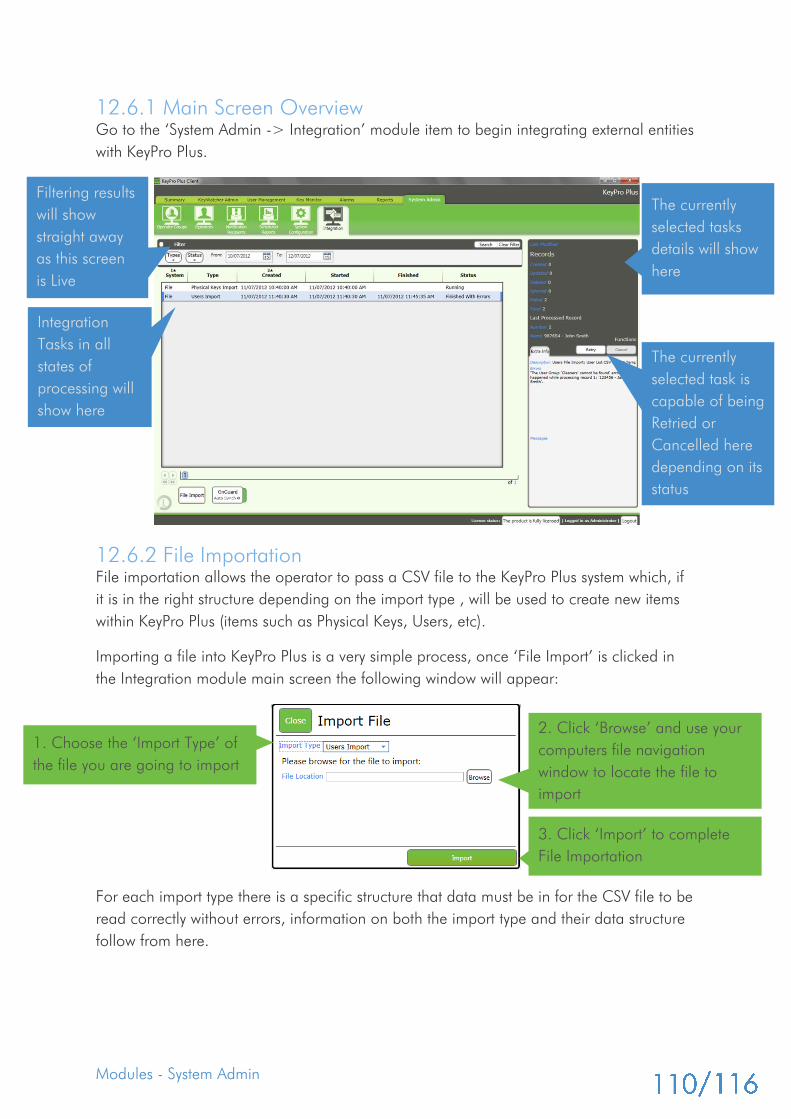
Modules - System Admin
12.6.1 Main Screen Overview
Go to the ‘System Admin -> Integration’ module item to begin integrating external entities
with KeyPro Plus.
12.6.2 File Importation
File importation allows the operator to pass a CSV file to the KeyPro Plus system which, if
it is in the right structure depending on the import type , will be used to create new items
within KeyPro Plus (items such as Physical Keys, Users, etc).
Importing a file into KeyPro Plus is a very simple process, once ‘File Import’ is clicked in
the Integration module main screen the following window will appear:
For each import type there is a specific structure that data must be in for the CSV file to be
read correctly without errors, information on both the import type and their data structure
follow from here.
Integration
Tasks in all
states of
processing will
show here
Filtering results
will show
straight away
as this screen
is Live
The currently
selected tasks
details will show
here
The currently
selected task is
capable of being
Retried or
Cancelled here
depending on its
status
2. Click ‘Browse’ and use your
computers file navigation
window to locate the file to
import
3. Click ‘Import’ to complete
File Importation
1. Choose the ‘Import Type’ of
the file you are going to import
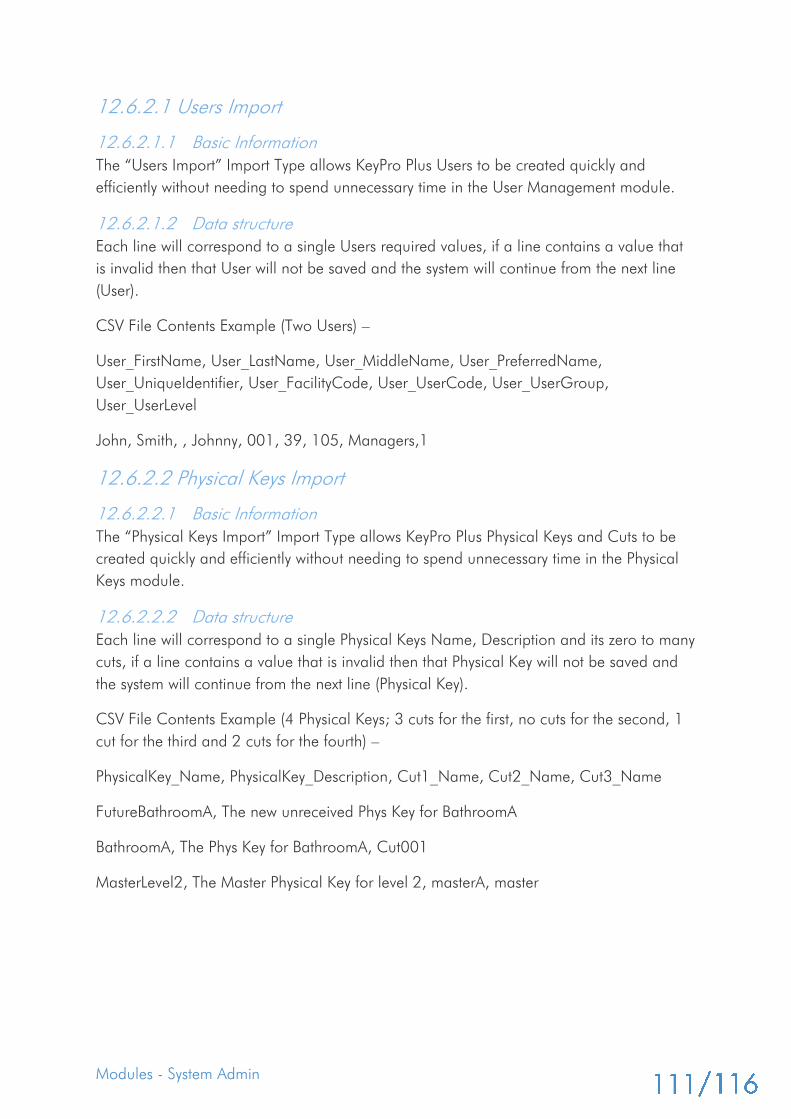
Modules - System Admin
12.6.2.1 Users Import
12.6.2.1.1 Basic Information
The “Users Import” Import Type allows KeyPro Plus Users to be created quickly and
efficiently without needing to spend unnecessary time in the User Management module.
12.6.2.1.2 Data structure
Each line will correspond to a single Users required values, if a line contains a value that
is invalid then that User will not be saved and the system will continue from the next line
(User).
CSV File Contents Example (Two Users) –
User_FirstName, User_LastName, User_MiddleName, User_PreferredName,
User_UniqueIdentifier, User_FacilityCode, User_UserCode, User_UserGroup,
User_UserLevel
John, Smith, , Johnny, 001, 39, 105, Managers,1
12.6.2.2 Physical Keys Import
12.6.2.2.1 Basic Information
The “Physical Keys Import” Import Type allows KeyPro Plus Physical Keys and Cuts to be
created quickly and efficiently without needing to spend unnecessary time in the Physical
Keys module.
12.6.2.2.2 Data structure
Each line will correspond to a single Physical Keys Name, Description and its zero to many
cuts, if a line contains a value that is invalid then that Physical Key will not be saved and
the system will continue from the next line (Physical Key).
CSV File Contents Example (4 Physical Keys; 3 cuts for the first, no cuts for the second, 1
cut for the third and 2 cuts for the fourth) –
PhysicalKey_Name, PhysicalKey_Description, Cut1_Name, Cut2_Name, Cut3_Name
FutureBathroomA, The new unreceived Phys Key for BathroomA
BathroomA, The Phys Key for BathroomA, Cut001
MasterLevel2, The Master Physical Key for level 2, masterA, master
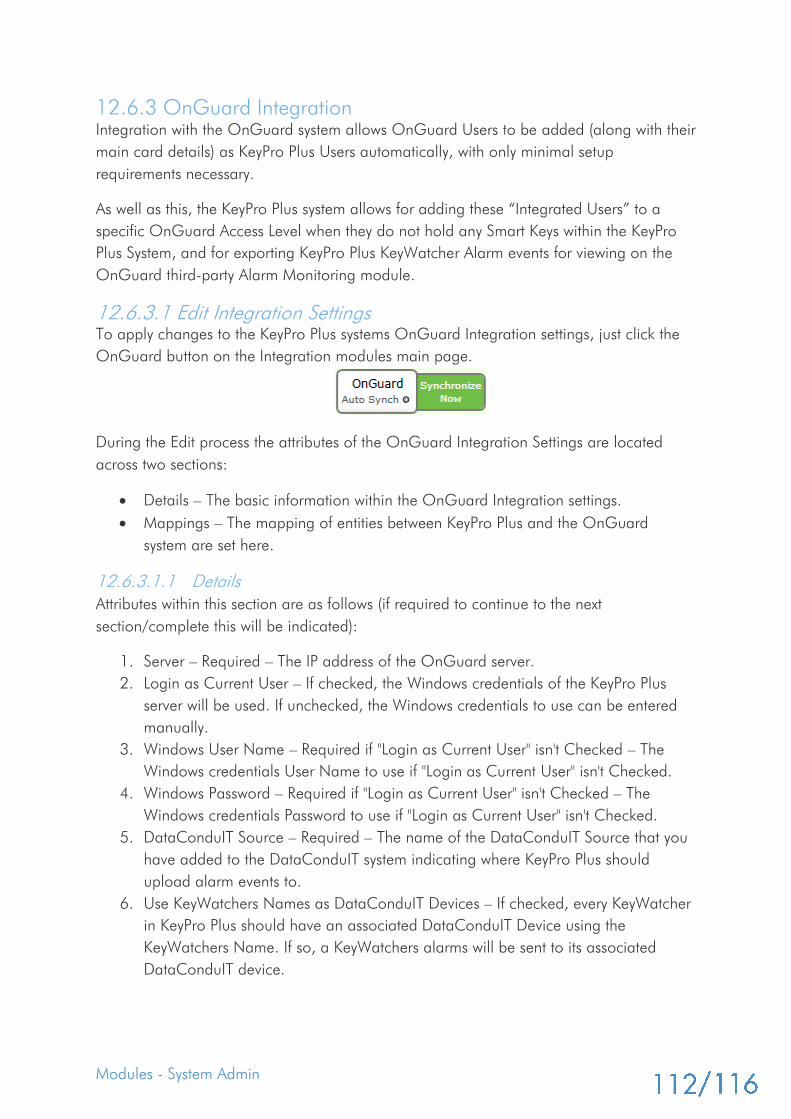
Modules - System Admin
12.6.3 OnGuard Integration
Integration with the OnGuard system allows OnGuard Users to be added (along with their
main card details) as KeyPro Plus Users automatically, with only minimal setup
requirements necessary.
As well as this, the KeyPro Plus system allows for adding these “Integrated Users” to a
specific OnGuard Access Level when they do not hold any Smart Keys within the KeyPro
Plus System, and for exporting KeyPro Plus KeyWatcher Alarm events for viewing on the
OnGuard third-party Alarm Monitoring module.
12.6.3.1 Edit Integration Settings
To apply changes to the KeyPro Plus systems OnGuard Integration settings, just click the
OnGuard button on the Integration modules main page.
During the Edit process the attributes of the OnGuard Integration Settings are located
across two sections:
Details – The basic information within the OnGuard Integration settings.
Mappings – The mapping of entities between KeyPro Plus and the OnGuard
system are set here.
12.6.3.1.1 Details
Attributes within this section are as follows (if required to continue to the next
section/complete this will be indicated):
1. Server – Required – The IP address of the OnGuard server.
2. Login as Current User – If checked, the Windows credentials of the KeyPro Plus
server will be used. If unchecked, the Windows credentials to use can be entered
manually.
3. Windows User Name – Required if "Login as Current User" isn't Checked – The
Windows credentials User Name to use if "Login as Current User" isn't Checked.
4. Windows Password – Required if "Login as Current User" isn't Checked – The
Windows credentials Password to use if "Login as Current User" isn't Checked.
5. DataConduIT Source – Required – The name of the DataConduIT Source that you
have added to the DataConduIT system indicating where KeyPro Plus should
upload alarm events to.
6. Use KeyWatchers Names as DataConduIT Devices – If checked, every KeyWatcher
in KeyPro Plus should have an associated DataConduIT Device using the
KeyWatchers Name. If so, a KeyWatchers alarms will be sent to its associated
DataConduIT device.

Modules - System Admin
7. Automatic Synchronization – If checked, the KeyPro Plus system will synchronize
with the OnGuard system every set number of seconds (determined by the
"Synchronization Interval" setting).
8. Synchronization Interval – The number of seconds between synchronization is
performed.
12.6.3.1.2 Mappings
Attributes within this section are as follows (if required to continue to the next
section/complete this will be indicated):
1. Access Level Mappings – The list of OnGuard Access levels are shown here, it is
possible to select KeyPro Plus User Groups to map with these Access Levels.
2. Multi-Map User Group – Required – If an OnGuard user is part of more than one
mapped Access Level, they will be placed in this User Group rather than ANY of
the mapped User Groups.
3. Archived User Group – If an OnGuard user is not part of a mapped Access Level
(one without a User Group mapping in the Access Level Mappings list), cannot be
mapped, or is deleted, then they will be placed in the selected "Archived User
Group". If unset, the User will be deleted from KeyPro Plus.
4. Keys Not Held Access Level – Required – If an Integrated User does not have any
held keys, they will be added to this Access Level within the OnGuard system. The
Access Level selected here will not be mappable and any User Group set against it
in “Access Level Mappings” will be ignored.
5. Badge Type – Required – Only OnGuard Users with this selected OnGuard Badge
Type will be synched to the relevant, mapped KeyPro Plus User Group.
6. Wiegand Data Type – Required – All Integrated Users within KeyPro Plus will be
given this Wiegand Data Type. If any “Access Level Mappings” reference a KeyPro
Plus User Group that does not allow this Wiegand Data Type, completion will fail,
specifying the User Group that is causing the failure. It must then be set which
Once all the required
attributes have valid values
in this section you may
click ‘Next’ to move to the
next section or ‘Complete’
if you are done changing
the Integration settings
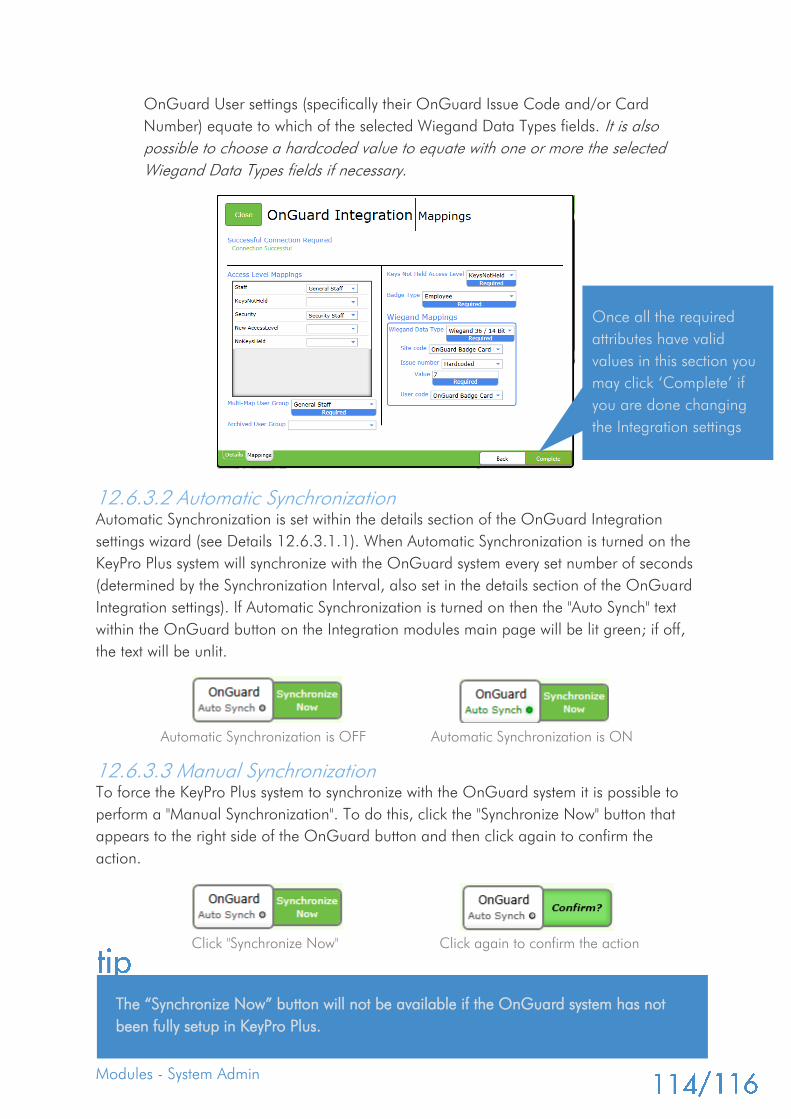
Modules - System Admin
OnGuard User settings (specifically their OnGuard Issue Code and/or Card
Number) equate to which of the selected Wiegand Data Types fields. It is also
possible to choose a hardcoded value to equate with one or more the selected
Wiegand Data Types fields if necessary.
12.6.3.2 Automatic Synchronization
Automatic Synchronization is set within the details section of the OnGuard Integration
settings wizard (see Details 12.6.3.1.1). When Automatic Synchronization is turned on the
KeyPro Plus system will synchronize with the OnGuard system every set number of seconds
(determined by the Synchronization Interval, also set in the details section of the OnGuard
Integration settings). If Automatic Synchronization is turned on then the "Auto Synch" text
within the OnGuard button on the Integration modules main page will be lit green; if off,
the text will be unlit.
Automatic Synchronization is OFF Automatic Synchronization is ON
12.6.3.3 Manual Synchronization
To force the KeyPro Plus system to synchronize with the OnGuard system it is possible to
perform a "Manual Synchronization". To do this, click the "Synchronize Now" button that
appears to the right side of the OnGuard button and then click again to confirm the
action.
Click "Synchronize Now" Click again to confirm the action
Once all the required
attributes have valid
values in this section you
may click ‘Complete’ if
you are done changing
the Integration settings
The “Synchronize Now” button will not be available if the OnGuard system has not
been fully setup in KeyPro Plus.
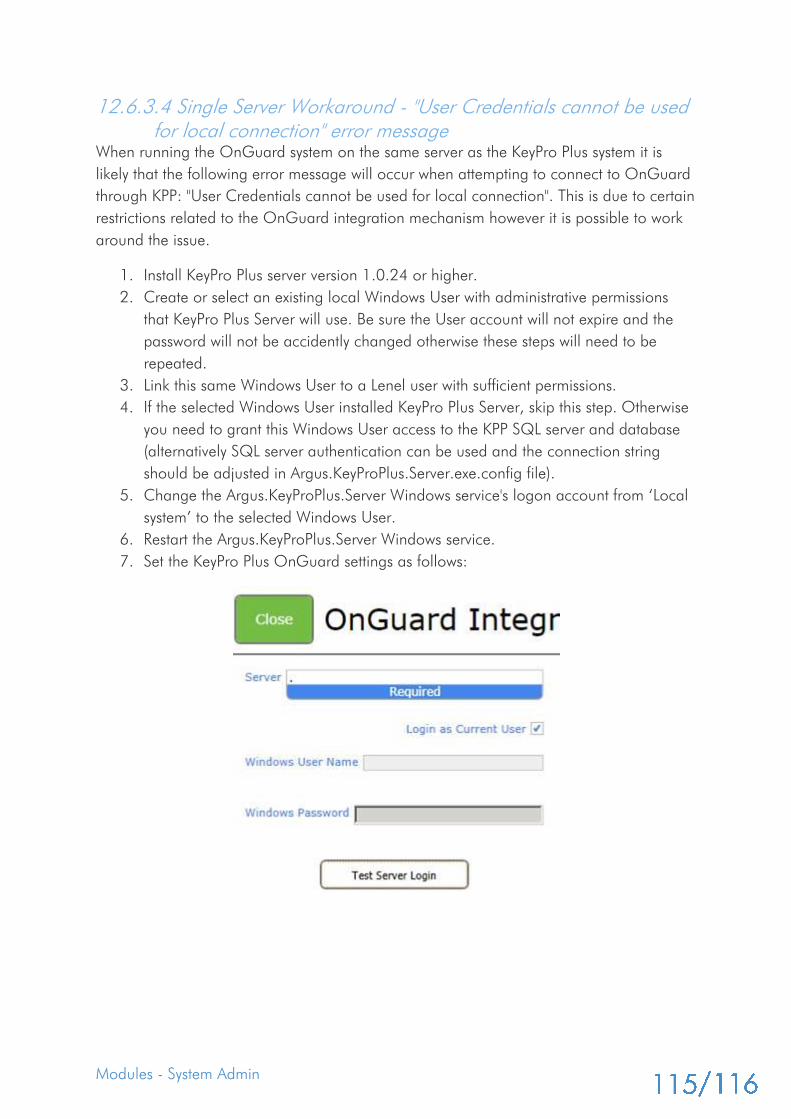
Modules - System Admin
12.6.3.4 Single Server Workaround - "User Credentials cannot be used
for local connection" error message
When running the OnGuard system on the same server as the KeyPro Plus system it is
likely that the following error message will occur when attempting to connect to OnGuard
through KPP: "User Credentials cannot be used for local connection". This is due to certain
restrictions related to the OnGuard integration mechanism however it is possible to work
around the issue.
1. Install KeyPro Plus server version 1.0.24 or higher.
2. Create or select an existing local Windows User with administrative permissions
that KeyPro Plus Server will use. Be sure the User account will not expire and the
password will not be accidently changed otherwise these steps will need to be
repeated.
3. Link this same Windows User to a Lenel user with sufficient permissions.
4. If the selected Windows User installed KeyPro Plus Server, skip this step. Otherwise
you need to grant this Windows User access to the KPP SQL server and database
(alternatively SQL server authentication can be used and the connection string
should be adjusted in Argus.KeyProPlus.Server.exe.config file).
5. Change the Argus.KeyProPlus.Server Windows service's logon account from ‘Local
system’ to the selected Windows User.
6. Restart the Argus.KeyProPlus.Server Windows service.
7. Set the KeyPro Plus OnGuard settings as follows:

Founded in 1997, Argus Global delivers enterprise level and bespoke business solutions that
incorporate biometrics.
Our aim is to deliver complete biometrically enabled solutions that empower our customers
and allow institutions to ascertain the ‘true identity’ of those they serve.
Our solutions are used worldwide to mitigate risk, increase security, improve business and
process efficiency, and manage information. They are currently deployed in areas as diverse
as correctional facilities, mining, hospitals, pharmacies, banking, airports, policing, and
military.
| Argus Global PTY LTD | 71 Epping Road, Maquarie Park NSW 2113 Australia | ABN 42 138 440 230 |
| T: +61 2 9963 7300 | F: +61 2 9963 7399 | www.argus-global.com | email: [email protected] |