design of a hybrid passive-active prosthesis for above-knee
TRANSCRIPT

Design of a Hybrid Passive-Active Prosthesis for Above-Knee Amputees
by
Bram G. A. Lambrecht
B.S. (Case Western Reserve University) 2004M.S. (Case Western Reserve University) 2005
A dissertation submitted in partial satisfaction of the
requirements for the degree of
Doctor of Philosophy
in
Engineering — Mechanical Engineering
in the
GRADUATE DIVISION
of the
UNIVERSITY OF CALIFORNIA, BERKELEY
Committee in charge:Professor H. Kazerooni, Chair
Professor Dennis K. LieuProfessor Carlo H. Sequin
Fall 2008

Design of a Hybrid Passive-Active Prosthesis for Above-Knee Amputees
Copyright 2008
by
Bram G. A. Lambrecht

1
Abstract
Design of a Hybrid Passive-Active Prosthesis for Above-Knee Amputees
by
Bram G. A. Lambrecht
Doctor of Philosophy in Engineering — Mechanical Engineering
University of California, Berkeley
Professor H. Kazerooni, Chair
Every year, tens of thousands of people in the United States alone require an above-knee
leg amputation. These amputees require a prosthetic leg to regain mobility and to im-
prove quality of life. Current prosthetic knees range from simple hinges to sophisticated
computer controlled hydraulic dampers. Despite the advances in technology, above-knee
amputees still show significant deficiencies in their walking patterns, walking speed, and en-
ergy consumption. Also, without a compact energy source and small, high power actuators,
current prostheses prohibit ascending stairs step over step, and provide no assistance when
standing up. Development in powered prosthetic knees has mostly focused on the control,
with little emphasis on creating an efficient, low energy consumption, untethered device.
This thesis presents the first energetically autonomous hydraulically powered pros-
thetic knee. The primary innovation of the knee is a hybrid design with two separate hy-
draulic modes of operation: an active mode driven by a pump, and a passive mode controlled

2
by a variable position valve. The electrohydraulic design combines the safety, comfort, and
versatility of a state of the art microprocessor controlled hydraulic knee with three new ben-
efits. First, by pumping fluid into the hydraulic cylinder, the necessary knee angle during
the swing phase of walking to clear obstacles in the path of the foot is achieved. Second,
adding power at the knee reduces hip torque required to swing the leg forward. Third, the
power added at the knee helps lift the amputee’s body weight, allowing the step over step
ascent of ramps and stairs. These benefits should reduce back and hip pain, and should
improve mobility to afford the amputee a healthier life.

i
Contents
List of Figures iii
List of Tables v
1 Introduction 11.1 Motivation . . . . . . . . . . . . . . . . . . . . . . . . . . . . . . . . . . . . 1
1.1.1 Amputation Statistics . . . . . . . . . . . . . . . . . . . . . . . . . . 11.1.2 Improving Amputee Quality of Life through Prosthetics . . . . . . . 2
1.2 Limitations of Current Prostheses . . . . . . . . . . . . . . . . . . . . . . . . 21.3 Major Contributions and Outline of the Thesis . . . . . . . . . . . . . . . . 3
2 Background 52.1 Biomechanics Vocabulary . . . . . . . . . . . . . . . . . . . . . . . . . . . . 52.2 A Normal Gait Cycle . . . . . . . . . . . . . . . . . . . . . . . . . . . . . . . 72.3 Energetically Passive Prosthetic Knees . . . . . . . . . . . . . . . . . . . . . 9
2.3.1 Single Axis Knees . . . . . . . . . . . . . . . . . . . . . . . . . . . . 112.3.2 Locking Knees . . . . . . . . . . . . . . . . . . . . . . . . . . . . . . 122.3.3 Stance Control Knees . . . . . . . . . . . . . . . . . . . . . . . . . . 122.3.4 Polycentric Knees . . . . . . . . . . . . . . . . . . . . . . . . . . . . 132.3.5 Pneumatic and Hydraulic Knees . . . . . . . . . . . . . . . . . . . . 132.3.6 Microprocessor Knees . . . . . . . . . . . . . . . . . . . . . . . . . . 14
2.4 Transfemoral Amputee Gait Deficiencies . . . . . . . . . . . . . . . . . . . . 172.5 Powered Prosthetic Knee Development . . . . . . . . . . . . . . . . . . . . . 192.6 A Novel Hybrid Approach . . . . . . . . . . . . . . . . . . . . . . . . . . . . 21
3 Developing a Hydraulic Circuit 223.1 Hybrid Knee Characteristics . . . . . . . . . . . . . . . . . . . . . . . . . . . 223.2 Circuit Elements . . . . . . . . . . . . . . . . . . . . . . . . . . . . . . . . . 243.3 Hydraulic Circuit Candidates . . . . . . . . . . . . . . . . . . . . . . . . . . 283.4 Hydraulic Actuator Options . . . . . . . . . . . . . . . . . . . . . . . . . . . 36
3.4.1 Single Acting Cylinder . . . . . . . . . . . . . . . . . . . . . . . . . . 363.4.2 Double Acting, Unequal Volume (single rod) Cylinder . . . . . . . . 37

ii
3.4.3 Double Acting, Equal Volume (double rod) Cylinder . . . . . . . . . 373.4.4 Double Acting Rotary Vane . . . . . . . . . . . . . . . . . . . . . . . 38
3.5 Completing the Hydraulic Circuit . . . . . . . . . . . . . . . . . . . . . . . . 38
4 Hydraulic Power Unit Implementation 404.1 Modeling Performance Requirements . . . . . . . . . . . . . . . . . . . . . . 414.2 Motor Selection . . . . . . . . . . . . . . . . . . . . . . . . . . . . . . . . . . 45
4.2.1 Defining a Performance Index . . . . . . . . . . . . . . . . . . . . . . 454.2.2 Heat Dissipation Analysis . . . . . . . . . . . . . . . . . . . . . . . . 47
4.3 Component Design . . . . . . . . . . . . . . . . . . . . . . . . . . . . . . . . 514.3.1 Control Valve . . . . . . . . . . . . . . . . . . . . . . . . . . . . . . . 514.3.2 Hydraulic Manifold . . . . . . . . . . . . . . . . . . . . . . . . . . . . 55
5 Sensing and Control 585.1 Control Strategy . . . . . . . . . . . . . . . . . . . . . . . . . . . . . . . . . 58
5.1.1 Control States . . . . . . . . . . . . . . . . . . . . . . . . . . . . . . 605.2 Sensor Requirements . . . . . . . . . . . . . . . . . . . . . . . . . . . . . . . 63
5.2.1 Knee Angle . . . . . . . . . . . . . . . . . . . . . . . . . . . . . . . . 635.2.2 Thigh Angle . . . . . . . . . . . . . . . . . . . . . . . . . . . . . . . 655.2.3 Knee Torque . . . . . . . . . . . . . . . . . . . . . . . . . . . . . . . 665.2.4 Foot Load . . . . . . . . . . . . . . . . . . . . . . . . . . . . . . . . . 67
5.3 Force Transducer Design . . . . . . . . . . . . . . . . . . . . . . . . . . . . . 715.3.1 Torsion Bar . . . . . . . . . . . . . . . . . . . . . . . . . . . . . . . . 725.3.2 Ovalizing Hole . . . . . . . . . . . . . . . . . . . . . . . . . . . . . . 735.3.3 Shear Web Beam . . . . . . . . . . . . . . . . . . . . . . . . . . . . . 74
6 Performance Evaluation 826.1 The Completed Hybrid Knee . . . . . . . . . . . . . . . . . . . . . . . . . . 826.2 Amputee Testing . . . . . . . . . . . . . . . . . . . . . . . . . . . . . . . . . 85
6.2.1 Otto Bock, U.S. . . . . . . . . . . . . . . . . . . . . . . . . . . . . . 866.2.2 Otto Bock, Germany . . . . . . . . . . . . . . . . . . . . . . . . . . . 876.2.3 Laboratory Treadmill Tests . . . . . . . . . . . . . . . . . . . . . . . 88
6.3 Testing Protocol Recommendations . . . . . . . . . . . . . . . . . . . . . . . 906.3.1 Measured Variables . . . . . . . . . . . . . . . . . . . . . . . . . . . . 916.3.2 Testing Procedures . . . . . . . . . . . . . . . . . . . . . . . . . . . . 92
7 Conclusion 947.1 Future Work . . . . . . . . . . . . . . . . . . . . . . . . . . . . . . . . . . . 96
Bibliography 99

iii
List of Figures
2.1 Sagittal, coronal, and transverse planes . . . . . . . . . . . . . . . . . . . . . 62.2 Directions of motion of the knee and hip joints . . . . . . . . . . . . . . . . 72.3 A single stride of the human gait cycle . . . . . . . . . . . . . . . . . . . . . 82.4 Components of an above-knee prosthesis . . . . . . . . . . . . . . . . . . . . 92.5 Knee angle, torque, and power for a normal stride . . . . . . . . . . . . . . 102.6 Five types of purely mechanical prosthetic knees . . . . . . . . . . . . . . . 122.7 Pneumatic schematic for the Endolite IP . . . . . . . . . . . . . . . . . . . . 142.8 Hydraulic and pneumatic schematic for the Endolite Adaptive . . . . . . . . 152.9 Hydraulic schematic for the Otto Bock C-Leg . . . . . . . . . . . . . . . . . 162.10 Abnormal hip abduction and pelvic obliquity in amputee gait . . . . . . . . 18
3.1 Hydraulic schematic for a passive knee . . . . . . . . . . . . . . . . . . . . . 263.2 Hydraulic schematic for an active knee . . . . . . . . . . . . . . . . . . . . . 263.3 Hydraulic schematic for a hybrid active/passive knee . . . . . . . . . . . . . 263.4 Candidate hydraulic schematics for the hybrid knee . . . . . . . . . . . . . . 273.5 Alternative hydraulic schematics for the hybrid knee . . . . . . . . . . . . . 323.6 Hydraulic schematics employing three-port controllable valves . . . . . . . . 333.7 Hydraulic schematics employing several multiple-port controllable valves . . 353.8 The implemented hydraulic circuit for the hybrid knee . . . . . . . . . . . . 39
4.1 Approximate knee angle, torque, and power for a prosthetic stride . . . . . 424.2 Geometry of the hydraulic actuator linkage . . . . . . . . . . . . . . . . . . 434.3 Pump motor performance capabilities . . . . . . . . . . . . . . . . . . . . . 464.4 Motor heat dissipation during stair climbing and level walking . . . . . . . . 494.5 Three-port controllable valve . . . . . . . . . . . . . . . . . . . . . . . . . . 534.6 Hydraulic manifold layout . . . . . . . . . . . . . . . . . . . . . . . . . . . . 564.7 Exploded hydraulic power unit . . . . . . . . . . . . . . . . . . . . . . . . . 57
5.1 Finite state machine . . . . . . . . . . . . . . . . . . . . . . . . . . . . . . . 595.2 Exploded view of the knee showing sensor locations . . . . . . . . . . . . . . 645.3 Pressure sensor locations . . . . . . . . . . . . . . . . . . . . . . . . . . . . . 665.4 Ground reaction forces for one stride . . . . . . . . . . . . . . . . . . . . . . 67

iv
5.5 Ground reaction forces in the sagittal plane . . . . . . . . . . . . . . . . . . 695.6 Foot load force transducer location . . . . . . . . . . . . . . . . . . . . . . . 705.7 Strain gage pattern for measuring shear strains . . . . . . . . . . . . . . . . 715.8 Torsion bar force transducer concept . . . . . . . . . . . . . . . . . . . . . . 735.9 Ovalizing hole force transducer concept . . . . . . . . . . . . . . . . . . . . 735.10 Shear web force transducer concept . . . . . . . . . . . . . . . . . . . . . . . 745.11 Shear web cross section dimensions . . . . . . . . . . . . . . . . . . . . . . . 755.12 I-beam loading in torsion and shear . . . . . . . . . . . . . . . . . . . . . . . 755.13 Force transducer gage placement . . . . . . . . . . . . . . . . . . . . . . . . 80
6.1 Cutaway view of the completed knee . . . . . . . . . . . . . . . . . . . . . . 836.2 Batteries and electronics fit under the knee cover . . . . . . . . . . . . . . . 846.3 Amputee walking with the hybrid knee . . . . . . . . . . . . . . . . . . . . . 89
7.1 Hydraulic circuit schematic with conservative element . . . . . . . . . . . . 967.2 Hydraulic circuit schematic with ankle . . . . . . . . . . . . . . . . . . . . . 97

v
List of Tables
4.1 Knee geometry parameters . . . . . . . . . . . . . . . . . . . . . . . . . . . 444.2 Motor temperature parameters . . . . . . . . . . . . . . . . . . . . . . . . . 48
5.1 Force transducer dimensions . . . . . . . . . . . . . . . . . . . . . . . . . . . 785.2 Strain gage measurement isolation . . . . . . . . . . . . . . . . . . . . . . . 79

vi
Acknowledgments
First of all, I would like to thank Professor Kazerooni for recruiting me to the University
of California, Berkeley for my graduate education, and particularly for inviting me to join
the Human Engineering Laboratory. The lab has always been populated with an incredibly
talented group of staff and students working collaboratively on groundbreaking technology.
I believe you would be hard pressed to find a university laboratory anywhere else with the
same resources, wisdom, innovation, and hands-on experience.
The hybrid knee described in this thesis would not have been possible without the
help of several members of the lab. Dylan Fairbanks designed the electronics. Matthew
Rosa wrote the control and spent countless hours debugging both hardware and software
issues. Minerva Pillai prepared many drawings for manufacturing, and was indispensable
in assembling the force transducer and several other components. Thanks to all those who
paved the way through previous projects and prototypes, including, but not limited to
Adam Zoss, Sebastian Kruse, and Miclas Schwartz.
Thanks to Professor Lieu and Professor Sequin for taking the time out of their
schedules to serve on my dissertation committee.
And of course I am grateful for the support from my parents and for their friendly
ribbing about my procrastination.
1
Chapter 1
Introduction
1.1 Motivation
1.1.1 Amputation Statistics
Today, there are approximately 1.7 million people living with an amputated limb in
the United States, with 185,000 new amputations per year. Currently, 54% of amputees lost
a limb due to complications of the vascular system. About 70% of those dysvascular ampu-
tations result from diabetes. Dysvascular amputations are expected to increase to 63% of all
amputations by 2050, contributing to an expected 3.6 million living amputees by that year.
About 1% of amputations are due to cancer, while the remainder are due to trauma. [43]
From 1988–1996, 97% of dysvascular amputations were on the lower limb. Transfemoral,
i.e., above-knee, surgeries contributed to 22.4% of all amputations, over 30,000 per year. [14]
Although most amputations are caused by dysvascular conditions, traumatic am-
putees without preexisting comorbidities may show the greatest potential for returning to

2
pre-amputation quality of life. There is no shortage of traumatic amputees, especially in
conflict zones. Bulletproof vests may save lives, but they leave soldiers’ limbs vulnerable to
improvised explosive devices. Although the Iraq war has seen the lowest rate of mortality
of U.S. troops of any war in U.S. history, the rate of limb amputations is twice the rate of
past wars [27]. Operation Iraqi Freedom and Operation Enduring Freedom have left 30,568
injured veterans, 877 of whom lost a major limb [15].
1.1.2 Improving Amputee Quality of Life through Prosthetics
The desire of amputees to return to healthy locomotion has created a diverse
market of prosthetic components [12]. For a transfemoral amputee, a complete prosthesis
comprises a socket custom fit to the residual limb, a prosthetic knee unit, a shank link
connecting the knee to a prosthetic ankle, and a prosthetic foot.
Daily prosthesis usage time is important to satisfaction and quality of life [10].
A healthy amount of exercise reduces the risk of adverse effects due to prolonged immo-
bilization, such as contractures, pressure ulcers, and damage to nerves and blood vessels.
The Veteran’s Administration recommends improving mobility and ambulation, including
increased walking distance, more hours wearing the prosthesis, and regaining the ability to
ascend and descend stairs [4].
1.2 Limitations of Current Prostheses
The technology of prosthetic ankles and energy storing feet has progressed to
the point where track and field’s world governing body almost banned an amputee from

3
running in the summer Olympic games [32]. However, transfemoral amputees have yet to
reap such benefits. Without a biological knee, they walk slower and consume more energy
than non-amputees [37].
While current prosthetic knee technology allows amputees to avoid the pitfalls of
wheelchair use, it does not return full mobility. Without a compact energy source and
small, high power actuators, prosthetic knees prohibit ascending stairs step over step, and
provide no assistance when standing up. Development in powered prosthetic knees has
mostly focused on the control, with little emphasis on creating an efficient, low energy
consumption, untethered device.
1.3 Major Contributions and Outline of the Thesis
The thesis presents the development of technology which enables the construction
of a hybrid passive/active prosthetic knee. This electrohydraulic design combines the safety,
comfort, and versatility of a state of the art microprocessor controlled hydraulic knee with
three new benefits. First, by pumping fluid into the hydraulic cylinder, the necessary
knee angle during the swing phase of walking to clear obstacles in the path of the foot is
achieved. Second, adding power at the knee reduces hip torque required to swing the leg
forward. Third, the power added at the knee helps lift the amputee’s body weight, allowing
the step over step ascent of ramps and stairs. These benefits should reduce back and hip
pain, and should improve mobility to afford the amputee a healthier life. The primary
unique innovation of the hybrid knee is the combination of two separate hydraulic modes of

4
operation: an active mode driven by a pump, and a passive mode controlled by a variable
position valve.
Chapter 1 introduces the motivation for the development of the hybrid passive/active
prosthetic knee.
Chapter 2 describes the biomechanics of human walking, the strategies employed by ex-
isting prosthetic solutions to mimic the lost biological function, and the limitations of
existing technology.
Chapter 3 suggests many novel embodiments for the hydraulic circuit of a knee with both
passive and active modes of operation.
Chapter 4 describes the modeling of the knee performance requirements in the pursuit of
a suitable drive motor. The motor couples to a compact hydraulic manifold with an
integrated actuator and unique control valve to realize the selected hydraulic circuit.
Chapter 5 briefly presents the control strategy and enumerates the sensory information
required to implement the control. One of these sensors is a novel force transducer
that isolates and measures a shear force and torsional moment.
Chapter 6 explains how the completed prosthesis has been successfully tested and pro-
poses protocols for more extensive evaluation.
Chapter 7 summarizes the contributions of the thesis and discusses opportunities for fu-
ture work.

5
Chapter 2
Background
The objective of a prosthesis is to replace the function of the lost limb. As legs are
primarily used for locomotion, the design process of a prosthetic knee requires a complete
understanding of the human biomechanics of walking. Fortunately, the specific motions of
the limbs have been widely collected for a variety of common tasks, including walking and
ascent and descent of ramps and stairs. Typical clinical gait analysis (CGA) involves video
examination of markers on the body to yield joint angles. This kinematic data is combined
with force plates or accelerometer measurements in a model of the limbs to estimate joint
torques.
2.1 Biomechanics Vocabulary
We define the movement of the limbs during walking relative to three reference
planes (Fig. 2.1). The legs swing primarily in the sagittal plane, parallel to the direction of
walking. The coronal plane lies perpendicular to the direction of walking, and the transverse

6
Figure 2.1: Human body motions aredefined in reference to three refer-ence planes: sagittal, coronal, andtransverse.
plane lies parallel to the ground. The knee moves in flexion and extension directions within
the sagittal plane. When the knee is fully extended, the leg is straight and the angle between
shank and thigh is zero. As the knee flexes, the angle between the thigh and shank increases,
shortening the overall length of the leg. While standing straight, the angle between hip and
vertical is zero. As the hip extends the leg behind the body, the angle increases. The hip
flexes to swing the leg forward with decreasing hip angle. The hip joint also moves in the
coronal plane. It abducts away from the body and adducts towards the contralateral leg.
(Fig. 2.2)
Walking is a cyclic motion where each stride is nearly indistinguishable from the
last. In this discussion, the stride cycle begins and ends with the heel strike of the right
leg. The motion of each leg may be split into two broad phases: a stance phase while the
foot of the leg is on the ground and supporting the weight of the body, and a swing phase
while the foot is in the air.

7
Figure 2.2: Directions of motion of the knee and hip in the sagittal plane (flexion andextension) and hip (abduction and adduction) and pelvis (obliquity) in the coronalplane . Adapted from [25].
2.2 A Normal Gait Cycle
Fig. 2.3 illustrates a single stride of the gait cycle. The stride begins with the heel
strike of the right leg, initiating right leg stance. During the first 12% of the stride, the
weight of the body transfers from the left leg to the right leg as the right hip extends until
the left toe leaves the ground. The right leg vaults the center of mass of the body over
the stance foot. Halfway through the stride cycle, the left heel strikes the ground. During
double support, the body weight is transferred from the right leg to the left leg. At 62% of
the stride, the right foot leaves the ground and the right hip flexes to swing the right leg
forward for the remainder of the stride. As walking speed increases, the percentage of the
stride cycle spent in double support decreases.
The simplest model of walking comprises two straight legs moving in the sagittal
plane only. This leads the center of mass of the body to move in an arc, highest during the

8
Figure 2.3: A single stride of the human walking cycle, beginning and ending withheel strike. Adapted from [39].
mid stance when the leg is vertical, and lowest at heel strike and toe off. During healthy
walking, the human body employs several mechanisms to minimize the height of that arc,
and hence the change in potential energy. First, the pelvis rotates in the transverse plane
to reduce the extension and flexion angles of the hip for the same stride length. Second,
the pelvis rotates in the coronal plane (Fig. 2.2), leaning downward on the swing leg side
to lower the center of mass of the body during mid stance. This negative pelvic obliquity
requires the knee to flex so that the foot of the swing leg does not hit the ground as it swings
forward. Third, the knee of the stance leg flexes slightly during mid stance to further lower
the center of mass of the body. The ankle also moves in the sagittal plane to increase the
effective length of the leg at early and late stance, and to reduce the effective length of the
leg during swing for better ground clearance. All of these motions work in concert to flatten
the arc of the center of mass of the body during each stride.

9
Figure 2.4: A complete prosthetic legfor a transfemoral amputee comprisesa thigh socket, knee joint, ankle, andfoot. A cosmetic cover is often fittedover the prosthesis to mimic the shapeand color of a biological leg.
2.3 Energetically Passive Prosthetic Knees
Accident, disease, or trauma may require the surgical removal of the foot, ankle,
shank, knee, and part of the thigh. After rehabilitation, a transfemoral amputee has some
control over the residual limb. To improve the quality of life to the amputee, a prosthetic
leg must be fitted, comprising a custom fitted socket to the residual thigh, a knee joint, an
ankle, a foot, and connecting components (Fig. 2.4). A successful prosthetic knee should
mimic the behavior of the biological knee.
Fig. 2.5 shows the knee angle, torque, and power during one stride of normal
level walking for a typical able-bodied subject [23]. As discussed in section 2.2, the initial
flexion and extension of the knee keeps the center of mass of the body relatively level
vertically over the stance leg. During the stance phase before toe-off, relatively low power
is required because the knee angle changes slowly. The flexion and extension that follows

10
cycle (%)
0 20 40 60 80 1000
10
20
30
40
50
60
0 20 40 60 80 100-20
-10
0
10
20
30
40
0 20 40 60 80 100-100
-50
0
50
100
Powe
r (W
)Fl
exio
n To
rque
(N
·m
)K
nee
Ang
le (
°)
cycle (%)
cycle (%)
FLEX EXTEND FLEX EXTEND
TOE OFF
TOE OFF
TOE OFF
POSITIVE KNEE WORKNEGATIVE KNEE WORK
stance swing
Figure 2.5: Knee angle, torque, andpower during one cycle of level walk-ing for a typical normal subject [23].Net power during swing phase is neg-ative, so energetically passive prosthe-ses dominate the market. However,as shown in the shaded areas, positivework is required to initiate flexion dur-ing terminal stance and to initiate ex-tension during swing for a completelynatural gait.

11
toe-off provides for ground clearance of the swing foot. During the swing phase, the knee
is predominately energetically dissipative; the average power is negative [39].
Because the knee primarily acts as a spring or damper during level ground walking,
energetically passive devices historically dominate the design of above-knee prostheses. such
a prosthetic knee must provide high stiffness to prevent rotation during stance to the support
the body weight of the subject. At toe off, this stiffness must be reduced to allow the leg
to swing smoothly forward in preparation for the next heel strike.
Commercially available prosthetic knees range from simple purely mechanical de-
vices to sophisticated microprocessor controlled systems. Typically, mechanical knees trade
increased mobility for decreased stability. It is up to the prosthetist to find a suitable
balance for the individual amputee’s muscular coordination. [9] Fig. 2.6 conceptually illus-
trates several approaches to a purely mechanical prosthetic knee. Further discussion of the
different types of knee prostheses may be found in [1, 2].
2.3.1 Single Axis Knees
The most basic prosthetic knee comprises a single pivot between the thigh socket
and shank. Typically, the pivot will be located posterior of the load path through the leg
during stance. Thus, as long as the leg is straight at heel strike, the knee will not buckle
during stance. The amputee may need to exert more hip extension torque to keep the knee
over center during mid to late stance.

12
Figure 2.6: Purely mechanical prosthetic knees may include characteristics from oneor more of the illustrated types of knees: single axis knees bend freely, locking kneesare kept straight during walking, stance control knees self-lock at any angle whenloaded, polycentric knees implement a moving center of rotation, and pneumatic orhydraulic knees adjust swing and stance flexion rates.
2.3.2 Locking Knees
A locking knee is kept straight during walking, and usually incorporates a lever
or cable release to allow the knee to bend for sitting. Locking knees are fitted when the
amputee lacks the hip control required to stabilize a bending knee. [3] The locking knee
leads to an inefficient stiff legged gait, no better than a pegleg. However, there is no chance
of the knee buckling and causing the amputee to fall.
2.3.3 Stance Control Knees
Stance control knees are single axis knees which self-lock by means of a friction
brake. When properly loaded with the amputee’s body weight during stance, the friction
brake engages, preventing the knee from buckling. When the load is removed, the brake
disengages, and the shank swings freely. Although the knee improves safety compared to a

13
single axis knee by locking at a range of angles, it does not allow knee flexion in terminal
stance to initiate swing until the knee is fully unloaded.
2.3.4 Polycentric Knees
Polycentric knees incorporate a four bar mechanism moving in the sagittal plane
to realize a moving center of rotation. Thus, near the straight position of the knee, the
effective pivot lies well posterior of the load path for safe early stance loading. During
terminal stance, the polycentric knee buckles easily to initiate swing. However, a simple
polycentric knee with no weight activated brake may still buckle if the leg is loaded with a
bent knee.
2.3.5 Pneumatic and Hydraulic Knees
Single axis knees, stance control knees, and polycentric knees allow the shank to
swing freely regardless of walking speed or stride length. If the amputee walks faster, the
knee joint may flex too far, or crash uncomfortably into the hard stops during extension.
Many prosthetic knee designs incorporate a pneumatic or hydraulic cylinder in a single axis
or polycentric knee design. Typically, such a cylinder contains valves which restrict the fluid
flow between the two sides of the cylinder. These valves are adjustable, allowing the pros-
thetist or amputee to adjust the free swing flexion and extension impedances individually
for comfortable walking at the preferred speed.
Some pneumatic and hydraulic knees, also incorporate a weight-activated valve
to create high impedance during stance. The Otto Bock 3R80 Mechanical Knee Joint [36]
comprises a hydraulic chamber partitioned by a rotary vane. Fluid passages connect the

14
stepper controlledpneumatic valve
Figure 2.7: The Endolite IP incorpo-rates pneumatic swing phase controlby means of a stepper controlled nee-dle valve [41].
two sides of the chamber. A spring loaded plunger interrupts the passage through which
fluid flows during flexion. When the leg is loaded, the plunger restricts flow to prevent knee
buckling during stance. As the leg is unloaded, the plunger retracts to allow terminal stance
flexion to initiate the swing phase.
2.3.6 Microprocessor Knees
Even sophisticated mechanically actuated hydraulic knees like the 3R80 cannot
adapt to the full range of walking speeds. Walking quickly with small steps, such as while
pushing a shopping cart, requires different flexion and extension impedances than walking
at the same speed with longer steps. Other activities, such as walking down stairs or ramps
are particularly difficult. During stair descent, the knee must buckle during stance in a safe,
predictable manner, but stance controlled knees do not allow any flexion during stance.
The state of the art commercially available prosthetic knees interpret angle and
load sensors with an on board microprocessor to adapt dynamically to changing gait. A
servo controlled valve adjusts flexion and extension impedance. Some microprocessor con-
trolled knees adjust only swing phase impedance, while others modulate both stance and
swing.

15
Figure 2.8: The Endolite Adaptivecontrols stance phase and late swingphase hydraulically while the pistonengages the narrow portion of thecylinder, and controls early and midswing pneumatically like the EndoliteIP [42].
Endolite IP
The Endolite Intelligent Prosthesis (IP) combines weight activated stance control
with pneumatically controlled swing phase impedance. A stepper motor adjusts a needle
valve connected to the pneumatic cylinder to adjust fluid damping and spring rate.[41] The
pneumatic circuit is illustrated in Fig. 2.7. A hand held remote control selects between slow,
normal, and fast walking speeds. Sensors monitor the amputee’s walking speed and cadence
to adjust between five different levels of damping in the pneumatic cylinder to transition
smoothly between the selected walking speeds. [9]
Endolite Adaptive
The Endolite Adaptive knee [42] improves on the IP by controlling stance impedance
as well as swing. As illustrated in Fig. 2.8, it comprises hydraulic and pneumatic cylinders
which share a common rod. The hydraulic cylinder increases diameter when the knee flexes
past 30°, allowing fluid to flow freely around the cylinder. Thus, the hydraulic cylinder
dominates the behavior of the knee during stance. A servo controlled valve in the flexion
path of the hydraulic cylinder modulates the flexion resistance during terminal stance, and

16
servo controlledhydraulic valve
Figure 2.9: A single servo controlledvalve adjusts hydraulic impedance inboth flexion and extension directionsin the Otto Bock C-Leg [21]. This hy-draulic schematic is realized inside thepiston of the C-Leg.
a solenoid valve locks the knee at heel strike. The extension path of the hydraulic cylinder
has a fixed small impedance to slow the leg in terminal swing. The pneumatic cylinder
dominates swing phase impedance. Like the IP, a stepper motor controlled needle valve
adjusts the spring rate of the pneumatic cylinder.
The Adaptive knee ascertains the amputee gait by measuring the piston position
inside the hydraulic cylinder to determine knee angle and by measuring stance load through
a force sensing resistor in the knee joint. Only the heel strike solenoid needs to move at
every step. The servo valves only need to adjust stance and swing impedance when the gait
changes.
Otto Bock C-Leg
The Otto Bock C-Leg employs a hydraulic cylinder with a single servo controlled
valve that adjusts both flexion and extension resistances dynamically during each stride
(Fig. 2.9). Different valve positions allow both passages to be completely blocked, flexion
blocked with adjustable extension impedance, flexion impeded with free extension, free
flexion and extension, free flexion with impeded extension, or impeded flexion with blocked
extension. Thus, the valve can adjust for the desired impedance for heel strike, stance

17
flexion, swing flexion, and swing extension at different speeds and for different activities.
The C-Leg interprets sensor inputs from a knee angle sensor and a multi-axis load sensor
near the ankle in the shank. [21]
Ossur RheoKnee
Like the C-Leg, Ossur’s RheoKnee [19] continually monitors knee angle and load
sensors to determine the amputee gait. However, it uses neither pneumatic nor traditional
hydraulic cylinders to create stance and swing impedance. Instead, several plates rotate
with the knee joint through a magnetorheological fluid. When the fluid is subjected to
a magnetic field, micrometer sized magnetic particles suspended in the fluid form chains
which restrict the movement of the fluid. By controlling the magnetic field, and hence the
apparent viscosity of the fluid, the desired impedance is achieved. Unlike the C-Leg, the
RheoKnee contains all of the load sensors inside the knee unit, reducing the possibility of
erroneous signals due to misalignment of the shank pylon.
2.4 Transfemoral Amputee Gait Deficiencies
Analysis of the gait of transfemoral amputees with currently available knee pros-
theses shows several deficiencies, including:
• asymmetry between the motions of the prosthetic leg and intact leg,
• reduced walking speed,
• increased energy expenditure,

18
Figure 2.10: Graphs illustrating amputee hip motion on the prosthetic side duringone stride. Compared to a normal gait, the amputee shows more hip abductionfor a wider stance, and positive instead of negative pelvic obliquity during swing,indicating hip-hike. Adapted from [34].
• and increased motion of the hips and body center of mass.
Transfemoral amputee gait is asymmetric. Amputees tend to walk with a reduced stance
time on the prosthetic leg compared to the intact leg, and with an increased stride length
on the prosthetic leg, possibly to ensure that the knee will load properly to engage stance
control at heel strike [13]. Transfemoral amputees walk 35% to 55% slower than normal
subjects, and 20% to 26% slower than transtibial amputees, while consuming greater energy
per step [37]. The increased energy expenditure is correlated to an increase in motion of the
center of mass of the body [13]. Several factors contribute to the excessive motion of the
body center of mass. First, hip muscle activity as measured by electromyography (EMG)
is greater than normal subjects [5]. The hips also show abnormal movement (Fig. 2.10).
Instead of negative pelvic obliquity towards the swing leg, amputee gait shows positive
obliquity, indicating hip-hiking as an attempt to improve foot clearance during swing [34].

19
In the coronal plane, hip abduction is increased on the amputated side [34], possibly because
of the reduced mass of the prosthetic limb compared to a biological leg.
Research shows that microprocessor knees improve gait. Sensor input means that
terminal stance can be identified early, so swing phase flexion can be initiated more easily
[33]. Adapting flexion and extension impedance to increase swing phase speed improves
walking symmetry, walking speed, and comfort [7]. However, even though they improve
walking confidence, microprocessor knees like the C-Leg provide no energetic advantage over
completely passive prostheses [26]. Despite the sophistication of current knee prostheses,
the currently available technology does not leave the amputee with a healthy normal gait.
2.5 Powered Prosthetic Knee Development
Without the ability to inject power into the knee, an energetically passive device
cannot restore the full functionality of a biological knee for ascending inclines and stairs.
Passive devices must rely on hip motions and ground reaction forces to create flexion in the
knee during toe off to avoid foot contact during swing. Adding power to the system opens
up the possibility to improve gait symmetry, eliminate unwanted hip motions, and reduce
overall energy expenditure.
Although much work has been done on powered upper extremity prostheses [9],
the higher power and energy requirements of ambulation have limited commercial knee
prosthetics almost exclusively to energetically passive devices. Research on powered knee
prosthetics began in 1973, when Flowers suggested a knee mechanism tethered to a hydraulic
power supply [16]. Using Flowers’ test platform, Grimes et al. developed a controller which

20
recorded the behavior of the intact leg on the previous step and played back that behavior
on the prosthetic limb [18]. Popovic et al. developed control strategies similar to echo
control [28, 29].
More recently, Sup et al. developed a tethered knee powered by a pneumatic
cylinder [35], while Klute et al. designed a tethered knee powered by pneumatic McKibben
artificial muscles [24].
Kapti et al. experimented with trajectory control, matching knee motion to a
pattern library of desired lower limb activities [22]. Borjian extended control based on
EMG signals, first developed for an energetically passive prosthesis by Horn in 1972 [20],
to a powered knee design [8]. Both knee designs incorporate an electric motor tethered to
a power supply which rotates a ball screw to flex or extend the shank.
The only untethered powered knee prosthesis is the Victhom Power Knee, sold by
Ossur. The Power Knee uses a ball screw mechanism to drive the knee in a preprogrammed
trajectory [6]. The knee consumes power during both stance and swing. As the Power
Knee is relatively new, no studies have yet shown any improvement in energy expenditure
over successful microprocessor knees. Like Flowers’ and Grimes’ early work, the Power
Knee takes cues from sensors on the intact limb to determine the desired activity of the
prosthetic leg, so it is limited to single amputees. Other factors have limited the commercial
success of the Power Knee: it is several times more expensive than the C-Leg; the ball screw
mechanism is loud enough to draw attention; the battery life is short enough that patients
typically turn the power functions off at every available opportunity; and it is so large that

21
only men in the top 50th percentile in height can wear the device [40]. The length also
limits the choice of ankles and feet available to the patient.
2.6 A Novel Hybrid Approach
The hybrid active/passive prosthetic knee described in this thesis addresses the
observed deficiencies in transfemoral amputee gait by employing a powered swing phase and
passive stance phase during level ground walking. The hybrid knee expands on the proven
success of hydraulic microprocessor knees like the C-Leg. By powering the swing phase of
walking, the knee can initiate flexion earlier and increase swing speeds to match the intact
limb. Instead of relying exclusively on passive impedance or fully powered movement, the
hybrid design takes advantage of the benefits offered by both types of knees.
The inertia of the heavier shank propelled by the powered knee should reduce hip
flexion and extension moments. By matching the weight of a biological leg. the additional
weight of a powered prosthetic knee improves mass symmetry, which could reduce hip
abduction to normal levels and improve pelvic obliquity. Even without injected power,
amputees minimize adverse effects of added prosthetic mass on the mechanical work of
walking by conserving the work needed to propel the heavier limb [17].
Through a clever design combining a hydraulic pump and variable position valve,
we can create a compact, low power system while providing the benefits of an active device:
sufficient heel rise to reduce hip hike, reduced hip torque, and occasional stair climbing
assist.
22
Chapter 3
Developing a Hydraulic Circuit
The hybrid active/passive knee combines the natural gait and enhanced mobility
achieved through powered knee movements with the proven safety, reliability, and energetic
efficiency of a hydraulically damped device. To realize such a knee, we invent several differ-
ent candidate hydraulic circuit schematics (〈1〉–〈18〉 in Fig. 3.3–3.7). Section 3.1 describes
the required characteristics of a candidate circuit, section 3.2 lists the component elements
of such a circuit, and section 3.3 introduces and compares the performance of each of the
different designs. Section 3.4 explains why all of the circuit candidates use a double act-
ing, double rod cylinder, and section 3.5 explains why candidate 〈13〉 was selected for the
physical implementation.
3.1 Hybrid Knee Characteristics
The hydraulic schematic design of the knee must provide fluid paths for:
• powered flexion

23
• powered extension
while maintaining:
• controlled flexion damping
• free extension
Powered flexion
To facilitate a natural gait, the hybrid knee powers flexion at toe off of the pros-
thetic limb. This creates the necessary heel rise so that the toe may clear the ground
effectively during the forward swing. This heel rise is especially important for walking up
inclines or stairs where there is an increased possibility of the toe catching or dragging on the
ground. Creating the heel rise through powered flexion eliminates the cause of “hip-hike”
during normal walking.
Powered extension
With the large knee angles created by powered flexion, it becomes necessary to
power extension during swing so that the knee may return to the straight position in time
for the next step cycle. Powering the knee extension reduces the hip power required to
swing the leg. This should reduce overall energy expenditure of the patient. Furthermore,
including fluid paths for powered extension provides the opportunity to power extension
during stance for assistance climbing inclines and stairs or rising from a seated position.
24
Flexion damping
To reduce the power requirements of the hybrid knee, the active mode of operation
is not used during normal flat ground stance. Instead, a computer controlled valve creates a
locked knee to absorb the impact forces at each heel strike and then relieves pressure slowly
to allow the knee to give slightly during mid- and late stance.
Free extension
If the knee is to have a completely passive mode of operation, when, for example,
remaining battery is limited, then it must provide a means to extend the knee with limited
resistance. In the passive mode of operation, the patient provides the means for extending
the knee through hip torque, as in a traditional passive knee. To keep the required hip
torques low, the knee must swing easily in the extension direction.
3.2 Circuit Elements
A candidate hydraulic circuit for the hybrid knee may comprise one or more of the
following hydraulic elements:
• A hydraulic pump driven by an electric motor
• A computer controlled variable resistance valve
• A one-way (check) valve
• A fixed or manually adjustable restrictor valve
Ideally, these elements have the following impedance characteristics.

25
Hydraulic pump
In passive operation, the pump has a greater-than-zero impedance in both direc-
tions. In a gear pump, the impedance will depend on the rotary inertia of the pump gears,
the motor rotor, and the transmission between the pump and motor, if any. In active op-
eration, the pump can provide a certain flow and pressure in either direction depending on
the motor specifications and battery power available.
Controllable valve
The valve may be a servo controlled valve whose impedance ranges between zero
(fully open) and infinity (fully closed) in both directions. If no intermediate impedances
are needed, a solenoid valve may also be used.
Check valve
A check valve provides zero impedance in one direction, and infinite impedance in
the other direction. In other words, it allows fluid flow in only one direction.
Restrictor valve
The restrictor valve provides a fixed impedance. It can be implemented as a
needle valve or some other design with a variable orifice. This may be adjusted differently
for different patients, but in general does not change during operation.

26
Figure 3.1: A simple embodiment of apassive hydraulic knee connects a micro-processor controlled valve to the actua-tor to adjust impedance during stance andswing.
Figure 3.2: The simplest embodimentof an active hydraulic knee connects thepump directly to the actuator.
〈1〉
Figure 3.3: Placing a controllable valvein series with the pump enables passiveimpedance control while retaining activemodes of operation.

27
〈2〉 〈3〉
〈4〉 〈5〉
〈6〉
Figure 3.4: These candidate hydraulicschematics for the hybrid knee allow bothactive and passive modes of operation.The first controllable valve is installed inseries with the hydraulic pump, but inparallel with the fluid path used duringpassive operation.

28
3.3 Hydraulic Circuit Candidates
The simplest schematic for an active knee with an equal volume double-acting
actuator (such as a double-end cylinder or a rotary vane actuator) connects each end of the
actuator to each end of the pump (Fig. 3.2). While this circuit can provide powered flexion
and extension, it prohibits controlled flexion damping without driving the pump. Although
the motor may be able to provide some resistance, it is unlikely to be able to provide a
high enough impedance quickly enough to safely transition between knee extension and heel
strike. Inserting a controllable valve placed in series with the pump (Fig. 3.3) allows the
knee to be locked for heel strike, combining the functionality of a passive system (Fig. 3.1)
with an active system (Fig. 3.2). In this case, the total knee impedance during passive
operation in either the flexion or extension direction is:
Ztotal = Zpump + Zvalve
0 ≤ Zvalve <∞, so
Zpump ≤ Ztotal <∞
(3.1)
The total impedance is limited at the lower end to be greater than or equal to the pump
impedance. This prohibits free extension. Thus, a candidate circuit meeting all of the
requirements of the hybrid knee must contain a fluid path parallel to the pump.
To include a fluid path parallel to the pump, a second controllable valve must be
added to the circuit (Fig. 3.4〈2〉). This second valve must be closed during active modes
of operation to ensure that fluid pushed by the pump enters the actuator instead of simply
circulating through the parallel path. In this schematic, the total knee impedance during

29
passive operation in either the flexion or extension direction is:
Ztotal =
(1
Zpump + Zvalvefirst
+1
Zvalvesecond
)−1
0 ≤ Zvalvefirst <∞ and 0 ≤ Zvalvesecond <∞, so
0 ≤ Ztotal <∞
(3.2)
Thus, free extension and controlled flexion are both attainable.
Adding elements to the basic schematic with a parallel path opens up control
possibilities. In the basic circuit, the second valve must remain closed while the pump is
operating, so there is no way to extend the leg faster than the pump can push, or to let
the leg extend ballistically without moving the valve. Adding a check valve in series with
the second valve (Fig. 3.4〈3〉) introduces that possibility. Now, in extension during passive
operation:
Ztotalextension =
(1
Zpump + Zvalvefirst
+1
Zvalvesecond
)−1
(3.3a)
and in flexion during passive operation:
Ztotalflexion = Zvalvefirst + Zpump (3.3b)
so free extension and controlled flexion remain. Furthermore, the second valve may remain
open during powered extension. This allows the hybrid knee to be used in active and passive
modes of operation during one extension of the knee without any additional power being
used to move valves. In this scenario, the pump provides power to initiate extension. The
pump may then turn off while fluid continues to flow through the check valve and second
controllable valve until extension is complete.
By introducing a check valve, the previous schematic also limits the minimum
flexion impedance during passive operation to Zpump. If Zpump is large, then it becomes

30
desirable to add another parallel fluid path with a third controllable valve (Fig. 3.4〈4〉).
Now, in passive operation:
Ztotalextension =
(1
Zpump + Zvalvefirst
+1
Zvalvesecond
+1
Zvalvethird
)−1
(3.4a)
Ztotalflexion =
(1
Zpump + Zvalvefirst
+1
Zvalvethird
)−1
(3.4b)
Or, if a second check valve is included (Fig. 3.4〈5〉):
Ztotalextension =
(1
Zpump + Zvalvefirst
+1
Zvalvesecond
)−1
(3.5a)
Ztotalflexion =
(1
Zpump + Zvalvefirst
+1
Zvalvethird
)−1
(3.5b)
Both these circuits provide independent control of flexion and extension impedance during
passive operation. Adding the second check valve additionally allows ballistic flexion after
initial flexion pumping without an interceding valve move.
Alternatively, if flexion and extension impedances remain relatively constant through-
out different modes of operation of the knee, the two check valve circuit may be implemented
with fixed restrictor valves and only two controllable valves (Fig. 3.4〈6〉). In passive opera-
tion,
Ztotalextension =
(1
Zpump + Zvalvefirst
+1
Zvalvesecond + Zrestrictorfirst
)−1
(3.6a)
Ztotalflexion =
(1
Zpump + Zvalvefirst
+1
Zvalvesecond + Zrestrictorsecond
)−1
(3.6b)
so,(1
Zpump+
1Zrestrictorfirst
)−1
≤ Ztotalextension <∞(1
Zpump+
1Zrestrictorsecond
)−1
≤ Ztotalflexion <∞

31
In all of the circuits with a parallel path to the pump, the first controllable valve
is shown in parallel with the parallel path. Alternatively, it may be installed in series with
the passive control passages and the pump (Fig. 3.5〈7〉). In the simplest case, the new total
impedance is:
Ztotal = Zvalvefirst +(
1Zpump
+1
Zvalvesecond
)−1
0 ≤ Zvalvefirst <∞ and 0 ≤ Zvalvesecond <∞, so
0 ≤ Ztotal <∞
(3.7)
The range of achievable impedances remains the same. For the case with one check valve
(Fig. 3.5〈8〉):
Ztotalextension = Zvalvefirst +(
1Zpump
+1
Zvalvesecond
)−1
(3.8a)
Ztotalflexion = Zvalvefirst + Zpump (3.8b)
With a third controllable valve (Fig. 3.5〈9〉):
Ztotalextension = Zvalvefirst +(
1Zpump
+1
Zvalvesecond
+1
Zvalvethird
)−1
(3.9a)
Ztotalflexion = Zvalvefirst +(
1Zpump
+1
Zvalvethird
)−1
(3.9b)
With a third controllable valve and second check valve (Fig. 3.5〈10〉):
Ztotalextension = Zvalvefirst +(
1Zpump
+1
Zvalvesecond
)−1
(3.10a)
Ztotalflexion = Zvalvefirst +(
1Zpump
+1
Zvalvethird
)−1
(3.10b)
And with two controllable valves and two restrictor valves (Fig. 3.5〈11〉):
Ztotalextension = Zvalvefirst +
(1
Zpump+
1Zvalvesecond + Zrestrictorfirst
)−1
(3.11a)
Ztotalflexion = Zvalvefirst +(
1Zpump
+1
Zvalvesecond + Zrestrictorsecond
)−1
(3.11b)

32
〈7〉 〈8〉
〈9〉 〈10〉
〈11〉
Figure 3.5: These candidate hydraulicschematics for the hybrid knee also al-low active and passive modes of opera-tion. The first controllable valve is in-stalled in series with both the hydraulicpump and the parallel fluid, so fluid maypass through the pump even during pas-sive operation.

33
〈12〉 〈13〉
〈14〉
Figure 3.6: These candidate hydraulicschematics for the hybrid knee replace thefunctionality of two controllable two-portvalves with a single controllable three-portvalve.
The only difference in these schematics (Fig. 3.5) from the first set of schematics
(Fig. 3.4) is that the fluid cannot be restricted from passing through the pump unless it
is restricted from passing through the entire circuit. Thus, while in the first schematics,
the first controllable valve could be implemented as an on/off solenoid valve, in the second
schematics, the first valve must be controllable to intermediate impedances.
Hydraulic valves are not limited to two port valves which control the flow of fluid
through only one passage at a time. The operation of the first and second, or even the first,
second, and third controllable valve may be combined into one cleverly designed multiple-
port valve.

34
The two controllable valves in several of the hydraulic circuits can be replaced
with a single valve with three ports. in the simplest hydraulic circuit (Fig. 3.4〈2〉 or 3.5〈7〉)
the three ports are connected to the pump outlet, the parallel passage, and the actuator
(Fig. 3.6〈12〉). The valve selects between the pump or the parallel hydraulic path or closes
off both paths. By closing off the valve orifices gradually, intermediate impedances may
be created. When implementing the circuit with a checked extension path (Fig. 3.4〈3〉 or
3.5〈8〉), the three port valve leaves the passage to the pump open while the parallel path is
open (Fig. 3.6〈13〉). Otherwise, the operation is identical to the previous case. The circuits
with fixed restrictor valves (Fig. 3.4〈6〉 or 3.5〈11〉) may be implemented with either the type
of three-port valve.
The circuits with a third controllable valve (Fig. 3.4〈4〉, 3.4〈5〉, 3.5〈9〉, or 3.5〈10〉)
may be implemented with one two-port valve and one three-port valve, two three-port
valves, or a four-port valve. The three-port valve replaces the second and third two-port
valves, and selects between the extension and flexion passages, or closes both passages
(Fig. 3.7〈15〉 or 3.7〈16〉). When implemented with two three-port valves (Fig. 3.7〈17〉), the
second three-port valve selects between closed, open to pump, or open to the pump and
the parallel circuit. Since the second three-port valve can close the parallel passages, the
first three-port valve may simply select between the flexion path and the extension path.
Alternatively, one four-port valve (Fig. 3.7〈18〉) selects between closed, open to the pump,
open to the pump and the extension path, or open to the pump and the flexion path.
When both checked extension and flexion pathways are available, the only reason
to close off the parallel passage and only leave the pump connected is for smooth position

35
〈15〉 〈16〉
〈17〉 〈18〉
Figure 3.7: These candidate hydraulic schematics for the hybrid knee replace thefunctionality of three controllable two-port valves with one or two controllablemultiple-port valves.

36
control of the actuator without interfering valve moves. If position control is not required,
the connection to the pump only is not needed.
3.4 Hydraulic Actuator Options
The candidate hydraulic schematics discussed in the previous sections all incorpo-
rate a double acting, equal volume actuator. In the implemented hybrid knee, this actuator
comprises a custom designed hydraulic cylinder with dual rods. To explain why this actu-
ator was chosen, we must examine alternative compact actuators.
3.4.1 Single Acting Cylinder
A single-acting cylinder has one connection to the outlet of the pump, while the
inlet of the pump is connected to a reservoir of volume equal to or greater than the cylinder.
The pump can only push fluid into the single acting cylinder, so a spring is required to
push the actuator in the opposite direction. For example, if the spring acts in the flexion
direction, then the pump must counteract the spring force whenever powered extension is
desired. The spring must be selected for the maximum desirable flexion rate, so the pump
torque to overcome the spring will not be insignificant. Additionally, the rate of flexion can
only be controlled by modulating the fluid impedance against the spring, either through
the pump or a valve.

37
3.4.2 Double Acting, Unequal Volume (single rod) Cylinder
Adding a port to the other side of a single-acting cylinder makes it double-acting
and reduces the required size of the reservoir. The advantage of a double-acting single-rod
design is that the ratio of volumes can be tuned to create low force, high speed in one
direction and high force, low speed in the other direction. This ratio could be selected so
that the electric motor driving the pump operates at its most efficient speed for powered
flexion to create heal rise and at its highest power speed for powered extension for stair
climbing assistance. However, pilot check valves must be added to connect each side of
the cylinder to the reservoir at the appropriate times. During flexion, more fluid exits
the cylinder than enters it, so this excess fluid must be diverted to the reservoir. During
extension, excess fluid is required in the cylinder, which must be drawn from the reservoir.
The pilot check valves which open as necessary to allow fluid into or out of the reservoir
create a delay when switching flow directions, compromising position control.
3.4.3 Double Acting, Equal Volume (double rod) Cylinder
To eliminate volume discrepancies between the two sides of the cylinder, we can
add a rod to the other side of the cylinder, but leave it unconnected from the joint linkage.
This requires extra room for the rod at the extremes of piston travel. One side of the
cylinder connects to the inlet of the pump, the other to the outlet. Provided that the pump
is reversible, position control is greatly simplified since all the fluid moving from one side
of the cylinder is simply pumped to the other side with no requirement for a reservoir.

38
3.4.4 Double Acting Rotary Vane
Some passive hydraulic knees, such as the Otto Bock 3R80 [36], utilize a rotary
vane hydraulic actuator. The rotary actuator is compact, since it does not require a reservoir
or empty space for moving rods. However, sealing and manufacture are complicated. A
cylinder is easy to manufacture and seal; there are many options for piston and rod seals
which fit a cylindrical form factor. Tight tolerances between the piston and cylinder or the
between the rod and cylinder end caps are relatively straight forward to manufacture.
A rotary vane actuator must seal at the apex of the vane, along the vane sides,
and on the rotary axis. Sharp corners between the apex and vane sides are difficult to
close. Sealing the chamber requires either a custom shaped seal or tight tolerances between
the vane and the chamber. A tight seal is likely to increase friction of the joint so that it
will not swing freely. The Otto Bock 3R80 knee avoids these issues by employing a high
viscosity hydraulic fluid which does not pass through the unsealed gaps around the vane.
In a powered knee, the excessive friction of a high viscosity fluid in the pump and through
the hydraulic passages creates an inefficient device.
The double-acting, equal volume cylinder is the best compromise between control-
lability, compact packaging, and easy of design, manufacture, and assembly.
3.5 Completing the Hydraulic Circuit
Because we need a low friction hydraulic pump and low rotor inertia motor (§4.2.1)
to be able to implement power regeneration to the batteries [44], Zpump is low enough that
a parallel flexion path is not required. Thus, the impedance during passive operation is

39
Figure 3.8: The completed hydrauliccircuit schematic includes a reser-voir, filter, and pressure sensor in ad-dition to the circuit elements fromFig. 3.6〈13〉.
given by equation (3.8). To reduce the number of servo motors required to move valves, we
use a single three-port valve (Fig. 3.6〈13〉), so Zvalvefirst = Zvalvesecond.
A few other components are required to realize the hydraulic circuit. Drainage
passages collect any fluid that leaks from the controllable valve or the hydraulic pump.
These passages connect to an reservoir. An air spring in the reservoir allows for thermal
expansion of the fluid from operating temperatures of -15 to 70. The spring also main-
tains a nominal pressure in the system greater than the vapor pressure of the hydraulic
fluid to avoid cavitation. A filter traps particles which might damage or obstruct the fluid
passages, pump, or valves. Pressure sensors on either side of the cylinder provide the nec-
essary feedback to control the knee to a specific torque. The complete circuit is shown in
Fig. 3.8.
40
Chapter 4
Hydraulic Power Unit
Implementation
The implementation of the selected hydraulic circuit requires the selection of sev-
eral purchased components in concert with the custom design of a manifold to realize the
schematic. The design must compromise between compactness, manufacturability, and low
head loss.
The energy transfer from batteries to the knee joint takes place through several
steps. Several lithium polymer batteries power the drive to control the electric motor. The
motor magnet and windings transform the electrical power to speed and torque of the pump.
The pump displacement affects the ratio of flow to pressure created by the speed and torque
of the motor. The cylinder area influences the speed and force of the cylinder created by
the available pressure and flow. The geometry of the linkage determines the torque and
velocity of the knee joint.

41
4.1 Modeling Performance Requirements
A Matlab simulation allows all of the parameters of the motor, pump, and cylinder
geometry to be modified and evaluated at different walking speeds.
We begin with clinical gait analyses of normal walking in able bodied subjects.
Based on data from previously published trials [23], we approximate a sine curve to the hip
and knee angles, which allows for smooth differentiation of hip and knee velocity and accel-
eration. The differences between the actual gait pattern and the sinusoidal approximation
are small enough that they should not affect the overall performance requirements we are
estimating. If we estimate the expected mass and moment of inertia of the prosthesis below
the knee joint, we can then determine the required knee torque and speed. Since we know
the knee angle at any given time, we can determine the torque required to hold that angle
against gravity. We also determine the torque required to achieve the desired acceleration
of the knee at every instant.
Tk = lcmcos(θknee + θhip)mpg + Ipθknee (4.1)
where Tk is the required flexion torque at the knee, lcm is the length from the knee joint to
the center of mass of the prosthesis comprising the knee unit, shank pylon, ankle, and foot,
mp is the mass of the prosthesis, and Ip is the moment of inertia of the prosthesis about
the knee joint. θknee is the flexion angle of the knee relative to the thigh, and θhip is the
flexion angle of the hip relative to vertical; their sum is the flexion angle of the knee relative
to vertical. The calculated power requirements (Fig. 4.1) correspond with collected clinical
gait analysis data (Fig. 2.5), but can easily be adjusted for different parameters, including
walking speed, mass, and leg length.

42
Figure 4.1: Knee and hip angles ap-proximated by sine curves (top), kneetorque calculated from knee accelera-tion and expected inertia of the pros-thetic limb (middle), and resultingpower (bottom) during one cycle oflevel walking. The torque and powercalculations are easily adjusted forfaster or slower strides because thejoint angle derivatives are well defined.

43
Figure 4.2: Geometry of the hy-draulic actuator linkage (not to scale).Lengths la and lb stay fixed, while theactuator length, lc, and moment arm,lh, change as the knee flexes or ex-tends. The linkage angle φ changes atthe same rate as the knee angle θknee.
Next, we convert the knee joint angular velocity and torque to flow and pressure
in the hydraulic cylinder. At each angle, we calculate the instantaneous piston position lc
and moment arm lh of the linkage using the law of cosines (Fig. 4.2):
lc =√l2a + l2b − 2lalbcos(φ) (4.2)
lh = lbsin(α) = lblalc
sin(φ) (4.3)
Differentiating the piston position gives us the required cylinder speed, while the torque
divided by the moment arm determines the force. Multiplying the speed by the area of the
cylinder, Ac, determines the required flow, qc, and dividing the force by the area determines
the required pressure, pc:
qc = lcAc (4.4)
pc =Tk
lh ·Ac(4.5)

44
Hybrid Knee Geometry Parameters
actuator linkage la 32 mm
actuator linkage lb 167 mm
initial linkage angle φ∣∣∣θknee=0
120 °
cylinder area Ac 188 mm2
pump displacement d 408 mm3/rev
Table 4.1: Parameters for the knee ge-ometry used to calculate motor torqueand speed from the desired kneetrajectory.
Finally, we divide the hydraulic flow by the pump displacement d and multiply the pressure
by the displacement to determine the required speed and torque, respectively, of the motor:
ωmotor = ωpump =qpump
d · ηv=
qcd · ηv
(4.6)
Tmotor = T pump =d · ppump
ηm≈ d · pc
ηm(4.7)
where ηv is the volumetric efficiency of the pump and ηm is the mechanical efficiency. Other
losses occur in the friction of the cylinder and in the head loss between the pump and the
cylinder; however, these losses are more difficult to estimate and small in relation to the
losses to pump inefficiency.
Using equations (4.2)-(4.7), a trajectory of knee angle, θknee, and torque, Tk can be
transformed to the motor speed, ωmotor, and torque, Tmotor, required to achieve the desired
behavior. By varying pump displacement, cylinder area, and linkage lengths within the
design constraints, we arrive at a suitable set of parameters so that a motor can be selected
which operates efficiently at high speed for powered swing in level ground walking, but with
enough torque to assist in lifting the weight of the patient going up stairs or inclines.

45
4.2 Motor Selection
Since the overall packaging is limited in size to approximately that of a biological
leg, the moment arm, la on the hydraulic cylinder is limited in length. As a starting point
for the calculations, we can choose a linkage geometry similar to existing hydraulic and
pneumatic knees. From there we choose a pump displacement and cylinder area which
allows the pump to operate within the pump manufacturer’s specified maximum speed for
our full range of desired walking speeds. Table 4.1 summarizes the chosen parameters.
4.2.1 Defining a Performance Index
Our objective is to create a knee which is able to create high joint torque to assist
on stairs and inclines, but uses a limited amount of power for level ground walking. From
clinical gait analysis [30], we know that a typical able bodied individual exerts about 250 W
instantaneous power at the knee to climb an average step. Thus, any motor selected to drive
the knee should be able to produce hundreds of watts of mechanical power. In the selected
hydraulic schematic (Fig 3.8), fluid always passes through the pump during flexion. Thus,
if we wish to use as little power as possible when flexion should be impeded, for example,
immediately before extension in the gait cycle, or when walking down an incline or stairs,
the motor and pump must be easy to back-drive. Properly selected components allow the
hydraulic pump and electric motor to act as a hydraulic motor driving an electric generator,
so there is even the potential to regenerate power. In the motor, ease of back-driving depends
on the inertia of the rotor. So, the performance index, MPI, for selecting a suitable drive
motor is the motor constant, km, (essentially a measure of power density) divided by the

46
Figure 4.3: Maxon EC-powermax mo-tor torque versus speed performancecapability (shaded). Curves show thetorque and speed required of the mo-tor for a typical amputee walking at0.67 m/s, fast walking at 1.3 m/s, andpowered lifting for stair climbing. Al-though the total torque for stair climb-ing is not available, partial assistanceis sufficient for step over step ascent.
rotor inertia, J :
MPI =kmJ
, Pmotormax > 100 W (4.8)
The Maxon EC-powermax 30 mm 200 W brushless series of motors has a motor
constant of 44 mNm/√
W with a rotor inertia of 33 gcm2, making it the best available motor
series as calculated by (4.8). Although the motor constant, km, is fixed for the design and
size of the motor, different windings with more turns and a smaller wire diameter or fewer
turns and a larger wire diameter will create more or less torque, respectively, for the given
drive current. Thus, the choice of winding is driven by the maximum current of the motor
driver and the desired maximum torque for assisting stair ascent:
kt =Tmotormax
Idrivemax
, subject to (4.9)
ωmotormax =V drivemax
kt(4.10)
Fig. 4.3 shows the speed and torque capabilities of the motor at 48 V in relation to the
requirements for walking at 1.5 mph, 3.0 mph, and up a typical stair step for the chosen
winding with a torque constant, kt, of 41 mNm/A.

47
4.2.2 Heat Dissipation Analysis
Although the manufacturer claims the motor is capable of producing 200 W output
power, it is important to estimate the temperature rise of the motor during normal operation
to ensure that it will not overheat. Starting from Newton’s Law of Cooling:
Θoutm = − 1
tm(Θm −Θamb) (4.11)
where Θm is the temperature of the motor housing, Θamb is the ambient air temperature,
and tm is the thermal time constant for the motor housing. The heat absorbed by the motor
housing, Qinm , is equal to the heat lost from the motor windings, Qoutw :
Qinm = −Qoutw (4.12)
CmΘinm = −CwΘout
w
CmΘinm = −Cw
1tw
(Θm −Θw)
Θinm =
CwCmtw
(Θw −Θm) (4.13)
where Θw is the temperature of the winding, and Cm and Cw are the thermal capacities
of the motor housing and winding, respectively. Thus, the total rate of change of the
temperature of the motor housing is:
Θm =CwCmtw
(Θw −Θm)− 1tm
(Θm −Θamb) (4.14)

48
Motor Temperature Parameters
maximum drive current Idrivemax 30 A
motor winding resistance at 25 R25 0.794 Ω
thermal time constant: winding to housing tw 0.802 s
thermal time constant: housing to ambient tm 848 s
thermal capacity: motor winding Cw 10.2 J/
thermal capacity: motor housing Cm 160 J/
maximum winding temperature Θmaxw 155
Table 4.2: Characteristic data of the custom wound Maxon EC -powermax motorused in motor temperature analysis.
Analysis of the motor winding temperature is similar. We assume a worst case scenario
where all of the electrical energy input is converted into heat, i.e., the motor is stalled:
Qinw = I2R (4.15)
CwΘinw = I2R25 (1 + αCu(Θw − 25))
Θinw =
I2R25
Cw(1 + αCu(Θw − 25)) (4.16)
where I is the drive current, and R is the winding resistance, starting at R25 at 25,
and increasing according to the thermal coefficient of copper, αCu, at 0.00392 Ω/. Thus,
the total rate of change of the temperature of the motor winding is:
Θw =I2R25
Cw(1 + αCu(Θw − 25))− 1
tw(Θw −Θm) (4.17)

49
Figure 4.4: Worst-case heat dissipation during stair climbing allows at least 25 steps,about two full flights of stairs before the motor must be disabled (left). Level groundwalking at 10% duty cycle of peak continuous current is limited only by battery life(right).
Equations (4.14) and (4.17) form a system of differential equations which we solve
numerically in Matlab using the parameter values from Table 4.2. For safe operation, the
winding temperature, Θw may not exceed the manufacturer’s limit of 155. The motor
will operate most inefficiently when loaded for stair climbing. To get a conservative estimate
of how many steps may be climbed before the motor starts to overheat, we assume all the
electrical energy is converted to heat at the maximum intermittent current of the drive. We
also assume an ambient temperature of 40 inside the knee unit. At a 40% duty cycle with
steps at 1.2 s intervals, at least two full flights of stairs, or about 25 steps, may be climbed
before the maximum winding temperature is exceeded (Fig. 4.4). With no heat sink, the
motor winding temperature will drop 90% of the way to the ambient temperature in about
half an hour.
Because the time constant of the housing dominates the temperature of the wind-
ing, we can estimate the temperature rise of only the housing to find the peak operating
conditions for level ground walking. The time constant of the housing is much greater than

50
the step cycle, so we can average the input power instead of using the discontinuous current
profile employed in equation (4.17). All the heat generated in the winding is lost to the
motor housing, so:
Θm =(
1Cm
(I2)avgR25αCu −1tm
)Θm + (4.18)(
1Cm
(I2)avgR25(1− αCu25) +Θamb
tm
)where (I2)avg =
(Idrivecont.
)2(duty cycle
)(1− ηmotor
)(4.19)
We can solve equation (4.18):
Θm(t) =β
−λ
(1− eλt
)+ Θm(0)
(eλt)
(4.20)
where λ =(
1Cm
(I2)avgR25αCu −1tm
)β =
(1Cm
(I2)avgR25(1− αCu25) +Θamb
tm
)If we consider aggressive level ground walking operating at peak continuous drive current,
Idrivecont. , of 15 A at a 10% duty cycle, with the motor operating at peak power, i.e., at an
efficiency, ηmotor, of 50%, then the motor housing temperature will level off at approximately
100, so the motor winding will not overheat (Fig. 4.4).
Adding a heat sink reduces the temperature rise of the motor below the worst case
scenarios presented in Fig. 4.4. To reduce the thermal resistance, and thus the thermal time
constant, of the motor housing, a custom machined heat sink with fins optimally spaced
for cooling by natural convection was considered, but was ultimately rejected in favor of
an easily modified, inexpensive Maxx Products heat sink. For additional safety, a sensor
mounted to the motor housing monitors the temperature. The motor winding has a very
small thermal time constant, so the winding is generally no more than 50 warmer than

51
the motor housing. Thus, if the temperature sensor exceeds a threshold, the drive motor is
disabled so the winding can cool down.
4.3 Component Design
Having selected a motor, pump displacement, and cylinder dimensions,we must
design a valve and manifold to complete the hydraulic circuit. The manifold incorporates
active and passive flow paths, while a 3 port variable position valve controls the circuit
between active and passive modes of operation to complete the schematic shown in Fig. 3.8.
4.3.1 Control Valve
For each step, the knee transitions from passive resistance during stance to active
assistance during swing. At heel strike, the valve must provide high impedance through
passive damping. In late stance, impedance must be reduced, reaching a fully open pump
path at toe off to begin the active portion of the step cycle. During toe off, we activate the
pump to provide knee flexion for sufficient heel rise. At the end of flexion, we reverse the
pump direction and move the valve to open the parallel free extension path of the hydraulic
circuit. To slow the leg in preparation for the next heel strike, we begin closing the valve
to damp hydraulic flow at the end of swing.
Thus there are three primary positions of the valve:
• closed
• open to the pump
• open to the pump and parallel path

52
For smooth operation, we must be able to move incrementally between any two of these
positions without passing through the third. We accomplish this through a rotary design.
The valve barrel driven by an electric servo motor rotates inside the valve housing
(Fig. 4.5). The valve housing is separated into three distinct levels along its length by
O-ring seals. At each level, holes drilled through the circumference of the housing connect
the interior of the housing to the exterior. Each level is connected to a different port:
• the pump outlet
• the parallel check valve path
• the extension side of the cylinder
The gap between the barrel and the housing interior is approximately 5µm, small enough
to prohibit hydraulic fluid flow. Two axial slots machined 180° from each other around the
circumference of the barrel allow fluid to flow between the the different levels of the valve
housing when the barrel is rotated to a position where it connects the circumferential holes
in the housing.
The holes in the valve housing follow a pattern spaced at approximately 60° around
the circumference of the housing. In the first position, there are no holes. When the barrel
slot is aligned with the first position, the valve is fully closed. In the second position, holes
are drilled through the level connected to the pump and to the cylinder. When the barrel
slot is aligned with the second position, the pump is directly connected to the cylinder, and
the parallel fluid path is bypassed. In the third position, holes are drilled through all three
levels. When the barrel slot is aligned with the third position, all three ports are connected,
so fluid may pass through either the pump or the parallel fluid path to reach the cylinder.

53
Figure 4.5: A rotary control valve provides impedance to rotation of the knee with-out consuming electrical power. It comprises a servo controlled barrel inside a fixedhousing. Varying the position of the barrel adjusts the orifice size to control hy-draulic damping. Positions open to the pump allow active assistance for improvedswing and incline ascent.

54
This pattern is repeated through the next 180°. Since the valve is symmetric, radial forces
created by fluid pressure are balanced.
Clearly, the valve barrel can rotate to positions where the slot is not completely
lined up with the holes. These intermediate position create a partial opening which restricts
fluid flow to increase impedance. In situations like stair descent, very high, but not infinite,
impedance is desired to allow gradual knee flexion. To improve the control of high levels of
impedance, small triangular notches extend from the slot in the valve barrel. When these
notches overlap with the holes in valve housing, fluid passes through the hole from one port,
into the notch, through the valve slot, and through the notch overlapping the second port.
The angular position of the valve barrel affects the portion of the notch which overlaps with
the holes, and hence the effective cross sectional area of the orifice.
The valve passes through all three positions in the course of a single step. At heel
strike, the valve is moved to the fully closed position to provide resistance to the impact
pressure. As the amputee transfers weight over the leg, the valve gradually opens to the
pump port, letting the knee flex slightly. At the end of the stance phase, the pump port is
fully open so that the pump can power the flexion of the knee to create the necessary heel
rise for the swing phase of the step. At the end of flexion, the valve moves to the position
with both passages open. The pump drives in the opposite direction, kicking the knee into
extension. After providing a sufficient impulse, the motor may turn off, letting the fluid
pass through the check valve to allow the knee to swing ballistically. In the terminal swing
phase, the valve moves again towards the closed position to create some damping so the

55
knee does not jar into the hard stops as the leg reaches a fully straight position. At this
point in time, the cycle repeats for the next step.
4.3.2 Hydraulic Manifold
Once all parts of the hydraulic schematic are designed, we must realize the circuit
in three dimensions to connect them. After we establish a preliminary layout (Fig. 4.6), we
can count the number of right angle corners and the total length of passages to estimate the
head losses of fluid through the manifold for different passage diameters and check valve or
filter sizes. Thus, we optimize the size of the passages and valves for the space available.
We model the manifold passages as solids, leaving space between them for the
necessary wall thickness to accommodate the working pressures. A minimum wall thickness
may be calculated through a simple stress analysis given the peak pressures expected and
the material properties of the aluminum used to make the manifold. Once the passages are
in place, we model a machinable exterior around the passages and then subtract the passage
model to create the final design. Each passage must reach an outside surface to maintain
machinability of the manifold. This method leaves material only where it is needed for
strength, mounting points, or machinability. By using flat surfaces and prismatic segments,
we reduce the cost of machining by eliminating complex three dimensional surfaces. The
final manifold design is compact and lightweight. Fig. 4.7 shows how the completed manifold
fits into the hydraulic power unit assembly.

56
Figure 4.6: Three dimensional realization of the hydraulic schematic from Fig. 3.8as implemented in the hydraulic manifold. The flow paths from one side of thehydraulic cylinder to the other during passive (unpowered) and active (powered)modes of operation are indicated.

57
Figure 4.7: The hydraulicmanifold acts as the centralpiece of the hydraulic powerunit, connecting the motorand pump to the controllablevalve and actuator.

58
Chapter 5
Sensing and Control
The control strategy for a mechatronic system defines the sensor requirements.
Mimicking a smooth, natural gait without reading the mind of the amputee or resorting
to unreliable [8] electromyographic (EMG) signals requires a sophisticated estimate of the
knee state at all times and enough sensory information to guess the next logical state.
5.1 Control Strategy
The hybrid knee controller was written by Matthew Rosa, building on previous
work by Sebastian Kruse, Miclas Schwartz, and Adam Zoss. The controller is organized as
a finite state machine. For simplicity, durability, ease of use, and so that double amputees
may wear the knee, all sensing is contained within the knee unit. Thus, the desired action
must be guessed from the information provided by these sensors only. No information from
the contralateral foot or knee is available.
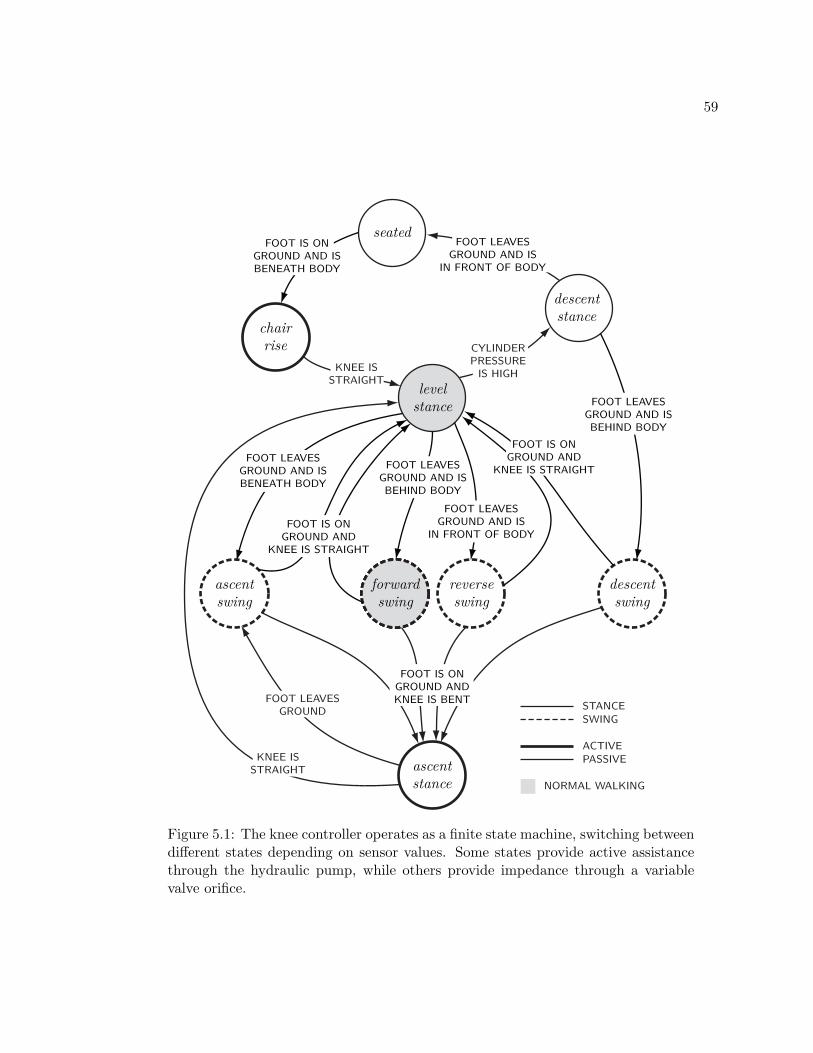
59
STANCESWING
ACTIVEPASSIVE
NORMAL WALKING
Figure 5.1: The knee controller operates as a finite state machine, switching betweendifferent states depending on sensor values. Some states provide active assistancethrough the hydraulic pump, while others provide impedance through a variablevalve orifice.

60
5.1.1 Control States
A combination of sensor values and thresholds allow the controller to determine
whether the amputee is walking, standing, sitting, ascending an incline or stairs, descending
an incline or stairs, or performing some other activity. Furthermore, the controller deter-
mines at what speed the amputee is moving and which phase of the walking cycle the knee
is in. Once the state is determined, we calculate and apply the required level of active
assistance or passive impedance. The state machine is illustrated in Fig. 5.1
Level Stance
When the controller determines that the prosthetic foot is in contact with the
ground, the control enters a level stance state. In this state, the pump is disabled and only
the valve is used to create impedance to knee flexion. If the load passing through the foot is
concentrated towards the heel, a high impedance is designated. If the load passing through
the foot is concentrated towards the toe, knee flexion may be imminent, so a low impedance
is designated. One of two criteria must be met to leave the level stance state. Either the
foot leaves the ground, or the controller determines that amputee wishes to flex the knee
in place. All other states return to the level stance state if the foot is on the ground and
the knee is fully extended.
Forward Swing
If, from the level stance state, the prosthetic foot leaves the ground and the foot
is behind the amputee’s body, then the controller determines that the amputee wishes to
swing the prosthetic limb forward. The controller determines the angle of the thigh, and

61
swings the leg such that the foot follows the ground below the body. When the thigh slows
down towards the end of hip flexion, knee extension completes to straighten the leg. In the
current implementation, the foot position depends on the absolute position and velocity of
the thigh. If the thigh swings faster, the knee flexes and extends faster.
Reverse Swing
If, from the level stance state, the prosthetic foot leaves the ground and the foot
is in front of the amputee’s body, then the controller determines that the amputee wishes
to swing the prosthetic limb back for a reverse step. The controller follows a trajectory
reverse of the forward swing state until the foot touches the ground again.
Ascent Swing
If, from the level stance state, the prosthetic foot leaves the ground and the foot is
underneath the amputee’s body, then the controller determines that the amputee is standing
in front of an step and wishes to swing the foot up. In this case, a different trajectory is
designated which mimics the knee swing angles found during normal stair ascent.
Ascent Stance
If, from any of the swing states, the foot contacts the ground while the knee is
bent instead of fully extended, the controller enters an ascent stance state instead of the
level stance state. In this state, the pump is employed to lift the body weight as the knee
extends. If the foot leaves the ground, the controller returns to the ascent swing state. If
the knee extends fully without leaving the ground, the knee returns to the level stance state.
62
Decent Stance
If the amputee pushes against the impedance created by the valve during level
stance, pressure in the hydraulic cylinder will increase. In this case, the controller determines
that the amputee wishes to flex the knee and reduces the impedance. In some cases, energy
may be recaptured by back-driving the pump and running the motor as an electric generator.
The controller leaves the descent stance state when the foot leaves the ground.
Decent Swing
If, from the descent stance state, the foot leaves the ground behind the body, the
controller determines that the amputee is descending a step. In this case, a trajectory is
designated which mimics the knee swing angles found during normal stair descent. Depend-
ing on the knee angle when foot contact is determined, the controller returns to the level
or ascent stance states.
Sitting and Chair Rise
If, from the descent stance state, the foot leaves the ground in front of the body,
the controller determines that the amputee is sitting. If the foot contacts the ground, the
controller enters a chair rise state, in which the pump is employed to lift the body weight
as the knee extends. When the knee is fully extended, the controller returns to the level
stance state.

63
5.2 Sensor Requirements
The prescribed state machine determines the necessary sensory information to
switch between states and control the knee motion during individual states:
• Knee flexion angle
• Foot position in relation to the body
• Knee torque
• Load passing through the toe and heel of the foot
5.2.1 Knee Angle
In order to mimic natural knee flexion angles for different activities, it is important
to measure the actual flexion angle of the prosthetic. The knee angle also determines the
instantaneous moment arm of the hydraulic cylinder, so it is required to calculate knee
flexion torque.
The knee angle may be measured directly or indirectly. An angular sensor, such as
a potentiometer, optical encoder, or magnetic encoder attached to the knee pivot measures
the angular difference between the thigh link and shank link directly. Alternatively, we
could measure thigh and shank angles relative to gravity and take the difference to obtain
the knee flexion angle. The angle may also be calculated from the actuator position by
integrating hydraulic flow or measuring the piston position using a linear encoder, linear
variable differential transformer (LVDT), linear potentiometer, string potentiometer, or
giant magnetoresistance (GMR) sensor with a moving magnet.

64
Figure 5.2: Sensors on the knee include an accelerometer and gyroscope for mea-suring thigh angle, magnetic encoder for measuring knee angle, and custom forcetransducer for measuring foot loads.

65
The most compact and simplest solution for the controller is using a RLS RMB20
magnetic encoder mounted on a printed circuit board (PCB) attached to the shank link at
the knee joint. A magnet embedded in the joint pin rotates with the thigh link. As the knee
flexes, the orientation of the magnetic field changes with respect to the sensor mounted on
the shank link. To avoid affecting the magnetic field near the magnet and sensor, the joint
pin is manufactured from 7075-T6 aluminum instead of steel. Hardened steel sleeves fit
over the ends of the joint pin to act as the inner bearing race for the joint needle bearings.
5.2.2 Thigh Angle
The controller requires knowledge of the position of the prosthetic foot in relation
to the amputees body to enter several of the control states. The ankle is relatively stiff, so
the position of the toe and heel with respect to the shank do not change significantly. The
only other degree of freedom between the hip and the toe is the knee flexion angle. Thus, if
we know the thigh position and angle in the sagittal plane, we can calculate the toe location
using the shank length, foot size, and knee flexion angle. Alternatively, we could measure
the absolute shank angle and position and calculate the thigh angle. However, the thigh is
the primary input from the amputee to the controller, so a clean signal is very important.
We measure the thigh position and angle in the sagittal plane by integrating a dual
axis Analog Devices ADXL203 accelerometer and a single axis Analog Devices ADXRS300
rate gyroscope. A software low pass filter on the accelerometer and high pass filter on the
gyroscope avoid drift. The initial position of the knee can be calibrated from the known
length of the leg when the amputee stands straight up. Knowing the position of the leg with
respect to both the ground and the person enables toe trajectory tracking with minimal

66
Figure 5.3: Pressure sensors measurefluid pressure on either side of the hy-draulic cylinder to determine actuatorforce and knee torque.
ground clearance. Minimizing ground clearance should yield a natural gait with normal knee
flexion angles, hip abduction, and pelvic obliquity. The accelerometer and gyroscope can
also be used to measure thigh velocity. The velocity measurement determines the desired
walking speed so that the controller can adjust the knee flexion trajectory to suit.
5.2.3 Knee Torque
The descent stance state requires a measure of the force the amputee exerts against
the knee to calculate an appropriate impedance for a controlled descent. Likewise, the ascent
stance state control is aided by knowledge of the output force exerted on the amputee.

67
Figure 5.4: The location of the load passing through the foot moves from the heeltowards the toe through the stance phase of the stride (left). At the ground, theload is primarily in the vertical direction, with some friction force in the antero-posterior direction for braking and propulsion, and a small stabilizing force in themedio-lateral direction. Adapted from [11].
Measuring the knee torque also allows for a direct comparison to CGA data to evaluate
improvements in walking.
A torque sensor mounted at the knee joint strong enough to withstand human
joint torques would be too bulky and expensive. Since the knee angle is known, the torque
may be calculated from actuator force and the moment arm. One way to measure actuator
force is to add a load cell at the rod end. However, the most compact and strongest method
is to measure the fluid pressure on both sides of the cylinder. The difference of the pressures
multiplied by the cylinder area gives the actuator force. Fig 5.3 shows the location of both
Omega PX600 pressure transducers in the hydraulic manifold.
5.2.4 Foot Load
A foot load sensor is required to measure the ground reaction force, GRF , and its
point of application on the foot, or center of pressure. The ground reaction force can be

68
separated into three perpendicular component forces, a vertical force perpendicular to the
transverse plane, a antero-posterior force perpendicular to the coronal plane, and a medio-
lateral force perpendicular to the sagittal plane (Fig. 5.4). The vertical force is created
primarily in support of the body weight over the stance leg. The antero-posterior force is a
friction force along the ground surface which slows the body’s forward progression at heel
strike and provides the propulsive reaction at toe off. The medio-lateral force is a friction
force along the ground surface which resists side to side motion of the body. [38]
The fundamental requirement for switching between swing and stance states is foot
contact, measured as ground reaction force. As shown in Fig. 5.4, the center of pressure of
the ground reaction force moves from the heel to the toe during each stance cycle. Thus, the
application point of the ground reaction force, either towards the heel or the toe, identifies
early, mid and terminal stance [11].The identification of the stance timing designates the
appropriate valve impedance.
The simplest way to measure foot contact is to place contact switches below the
toe and heel of the prosthetic foot. A signal proportional to the load is achieved by replacing
the switches with force sensing resistors or load cells. However, either solution requires an
instrumented foot, leaving the sensors and connecting wires vulnerable, and restricting the
amputee to use a specific foot with the knee. Furthermore, the critical downside of the
instrumented foot is that it is sensitive only in discrete patches. So, if the amputee were to
step on the edge of a stair with the middle of the foot, no load would be measured.
The Otto Bock C-Leg uses several strain gages on the ankle pylon to independently
determine the components of the ground reaction force [21]. This requires a different length,

69
Figure 5.5: The vertical and antero-posterior ground reaction forces ap-plied at the center of pressure of thefoot create a sagittal plane moment,M , an axial shear force, V , and a sec-ondary shear force, Fs, in the framemounted force transducer.
custom pylon for each patient. There is even less room in the pylon than in the frame
to provide protection to the gages. The limited room also means that the pylon is not
necessarily designed for sensitivity, or high strain, in particular directions. Thus, either high
gains or expensive high gage factor gages are required to achieve precise measurements.
Since adding sensing at the foot requires the patient to use a specific foot or a
modified foot, sensing in the frame allows more freedom in choosing prosthetic components.
Force sensitive resistors placed between frame members are too susceptible to off-axis loads
to provide sufficient accuracy, and off the shelf load cells are too large to package within
the limited space available in the frame. This leaves a custom designed sensor using strain
gages as the best option (§5.3).

70
Figure 5.6: A custom designed forcetransducer measures axial load andsagittal plane moment transmittedfrom the foot through the ankle pylonand into the knee frame.

71
Figure 5.7: Strain gage pattern formeasuring shear strains. Placing thepattern so the neutral axis in bendinglines up with either set of arrows willcancel out the normal bending strains.
5.3 Force Transducer Design
Since measuring the ground reaction force directly at the center of pressure is
inconvenient, we must instead measure the forces and moments created inside the structure
of the prosthetic knee. Fig. 5.5 shows how the vertical and antero-posterior ground reaction
forces both contribute to an axial shear force, V in the knee structure. The center of pressure
of the ground reaction force creates a moment in the sagittal plane, M . Thus, a measure
of V and M is sufficient to determine the proper control state of the knee. From Fig. 5.4,
we can see that the secondary shear force Fs, and moments in the coronal plane due to the
medio-lateral ground reaction force will be small; however, they might still contaminate the
measurement of axial force and sagittal plane moment.
The most convenient location for measuring load is in the frame where the ankle
pylon is clamped to the bottom of the knee assembly (Fig. 5.6). There, the gages can be
protected by the knee cover. Also, any length pylon and any foot may be used in conjunction
with the knee without modification. The sensor needs to isolate the axial load and sagittal
plane moment, while canceling out strains created by perpendicular shear forces and coronal
and transverse plane moments.
Many load cells and force transducers measure applied forces by measuring direct
strains due to tensile or compressive forces on a metal element, or by measuring tension

72
and compression in a bending beam. However, a compact force transducer requires that
the bending elements be short. In a short beam constrained on both ends, the position of
strain gages for measuring bending becomes critical to avoid crossing inflection points and
achieve the highest strains. Instead of measuring bending, a compact, low deflection, high
force transducer may measure shear strain instead of bending strain. Placed across the
neutral axis in bending, a shear strain gage (Fig. 5.7) cancels bending strains. Shear force
is constant throughout the length of the beam, so there is more flexibility in positioning the
gages. Torsional loading also creates shear strains along the surface of the bending beam,
so both the axial shear force and sagittal moment can be measured solely through shear
strain measurements.
Three candidate designs for the force transducer were analyzed: a torsion bar
measuring shear force and torsion, an ovalizing hole measuring bending and torsion, and a
shear web design which improves the sensitivity and strength of the torsion bar. The shear
web beam offers the best compromise of strength, load isolation, sensitivity, and ease of
assembly.
5.3.1 Torsion Bar
The torsion bar design connects the ankle pylon clamp to the frame through a
square cross section beam (Fig. 5.8). By placing shear pattern strain gages on the top,
bottom, front, and back of the beam, we can measure the shear strain to determine the
sagittal moment, M , axial shear force, V , and secondary shear force, Fs, in the beam. Since
the surfaces are flat and accessible, the gages are easy to install. The analytical model for
this kind of loading is well understood, so it is easy to estimate what strains will show

73
Figure 5.8: Strain gages around thesquare beam measure shear strain toresolve shear forces and torsion.
Figure 5.9: Strain gages inside the cir-cumference of the hole measure ax-ial force which ovalize the hole, whilegages at the top and bottom of theconnecting beam measure torsion.
up in each sensor. However, from the model, we quickly determine that the strains due
to sagittal moment are not minimized at the gage locations where we want to measure
axial shear force strain. Instead, the large strains due to sagittal moment loading must be
subtracted out, leaving a very small signal due to the axial shear force, so the design will
be highly susceptible to noise.
5.3.2 Ovalizing Hole
The ovalizing hole design connects the ankle pylon clamp to the frame through a
rectangular beam with a hole cut through it perpendicular to the coronal plane (Fig. 5.9).
Four bending pattern strain gages are placed inside the circumference of the hole at ±45°

74
Figure 5.10: The shear web transducermeasures axial shear forces in a thinweb and torsion at the top and bottomof the beam.
and ±135°. As the ankle pylon is loaded by the axial force, V , bending ovalizes the hole,
compressing two gages and stretching the other two. Separate shear pattern strain gages
on the top and bottom of the beam measure the strains due to sagittal moment, M . This
design was evaluated using a finite element analysis. Although axial load and sagittal
moment provide mostly independent measurements, the strains from axial loads are still 5
times smaller than the strain from moments, requiring high gage factor gages. Installing the
gages inside the hole would be difficult, and placement of the gages away from the middle
of the hole would contaminate axial loading shear with sagittal moment shear.
5.3.3 Shear Web Beam
The final selected design uses a shear web to measure axial load. The ankle pylon
clamp is connected to the frame by an I-beam with a thin web (Fig. 5.10). The sagittal
moment, M , and secondary shear, Fs, loading in the beam are supported almost entirely
by the top and bottom flange members of the cross section, while axial loading, V , creates
high shear strains in the web. By adjusting the thickness of the web, the sensitivity to axial
loading may be modified independently from sensitivity to sagittal moment.

75
b
c
a
D
rd
Figure 5.11: The shear web forcetransducer has an I shaped cross sec-tion (shown not to scale). The la-beled dimensions are used in the stressanalysis.
M
V
Figure 5.12: The shear web force transducer is modeled as an I-beam (shown notto scale). The beam is loaded in torsion due to sagittal plane moment, M , and inshear due to axial shear force, V . The shaded region shows the location of the strainmeasurement.

76
Analytical Modeling
We can model the loading analytically using the I-beam torsion equation [31]. The
shear stress at the center of the top of the I-beam flange is:
τflange =M
K
(D
1 + π2D4
16A2
)(1 + 0.15
π2D4
16A2
)(5.1)
where M is sagittal plane moment. The cross sectional area, A, inscribed circle diameter, D,
and constant, K, depend on the dimensions of the I-beam cross section shown in Fig. 5.11:
A = 2ab+ cd+ (4− π)r2 (5.2)
D =1
2r + b
((r + b)2 + rd+
d2
4
)(5.3)
K = 0.67ab3 − 0.42b4 + 0.035b8
a4+ 0.33cd3 +
d
b
(0.3 + 0.2
r
b
)D4 (5.4)
On opposite sides of the web of the I-beam, the shear stress due to sagittal plane moment
of the beam will be small, and in opposite directions. The shear stress due to a axial load,
V , will in the same directions. If we add the stresses together, only shear stress due to axial
load will remain. Thus the relevant stress calculation is:
τweb =V∫y dA
d∫y2 dA
(5.5)
where the first and second moments of area,∫y dA and
∫y2 dA can be broken down as
follows:
∫y dA = d
∫ c2
0y dy + a
∫ c2
+b
c2
y dy +∫ r
0
( c2− r + y
)(r −
√r2 − z2
)dy (5.6)
∫y2 dA = d
∫ c2
0y2 dy + a
∫ c2
+b
c2
y2 dy +∫ r
0
( c2− r + y
)2 (r −
√r2 − z2
)dy (5.7)

77
From the shear stress at the top of the flange (5.1) and center of the web (5.5) of the I-beam,
we calculate the expected shear strains:
γflange =τflangeG
(5.8)
γweb =τwebG
(5.9)
where G is the shear modulus of the transducer material.
Since d b, the I-beam flange dimensions, a and b, and fillet radius r dominate
equations (5.2)-(5.4), reducing the shear web thickness, d, does not affect the expected
shear strains due to sagittal moment at the flange. However, the web thickness is inversely
proportional to the expected shear strain due to axial loading in the web. Thus, sensitivity
to sagittal plane moment and axial loads can be adjusted relatively independently by varying
the web thickness, d.
Of course, the force transducer must be strong enough to support the loads it
measures. The I-beam is weakest in torsion. The maximum shear stress due to sagittal
plane moment will be at the point of contact between the fillet, radius r, and the inscribed
circle, diameter D [31]:
τmax =M
K
(D
1 + π2D4
16A2
)(1 + 0.09 log
(1 +
D
2r
)+ 0.18
D
2r
)(5.10)
where A, D, and K are calculated by equations (5.2)-(5.4). We choose the dimensions
of the I-beam cross section with an appropriate factor of safety between the maximum
shear stress, τmax, and the shear yield strength of the transducer material. High strength
2024-T81 aluminum is the most suitable material for its high ratios of yield strength to
modulus of elasticity and strength to weight. The final sensor dimensions (Table 5.1) with

78
Force Transducer Dimensions
flange width a 15.9 mm
flange height b 9.5 mm
web height c 12.7 mm
web thickness d 0.5 mm
fillet radius r 3.2 mmTable 5.1: Chosen dimensions for theI-beam shape of the shear web forcetransducer cross section.
a typical foil strain gage of gage factor 2.08 ideally yield a sensitivity per gage of 6.3 µV/V·N
for axial load and 120 µV/V·Nm for sagittal plane moment. Under typical ground reaction
forces (Fig. 5.4), the total signal will be tens of millivolts, so high gains are not required.
Gage Placement for Measurement Isolation
The strain gages for measuring the shear strain due to axial load and sagittal plane
moment are placed along the neutral bending axes of an ideal I-beam to minimize bending
stresses. However, the beam is not long enough to behave exactly like the analytical model.
Thus, it is important to place strain gages in Wheatstone bridge configurations that will
cancel out remaining bending stresses and loads in directions other than those we wish to
measure. Table 5.2 summarizes how these potential contaminating strains are minimized
or removed.
Axial load shear strain is measured by two full Wheatstone bridges. The first
bridge comprises gages at 45° and 135° as in Fig. 5.7, on either side of the web. The sum
of these strains cancels out normal strains due to bending, and subtracts out the torsional

79
Desired Measurement
Contaminating axial shear force sagittal plane momentStrains V M
shea
rfo
rce
axial load V desired unaffected
secondaryshear Fs
unaffectedcanceled by top and
bottom of flange
medio-lateralGRFmed.−lat.
canceled by gage pattern canceled by gage pattern
tors
ion
sagittalmoment M
minimize by proximity tocenter; canceled by front
and back of webdesired
coronalmoment
canceled bycontralateral web
unaffected
transversemoment
unaffectedcanceled by top and
bottom of flange
bend
ing
sagittal planeminimized by proximity
to neutral axiscanceled by gage pattern
coronal planeminimize by proximity toneutral axis and inflectionpoint; canceled by pattern
canceled by gage pattern
transverseplane
canceled by gage pattern,front and back of web
minimize by proximity toneutral axis and inflectionpoint; canceled by pattern
Table 5.2: The measurement of axial force, V , and sagittal moment, M , are isolatedfrom potential contamination by other strains due to shear, torsion, or bending.

80
Figure 5.13: Foil strain gages orientedfor measuring shear strain are placedon both sides of each web, and at thetop and bottom of the flange.
shear strains due to sagittal plane moment. A second, identical bridge in the shear web
contralateral to the ankle pylon measures the axial shear strain on that side of the pylon.
The sum of the strain measurements from both bridges cancels out any torsional shear
strain from coronal plane moment, e.g., from medio-lateral ground reaction force.
Sagittal plane moment shear strain is measured by a single Wheatstone bridge.
The bridge comprises gages at 45° and 135° as in Fig. 5.7, on the top of the top I-beam
flange and on the bottom of the bottom I-beam flange. The sum of these strains cancels out
normal strains due to bending, and subtracts out the shear strains due to secondary shear
force, e.g., from sliding friction on the bottom of the foot creating high antero-posterior
ground reaction force. A second bridge could be employed on the contralateral side of the
ankle pylon to measure secondary shear force.
Measuring the load in the frame allows forces over the entire foot to be measured,
not just discrete points in the toe and heel. We also free the amputee or prosthetist to
choose any foot and ankle pylon desired. While the custom force transducer does not

81
directly measure the secondary shear force, we can estimate how much of the torsional
moment is due to the axial load by using a guess of the point of application of the load.
Since we know the absolute position of the shank, we know where the foot is as well. Thus,
we know which point on the foot is most likely to be in contact with the ground. From
our axial load measurement, we can estimate a moment and compare this to the moment
registered by the torsional sensor. The difference is the torsion created by secondary shear
force. Although not currently implemented, the estimate of secondary shear force could be
used to improve stumble detection.

82
Chapter 6
Performance Evaluation
With components selected and purchased, and custom components designed and
manufactured, the knee can be assembled and evaluated. Three amputees have worn the
hybrid knee, walked comfortably in it, and noticed a decrease in hip torque during swing.
Further testing will be required to quantify improvements in gait.
6.1 The Completed Hybrid Knee
The actuator assembly, comprising the hydraulic manifold, control valve, pump,
motor, and cylinder, fits into a frame constructed of carbon fiber side plates and aluminum
holders for needle bearings. Steel pins fit into the bottom of the cylinder and the rod end to
hold the actuator assembly in place and form the inner race of the needle bearings. The force
transducer connects the frame to the ankle pylon and prosthetic foot, while the aluminum
thigh link connects to the knee joint bearings, rod end, and thigh socket. (Fig. 6.1)

83
Figure 6.1: A cutaway view of the hy-brid knee shows the placement of themanifold and actuator assembly in re-lation to thigh socket and ankle pylonconnections.
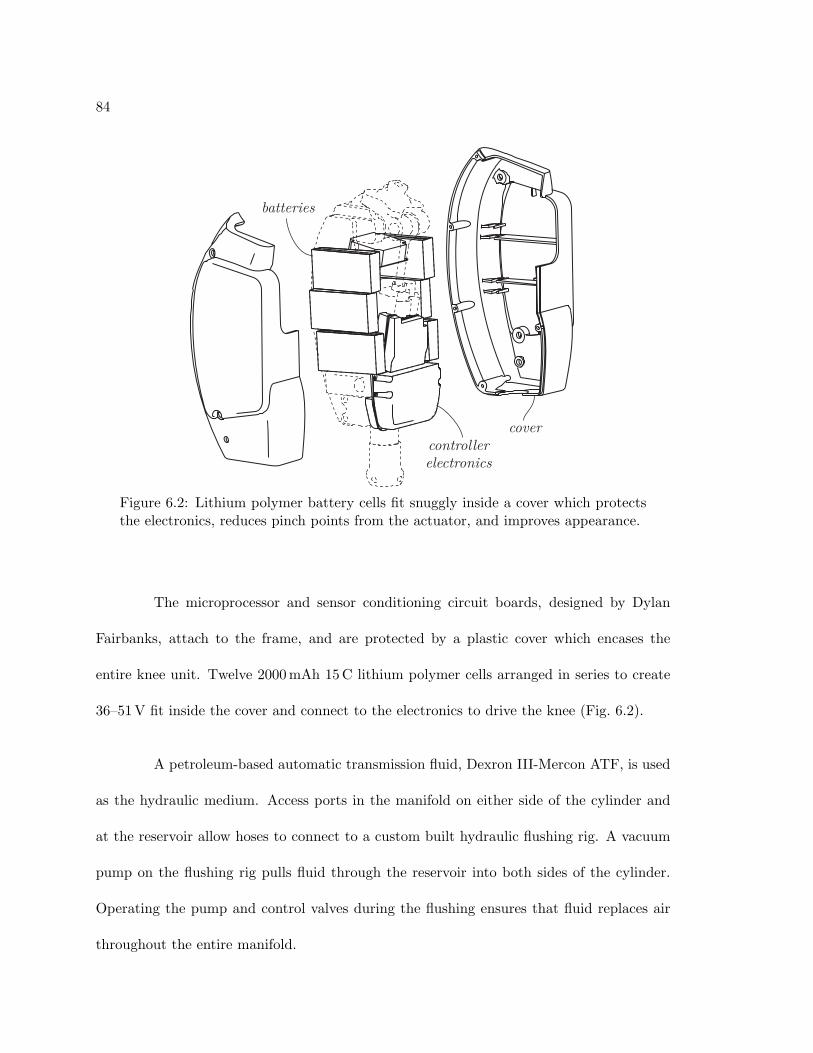
84
Figure 6.2: Lithium polymer battery cells fit snuggly inside a cover which protectsthe electronics, reduces pinch points from the actuator, and improves appearance.
The microprocessor and sensor conditioning circuit boards, designed by Dylan
Fairbanks, attach to the frame, and are protected by a plastic cover which encases the
entire knee unit. Twelve 2000 mAh 15 C lithium polymer cells arranged in series to create
36–51 V fit inside the cover and connect to the electronics to drive the knee (Fig. 6.2).
A petroleum-based automatic transmission fluid, Dexron III-Mercon ATF, is used
as the hydraulic medium. Access ports in the manifold on either side of the cylinder and
at the reservoir allow hoses to connect to a custom built hydraulic flushing rig. A vacuum
pump on the flushing rig pulls fluid through the reservoir into both sides of the cylinder.
Operating the pump and control valves during the flushing ensures that fluid replaces air
throughout the entire manifold.

85
Initial powered movements of the hybrid knee were inhibited by excessive friction
in the pump and actuator. The piston rubbed against the inside of the cylinder at certain
positions. We tracked this problem down to poor concentricity between the rod and the
piston, specifically in the glued joint attaching the piston to the rod. These parts were
redesigned and replaced with a piston press fit over the rod for much tighter tolerance on
circular runout. The static friction in the pump, outside of the specifications given by the
manufacturer, required high current in the motor to initiate movement. Some friction was
alleviated by moving to a custom designed pump which borrowed gears from a lower friction
unit. The pump still requires a careful, iterative assembly procedure so that friction is not
exacerbated by uneven bolt torque or slight misalignments between the pump gears and
motor shaft. Future versions of the hybrid knee must continue to address these friction
issues.
6.2 Amputee Testing
To test the control software, an adapter may be worn to use the knee with an
intact leg. The adapter comprises a waist belt rigidly attached to a modified knee brace.
The knee brace is held in a flexed position by webbing. An aluminum frame wraps around
the knee cap of the brace and mounts to the standard bolt pattern of the thigh link on the
knee. While the adapter allows sensors to be tested with realistic loads, it is impossible to
mimic the actual dynamics of an amputated leg. The adapter moves the knee joint below
the biological knee, and the added mass of the intact shank changes the inertia and center

86
of mass of the thigh. Thus, a valid evaluation of the knee requires the assistance of an
amputee.
6.2.1 Otto Bock, U.S.
The first opportunity to evaluate the knee with an amputee was at a demonstration
to Otto Bock, the manufacturer of the C-Leg, in Minneapolis, Minnesota. To minimize the
differences from the amputee’s regular prosthesis, the same socket and foot were used. A
new ankle pylon was cut to create the proper length from the knee joint to the bottom of the
foot. Finally, the knee was positioned by a certified prosthetist to create a stable neutral
position, with the knee joint slightly posterior to the load path while standing straight.
The demonstration began with the knee in a passive mode of operation only, mimicking the
behavior of the amputee’s C-Leg prosthesis. Short walks between handrails in the passive
mode allowed the load sensor thresholds and impedance levels to be set to comfortable
settings for smooth walking. After the amputee was comfortable walking in the passive
mode, the active swing mode was enabled.
In the active swing mode, we recognized the importance of proper tuning of the
thigh angle sensors in conjunction with the knee angle position control. The reduced inertia
of the residual limb compared to an intact leg in the adapter brace meant that the powered
swing assistance of the knee moved the thigh. A hip flexion motion in the thigh initiates
extension in the knee. The knee extension moment reacts in the thigh as hip extension
moment. Thus, there is potential for this feedback loop to create a chattering knee move-
ment if the thigh moves back and forth as it reacts to the swing assistance. A smooth gait

87
minimizes this effect, but hesitation due to unfamiliarity with the knee behavior exacerbates
the feedback.
The amputee also attempted ascent and descent of a short flight of stairs. Stair
descent worked well, similar to the behavior of the C-Leg to which the amputee was accus-
tomed. During stair ascent, she would normally lead with her intact leg for every step, and
then pull the prosthetic limb up to the same step. Skipping every other stair would allow
the amputee to keep a close to normal pace, but would consume a lot of metabolic energy.
The powered assistance allowed her to climb a couple steps leading with the amputated leg,
a completely new experience. However, we noticed the importance of the position of the
body over the prosthetic foot at the initiation of a step. If the amputee did not place her
body weight completely over the prosthetic foot, the powered extension assistance would
push her body backwards or sideways away from the stairs instead of upward. Improving
trust in the knee would promote proper loading of the leg, but would also require a better
estimate of the amputee’s intentions.
6.2.2 Otto Bock, Germany
The second demonstration for Otto Bock occurred at the headquarters in Duder-
stadt, Germany. The amputee was an experienced tester who helped Otto Bock evaluate
the C-Leg during initial development. As in the first demonstration, a prosthetist fitted
the hybrid knee to the amputee’s custom socket and a familiar foot. In the passive mode
of operation, the amputee quickly felt comfortable enough to walk without handrails. He
confirmed that the knee adapted to different walking speeds and long and short steps.

88
The amputee enjoyed using the hybrid knee. With the active swing mode of
operation enabled, the amputee noticed a reduction in hip energy required to move the
leg. Transitions between walking speeds were seamless. The amputee was able to walk
backwards, something he had never done before. Traversing up and down ramps at moderate
grade worked well, as did step over step stair descent. Stair ascent was much improved over
the first demonstration. Nonetheless, unfamiliarity with step over step climbing caused
some glitches and may require more practice than available during the short demonstration.
Extensive testing with an amputee in the laboratory will ameliorate development of the stair
ascent software.
The amputee praised the capabilities of the hybrid knee. He saw great potential
in the technology for a commercial product that would reduce energy consumption and
improve amputee mobility.
6.2.3 Laboratory Treadmill Tests
The third amputee to evaluate the knee was a local volunteer. His residual limb is
very long, so his usual prosthesis is a custom designed unit with the joint integrated into the
socket. His prosthetist had a test socket without a knee attached, to which the prosthetist
attached the hybrid knee and a prosthetic foot to which the amputee was accustomed. The
extra length of the socket meant that the hybrid knee joint was lower than the contralateral
biological knee. Unlike the Otto Bock testers, the third amputee had no experience with
microprocessor controlled knees. In fact, his every day prosthesis was so deteriorated that
it functioned as a single axis knee with no stance or swing control.

89
Figure 6.3: Video frames of a transfemoral amputee volunteer walk-ing with the hybrid passive/active prosthetic knee on a treadmill at0.6 m/s.
90
Despite these hindrances, the amputee became comfortable using the hybrid knee
within minutes. Like the other testers, he noticed a decrease in hip torque. A prelimi-
nary evaluation of energy consumption by measuring the volume of oxygen consumed at
a self selected walking pace on a treadmill (Fig. 6.3) showed no difference between the fa-
miliar prosthesis and the unfamiliar hybrid knee. Increased confidence in the hybrid knee
through extensive training and careful tuning of sensor and control parameters should show
improvement from the baseline test.
We also placed reflective markers on the hip to measure hip hike. Unfortunately,
the video of the markers was recorded at only 15 frames per second, which is not fast enough
to resolve a smooth hip motion. Furthermore, to get a good estimate of pelvic obliquity and
gait symmetry it will be important to use reflective markers at more joints with a consistent
camera placement.
6.3 Testing Protocol Recommendations
Initial testing with amputees has been decidedly successful. However, total testing
time has been less than 10 hours, not nearly enough to measure meaningful improvements
over existing technology. Furthermore, testing with an amputee is invaluable for devel-
opment of a truly robust and predictable controller for the knee behavior. The following
protocol evaluates several parameters of gait to quantify advantages of the hybrid knee.

91
6.3.1 Measured Variables
Gait deficiencies in amputees include asymmetry, abnormal joint angles, increased
energy consumption, and decreased walking speed (§2.4). Some of these deficiencies may
be measured from the sensors in the prosthesis, while others require external means of
measurement.
Thigh angle, knee angle, and knee torque can be compared directly to clinical gait
analysis data for normal subjects at the same walking speeds. These angles can be used to
calculate stride length, which can subsequently be compared to a measured stride length
of the intact leg. The swing and stance state timing on the amputated side should also
be measured and compared to the intact side and normal walking to establish temporal
symmetry.
To advance the measure of gait symmetry beyond timing, it becomes necessary to
measure joint angles on the hips, pelvis, and intact leg. A common way to measure joint
angle data is to place reflective or light emitting markers at the joints. The walking move-
ments of the amputee are then recorded with a high frame rate camera. Ideally, multiple
camera are used so that the three dimension position of each marker can be triangulated
to create a complete model of the walking motion. Marker tracking should provide all the
necessary data to evaluate symmetry in timing, stride length, and joint angles between the
amputated and intact side, hip abduction and pelvic obliquity.
Reductions in hip torque should contribute to an overall decrease in metabolic
energy consumption. Energy consumption is estimated by measuring the consumption of
oxygen. The more energy the body uses, the greater the volume of oxygen is absorbed by
92
the lungs. A reduction of energy required to walk with the prosthesis will be evidenced by
a lower volume of oxygen consumed per meter traveled. This may appear as a higher self
selected walking speed for the same rate of oxygen consumption, or as a lower rate for a
constant walking speed.
6.3.2 Testing Procedures
The performance of the hybrid knee should be compared against a baseline. This
baseline could be the amputee’s standard prosthesis, or preferably, a state of the art mi-
croprocessor knee. An ideal assessment would involve several amputees and take place over
several weeks or months. One set of the amputees would start with the hybrid knee, and
then switch to the baseline knee for the second half of the assessment. The other set of
amputees would start with the baseline knee and switch to the hybrid knee. A long assess-
ment period with frequent evaluations would allow the amputees to become accustomed
to the knee and would allow the prosthetist to tune the knee parameters for the best gait
improvements. Presumably, in the first group of amputees, improvements in gait would
disappear without the active swing assistance of the hybrid knee.
Typically, amputees walk with a large toe clearance to mitigate the chance of
stumbling. However, the active swing phase has fine control over the position of the toe,
so there is a much lower likelihood of catching the toe on the ground. This should allow
the amputee to walk with a lower toe clearance, close to normal gait. Creating lower toe
clearance will probably require gait training, for example, by kicking a low object on the
ground with each step. Reducing toe clearance should reduce hip hike from unhealthy hip

93
abduction and pelvic obliquity. Eliminating hip hike should help to eliminate hip and back
pain.

94
Chapter 7
Conclusion
Microprocessor controlled passive prostheses like the C-Leg enable an enormous
amount of mobility over less sophisticated prosthetic knees. They enable walking at a wide
range of speeds and stride lengths. Walking down ramps and descending stairs step over
step is smooth and safe. There are even modes for cycling and other non-walking activities.
However, without a compact energy source and powered actuator, passive prostheses cannot
return full mobility to the amputee.
The hybrid knee describe in this thesis is a successful prototype which enhances
mobility of transfemoral amputees over currently available technology. It maintains all
of the advantages of a passive microprocessor knee, while adding the capability to walk
backwards, stand up from a seat, and ascend ramps and stairs step over step. Not only is
mobility enhanced, but the active control over the prosthesis has the potential to create a
more natural, symmetric gait. Improving the gait will reduce hip and back injury, reduce

95
energy consumption, increase walking speed, and increase the total amount of time spent
on the prosthesis.
The hybrid knee employs a compact, low energy actuator with the capability for
high power maneuvers. By using hydraulic fluid as the transmission between an electric
motor and the output motion, both active and passive modes of operation are possible.
Providing power to the knee only at key points in the gait cycle reduces total energy
consumption of the prosthesis, so the system can remain lightweight and compact.
Even with a small, underpowered motor, amputees were able to climb stair step
over step while wearing the hybrid knee. Clearly, the prosthesis does not need to be able to
lift the entire body weight of the amputee. Partial assistance is enough to reduce the strain
on hip muscles enough so that it becomes possible to pull the body up over the prosthetic
leg.
Unlike previous development in powered prostheses, the low energy requirements
of the hybrid knee compared to a fully active prosthetic knee means that it does not have
to be tethered to an external source of power or control. There is no waist belt of batteries
to wear. Furthermore, all sensors for the control are located within the knee unit. There
are no sensors on the contralateral leg, on the foot, or on the ankle pylon. No EMG sensors
are needed to determine the correct actions to match the amputee’s gait. There are no
significant obstacles preventing the hybrid knee from becoming a marketable product.

96
Figure 7.1: A small hydraulic cylinder fitted with a spring storesenergy from knee flexion torque during stance to create knee exten-sion torque before toe off. A controllable valve switches the sprungcylinder into or out of the hydraulic circuit.
7.1 Future Work
Adding power to the swing phase of the gait cycle has the potential to improve
symmetry and reduce injury. Proving the health benefits of the hybrid knee will require
clinical trials. A suggested protocol to perform such an evaluation is presented in section 6.3.
Although the hybrid knee can more closely match a normal gait than existing passive
prostheses, there remain possibilities for even greater improvements.
By taking advantage of the technology developed for the hybrid knee, including
small, low friction pumps and actuators, and the control valves which switch between active
and passive operation, we can more closely mimic a natural gait at the knee and ankle joints.
During stance phase, a healthy gait includes a small flexion and extension of the
knee, which helps reduce the vertical travel of the center of mass of the body (Fig. 2.5).
Without the capability to inject power, no available prosthetic knee can create that exten-
sion, so generally the knee remains straight during the entire stance phase. Although the
hybrid knee has the capability to extend the knee during stance, it would be inefficient to
do so. However, we can take advantage of the ability to switch between different modes of

97
Figure 7.2: A second hydraulic actuator (shown on the left) may beadded to the hydraulic circuit to power ankle motion as well as kneeangle.
operation. The current design includes only positive power (from the pump) and negative
power (through valve impedance) elements. A conservative, zero power, element would
allow the flexion torque to be captured and returned for extension during mid stance.
The conservative element may be implemented as a spring inside a hydraulic cylin-
der. The cylinder need only have as much volume as the volume of fluid displaced from the
actuator if the knee flexes a natural amount during stance. The spring force should match
the amputee body weight. An example schematic of the concept is shown in Fig. 7.1. At heel
strike, all four control controllable valves are closed. The fourth controllable valve opens to
allow the knee to flex during stance, and then modulates the rate of flexion and extension
during the stance phase. Terminal stance and swing phase are controlled as described in
previous chapters.
The ankle plays a key role in toe clearance during swing, especially when walking
up ramps. Matching the ankle angle to the slope also improves walking down ramps by
eliminating foot slap. Most prosthetic ankles are simple springs or dampers, so the foot
remains stationary with respect to the shank while the leg is in swing phase and no loads
are passed through the ankle. With another valve and actuator, the hybrid knee hydraulics

98
could be extended to drive ankle motions during swing as well as knee motion (Fig. 7.2).
Modulating the relative impedance of the first and fourth controllable valves enables control
of both ankle and knee angles simultaneously.

99
Bibliography
[1] Artificial limbs: Prosthetic knees. http://www.waramps.ca/nac/limbs/legs/knees adult.html,
December 2008.
[2] Military instep: Prosthetic knee systems. http://www.amputee-coalition.org/military-
instep/knees.html, September 2008.
[3] Otto Bock 3R33. http://ottobockus.com/products/lower limb prosthetics/knees 3r33.asp,
December 2008.
[4] VA/DoD clinical practice guideline for management for rehabilitation of lower limb am-
putation. http://www.oqp.med.va.gov/cpg/AMP/G/AMP SUM draft.pdf, December
2008.
[5] T. S. Bae, K. Choi, D. Hong, and M. Mun. Dynamic analysis of above-knee amputee
gait. Clinical Biomechanics (Bristol, Avon), 22(5):557–66, 2007.
[6] Stephane Bedard and Pierre-Olivier Roy. Actuated leg prosthesis for above-knee am-
putees, January 2008. U.S. Patent 7,314,490.

100
[7] A. M. Boonstra, J. M. Schrama, W. H. Eisma, A. L. Hof, and V. Fidler. Gait analysis of
transfemoral amputee patients using prostheses with two different knee joints. Archives
of Physical Medicine and Rehabilitation, 77(5):515–20, 1996.
[8] Roozbeh Borjian. Design, modeling, and control of an active prosthetic knee. Masters
of applied science, University of Waterloo, 2008.
[9] Kevin Carroll and Joan E. Edelstein. Prosthetics and Patient Management. SLACK,
Inc, 2006.
[10] Meng-Chum Chen, Su-Shin Lee, Ya-Lun Hsieh, Shu-Jung Wu, Chung-Sheng Lai, and
Sin-Daw Lin. Influencing factors of outcome after lower-limb amputation: a five-
year review in a plastic surgical department. Annals of Plastic Surgery, 61(3):314–8,
September 2008.
[11] A. Forner Cordero, H. J. Koopman, and F. C. van der Helm. Use of pressure insoles to
calculate the complete ground reaction forces. Journal of Biomechanics, 37(9):1427–
1432, 2004.
[12] Adrian Cristian. Lower Limb Amputation. Demos Medical Publishing, LLC, 2005.
[13] J. M. Czerniecki and A. J. Gitter. Gait analysis in the amputee: Has it helped the
amputee or contributed to the development of improved prosthetic components? Gait
& Posture, 4(3):258–268, 1996.
[14] Timothy R. Dillingham, Liliana E. Pezzin, and Ellen J. Mackenzie. Limb amputation
and limb deficiency: Epidemiology and recent trends in the United States. Southern
Medical Journal, 95(8):875–883, 2002.
101
[15] Hannah Fischer. United States military casualty statistics: Operation Iraqi Freedom
and Operation Enduring Freedom. U.S. Congressional Research Service RS22452,
Library of Congress, September 2008.
[16] Woodie Claude Flowers. A man-interactive simulator system for above-knee prosthetics
studies. PhD thesis, Massachussetts Institute of Technology, 1973.
[17] A. J. Gitter, J. M. Czerniecki, and M. Meinders. Effect of prosthetic mass on swing
phase work during above-knee amputee ambulation. American Journal of Physical
Medicine & Rehabilitation / Association of Academic Physiatrists, 76(2), 1997.
[18] D. L. Grimes, Woodie Claude Flowers, and M. Donath. Feasibility of an active control
scheme for above knee prostheses. ASME Journal of Biomechanical Engineering, 99(4),
1977.
[19] Hugh M. Herr, Ari Wilkenfeld, and Olaf Bleck. Speed-adaptive and patient-adaptive
prosthetic knee, October 2007. U.S. Patent 7,279,009.
[20] G. W. Horn. Electro-control: am EMG-controlled A/K prosthesis. Medical and Bio-
logical Engineering and Computing, 10(1):61–73, 1972.
[21] Kelvin B. James. System for controlling artificial knee joint action in an above knee
prosthesis, January 1995. U.S. Patent 5,383,939.
[22] A. O. Kapti and M. S. Yucenur. Design and control of an active artificial knee joint.
Mechanism and Machine Theory, 41(12):1477–1485, 2006.

102
[23] Chris Kirtley. CGA normative gait database, Hong Kong Polytechnic University.
http://www.univie.ac.at/cga/data/, 1997.
[24] G. K. Klute, J. Czerniecki, and B. Hannaford. Development of powered prosthetic lower
limb. In 1st National Meeting, Veterans Affairs Rehab. R&D Service, Washington, D.
C., October 1998.
[25] Peter Merton McGinnis. Biomechanics of Sport and Exercise. Human Kinetics, second
edition, 2005.
[26] M. R. Meier, S. A. Gard, A. H. Hansen, and D. S. Childress. A comparison of C-Leg
and 3R60 prosthetic knee joint performance. In 27th Annual Meeting of the American
Society of Biomechanics, Toledo, Ohio, September 2003.
[27] Raja Mishra. Amputation rate for U.S. troops twice that of past wars. Boston Globe,
December 2004.
[28] D. Popovic, M. Oguztoreli, and R. Stein. Optimal control for the active above-knee
prosthesis. Annals of Biomedical Engineering, 19(2):131–150, March 1991.
[29] D. Popovic, M. Oguztoreli, and R. B. Stein. Optimal control for an above-knee pros-
thesis with two degrees of freedom. Journal of Biomechanics, 28(1):89, 1995.
[30] R. Riener, M. Rabuffetti, and C. Frigo. Stair ascent and descent at different inclina-
tions. Gait & Posture, 15(1):32–44, 2002.
[31] Raymond Jefferson Roark and Warren Clarence Young. Roark’s Formulas for Stress
and Strain. McGraw-Hill, sixth edition, 1989.

103
[32] Joshua Robinson and Alan Schwarz. Olympic dream stays alive, on synthetic legs. The
New York Times, May 2008.
[33] T. Schmalz, S. Blumentritt, and R. Jarasch. Energy expenditure and biomechanical
characteristics of lower limb amputee gait: the influence of prosthetic alignment and
different prosthetic components. Gait & Posture, 16(3):255–63, 2002.
[34] C. Sjodahl, G. B. Jarnlo, B. Soderberg, and B. M. Persson. Pelvic motion in trans-
femoral amputees in the frontal and transverse plane before and after special gait
re-education. Prosthetics and Orthotics International, 27(3):227–37, 2003.
[35] Frank Sup, Amit Bohara, and Michael Goldfarb. Design and control of a powered
transfemoral prosthesis. The International Journal of Robotics Research, 27(2):263–
273, 2008.
[36] Helmut Wagner and Manfred Krukenberg. Brake-action knee joint, January 1998. U.S.
Patent 5,704,945.
[37] Robert L. Waters and Sara Mulroy. The energy expenditure of normal and pathologic
gait. Gait & Posture, 9(3):207–231, July 1999.
[38] James Watkins. An Introduction to Biomechanics of Sport and Exercise. Elsevier
Health Sciences, 2007.
[39] David A. Winter. The biomechanics and motor control of human gait: normal, elderly
and pathological. University of Waterloo Press, Waterloo, Ont., 1991.

104
[40] Wesley E. Woodson. Human factors design handbook : information and guidelines for
the design of systems, facilities, equipment, and products for human use. McGraw-Hill,
New York, 1981.
[41] Mir Saeed Zahedi and Andrew John Sykes. Lower limb prosthesis and control unit,
April 2004. U.S. Patent 6,719,806.
[42] Mir Saeed Zahedi, Andrew John Sykes, and Stephen Terry Lang. Lower limb prosthesis,
February 2003. U.S. Patent 6,517,585.
[43] Kathryn Ziegler-Graham, Ellen J MacKenzie, Patti L Ephraim, Thomas G Travison,
and Ron Brookmeyer. Estimating the prevalence of limb loss in the United States:
2005 to 2050. Archives of Physical Medicine and Rehabilitation, 89(3):422–9, March
2008.
[44] Adam Brian Zoss. Actuation design and implementation for lower extremity human
exoskeletons. PhD thesis, University of California, Berkeley, 2006.