demonstration guides - faast device loan … gude english final 1... · demonstration guides 1. ......
TRANSCRIPT

1
DEMONSTRATION GUIDES
1. Go Talk Now App Communication Page 2. Go Talk Now App Scene Page 3. Talkboard App 4. Boardmaker Software 5. Boardmaker Share Site
6. Switch Activated Toy: Fubbles Bubble Blower and Jelly Bean Twist 7. Big Mack Communicator 8. iTalk 2 with Levels 9. Multi-Level Communicator: Talkable IV 10. Adapted books: How to make Baggie Books 11. Color coded Keyboard (large Keys) with BIGtrack Trackball Mouse 12. My Story Book Creator School Edition App

2
GO TALK NOW APP – SET UP A COMMUNICATION PAGE A full-featured, customizable Augmentative and Alternative Communication (AAC) app, ideal for both the beginner and experienced
communicator, that turns your iPad into a dynamic GoTalk in seconds with easy-to-use, touch-based tools to edit pages. In Standard Pages, the action occurs when the location is pressed.
VIDEOS: Short one minute video on tips of setting up a new GoTalk communication page: https://www.youtube.com/watch?v=6htXxLFrSx4 Two minute video on how to use the GoTalk at school. https://www.youtube.com/watch?v=RsUwoiR2DKA In-Depth Video on setting up a GoTalk communication page: https://www.youtube.com/watch?v=rKldX494M7I

3
HOW TO USE: 1. On the Home page, locate the “Page Editor” icon. Page Editor is where communication pages are
created. 2. Choose 1, 4, 9, 16, or 25 communication locations per page by clicking the “Page Options” icon. 3. Tap on an empty cell and customize the background color, border color, and text by clicking on each tab. 4. Use images from your iPad camera, photo library, the Internet, or the GoTalk image library by clicking
the “Add Image” tab. 5. To record sound, click on the “Auditory Cues” tab and record your voice or use text-to-speech. 6. Once the communication page is created, return to the Home page by clicking the “Home” icon. Tap the
“Player” Mode to begin using the app with the child.
TIPS FOR USE: 1. Play Bubbles - Add words to each cell such as “blow”, “pop”, “up”, “down”, “more”, and “like”. Model
the use of the words by pressing each cell and activating the message, expecting the child to do the same to communicate his or her desires during the activity.
2. Play Music - Add words to each cell such as “louder”, “softer”, “”good”, “bad”, “stop”. Ask the child questions, “Is the volume ok?” Let the child chose the cell to activate the message and direct the adult’s actions or comment about the activity.
For more information visit: http://www.attainmentcompany.com/gotalk-now
Go Talk Now User Guide: https://www.attainmentcompany.com/sites/default/files/pdf/support/GTN-Free-UsersGuide_0.pdf

4
GO TALK NOW APP – SET UP A SCENE PAGE A full-featured, customizable AAC app, ideal for both the beginner and experienced communicator, that turns your iPad into a dynamic GoTalk in
seconds with an easy-to-use, touch-based tools to edit pages. Scene pages are built around a single photo or image. When you arrange invisible hotspots over people or objects in the photo, the hotspots play speech, music, or videos.
HOW TO USE: 1. On the Home page, locate the “Page Editor” icon. Page Editor is where scene pages are created. 2. Click the “Plus” icon. A “Template Gallery” window will pop up. 3. Select the “Add Blank Scene Page” tab. 4. A black screen will appear with an icon stating: “Tap here to set the image that will be used for the background
of the scene”. 5. You can download images from the GoTalk image library, Internet or photo library. 6. To add your own photo, select the “Photo Library” option and chose a photo from your Cameral Roll. The photo
will appear on the entire screen creating a “Scene”. 7. Tap on the “Plus” icon to add a “Tappable Region to the Scene”, in other words, Hot Spot squares. 8. Drag the square to desired location on the photo scene 9. Tap the square to set an “Auditory Cue” and record sound. Either record your voice or use text-to-speech. 10. Repeat the same steps for desired number of “Tappable Regions” or Hot Spot squares you wish to have per
scene page. 11. Once the scene page is created, return to the Home page by clicking the “Home” icon. Tap the “Player” Mode to begin
using the app with the child.

5
TIPS FOR USE: 1. Take a picture of the child reading the book Brown Bear, Brown Bear, What Do You See? Select a hot
spot over the book section of the scene and record the repeatable line: “Brown Bear, Brown Bear What do you see?” When reading the book during Circle Time, offer the child the app with the scene page open so the child can press the area of the scene where the book is located to make the phrase play.
2. Take picture of an alphabet board, record hot spots over each letter, either the sound of the letters or a word that starts with the letter. The child selects a letter and hears the sound or word to practice early literacy skills.
For more information visit: http://www.attainmentcompany.com/gotalk-now
GoTalk Now User Guide: https://www.attainmentcompany.com/sites/default/files/pdf/support/GTN-Free-UsersGuide_0.pdf

6
TALKBOARD APP – CREATE PERSONALIZED VISUAL BOARDS
Turns your IOS device into a communication aid and visual prompt board. You can easily use your own pictures and symbols to personalize the app to meet the child’s need.
VIDEOS: Short video on Creating User Boards (no audio): https://www.youtube.com/watch?v=S4xhP9KLnbk Short video on Adding Pictures (no audio): https://www.youtube.com/watch?v=iGx0oSOhhz4 Short video on Recording Sound (no audio, except on items being recorded): https://www.youtube.com/watch?v=R4zBf7Cxx_A Short video on Adding Text (no audio): https://www.youtube.com/watch?v=haYJuiW5AKY

7
HOW TO USE: 1. On the Home page, select “Setup” Mode. 2. In “Setup” Mode, you can add multiple Users and multiple Boards for each User. 3. To create a User, select “Options” and click the “Add User” button. Enter name, image and click “Add”. 4. When adding a Board to a User, first select the User. Click “Options” and “Add Board”. 5. A new window will appear. Name the Board; select the number of cells by scrolling back and forth the custom grid size bar, and chose the color for the cell border.
6. Once you create the new Board, tap each cell to customize. A small window pops up with the options to add pictures, text, sound, and a timer.
7. Once the Board is completed, switch from “Setup” Mode to “Player “Mode to use with the child. TIPS FOR USE:
1. Create a visual board using images/photos of the child’s favorite bedtime books and let the child use the board to choose which book to read each night.
2. Create a visual board using images/photos of the child’s preferred toys and games. When the child plays with his peers he can select which toy or game to play with.
For more information visit: http://www.mashley.net/talkboard.php

8
BOARDMAKER SOFTWARE – CREATE NEW BOARDS Software that facilitates the creation of adapted curriculum materials, visuals, and communication aids, using the included symbol set,
which can be printed or viewed online.
VIDEO: How to use Boardmaker: https://www.youtube.com/watch?v=3hq9-gqnnl8 How to create a button: 1:34 How to insert a picture: 3:10 How to import your own picture: 4:22 Boardmaker 101: https://www.youtube.com/watch?v=KZotgmTlc7g

9
HOW TO USE: 1. Once the software is installed in your computer, open Boardmaker by clicking the icon on your desktop. 2. A screen will appear with 3 options: a) Open a New Board b) Open a Saved Board or c) Open a Template.
3. Choose “Open a New Board”. 4. At the top of the screen you will see a toolbar. 5. To create a button, click the “button” tool. 6. Position the cursor (arrow) on the page to where you want the button to be. 7. Once you have made the button, you can customize by clicking on any line and dragging it accordingly till desired size. 8. If you wish to make more buttons of the same size, click on the “Button Sprayer Tool”. 9. To insert a picture, click the “Symbol Finder” tool. The “Symbol Finder” window will appear. 10. To find a specific image, type the name in the space provided. Hit enter. The picture will appear in the first button. 11. To rename the picture, click the “Change Symbol Names” button. 12. Print and laminate the page or pictures to use with the child. TIPS FOR USE
1. Adapt books such as “Good Night Moon” by printing visual supports corresponding to the stories main theme. 2. Print images corresponding to the main characters of a story such as the “Three Little Pigs”.
Laminate, cut, and glue onto Popsicle sticks to use as props when reading the story.
For more information visit: http://www.mayer-johnson.com/boardmaker-software

10
BOARDMAKER SHARE SITE – REGISTER AND SHARE The largest online community for sharing adapted curriculum materials, visuals, and communication aids.
VIDEOS:
Boardmaker Share demonstration on logging in, the home page, and how to find previously made resources: https://www.youtube.com/watch?v=tdrwbDyUiuk
Boardmaker Share Overview: https://www.youtube.com/watch?v=1e6sIi20H4w
11
HOW TO USE: 1. Register creating a username and password at: https://br.boardmakershare.com/register 2. Sign in once you create an account. 3. In the “Activities” tab, you can view your activities, search/browse premade activities, or share your activities. 4. If you select the “Search/Browse Activities” tab, you can search pre-made visual boards and visual supports created by
other users. You can also search by categories ranging from communication, school curriculum, or life skills. 5. You can also enter a specific topic by typing key words in the search bar. 6. If you select the “Community” tab, you can browse by groups (i.e. MDCPS) or find specific members. 7. Each board includes a description of when the board was last updated, the intended grade level, language and type. 8. The Red Square icons next to each board indicates the type of Boardmaker program needed to downloads the board:
a)Boardmaker Studio, b)Boardmaker 5 and Higher, c)Boardmaker Plus, d)Print Editor. 9. Once you select a board, you can download, print and laminate to use with the child.
TIPS FOR USE:
1. Use this online resource as a guide to create visual boards to facilitate communication or to adapt books. You can edit or recreate the material to meet the specific needs of the children in your classroom.
2. Search pre-made boards by topics relevant to a child’s needs. For example, browse visual classroom schedules to help a child transition from one activity to another or look for classroom visual cues such as a “STOP” or “Clean Up” sign.
For more information visit: http://www.mayer-johnson.com/boardmaker-software

12
SWITCH ACTIVATED TOY: FUBBLES BUBBLE BLOWER AND JELLY BEAN TWIST Toys that are adapted to allow children with physical disabilities the opportunity to play and learn as independently as possible. With the use of a
switch, children can be active participants in fun, meaningful accessible activities.
VIDEO Switch Adapted Toys: https://www.youtube.com/watch?v=x0CVVnw2s94

13
HOW TO USE: Fubbles Bubble Blower:
1. To fill, unscrew the yellow base from the green top.
2. Add bubble solution.
3. Screw the base back on. Make sure the tubes go into the fill opening and are not pinched when screwing the base on.
4. The Bubble Blower can be used with or without an external switch.
5. The ON/OFF switch is located in the front of the unit. When using an external capability switch, the ON/OFF switch needs to be set in the OFF position.
6. Activate your external capability switch and the bubbles will start to flow.
7. Once you release your switch the bubbles will stop.
Jelly Bean Twist:
1. Wired switch that provides an auditory click, tactile feedback, and requires force to activate.
2. Switch tops can be removed and replaced with different colors: Red, Blue, Yellow, or Green.
3. It also includes a clear snap cap for symbol use.
4. Plug a single switch into any switch-adapted device.
5. Once the activation area is pressed, any attached device will activate.
TIPS FOR USE: 1. To practice cause and effect, asks the child to press the switch and activate the bubble blower by saying, “Go”. Then, after a few
seconds of bubbles, ask the child to press the switch to “Stop”. 2. To practice turn taking, say to the child “My Turn”, and you press the switch to activate the bubble blower. Once you stop, tell
the child, “Your Turn” and wait for him or her to press the switch to continue with the activity. For more information: https://enablingdevices.com/catalog/toys_for_disabled_children/bubble-blowers/fubbles

14
BIG MACK SWITCH - RECORD A MESSAGE
Single message communication device that allows up to two minutes of recordable time. Message activated by the push of a large button.
Video:
Descriptive video of Big Mack. For instructions on recording a message on the Big Mack, start at minute 1:23: https://www.youtube.com/watch?v=lP__hEr-4K0

15
HOW TO USE:
1. Make sure big mac switch is on. To do so, rotate the switch in the back until you hear a click. This indicates that the Big Mack is on. This switch also controls the volume of the message, turn it all the way to make it louder and all the way down to lower the volume.
2. In the back there is a small black button, this is to record. 3. Hold down the Big Mack red button, and the black record button, and start speaking your message. 4. Release both buttons, and the message is recorded. 5. To activate message simply press button, and message will be said!
TIPS FOR USE:
1. Include visual support for the message being record. 2. For shared reading experiences, record a message of “Turn the page” to allow the child to activate the message. 3. Record a repetitive line of a popular song and allow the child to activate the message during circle time or other music
time. 4. Model use of the device for the child by activating it at the appropriate time until the child learns to use it on his or her
own.
For more information visit:
https://www.ablenetinc.com/bigmack

16
iTalk 2 WITH LEVELS - RECORDING MESSAGES
Message communication device with two buttons for two different messages. Three levels allow up to six messages to be recorded. The entire device has 4:00 minutes of recordable time.
VIDEO:
Descriptive video of iTalk2. For specific instructions on how to record a message, go to minute 1:16:
https://www.youtube.com/watch?v=1_gBTGpBKqk

17
HOW TO USE:
1. Turn on with switch in the back. 2. Press and hold record button until red light comes on. 3. Press down the button you want to record on. 4. Record your message. When you are done press record button again to turn it off 5. On the side, there are options for three different layers. Each layer allows you to record the messages.
TIPS FOR USE:
1. For any daily messages that there are two options, record on the switch. For example “Hello/Goodbye”, “Yes/No”, “More/Stop”, “Please/Thank you”. Model the use of the messages in the appropriate situation. You can include any or all of these messages with the three different levels. Include visual supports for the message.
2. Include choices for the child to activate during circle time, for example what song they would like to sing or what book they would like to read. Include a visual support.
For more information visit:
https://www.ablenetinc.com/italk2-with-levels

18
BAGGIE BOOKS
One way to adapt reading materials. Can be used for premade stories, little readers, or stories the child can help to create!
Materials:
Plastic bags (Ziplock) (size varies depending on needs of the teacher, parent, and/or child)
Tape (Clear and colorful)
Story

19
HOW TO MAKE:
1. Make copies or print pages of the book you would like to adapt.
2. Put the pages in the plastic bags, leaving about one inch of space on the side, where the tape will go.
3. Gather all the plastic bags together, and bind them with duct tape. Make sure the opening of the bag is not taped, this way you can change the pages out in the future.
4. Enforce the pages but adding a strip of tape down the middle of each page, where the binding is.
TIPS FOR USE:
1. Use books that are being used during circle time, allow the child to make his or her own book, decorate the books with stickers and other decorative props.
2. Baggie Books work great for students with motor difficulties to keep the books intact, or may have a harder time keeping books neat.
For more information visit:
https://tnt.asu.edu/sites/default/files/HarrisAdaptingBooks.pdf
20
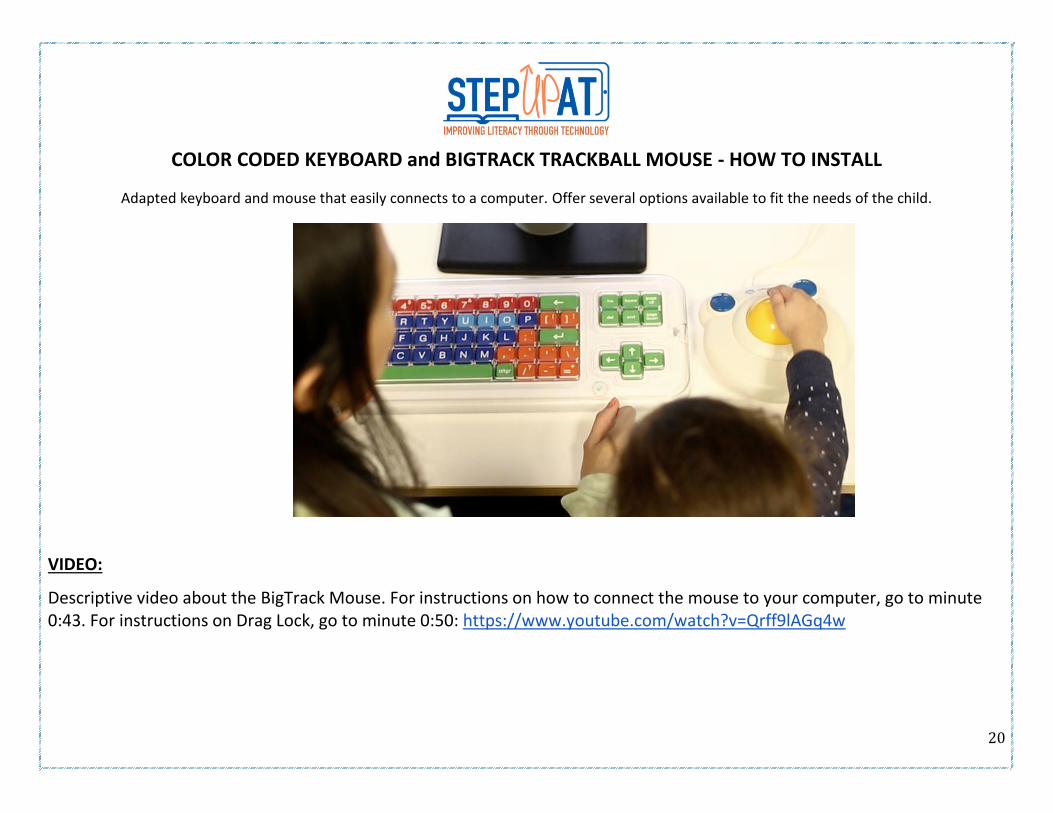
COLOR CODED KEYBOARD and BIGTRACK TRACKBALL MOUSE - HOW TO INSTALL
Adapted keyboard and mouse that easily connects to a computer. Offer several options available to fit the needs of the child.
VIDEO:
Descriptive video about the BigTrack Mouse. For instructions on how to connect the mouse to your computer, go to minute 0:43. For instructions on Drag Lock, go to minute 0:50: https://www.youtube.com/watch?v=Qrff9lAGq4w

21
HOW TO USE:
1. Locate the USB port on the computer or laptop. 2. Connect the keyboard or the mouse to the computer. 3. The computer will detect the keyboard or mouse, and ask you to confirm that you have plugged it in.
BIGTRACK MOUSE:
1. The BigTrack has a feature called “drag lock” in which the user can drag an item without having to hold down the mouse. To do so: place the cursor (arrow) on the item you wish to move. Double click the right button on the BigTrack. Then move the item to the desired location, and click the right button again.
TIPS FOR USE:
1. Use for children with vision difficulties. Can also be used to motivate children to complete computer tasks. 2. Model using the keyboard as a tool, and not a toy. It can be exciting to have something new!
For more information visit:
http://www.computerhope.com/issues/ch000449.htm
http://www.infogrip.com/bigtrack-trackball.html

22
MY STORYBOOK CREATOR APP
IOS application that allows children to fully customize digital stories. Easy to create and share!
VIDEO:
Descriptive video on how to start a new storybook: https://www.youtube.com/watch?v=Ms3lKtdIJxA

23
HOW TO USE:
1. Open the app to begin your story. 2. To start a new story click on “new book” on the left. To continue working on a previous story click on ‘edit’ on the book, under
“my library” 3. Give your new book a name, and click create book 4. The first thing the story will ask you to do is select a page type between photo, text, photo and text, different formats. 5. When you begin a new page you will have all the options to personalize that page on the screen. You can select between objects,
photos, audio recording, borders, page colors, fonts and so on. Simply click what you would like to add or edit. 6. To go back at any time, click the yellow triangle on the upper lefthand corner. 7. When you are done, click the yellow triangle until you are back on the library page, and the book is now ready to read. To do so,
simply click the book and enjoy! 8. You can also share the book. In the library page, select share and you can either email it, share it to the public library (all
Storybook Maker users will have access to the public library of books) or you can share it to another Storybook Maker user with the apple ID.
9. To delete a book click on edit, and select “trash” on the bottom lefthand corner.
TIPS FOR USE:
1. Create to use as a shared reading experience with the teacher, parents, and other students.
2. Connect the theme of the classroom curriculum with a story the child can create.
For more information:
http://mystoryapp.tumblr.com/